The Nubian Vault Mason’s Manual · 2018-05-14 · 2.7 Roof ventilation 2.8 Staircases 2.8.1...
84
The Nubian Vault Mason’s Manual Technical Guides Principal & Secondary Structural Works Finishes & Coatings / Renders Entrepreneurship Advice www.lavoutenubienne.org/en ENGLISH EDITION October 2014
Transcript of The Nubian Vault Mason’s Manual · 2018-05-14 · 2.7 Roof ventilation 2.8 Staircases 2.8.1...
The Nubian VaultMason’s Manual
Technical GuidesPrincipal & Secondary Structural Works
Finishes & Coatings / RendersEntrepreneurship Advice
www.lavoutenubienne.org/en
ENGLISH EDITION October 2014
Livre Technique VN_Edition n°4 _ 2013 2
Sous la direction de Thomas Granier_ Directeur Général - Fondateur4ème édition réalisée par Cyril Chabaud et Mathieu Hardy_ Architectes
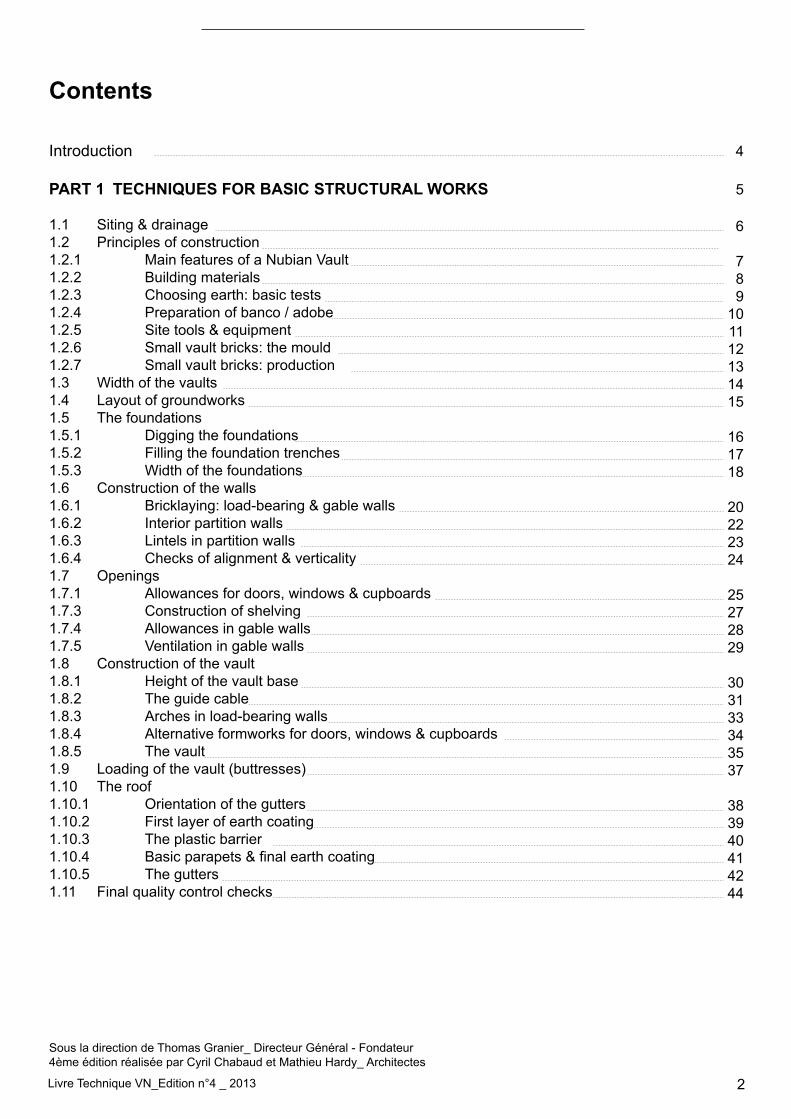
Contents
Introduction
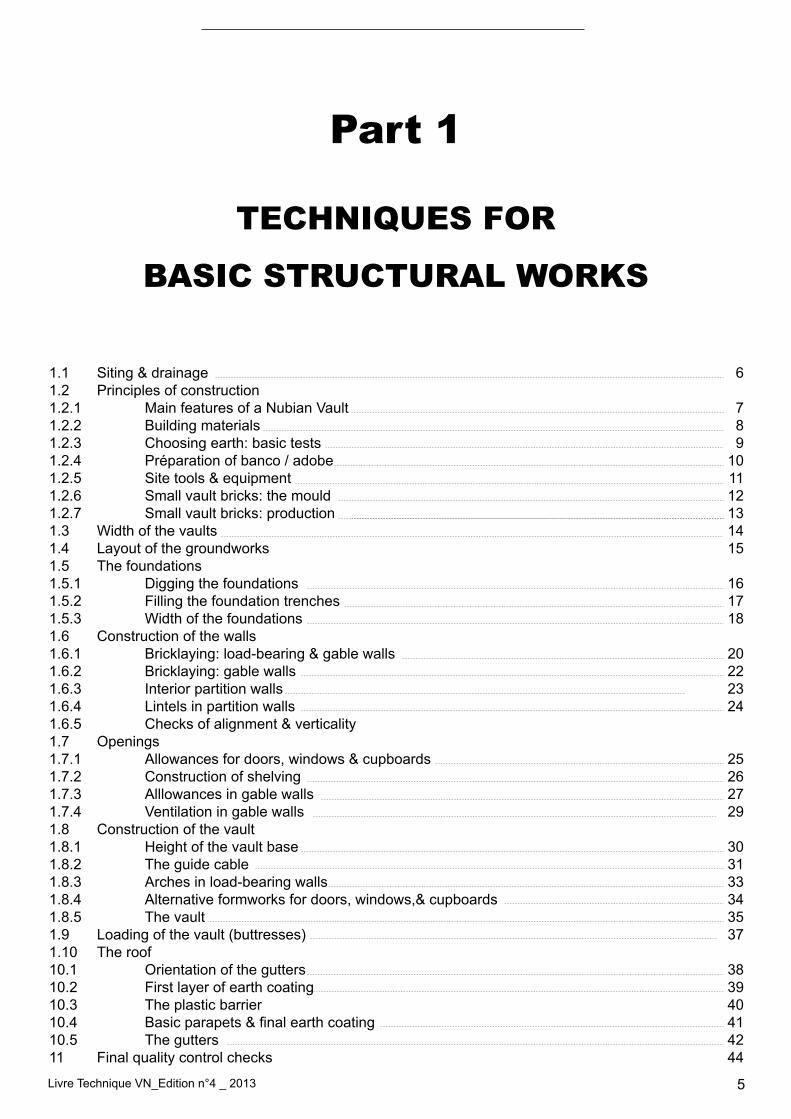
PART 1 TECHNIQUES FOR BASIC STRUCTURAL WORKS
1.1 Siting & drainage1.2 Principles of construction1.2.1 Main features of a Nubian Vault1.2.2 Building materials1.2.3 Choosing earth: basic tests1.2.4 Preparation of banco / adobe1.2.5 Site tools & equipment1.2.6 Small vault bricks: the mould1.2.7 Small vault bricks: production1.3 Width of the vaults1.4 Layout of groundworks1.5 The foundations 1.5.1 Digging the foundations1.5.2 Filling the foundation trenches 1.5.3 Width of the foundations1.6 Construction of the walls 1.6.1 Bricklaying: load-bearing & gable walls1.6.2 Interior partition walls1.6.3 Lintels in partition walls1.6.4 Checks of alignment & verticality1.7 Openings1.7.1 Allowances for doors, windows & cupboards 1.7.3 Construction of shelving1.7.4 Allowances in gable walls1.7.5 Ventilation in gable walls1.8 Construction of the vault1.8.1 Height of the vault base1.8.2 The guide cable1.8.3 Arches in load-bearing walls1.8.4 Alternative formworks for doors, windows & cupboards1.8.5 The vault1.9 Loading of the vault (buttresses)1.10 The roof1.10.1 Orientation of the gutters1.10.2 First layer of earth coating1.10.3 The plastic barrier1.10.4 Basicparapets&finalearthcoating1.10.5 The gutters1.11 Final quality control checks
4
5
6
789
101112131415
161718
20222324
25272829
303133343537
383940414244
Livre Technique VN_Edition n°4 _ 2013 3
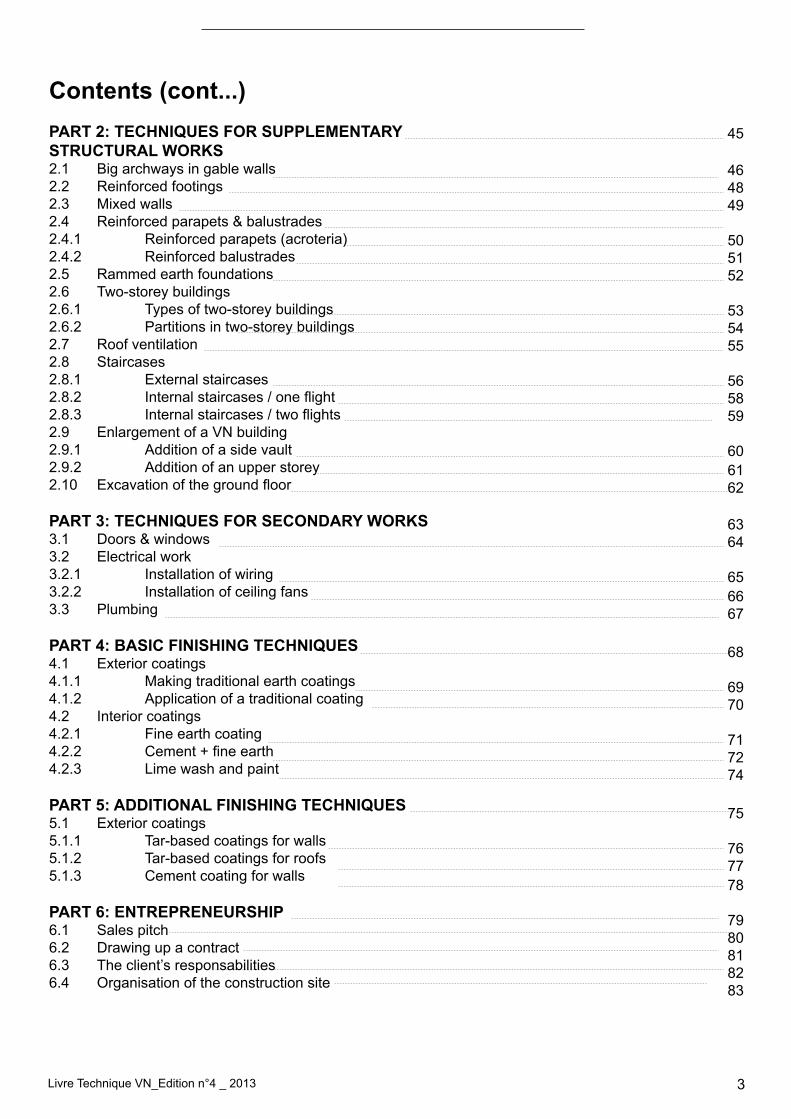
Contents (cont...)PART 2: TECHNIQUES FOR SUPPLEMENTARY STRUCTURAL WORKS2.1 Big archways in gable walls2.2 Reinforced footings2.3 Mixed walls2.4 Reinforced parapets & balustrades2.4.1 Reinforced parapets (acroteria)2.4.2 Reinforced balustrades 2.5 Rammed earth foundations 2.6 Two-storey buildings2.6.1 Types of two-storey buildings2.6.2 Partitions in two-storey buildings2.7 Roof ventilation2.8 Staircases2.8.1 External staircases2.8.2 Internalstaircases/oneflight2.8.3 Internalstaircases/twoflights2.9 Enlargement of a VN building2.9.1 Addition of a side vault2.9.2 Addition of an upper storey2.10 Excavationofthegroundfloor
PART 3: TECHNIQUES FOR SECONDARY WORKS3.1 Doors & windows3.2 Electrical work3.2.1 Installation of wiring3.2.2 Installation of ceiling fans3.3 Plumbing
PART 4: BASIC FINISHING TECHNIQUES 4.1 Exterior coatings4.1.1 Making traditional earth coatings4.1.2 Application of a traditional coating4.2 Interior coatings4.2.1 Fine earth coating4.2.2 Cement+fineearth4.2.3 Lime wash and paint
PART 5: ADDITIONAL FINISHING TECHNIQUES 5.1 Exterior coatings5.1.1 Tar-based coatings for walls5.1.2 Tar-based coatings for roofs5.1.3 Cement coating for walls
PART 6: ENTREPRENEURSHIP6.1 Sales pitch6.2 Drawing up a contract6.3 The client’s responsabilities6.4 Organisation of the construction site
45
464849
505152
535455
565859
606162
6364
656667
68
6970
717274
75
767778
7980818283
Livre Technique VN_Edition n°4 _ 2013 4
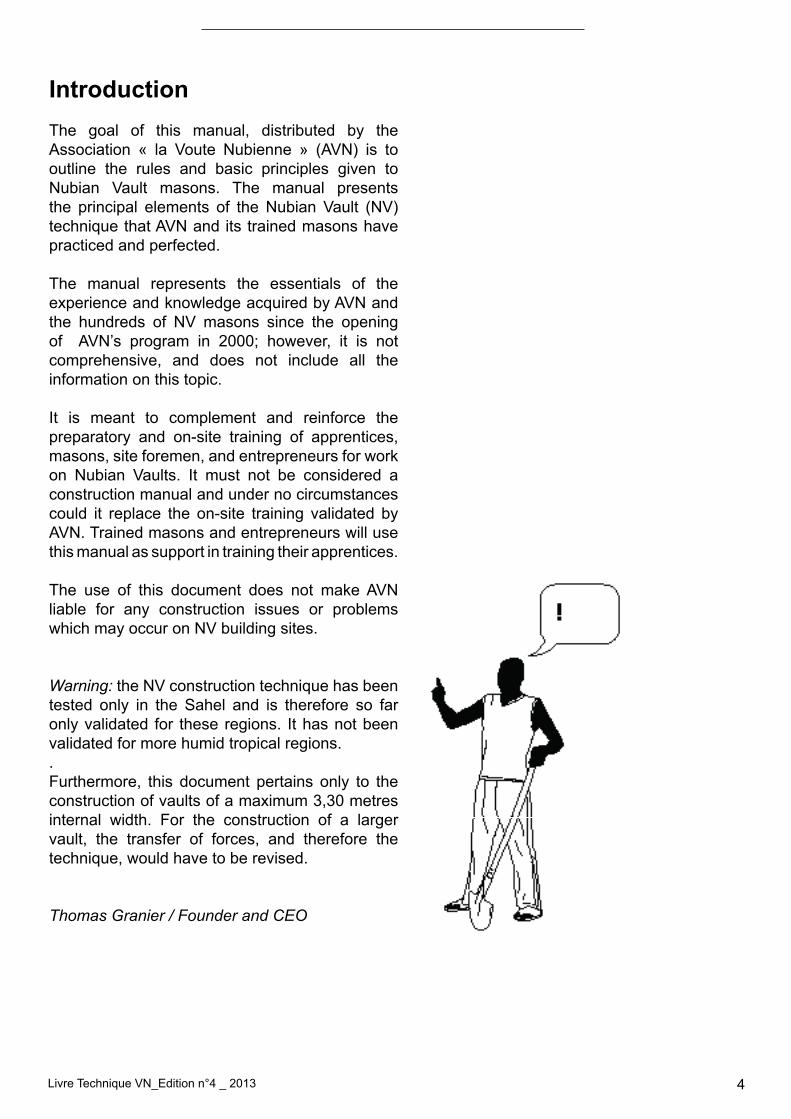
Introduction The goal of this manual, distributed by the Association « la Voute Nubienne » (AVN) is tooutline the rules and basic principles given to Nubian Vault masons. The manual presents the principal elements of the Nubian Vault (NV)technique that AVN and its trained masons have practiced and perfected.
The manual represents the essentials of the experience and knowledge acquired by AVN and the hundreds of NV masons since the opening of AVN’s program in 2000; however, it is not comprehensive, and does not include all the information on this topic.
It is meant to complement and reinforce the preparatory and on-site training of apprentices, masons, site foremen, and entrepreneurs for work on Nubian Vaults. It must not be considered a construction manual and under no circumstances could it replace the on-site training validated by AVN. Trained masons and entrepreneurs will use this manual as support in training their apprentices.
The use of this document does not make AVN liable for any construction issues or problems which may occur on NV building sites.
Warning: the NV construction technique has been tested only in the Sahel and is therefore so far only validated for these regions. It has not been validated for more humid tropical regions.. Furthermore, this document pertains only to the construction of vaults of a maximum 3,30 metres internal width. For the construction of a larger vault, the transfer of forces, and therefore the technique, would have to be revised.
Thomas Granier / Founder and CEO
Livre Technique VN_Edition n°4 _ 2013 5
Part 1
TECHNIQUES FOR
BASIC STRUCTURAL WORKS
1.1 Siting & drainage1.2 Principles of construction1.2.1 Main features of a Nubian Vault1.2.2 Building materials1.2.3 Choosing earth: basic tests 1.2.4 Préparation of banco / adobe1.2.5 Site tools & equipment1.2.6 Small vault bricks: the mould1.2.7 Small vault bricks: production1.3 Width of the vaults1.4 Layout of the groundworks1.5 The foundations 1.5.1 Digging the foundations1.5.2 Filling the foundation trenches1.5.3 Width of the foundations1.6 Construction of the walls1.6.1 Bricklaying: load-bearing & gable walls1.6.2 Bricklaying: gable walls1.6.3 Interior partition walls1.6.4 Lintels in partition walls1.6.5 Checks of alignment & verticality1.7 Openings1.7.1 Allowances for doors, windows & cupboards 1.7.2 Construction of shelving 1.7.3 Alllowances in gable walls1.7.4 Ventilation in gable walls1.8 Construction of the vault1.8.1 Height of the vault base1.8.2 The guide cable1.8.3 Arches in load-bearing walls1.8.4 Alternative formworks for doors, windows,& cupboards1.8.5 The vault1.9 Loading of the vault (buttresses)1.10 The roof10.1 Orientation of the gutters10.2 First layer of earth coating10.3 The plastic barrier10.4 Basicparapets&finalearthcoating10.5 The gutters11 Final quality control checks
6
789
101112131415
161718
20222324
25262729
303133343537
383940414244
Livre Technique VN_Edition n°4 _ 2013 6
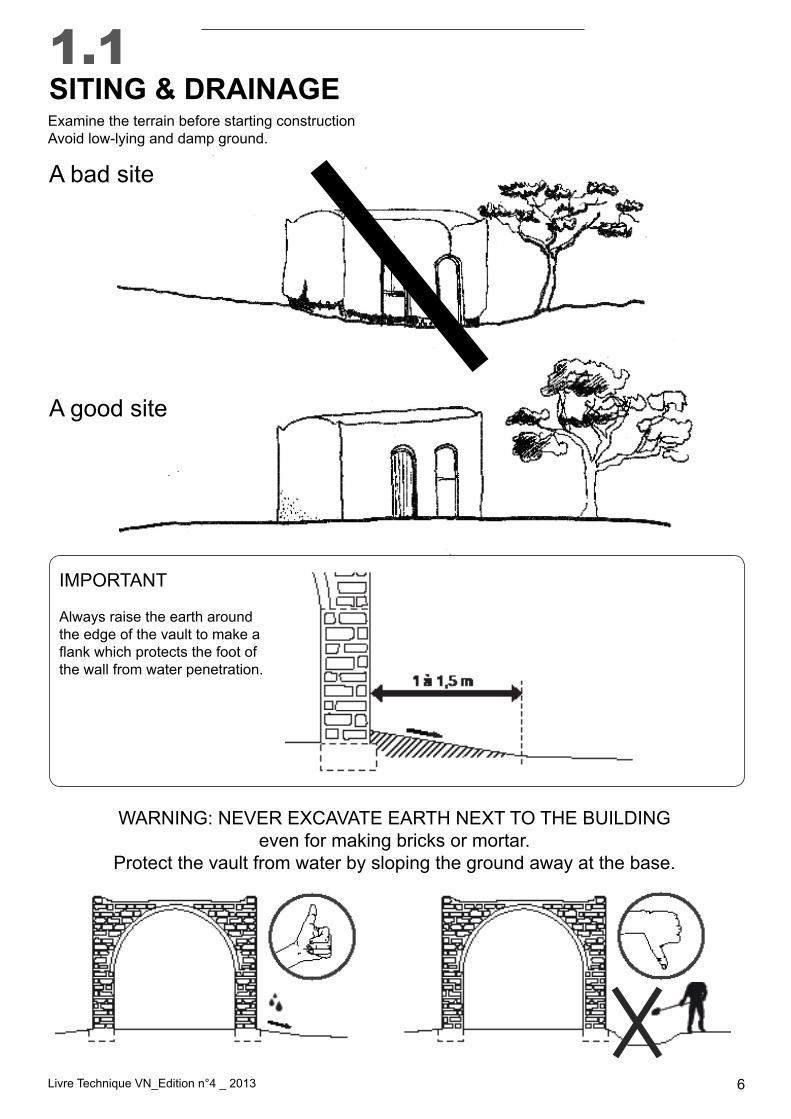
1.1SITING & DRAINAGEExamine the terrain before starting constructionAvoid low-lying and damp ground.
WARNING: NEVER EXCAVATE EARTH NEXT TO THE BUILDINGeven for making bricks or mortar.
Protect the vault from water by sloping the ground away at the base.
A bad site
A good site
IMPORTANT
Always raise the earth around the edge of the vault to make aflankwhichprotectsthefootofthe wall from water penetration.
Livre Technique VN_Edition n°4 _ 2013 7
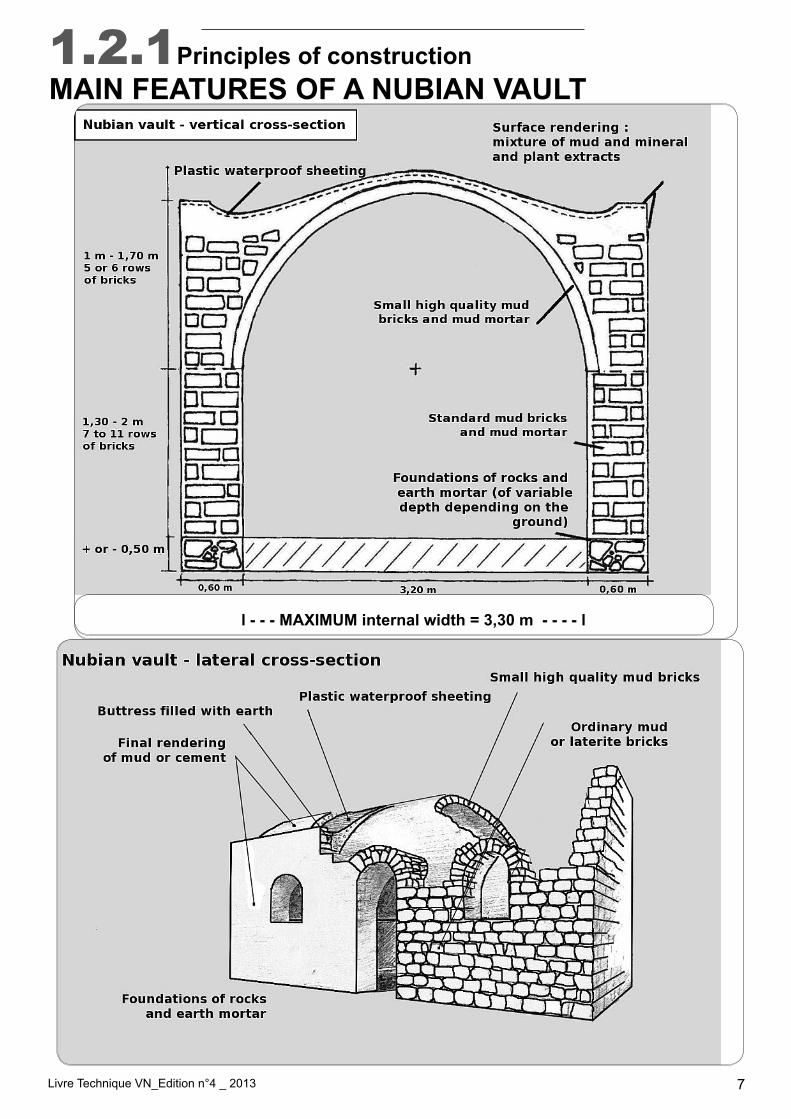
1.2.1Principles of constructionMAIN FEATURES OF A NUBIAN VAULT
Waterproofingwithgranular rammed mortar
l - - - MAXIMUM internal width = 3,30 m - - - - l

Livre du Maçon VN_Edition n°3 _ 2012 8
Good soil: for bricks, mortar, and for some renders / coatings
Rocks and stones: used for the foundations
Mud bricks for the walls: correctly made good quality large bricks of the best possible quality, such as the traditional ones usually found in villages. Their dimensions are roughly 38x18x18cm.
Smaller bricks for the vaults and arches: made directly on site with the best quality soil (grain silo soil). The site foreman or master mason supervises their fabrication. The dimensions of these bricks are 24x12x4,5cm.
Plastic sheet or tarpaulin:forwaterproofingthevault
Water: required in large quantities throughout the construction period.
1.2.2 Principles of constructionBUILDING MATERIALS
If funds allow it, and these materials are available, they can be used for the external walls: - cut laterite bricks or blocks- cut stone blocks (granite etc)- compressed earth bricks (CEB)Their use avoids having to apply a waterproof render to the external walls (see 4.1, 5.1.1, 5.1.3) Mud bricks with pebbles and stones embedded in their external surface can also be used, allowing for the use and adherence of a cement render (see 5.1.3)
Livre Technique VN_Edition n°4 _ 2013 9
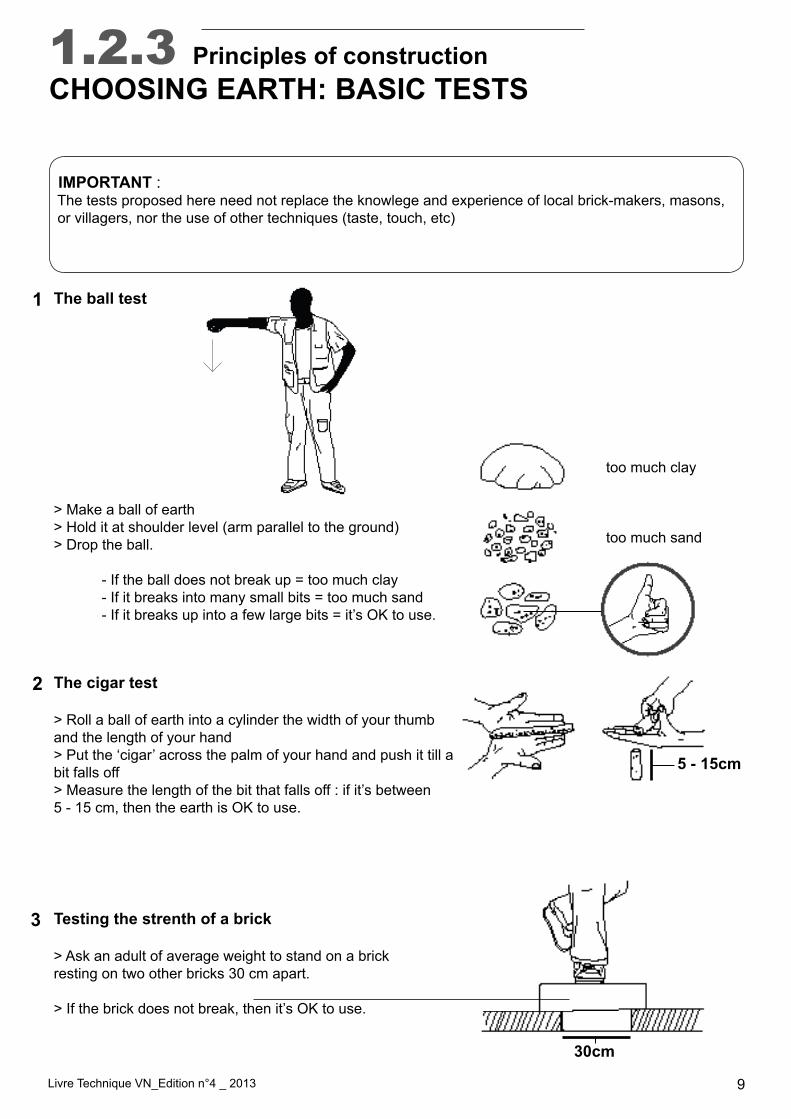
1.2.3 Principles of constructionCHOOSING EARTH: BASIC TESTS
The ball test
> Make a ball of earth> Hold it at shoulder level (arm parallel to the ground)> Drop the ball.
- If the ball does not break up = too much clay - If it breaks into many small bits = too much sand - If it breaks up into a few large bits = it’s OK to use.
IMPORTANT : The tests proposed here need not replace the knowlege and experience of local brick-makers, masons, or villagers, nor the use of other techniques (taste, touch, etc)
The cigar test
> Roll a ball of earth into a cylinder the width of your thumb and the length of your hand> Put the ‘cigar’ across the palm of your hand and push it till a bit falls off> Measure the length of the bit that falls off : if it’s between 5 - 15 cm, then the earth is OK to use.
Testing the strenth of a brick
> Ask an adult of average weight to stand on a brick resting on two other bricks 30 cm apart.
> If the brick does not break, then it’s OK to use.
too much clay
too much sand
5 - 15cm
30cm
1
2
3
Livre du Maçon VN_Edition n°3 _ 2012 10
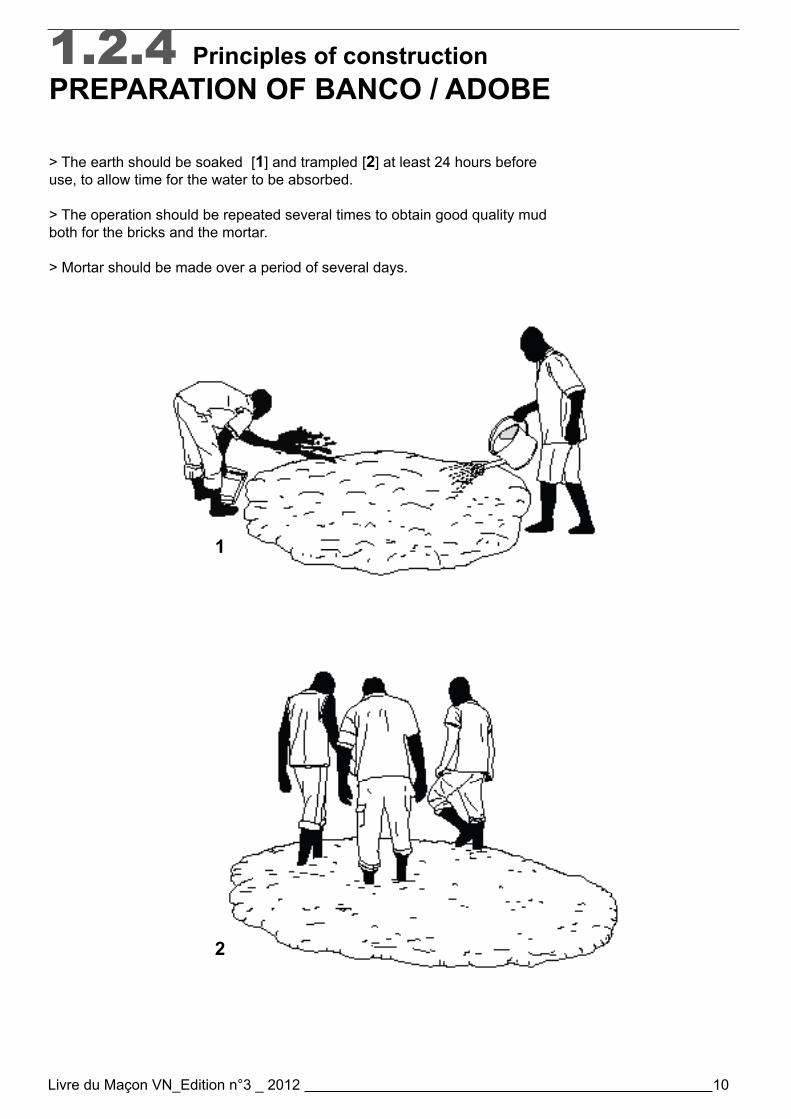
1.2.4 Principles of constructionPREPARATION OF BANCO / ADOBE
> The earth should be soaked [1] and trampled [2] at least 24 hours before use, to allow time for the water to be absorbed.
> The operation should be repeated several times to obtain good quality mud both for the bricks and the mortar.
> Mortar should be made over a period of several days.
1
2
Livre Technique VN_Edition n°4 _ 2013 11
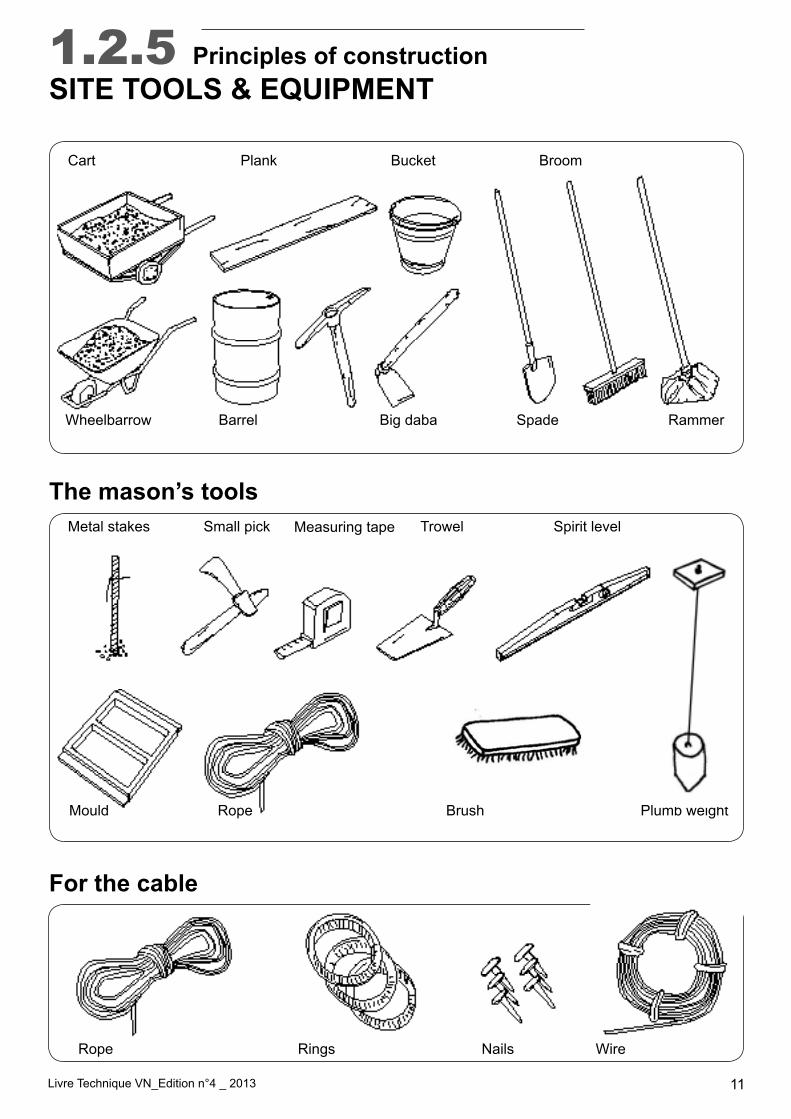
Cart BucketPlank Broom
Pick
Mould
Metal stakes Trowel
Rope Brush Plumb weight
Small pick Spirit levelMeasuring tape
Rings Nails WireRope
1.2.5 Principles of constructionSITE TOOLS & EQUIPMENT
The mason’s tools
For the cable
Big dabaBarrel Wheelbarrow Spade Rammer
Livre Technique VN_Edition n°4 _ 2013 12
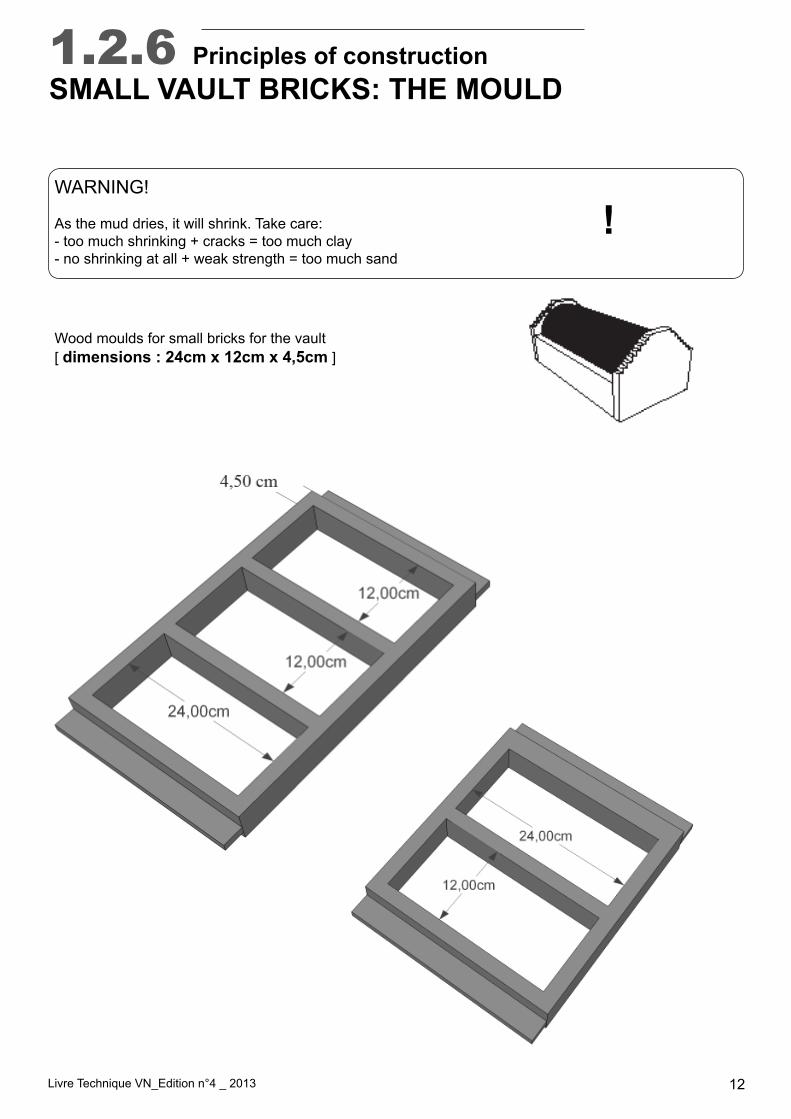
1.2.6 Principles of constructionSMALL VAULT BRICKS: THE MOULD
WARNING!
As the mud dries, it will shrink. Take care: - too much shrinking + cracks = too much clay- no shrinking at all + weak strength = too much sand
Wood moulds for small bricks for the vault[ dimensions : 24cm x 12cm x 4,5cm ]
!
Livre Technique VN_Edition n°4 _ 2013 13
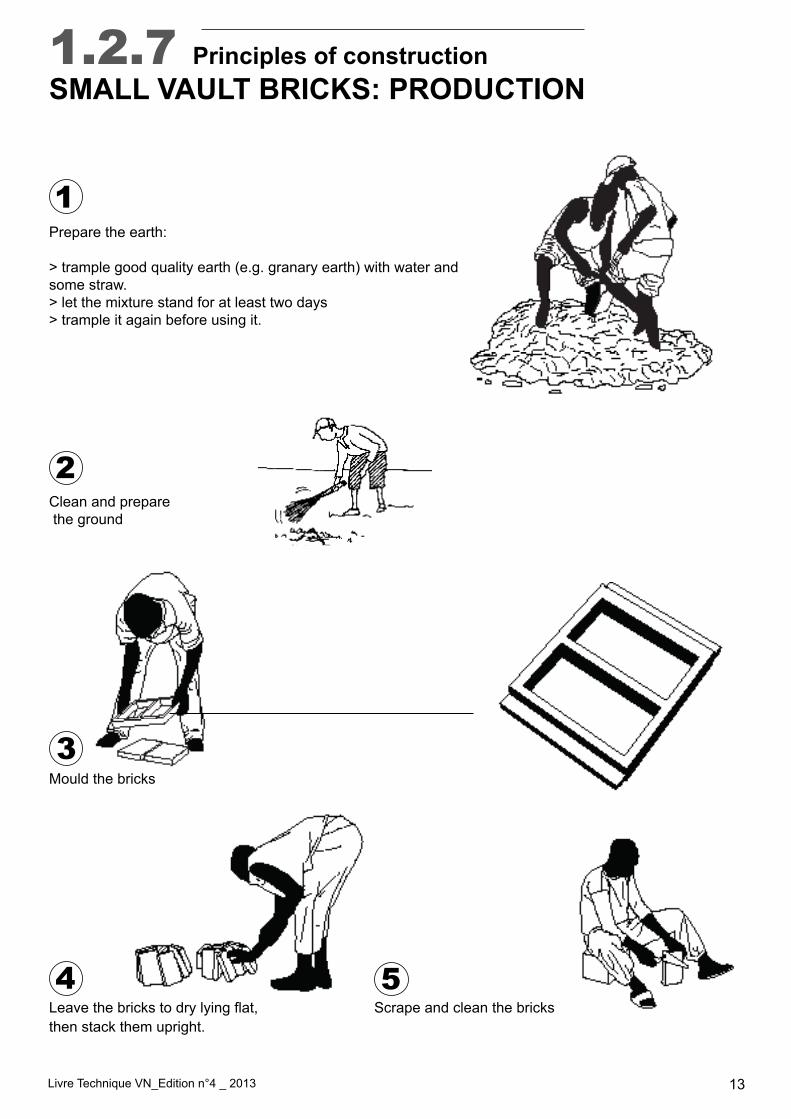
Prepare the earth:
> trample good quality earth (e.g. granary earth) with water and some straw. > let the mixture stand for at least two days> trample it again before using it.
1
2
3
4 5
Mould the bricks
Scrape and clean the bricksLeavethebrickstodrylyingflat,then stack them upright.
1.2.7 Principles of constructionSMALL VAULT BRICKS: PRODUCTION
Clean and prepare the ground
Livre Technique VN_Edition n°4 _ 2013 14
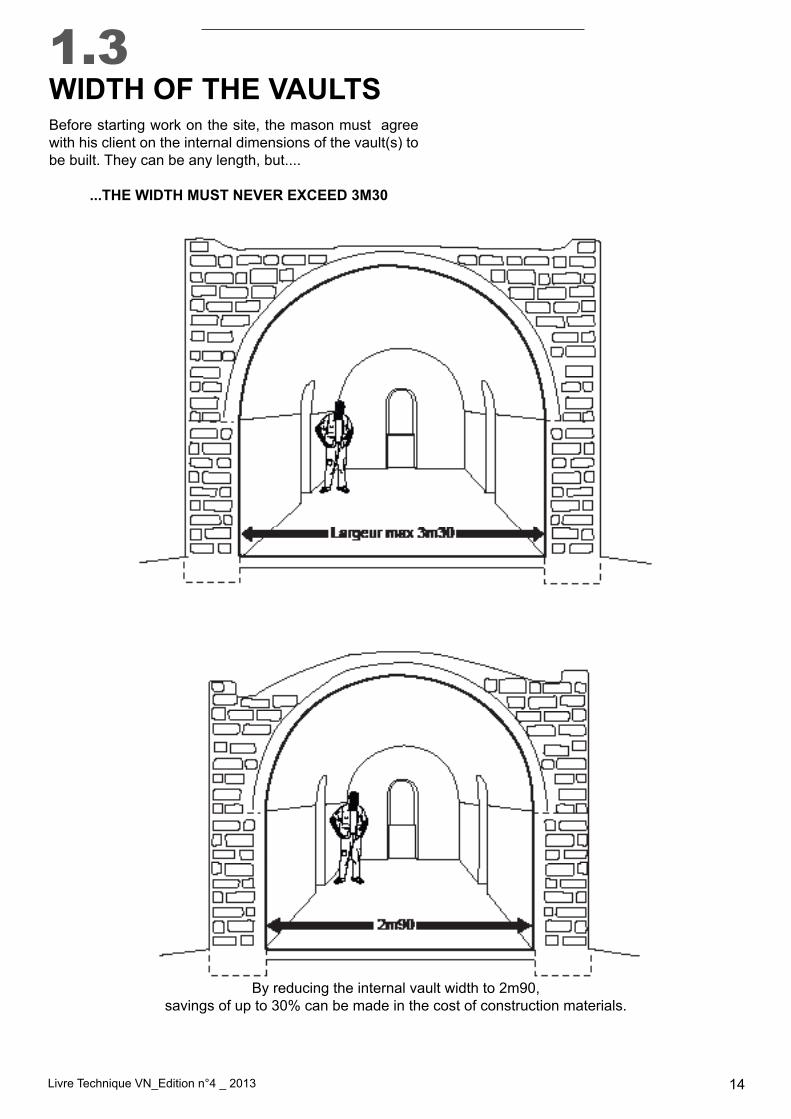
1.3WIDTH OF THE VAULTSBefore starting work on the site, the mason must agree with his client on the internal dimensions of the vault(s) to be built. They can be any length, but....
...THE WIDTH MUST NEVER EXCEED 3M30
By reducing the internal vault width to 2m90, savings of up to 30% can be made in the cost of construction materials.
Livre Technique VN_Edition n°4 _ 2013 15
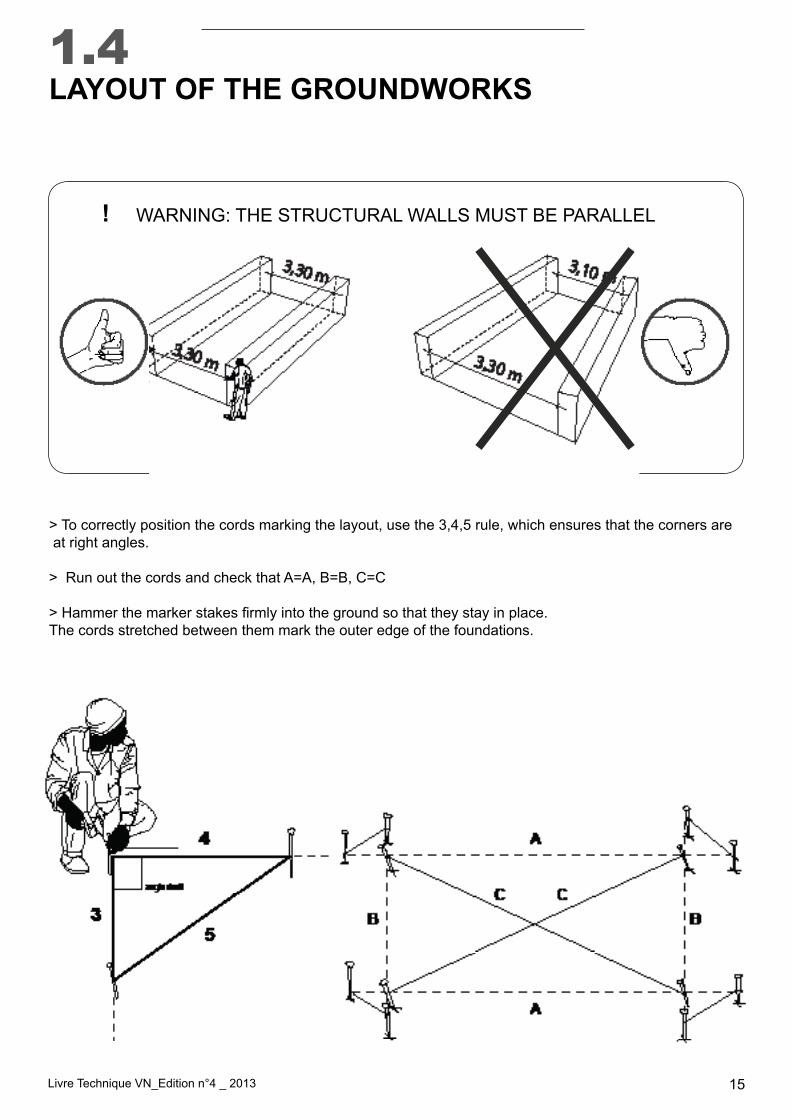
WARNING: THE STRUCTURAL WALLS MUST BE PARALLEL
> To correctly position the cords marking the layout, use the 3,4,5 rule, which ensures that the corners are at right angles.
> Run out the cords and check that A=A, B=B, C=C
>Hammerthemarkerstakesfirmlyintothegroundsothattheystayinplace.The cords stretched between them mark the outer edge of the foundations.
!
1.4LAYOUT OF THE GROUNDWORKS
Livre Technique VN_Edition n°4 _ 2013 16
HARD GROUND SOFT GROUND
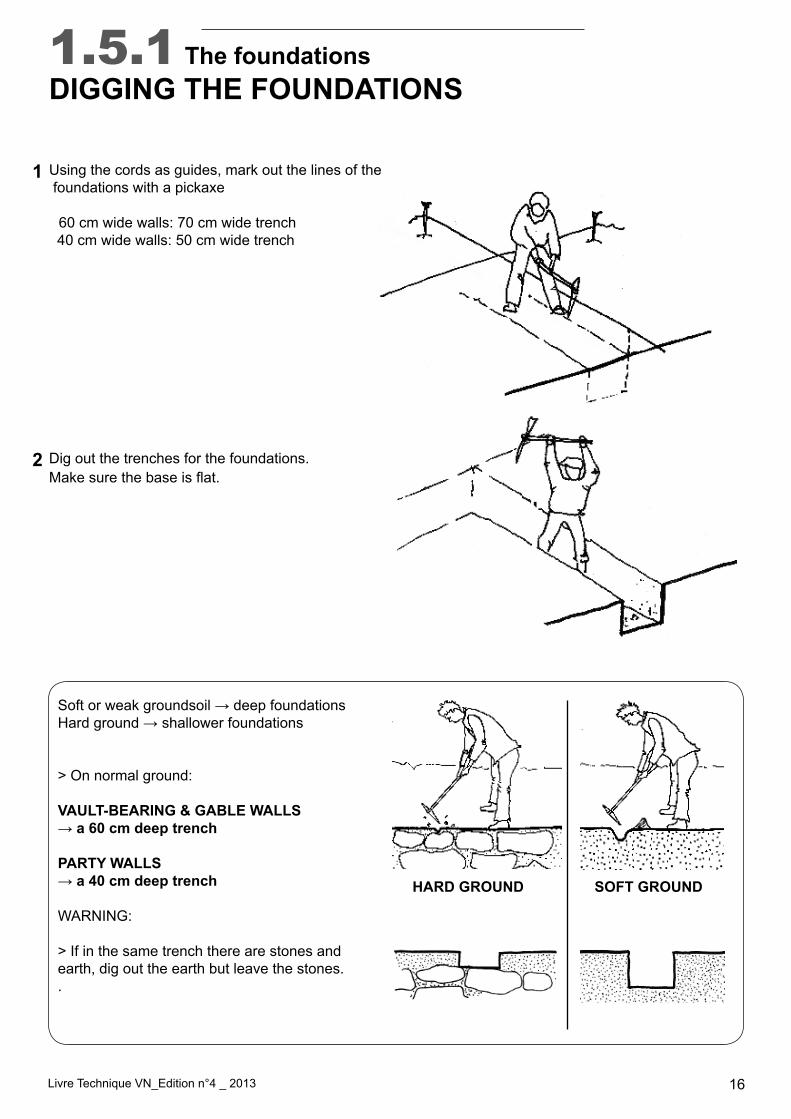
1.5.1 The foundationsDIGGING THE FOUNDATIONS
Using the cords as guides, mark out the lines of the foundations with a pickaxe
60 cm wide walls: 70 cm wide trench 40 cm wide walls: 50 cm wide trench
Dig out the trenches for the foundations.Makesurethebaseisflat.
Softorweakgroundsoil→deepfoundationsHardground→shallowerfoundations
> On normal ground:
VAULT-BEARING & GABLE WALLS → a 60 cm deep trench
PARTY WALLS→ a 40 cm deep trench
WARNING:
> If in the same trench there are stones and earth, dig out the earth but leave the stones..
1
2
Livre Technique VN_Edition n°4 _ 2013 17
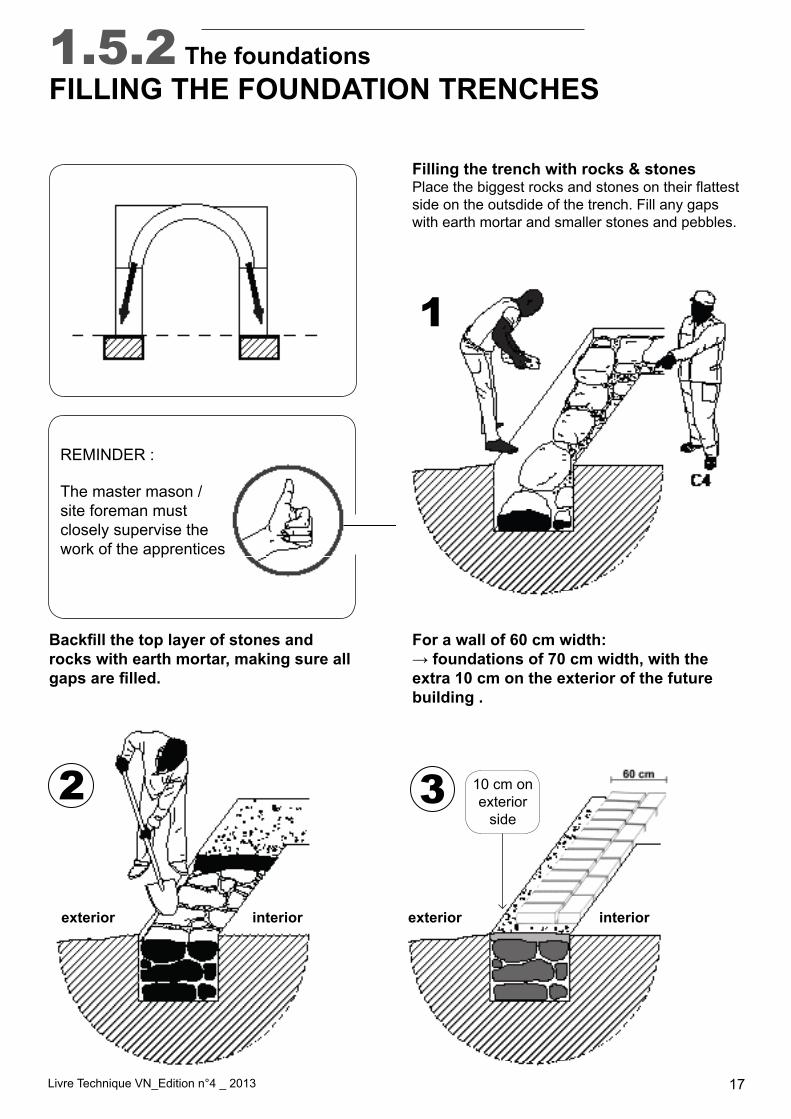
For a wall of 60 cm width:→ foundations of 70 cm width, with theextra 10 cm on the exterior of the futurebuilding .
Filling the trench with rocks & stones Placethebiggestrocksandstonesontheirflattestside on the outsdide of the trench. Fill any gaps with earth mortar and smaller stones and pebbles.
Backfill the top layer of stones and rocks with earth mortar, making sure all gaps are filled.
.
REMINDER :
The master mason / site foreman mustclosely supervise the work of the apprentices
2 3
1.5.2 The foundationsFILLING THE FOUNDATION TRENCHES
exterior exteriorinterior interior
10 cm onexterior
side
1

Livre Technique VN_Edition n°4 _ 2013 18
s
1.5.3 The foundationsWIDTH OF THE FOUNDATIONS
FOUNDATIONS OF EXTERNAL LOAD-BEARING WALLS
- width of external load-bearing wall: 60 cm- depth of foundations: according to the type of ground- width of foundations: 70 cm
> Build the wall towards the inside of the house, leaving a 10 cm strip on the outside.
FOUNDATIONS OF INTERNAL LOAD-BEARING WALLS
- width of internal load-bearing wall: 60 cm- depth of foundations: according to the type of ground- width of foundations: 70 cm
> Foundations in the axis of the wall.

Livre Technique VN_Edition n°4 _ 2013 19
>
1.5.4 The foundationsWIDTH OF THE FOUNDATIONS / cont...
FOUNDATIONS OF INTERNAL PARTITION WALLS
- width of partition wall: 20 cm- depth of foundations: approx. 40 cm- width of foundations: 20 cm
FOUNDATIONS OF INTERNAL PARTY WALLS
- party wall width: 40 cm- depth of the foundations: according to the type of soil- width of the foundations: 50 cm
> Foundations in the axis of the wall.
FOUNDATIONS OF EXTERNAL GABLE WALLS
- gable wall width: 40 cm- depth of foundations: according to the type of ground- width of foundations: 50 cm
> Build the wall towards the inside.> Leave a strip of 10 cm on the outside.
Livre Technique VN_Edition n°4 _ 2013 20
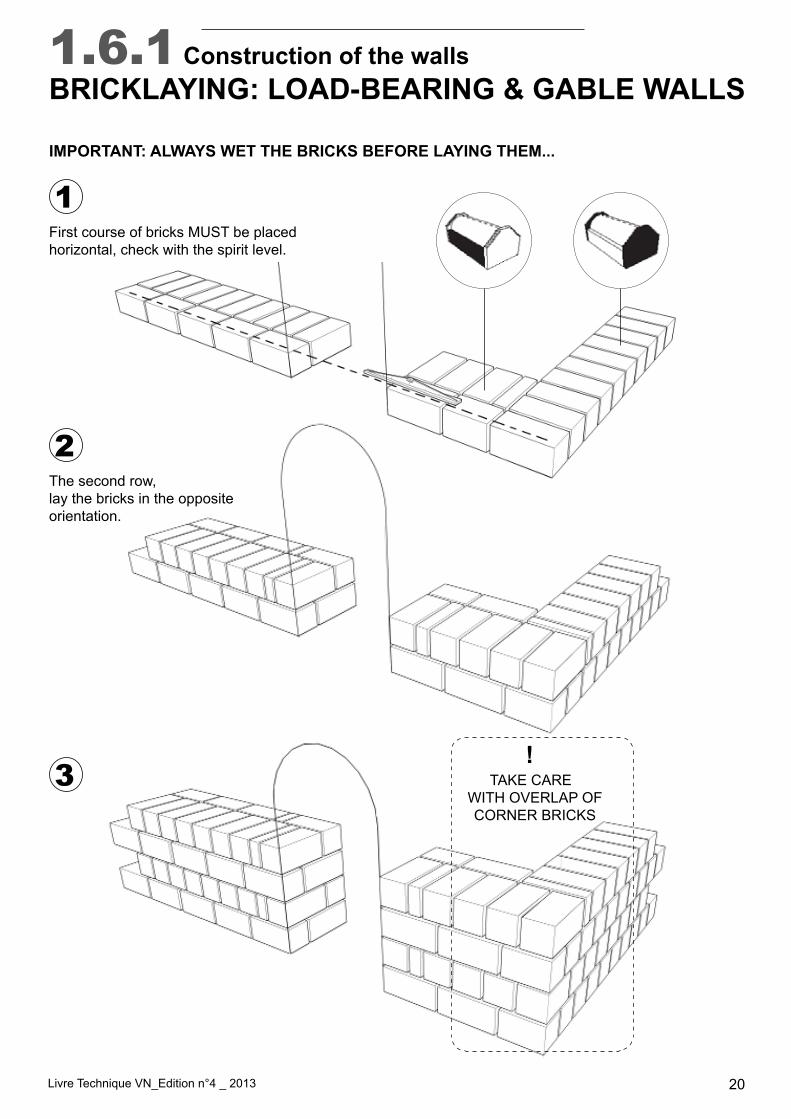
1.6.1 Construction of the wallsBRICKLAYING: LOAD-BEARING & GABLE WALLS
IMPORTANT: ALWAYS WET THE BRICKS BEFORE LAYING THEM...
First course of bricks MUST be placedhorizontal, check with the spirit level.
The second row,lay the bricks in the opposite orientation.
TAKE CARE WITH OVERLAP OF CORNER BRICKS
1
2
3!
Livre Technique VN_Edition n°4 _ 2013 21
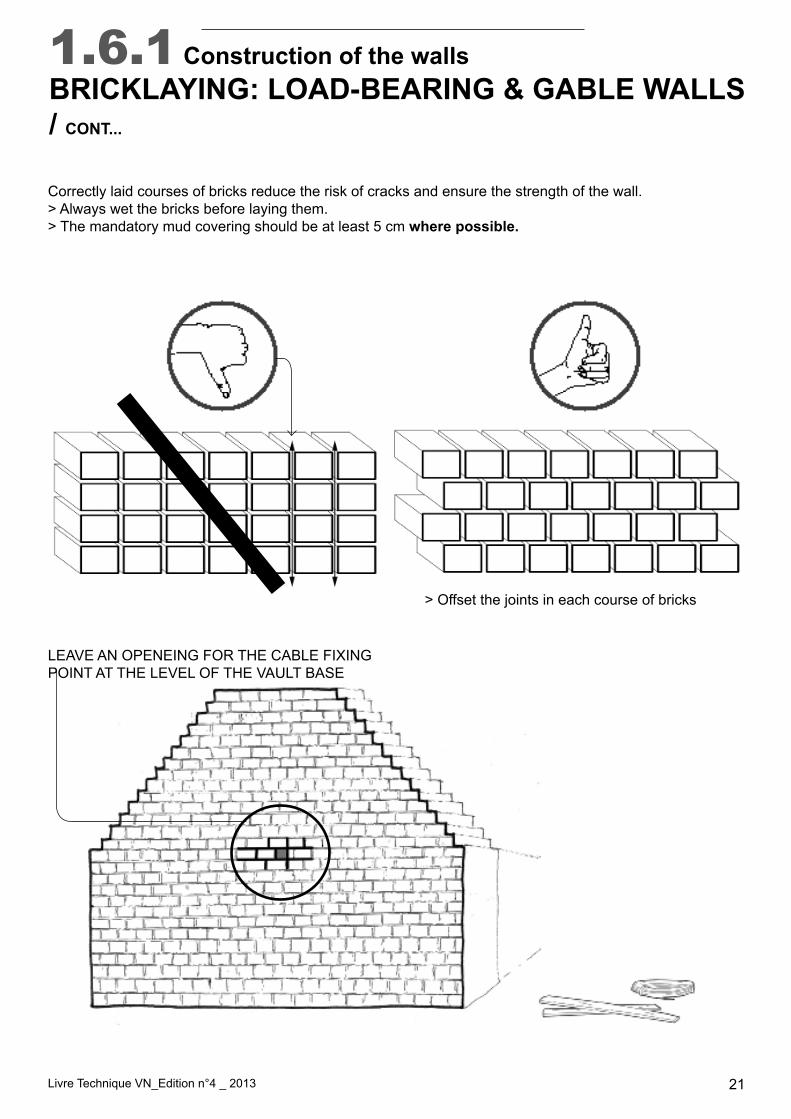
Correctly laid courses of bricks reduce the risk of cracks and ensure the strength of the wall. > Always wet the bricks before laying them.> The mandatory mud covering should be at least 5 cm where possible.
> Offset the joints in each course of bricks
LEAVE AN OPENEING FOR THE CABLE FIXING POINT AT THE LEVEL OF THE VAULT BASE
1.6.1 Construction of the wallsBRICKLAYING: LOAD-BEARING & GABLE WALLS/ CONT...
Livre Technique VN_Edition n°4 _ 2013 22
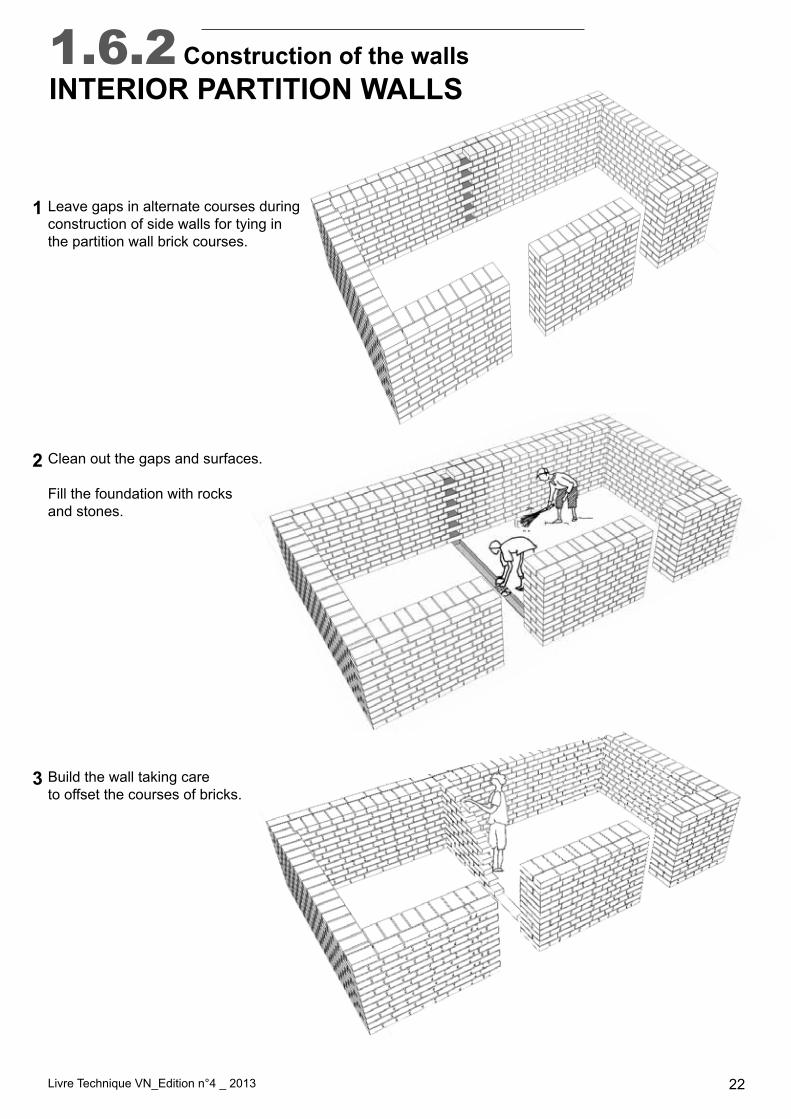
1.6.2 Construction of the wallsINTERIOR PARTITION WALLS
Leave gaps in alternate courses during construction of side walls for tying inthe partition wall brick courses.
Clean out the gaps and surfaces.
Fill the foundation with rocksand stones.
Build the wall taking careto offset the courses of bricks.
1
2
3
Livre Technique VN_Edition n°4 _ 2013 23
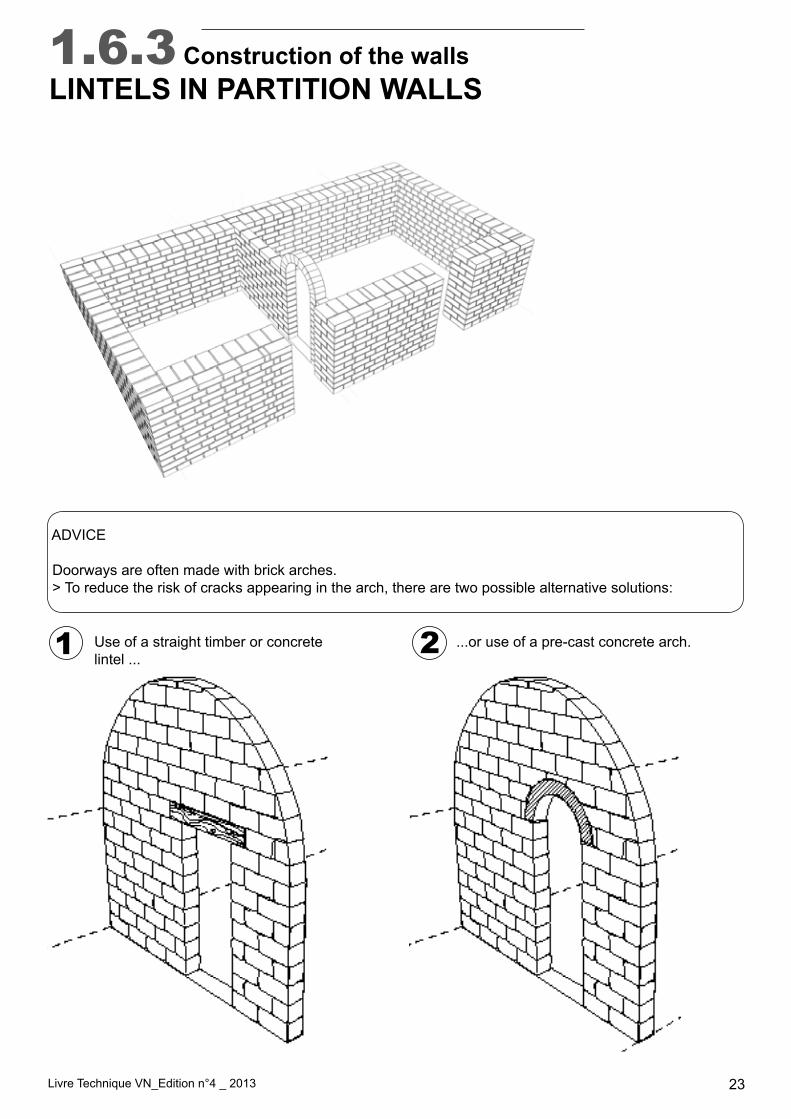
1.6.3 Construction of the wallsLINTELS IN PARTITION WALLS
ADVICE
Doorways are often made with brick arches. > To reduce the risk of cracks appearing in the arch, there are two possible alternative solutions:
Use of a straight timber or concrete lintel ...
...or use of a pre-cast concrete arch.1 2
Livre Technique VN_Edition n°4 _ 2013 24
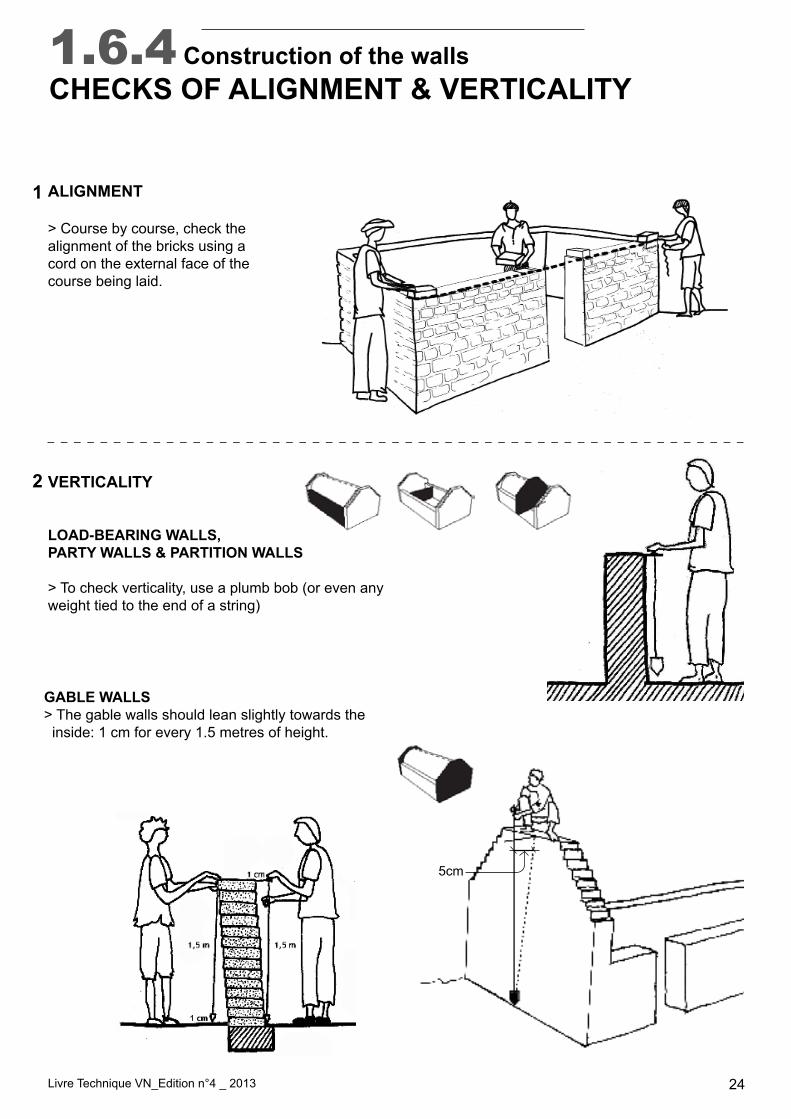
VERTICALITY
LOAD-BEARING WALLS, PARTY WALLS & PARTITION WALLS
> To check verticality, use a plumb bob (or even any weight tied to the end of a string)
1.6.4 Construction of the wallsCHECKS OF ALIGNMENT & VERTICALITY
ALIGNMENT
> Course by course, check the alignment of the bricks using a cord on the external face of thecourse being laid.
GABLE WALLS> The gable walls should lean slightly towards the inside: 1 cm for every 1.5 metres of height.
1
2
5cm
Livre Technique VN_Edition n°4 _ 2013 25
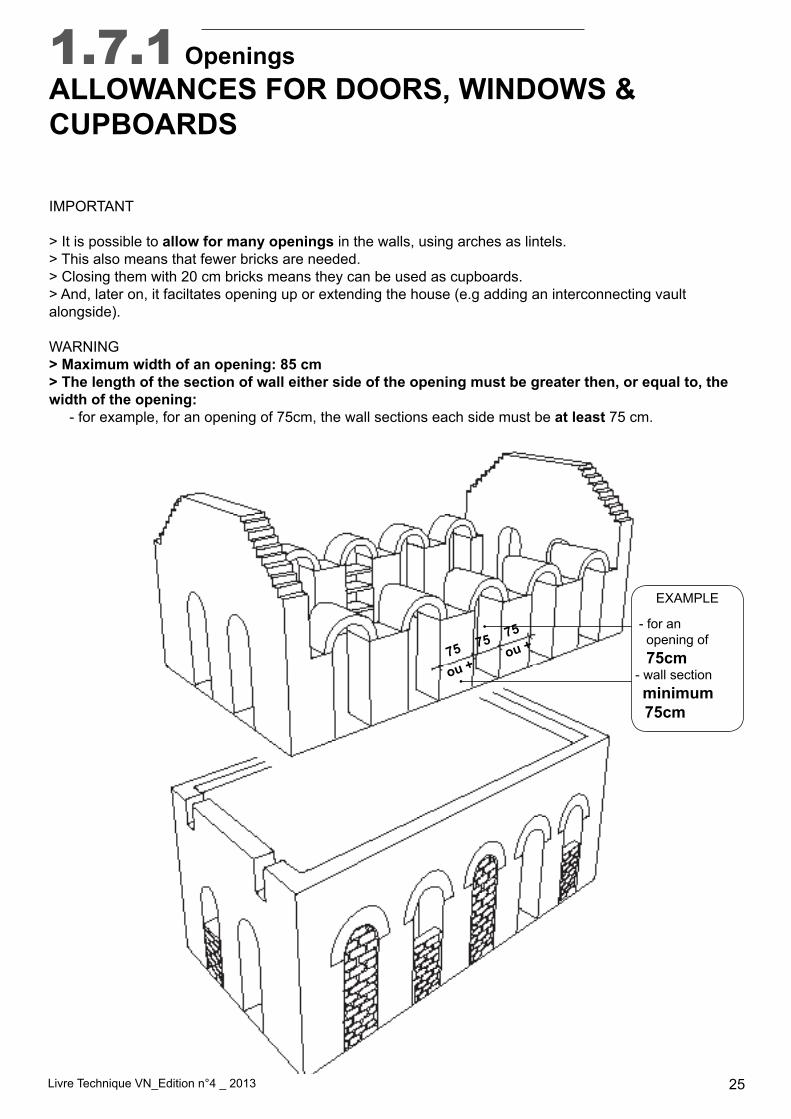
IMPORTANT
> It is possible to allow for many openings in the walls, using arches as lintels. > This also means that fewer bricks are needed. > Closing them with 20 cm bricks means they can be used as cupboards.> And, later on, it faciltates opening up or extending the house (e.g adding an interconnecting vault alongside).
WARNING> Maximum width of an opening: 85 cm> The length of the section of wall either side of the opening must be greater then, or equal to, the width of the opening: - for example, for an opening of 75cm, the wall sections each side must be at least 75 cm.
1.7.1 OpeningsALLOWANCES FOR DOORS, WINDOWS & CUPBOARDS
EXAMPLE
- for an opening of 75cm - wall section minimum 75cm
75ou +
75ou +75
Livre Technique VN_Edition n°4 _ 2013 26
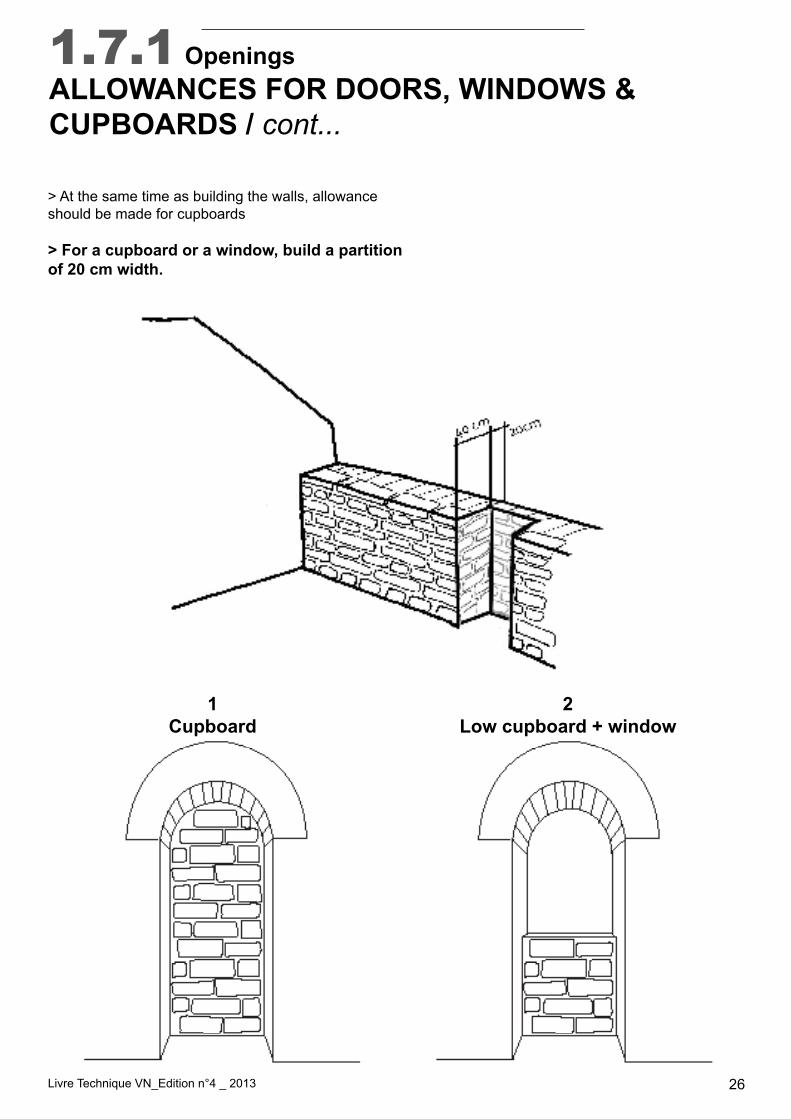
> At the same time as building the walls, allowanceshould be made for cupboards
> For a cupboard or a window, build a partitionof 20 cm width.
1Cupboard
2Low cupboard + window
1.7.1 OpeningsALLOWANCES FOR DOORS, WINDOWS & CUPBOARDS / cont...
Livre Technique VN_Edition n°4 _ 2013 27
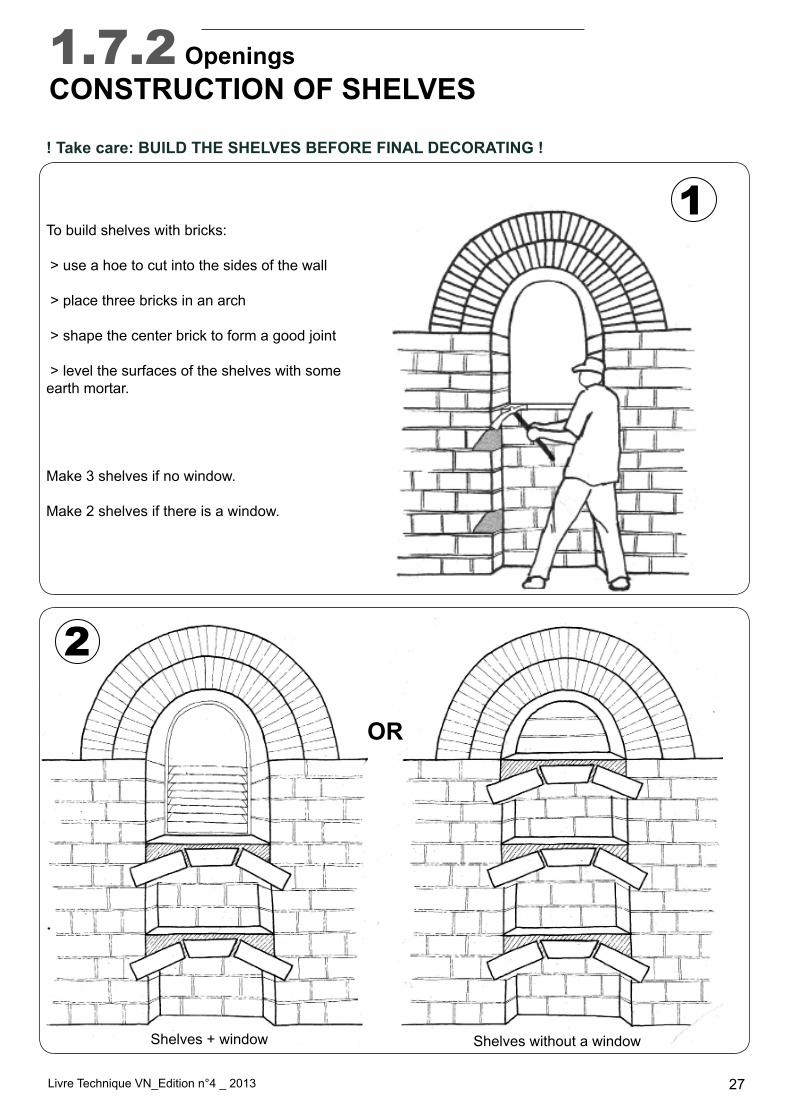
1.7.2 OpeningsCONSTRUCTION OF SHELVES
To build shelves with bricks:
> use a hoe to cut into the sides of the wall > place three bricks in an arch > shape the center brick to form a good joint > level the surfaces of the shelves with some earth mortar.
Make 3 shelves if no window.
Make 2 shelves if there is a window.
OR
Shelves + window Shelves without a window
! Take care: BUILD THE SHELVES BEFORE FINAL DECORATING !
1
2

Livre Technique VN_Edition n°4 _ 2013 28
1.7.3 Openings ALLOWANCES IN GABLE WALLS
WINDOW
DOOR
WINDOW + DOOR
ARCHWAY
See section 2.1«Big arches in gable walls»to learn about the potentialrisks of big arches...
Different types of opening can be made in gable walls depending on the client’s wishes.
Livre Technique VN_Edition n°4 _ 2013 29
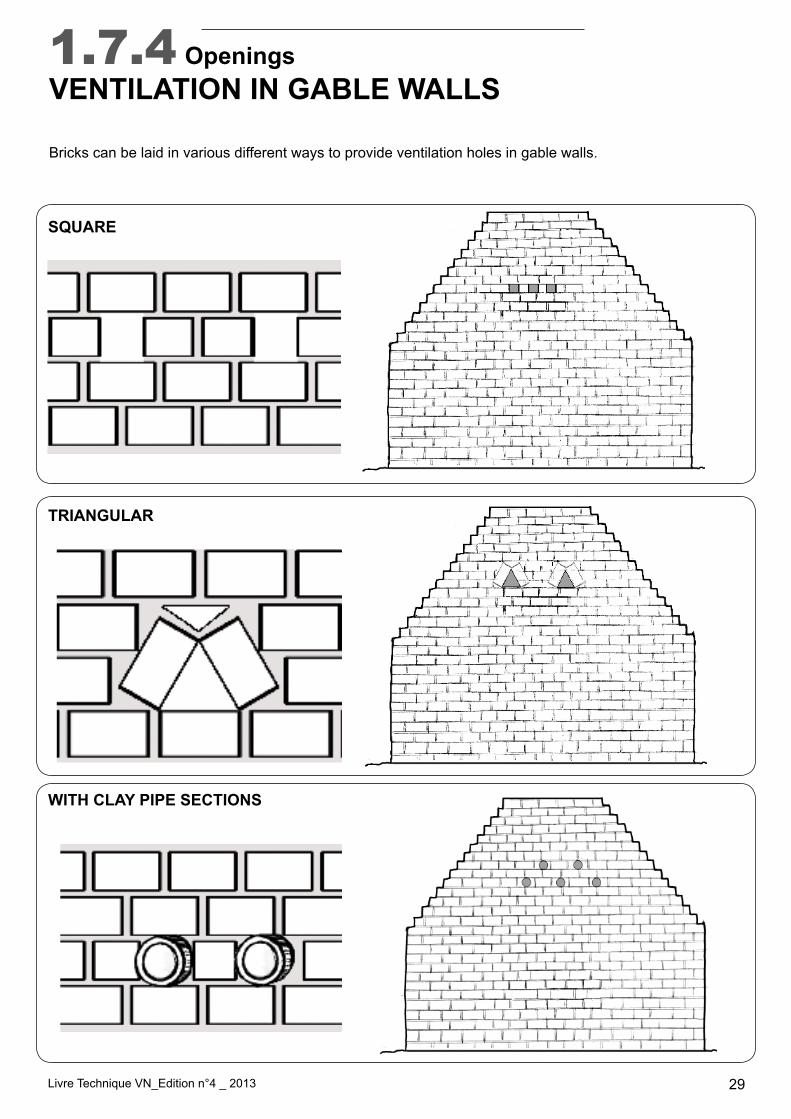
1.7.4 OpeningsVENTILATION IN GABLE WALLS
SQUARE
TRIANGULAR
WITH CLAY PIPE SECTIONS
Bricks can be laid in various different ways to provide ventilation holes in gable walls.
Livre Technique VN_Edition n°4 _ 2013 30
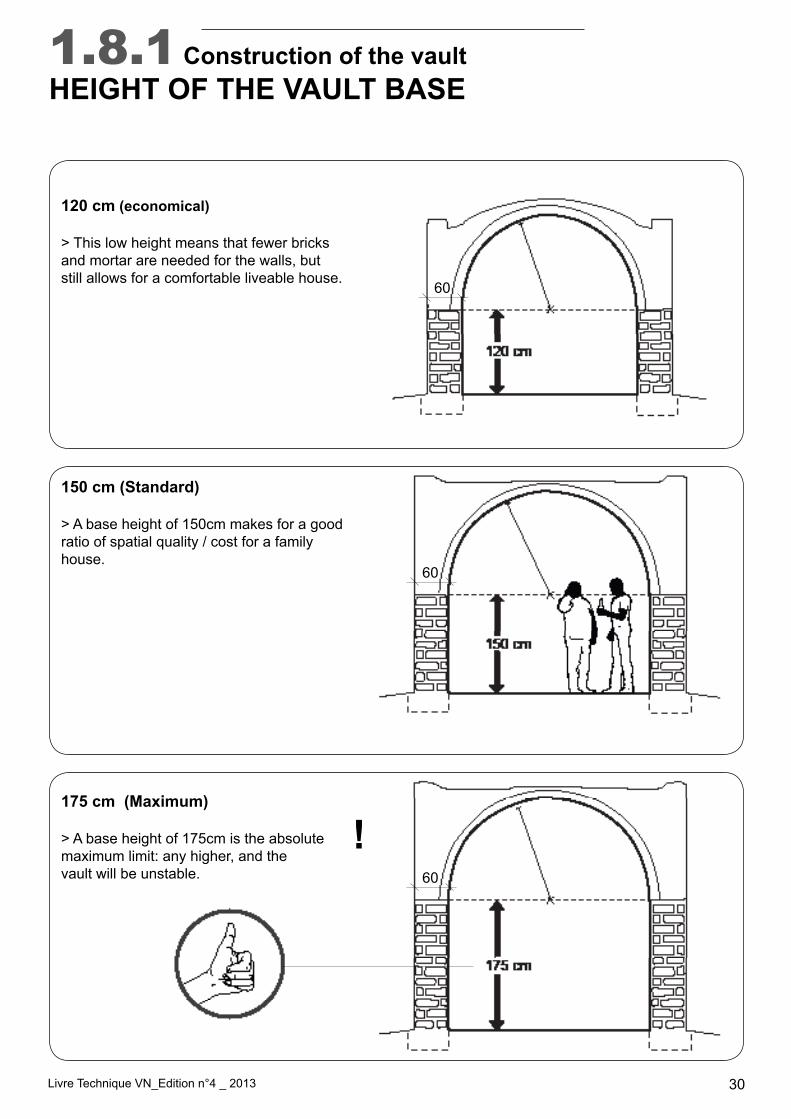
1.8.1 Construction of the vaultHEIGHT OF THE VAULT BASE
150 cm (Standard)
> A base height of 150cm makes for a goodratio of spatial quality / cost for a familyhouse.
175 cm (Maximum)
> A base height of 175cm is the absolutemaximum limit: any higher, and thevault will be unstable.
120 cm (economical)
> This low height means that fewer bricksand mortar are needed for the walls, butstill allows for a comfortable liveable house.
!
60
60
60
Livre Technique VN_Edition n°4 _ 2013 31
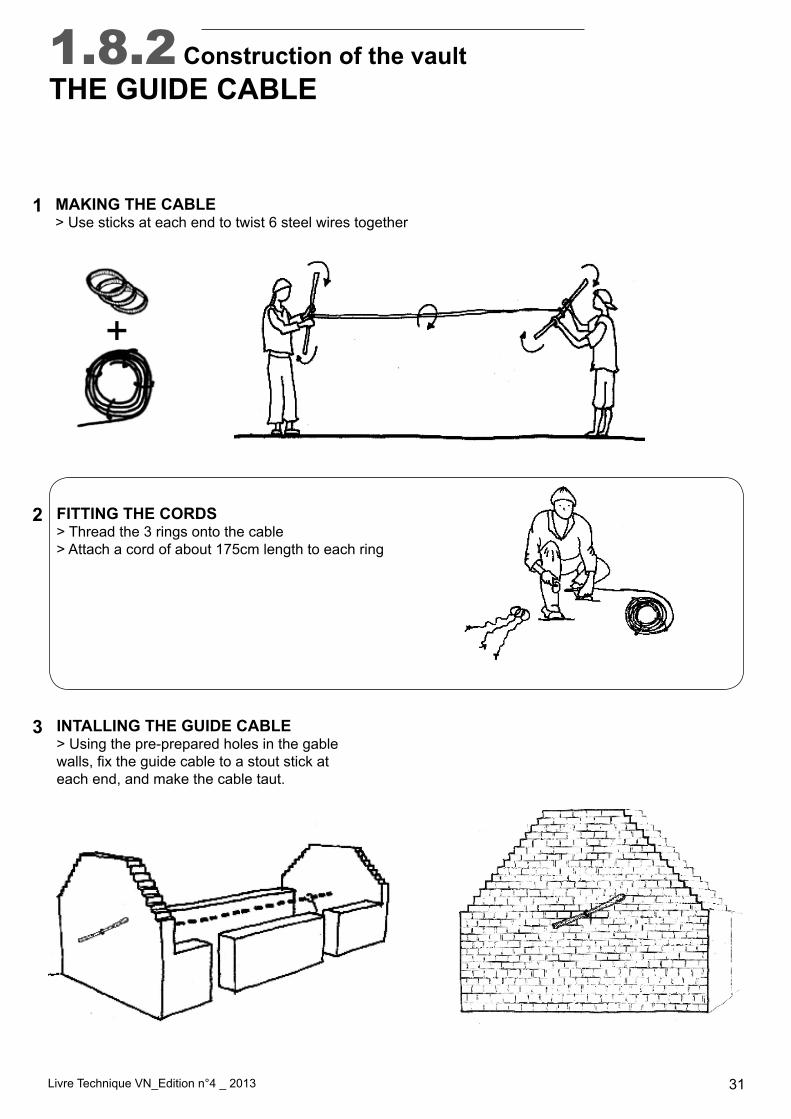
MAKING THE CABLE> Use sticks at each end to twist 6 steel wires together
1.8.2 Construction of the vaultTHE GUIDE CABLE
+
FITTING THE CORDS> Thread the 3 rings onto the cable> Attach a cord of about 175cm length to each ring
INTALLING THE GUIDE CABLE> Using the pre-prepared holes in the gable walls,fixtheguidecabletoastoutstickateach end, and make the cable taut.
1
2
3
Livre Technique VN_Edition n°4 _ 2013 32
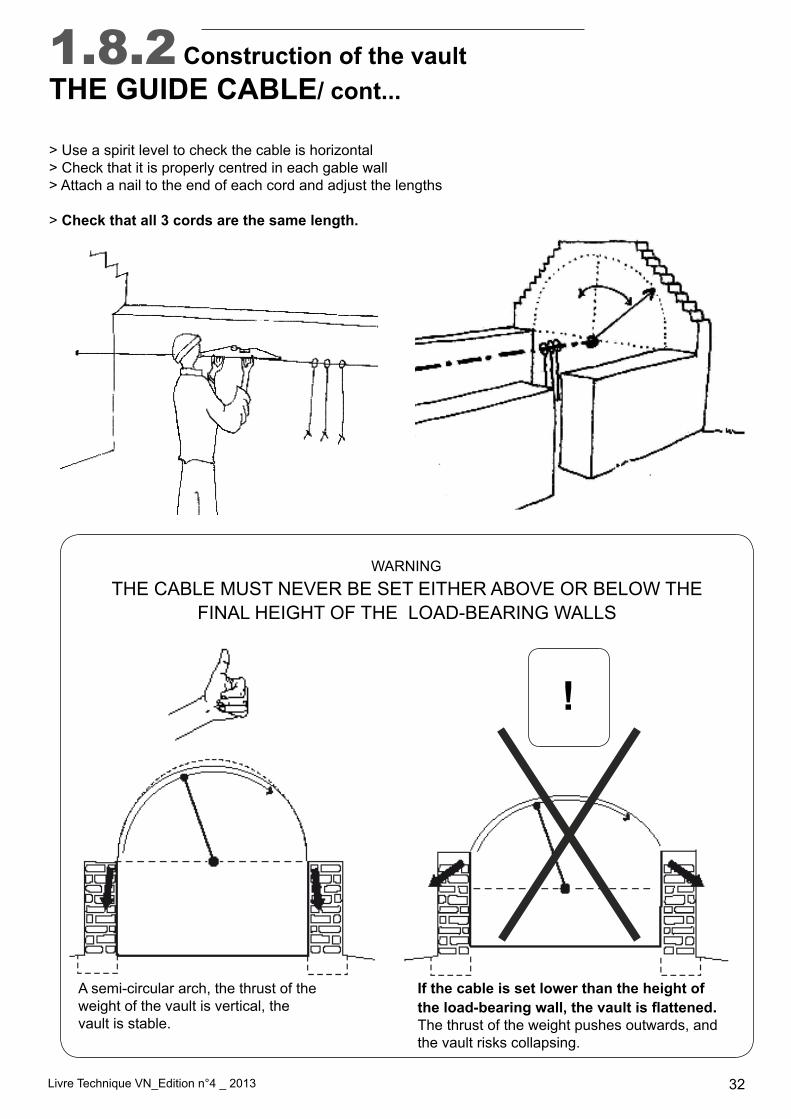
WARNING THE CABLE MUST NEVER BE SET EITHER ABOVE OR BELOW THE
FINAL HEIGHT OF THE LOAD-BEARING WALLS
A semi-circular arch, the thrust of theweight of the vault is vertical, the vault is stable.
If the cable is set lower than the height ofthe load-bearing wall, the vault is flattened.The thrust of the weight pushes outwards, andthe vault risks collapsing.
!
1.8.2 Construction of the vaultTHE GUIDE CABLE/ cont...
> Use a spirit level to check the cable is horizontal> Check that it is properly centred in each gable wall> Attach a nail to the end of each cord and adjust the lengths
> Check that all 3 cords are the same length.
Livre Technique VN_Edition n°4 _ 2013 33
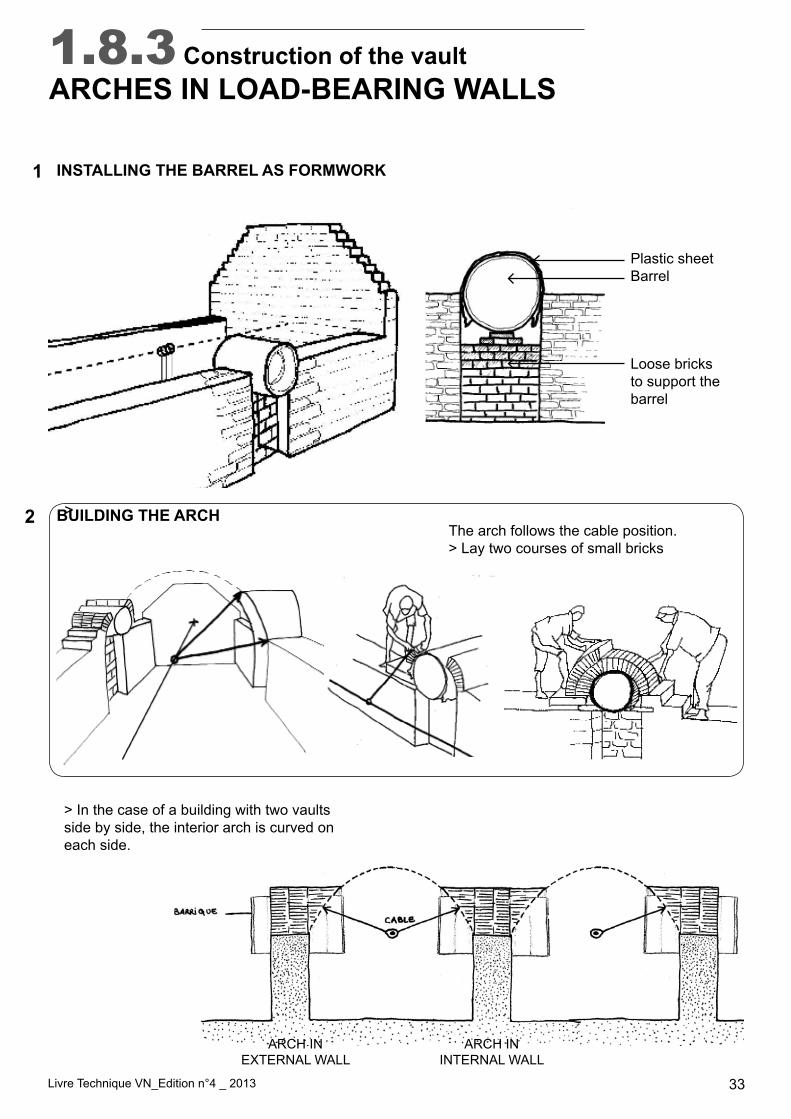
> The arch follows the cable position. > Lay two courses of small bricks
1.8.3 Construction of the vaultARCHES IN LOAD-BEARING WALLS
INSTALLING THE BARREL AS FORMWORK
BUILDING THE ARCH
1
2
Plastic sheet Barrel
Loose bricks to support the barrel
ARCH IN EXTERNAL WALL
ARCH ININTERNAL WALL
> In the case of a building with two vaults side by side, the interior arch is curved on each side.
Livre Technique VN_Edition n°4 _ 2013 34
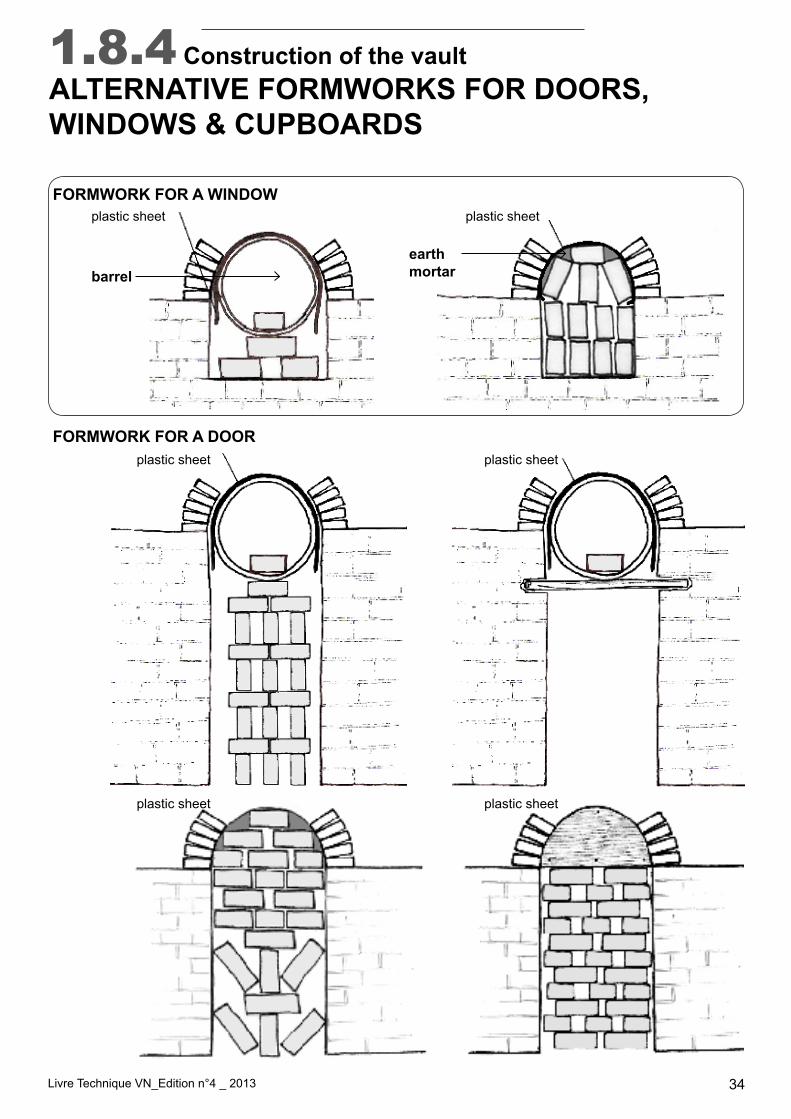
1.8.4 Construction of the vaultALTERNATIVE FORMWORKS FOR DOORS, WINDOWS & CUPBOARDS
plastic sheet plastic sheet
plastic sheet
plastic sheet plastic sheet
plastic sheetFORMWORK FOR A WINDOW
FORMWORK FOR A DOOR
earthmortarbarrel
Livre Technique VN_Edition n°4 _ 2013 35
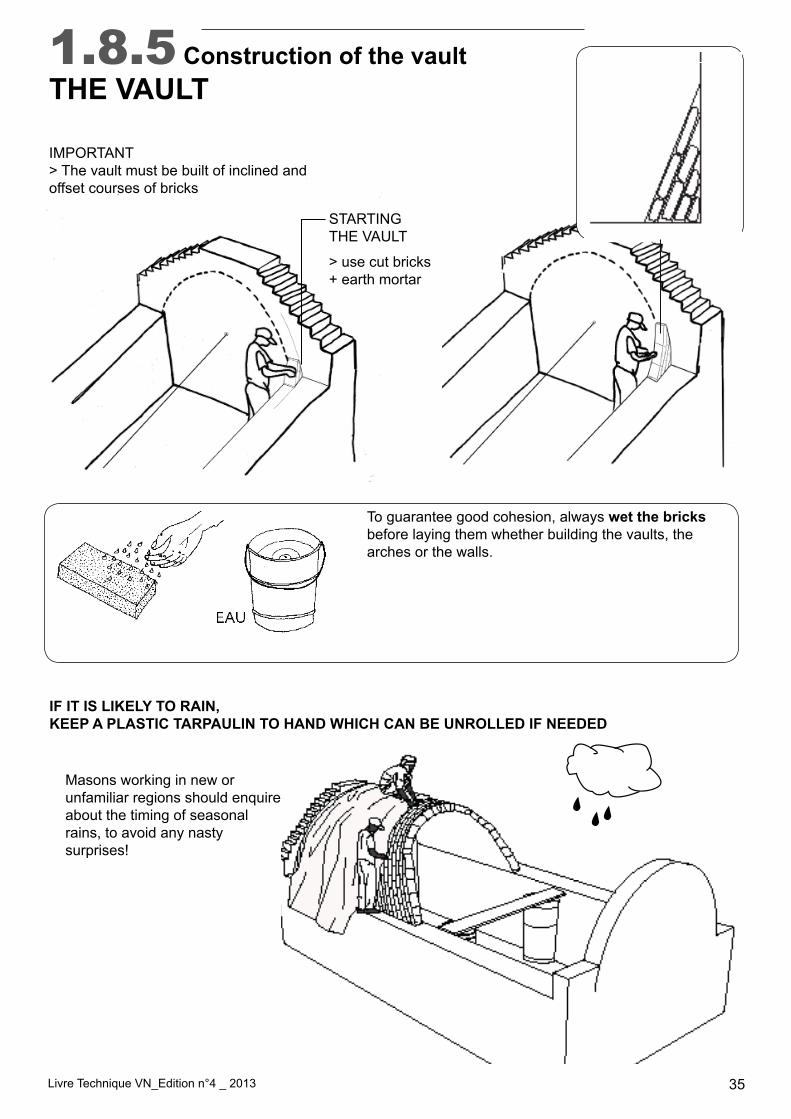
> use cut bricks + earth mortar
IMPORTANT > The vault must be built of inclined and offset courses of bricks
To guarantee good cohesion, always wet the bricksbefore laying them whether building the vaults, the arches or the walls.
Masons working in new orunfamiliar regions should enquireabout the timing of seasonalrains, to avoid any nastysurprises!
1.8.5 Construction of the vaultTHE VAULT
STARTING THE VAULT
IF IT IS LIKELY TO RAIN, KEEP A PLASTIC TARPAULIN TO HAND WHICH CAN BE UNROLLED IF NEEDED
Livre du Maçon VN_Edition n°3 _ 2012 36
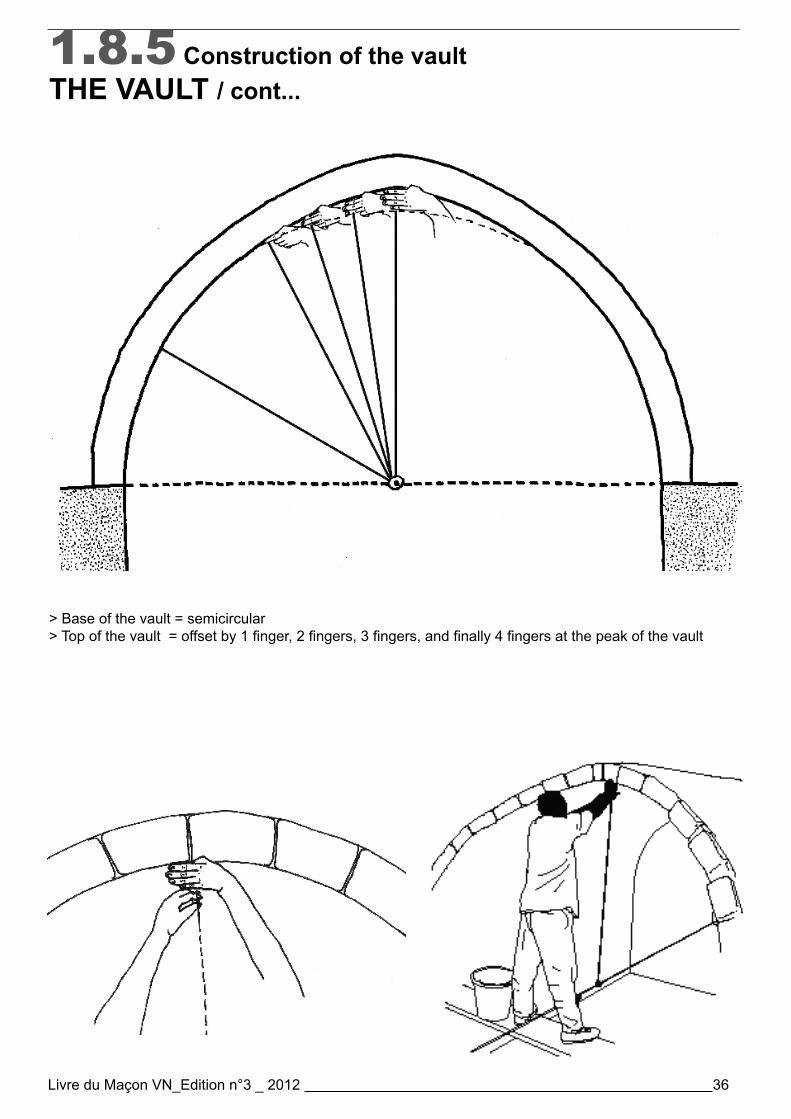
> Base of the vault = semicircular>Topofthevault=offsetby1finger,2fingers,3fingers,andfinally4fingersatthepeakofthevault
1.8.5 Construction of the vaultTHE VAULT / cont...
Livre Technique VN_Edition n°4 _ 2013 37
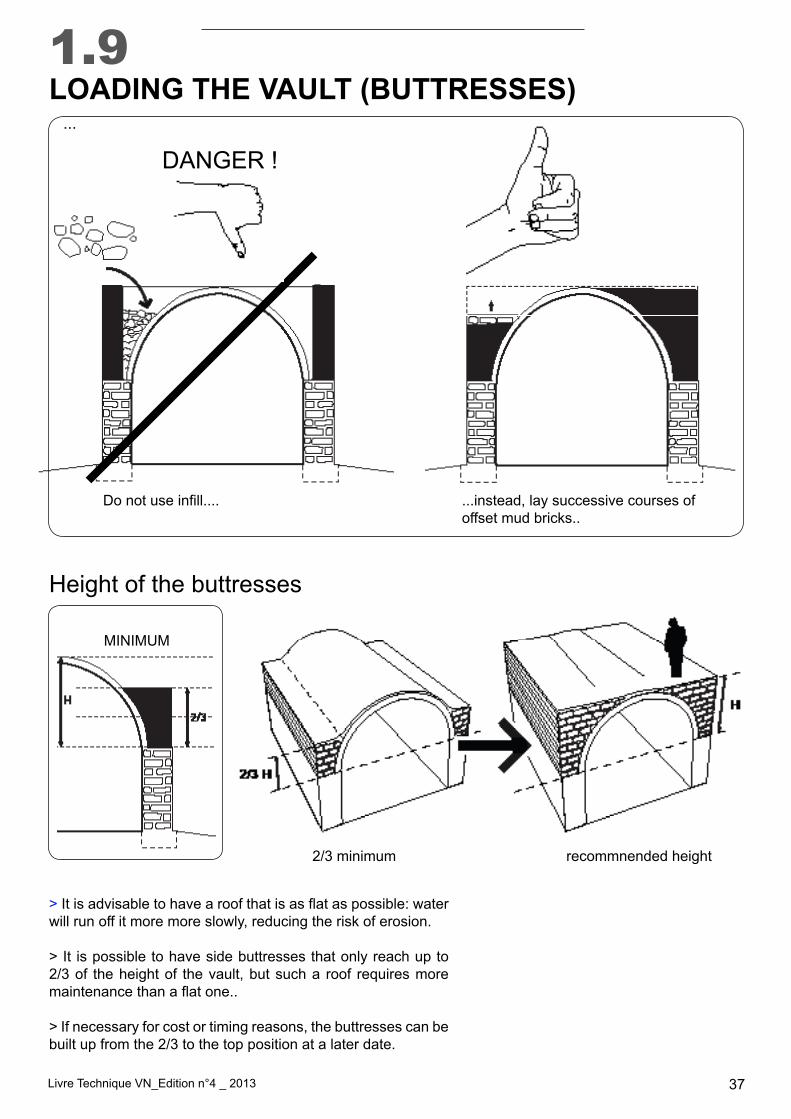
Donotuseinfill....
> Itisadvisabletohavearoofthatisasflataspossible:waterwill run off it more more slowly, reducing the risk of erosion.
> It is possible to have side buttresses that only reach up to 2/3 of the height of the vault, but such a roof requires more maintenancethanaflatone..
> If necessary for cost or timing reasons, the buttresses can be built up from the 2/3 to the top position at a later date.
...instead, lay successive courses of offset mud bricks..
1.9LOADING THE VAULT (BUTTRESSES)
...
Height of the buttresses
DANGER !
MINIMUM
2/3 minimum recommnended height
Livre Technique VN_Edition n°4 _ 2013 38
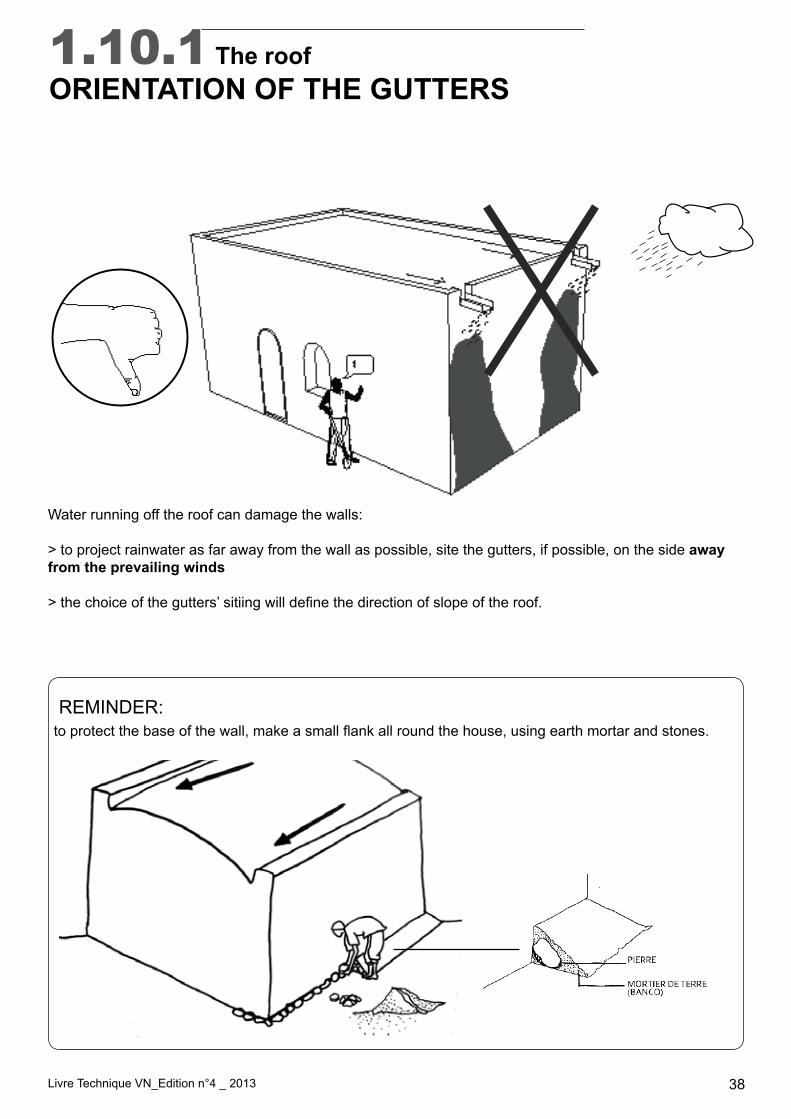
Water running off the roof can damage the walls:
> to project rainwater as far away from the wall as possible, site the gutters, if possible, on the side away from the prevailing winds
>thechoiceofthegutters’sitiingwilldefinethedirectionofslopeoftheroof.
1.10.1 The roofORIENTATION OF THE GUTTERS
REMINDER: toprotectthebaseofthewall,makeasmallflankallroundthehouse,usingearthmortarandstones.

Livre Technique VN_Edition n°4 _ 2013 39
1
2
3
Laythefirstlayerofearth
> it must be thicker at the end opposite the gutters, and thinner at the gutter end: = slope of 1cm/m
> Tamp / ram the earth> Wet and smooth it with water> Use a broom to remove any stones
> Check the slope
1.10.2 The roofFIRST LAYER OF EARTH COATING
1 m
1 cm
Livre Technique VN_Edition n°4 _ 2013 40
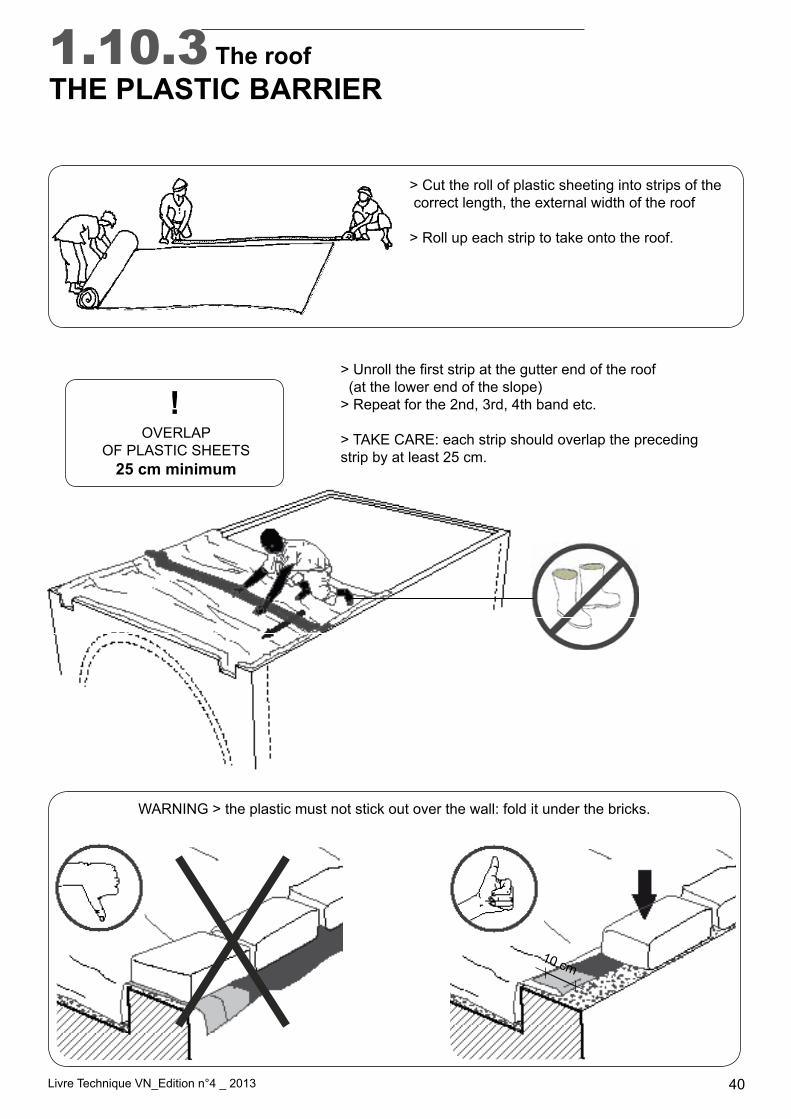
> Cut the roll of plastic sheeting into strips of the correct length, the external width of the roof
> Roll up each strip to take onto the roof.
OVERLAPOF PLASTIC SHEETS
25 cm minimum
>Unrollthefirststripatthegutterendoftheroof (at the lower end of the slope)> Repeat for the 2nd, 3rd, 4th band etc.
> TAKE CARE: each strip should overlap the preceding strip by at least 25 cm.
!
WARNING > the plastic must not stick out over the wall: fold it under the bricks.
1.10.3 The roofTHE PLASTIC BARRIER
10 cm
Livre Technique VN_Edition n°4 _ 2013 41
1
2
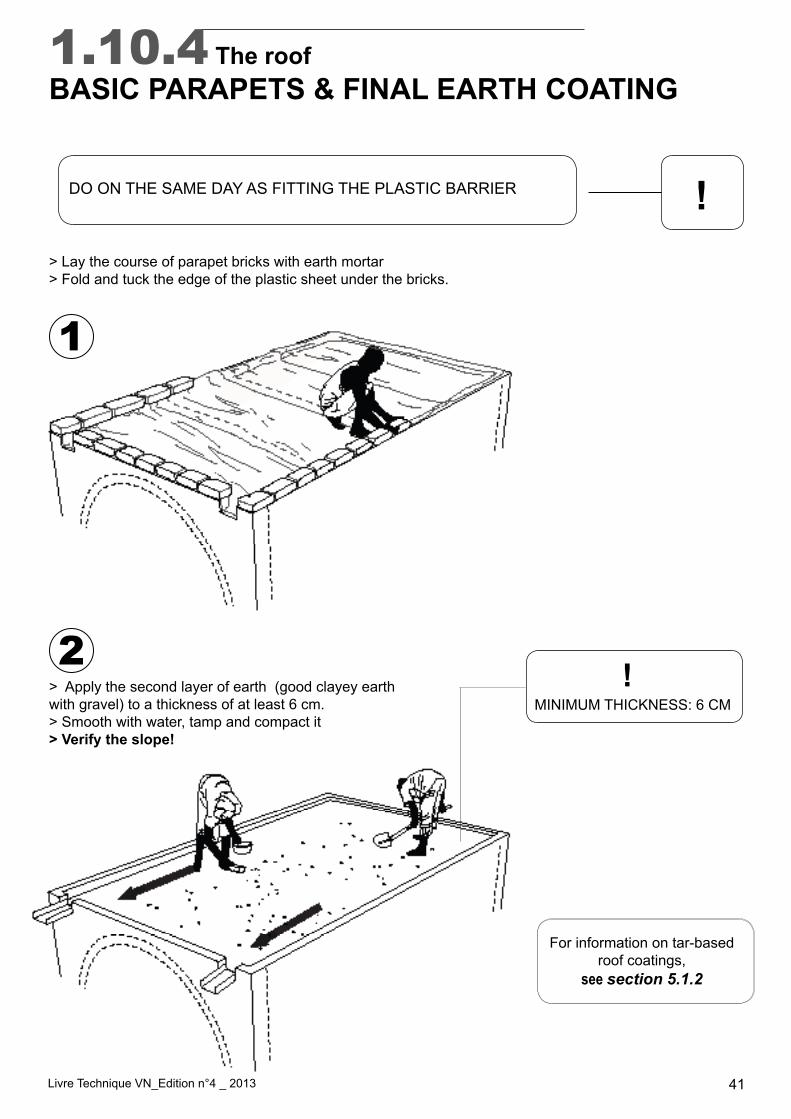
> Lay the course of parapet bricks with earth mortar> Fold and tuck the edge of the plastic sheet under the bricks.
> Apply the second layer of earth (good clayey earthwith gravel) to a thickness of at least 6 cm.> Smooth with water, tamp and compact it> Verify the slope!
MINIMUM THICKNESS: 6 CM !
1.10.4 The roofBASIC PARAPETS & FINAL EARTH COATING
! DO ON THE SAME DAY AS FITTING THE PLASTIC BARRIER
For information on tar-basedroof coatings,
see section 5.1.2
Livre Technique VN_Edition n°4 _ 2013 42
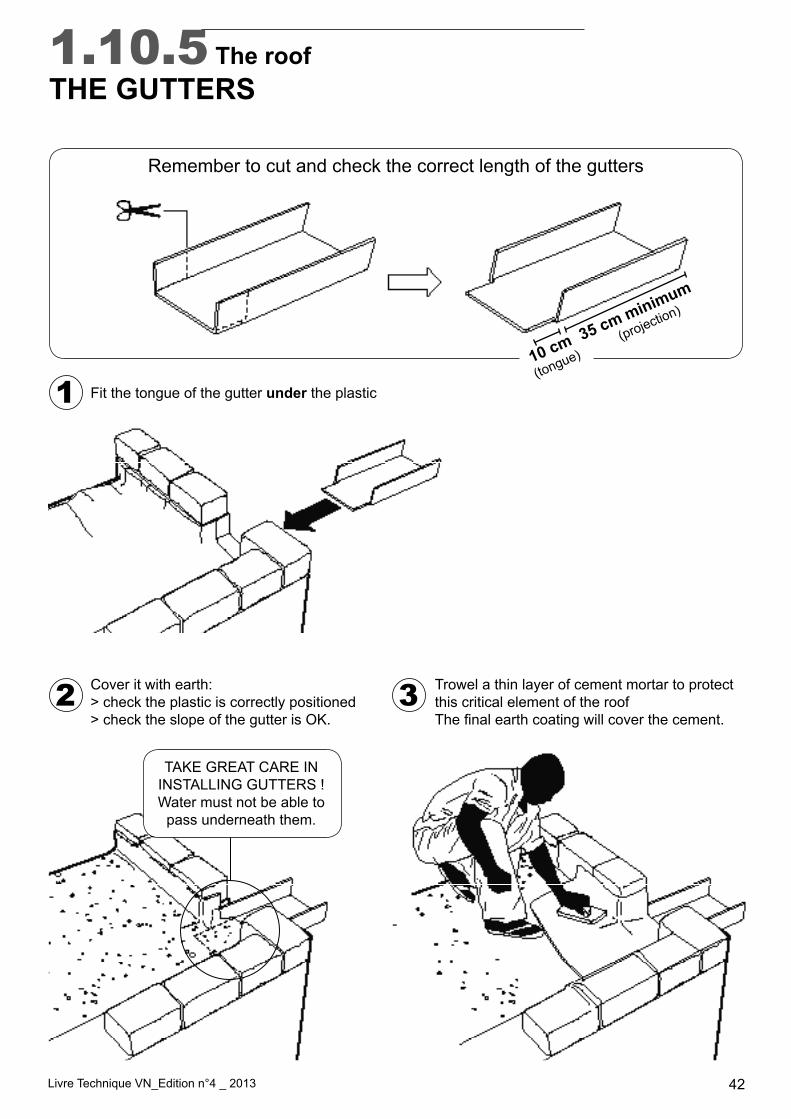
1.10.5 The roofTHE GUTTERS
1
2 3Cover it with earth:> check the plastic is correctly positioned> check the slope of the gutter is OK.
Fit the tongue of the gutter under the plastic
Trowel a thin layer of cement mortar to protectthis critical element of the roofThefinalearthcoatingwillcoverthecement.
35 cm minimum
(projection)
Remember to cut and check the correct length of the gutters
TAKE GREAT CARE ININSTALLING GUTTERS !Water must not be able to
pass underneath them.
10 cm
(tongue)
Livre Technique VN_Edition n°4 _ 2013 43
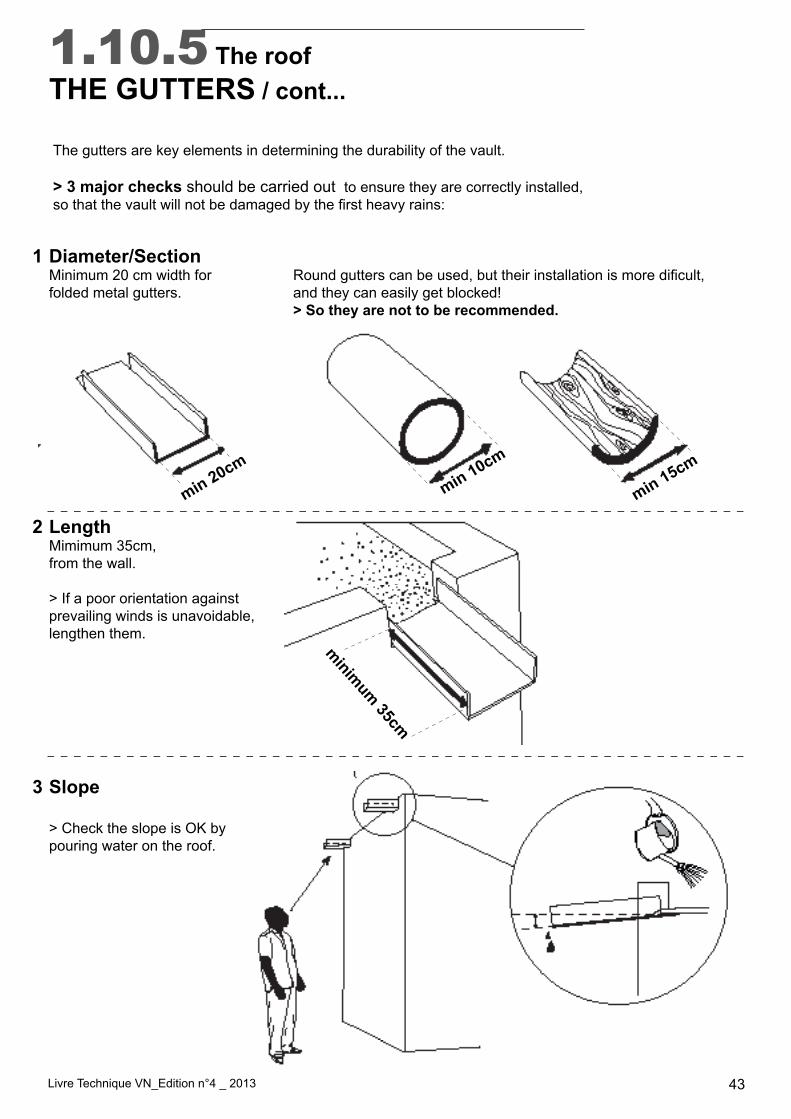
1.10.5 The roofTHE GUTTERS / cont...
The gutters are key elements in determining the durability of the vault.
> 3 major checks should be carried out to ensure they are correctly installed, sothatthevaultwillnotbedamagedbythefirstheavyrains:
Diameter/SectionMinimum 20 cm width forfolded metal gutters.
Roundgutterscanbeused,buttheirinstallationismoredificult,and they can easily get blocked!> So they are not to be recommended.
LengthMimimum 35cm, from the wall.
> If a poor orientation againstprevailing winds is unavoidable,lengthen them.
Slope
> Check the slope is OK bypouring water on the roof.
minimum 35cm
min 10cm
min 15cm
min 20cm
1
2
3
Livre Technique VN_Edition n°4 _ 2013 44
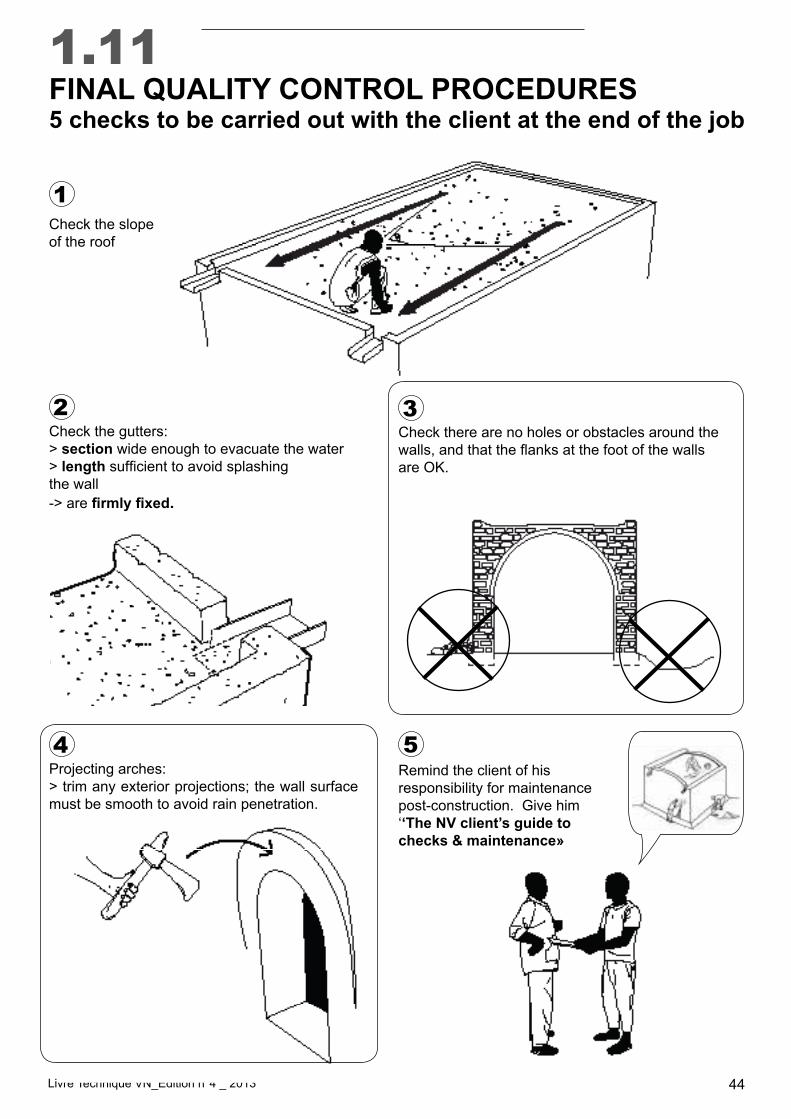
1.11FINAL QUALITY CONTROL PROCEDURES5 checks to be carried out with the client at the end of the job
Check the slope of the roof
Check the gutters:> section wide enough to evacuate the water > length sufficienttoavoidsplashingthe wall-> are firmly fixed.
Check there are no holes or obstacles around thewalls,andthattheflanksatthefootofthewallsare OK.
Remind the client of his responsibility for maintenance post-construction. Give him ‘‘The NV client’s guide to checks & maintenance»
1
2 3
4 5Projecting arches:> trim any exterior projections; the wall surface must be smooth to avoid rain penetration.
Livre Technique VN_Edition n°4 _ 2013 45
Part 2
TECHNIQUES FORSUPPLEMENTARY
STRUCTURAL WORKS
2.1 Big archways in gable walls 462.2 Reinforced footings 482.3 Mixed walls 492.4 Reinforced parapets & balustrades 2.4.1 Reinforced parapets (acroteria) 502.4.2 Reinforced balustrades 512.5 Rammed earth foundations 522.6 Two-storey buildings2.6.1 Types of two-storey buildings 532.6.2 Partitions in two-storey buildings 542.7 Roof ventilation 552.8 Staircases2.8.1 External staircases 562.8.2 Internalstaircases/oneflight 582.8.3 Internalstaircases/twoflights 592.9 Enlargement of a NV building2.9.1 Addition of a side vault 602.9.2 Addition of an upper storey 612.10 Excavationofthegroundfloor 62
Livre Technique VN_Edition n°4 _ 2013 46
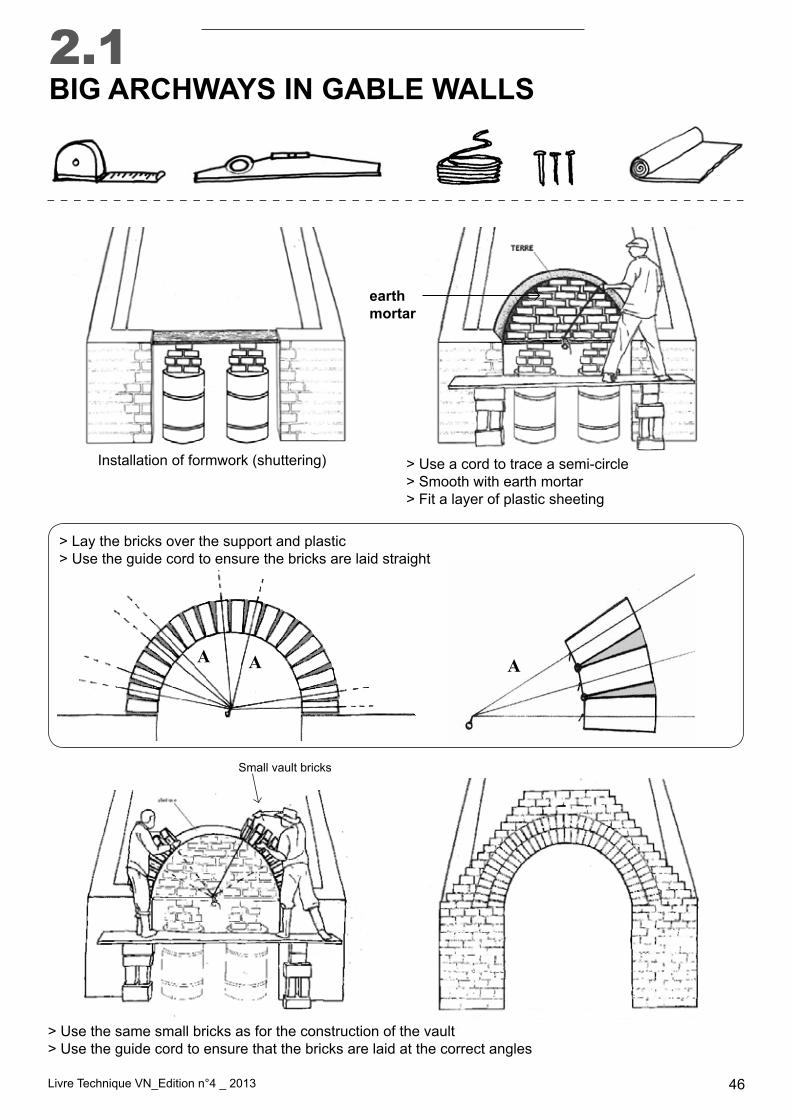
> Use a cord to trace a semi-circle > Smooth with earth mortar> Fit a layer of plastic sheeting
> Use the same small bricks as for the construction of the vault> Use the guide cord to ensure that the bricks are laid at the correct angles
Small vault bricks
2.1BIG ARCHWAYS IN GABLE WALLS
earth mortar
> Lay the bricks over the support and plastic> Use the guide cord to ensure the bricks are laid straight
AA A
Installation of formwork (shuttering)
Livre Technique VN_Edition n°4 _ 2013 47
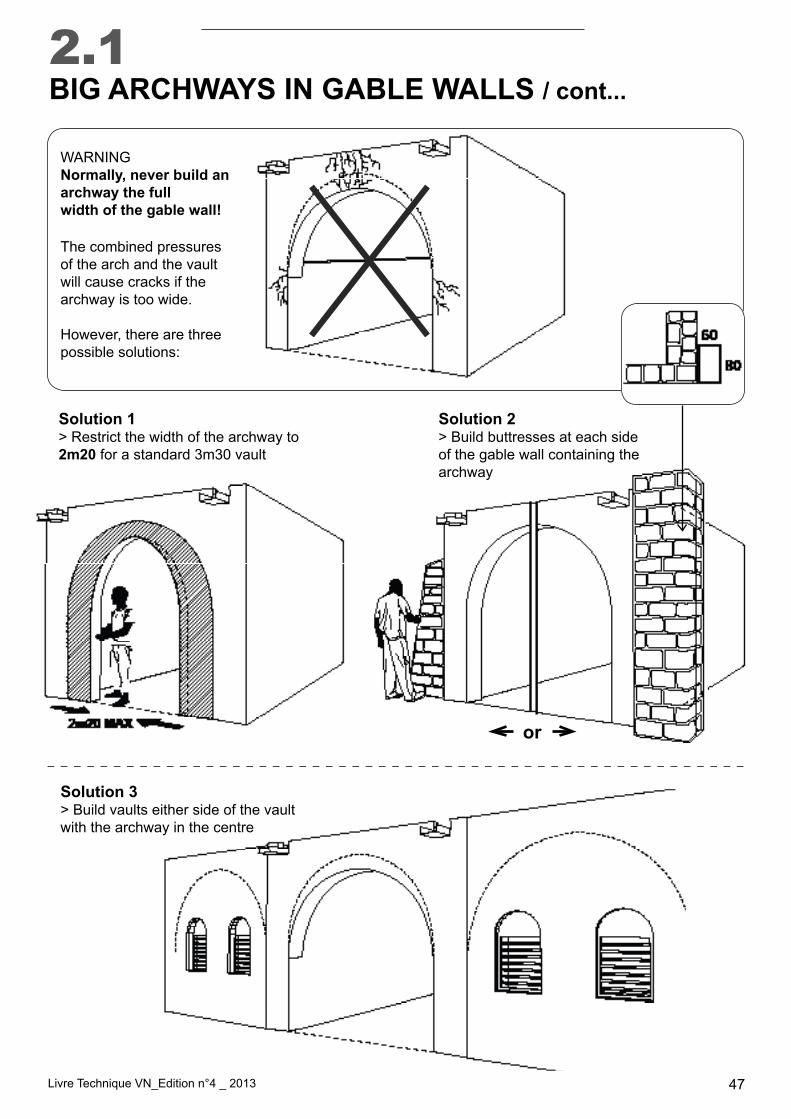
2.1BIG ARCHWAYS IN GABLE WALLS / cont...
WARNINGNormally, never build an archway the full width of the gable wall!
The combined pressures of the arch and the vault will cause cracks if the archway is too wide.
However, there are threepossible solutions:
Solution 1> Restrict the width of the archway to 2m20 for a standard 3m30 vault
Solution 2> Build buttresses at each side of the gable wall containing the archway
Solution 3> Build vaults either side of the vault with the archway in the centre
or
Livre Technique VN_Edition n°4 _ 2013 48
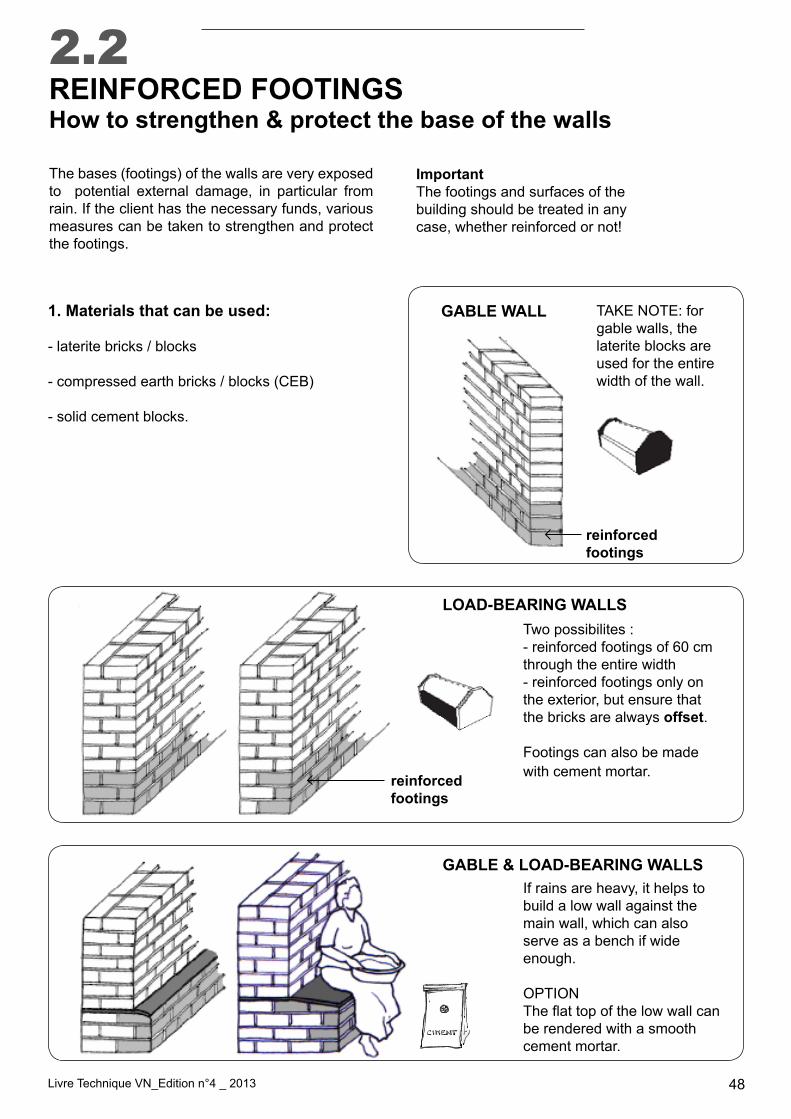
TAKE NOTE: for gable walls, the laterite blocks are used for the entire width of the wall.
GABLE WALL
Two possibilites :- reinforced footings of 60 cm through the entire width- reinforced footings only on the exterior, but ensure that the bricks are always offset.
Footings can also be made with cement mortar.
If rains are heavy, it helps tobuild a low wall against the main wall, which can also serve as a bench if wide enough.
OPTION Theflattopofthelowwallcanbe rendered with a smooth cement mortar.
GABLE & LOAD-BEARING WALLS
2.2REINFORCED FOOTINGSHow to strengthen & protect the base of the walls
reinforced footings
reinforcedfootings
LOAD-BEARING WALLS
1. Materials that can be used:
- laterite bricks / blocks
- compressed earth bricks / blocks (CEB)
- solid cement blocks.
The bases (footings) of the walls are very exposed to potential external damage, in particular from rain. If the client has the necessary funds, various measures can be taken to strengthen and protect the footings.
ImportantThe footings and surfaces of the building should be treated in any case, whether reinforced or not!
Livre Technique VN_Edition n°4 _ 2013 49
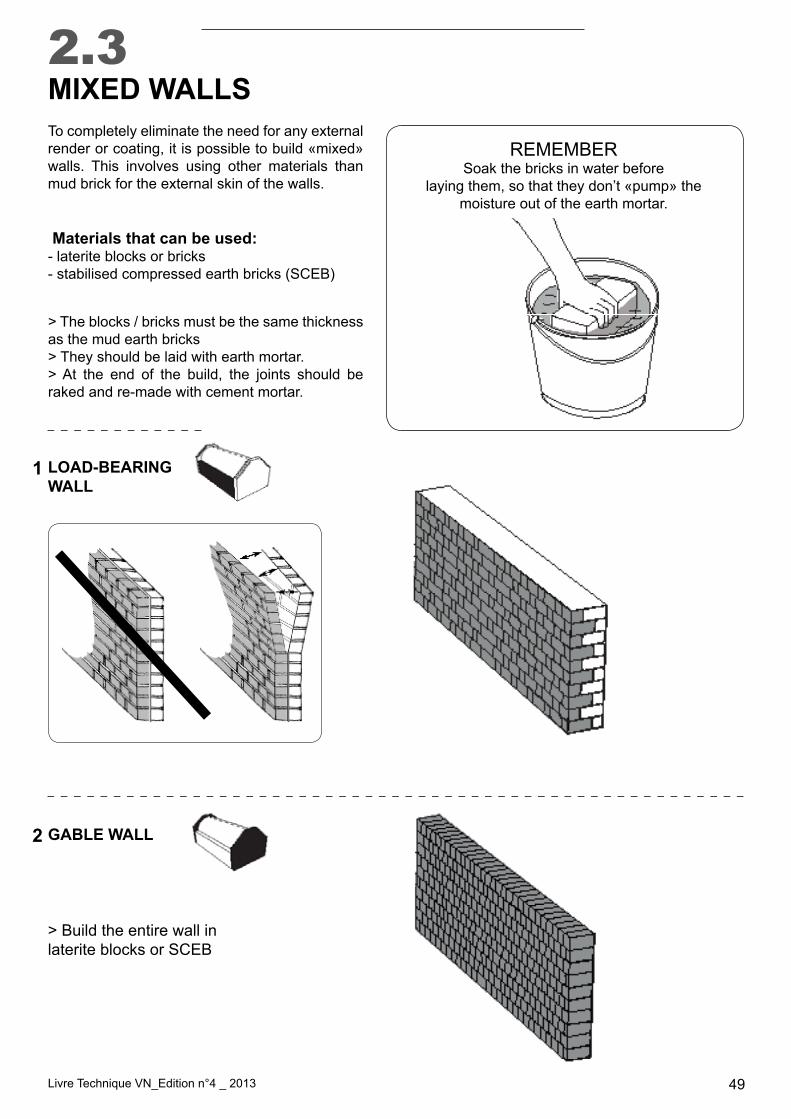
2.3MIXED WALLSTo completely eliminate the need for any external render or coating, it is possible to build «mixed» walls. This involves using other materials than mud brick for the external skin of the walls.
Materials that can be used:- laterite blocks or bricks - stabilised compressed earth bricks (SCEB)
> The blocks / bricks must be the same thickness as the mud earth bricks> They should be laid with earth mortar.> At the end of the build, the joints should be raked and re-made with cement mortar.
LOAD-BEARINGWALL
GABLE WALL
> Build the entire wall in laterite blocks or SCEB
1
2
REMEMBERSoak the bricks in water before
laying them, so that they don’t «pump» themoisture out of the earth mortar.
Livre Technique VN_Edition n°4 _ 2013 50
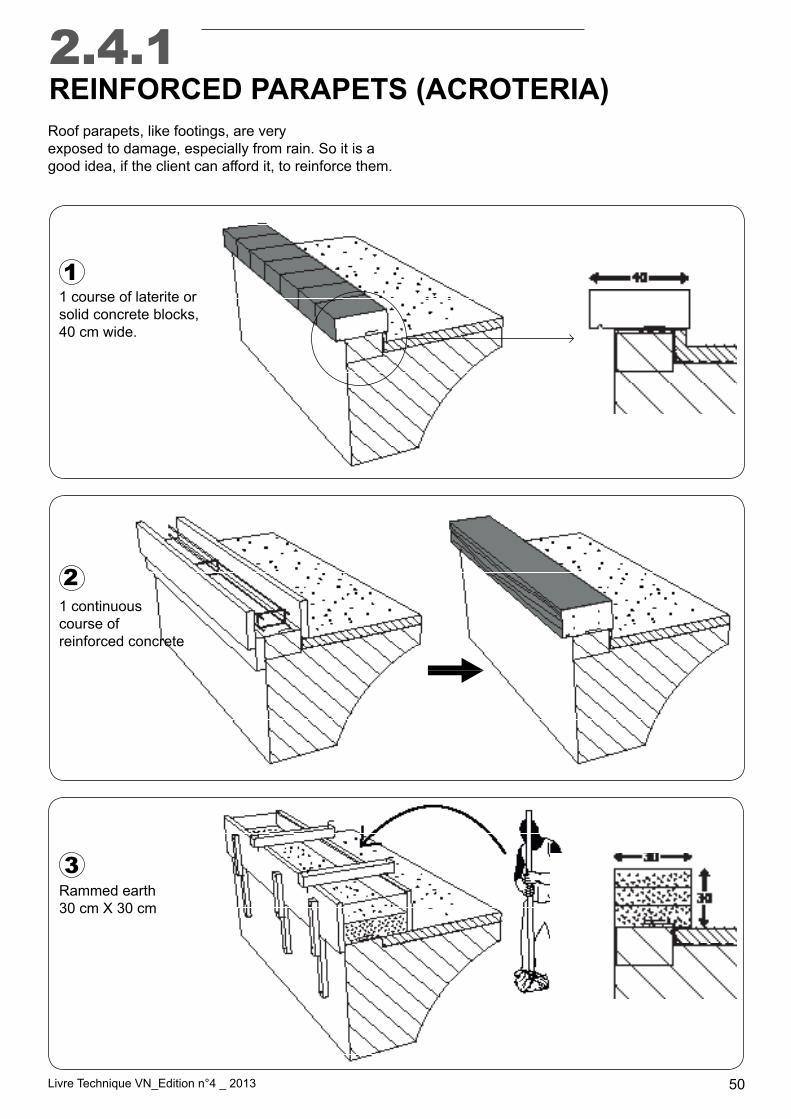
2.4.1REINFORCED PARAPETS (ACROTERIA)Roof parapets, like footings, are veryexposed to damage, especially from rain. So it is a good idea, if the client can afford it, to reinforce them.
1
2
3
1 course of laterite or solid concrete blocks, 40 cm wide.
Rammed earth30 cm X 30 cm
1 continuouscourse of reinforced concrete
Livre Technique VN_Edition n°4 _ 2013 51
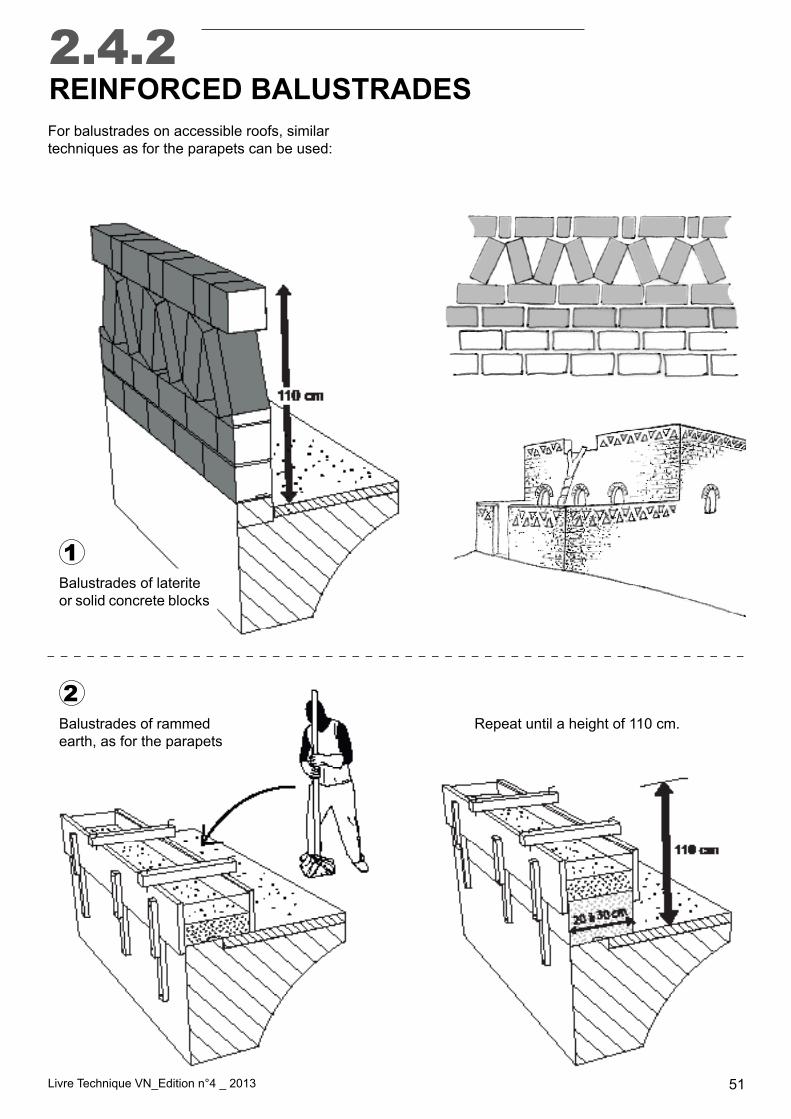
2.4.2REINFORCED BALUSTRADESFor balustrades on accessible roofs, similartechniques as for the parapets can be used:
1
2
Balustrades of lateriteor solid concrete blocks
Balustrades of rammedearth, as for the parapets
Repeat until a height of 110 cm.
Livre Technique VN_Edition n°4 _ 2013 52
2.5RAMMED EARTH FOUNDATIONSBuilding rammed earth foundations requires specialist skills. NV masons who want to master the technique need to learn it thoroughly!
When to use rammed earth for foundations? Only when there is no available source of rocks.
Livre Technique VN_Edition n°4 _ 2013 53
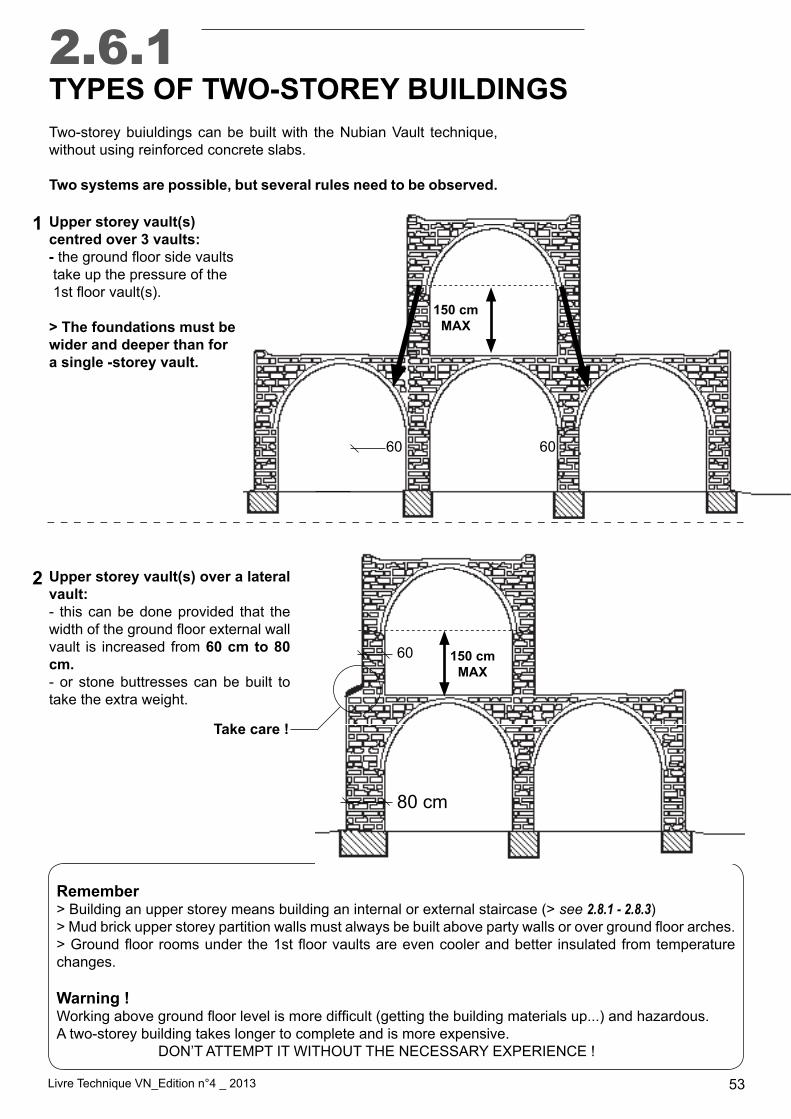
2.6.1TYPES OF TWO-STOREY BUILDINGSTwo-storey buiuldings can be built with the Nubian Vault technique, without using reinforced concrete slabs.
Two systems are possible, but several rules need to be observed.
Upper storey vault(s) centred over 3 vaults: - thegroundfloorsidevaults take up the pressure of the1stfloorvault(s).
> The foundations must be wider and deeper than fora single -storey vault.
Upper storey vault(s) over a lateral vault:- this can be done provided that the widthofthegroundfloorexternalwallvault is increased from 60 cm to 80 cm. - or stone buttresses can be built to take the extra weight.
Remember> Building an upper storey means building an internal or external staircase (> see 2.8.1 - 2.8.3)>Mudbrickupperstoreypartitionwallsmustalwaysbebuiltabovepartywallsorovergroundfloorarches.>Groundfloorroomsunderthe1stfloorvaultsareevencoolerandbetter insulatedfromtemperaturechanges.
Warning ! Workingabovegroundfloorlevelismoredifficult(gettingthebuildingmaterialsup...)andhazardous.A two-storey building takes longer to complete and is more expensive. DON’T ATTEMPT IT WITHOUT THE NECESSARY EXPERIENCE !
1
2
60
6060
80 cm
150 cm MAX
150 cm MAX
Take care !
Livre Technique VN_Edition n°4 _ 2013 54
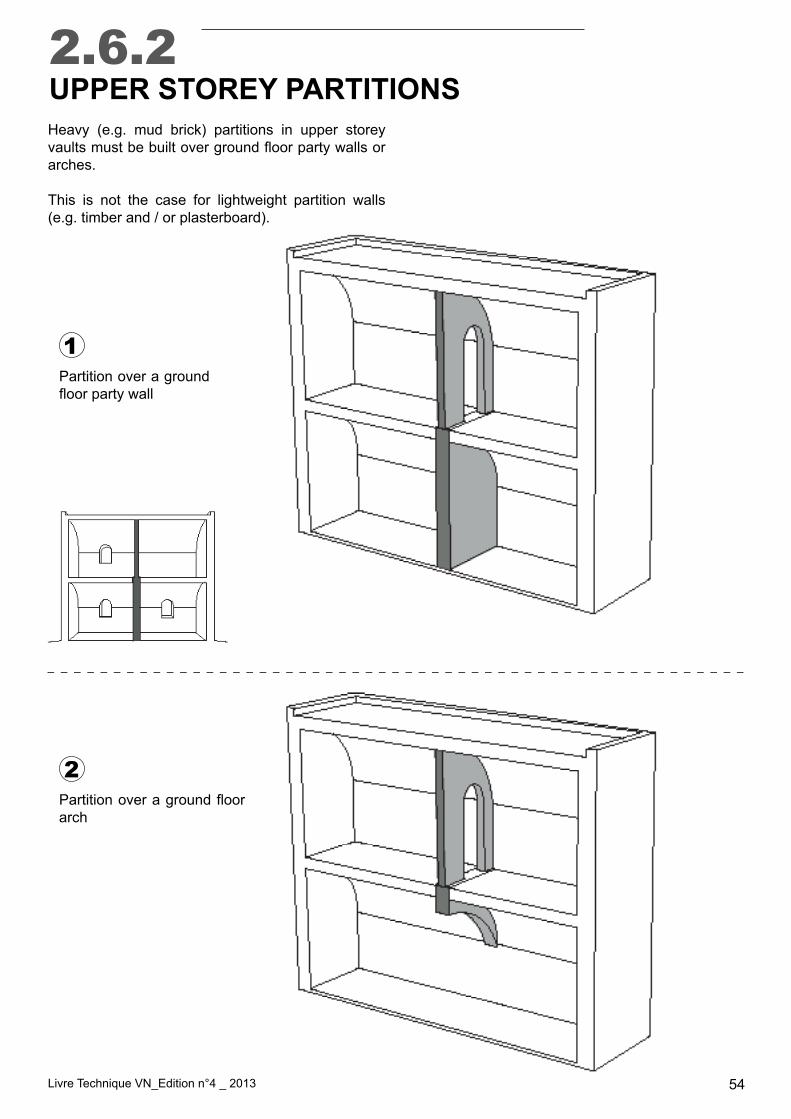
2.6.2UPPER STOREY PARTITIONSHeavy (e.g. mud brick) partitions in upper storey vaultsmustbebuiltovergroundfloorpartywallsorarches.
This is not the case for lightweight partition walls (e.g. timber and / or plasterboard).
1
2
Partition over a ground floorpartywall
Partitionoveragroundfloorarch
Livre Technique VN_Edition n°4 _ 2013 55
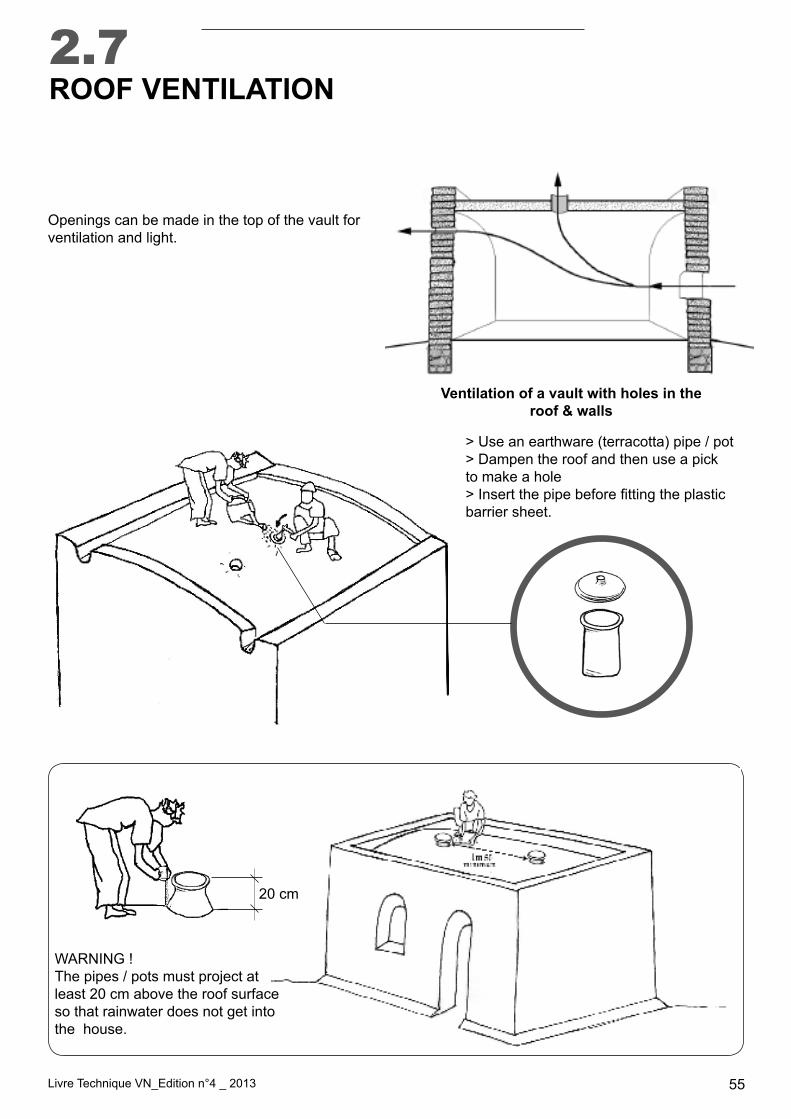
Openings can be made in the top of the vault for ventilation and light.
Ventilation of a vault with holes in theroof & walls
> Use an earthware (terracotta) pipe / pot> Dampen the roof and then use a pickto make a hole>Insertthepipebeforefittingtheplasticbarrier sheet.
WARNING !The pipes / pots must project at least 20 cm above the roof surface so that rainwater does not get into the house.
2.7ROOF VENTILATION
20 cm
Livre Technique VN_Edition n°4 _ 2013 56
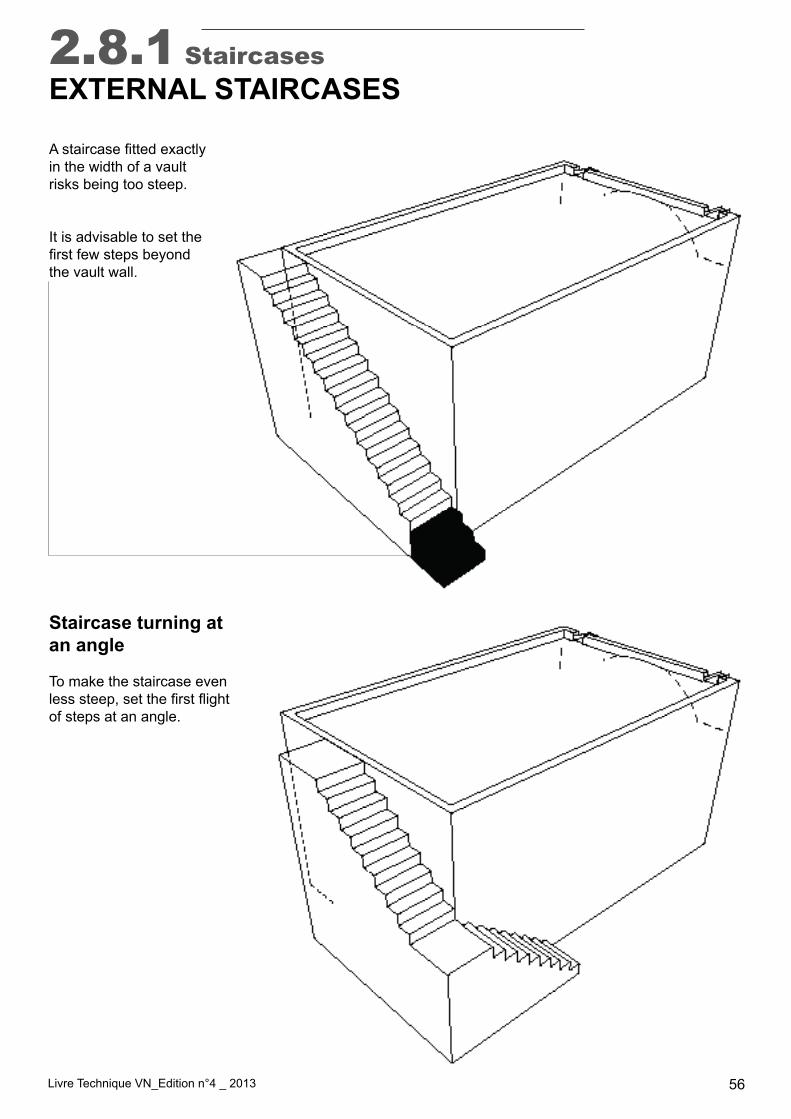
2.8.1 StaircasesEXTERNAL STAIRCASES
Astaircasefittedexactlyin the width of a vault risks being too steep.
It is advisable to set thefirstfewstepsbeyondthe vault wall.
Staircase turning at an angle
To make the staircase even lesssteep,setthefirstflightof steps at an angle.
Livre Technique VN_Edition n°4 _ 2013 57
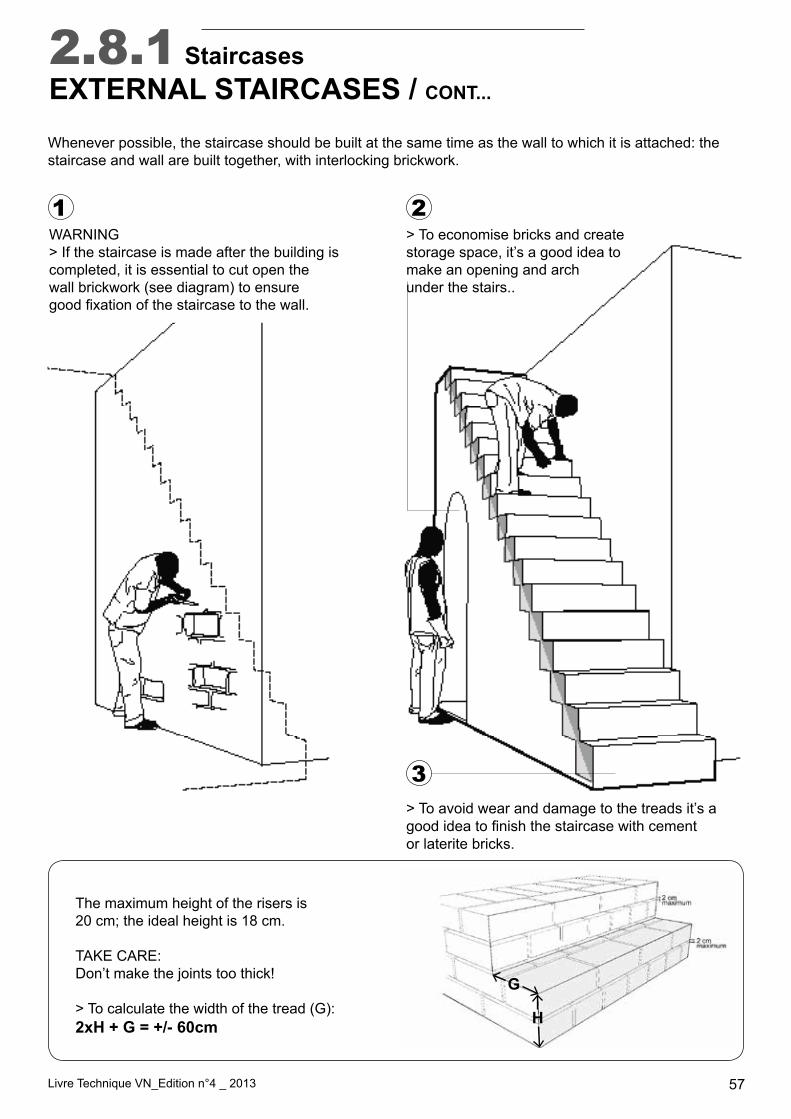
The maximum height of the risers is20 cm; the ideal height is 18 cm.
TAKE CARE: Don’t make the joints too thick!
> To calculate the width of the tread (G):2xH + G = +/- 60cm
WARNING> If the staircase is made after the building iscompleted, it is essential to cut open thewall brickwork (see diagram) to ensuregoodfixationofthestaircasetothewall.
> To economise bricks and createstorage space, it’s a good idea tomake an opening and archunder the stairs..
> To avoid wear and damage to the treads it’s a goodideatofinishthestaircasewithcementor laterite bricks.
G
H
2.8.1 StaircasesEXTERNAL STAIRCASES / CONT...
Whenever possible, the staircase should be built at the same time as the wall to which it is attached: the staircase and wall are built together, with interlocking brickwork.
1 2
3
Livre Technique VN_Edition n°4 _ 2013 58
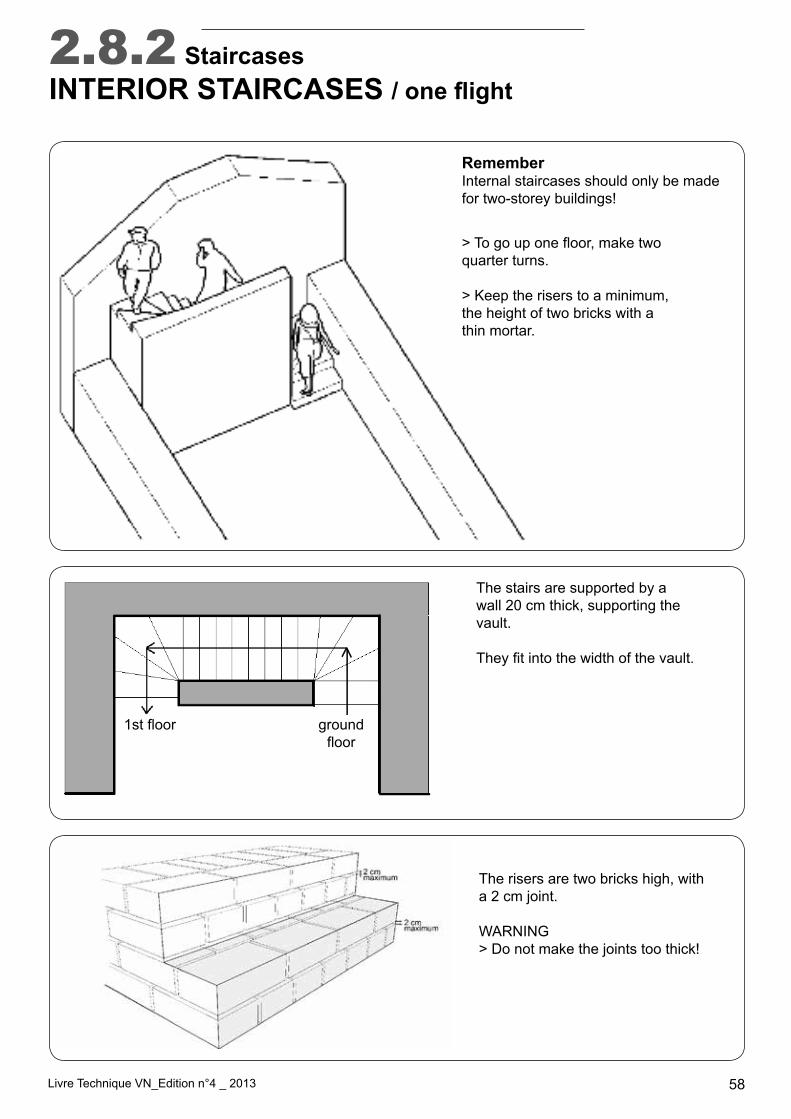
2.8.2 StaircasesINTERIOR STAIRCASES / one flight
>Togouponefloor,maketwoquarter turns.
> Keep the risers to a minimum,the height of two bricks with athin mortar.
The stairs are supported by a wall 20 cm thick, supporting thevault.
Theyfitintothewidthofthevault.
The risers are two bricks high, witha 2 cm joint.
WARNING > Do not make the joints too thick!
RememberInternal staircases should only be madefor two-storey buildings!
groundfloor
1stfloor
Livre Technique VN_Edition n°4 _ 2013 59
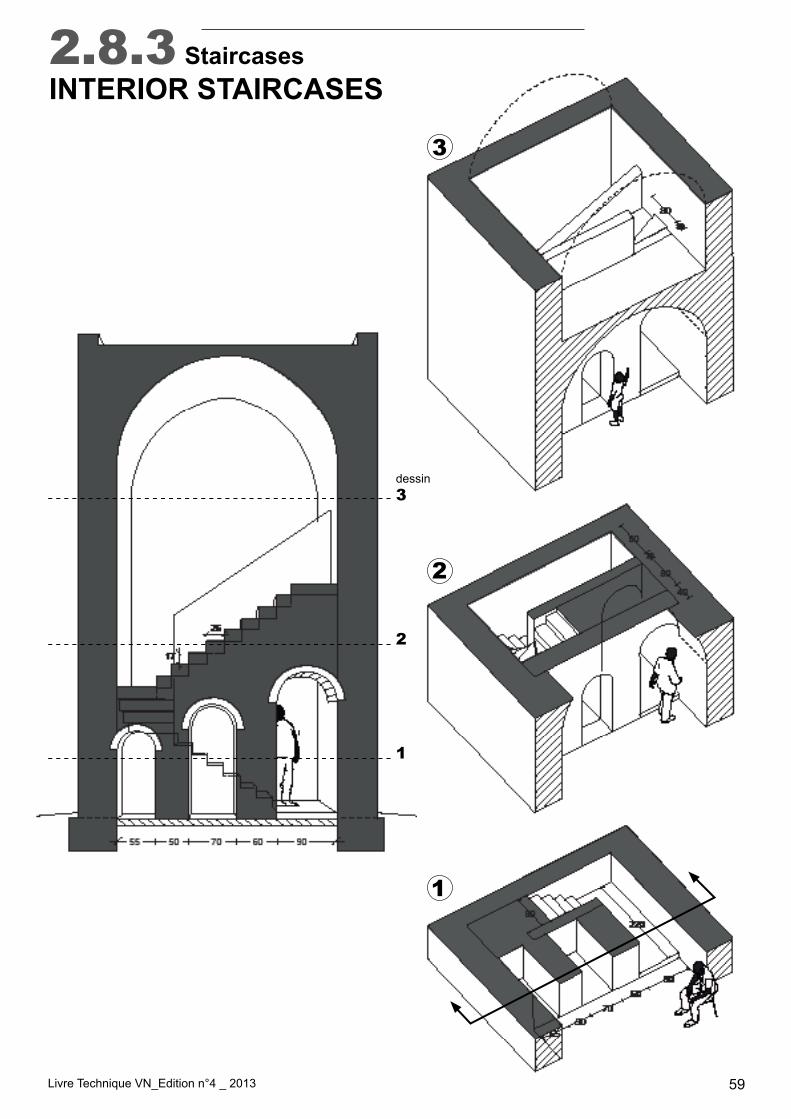
2.8.3 StaircasesINTERIOR STAIRCASES / two flights
1
2
3
1
2
3dessin
Livre Technique VN_Edition n°4 _ 2013 60
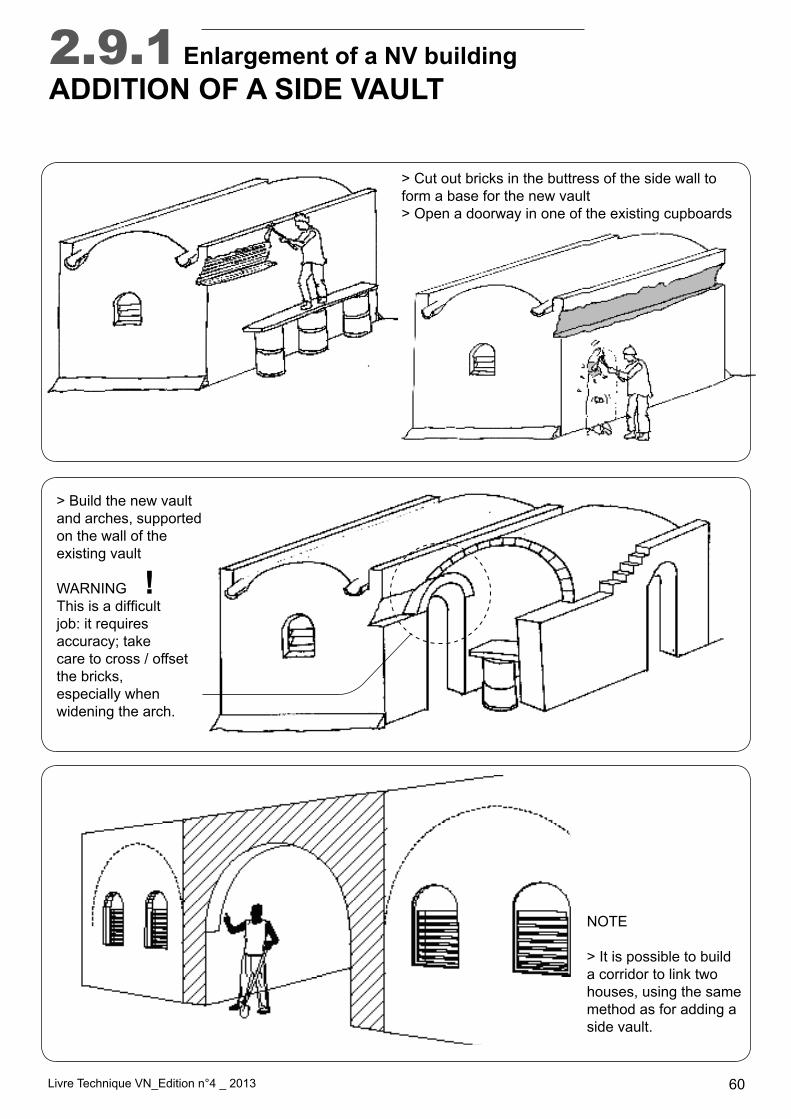
> Cut out bricks in the buttress of the side wall toform a base for the new vault> Open a doorway in one of the existing cupboards
> Build the new vaultand arches, supportedon the wall of theexisting vault
WARNINGThisisadifficultjob: it requiresaccuracy; takecare to cross / offset the bricks, especially when widening the arch.
NOTE
> It is possible to build a corridor to link two houses, using the same method as for adding a side vault.
2.9.1 Enlargement of a NV buildingADDITION OF A SIDE VAULT
!
Livre Technique VN_Edition n°4 _ 2013 61
2.9.2 Enlargement of a NV buildingADDITION OF A SECOND STOREY
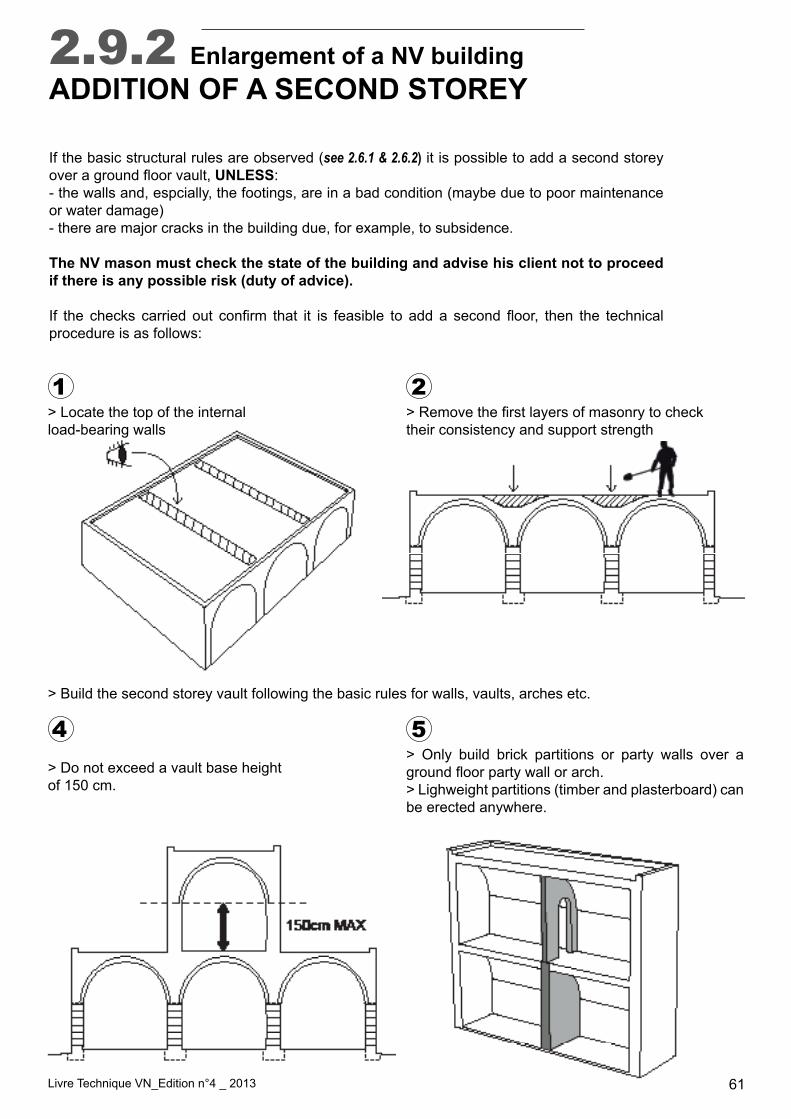
If the basic structural rules are observed (see 2.6.1 & 2.6.2) it is possible to add a second storey overagroundfloorvault,UNLESS: - the walls and, espcially, the footings, are in a bad condition (maybe due to poor maintenance or water damage)- there are major cracks in the building due, for example, to subsidence.
The NV mason must check the state of the building and advise his client not to proceed if there is any possible risk (duty of advice).
If the checks carried out confirm that it is feasible to adda second floor, then the technicalprocedure is as follows:
1
4
2
5
> Locate the top of the internal load-bearing walls
> Build the second storey vault following the basic rules for walls, vaults, arches etc.
> Do not exceed a vault base height of 150 cm.
>Removethefirstlayersofmasonrytochecktheir consistency and support strength
> Only build brick partitions or party walls over a groundfloorpartywallorarch.> Lighweight partitions (timber and plasterboard) can be erected anywhere.
Livre Technique VN_Edition n°4 _ 2013 62
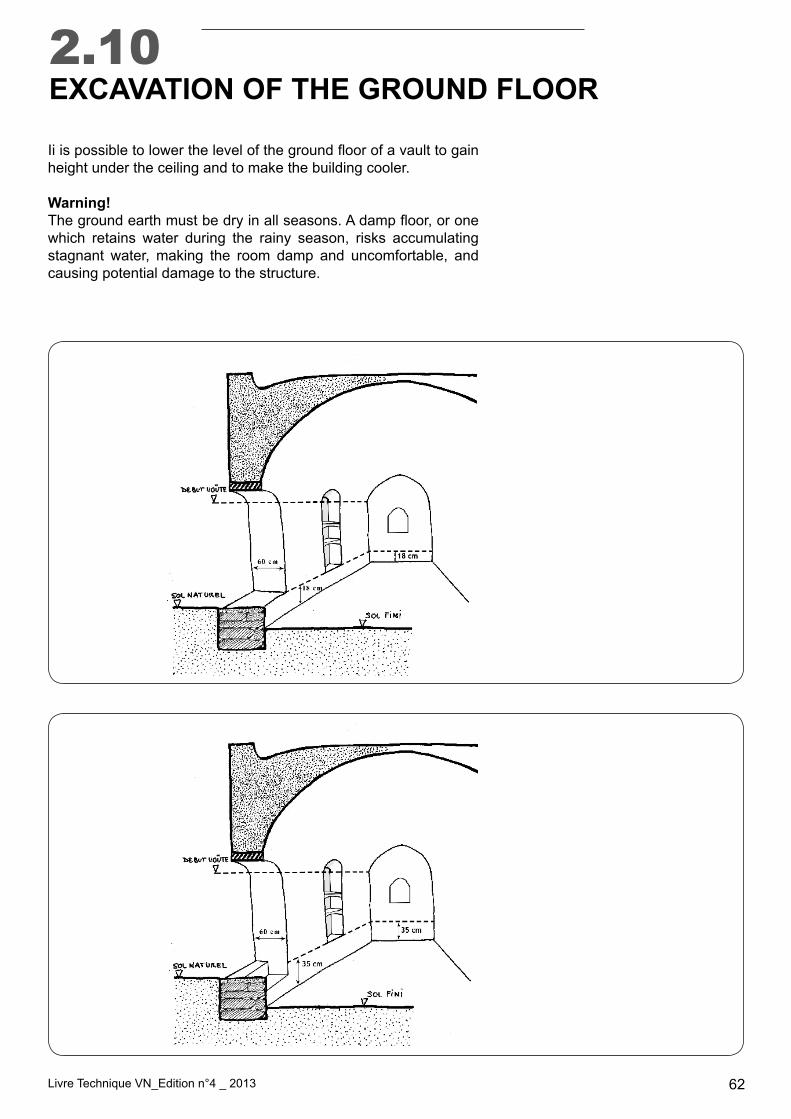
Iiispossibletolowerthelevelofthegroundfloorofavaulttogainheight under the ceiling and to make the building cooler.
Warning! Thegroundearthmustbedryinallseasons.Adampfloor,oronewhich retains water during the rainy season, risks accumulating stagnant water, making the room damp and uncomfortable, and causing potential damage to the structure.
2.10EXCAVATION OF THE GROUND FLOOR
Livre Technique VN_Edition n°4 _ 2013 63
Part 3
TECHNIQUESFOR
SECONDARY WORKS
3.1 Doors & windows3.2 Electrical work 3.2.1 Installation of wiring 3.2.2 Installation of celing fans3.3 Plumbing 67
64
6566
Livre Technique VN_Edition n°4 _ 2013 64
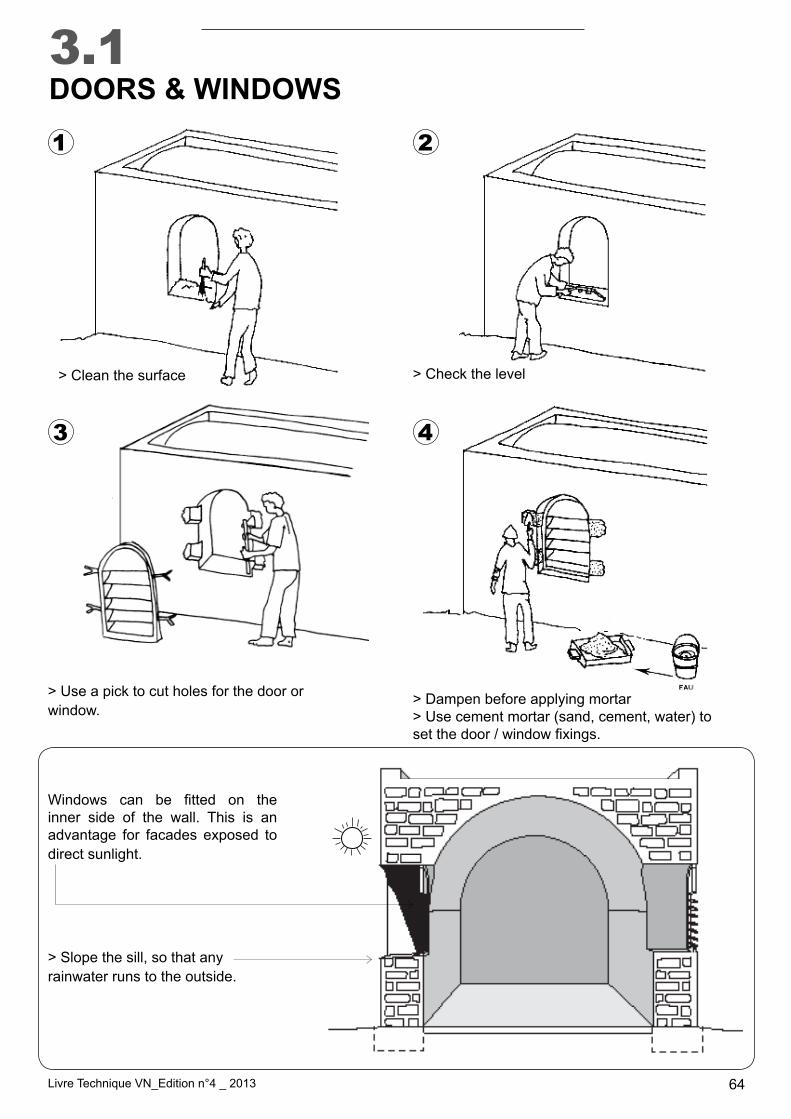
> Use a pick to cut holes for the door orwindow.
> Dampen before applying mortar> Use cement mortar (sand, cement, water) tosetthedoor/windowfixings.
> Clean the surface > Check the level
3.1DOORS & WINDOWS
1
3
2
4
Windows can be fitted on theinner side of the wall. This is an advantage for facades exposed to direct sunlight.
> Slope the sill, so that any rainwater runs to the outside.
Livre Technique VN_Edition n°4 _ 2013 65
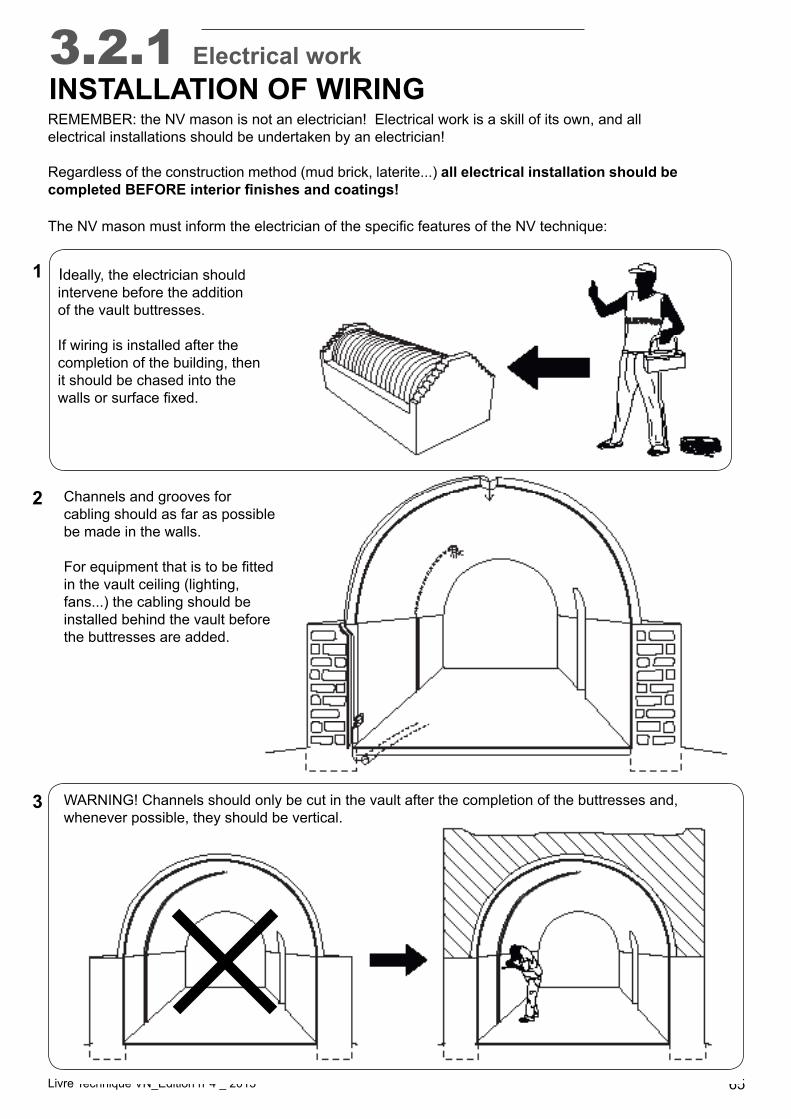
3.2.1 Electrical workINSTALLATION OF WIRING REMEMBER: the NV mason is not an electrician! Electrical work is a skill of its own, and all electrical installations should be undertaken by an electrician!
Regardless of the construction method (mud brick, laterite...) all electrical installation should be completed BEFORE interior finishes and coatings!
TheNVmasonmustinformtheelectricianofthespecificfeaturesoftheNVtechnique:
Ideally, the electrician should intervene before the addition of the vault buttresses.
If wiring is installed after the completion of the building, then it should be chased into thewallsorsurfacefixed.
1
2
3
Channels and grooves for cabling should as far as possible be made in the walls.
Forequipmentthatistobefittedin the vault ceiling (lighting, fans...) the cabling should be installed behind the vault before the buttresses are added.
WARNING! Channels should only be cut in the vault after the completion of the buttresses and, whenever possible, they should be vertical.
Livre Technique VN_Edition n°4 _ 2013 66
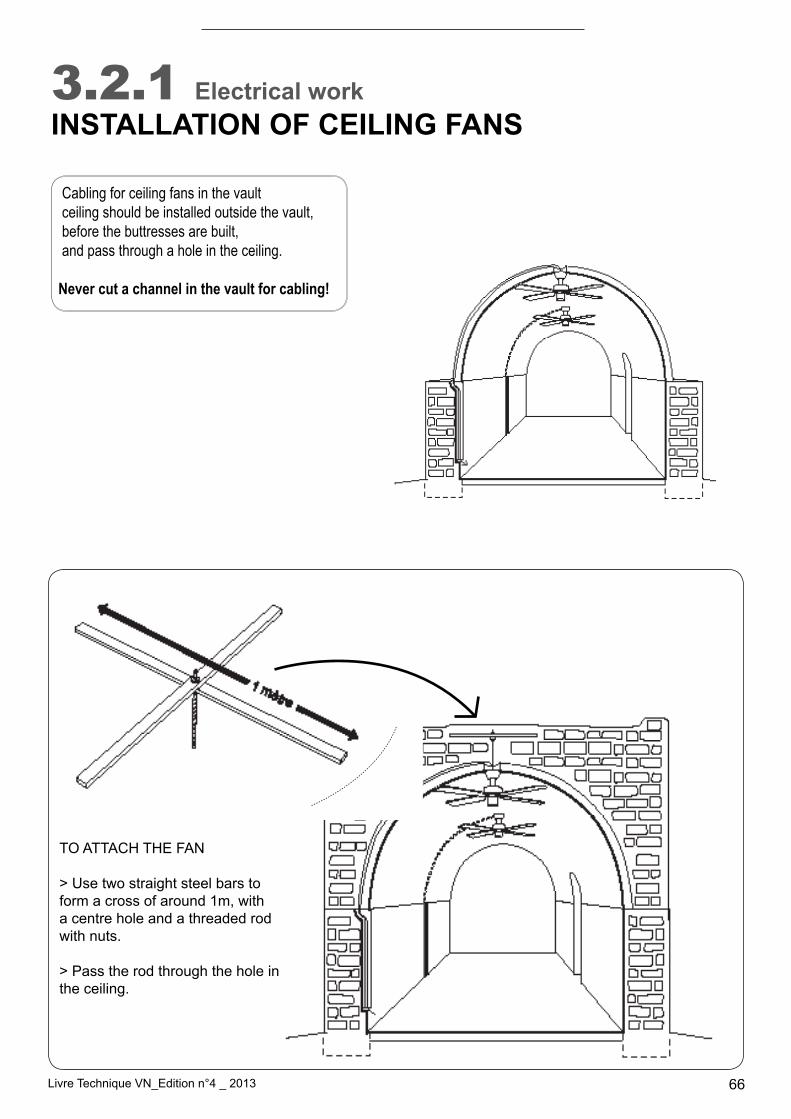
Cabling for ceiling fans in the vault ceiling should be installed outside the vault, before the buttresses are built, and pass through a hole in the ceiling.
Never cut a channel in the vault for cabling!
TO ATTACH THE FAN
> Use two straight steel bars to form a cross of around 1m, with a centre hole and a threaded rod with nuts.
> Pass the rod through the hole in the ceiling.
3.2.1 Electrical workINSTALLATION OF CEILING FANS
Livre Technique VN_Edition n°4 _ 2013 67
3.3PLUMBING
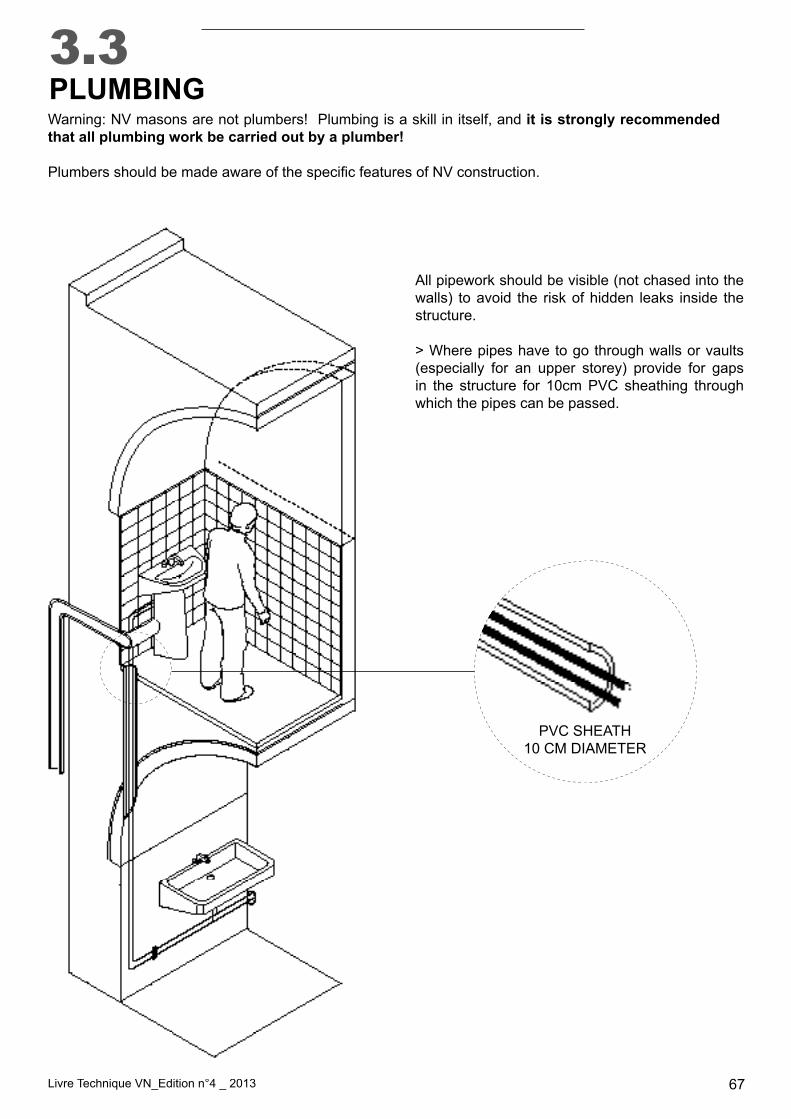
All pipework should be visible (not chased into the walls) to avoid the risk of hidden leaks inside the structure.
> Where pipes have to go through walls or vaults (especially for an upper storey) provide for gaps in the structure for 10cm PVC sheathing through which the pipes can be passed.
Warning: NV masons are not plumbers! Plumbing is a skill in itself, and it is strongly recommended that all plumbing work be carried out by a plumber!
PlumbersshouldbemadeawareofthespecificfeaturesofNVconstruction.
PVC SHEATH10 CM DIAMETER
Livre Technique VN_Edition n°4 _ 2013 68
Part 4
BASIC FINISHING TECHNIQUES
4.1 External coatings4.1.1 Making traditional earth coatings4.1.2 Application of a traditional coating4.2 Internal coatings4.2.1 Fine earth coating4.2.2 Cement+fineearth4.2.3 Lime wash and paint
6970
717274
Livre du Maçon VN_Edition n°3 _ 2012 69
4.1.1 External coatingsMAKING TRADITIONAL EARTH COATINGS
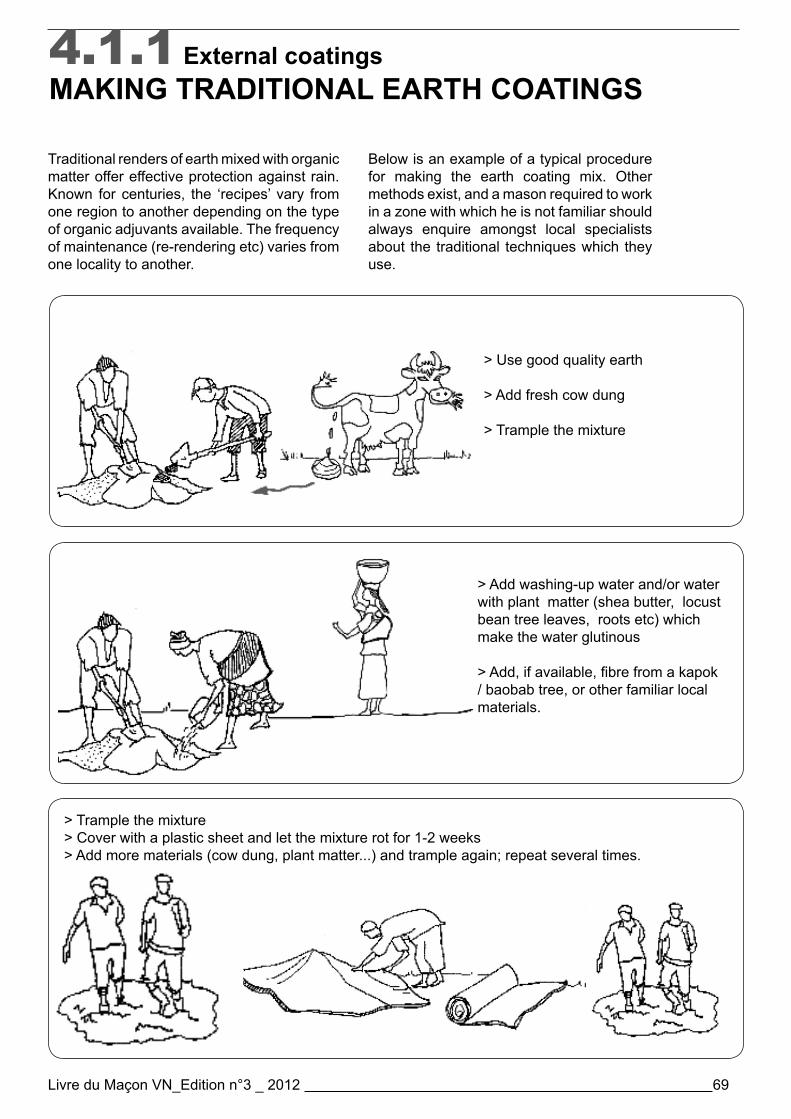
> Use good quality earth
> Add fresh cow dung
> Trample the mixture
> Add washing-up water and/or water with plant matter (shea butter, locust bean tree leaves, roots etc) which make the water glutinous
>Add,ifavailable,fibrefromakapok/ baobab tree, or other familiar local materials.
> Trample the mixture> Cover with a plastic sheet and let the mixture rot for 1-2 weeks > Add more materials (cow dung, plant matter...) and trample again; repeat several times.
Traditional renders of earth mixed with organic matter offer effective protection against rain. Known for centuries, the ‘recipes’ vary from one region to another depending on the type of organic adjuvants available. The frequency of maintenance (re-rendering etc) varies from one locality to another.
Below is an example of a typical procedure for making the earth coating mix. Other methods exist, and a mason required to work in a zone with which he is not familiar should always enquire amongst local specialists about the traditional techniques which they use.
Livre Technique VN_Edition n°4 _ 2013 70
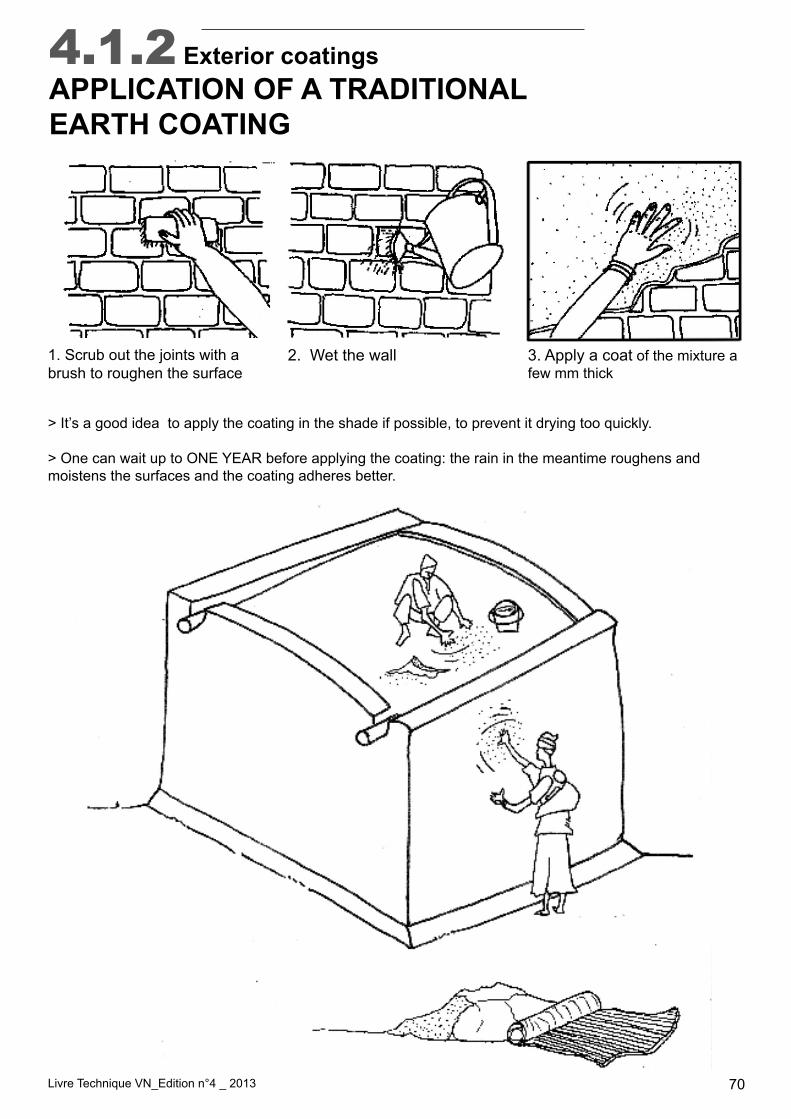
4.1.2 Exterior coatingsAPPLICATION OF A TRADITIONAL EARTH COATING
> It’s a good idea to apply the coating in the shade if possible, to prevent it drying too quickly.
> One can wait up to ONE YEAR before applying the coating: the rain in the meantime roughens and moistens the surfaces and the coating adheres better.
1. Scrub out the joints with a brush to roughen the surface
2. Wet the wall 3. Apply a coat of the mixture a few mm thick
Livre Technique VN_Edition n°4 _ 2013 71
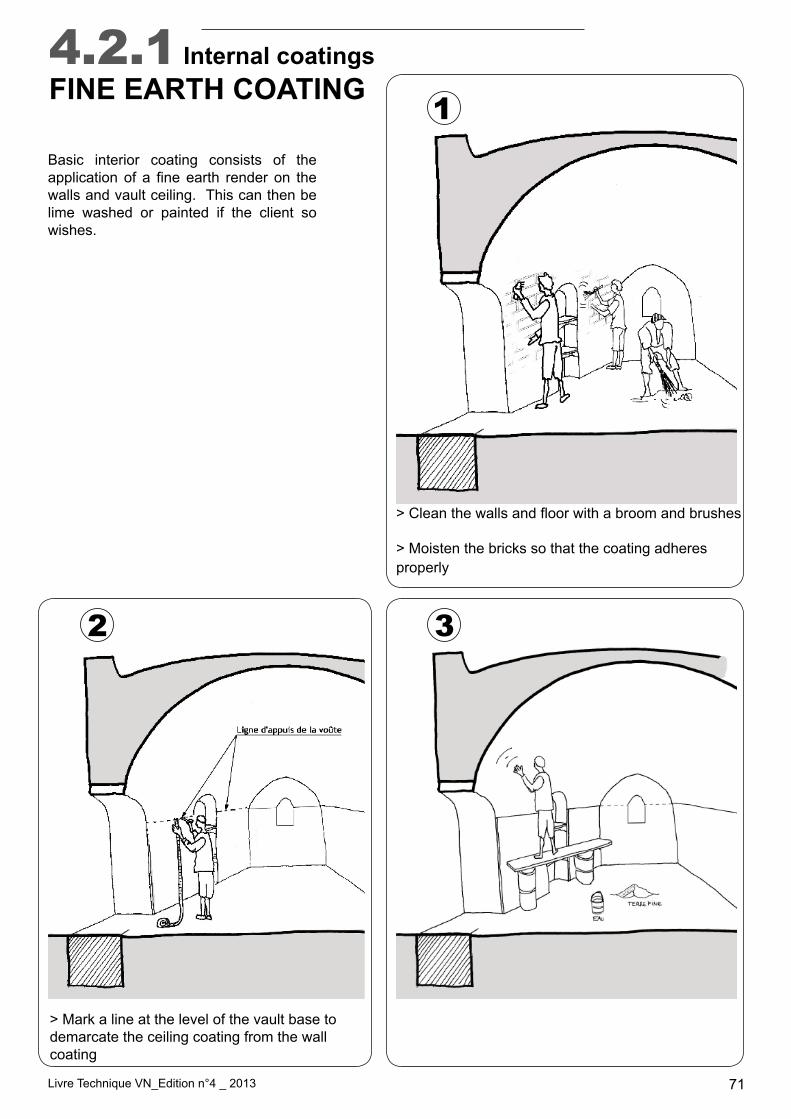
>Cleanthewallsandfloorwithabroomandbrushes
> Moisten the bricks so that the coating adheres properly
> Mark a line at the level of the vault base to demarcate the ceiling coating from the wall coating
4.2.1 Internal coatingsFINE EARTH COATING
Basic interior coating consists of the applicationof a fineearth render on thewalls and vault ceiling. This can then be lime washed or painted if the client so wishes.
1
32
Livre Technique VN_Edition n°4 _ 2013 72
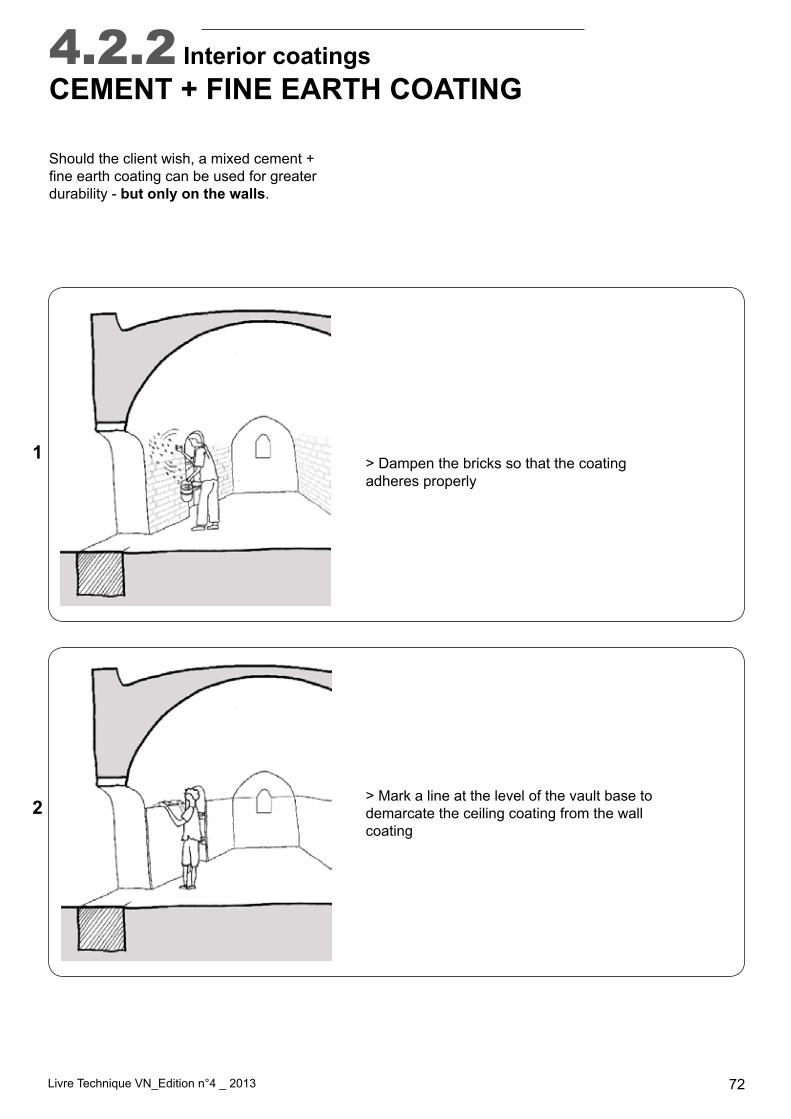
4.2.2 Interior coatingsCEMENT + FINE EARTH COATING
> Dampen the bricks so that the coating adheres properly
> Mark a line at the level of the vault base to demarcate the ceiling coating from the wall coating
Should the client wish, a mixed cement + fineearthcoatingcanbeusedforgreaterdurability - but only on the walls.
1
2
Livre Technique VN_Edition n°4 _ 2013 73
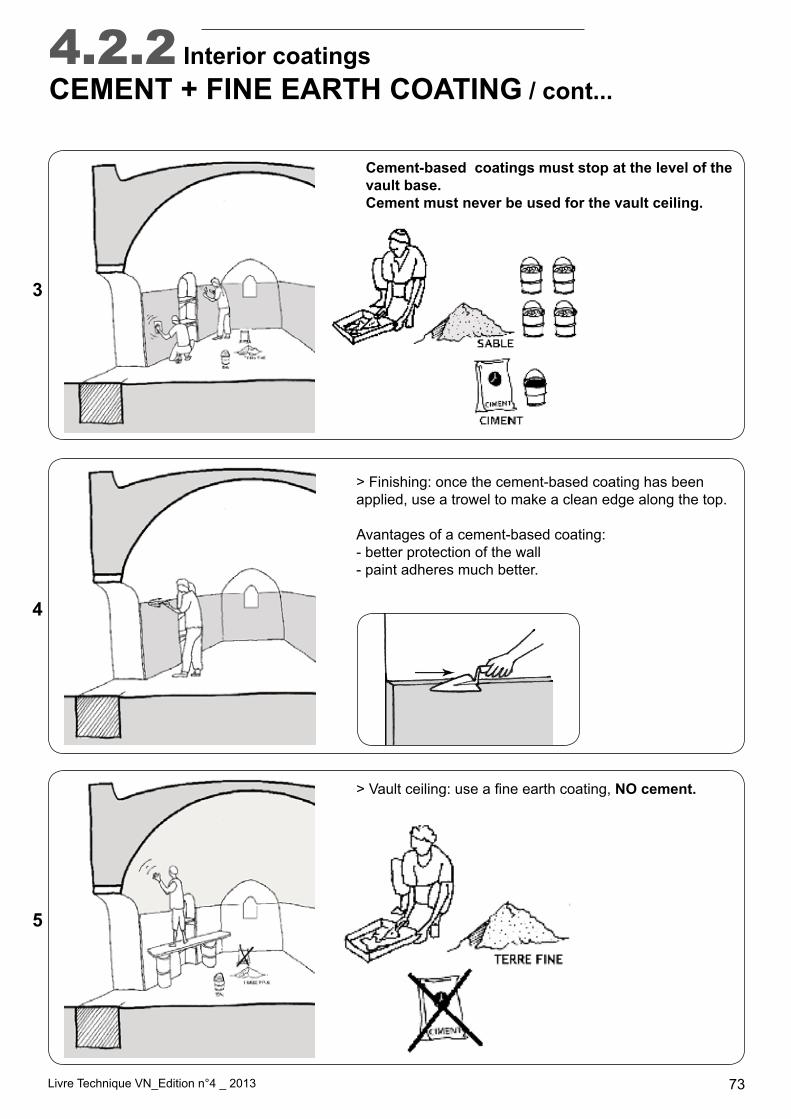
4.2.2 Interior coatingsCEMENT + FINE EARTH COATING / cont...
Cement-based coatings must stop at the level of the vault base.Cement must never be used for the vault ceiling.
> Finishing: once the cement-based coating has been applied, use a trowel to make a clean edge along the top.
Avantages of a cement-based coating:- better protection of the wall- paint adheres much better.
>Vaultceiling:useafineearthcoating,NO cement.
3
4
5
Livre Technique VN_Edition n°4 _ 2013 74
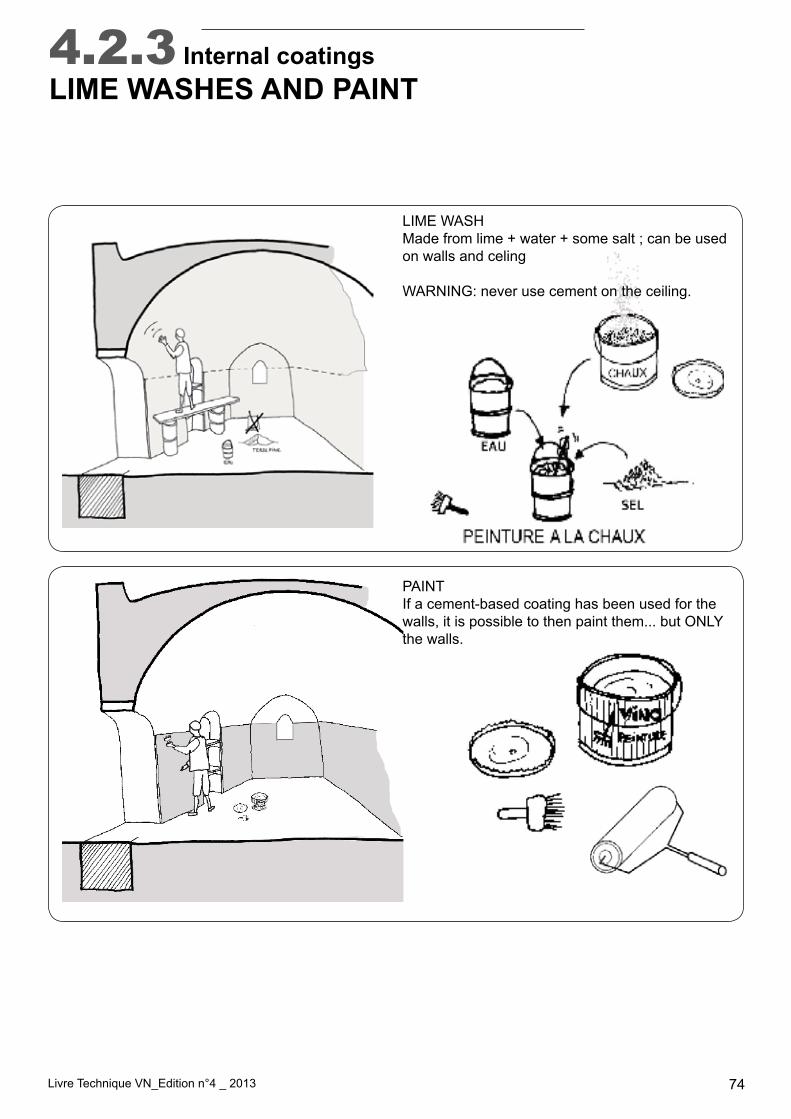
LIME WASHMade from lime + water + some salt ; can be used on walls and celing
WARNING: never use cement on the ceiling.
PAINT If a cement-based coating has been used for the walls, it is possible to then paint them... but ONLY the walls.
4.2.3 Internal coatingsLIME WASHES AND PAINT
Livre Technique VN_Edition n°4 _ 2013 75
Part 5
ADDITIONAL FINISHINGTECHNIQUES
5.1 Exterior coatings5.1.1 Tar-based coatings for walls5.1.2 Tar-based coatings for roofs5.1.3 Cement coating for walls
767778
Livre Technique VN_Edition n°4 _ 2013 76
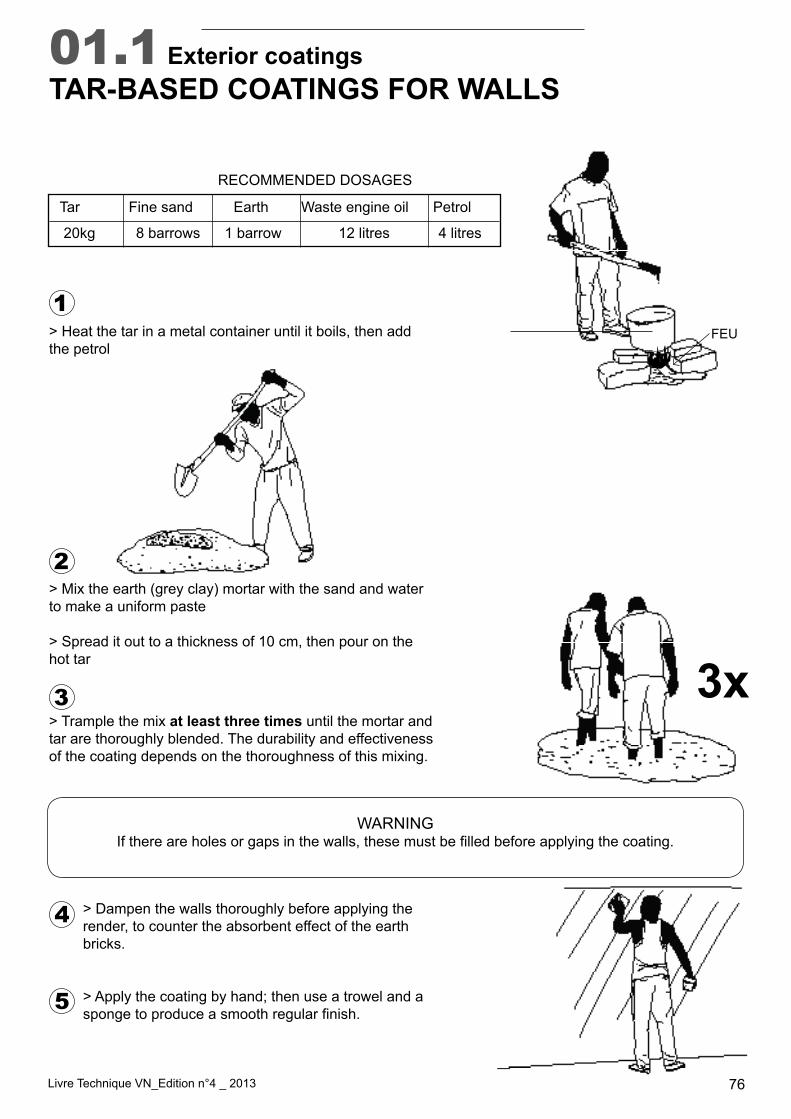
01.1 Exterior coatingsTAR-BASED COATINGS FOR WALLS
3x
> Heat the tar in a metal container until it boils, then addthe petrol
RECOMMENDED DOSAGES
1
2
3
4
5
> Dampen the walls thoroughly before applying therender, to counter the absorbent effect of the earth bricks.
> Apply the coating by hand; then use a trowel and a spongetoproduceasmoothregularfinish.
> Mix the earth (grey clay) mortar with the sand and waterto make a uniform paste
> Spread it out to a thickness of 10 cm, then pour on thehot tar
> Trample the mix at least three times until the mortar and tar are thoroughly blended. The durability and effectiveness of the coating depends on the thoroughness of this mixing.
WARNINGIfthereareholesorgapsinthewalls,thesemustbefilledbeforeapplyingthecoating.
Tar Fine sand Earth Waste engine oil Petrol 20kg 8 barrows 1 barrow 12 litres 4 litres
FEU
Livre Technique VN_Edition n°4 _ 2013 77
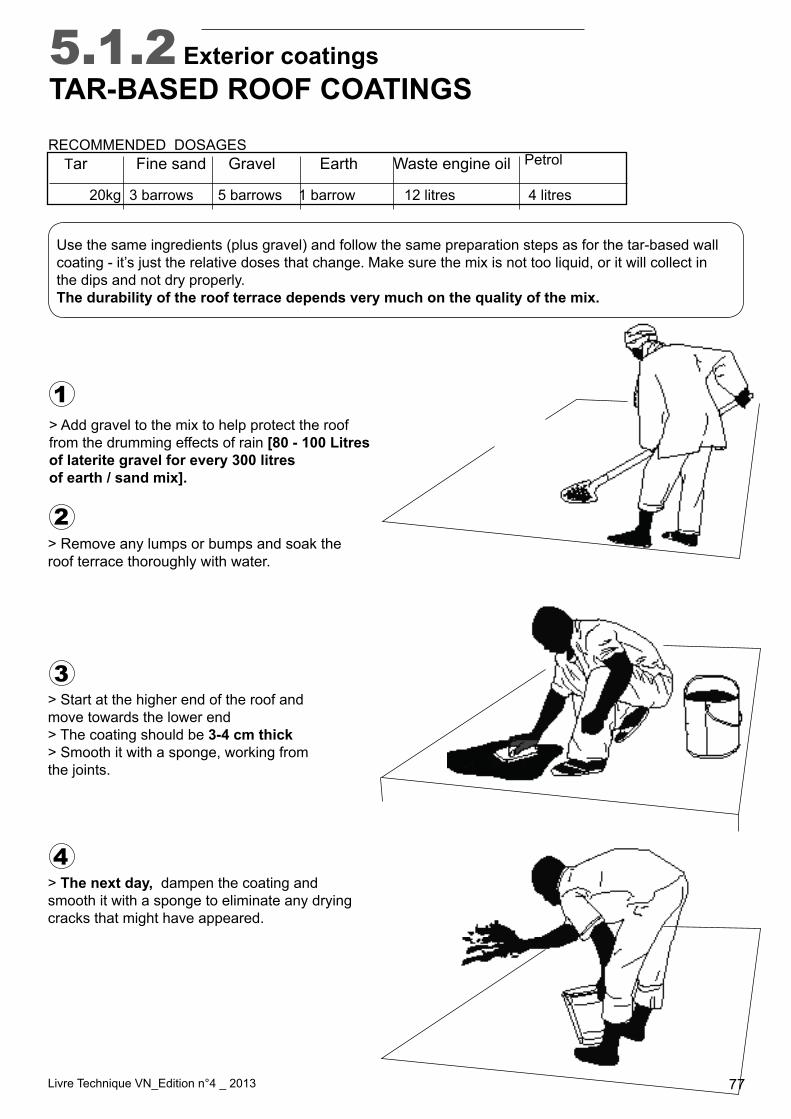
5.1.2 Exterior coatingsTAR-BASED ROOF COATINGS
Use the same ingredients (plus gravel) and follow the same preparation steps as for the tar-based wall coating - it’s just the relative doses that change. Make sure the mix is not too liquid, or it will collect in the dips and not dry properly. The durability of the roof terrace depends very much on the quality of the mix.
> Remove any lumps or bumps and soak the roof terrace thoroughly with water.
> The next day, dampen the coating andsmooth it with a sponge to eliminate any dryingcracks that might have appeared.
> Add gravel to the mix to help protect the rooffrom the drumming effects of rain [80 - 100 Litresof laterite gravel for every 300 litresof earth / sand mix].
1
2
3
4
RECOMMENDED DOSAGES Tar Fine sand Gravel Earth Waste engine oil
20kg 3 barrows 5 barrows 1 barrow 12 litres 4 litres
Petrol
> Start at the higher end of the roof andmove towards the lower end> The coating should be 3-4 cm thick> Smooth it with a sponge, working fromthe joints.
Livre Technique VN_Edition n°4 _ 2013 78
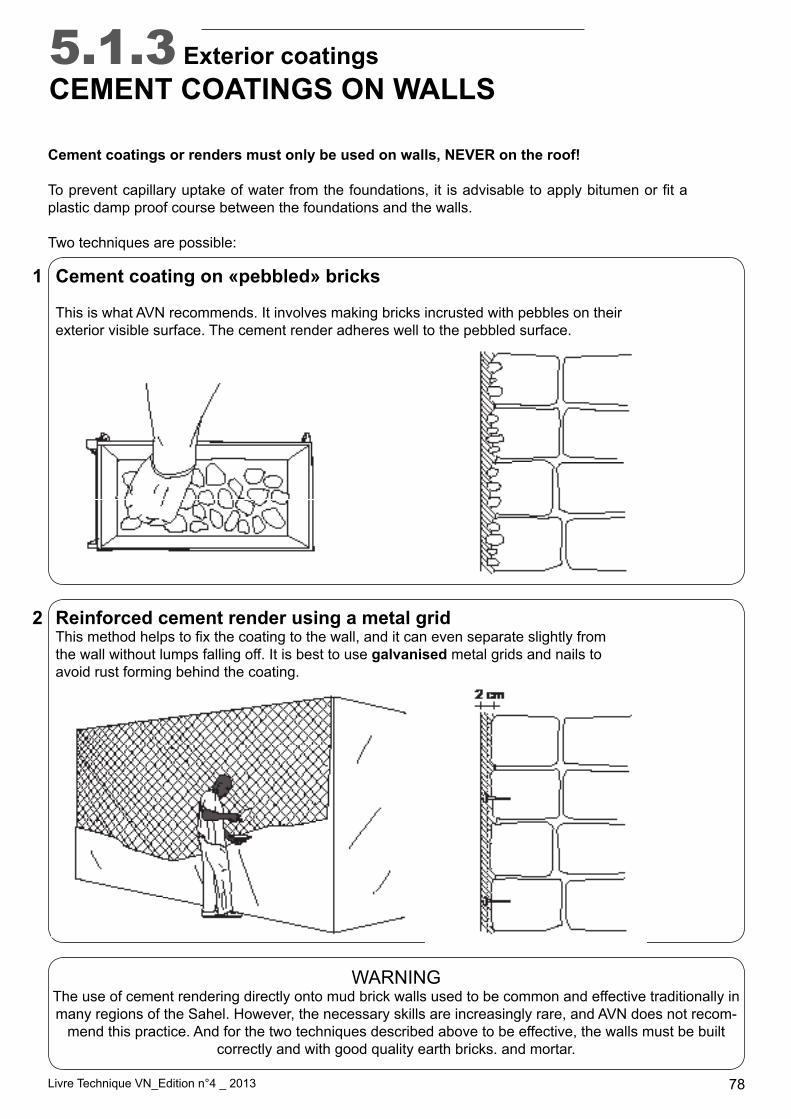
5.1.3 Exterior coatingsCEMENT COATINGS ON WALLS
Cement coatings or renders must only be used on walls, NEVER on the roof!
Topreventcapillaryuptakeofwaterfromthefoundations,it isadvisabletoapplybitumenorfitaplastic damp proof course between the foundations and the walls.
Two techniques are possible:
1
2
Cement coating on «pebbled» bricks
This is what AVN recommends. It involves making bricks incrusted with pebbles on theirexterior visible surface. The cement render adheres well to the pebbled surface.
Reinforced cement render using a metal gridThismethodhelpstofixthecoatingtothewall,anditcanevenseparateslightlyfromthe wall without lumps falling off. It is best to use galvanised metal grids and nails to avoid rust forming behind the coating.
WARNINGThe use of cement rendering directly onto mud brick walls used to be common and effective traditionally in many regions of the Sahel. However, the necessary skills are increasingly rare, and AVN does not recom-
mend this practice. And for the two techniques described above to be effective, the walls must be built correctly and with good quality earth bricks. and mortar.
Livre Technique VN_Edition n°4 _ 2013 79
Part 6
ENTREPRENEURSHIP
6.1 Sales pitch6.2 Drawing up a contract6.3 The client’s responsabilities6.4 Organisation of the construction site
80818283
Livre Technique VN_Edition n°4 _ 2013 80
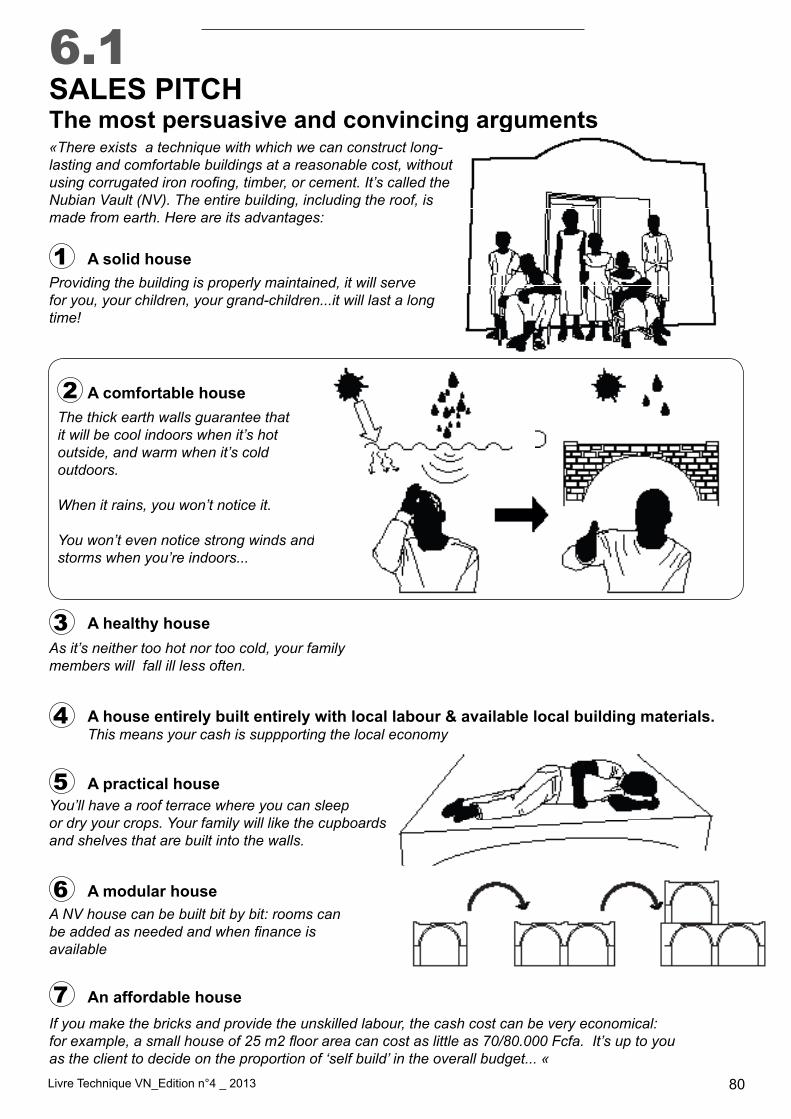
6.1SALES PITCHThe most persuasive and convincing arguments«There exists a technique with which we can construct long-lasting and comfortable buildings at a reasonable cost, without using corrugated iron roofing, timber, or cement. It’s called the Nubian Vault (NV). The entire building, including the roof, is made from earth. Here are its advantages:
Providing the building is properly maintained, it will serve for you, your children, your grand-children...it will last a long time!
As it’s neither too hot nor too cold, your family members will fall ill less often.
If you make the bricks and provide the unskilled labour, the cash cost can be very economical:for example, a small house of 25 m2 floor area can cost as little as 70/80.000 Fcfa. It’s up to youas the client to decide on the proportion of ‘self build’ in the overall budget... «
The thick earth walls guarantee that it will be cool indoors when it’s hot outside, and warm when it’s cold outdoors.
When it rains, you won’t notice it. You won’t even notice strong winds and storms when you’re indoors...
1
7
3
4
2
A solid house
A comfortable house
A healthy house
A house entirely built entirely with local labour & available local building materials.This means your cash is suppporting the local economy
You’ll have a roof terrace where you can sleepor dry your crops. Your family will like the cupboards and shelves that are built into the walls.
5 A practical house
An affordable house
A NV house can be built bit by bit: rooms can be added as needed and when finance isavailable
6 A modular house
Livre Technique VN_Edition n°4 _ 2013 81
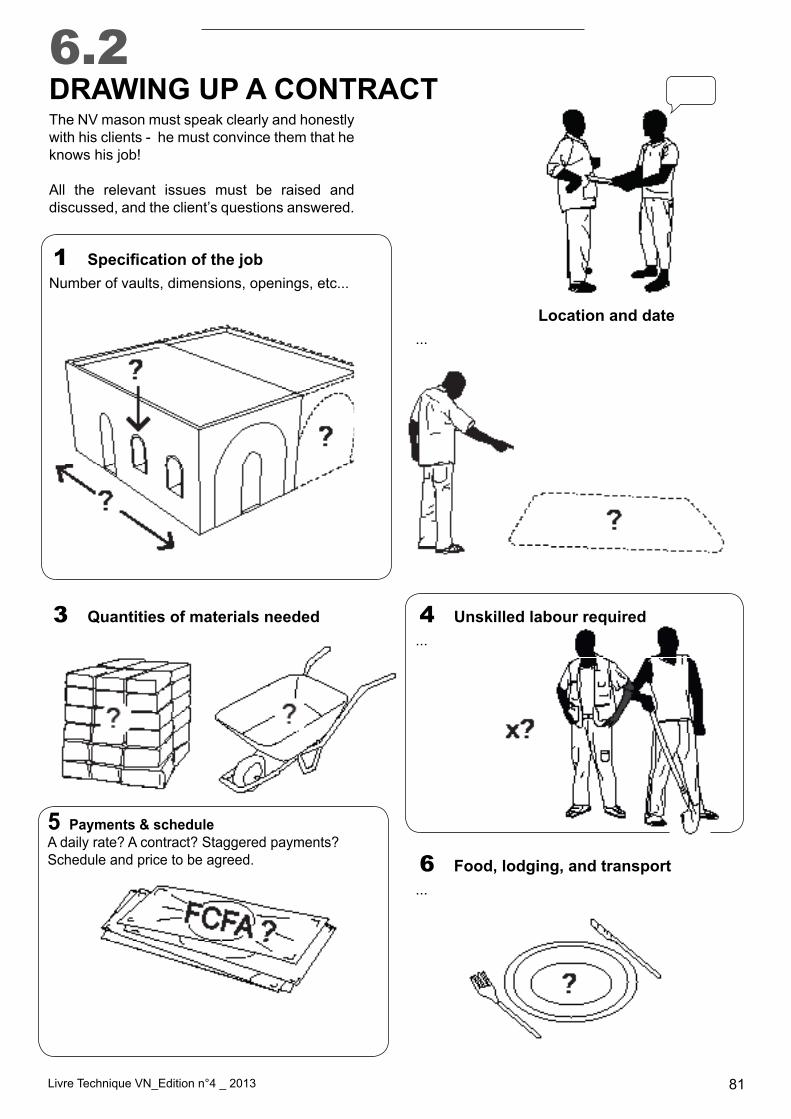
6.2DRAWING UP A CONTRACTThe NV mason must speak clearly and honestly with his clients - he must convince them that he knows his job!
All the relevant issues must be raised and discussed, and the client’s questions answered.
Number of vaults, dimensions, openings, etc...
...
... ...
...
1
3 4
6
Specification of the job
Location and date
Quantities of materials needed
Mode de rémunérationFood, lodging, and transport
5 Payments & scheduleA daily rate? A contract? Staggered payments? Schedule and price to be agreed.
Unskilled labour required
Livre Technique VN_Edition n°4 _ 2013 82
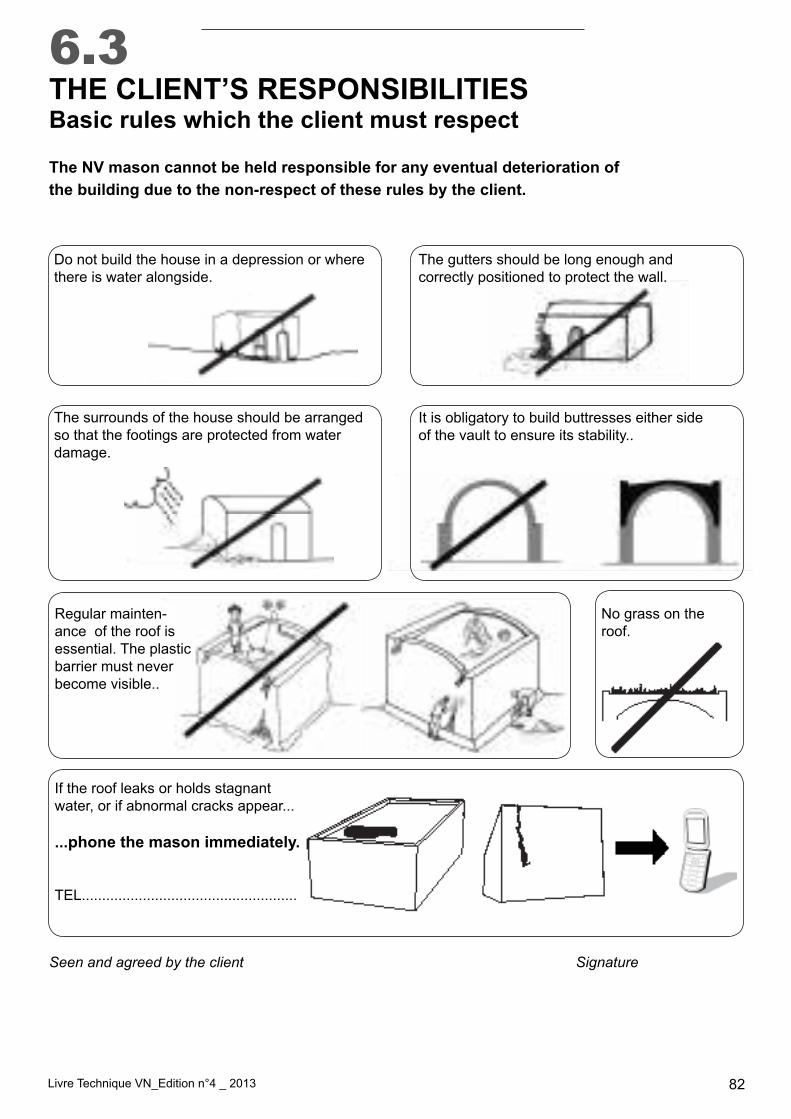
6.3THE CLIENT’S RESPONSIBILITIESBasic rules which the client must respect
Seen and agreed by the client Signature
The gutters should be long enough and correctly positioned to protect the wall.
It is obligatory to build buttresses either sideof the vault to ensure its stability..
Regular mainten-ance of the roof is essential. The plastic barrier must never become visible..
No grass on the roof.
If the roof leaks or holds stagnantwater, or if abnormal cracks appear...
...phone the mason immediately.
TEL.....................................................
The NV mason cannot be held responsible for any eventual deterioration of the building due to the non-respect of these rules by the client.
Do not build the house in a depression or wherethere is water alongside.
The surrounds of the house should be arrangedso that the footings are protected from waterdamage.
Livre Technique VN_Edition n°4 _ 2013 83
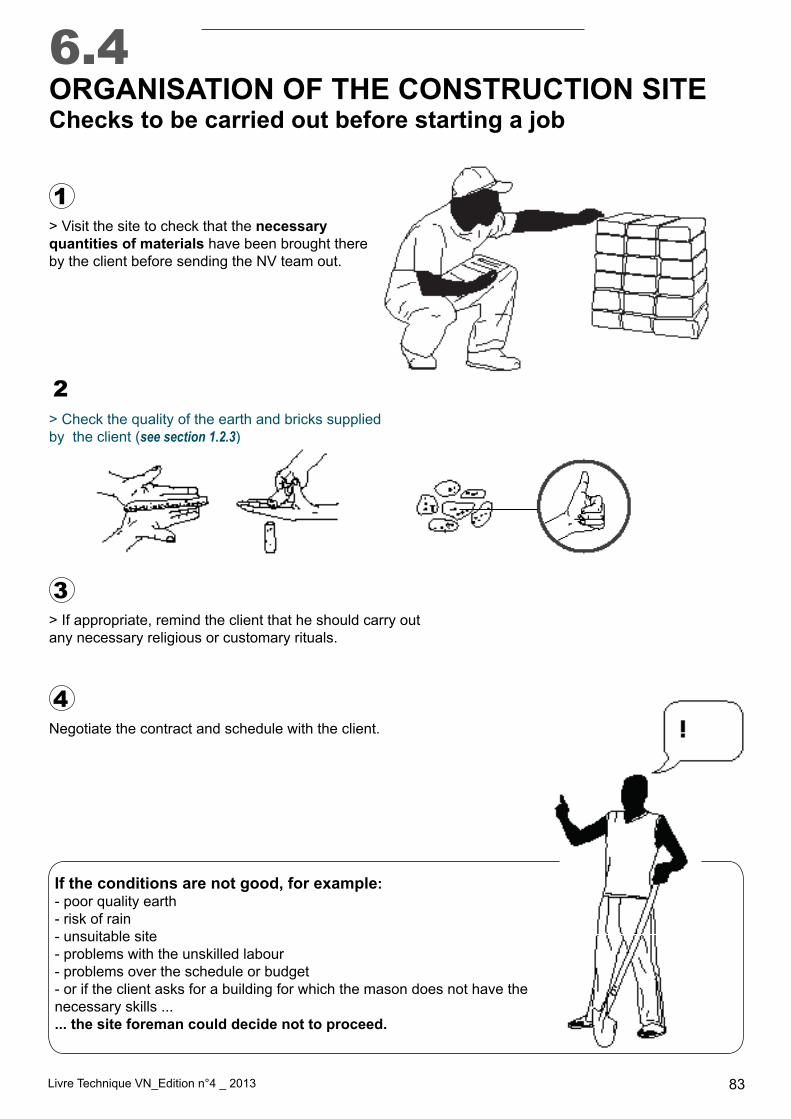
6.4ORGANISATION OF THE CONSTRUCTION SITEChecks to be carried out before starting a job
> Visit the site to check that the necessaryquantities of materials have been brought thereby the client before sending the NV team out.
> Check the quality of the earth and bricks supplied by the client (see section 1.2.3)
> If appropriate, remind the client that he should carry outany necessary religious or customary rituals.
Negotiate the contract and schedule with the client.
If the conditions are not good, for example:- poor quality earth- risk of rain- unsuitable site- problems with the unskilled labour- problems over the schedule or budget- or if the client asks for a building for which the mason does not have the necessary skills ...... the site foreman could decide not to proceed.
1
2
3
4
Tel : 00.33.4.67.81.21.059 rue des Arts, 34 190 Ganges
AVN BURKINA [email protected]
Tel : 00 226 76 64 37 64 BP 505 - Boromo - secteur 1- Burkina Faso
Tel : 00 223 21 32 02 41 - 00 223 70 58 40 71 BP 424 SEGOU /
AVN SÉNÉ[email protected]
Tel: +221 77 881 79 55
AVN in [email protected]
Tel: + 226 65 42 43 83
AVN in [email protected]
+ 229 96 37 55 81
Sous la direction de Thomas Granier_ Directeur Général - Fondateur4ème édition réalisée par Cyril Chabaud et Mathieu Hardy_ Architectes