692478A00 NFS CA 1884 5L - … · Sélectionnez cette icône et appuyez sur la touche MENU (ENTRER)...
37
Caméra thermographie I.R Infrared Camera I.R. Wärmebildkamera Videocamera termografica I.R. Cámara de termografía IR C.A 1884 FRANÇAIS Notice d’utilisation simplifiée ENGLISH User’s Manual :Quick start DEUTSCH Bedienungsanleitung ITALIANO Libretto d’istruzioni : Inizio rapido ESPAÑOL Manual de instrucciones www.electronicaembajadores.com
-
Upload
hoangduong -
Category
Documents
-
view
214 -
download
1
Transcript of 692478A00 NFS CA 1884 5L - … · Sélectionnez cette icône et appuyez sur la touche MENU (ENTRER)...

� Caméra thermographie I.R � Infrared Camera � I.R. Wärmebildkamera � Videocamera termografica I.R. � Cámara de termografía IR
C.A 1884
FRANÇAIS Notice d’utilisation simplifiée ENGLISH User’s Manual :Quick start DEUTSCH Bedienungsanleitung ITALIANO Libretto d’istruzioni : Inizio rapido ESPAÑOL Manual de instrucciones
www.electronicaembajadores.com
Français
ATTENTION Une camera infrarouge est un équipement de mesure optique précieux, attention aux remarques suivantes : 1. Ne pas diriger la camera vers le soleil, devant une soudure au laser ou toute
autre source de fort rayonnement thermique. 2. Ne pas utiliser une mauvaise gamme de température pour inspecter une
cible à haute température. 3. Lors de l’allumage de la caméra, attendre 10-15 minutes avant d’enregistrer
vos premiers thermogrammes pour être certain d’une stabilisation correcte en température de votre RayCAm.
4. Si des éléments de la caméra sont brûlés, endommagés ou présentent des problèmes à la suite d’un non respect des consignes énumérées ci-dessus, le constructeur ainsi que le distributeur ne seront en aucun cas responsables et tous les frais mis en jeu seront entièrement à la charge de l’utilisateur.
STRUCTURE DE LA RayCAm C.A 1884
1. Ecran à cristaux liquides 2. Bouton d’allumage 3. Clavier 4. Gâchette 5. Focale manuelle 6. Gâchette du compartiment batterie 7. Couvercle batterie
1
2
3
4
5
7
6
Appareil pouvant, et uniquement dans des conditions particulières, être sensible aux décharges ESD.
www.electronicaembajadores.com
Français
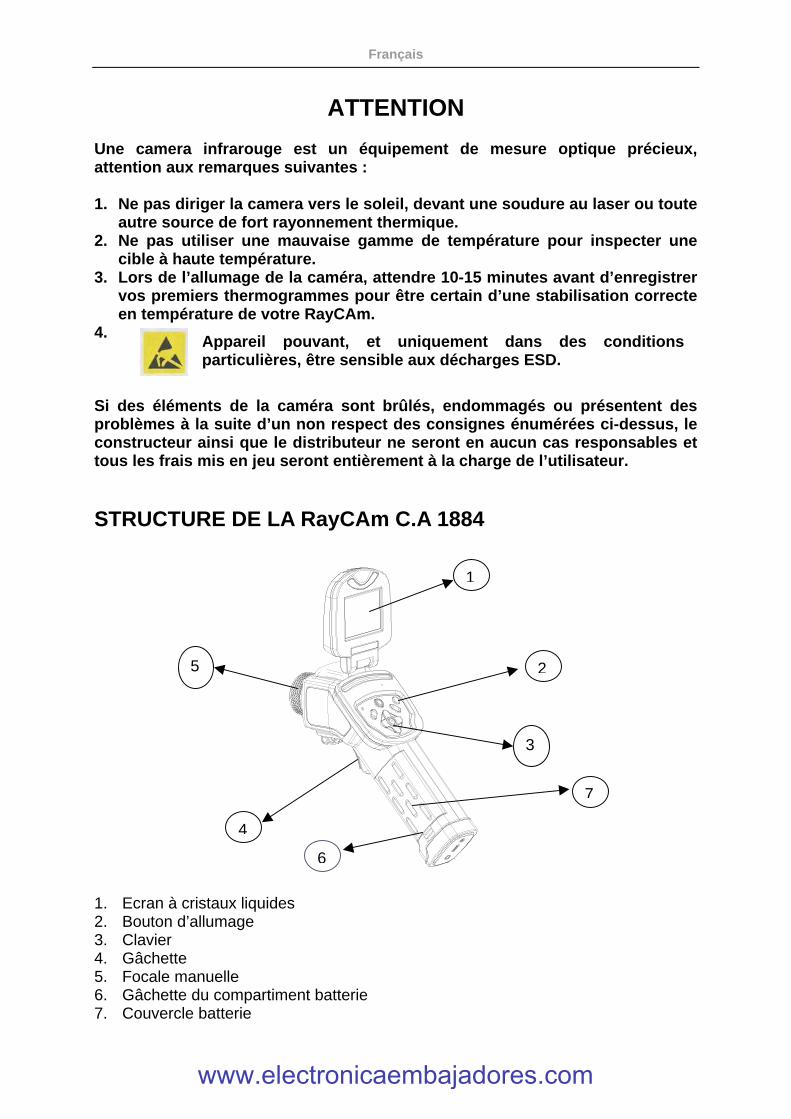
INTERFACE RayCAm C.A 1884 1. Chargement. Entrée externe 8V DC. 2. Interface USB. Connexion USB standard pour PC 3. Interface vidéo RCA standard 4. Interface RS 232 standard ( Uniquement pour la mise à niveau du logiciel)
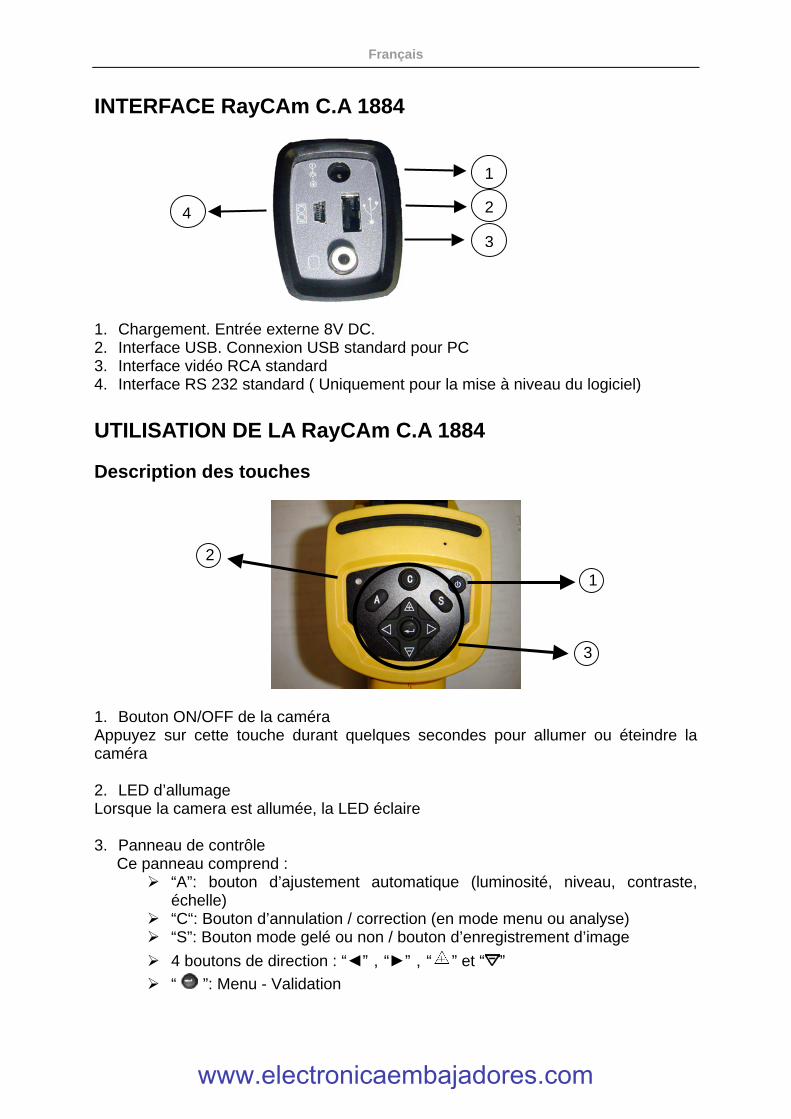
UTILISATION DE LA RayCAm C.A 1884 Description des touches
1. Bouton ON/OFF de la caméra Appuyez sur cette touche durant quelques secondes pour allumer ou éteindre la caméra 2. LED d’allumage Lorsque la camera est allumée, la LED éclaire 3. Panneau de contrôle
Ce panneau comprend : � “A”: bouton d’ajustement automatique (luminosité, niveau, contraste,
échelle) � “C“: Bouton d’annulation / correction (en mode menu ou analyse) � “S”: Bouton mode gelé ou non / bouton d’enregistrement d’image
� 4 boutons de direction : “◄”,“►”,“ ” et “ ” � “ ”: Menu - Validation
2 4
1
3
3
2
1
www.electronicaembajadores.com
Français
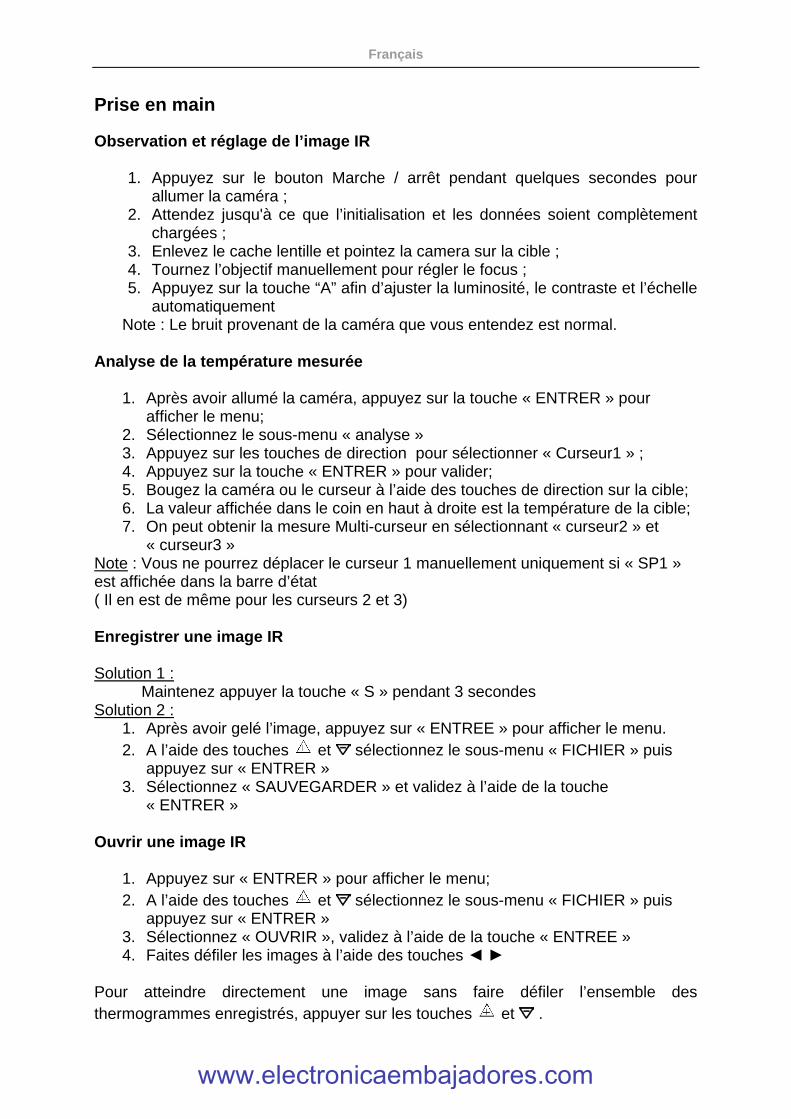
Prise en main Observation et réglage de l’image IR
1. Appuyez sur le bouton Marche / arrêt pendant quelques secondes pour allumer la caméra ;
2. Attendez jusqu'à ce que l’initialisation et les données soient complètement chargées ;
3. Enlevez le cache lentille et pointez la camera sur la cible ; 4. Tournez l’objectif manuellement pour régler le focus ; 5. Appuyez sur la touche “A” afin d’ajuster la luminosité, le contraste et l’échelle
automatiquement Note : Le bruit provenant de la caméra que vous entendez est normal.
Analyse de la température mesurée
1. Après avoir allumé la caméra, appuyez sur la touche « ENTRER » pour afficher le menu;
2. Sélectionnez le sous-menu « analyse » 3. Appuyez sur les touches de direction pour sélectionner « Curseur1 » ; 4. Appuyez sur la touche « ENTRER » pour valider; 5. Bougez la caméra ou le curseur à l’aide des touches de direction sur la cible; 6. La valeur affichée dans le coin en haut à droite est la température de la cible; 7. On peut obtenir la mesure Multi-curseur en sélectionnant « curseur2 » et
« curseur3 » Note : Vous ne pourrez déplacer le curseur 1 manuellement uniquement si « SP1 » est affichée dans la barre d’état ( Il en est de même pour les curseurs 2 et 3) Enregistrer une image IR Solution 1 :
Maintenez appuyer la touche « S » pendant 3 secondes Solution 2 :
1. Après avoir gelé l’image, appuyez sur « ENTREE » pour afficher le menu. 2. A l’aide des touches et sélectionnez le sous-menu « FICHIER » puis
appuyez sur « ENTRER » 3. Sélectionnez « SAUVEGARDER » et validez à l’aide de la touche
« ENTRER » Ouvrir une image IR
1. Appuyez sur « ENTRER » pour afficher le menu; 2. A l’aide des touches et sélectionnez le sous-menu « FICHIER » puis
appuyez sur « ENTRER » 3. Sélectionnez « OUVRIR », validez à l’aide de la touche « ENTREE » 4. Faites défiler les images à l’aide des touches ◄ ►
Pour atteindre directement une image sans faire défiler l’ensemble des thermogrammes enregistrés, appuyer sur les touches et .
www.electronicaembajadores.com
Français
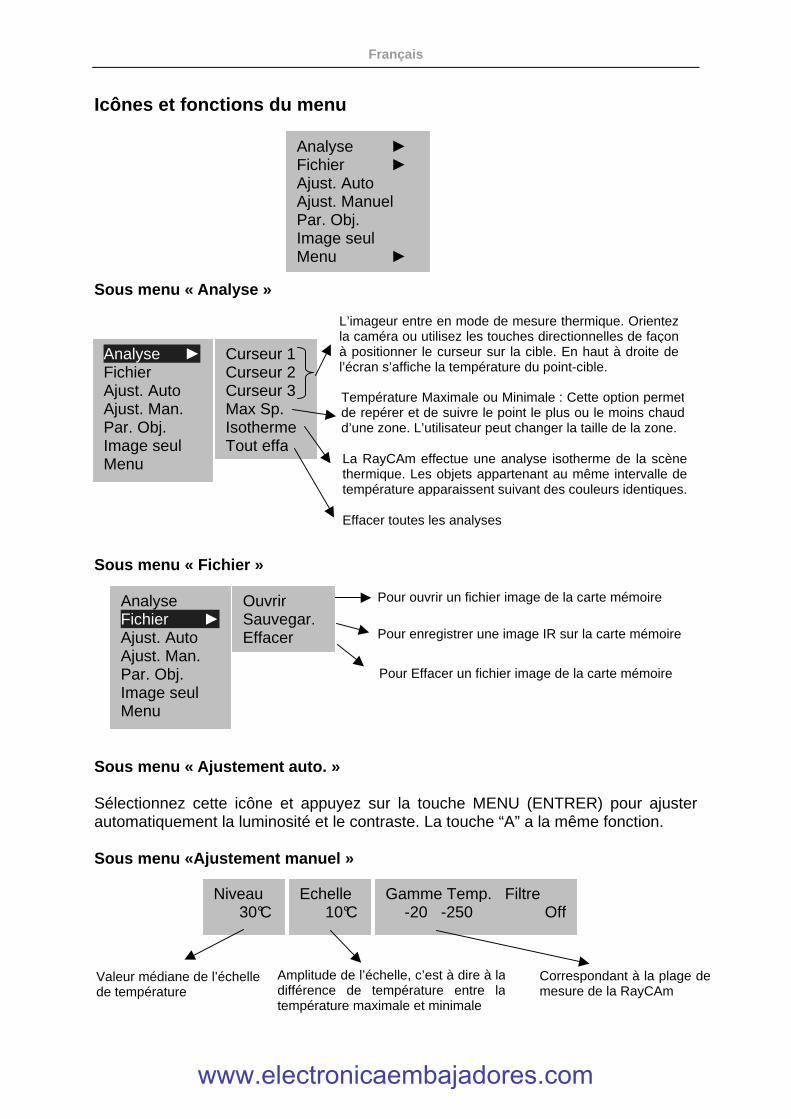
Icônes et fonctions du menu
Sous menu « Analyse »
Sous menu « Fichier »
Sous menu « Ajustement auto. » Sélectionnez cette icône et appuyez sur la touche MENU (ENTRER) pour ajuster automatiquement la luminosité et le contraste. La touche “A” a la même fonction. Sous menu «Ajustement manuel »
Analyse ► Fichier ► Ajust. Auto Ajust. Manuel Par. Obj. Image seul Menu ►
Analyse ► Fichier Ajust. Auto Ajust. Man. Par. Obj. Image seul Menu
Curseur 1 Curseur 2 Curseur 3 Max Sp. Isotherme Tout effa
Analyse Fichier ► Ajust. Auto Ajust. Man. Par. Obj. Image seul Menu
Ouvrir Sauvegar. Effacer
Niveau 30°C
Echelle 10°C
Gamme Temp.-20 -250
Filtre Off
L’imageur entre en mode de mesure thermique. Orientez la caméra ou utilisez les touches directionnelles de façon à positionner le curseur sur la cible. En haut à droite de l’écran s’affiche la température du point-cible.
Température Maximale ou Minimale : Cette option permet de repérer et de suivre le point le plus ou le moins chaud d’une zone. L’utilisateur peut changer la taille de la zone. La RayCAm effectue une analyse isotherme de la scène thermique. Les objets appartenant au même intervalle de température apparaissent suivant des couleurs identiques.
Effacer toutes les analyses
Pour ouvrir un fichier image de la carte mémoire
Pour enregistrer une image IR sur la carte mémoire
Pour Effacer un fichier image de la carte mémoire
Valeur médiane de l’échelle de température
Amplitude de l’échelle, c’est à dire à la différence de température entre la température maximale et minimale
Correspondant à la plage de mesure de la RayCAm
www.electronicaembajadores.com
Français
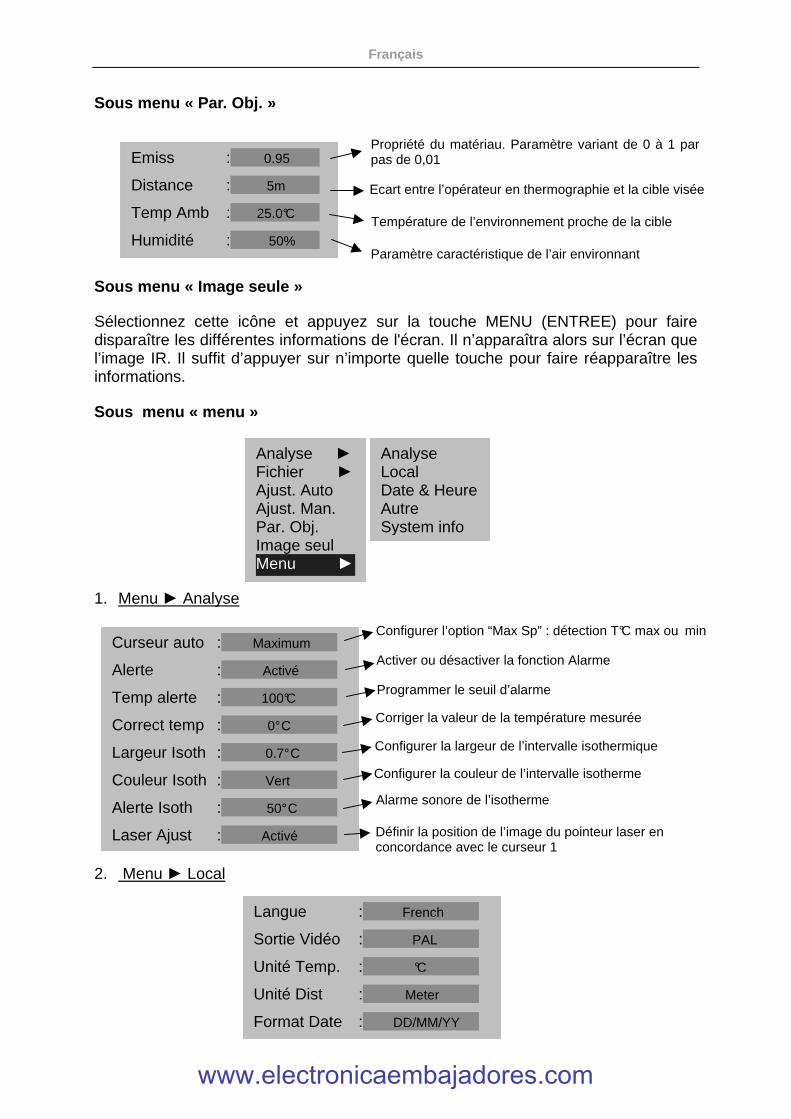
Sous menu « Par. Obj. » Sous menu « Image seule » Sélectionnez cette icône et appuyez sur la touche MENU (ENTREE) pour faire disparaître les différentes informations de l'écran. Il n’apparaîtra alors sur l’écran que l’image IR. Il suffit d’appuyer sur n’importe quelle touche pour faire réapparaître les informations. Sous menu « menu » 1. Menu ► Analyse 2. Menu ► Local
Emiss : 0.95
Distance : 5m
Temp Amb : 25.0°C
Humidité : 50%
Analyse ► Fichier ► Ajust. Auto Ajust. Man. Par. Obj. Image seul Menu ►
Analyse Local Date & Heure Autre System info
Curseur auto : Maximum
Alerte : Activé
Temp alerte : 100°C
Correct temp : 0° C
Largeur Isoth : 0.7° C
Couleur Isoth : Vert
Alerte Isoth : 50° C
Laser Ajust : Activé
Langue : French
Sortie Vidéo : PAL
Unité Temp. : °C
Unité Dist : Meter
Format Date : DD/MM/YY
Propriété du matériau. Paramètre variant de 0 à 1 par pas de 0,01
Ecart entre l’opérateur en thermographie et la cible visée
Température de l’environnement proche de la cible
Paramètre caractéristique de l’air environnant
Configurer l’option “Max Sp” : détection T°C max ou min
Activer ou désactiver la fonction Alarme
Programmer le seuil d’alarme
Corriger la valeur de la température mesurée
Configurer la largeur de l’intervalle isothermique
Configurer la couleur de l’intervalle isotherme
Alarme sonore de l’isotherme
Définir la position de l’image du pointeur laser en concordance avec le curseur 1
www.electronicaembajadores.com
Français
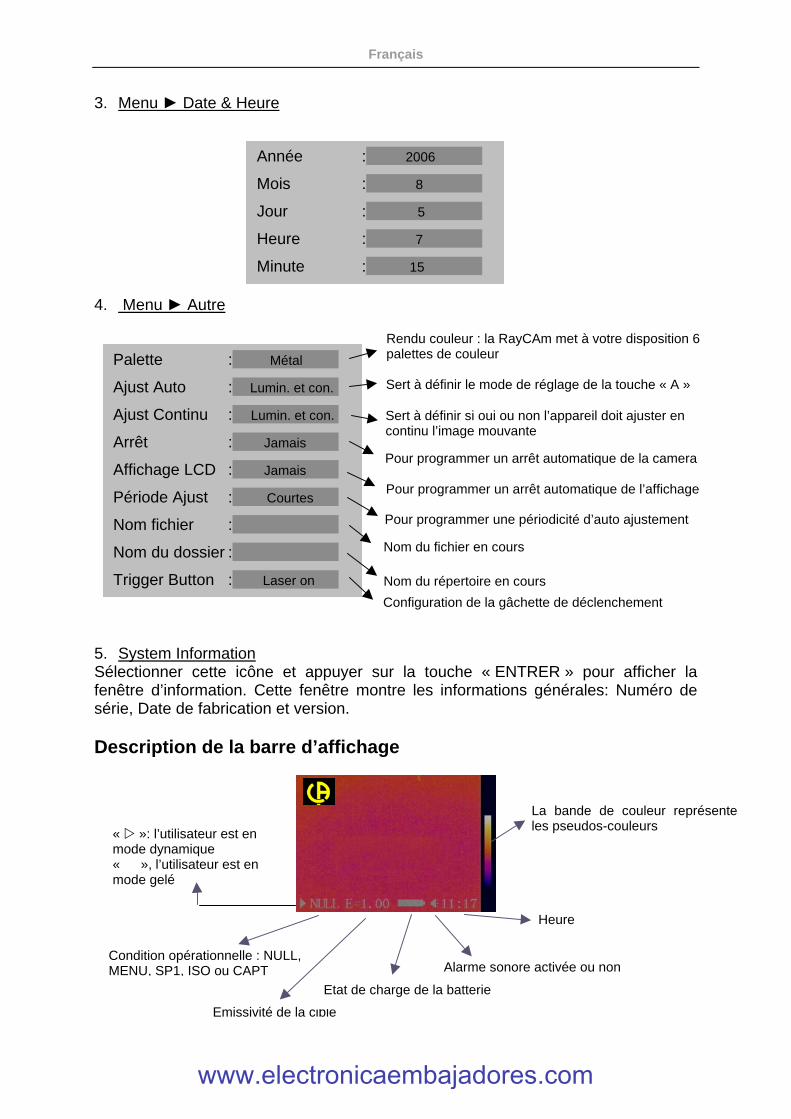
3. Menu ► Date & Heure 4. Menu ► Autre 5. System Information Sélectionner cette icône et appuyer sur la touche « ENTRER » pour afficher la fenêtre d’information. Cette fenêtre montre les informations générales: Numéro de série, Date de fabrication et version. Description de la barre d’affichage
Alarme sonore activée ou non
La bande de couleur représente les pseudos-couleurs
B
Année : 2006
Mois : 8
Jour : 5
Heure : 7
Minute : 15
Palette : Métal
Ajust Auto : Lumin. et con.
Ajust Continu : Lumin. et con.
Arrêt : Jamais
Affichage LCD : Jamais
Période Ajust : Courtes
Nom fichier :
Nom du dossier :
Trigger Button : Laser on Nom du répertoire en cours
Rendu couleur : la RayCAm met à votre disposition 6 palettes de couleur
Sert à définir le mode de réglage de la touche « A »
Sert à définir si oui ou non l’appareil doit ajuster en continu l’image mouvante
Pour programmer un arrêt automatique de la camera
Pour programmer un arrêt automatique de l’affichage
Pour programmer une périodicité d’auto ajustement
Nom du fichier en cours
Configuration de la gâchette de déclenchement
« � »: l’utilisateur est en mode dynamique « », l’utilisateur est en mode gelé
Condition opérationnelle : NULL, MENU, SP1, ISO ou CAPT
Emissivité de la cible
Etat de charge de la batterie
Heure
www.electronicaembajadores.com
Français
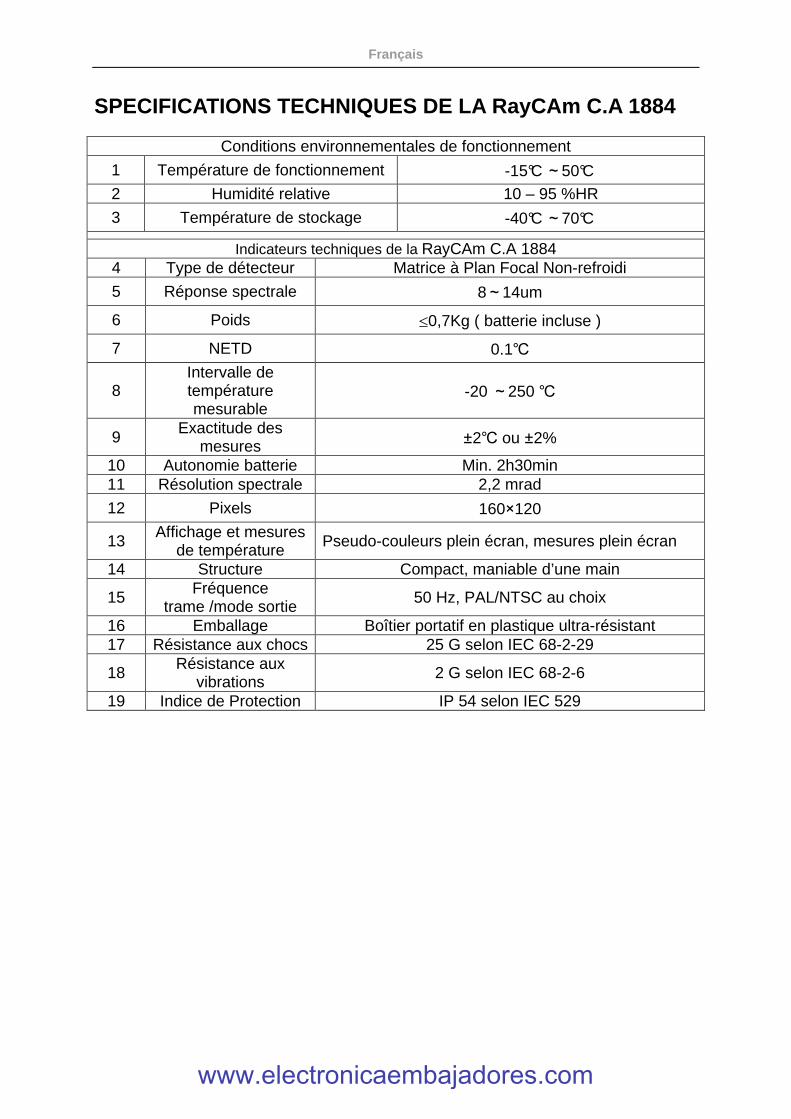
SPECIFICATIONS TECHNIQUES DE LA RayCAm C.A 1884
Conditions environnementales de fonctionnement
1 Température de fonctionnement -15°C~50°C 2 Humidité relative 10 – 95 %HR
3 Température de stockage -40°C~70°C Indicateurs techniques de la RayCAm C.A 1884
4 Type de détecteur Matrice à Plan Focal Non-refroidi
5 Réponse spectrale 8~14um
6 Poids ≤0,7Kg ( batterie incluse )
7 NETD 0.1℃
8 Intervalle de température mesurable
-20 ~250 ℃
9 Exactitude des mesures ±2℃ ou ±2%
10 Autonomie batterie Min. 2h30min 11 Résolution spectrale 2,2 mrad
12 Pixels 160×120
13 Affichage et mesures de température Pseudo-couleurs plein écran, mesures plein écran
14 Structure Compact, maniable d’une main
15 Fréquence trame /mode sortie 50 Hz, PAL/NTSC au choix
16 Emballage Boîtier portatif en plastique ultra-résistant 17 Résistance aux chocs 25 G selon IEC 68-2-29
18 Résistance aux vibrations 2 G selon IEC 68-2-6
19 Indice de Protection IP 54 selon IEC 529
www.electronicaembajadores.com
English
WARNING The Infrared Camera is one high precious optics and measurement equipment, please be careful when using it:
1. Do not point the camera straightly to the sun, laser welding torch or other over high temperature target for inspection
2. Do not use the incorrect temperature measurement range to measure the high temperature target which is over the setting range.
3. When you start the RayCAm, please wait for 10-15 minutes before saving your first thermograms to be sure that you have a correct temperature stabilization of your RayCAm.
4. If the camera was burned, damage or comes out other problems cause by the reasons mentioned above, the manufacturer will not take the responsibility of warranty, all the repair fees, transportation fees will be paid by the user.
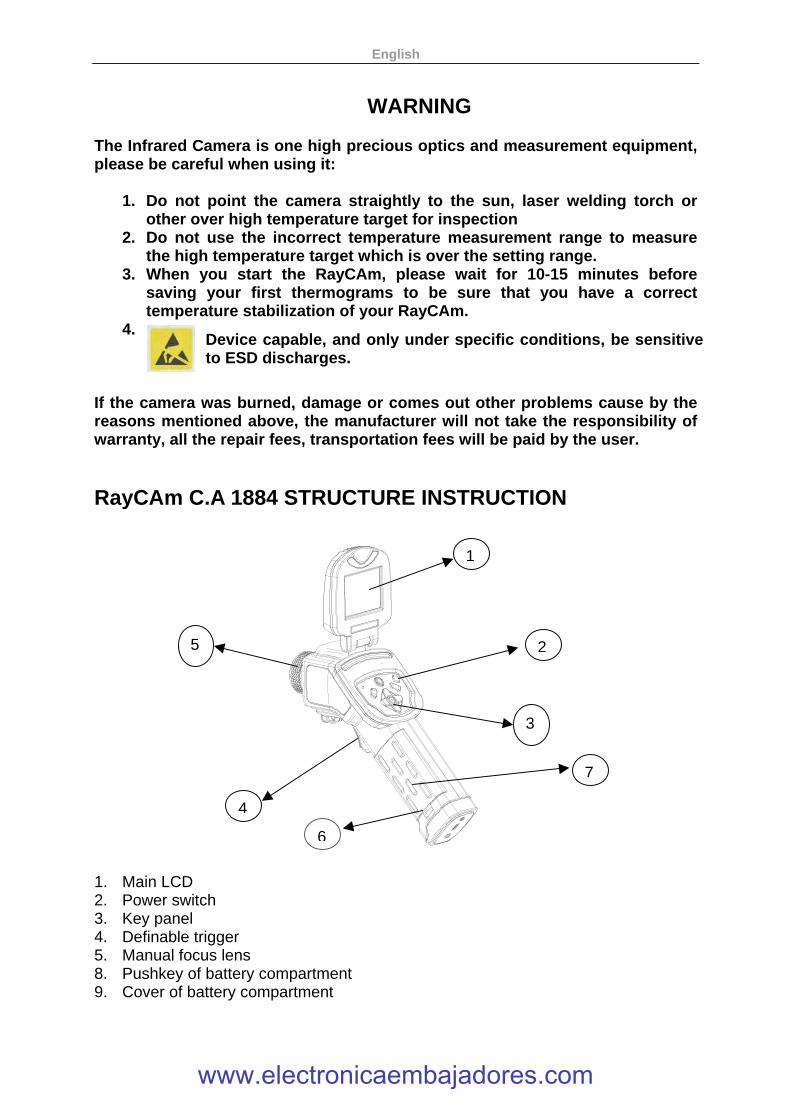
RayCAm C.A 1884 STRUCTURE INSTRUCTION
1. Main LCD 2. Power switch 3. Key panel 4. Definable trigger 5. Manual focus lens 8. Pushkey of battery compartment 9. Cover of battery compartment
1
2
3
4
5
7
6
Device capable, and only under specific conditions, be sensitive to ESD discharges.
www.electronicaembajadores.com
English
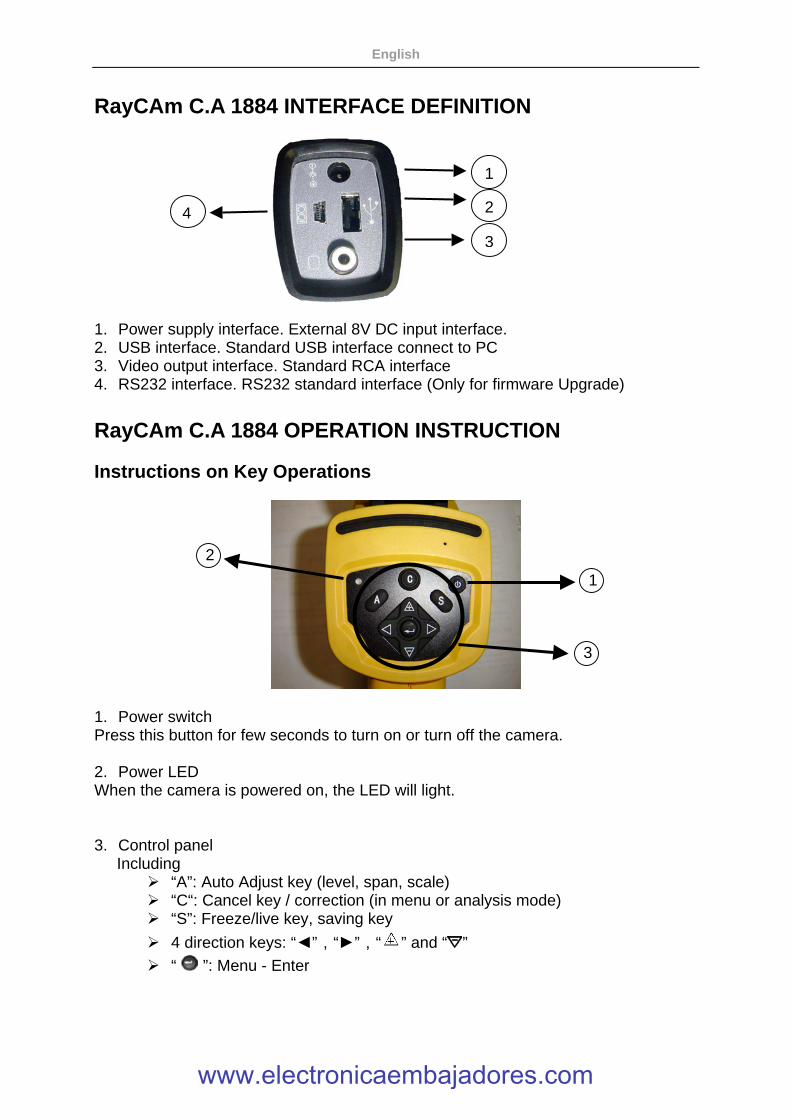
RayCAm C.A 1884 INTERFACE DEFINITION 1. Power supply interface. External 8V DC input interface. 2. USB interface. Standard USB interface connect to PC 3. Video output interface. Standard RCA interface 4. RS232 interface. RS232 standard interface (Only for firmware Upgrade)
RayCAm C.A 1884 OPERATION INSTRUCTION Instructions on Key Operations
1. Power switch Press this button for few seconds to turn on or turn off the camera. 2. Power LED When the camera is powered on, the LED will light. 3. Control panel
Including � “A”: Auto Adjust key (level, span, scale) � “C“: Cancel key / correction (in menu or analysis mode) � “S”: Freeze/live key, saving key
� 4 direction keys: “◄”,“►”,“ ” and “ ”
� “ ”: Menu - Enter
2 4
1
3
3
2
1
www.electronicaembajadores.com
English
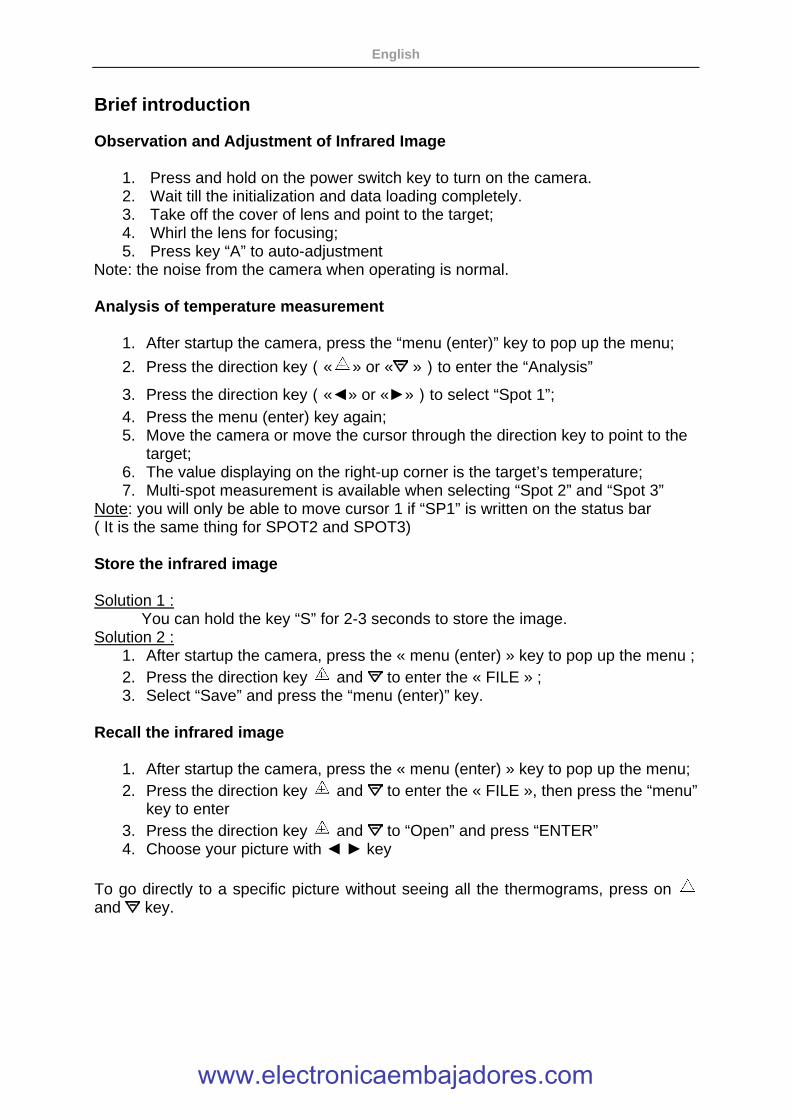
Brief introduction Observation and Adjustment of Infrared Image
1. Press and hold on the power switch key to turn on the camera. 2. Wait till the initialization and data loading completely. 3. Take off the cover of lens and point to the target; 4. Whirl the lens for focusing; 5. Press key “A” to auto-adjustment
Note: the noise from the camera when operating is normal. Analysis of temperature measurement
1. After startup the camera, press the “menu (enter)” key to pop up the menu;
2. Press the direction key(« » or « »)to enter the “Analysis”
3. Press the direction key(«◄» or «►»)to select “Spot 1”; 4. Press the menu (enter) key again; 5. Move the camera or move the cursor through the direction key to point to the
target; 6. The value displaying on the right-up corner is the target’s temperature; 7. Multi-spot measurement is available when selecting “Spot 2” and “Spot 3”
Note: you will only be able to move cursor 1 if “SP1” is written on the status bar ( It is the same thing for SPOT2 and SPOT3) Store the infrared image Solution 1 :
You can hold the key “S” for 2-3 seconds to store the image. Solution 2 :
1. After startup the camera, press the « menu (enter) » key to pop up the menu ; 2. Press the direction key and to enter the « FILE » ; 3. Select “Save” and press the “menu (enter)” key.
Recall the infrared image
1. After startup the camera, press the « menu (enter) » key to pop up the menu; 2. Press the direction key and to enter the « FILE », then press the “menu”
key to enter 3. Press the direction key and to “Open” and press “ENTER” 4. Choose your picture with ◄ ► key
To go directly to a specific picture without seeing all the thermograms, press on and key.
www.electronicaembajadores.com
English
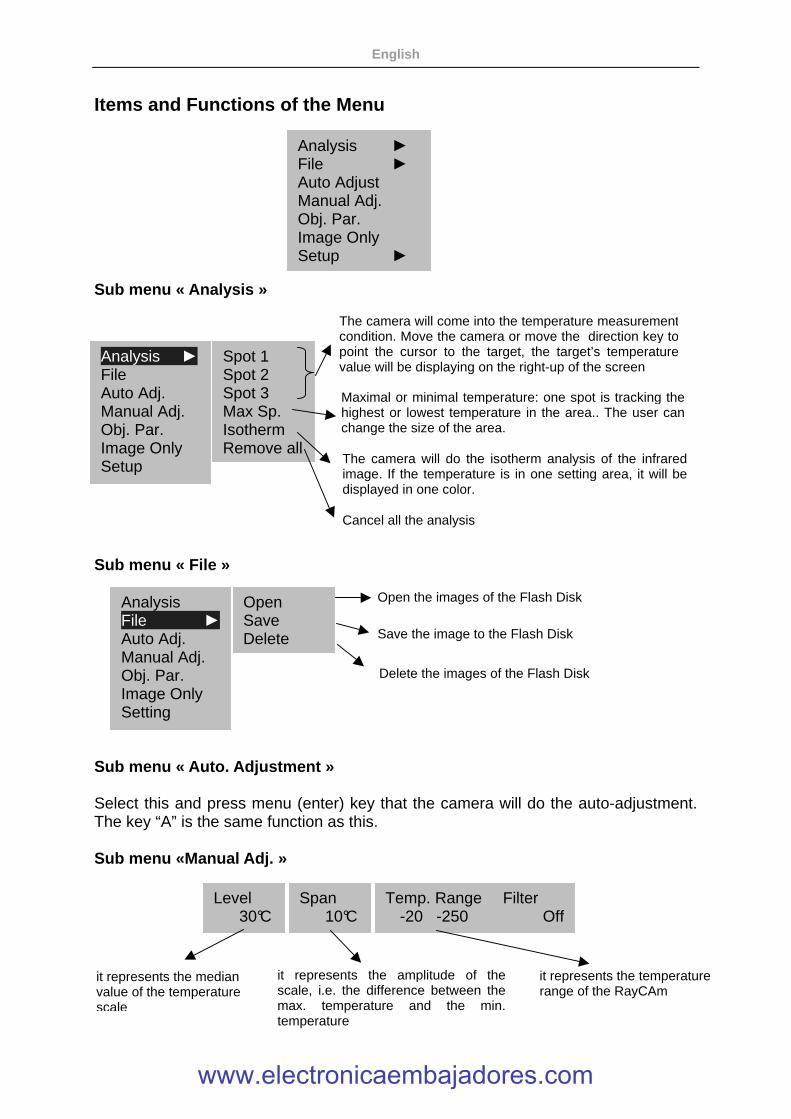
Items and Functions of the Menu
Sub menu « Analysis »
Sub menu « File »
Sub menu « Auto. Adjustment » Select this and press menu (enter) key that the camera will do the auto-adjustment. The key “A” is the same function as this. Sub menu «Manual Adj. »
Level 30°C
Span 10°C
Temp. Range -20 -250
Filter Off
Analysis ► File Auto Adj. Manual Adj. Obj. Par. Image Only Setup
Spot 1 Spot 2 Spot 3 Max Sp. Isotherm Remove all
The camera will come into the temperature measurement condition. Move the camera or move the direction key to point the cursor to the target, the target’s temperature value will be displaying on the right-up of the screen
Maximal or minimal temperature: one spot is tracking the highest or lowest temperature in the area.. The user can change the size of the area. The camera will do the isotherm analysis of the infrared image. If the temperature is in one setting area, it will be displayed in one color.
Cancel all the analysis
Open the images of the Flash Disk
Save the image to the Flash Disk
Delete the images of the Flash Disk
it represents the median value of the temperature scale
it represents the amplitude of the scale, i.e. the difference between the max. temperature and the min. temperature
it represents the temperature range of the RayCAm
Analysis ► File ► Auto Adjust Manual Adj. Obj. Par. Image Only Setup ►
Analysis File ► Auto Adj. Manual Adj. Obj. Par. Image Only Setting
Open Save Delete
www.electronicaembajadores.com
English
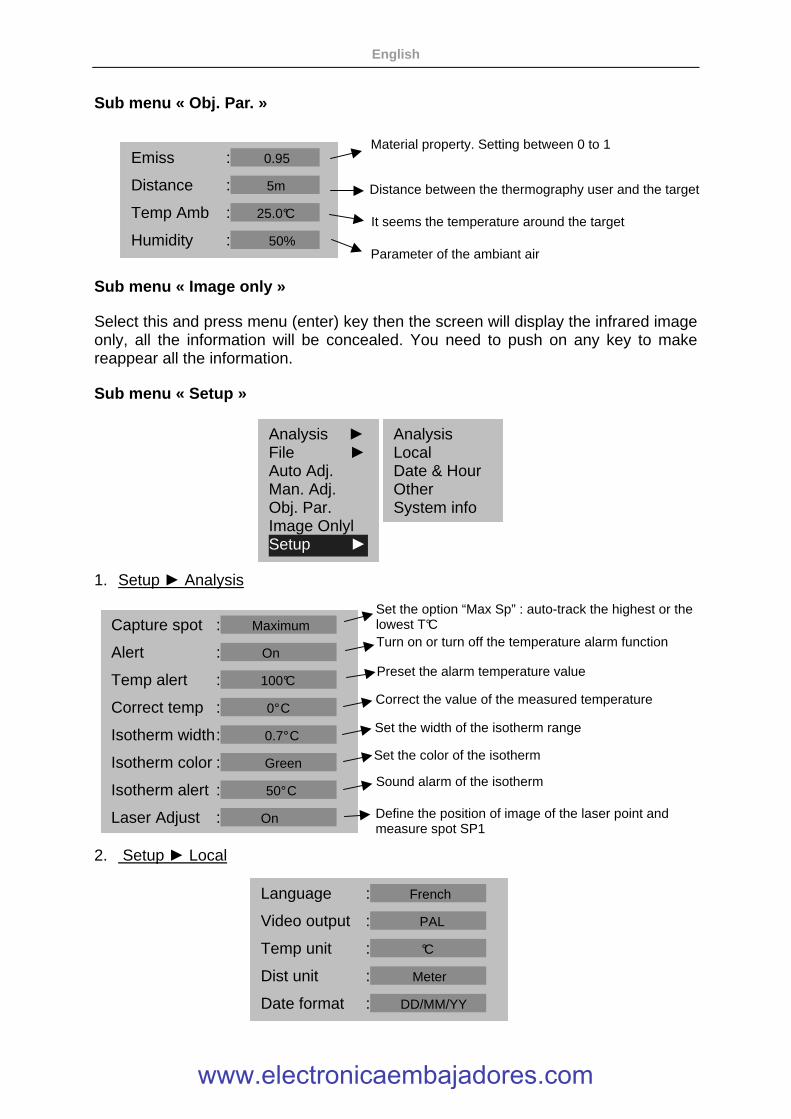
Sub menu « Obj. Par. » Sub menu « Image only » Select this and press menu (enter) key then the screen will display the infrared image only, all the information will be concealed. You need to push on any key to make reappear all the information. Sub menu « Setup » 1. Setup ► Analysis 2. Setup ► Local
Capture spot : Maximum
Alert : On
Temp alert : 100°C
Correct temp : 0° C
Isotherm width : 0.7° C
Isotherm color : Green
Isotherm alert : 50° C
Laser Adjust : On
Emiss : 0.95
Distance : 5m
Temp Amb : 25.0°C
Humidity : 50%
Material property. Setting between 0 to 1
Distance between the thermography user and the target
It seems the temperature around the target
Parameter of the ambiant air
Set the option “Max Sp” : auto-track the highest or the lowest T°C Turn on or turn off the temperature alarm function
Preset the alarm temperature value
Correct the value of the measured temperature
Set the width of the isotherm range
Set the color of the isotherm
Sound alarm of the isotherm
Define the position of image of the laser point and measure spot SP1
Analysis ► File ► Auto Adj. Man. Adj. Obj. Par. Image Onlyl Setup ►
Analysis Local Date & Hour Other System info
Language : French
Video output : PAL
Temp unit : °C
Dist unit : Meter
Date format : DD/MM/YY
www.electronicaembajadores.com
English
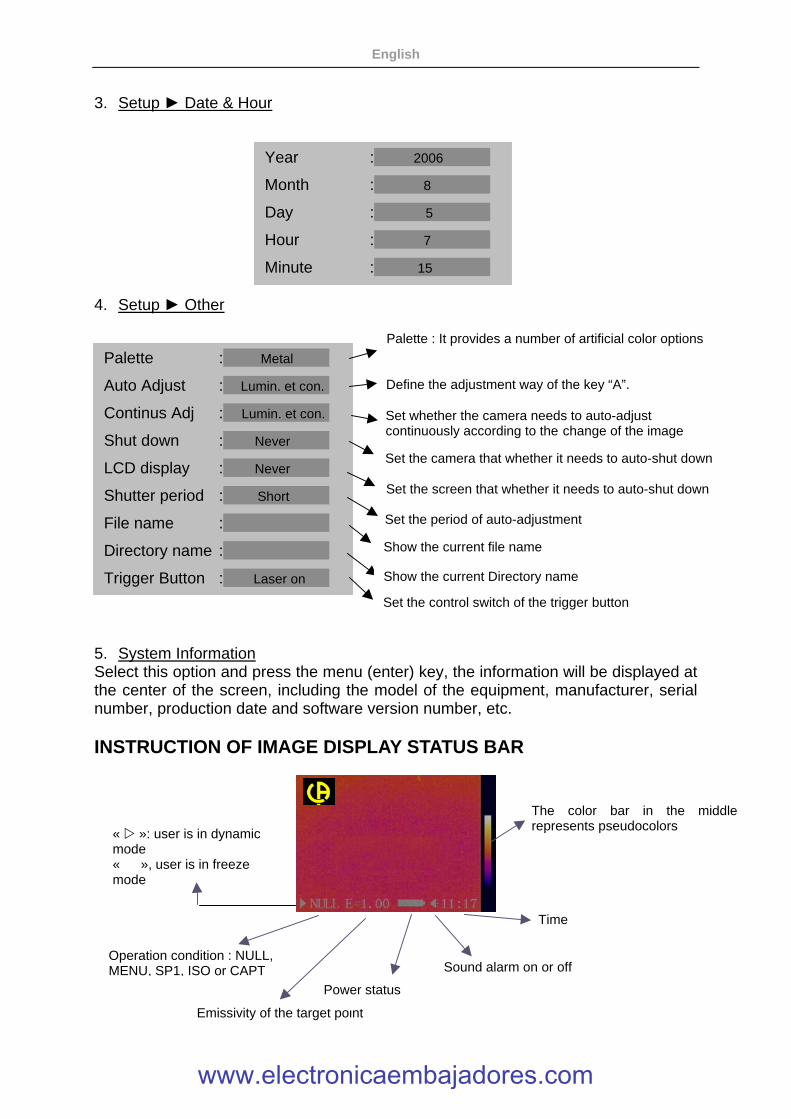
3. Setup ► Date & Hour 4. Setup ► Other 5. System Information Select this option and press the menu (enter) key, the information will be displayed at the center of the screen, including the model of the equipment, manufacturer, serial number, production date and software version number, etc. INSTRUCTION OF IMAGE DISPLAY STATUS BAR
Palette : Metal
Auto Adjust : Lumin. et con.
Continus Adj : Lumin. et con.
Shut down : Never
LCD display : Never
Shutter period : Short
File name :
Directory name :
Trigger Button : Laser on
Sound alarm on or off
The color bar in the middle represents pseudocolors
B
Palette : It provides a number of artificial color options
Define the adjustment way of the key “A”.
Set whether the camera needs to auto-adjust continuously according to the change of the image
Set the camera that whether it needs to auto-shut down
Set the screen that whether it needs to auto-shut down
Set the period of auto-adjustment
Show the current file name
Set the control switch of the trigger button
« � »: user is in dynamic mode « », user is in freeze mode
Operation condition : NULL, MENU, SP1, ISO or CAPT
Emissivity of the target point
Power status
Time
Year : 2006
Month : 8
Day : 5
Hour : 7
Minute : 15
Show the current Directory name
www.electronicaembajadores.com
English
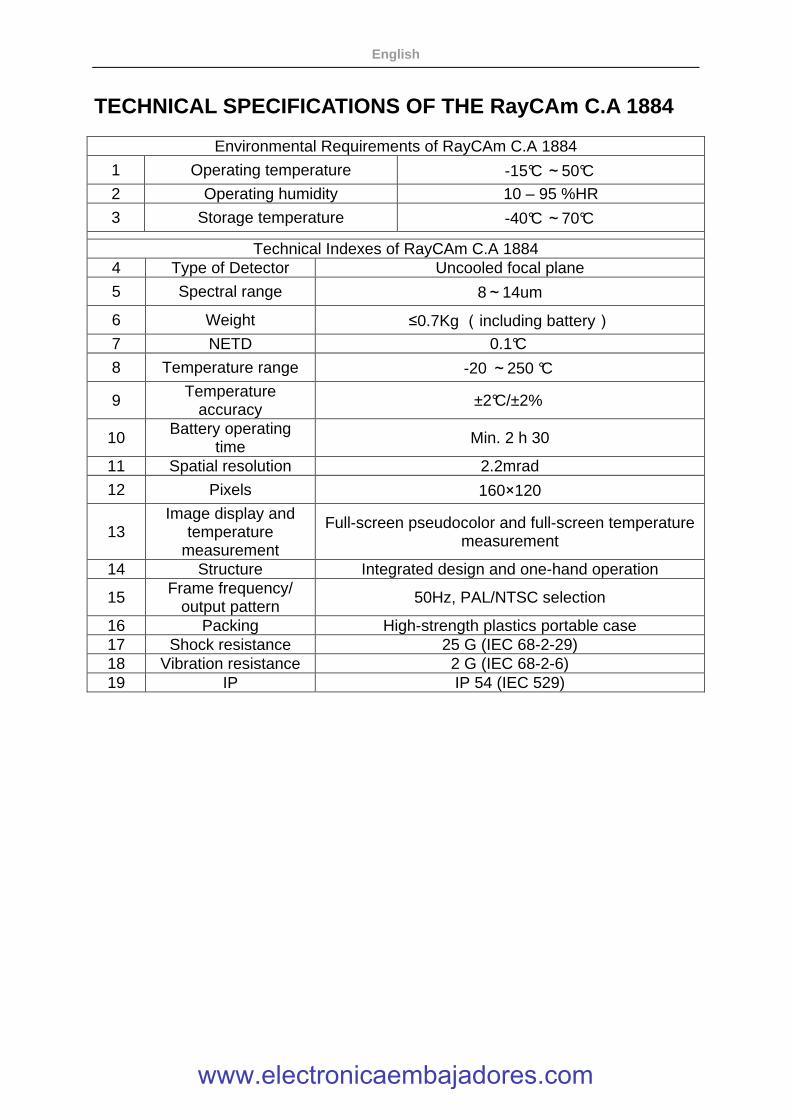
TECHNICAL SPECIFICATIONS OF THE RayCAm C.A 1884
Environmental Requirements of RayCAm C.A 1884
1 Operating temperature -15°C~50°C 2 Operating humidity 10 – 95 %HR
3 Storage temperature -40°C~70°C Technical Indexes of RayCAm C.A 1884
4 Type of Detector Uncooled focal plane
5 Spectral range 8~14um
6 Weight ≤0.7Kg (including battery) 7 NETD 0.1°C
8 Temperature range -20 ~250 °C
9 Temperature accuracy ±2°C/±2%
10 Battery operating time Min. 2 h 30
11 Spatial resolution 2.2mrad
12 Pixels 160×120
13 Image display and
temperature measurement
Full-screen pseudocolor and full-screen temperature measurement
14 Structure Integrated design and one-hand operation
15 Frame frequency/ output pattern 50Hz, PAL/NTSC selection
16 Packing High-strength plastics portable case 17 Shock resistance 25 G (IEC 68-2-29) 18 Vibration resistance 2 G (IEC 68-2-6) 19 IP IP 54 (IEC 529)
www.electronicaembajadores.com
Deutsch
ACHTUNG Eine Infrarotkamera ist ein wertvolles optisches Messgerät, bitte beachten Sie daher folgende Hinweise: 1. Die Kamera nicht auf die Sonne, Laserschweißungen oder andere stark strahlende Wärmequellen richten. 2. Achten Sie darauf, den richtigen Temperaturbereich zu wählen, um ein Objekt mit hoher Temperatur zu untersuchen. 3. Um sicher zu sein, dass die Kamera eine Temperaturstabilität erreicht hat und somit die Messungen korrekt sind, ist beim Einschalten der Kamera eine Wartezeit von 10 bis 15 Minuten einzuhalten bevor die ersten Wärmebilder gespeichert werden. 4. Wenn Teile der Kamera verbrannt oder beschädigt sind oder Probleme infolge der Nichtbeachtung oben genannter Hinweise auftreten, können Hersteller und Händler hierfür nicht haftbar gemacht werden. Alle anfallenden Kosten gehen in diesem Fall zu Lasten des Benutzers.
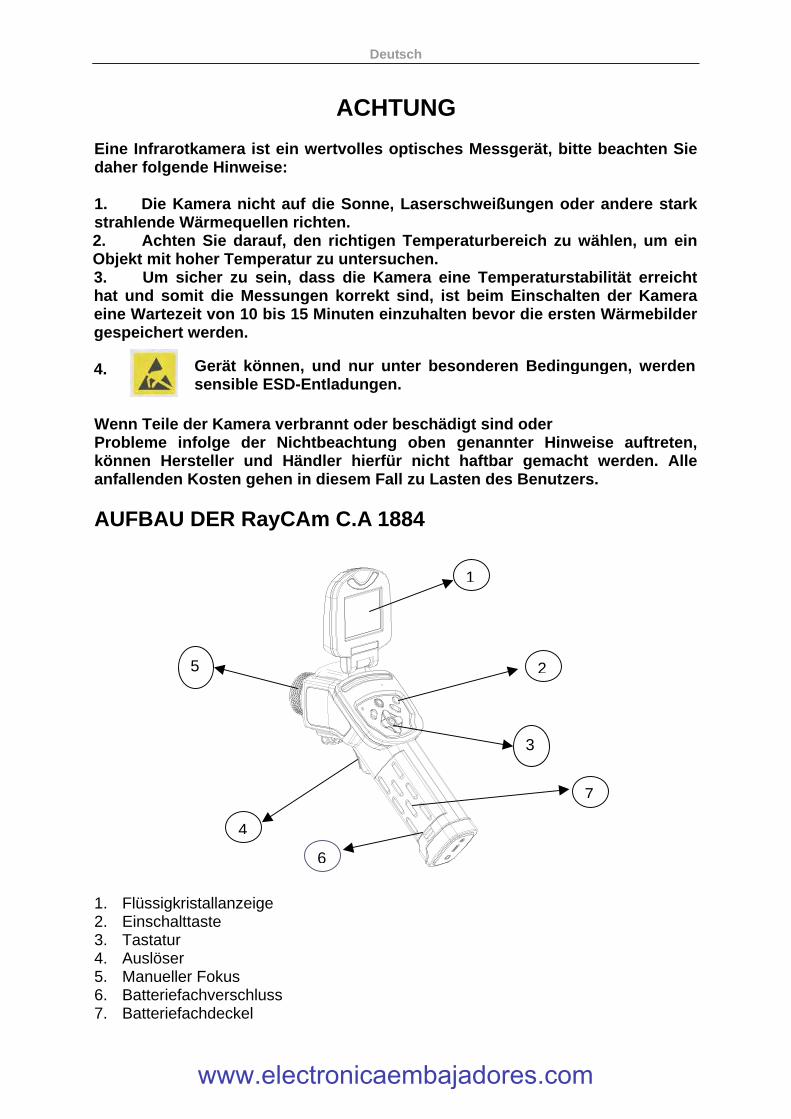
AUFBAU DER RayCAm C.A 1884
1. Flüssigkristallanzeige 2. Einschalttaste 3. Tastatur 4. Auslöser 5. Manueller Fokus 6. Batteriefachverschluss 7. Batteriefachdeckel
1
2
3
4
5
7
6
Gerät können , und nur unter besonderen Bedingungen, werden sensible ESD-Entladungen.
www.electronicaembajadores.com
Deutsch
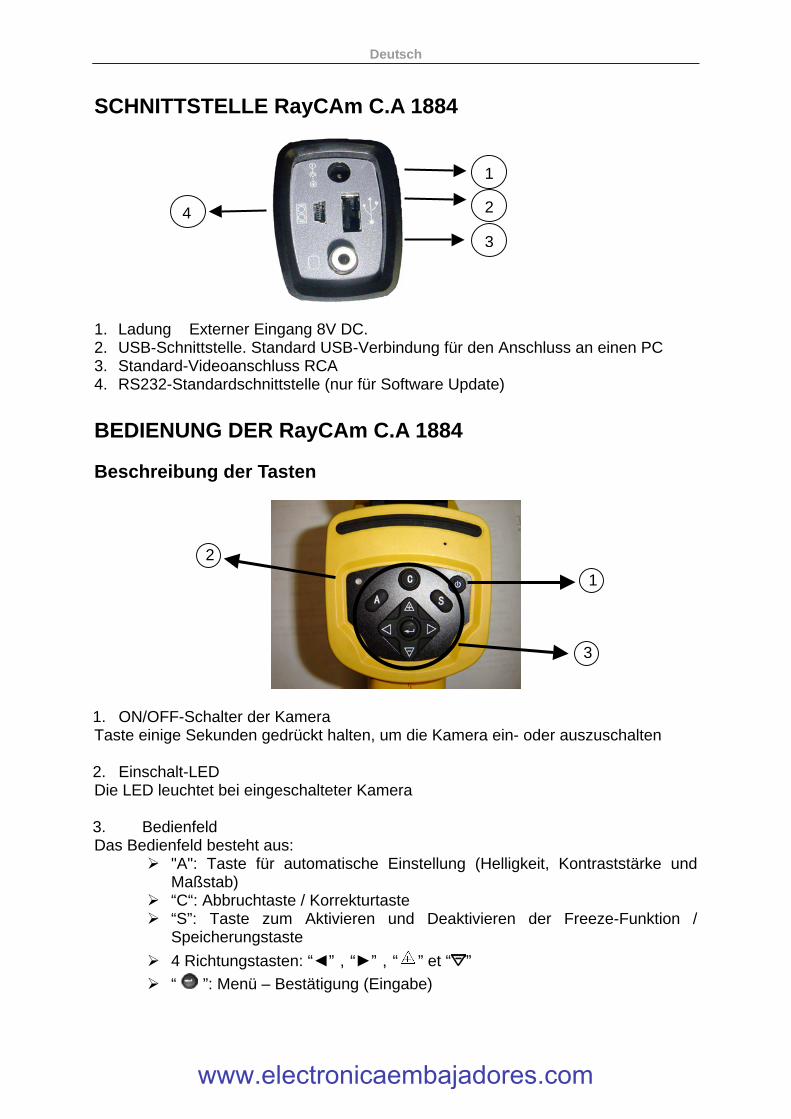
SCHNITTSTELLE RayCAm C.A 1884 1. Ladung Externer Eingang 8V DC. 2. USB-Schnittstelle. Standard USB-Verbindung für den Anschluss an einen PC 3. Standard-Videoanschluss RCA 4. RS232-Standardschnittstelle (nur für Software Update)
BEDIENUNG DER RayCAm C.A 1884 Beschreibung der Tasten
1. ON/OFF-Schalter der Kamera Taste einige Sekunden gedrückt halten, um die Kamera ein- oder auszuschalten 2. Einschalt-LED Die LED leuchtet bei eingeschalteter Kamera 3. Bedienfeld Das Bedienfeld besteht aus:
� "A": Taste für automatische Einstellung (Helligkeit, Kontraststärke und Maßstab)
� “C“: Abbruchtaste / Korrekturtaste � “S”: Taste zum Aktivieren und Deaktivieren der Freeze-Funktion /
Speicherungstaste
� 4 Richtungstasten: “◄”,“►”,“ ” et “ ” � “ ”: Menü – Bestätigung (Eingabe)
2 4
1
3
3
2
1
www.electronicaembajadores.com
Deutsch
Kurzeinführung Beobachtung und Einstellung des IR-Bildes
1. Drücken Sie einige Sekunden die Ein-/Aus-Taste, um die Kamera einzuschalten;
2. Warten Sie, bis die Initialisierung und die Daten vollständig geladen sind; 3. Nehmen Sie den Linsenschutz ab und richten Sie die Kamera auf das
Zielobjekt; 4. Drehen Sie das Objektiv von Hand, um den Fokus einzustellen; 5. Drücken Sie die Taste “A”, um Helligkeit, Kontrast und Skala automatisch
einzustellen Anmerkung: Das Geräusch der Kamera, dass Sie vernehmen, ist normal. Analyse der gemessenen Temperatur
1. Wenn Sie die Kamera eingeschaltet haben, drücken Sie die Eingabetaste, um das Menü aufzurufen;
2. Wählen Sie das Untermenü "Analyse" 3. Drücken Sie die Richtungstasten, um "Cursor 1" zu wählen; 4. Drücken Sie die Eingabetaste, um zu bestätigen. 5. Bewegen Sie die Kamera oder den Cursor mit Hilfe der Richtungstasten auf
dem Zielobjekt; 6. Der oben rechts angezeigte Wert entspricht der Temperatur des Objekts; 7. Den Messwert von mehreren Cursors erhält man, wenn man "Cursor 2" und
"Cursor 3" wählt Hinweis: Der Cursor kann nur dann verstellt werden, wenn „SP1“ in der Anzeigeleiste eingeblendet ist. (Dito für die Cursor 2 und 3) Speichern eines IR-Bildes Lösung 1 : Halten Sie die Taste "SAVE" 3 Sekunden lang gedrückt Lösung 2 :
1. Wenn Sie das Bild eingefroren haben, drücken Sie "EINGABE", um das Menü anzuzeigen.
2. Wählen Sie mit Hilfe der Tasten und das Untermenü "DATEI“ und drücken dann "EINGABE“
3. Wählen Sie " SEICHERN " und bestätigen Sie mit Hilfe der Eingabetaste. Öffnen eines IR-Bilds
1. Drücken Sie « EINGABE », um das Menü anzuzeigen ; 2. Wählen Sie mit Hilfe der Tasten und das Untermenü „DATEI“ und
drücken dann auf „EINGABE“. 3. Wählen Sie « ÖFFNEN » und bestätigen Sie mit Hilfe der Eingabetaste. 4. Blättern Sie die Bilder mit Hilfe der Tasten ◄ ► durch.
Um direkt zu einem gewünschten Bild zu gelangen ohne alle Thermobilder ablaufen zu lassen, drücken Sie bitte auf die Tasten und .
www.electronicaembajadores.com
Deutsch
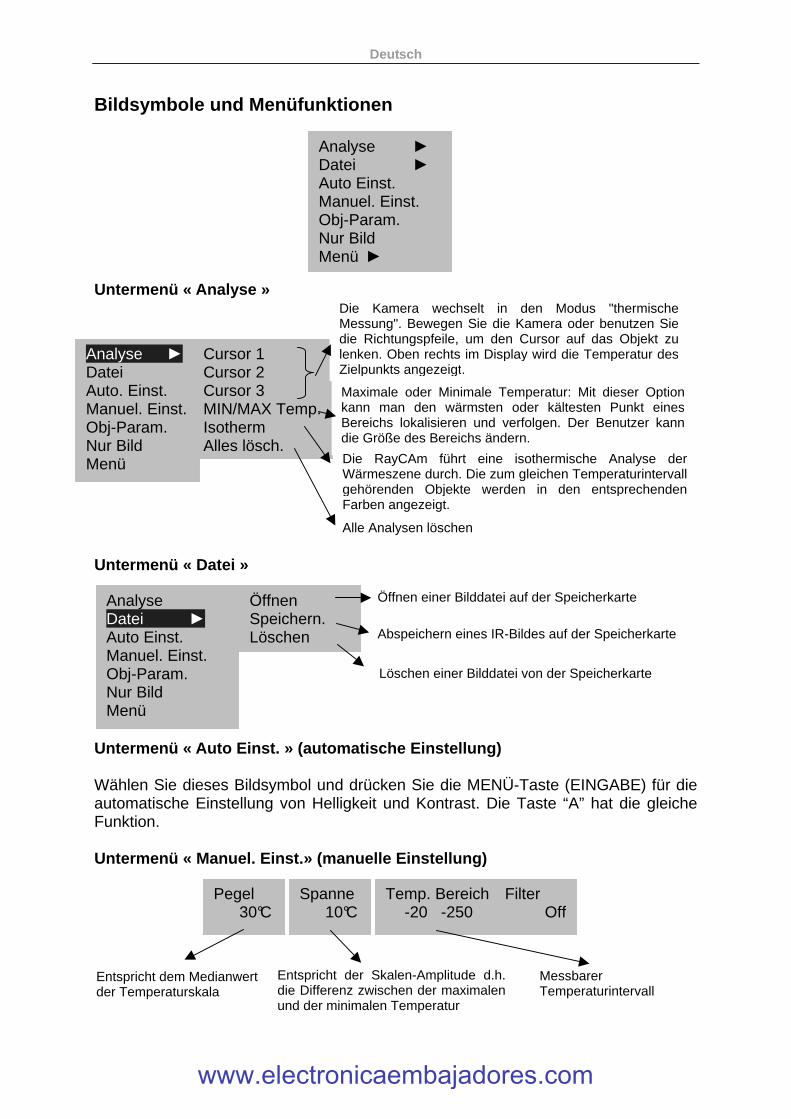
Bildsymbole und Menüfunktionen
Untermenü « Analyse »
Untermenü « Datei »
Untermenü « Auto Einst. » (automatische Einstellung) Wählen Sie dieses Bildsymbol und drücken Sie die MENÜ-Taste (EINGABE) für die automatische Einstellung von Helligkeit und Kontrast. Die Taste “A” hat die gleiche Funktion. Untermenü « Manuel. Einst.» (manuelle Einstellung)
Analyse ► Datei Auto. Einst. Manuel. Einst. Obj-Param. Nur Bild Menü
Cursor 1 Cursor 2 Cursor 3 MIN/MAX Temp. Isotherm Alles lösch.
Analyse Datei ► Auto Einst. Manuel. Einst. Obj-Param. Nur Bild Menü
Öffnen Speichern. Löschen
Pegel 30°C
Spanne 10°C
Temp. Bereich -20 -250
Filter Off
Die Kamera wechselt in den Modus "thermische Messung". Bewegen Sie die Kamera oder benutzen Sie die Richtungspfeile, um den Cursor auf das Objekt zu lenken. Oben rechts im Display wird die Temperatur des Zielpunkts angezeigt.
Maximale oder Minimale Temperatur: Mit dieser Option kann man den wärmsten oder kältesten Punkt eines Bereichs lokalisieren und verfolgen. Der Benutzer kann die Größe des Bereichs ändern. Die RayCAm führt eine isothermische Analyse der Wärmeszene durch. Die zum gleichen Temperaturintervall gehörenden Objekte werden in den entsprechenden Farben angezeigt.
Alle Analysen löschen
Öffnen einer Bilddatei auf der Speicherkarte
Abspeichern eines IR-Bildes auf der Speicherkarte
Löschen einer Bilddatei von der Speicherkarte
Entspricht dem Medianwert der Temperaturskala
Entspricht der Skalen-Amplitude d.h. die Differenz zwischen der maximalen und der minimalen Temperatur
Messbarer Temperaturintervall
Analyse ► Datei ► Auto Einst. Manuel. Einst. Obj-Param. Nur Bild Menü ►
www.electronicaembajadores.com
Deutsch
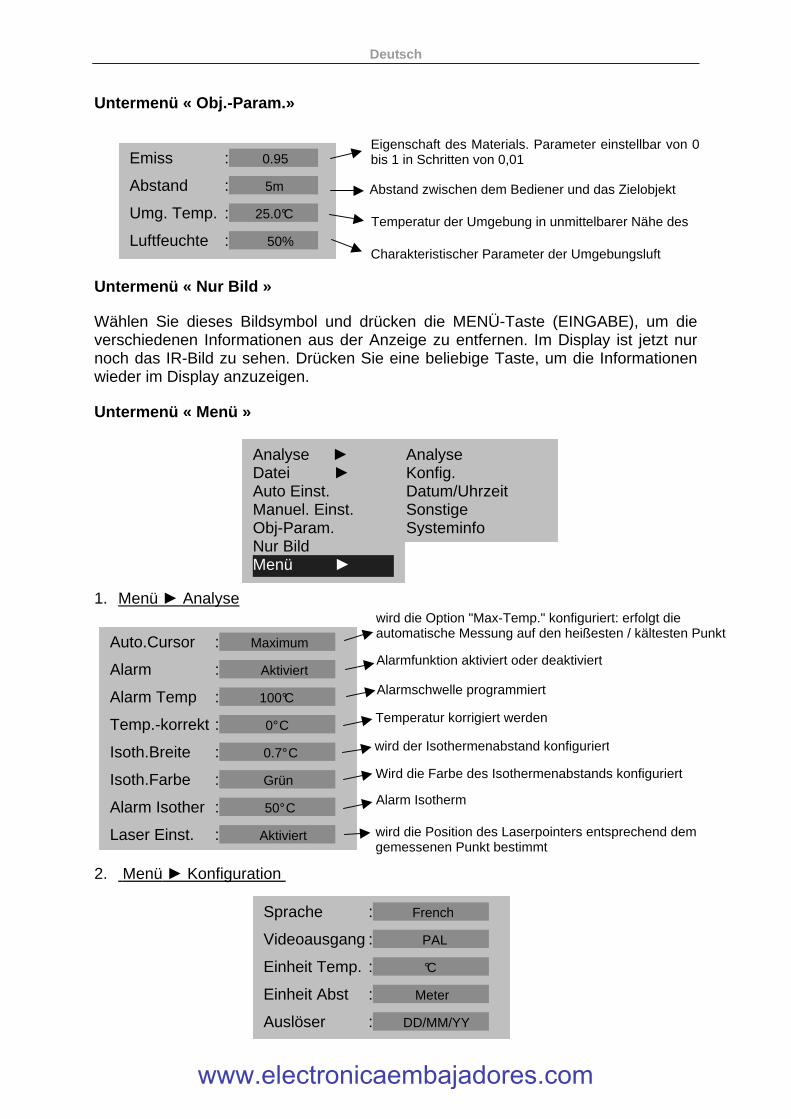
Untermenü « Obj.-Param.» Untermenü « Nur Bild » Wählen Sie dieses Bildsymbol und drücken die MENÜ-Taste (EINGABE), um die verschiedenen Informationen aus der Anzeige zu entfernen. Im Display ist jetzt nur noch das IR-Bild zu sehen. Drücken Sie eine beliebige Taste, um die Informationen wieder im Display anzuzeigen. Untermenü « Menü » 1. Menü ► Analyse 2. Menü ► Konfiguration
Auto.Cursor : Maximum
Alarm : Aktiviert
Alarm Temp : 100°C
Temp.-korrekt : 0° C
Isoth.Breite : 0.7° C
Isoth.Farbe : Grün
Alarm Isother : 50° C
Laser Einst. : Aktiviert
Emiss : 0.95
Abstand : 5m
Umg. Temp. : 25.0°C
Luftfeuchte : 50%
Eigenschaft des Materials. Parameter einstellbar von 0 bis 1 in Schritten von 0,01
Abstand zwischen dem Bediener und das Zielobjekt
Temperatur der Umgebung in unmittelbarer Nähe des Zielobjekts Charakteristischer Parameter der Umgebungsluft
wird die Option "Max-Temp." konfiguriert: erfolgt die automatische Messung auf den heißesten / kältesten Punkt
Alarmfunktion aktiviert oder deaktiviert
Alarmschwelle programmiert
Temperatur korrigiert werden
wird der Isothermenabstand konfiguriert
Wird die Farbe des Isothermenabstands konfiguriert
Alarm Isotherm
wird die Position des Laserpointers entsprechend dem gemessenen Punkt bestimmt
Analyse ► Datei ► Auto Einst. Manuel. Einst. Obj-Param. Nur Bild Menü ►
Analyse Konfig. Datum/Uhrzeit Sonstige Systeminfo
Sprache : French
Videoausgang : PAL
Einheit Temp. : °C
Einheit Abst : Meter
Auslöser : DD/MM/YY
www.electronicaembajadores.com
Deutsch
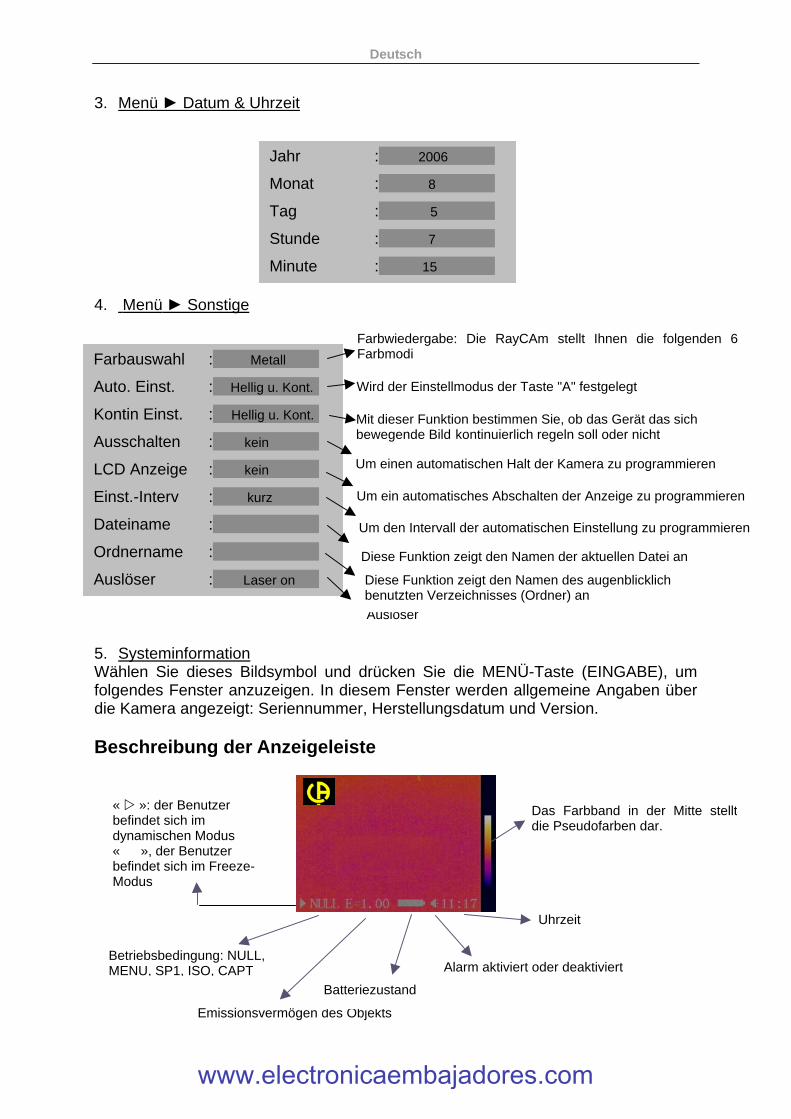
3. Menü ► Datum & Uhrzeit 4. Menü ► Sonstige 5. Systeminformation Wählen Sie dieses Bildsymbol und drücken Sie die MENÜ-Taste (EINGABE), um folgendes Fenster anzuzeigen. In diesem Fenster werden allgemeine Angaben über die Kamera angezeigt: Seriennummer, Herstellungsdatum und Version. Beschreibung der Anzeigeleiste
Farbauswahl : Metall
Auto. Einst. : Hellig u. Kont.
Kontin Einst. : Hellig u. Kont.
Ausschalten : kein
LCD Anzeige : kein
Einst.-Interv : kurz
Dateiname :
Ordnername :
Auslöser : Laser on
Alarm aktiviert oder deaktiviert
Das Farbband in der Mitte stellt die Pseudofarben dar.
B
Farbwiedergabe: Die RayCAm stellt Ihnen die folgenden 6 Farbmodi
Wird der Einstellmodus der Taste "A" festgelegt
Mit dieser Funktion bestimmen Sie, ob das Gerät das sich bewegende Bild kontinuierlich regeln soll oder nicht
Um einen automatischen Halt der Kamera zu programmieren
Um ein automatisches Abschalten der Anzeige zu programmieren
Um den Intervall der automatischen Einstellung zu programmieren
Diese Funktion zeigt den Namen der aktuellen Datei an
Auslöser
« � »: der Benutzer befindet sich im dynamischen Modus « », der Benutzer befindet sich im Freeze-Modus
Betriebsbedingung: NULL, MENU, SP1, ISO, CAPT
Emissionsvermögen des Objekts
Batteriezustand
Uhrzeit
Jahr : 2006
Monat : 8
Tag : 5
Stunde : 7
Minute : 15
Diese Funktion zeigt den Namen des augenblicklich benutzten Verzeichnisses (Ordner) an
www.electronicaembajadores.com
Deutsch
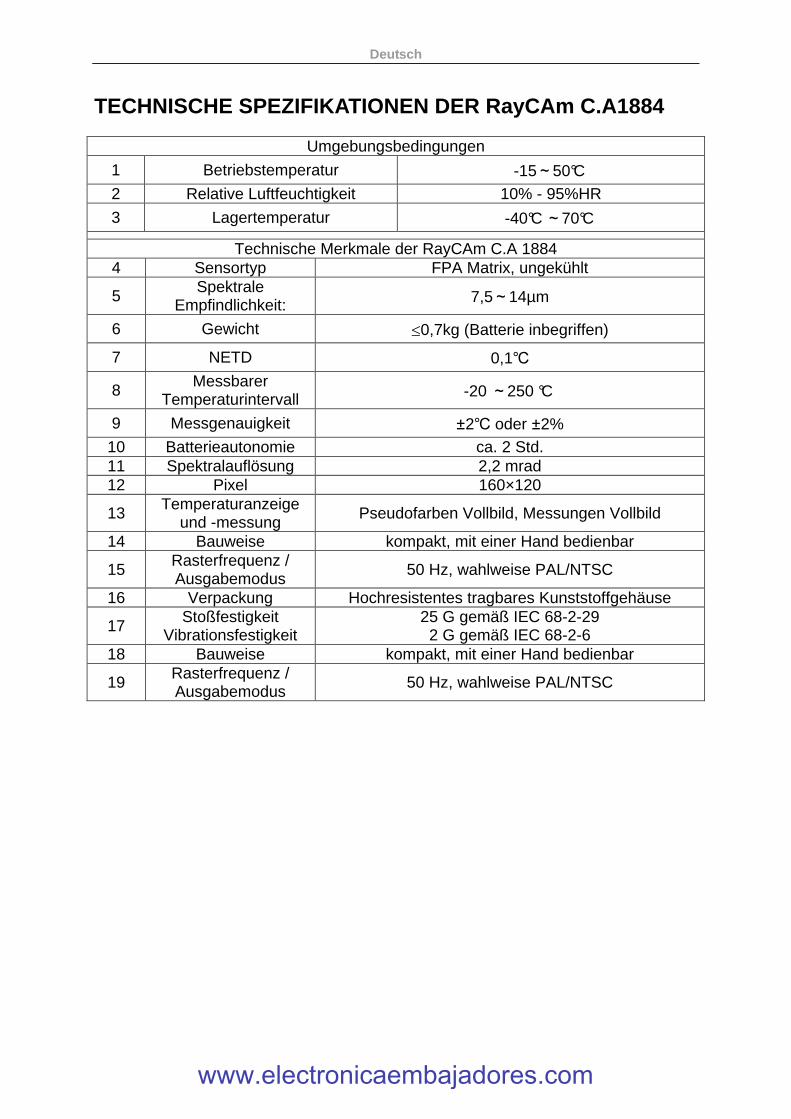
TECHNISCHE SPEZIFIKATIONEN DER RayCAm C.A1884
Umgebungsbedingungen
1 Betriebstemperatur -15~50°C 2 Relative Luftfeuchtigkeit 10% - 95%HR
3 Lagertemperatur -40°C~70°C Technische Merkmale der RayCAm C.A 1884
4 Sensortyp FPA Matrix, ungekühlt
5 Spektrale Empfindlichkeit: 7,5~14µm
6 Gewicht ≤0,7kg (Batterie inbegriffen)
7 NETD 0,1℃
8 Messbarer Temperaturintervall -20 ~250 °C
9 Messgenauigkeit ±2℃ oder ±2% 10 Batterieautonomie ca. 2 Std. 11 Spektralauflösung 2,2 mrad 12 Pixel 160×120
13 Temperaturanzeige und -messung Pseudofarben Vollbild, Messungen Vollbild
14 Bauweise kompakt, mit einer Hand bedienbar
15 Rasterfrequenz / Ausgabemodus 50 Hz, wahlweise PAL/NTSC
16 Verpackung Hochresistentes tragbares Kunststoffgehäuse
17 Stoßfestigkeit Vibrationsfestigkeit
25 G gemäß IEC 68-2-29 2 G gemäß IEC 68-2-6
18 Bauweise kompakt, mit einer Hand bedienbar
19 Rasterfrequenz / Ausgabemodus 50 Hz, wahlweise PAL/NTSC
www.electronicaembajadores.com
Italiano
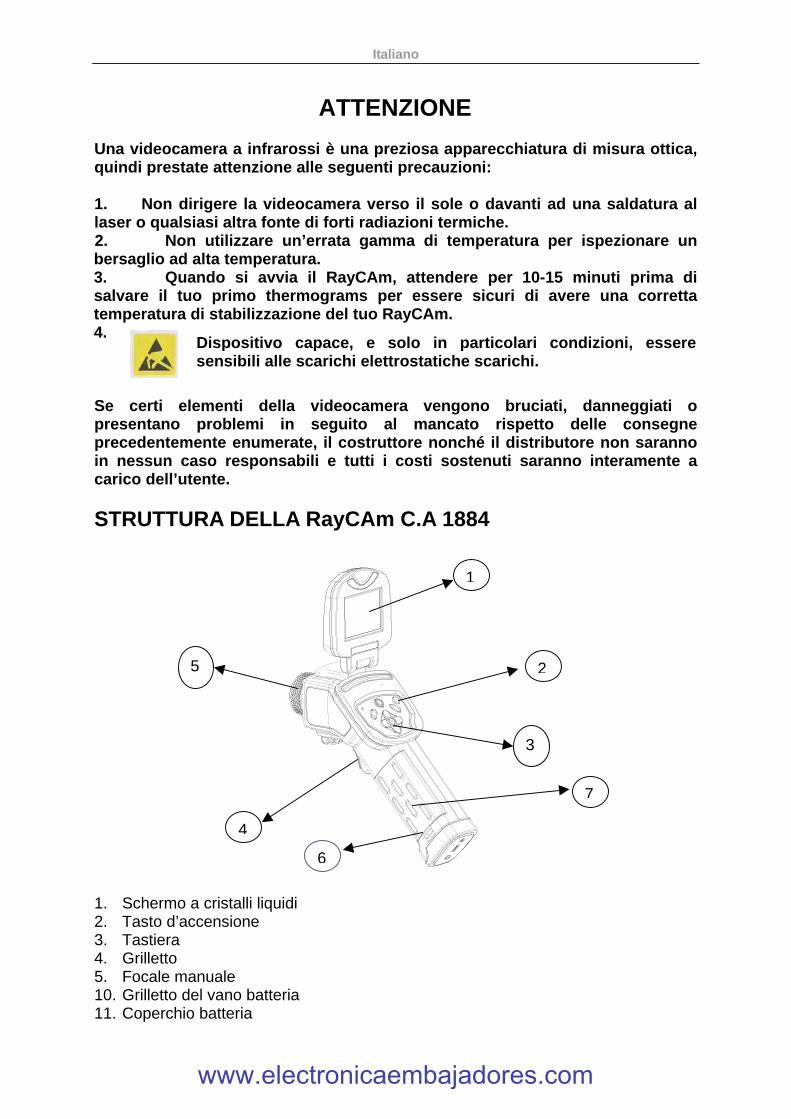
ATTENZIONE Una videocamera a infrarossi è una preziosa apparecchiatura di misura ottica, quindi prestate attenzione alle seguenti precauzioni: 1. Non dirigere la videocamera verso il sole o davanti ad una saldatura al laser o qualsiasi altra fonte di forti radiazioni termiche. 2. Non utilizzare un’errata gamma di temperatura per ispezionare un bersaglio ad alta temperatura. 3. Quando si avvia il RayCAm, attendere per 10-15 minuti prima di salvare il tuo primo thermograms per essere sicuri di avere una corretta temperatura di stabilizzazione del tuo RayCAm. 4. Se certi elementi della videocamera vengono bruciati, danneggiati o presentano problemi in seguito al mancato rispetto delle consegne precedentemente enumerate, il costruttore nonché il distributore non saranno in nessun caso responsabili e tutti i costi sostenuti saranno interamente a carico dell’utente.
STRUTTURA DELLA RayCAm C.A 1884
1. Schermo a cristalli liquidi 2. Tasto d’accensione 3. Tastiera 4. Grilletto 5. Focale manuale 10. Grilletto del vano batteria 11. Coperchio batteria
1
2
3
4
5
7
6
Dispositivo capace, e solo in particolari condizioni, essere sensibili alle scarichi elettrostatiche scarichi.
www.electronicaembajadores.com
Italiano
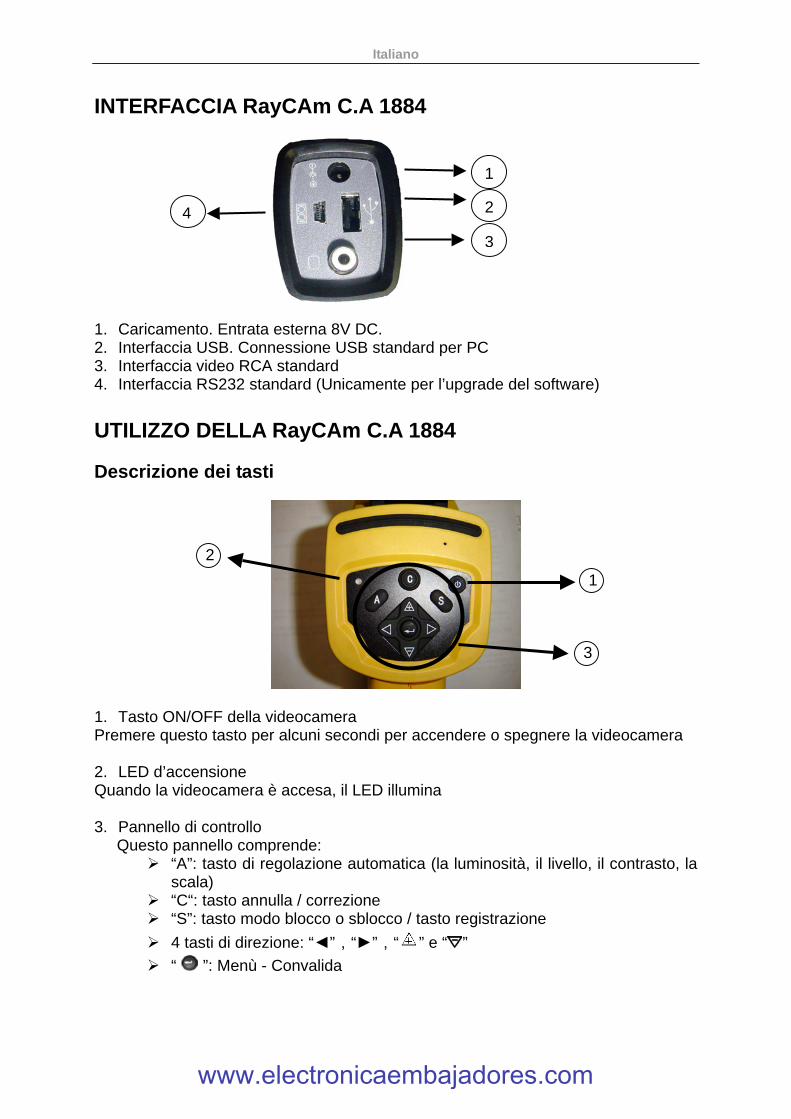
INTERFACCIA RayCAm C.A 1884 1. Caricamento. Entrata esterna 8V DC. 2. Interfaccia USB. Connessione USB standard per PC 3. Interfaccia video RCA standard 4. Interfaccia RS232 standard (Unicamente per l’upgrade del software)
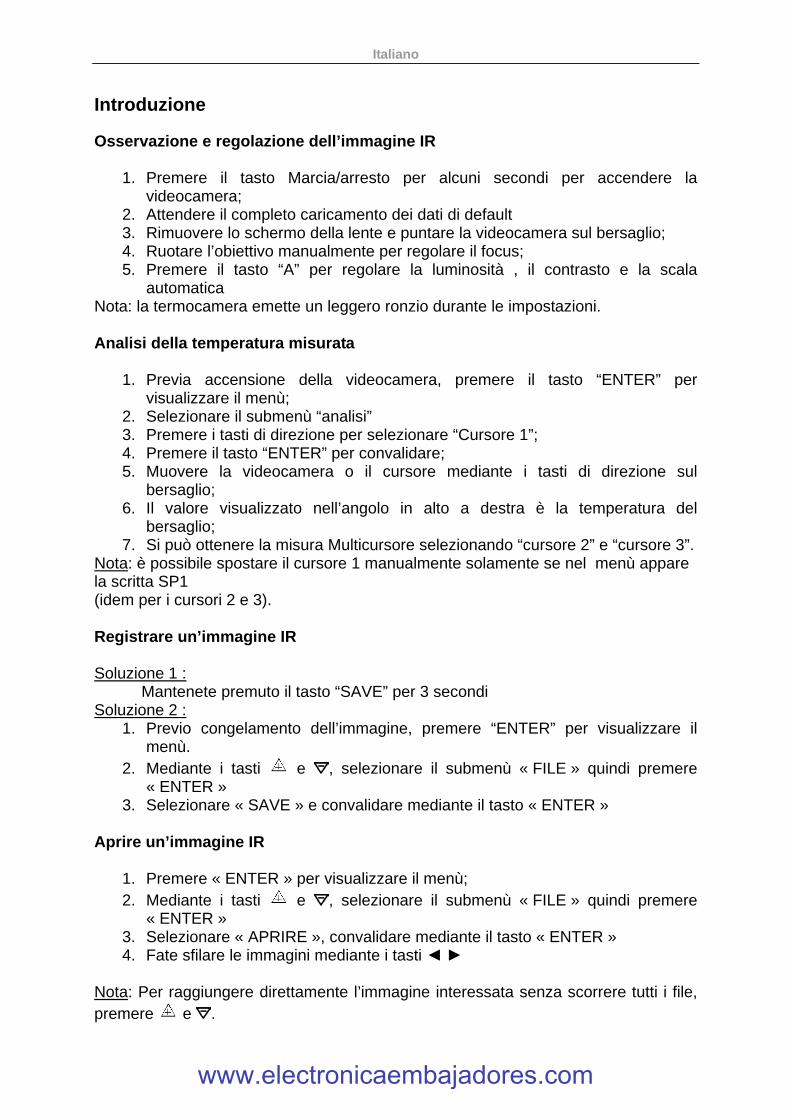
UTILIZZO DELLA RayCAm C.A 1884 Descrizione dei tasti
1. Tasto ON/OFF della videocamera Premere questo tasto per alcuni secondi per accendere o spegnere la videocamera 2. LED d’accensione Quando la videocamera è accesa, il LED illumina 3. Pannello di controllo
Questo pannello comprende: � “A”: tasto di regolazione automatica (la luminosità, il livello, il contrasto, la
scala) � “C“: tasto annulla / correzione � “S”: tasto modo blocco o sblocco / tasto registrazione
� 4 tasti di direzione: “◄”,“►”,“ ” e “ ”
� “ ”: Menù - Convalida
2 4
1
3
3
2
1
www.electronicaembajadores.com
Italiano
Introduzione Osservazione e regolazione dell’immagine IR
1. Premere il tasto Marcia/arresto per alcuni secondi per accendere la videocamera;
2. Attendere il completo caricamento dei dati di default 3. Rimuovere lo schermo della lente e puntare la videocamera sul bersaglio; 4. Ruotare l’obiettivo manualmente per regolare il focus; 5. Premere il tasto “A” per regolare la luminosità , il contrasto e la scala
automatica Nota: la termocamera emette un leggero ronzio durante le impostazioni. Analisi della temperatura misurata
1. Previa accensione della videocamera, premere il tasto “ENTER” per visualizzare il menù;
2. Selezionare il submenù “analisi” 3. Premere i tasti di direzione per selezionare “Cursore 1”; 4. Premere il tasto “ENTER” per convalidare; 5. Muovere la videocamera o il cursore mediante i tasti di direzione sul
bersaglio; 6. Il valore visualizzato nell’angolo in alto a destra è la temperatura del
bersaglio; 7. Si può ottenere la misura Multicursore selezionando “cursore 2” e “cursore 3”.
Nota: è possibile spostare il cursore 1 manualmente solamente se nel menù appare la scritta SP1 (idem per i cursori 2 e 3). Registrare un’immagine IR Soluzione 1 :
Mantenete premuto il tasto “SAVE” per 3 secondi Soluzione 2 :
1. Previo congelamento dell’immagine, premere “ENTER” per visualizzare il menù.
2. Mediante i tasti e , selezionare il submenù « FILE » quindi premere « ENTER »
3. Selezionare « SAVE » e convalidare mediante il tasto « ENTER » Aprire un’immagine IR
1. Premere « ENTER » per visualizzare il menù; 2. Mediante i tasti e , selezionare il submenù « FILE » quindi premere
« ENTER » 3. Selezionare « APRIRE », convalidare mediante il tasto « ENTER » 4. Fate sfilare le immagini mediante i tasti ◄ ►
Nota: Per raggiungere direttamente l’immagine interessata senza scorrere tutti i file, premere e .
www.electronicaembajadores.com
Italiano
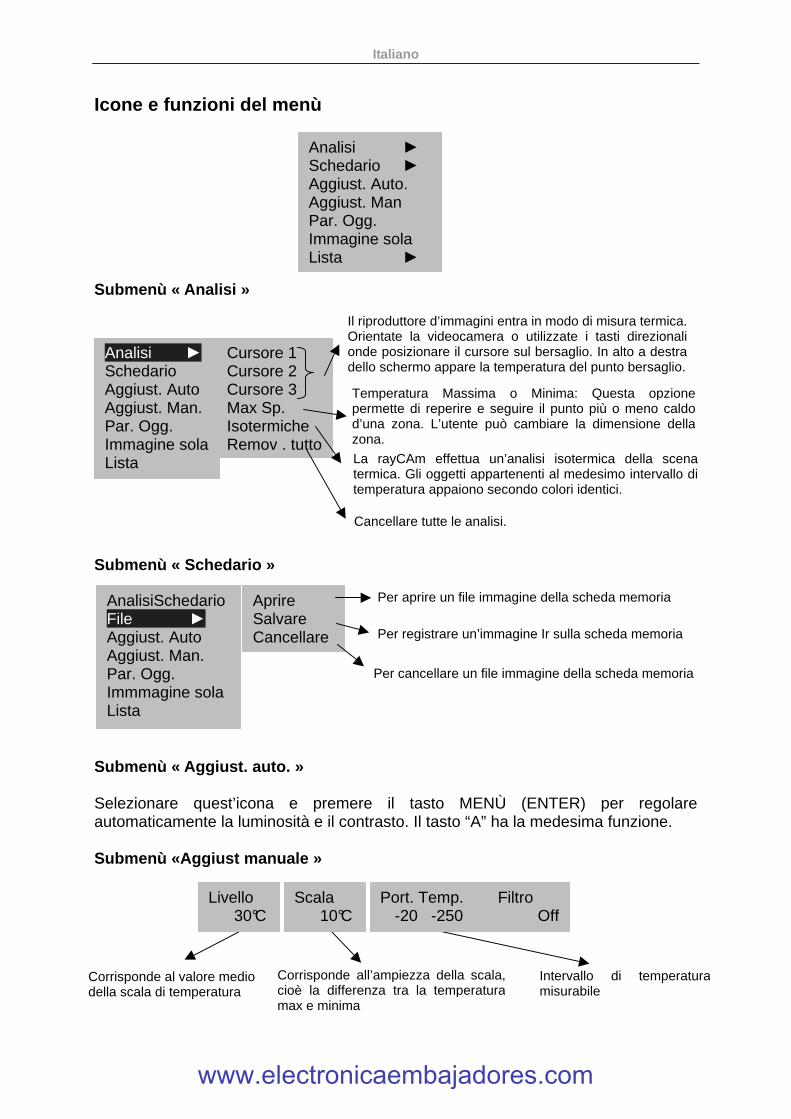
Icone e funzioni del menù
Submenù « Analisi »
Submenù « Schedario »
Submenù « Aggiust. auto. » Selezionare quest’icona e premere il tasto MENÙ (ENTER) per regolare automaticamente la luminosità e il contrasto. Il tasto “A” ha la medesima funzione. Submenù «Aggiust manuale »
AnalisiSchedario File ► Aggiust. Auto Aggiust. Man. Par. Ogg. Immmagine sola Lista
Aprire Salvare Cancellare
Analisi ► Schedario Aggiust. Auto Aggiust. Man. Par. Ogg. Immagine sola Lista
Cursore 1 Cursore 2 Cursore 3 Max Sp. Isotermiche Remov . tutto
Il riproduttore d’immagini entra in modo di misura termica. Orientate la videocamera o utilizzate i tasti direzionali onde posizionare il cursore sul bersaglio. In alto a destra dello schermo appare la temperatura del punto bersaglio.
Temperatura Massima o Minima: Questa opzione permette di reperire e seguire il punto più o meno caldo d’una zona. L’utente può cambiare la dimensione della zona.
La rayCAm effettua un’analisi isotermica della scena termica. Gli oggetti appartenenti al medesimo intervallo di temperatura appaiono secondo colori identici.
Cancellare tutte le analisi.
Per aprire un file immagine della scheda memoria
Per registrare un’immagine Ir sulla scheda memoria
Per cancellare un file immagine della scheda memoria
Corrisponde al valore medio della scala di temperatura
Corrisponde all’ampiezza della scala, cioè la differenza tra la temperatura max e minima
Intervallo di temperatura misurabile
Analisi ► Schedario ► Aggiust. Auto. Aggiust. Man Par. Ogg. Immagine sola Lista ►
Livello 30°C
Scala 10°C
Port. Temp. -20 -250
Filtro Off
www.electronicaembajadores.com
Italiano
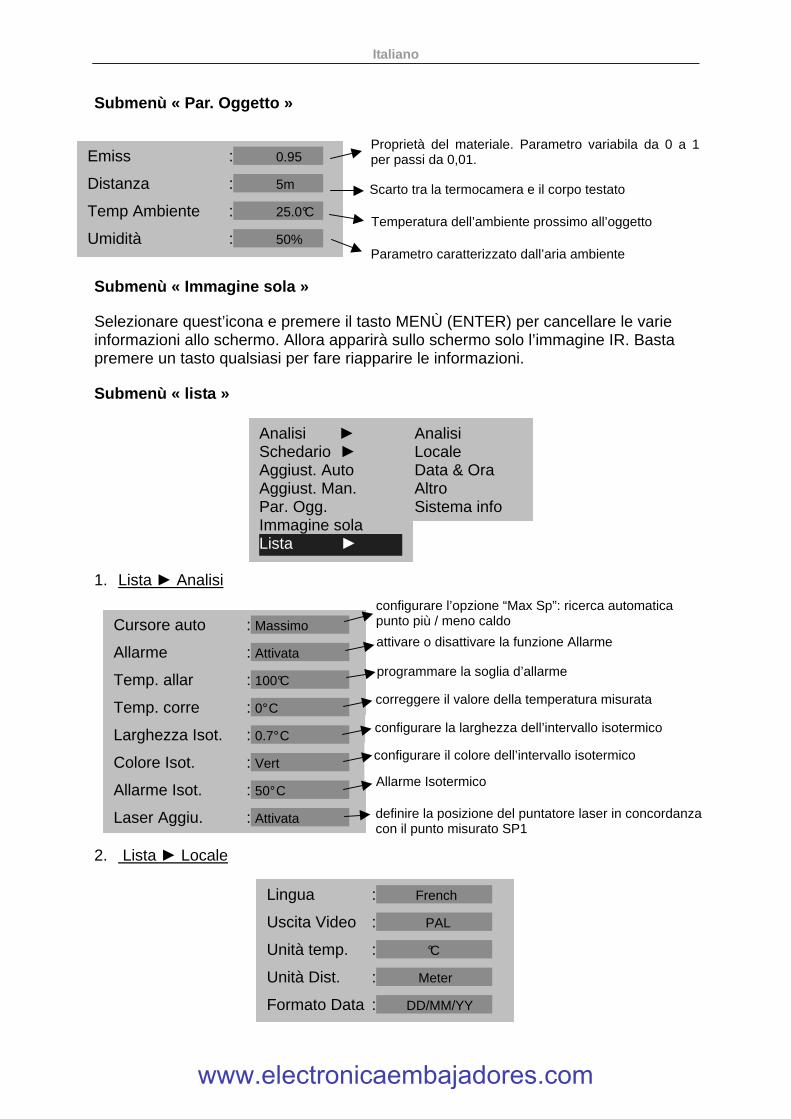
Submenù « Par. Oggetto » Submenù « Immagine sola » Selezionare quest’icona e premere il tasto MENÙ (ENTER) per cancellare le varie informazioni allo schermo. Allora apparirà sullo schermo solo l’immagine IR. Basta premere un tasto qualsiasi per fare riapparire le informazioni. Submenù « lista » 1. Lista ► Analisi 2. Lista ► Locale
Cursore auto : Massimo
Allarme : Attivata
Temp. allar : 100°C
Temp. corre : 0° C
Larghezza Isot. : 0.7° C
Colore Isot. : Vert
Allarme Isot. : 50° C
Laser Aggiu. : Attivata
Emiss : 0.95
Distanza : 5m
Temp Ambiente : 25.0°C
Umidità : 50%
Proprietà del materiale. Parametro variabila da 0 a 1 per passi da 0,01.
Scarto tra la termocamera e il corpo testato
Temperatura dell’ambiente prossimo all’oggetto
Parametro caratterizzato dall’aria ambiente
configurare l’opzione “Max Sp”: ricerca automatica punto più / meno caldo
attivare o disattivare la funzione Allarme
programmare la soglia d’allarme
correggere il valore della temperatura misurata
configurare la larghezza dell’intervallo isotermico
configurare il colore dell’intervallo isotermico
Allarme Isotermico
definire la posizione del puntatore laser in concordanza con il punto misurato SP1
Analisi ► Schedario ► Aggiust. Auto Aggiust. Man. Par. Ogg. Immagine sola Lista ►
Analisi Locale Data & Ora Altro Sistema info
Lingua : French
Uscita Video : PAL
Unità temp. : °C
Unità Dist. : Meter
Formato Data : DD/MM/YY
www.electronicaembajadores.com

Italiano
3. Lista ► Date & Ora 4. Lista ► Altre Indicazioni 5. Informazione sistema Selezionare questa icona e premere il tasto “ENTER” per visualizzare la seguente finestra. Questa finestra fornisce le informazioni generali: Numero di serie, Data di fabbricazione e versione. Descrizione della barra di visualizzazione
Tavolozza : Metallo
Aggiu. Auto : Lumin. e con.
Aggiu. Continua : Lumin. e con.
Arresto : mai
Affissione LCD : mai
Periodo Aggiust.: Brevi
Nome file :
Nome directory :
Trigger : Laser on
Allarme attivare o disattivare
La banda colorata centrale rappresenta gli pseudo colori
B
Nome del directory in corso
Resa cromatica: la rayCAm mette a vostra disposizione 6 modi colore
Serve a definire il modo di regolazione del tasto “A”
Serve a definire se l’apparecchio deve (si o no) regolare in continuo l’immagine mobile
Per programmare un arresto automatico della camera
Per programmare un arresto automatico della visualizzazione Per programmare una periodicità d’autoregolazione
Nome del file in corso
Configurazione del grilletto d’attivazione
« � »: l’utente è in modo dinamico « », l’utente è in modo congelato
Condizione operativa: NULL, MENU, SP1, ISO o CAPT
Emissività del bersaglio
Stato di carica della batteria
Ora
Anno : 2006
Mese : 8
Giorno : 5
Ora : 7
Minuto : 15
www.electronicaembajadores.com
Italiano
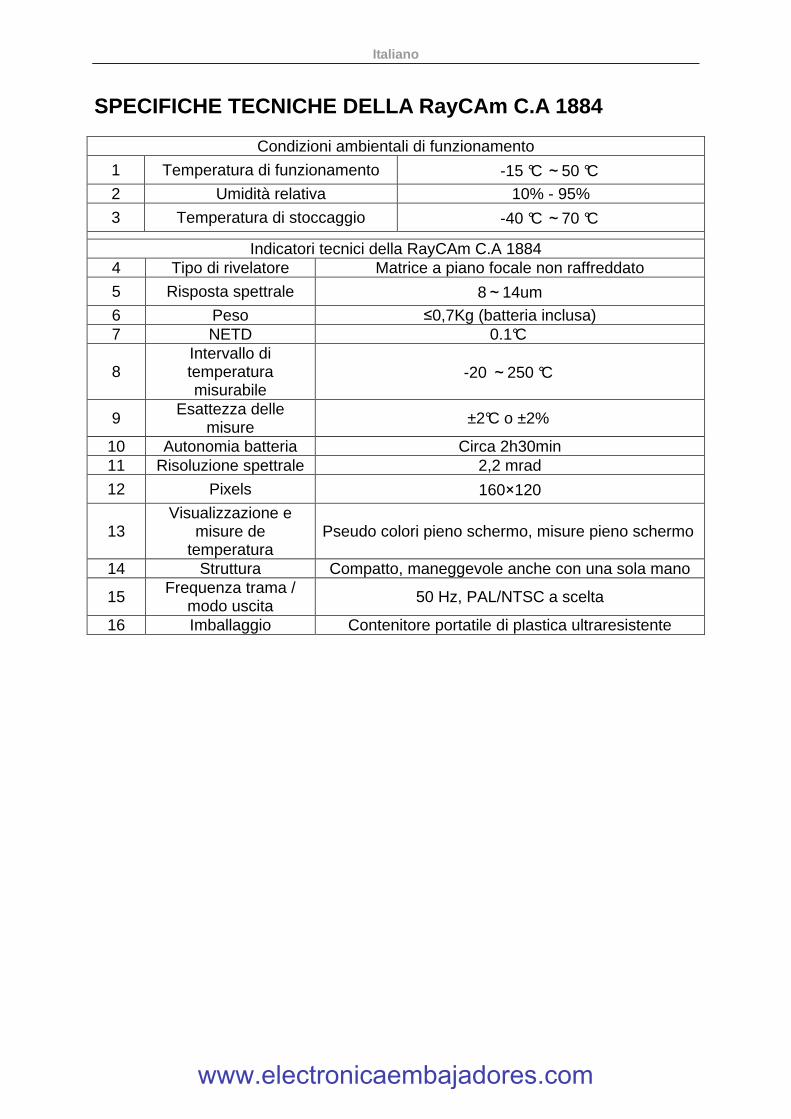
SPECIFICHE TECNICHE DELLA RayCAm C.A 1884
Condizioni ambientali di funzionamento
1 Temperatura di funzionamento -15 °C~50 °C 2 Umidità relativa 10% - 95%
3 Temperatura di stoccaggio -40 °C~70 °C Indicatori tecnici della RayCAm C.A 1884
4 Tipo di rivelatore Matrice a piano focale non raffreddato
5 Risposta spettrale 8~14um 6 Peso ≤0,7Kg (batteria inclusa) 7 NETD 0.1°C
8 Intervallo di temperatura misurabile
-20 ~250 °C
9 Esattezza delle misure ±2°C o ±2%
10 Autonomia batteria Circa 2h30min 11 Risoluzione spettrale 2,2 mrad
12 Pixels 160×120
13 Visualizzazione e
misure de temperatura
Pseudo colori pieno schermo, misure pieno schermo
14 Struttura Compatto, maneggevole anche con una sola mano
15 Frequenza trama / modo uscita 50 Hz, PAL/NTSC a scelta
16 Imballaggio Contenitore portatile di plastica ultraresistente
www.electronicaembajadores.com
Español
ATENCIÓN Una cámara infrarroja es un equipo de medida óptico frágil. Prestar especial atención a las siguientes advertencias: 1. No dirigir la cámara hacia el sol o delante de una soldadura con láser o cualquier otra fuente que genere fuertes radiaciones térmicas. 2. No utilizar una gama de temperatura inadecuada para comprobar un blanco con una temperatura alta. 3. Esperar entre 10 y 15 minutos desde la puesta en marcha antes de registrar las primeras termografías para estar seguro de que la cámara se ha estabilizado en temperatura y que las medidas serán correctas. 4. En caso de que algún elemento de la cámara se queme, deteriore o falle debido al incumplimiento de las instrucciones indicadas anteriormente, el constructor así como el distribuidor no serán responsables y todos los gastos incurridos correrán a cargo del usuario.
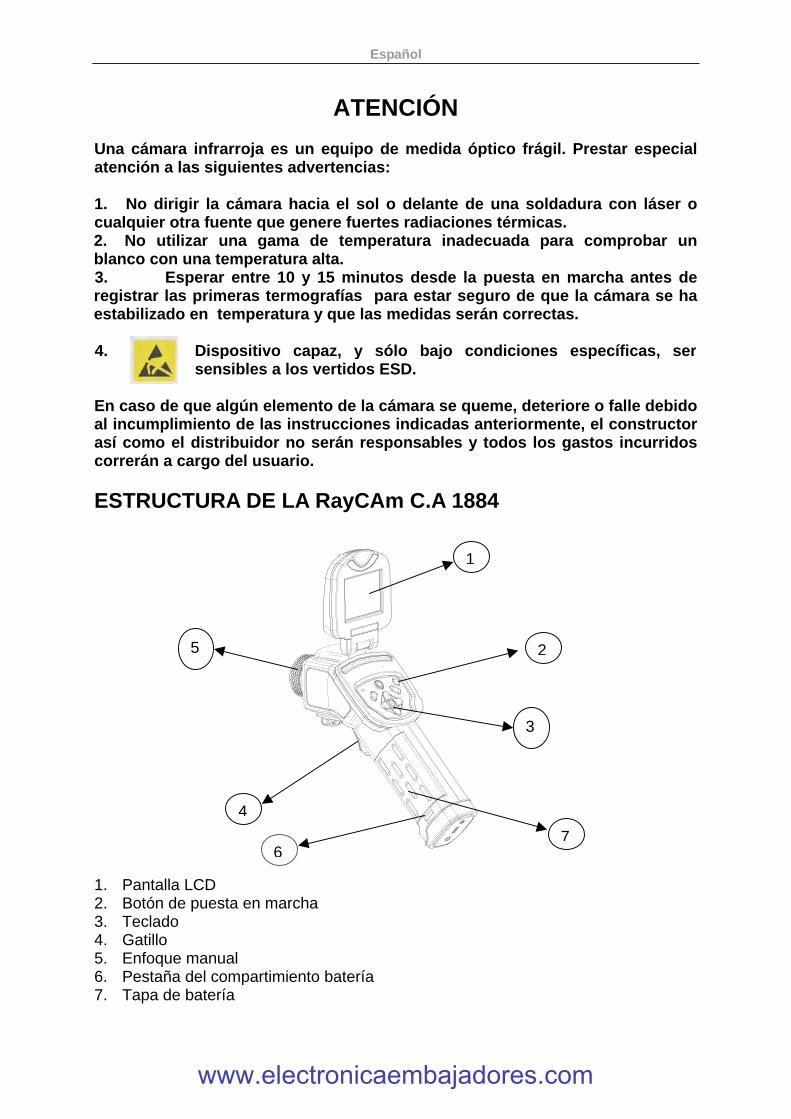
ESTRUCTURA DE LA RayCAm C.A 1884
1. Pantalla LCD 2. Botón de puesta en marcha 3. Teclado 4. Gatillo 5. Enfoque manual 6. Pestaña del compartimiento batería 7. Tapa de batería
1
2
3
4
5
7 6
Dispositivo capaz, y sólo bajo condiciones específicas, ser sensibles a los vertidos ESD.
www.electronicaembajadores.com
Español
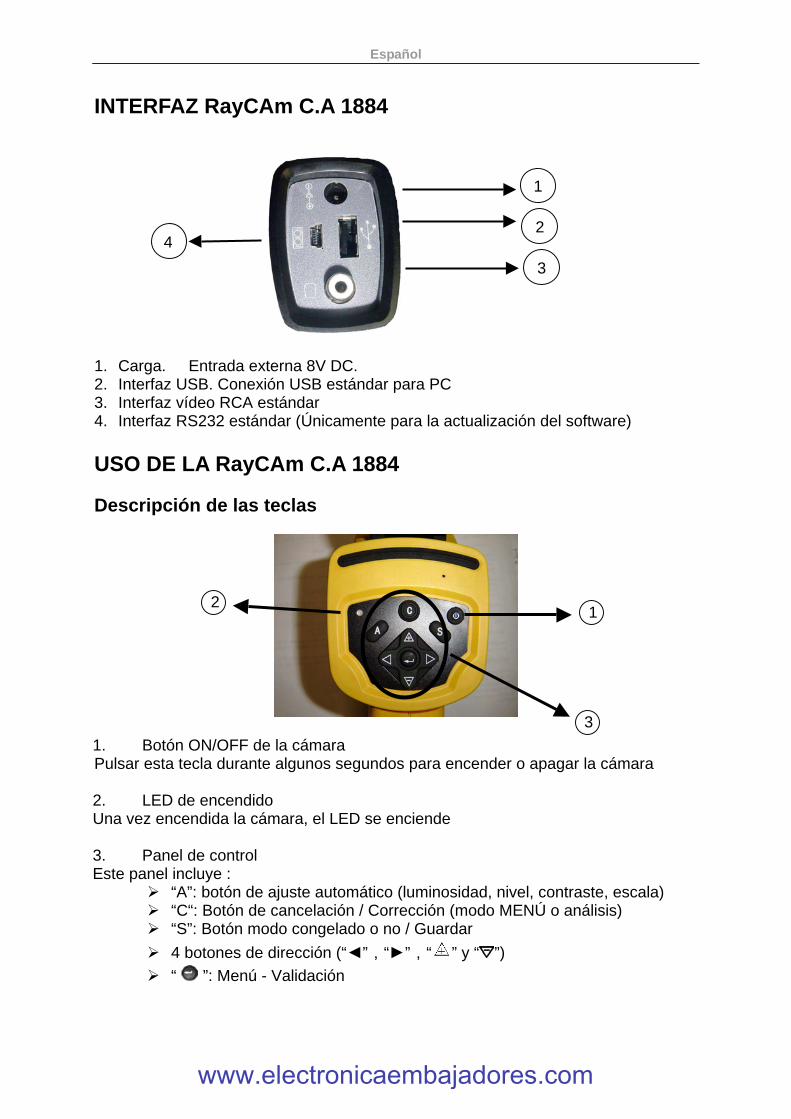
INTERFAZ RayCAm C.A 1884 1. Carga. Entrada externa 8V DC. 2. Interfaz USB. Conexión USB estándar para PC 3. Interfaz vídeo RCA estándar 4. Interfaz RS232 estándar (Únicamente para la actualización del software) USO DE LA RayCAm C.A 1884 Descripción de las teclas
1. Botón ON/OFF de la cámara Pulsar esta tecla durante algunos segundos para encender o apagar la cámara 2. LED de encendido Una vez encendida la cámara, el LED se enciende 3. Panel de control Este panel incluye :
� “A”: botón de ajuste automático (luminosidad, nivel, contraste, escala) � “C“: Botón de cancelación / Corrección (modo MENÚ o análisis) � “S”: Botón modo congelado o no / Guardar
� 4 botones de dirección (“◄”,“►”,“ ” y “ ”) � “ ”: Menú - Validación
2 4
1
3
3
2 1
www.electronicaembajadores.com
Español
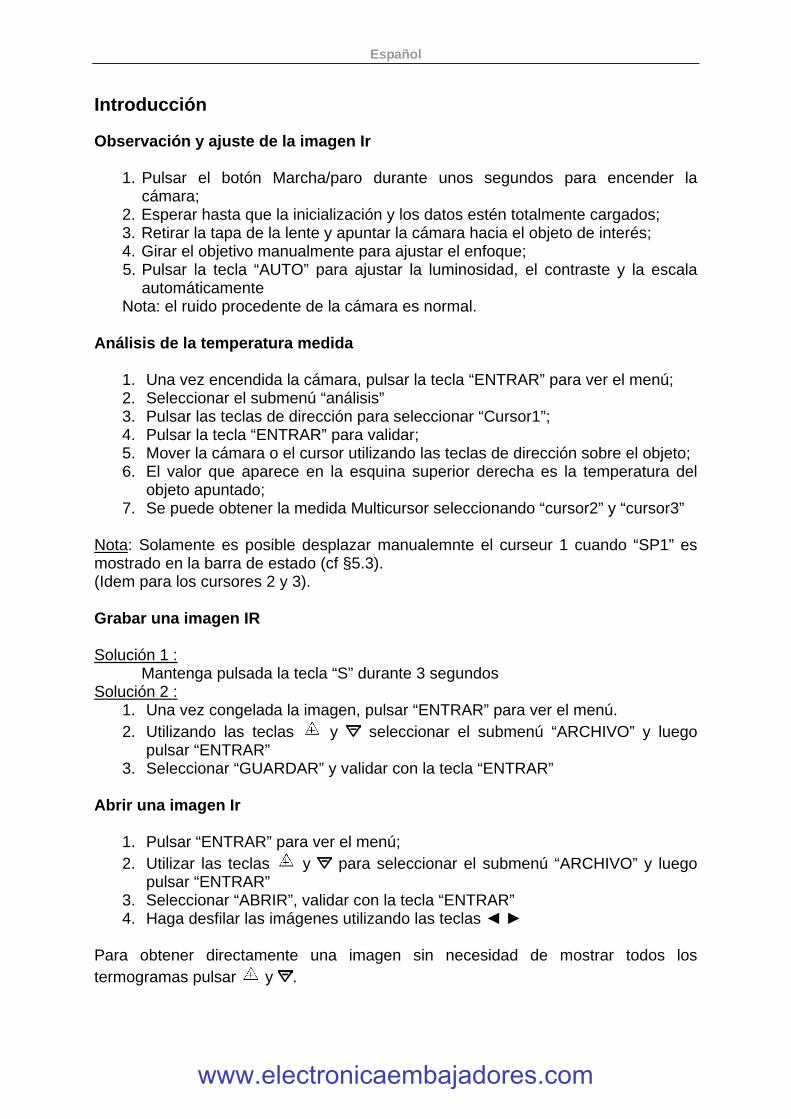
Introducción Observación y ajuste de la imagen Ir
1. Pulsar el botón Marcha/paro durante unos segundos para encender la cámara;
2. Esperar hasta que la inicialización y los datos estén totalmente cargados; 3. Retirar la tapa de la lente y apuntar la cámara hacia el objeto de interés; 4. Girar el objetivo manualmente para ajustar el enfoque; 5. Pulsar la tecla “AUTO” para ajustar la luminosidad, el contraste y la escala
automáticamente Nota: el ruido procedente de la cámara es normal.
Análisis de la temperatura medida
1. Una vez encendida la cámara, pulsar la tecla “ENTRAR” para ver el menú; 2. Seleccionar el submenú “análisis” 3. Pulsar las teclas de dirección para seleccionar “Cursor1”; 4. Pulsar la tecla “ENTRAR” para validar; 5. Mover la cámara o el cursor utilizando las teclas de dirección sobre el objeto; 6. El valor que aparece en la esquina superior derecha es la temperatura del
objeto apuntado; 7. Se puede obtener la medida Multicursor seleccionando “cursor2” y “cursor3”
Nota: Solamente es posible desplazar manualemnte el curseur 1 cuando “SP1” es mostrado en la barra de estado (cf §5.3). (Idem para los cursores 2 y 3). Grabar una imagen IR Solución 1 :
Mantenga pulsada la tecla “S” durante 3 segundos Solución 2 :
1. Una vez congelada la imagen, pulsar “ENTRAR” para ver el menú. 2. Utilizando las teclas y seleccionar el submenú “ARCHIVO” y luego
pulsar “ENTRAR” 3. Seleccionar “GUARDAR” y validar con la tecla “ENTRAR”
Abrir una imagen Ir
1. Pulsar “ENTRAR” para ver el menú; 2. Utilizar las teclas y para seleccionar el submenú “ARCHIVO” y luego
pulsar “ENTRAR” 3. Seleccionar “ABRIR”, validar con la tecla “ENTRAR” 4. Haga desfilar las imágenes utilizando las teclas ◄ ►
Para obtener directamente una imagen sin necesidad de mostrar todos los termogramas pulsar y .
www.electronicaembajadores.com
Español
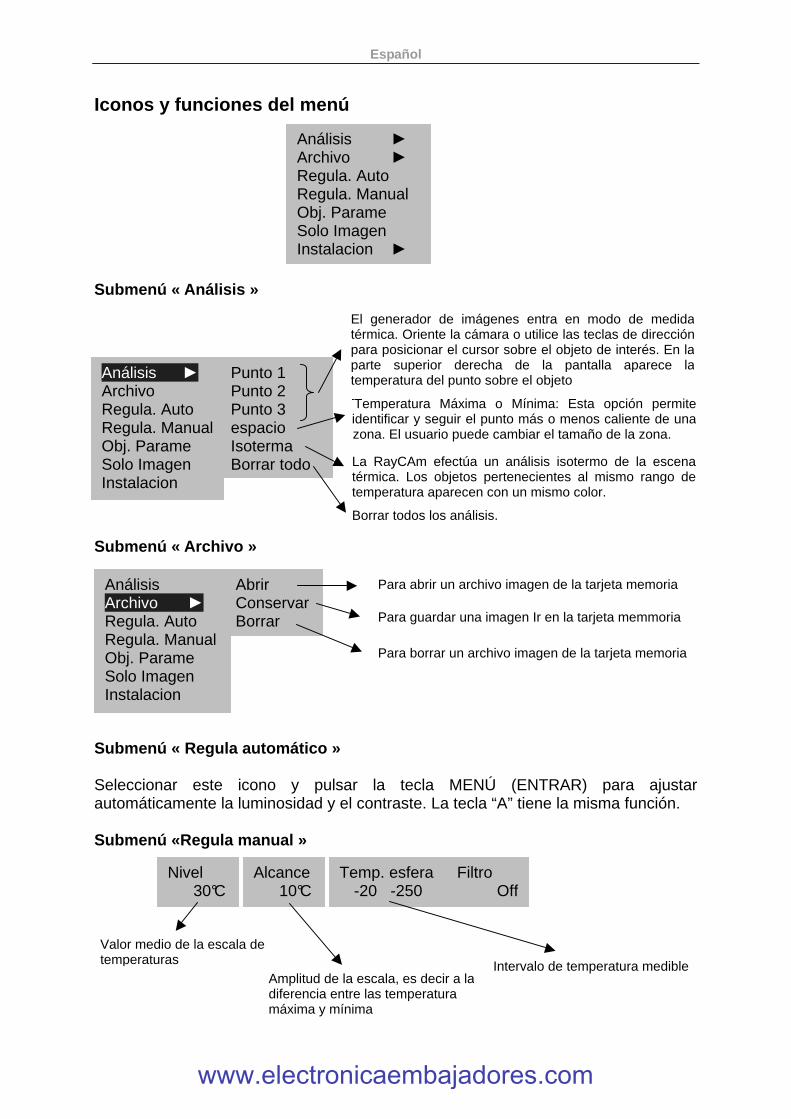
Iconos y funciones del menú
Submenú « Análisis » Submenú « Archivo » Submenú « Regula automático » Seleccionar este icono y pulsar la tecla MENÚ (ENTRAR) para ajustar automáticamente la luminosidad y el contraste. La tecla “A” tiene la misma función. Submenú «Regula manual »
Análisis ► Archivo ► Regula. Auto Regula. Manual Obj. Parame Solo Imagen Instalacion ►
Análisis ► Archivo Regula. Auto Regula. Manual Obj. Parame Solo Imagen Instalacion
Punto 1 Punto 2 Punto 3 espacio Isoterma Borrar todo
Análisis Archivo ► Regula. Auto Regula. Manual Obj. Parame Solo Imagen Instalacion
Abrir Conservar Borrar
Nivel 30°C
Alcance 10°C
Temp. esfera -20 -250
Filtro Off
El generador de imágenes entra en modo de medida térmica. Oriente la cámara o utilice las teclas de dirección para posicionar el cursor sobre el objeto de interés. En la parte superior derecha de la pantalla aparece la temperatura del punto sobre el objeto
TTemperatura Máxima o Mínima: Esta opción permite iiidentificar y seguir el punto más o menos caliente de una zzona. El usuario puede cambiar el tamaño de la zona.
La RayCAm efectúa un análisis isotermo de la escena térmica. Los objetos pertenecientes al mismo rango de temperatura aparecen con un mismo color. Borrar todos los análisis.
Para abrir un archivo imagen de la tarjeta memoria
Para guardar una imagen Ir en la tarjeta memmoria
Para borrar un archivo imagen de la tarjeta memoria
Valor medio de la escala de temperaturas
Amplitud de la escala, es decir a la diferencia entre las temperatura máxima y mínima
Intervalo de temperatura medible
www.electronicaembajadores.com
Español
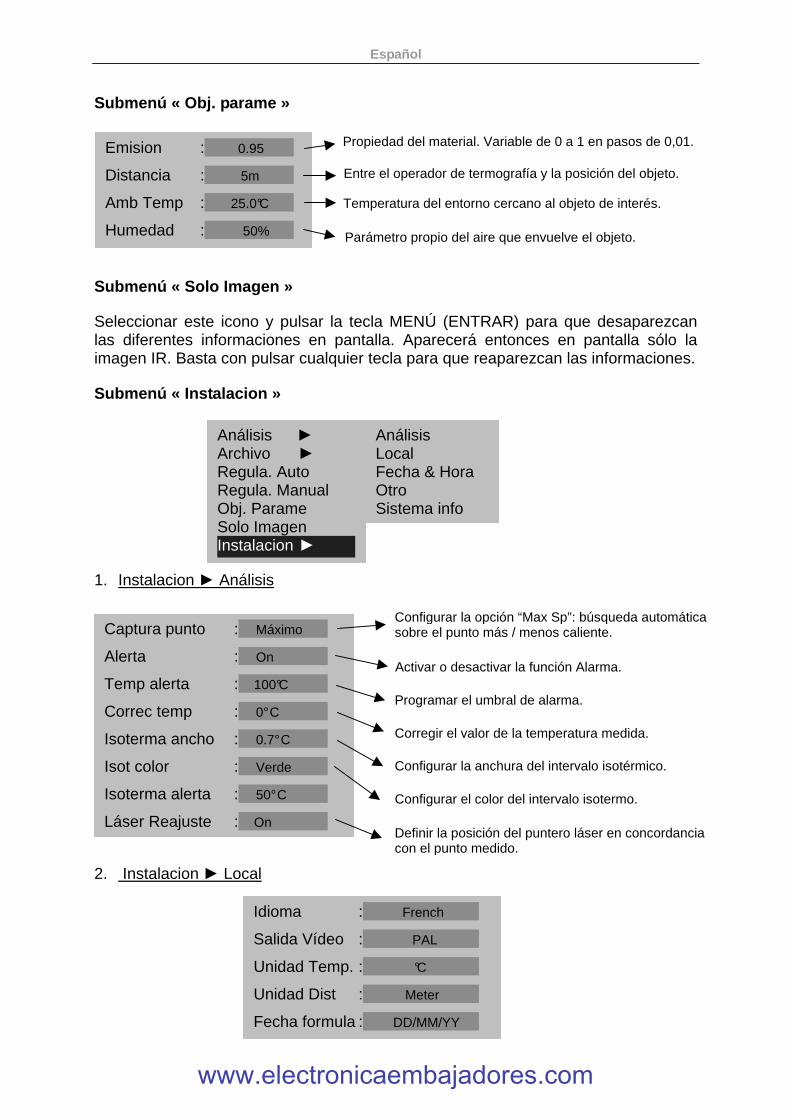
Submenú « Obj. parame » Submenú « Solo Imagen » Seleccionar este icono y pulsar la tecla MENÚ (ENTRAR) para que desaparezcan las diferentes informaciones en pantalla. Aparecerá entonces en pantalla sólo la imagen IR. Basta con pulsar cualquier tecla para que reaparezcan las informaciones. Submenú « Instalacion » 1. Instalacion ► Análisis 2. Instalacion ► Local
Emision : 0.95
Distancia : 5m
Amb Temp : 25.0°C
Humedad : 50%
Análisis ► Archivo ► Regula. Auto Regula. Manual Obj. Parame Solo Imagen Instalacion ►
Análisis Local Fecha & Hora Otro Sistema info
Captura punto : Máximo
Alerta : On
Temp alerta : 100°C
Correc temp : 0° C
Isoterma ancho : 0.7° C
Isot color : Verde
Isoterma alerta : 50° C
Láser Reajuste : On
Idioma : French
Salida Vídeo : PAL
Unidad Temp. : °C
Unidad Dist : Meter
Fecha formula : DD/MM/YY
Propiedad del material. Variable de 0 a 1 en pasos de 0,01.
Entre el operador de termografía y la posición del objeto.
Temperatura del entorno cercano al objeto de interés.
Parámetro propio del aire que envuelve el objeto.
Configurar la opción “Max Sp”: búsqueda automática sobre el punto más / menos caliente.
Activar o desactivar la función Alarma.
Programar el umbral de alarma.
Corregir el valor de la temperatura medida.
Configurar la anchura del intervalo isotérmico.
Configurar el color del intervalo isotermo.
Definir la posición del puntero láser en concordancia con el punto medido.
www.electronicaembajadores.com
Español
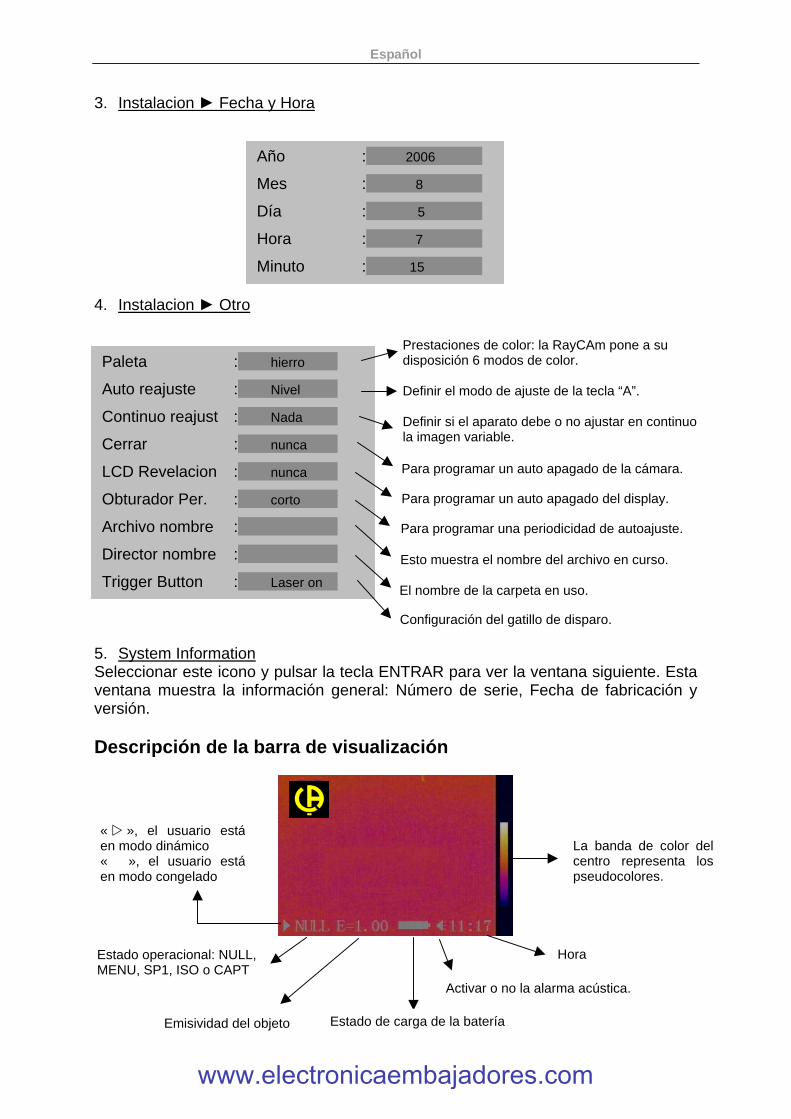
3. Instalacion ► Fecha y Hora 4. Instalacion ► Otro 5. System Information Seleccionar este icono y pulsar la tecla ENTRAR para ver la ventana siguiente. Esta ventana muestra la información general: Número de serie, Fecha de fabricación y versión. Descripción de la barra de visualización
Estado operacional: NULL, MENU, SP1, ISO o CAPT
Año : 2006
Mes : 8
Día : 5
Hora : 7
Minuto : 15
Paleta : hierro
Auto reajuste : Nivel
Continuo reajust : Nada
Cerrar : nunca
LCD Revelacion : nunca
Obturador Per. : corto
Archivo nombre :
Director nombre :
Trigger Button : Laser on
Prestaciones de color: la RayCAm pone a su disposición 6 modos de color.
Definir el modo de ajuste de la tecla “A”.
Definir si el aparato debe o no ajustar en continuo la imagen variable.
Para programar un auto apagado de la cámara.
Para programar un auto apagado del display.
Para programar una periodicidad de autoajuste.
Esto muestra el nombre del archivo en curso.
El nombre de la carpeta en uso.
Configuración del gatillo de disparo.
La banda de color del centro representa los pseudocolores.
« � », el usuario está en modo dinámico « », el usuario está en modo congelado
Emisividad del objeto Estado de carga de la batería
Hora
Activar o no la alarma acústica.
www.electronicaembajadores.com
Español
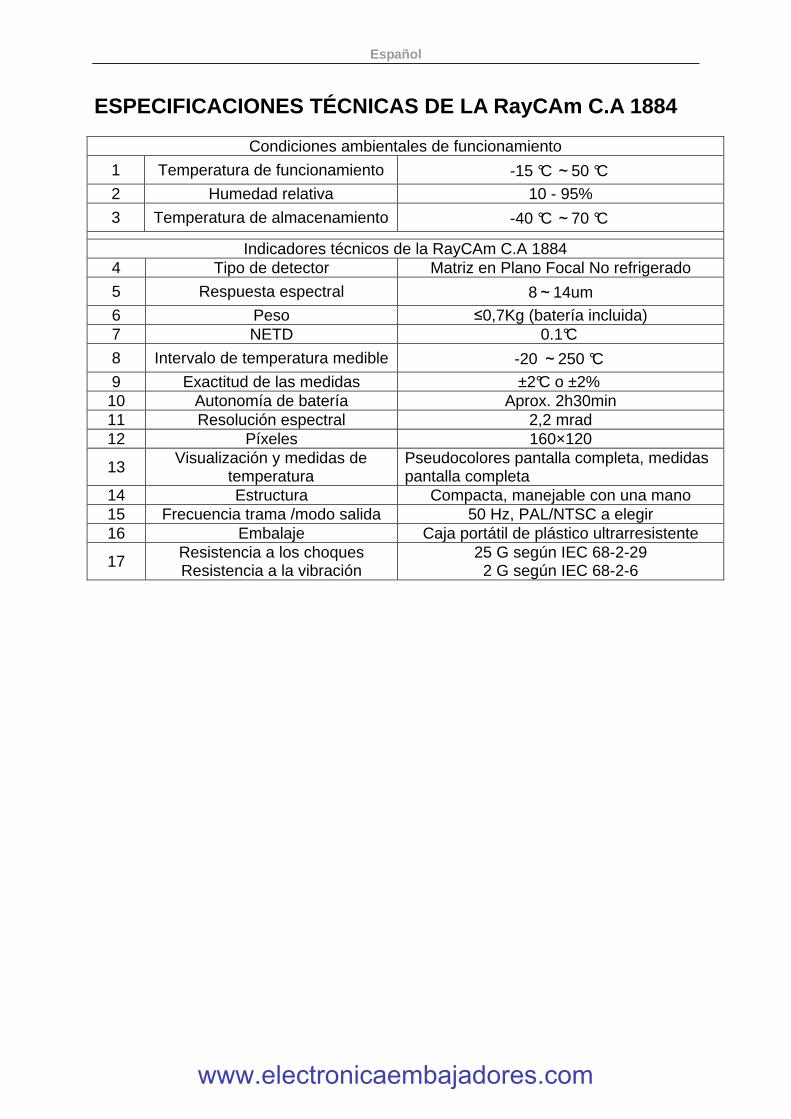
ESPECIFICACIONES TÉCNICAS DE LA RayCAm C.A 1884
Condiciones ambientales de funcionamiento
1 Temperatura de funcionamiento -15 °C~50 °C 2 Humedad relativa 10 - 95%
3 Temperatura de almacenamiento -40 °C~70 °C Indicadores técnicos de la RayCAm C.A 1884
4 Tipo de detector Matriz en Plano Focal No refrigerado
5 Respuesta espectral 8~14um 6 Peso ≤0,7Kg (batería incluida) 7 NETD 0.1°C
8 Intervalo de temperatura medible -20 ~250 °C 9 Exactitud de las medidas ±2°C o ±2% 10 Autonomía de batería Aprox. 2h30min 11 Resolución espectral 2,2 mrad 12 Píxeles 160×120
13 Visualización y medidas de temperatura
Pseudocolores pantalla completa, medidas pantalla completa
14 Estructura Compacta, manejable con una mano 15 Frecuencia trama /modo salida 50 Hz, PAL/NTSC a elegir 16 Embalaje Caja portátil de plástico ultrarresistente
17 Resistencia a los choques Resistencia a la vibración
25 G según IEC 68-2-29 2 G según IEC 68-2-6
www.electronicaembajadores.com
10 - 2009
Code 692478A00 – Ed. 1
www.electronicaembajadores.com


![REFERENTIEL REGIONAL ONCO-LR Comité Onco-Hématologie · Explorations complémentaires [1] - Biologie : NFS, réticulocytes, électrophorèse des protéines sériques, LDH, ... CRITERES](https://static.fdocuments.fr/doc/165x107/5bed33ea09d3f2f6028b6d0b/referentiel-regional-onco-lr-comite-onco-he-explorations-complementaires.jpg)