Guide d’installation Deco Drain inc. · la douche avec le Deco Drain. ... Le ciment ou le...
31
Guide d’installation Deco Drain inc. Pour de plus amples informations et pour télécharger les guides d’installation en couleur, visitez notre site web. www.decodrain.com Soutien technique : Composez le : 514-946-8901 ou 514-358-0226 Ou [email protected] Télécopieur : 450-446-8929 Horaire : Lundi au vendredi : De 7h00 à 17h00 Samedi : De 9h00 à 16h00 Deco Drain inc. Installation guide Visit our web site for more information and to download our installation guides in colors. www.decodrain.com Technical support : Call : 514-946-8901 or 514-358-0226 or [email protected] Fax : 450-446-8929 Schedule : Monday to friday : De 7h00 à 17h00 Saturday : De 9h00 à 16h00
Transcript of Guide d’installation Deco Drain inc. · la douche avec le Deco Drain. ... Le ciment ou le...

Guide d’installation Deco Drain inc.
Pour de plus amples informations et pour télécharger les guides d’installation en couleur, visitez notre site web.
www.decodrain.com
Soutien technique :
Composez le : 514-946-8901 ou 514-358-0226
Ou
Télécopieur : 450-446-8929
Horaire :
Lundi au vendredi : De 7h00 à 17h00 Samedi : De 9h00 à 16h00
Deco Drain inc. Installation guide
Visit our web site for more information and to download our installation guides in colors.
www.decodrain.com
Technical support :
Call : 514-946-8901 or 514-358-0226
or
Fax : 450-446-8929
Schedule :
Monday to friday : De 7h00 à 17h00 Saturday : De 9h00 à 16h00
Tables des matières / Table of contents Comment déterminer la hauteur du bassin ………………………………...p.3 How to determine the height of the bassin ………………………………...p.3 Information pour lit de mortier et plancher chauffant ……………………...p. 8 Information on sandcoat and floor heating system ……………………...…p. 8 Guide d’installation - Construction neuve ..………………………………. P.9 Installation guide - New construction ..…………...………………………. p.9 Guide d’installation - Rénovation………..….……………………………. p. 20 Installation guide - Renovation ………………….……………………….. p. 20
Important Si des modifications à la structure sont faites durant les travaux, il est impor-tant de vérifier avec les professionnels concernés que tout changement respecte les normes de la construction. Différents produits sont disponibles sur le marché pour assurer l’étanchéité de la douche avec le Deco Drain. Assurez-vous d’utiliser des produits appropriés. If modifications to the structure are done during the construction it is important to have a professional on site to make sure the work is done correctly and ac-cording to constructions norms. Different products are available on the market to make sure the shower is leak proof with the Deco Drain. Make sure to use the appropriate products.
Garantie / Warranty
Le bassin Deco Drain est garanti pour une durée de 5 ans contre les fuites. Si des modifications son apportées au drain au niveau de sa forme et/ou appa-
rence d’origine aucune garantie n’est applicable. La grille de finition est un ac-cessoire d’esthétique et n’est pas garantie.
The Deco Drain basin has a 5 year warranty against leaking. If ever the shape and/or appearance of the basin is modified from it’s original version, the war-
ranty will not apply. The finishing grid is only a design accessory and is not co-vered by the guaranty.
Page : 2
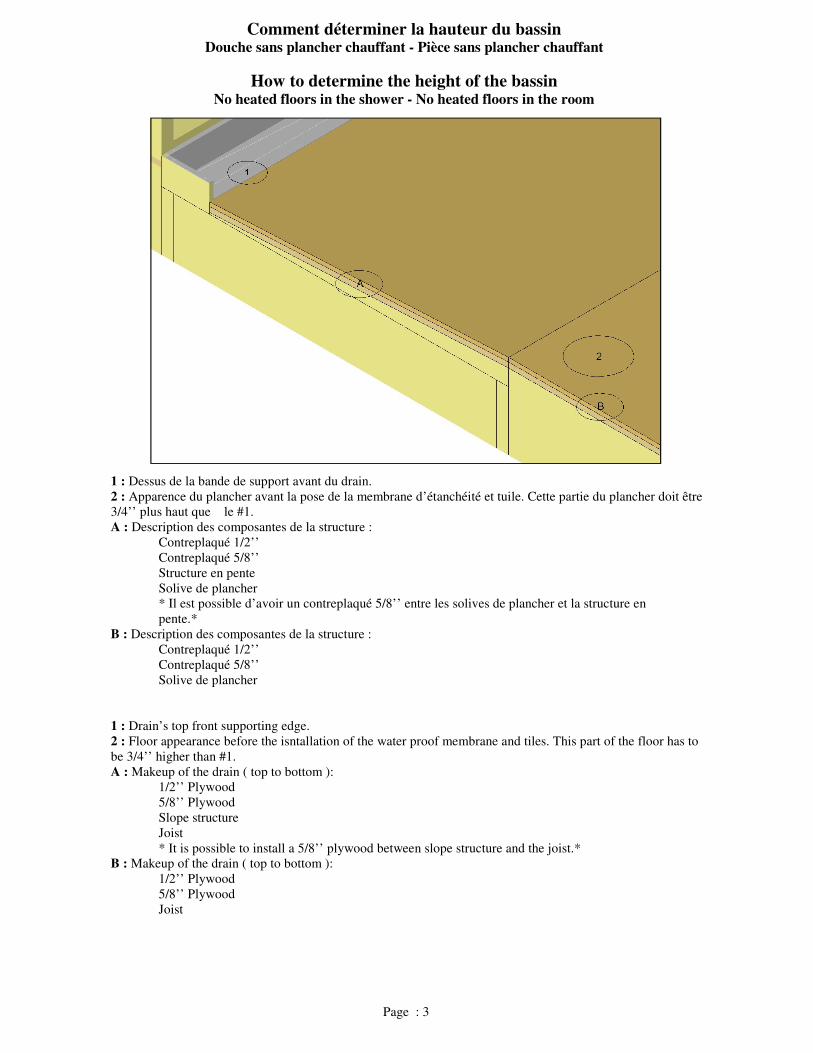
1 : Dessus de la bande de support avant du drain. 2 : Apparence du plancher avant la pose de la membrane d’étanchéité et tuile. Cette partie du plancher doit être 3/4’’ plus haut que le #1. A : Description des composantes de la structure : Contreplaqué 1/2’’ Contreplaqué 5/8’’ Structure en pente Solive de plancher * Il est possible d’avoir un contreplaqué 5/8’’ entre les solives de plancher et la structure en pente.* B : Description des composantes de la structure : Contreplaqué 1/2’’ Contreplaqué 5/8’’ Solive de plancher 1 : Drain’s top front supporting edge. 2 : Floor appearance before the isntallation of the water proof membrane and tiles. This part of the floor has to be 3/4’’ higher than #1. A : Makeup of the drain ( top to bottom ): 1/2’’ Plywood 5/8’’ Plywood Slope structure Joist * It is possible to install a 5/8’’ plywood between slope structure and the joist.* B : Makeup of the drain ( top to bottom ): 1/2’’ Plywood 5/8’’ Plywood Joist
Comment déterminer la hauteur du bassin Douche sans plancher chauffant - Pièce sans plancher chauffant
How to determine the height of the bassin No heated floors in the shower - No heated floors in the room
Page : 3
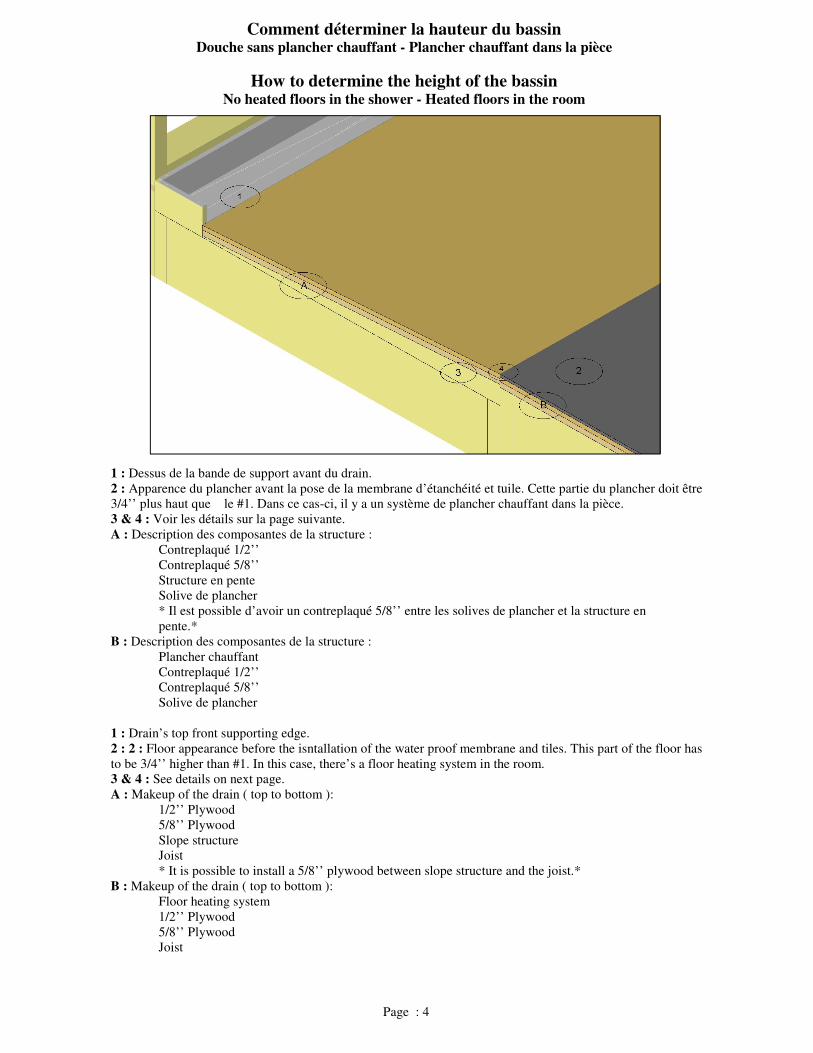
1 : Dessus de la bande de support avant du drain. 2 : Apparence du plancher avant la pose de la membrane d’étanchéité et tuile. Cette partie du plancher doit être 3/4’’ plus haut que le #1. Dans ce cas-ci, il y a un système de plancher chauffant dans la pièce. 3 & 4 : Voir les détails sur la page suivante. A : Description des composantes de la structure : Contreplaqué 1/2’’ Contreplaqué 5/8’’ Structure en pente Solive de plancher * Il est possible d’avoir un contreplaqué 5/8’’ entre les solives de plancher et la structure en pente.* B : Description des composantes de la structure : Plancher chauffant Contreplaqué 1/2’’ Contreplaqué 5/8’’ Solive de plancher 1 : Drain’s top front supporting edge. 2 : 2 : Floor appearance before the isntallation of the water proof membrane and tiles. This part of the floor has to be 3/4’’ higher than #1. In this case, there’s a floor heating system in the room. 3 & 4 : See details on next page. A : Makeup of the drain ( top to bottom ): 1/2’’ Plywood 5/8’’ Plywood Slope structure Joist * It is possible to install a 5/8’’ plywood between slope structure and the joist.* B : Makeup of the drain ( top to bottom ): Floor heating system 1/2’’ Plywood 5/8’’ Plywood Joist
Comment déterminer la hauteur du bassin Douche sans plancher chauffant - Plancher chauffant dans la pièce
How to determine the height of the bassin No heated floors in the shower - Heated floors in the room
Page : 4
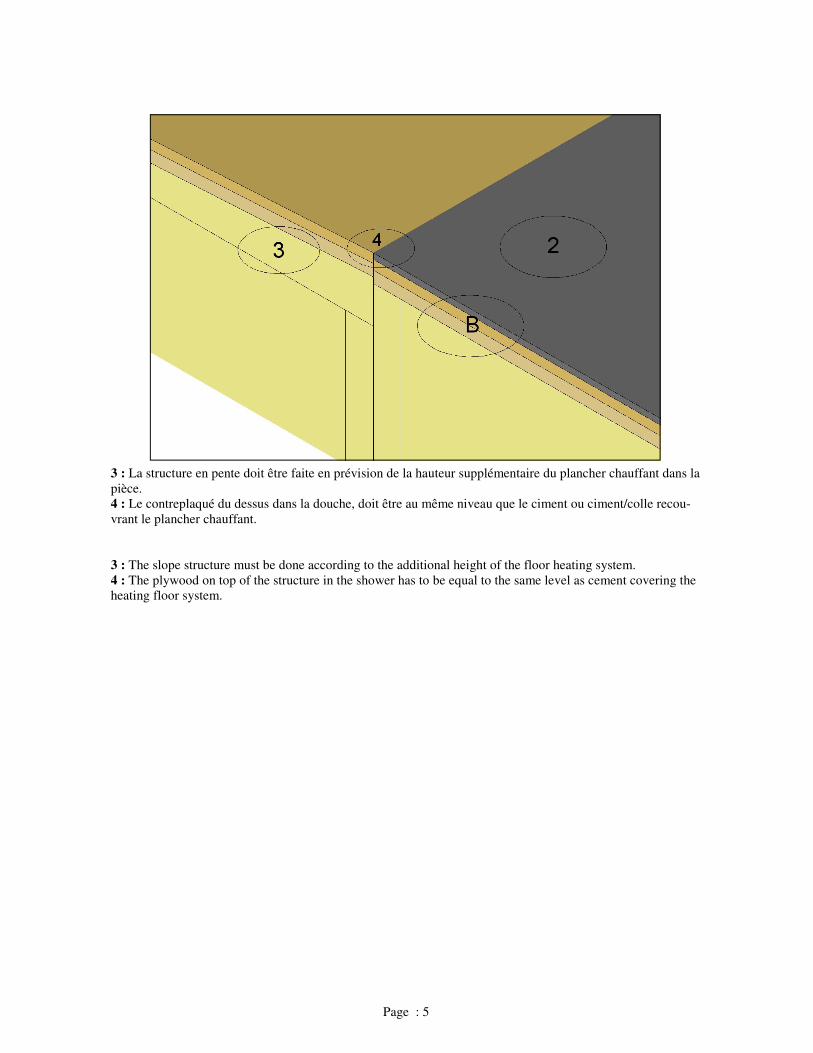
3 : La structure en pente doit être faite en prévision de la hauteur supplémentaire du plancher chauffant dans la pièce. 4 : Le contreplaqué du dessus dans la douche, doit être au même niveau que le ciment ou ciment/colle recou-vrant le plancher chauffant. 3 : The slope structure must be done according to the additional height of the floor heating system. 4 : The plywood on top of the structure in the shower has to be equal to the same level as cement covering the heating floor system.
Page : 5
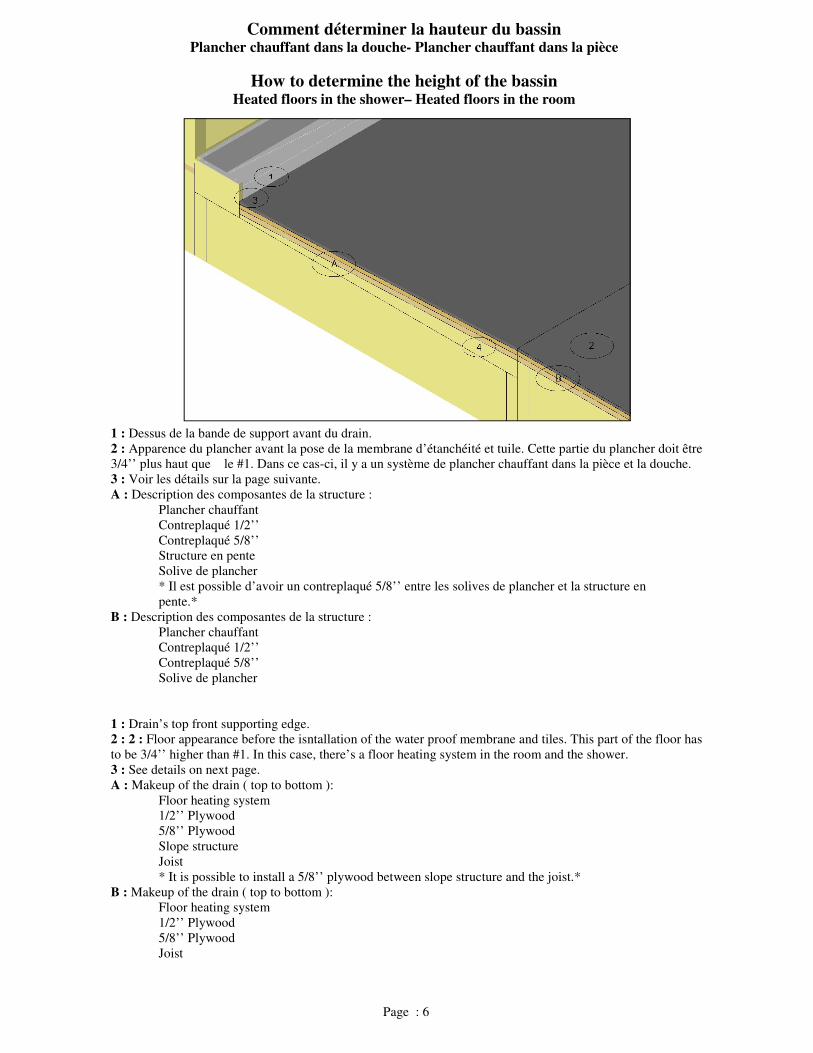
1 : Dessus de la bande de support avant du drain. 2 : Apparence du plancher avant la pose de la membrane d’étanchéité et tuile. Cette partie du plancher doit être 3/4’’ plus haut que le #1. Dans ce cas-ci, il y a un système de plancher chauffant dans la pièce et la douche. 3 : Voir les détails sur la page suivante. A : Description des composantes de la structure : Plancher chauffant Contreplaqué 1/2’’ Contreplaqué 5/8’’ Structure en pente Solive de plancher * Il est possible d’avoir un contreplaqué 5/8’’ entre les solives de plancher et la structure en pente.* B : Description des composantes de la structure : Plancher chauffant Contreplaqué 1/2’’ Contreplaqué 5/8’’ Solive de plancher 1 : Drain’s top front supporting edge. 2 : 2 : Floor appearance before the isntallation of the water proof membrane and tiles. This part of the floor has to be 3/4’’ higher than #1. In this case, there’s a floor heating system in the room and the shower. 3 : See details on next page. A : Makeup of the drain ( top to bottom ): Floor heating system 1/2’’ Plywood 5/8’’ Plywood Slope structure Joist * It is possible to install a 5/8’’ plywood between slope structure and the joist.* B : Makeup of the drain ( top to bottom ): Floor heating system 1/2’’ Plywood 5/8’’ Plywood Joist
Comment déterminer la hauteur du bassin Plancher chauffant dans la douche- Plancher chauffant dans la pièce
How to determine the height of the bassin Heated floors in the shower– Heated floors in the room
Page : 6
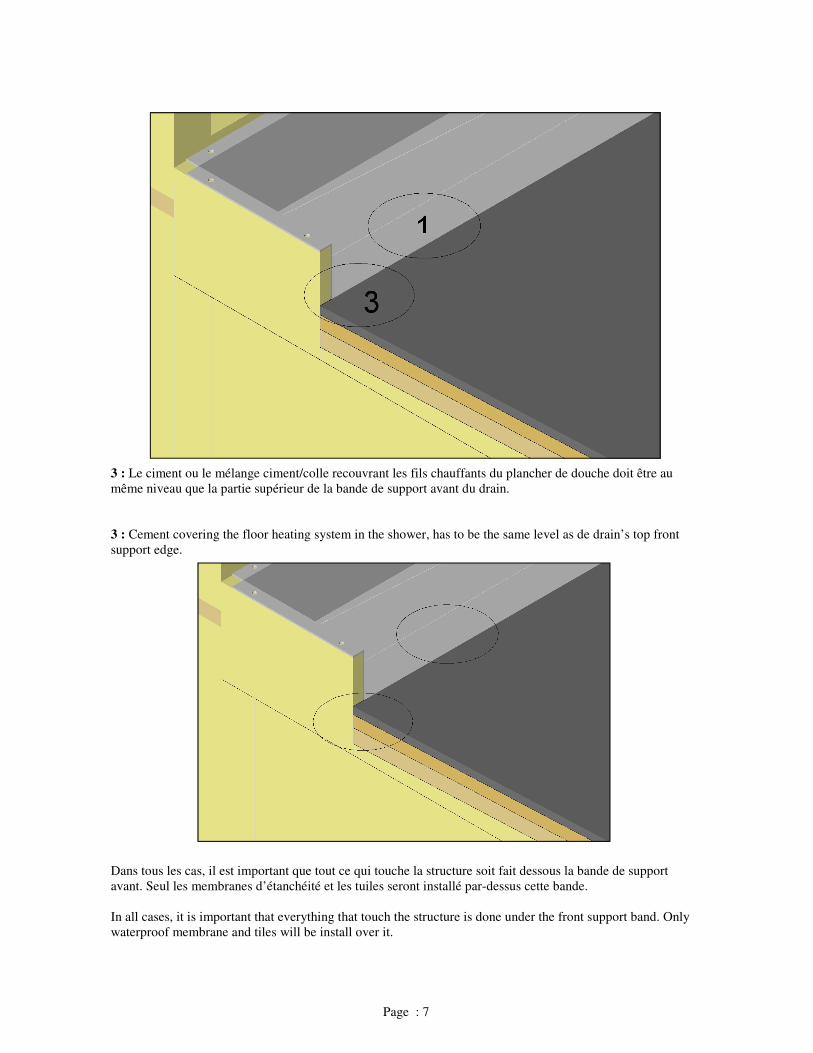
3 : Le ciment ou le mélange ciment/colle recouvrant les fils chauffants du plancher de douche doit être au même niveau que la partie supérieur de la bande de support avant du drain. 3 : Cement covering the floor heating system in the shower, has to be the same level as de drain’s top front support edge. Dans tous les cas, il est important que tout ce qui touche la structure soit fait dessous la bande de support avant. Seul les membranes d’étanchéité et les tuiles seront installé par-dessus cette bande. In all cases, it is important that everything that touch the structure is done under the front support band. Only waterproof membrane and tiles will be install over it.
Page : 7
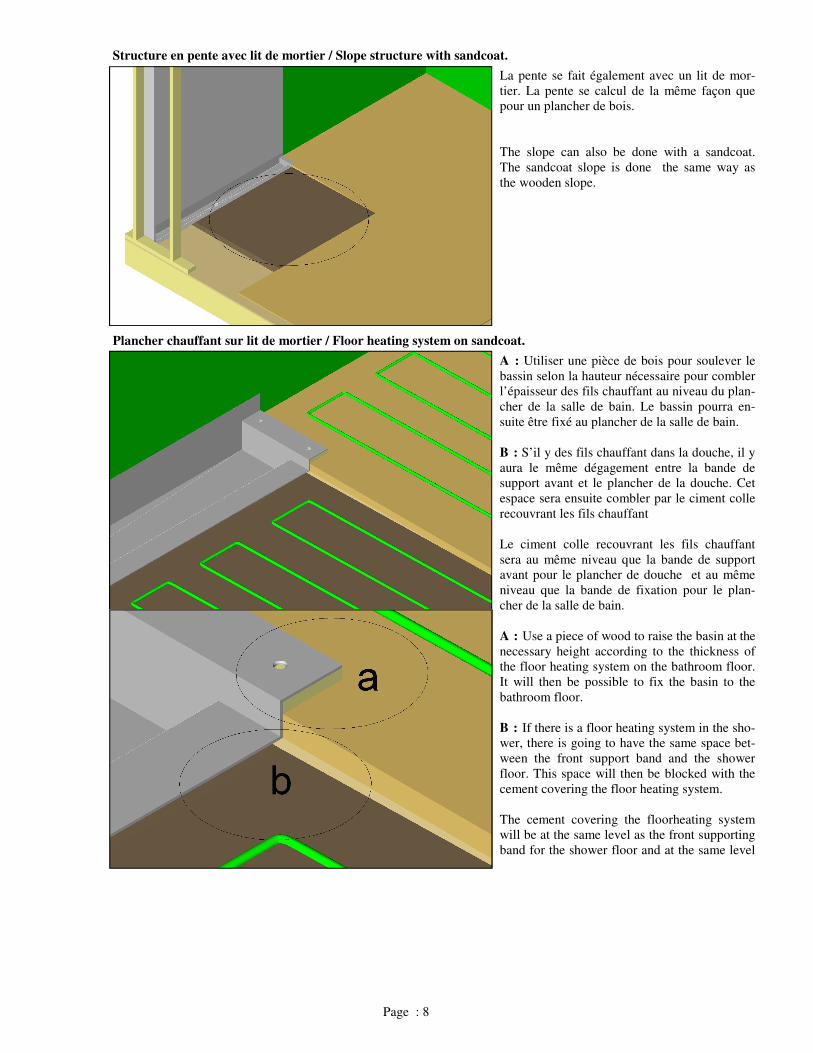
La pente se fait également avec un lit de mor-tier. La pente se calcul de la même façon que pour un plancher de bois. The slope can also be done with a sandcoat. The sandcoat slope is done the same way as the wooden slope.
A : Utiliser une pièce de bois pour soulever le bassin selon la hauteur nécessaire pour combler l’épaisseur des fils chauffant au niveau du plan-cher de la salle de bain. Le bassin pourra en-suite être fixé au plancher de la salle de bain. B : S’il y des fils chauffant dans la douche, il y aura le même dégagement entre la bande de support avant et le plancher de la douche. Cet espace sera ensuite combler par le ciment colle recouvrant les fils chauffant Le ciment colle recouvrant les fils chauffant sera au même niveau que la bande de support avant pour le plancher de douche et au même niveau que la bande de fixation pour le plan-cher de la salle de bain. A : Use a piece of wood to raise the basin at the necessary height according to the thickness of the floor heating system on the bathroom floor. It will then be possible to fix the basin to the bathroom floor. B : If there is a floor heating system in the sho-wer, there is going to have the same space bet-ween the front support band and the shower floor. This space will then be blocked with the cement covering the floor heating system. The cement covering the floorheating system will be at the same level as the front supporting band for the shower floor and at the same level
Structure en pente avec lit de mortier / Slope structure with sandcoat.
Plancher chauffant sur lit de mortier / Floor heating system on sandcoat.
Page : 8
Deco Drain inc.
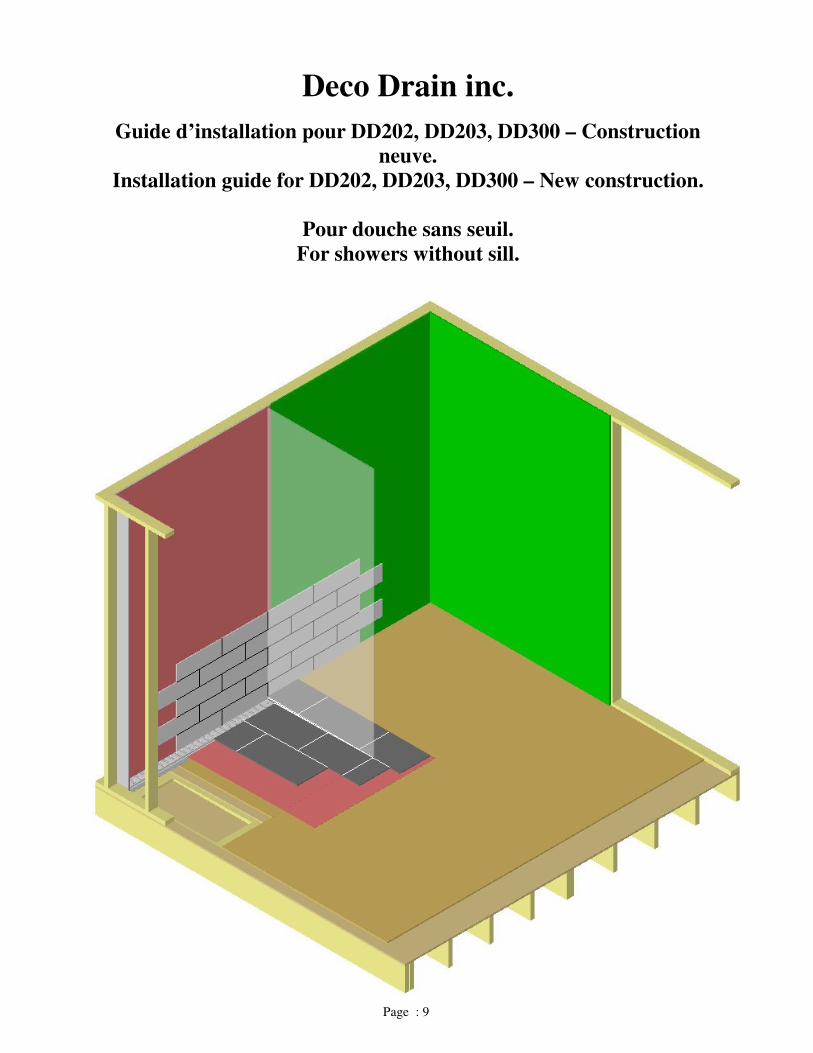
Guide d’installation pour DD202, DD203, DD300 – Construction neuve.
Installation guide for DD202, DD203, DD300 – New construction.
Pour douche sans seuil. For showers without sill.
Page : 9
Étape 1 / Step 1
Étape 2 / Step 2
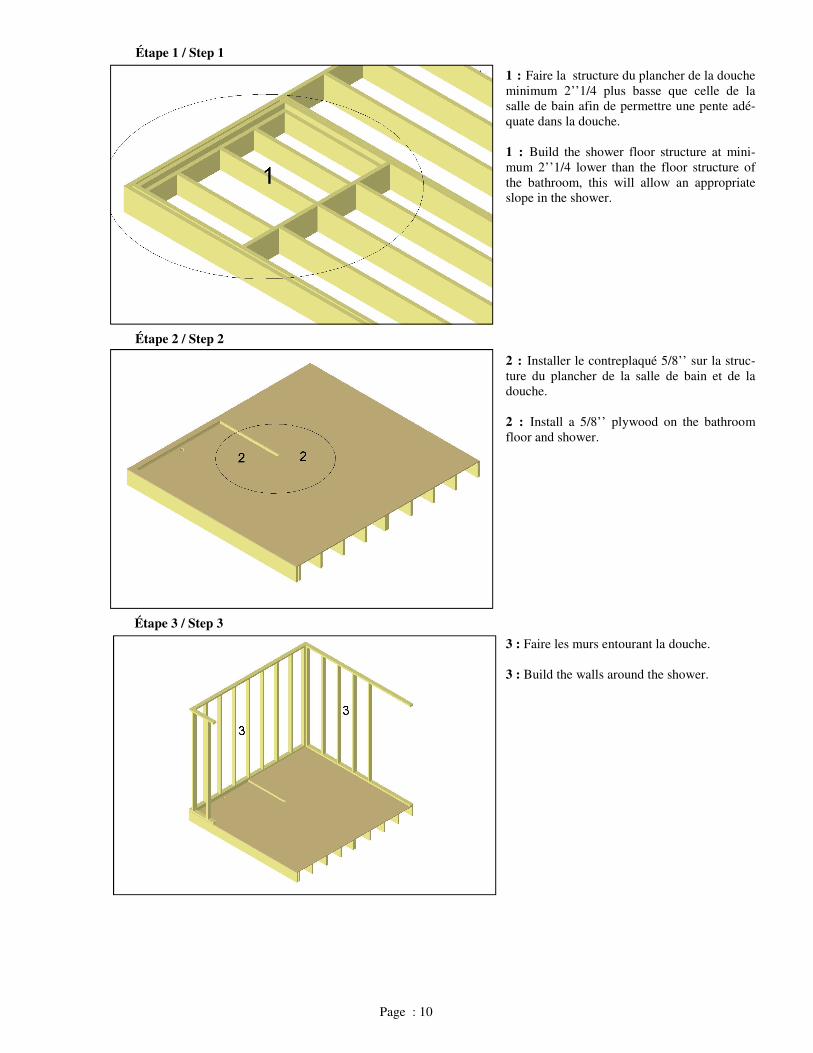
1 : Faire la structure du plancher de la douche minimum 2’’1/4 plus basse que celle de la salle de bain afin de permettre une pente adé-quate dans la douche. 1 : Build the shower floor structure at mini-mum 2’’1/4 lower than the floor structure of the bathroom, this will allow an appropriate slope in the shower.
2 : Installer le contreplaqué 5/8’’ sur la struc-ture du plancher de la salle de bain et de la douche. 2 : Install a 5/8’’ plywood on the bathroom floor and shower.
Étape 3 / Step 3
3 : Faire les murs entourant la douche. 3 : Build the walls around the shower.
Page : 10
Étape 4 / Step 4
Étape 5 / Step 5
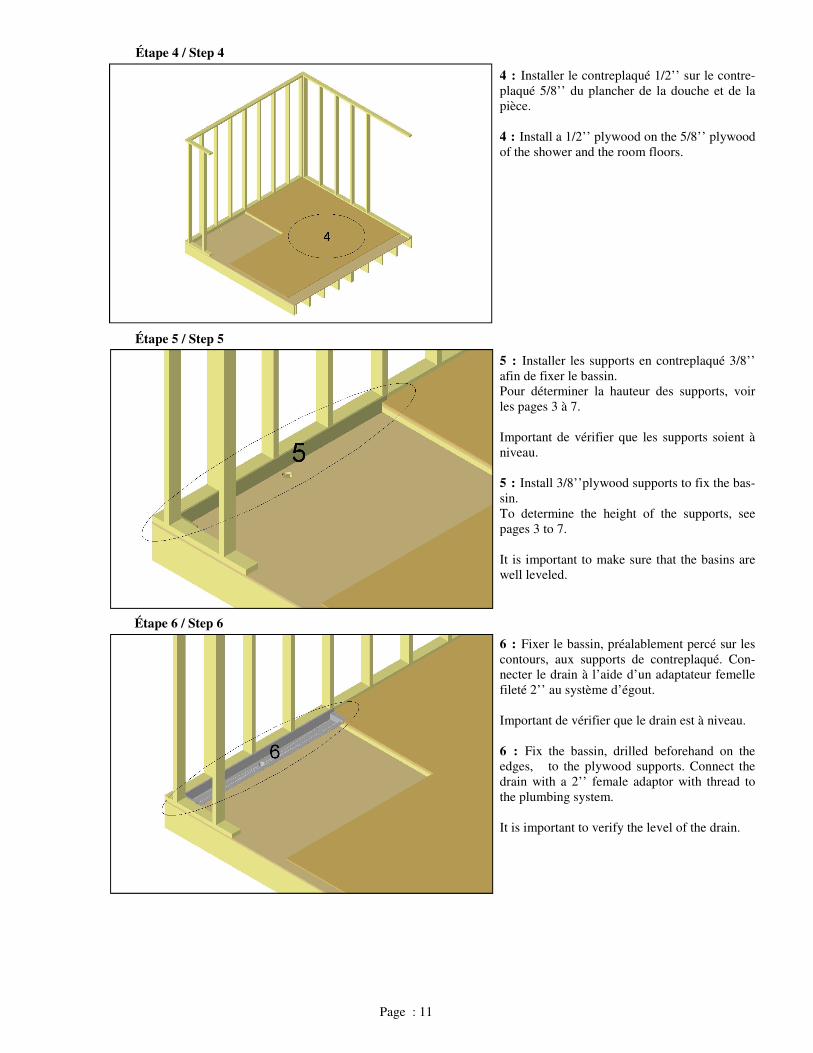
4 : Installer le contreplaqué 1/2’’ sur le contre-plaqué 5/8’’ du plancher de la douche et de la pièce. 4 : Install a 1/2’’ plywood on the 5/8’’ plywood of the shower and the room floors.
5 : Installer les supports en contreplaqué 3/8’’ afin de fixer le bassin. Pour déterminer la hauteur des supports, voir les pages 3 à 7. Important de vérifier que les supports soient à niveau. 5 : Install 3/8’’plywood supports to fix the bas-sin. To determine the height of the supports, see pages 3 to 7. It is important to make sure that the basins are well leveled.
Étape 6 / Step 6
6 : Fixer le bassin, préalablement percé sur les contours, aux supports de contreplaqué. Con-necter le drain à l’aide d’un adaptateur femelle fileté 2’’ au système d’égout. Important de vérifier que le drain est à niveau. 6 : Fix the bassin, drilled beforehand on the edges, to the plywood supports. Connect the drain with a 2’’ female adaptor with thread to the plumbing system. It is important to verify the level of the drain.
Page : 11
Étape 6a / Step 6a
Étape 7/ Step 7
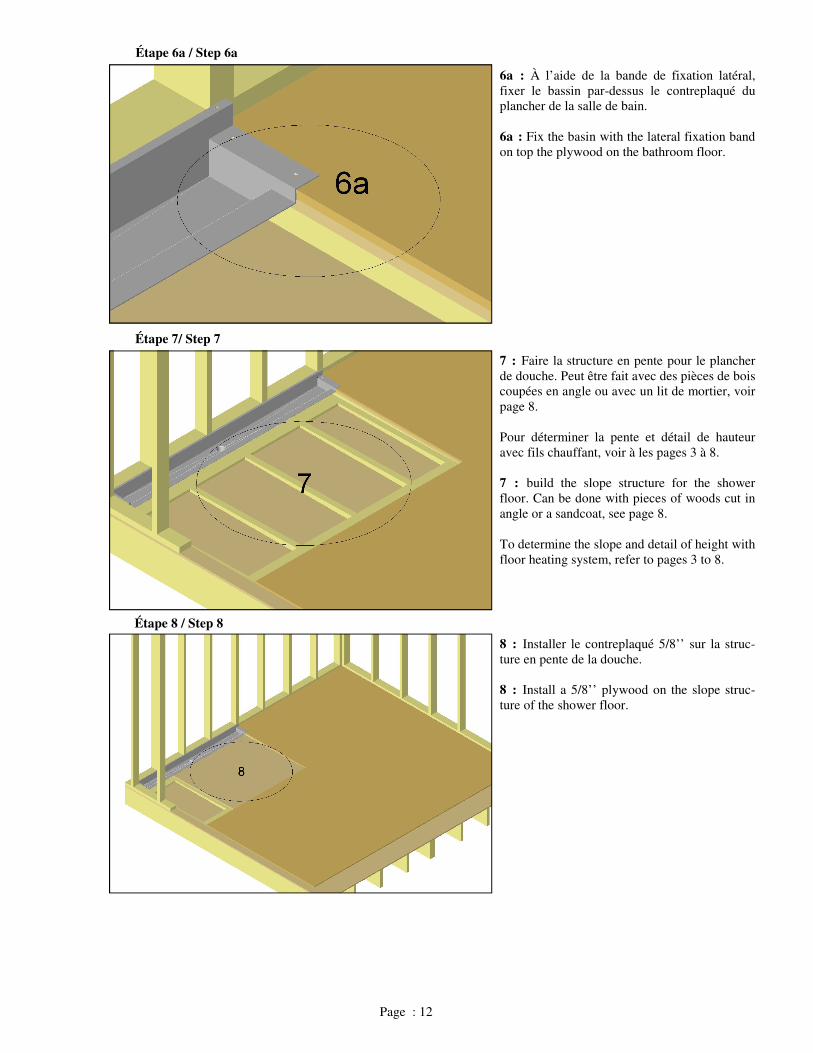
6a : À l’aide de la bande de fixation latéral, fixer le bassin par-dessus le contreplaqué du plancher de la salle de bain. 6a : Fix the basin with the lateral fixation band on top the plywood on the bathroom floor.
7 : Faire la structure en pente pour le plancher de douche. Peut être fait avec des pièces de bois coupées en angle ou avec un lit de mortier, voir page 8. Pour déterminer la pente et détail de hauteur avec fils chauffant, voir à les pages 3 à 8. 7 : build the slope structure for the shower floor. Can be done with pieces of woods cut in angle or a sandcoat, see page 8. To determine the slope and detail of height with floor heating system, refer to pages 3 to 8.
Étape 8 / Step 8
8 : Installer le contreplaqué 5/8’’ sur la struc-ture en pente de la douche. 8 : Install a 5/8’’ plywood on the slope struc-ture of the shower floor.
Page : 12
Étape 9 / Step 9
Étape 10 / Step 10
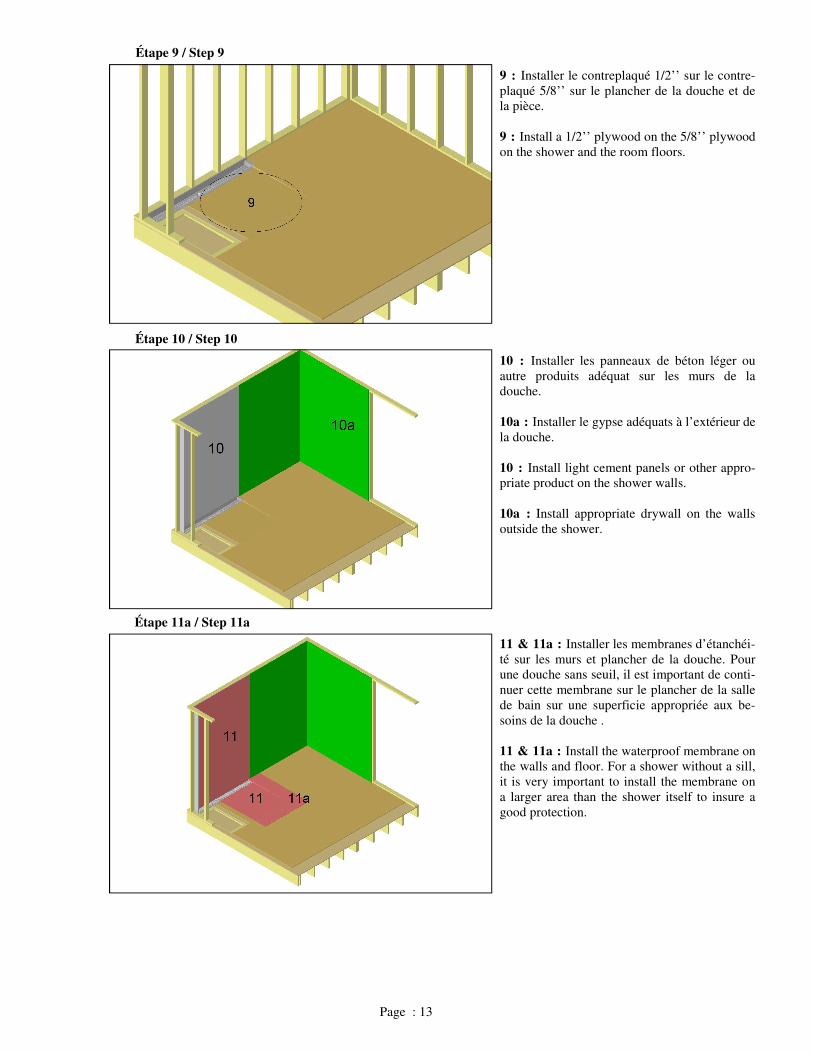
9 : Installer le contreplaqué 1/2’’ sur le contre-plaqué 5/8’’ sur le plancher de la douche et de la pièce. 9 : Install a 1/2’’ plywood on the 5/8’’ plywood on the shower and the room floors.
10 : Installer les panneaux de béton léger ou autre produits adéquat sur les murs de la douche. 10a : Installer le gypse adéquats à l’extérieur de la douche. 10 : Install light cement panels or other appro-priate product on the shower walls. 10a : Install appropriate drywall on the walls outside the shower.
Étape 11a / Step 11a
11 & 11a : Installer les membranes d’étanchéi-té sur les murs et plancher de la douche. Pour une douche sans seuil, il est important de conti-nuer cette membrane sur le plancher de la salle de bain sur une superficie appropriée aux be-soins de la douche . 11 & 11a : Install the waterproof membrane on the walls and floor. For a shower without a sill, it is very important to install the membrane on a larger area than the shower itself to insure a good protection.
Page : 13
Étape 11b / Step 11b
Étape 11c / Step 11c
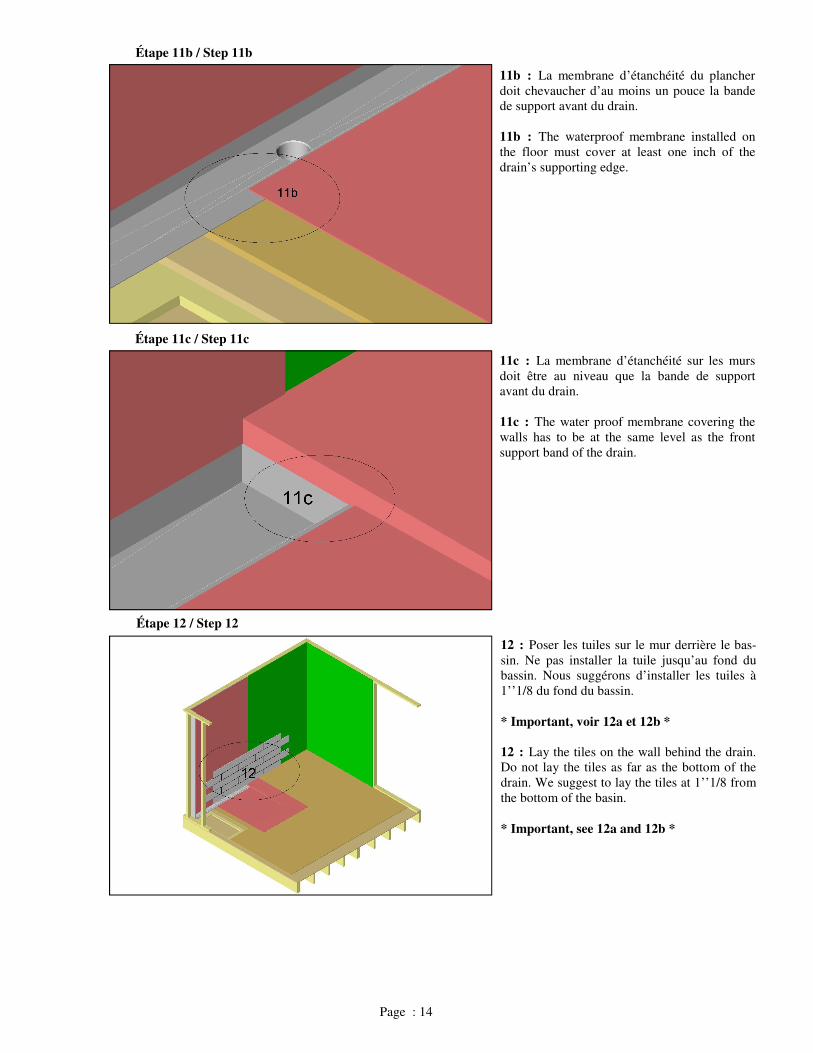
11b : La membrane d’étanchéité du plancher doit chevaucher d’au moins un pouce la bande de support avant du drain. 11b : The waterproof membrane installed on the floor must cover at least one inch of the drain’s supporting edge.
11c : La membrane d’étanchéité sur les murs doit être au niveau que la bande de support avant du drain. 11c : The water proof membrane covering the walls has to be at the same level as the front support band of the drain.
Page : 14
Étape 12 / Step 12
12 : Poser les tuiles sur le mur derrière le bas-sin. Ne pas installer la tuile jusqu’au fond du bassin. Nous suggérons d’installer les tuiles à 1’’1/8 du fond du bassin. * Important, voir 12a et 12b * 12 : Lay the tiles on the wall behind the drain. Do not lay the tiles as far as the bottom of the drain. We suggest to lay the tiles at 1’’1/8 from the bottom of the basin. * Important, see 12a and 12b *
Étape 12a / Step 12a
Étape 12b / Step 12b
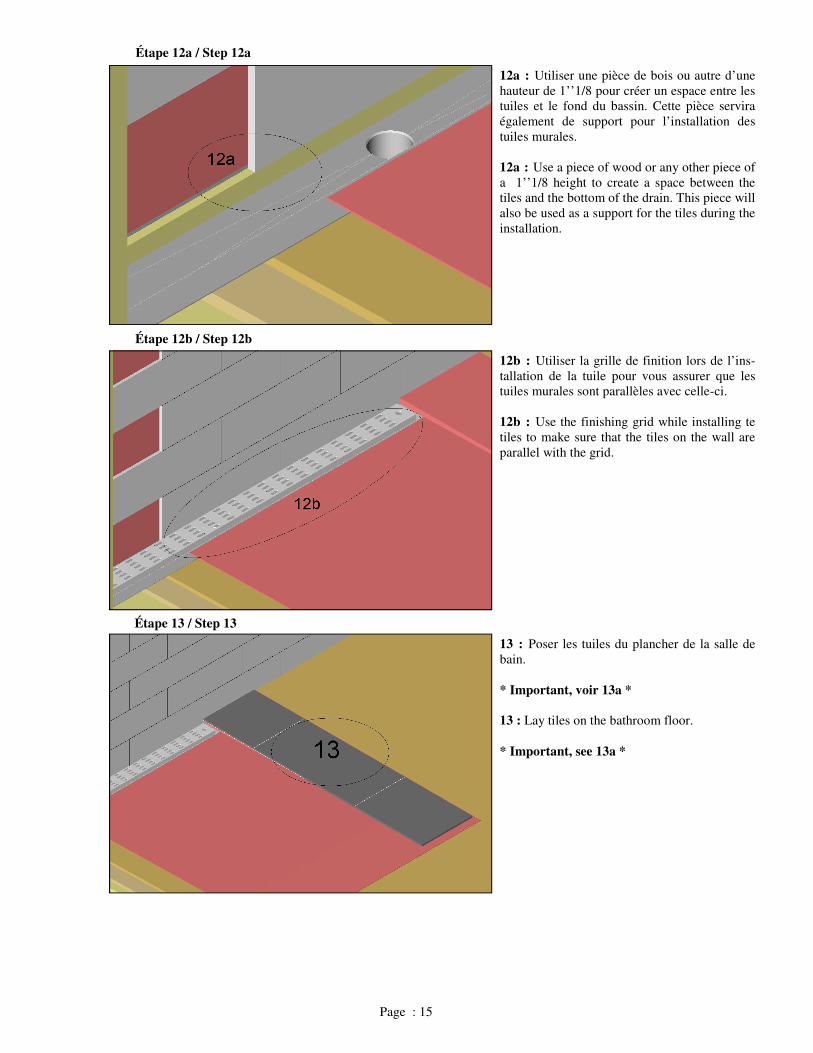
12a : Utiliser une pièce de bois ou autre d’une hauteur de 1’’1/8 pour créer un espace entre les tuiles et le fond du bassin. Cette pièce servira également de support pour l’installation des tuiles murales. 12a : Use a piece of wood or any other piece of a 1’’1/8 height to create a space between the tiles and the bottom of the drain. This piece will also be used as a support for the tiles during the installation.
12b : Utiliser la grille de finition lors de l’ins-tallation de la tuile pour vous assurer que les tuiles murales sont parallèles avec celle-ci. 12b : Use the finishing grid while installing te tiles to make sure that the tiles on the wall are parallel with the grid.
Étape 13 / Step 13
13 : Poser les tuiles du plancher de la salle de bain. * Important, voir 13a * 13 : Lay tiles on the bathroom floor. * Important, see 13a *
Page : 15
Étape 13a / Step 13a
Étape 14a / Step 14a
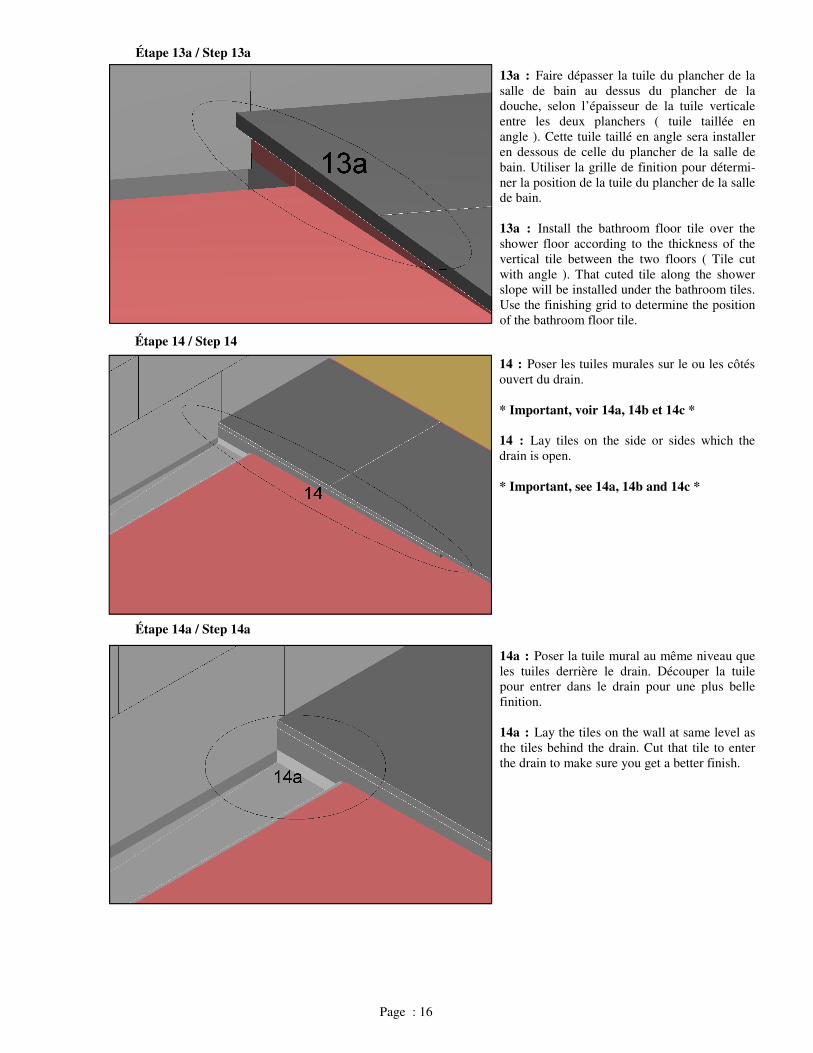
13a : Faire dépasser la tuile du plancher de la salle de bain au dessus du plancher de la douche, selon l’épaisseur de la tuile verticale entre les deux planchers ( tuile taillée en angle ). Cette tuile taillé en angle sera installer en dessous de celle du plancher de la salle de bain. Utiliser la grille de finition pour détermi-ner la position de la tuile du plancher de la salle de bain. 13a : Install the bathroom floor tile over the shower floor according to the thickness of the vertical tile between the two floors ( Tile cut with angle ). That cuted tile along the shower slope will be installed under the bathroom tiles. Use the finishing grid to determine the position of the bathroom floor tile.
14a : Poser la tuile mural au même niveau que les tuiles derrière le drain. Découper la tuile pour entrer dans le drain pour une plus belle finition. 14a : Lay the tiles on the wall at same level as the tiles behind the drain. Cut that tile to enter the drain to make sure you get a better finish.
Page : 16
Étape 14 / Step 14
14 : Poser les tuiles murales sur le ou les côtés ouvert du drain. * Important, voir 14a, 14b et 14c * 14 : Lay tiles on the side or sides which the drain is open. * Important, see 14a, 14b and 14c *
Étape 14b / Step 14b
Étape 14c / Step 14c
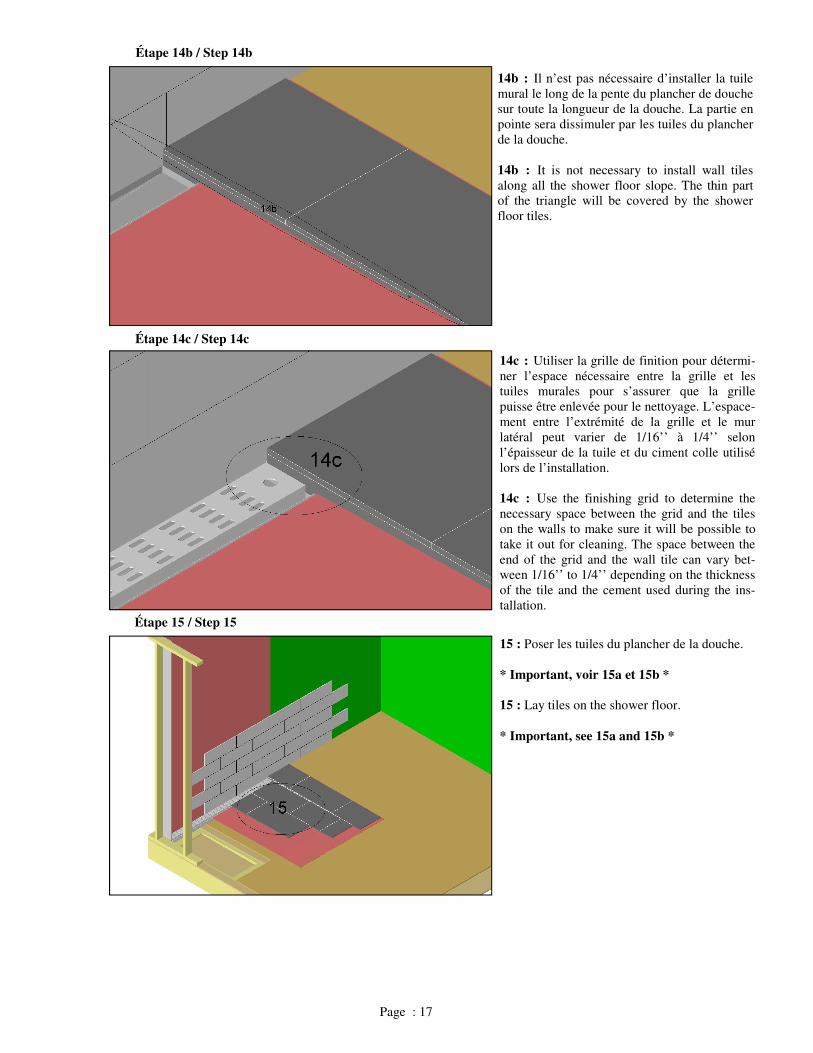
14c : Utiliser la grille de finition pour détermi-ner l’espace nécessaire entre la grille et les tuiles murales pour s’assurer que la grille puisse être enlevée pour le nettoyage. L’espace-ment entre l’extrémité de la grille et le mur latéral peut varier de 1/16’’ à 1/4’’ selon l’épaisseur de la tuile et du ciment colle utilisé lors de l’installation. 14c : Use the finishing grid to determine the necessary space between the grid and the tiles on the walls to make sure it will be possible to take it out for cleaning. The space between the end of the grid and the wall tile can vary bet-ween 1/16’’ to 1/4’’ depending on the thickness of the tile and the cement used during the ins-tallation.
Étape 15 / Step 15
15 : Poser les tuiles du plancher de la douche. * Important, voir 15a et 15b * 15 : Lay tiles on the shower floor. * Important, see 15a and 15b *
Page : 17
14b : Il n’est pas nécessaire d’installer la tuile mural le long de la pente du plancher de douche sur toute la longueur de la douche. La partie en pointe sera dissimuler par les tuiles du plancher de la douche. 14b : It is not necessary to install wall tiles along all the shower floor slope. The thin part of the triangle will be covered by the shower floor tiles.
Étape 15a / Step 15a
Étape 15b / Step 15b
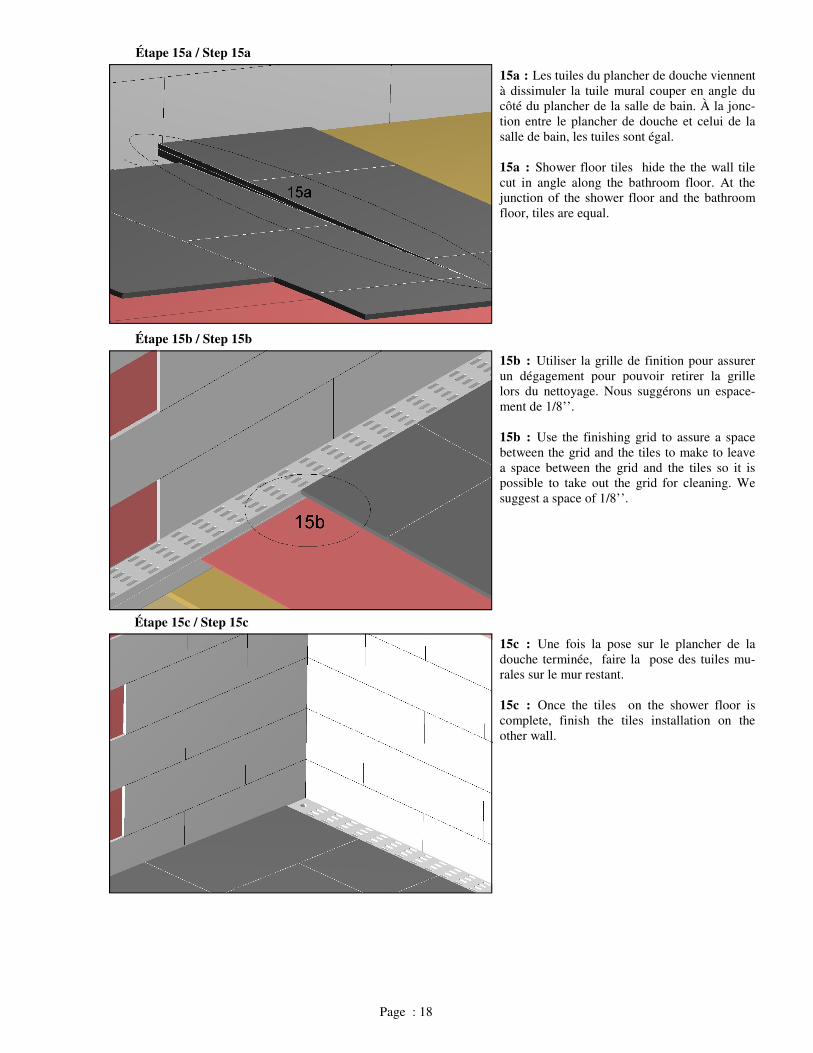
15a : Les tuiles du plancher de douche viennent à dissimuler la tuile mural couper en angle du côté du plancher de la salle de bain. À la jonc-tion entre le plancher de douche et celui de la salle de bain, les tuiles sont égal. 15a : Shower floor tiles hide the the wall tile cut in angle along the bathroom floor. At the junction of the shower floor and the bathroom floor, tiles are equal.
15b : Utiliser la grille de finition pour assurer un dégagement pour pouvoir retirer la grille lors du nettoyage. Nous suggérons un espace-ment de 1/8’’. 15b : Use the finishing grid to assure a space between the grid and the tiles to make to leave a space between the grid and the tiles so it is possible to take out the grid for cleaning. We suggest a space of 1/8’’.
Étape 15c / Step 15c
15c : Une fois la pose sur le plancher de la douche terminée, faire la pose des tuiles mu-rales sur le mur restant. 15c : Once the tiles on the shower floor is complete, finish the tiles installation on the other wall.
Page : 18
Étape 16a / Step 16a
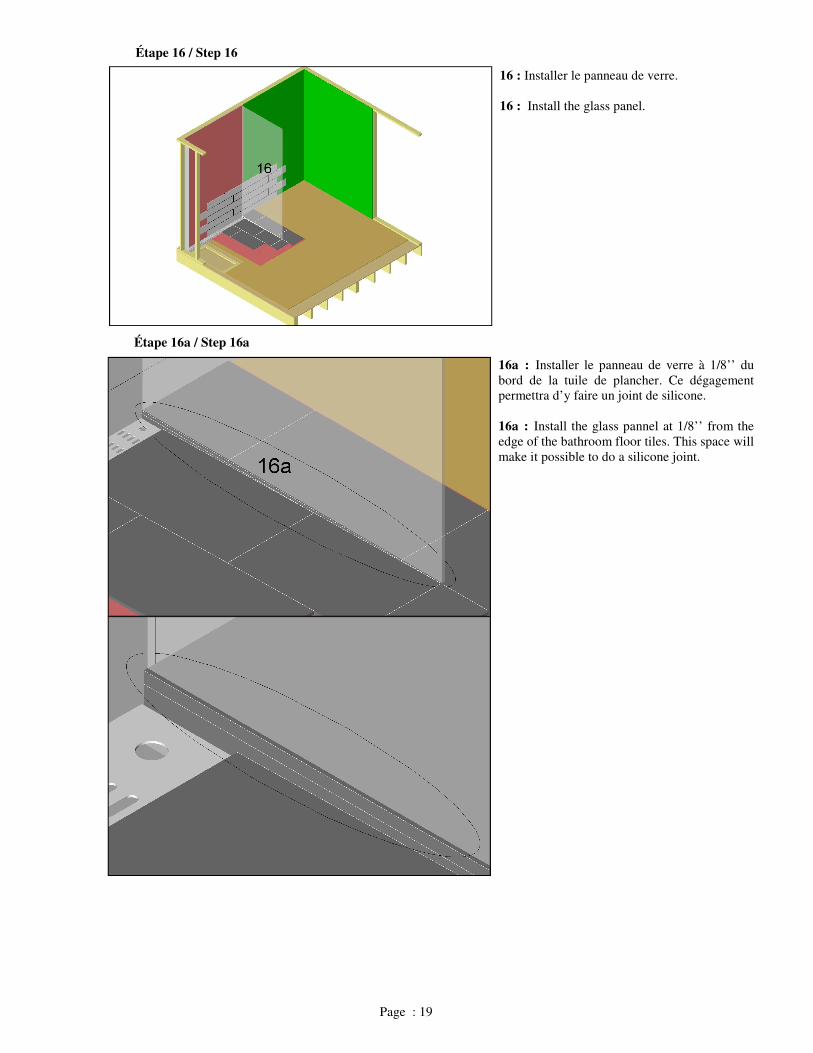
16a : Installer le panneau de verre à 1/8’’ du bord de la tuile de plancher. Ce dégagement permettra d’y faire un joint de silicone. 16a : Install the glass pannel at 1/8’’ from the edge of the bathroom floor tiles. This space will make it possible to do a silicone joint.
Étape 16 / Step 16
16 : Installer le panneau de verre. 16 : Install the glass panel.
Page : 19
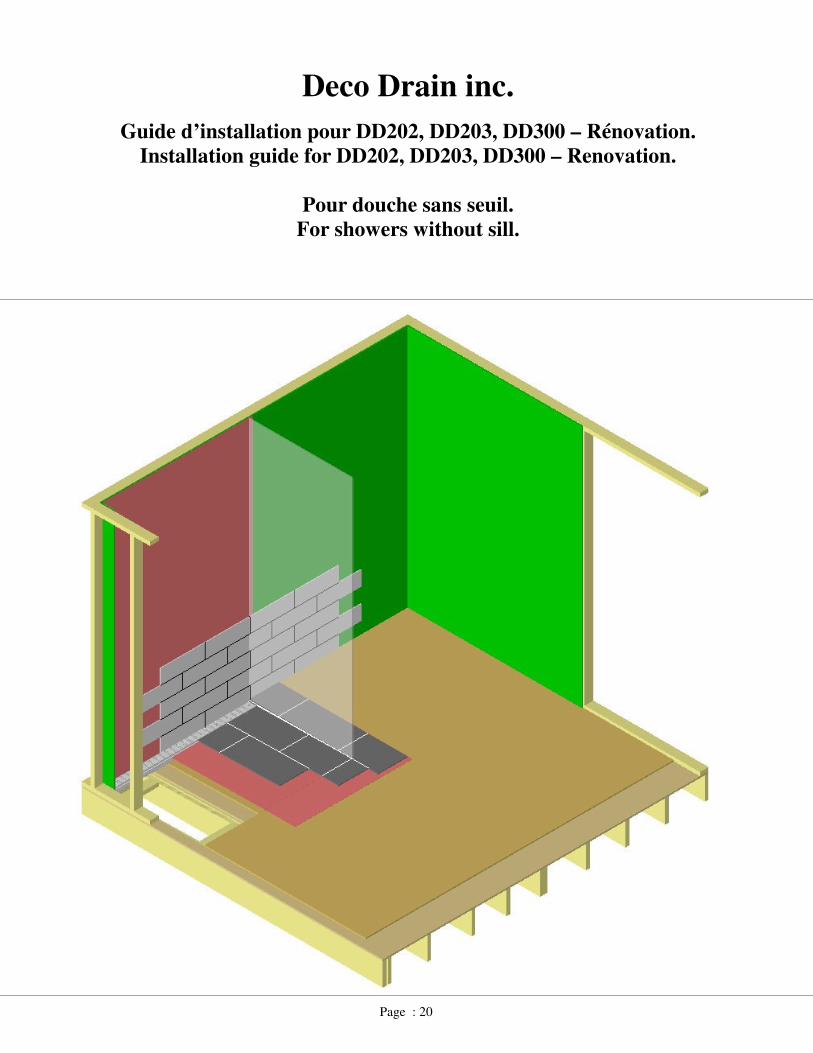
Deco Drain inc.
Guide d’installation pour DD202, DD203, DD300 – Rénovation. Installation guide for DD202, DD203, DD300 – Renovation.
Pour douche sans seuil.
For showers without sill.
Page : 20
Étape 1 / Step 1
Étape 2 / Step 2
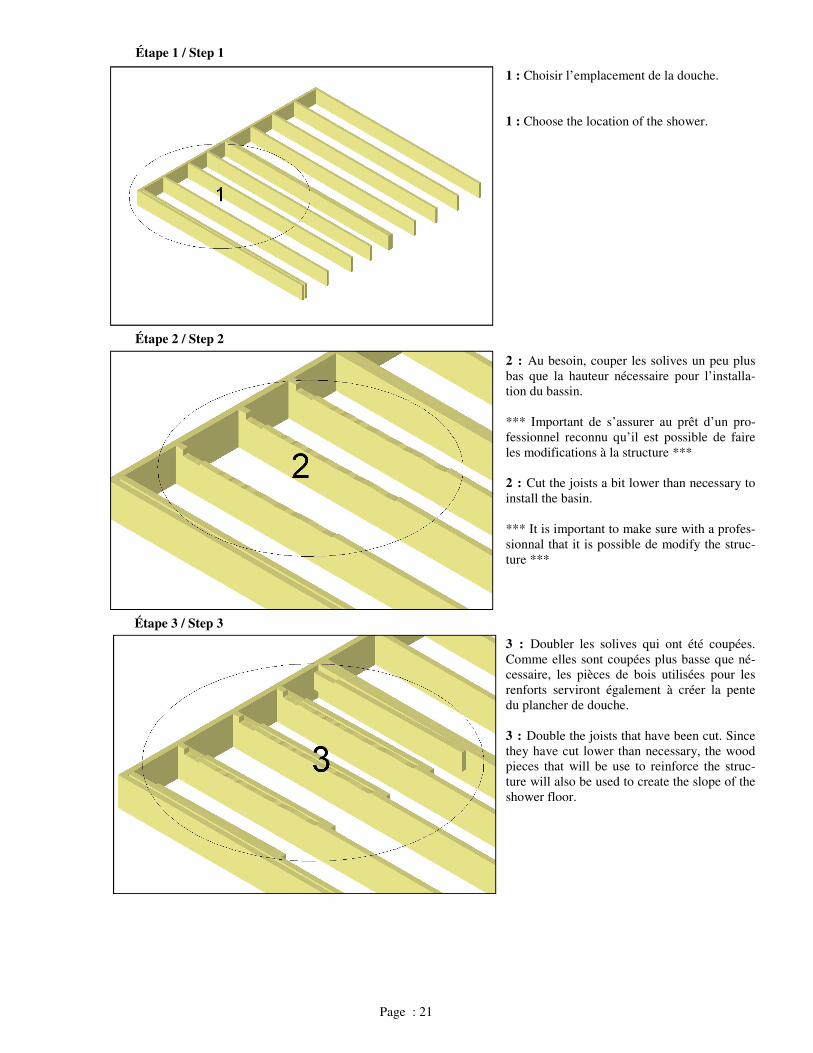
1 : Choisir l’emplacement de la douche. 1 : Choose the location of the shower.
2 : Au besoin, couper les solives un peu plus bas que la hauteur nécessaire pour l’installa-tion du bassin. *** Important de s’assurer au prêt d’un pro-fessionnel reconnu qu’il est possible de faire les modifications à la structure *** 2 : Cut the joists a bit lower than necessary to install the basin. *** It is important to make sure with a profes-sionnal that it is possible de modify the struc-ture ***
Étape 3 / Step 3
3 : Doubler les solives qui ont été coupées. Comme elles sont coupées plus basse que né-cessaire, les pièces de bois utilisées pour les renforts serviront également à créer la pente du plancher de douche. 3 : Double the joists that have been cut. Since they have cut lower than necessary, the wood pieces that will be use to reinforce the struc-ture will also be used to create the slope of the shower floor.
Page : 21
Étape 4 / Step 4
Étape 5 / Step 5
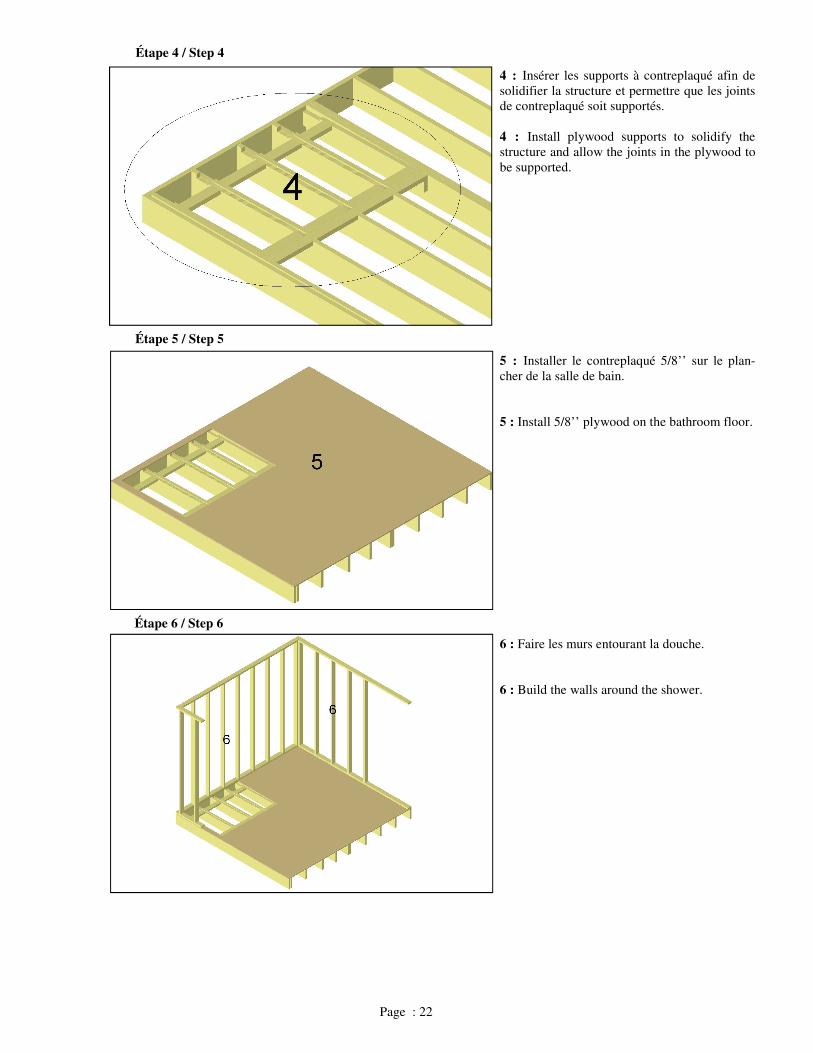
4 : Insérer les supports à contreplaqué afin de solidifier la structure et permettre que les joints de contreplaqué soit supportés. 4 : Install plywood supports to solidify the structure and allow the joints in the plywood to be supported.
5 : Installer le contreplaqué 5/8’’ sur le plan-cher de la salle de bain. 5 : Install 5/8’’ plywood on the bathroom floor.
Étape 6 / Step 6
6 : Faire les murs entourant la douche. 6 : Build the walls around the shower.
Page : 22
Étape 7 / Step 7
Étape 8 / Step 8
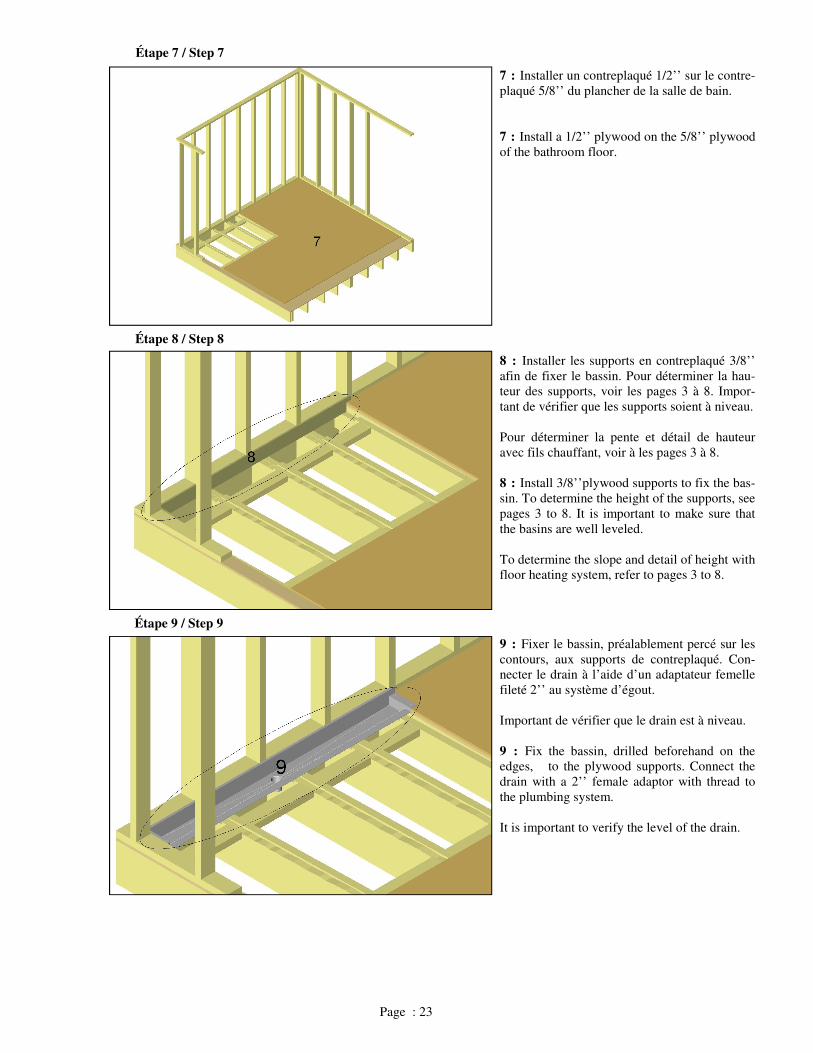
7 : Installer un contreplaqué 1/2’’ sur le contre-plaqué 5/8’’ du plancher de la salle de bain. 7 : Install a 1/2’’ plywood on the 5/8’’ plywood of the bathroom floor.
8 : Installer les supports en contreplaqué 3/8’’ afin de fixer le bassin. Pour déterminer la hau-teur des supports, voir les pages 3 à 8. Impor-tant de vérifier que les supports soient à niveau. Pour déterminer la pente et détail de hauteur avec fils chauffant, voir à les pages 3 à 8. 8 : Install 3/8’’plywood supports to fix the bas-sin. To determine the height of the supports, see pages 3 to 8. It is important to make sure that the basins are well leveled. To determine the slope and detail of height with floor heating system, refer to pages 3 to 8.
Étape 9 / Step 9
9 : Fixer le bassin, préalablement percé sur les contours, aux supports de contreplaqué. Con-necter le drain à l’aide d’un adaptateur femelle fileté 2’’ au système d’égout. Important de vérifier que le drain est à niveau. 9 : Fix the bassin, drilled beforehand on the edges, to the plywood supports. Connect the drain with a 2’’ female adaptor with thread to the plumbing system. It is important to verify the level of the drain.
Page : 23
Étape 9a / Step 9a
Étape 10 / Step 10
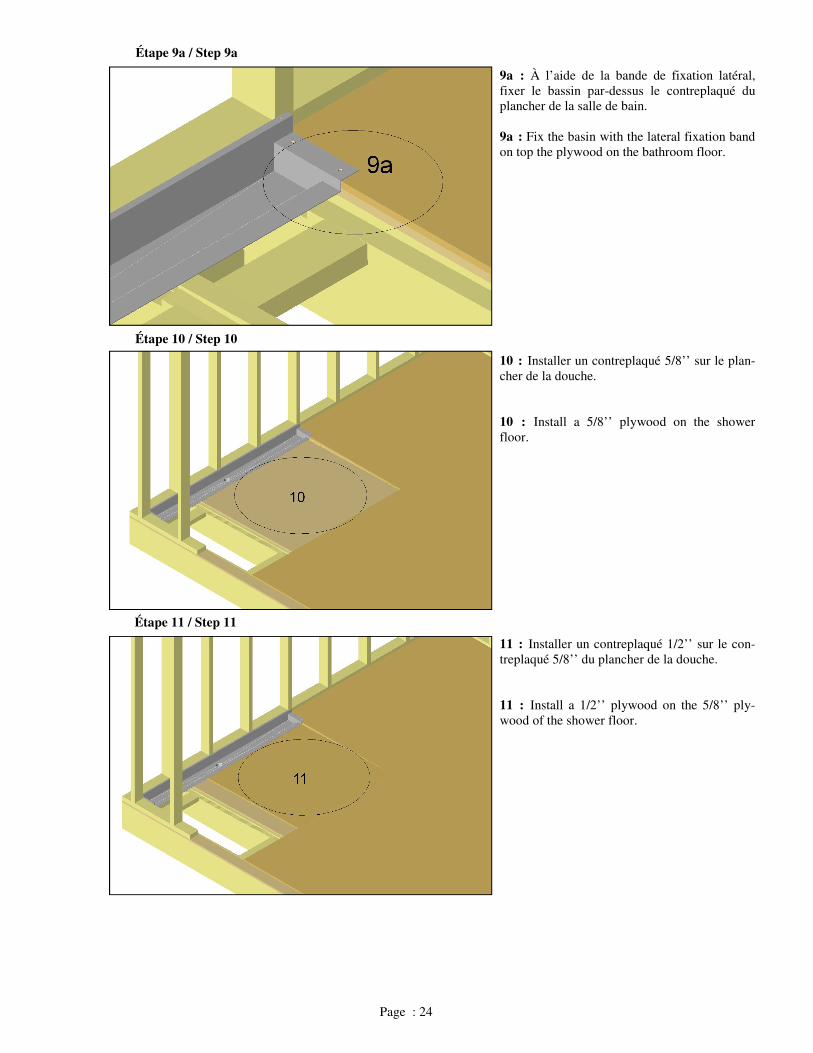
9a : À l’aide de la bande de fixation latéral, fixer le bassin par-dessus le contreplaqué du plancher de la salle de bain. 9a : Fix the basin with the lateral fixation band on top the plywood on the bathroom floor.
10 : Installer un contreplaqué 5/8’’ sur le plan-cher de la douche. 10 : Install a 5/8’’ plywood on the shower floor.
Étape 11 / Step 11
11 : Installer un contreplaqué 1/2’’ sur le con-treplaqué 5/8’’ du plancher de la douche. 11 : Install a 1/2’’ plywood on the 5/8’’ ply-wood of the shower floor.
Page : 24
Étape 12 & 12a / Step 12 & 12a
Étape 13a / Step 13a
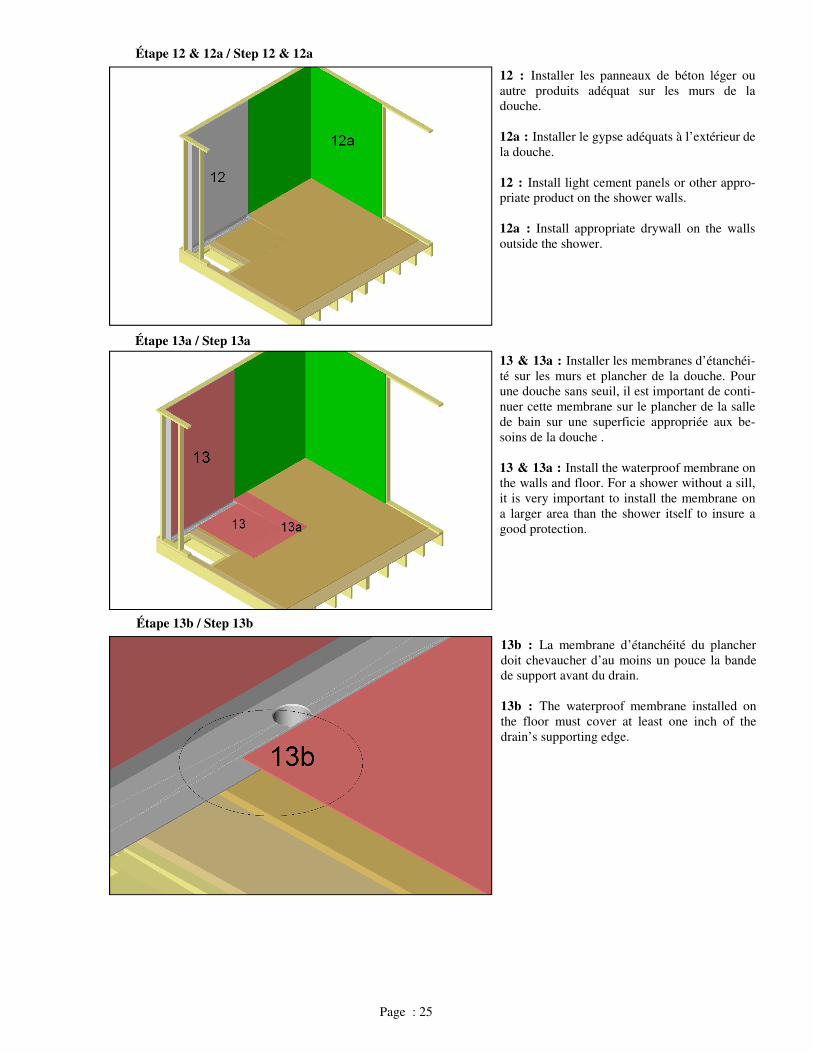
12 : Installer les panneaux de béton léger ou autre produits adéquat sur les murs de la douche. 12a : Installer le gypse adéquats à l’extérieur de la douche. 12 : Install light cement panels or other appro-priate product on the shower walls. 12a : Install appropriate drywall on the walls outside the shower.
13 & 13a : Installer les membranes d’étanchéi-té sur les murs et plancher de la douche. Pour une douche sans seuil, il est important de conti-nuer cette membrane sur le plancher de la salle de bain sur une superficie appropriée aux be-soins de la douche . 13 & 13a : Install the waterproof membrane on the walls and floor. For a shower without a sill, it is very important to install the membrane on a larger area than the shower itself to insure a good protection.
Page : 25
Étape 13b / Step 13b
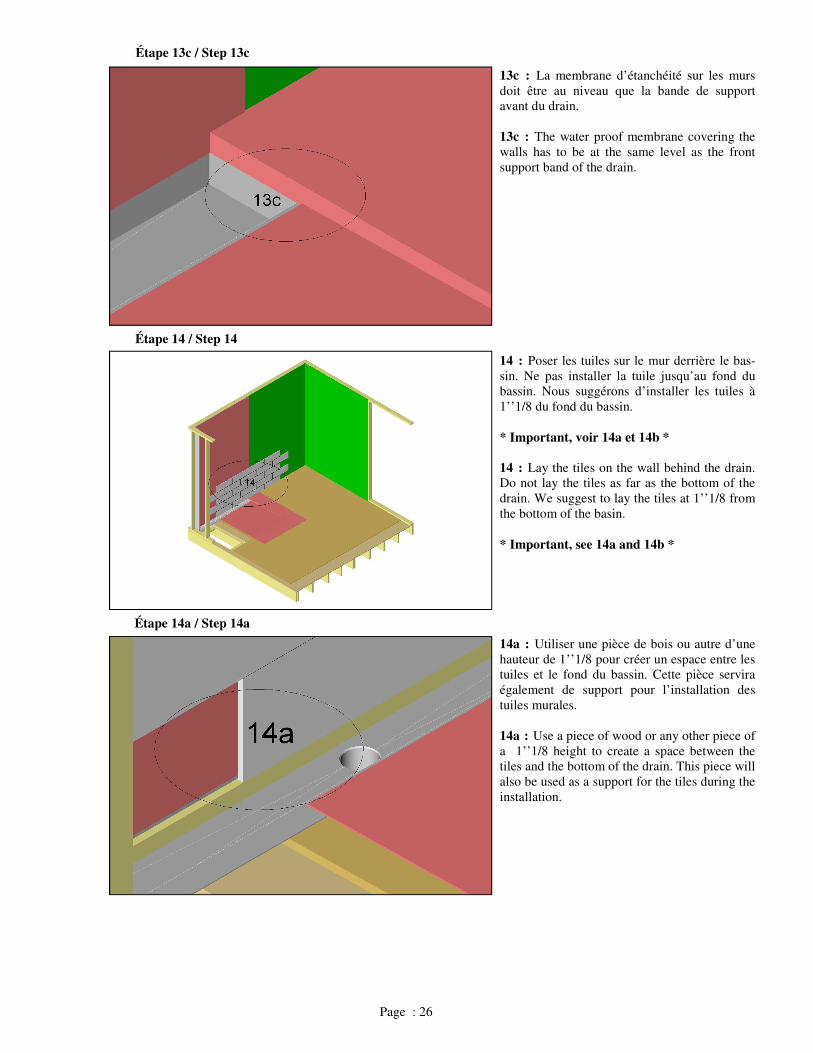
13b : La membrane d’étanchéité du plancher doit chevaucher d’au moins un pouce la bande de support avant du drain. 13b : The waterproof membrane installed on the floor must cover at least one inch of the drain’s supporting edge.
Étape 13c / Step 13c
Étape 14 / Step 14
13c : La membrane d’étanchéité sur les murs doit être au niveau que la bande de support avant du drain. 13c : The water proof membrane covering the walls has to be at the same level as the front support band of the drain.
14 : Poser les tuiles sur le mur derrière le bas-sin. Ne pas installer la tuile jusqu’au fond du bassin. Nous suggérons d’installer les tuiles à 1’’1/8 du fond du bassin. * Important, voir 14a et 14b * 14 : Lay the tiles on the wall behind the drain. Do not lay the tiles as far as the bottom of the drain. We suggest to lay the tiles at 1’’1/8 from the bottom of the basin. * Important, see 14a and 14b *
Étape 14a / Step 14a
14a : Utiliser une pièce de bois ou autre d’une hauteur de 1’’1/8 pour créer un espace entre les tuiles et le fond du bassin. Cette pièce servira également de support pour l’installation des tuiles murales. 14a : Use a piece of wood or any other piece of a 1’’1/8 height to create a space between the tiles and the bottom of the drain. This piece will also be used as a support for the tiles during the installation.
Page : 26

Étape 14b / Step 14b
Étape 15 / Step 15
14b : Utiliser la grille de finition lors de l’ins-tallation de la tuile pour vous assurer que les tuiles murales sont parallèles avec celle-ci. 14b : Use the finishing grid while installing te tiles to make sure that the tiles on the wall are parallel with the grid.
15 : Poser les tuiles du plancher de la salle de bain. * Important, voir 15a * 15 : Lay tiles on the bathroom floor. * Important, see 15a *
Étape 15a / Step 15a
15a : Faire dépasser la tuile du plancher de la salle de bain au dessus du plancher de la douche, selon l’épaisseur de la tuile verticale entre les deux planchers ( tuile taillée en angle ). Cette tuile taillé en angle sera installer en dessous de celle du plancher de la salle de bain. Utiliser la grille de finition pour détermi-ner la position de la tuile du plancher de la salle de bain. 15a : Install the bathroom floor tile over the shower floor according to the thickness of the vertical tile between the two floors ( Tile cut with angle ). That cuted tile along the shower slope will be installed under the bathroom tiles. Use the finishing grid to determine the position
Page : 27
Étape 16 / Step 16
Étape 16a / Step 16a
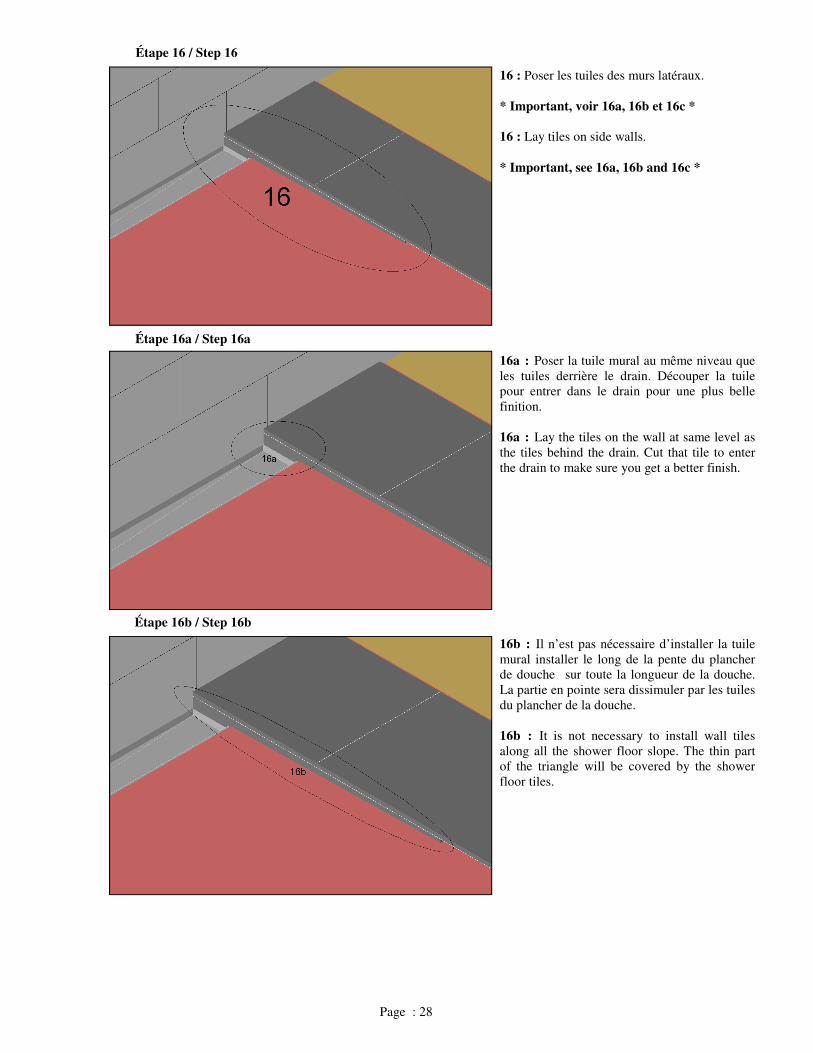
16 : Poser les tuiles des murs latéraux. * Important, voir 16a, 16b et 16c * 16 : Lay tiles on side walls. * Important, see 16a, 16b and 16c *
16a : Poser la tuile mural au même niveau que les tuiles derrière le drain. Découper la tuile pour entrer dans le drain pour une plus belle finition. 16a : Lay the tiles on the wall at same level as the tiles behind the drain. Cut that tile to enter the drain to make sure you get a better finish.
Page : 28
Étape 16b / Step 16b
16b : Il n’est pas nécessaire d’installer la tuile mural installer le long de la pente du plancher de douche sur toute la longueur de la douche. La partie en pointe sera dissimuler par les tuiles du plancher de la douche. 16b : It is not necessary to install wall tiles along all the shower floor slope. The thin part of the triangle will be covered by the shower floor tiles.
Étape 16c / Step 16c
Étape 17 / Step 17
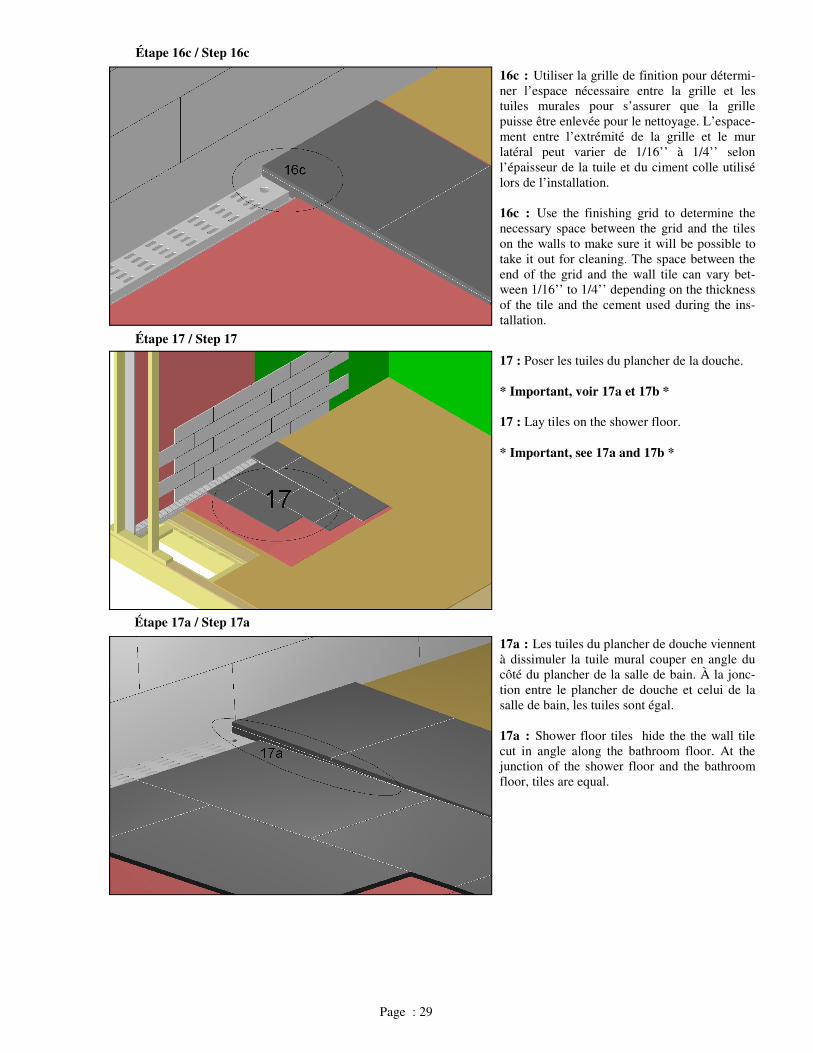
16c : Utiliser la grille de finition pour détermi-ner l’espace nécessaire entre la grille et les tuiles murales pour s’assurer que la grille puisse être enlevée pour le nettoyage. L’espace-ment entre l’extrémité de la grille et le mur latéral peut varier de 1/16’’ à 1/4’’ selon l’épaisseur de la tuile et du ciment colle utilisé lors de l’installation. 16c : Use the finishing grid to determine the necessary space between the grid and the tiles on the walls to make sure it will be possible to take it out for cleaning. The space between the end of the grid and the wall tile can vary bet-ween 1/16’’ to 1/4’’ depending on the thickness of the tile and the cement used during the ins-tallation.
17 : Poser les tuiles du plancher de la douche. * Important, voir 17a et 17b * 17 : Lay tiles on the shower floor. * Important, see 17a and 17b *
Étape 17a / Step 17a
17a : Les tuiles du plancher de douche viennent à dissimuler la tuile mural couper en angle du côté du plancher de la salle de bain. À la jonc-tion entre le plancher de douche et celui de la salle de bain, les tuiles sont égal. 17a : Shower floor tiles hide the the wall tile cut in angle along the bathroom floor. At the junction of the shower floor and the bathroom floor, tiles are equal.
Page : 29
Étape 17b / Step 17b
Étape 17c / Step 17c
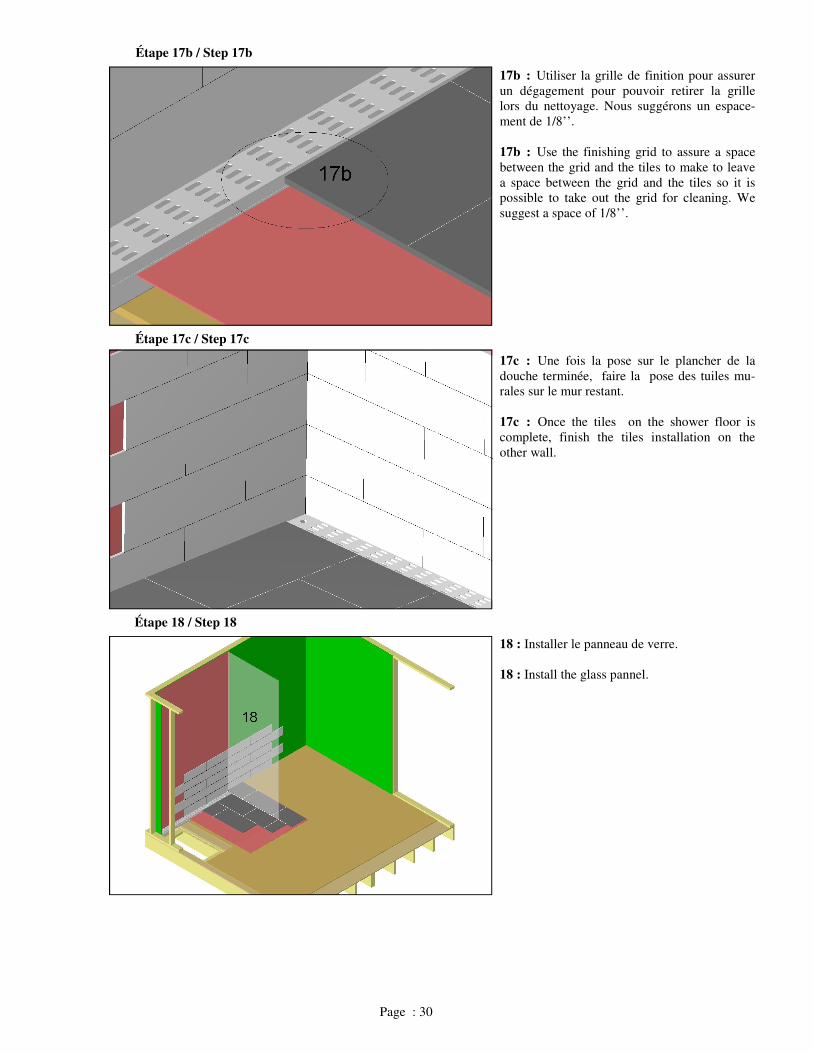
17b : Utiliser la grille de finition pour assurer un dégagement pour pouvoir retirer la grille lors du nettoyage. Nous suggérons un espace-ment de 1/8’’. 17b : Use the finishing grid to assure a space between the grid and the tiles to make to leave a space between the grid and the tiles so it is possible to take out the grid for cleaning. We suggest a space of 1/8’’.
17c : Une fois la pose sur le plancher de la douche terminée, faire la pose des tuiles mu-rales sur le mur restant. 17c : Once the tiles on the shower floor is complete, finish the tiles installation on the other wall.
Étape 18 / Step 18
18 : Installer le panneau de verre. 18 : Install the glass pannel.
Page : 30
Étape 18a / Step 18a
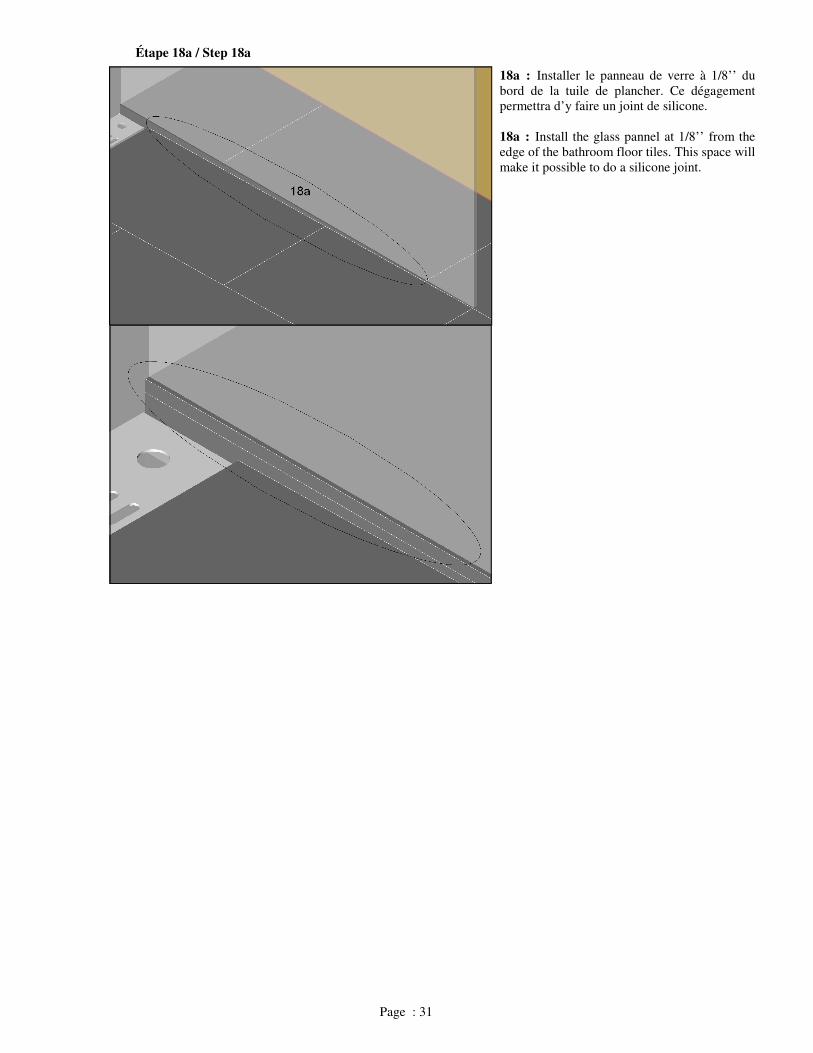
18a : Installer le panneau de verre à 1/8’’ du bord de la tuile de plancher. Ce dégagement permettra d’y faire un joint de silicone. 18a : Install the glass pannel at 1/8’’ from the edge of the bathroom floor tiles. This space will make it possible to do a silicone joint.
Page : 31