AVANT DE COMMENCER L’ASSEMBLAGE - Lowes...
26
39" MULTI-PURPOSE CABINET 39" ARMOIRE POLYVALENTE 39" GABINETE MULTIUSO BEFORE BEGINNING ASSEMBLY – READ DIRECTIONS THOROUGHLY – ASSEMBLE NEAR DESIRED LOCATION – TWO-PERSON ASSEMBLY IS RECOMMENDED AVANT DE COMMENCER L’ASSEMBLAGE – LISEZ COMPLÈTEMENT LES INSTRUCTIONS – ASSEMBLEZ À PROXIMITÉ DE L'EMPLACEMENT SOUHAITÉ – IL EST RECOMMANDÉ DE SE METTRE À DEUX PERSONNES POUR L'ASSEMBLAGE ANTES DE COMENZAR AL ENSAMBLAJE – LEE LAS INSTRUCCIONES MINUCIOSAMENTE – ENSAMBLA CERCA DE LA UBICACIÓN FINAL – SE RECOMIENDAN DOS PERSONAS PARA ENSAMBLAR ASSEMBLY & INSTALLATION INSTRUCTIONS • INSTRUCTIONS POUR L’ASSEMBLAGE ET L’INSTALLATION • INSTRUCCIONES PARA LA INSTALACION Model Number(s): N o de modèle: Numero(s) de: TOOLS NEEDED FOR ASSEMBLY* OUTILS REQUIS POUR L'ASSEMBLAGE* HERRAMIENTAS NECESARIAS PARA LA INSTALACIÓN* *TOOLS NOT INCLUDED *OUTILS NON COMPRIS *HERRAMIENTAS NO INCLUIDAS WIDE SIDE CÔTÉ LARGE LADO ANCHO WHEN ASSEMBLED, WIDE SIDE SHOULD BE ON THE LEFT. ASSEMBLE DE COTE DE LARGE DEVRAIT ETRE SUR LA GAUCHE. EL LADO ANCHO REUNIDO DEBE ESTAR EN LA IZQUIERDA. NARROW SIDE CÔTÉ ÉTROIT LADO ANGOSTO STUD FINDER DÉTECTEUR DE MONTANTS DETECTOR DE VIGAS U180136 / 0614 ESM3970SW
Transcript of AVANT DE COMMENCER L’ASSEMBLAGE - Lowes...
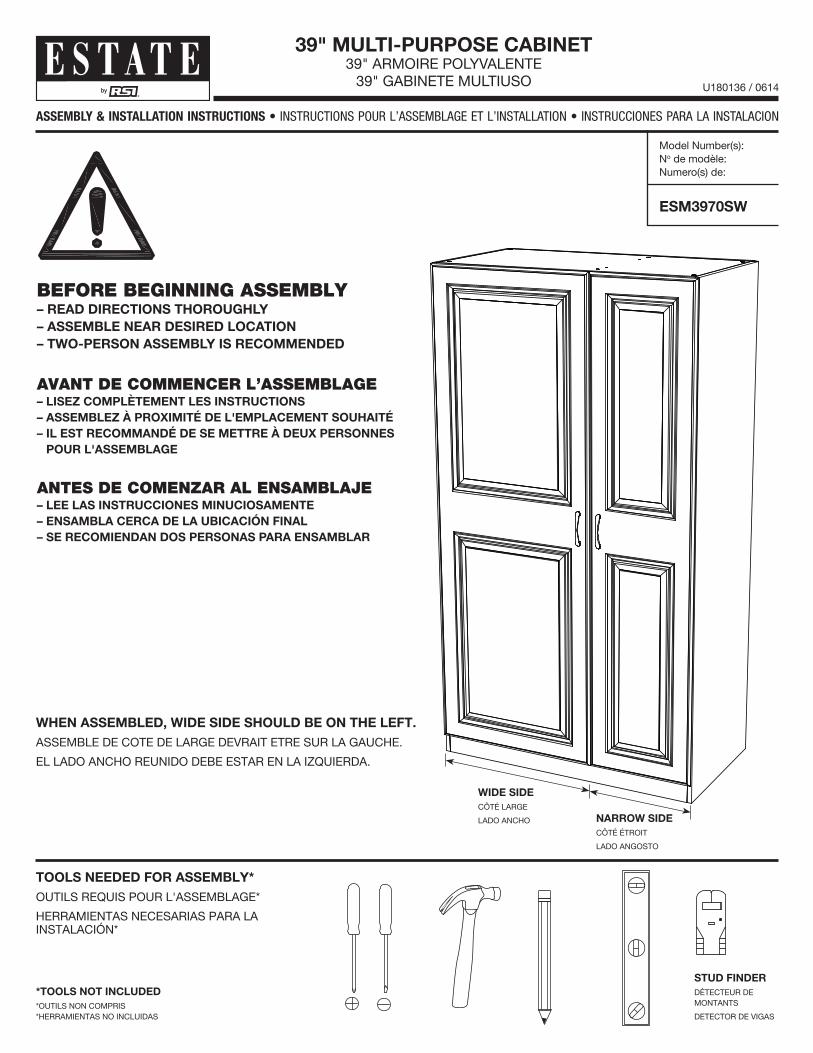
39" MULTI-PURPOSE CABINET39" ARMOIRE POLYVALENTE
39" GABINETE MULTIUSO
BEFORE BEGINNING ASSEMBLY– READ DIRECTIONS THOROUGHLY– ASSEMBLE NEAR DESIRED LOCATION– TWO-PERSON ASSEMBLY IS RECOMMENDED
AVANT DE COMMENCER L’ASSEMBLAGE– LISEZ COMPLÈTEMENT LES INSTRUCTIONS– ASSEMBLEZ À PROXIMITÉ DE L'EMPLACEMENT SOUHAITÉ– IL EST RECOMMANDÉ DE SE METTRE À DEUX PERSONNES
POUR L'ASSEMBLAGE
ANTES DE COMENZAR AL ENSAMBLAJE– LEE LAS INSTRUCCIONES MINUCIOSAMENTE– ENSAMBLA CERCA DE LA UBICACIÓN FINAL– SE RECOMIENDAN DOS PERSONAS PARA ENSAMBLAR
ASSEMBLY & INSTALLATION INSTRUCTIONS • INSTRUCTIONS POUR L’ASSEMBLAGE ET L’INSTALLATION • INSTRUCCIONES PARA LA INSTALACION
Model Number(s):No de modèle:Numero(s) de:
TOOLS NEEDED FOR ASSEMBLY*OUTILS REQUIS POUR L'ASSEMBLAGE*
HERRAMIENTAS NECESARIAS PARA LA INSTALACIÓN*
*TOOLS NOT INCLUDED*OUTILS NON COMPRIS *HERRAMIENTAS NO INCLUIDAS
WIDE SIDECÔTÉ LARGE
LADO ANCHO
WHEN ASSEMBLED, WIDE SIDE SHOULD BE ON THE LEFT.ASSEMBLE DE COTE DE LARGE DEVRAIT ETRE SUR LA GAUCHE.
EL LADO ANCHO REUNIDO DEBE ESTAR EN LA IZQUIERDA.
NARROW SIDECÔTÉ ÉTROIT
LADO ANGOSTO
STUD FINDERDÉTECTEUR DE MONTANTS
DETECTOR DE VIGAS
U180136 / 0614
ESM3970SW
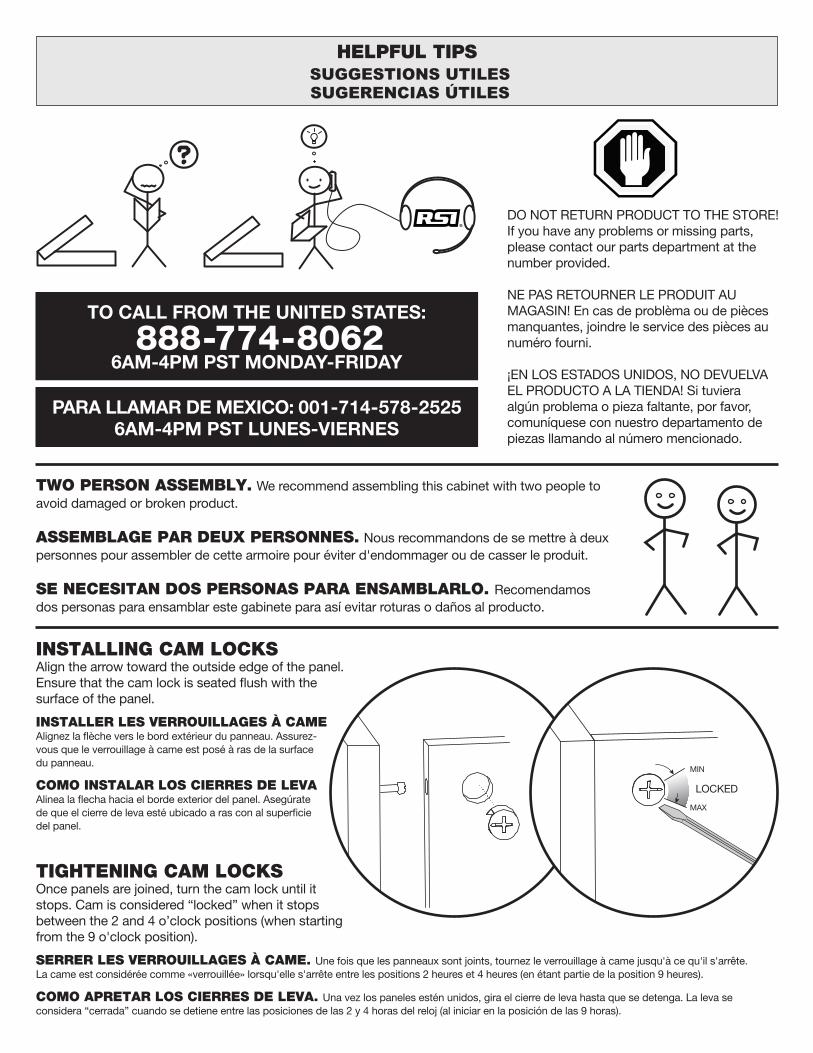
HELPFUL TIPSSUGGESTIONS UTILESSUGERENCIAS ÚTILES
DO NOT RETURN PRODUCT TO THE STORE! If you have any problems or missing parts, please contact our parts department at the number provided.
NE PAS RETOURNER LE PRODUIT AU MAGASIN! En cas de problèma ou de pièces manquantes, joindre le service des pièces au numéro fourni.
¡EN LOS ESTADOS UNIDOS, NO DEVUELVA EL PRODUCTO A LA TIENDA! Si tuviera algún problema o pieza faltante, por favor, comuníquese con nuestro departamento de piezas llamando al número mencionado.
TWO PERSON ASSEMBLY. We recommend assembling this cabinet with two people to avoid damaged or broken product.
ASSEMBLAGE PAR DEUX PERSONNES. Nous recommandons de se mettre à deux personnes pour assembler de cette armoire pour éviter d'endommager ou de casser le produit.
SE NECESITAN DOS PERSONAS PARA ENSAMBLARLO. Recomendamos dos personas para ensamblar este gabinete para así evitar roturas o daños al producto.
INSTALLING CAM LOCKSAlign the arrow toward the outside edge of the panel. Ensure that the cam lock is seated flush with the surface of the panel.
INSTALLER LES VERROUILLAGES À CAME Alignez la flèche vers le bord extérieur du panneau. Assurez- vous que le verrouillage à came est posé à ras de la surface du panneau.
COMO INSTALAR LOS CIERRES DE LEVA Alinea la flecha hacia el borde exterior del panel. Asegúrate de que el cierre de leva esté ubicado a ras con al superficie del panel.
TIGHTENING CAM LOCKSOnce panels are joined, turn the cam lock until it stops. Cam is considered “locked” when it stops between the 2 and 4 o’clock positions (when starting from the 9 o'clock position).
SERRER LES VERROUILLAGES À CAME. Une fois que les panneaux sont joints, tournez le verrouillage à came jusqu'à ce qu'il s'arrête. La came est considérée comme «verrouillée» lorsqu'elle s'arrête entre les positions 2 heures et 4 heures (en étant partie de la position 9 heures).
COMO APRETAR LOS CIERRES DE LEVA. Una vez los paneles estén unidos, gira el cierre de leva hasta que se detenga. La leva se considera “cerrada” cuando se detiene entre las posiciones de las 2 y 4 horas del reloj (al iniciar en la posición de las 9 horas).
TO CALL FROM THE UNITED STATES:
888-774-80626AM-4PM PST MONDAY-FRIDAY
PARA LLAMAR DE MEXICO: 001-714-578-25256AM-4PM PST LUNES-VIERNES
MIN
LOCKED
MAX
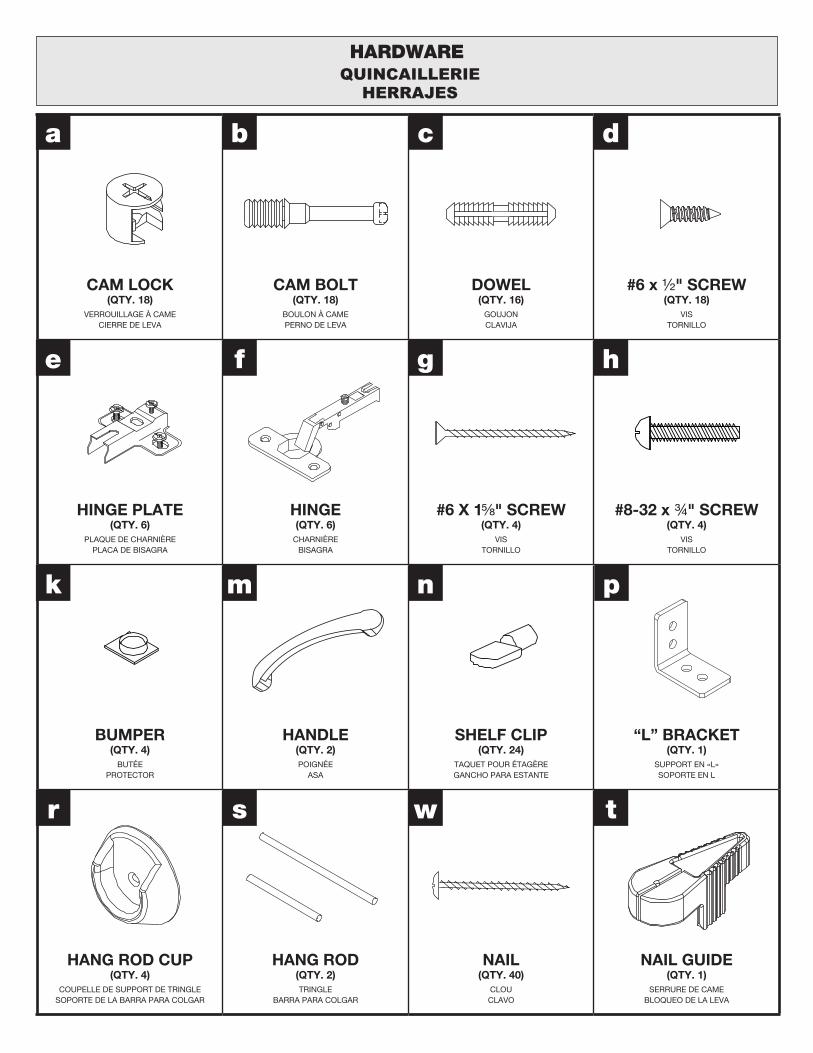
HARDWAREQUINCAILLERIE
HERRAJES
CAM LOCK(QTY. 18)
VERROUILLAGE À CAME CIERRE DE LEVA
CAM BOLT(QTY. 18)
BOULON À CAME PERNO DE LEVA
DOWEL(QTY. 16)
GOUJON CLAVIJA
#6 x ½" SCREW(QTY. 18)
VIS TORNILLO
HINGE PLATE(QTY. 6)
PLAQUE DE CHARNIÈRE PLACA DE BISAGRA
HINGE(QTY. 6)
CHARNIÈRE BISAGRA
#6 X 1⁵₈" SCREW(QTY. 4)
VIS TORNILLO
#8-32 x ¾" SCREW(QTY. 4)
VIS TORNILLO
BUMPER(QTY. 4)
BUTÉE PROTECTOR
HANDLE(QTY. 2)POIGNÉE
ASA
SHELF CLIP(QTY. 24)
TAQUET POUR ÉTAGÈRE GANCHO PARA ESTANTE
“L” BRACKET(QTY. 1)
SUPPORT EN «L» SOPORTE EN L
HANG ROD CUP(QTY. 4)
COUPELLE DE SUPPORT DE TRINGLE SOPORTE DE LA BARRA PARA COLGAR
HANG ROD(QTY. 2)TRINGLE
BARRA PARA COLGAR
NAIL(QTY. 40)
CLOU CLAVO
NAIL GUIDE(QTY. 1)
SERRURE DE CAME BLOQUEO DE LA LEVA
t
a b
h
c d
r s w
m n pk
ge f
EXPLODED VIEWVUE ÉCLATÉE
VISTA AMPLIADA
A
B
E
C
C
J
L
J
L
J
L
F
M
P
G
H
PANEL A
Panels are identified on edges.
Les panneaux sont identifiés sur les bords.
Los paneles están marcados en los bordes.

LEFT SIDE PANEL(QTY. 1)
PANNEAU LATÉRAL GAUCHE • PANEL DEL LADO IZQUIERDO
RIGHT SIDE PANEL(QTY. 1)
PANNEAU LATÉRAL DROIT • PANEL DEL LADO DERECHO
TOP / BOTTOM PANEL(QTY. 2)
PANNEAU INFÉRIEUR / ÉTAGÈRE FIXE • PANEL INFERIOR / ESTANTE FIJO
PARTITION(QTY. 1)
PARTITION • DIVISIÓN
TOP RAIL(QTY. 1)
TRAVERSE SUPÉRIEURE RIEL SUPERIOR
TOEKICK(QTY. 1)
COUP-DE-PIED ZÓCALO
LARGE BACK RAIL(QTY. 1)
GRAND RAIL ARRIÈRE RIEL POSTERIOR GRANDE
SMALL BACK RAIL(QTY. 1)
PETIT RAIL ARRIÈRE RIEL POSTERIOR PEQUEÑO
BACK PANEL(QTY. 1)
PANNEAU ARRIÈRE PANEL POSTERIOR
SHELF(QTY. 3)
ÉTAGÈRE • ESTANTE
DOORS(QTY. 2)
PORTE PUERTA
SHELF(QTY. 3)
ÉTAGÈRE • ESTANTE
PANELSPANNEAUXPANELES
A B
C
H J
L
K
M P
F G
E
PANEL A
Panels are identified on edges.
Les panneaux sont identifiés sur les bords. Los paneles están marcados en los bordes.
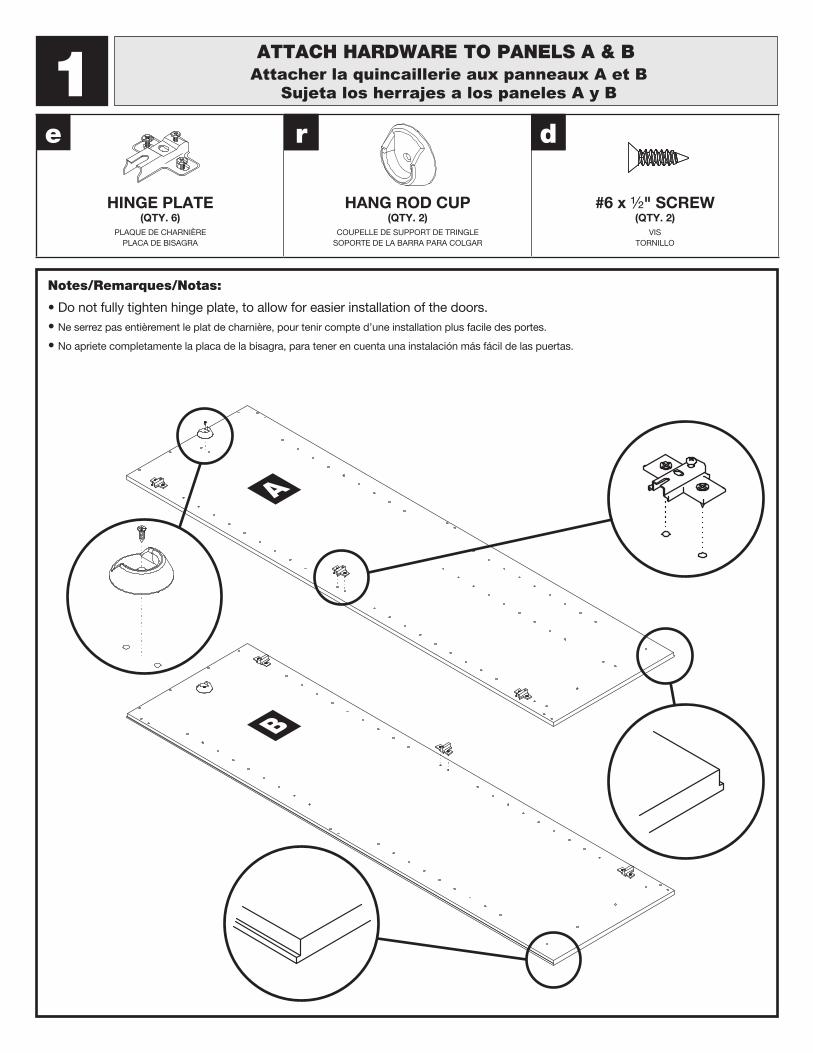
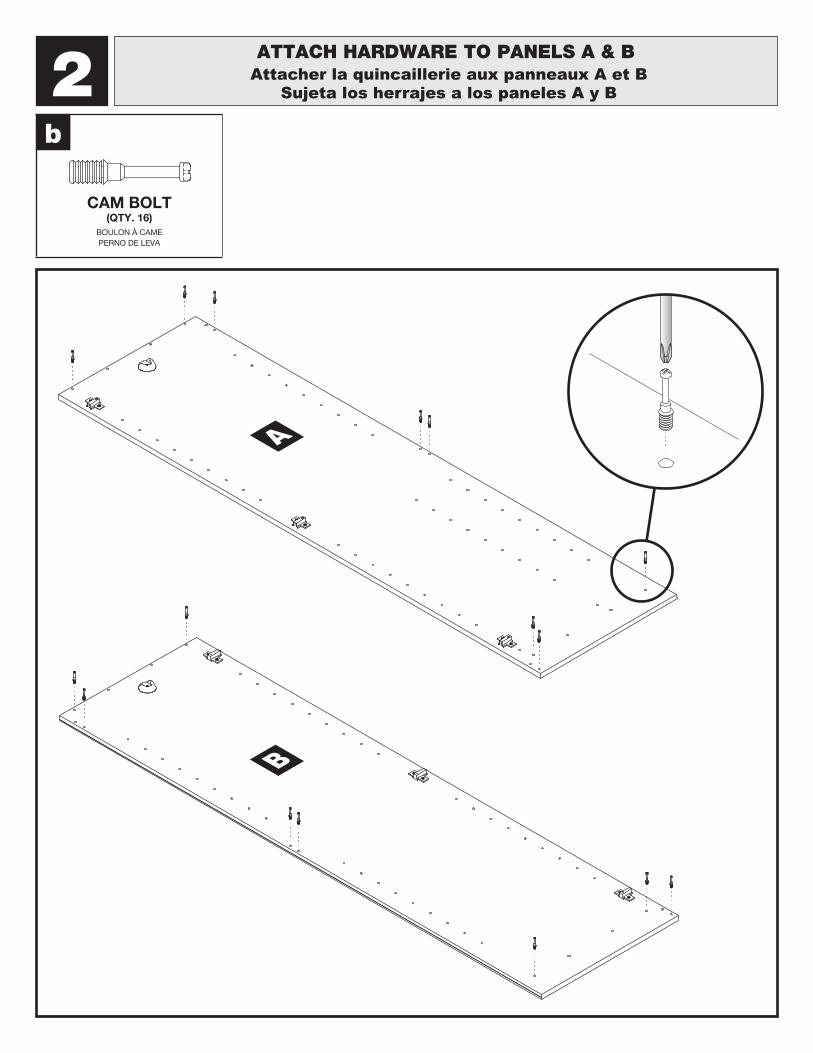
ATTACH HARDWARE TO PANELS A & BAttacher la quincaillerie aux panneaux A et B
Sujeta los herrajes a los paneles A y B
HINGE PLATE(QTY. 6)
PLAQUE DE CHARNIÈRE PLACA DE BISAGRA
HANG ROD CUP(QTY. 2)
COUPELLE DE SUPPORT DE TRINGLE SOPORTE DE LA BARRA PARA COLGAR
#6 x ½" SCREW(QTY. 2)
VIS TORNILLO
1e r d
A
B
Notes/Remarques/Notas:
• Do not fully tighten hinge plate, to allow for easier installation of the doors. • Ne serrez pas entièrement le plat de charnière, pour tenir compte d’une installation plus facile des portes.
• No apriete completamente la placa de la bisagra, para tener en cuenta una instalación más fácil de las puertas.
r d
ATTACH HARDWARE TO PANELS A & BAttacher la quincaillerie aux panneaux A et B
Sujeta los herrajes a los paneles A y B
CAM BOLT(QTY. 16)
BOULON À CAME PERNO DE LEVA
2b
A
B

3ATTACH HARDWARE TO PANEL E
Attacher la quincaillerie aux panneaux ESujeta los herrajes a los paneles E
CAM BOLT(QTY. 1)
BOULON À CAME PERNO DE LEVA
DOWEL(QTY. 4)GOUJON CLAVIJA
HANG ROD CUP(QTY. 1)
COUPELLE DE SUPPORT DE TRINGLE SOPORTE DE LA BARRA PARA COLGAR
#6 x ½" SCREW(QTY. 1)
VIS TORNILLO
b
E
c r d
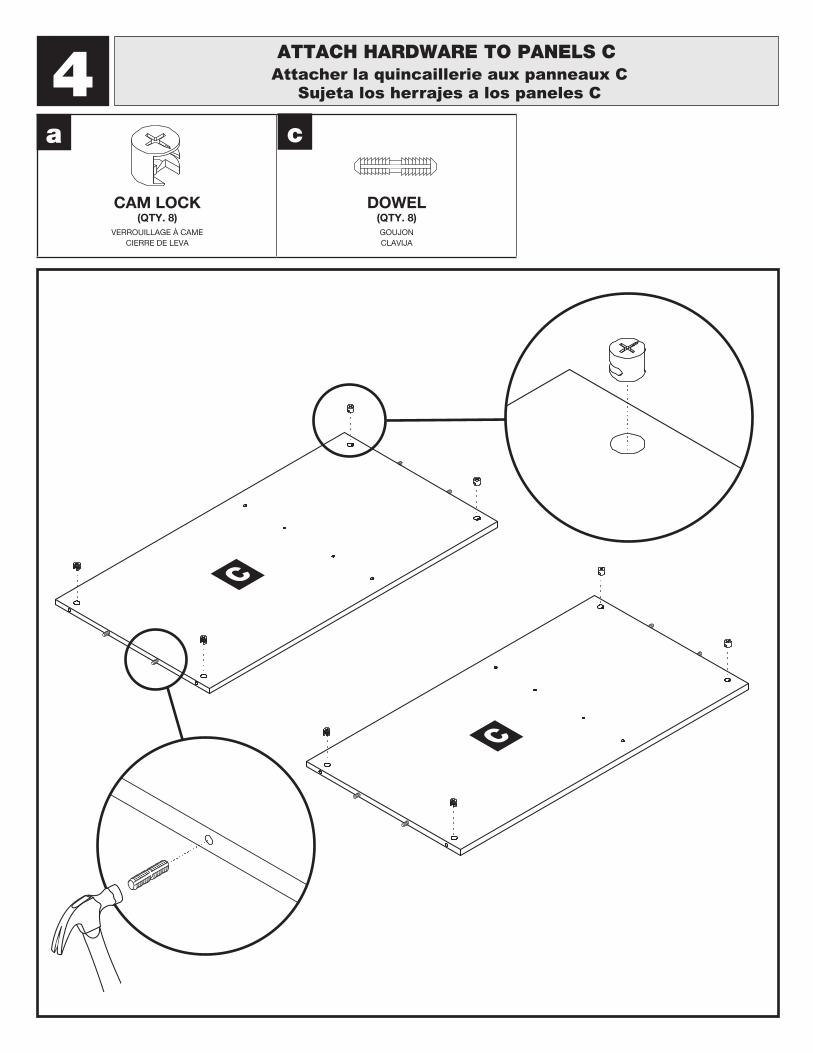
4ATTACH HARDWARE TO PANELS C
Attacher la quincaillerie aux panneaux CSujeta los herrajes a los paneles C
CAM LOCK(QTY. 8)
VERROUILLAGE À CAME CIERRE DE LEVA
DOWEL(QTY. 8)GOUJON CLAVIJA
a
C
C
c
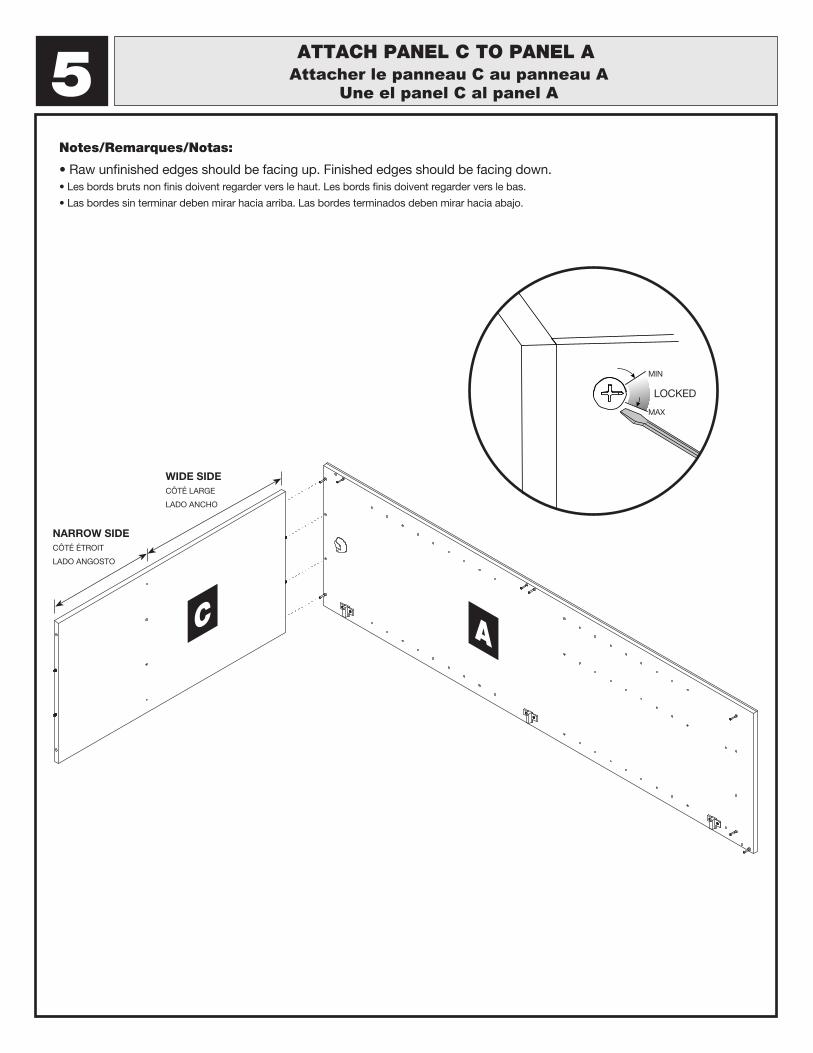
ATTACH PANEL C TO PANEL AAttacher le panneau C au panneau A
Une el panel C al panel A5Notes/Remarques/Notas:
• Raw unfinished edges should be facing up. Finished edges should be facing down.• Les bords bruts non finis doivent regarder vers le haut. Les bords finis doivent regarder vers le bas.
• Las bordes sin terminar deben mirar hacia arriba. Las bordes terminados deben mirar hacia abajo.
AC
MIN
LOCKED
MAX
WIDE SIDECÔTÉ LARGE
LADO ANCHO
NARROW SIDECÔTÉ ÉTROIT
LADO ANGOSTO
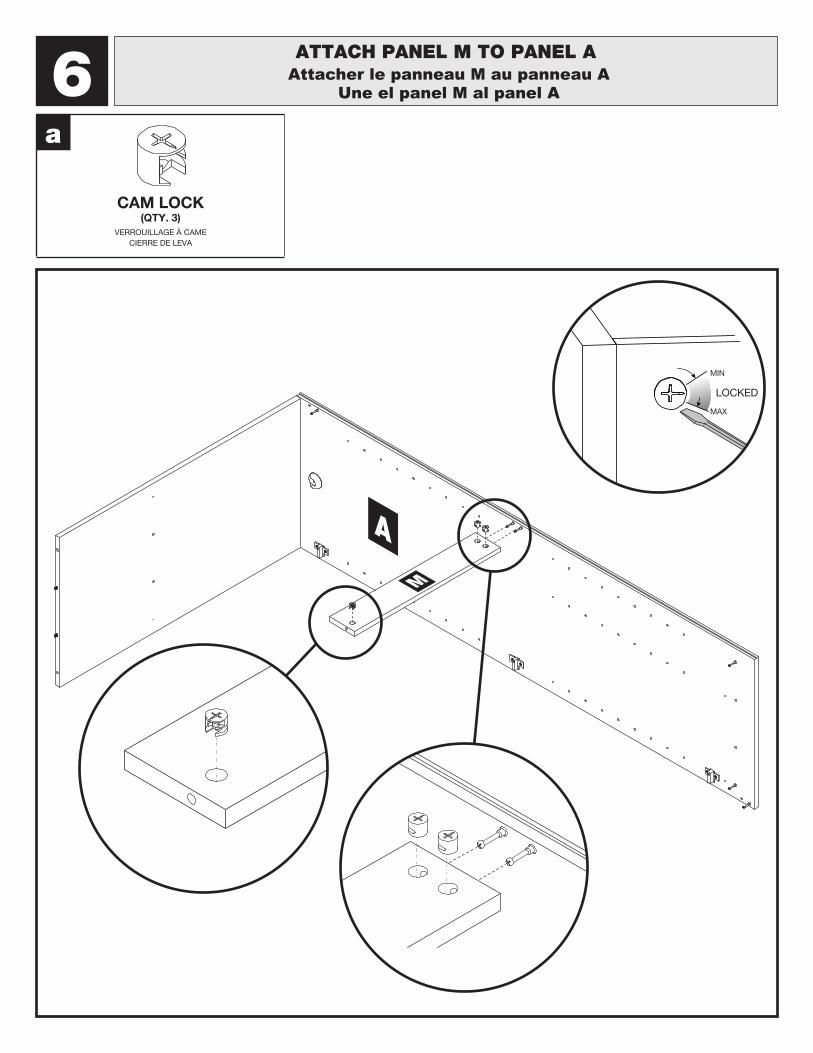
6
CAM LOCK(QTY. 3)
VERROUILLAGE À CAME CIERRE DE LEVA
ATTACH PANEL M TO PANEL AAttacher le panneau M au panneau A
Une el panel M al panel A
A
M
a
MIN
LOCKED
MAX
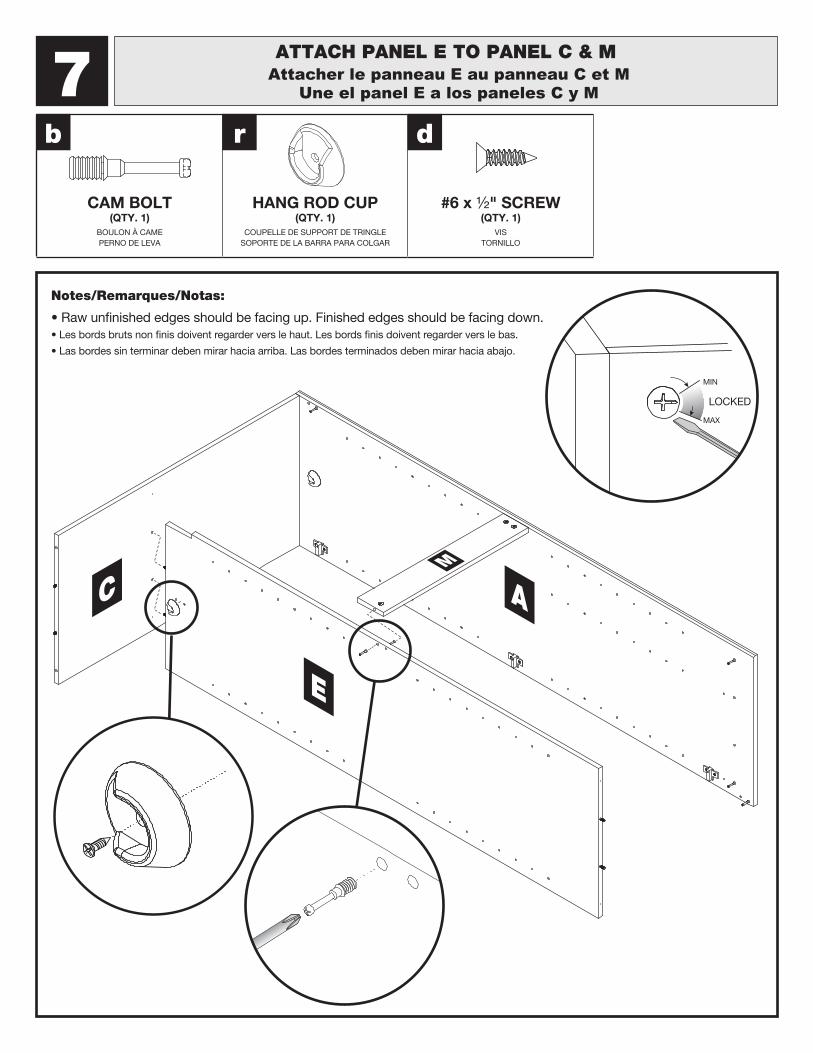
ATTACH PANEL E TO PANEL C & MAttacher le panneau E au panneau C et M
Une el panel E a los paneles C y M7
Notes/Remarques/Notas:
• Raw unfinished edges should be facing up. Finished edges should be facing down.• Les bords bruts non finis doivent regarder vers le haut. Les bords finis doivent regarder vers le bas.
• Las bordes sin terminar deben mirar hacia arriba. Las bordes terminados deben mirar hacia abajo.
C A
E
M
MIN
LOCKED
MAX
CAM BOLT(QTY. 1)
BOULON À CAME PERNO DE LEVA
HANG ROD CUP(QTY. 1)
COUPELLE DE SUPPORT DE TRINGLE SOPORTE DE LA BARRA PARA COLGAR
#6 x ½" SCREW(QTY. 1)
VIS TORNILLO
b r d
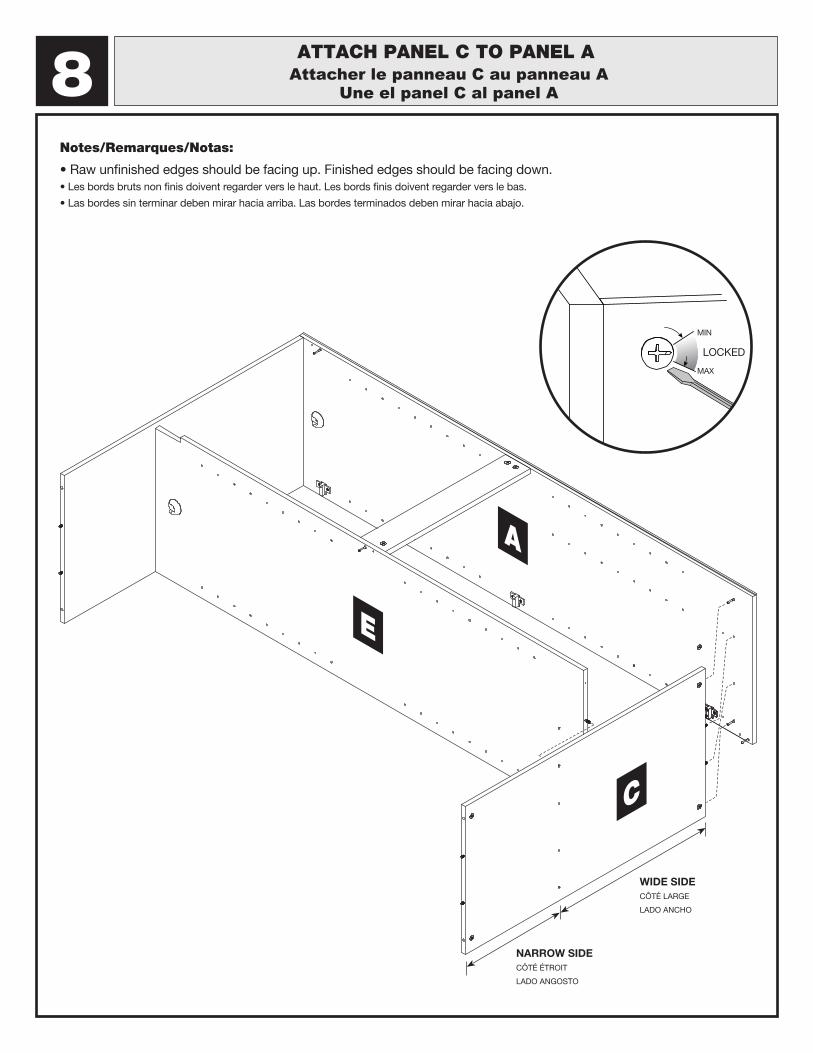
8ATTACH PANEL C TO PANEL A
Attacher le panneau C au panneau AUne el panel C al panel A
Notes/Remarques/Notas:
• Raw unfinished edges should be facing up. Finished edges should be facing down.• Les bords bruts non finis doivent regarder vers le haut. Les bords finis doivent regarder vers le bas.
• Las bordes sin terminar deben mirar hacia arriba. Las bordes terminados deben mirar hacia abajo.
MIN
LOCKED
MAX
C
A
E
WIDE SIDECÔTÉ LARGE
LADO ANCHO
NARROW SIDECÔTÉ ÉTROIT
LADO ANGOSTO
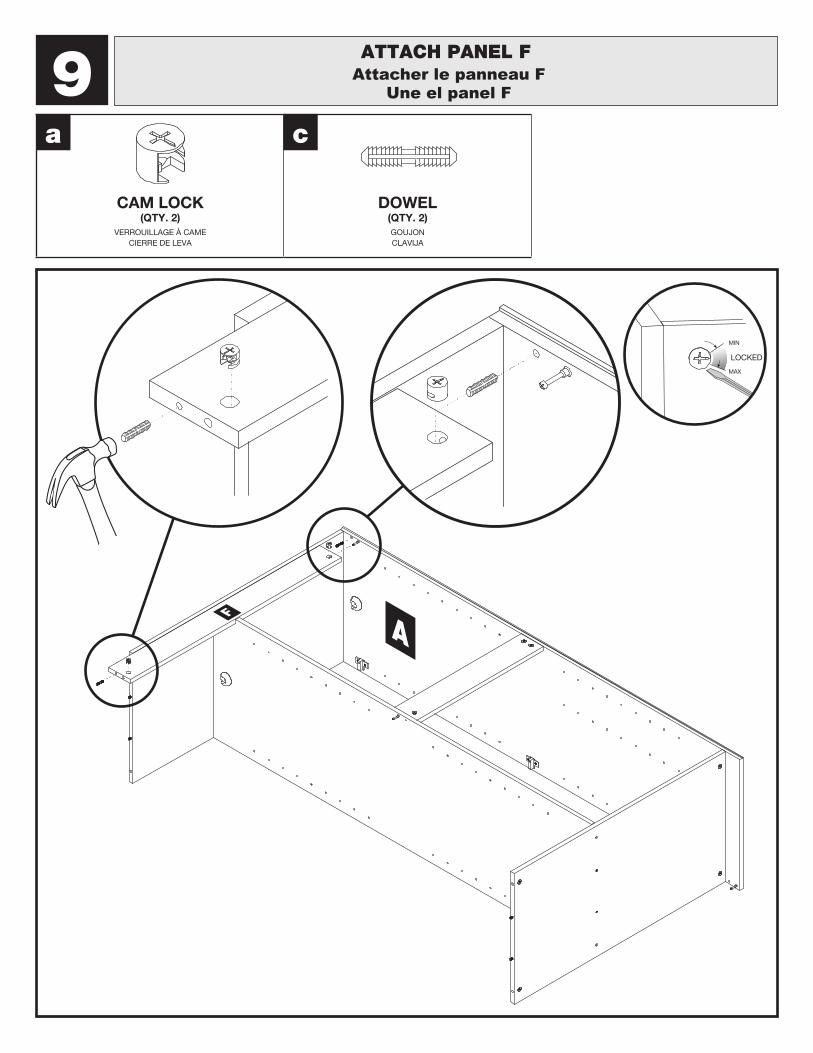
ATTACH PANEL FAttacher le panneau F
Une el panel F
CAM LOCK(QTY. 2)
VERROUILLAGE À CAME CIERRE DE LEVA
DOWEL(QTY. 2)GOUJON CLAVIJA
a c
9
MIN
LOCKED
MAX
FA

10ATTACH PANEL G
Attacher le panneau GUne el panel G
CAM LOCK(QTY. 2)
VERROUILLAGE À CAME CIERRE DE LEVA
DOWEL(QTY. 2)GOUJON CLAVIJA
a c
MIN
LOCKED
MAX
G

ATTACH PANEL PAttacher le panneau P
Une el panel P11
EP
MIN
LOCKED
MAX
CAM LOCK(QTY. 3)
VERROUILLAGE À CAME CIERRE DE LEVA
a
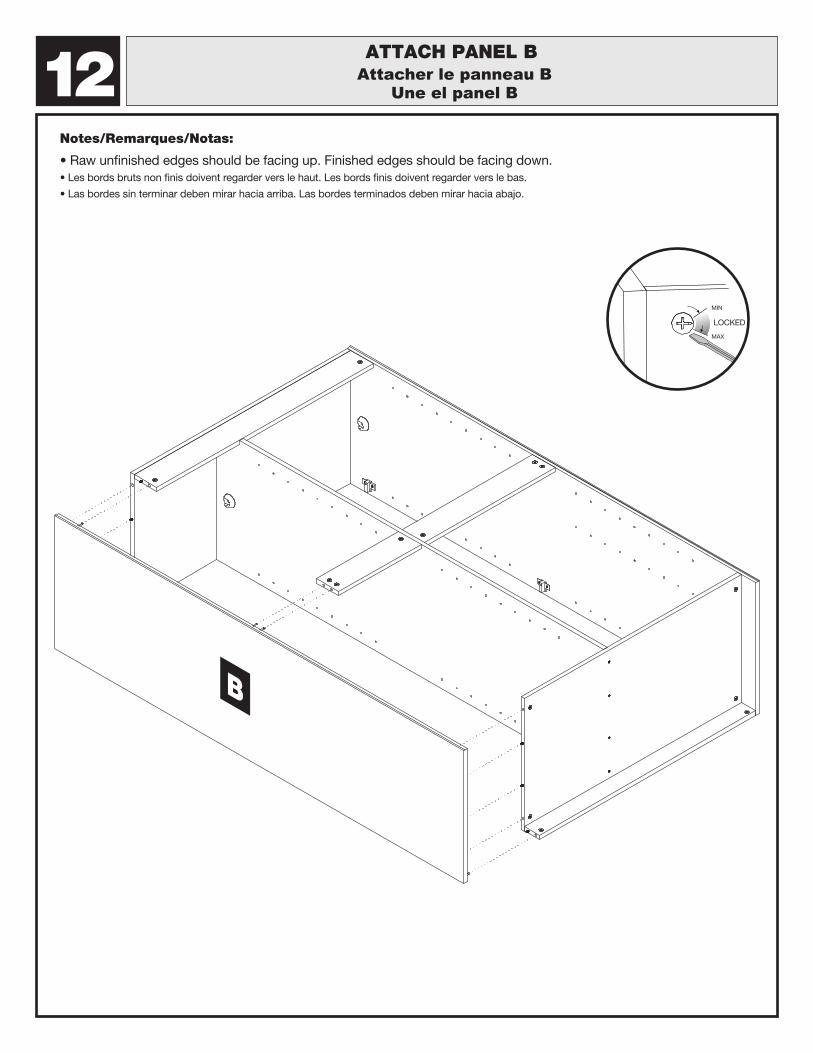
12ATTACH PANEL B
Attacher le panneau BUne el panel B
B
Notes/Remarques/Notas:
• Raw unfinished edges should be facing up. Finished edges should be facing down.• Les bords bruts non finis doivent regarder vers le haut. Les bords finis doivent regarder vers le bas.
• Las bordes sin terminar deben mirar hacia arriba. Las bordes terminados deben mirar hacia abajo.
MIN
LOCKED
MAX
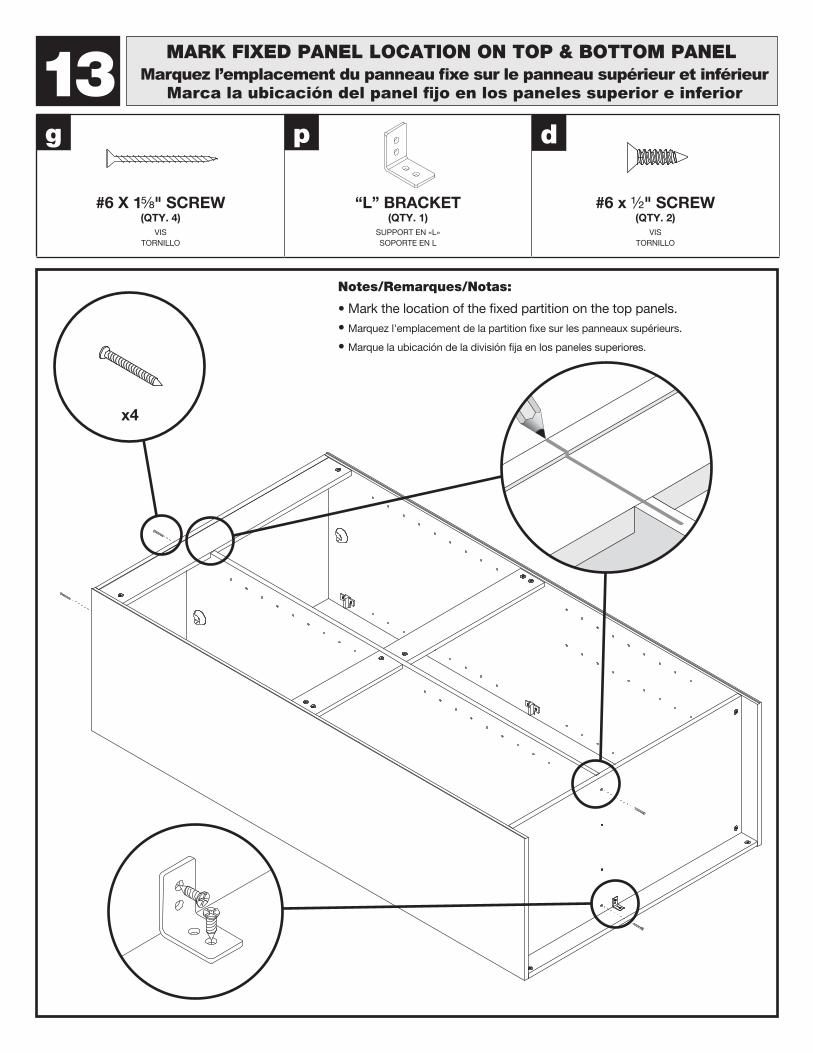
13MARK FIXED PANEL LOCATION ON TOP & BOTTOM PANEL
Marquez l’emplacement du panneau fixe sur le panneau supérieur et inférieurMarca la ubicación del panel fijo en los paneles superior e inferior
#6 X 1⁵₈" SCREW(QTY. 4)
VIS TORNILLO
“L” BRACKET(QTY. 1)
SUPPORT EN «L» SOPORTE EN L
#6 x ½" SCREW(QTY. 2)
VIS TORNILLO
g dp
Notes/Remarques/Notas:
• Mark the location of the fixed partition on the top panels.• Marquez l'emplacement de la partition fixe sur les panneaux supérieurs.
• Marque la ubicación de la división fija en los paneles superiores.
x4
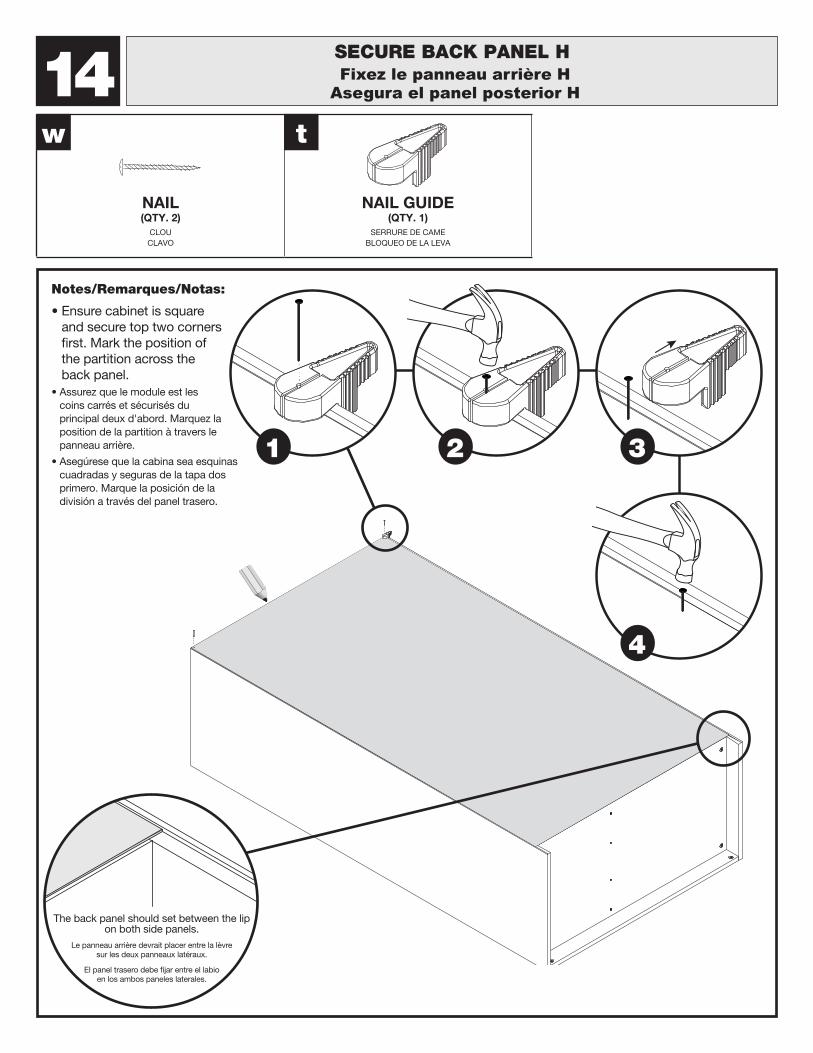
14SECURE BACK PANEL HFixez le panneau arrière H
Asegura el panel posterior H
Notes/Remarques/Notas:
• Ensure cabinet is square and secure top two corners first. Mark the position of the partition across the back panel.
• Assurez que le module est les coins carrés et sécurisés du principal deux d'abord. Marquez la position de la partition à travers le panneau arrière.
• Asegúrese que la cabina sea esquinas cuadradas y seguras de la tapa dos primero. Marque la posición de la división a través del panel trasero.
1 3
4
2
NAIL(QTY. 2)
CLOU CLAVO
NAIL GUIDE(QTY. 1)
SERRURE DE CAME BLOQUEO DE LA LEVA
w t
The back panel should set between the lip on both side panels.
Le panneau arrière devrait placer entre la lèvre sur les deux panneaux latéraux.
El panel trasero debe fijar entre el labio en los ambos paneles laterales.
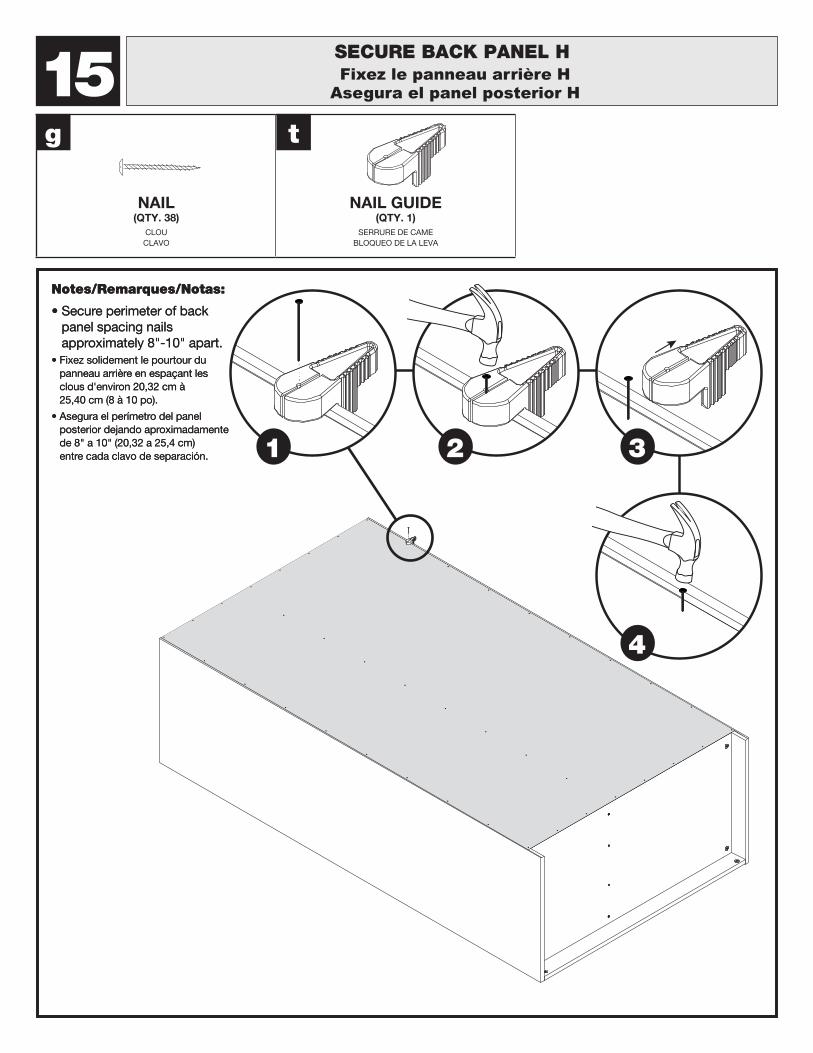
15SECURE BACK PANEL HFixez le panneau arrière H
Asegura el panel posterior H
Notes/Remarques/Notas:
• Secure perimeter of back panel spacing nails approximately 8"-10" apart.
• Fixez solidement le pourtour du panneau arrière en espaçant les clous d'environ 20,32 cm à 25,40 cm (8 à 10 po).
• Asegura el perímetro del panel posterior dejando aproximadamente de 8" a 10" (20,32 a 25,4 cm) entre cada clavo de separación. 1 3
4
2
NAIL(QTY. 38)
CLOU CLAVO
NAIL GUIDE(QTY. 1)
SERRURE DE CAME BLOQUEO DE LA LEVA
g t
Notes/Remarques/Notas:
• Secure perimeter of back panel spacing nails approximately 8"-10" apart.
• Fixez solidement le pourtour du panneau arrière en espaçant les clous d'environ 20,32 cm à 25,40 cm (8 à 10 po).
• Asegura el perímetro del panel posterior dejando aproximadamente de 8" a 10" (20,32 a 25,4 cm) entre cada clavo de separación.
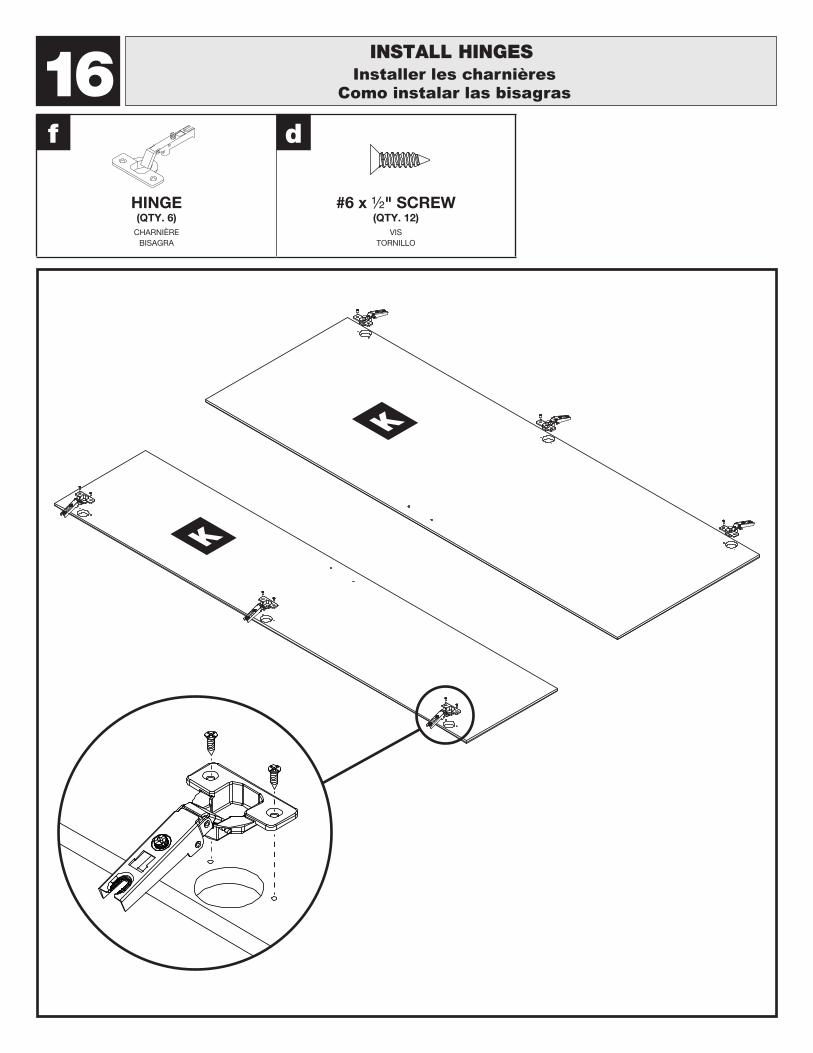
HINGE(QTY. 6)
CHARNIÈRE BISAGRA
#6 x ½" SCREW(QTY. 12)
VIS TORNILLO
f d
INSTALL HINGESInstaller les charnières
Como instalar las bisagras
K
K
16
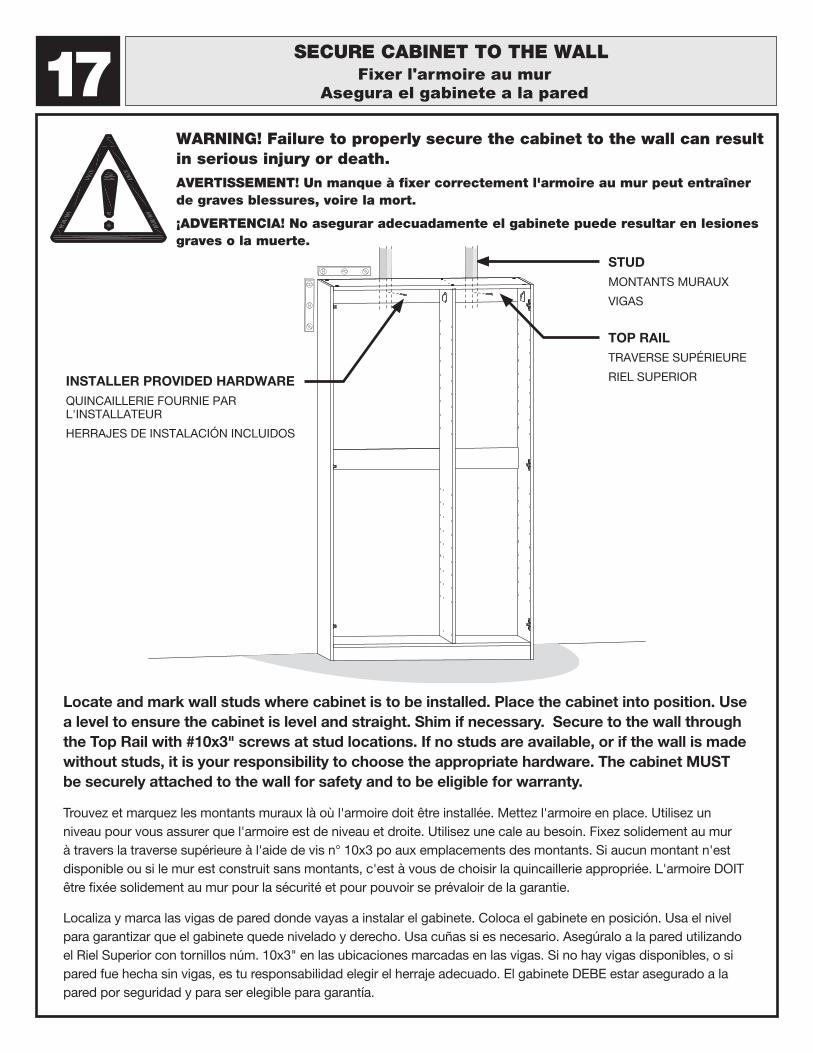
SECURE CABINET TO THE WALLFixer l'armoire au mur
Asegura el gabinete a la pared17WARNING! Failure to properly secure the cabinet to the wall can result in serious injury or death.AVERTISSEMENT! Un manque à fixer correctement l'armoire au mur peut entraîner de graves blessures, voire la mort.
¡ADVERTENCIA! No asegurar adecuadamente el gabinete puede resultar en lesiones graves o la muerte.
Locate and mark wall studs where cabinet is to be installed. Place the cabinet into position. Use a level to ensure the cabinet is level and straight. Shim if necessary. Secure to the wall through the Top Rail with #10x3" screws at stud locations. If no studs are available, or if the wall is made without studs, it is your responsibility to choose the appropriate hardware. The cabinet MUST be securely attached to the wall for safety and to be eligible for warranty.
Trouvez et marquez les montants muraux là où l'armoire doit être installée. Mettez l'armoire en place. Utilisez un niveau pour vous assurer que l'armoire est de niveau et droite. Utilisez une cale au besoin. Fixez solidement au mur à travers la traverse supérieure à l'aide de vis n° 10x3 po aux emplacements des montants. Si aucun montant n'est disponible ou si le mur est construit sans montants, c'est à vous de choisir la quincaillerie appropriée. L'armoire DOIT être fixée solidement au mur pour la sécurité et pour pouvoir se prévaloir de la garantie.
Localiza y marca las vigas de pared donde vayas a instalar el gabinete. Coloca el gabinete en posición. Usa el nivel para garantizar que el gabinete quede nivelado y derecho. Usa cuñas si es necesario. Asegúralo a la pared utilizando el Riel Superior con tornillos núm. 10x3" en las ubicaciones marcadas en las vigas. Si no hay vigas disponibles, o si pared fue hecha sin vigas, es tu responsabilidad elegir el herraje adecuado. El gabinete DEBE estar asegurado a la pared por seguridad y para ser elegible para garantía.
TOP RAILTRAVERSE SUPÉRIEURE
RIEL SUPERIOR
STUDMONTANTS MURAUX
VIGAS
INSTALLER PROVIDED HARDWAREQUINCAILLERIE FOURNIE PAR L'INSTALLATEUR
HERRAJES DE INSTALACIÓN INCLUIDOS
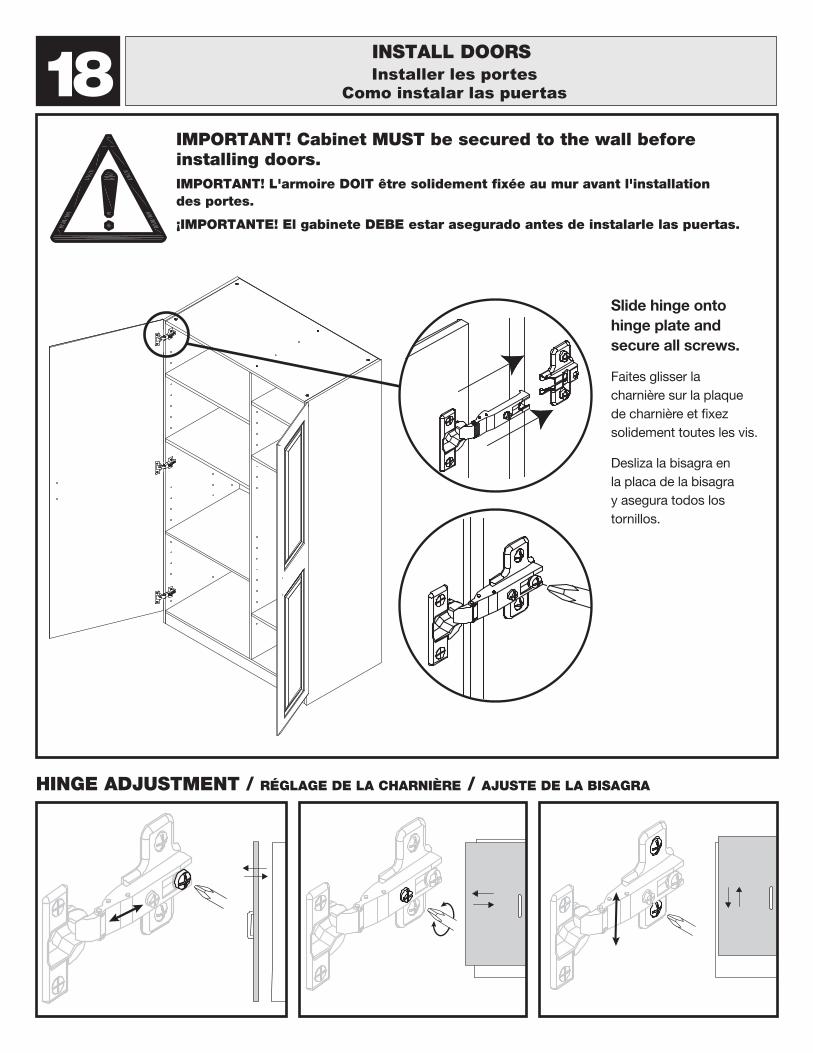
INSTALL DOORSInstaller les portes
Como instalar las puertas18IMPORTANT! Cabinet MUST be secured to the wall before installing doors.IMPORTANT! L'armoire DOIT être solidement fixée au mur avant l'installation des portes.
¡IMPORTANTE! El gabinete DEBE estar asegurado antes de instalarle las puertas.
HINGE ADJUSTMENT / RÉGLAGE DE LA CHARNIÈRE / AJUSTE DE LA BISAGRA
Slide hinge onto hinge plate and secure all screws.
Faites glisser la charnière sur la plaque de charnière et fixez solidement toutes les vis.
Desliza la bisagra en la placa de la bisagra y asegura todos los tornillos.
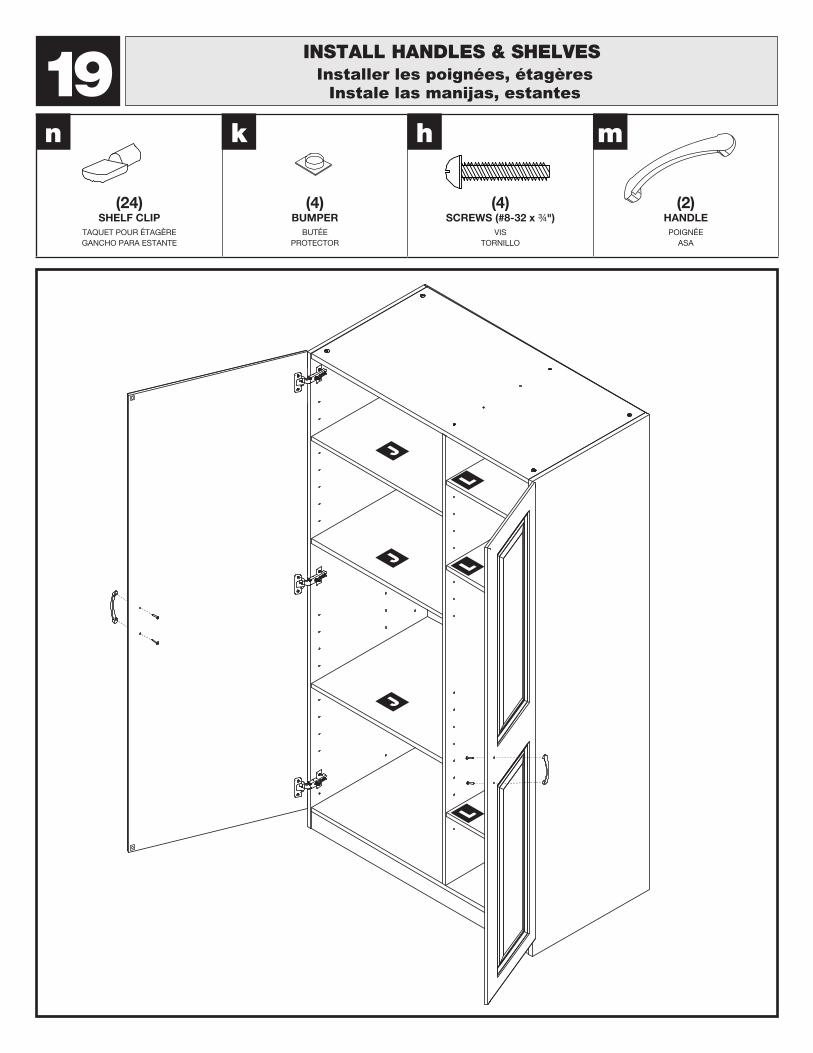
(24)SHELF CLIP
TAQUET POUR ÉTAGÈRE GANCHO PARA ESTANTE
(4)BUMPER
BUTÉE PROTECTOR
(4)SCREWS (#8-32 x ¾")
VIS TORNILLO
(2)HANDLE
POIGNÉE ASA
INSTALL HANDLES & SHELVESInstaller les poignées, étagères
Instale las manijas, estantes
n k h m
19
JL
J L
J
L
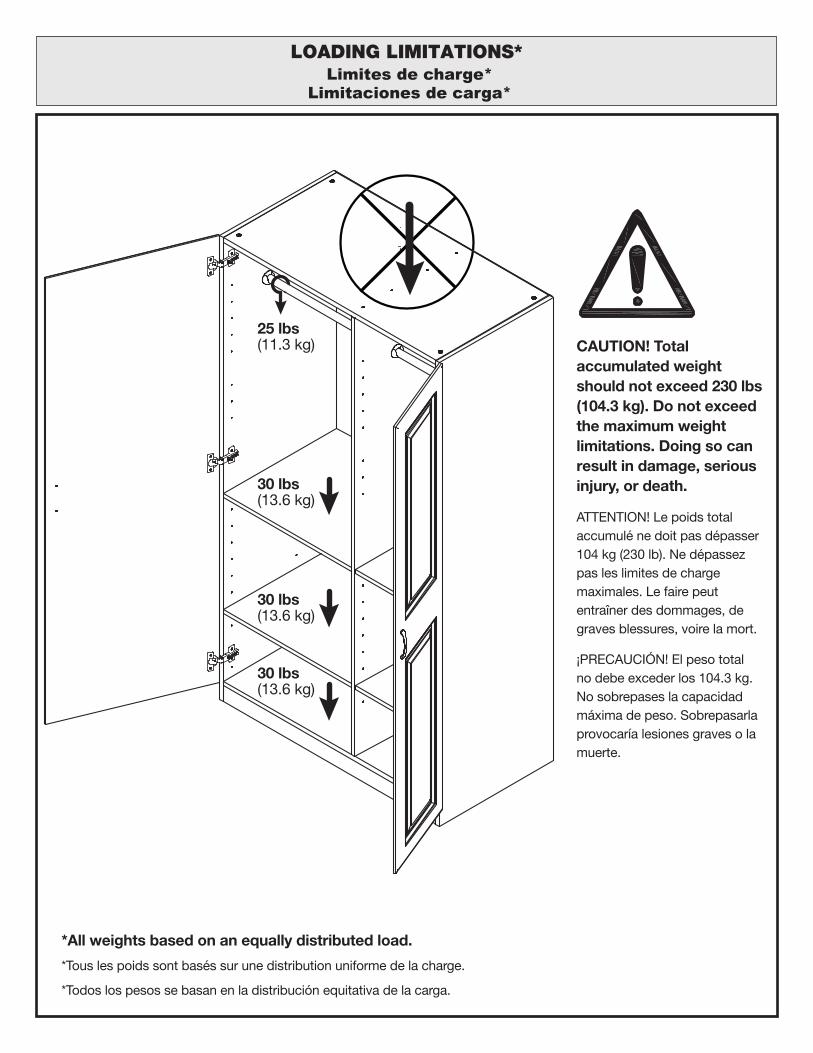
LOADING LIMITATIONS*Limites de charge*
Limitaciones de carga*
CAUTION! Total accumulated weight should not exceed 230 lbs (104.3 kg). Do not exceed the maximum weight limitations. Doing so can result in damage, serious injury, or death.
ATTENTION! Le poids total accumulé ne doit pas dépasser 104 kg (230 lb). Ne dépassez pas les limites de charge maximales. Le faire peut entraîner des dommages, de graves blessures, voire la mort.
¡PRECAUCIÓN! El peso total no debe exceder los 104.3 kg. No sobrepases la capacidad máxima de peso. Sobrepasarla provocaría lesiones graves o la muerte.
* All weights based on an equally distributed load.
*Tous les poids sont basés sur une distribution uniforme de la charge.
*Todos los pesos se basan en la distribución equitativa de la carga.
25 lbs(11.3 kg)
30 lbs(13.6 kg)
30 lbs(13.6 kg)
30 lbs(13.6 kg)
RSI Home Products, Inc. • 400 E. Orangethorpe Ave. • Anaheim, CA 92801 • Fax: 714-449-2222Customer Service & Parts Department (888) 774-8062 or email: [email protected]
RSI HOME PRODUCTS, INC. LIMITED WARRANTYGARANTIE LIMITÉE DE RSI HOME PRODUCTS, INC. • GARANTÍA LIMITADA DE RSI HOME PRODUCTS, INC.
WHAT THIS WARRANTY COVERS: RSI Home Products, Inc. (“RSI”) warrants its parts and products to be free of substantial defects in materials and workmanship from the original date of purchase under normal home use. This warranty is offered only to the original consumer purchaser and may not be transferred.HOW LONG THE WARRANTY LASTS: Coverage for all storage cabinets lasts for the life of the product.WHAT RSI HOME PRODUCTS WILL DO UNDER THE WARRANTY: During the warranty period, RSI, at its option, will repair or replace any part or product that proves to have substantial defects in materials or workmanship, or RSI will provide an equivalent replacement product. In keeping with our policy of continuous product improvement, RSI reserves the right to change specifications in design and materials without notice and with no obligation to retrofit products we previously manufactured.HOW STATE LAW APPLIES: This warranty gives you specific legal rights, and you may also have other rights that vary from state to state.IMPLIED WARRANTIES: RSI DISCLAIMS ANY IMPLIED WARRANTY OF MERCHANTABILITY, AND THERE ARE NO WARRANTIES THAT EXTEND BEYOND THE DESCRIPTIONS ON THE FACE HEREOF. TO THE EXTENT THAT SUCH DISCLAIMER IS NOT VALID UNDER APPLICABLE LAW, ANY IMPLIED WARRANTY SHALL BE COEXTENSIVE IN DURATION WITH THIS WARRANTY.PRINTING LIMITATIONS: Product shown in displays and/or printed materials may not be an exact match to new cabinetry you will receive. Depending on the age of a sample and the environment of the showroom, samples may show some degree of variation from new product. In addition, all doors, drawer fronts, trim or molding may not match exactly. It is not possible to exactly match our colors in printed materials. Therefore, you should view the actual samples when making your color selection.WHAT THIS WARRANTY DOES NOT COVER: This warranty does not cover any problems or damage which result from improper transportation, improper installation, mishandling, misuse, abuse, neglect, abnormal use, commercial use, improper maintenance, non-RSI repairs, accidents, or acts of God, such as hurricanes, fire, earthquakes or floods. This warranty and any applicable implied warranties do not cover incidental or consequential damages arising from any defects in the product, such as labor charges for installation or removal of the product or any associated products. This warranty does not cover defects or damage caused by normal wear & tear, alterations, environmental conditions, humidity absorption, or mold. Some states do not allow the exclusion or limitation of incidental or consequential damages, so the above limitation or exclusion may not apply to you.HOW TO OBTAIN WARRANTY SERVICE: If you need replacement parts or would like to make a warranty claim, please contact our customer service representative by mail, email, fax or telephone at the address or phone numbers listed on this page. All warranty claims must include the model number of the product, copy of the original receipt and the nature of the problem. In addition, RSI may at its discretion require inspection of the installation site or authorize the prepaid return of the claimed defective part. Merchandise not pre-approved for return will not be accepted and the associated claim not accepted.The product parts should be examined prior to installation. If upon inspection you find our product has a damaged or missing part, it may not be necessary to return the unit to the store of purchase. Please contact RSI Customer Service to obtain a replacement part.
CE QUI EST COUVERT PAR LA GARANTIE: RSI Home Products, Inc. (“RSI”) garantit que ses pièces et produits ne présenteront pas de défaut important de matériau ou de main d’oeuvre à compter de leur date d’achat original, dans la mesure où ils sont soumis à un usage domestique normal. Cette garantie est offerte uniquement à l’acheteur original et n’est pas transférable.DURÉE DE LA GARANTIE : La garantie de tous les meubles de rangement est valable pendant toute la durée de vie utile de produit. SERVICES OFFERTS PAR RSI DANS LE CADRE DE CETTE GARANTIE: Durant la période de garantie, rsi réparera ou remplacera, à son choix, toute pièce ou produit s’avérant présenter un défaut important de matériau ou de main d’oeuvre, faute de quoi rsi offrira un produit de remplacement équivalent. Conformément à sa politique d’amélioration continue de ses produits, rsi se réserve le droit de modifier les spécifications de conception et de matériaux de ses produits sans préavis et sans obligation de convertir les produits fabriqués auparavant.APPLICATION DES LOIS EN VIGUEUR: Cette garantie vous accorde des droits juridiques précis, mais il est possible que vous ayez d’autres droits selon votre lieu de résidence.GARANTIES IMPLICITES: RSI RÉFUTE TOUTE GARANTIE IMPLICITE DE COMMERCIALISATION ET DÉCLARE QU’IL N’EXISTE AUCUNE GARANTIE S’APPLIQUANT AU DELÀ DES PROTECTIONS OFFERTES DANS LES PRÉSENTES. SI CETTE RÉFUTATION S’AVÈRE INVALIDE DANS LE CADRE DE LOIS EN VIGUEUR, TOUTE GARANTIE IMPLICITE AURA UNE DURÉE ÉQUIVALENTE À LA PRÉSENTE GARANTIE.LIMITES DES PROCÉDÉS D’IMPRESSION: Les produits offerts sur les présentoirs et les documents imprimés ne peuvent être exactement identiques à ceux que vous recevrez. Selon l’âge des échantillons et l’environnement de la salle de montre, les échantillons peuvent être sensiblement différents des produits neufs. En outre, toutes les portes, tous les devants de tiroir et toutes les moulures ne peuvent être exactement identiques. Il est impossible que les produits aient exactement la même couleur que sur les documents imprimés. Par conséquent, vous devez utiliser des échantillons réels pour choisir vos couleurs.CE QUI N’EST PAS COUVERT PAR LA GARANTIE: Cette garantie ne couvre pas les problèmes et les dommages attribuables à un transport inapproprié, à une installation inadéquate, à une erreur de manipulation, à un mauvais usage, à un usage abusif, à une négligence, à un usage anormal, à un usage commercial, à un mauvais entretien, à une réparation non effectuée par RSI, à un accident ou à une catastrophe naturelle, comme un ouragan, un incendie, un tremblement de terre ou une inondation. Cette garantie et toute garantie implicite applicable ne couvrent pas les dommages indirects ou consécutifs découlant de tout défaut du produit, comme les frais de main-d’oeuvre encourus durant l’installation ou l’enlèvement du produit ou de tout produit qui y est associé. Cette garantie ne couvre pas les défauts ou dommages causés par une usure normale, des altérations, des conditions environnementales, une absorption d’humidité ou la moisissure. Puisque certains gouvernements interdisent les restrictions ou les exclusions concernant les dommages indirects ou consécutifs, il est possible que les restrictions ou exclusions ci dessus ne s’appliquent pas à vous.COMMENT DEMANDER UNE RÉPARATION SOUS GARANTIE: S’il vous faut des pièces de rechange ou si vous désirez présenter une réclamation sous garantie, veuillez contacter un représentant du service à la clientèle par courrier, par courriel, par télécopieur ou par téléphone (voir les coordonnées sur cette page). Toutes les réclamations sous garantie doivent être accompagnées d’une copie de la facture originale et indiquer le numéro de modèle du produit, ainsi que la nature du problème. En outre, rsi pourra demander si elle le désire, la permission d’inspecter le site d’installation ou autoriser le retour en port payé du composant paraissant défectueux. Les marchandises dont le retour ne sera pas préalablement autorisé ne seront pas acceptées et la réclamation correspondante sera rejetée.Lors de l’inspection du produit, si vous découvrez qu’il est endommagé ou qu’il lui manque une pièce, il n’est pas nécessaire de le retourner au marchand. Veuillez contacter le service à la clientèle rsi et demandez la pièce de rechange appropriée.
QUÉ CUBRE ESTA GARANTÍA: RSI Home Products, Inc. (“RSI”) garantiza que sus piezas y productos están exentos de defectos sustanciales en materiales y mano de obra a partir de la fecha de compra original y en condiciones de uso doméstico normal. Esta garantía se ofrece únicamente al comprador y consumidor original, y no es transferible.CUÁNTO DURA LA GARANTÍA: La garantia para todos los gabinetes de almacenamiento cubre toda la vida útil del producto.QUÉ HARÁ RSI PARA CUMPLIR CON ESTA GARANTÍA: Durante el período de garantía, rsi, a discreción de rsi, reparará o reemplazará cualquier componente o producto que presente defectos sustanciales en materiales o mano de obra, o rsi reemplazará el producto por uno equivalente. Conforme a su política de mejoramiento continuo de sus productos, RSI se reserva el derecho de modificar las especificaciones de diseño y materiales sin previo aviso y sin obligación de reconvertir los productos fabricados con anterioridad.APLICACIÓN DE LAS LEYES DEL ESTADO: Esta garantía le otorga derechos legales específicos, y quizá pueda tener otros derechos, que varían de estado a estado.GARANTÍAS IMPLÍCITAS: RSI RECHAZA CUALQUIER GARANTÍA IMPLÍCITA DE COMERCIABILIDAD, Y NO EXISTE GARANTÍA ALGUNA CON ALCANCES MAYORES QUE LOS DESCRITOS EN EL PRESENTE DOCUMENTO. HASTA EL ALCANCE EN QUE DICHA RENUNCIA DE RESPONSABILIDADES DEJE DE TENER VALIDEZ EN VIRTUD DE LAS LEYES APLICABLES, CUALQUIER GARANTÍA IMPLÍCITA HA DE TENER LA MISMA DURACIÓN QUE LA PRESENTE GARANTÍA.LIMITACIONES DE LOS DOCUMENTOS IMPRESOS: El producto mostrado en los exhibidores o documentos impresos podría no coincidir exactamente con los muebles nuevos que usted recibirá. Dependiendo de la edad de una muestra y el entorno de la sala de exhibición, las muestras podrían presentar algún grado de variación respecto a un producto nuevo.Además, es posible que todas las puertas, frentes de cajones, bordes o molduras no coincidan exactamente entre sí. No es posible hacer que coincidan exactamente los colores de los productos con los colores en los documentos impresos. Por lo tanto, al seleccionar sus colores le recomendamos ver las muestras reales.QUÉ EXCLUYE ESTA GARANTÍA: Esta garantía no cubre los problemas ni los daños que resulten del transporte indebido, instalación errónea, mal manejo, uso indebido, abuso, abandono, uso anormal, uso comercial, mantenimiento inadecuado, reparaciones realizadas por terceros y no por rsi, accidentes, o actos de la naturaleza o fuerza mayor, tales como huracanes, incendios, terremotos o inundaciones. Esta garantía y cualesquier garantías implícitas aplicables no cubren los daños indirectos ni consecuentes que resulten de los defectos en el producto, tales como los cargos de mano de obra por la instalación o desmontaje del producto o cualesquier productos asociados. Esta garantía no cubre los defectos ni los daños causados por el uso y desgaste normales, modificaciones, condiciones ambientales, absorción de humedad o moho. Algunos estados no permiten la exclusión ni la limitación de los daños indirectos o consecuentes, así que la limitación o exclusión anterior quizá no sea aplicable a su caso.CÓMO OBTENER SERVICIO EN VIRTUD DE LA GARANTÍA: Si necesita repuestos o si desea presentar una reclamación en virtud de la presente garantía, por favor comuníquese con nuestro representante de servicio al cliente, por correo postal o electrónico, fax o por teléfono, a la dirección o números telefónicos listados en esta página. Todas las reclamaciones en virtud de esta garantía deben incluir el número de modelo del producto, una copia del recibo original y la descripción de la naturaleza del problema. Además, RSI puede, a su sola discreción, requerir la inspección del sitio de la instalación o autorizar la devolución con flete prepagado de la pieza presuntamente defectuosa. No se aceptará mercancía alguna que no obtenga la preautorización para su devolución y se rechazará la reclamación correspondiente.Si al inspeccionar el producto se detecta que falta una pieza o hay una pieza dañada, no es necesario devolver la unidad a la tienda donde se compró el producto. Comuníquese con servicio al cliente de rsi para obtener una pieza de repuesto.