USER GUIDE / GUIDE DE L’UTILISATEUR - Grit Inc · rapide de la tablette inférieure (H) permet de...
8
®
Transcript of USER GUIDE / GUIDE DE L’UTILISATEUR - Grit Inc · rapide de la tablette inférieure (H) permet de...
®
HOCKEYT O W E RSYSTEM
Thank you for purchasing the GRIT Hockey Tower. Please take a few minutes to familiarize yourself with all the features and functions of the GRIT Hockey Tower. Retain this guide for future reference.
Merci de vous être procuré le sac Hockey Tower GRIT. Prenez quelques instants pour vous familiariser avec ses caractéristiques et ses fonctionnalités. Conservez ce guide pour pouvoir vous y référer plus tard.
Lay the bag on it’s back. Unfold the bag and unzip the main compartment. Undo the quick release clip at the top of the bag (A) and remove the foot carpet (B). Remove the mesh laundry bag (C) from the lower shelf.
Couchez le sac sur le dos. Dépliez-le et dézippez le comparti-ment principal. Détachez le clip à attache rapide sur le dessus du sac (A) et enlevez la carpette pour les pieds (B). Retirez le sac à lessive en �let (C) de la tablette inférieure.
USER GUIDE / GUIDE DE L’UTILISATEURModel/Modèle: HT5-033, HT5-036
(2013 model / modèle 2013)
STEP 1: Initial Set Up ÉTAPE 1 : Préparation du sac
A
C
B
1
1
2
3
4
DD
STEP 2: Fasten the Torsion TechnologyTM Frame ÉTAPE 2 : Attacher le cadre Torsion TechnologyTM
2
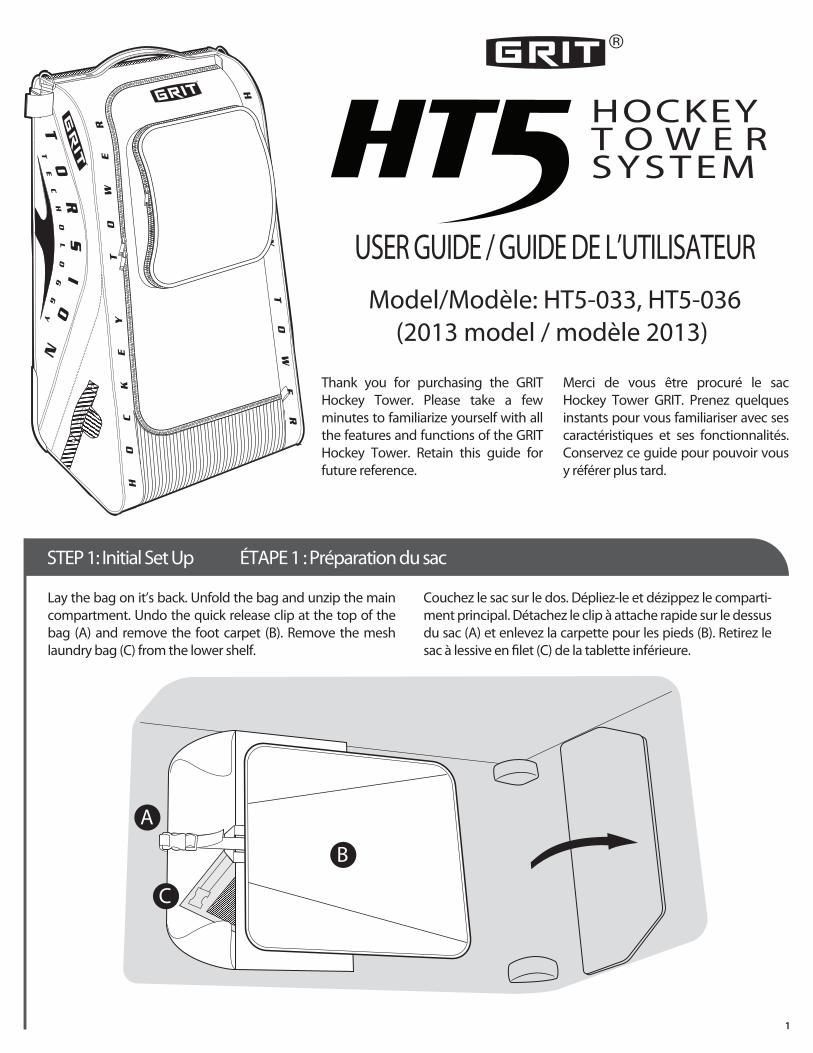
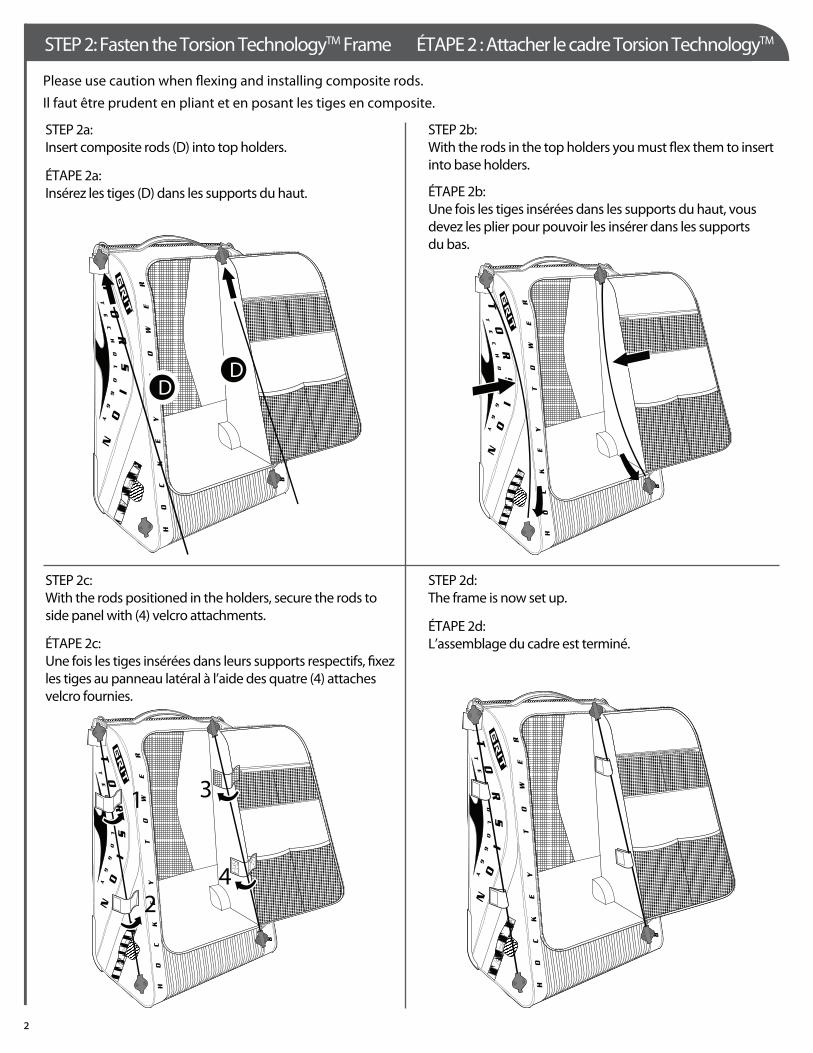
Please use caution when �exing and installing composite rods.
Il faut être prudent en pliant et en posant les tiges en composite.
STEP 2d:The frame is now set up.
ÉTAPE 2d:L’assemblage du cadre est terminé.
STEP 2c:With the rods positioned in the holders, secure the rods to side panel with (4) velcro attachments.
ÉTAPE 2c:Une fois les tiges insérées dans leurs supports respectifs, �xez les tiges au panneau latéral à l’aide des quatre (4) attaches velcro fournies.
STEP 2b:With the rods in the top holders you must �ex them to insert into base holders.
ÉTAPE 2b:Une fois les tiges insérées dans les supports du haut, vous devez les plier pour pouvoir les insérer dans les supports du bas.
STEP 2a:Insert composite rods (D) into top holders.
ÉTAPE 2a:Insérez les tiges (D) dans les supports du haut.

BUCKLE DIAGRAMPLAN DES BOUCLES
1
2
3
G
H
STEP 3: Shelf Adjustment ÉTAPE 3 : Ajustement des tablettes
Adjust each of the four straps (G) on the shelf unit so that the shelves are level. Shortening the straps allows more room in the bottom compartment of the bag (for larger pants and pads). Lengthening the straps allows more room at the top (for skates and helmet). Readjust these straps should the shelves start to sag with use. Refastening the quick clip on the lower shelf (H) will help hold your gear in place.
Ajuster chacune des quatre courroies (G) de l’unité de tablettes pour le mettre à niveau. En les ajustant plus courtes, vous obtenez davantage de place dans la partie inférieure du sac (pour des culottes volumineuses et les jambières). Plus longues, vous obtenez plus de place dans le haut (pour les patins et le casque). Ajuster de nouveau
les courroies si les tablettes commencent à s’a�aisser à l’utilisation. Le clip à attache rapide de la tablette inférieure (H) permet de maintenir votre équipement en place.
STEP 4: Foot Carpet and Laundry Bag ÉTAPE 4 : Carpette et sac à lessive
1
2
3
GM
N
J
K
L
BUCKLE DIAGRAM / PLAN DES BOUCLES
Place the foot carpet (J) facing up (carpet on top) in front of the bag. Attach the foot carpet straps to the buckles inside the bag (K) and adjust as necessary (see buckle diagram). The foot carpet is intended to keep your feet dry while changing into and out of your skates. The foot carpet can be
secured in place by passing the quick clip on the lower shelf (G) through the loop (L). Fasten the two quick clips (M) at the top of the laundry bag (N) and adjust the straps as necessary. Undoing one or both of the quick clips allows the laundry bag to fold down for access to the lower compartment. The laundry bag is intended for wet items.
Placer la carpette (J) sur le sol, face vers le haut. Y déposer le sac à lessive, en orientant la partie �let et fermoir vers le bas. Insérer les bandes en tissu de la carpette dans les boucles en plastique du sac à lessive (K). Ajuster les courroies au besoin (voir gros
plan des boucles). La carpette sert à garder les pieds au sec au moment d’en�ler et d’enlever les patins. La carpette s’attache en passant le clip à attache rapide de la tablette inférieure (G) dans la boucle (L). Attacher les deux clips à attache rapide (M) en haut du sac (N). Ajuster les courroies au besoin. Détacher un clip, ou les deux, pour plier le sac à lessive et permettre l’accès au fond du sac. Ce sac sert à mettre le linge souillé.
DO NOT STAND OR WALK ON THE CARPET WITH YOUR SKATES. DOING SO WILL REDUCE THE LIFE OF THE CARPET AND VOID WARRANTY COVERAGE.
ÉVITEZ DE MARCHER OU DE VOUS TENIR DEBOUT SUR LA CARPETTE AVEC VOS PATINS POUR LA GARDER EN BON ÉTAT, CE QUI AURAIT POUR EFFET D’ANNULER LA GARANTIE.
WARNING / AVERTISSEMENT
3

Using the Grit Hockey Tower Utilisation du Hockey Tower Grit
P
R
4
LOADING YOUR HOCKEY TOWER To take full advantage of the Hockey Tower’s space saving design, we advise packing your equipment as shown in the diagram. Put your skates in place with the toe up and the blade in (P). This will ensure that the blades are protected by the mats in the back of the bag, and that the skate boots will air out better. The inside pockets (Q) are ideal for small items, such as undergarments, sandals, tape, etc.; they are NOT intended for heavy and/or bulky items which will make the zipper di�cult to close. Place your shoulder pads, shinguards and pants in the lower compartment (R). Use remaining space for folded socks, sweaters and other items. The foot carpet will help hold your gear in place: pass the quick clip on the lower shelf through the loop (S).
RANGER L’ÉQUIPEMENTDANS LE HOCKEY TOWER Pour pro�ter pleinement de l’économie d’espace du Hockey Tower, il est conseillé de ranger votre équipement tel que l’indique le diagramme. Placez vos patins, lame au fond et orteils vers le haut (P). Le tapis dans le fond du sac protège la lame et les patins sécheront plus vite. Utilisez les pochettes intérieures (Q) pour ranger les petits articles : sous-vêtements, sandales, ruban, etc. N’y mettez PAS d’objets lourds ou volumineux qui nuisent à la fermeture du fermoir. Placez vos épaulières, jambières et culotte dans le compartiment inférieur (R). La carpette servira à les immobiliser : en�lez le clip à attache rapide dans la boucle de la tablette inférieure (S).

Q
Q
S
5

T
U
V
W
Z
6
HANDLE NOT SHOWNFOR CLARITY
POIGNÉE NON ILLUSTRÉEPOUR PLUS DE CLARTÉ
Stick Handling Bâtons
The Hockey Tower has BladePorts on both sides - for left or right handed players. Undo the stick strap (T) on the side you wish to place your stick. Put the blade of your stick into the BladePort (U) with the tip seated in the lower strap (V). Refasten the stick strap snugly around the shaft of your stick. The BladePort can hold one or two sticks at a time.
Le sac Hockey Tower est muni de pochettes de chaque côté pour y ranger un bâton droitier ou gaucher. Détachez la courroie pour le bâton (T) du côté que vous désirez utiliser pour ranger le bâton. Insérez la lame du bâton dans la sangle (U), le bout de la lame bien enfoncé dans la sangle inférieure (V). Resserrez la courroie fermement autour du manche du bâton. Les pochettes peuvent chacune contenir un ou deux bâtons.
Optional: Garment Bag Facultatif: Sac de vêtement contenant l'uniforme de hockey
BladePortTM D-ring Warning Mise en garde sur l’anneau en D du BladePortTM
Place your jersey(s) on a hanger (not supplied). Put the jersey inside the ColorWrap garment bag. Close the zipper but allow the hook of the hanger to remain outside the garment bag (W). Hook the hanger into the loop at the top of the Hockey Tower (X) and secure with the velcro strap (Y). Drape the ColorWrap over the front of the Hockey Tower. Secure the velcro straps to the D-rings (Z) on both sides of the Hockey Tower.
Placez votre ou vos chandails sur un cintre (non inclus) et insérez-le(s) dans le rabat couleur qui sert de sac à vêtements. Refermez le fermoir en laissant sortir le crochet du cintre à l'extérieur du sac (W). Accrochez ce crochet à la boucle dans la partie supérieure du Hockey Tower (X) et retenez-le en place à l'aide de la bande velcro (Y). Refermez le rabat couleur sur le devant du Hockey Tower. Refermez les deux bandes velcro autour des boucles en D (Z) de chaque côté du sac.
Please do not use the D-ring on BladePortTM
to hang your shoulder strap. D-ring is for attaching the optional garment bag only.
N’utilisez pas l’anneau en D du logement pour bâtons BladePortTM pour y accrocher la bandoulière. Cet anneau ne doit servir qu’à accrocher le sac de vêtements o�erten option.
X Y

AA
BB
CC
When You Get Home Rendu à la maison
7
When you park the Hockey Tower at home, leave the bag upright and remove the ColorWrap garment bag (OPTIONAL). Hang the ColorWrap so that the mesh back is exposed, allowing your jersey to dry (AA). Open the front �ap, lower the foot carpet and remove the laundry bag (soiled items should be laundered as soon as possible). The vents in the back of the Hockey Tower will allow ventilation and help to reduce odour and bacteria build-up (BB). To assist the drying of your equipment, remove your pants, shoulder pads and shinguards from the lower compartment. You can hang your pants or shoulder pads from your stick (CC).
À la maison, ranger le Hockey Tower à la verticale et retirez le rabat couleur qui sert de sac à vêtements de hockey (FACULTATIF). Suspendiez le sac à vêtements de telle façon que le côté en �let soit dégagé, ce qui permettra à vos vêtement de sécher (AA). Ouvrez le rabat avant, descendez la carpette et retirez le sac à lessive (laver les articles souillés le plus rapidement possible). Les ori�ces d’aération situés à l’arrière permettent de bien ventiler le sac, ce qui réduit la prolifération des bactéries et des odeurs (BB). Pour que l’équipement sèche plus vite, sortez les épaulières, les jambières et la culotte du

IMPORTANT NOTICE AVIS IMPORTANT
8
Do not lean on or place weight on the top of the Hockey Tower.
The foot carpet is intended for your feet - do not stand or walk on the carpet with your skates. Doing so will reduce the life of the carpet.
Grit Hockey Tower is speci�cally designed to carry a hockey player’s equipment - it should NOT be used to carry anything else.
Although the Grit Hockey Tower has been designed to withstand the normal wear and tear of towing your equipment, care should be taken when raising or lowering the bag. Dropping the Hockey Tower from any substantial height, such as out of a vehicle or down stairs, may cause damage to the bag.
FAILURE TO ADHERE TO THIS NOTICE WILL VOID YOUR WARRANTY.
Ne pas s’appuyer sur le dessus du Hockey Tower ou y déposer des articles lourds.
La carpette sert à garder les pieds au sec au moment d’en�ler et d’enlever les patins. On ne doit pas y marcher ou s’y tenir debout avec des patins, au risque d’en réduire la durée de vie.
Le Hockey Tower est spécialement conçu pour transporter de l’équipement de joueur. On ne doit PAS l’utiliser pour transporter autre chose.
Le Hockey Tower est capable de résister à un usage normal et approprié, mais il faut éviter toute chute d’une hauteur appréciable, comme du co�re d’une voiture ou d’une volée de marches. Cela risque d’endommager sérieusement le sac.
LA GARANTIE SERA ANNULÉE SI CES CONDITIONS NE SONT PAS RESPECTÉES.
WARRANTY: The GRIT Hockey Tower has a 90 day warranty (from date of purchase) against manufacture defect or damage incurred during normal and proper use. Warranty is void if signs of abuse or misuse are detected. Grit Inc. will repair or replace defective product at our sole discretion.
GARANTIE: Le Hockey Tower GRIT est garanti pour 90 jours, à partir de la date d’achat, contre tout vice de fabrication ou tout dommage subi lors d’une utilisation normale et appropriée. La garantie est nulle s’il y a signe d’abus ou de mauvais traitement. Grit Inc. s’engage
Designed in Canada • Conçu au CanadaUS Patent #5797612 • Can Patent #2145612
GRIT INC. Tottenham, Ontario, Canada • [email protected] • www.gritinc.net
•
•
•
•
•
•
•
•