Programmateur CPL multizone Multizone PLC … D'EMPLOI... · 2016-05-30 · Principe du courant...
56
Programmateur CPL multizone Multizone PLC programmer *2701732_Rev.1* 2701732_rev1 notice prog cpl oem Mzone.qxp 28/10/2008 13:20 P
Transcript of Programmateur CPL multizone Multizone PLC … D'EMPLOI... · 2016-05-30 · Principe du courant...
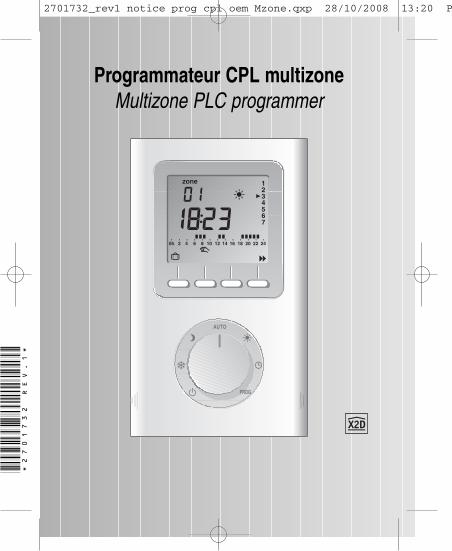
Programmateur CPL multizoneMultizone PLC programmer
*2701732_Rev.1*
2701732_rev1 notice prog cpl oem Mzone.qxp 28/10/2008 13:20 P
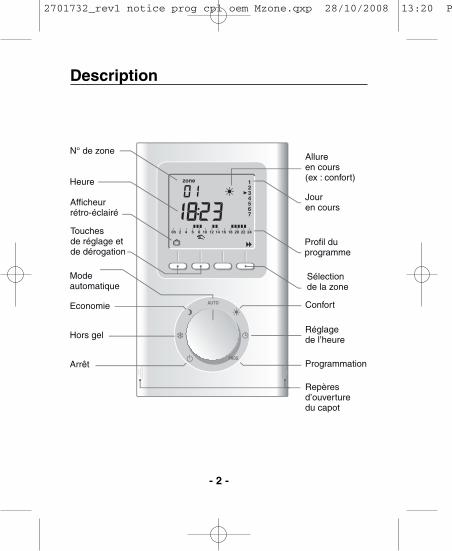
Description
- 2 -
Allure en cours(ex : confort)
Jour en cours
Profil duprogramme
Heure
Mode automatique
Confort
Réglagede l’heure
Programmation
Repères d’ouverturedu capot
Economie
Hors gel
Arrêt
Afficheurrétro-éclairé
Sélection de la zone
N° de zone
Touches de réglage etde dérogation
2701732_rev1 notice prog cpl oem Mzone.qxp 28/10/2008 13:20 P
- 3 -
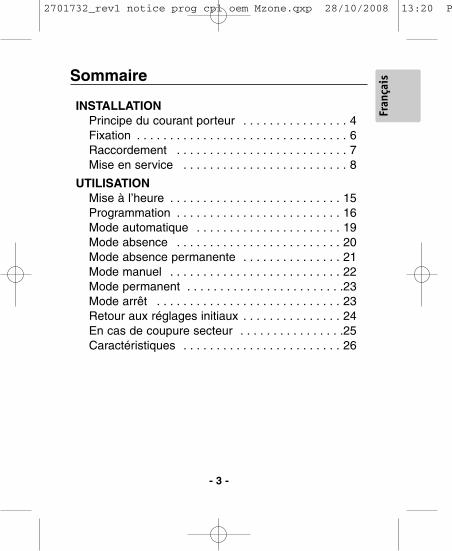
Sommaire
Fran
çais
INSTALLATIONPrincipe du courant porteur . . . . . . . . . . . . . . . . 4Fixation . . . . . . . . . . . . . . . . . . . . . . . . . . . . . . . . 6Raccordement . . . . . . . . . . . . . . . . . . . . . . . . . . 7Mise en service . . . . . . . . . . . . . . . . . . . . . . . . . 8
UTILISATIONMise à l’heure . . . . . . . . . . . . . . . . . . . . . . . . . . 15Programmation . . . . . . . . . . . . . . . . . . . . . . . . . 16Mode automatique . . . . . . . . . . . . . . . . . . . . . . 19Mode absence . . . . . . . . . . . . . . . . . . . . . . . . . 20Mode absence permanente . . . . . . . . . . . . . . . 21Mode manuel . . . . . . . . . . . . . . . . . . . . . . . . . . 22Mode permanent . . . . . . . . . . . . . . . . . . . . . . . .23Mode arrêt . . . . . . . . . . . . . . . . . . . . . . . . . . . . 23Retour aux réglages initiaux . . . . . . . . . . . . . . . 24En cas de coupure secteur . . . . . . . . . . . . . . . .25Caractéristiques . . . . . . . . . . . . . . . . . . . . . . . . 26
2701732_rev1 notice prog cpl oem Mzone.qxp 28/10/2008 13:20 P
- 4 -
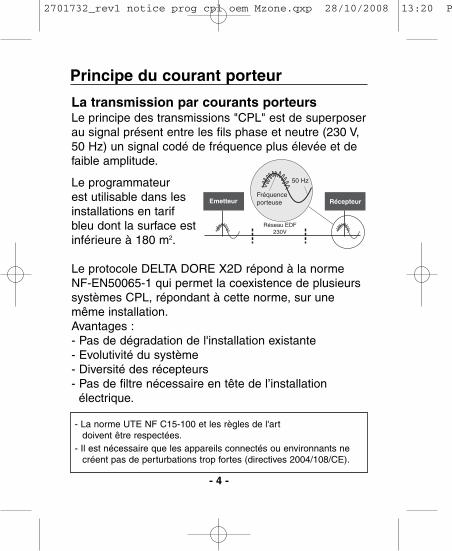
Principe du courant porteur
La transmission par courants porteursLe principe des transmissions "CPL" est de superposerau signal présent entre les fils phase et neutre (230 V,50 Hz) un signal codé de fréquence plus élevée et defaible amplitude.
Le programmateur est utilisable dans lesinstallations en tarifbleu dont la surface estinférieure à 180 m2.
Le protocole DELTA DORE X2D répond à la normeNF-EN50065-1 qui permet la coexistence de plusieurssystèmes CPL, répondant à cette norme, sur unemême installation.Avantages :- Pas de dégradation de l'installation existante- Evolutivité du système- Diversité des récepteurs- Pas de filtre nécessaire en tête de l’installation
électrique.
50 Hz
Fréquenceporteuse
Réseau EDF230V
- La norme UTE NF C15-100 et les règles de l'art doivent être respectées.
- Il est nécessaire que les appareils connectés ou environnants necréent pas de perturbations trop fortes (directives 2004/108/CE).
2701732_rev1 notice prog cpl oem Mzone.qxp 28/10/2008 13:20 P
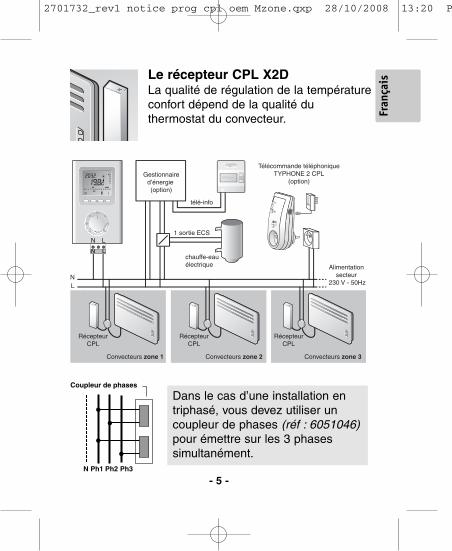
Alimentation secteur
230 V - 50HzNL
RécepteurCPL
RécepteurCPL
RécepteurCPL
N L
NN LL
Convecteurs zone 1 Convecteurs zone 2 Convecteurs zone 3
Télécommande téléphoniqueTYPHONE 2 CPL
(option)
télé-info
1 sortie ECS
chauffe-eauélectrique
Gestionnaired’énergie (option)
Dans le cas d’une installation entriphasé, vous devez utiliser uncoupleur de phases (réf : 6051046)pour émettre sur les 3 phasessimultanément.
N Ph1 Ph2 Ph3
Coupleur de phases
Le récepteur CPL X2DLa qualité de régulation de la températureconfort dépend de la qualité du thermostat du convecteur.
- 5 -
Fran
çais
2701732_rev1 notice prog cpl oem Mzone.qxp 28/10/2008 13:20 P
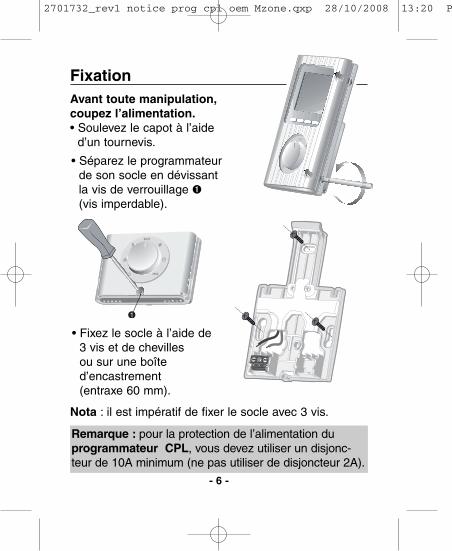
FixationAvant toute manipulation,coupez l’alimentation.• Soulevez le capot à l’aide
d’un tournevis.
1
Remarque : pour la protection de l’alimentation du programmateur CPL, vous devez utiliser un disjonc-teur de 10A minimum (ne pas utiliser de disjoncteur 2A).
- 6 -
• Fixez le socle à l’aide de 3 vis et de chevilles ou sur une boîte d’encastrement (entraxe 60 mm).
• Séparez le programmateurde son socle en dévissant la vis de verrouillage ➊(vis imperdable).
Nota : il est impératif de fixer le socle avec 3 vis.
AUTO
PROG
2701732_rev1 notice prog cpl oem Mzone.qxp 28/10/2008 13:20 P
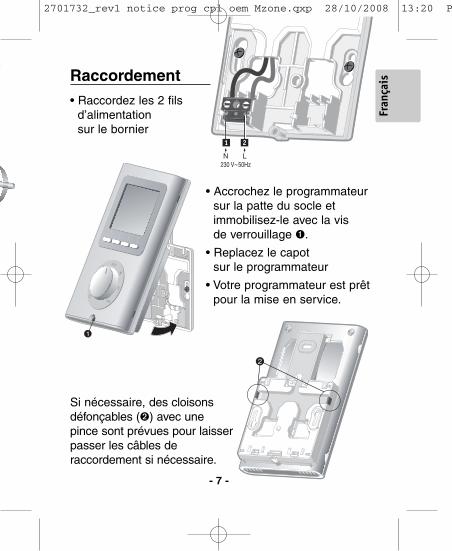
Raccordement
Si nécessaire, des cloisonsdéfonçables (➋) avec une pince sont prévues pour laisserpasser les câbles de raccordement si nécessaire.
• Raccordez les 2 fils d’alimentation sur le bornier
AUTO
PROG
1
• Accrochez le programmateur sur la patte du socle et immobilisez-le avec la vis de verrouillage ➊.
• Replacez le capot sur le programmateur
• Votre programmateur est prêt pour la mise en service.
2
- 7 -
Fran
çais
2701732_rev1 notice prog cpl oem Mzone.qxp 28/10/2008 13:20 P
- 8 -
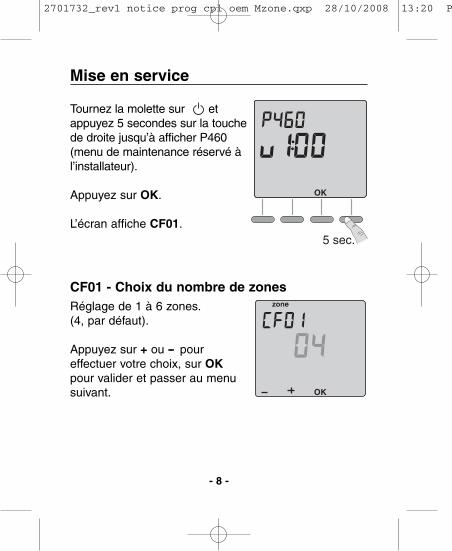
Tournez la molette sur etappuyez 5 secondes sur la touchede droite jusqu’à afficher P460(menu de maintenance réservé àl’installateur).
Appuyez sur OK.
L’écran affiche CF01.
CF01 - Choix du nombre de zonesRéglage de 1 à 6 zones.(4, par défaut).
Appuyez sur + ou -- pour effectuer votre choix, sur OKpour valider et passer au menusuivant.
Mise en service
5 sec.
2701732_rev1 notice prog cpl oem Mzone.qxp 28/10/2008 13:20 P
- 9 -
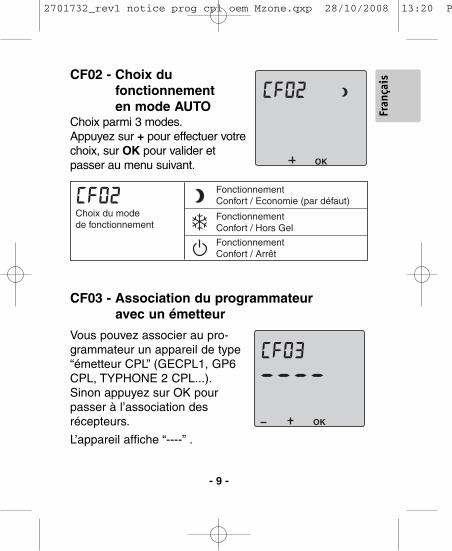
CF02 - Choix du fonctionnement en mode AUTO
Choix parmi 3 modes.Appuyez sur + pour effectuer votrechoix, sur OK pour valider et passer au menu suivant.
Fonctionnement Confort / Economie (par défaut)
Choix du mode de fonctionnement
Fonctionnement Confort / Hors Gel
Fonctionnement Confort / Arrêt
CF03 - Association du programmateur avec un émetteur
Vous pouvez associer au pro-grammateur un appareil de type“émetteur CPL” (GECPL1, GP6CPL, TYPHONE 2 CPL...).Sinon appuyez sur OK pourpasser à l’association desrécepteurs.
L’appareil affiche “----” .
Fran
çais
2701732_rev1 notice prog cpl oem Mzone.qxp 28/10/2008 13:20 P
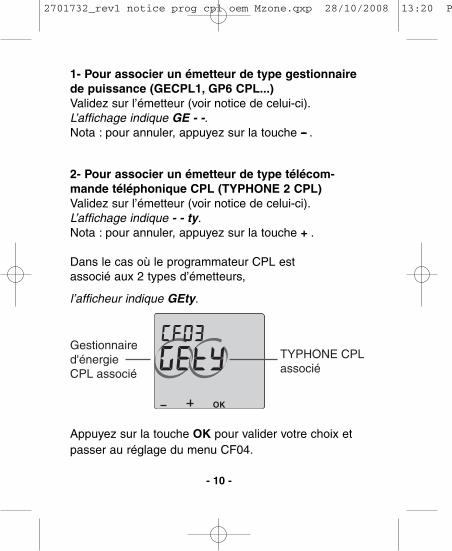
1- Pour associer un émetteur de type gestionnairede puissance (GECPL1, GP6 CPL...)Validez sur l’émetteur (voir notice de celui-ci).L’affichage indique GE - -.Nota : pour annuler, appuyez sur la touche -- .
2- Pour associer un émetteur de type télécom-mande téléphonique CPL (TYPHONE 2 CPL)Validez sur l’émetteur (voir notice de celui-ci).L’affichage indique - - ty.Nota : pour annuler, appuyez sur la touche + .
Dans le cas où le programmateur CPL est associé aux 2 types d’émetteurs,
l’afficheur indique GEty.
Appuyez sur la touche OK pour valider votre choix etpasser au réglage du menu CF04.
Gestionnaire d'énergieCPL associé
TYPHONE CPL associé
- 10 -
2701732_rev1 notice prog cpl oem Mzone.qxp 28/10/2008 13:20 P
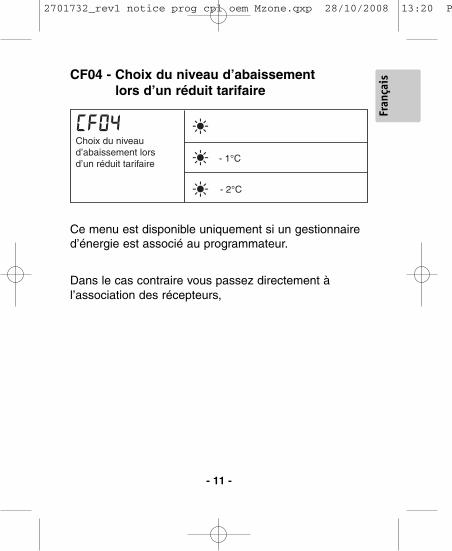
CF04 - Choix du niveau d’abaissement lors d’un réduit tarifaire
Ce menu est disponible uniquement si un gestionnaired’énergie est associé au programmateur.
Dans le cas contraire vous passez directement à l’association des récepteurs,
Choix du niveau d’abaissement lorsd’un réduit tarifaire - 1°C
- 2°C
- 11 -
Fran
çais
2701732_rev1 notice prog cpl oem Mzone.qxp 28/10/2008 13:20 P
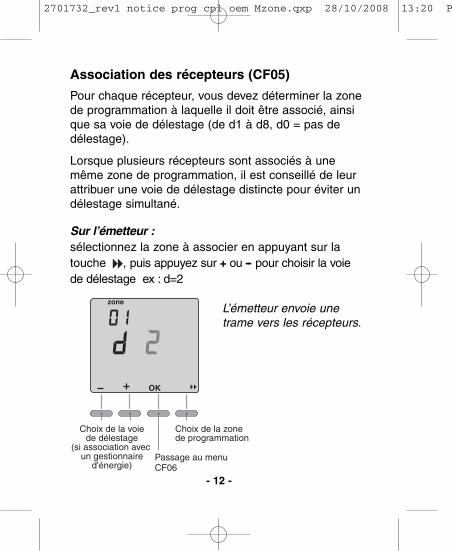
Association des récepteurs (CF05)
Pour chaque récepteur, vous devez déterminer la zonede programmation à laquelle il doit être associé, ainsique sa voie de délestage (de d1 à d8, d0 = pas dedélestage).
Lorsque plusieurs récepteurs sont associés à unemême zone de programmation, il est conseillé de leurattribuer une voie de délestage distincte pour éviter undélestage simultané.
Sur l’émetteur :sélectionnez la zone à associer en appuyant sur la touche , puis appuyez sur + ou -- pour choisir la voie de délestage ex : d=2
- 12 -
Choix de la voiede délestage
(si association avec un gestionnaire
d'énergie)
Choix de la zonede programmation
Passage au menuCF06
L’émetteur envoie unetrame vers les récepteurs.
2701732_rev1 notice prog cpl oem Mzone.qxp 28/10/2008 13:20 P

Sur le récepteur : Appuyez 5 secondes sur la touchejusqu’à ce que le voyant OK du récepteur clignote
lentement. Appuyez brièvement sur la touche .Le voyant vert ne clignote plus.
Le récepteur est associé à la zone choisie.Recommencez les opérations pour chaque zone.Appuyez sur OK pour sortir du mode association.
Appuyez brièvement sur la touche . Le voyant vertne clignote plus. Le récepteur A est associé à la zone1 et à la voie de délestage d=2.
Exemple : Les récepteurs A et B sont associés à la zone 1.
Récepteur A : voie de délestage 2Récepteur B : voie de délestage 3
Associer le récepteur A à la voie de délestage 2.
Sur l’émetteur :Appuyez sur + ou -- pour choisir lavoie de délestage : d=2.
Sur le récepteur :Appuyez 5 secondes sur la touche
jusqu’à ce que le voyant OK du récepteur clignote lentement.
Choix de la voiede délestage
Passage au menuCF06
- 13 -
Fran
çais
2701732_rev1 notice prog cpl oem Mzone.qxp 28/10/2008 13:20 P
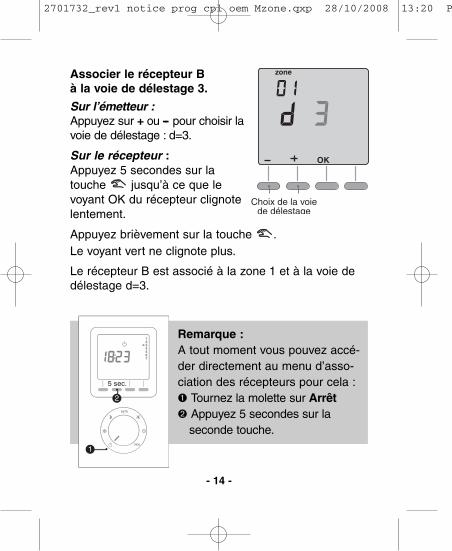
Associer le récepteur B à la voie de délestage 3.
Sur l’émetteur :Appuyez sur + ou -- pour choisir lavoie de délestage : d=3.
Sur le récepteur :Appuyez 5 secondes sur la touche jusqu’à ce que levoyant OK du récepteur clignote lentement.
Appuyez brièvement sur la touche .Le voyant vert ne clignote plus.
Le récepteur B est associé à la zone 1 et à la voie dedélestage d=3.
- 14 -
Choix de la voiede délestage
Remarque :A tout moment vous pouvez accé-der directement au menu d’asso-ciation des récepteurs pour cela :➊ Tournez la molette sur Arrêt➋ Appuyez 5 secondes sur la
seconde touche.
1
2
5 sec.
2701732_rev1 notice prog cpl oem Mzone.qxp 28/10/2008 13:20 P
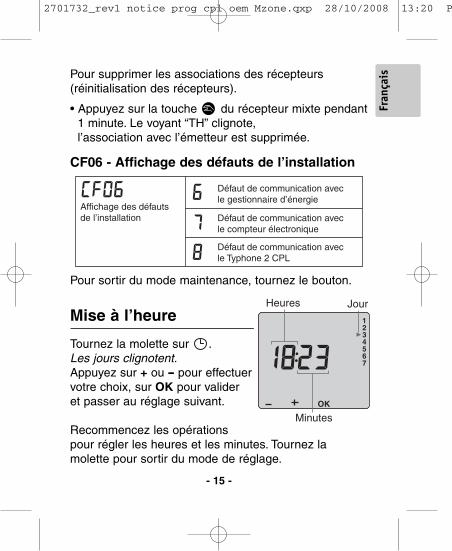
Tournez la molette sur .Les jours clignotent.Appuyez sur + ou -- pour effectuervotre choix, sur OK pour valideret passer au réglage suivant.
Recommencez les opérationspour régler les heures et les minutes. Tournez lamolette pour sortir du mode de réglage.
Mise à l’heureJourHeures
Minutes
CF06 - Affichage des défauts de l’installation
Pour sortir du mode maintenance, tournez le bouton.
Défaut de communication avec le gestionnaire d’énergie
Défaut de communication avec le compteur électronique
Défaut de communication avec le Typhone 2 CPL
Affichage des défauts de l’installation
- 15 -
Pour supprimer les associations des récepteurs (réinitialisation des récepteurs).
• Appuyez sur la touche du récepteur mixte pendant1 minute. Le voyant “TH” clignote, l’association avec l’émetteur est supprimée.
Fran
çais
2701732_rev1 notice prog cpl oem Mzone.qxp 28/10/2008 13:20 P
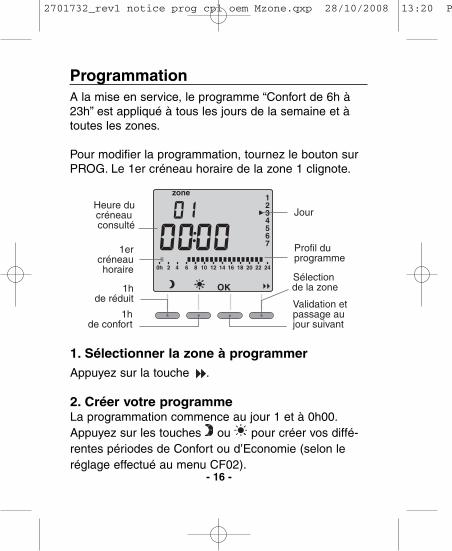
Programmation
1hde réduit
1hde confort
Validation et passage au jour suivant
1ercréneauhoraire
Heure ducréneau consulté
Jour
Profil duprogramme
Sélection de la zone
A la mise en service, le programme “Confort de 6h à23h” est appliqué à tous les jours de la semaine et àtoutes les zones.
Pour modifier la programmation, tournez le bouton surPROG. Le 1er créneau horaire de la zone 1 clignote.
- 16 -
1. Sélectionner la zone à programmerAppuyez sur la touche .
2. Créer votre programmeLa programmation commence au jour 1 et à 0h00.Appuyez sur les touches ou pour créer vos diffé-rentes périodes de Confort ou d’Economie (selon leréglage effectué au menu CF02).
2701732_rev1 notice prog cpl oem Mzone.qxp 28/10/2008 13:20 P
Sur la même zone pour le jour suivant
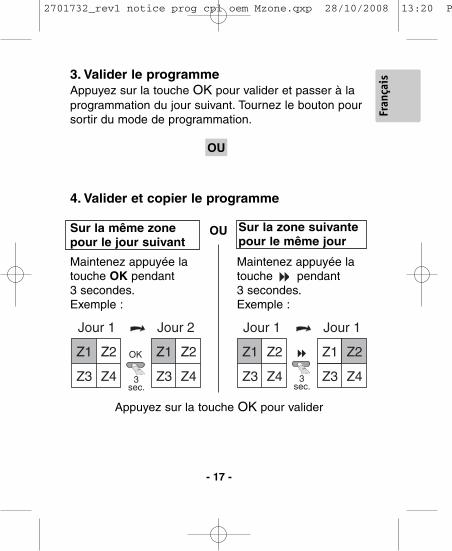
3. Valider le programmeAppuyez sur la touche OK pour valider et passer à laprogrammation du jour suivant. Tournez le bouton poursortir du mode de programmation.
- 17 -
Sur la zone suivantepour le même jour
4. Valider et copier le programme
OU
OU
Maintenez appuyée la touche OK pendant 3 secondes.Exemple :
Maintenez appuyée la touche pendant 3 secondes.Exemple :
Z1 Z2
Jour 1
Z3 Z4
Z1 Z2
Jour 2
Z3 Z43sec.
OK Z1 Z2
Jour 1
Z3 Z4
Z1 Z2
Jour 1
Z3 Z43sec.
Appuyez sur la touche OK pour valider
Fran
çais
2701732_rev1 notice prog cpl oem Mzone.qxp 28/10/2008 13:20 P

- 18 -
6h 8h 0h0h 17h 23h
Exemple : Confort de 6h à 8h et de 17h à 23h sur la zone 3
Appuyez sur jusqu'à 06:00
Appuyez sur jusqu'à 00:00
Appuyez sur jusqu'à 17:00
Appuyez sur jusqu'à 08:00
Appuyez sur jusqu'à 23:00
Validez
Appuyez sur la touche pour changer de zone
2701732_rev1 notice prog cpl oem Mzone.qxp 28/10/2008 13:20 P

Mode automatique
Tournez le bouton sur AUTO.
L’appareil suit la programmation.
Appuyez sur la touche pour sélectionner la zone àconsulter.
Mode absence(toutes zones)
Mode manuel (zone par zone) Confort ou Economie (selon réglage CF02),
jusqu'au prochain changement de programme
Sélection de zone
Zone dechauffage
Allure en cours (ex : Confort)
Jour
Programmeen cours
Heure
- 19 -
Fran
çais
Remarque :Dans le cas d’une installation en tarif le pictogramme “AUTO” clignote lorsque qu’un abaissementtarifaire est en cours.En période de confort, l’appareil suit alors le réduit tarifairechoisi dans le menu CF04.
2701732_rev1 notice prog cpl oem Mzone.qxp 28/10/2008 13:20 P
- 20 -
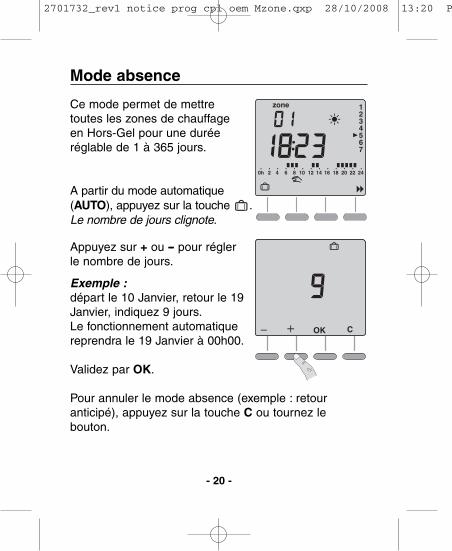
Ce mode permet de mettre toutes les zones de chauffage en Hors-Gel pour une duréeréglable de 1 à 365 jours.
A partir du mode automatique(AUTO), appuyez sur la touche .Le nombre de jours clignote.
Appuyez sur + ou -- pour régler le nombre de jours.
Exemple :départ le 10 Janvier, retour le 19Janvier, indiquez 9 jours.Le fonctionnement automatiquereprendra le 19 Janvier à 00h00.
Validez par OK.
Pour annuler le mode absence (exemple : retour anticipé), appuyez sur la touche C ou tournez le bouton.
Mode absence
2701732_rev1 notice prog cpl oem Mzone.qxp 28/10/2008 13:20 P
- 21 -
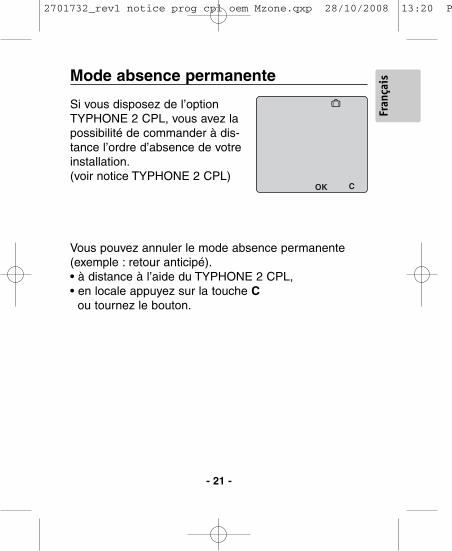
Si vous disposez de l’optionTYPHONE 2 CPL, vous avez lapossibilité de commander à dis-tance l’ordre d’absence de votreinstallation.(voir notice TYPHONE 2 CPL)
Vous pouvez annuler le mode absence permanente(exemple : retour anticipé).• à distance à l’aide du TYPHONE 2 CPL,• en locale appuyez sur la touche C
ou tournez le bouton.
Mode absence permanente
Fran
çais
2701732_rev1 notice prog cpl oem Mzone.qxp 28/10/2008 13:20 P

- 22 -
Ce mode permet de passer de Confort à Economie(selon le réglage du menu CF02) ou inversement,jusqu’au prochain changement du programme de lazone.
Appuyez sur la touche pour sélectionner la zone et appuyez sur la touche .
Exemple :vous êtes en économie (selon réglage du menu CF02),un appui sur la touche permet de passer en confort.Pour annuler ce mode manuel, appuyez à nouveau sur latouche ou tournez le bouton.
Mode manuel
Mode manuelen cours
Sélection de la zone par
2701732_rev1 notice prog cpl oem Mzone.qxp 28/10/2008 13:21 P
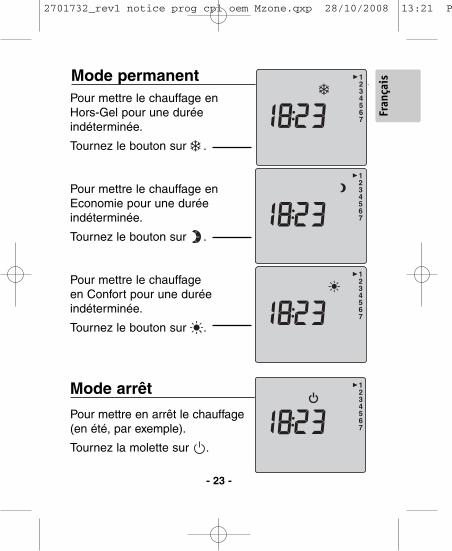
Pour mettre le chauffage en Hors-Gel pour une durée indéterminée.
Tournez le bouton sur .
Pour mettre le chauffage enEconomie pour une durée indéterminée.
Tournez le bouton sur .
Pour mettre le chauffage en Confort pour une durée indéterminée.
Tournez le bouton sur .
Mode permanent
Pour mettre en arrêt le chauffage(en été, par exemple).
Tournez la molette sur .
Mode arrêt
- 23 -
Fran
çais
2701732_rev1 notice prog cpl oem Mzone.qxp 28/10/2008 13:21 P
- 24 -
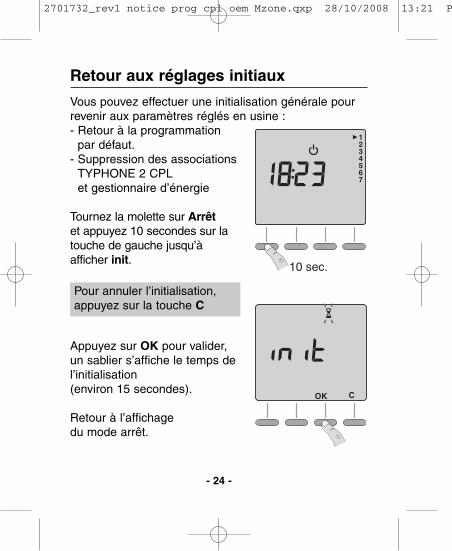
Vous pouvez effectuer une initialisation générale pourrevenir aux paramètres réglés en usine :- Retour à la programmation
par défaut.- Suppression des associations
TYPHONE 2 CPL et gestionnaire d’énergie
Tournez la molette sur Arrêtet appuyez 10 secondes sur la touche de gauche jusqu’à afficher init.
Appuyez sur OK pour valider, un sablier s’affiche le temps del’initialisation (environ 15 secondes).
Retour à l’affichage du mode arrêt.
10 sec.
Retour aux réglages initiaux
Pour annuler l’initialisation,appuyez sur la touche C
2701732_rev1 notice prog cpl oem Mzone.qxp 28/10/2008 13:21 P
- 25 -
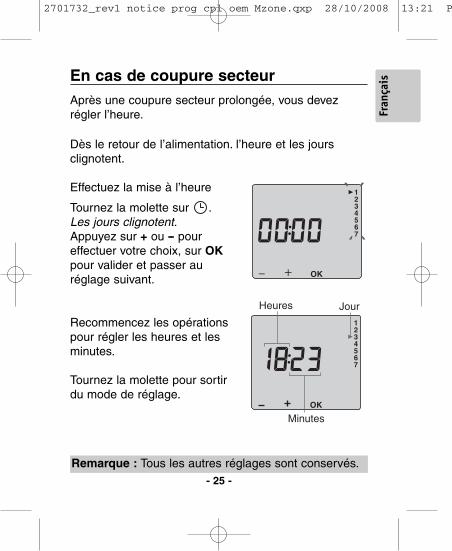
Dès le retour de l’alimentation. l’heure et les jours clignotent.
Effectuez la mise à l’heure
Tournez la molette sur .Les jours clignotent.Appuyez sur + ou -- poureffectuer votre choix, sur OKpour valider et passer auréglage suivant.
Recommencez les opérationspour régler les heures et lesminutes.
Tournez la molette pour sortir du mode de réglage.
En cas de coupure secteur
JourHeures
Minutes
Après une coupure secteur prolongée, vous devezrégler l’heure.
Remarque : Tous les autres réglages sont conservés.
Fran
çais
2701732_rev1 notice prog cpl oem Mzone.qxp 28/10/2008 13:21 P
- 26 -
• Alimentation 230V, +/-- 10%, 50 Hz
• Sauvegarde de l’horloge en cas de coupure secteur :4h (par condensateur) Sauvegarde permanente de la programmation
• Consommation : 2 VA
• Isolement classe II
• Dimensions : 134 x 80 x 25 mm
• Indice de protection : IP 30
• Fixation murale
• Installation en milieu normalement pollué
• Température de stockage : -- 10°C à +70°C
• Température de fonctionnement : 0°C à +40°C
• Fréquence d’émission : 132,5 kHz, modulation FSK,
• Conforme à la norme CENELEC NF 50065, classe 122,
• Compatible avec les produits CPL utilisant le protocole X2D
Caractéristiques
2701732_rev1 notice prog cpl oem Mzone.qxp 28/10/2008 13:21 P

- 27 -
Fran
çais
2701732_rev1 notice prog cpl oem Mzone.qxp 28/10/2008 13:21 P
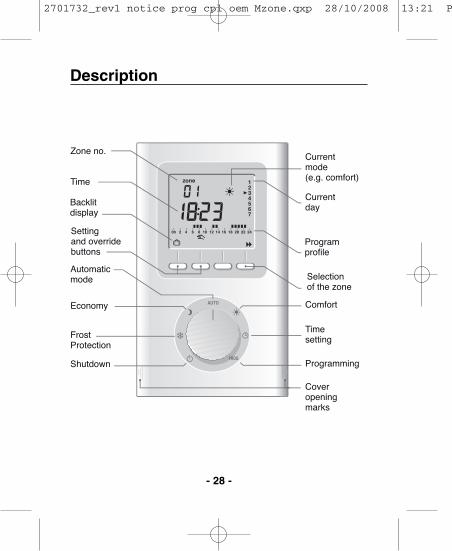
Description
- 28 -
Currentmode(e.g. comfort)
Currentday
Programprofile
Time
Automaticmode
Comfort
Timesetting
Programming
Coveropeningmarks
Economy
FrostProtection
Shutdown
Backlitdisplay
Selectionof the zone
Zone no.
Settingand overridebuttons
2701732_rev1 notice prog cpl oem Mzone.qxp 28/10/2008 13:21 P
- 29 -
Contents
)
g
INSTALLATIONPower line carrier principle . . . . . . . . . . . . . . . . 30Mountings . . . . . . . . . . . . . . . . . . . . . . . . . . . . . 32Connection . . . . . . . . . . . . . . . . . . . . . . . . . . . . 33Starting up . . . . . . . . . . . . . . . . . . . . . . . . . . . . 34
USETime setting . . . . . . . . . . . . . . . . . . . . . . . . . . . 41Programming . . . . . . . . . . . . . . . . . . . . . . . . . . 42Automatic mode . . . . . . . . . . . . . . . . . . . . . . . . 45Mode absence . . . . . . . . . . . . . . . . . . . . . . . . . 46Permanent absence mode . . . . . . . . . . . . . . . . 47Manual mode . . . . . . . . . . . . . . . . . . . . . . . . . . 48Continuous mode . . . . . . . . . . . . . . . . . . . . . . . .49Shutdown mode . . . . . . . . . . . . . . . . . . . . . . . . 49Return to the initial settings . . . . . . . . . . . . . . . 50Mains failure . . . . . . . . . . . . . . . . . . . . . . . . . . .51Characteristics . . . . . . . . . . . . . . . . . . . . . . . . . 52
Engl
ish
2701732_rev1 notice prog cpl oem Mzone.qxp 28/10/2008 13:21 P
NL
PLrece
N
NN
N Ph1 P
Phase
- 30 -
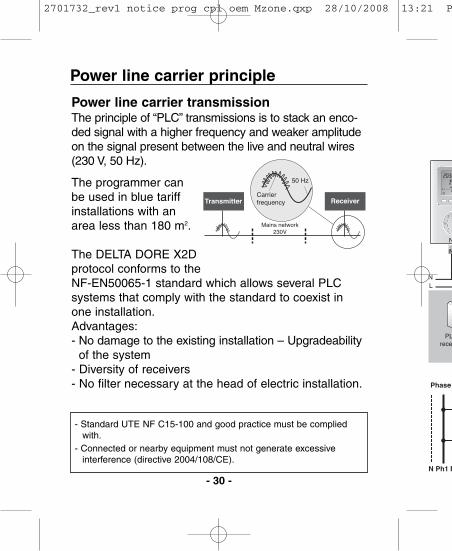
Power line carrier principle
Power line carrier transmissionThe principle of “PLC” transmissions is to stack an enco-ded signal with a higher frequency and weaker amplitudeon the signal present between the live and neutral wires(230 V, 50 Hz).
The programmer canbe used in blue tariffinstallations with anarea less than 180 m2.
The DELTA DORE X2Dprotocol conforms to theNF-EN50065-1 standard which allows several PLCsystems that comply with the standard to coexist inone installation.Advantages:- No damage to the existing installation – Upgradeability
of the system- Diversity of receivers- No filter necessary at the head of electric installation.
50 Hz
Carrierfrequency
Mains network230V
Transmitter Receiver
- Standard UTE NF C15-100 and good practice must be compliedwith.
- Connected or nearby equipment must not generate excessiveinterference (directive 2004/108/CE).
2701732_rev1 notice prog cpl oem Mzone.qxp 28/10/2008 13:21 P
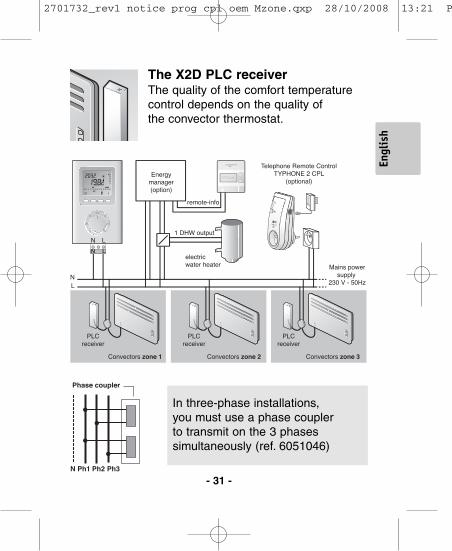
Mains powersupply
230 V - 50HzNL
PLCreceiver
PLCreceiver
PLCreceiver
N L
NN LL
Convectors zone 1 Convectors zone 2 Convectors zone 3
Telephone Remote ControlTYPHONE 2 CPL
(optional)
remote-info
1 DHW output
electricwater heater
Energymanager(option)
In three-phase installations,you must use a phase couplerto transmit on the 3 phasessimultaneously (ref. 6051046)
N Ph1 Ph2 Ph3
Phase coupler
The X2D PLC receiverThe quality of the comfort temperaturecontrol depends on the quality ofthe convector thermostat.
- 31 -
Engl
ish
2701732_rev1 notice prog cpl oem Mzone.qxp 28/10/2008 13:21 P

MountingsSwitch off the mains powerbefore handling the device.• Lift off the cover by using
a screwdriver.
1
Note: To protect the power supply to the PLCprogrammer, you must use a 10 A circuit breaker atleast (do not use a 2 A circuit breaker).
- 32 -
• Secure the base with3 screws and pegs or ona flush mounted box(distance between centres60 mm).
• Separate the programmerfrom its base by looseningthe clamp screw ➊(vis imperdable).
Note: the base must be secured using 3 screws.
AUTO
PROG
2701732_rev1 notice prog cpl oem Mzone.qxp 28/10/2008 13:21 P
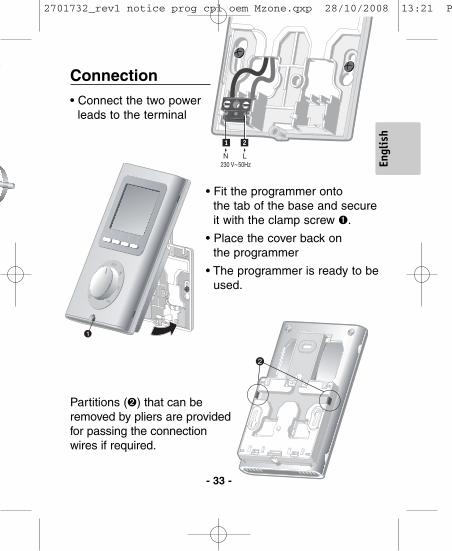
Connection
Partitions (➋) that can beremoved by pliers are providedfor passing the connectionwires if required.
• Connect the two powerleads to the terminal
AUTO
PROG
1
• Fit the programmer ontothe tab of the base and secureit with the clamp screw ➊.
• Place the cover back onthe programmer
• The programmer is ready to beused.
2
- 33 -
Engl
ish
2701732_rev1 notice prog cpl oem Mzone.qxp 28/10/2008 13:21 P
- 34 -
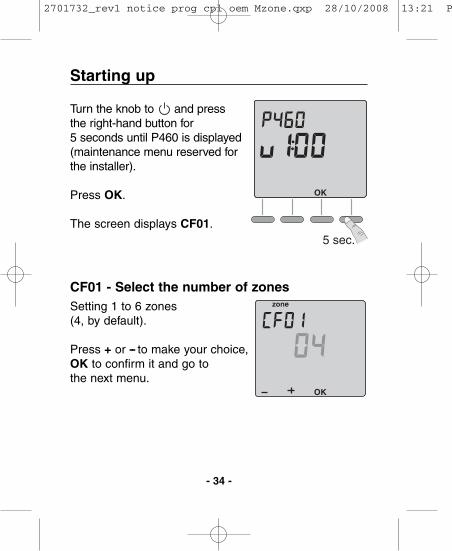
Turn the knob to and pressthe right-hand button for5 seconds until P460 is displayed(maintenance menu reserved forthe installer).
Press OK.
The screen displays CF01.
CF01 - Select the number of zonesSetting 1 to 6 zones(4, by default).
Press + or -- to make your choice,OK to confirm it and go tothe next menu.
Starting up
5 sec.
2701732_rev1 notice prog cpl oem Mzone.qxp 28/10/2008 13:21 P
- 35 -
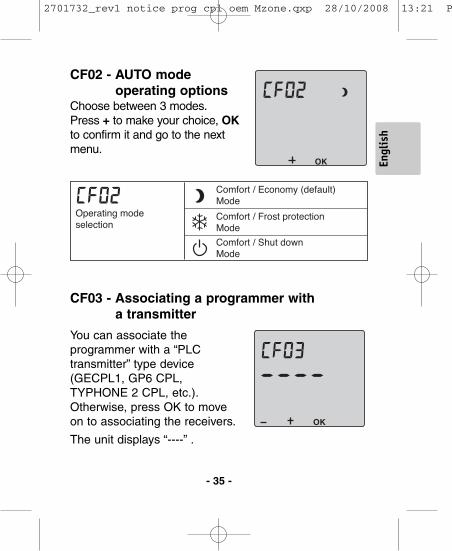
CF02 - AUTO modeoperating options
Choose between 3 modes.Press + to make your choice, OKto confirm it and go to the nextmenu.
Comfort / Economy (default)Mode
Operating modeselection
Comfort / Frost protectionMode
Comfort / Shut downMode
CF03 - Associating a programmer witha transmitter
You can associate theprogrammer with a “PLCtransmitter” type device(GECPL1, GP6 CPL,TYPHONE 2 CPL, etc.).Otherwise, press OK to moveon to associating the receivers.
The unit displays “----” .
Engl
ish
2701732_rev1 notice prog cpl oem Mzone.qxp 28/10/2008 13:21 P
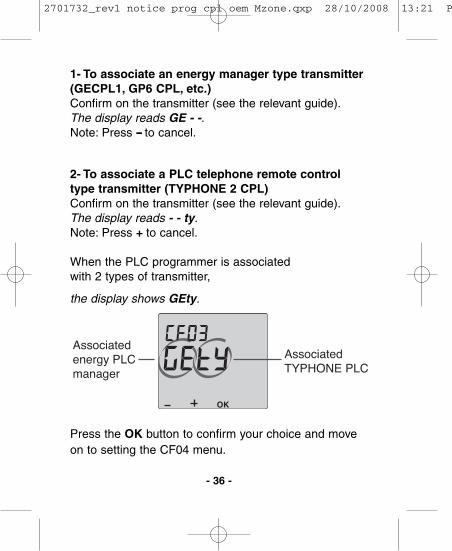
1- To associate an energy manager type transmitter(GECPL1, GP6 CPL, etc.)Confirm on the transmitter (see the relevant guide).The display reads GE - -.Note: Press -- to cancel.
2- To associate a PLC telephone remote controltype transmitter (TYPHONE 2 CPL)Confirm on the transmitter (see the relevant guide).The display reads - - ty.Note: Press + to cancel.
When the PLC programmer is associated with 2 types of transmitter,
the display shows GEty.
Press the OK button to confirm your choice and moveon to setting the CF04 menu.
Associatedenergy PLCmanager
AssociatedTYPHONE PLC
- 36 -
2701732_rev1 notice prog cpl oem Mzone.qxp 28/10/2008 13:21 P
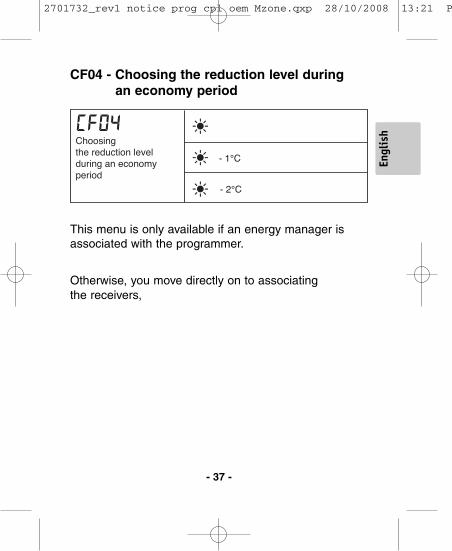
CF04 - Choosing the reduction level duringan economy period
This menu is only available if an energy manager isassociated with the programmer.
Otherwise, you move directly on to associatingthe receivers,
Choosingthe reduction levelduring an economyperiod
- 1°C
- 2°C
- 37 -
Engl
ish
2701732_rev1 notice prog cpl oem Mzone.qxp 28/10/2008 13:21 P
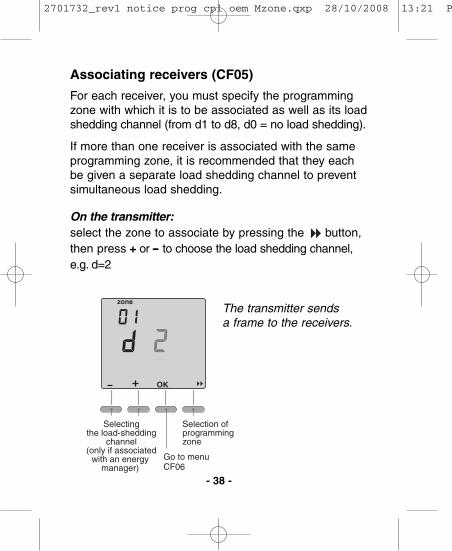
Associating receivers (CF05)
For each receiver, you must specify the programmingzone with which it is to be associated as well as its loadshedding channel (from d1 to d8, d0 = no load shedding).
If more than one receiver is associated with the sameprogramming zone, it is recommended that they eachbe given a separate load shedding channel to preventsimultaneous load shedding.
On the transmitter:select the zone to associate by pressing the button,then press + or -- to choose the load shedding channel,e.g. d=2
- 38 -
Selectingthe load-shedding
channel(only if associated
with an energy manager)
Selection ofprogrammingzone
Go to menuCF06
The transmitter sendsa frame to the receivers.
2701732_rev1 notice prog cpl oem Mzone.qxp 28/10/2008 13:21 P
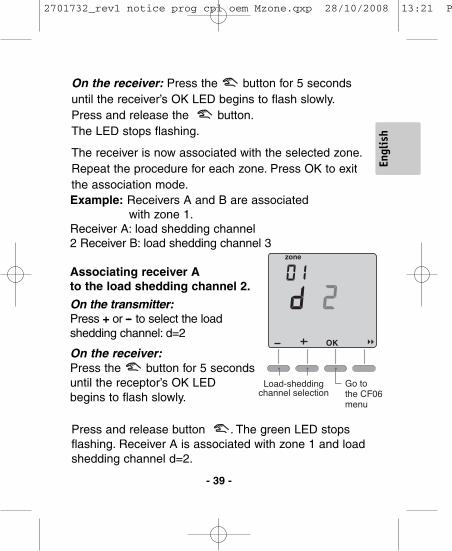
On the receiver: Press the button for 5 secondsuntil the receiver’s OK LED begins to flash slowly.Press and release the button.The LED stops flashing.
The receiver is now associated with the selected zone.Repeat the procedure for each zone. Press OK to exitthe association mode.
Press and release button . The green LED stopsflashing. Receiver A is associated with zone 1 and loadshedding channel d=2.
Example: Receivers A and B are associatedwith zone 1.
Receiver A: load shedding channel2 Receiver B: load shedding channel 3
Associating receiver Ato the load shedding channel 2.
On the transmitter:Press + or -- to select the loadshedding channel: d=2
On the receiver:Press the button for 5 secondsuntil the receptor’s OK LEDbegins to flash slowly.
Load-sheddingchannel selection
Go tothe CF06menu
- 39 -
Engl
ish
2701732_rev1 notice prog cpl oem Mzone.qxp 28/10/2008 13:21 P
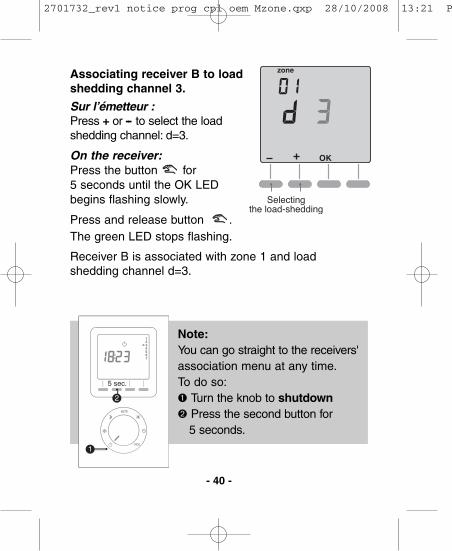
Associating receiver B to loadshedding channel 3.
Sur l’émetteur :Press + or -- to select the loadshedding channel: d=3.
On the receiver:Press the button for5 seconds until the OK LEDbegins flashing slowly.
Press and release button .The green LED stops flashing.
Receiver B is associated with zone 1 and loadshedding channel d=3.
- 40 -
Selectingthe load-shedding
Note:You can go straight to the receivers'association menu at any time.To do so:➊ Turn the knob to shutdown➋ Press the second button for
5 seconds.
1
2
5 sec.
2701732_rev1 notice prog cpl oem Mzone.qxp 28/10/2008 13:21 P
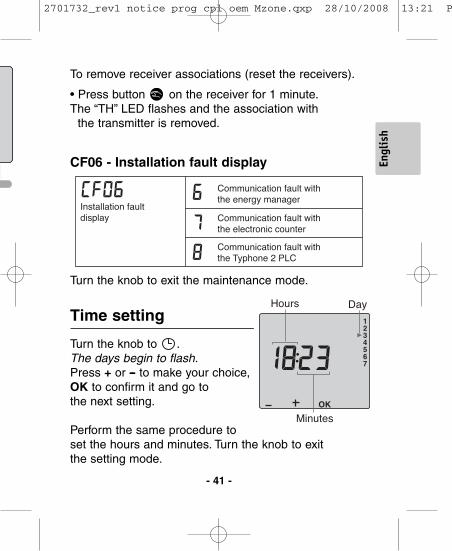
Turn the knob to .The days begin to flash.Press + or -- to make your choice,OK to confirm it and go tothe next setting.
Perform the same procedure toset the hours and minutes. Turn the knob to exitthe setting mode.
Time settingDayHours
Minutes
CF06 - Installation fault display
Turn the knob to exit the maintenance mode.
Communication fault withthe energy manager
Communication fault withthe electronic counter
Communication fault withthe Typhone 2 PLC
Installation faultdisplay
- 41 -
To remove receiver associations (reset the receivers).
• Press button on the receiver for 1 minute.The “TH” LED flashes and the association with
the transmitter is removed.
Engl
ish
2701732_rev1 notice prog cpl oem Mzone.qxp 28/10/2008 13:21 P
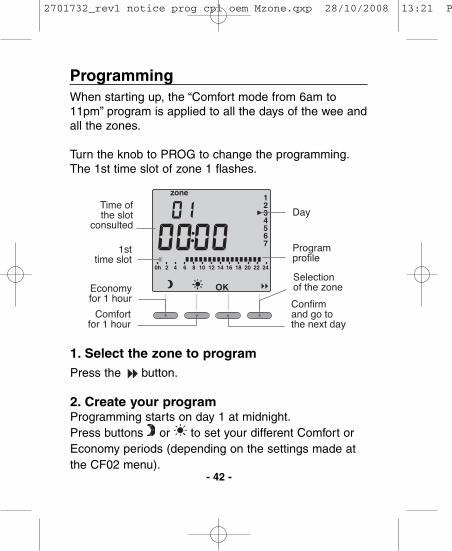
Programming
Economyfor 1 hour
Comfortfor 1 hour
Confirmand go tothe next day
1sttime slot
Time ofthe slot
consultedDay
Programprofile
Selectionof the zone
When starting up, the “Comfort mode from 6am to11pm” program is applied to all the days of the wee andall the zones.
Turn the knob to PROG to change the programming.The 1st time slot of zone 1 flashes.
- 42 -
1. Select the zone to programPress the button.
2. Create your programProgramming starts on day 1 at midnight.Press buttons or to set your different Comfort orEconomy periods (depending on the settings made atthe CF02 menu).
2701732_rev1 notice prog cpl oem Mzone.qxp 28/10/2008 13:21 P
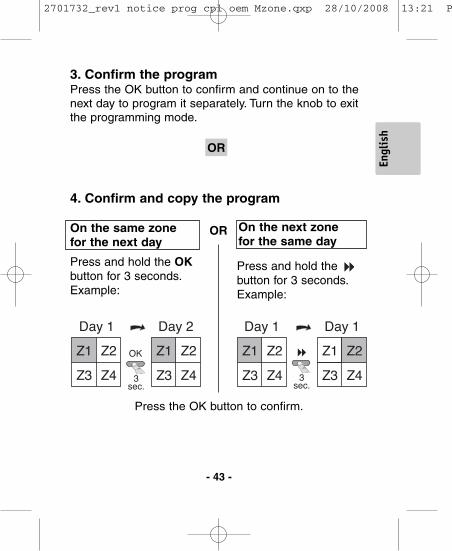
On the same zonefor the next day
3. Confirm the programPress the OK button to confirm and continue on to thenext day to program it separately. Turn the knob to exitthe programming mode.
- 43 -
On the next zonefor the same day
4. Confirm and copy the program
OR
OR
Press and hold the OKbutton for 3 seconds.Example:
Press and hold the button for 3 seconds.Example:
Z1 Z2
Day 1
Z3 Z4
Z1 Z2
Day 2
Z3 Z43sec.
OK Z1 Z2
Day 1
Z3 Z4
Z1 Z2
Day 1
Z3 Z43sec.
Press the OK button to confirm.
Engl
ish
2701732_rev1 notice prog cpl oem Mzone.qxp 28/10/2008 13:21 P
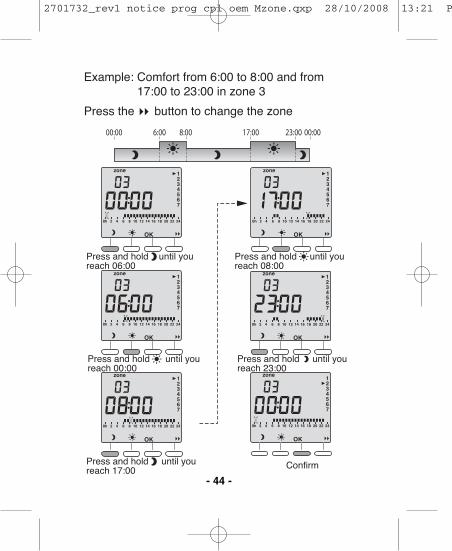
6:00 8:00 00:0000:00 17:00 23:00
Example: Comfort from 6:00 to 8:00 and from 17:00 to 23:00 in zone 3
Press and hold until youreach 06:00
Press and hold until youreach 23:00
Press and hold until youreach 17:00
Press and hold until you reach 00:00
Press and hold until youreach 08:00
Confirm
Press the button to change the zone
- 44 -
2701732_rev1 notice prog cpl oem Mzone.qxp 28/10/2008 13:21 P
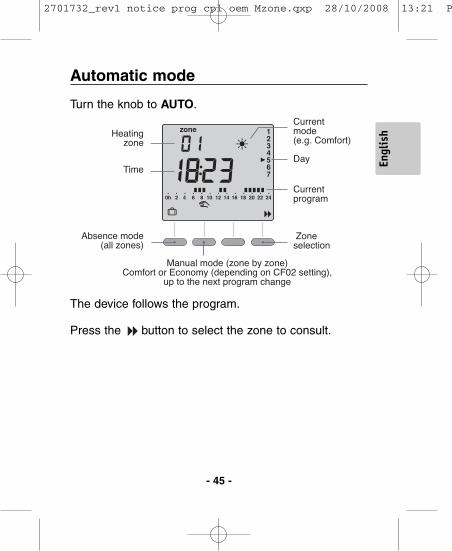
Automatic mode
Turn the knob to AUTO.
The device follows the program.
Press the button to select the zone to consult.
Absence mode(all zones)
Manual mode (zone by zone)Comfort or Economy (depending on CF02 setting),
up to the next program change
Zoneselection
Heatingzone
Currentmode(e.g. Comfort)
Day
Currentprogram
Time
- 45 -
Engl
ish
2701732_rev1 notice prog cpl oem Mzone.qxp 28/10/2008 13:21 P
- 46 -
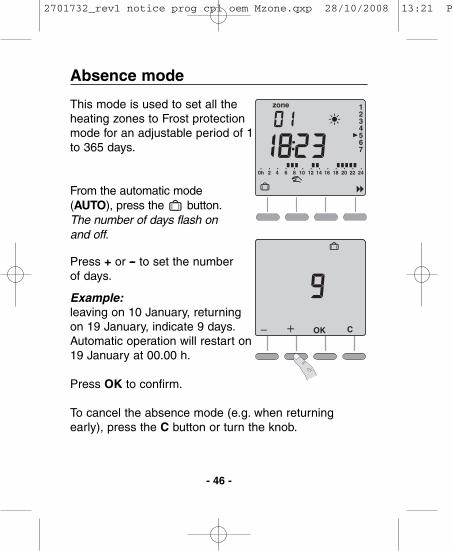
This mode is used to set all theheating zones to Frost protectionmode for an adjustable period of 1to 365 days.
From the automatic mode(AUTO), press the button.The number of days flash onand off.
Press + or -- to set the numberof days.
Example:leaving on 10 January, returningon 19 January, indicate 9 days.Automatic operation will restart on19 January at 00.00 h.
Press OK to confirm.
To cancel the absence mode (e.g. when returningearly), press the C button or turn the knob.
Absence mode
2701732_rev1 notice prog cpl oem Mzone.qxp 28/10/2008 13:21 P
- 47 -
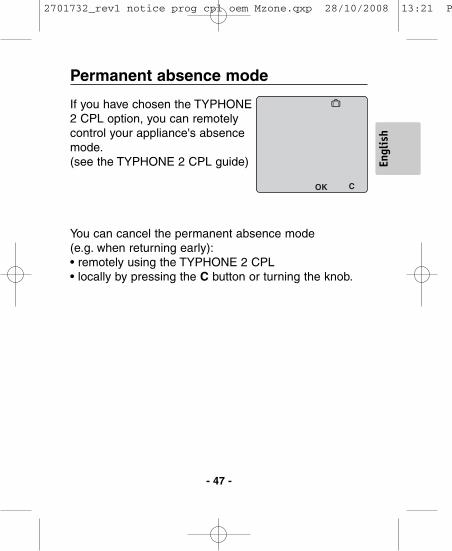
If you have chosen the TYPHONE2 CPL option, you can remotelycontrol your appliance's absencemode.(see the TYPHONE 2 CPL guide)
You can cancel the permanent absence mode(e.g. when returning early):• remotely using the TYPHONE 2 CPL• locally by pressing the C button or turning the knob.
Permanent absence mode
Engl
ish
2701732_rev1 notice prog cpl oem Mzone.qxp 28/10/2008 13:21 P
- 48 -
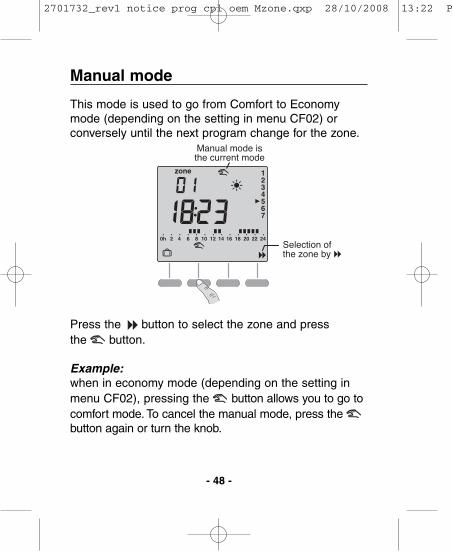
This mode is used to go from Comfort to Economymode (depending on the setting in menu CF02) orconversely until the next program change for the zone.
Press the button to select the zone and pressthe button.
Example:when in economy mode (depending on the setting inmenu CF02), pressing the button allows you to go tocomfort mode. To cancel the manual mode, press the button again or turn the knob.
Manual mode
Manual mode isthe current mode
Selection ofthe zone by
2701732_rev1 notice prog cpl oem Mzone.qxp 28/10/2008 13:22 P

To set the heating to FrostProtection mode for an indefiniteduration.
Turn the knob to .
To set the heating to Economymode for an indefiniteduration.
Turn the knob to .
To set the heating to Comfortmode for an indefiniteduration.
Turn the knob to .
Continuous mode
To shut down the heating(in summer, for example).
Turn the knob to .
Shutdown mode
- 49 -
Engl
ish
2701732_rev1 notice prog cpl oem Mzone.qxp 28/10/2008 13:22 P
- 50 -
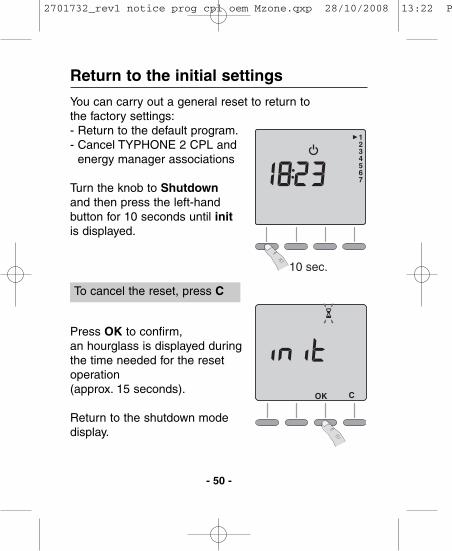
You can carry out a general reset to return tothe factory settings:- Return to the default program.- Cancel TYPHONE 2 CPL and
energy manager associations
Turn the knob to Shutdownand then press the left-handbutton for 10 seconds until initis displayed.
Press OK to confirm,an hourglass is displayed duringthe time needed for the resetoperation(approx. 15 seconds).
Return to the shutdown modedisplay.
10 sec.
Return to the initial settings
To cancel the reset, press C
2701732_rev1 notice prog cpl oem Mzone.qxp 28/10/2008 13:22 P
- 51 -
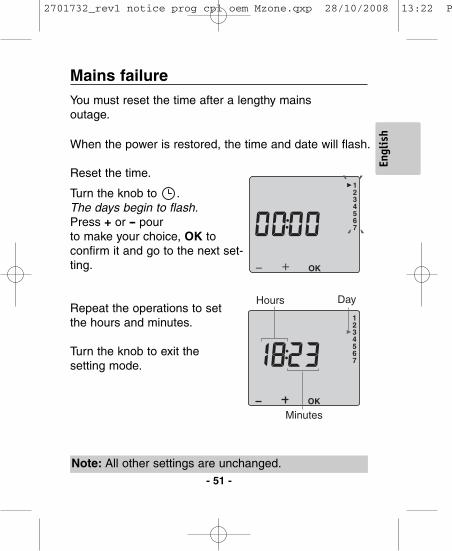
When the power is restored, the time and date will flash.
Reset the time.
Turn the knob to .The days begin to flash.Press + or -- pourto make your choice, OK toconfirm it and go to the next set-ting.
Repeat the operations to set the hours and minutes.
Turn the knob to exit the setting mode.
Mains failure
DayHours
Minutes
You must reset the time after a lengthy mainsoutage.
Note: All other settings are unchanged.
Engl
ish
2701732_rev1 notice prog cpl oem Mzone.qxp 28/10/2008 13:22 P
- 52 -
• 230V +/-- 10%, 50 Hz power supply
• Clock back-up in event of mains outage:4h (by capacitor)Permanent back-up of the programming
• Power consumption: 2 VA
• Class II insulation
• Dimensions : 134 x 80 x 25 mm
• Protection index: IP 30
• Wall-mounted
• Install in an environment with normal pollution levels
• Storage temperature: -- 10°C to +70°C
• Operating temperature: 0°C to +40°C
• Transmission frequency: 132.5 kHz, FSK modulation
• Compliant with the CENELEC NF 50065 standard,class 122
• Compatible with power line carrier products usingX2D protocol
Characteristics
2701732_rev1 notice prog cpl oem Mzone.qxp 28/10/2008 13:22 P
- 53 -
Engl
ish
2701732_rev1 notice prog cpl oem Mzone.qxp 28/10/2008 13:22 P

- 54 -
2701732_rev1 notice prog cpl oem Mzone.qxp 28/10/2008 13:22 P
- 55 -
2701732_rev1 notice prog cpl oem Mzone.qxp 28/10/2008 13:22 P
Appareil conforme aux exigences des directives2004/108/CE (Compatibilité ElectroMagnétique)
2006/95/CE (Sécurité basse tension)
En raison de l'évolution des normes et du matériel, les caractéristiques indiquées par le texte et les images de ce document ne nous engagent qu'après confirmation par nos services.
Device complying with the requirements of directives2004/108/CE(ElectroMagnetic Compatibility)
and 2006/95/CE (low voltage safety)
Because of changes in standards and equipment, the characteristics given in the text andthe illustrations of this document are not binding unless confirmed by our services. *2
701732_Rev.1*
2701732_rev1 notice prog cpl oem Mzone.qxp 28/10/2008 13:20 P