Notice Hygromaster 230V - · PDF filede l'hygrométrie extérieure qui varie...
40
01/2009 Notice : W6934 Numéro de série Hygromaster®
-
Upload
truongdien -
Category
Documents
-
view
219 -
download
1
Transcript of Notice Hygromaster 230V - · PDF filede l'hygrométrie extérieure qui varie...

01/2009
1
Notice : W6934
Numéro de série
Hygromaster®

01/2009
2
Table des matières
1. LA RÉGULATION DE L'HYGROMÉTRIE 3
2. INSTALLATION DE L'HYGROMASTER 4
2. Montage de l'Hygromaster
2.2 Montage du réservoir
3. MISE EN SERVICE 8
4. UTILISATION 9
5. ENTRETIEN 9
6. CONSERVATION DU VIN 9
7. GARANTIE 10

01/2009
3
Caractéristiques
Dimensions 258x140x166
Poids 3 kg
Puissance moyenne pour humidification 75 w
Tension 230V-240V
Intensité Moyenne pour Humidification 0.63 A
Fréquence 50/60 Hz
Capacité d’humidification 18,2 g d'eau à l'heure à 12°C
Longueur de câble d’alimentation 1.5 M
1. LA RÉGULATION DE L'HYGROMÉTRIE
Votre climatiseur de cave Fondis régule naturellement l’hygrométrie. Celle-ci est alors
maintenue entre 65 % et 85 % d'humidité relative. L'excès coule vers un trop plein
d’évacuation.
L'hygrométrie ne peut pas être totalement stabilisée à une valeur choisie car elle dépend
de l'hygrométrie extérieure qui varie fortement selon les régions, les saisons, le temps.
L'HYGROMASTER prendra toute son importance en hiver lorsque les températures seront
basses et l’hygrométrie relative très basse.
Dans ce cas, il sera nécessaire d’apporter de l’humidité supplémentaire grâce à
l'HYGROMASTER. Celui-ci étant un générateur de vapeur, il produira une humidité
totalement propre.
IMPORTANT : la régulation d'hygrométrie et le bon fonctionnement du climatiseur
nécessitent :
- l'isolation intégrale de la cave (murs, sol, plafond, porte) avec un isolant étanche.
- la continuité parfaite de l'isolation (pas d'interstices, ni de ponts thermiques).
- pas de ventilation autre que celle du climatiseur.
- Absence de source de chaleur (réfrigérateur, tuyau de chauffage,…).
01/2009
4
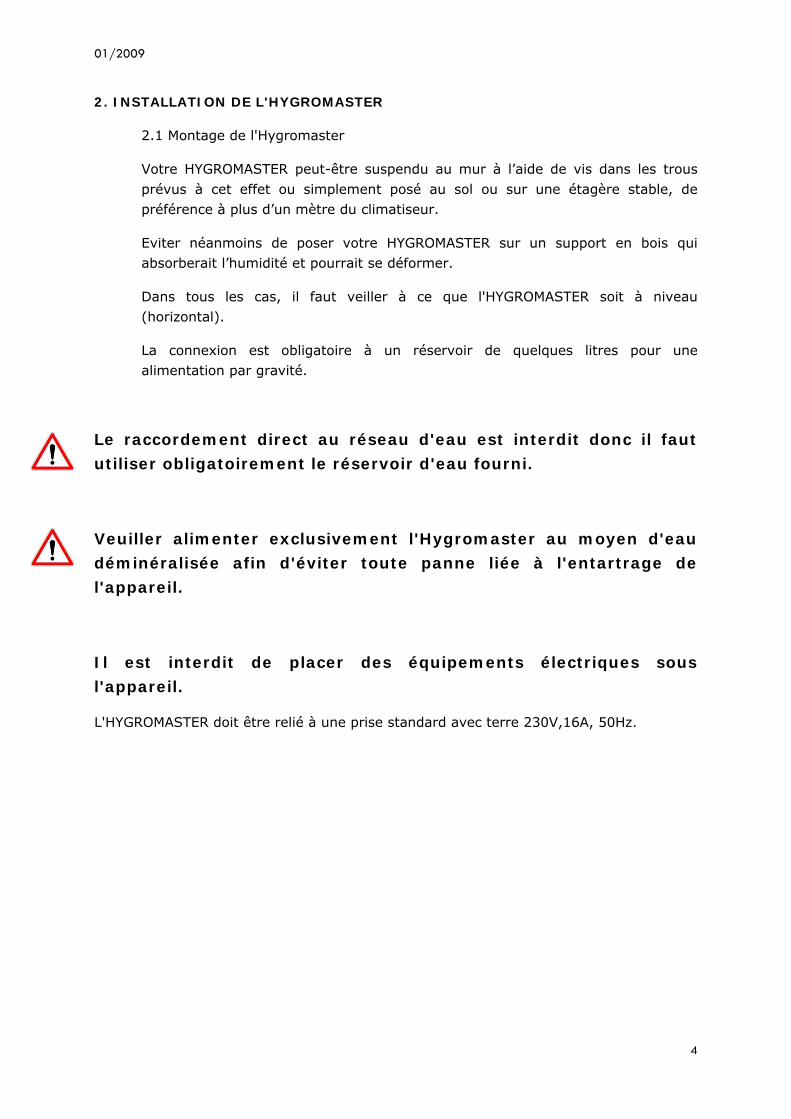
2. INSTALLATION DE L'HYGROMASTER
2.1 Montage de l'Hygromaster
Votre HYGROMASTER peut-être suspendu au mur à l’aide de vis dans les trous
prévus à cet effet ou simplement posé au sol ou sur une étagère stable, de
préférence à plus d’un mètre du climatiseur.
Eviter néanmoins de poser votre HYGROMASTER sur un support en bois qui
absorberait l’humidité et pourrait se déformer.
Dans tous les cas, il faut veiller à ce que l'HYGROMASTER soit à niveau
(horizontal).
La connexion est obligatoire à un réservoir de quelques litres pour une
alimentation par gravité.
Le raccordement direct au réseau d'eau est interdit donc il faut
utiliser obligatoirement le réservoir d'eau fourni.
Veuiller alimenter exclusivement l'Hygromaster au moyen d'eau
déminéralisée afin d'éviter toute panne liée à l'entartrage de
l'appareil.
Il est interdit de placer des équipements électriques sous
l'appareil.
L'HYGROMASTER doit être relié à une prise standard avec terre 230V,16A, 50Hz.

01/2009
5
2.2 Montage du réservoir
Le kit réservoir à eau comprend :
1. Un réservoir d’une contenance de 20 litres.
2. Un robinet à visser sur lequel est connecté un tuyau flexible Ø 16 mm et un
raccord rapide femelle.
3. Un tuyau flexible Ø 8 mm longueur 3m connecté à un raccord rapide mâle.
4. Un manchon à visser ¼ de pouce.
5. Un joint en caoutchouc.
1
2
3 4 et 5

01/2009
6
Glisser le joint en caoutchouc 1 sur le filetage du manchon 2.
Visser le manchon et son joint sur le raccord situé à l'arrière de l’appareil
comme indiqué sur la figure ci-dessous.
Positionner le réservoir à la verticale.
Dévisser le grand bouchon (remplissage).
Remplisser le réservoir d’eau environ au ¾ de sa contenance.
Pour éviter la formation de mousse n’utilisez jamais d’eau de pluie.
Positionner la poignée du robinet vers la droite pour fermer l’écoulement
d’eau.
Visser l’ensemble robinet, tuyau flexible et raccord femelle sur le réservoir
en position verticale.
2 1

01/2009
7
Connexion de la bombone sur l'Hygromaster
1. Positionner le réservoir à l’horizontale.
2. Connecter le raccord rapide mâle dans le raccord femelle.
3. Couper le tuyau flexible Ø 8mm à la longueur souhaitée puis le connecter sur le
manchon de l’hygromaster.
4. Tourner la poignée du robinet vers la gauche.
5. Desserrer le petit bouchon du réservoir d’un demi-tour pour créer un passage d’air.
Poignée vers la droite, position fermé.
1 5
1 2 3

01/2009
8
3. MISE EN SERVICE
Quand les connexions sont faites, mettez l’interrupteur sur “0”.
Fermer le couvercle et branchez l’arrivée d’eau.
Puis mettre sous tension.
Laisser le couvercle fermé quand l’interrupteur est sur la position II
Interrupteur position II: humidification
HYGROMASTER se remplit.
Le couvercle doit être maintenu fermé pendant cette phase.
Régler la consigne dans la plage désirée. (entre 60% et 80%)
Si nécessaire l'HYGROMASTER humidifiera l’air.
Interrupteur position I: Déshumidification
Interrupteur position II: humidification
Interrupteur position I: Déshumidification
Raccordement accessoire déshumidification
Raccordement secteur
Réglage de consigne d’humidité
01/2009
9
4. UTILISATION
En hiver, positionner l'HYGROMASTER en position humification (II).
Veiller à contrôler et compléter le niveau d’eau du réservoir régulièrement.
En été, couper l'humidification pour ne pas perturber la production de froid et générer
une quantité excessive de condensats.
En option: La fonction déshumidification n’est nécessaire que pour les caves enterrées
lorsque la production de froid est inactive. Ne pas l'utiliser en été.
5. ENTRETIEN
Débrancher votre HYGROMASTER et nettoyer le dépôt de tartre si besoin avec un produit
du commerce par trempage.
Attention aux risques de brûlures notamment sur la cheminée et les tôles autour du bac.
Pour toutes questions, n’hésitez pas à contacter votre revendeur ou le service
Client Fondis: +33 (0)3 89 37 75 00 ou [email protected]
6. CONSERVATION DU VIN
Sa conservation et son vieillissement nécessitent un environnement répondant à
certaines conditions.
Plus que la température elle-même, c'est la stabilité de la température de la cave qui est
importante pour une bonne conservation du vin.
La température idéale d’une cave à vin est de 12 degrés environ. Au-dessus de vingt-
cinq degrés, les vins blancs jeunes risquent une fermentation secondaire. Au contraire,
pour certains vins rouges, leur vieillissement se trouvera accéléré.
Les tuyaux de chauffage central, la proximité d'une chaudière, les entrées d’air parasites,
les frigos et les congélateurs sont les grands ennemis du vin.
Une bonne cave ne doit être ni trop sèche, ni trop humide. L'action d'un air sec est
insidieuse : elle dessèche les bouchons et provoque une importante évaporation du vin à
travers les bouchons et rend la bouteille "couleuse". Un excès d'humidité favorisera le
développement de moisissures sur les fûts et les bouchons. L'hygrométrie idéale se situe
entre 60 % et 80%, elle peut s'élever sans dommage pour le vin jusqu'à 90 %. La cave
doit être close, sans vibration. Les étagères ou les rayonnages sont isolés de toute
source de vibration, ils reposent sur le sol plutôt que fixés à une paroi, plus sensible aux
vibrations. Le vieillissement du vin se fait à l'abri de la lumière. La cave doit donc être
sombre et la durée d'éclairage limitée. Ces conditions étant requises, le vin se gardera
01/2009
10
longtemps. La cave lui apportera une bonne maturation et un vieillissement optimal. Le
vin n'est pas aussi fragile qu'on le croit souvent, il doit essentiellement être protégé de
ses principaux ennemis: les écarts brusques de température, la lumière.
Problèmes et solutions
Problèmes Solutions
Hygrométrie de consigne non atteinte - Défaut d'isolation et/ou d'étanchéité
- Manque d'eau
- vérifier s’il n’y a pas de facteurs asséchants
(tuyaux de chauffage central, proximité d'une
chaudière, les frigos, les congélateurs, les
armoires à vin… qui sont aussi à proscrire dans
une cave à vin climatisée)
Débordement - Veuiller alimenter exclusivement
l'Hygromaster au moyen d'eau déminéralisée
afin d'éviter toute panne liée à l'entartrage
de l'appareil
- Le raccordement direct au réseau d'eau est
interdit donc il faut utiliser obligatoirement le
réservoir d'eau fourni.
7. GARANTIE
L'application de la garantie est conditionnée par la présentation de la facture d'achat ou à
défaut de sa copie.
La Communauté Européenne accordant une grande importance à l’environnement et au
traitement des déchets, a mis en place la Directive 2002/96/CE relative aux Déchets
d’Equipements Electriques et Electroniques (DEEE).
Conformément à cette norme, la présence du logo ″poubelle barrée″ est obligatoire.
Ce logo signifie que ce produit ne peut être en aucun cas jeté dans les ordures
ménagères.
Il doit être remis à un point de collecte approprié pour le traitement, la valorisation,
le recyclage des déchets d’Equipements Electriques et Electroniques.
Par cette action vous faites un geste pour l’environnement et vous contribuez à la
préservation des ressources naturelles ainsi qu’à la protection de la santé humaine.

01/2009
1
Instructions booklet : W6934
Serial number
Hygromaster®

01/2009
2
Contents
1. AUTOMATIC CONTROL OF HYGROMETRY 3
2. INSTALLATION OF THE HYGROMASTER 4
2. Hygromaster installation
2.2 Public water system installation
3. STARTUP 8
4. USE 9
5. MAINTENANCE 9
6. PRESERVATION OF WINE 9
7. WARRANTY 10

01/2009
3
Datas
Dimensions 258x140x166
weight 3 kg
Average power consumption for
humidification
75 w
Voltage 230V-240V
Average intensity for humidification 0.63 A
Frequency 50/60 Hz
Capacity of humidification: 18,2 g Water/hour at 12°C
Length of power cord 1.5 M
1. AUTOMATIC CONTROL OF HYGROMETRY
Your Fondis cellar air-conditioner controls hygrometry in a natural way. This is then
maintained between 65 % and 85 % of relative humidity. The excess runs towards a
draining overflow.
Since it depends on the external hygrometry, which strongly varies according to the
region, the season, the weather, the hygrometry cannot be completely kept at a set
value.
THE HYGROMASTER will assume its full relevance in winter when the temperatures are
low and the relative hygrometry is very low.
In this case, it will be necessary to provide additional moisture thanks to HYGROMASTER.
Since it is a steam generator, it will produce completely clean moisture.
IMPORTANT: the control of hygrometry and the good operation of the air-conditioner
require:
- complete insulation of the cellar (walls, floor, ceiling, door) with a tight insulating
material.
- perfect continuity of the insulation (no gaps, nor thermal bridges).
- no other ventilation than that of the air-conditioner
- Lack of heat source (fridge, heating pipe, ...).
01/2009
4
2. INSTALLATION OF THE HYGROMASTER
2.1 Hygromaster installation
Your HYGROMASTER can be suspended on a wall using screws in the holes
intended for this purpose or simply placed on the ground or on a stable shelf
preferably more than a meter away from the air-conditioner.
However, avoid placing your HYGROMASTER on a wooden support which would
absorb the moisture and could become deformed.
In any case, it is essential that the HYGROMASTER is level (horizontal).
Connection of the water inlet with the public water system or with a tank
containing a few litres for gravity feed will be performed using a male hose
connector, 1/4” cylindrical thread.
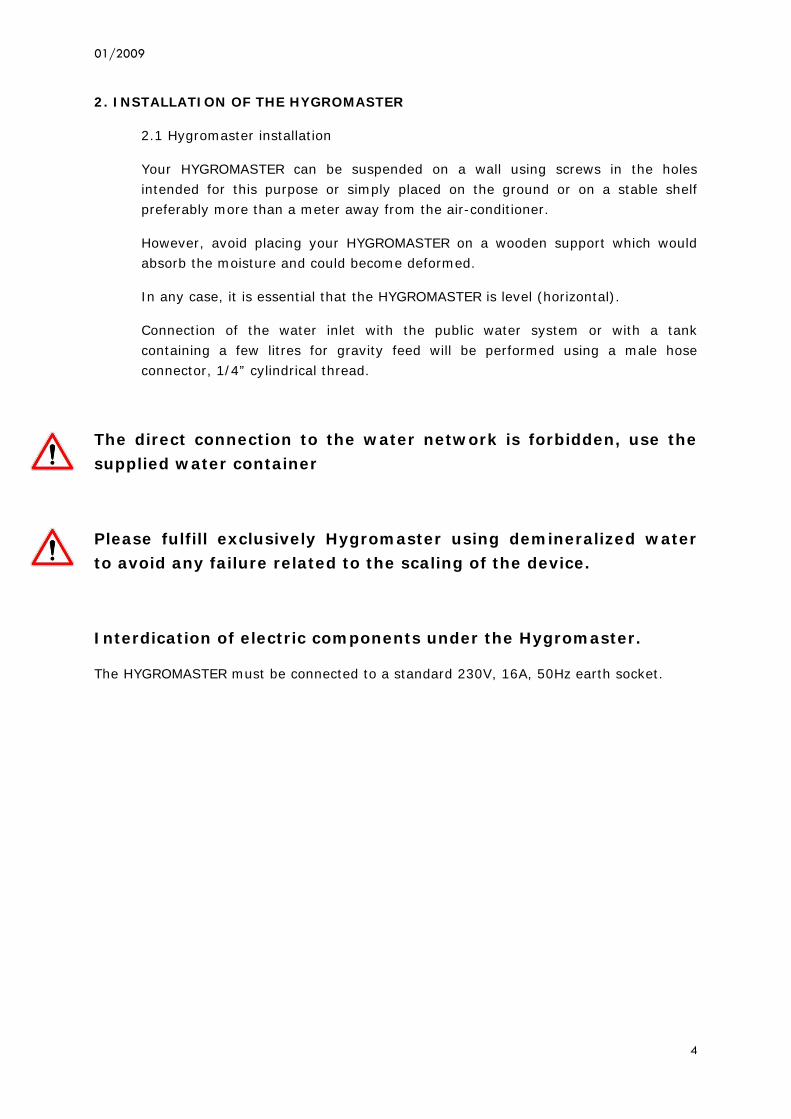
The direct connection to the water network is forbidden, use the
supplied water container
Please fulfill exclusively Hygromaster using demineralized water
to avoid any failure related to the scaling of the device.
Interdication of electric components under the Hygromaster.
The HYGROMASTER must be connected to a standard 230V, 16A, 50Hz earth socket.

01/2009
5
2.2 Public water system installation
The water tank kit is composed of :
1. A reservoir with a capacity of 20 liters.
2. A tap screw which is connected to a hose Ø 16 mm and a female coupling.
3. A hose Ø 8 mm length 3m connected to a quick buck.
4. A sleeve screw ¼ inch 5. A rubber gasket
1
2
3 4 et 5

01/2009
6
Slide the rubber seal on the thread 1 of 2 sleeve
Screw the sleeve and attached to the connector on the back of the device
as shown in the figure
Set the tank upright.
Loosen the large cap (Filling).
Fill the water reservoir at about ¾ of its capacity.
To avoid foaming do not use rainwater.
Turn the valve handle clockwise to close the flow of water.
Screw all tap, hose and female connector on the tank upright.
2 1

01/2009
7
Connection to the water tank of Hygromaster
1. Place the tank in horizontal position.
2. Connect the quick buck in the female connector.
3. Cut the hose Ø 8mm to the desired length and then connect it on the sleeve of
hygromaster.
4. Turn the tap handle to the left.
5. Loosen the small cap tank half a turn to create anair inlet.
Slide the rubber seal on the thread 1 of 2 sleeve
1 5
1 2 3

01/2009
8
3. STARTUP
Once the connections are made, place the switch on "0".
Close the lid and connect the water inlet.
Then power up.
Leave the lid closed when the switch is on position II.
Switch position II: humidification
HYGROMASTER fills up.
The lid must be kept closed during this phase.
Adjust the set-point to the required range (between 60% and 80%).
If necessary the HYGROMASTER will humidify the air.
Switch position I: Dehumidification
Switch position II: humidification
Switch position I: Dehumidification
Dehumidification accessory connection
Mains connection
Humidity set-point adjustment

01/2009
9
4. USE
In winter switch HYGROMASTER to the humidification position. (II)
Check and fill the water tank regularly.
In summer, stop humidification to prevent the disruption of refrigeration and the
excessive production of condensate
Optional: The dehumidification function is only necessary for underground cellars when
refrigeration is not active. Do not use it in the summer.
5. MAINTENANCE
Unplug your HYGROMASTER and if necessary clean the scale deposit by soaking using a
commercial product.
Attention with the risks of burns in particular on sheets around the vat
In case of questions, do not hesitate to contact your retailer or the Fondis Customer service: +33 (0)3 89 37 75 00 or [email protected]
6. PRESERVATION OF WINE
Its preservation and ageing require an environment that satisfies certain conditions.
More than temperature itself, it is the stability of the cellar temperature which is
important for the good preservation of wine.
The ideal temperature of a wine cellar is approximately 12 degrees. Above twenty-five
degrees, young white wines run the risk of a secondary fermentation. On the contrary,
for certain red wines, their ageing will be accelerated..
The central heating pipes, the proximity of a boiler, parasite air entries, refrigerators,
freezers, are the worst enemies of wine.
A good cellar must neither be too dry, nor too humid. The action of dry air is insidious: it
dries out the corks, causes significant evaporation of the wine through the corks and
makes the bottle leak. An excess of moisture will increase the development of moulds on
barrels and corks. The ideal level of hygrometry is between 60 % and 80%, it can rise to
90 % without damage to the wine. The cellar must be closed, without vibration. The
racks or shelves are insulated from any source of vibration, they rest on the ground
rather than fixed on a wall, more sensitive to vibrations. The ageing of wine occurs away
from light. The cellar must thus be dark and the duration of lighting limited. If these
conditions are satisfied, wine will keep for a long time. The cellar will provide good
maturation and optimum ageing. Wine is not as fragile as it is often believed, it must
primarily be protected from its main enemies: abrupt temperature variations, light.

01/2009
10
Problems and solutions
Problems Solutions
Hygrometry set-point not achieved - Insulation or tightness lack
- Lack of water
- make sure there are no drying factors (central
heating pipes, proximity of a boiler,
refrigerators, freezers, wine cooling cabinets...
which are also to proscribe in an air-conditioned
wine cellar)
overflow - Please fulfill exclusively Hygromaster using
demineralized water to avoid any failure
related to the scaling of the device
- The direct connection to the water network is
forbidden, use the supplied water container
7. WARRANTY
The warranty application is conditionned by the presentation of the invoice of purshace or
for lack of its copy.
The European Community attaching a great importance to the environment and the waste
processing, set up Directive 2002/96/CE relating to the Electric and Electronic Component
Waste.
In accordance with this standard, the presence of the logo "barred dustbin" is obligatory.
This logo means that this product cannot be to in no case thrown in the household
refuse.
It must be given to a suitable collection point for the treatment, valorization,
recycling of Electric and Electronic Components.
Acting like that you make a gesture for the environment and you contribute to the
safeguarding of the natural resources as well as to the protection of human health.

01/2009
1
Gebrauchsanweisung : W6934
Seriennummer
Hygromaster®

01/2009
2
Inhaltverzeichnis
1. DIE REGELUNG DER LUFTFEUCHTIGKEIT 3
2. INSTALLIEREN VON HYGROMASTER 4
2. Hygromaster Installation
2.2 Stadtwasserleitung installation
3. INBETRIEBNAHME 8
4. BENUTZUNG 9
5. WARTUNG 9
6. AUFBEWAHRUNG DES WEINS 9
7. GARANTIE 10

01/2009
3
Einzelheiten
Dimensionen 258x140x166
Gewicht 3 kg
Durchschnittliche Leistung zum Befeuchten 75 w
Spannung 230V-240V
Durchschnittliche Stromstärke zum
Befeuchten
0.63 A
Frequenz 50/60 Hz
Befeuchtungskapazität 18,2 g Wasser/Stunde zu 12° Grad
Länge des Stromzuführungskabels 1.5 M
1. DIE REGELUNG DER LUFTFEUCHTIGKEIT
Ihr Fondis-Kellerklimagerät regelt die Luftfeuchtigkeit auf natürliche Weise. Es wird eine
relative Luftfeuchtigkeit zwischen 65 % und 85 % aufrechterhalten. Der Überschuss läuft
in einer Überlaufleitung ab.
Die Luftfeuchtigkeit kann nicht vollständig auf einen gewählten Wert festgelegt werden,
da sie von der Luftfeuchtigkeit im Freien abhängt, die je nach Region, Jahreszeit oder
Wetter stark variiert.
Der HYGROMASTER ist besonders im Winter von großer Bedeutung, wenn die
Temperaturen niedrig liegen und die relative Luftfeuchtigkeit sehr niedrig ist.
In diesem Fall ist es nötig, mit Hilfe von HYGROMASTER zusätzliche Feuchtigkeit zu
produzieren. Da dieser Wasserdampf erzeugt, produziert er eine völlig saubere
Feuchtigkeit.
WICHTIG: die Regelung der Luftfeuchtigkeit und das gute Funktionieren des Klimageräts
erfordern:
- die komplette Isolation des Kellers (Wände, Boden, Decke, Tür) mit einem dichten
Isolierstoff.
- die tadellose Kontinuität der Isolierung (keine Lücken oder Wärmebrücken).
- keine andere Lüftung als die des Klimagerätes.
- Keine Wärmequellen (Kühlschrank, Heizung Rohr, ...).

01/2009
4
2. INSTALLIEREN VON HYGROMASTER
2.1 Hygromaster Installation
Ihr HYGROMASTER kann anhand von Schrauben in den dafür vorgesehenen
Löchern an der Wand aufgehängt, oder einfach auf den Boden, oder auf ein
stabiles Regal, möglichst mehr als ein Meter vom Klimagerät entfernt, gestellt
werden.
Vermeiden Sie es aber ihren HYGROMASTER auf eine Unterlage aus Holz zu
stellen, welche die Feuchtigkeit aufnehmen und sich verformen könnte.
Auf jedem Fall muss darauf geachtet werden, dass der HYGROMASTER sich in
ebener (horizontaler) Lage befindet.
Anschluss des Wassereintritts an die Stadtwasserleitung oder an ein Tank von
mehreren Litern, für eine Schwerkraft-Zufuhr, anhand eines flexiblen
Schlauchanschlusses mit einem zylindrischen 1/4“-Gewinde.
Das direkte Anschluss an die Wasserversorgung ist verboten,
benutzen Sie den verfügten Wassertank.
Bitte Hygromaster ausschließlich mit entmineralisiertes Wasser
einfüllen um eine Störung im Zusammenhang mit der Verkalkung
des Gerätes zu vermeiden.
Beachtung an elektrischer Ausstattungen unter dem Gerät.
Der HYGROMASTER muss an eine geerdete 230 V, 16 A, 50 Hz - Standardsteckdose
angeschlossen werden.

01/2009
5
2.2 Stadtwasserleitung installation
Das Wasserbehälter kit besteht auf :
1. Ein Tank mit einem Fassungsvermögen von 20 Litern.
2. Ein schraubbaren Hahn, auf dem Schlauch Ø 16 mm und eine weibliche
Schnellkupplung zu verbinden.
3. Ein Schlauch Ø 8 mm Länge 3m mit einem männlichen Schnellkupplungs .
4. Eine Hülse schraubbar ¼ .
5. Eine Gummidichtung
1
2
3 4 et 5
01/2009
6
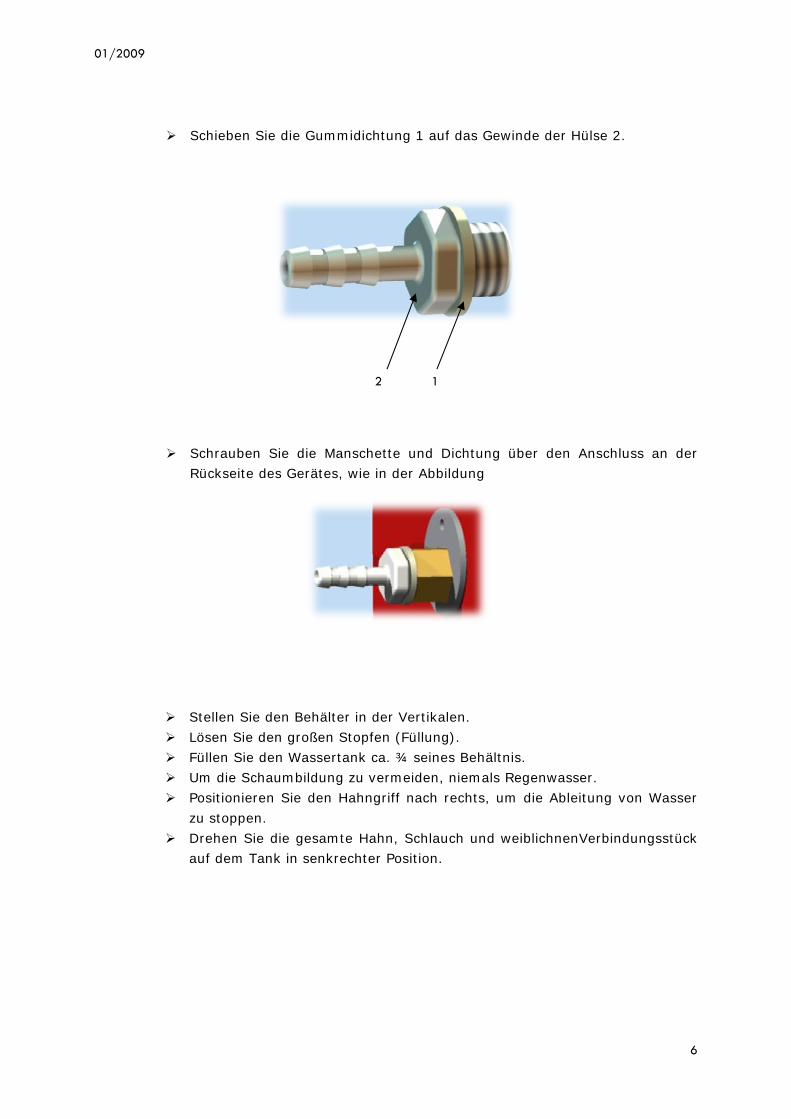
Schieben Sie die Gummidichtung 1 auf das Gewinde der Hülse 2.
Schrauben Sie die Manschette und Dichtung über den Anschluss an der
Rückseite des Gerätes, wie in der Abbildung
Stellen Sie den Behälter in der Vertikalen.
Lösen Sie den großen Stopfen (Füllung).
Füllen Sie den Wassertank ca. ¾ seines Behältnis.
Um die Schaumbildung zu vermeiden, niemals Regenwasser.
Positionieren Sie den Hahngriff nach rechts, um die Ableitung von Wasser
zu stoppen.
Drehen Sie die gesamte Hahn, Schlauch und weiblichnenVerbindungsstück
auf dem Tank in senkrechter Position.
2 1

01/2009
7
Verbindung an dem Wassertank des Hygromaster
1. Positionieren Sie den Tank in Horizontale Position,
2. Schließen Sie die mähnliche Schnellkupplung in dem weiblichen Anschluss, 3.
Schneiden Sie den Schlauch Ø 8mm in der gewünschten Länge und verbinden Sie es auf
die Hülse des hygromaster.
4. Drehen Sie den Hahngriff auf der linken Seite.
5. Lösen Sie die kleinen Tankdeckel um eine halbe Drehung, um eine Luftanlass zu
erlauben.
Schieben Sie die Gummidichtung 1 auf das Gewinde der Hülse
1 5
1 2 3
01/2009
8
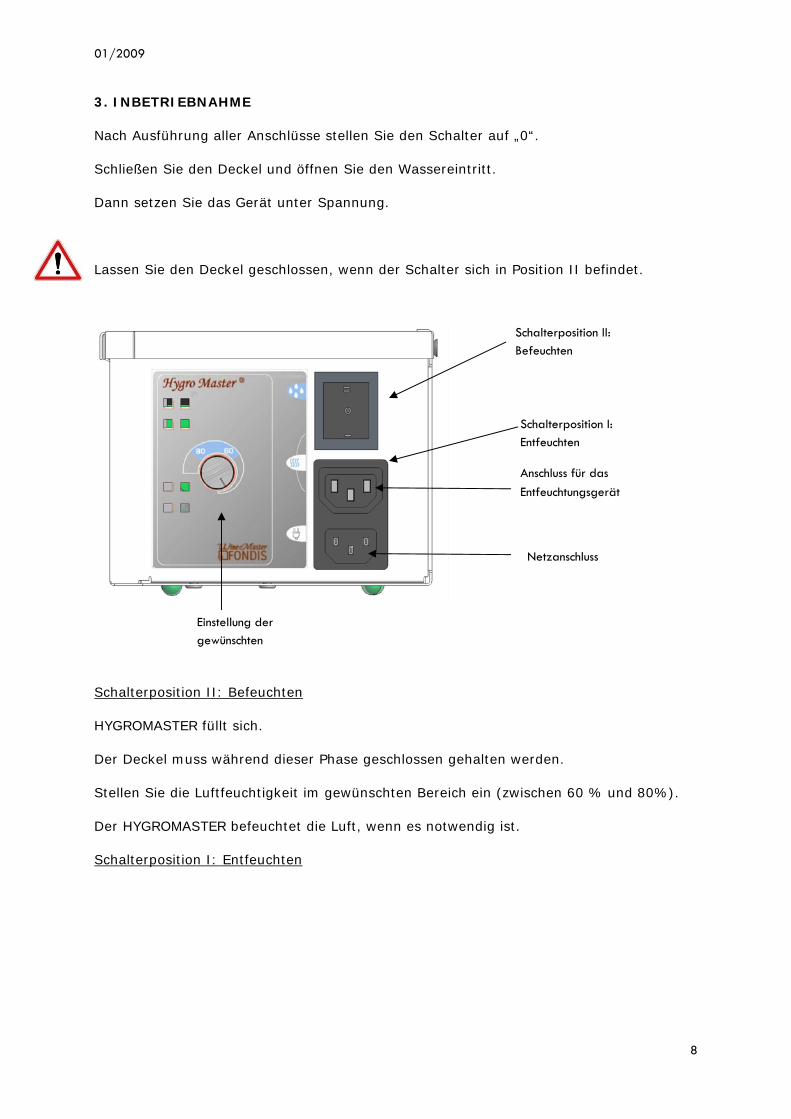
3. INBETRIEBNAHME
Nach Ausführung aller Anschlüsse stellen Sie den Schalter auf „0“.
Schließen Sie den Deckel und öffnen Sie den Wassereintritt.
Dann setzen Sie das Gerät unter Spannung.
Lassen Sie den Deckel geschlossen, wenn der Schalter sich in Position II befindet.
Schalterposition II: Befeuchten
HYGROMASTER füllt sich.
Der Deckel muss während dieser Phase geschlossen gehalten werden.
Stellen Sie die Luftfeuchtigkeit im gewünschten Bereich ein (zwischen 60 % und 80%).
Der HYGROMASTER befeuchtet die Luft, wenn es notwendig ist.
Schalterposition I: Entfeuchten
Schalterposition II: Befeuchten
Schalterposition I: Entfeuchten
Anschluss für das Entfeuchtungsgerät
Netzanschluss
Einstellung der gewünschten
01/2009
9
4. BENUTZUNG
Stellen Sie den HYGROMASTER im Winter auf Position Befeuchten. (II)
Überprüfen Sie das Wasser Niveau und nachfüllen regelmässig
Im Sommer stellen Sie die Befeuchtung ab, um die Produktion von Kälte nicht zu
behindern und keine überschüssige Menge von Kondensat zu erzeugen.
Wahlweise: Die Funktion Entfeuchten ist nur in eingegrabenen Kellern erforderlich, wenn
die Kälteproduktion nicht aktiv ist. Nicht im Sommer benutzen.
5. WARTUNG
Schalten Sie Ihren HYGROMASTER ab und entfernen Sie, wenn erforderlich, den
Kesselstein mit einem handelsüblichen Produkt durch Einweichen.
Beachtung an den Verbrennungsrisiken insbesondere auf dem Schornstein und den Blechen um den Behälter
Bei weiteren Fragen gibt Ihnen Ihr Händler oder Ihr Fondis-Kundendienst: +33
(0)3 89 37 75 00 oder [email protected] gerne Auskunft.
6. AUFBEWAHRUNG DES WEINS
Seine Aufbewahrung und sein Reifen erfordern eine Umgebung, die bestimmten
Bedingungen entspricht.
Für die richtige Aufbewahrung des Weins ist die Temperaturstabilität des Kellers wichtiger
als die Temperatur selbst.
Die ideale Temperatur eines Weinkellers liegt etwa bei 12 Grad. Oberhalb von
fünfundzwanzig Grad besteht bei jungen Weißweinen die Gefahr einer Zweitfermentation.
Bei bestimmten Rotweinen wird im Gegenteil das Reifen beschleunigt..
Die Zentralheizungsleitungen, die Nähe eines Heizkessels, der Eintritt von Nebenluft, die
Kühl- und Gefrierschränke sind ausgemachte Feinde des Weins.
Ein guter Keller darf weder zu trocken noch zu feucht sein. Die Aktion trockener Luft ist
heimtückisch: sie trocknet die Korken und verursacht eine starke Verdunstung des
Weines durch die Korken und lässt die Flasche „auslaufen“. Ein Feuchtigkeitsüberschuss
begünstigt die Entwicklung von Schimmel auf Fässern und Korken Die ideale Hygrometrie
liegt zwischen 60 % und 80 %, sie kann ohne Schaden für den Wein bis auf 90 %
ansteigen. Der Keller muss geschlossen und frei von Vibrationen sein. Die Regale werden
von jeglicher Vibrationsquelle isoliert, vorzugsweise stehen sie auf dem Boden und sind
nicht an Wänden befestigt, die empfindlicher für Vibrationen sind. Das Reifen des Weines
geschieht unter Lichtabschluss. Der Keller muss also dunkel und die Beleuchtungsdauer

01/2009
10
beschränkt sein. Wenn diese Bedingungen erfüllt werden, kann der Wein lange
aufbewahrt werden. Der Keller erlaubt ihm eine gute Reifung und eine optimale Alterung.
Der Wein ist nicht so empfindlich wie man es oft glaubt, er muss in erster Linie gegen
seine Hauptfeinde geschützt werden: Plötzliche Temperaturschwankungen, Licht.
Probleme und Lösungen
Probleme Lösungen
Eingestellte Hygrometrie nicht erreicht - Isolationsmangel und / oder Dichtung
- Wassermangel
- überprüfen, ob keine wasserentziehenden
Faktoren bestehen (Zentralheizungsleitungen,
Nähe eines Heizkessels, Kühlschränke,
Gefrierschränke, Weinschränke..., die in einem
klimatisierten Keller ebenfalls zu vermeiden
sind)
Ûberlauf - Bitte Hygromaster ausschließlich mit
entmineralisiertes Wasser einfüllen um eine
Störung im Zusammenhang mit der
Verkalkung des Gerätes zu vermeiden
- Das direkte Anschluss an die
Wasserversorgung ist verboten, benutzen Sie
den verfügten Wassertank.
7. GARANTIE
Die Anwendung der Garantie gilt unter der Bedigung dass, die Kaufrechnung oder bei
Mangel an ihre Kopie, vorliegt.
Die Europäische Gemeinschaft, die der Umwelt und der Behandlung der Abfälle eine große
Bedeutung beimißt, hat die Richtlinie 2002/96/EG über die elektrischen und elektronischen
Ausstattungsabfälle geschaffen.
Gemäß dieser Norm ist die Anwesenheit des Logos "gesperrter Mülleimer" zwingend.
Dieses Logo bedeutet, daß dieses Produkt auf keinem Fall mit dem Haushaltsmüll
geworfen werden kann.
Es muß auf einen angemessenen Sammlungspunkt für die Behandlung, die
Aufwertung, die Wiederaufarbeitung der elektrischen und elektronischen
Ausstattungsabfälle vorgelegt werden.
Durch diese Aktion machen Sie eine Geste für die Umwelt, und Sie tragen zur
Erhaltung der Naturschätze sowie zum menschlichen Gesundheitsschutz bei.

01/2009
1
Libretto d'istruzioni : W6934
Numero di serie
Hygromaster®

01/2009
2
Sommario
1. LA REGOLAZIONE DELL' IGROMETRIA 3
2. INSTALLAZIONE DI HYGROMASTER 4
2. Montaggio dell'hygromaster
2.2 Die alcuini litri montaggio
3. MESSA IN SERVIZIO 8
4. UTILIZZO 9
5. MANUTENZIONE 9
6. CONSERVAZIONE DEL VINO 9
7. GARANZIA 10

01/2009
3
Caratteristiche
Dimensioni 258x140x166
Peso 3 kg
Potenza media per umidificazione 75 w
Tensione 230V-240V
Intensità Media per Umidificazione 0.63 A
Frequenza 50/60 Hz
Capacità di umidificazione 18,2 g d'acqua/ora a 12°C
Lunghezza del cavo di alimentazione 1.5 M
1. LA REGOLAZIONE DELL' IGROMETRIA
Il vostro climatizzatore per cantina Fondis regola naturalmente l'igrometria. Questa
viene quindi mantenuta tra il 65 e l'85 % di umidità relativa. L'eccesso defluisce verso
un troppopieno di evacuazione.
L'igrometria non può essere totalmente stabilizzata con un valore definito, poiché
dipende dall'igrometria esterna che varia notevolmente a seconda delle regioni, delle
stagioni, del tempo.
HYGROMASTER acquisterà un'importanza notevole in inverno quando le temperature
saranno basse e e l'igrometria relativa sarà molto bassa.
In questo caso, sarà necessario fornire dell'umidità supplementare grazie a
HYGROMASTER. Trattandosi di un generatore di vapore, quest'ultimo produrrà un'umidità
totalmente pulita.
IMPORTANTE: la regolazione dell'igrometria ed il buon funzionamento del climatizzatore
necessitano:
- l'isolamento integrale della cantina (muri, suolo, soffitto, porta) con un isolante
impermeabile.
- la perfetta continuità dell'isolamento (nessun interstizio, né ponti termici).
- nessuna ventilazione altra rispetto a quella del climatizzatore.
- Assenza di fonte di calore (refrigeratore, tubo riscaldamento, …)..

01/2009
4
2. INSTALLAZIONE DI HYGROMASTER
2.1 Montaggio dell'hygromaster
Il vostro HYGROMASTER può essere appenso al muro per mezzo di viti negi
appositi fori, o semplicemente appoggiato al suolo o su uno scaffale stabile, di
preferenza ad una distanza di più di un metro dal climatizzatore.
Evitare comunque di posare il vostro HYGROMASTER su un supporto in legno che
assorbirebbe l'umidità e potrebbe deformarsi.
In ogni caso, bisogna assicurarsi che HYGROMASTER sia a livello (orizzontale).
Connessione obbligatoria ad un serbatoio di alcuni litri per un'alimentazione per
gravità,
Il raccordo diretto alla rete di distribuzione d'acqua è vietato,
quindi è necessario utilizzare il serbatoio in dotazione,
Bisogna utilizzare esclusivamente acqua demineralizzata per
evitare qualsiasi guasto dovuto all'incrostazione
dell'Hygromaster,.
E' vietato collocare delle apparecchiature elettriche sotto
l'apparecchio.
HYGROMASTER deve essere collegato ad una presa standard con messa a terra
230V,16A, 50Hz.
01/2009
5
2.2 Die alcuini litri montaggio
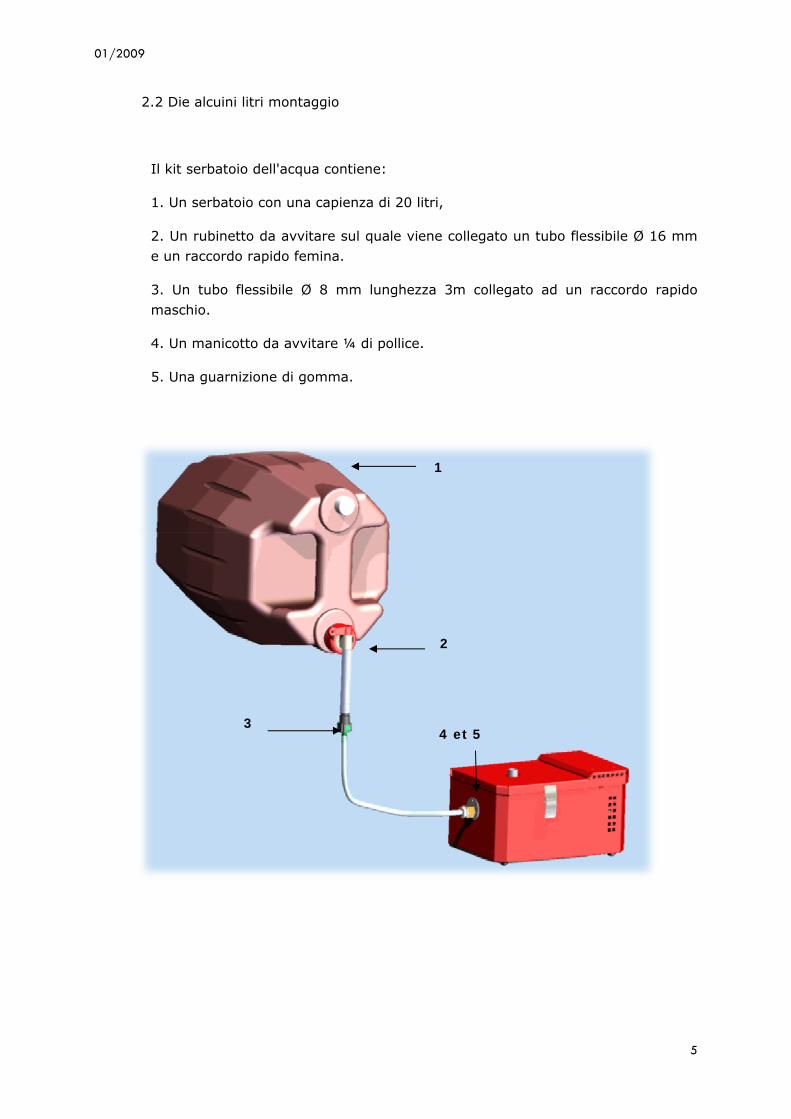
Il kit serbatoio dell'acqua contiene:
1. Un serbatoio con una capienza di 20 litri,
2. Un rubinetto da avvitare sul quale viene collegato un tubo flessibile Ø 16 mm
e un raccordo rapido femina.
3. Un tubo flessibile Ø 8 mm lunghezza 3m collegato ad un raccordo rapido
maschio.
4. Un manicotto da avvitare ¼ di pollice.
5. Una guarnizione di gomma.
1
2
3 4 et 5

01/2009
6
Applicare la guarnizione di gomma 1 sulla filetto del manicotto 2.
Avvitare il manicotto con la sua guarnizione sul raccordo situato dietro
l'apparecchio come indicato sul disegno.
Posizionare il serbatoio verticalmente (Riempimento),
Svitare il grande tappo.
Riempire il serbatoio d'acqua ai ¾ circa della sua capienza.
Per evitare la formazione di schiuma, non utilizzate mai acqua di pioggia.
Girare la manopola del rubinetto verso destra per chiudere l'acqua.
Avvitare rubinetto, tubo flessibile e raccordo femina insieme sul serbatoio
in posizione verticale.
2 1

01/2009
7
Del serbatio d'acqua all'Hygromaster Collegamento
1. Posizionare il serbatoio orizzontalmente.
2. Collegare il raccordo rapido maschio col raccordo femina.
3. Tagliare il tubo flessibile Ø 8mm alla lunghezza desiderata e collegarlo al manicotto
dell'hygromaster.
4. Girare la manopola del rubinetto verso sinistra.
5. Svitare il piccolo tappo del serbatoio di 1/4 di giro per creare un passaggio d'aria,
Manopola verso destra: posizione chiuso
1 5
1 2 3
01/2009
8
3. MESSA IN SERVIZIO
Una volta che le connessioni sono state fatte, mettere l'interruttore su “0”.
Chiudere il coperchio e collegare l'arrivo dell'acqua.
Quindi mettere sotto tensione
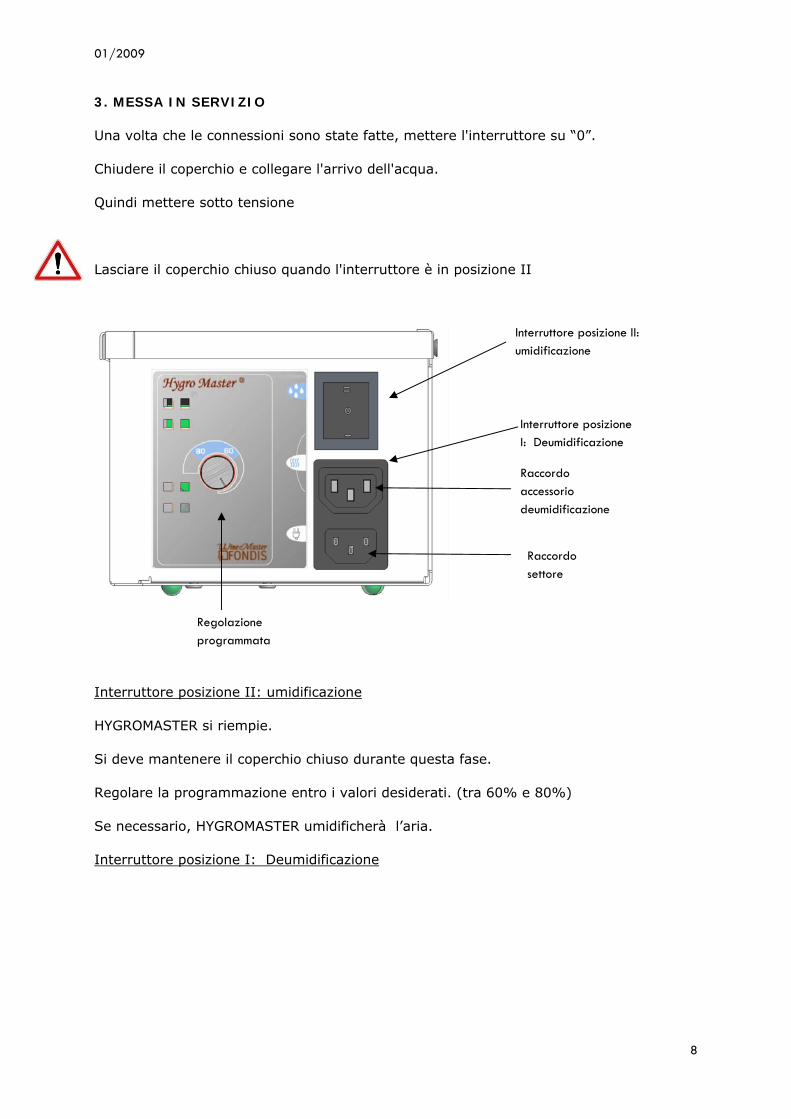
Lasciare il coperchio chiuso quando l'interruttore è in posizione II
Interruttore posizione II: umidificazione
HYGROMASTER si riempie.
Si deve mantenere il coperchio chiuso durante questa fase.
Regolare la programmazione entro i valori desiderati. (tra 60% e 80%)
Se necessario, HYGROMASTER umidificherà l’aria.
Interruttore posizione I: Deumidificazione
Interruttore posizione II: umidificazione
Interruttore posizione I: Deumidificazione
Raccordo accessorio deumidificazione
Raccordo settore
Regolazione programmata

01/2009
9
4. UTILIZZO
In inverno collocare HYGROMASTER in posizione umifidicazione. (II)
Si prega verificare e completare regolarmente il livello d'acqua del serbatoio,
In estate, arrestare l'umidificazione per non perturbare la produzione di freddo e
generare una quantità eccessiva di acqua di condensa.
In opzione: La funzione deumidificazione è necessaria solo per le cantine interrate
quando la produzione di freddo è inattiva. Non utilizzare in estate
5. MANUTENZIONE
Scollegare il vostro HYGROMASTER e pulire le incrostazioni se necessario, con un
prodotto in commercio, mediante ammollo.
Attenzione ai rischi di bruciature in particolar modo sul camino e le lastre intorno al contenitore.
Per qualsiasi domanda contattare subito il vostro rivenditore o il servizio
clienti, Fondis: +33 (0)3 89 37 75 00 ou +33 (0)3 89 37 75 19
6. CONSERVAZIONE DEL VINO
La sua conservazione ed il suo invecchiamento necessitano di un ambiente che risponde
a determinate condizioni
Più che la temperatura stessa, è la stabilità della temperatura della cantina che è
importante per una buona conservazione del vino.
La temperatura ideale di una cantina dei i vini è di 12 gradi circa. Al di sopra di
venticinque gradi, i vini bianchi giovani rischiano una fermentazione secondaria. Al
contrario, per certi vini rossi l'invecchiamento verrà accelerato..
I tubi del riscaldamento centralizzato, la vicinanza di una caldaia, gli ingressi d'aria
parassita, i frigoriferi, i congelatori sono i grandi nemici del vino.
Una buona cantina non deve essere né troppo secca né troppo umida. L'azione di un'aria
secca è insidiosa: questa infatti dissecca i tappi e provoca una massiccia evaporazione
del vino attraverso i tappi e rende la bottiglia "colosa". Un eccesso di umidità favorirà lo
sviluppo di muffe sui fusti e sui tappi. L'igrometria ideale si colloca tra il 60 % e l'80%,
può salire senza danni per il vino fino al 90%. La cantina deve essere chiusa, senza
vibrazioni. Gli scaffali o le mensole sono isolati da qualsiasi fonte di vibrazione, riposano
sul suolo piuttosto che fissati su una parete, più sensibile alle vibrazioni.
L’invecchiamento del vino viene fatto al riparo dalla luce. La cantina deve quindi essere
buia e la durata di illuminazione limitata. Una volta soddisfatti questi requisiti, il vino si
01/2009
10
conserverà a lungo. La cantina lo farà giungere ad una buona maturazione e ad un
invecchiamento ottimale. Il vino non è poi così fragile come si crede, deve essere
essenzialmente protetto dai suoi principali nemici: i bruschi sbalzi di temperatura, la
luce.
Problemi e soluzioni
Problemi soluzioni
Igrometria programmata non raggiunta - Diffetto di isolamento o di ermeticità
- Carenza d'acqua
- verificare che non siano presenti dei fattori
diseccanti (tubi del riscaldamento
centralizzato, vicinanza di una caldaia,
frigoriferi, congelatori, armadi per vino… che
sono anche da proscrivere in una cantina
climatizzata)
fuoriuscita - Bisogna utilizzare esclusivamente acqua
demineralizzata per evitare qualsiasi guasto
dovuto all'incrostazione dell'Hygromaster,
- Il raccordo diretto alla rete di distribuzione
d'acqua è vietato, quindi è necessario utilizzare
il serbatoio in dotazione,
7. GARANZIA
L'applicazione della garanzia è condizionata dalla presentazione della fattura d'acquisto o
a difetto di una copia di questa.
La Comunità Europea, accordando grande importanza all’ambiente e al trattamento dei rifiuti,
ha stabilito la Direttiva 2002/96/CE relativa ai Rifiuti di Equipaggiamenti Elettrici ed Elettronici
(DEEE).
In conformità con questa norma, la presenza del simbolo ″cestino barrato ″ è obbligatoria.
Tale simbolo significa che questo prodotto non può essere, in nessun caso, buttato
nei rifiuti domestici.
Deve essere consegnato in un punto di raccolta appropriato per il trattamento, la
valorizzazione, il riciclo dei rifiuti di Equipaggiamenti Elettrici ed Elettronici.
Compiendo quest'azione fate un gesto per l'ambiente e contribuite alla salvaguardia
delle risorse naturali e alla tutela della salute umana.


![A/ Charges résistives - jltimin.free.frjltimin.free.fr/greta_2013_2014/cours2_CMat.pdf · [corrigé] Symbole ... Monophasé : P 1 = U * I ... Transformateur 230v/24v, 40kVA Disjoncteur](https://static.fdocuments.fr/doc/165x107/5b99affb09d3f2dc2b8c3a3a/a-charges-resistives-corrige-symbole-monophase-p-1-u-i-.jpg)