Le Catalogue N°40
99
Le Catalogue Découvrez nos Offres Garanties Midi-Pyrénées / Automne 2015 LE CATALOGUE N°40 / MIDI-PYRÉNÉES / AUTOMNE 2015
-
Upload
lajoly-edition -
Category
Documents
-
view
234 -
download
2
description
La Bourse de L'iImmobilier vous présente son nouveau Catalogue d'Automne 2015 de votre région Midi-Pyrénées. Le Catalogue répertorie toutes nos Offres Garanties. Retrouvez gratuitement tous les trimestres notre magazine immobilier dans l'une de nos agences.
Transcript of Le Catalogue N°40

Le CatalogueDécouvrez nos Offres Garanties
Midi-Pyrénées / Automne 2015
LE C
ATA
LOG
UE
N°4
0 /
MID
I-P
YR
ÉN
ÉE
S /
AU
TO
MN
E 2
015

Avec plus de 300 agences en France et plus de 1000 collaborateurs, nous célébrons cette année nos 35 ans.
Devenue le premier réseau indépendant français d’agences immobilières, l’entreprise familiale est restée fidèle à ses valeurs depuis 1980 : la transparence, l’éthique et la satisfaction client.
C’est toujours avec la même passion pour l’immobilier que, jour après jour, les équipes de la Bourse de l’Immobilier cultivent et véhiculent un savoir-faire riche de trente-cinq ans d’expérience.
Aujourd’hui encore, notre succès repose sur la confiance que vous nous accordez dans la réalisation de vos projets immobiliers, et nous vous en remercions.
UNE HISTOIRE UN SAVOIR-FAIRE
UNE IDENTITÉ
1ère agence Bourse de l’Immobilier à Libourne, 1980
Agence de Gimont (32)
1994LA CRÉATION DU CATALOGUEAvec une volonté intacte, l’entreprise poursuit son développement et met en place des outils radicalement novateurs : en 1994 sort le premier Catalogue de la Bourse de l’Immobilier, une première en France.
2012LA CRÉATION DU MANDAT PRO ET DES OFFRES GARANTIESEn 2012, Eddy Salah confie la direction générale à son fils Benjamin. La Bourse de l’Immobilier poursuit alors intensément sa politique d’innovation : c’est la création du Mandat PRO et des Offres Garanties, produits uniques sur le marché des agences immobilières.
Eddy Salah, Fondateur
et Président
Benjamin Salah, Directeur Général
ans
2 www.bourse-immobilier.fr
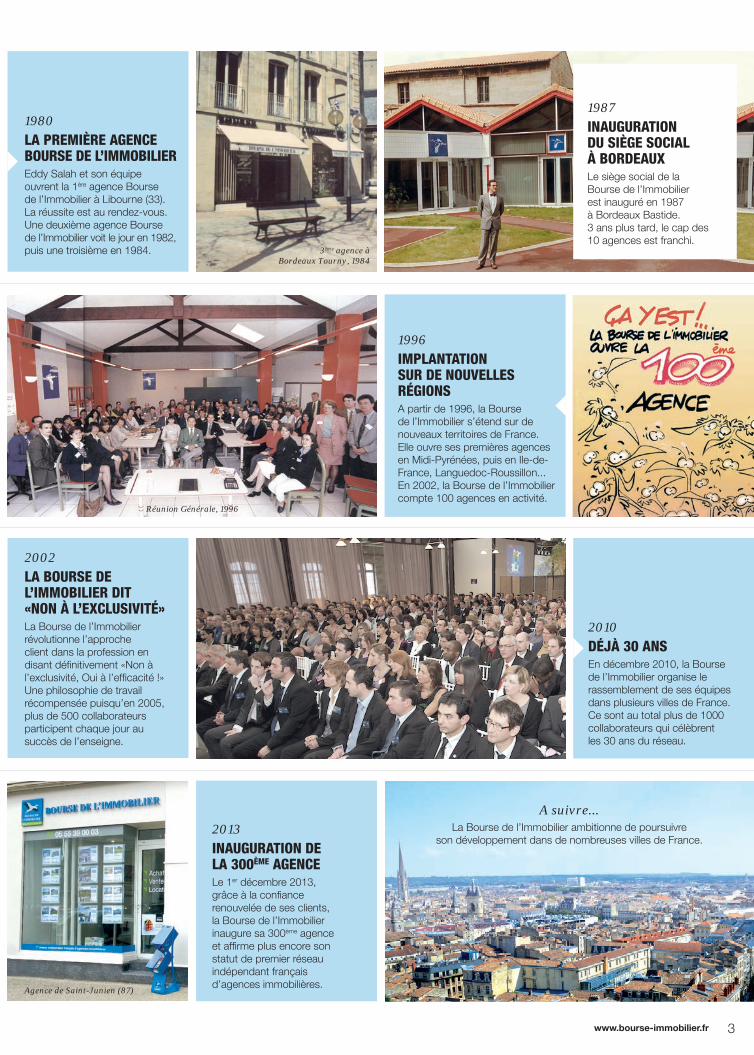
1980LA PREMIÈRE AGENCE BOURSE DE L’IMMOBILIEREddy Salah et son équipe ouvrent la 1ère agence Bourse de l’Immobilier à Libourne (33). La réussite est au rendez-vous. Une deuxième agence Bourse de l’Immobilier voit le jour en 1982, puis une troisième en 1984. 3ème agence à
Bordeaux Tourny, 1984
Réunion Générale, 1996
Agence de Saint-Junien (87)
1996IMPLANTATION SUR DE NOUVELLES RÉGIONSA partir de 1996, la Bourse de l’Immobilier s’étend sur de nouveaux territoires de France. Elle ouvre ses premières agences en Midi-Pyrénées, puis en Ile-de-France, Languedoc-Roussillon...En 2002, la Bourse de l’Immobilier compte 100 agences en activité.
2002LA BOURSE DE L’IMMOBILIER DIT «NON À L’EXCLUSIVITÉ»La Bourse de l’Immobilier révolutionne l’approche client dans la profession en disant définitivement «Non à l’exclusivité, Oui à l’efficacité !» Une philosophie de travail récompensée puisqu’en 2005, plus de 500 collaborateurs participent chaque jour au succès de l’enseigne.
2013INAUGURATION DE LA 300ÈME AGENCELe 1er décembre 2013, grâce à la confiance renouvelée de ses clients, la Bourse de l’Immobilier inaugure sa 300ème agence et affirme plus encore son statut de premier réseau indépendant français d’agences immobilières.
2010DÉJÀ 30 ANSEn décembre 2010, la Bourse de l’Immobilier organise le rassemblement de ses équipes dans plusieurs villes de France. Ce sont au total plus de 1000 collaborateurs qui célèbrent les 30 ans du réseau.
1987INAUGURATION DU SIÈGE SOCIAL À BORDEAUXLe siège social de la Bourse de l’Immobilier est inauguré en 1987 à Bordeaux Bastide.3 ans plus tard, le cap des 10 agences est franchi.
A suivre...La Bourse de l’Immobilier ambitionne de poursuivre
son développement dans de nombreuses villes de France.
www.bourse-immobilier.fr 3

4 www.bourse-immobilier.fr
Le 1er réseau indépendant français d’agences immobilières au service de tous vos projets immobiliers.
p.8 p.10 p.12
p.16
VENDEURS ACQUÉREURS
NEUF
LE NEUF
LE MANDAT PRO LES OFFRES GARANTIES
LA RECHERCHE INTELLIGENTE
Achetez en toute sérénité. Notre site web et notre application mobile.
La solution pour vendre.
Tous nos programmes neufs à prix promoteurs.
SOMMAIRE

81
09
31
82
46
5www.bourse-immobilier.fr
Haute-Garonnep.28 Toulousep.33 Périphérie de Toulousep.42 Nord de Toulousep.46 Sud Toulousain, Cazères, St-Gaudensp.51 Castelnaudary et le Lauragais
Tarn p.54 Castres, Lavaur et leurs environs
Tarn-et-Garonnep.56 Montauban et ses environsp.60 Castelsarrasin, Moissac et leur environs
Lot p.67 Figeac et les Causses du Quercy p.73 Cahors, Gourdon et leurs environs p.81 Vallée de la Dordogne
Ariègep.91 Pamiers, Foix et leurs environs
p.98 Nos agencesp.99 Nos partenaires
ANNUAIRES
p.14 p.15
p.22
PARTENAIRES
RECRUTEMENT
GESTION LOCATIVEFINANCEMENT
TRAVAILLERAVEC NOUS
Les services de notre partenaire J’emprunte Moins Cher.
Les services de notre partenaire Intégral Immobilier.
Nos métiers.
A Vendre
OffresGaranties
Dans vos départements
p.95 Les Offres Garanties
TERRAINS A BATIRNOUVEAU

Chers lecteurs, chers clients,
En 2015, la Bourse de l’Immobilier a l’immense privilège de souffler les bougies de son 35e anniversaire. Notre vocation est restée intacte, celle de vous apporter écoute, professionnalisme et expertise, tout en privilégiant ce qui demeure inévitablement au cœur de notre profession : les rapports humains.
Nous avons fait le choix de réserver ce tout nouveau Catalogue aux Offres Garanties, biens à la vente pour lesquels les propriétaires vendeurs ont décidé de nous donner la priorité. La confiance qu’ils nous ont accordée nous permet de vous offrir des garanties complémentaires fondamentales pour une acquisition réussie (le Prix, le Financement, la Revente).
Pour faciliter encore votre recherche, nous sommes heureux de vous annoncer que nous venons de sortir une toute nouvelle version de notre site web (www.bourse-immobilier.fr). Vous y découvrirez un moteur de recherche des plus performants, ainsi que de nouvelles informations précieuses sur les biens qui vous intéressent et leur environnement.
Trouvez votre « coup de cœur », nous serons ravis de pouvoir vous y conduire. Merci infiniment pour votre confiance et votre fidélité.
Un catalogue flambant neuf pour nos 35 ans
édito
6 www.bourse-immobilier.fr
Benjamin SALAH Directeur Général
Eddy SALAH Président
Bourse de l’Immobilier - Catalogue N°40 Midi-Pyrénées - Automne 2015, édité par la Bourse de l’Immobilier, SAS au capital de 600 000 €, dont le siège social est situé 28 avenue Thiers à Bordeaux (33100). CODE APE : 6831Z. RCS BORDEAUX : B 414 854 216. SIRET : 41485421600010. N°TVA intra-communautaire : FR 86414854216. Carte Professionnelle Transaction sur Immeubles et Fonds de Commerce N°33063.1597 délivrée par la Préfecture de Gironde. Garantie financière « GALIAN » n°22278Q, dont le siège social est situé 89 rue de la Boétie à Paris (75008), pour un montant de 8 000 000 € (Transaction) et 760 000 € (Gestion). Réalisation du catalogue : Benjamin Salah, Stéphanie de Lafargue, Léa Villejoubert, Nathalie Coindet, Mariya Derrazi, Vinciane Tkaczuk, Erwan Chedaleux, Sonia Leprince. Achevé d’imprimer le 06/09/2015. Imprimerie : Groupe EasyPrint, 39 rue Santos Dumont 75015 Paris France. Document non contractuel. La responsabilité de la société ne saurait être mise en cause pour les erreurs ou omissions contenues dans ce catalogue. La reproduction totale ou partielle de cette parution est interdite sauf autorisation expresse de l’éditeur.J’emprunte Moins Cher : Courtier indépendant en prêts immobiliers, rachat de crédits et assurance de prêt - SAS au capital de 146 380 € - Siège social : 28 avenue Thiers à Bordeaux (33100). CODE APE : 7022Z - RCS BORDEAUX : B 490 077 864 - SIRET : 490 077 864 000 59 - N°TVA intra-communautaire : FR 45 490 077 864 000 59 - N° ORIAS : 09 050 758 - RCP : V15TAA09PNPM. Code de la consommation, Art.L321-2 : «Aucun versement, de quelque nature que ce soit, ne peut être exigé d’un particulier, avant l’obtention d’un ou plusieurs prêts d’argent.» Intégral Immobilier : SAS au capital de 24.000 € - Siège social : 28 avenue Thiers, 33100 Bordeaux - Tél : 05 57 81 98 20 - RCS Bordeaux B 397 962 796. SIRET 39796279600025 - N° TVA intra-communautaire FR 81397962796 - Carte professionnelle N°33063-1338 gestion et transaction sur immeubles et fonds de commerce délivrée par la Préfecture de Gironde - Garantie financière Galian : 89 rue de la Boétie, 75008 Paris N°19850 B Gestion : 2 000 000 € Transaction : 120 000 €. Responsabilité civile Covea Risk N°de police 40 419 380. Bourse de l’Immobilier Neuf : SAS au capital de 100 000 €. Siège social : 28 avenue Thiers à Bordeaux (33100) - CODE APE : 6831Z - RCS BORDEAUX : B 794 379 156 - SIRET : 794 379 156 000 19 - TVA intracommunautaire : FR61794379156 - Carte professionnelle Transaction sur Immeubles et Fonds de Commerce N°33063-3405 délivrée par la Préfecture de la Gironde. Non-détention de fonds. Absence de garantie financière.
immonews
www.bourse-immobilier.fr 7
LA REPRISE DU MARCHÉ SE CONFIRME
Dopé par des taux d’intérêt excessivement attractifs et des prix légèrement orientés à la baisse depuis 3 ans, le marché de l’immobilier a repris des couleurs au premier semestre 2015.
Au niveau national, la Bourse de l’Immobilier enregistre une augmentation du nombre de transactions supérieure à 20% sur cette période, en comparaison avec le premier semestre 2014.
VERS UNE REMONTÉE DES TAUX ?
Anticipée en juin par l’Observatoire du Crédit Logement, la hausse des taux d’intérêt accordés aux particuliers par les banques se confirme depuis le début de l’été. Il s’agit de la première remontée depuis 2013, après plusieurs mois de baisse et des niveaux de taux historiquement bas. En juillet 2015, le taux moyen s’élevait à 2,06%, contre 2,01% en juin selon une étude du Crédit Logement/CSA. Bien que la tendance soit toujours à la hausse pour la rentrée, la remontée des taux devrait rester lente et modérée. Pour l’heure, le niveau des taux d’intérêt reste historiquement bas et extrêmement avantageux dans le cadre d’une acquisition immobilière.
Notre partenaire J’emprunte Moins Cher vous accompagne et réalise gratuitement votre simulation de financement.
ACHAT IMMOBILIER : 10 JOURS POUR CHANGER D’AVIS
Depuis le 8 août 2015 et l’entrée en vigueur de la loi Macron, le délai de rétractation après la signature d’un compromis passe de 7 à 10 jours. 10 jours pendant lesquels il vous est possible d’annuler la transaction sans justification ni conséquence.
LOCATION MEUBLÉE : LES ÉQUIPEMENTS OBLIGATOIRES
Un décret vient d’être publié par le ministère du logement pour préciser la liste des équipements obligatoires que doit présenter un logement loué “meublé” : literie avec couette ou couverture, dispositif d’occultation des fenêtres dans les pièces destinées à être utilisées comme chambre à coucher, plaques de cuisson, four ou four micro-ondes, réfrigérateur avec au minimum un freezer, vaisselle et ustensiles de cuisine, table et sièges, étagères de rangement, luminaires et matériel d’entretien ménager adapté au logement. Tous ces équipements doivent être en état de marche au moment où le locataire s’installe dans le logement. Cette mesure ne s’applique qu’aux nouveaux baux, à compter du 5 septembre 2015.
TENDANCE
LOCATION
TRANSACTION
FINANCEMENT
La Bourse de l’Immobilier vous informe.
NEUF
LA LOI PINEL DANS LE NEUF
La loi Pinel, en vigueur depuis le 1er septembre 2014, vous offre des avantages fiscaux conséquents si vous êtes investisseurs acquéreurs d’un logement neuf (construit aux normes BBC et localisé dans une zone éligible). Le taux de votre réduction d’impôt varie selon la durée de location : 12%, 18% et 21% pour respectivement 6, 9 et 12 ans de location. Ainsi, vous pouvez économiser jusqu’à 63 000 € d’impôts pour un investissement de 300 000 €.La loi Pinel ouvre aussi la possibilité de louer le bien acquis à vos enfants ou parents.
Experte aussi dans le neuf, la Bourse de l’Immobilier vous fait profiter des avantages de la loi Pinel. Découvrez tous nos programmes neufs à prix promoteurs :www.bourse-immobilier-neuf.fr

www.bourse-immobilier.fr
Le Mandat PRO.
Depuis sa création en 2012, plus de 30 000 clients nous ont confié un Mandat PRO. Celui-ci affiche un taux de réussite trois fois supérieur à celui d’un mandat traditionnel. Pourquoi ?Parce que vous profitez des outils les plus performants du premier réseau indépendant français d’agences immobilières. Parce que vous devenez notre client privilégié et que votre projet de vente devient notre mission prioritaire. Parce que nous vous garantissons un retour d’informations systématique, rapide et professionnel suite aux visites que nous effectuons. Parce que chaque vente est unique et qu’elle mérite toute notre attention.Enfin, parce que nous créons avec vous un vrai rapport de confiance et que nous trouvons ensemble la meilleure solution pour votre vente.
Le Mandat
PRO
La solution pour vendre.
8

Claire_FONTAINE_INT.indd 1 03/03/11 18:22

Some Instructions forthe Sharing of Private Property
Claire_FONTAINE_INT.indd 2-3 03/03/11 18:22
one_star_pre.pdf 4 22/02/2011 12:04
Claire_FONTAINE_INT.indd 4-5 03/03/11 18:22

one_star_pre.pdf 5 22/02/2011 12:04 one_star_pre.pdf 6 22/02/2011 12:04
Claire_FONTAINE_INT.indd 6-7 03/03/11 18:22

one_star_pre.pdf 7 22/02/2011 12:04 one_star_pre.pdf 8 22/02/2011 12:04
Claire_FONTAINE_INT.indd 8-9 03/03/11 18:22
one_star_pre.pdf 9 22/02/2011 12:04
Claire_FONTAINE_INT.indd 10-11 03/03/11 18:22
one_star_pre.pdf 11 22/02/2011 12:04
Claire_FONTAINE_INT.indd 12-13 03/03/11 18:22

one_star_pre.pdf 13 22/02/2011 12:04 one_star_pre.pdf 14 22/02/2011 12:04
Claire_FONTAINE_INT.indd 14-15 03/03/11 18:22
one_star_pre.pdf 15 22/02/2011 12:04 one_star_pre.pdf 16 22/02/2011 12:04
Claire_FONTAINE_INT.indd 16-17 03/03/11 18:22

one_star_pre.pdf 17 22/02/2011 12:04 one_star_pre.pdf 18 22/02/2011 12:04
Claire_FONTAINE_INT.indd 18-19 03/03/11 18:22

one_star_pre.pdf 19 22/02/2011 12:04 one_star_pre.pdf 20 22/02/2011 12:04
Claire_FONTAINE_INT.indd 20-21 03/03/11 18:22
one_star_pre.pdf 21 22/02/2011 12:04 one_star_pre.pdf 22 22/02/2011 12:04
Claire_FONTAINE_INT.indd 22-23 03/03/11 18:22
one_star_pre.pdf 23 22/02/2011 12:04
one_star_pre.pdf 24 22/02/2011 12:04
Claire_FONTAINE_INT.indd 24-25 03/03/11 18:22
one_star_pre.pdf 25 22/02/2011 12:04 one_star_pre.pdf 26 22/02/2011 12:04
Claire_FONTAINE_INT.indd 26-27 03/03/11 18:22

one_star_pre.pdf 27 22/02/2011 12:04 one_star_pre.pdf 28 22/02/2011 12:04
Claire_FONTAINE_INT.indd 28-29 03/03/11 18:22

one_star_pre.pdf 29 22/02/2011 12:04 one_star_pre.pdf 30 22/02/2011 12:04
Claire_FONTAINE_INT.indd 30-31 03/03/11 18:22

one_star_pre.pdf 31 22/02/2011 12:04 one_star_pre.pdf 32 22/02/2011 12:04
Claire_FONTAINE_INT.indd 32-33 03/03/11 18:22

one_star_pre.pdf 33 22/02/2011 12:04 one_star_pre.pdf 34 22/02/2011 12:04
Claire_FONTAINE_INT.indd 34-35 03/03/11 18:22

one_star_pre.pdf 36 22/02/2011 12:04
Claire_FONTAINE_INT.indd 36-37 03/03/11 18:22

one_star_pre.pdf 37 22/02/2011 12:04 one_star_pre.pdf 38 22/02/2011 12:04
Claire_FONTAINE_INT.indd 38-39 03/03/11 18:22

one_star_pre.pdf 40 22/02/2011 12:04
Claire_FONTAINE_INT.indd 40-41 03/03/11 18:22

one_star_pre.pdf 41 22/02/2011 12:04 one_star_pre.pdf 42 22/02/2011 12:04
Claire_FONTAINE_INT.indd 42-43 03/03/11 18:22

one_star_pre.pdf 43 22/02/2011 12:04 one_star_pre.pdf 44 22/02/2011 12:04
Claire_FONTAINE_INT.indd 44-45 03/03/11 18:22
one_star_pre.pdf 45 22/02/2011 12:04 one_star_pre.pdf 46 22/02/2011 12:04
Claire_FONTAINE_INT.indd 46-47 03/03/11 18:22
one_star_pre.pdf 47 22/02/2011 12:04 one_star_pre.pdf 48 22/02/2011 12:04
Claire_FONTAINE_INT.indd 48-49 03/03/11 18:22

one_star_pre.pdf 49 22/02/2011 12:04 one_star_pre.pdf 50 22/02/2011 12:04
Claire_FONTAINE_INT.indd 50-51 03/03/11 18:22
one_star_pre.pdf 51 22/02/2011 12:04
Claire_FONTAINE_INT.indd 52-53 03/03/11 18:22
Distribution Copyright 1987, 1991 Theodore T. Tool. All rights reserved. Permission to reproduce this document on a non-profit basis is granted provided that this copyright and distribution notice is included in full. The information in this booklet is provided for educational purposes only.
August 1991 revision.
1
one_star_pre.pdf 54 22/02/2011 12:04
Claire_FONTAINE_INT.indd 54-55 03/03/11 18:22
Contents 1 It's Easy 4
2 How a Key Opens a Lock 5
3 The Flatland Model 7
4 Basic Picking & The Binding Defect 9
5 The Pin Column Model 11
6 Basic Scrubbing 17
7 Advanced Lock Picking 21
7.1 Mechanical Skills 21
7.2 Zen and the Art of Lock Picking 21
7.3 Analytic Thinking 22
8 Exercises 23
8.1 Exercise 1: Bouncing the pick 23
8.2 Exercise 2: Picking pressure 24
8.3 Exercise 3: Picking Torque 24
8.4 Exercise 4: Identifying Set Pins 25
8.5 Exercise 5: Projection 26
9 Recognising and Exploiting Personality Traits 27
9.1 Which Way To Turn 27
9.2 How Far to Turn 29
9.3 Gravity 29
9.4 Pins Not Setting 29
9.5 Elastic Deformation 30
2
one_star_pre.pdf 55 22/02/2011 12:04
Claire_FONTAINE_INT.indd 56 02/03/11 15:58
9.6 Loose Plug 30
9.7 Pin Diameter 32
9.8 Bevelled Holes and Rounded pins 32
9.9 Mushroom Driver Pins 34
9.10 Master Keys 36
9.11 Driver or Spacer Enters Keyway 38
9.12 Vibration Picking 39
9.13 Disk Tumblers 40
10 Final Remarks 42
A Tools 43
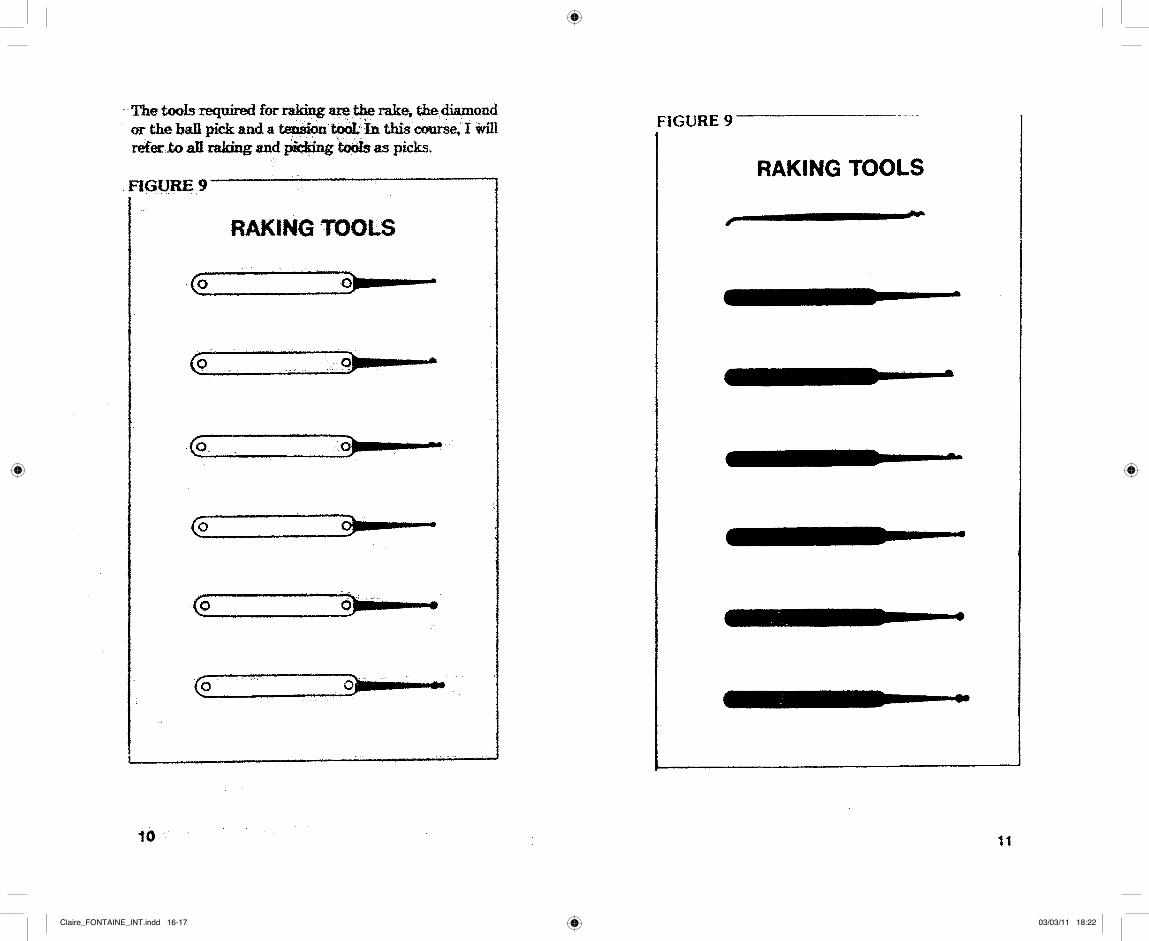
A.1 Pick Shapes 43
A.2 Street cleaner bristles 44
A.3 Bicycle spokes 47
A.4 Brick Strap 47
B Legal Issues 48
3
one_star_pre.pdf 56 22/02/2011 12:04
Claire_FONTAINE_INT.indd 57 02/03/11 15:58Claire_FONTAINE_INT.indd 56-57 03/03/11 18:22
Chapter 1: It's Easy
The big secret of lock picking is that it's easy. Anyone can learn how to pick locks. The theory of lock picking is the theory of exploiting mechanical defects. There are a few basic concepts and definitions but the bulk of the material consists of tricks for opening locks with particular defects or characteristics. The organisation of this manual reflects this structure. The first few chapters present the vocabulary and basic information about locks and lock picking. There is no way to learn lock picking without practicing, so one chapter presents a set of carefully chosen exercises that will help you learn the skills of lock picking. The document ends with a catalogue of the mechanical traits and defects found in locks and the techniques used to recognize and exploit them. The first appendix describes how to make lock picking tools. The other appendix presents some of the legal issues of lock picking. The exercises are important. The only way to learn how to recognize and exploit the defects in a lock is to practice. This means practicing many times on the same lock as well as practicing on many different locks. Anyone can learn how to open desk and filing cabinet locks, but the ability to open most locks in under thirty seconds is a skill that requires practice. Before getting into the details of locks and picking, it is worth pointing out that lock picking is just one way to bypass a lock, though it does cause less damage than brute force techniques. In fact, it may be easier to bypass the bolt mechanism than to bypass the lock. It may also be easier to bypass some other part of the door or even avoid the door entirely. Remember: There is always another way, usually a better one.
4
one_star_pre.pdf 57 22/02/2011 12:04
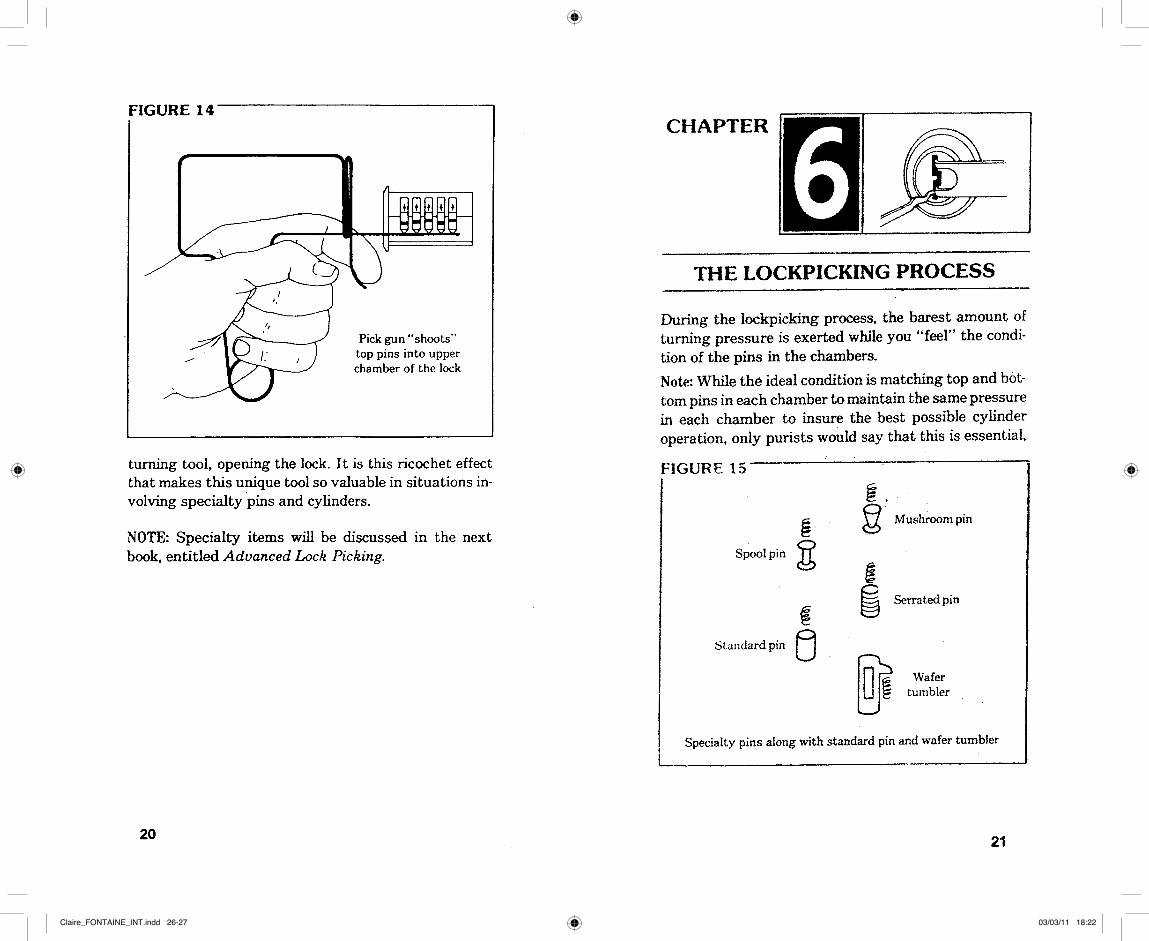
Chapter 2: How a Key Opens a Lock This chapter presents the basic workings of pin tumbler locks, and the vocabulary used in the rest of this booklet. The terms used to describe locks and lock parts vary from manufacture to manufacture and from city to city, so even if you already understand the basic workings of locks, you should look at Figure 2.1 for the vocabulary. Knowing how a lock works when it is opened by a key is only part of what you need to know. You also need to know how a lock responds to picking. Chapters 3 and 5 present models which will help you understand a lock's response to picking. Figure 2.1 introduces the vocabulary of real locks. The key is inserted into the keyway of the plug. The protrusions on the side of the keyway are called wards. Wards restrict the set of keys that can be inserted into the plug. The plug is a cylinder which can rotate when the proper key is fully inserted. The non-rotating part of the lock is called the hull. The first pin touched by the key is called pin one. The remaining pins are numbered increasingly toward the rear of the lock. The proper key lifts each pin pair until the gap between the key pin and the driver pin reaches the sheer line. When all the pins are in this position, the plug can rotate and the lock can be opened. An incorrect key will leave some of the pins protruding between the hull and the plug, and these pins will prevent the plug from rotating.
5
one_star_pre.pdf 58 22/02/2011 12:04
Claire_FONTAINE_INT.indd 58-59 03/03/11 18:22

6
one_star_pre.pdf 59 22/02/2011 12:04
Chapter 3: The Flatland Model In order to become good at picking locks, you will need a detailed understanding of how locks works and what happens as it is picked. This document uses two models to help you understand the behaviour of locks. This chapter presents a model that highlights interactions between pin positions. Chapter 4 uses this model to explain how picking works. Chapter 9 will use this model to explain complicated mechanical defects. The "Flatland" model of a lock is shown in Figure 3.1. This is not a cross section of a real lock. It is a cross section of a very simple kind of lock. The purpose of this lock is to keep two plates of metal from sliding over each other unless the proper key is present. The lock is constructed by placing the two plates over each other and drilling holes which pass through both plates. The figure shows a two-hole lock. Two pins are placed in each hole such that the gap between the pins does not line up with the gap between the plates. The bottom pin is called the key pin because it touches the key. The top pin is called the driver pin. Often the driver and key pins are just called the driver and the pin. A protrusion on the underside of the bottom plate keeps the pins from falling out, and a spring above the top plate pushes down on the driver pin. If the key is absent, the plates cannot slide over each other because the driver pins pass through both plates. The correct key lifts the pin pairs to align the gap between the pins with the gap between the plates. See Figure 3.3. That is, the key lifts the key pin until its top reaches the lock's sheer line. In this configuration, the plates can slide past each other. Figure 3.3 also illustrates one of the important features of real locks. There is always a sliding allowance. That is, any parts which slide past each other must be separated by a gap. The gap between the top and bottom plates allows a range of keys to open the lock. Notice that the right key pin in Figure 3.3 is not raised as high as the left pin, yet the lock will still open.
7
one_star_pre.pdf 60 22/02/2011 12:04
Claire_FONTAINE_INT.indd 60-61 03/03/11 18:22

8
one_star_pre.pdf 61 22/02/2011 12:04
Chapter 4: Basic Picking & The Binding Defect The Flatland model highlights the basic defect that enables lock picking to work. This defect makes it possible to open a lock by lifting the pins one at a time, and thus you don't need a key to lift all the pins at the same time. Figure 4.3 shows how the pins of a lock can be set one at a time. The first step of the procedure is to apply a sheer force to the lock by pushing on the bottom plate. This force causes one or more of the pins to be scissored between the top and bottom plate. The most common defect in a lock is that only one pin will bind. Figure 4.3a shows the left pin binding. Even though a pin is binding, it can be pushed up with a picking tool, see Figure 4.3b. When the top of the key pin reaches the sheer line, the bottom plate will slide slightly. If the pick is removed, the driver pin will be held up by the overlapping bottom plate, and the key pin will drop down to its initial position, see Figure 4.3c. The slight movement of the bottom plate causes a new pin to bind. The same procedure can be used to set the new pin. Thus, the procedure for one pin at a time picking a lock is to apply a sheer force, and the pin which is binding the most, and push it up. When the top of the key pin reaches the sheer line, the moving portion of the lock will give slightly, and driver pin will be trapped above the sheer line. This is called setting a pin. Chapter 9 discusses the different defects that cause pins to bind one at a time.
1. Apply a sheer force. 2. Find the pin that is binding the most. 3. Push that pin up until you feel it set at the sheer line. 4. Go to step 2
Table 4.1: Figure 5: Picking a lock one pin at a time.
9
one_star_pre.pdf 62 22/02/2011 12:04
Claire_FONTAINE_INT.indd 62-63 03/03/11 18:22

10
one_star_pre.pdf 63 22/02/2011 12:04
Chapter 5: The Pin Column Model
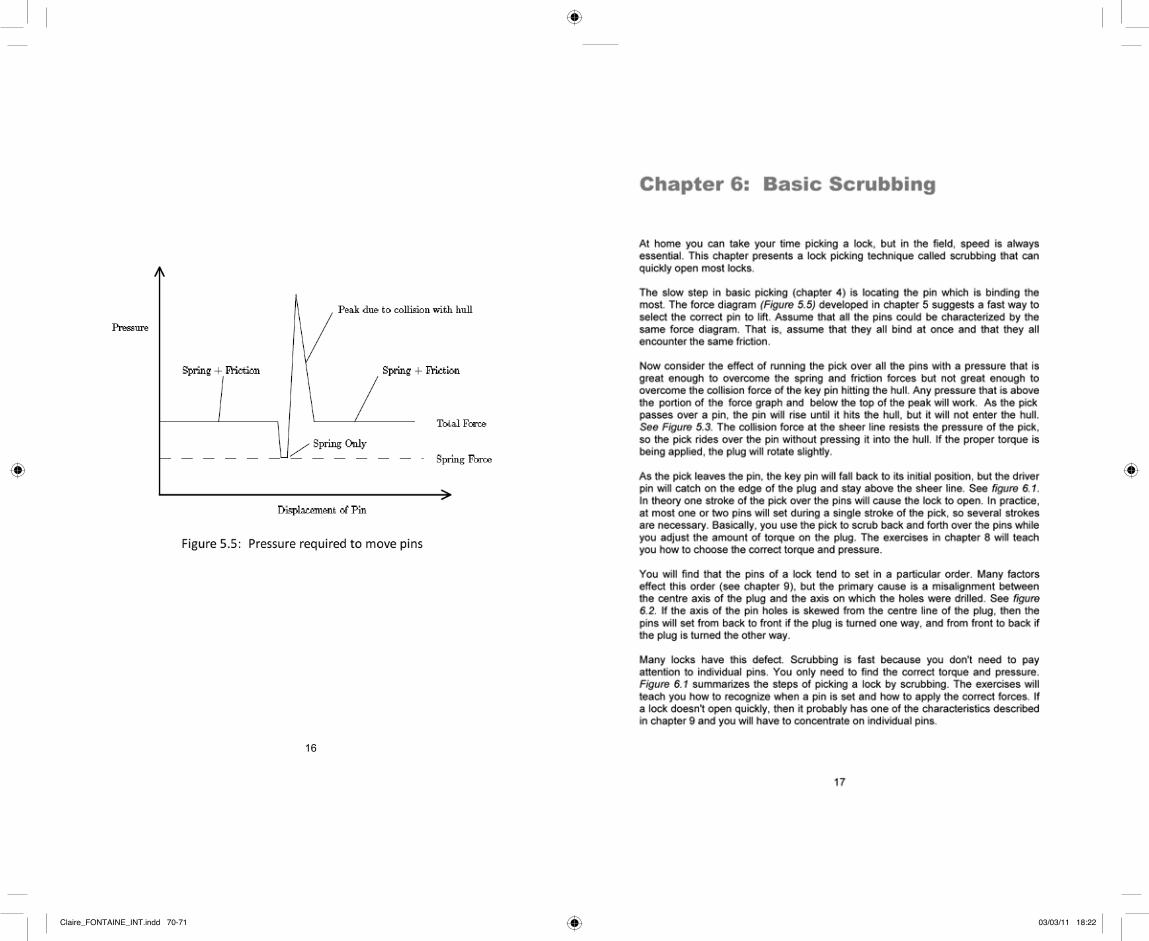
The Flatland model of locks can explain effects that involve more than one pin, but a different model is needed to explain the detailed behaviour of a single pin. See Figure 5.1. The pin-column model highlights the relationship between the torque applied and the amount of force needed to lift each pin. It is essential that you understand this relationship. In order to understand the "feel" of lock picking you need to know how the movement of a pin is effected by the torque applied by your torque wrench (tensioner) and the pressure applied by your pick. A good way to represent this understanding is a graph that shows the minimum pressure needed to move a pin as a function of how far the pin has been displaced from its initial position. The remainder of this chapter will derive that force graph from the pin-column model. Figure 5.2 shows a single pin position after torque has been applied to the plug. The forces acting of the driver pin are the friction from the sides, the spring contact force from above, and the contact force from the key pin below. The amount of pressure you apply to the pick determines the contact force from below. The spring force increases as the pins are pushed into the hull, but the increase is slight, so we will assume that the spring force is constant over the range of displacements we are interested in. The pins will not move unless you apply enough pressure to overcome the spring force. The binding friction is proportional to how hard the driver pin is being scissored between the plug and the hull, which in this case is proportional to the torque. The more torque you apply to the plug, the harder it will be to move the pins. To make a pin move, you need to apply a pressure that is greater than the sum of the spring and friction forces. When the bottom of the driver pin reaches the sheer line, the situation suddenly changes. See Figure 5.3. The friction binding force drops to zero and the plug rotates slightly (until some other pin binds). Now the only resistance to motion is the spring force. After the top of the key pin crosses the gap between the plug and the hull, a new contact force arises from the key pin striking the hull. This force can be quite large, and it causes a peak in the amount of pressure needed to move a pin.
11
one_star_pre.pdf 64 22/02/2011 12:04
Claire_FONTAINE_INT.indd 64-65 03/03/11 18:22

If the pins are pushed further into the hull, the key pin acquires a binding action like the driver pin had in the initial situation. See Figure 5.4. Thus, the amount of pressure needed to move the pins before and after the sheer line is about the same. Increasing the torque increases the required pressure. At the sheer line, the pressure increases dramatically due to the key pin hitting the hull. This analysis is summarized graphically in figure 5.5.
12
one_star_pre.pdf 65 22/02/2011 12:04
13
one_star_pre.pdf 66 22/02/2011 12:04
Claire_FONTAINE_INT.indd 66-67 03/03/11 18:22

14
one_star_pre.pdf 67 22/02/2011 12:04
15
one_star_pre.pdf 68 22/02/2011 12:04
Claire_FONTAINE_INT.indd 68-69 03/03/11 18:22
16
one_star_pre.pdf 69 22/02/2011 12:04
Claire_FONTAINE_INT.indd 70-71 03/03/11 18:22
18
one_star_pre.pdf 71 22/02/2011 12:04
19
one_star_pre.pdf 72 22/02/2011 12:04
Claire_FONTAINE_INT.indd 72-73 03/03/11 18:22

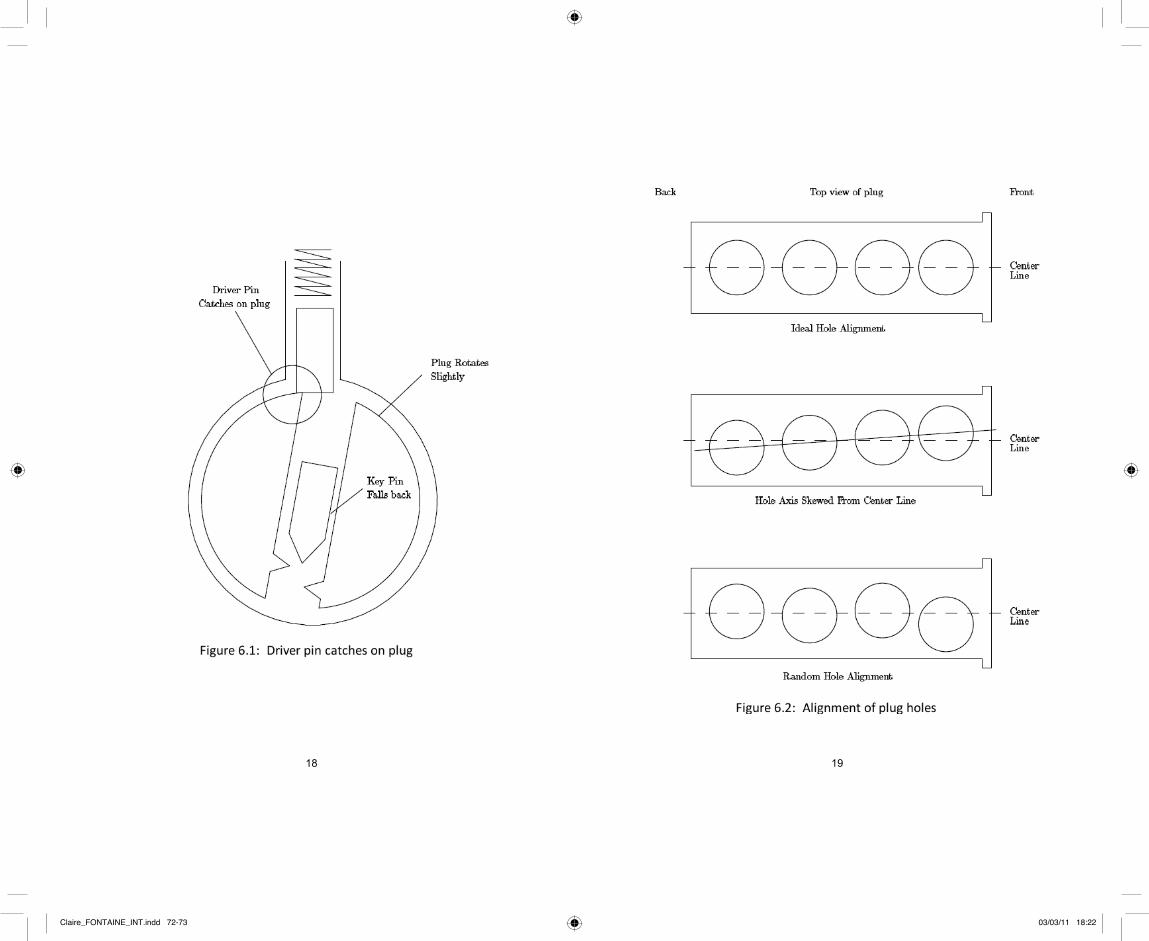
1. Insert the pick and torque wrench. Without applying any torque pull the pick out to get a feel for the stiffness of the lock's springs. 2. Apply a light torque. Insert the pick without touching the pins. As you pull the pick out, apply pressure to the pins. The pressure should be slightly larger than the minimum necessary to overcome the spring force. 3. Gradually increase the torque with each stroke of the pick until pins begin to set. 4. Keeping the torque fixed, scrub back and forth over the pins that have not set. If additional pins do not set, release the torque and start over with the torque found in the last step. 5. Once the majority of the pins have been set, increase the torque and scrub the Pins with a slightly larger pressure. This will set any pins which have set low due to bevelled edges, etc.
Table 6.1: Figure 13: Basic scrubbing.
20
one_star_pre.pdf 73 22/02/2011 12:04
Chapter 7: Advanced Lock Picking Simple lock picking is a trade that anyone can learn. However, advanced lock picking is a craft that requires mechanical sensitivity, physical dexterity, visual concentration and analytic thinking. If you strive to excel at lock picking, you will grow in many ways. 7.1 Mechanical Skills Learning how to pull the pick over the pins is surprisingly difficult. The problem is that the mechanical skills you learned early in life involved maintaining a fixed position or fixed path for your hands independent of the amount of force required. In lock picking, you must learn how to apply a fixed force independent of the position of your hand. As you pull the pick out of the lock you want to apply a fixed pressure on the pins. The pick should bounce up and down in the keyway according to the resistance offered by each pin. To pick a lock you need feedback about the effects of your manipulations. To get the feedback, you must train yourself to be sensitive to the sound and feel of the pick passing over the pins. This is a mechanical skill that can only be learned with practice. The exercises will help you recognize the important information coming from your fingers. 7.2 Zen and the Art of Lock Picking In order to excel at lock picking, you must train yourself to have a visually reconstructive imagination. The idea is to use information from all your senses to build a picture of what is happening inside the lock as you pick it. Basically, you want to project your senses into the lock to receive a full picture of how it is responding to your manipulations. Once you have learned how to build this picture, it is easy to choose manipulations that will open the lock. All your senses provide information about the lock. Touch and sound provide the most information, but the other senses can reveal critical information. For example, your nose can tell you whether a lock has been lubricated recently. As a beginner, you will need to use your eyes for hand-eye coordination, but as you improve you will find it unnecessary to look at the lock. In fact, it is better to ignore your eyes and use your sight to build an image of the lock based on the information you receive from your fingers and ears. The goal of this mental skill is to acquire a relaxed concentration on the lock. Don't force the concentration. Try to ignore the sensations and thoughts that are not related to the lock. Don't try to focus on the lock.
21
one_star_pre.pdf 74 22/02/2011 12:04
Claire_FONTAINE_INT.indd 74-75 03/03/11 18:22

7.3 Analytic Thinking Each lock has its own special characteristics which make picking harder or easier. If you learn to recognize and exploit the "personality traits" of locks, picking will go much faster. Basically, you want to analyze the feedback you get from a lock to diagnose its personality traits and then use your experience to decide on an approach to open the lock. Chapter 9 discusses a large number of common traits and ways to exploit or overcome them. People underestimate the analytic skills involved in lock picking. They think that the picking tool opens the lock. To them the torque wrench is a passive tool that just puts the lock under the desired stress. Let me propose another way to view the situation. The pick is just running over the pins to get information about the lock. Based on an analysis that information the torque is adjusted to make the pins set at the sheer line. It's the torque wrench that opens the lock. Varying the torque as the pick moves in and out of the keyway is a general trick that can be used to get around several picking problems. For example, if the middle pins are set, but the end pins are not, you can increase the torque as the pick moves over the middle pins. This will reduce the chances of disturbing the correctly set pins. If some pin doesn't seem to lift up far enough as the pick passes over it, then try reducing the torque on the next pass. The skill of adjusting the torque while the pick is moving requires careful coordination between your hands, but as you become better at visualizing the process of picking a lock you will become better at this important skill.
22
one_star_pre.pdf 75 22/02/2011 12:04
Chapter 8: Exercises
This chapter presents a series of exercises that will help you learn the basic skill of lock picking. Some exercises teach a single skill, while others stress the coordination of skills.
When you do these exercises, focus on the skills, not on opening the lock. If you focus on opening the lock, you will get frustrated and your mind will stop learning. The goal of each exercise is to learn something about the particular lock you are holding and something about yourself. If a lock happens to open, focus on the memory of what you were doing and what you felt just before it opened. These exercises should be practiced in short sessions. After about thirty minutes you will find that your fingers become sore and your mind looses its ability to achieve relaxed concentration. 8.1 Exercise 1: Bouncing the pick This exercise helps you learn the skill of applying a fixed pressure with the pick independent of how the pick moves up and down in the lock. Basically you want to learn how to let the pick bounce up and down according to the resistance offered by each pin. How you hold the pick makes a difference on how easy it is to apply a fixed pressure. You want to hold it in such a way that the pressure comes from your fingers or your wrist. Your elbow and shoulder do not have the dexterity required to pick locks. While you are scrubbing a lock, notice which of your joints are fixed, and which are allowed to move. The moving joints are providing the pressure. One way to hold a pick is to use two fingers to provide a pivot point while another finger levers the pick to provide the pressure. Which fingers you use is a matter of personal choice. Another way to hold the pick is like holding a pencil. With this method, your wrist provides the pressure. If your wrist is providing the pressure, your shoulder and elbow should provide the force to move the pick in and out of the lock. Do not use your wrist to both move the pick and apply pressure. A good way to get used to the feel of the pick bouncing up and down in the keyway is to try scrubbing over the pins of an open lock. The pins cannot be pushed down, so the pick must adjust to the heights of the pins. Try to feel the pins rattle as the pick moves over them. If you move the pick quickly, you can hear the rattle. This same rattling feel will help you recognize when a pin is set correctly. If a pin appears to be set but it doesn't rattle, then it is false set. False set pins can be fixed by pushing them down farther, or by releasing torque and letting them pop back to their initial position. One last word of advice; focus on the tip of the pick. Don't think about how you are moving the handle; think about how you are moving the tip of the pick.
23
one_star_pre.pdf 76 22/02/2011 12:04
Claire_FONTAINE_INT.indd 76-77 03/03/11 18:22

8.2 Exercise 2: Picking pressure This exercise will teach you the range of pressures you will need to apply with a pick. When you are starting, just apply pressure when you are drawing the pick out of the lock. Once you have mastered that, try applying pressure when the pick is moving inward. With the flat side of your pick, push down on the first pin of a lock. Don't apply any torque to the lock. The amount of pressure you are applying should be just enough to overcome the spring force. This force gives you an idea of minimum pressure you will apply with a pick. The spring force increases as you push the pin down. See if you can feel this increase. Now see how it feels to push down the other pins as you pull the pick out of the lock. Start out with both the pick and torque wrench in the lock, but don't apply any torque. As you draw the pick out of the lock, apply enough pressure to push each pin all the way down. The pins should spring back as the pick goes past them. Notice the sound that the pins make as they spring back. Notice the popping feel as a pick goes past each pin. Notice the springy feel as the pick pushes down on each new pin. To help you focus on these sensations, try counting the number of pins in the lock. Door locks at MIT have seven pins, padlocks usually have four. To get an idea of the maximum pressure, use the at side of your pick to push down all the pins in the lock. Sometimes you will need to apply this much pressure to a single pin. If you encounter a new kind of lock, perform this exercise to determine the stiffness of its springs. 8.3 Exercise 3: Picking Torque This exercise will teach you the range of torque you will need to apply to a lock. It demonstrates the interaction between torque and pressure which was described in chapter 5. The minimum torque you will use is just enough to overcome the fiction of rotating the plug in the hull. Use your torque wrench to rotate the plug until it stops. Notice how much torque is needed to move the plug before the pins bind. This force can be quite high for locks that have been left out in the rain. The minimum torque for padlocks includes the force of a spring that is attached between the plug and the shackle bolt.
24
one_star_pre.pdf 77 22/02/2011 12:04
To get a feel for the maximum value of torque, use the at side of the pick to push all the pins down, and try applying enough torque to make the pins stay down after the pick is removed. If your torque wrench has a twist in it, you may not be able to hold down more than a few pins. If you use too much torque and too much pressure you can get into a situation like the one you just created. The key pins are pushed too far into the hull and the torque is sufficient to hold them there. The range of picking torque can be found by gradually increasing the torque while scrubbing the pins with the pick. Some of the pins will become harder to push down. Gradually increase the torque until some of the pins set. These pins will loose their springiness. Keeping the torque fixed, use the pick to scrub the pins a few times to see if other pins will set. The most common mistake of beginners is to use too much torque. Use this exercise to find the minimum torque required to pick the lock. 8.4 Exercise 4: Identifying Set Pins While you are picking a lock, try to identify which pins are set. You can tell a pin is set because it will have a slight give. That is, the pin can be pushed down a short distance with a light pressure, but it becomes hard to move after that distance (see chapter 6 for an explanation). When you remove the light pressure, the pin springs back up slightly. Set pins also rattle if you flick them with the pick. Try listening for that sound. Run the pick over the pins and try to decide whether the set pins are in the front or back of the lock (or both). Try identifying exactly which pins are set. Remember that pin one is the front-most pin (i.e., the pin that a key touches first). The most important skill of lock picking is the ability to recognize correctly set pins. This exercise will teach you that skill. Try repeating this exercise with the plug turning in the other direction. If the front pins set when the plug is turned one way, the back pins will set when the plug is turned the other way. See Figure 6.2 for an explanation. One way to verify how many pins are set is to release the torque, and count the clicks as the pins snap back to their initial position. Try this. Try to notice the difference in sound between the snap of a single pin and the snap of two pins at once. A pin that has been false set will also make a snapping sound. Try this exercise with different amounts of torque and pressure. You should notice that a larger torque requires a larger pressure to make pins set correctly. If the pressure is too high, the pins will be jammed into the hull and stay there.
25
one_star_pre.pdf 78 22/02/2011 12:04
Claire_FONTAINE_INT.indd 78-79 03/03/11 18:22
8.5 Exercise 5: Projection As you are doing the exercises try building a picture in your mind of what is going on. The picture does not have to be visual, it could be a rough understanding of which pins are set and how much resistance you are encountering from each pin. One way to foster this picture building is to try to remember your sensations and beliefs about a lock just before it opened. When a lock opens, don't think "that's over", think "what happened". This exercise requires a lock that you find easy to pick. It will help you refine the visual skills you need to master lock picking. Pick the lock, and try to remember how the process felt. Rehearse in your mind how everything feels when the lock is picked properly. Basically, you want to create a movie that records the process of picking the lock. Visualize the motion of your muscles as they apply the correct pressure and torque, and feel the resistance encountered by the pick. Now pick the lock again trying to match your actions to the movie. By repeating this exercise, you are learning how to formulate detailed commands for your muscles and how to interpret feedback from your senses. The mental rehearsal teaches you how to build a visual understanding of the lock and how to recognize the major steps of picking it.
26
one_star_pre.pdf 79 22/02/2011 12:04
Chapter 9: Recognizing and Exploiting Personality Traits Real locks have a wide range of mechanical features and defects that help and hinder lock picking. If a lock doesn't respond to scrubbing, then it probably has one of the traits discussed in this chapter. To open the lock, you must diagnose the trait and apply the recommended technique. The exercises will help you develop the mechanical sensitivity and dexterity necessary to recognize and exploit the different traits. 9.1 Which Way To Turn It can be very frustrating to spend a long time picking a lock and then discover that you turned the plug the wrong way. If you turn a plug the wrong way it will rotate freely until it hits a stop, or until it rotates 180 degrees and the drivers enter the keyway (see section 9.11). Section 9.11 also explains how to turn the plug more than 180 degrees if that is necessary to fully retract the bolt. When the plug is turned in the correct direction, you should feel an extra resistance when the plug cam engages the bolt spring. The direction to turn the plug depends on the bolt mechanism, not on the lock, but here are some general rules. Cheap padlocks will open if the plug is turned in either direction, so you can chose the direction which is best for the torque wrench. All padlocks made by the Master Company can be opened in either direction. Padlocks made by Yale will only open if the plug is turned clockwise. The double plug Yale cylinder locks generally open by turning the bottom of the keyway (i.e., the flat edge of the key) away from the nearest doorframe. Single plug cylinder locks also follow this rule. See Figure 9.1. Locks built into the doorknob usually open clockwise. Desk and filing cabinet locks also tend to open clockwise. When you encounter a new kind of lock mechanism, try turning the plug in both directions. In the correct direction, the plug will be stopped by the pins, so the stop will feel mushy when you use heavy torque. In the wrong direction the plug will be stopped by a metal tab, so the stop will feel solid.
27
one_star_pre.pdf 80 22/02/2011 12:04
Claire_FONTAINE_INT.indd 80-81 03/03/11 18:22

28
one_star_pre.pdf 81 22/02/2011 12:04
9.2 How Far to Turn The companion question to which way to turn a lock is how far to turn it. Desk and filing cabinet locks generally open with less than a quarter turn (90 degrees) of the plug. When opening a desk lock try to avoid having the plug lock in the open position. Locks built into doorknobs also tend to open with less than a quarter turn. Locks which are separate from the doorknob tend to require a half turn to open. Deadbolt lock mechanisms can require almost a full turn to open. Turning a lock more than 180 degrees is a difficult because the drivers enter the bottom of the keyway. See section 9.11. 9.3 Gravity Picking a lock that has the springs at the top is different than picking one with the springs at the bottom. It should be obvious how to tell the two apart. The nice feature of a lock with the springs at the bottom is that gravity holds the key pins down once they set. With the set pins out of the way, it is easy to find and manipulate the remaining unset pins. It is also straight forward to test for the slight give of a correctly set pin. When the springs are on top, gravity will pull the key pins down after the driver pin catches at the sheer line. In this case, you can identify the set pins by noticing that the key pin is easy to lift and that it does not feel springy. Set pins also rattle as you draw the pick over them because they are not being pushed down by the driver pin. 9.4 Pins Not Setting If you scrub a lock and pins are not setting even when you vary the torque, then some pin has false set and it is keeping the rest of the pins from setting. Consider a lock whose pins prefer to set from back to front. If the backmost pin false sets high or low (see Figure 9.2), then the plug cannot rotate enough to allow the other pins to bind. It is hard to recognize that a back pin has false set because the springiness of the front pins makes it hard to sense the small give of a correctly set back pin. The main symptom of this situation is that the other pins will not set unless a very large torque is applied . When you encounter this situation, release the torque and start over by concentrating on the back pins. Try a light torque and moderate pressure, or heavy torque and heavy pressure. Try to feel for the click that happens when a pin reaches the sheer line and the plug rotates slightly. The click will be easier to feel if you use a stiff torque wrench.
29
one_star_pre.pdf 82 22/02/2011 12:04
Claire_FONTAINE_INT.indd 82-83 03/03/11 18:22

9.5 Elastic Deformation The interesting events of lock picking happen over distances measured in thousandths of an inch. Over such short distances, metals behave like springs. Very little force is necessary to detect a piece metal over those distances, and when the force is removed, the metal will spring back to its original position. Deformation can be used to your advantage if you want to force several pins to bind at once. For example, picking a lock with pins that prefer to set from front to back is slow because the pins set one at a time. This is particularly true if you only apply pressure as the pick is drawn out of the lock. Each pass of the pick will only set the front-most pin that is binding. Numerous passes are required to set all the pins. If the preference for setting is not very strong (i.e., the axis of the plug holes is only slightly skewed from the plug's centre line), then you can cause additional pins to bind by applying extra torque. Basically, the torque puts a twist in the plug that causes the front of the plug to be detected further than the back of the plug. With light torque, the back of the plug stays in its initial position, but with medium to heavy torque, the front pin columns bend enough to allow the back of the plug to rotate and thus cause the back pins to bind. With the extra torque, a single stroke of the pick can set several pins, and the lock can be opened quickly. Too much torque causes its own problems. When the torque is large, the front pins and plug holes can be deformed enough to prevent the pins from setting correctly. In particular, the first pin tends to false set low. Figure 9.2 shows how excess torque can deform the bottom of the driver pin and prevent the key pin from reaching the sheer line. This situation can be recognized by the lack of give in the first pin. Correctly set pins feel springy if they are pressed down slightly. A falsely set pin lacks this springiness. The solution is to press down hard on the first pin. You may want to reduce the torque slightly, but if you reduce torque too much then other pins will unset as the first pin is being depressed. It is also possible to deform the top of the key pin. The key pin is scissored between the plug and the hull and stays fixed. When this happens, the pin is said to be false set high. 9.6 Loose Plug The plug is held into the hull by being wider at the front and by having a cam on the back that is bigger than the hole drilled into the hull. If the cam is not properly installed, the plug can move in and out of the lock slightly. On the outward stroke of the pick, the plug will move forward, and if you apply pressure on the inward stroke, the plug will be pushed back. The problem with a loose plug is that the driver pins tend to set on the back of the plug holes rather than on the sides of the holes. When you push the plug in, the drivers will unset. You can use this defect to your advantage by only applying pressure on the outward or inward stroke of the pick. Alternatively, you can use your finger or torque wrench to prevent the plug from moving forward.
30
one_star_pre.pdf 83 22/02/2011 12:04
31
one_star_pre.pdf 84 22/02/2011 12:04
Claire_FONTAINE_INT.indd 84-85 03/03/11 18:22
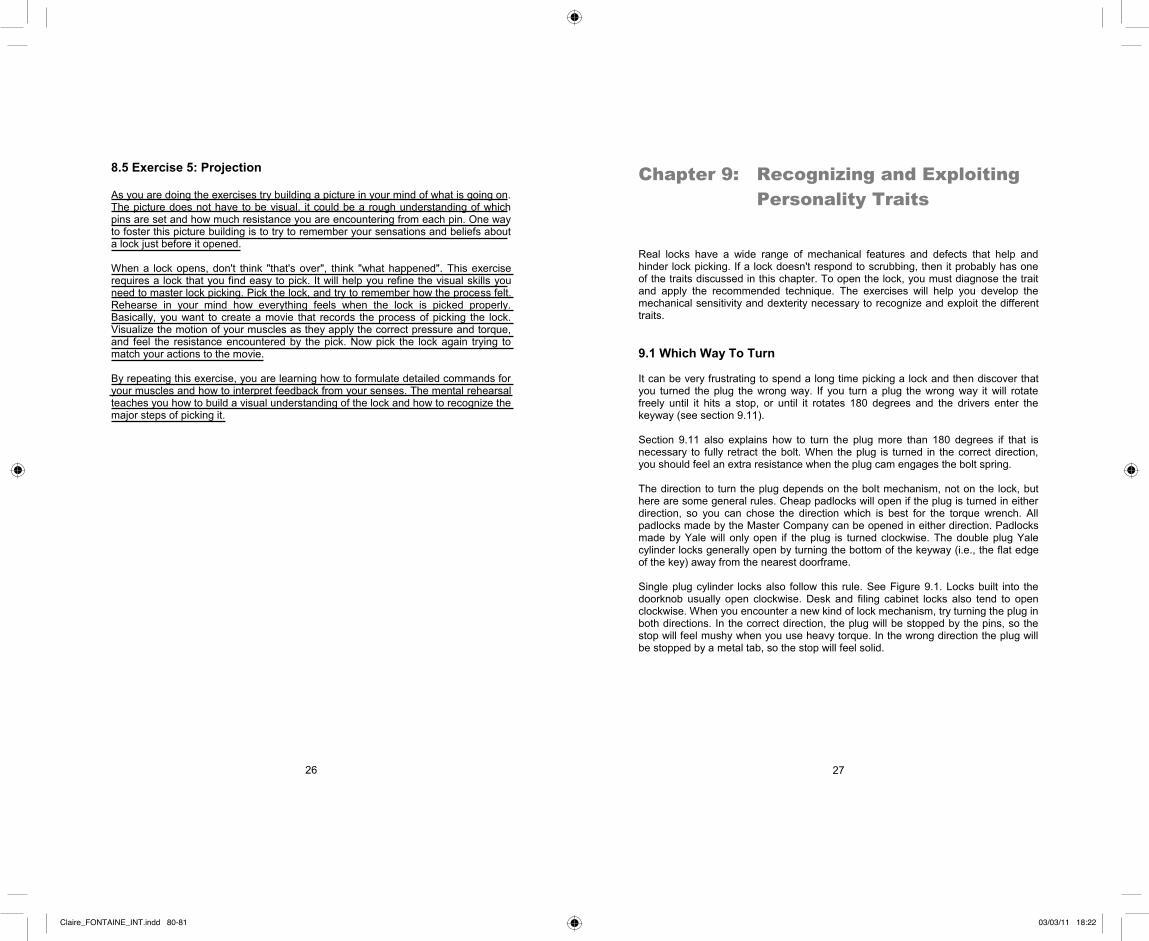
9.7 Pin Diameter When the pair of pins in a particular column have different diameters, that column will react strangely to the pressure of the pick. The top half of Figure 9.3 shows a pin column with a driver pin that has a larger diameter than the key pin. As the pins are lifted, the picking pressure is resisted by the binding friction and the spring force. Once the driver clears the sheer line, the plug rotates (until some other pin binds) and the only resistance to motion is the spring force. If the key pin is small enough and the plug did not rotate very far, the key pin can enter the hull without colliding with the edge of the hull. Some other pin is binding, so again the only resistance to motion is the spring force. This relationship is graphed in the bottom half of the Figure. Basically, the pins feel normal at first, but then the lock clicks and the pin becomes springy. The narrow key pin can be pushed all the way into the hull without loosing its springiness, but when the picking pressure is released, the key pin will fall back to its initial position while the large driver catches on the edge of the plug hole. The problem with a large driver pin is that the key pin tends to get stuck in the hull when some other pin sets. Imagine that a neighbouring pin sets and the plug rotates enough to bind the narrow key pin. If the pick was pressing down on the narrow key pin at the same time as it was pressing down on the pin that set, then the narrow key pin will be in the hull and it will get stuck there when the plug rotates. The behaviour of a large key pin is left as an exercise for the reader. 9.8 Bevelled Holes and Rounded pins Some lock manufacturers (e.g., Yale) bevel the edges of the plug holes and/or round off the ends of the key pins. This tends to reduce the wear on the lock and it can both help and hinder lock picking. You can recognize a lock with these features by the large give in set pins. See Figure 9.4. That is, the distance between the height at which the driver pin catches on the edge of the plug hole and the height at which the key pin hits the hull is larger (sometimes as large as a sixteenth of an inch) when the plug holes are bevelled or the pins are rounded. While the key pin is moving between those two heights, the only resistance to motion will be the force of the spring. There won't be any binding friction. This corresponds to the dip in the force graph shown in Figure 5.5. A lock with bevelled plug holes requires more scrubbing to open than a lock without bevelled holes because the driver pins set on the bevel instead of setting on the top of the plug. The plug will not turn if one of the drivers is caught on a bevel.
32
one_star_pre.pdf 85 22/02/2011 12:04
The key pin must be scrubbed again to push the driver pin up and off the bevel. The left driver pin in Figure 9.6a is set. The driver is resting on the bevel, and the bottom plate has moved enough to allow the right driver to bind. Figure 9.6b shows what happens after the right driver pin sets. The bottom plate slides further to the right and now the left driver pin is scissored between the bevel and the top plate. It is caught on the bevel. To open the lock, the left driver pin must be pushed up above the bevel. Once that driver is free, the bottom plate can slide and the right driver may bind on its bevel. If you encounter a lock with bevelled plug holes, and all the pins appear to be set but the lock is not opening, you should reduce torque and continue scrubbing over the pins. The reduced torque will make it easier to push the drivers off the bevels. If any pins unset when you reduce the torque, try increasing the torque and the picking pressure. The problem with increasing the force is that you may jam some key pins into the hull.
33
one_star_pre.pdf 86 22/02/2011 12:04
Claire_FONTAINE_INT.indd 86-87 03/03/11 18:22

9.9 Mushroom Driver Pins A general trick that lock makers use to make picking harder is to modify the shape of the driver pin. The most popular shapes are mushroom, spool and serrated, see Figure 9.7. The purpose of these shapes is to cause the pins to false set low. These drivers stop a picking technique called vibration picking (see section 9.12), but they only slightly complicate scrubbing and one-pin-at-a-time picking (see chapter 4). If you pick a lock and the plug stops turning after a few degrees and none of the pins can be pushed up any further, then you known that the lock has modified drivers. Basically, the lip of the driver has caught at the sheer line. See the bottom of Figure 9.7. Mushroom and spool drivers are often found in Russwin locks, and locks that have several spacers for master keying.
34
one_star_pre.pdf 87 22/02/2011 12:04
35
one_star_pre.pdf 88 22/02/2011 12:04
Claire_FONTAINE_INT.indd 88-89 03/03/11 18:22

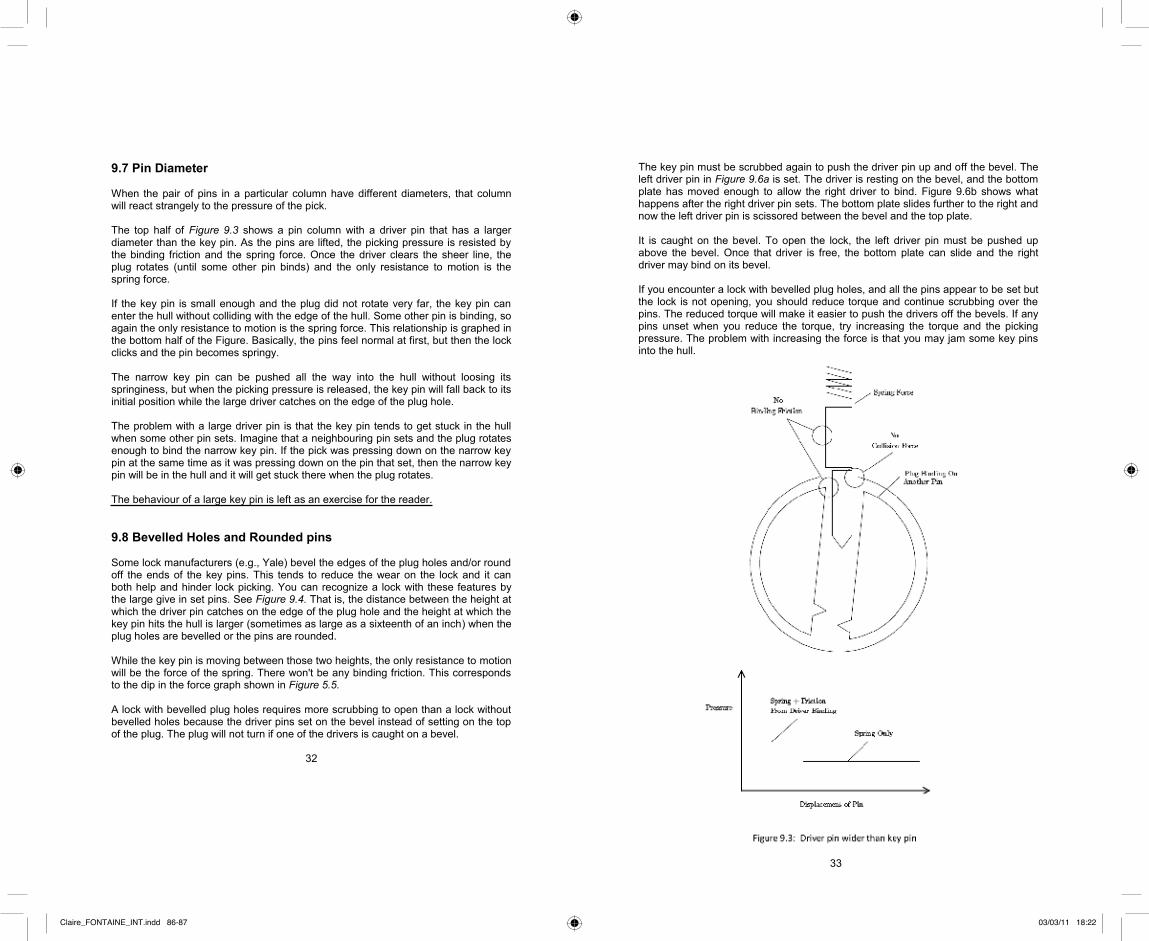
You can identify the positions with mushroom drivers by applying a light torque and pushing up on each pin. The pins with mushroom drivers will exhibit a tendency to bring the plug back to the fully locked position. By pushing the key pin up you are pushing the top of the key pin against the tilted bottom of the mushroom driver. This causes the driver to straighten up which in turn causes the plug to unrotate. You can use this motion to identify the columns that have mushroom drivers. Push those pins up to sheer line; even if you lose some of the other pins in the process they will be easier to re-pick than the pins with mushroom drivers. Eventually all the pins will be correctly set at the sheer line. One way to identify all the positions with mushroom drivers is to use the flat of your pick to push all the pins up about halfway. This should put most of the drivers in their cockable position and you can feel for them. To pick a lock with modified drivers, use a lighter torque and heavier pressure. You want to error on the side of pushing the key pins too far into the hull. In fact, another way to pick these locks is to use the flat side of your pick to push the pins up all the way, and apply very heavy torque to hold them there. Use a scrubbing action to vibrate the key pins while you slowly reduce the torque. Reducing the torque reduces the binding friction on the pins. The vibration and spring force cause the key pins to slide down to the sheer line. The key to picking locks with modified drivers is recognizing incorrectly set pins. A mushroom driver set on its lip will not have the springy give of a correctly set driver. Practice recognizing the difference. 9.10 Master Keys Many applications require keys that open only a single lock and keys that open a group of locks. The keys that open a single lock are called change keys and the keys that open multiple locks are called master keys. To allow both the change key and the master key to open the same lock, a locksmith adds an extra pin called a spacer to some of the pin columns. See Figure 9.8. The effect of the spacer is to create two gaps in the pin column that could be lined up with the sheer line. Usually the change key aligns the top of the spacer with the sheer line, and the master key aligns the bottom of the spacer with the sheer line (the idea is to prevent people from filing down a change key to get a master key). In either case the plug is free to rotate. In general, spacers make a lock easier to pick. They increase the number of opportunities to set each pin, and they make it more likely that the lock can opened by setting the all the pins at about the same height. In most cases only two or three positions will have spacers. You can recognize a position with a spacer by the two clicks you feel when the pin is pushed down.
36
one_star_pre.pdf 89 22/02/2011 12:04
If the spacer has a smaller diameter than the driver and key pins, then you will feel a wide springy region because the spacer will not bind as it passes through the sheer line. It is more common for the spacer to be larger than the driver pin. You can recognize this by an increase in friction when the spacer passes through the sheer line. Since the spacer is larger than the driver pin, it will also catch better on the plug. If you push the spacer further into the hull, you will feel a strong click when the bottom of the spacer clears the sheer line. Thin spacers can cause serious problems. If you apply heavy torque and the plug has bevelled holes, the spacer can twist and jam at the sheer line. It is also possible for the spacer to fall into the keyway if the plug is rotated 180 degrees. See section 9.11 for the solution to this problem.
37
one_star_pre.pdf 90 22/02/2011 12:04
Claire_FONTAINE_INT.indd 90-91 03/03/11 18:22
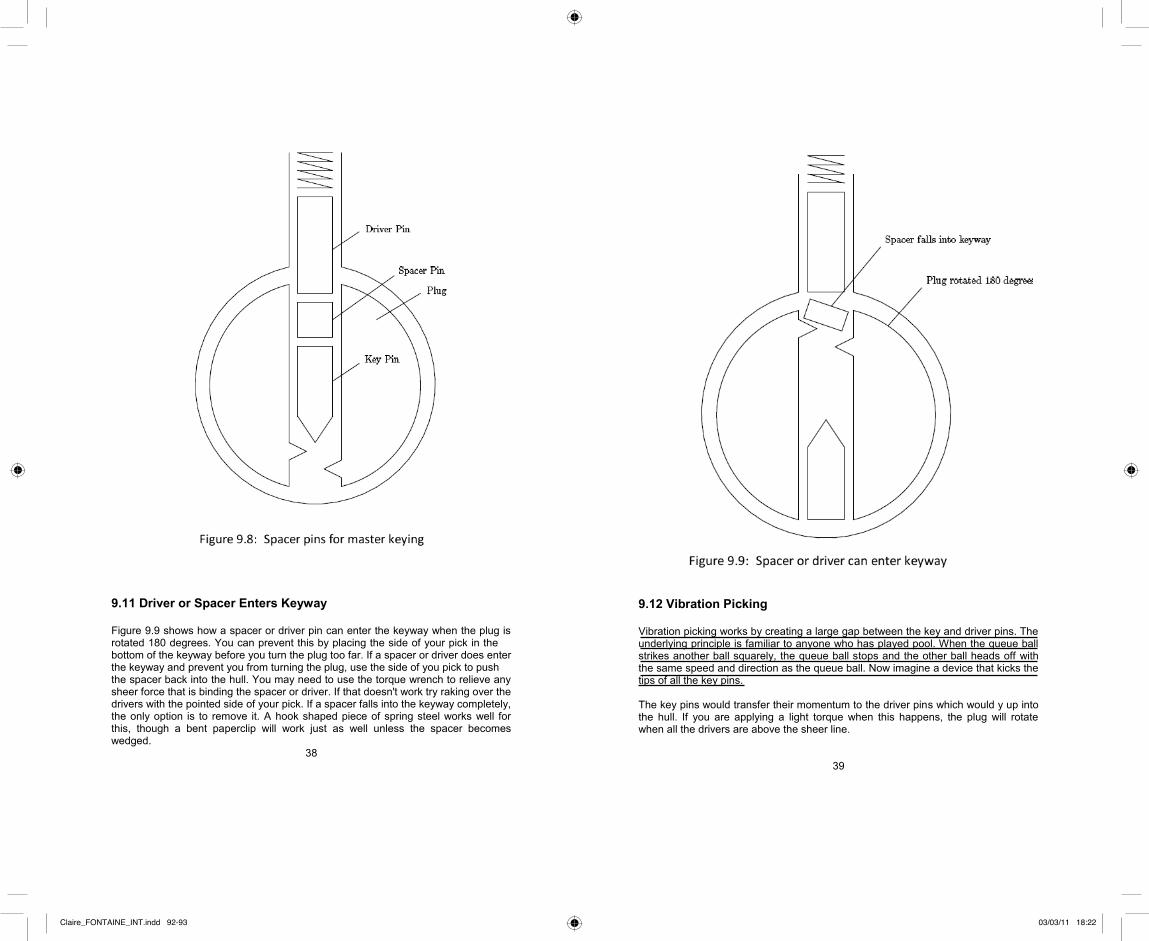
9.11 Driver or Spacer Enters Keyway Figure 9.9 shows how a spacer or driver pin can enter the keyway when the plug is rotated 180 degrees. You can prevent this by placing the side of your pick in the bottom of the keyway before you turn the plug too far. If a spacer or driver does enter the keyway and prevent you from turning the plug, use the side of you pick to push the spacer back into the hull. You may need to use the torque wrench to relieve any sheer force that is binding the spacer or driver. If that doesn't work try raking over the drivers with the pointed side of your pick. If a spacer falls into the keyway completely, the only option is to remove it. A hook shaped piece of spring steel works well for this, though a bent paperclip will work just as well unless the spacer becomes wedged.
38
one_star_pre.pdf 91 22/02/2011 12:04
9.12 Vibration Picking Vibration picking works by creating a large gap between the key and driver pins. The underlying principle is familiar to anyone who has played pool. When the queue ball strikes another ball squarely, the queue ball stops and the other ball heads off with the same speed and direction as the queue ball. Now imagine a device that kicks the tips of all the key pins. The key pins would transfer their momentum to the driver pins which would y up into the hull. If you are applying a light torque when this happens, the plug will rotate when all the drivers are above the sheer line.
39
one_star_pre.pdf 92 22/02/2011 12:04
Claire_FONTAINE_INT.indd 92-93 03/03/11 18:22
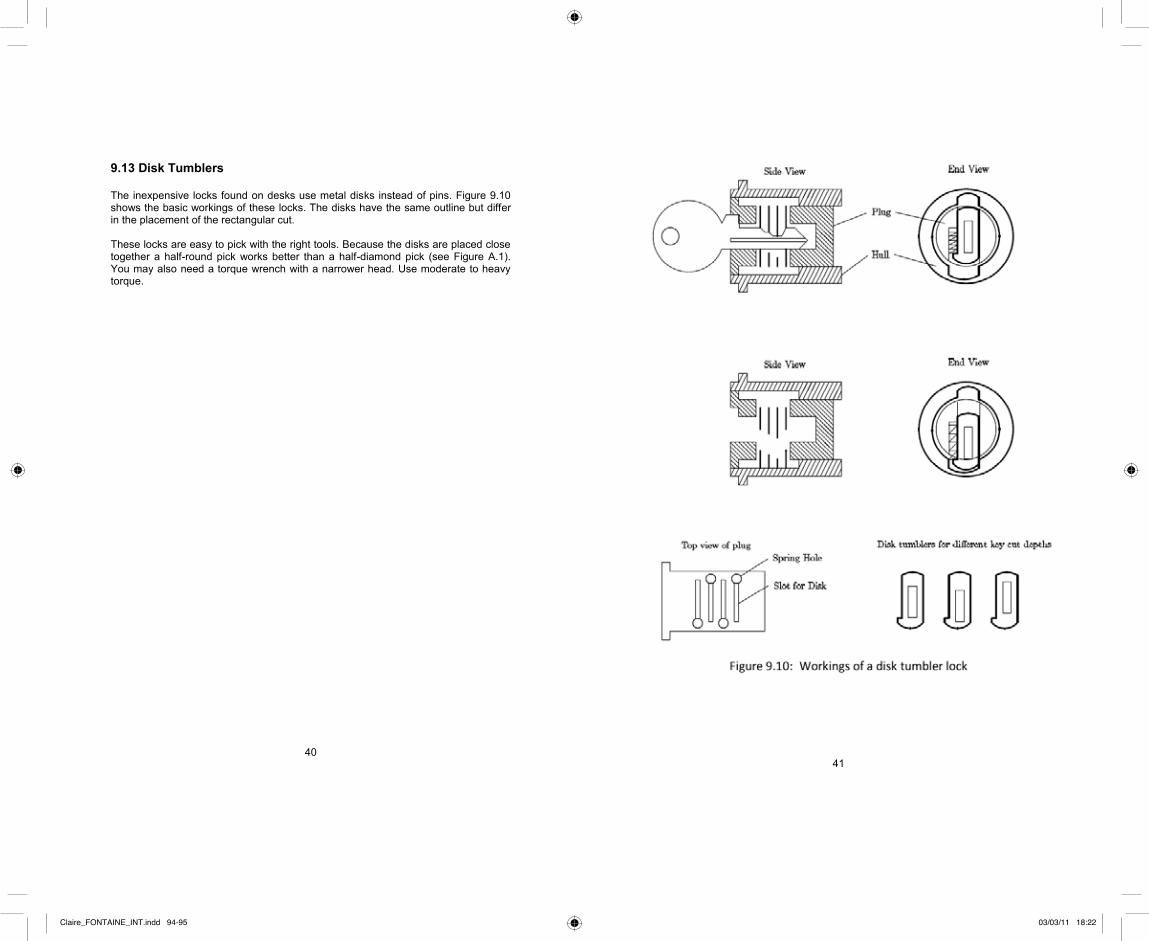
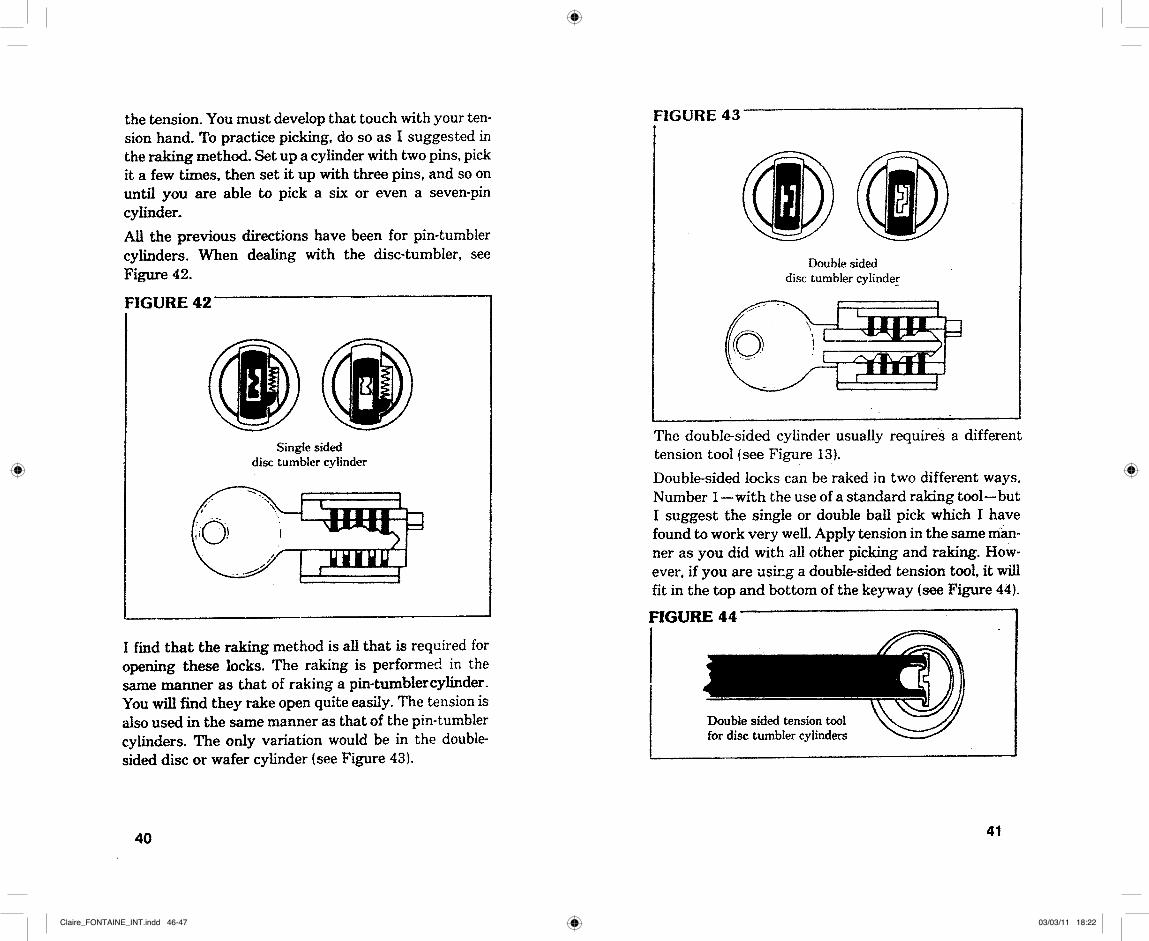
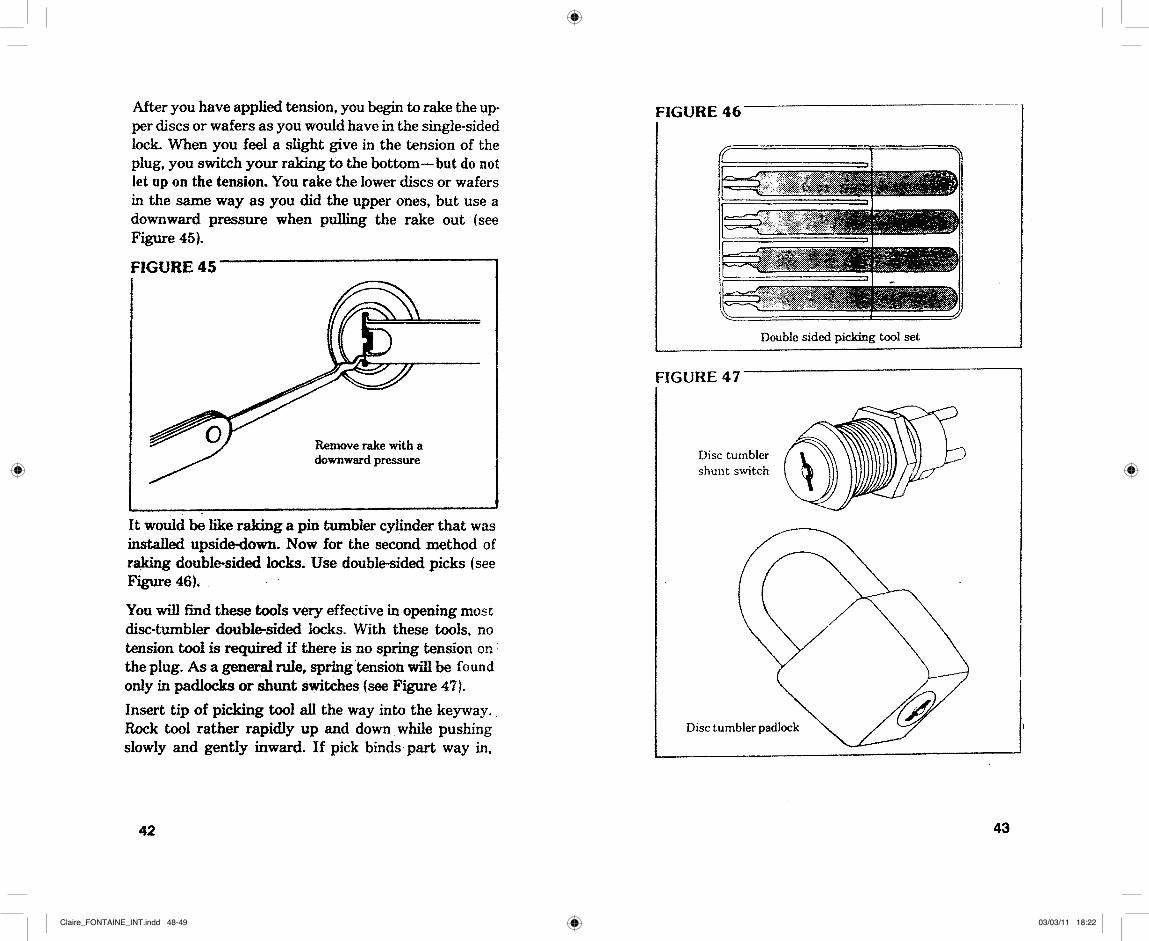
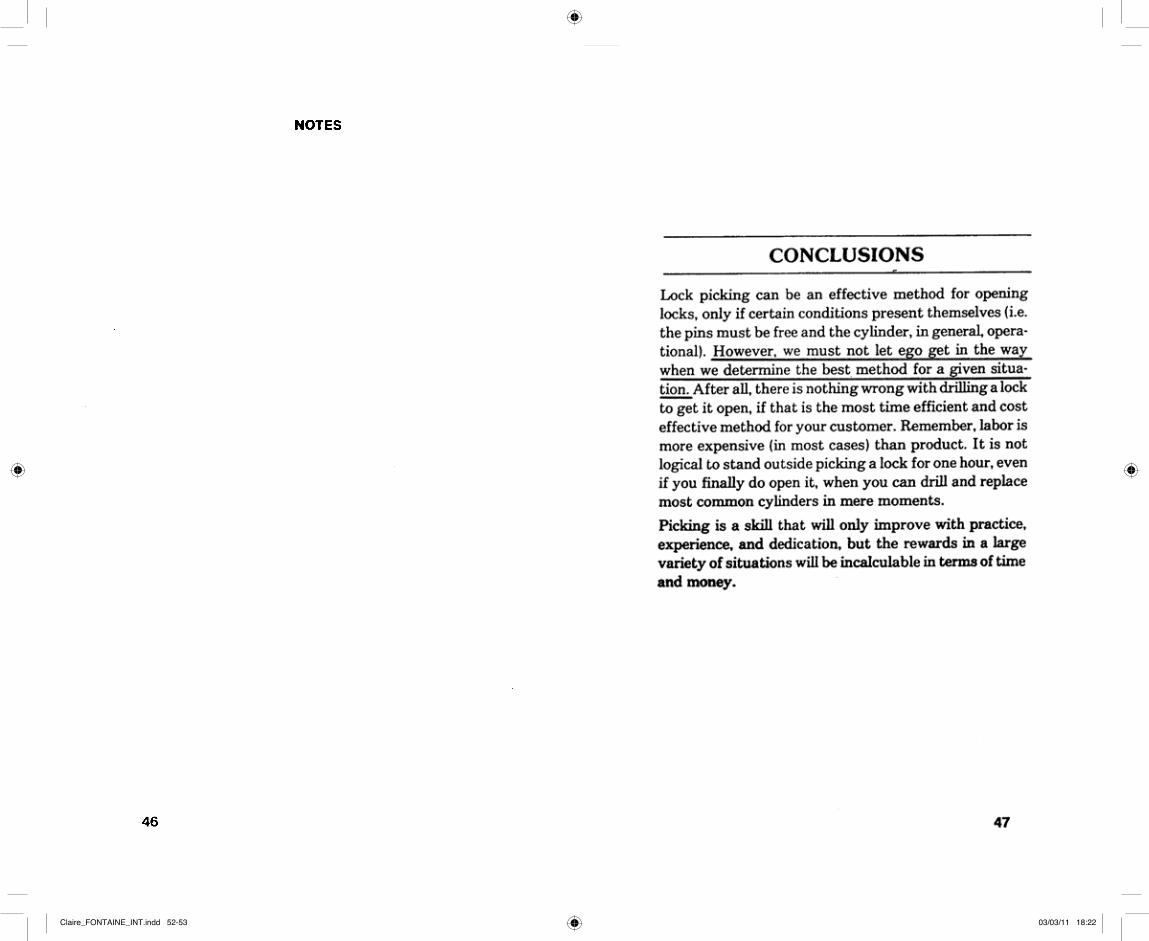
9.13 Disk Tumblers The inexpensive locks found on desks use metal disks instead of pins. Figure 9.10 shows the basic workings of these locks. The disks have the same outline but differ in the placement of the rectangular cut. These locks are easy to pick with the right tools. Because the disks are placed close together a half-round pick works better than a half-diamond pick (see Figure A.1). You may also need a torque wrench with a narrower head. Use moderate to heavy torque.
40
one_star_pre.pdf 93 22/02/2011 12:04
41
one_star_pre.pdf 94 22/02/2011 12:04
Claire_FONTAINE_INT.indd 94-95 03/03/11 18:22

Chapter 10: Final Remarks Lock picking is a craft, not a science. This document presents the knowledge and skills that are essential to lock picking, but more importantly it provides you with models and exercises that will help you study locks on your own. To excel at lock picking, you must practice and develop a style which fits you personally. Remember that the best technique is the one that works best for you.
42
one_star_pre.pdf 95 22/02/2011 12:04
Appendix A: Tools This appendix describes the design and construction of lock picking tools. A.1 Pick Shapes Picks come in several shapes and sizes. Figure A.1 shows the most common shapes. The handle and tang of a pick are the same for all picks. The handle must be comfortable and the tang must be thin enough to avoid bumping pins unnecessarily. If the tang is too thin, then it will act like a spring and you will loose the feel of the tip interacting with the pins. The shape of the tip determines how easily the pick passes over the pins and what kind of feedback you get from each pin. The design of a tip is a compromise between ease of insertion, ease of withdrawal and feel of the interaction. The half diamond tip with shallow angles is easy to insert and remove, so you can apply pressure when the pick is moving in either direction. It can quickly pick a lock that has little variation in the lengths of the key pins. If the lock requires a key that has a deep cut between two shallow cuts, the pick may not be able to push the middle pin down far enough. The half diamond pick with steep angles could deal with such a lock, and in general steep angles give you better feedback about the pins. Unfortunately, the steep angles make it harder to move the pick in the lock. A tip that has a shallow front angle and a steep back angle works well for Yale locks. The half round tip works well in disk tumbler locks. See section 9.13. The full diamond and full round tips are useful for locks that have pins at the top and bottom of the keyway. The rake tip is designed for picking pins one by one. It can also be used to rake over the pins, but the pressure can only be applied as the pick is withdrawn. The rake tip allows you to carefully feel each pin and apply varying amounts of pressure. Some rake tips are flat or dented on the top to make it easier to align the pick on the pin. The primary benefit of picking pins one at a time is that you avoid scratching the pins. Scrubbing scratches the tips of the pins and the keyway, and it spreads metal dust throughout the lock. If you want to avoid leaving traces, you must avoid scrubbing. The snake tip can be used for scrubbing or picking. When scrubbing, the multiple bumps generate more action than a regular pick. The snake tip is particularly good at opening five pin household locks. When a snake tip is used for picking, it can set two or three pins at once. Basically, the snake pick acts like a segment of a key which can be adjusted by lifting and lowering the tip, by tilting it back and forth, and by using either the top or bottom of the tip. You should use moderate to heavy torque with a snake pick to allow several pins to bind at the same time. This style of picking is faster than using a rake and it leaves as little evidence.
43
one_star_pre.pdf 96 22/02/2011 12:04
Claire_FONTAINE_INT.indd 96-97 03/03/11 18:22

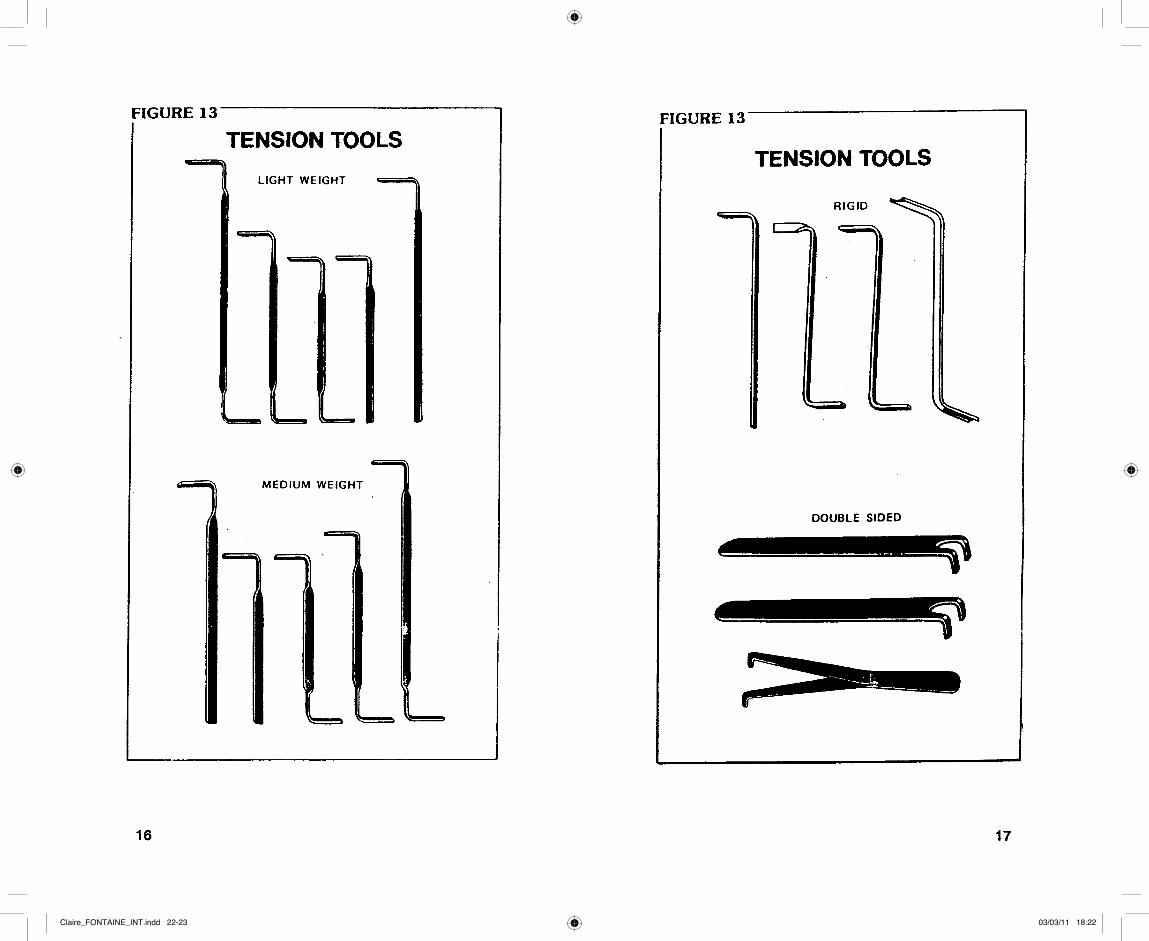
A.2 Street cleaner bristles The spring steel bristles used on street cleaners make excellent tools for lock picking. The bristles have the right thickness and width, and they are easy to grind into the desired shape. The resulting tools are springy and strong. Section A.3 describes how to make tools that are less springy. The first step in making tools is to sand off any rust on the bristles. Course grit sand paper works fine as does a steel wool cleaning pad (not copper wool). If the edges or tip of the bristle are worn down, use a file to make them square. A torque wrench has a head and a handle as shown in Figure A.2. The head is usually 1/2 to 3/4 of an inch long and the handle varies from 2 to 4 inches long. The head and the handle are separated by a bend that is about 80 degrees. The head must be long enough to reach over any protrusions (such as a grip-proof collar) and firmly engage the plug. A long handle allows delicate control over the torque, but if it is too long, it will bump against the doorframe. The handle, head and bend angle can be made quite small if you want to make tools that are easy to conceal (e.g., in a pen, flashlight, or belt buckle). Some torque wrenches have a 90 degree twist in the handle. The twist makes it easy to control the torque by controlling how far the handle has been deflected from its rest position. The handle acts as a spring which sets the torque. The disadvantage of this method of setting the torque is that you get less feedback about the rotation of the plug. To pick difficult locks you will need to learn how to apply a steady torque via a stiff handled torque wrench. The width of the head of a torque wrench determines how well it will fit the keyway. Locks with narrow keyways (e.g., desk locks) need torque wrenches with narrow heads. Before bending the bristle, file the head to the desired width. A general purpose wrench can be made by narrowing the tip (about 1/4 inch) of the head. The tip fits small keyways while the rest of the head is wide enough to grab a normal keyway. The hard part of making a torque wrench is bending the bristle without cracking it. To make the 90 degree handle twist, clamp the head of the bristle (about one inch) in a vise and use pliers to grasp the bristle about 3/8 of an inch above the vise. You can use another pair of pliers instead of a vise. Apply a 45 degree twist. Try to keep the axis of the twist lined up with the axis of the bristle. Now move the pliers back another 3/8 inch and apply the remaining 45 degrees. You will need to twist the bristle more than 90 degrees in order to set a permanent 90 degree twist. To make the 80 degree head bend, lift the bristle out of the vise by about 1/4 inch (so3/4 inch is still in the vise). Place the shank of a screw driver against the bristle and bend the spring steel around it about 90 degrees. This should set a permanent 80 degree bend in the metal. Try to keep the axis of the bend perpendicular to the handle. The screwdriver shank ensures that the radius of curvature will not be too small.
44
one_star_pre.pdf 97 22/02/2011 12:04
Any rounded object will work (e.g., drill bit, needle nose pliers, or a pen cap). If you have trouble with this method, try grasping the bristle with two pliers separated by about 1/2 inch and bend. This method produces a gentle curve that won't break the bristle.
45
one_star_pre.pdf 98 22/02/2011 12:04
Claire_FONTAINE_INT.indd 98-99 03/03/11 18:22

A.3 Bicycle spokes An alternative to making tools out of street cleaner bristles is to make them out of nails and bicycle spokes. These materials are easily accessible and when they are heat treated, they will be stronger than tools made from bristles. A strong torque wrench can be constructed from an 8-penny nail (about .1 inch diameter). First heat up the point with a propane torch until it glows red, slowly remove it from the flame, and let it air cool; this softens it. The burner of a gas stove can be used instead of a torch. Grind it down into the shape of a skinny screwdriver blade and bend it to about 80 degrees. The bend should be less than a right angle because some lock faces are recessed behind a plate (called an escutcheon) and you want the head of the wrench to be able to reach about half an inch into the plug. Temper (harden) the torque wrench by heating to bright orange and dunking it into ice water. You will wind up with a virtually indestructible bent screwdriver that will last for years under brutal use. Bicycle spokes make excellent picks. Bend one to the shape you want and file the sides of the business end at such that it's strong in the vertical and flexy in the horizontal direction. Try a right-angle hunk about an inch long for a handle. For smaller picks, which you need for those really tiny keyways, find any large-diameter spring and unbend it. If you're careful you don't have to play any metallurgical games. A.4 Brick Strap For perfectly serviceable key blanks that you can't otherwise find at the store, use the metal strap they wrap around bricks for shipping. It's wonderfully handy stuff for just about anything you want to manufacture. To get around side wards in the keyway, you can bend the strap lengthwise by clamping it in a vice and tapping on the protruding part to bend the piece to the required angle. Brick strap is very hard. It can ruin a grinding wheel or key cutting machine. A hand file is the recommended tool for milling brick strap.
47
one_star_pre.pdf 100 22/02/2011 12:04
Claire_FONTAINE_INT.indd 158 02/03/11 15:59
A grinding wheel will greatly speed the job of making a pick. It takes a bit of practiceto learn how to make smooth cuts with a grinding wheel, but it takes less time topractice and make two or three picks than it does to hand file a single pick. The firststep is to cut the front angle of the pick. Use the front of the wheel to do this. Holdthe bristle at 45 degrees to the wheel and move the bristle side to side as you grindaway the metal. Grind slowly to avoid overheating the metal, which makes it brittle. If the metal changes colour (to dark blue), you have overheated it, and you shouldgrind away the coloured portion.
Next, cut the back angle of the tip using the corner of the wheel. Usually one corneris sharper than the other, and you should use that one. Hold the pick at the desiredangle and slowly push it into the corner of the wheel. The side of the stone shouldcut the back angle. Be sure that the tip of the pick is supported. If the grinding wheelstage is not close enough to the wheel to support the tip, use needle nose pliers tohold the tip. The cut should pass though about 2/3 of the width of the bristle. If the tipcame out well, continue. Otherwise break it off and try again.
You can break the bristle by clamping it into a vise and bending it sharply. Thecorner of the wheel is also used to grind the tang of the pick. Put a scratch mark toindicate how far back the tang should go. The tang should be long enough to allowthe tip to pass over the back pin of a seven pin lock. Cut the tang by making severalsmooth passes over the corner. Each pass starts at the tip and moves to the scratchmark.
Try to remove less than a 1/16th of an inch of metal with each pass. I use two fingersto hold the bristle on the stage at the proper angle while my other hand pushes thehandle of the pick to move the tang along the corner. Use whatever technique worksbest for you. Use a hand file to finish the pick. It should feel smooth if you run afinger nail over it. Any roughness will add noise to the feedback you want to get fromthe lock. The outer sheath of phone cable can be used as a handle for the pick.Remove three or four of the wires from a length of cable and push it over the pick. Ifthe sheath won't stay in place, you can put some epoxy on the handle beforepushing the sheath over it.
46
Claire_FONTAINE_INT.indd 100-101 03/03/11 18:22

Appendix B: Legal Issues Contrary to widespread myth, it is not a felony to possess lockpicks. Each state has its own laws with respect to such burglarious instruments. Here is the Massachusetts version quoted in entirety from the Massachusetts general code:
Chapter 266 (crimes against property) Section 49. Burglarious instruments; making; possession; use. Whoever makes or mends, or begins to make or
mend, or knowingly has in his possession, an engine, machine, tool or implement adapted and designed for cutting through, forcing or breaking open a building, room, vault, safe or other depository, IN ORDER TO STEAL THEREFROM money or other property, or to commit any other crime, knowing the same to be adapted and designed for the purpose aforesaid, WITH INTENT TO USE OR EMPLOY OR ALLOW the same to be used or employed for such purpose, or whoever knowingly has in his possession a master key designed to fit more than one motor vehicle, WITH INTENT, TO USE OR EMPLOY THE SAME to steal a motor vehicle or other property there from, shall be punished by imprisonment in the state prison for not more than ten years or by a fine of not more than one thousand dollars and imprisonment in jail for not more than two and one half years. Emphasis added. In other words, mere possession means nothing. If they stop you for speeding or something, and find a pick set, they can't do much. On the other hand, if they catch you picking the lock on a Monec machine they get to draw and quarter you. States with similar wording include ME, NH, NY. One place that DOES NOT have similar wording, and does make possession illegal, is Washington, DC. These are the only other places I have checked. I would imagine that most states are similar to Massachusetts, but I would not bet anything substantial (say, more than a slice of pizza) on it.
It may be a good idea to carry around a Xeroxed copy of the appropriate page from your state's criminal code.
48
one_star_press.pdf 1 21/02/2011 16:13
Improvised Lock Picks
(Formerly titled : POLICE GUIDE TO LOCK PICKING)
FOREWORD
From regular law enforcement to security guards - from gun shop owners to alarm installers - all areexpected to know the answers to the general public's questions about physical security.
With all that has been published in the last few security conscious years most everyone knows the virtuesof a dead- bolt latch versus a spring bolt latch; the vulnerability of a sliding arcadia door, casementwindows, and exposed hinge pins; the need for security chains & peep holes on front doors, etc.
Most all people concerned are well advised and knowledgeable in most of these "standard" areas ofphysical security. However, the subject of "lockpicking", "lockpicks", and pickproof locks" affords a largegrey area of confusion and misinformation.
Misled by TV detective & spy shows, where the hero or villain as the case may be is able to pick his way,usually with only one hand, through about any "locked in" or "locked out" situation and also bymanufacturers seeking to promote their latest "pickproof cylinder", the average person is prone to.consider "lockpicking" as a standard modus operandi for any would be burglar.
The purpose of this book is to shed light on the subject of lockpicking and better equip the reader tomake the proper decisions concerning physical security. There will be those who will consider publishingthis book as a contribution to the training of potential criminals. Those so naive may rest assured that anyamong us possessing larcenous intent already know this subject well, if lockpicking happens to be aneeded skill.
Basic lock design
Before a general study of lockpicking can be made the basics of lock design should be considered. Let usfirst think in terms of what a lock is and how it achieves its purpose. Basically, a lock is a latch intendedon holding the object to which it is attached in a certain position. A simple gate latch is, by definition, alock. It does not require a key, only the knowledge and dexterity to perform a simple movement.Fortunately, for the farmer, cattle and other farm animals do not normally possess this knowledge anddexterity. We say "normally possess" because- occasionally an animal will learn to manipulate or "pick" agate or door open. In effect, this animal is a "lockpicker", the pick being that part of their anatomy used toopen the latch.
We are purposely boring you with this Aesop's fable to align our thinking about lock design andconsequently lock picking methods.
Early lock design was hardly more than a simple latch operated by either a device (key) or knowledge(combination, secret keyway, etc.) possessed, hopefully, by only those with rightful access to the contentsbeyond.
But man, being a clever sort, was soon able to devise ways of opening these locks without a key. This, ofcourse, prompted other "clever sorts" to design more "pick-resistant" devices. Most common designsrequired a device (key) to be inserted and rotated. Further refinements introduced special shapedkeyholes, receiving only keys of similar profile.
Other refinements were internal structures known as "wards" that required matching cuts on the keybefore the key would turn after being inserted. This basic design is still prevalent today in low securitylocks as found in some luggage, cases, cupboards, cheap lock boxes, and padlocks. They, as a group, areknown as "warded locks".
Little revolutionary design came about until the 1850's when Linus Yale, Sr. invented the now universallyused pin tumbler lock. Until this time lock designers seemed to focus more attention to the ornateexterior than to the internal mechanism.
one_star_press.pdf 2 21/02/2011 16:13
Claire_FONTAINE_INT.indd 102-103 03/03/11 18:22
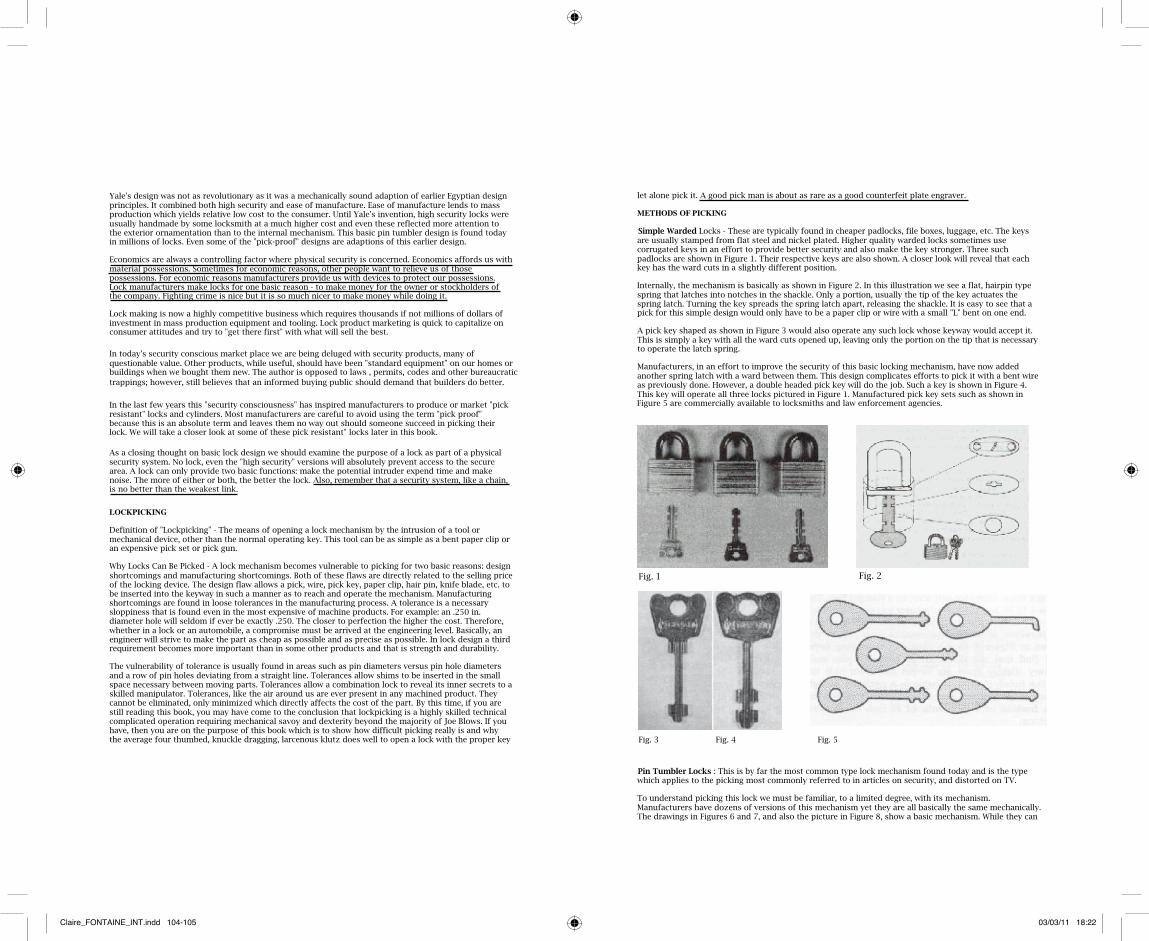
Yale's design was not as revolutionary as it was a mechanically sound adaption of earlier Egyptian designprinciples. It combined both high security and ease of manufacture. Ease of manufacture lends to massproduction which yields relative low cost to the consumer. Until Yale's invention, high security locks wereusually handmade by some locksmith at a much higher cost and even these reflected more attention tothe exterior ornamentation than to the internal mechanism. This basic pin tumbler design is found todayin millions of locks. Even some of the "pick-proof" designs are adaptions of this earlier design.
Economics are always a controlling factor where physical security is concerned. Economics affords us withmaterial possessions. Sometimes for economic reasons, other people want to relieve us of thosepossessions. For economic reasons manufacturers provide us with devices to protect our possessions.Lock manufacturers make locks for one basic reason - to make money for the owner or stockholders ofthe company. Fighting crime is nice but it is so much nicer to make money while doing it.
Lock making is now a highly competitive business which requires thousands if not millions of dollars ofinvestment in mass production equipment and tooling. Lock product marketing is quick to capitalize onconsumer attitudes and try to "get there first" with what will sell the best.
In today's security conscious market place we are being deluged with security products, many ofquestionable value. Other products, while useful, should have been "standard equipment" on our homes orbuildings when we bought them new. The author is opposed to laws , permits, codes and other bureaucratic trappings; however, still believes that an informed buying public should demand that builders do better.
In the last few years this "security consciousness" has inspired manufacturers to produce or market "pickresistant" locks and cylinders. Most manufacturers are careful to avoid using the term "pick proof"because this is an absolute term and leaves them no way out should someone succeed in picking theirlock. We will take a closer look at some of these pick resistant" locks later in this book.
As a closing thought on basic lock design we should examine the purpose of a lock as part of a physicalsecurity system. No lock, even the "high security" versions will absolutely prevent access to the securearea. A lock can only provide two basic functions: make the potential intruder expend time and makenoise. The more of either or both, the better the lock. Also, remember that a security system, like a chain,is no better than the weakest link.
LOCKPICKING
Definition of "Lockpicking" - The means of opening a lock mechanism by the intrusion of a tool ormechanical device, other than the normal operating key. This tool can be as simple as a bent paper clip oran expensive pick set or pick gun.
Why Locks Can Be Picked - A lock mechanism becomes vulnerable to picking for two basic reasons: designshortcomings and manufacturing shortcomings. Both of these flaws are directly related to the selling priceof the locking device. The design flaw allows a pick, wire, pick key, paper clip, hair pin, knife blade, etc. tobe inserted into the keyway in such a manner as to reach and operate the mechanism. Manufacturingshortcomings are found in loose tolerances in the manufacturing process. A tolerance is a necessarysloppiness that is found even in the most expensive of machine products. For example: an .250 in.diameter hole will seldom if ever be exactly .250. The closer to perfection the higher the cost. Therefore,whether in a lock or an automobile, a compromise must be arrived at the engineering level. Basically, anengineer will strive to make the part as cheap as possible and as precise as possible. In lock design a thirdrequirement becomes more important than in some other products and that is strength and durability.
The vulnerability of tolerance is usually found in areas such as pin diameters versus pin hole diametersand a row of pin holes deviating from a straight line. Tolerances allow shims to be inserted in the smallspace necessary between moving parts. Tolerances allow a combination lock to reveal its inner secrets to askilled manipulator. Tolerances, like the air around us are ever present in any machined product. Theycannot be eliminated, only minimized which directly affects the cost of the part. By this time, if you arestill reading this book, you may have come to the conclusion that lockpicking is a highly skilled technicalcomplicated operation requiring mechanical savoy and dexterity beyond the majority of Joe Blows. If youhave, then you are on the purpose of this book which is to show how difficult picking really is and whythe average four thumbed, knuckle dragging, larcenous klutz does well to open a lock with the proper key
one_star_press.pdf 3 21/02/2011 16:13
let alone pick it. A good pick man is about as rare as a good counterfeit plate engraver.
METHODS OF PICKING
Simple Warded Locks - These are typically found in cheaper padlocks, file boxes, luggage, etc. The keysare usually stamped from flat steel and nickel plated. Higher quality warded locks sometimes usecorrugated keys in an effort to provide better security and also make the key stronger. Three suchpadlocks are shown in Figure 1. Their respective keys are also shown. A closer look will reveal that eachkey has the ward cuts in a slightly different position.
Internally, the mechanism is basically as shown in Figure 2. In this illustration we see a flat, hairpin typespring that latches into notches in the shackle. Only a portion, usually the tip of the key actuates thespring latch. Turning the key spreads the spring latch apart, releasing the shackle. It is easy to see that apick for this simple design would only have to be a paper clip or wire with a small "L" bent on one end.
A pick key shaped as shown in Figure 3 would also operate any such lock whose keyway would accept it.This is simply a key with all the ward cuts opened up, leaving only the portion on the tip that is necessaryto operate the latch spring.
Manufacturers, in an effort to improve the security of this basic locking mechanism, have now addedanother spring latch with a ward between them. This design complicates efforts to pick it with a bent wireas previously done. However, a double headed pick key will do the job. Such a key is shown in Figure 4.This key will operate all three locks pictured in Figure 1. Manufactured pick key sets such as shown inFigure 5 are commercially available to locksmiths and law enforcement agencies.
Fig. 1 Fig. 2
Fig. 3 Fig. 4 Fig. 5
Pin Tumbler Locks : This is by far the most common type lock mechanism found today and is the typewhich applies to the picking most commonly referred to in articles on security, and distorted on TV.
To understand picking this lock we must be familiar, to a limited degree, with its mechanism.Manufacturers have dozens of versions of this mechanism yet they are all basically the same mechanically.The drawings in Figures 6 and 7, and also the picture in Figure 8, show a basic mechanism. While they can
one_star_press.pdf 4 21/02/2011 16:13
Claire_FONTAINE_INT.indd 104-105 03/03/11 18:22
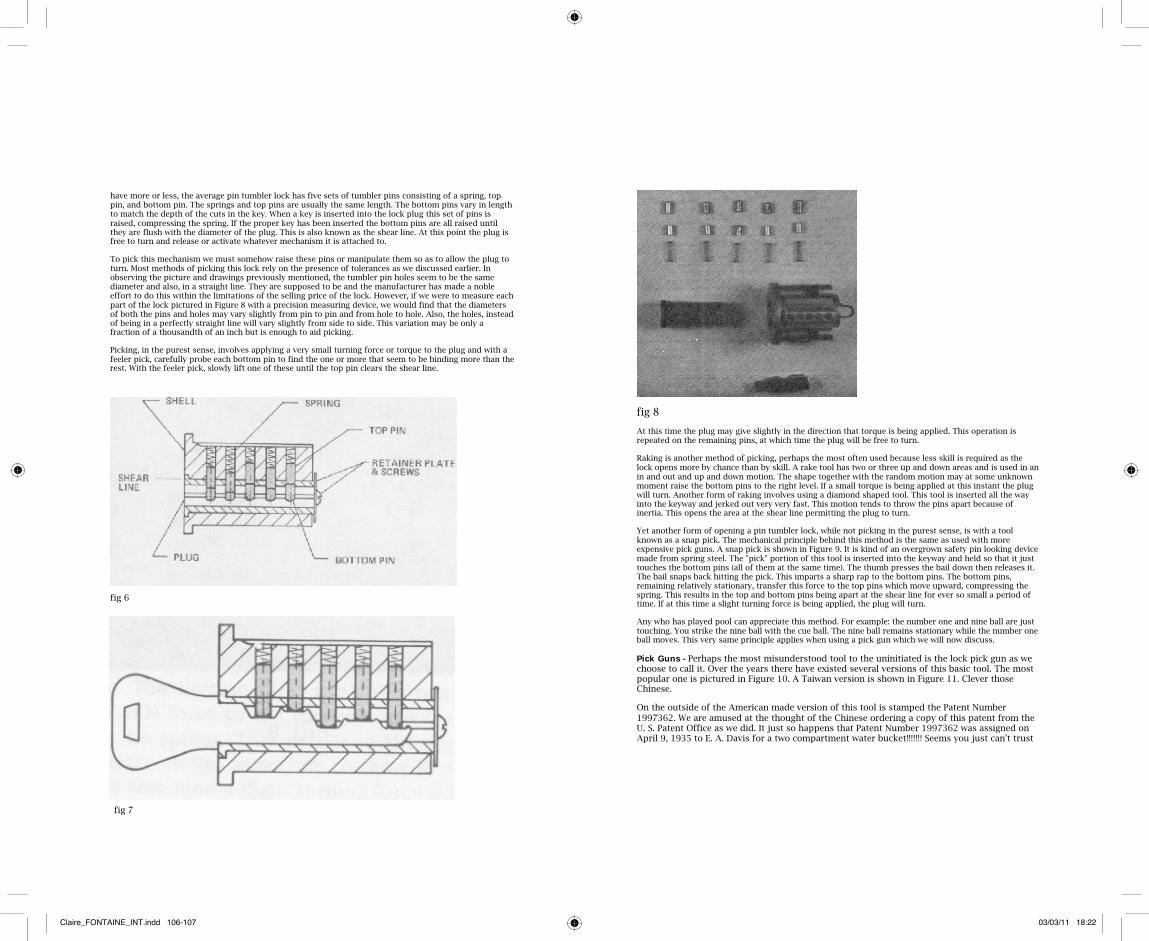
have more or less, the average pin tumbler lock has five sets of tumbler pins consisting of a spring, toppin, and bottom pin. The springs and top pins are usually the same length. The bottom pins vary in lengthto match the depth of the cuts in the key. When a key is inserted into the lock plug this set of pins israised, compressing the spring. If the proper key has been inserted the bottom pins are all raised untilthey are flush with the diameter of the plug. This is also known as the shear line. At this point the plug isfree to turn and release or activate whatever mechanism it is attached to.
To pick this mechanism we must somehow raise these pins or manipulate them so as to allow the plug toturn. Most methods of picking this lock rely on the presence of tolerances as we discussed earlier. Inobserving the picture and drawings previously mentioned, the tumbler pin holes seem to be the samediameter and also, in a straight line. They are supposed to be and the manufacturer has made a nobleeffort to do this within the limitations of the selling price of the lock. However, if we were to measure eachpart of the lock pictured in Figure 8 with a precision measuring device, we would find that the diametersof both the pins and holes may vary slightly from pin to pin and from hole to hole. Also, the holes, insteadof being in a perfectly straight line will vary slightly from side to side. This variation may be only afraction of a thousandth of an inch but is enough to aid picking.
Picking, in the purest sense, involves applying a very small turning force or torque to the plug and with afeeler pick, carefully probe each bottom pin to find the one or more that seem to be binding more than therest. With the feeler pick, slowly lift one of these until the top pin clears the shear line.
fig 6
fig 7
one_star_press.pdf 5 21/02/2011 16:13
fig 8
At this time the plug may give slightly in the direction that torque is being applied. This operation isrepeated on the remaining pins, at which time the plug will be free to turn.
Raking is another method of picking, perhaps the most often used because less skill is required as thelock opens more by chance than by skill. A rake tool has two or three up and down areas and is used in anin and out and up and down motion. The shape together with the random motion may at some unknownmoment raise the bottom pins to the right level. If a small torque is being applied at this instant the plugwill turn. Another form of raking involves using a diamond shaped tool. This tool is inserted all the wayinto the keyway and jerked out very very fast. This motion tends to throw the pins apart because ofinertia. This opens the area at the shear line permitting the plug to turn.
Yet another form of opening a pin tumbler lock, while not picking in the purest sense, is with a toolknown as a snap pick. The mechanical principle behind this method is the same as used with moreexpensive pick guns. A snap pick is shown in Figure 9. It is kind of an overgrown safety pin looking devicemade from spring steel. The "pick" portion of this tool is inserted into the keyway and held so that it justtouches the bottom pins (all of them at the same time). The thumb presses the bail down then releases it.The bail snaps back hitting the pick. This imparts a sharp rap to the bottom pins. The bottom pins,remaining relatively stationary, transfer this force to the top pins which move upward, compressing thespring. This results in the top and bottom pins being apart at the shear line for ever so small a period oftime. If at this time a slight turning force is being applied, the plug will turn.
Any who has played pool can appreciate this method. For example: the number one and nine ball are justtouching. You strike the nine ball with the cue ball. The nine ball remains stationary while the number oneball moves. This very same principle applies when using a pick gun which we will now discuss.
Pick Guns - Perhaps the most misunderstood tool to the uninitiated is the lock pick gun as wechoose to call it. Over the years there have existed several versions of this basic tool. The mostpopular one is pictured in Figure 10. A Taiwan version is shown in Figure 11. Clever thoseChinese.
On the outside of the American made version of this tool is stamped the Patent Number1997362. We are amused at the thought of the Chinese ordering a copy of this patent from theU. S. Patent Office as we did. It just so happens that Patent Number 1997362 was assigned onApril 9, 1935 to E. A. Davis for a two compartment water bucket!!!!!!! Seems you just can't trust
one_star_press.pdf 6 21/02/2011 16:13
Claire_FONTAINE_INT.indd 106-107 03/03/11 18:22
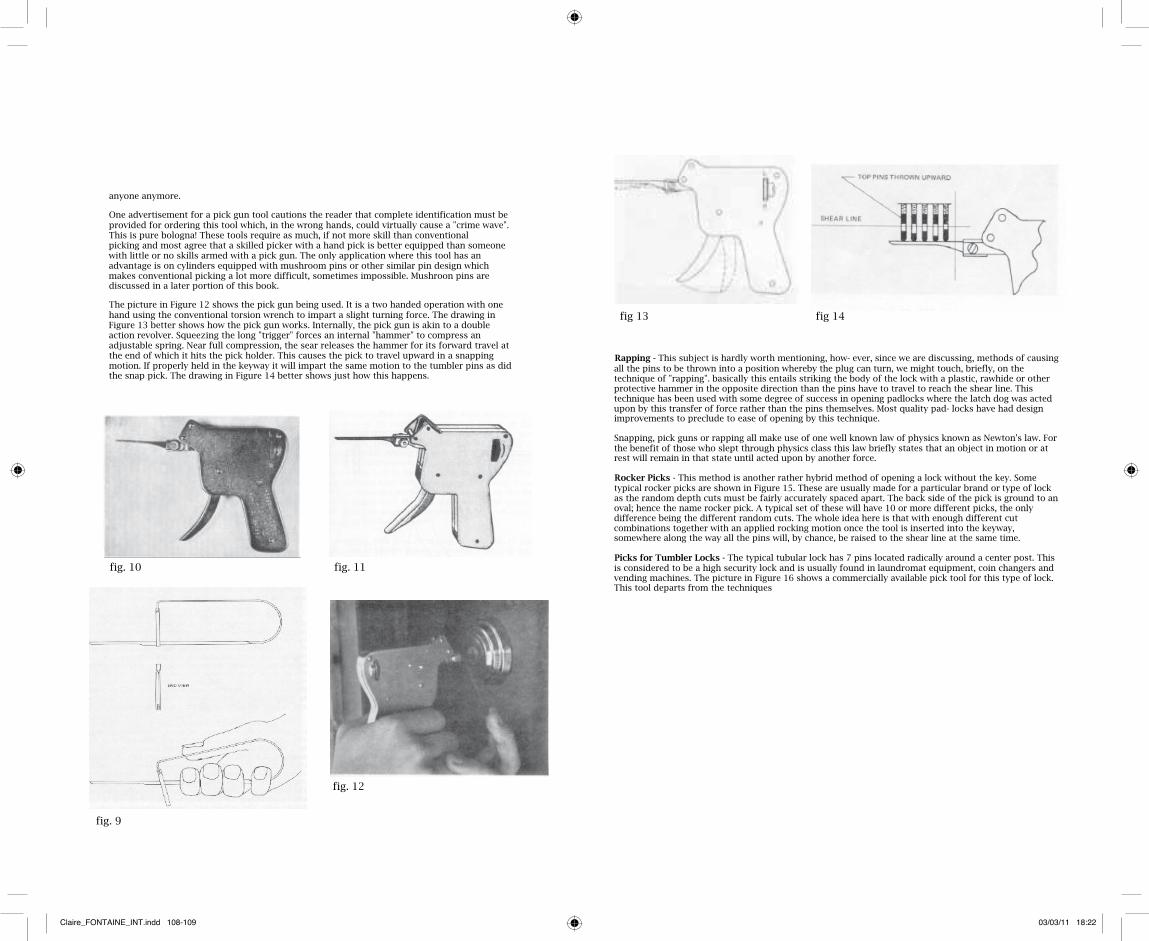
anyone anymore.
One advertisement for a pick gun tool cautions the reader that complete identification must beprovided for ordering this tool which, in the wrong hands, could virtually cause a "crime wave".This is pure bologna! These tools require as much, if not more skill than conventionalpicking and most agree that a skilled picker with a hand pick is better equipped than someonewith little or no skills armed with a pick gun. The only application where this tool has anadvantage is on cylinders equipped with mushroom pins or other similar pin design whichmakes conventional picking a lot more difficult, sometimes impossible. Mushroon pins arediscussed in a later portion of this book.
The picture in Figure 12 shows the pick gun being used. It is a two handed operation with onehand using the conventional torsion wrench to impart a slight turning force. The drawing inFigure 13 better shows how the pick gun works. Internally, the pick gun is akin to a doubleaction revolver. Squeezing the long "trigger" forces an internal "hammer" to compress anadjustable spring. Near full compression, the sear releases the hammer for its forward travel atthe end of which it hits the pick holder. This causes the pick to travel upward in a snappingmotion. If properly held in the keyway it will impart the same motion to the tumbler pins as didthe snap pick. The drawing in Figure 14 better shows just how this happens.
fig. 10 fig. 11
fig. 9
one_star_press.pdf 7 21/02/2011 16:13
fig. 12
fig 13 fig 14
Rapping - This subject is hardly worth mentioning, how- ever, since we are discussing, methods of causingall the pins to be thrown into a position whereby the plug can turn, we might touch, briefly, on thetechnique of "rapping". basically this entails striking the body of the lock with a plastic, rawhide or otherprotective hammer in the opposite direction than the pins have to travel to reach the shear line. Thistechnique has been used with some degree of success in opening padlocks where the latch dog was actedupon by this transfer of force rather than the pins themselves. Most quality pad- locks have had designimprovements to preclude to ease of opening by this technique.
Snapping, pick guns or rapping all make use of one well known law of physics known as Newton's law. Forthe benefit of those who slept through physics class this law briefly states that an object in motion or atrest will remain in that state until acted upon by another force.
Rocker Picks - This method is another rather hybrid method of opening a lock without the key. Sometypical rocker picks are shown in Figure 15. These are usually made for a particular brand or type of lockas the random depth cuts must be fairly accurately spaced apart. The back side of the pick is ground to anoval; hence the name rocker pick. A typical set of these will have 10 or more different picks, the onlydifference being the different random cuts. The whole idea here is that with enough different cutcombinations together with an applied rocking motion once the tool is inserted into the keyway,somewhere along the way all the pins will, by chance, be raised to the shear line at the same time.
Picks for Tumbler Locks - The typical tubular lock has 7 pins located radically around a center post. Thisis considered to be a high security lock and is usually found in laundromat equipment, coin changers andvending machines. The picture in Figure 16 shows a commercially available pick tool for this type of lock.This tool departs from the techniques
one_star_press.pdf 8 21/02/2011 16:13
Claire_FONTAINE_INT.indd 108-109 03/03/11 18:22
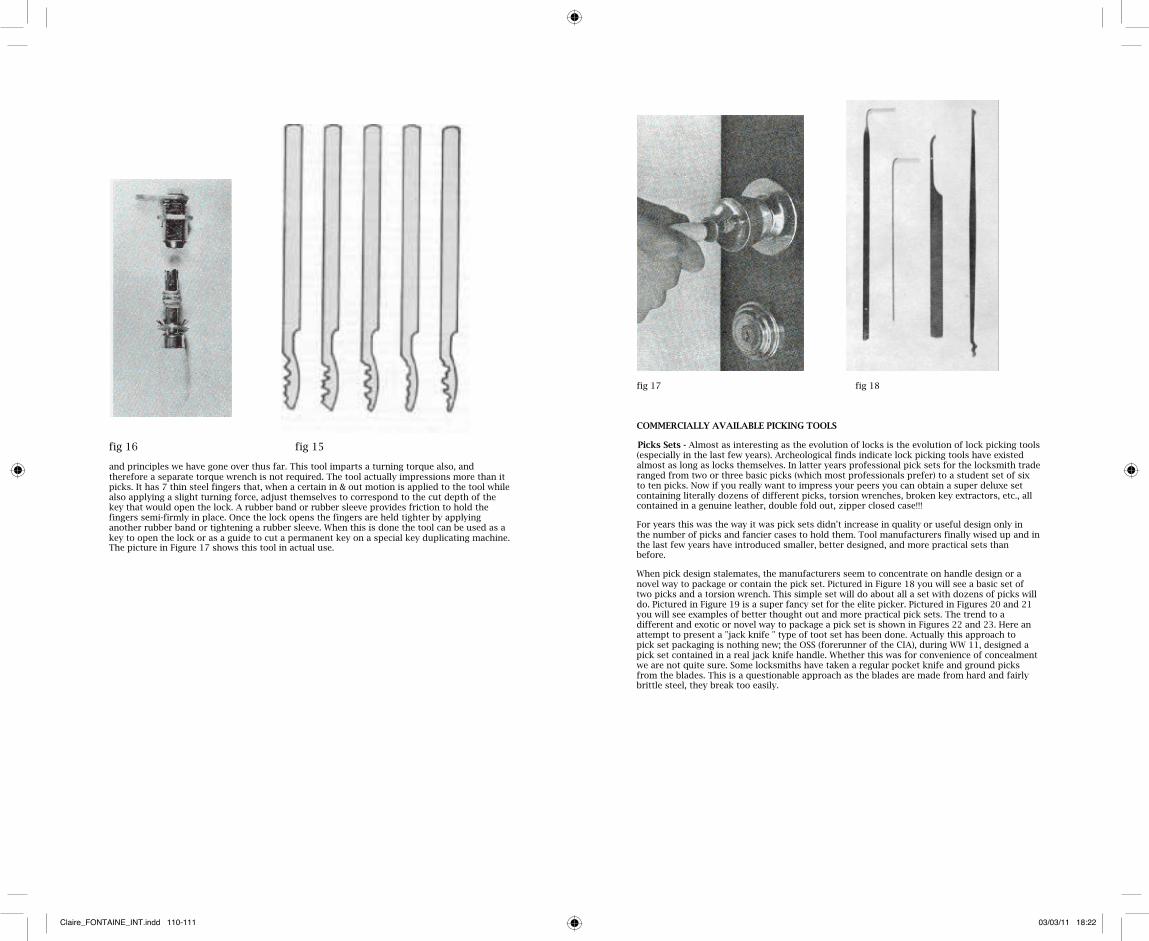
fig 16 fig 15
and principles we have gone over thus far. This tool imparts a turning torque also, andtherefore a separate torque wrench is not required. The tool actually impressions more than itpicks. It has 7 thin steel fingers that, when a certain in & out motion is applied to the tool whilealso applying a slight turning force, adjust themselves to correspond to the cut depth of thekey that would open the lock. A rubber band or rubber sleeve provides friction to hold thefingers semi-firmly in place. Once the lock opens the fingers are held tighter by applyinganother rubber band or tightening a rubber sleeve. When this is done the tool can be used as akey to open the lock or as a guide to cut a permanent key on a special key duplicating machine.The picture in Figure 17 shows this tool in actual use.
one_star_press.pdf 9 21/02/2011 16:13
fig 17 fig 18
COMMERCIALLY AVAILABLE PICKING TOOLS
Picks Sets - Almost as interesting as the evolution of locks is the evolution of lock picking tools(especially in the last few years). Archeological finds indicate lock picking tools have existedalmost as long as locks themselves. In latter years professional pick sets for the locksmith traderanged from two or three basic picks (which most professionals prefer) to a student set of sixto ten picks. Now if you really want to impress your peers you can obtain a super deluxe setcontaining literally dozens of different picks, torsion wrenches, broken key extractors, etc., allcontained in a genuine leather, double fold out, zipper closed case!!!
For years this was the way it was pick sets didn't increase in quality or useful design only inthe number of picks and fancier cases to hold them. Tool manufacturers finally wised up and inthe last few years have introduced smaller, better designed, and more practical sets thanbefore.
When pick design stalemates, the manufacturers seem to concentrate on handle design or anovel way to package or contain the pick set. Pictured in Figure 18 you will see a basic set oftwo picks and a torsion wrench. This simple set will do about all a set with dozens of picks willdo. Pictured in Figure 19 is a super fancy set for the elite picker. Pictured in Figures 20 and 21you will see examples of better thought out and more practical pick sets. The trend to adifferent and exotic or novel way to package a pick set is shown in Figures 22 and 23. Here anattempt to present a "jack knife " type of toot set has been done. Actually this approach topick set packaging is nothing new; the OSS (forerunner of the CIA), during WW 11, designed apick set contained in a real jack knife handle. Whether this was for convenience of concealmentwe are not quite sure. Some locksmiths have taken a regular pocket knife and ground picksfrom the blades. This is a questionable approach as the blades are made from hard and fairlybrittle steel, they break too easily.
one_star_press.pdf 10 21/02/2011 16:13
Claire_FONTAINE_INT.indd 110-111 03/03/11 18:22
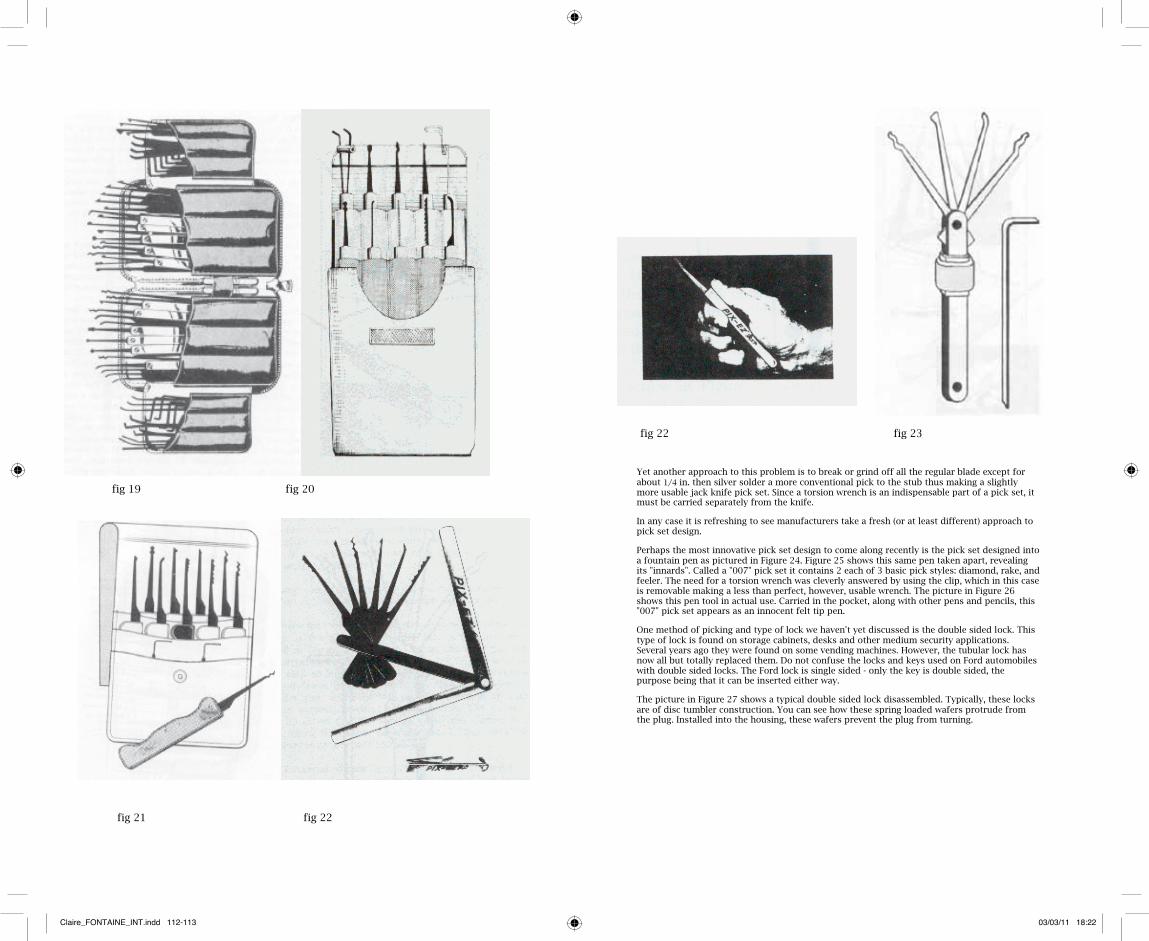
fig 19 fig 20
fig 21 fig 22
one_star_press.pdf 11 21/02/2011 16:13
fig 22 fig 23
Yet another approach to this problem is to break or grind off all the regular blade except forabout 1/4 in. then silver solder a more conventional pick to the stub thus making a slightlymore usable jack knife pick set. Since a torsion wrench is an indispensable part of a pick set, itmust be carried separately from the knife.
In any case it is refreshing to see manufacturers take a fresh (or at least different) approach topick set design.
Perhaps the most innovative pick set design to come along recently is the pick set designed intoa fountain pen as pictured in Figure 24. Figure 25 shows this same pen taken apart, revealingits "innards". Called a "007" pick set it contains 2 each of 3 basic pick styles: diamond, rake, andfeeler. The need for a torsion wrench was cleverly answered by using the clip, which in this caseis removable making a less than perfect, however, usable wrench. The picture in Figure 26shows this pen tool in actual use. Carried in the pocket, along with other pens and pencils, this"007" pick set appears as an innocent felt tip pen.
One method of picking and type of lock we haven't yet discussed is the double sided lock. Thistype of lock is found on storage cabinets, desks and other medium security applications.Several years ago they were found on some vending machines. However, the tubular lock hasnow all but totally replaced them. Do not confuse the locks and keys used on Ford automobileswith double sided locks. The Ford lock is single sided - only the key is double sided, thepurpose being that it can be inserted either way.
The picture in Figure 27 shows a typical double sided lock disassembled. Typically, these locksare of disc tumbler construction. You can see how these spring loaded wafers protrude fromthe plug. Installed into the housing, these wafers prevent the plug from turning.
one_star_press.pdf 12 21/02/2011 16:13
Claire_FONTAINE_INT.indd 112-113 03/03/11 18:22

fig 24 fig 25
one_star_press.pdf 13 21/02/2011 16:13
fig 26 fig 27
The picture in Figure 28 shows a set of commercially available double sided picks. Technically, these are acombination of a rake, a rocker pick and a try out key. The different tumbler cuts together with an up anddown rocking motion will usually result in one of these picks opening the lock.
The picture in Figure 30 shows such a pick inserted into the plug previously shown. We can see that thetumblers are pulled back into the plug enough to let it rotate if it were in the housing. The fingers of thesepicks are slim, of hardened steel, and are easily broken if care is not exercised while applying the up anddown motion.
fig. 30
Schlage Wafer Picks - Pictured in Figure 31 is a unique set of picking tools. These are made specifically forpicking the Schlage wafer tumbler lock. The set consists of two pairs of modified keys and two picks.These are pictured together with a pair of regular keys for comparison. These two pairs of modified keysare necessary because of Schlage's two different keyways and key tip configuration.
The drawing in Figure 32 shows the configuration in which this tool is used. The modified key provides apicking function, and also provides torque to facilitate the picking.
fig. 31 fig. 32
IMPROVISED PICKING TOOLS
Today there are literally hundreds of commercially available tools for the locksmith. Most of these toolsstarted out as homemade versions and many of the commercially available tools around today can be, andhave been duplicated by those handy with hand and machine. Only a few locksmithing tools requireexpensive or precision manufacturing machinery and processes. Most picks can be made by bending andgrinding pieces of steel wire and flat steel spring material.
Any flat spring material ranging in thickness from .015 to .035 can he fashioned into a pick with the aid ofa small grinder. One of the most common sources of such material is an automotive feeler gauge. Thesegauges have blades ranging in thickness from .001 to approximately .040 of an inch.
The picture in Figure 33 shows an improvised "jack knife" pick set which was made from an automotivefeeler gauge. There are enough blades in a set like this to allow hand making a complete set of special andcustom picking tools and shims.
one_star_press.pdf 14 21/02/2011 16:13
Claire_FONTAINE_INT.indd 114-115 03/03/11 18:22
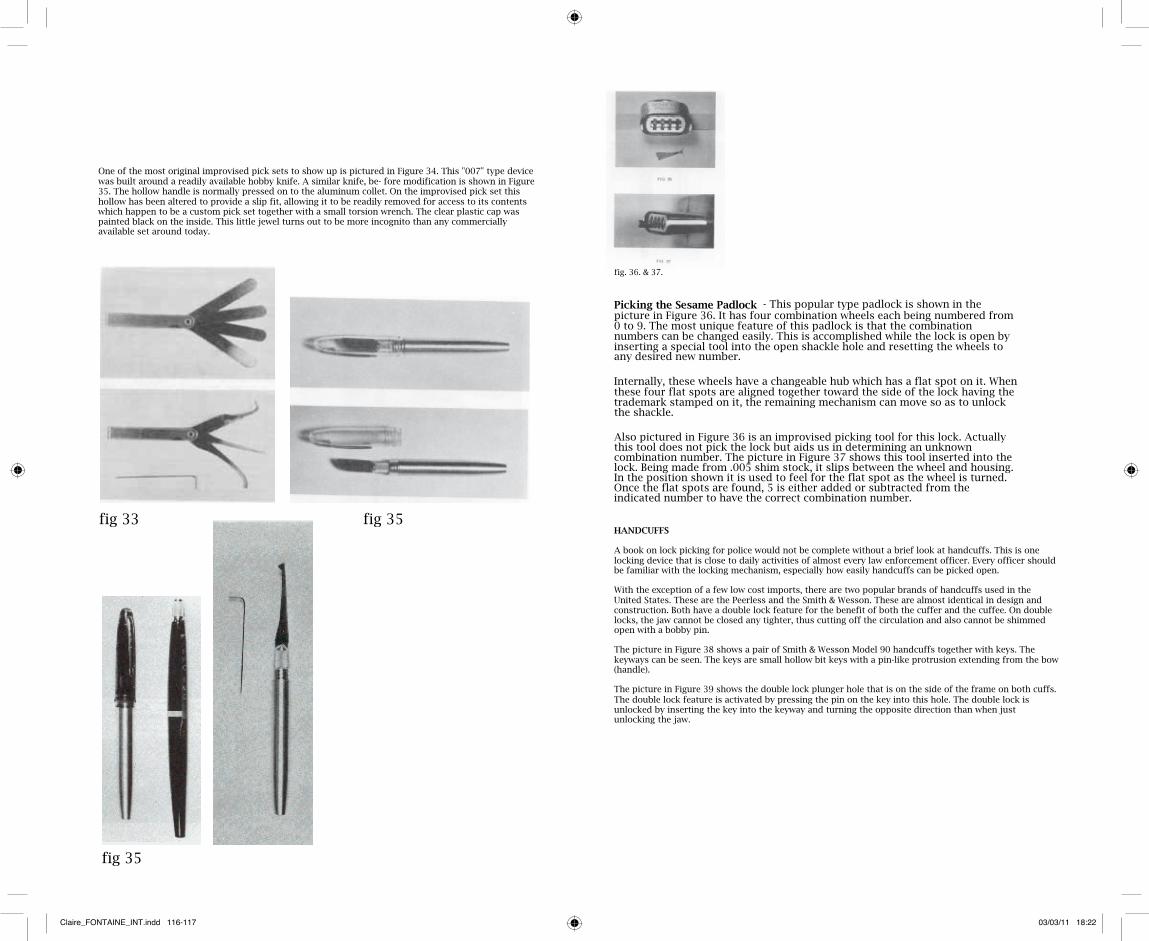
One of the most original improvised pick sets to show up is pictured in Figure 34. This "007" type devicewas built around a readily available hobby knife. A similar knife, be- fore modification is shown in Figure35. The hollow handle is normally pressed on to the aluminum collet. On the improvised pick set thishollow has been altered to provide a slip fit, allowing it to be readily removed for access to its contentswhich happen to be a custom pick set together with a small torsion wrench. The clear plastic cap waspainted black on the inside. This little jewel turns out to be more incognito than any commerciallyavailable set around today.
fig 33 fig 35
one_star_press.pdf 15 21/02/2011 16:13
fig 35
fig. 36. & 37.
Picking the Sesame Padlock - This popular type padlock is shown in thepicture in Figure 36. It has four combination wheels each being numbered from0 to 9. The most unique feature of this padlock is that the combinationnumbers can be changed easily. This is accomplished while the lock is open byinserting a special tool into the open shackle hole and resetting the wheels toany desired new number.
Internally, these wheels have a changeable hub which has a flat spot on it. Whenthese four flat spots are aligned together toward the side of the lock having thetrademark stamped on it, the remaining mechanism can move so as to unlockthe shackle.
Also pictured in Figure 36 is an improvised picking tool for this lock. Actuallythis tool does not pick the lock but aids us in determining an unknowncombination number. The picture in Figure 37 shows this tool inserted into thelock. Being made from .005 shim stock, it slips between the wheel and housing.In the position shown it is used to feel for the flat spot as the wheel is turned.Once the flat spots are found, 5 is either added or subtracted from theindicated number to have the correct combination number.
HANDCUFFS
A book on lock picking for police would not be complete without a brief look at handcuffs. This is onelocking device that is close to daily activities of almost every law enforcement officer. Every officer shouldbe familiar with the locking mechanism, especially how easily handcuffs can be picked open.
With the exception of a few low cost imports, there are two popular brands of handcuffs used in theUnited States. These are the Peerless and the Smith & Wesson. These are almost identical in design andconstruction. Both have a double lock feature for the benefit of both the cuffer and the cuffee. On doublelocks, the jaw cannot be closed any tighter, thus cutting off the circulation and also cannot be shimmedopen with a bobby pin.
The picture in Figure 38 shows a pair of Smith & Wesson Model 90 handcuffs together with keys. Thekeyways can be seen. The keys are small hollow bit keys with a pin-like protrusion extending from the bow(handle).
The picture in Figure 39 shows the double lock plunger hole that is on the side of the frame on both cuffs.The double lock feature is activated by pressing the pin on the key into this hole. The double lock isunlocked by inserting the key into the keyway and turning the opposite direction than when justunlocking the jaw.
one_star_press.pdf 16 21/02/2011 16:13
Claire_FONTAINE_INT.indd 116-117 03/03/11 18:22

Because of their small profile and light weight design, handcuffs have the simplest of lock mechanisms.While these locks are strong and are generally secure enough for their application, a law enforcementofficer should be aware just how easy they are to open. The picture in Figure 40 shows these cuffs beingshimmed open with a thin piece of steel. Over the years, bobby pins have become just about the standardtool for this operation, probably because of their presence almost everywhere including the crack in therear seat of your patrol car. When was the last time you checked this before taking a car out?
The pictures in Figures 41 and 42 show a ball point pen's Insides and the cuffs being opened by a keyfashioned from this pen. In this particular case, the inside of the ball point pen was transformed into ahandcuff key in about five seconds with the only tool being a nail clipper. With a little nore time and efforta much better improvised key could be made.
We hope that these two simple illustrations have made the point of how important it is to keep even thesimplest of raw materials away from the dexterous cuffee.
fig 38 fig 39
one_star_press.pdf 17 21/02/2011 16:13
fig 40 fig 42 fig 41
CONCLUSION
You, the reader, have just seen most of the inner secrets of lock picking. We have looked brieflyat some of the more common types of locks and the established ways of picking each one.
While the tools used differ, the basic ingredients of skill and dexterity remain the same. Lockpicking is not easy. You may "luck out" sometimes but will usually spend several minutes,sometimes hours before succeeding. No lock picking tool will perform by itself any more thanan artists paint brush.
Lockpicking is hardly a skill of the fence hopping, run of the mill burglar. He seldom has theknowledge or patience. These operators usually find enough open windows and unlocked doorsto satisfy their needs.
Lock picking enters the larcenous arena when the stakes are high. These stakes are usuallyitems of high monetary value when burglary is concerned or intelligence gathering whereespionage is involved. It is only here where the high security and "pick resistant" locks are reallyworth their extra cost and only then when combined into an overall physical security system.For the average home owner the extra security afforded by pick resistant locks should be addedonly after tending to more vulnerable points of security on their premises.
With little or no expenditure, existing locks can be made more secure by ascertaining that thereis enough difference in the cuts on the key so as not to allow a knife blade or similar straightinstrument to lift the tumblers to the shear line. It is also good practice to eliminate masterkeying found in most tract homes. Recently purchased or rented homes should be rekeyed bythe new occupant. You can never be sure just who the former owner or occupant gave keys to.
In "pick resistant" lock design, attention is usually focused on the pins. The "mushroom" pin was one ofthe first attempts to foil regular picking techniques. Here the top pin, rather than being a straight, smoothsided pin is machined to appear as a small, mushroom shaped spool. If you are now familiar with basicpin tumbler design, you can readily see how these work.
one_star_press.pdf 18 21/02/2011 16:13
Claire_FONTAINE_INT.indd 118-119 03/03/11 18:22

All in all there needs to be more attention to complete home security rather than concentrate on a "pickproof" lock or cylinder. The extra cost of this lock might be better spent in other areas of physicalsecurity. This does not mean such a lock won't enhance an already good system, only that it should beconsidered in the proper perspective.
one_star_press.pdf 19 21/02/2011 16:13
Contents
IntroductionToolsLock IdentificationPin Tumbler LocksWafer Tumbler LocksDouble Wafer LocksPin and Wafer Tumbler PadlocksTubular Cylinder LocksMushroom and Spool Pin Tumbler LocksMagnetic LocksDisk Tumbler LocksOpening a Combination PadlockTips for SuccessSome PrecautionsNobody’s perfectLearning to Touch and FeelVisualizationIllustrations
125579
101012131416182021222224
Claire_FONTAINE_INT.indd 120-121 03/03/11 18:22
1
INTRODUCTION
The ancient Egyptians were the first to come up with a complicated se-curity device. This was the pin tumbler lock. We use the same security principle today on millions of applications.
The most commonly used lock today is the pin tumbler lock. A series of pins that are divided at certain points must be raised to these dividing points in relationship to the separation between the cylinder wall and the shell of the lock by a key cut for that particular series of pin divisions. Thus the cylinder can be turned, and the mechanism or lock is unlocked.
Lock picking means to open a lock by use of a flat piece of steel called a pick. Actually, the process requires two pieces of flat steel to open cylin-der locks. It amuses me to watch spies and thieves on TV picking locks using only one tool. But it is for the better in a sense. If everyone learned how to pick locks by watching TV, we would all be at the mercy of any-one who wanted to steal from us, and the cylinder lock for the most part would be outdated.
The actual definition of lock picking should be: “The manipulation and opening of any restrictive mechanical or electronic device by usage of tools other than the implied instrument (key or code) used solely for that device.” A little lengthy, but more accurate description. With cylinder locks, it requires a pick and a tension wrench.
By picking the lock, you simply replace the function of a key with a pick that raises the pins to their “breaking point,” and using a tension wrench one rotates the cylinder to operate the cam at the rear of the lock’s cylin-der to unlock the mechanism. (See Fig.1-2 .page 24)
The tension wrench is used to apply tension to the cylinder of the lock to cause a slight binding action on the pins as well as to turn the cylinder after the pins have been aligned by the pick; this opens the lock. The slight binding action on the pins caused by the tension wrench allows one to hear and feel each pin as it “breaks” or reaches alignment with the separation of cylinder and shell. The vibration is felt in the knuckles and joints of the fingers, and the sound is similar to that of a cricket in an arm wrestling matcha subtle yet distinct click.
Claire_FONTAINE_INT.indd 122-123 03/03/11 18:22

2
Usually you need very little tension with the wrench while picking the lock. In fact, it takes somewhat of a delicate, yet firm touch. This is the secret to picking locks successfully-a firm and yet gentle touch on the tension wrench. You should be able to feel the pins click into place with the right amount of tension; experience will be your true guide.
Half of your success will be based on your ability to use or improvise var-ious objects to use as tools for your purpose. The other half will depend on practice. I once picked a pin tumbler lock using a borrowed roach clip and a hairpin. A dangerous fire was prevented and probably several lives were saved. The world is full of useful objects for the purpose, so never hesitate to experiment.
TOOLS
I started picking locks using a small screwdriver and a safety pin. The screwdriver can be used as a tension wrench, and the safety pin is used like a “hook” pick. The last half inch of the screwdriver’s tip was bent at a 45 degree angle so as to allow easy entry for the pick (bent safety pin). Do not heat the screwdriver tip to bend it, as this will destroy its temper. Use a vise and hammer to do the job. Bend slowly by using firm and short taps of the hammer, otherwise you may break and weaken the shaft. The safety pin should be about one and a half inches long and bent in the same way.
With the small screwdriver as a tension wrench, you can use more of a turning or twisting movement than with a regular tension wrench so you will generally need less direct force when using it. As I mentioned earlier, with practice you will develop the feeling for the right amount of tension on a cylinder. If the safety pin bends after a short time, use the keyway of the lock you are picking to bend it back into shape. Even after sev-eral times of bending, it should still be useful. Keep a few spares handy, though. File the tip of the safety pin flat in relationship to the bottom of the pins in the lock. Smooth any sharp edges so that you won’t impale yourself. Also, if the tip is smooth, the pick will not get hung up on the pins while picking the lock. Granted these are not the best tools for the job, but they do work. If you learn to use your junk box as a rich source of equipment, then with your experience real lock picks will give you magic fingers. Also, you’ll have the advantage of being able to improvise should you be without the real things (which are illegal to carry on your person in most parts of the country).
3
Lock picks are difficult to get. I received my first set when I became a locksmith apprentice. All of my subsequent sets I made from stainless steel steak knives with a grinder and cut-off wheel. They are much more durable than the commercial picks. If you do make your own, make cer-tain that the steel is quenched after every 3 seconds of grinding-do not allow the pick to get hot to the point of blue discoloration.
A diamond pick is the standard pick I use on most all pin and wafer locks. A small diamond pick is used for small pin tumbler locks such as small Master padlocks, cabinet file locks, etc. The tubular cylinder lock pick, we will discuss later. The double-ended, single-pronged tension wrench is used with the diamond pick. It features double usage; a small end for small cylinders and a large end for the larger cylinders. A special tension wrench is used for double-wafer cylinder locks with an end with two prongs on one end and tubular cylinder locks with the single prong on the other end. We will discuss tubular cylinder and double-wafer locks later as well. The steel should be .030 inches to .035 inches thick for the picks and .045 inches to .050 inches thick for the first tension wrench men-tioned above. The second tension wrench should be .062 inches square (.062 inches x .062 inches) on the tubular cylinder side (one pronged end), and .045 inches thick on the double-wafer end (two-pronged end). You can accomplish this by starting out with .045 inches in thickness.
The two-pronged end should be bent carefully in a vise at a 30 degree angle. This allows easy entry for the pick on double wafer locks. (See fig. 3. page 25)
Among the more common tools used by professionals around the world is the rake pick. The rake pick is used to “rake” the tumblers into place by sliding it in and out across the tumblers. I seldom use the rake pick be-cause it is not highly effective and I consider it a sloppy excuse for a lock pick. I’ve seen the rake pick work on some difficult locks, but you can rake with a diamond pick and get the same results. I prefer the diamond pick for most tumbler locks simply because it is easier to get in and out of locks-it slides across the tumblers with little or no trouble.
A ball pick is used for picking double-wafer cylinder locks, though I never carry one; I use a large diamond pick and reverse it when picking these locks. This means I have one less pick to carry and lose. (See Fig. 4-5. page 26)
Claire_FONTAINE_INT.indd 124-125 03/03/11 18:22
4
A double-ball pick is used like a rake on double-wafer locks in conjunc-tion with a tension wrench (two-pronged end).
A hook pick is used to open lever tumbler locks, though again, I use a diamond pick with a hooking action when possible. There are various sizes of hooks but they all have the same basic job-to catch the movable levers that unlock lever locks.
There are also various sizes of tension wrenches. They are usually made from spring steel. The standard tension wrench is used for pin and wafer locks. A special tension wrench is called a Feather Touch, and it is used for highsecurity mushroom and spool pin tumbler locks.
Its delicate spring-loaded action allows the pick to bypass the tendencies of these pins to stick. A homemade version of the Feather Touch can be made from a medium-light duty steel spring.
As to getting lock picks for your own use, you cannot go down to your local hardware store and buy them. I could supply you with some sources or wholesalers, but I do believe it is illegal for them to sell to individuals. Your best bet would be to find a machine shop that will fabricate them for you. It would be less expensive and arouse less suspicion if you purchase a small grinder with a cut-off wheel and make your own. With a little practice, you can make a whole set in an afternoon. Use a copy of the illustrations in this book as templates and carefully cut them out with an X-ACTO knife. Cut down the middle of the lines. Acquire some stainless steel (many steak knives approach proper thickness).
With a glue stick, lightly coat one side of the paper template and apply it to the cleaned stainless surface, and allow it to dry. You’ll need a can of black wrinkle finish spray paint. This kind of paint has a high carbon content and can stand high temperature of grinding. Spray the stainless (or knives) with the patterns glued on and dry in a warm oven or direct sunlight for one hour. Set aside for twenty-four more hours. Peel off the paper template and you are ready to cut and grind. Please use caution when cutting and grinding. The piece should be quenched every three seconds in cold water. Smooth up sharp edges with a small file or burnishing wheel. Tools made from stainless steel will outlast the purchased ones. The tools purchased from most sup-pliers are made from spring steel and wear out after about 100 uses. The stainless steel ones, if properly made, should last over 2,000 uses.
5
LOCK IDENTIFICATION
There are many types of locks, the most common being: 1. The pin tumbler lock. Used for house and garage doors, padlocks, mail boxes, and Ford automobiles.
2. The wafer tumbler lock. Used for garage and trailer doors, desks, pad-locks, cabinets, most autos, window locks, and older vending machines.
3. The double-wafer lock. Used for higher security wafer tumbler ap-plications.
4. The warded locks. Used for light security padlocks and old-fashioned door locks.
5. Lever locks Used for light security and older padlocks, sophisticated safe-deposit boxes, some desks, jewelry boxes, and small cash boxes.
6. Tubular cylinder locks. Used for alarm control systems, newer vending machines, car-wash control boxes and wherever higher security problems might exist.
These locks are the more common locks used yet there are variations and combinations of these principal types that usually pick open in the man-ner that will be discussed. Some of them just require practice of the basic types, others luck, and most of the rest of them knowledge of how that particular lock works and is keyed. This comes from experience. (See fig. 6-7. page 27)
PIN TUMBLER LOCKS
Pin tumbler locks offer the most security for their price. They have close machine tolerances and approximately 1,000,000 different key combina-tions for a five-pin lock. Considering the thousands of different compa-nies making pin tumblers (different shaped keyways for each company or design line), the chances of someone having a key that will work in your front door lock are one in many billions.
Pin tumbler locks can easily be identified by peering down the keyway and locating the first round pin. Sometimes you can see the pin’s dividing point, where it breaks with the cylinder wall (shear point).
Claire_FONTAINE_INT.indd 126-127 03/03/11 18:22

6
To successfully pick a pin tumbler lock, your sense of touch sould be honed so that both hands feel the tools. Once the hand holding the pick has located a slight relief in tension while picking a particular tumbler, the other hand holding the tension wrench will feel a relief or breaking point. Both hands should be involved with the sense of touch, the sensing of the inner workings of the lock.
We are now ready to begin the first lesson. First open your front door and check for a pin tumbler lock on it. It should have one on it. If there is one, leave the door open to decrease suspicion. Do not lock yourself out of your apartment or house by being overconfident; not only will you raise suspicion, but window glass is not cheap.
HOW TO PICK A TUMBLER LOCK
STEP ONE
Without using the tension wrench, slip the pick into the lock. The “hook” of the pick should be toward the tumblers (up in most cases, depending on whether or not the lock was mounted upside down-you can tell by looking down the keyway and locating the first pin with your pick). Try to feel the last tumbler of the lock. It should be 7/8 inches into the lock for a five-pin tumbler lock (most common pin tumbler lock used).
Make certain that you have no tension on the wrench when inserting the pick as this will encumber the frontal tumblers. When you feel the back tumbler, slowly raise it with a slight prying motion of the pick. Release it, but keep the pick in the lock on the rear tumbler.
Now insert the tension wrench, allowing room for the pick to manipulate all of the pins. It should be placed at the bottom of the cylinder if the lock was mounted upright, tumblers toward the top of the cylinder. Apply firm and yet gentle clockwise pressure to the tension wrench.
Slowly raise the back tumbler with a slight prying motion of the pick. A minute click will be felt and heard when it breaks. It will lose its springi-ness when this occurs, so do not go any further with it. Any further move-ment with the pick will cause binding by going past the pins’ shear line. Continue an even pressure with the tension wrench.
Keeping an even tension pressure, proceed to Step Two.
7
STEP TWO
The fourth tumbler should be easily felt since it is the next one in line. Raise it until it breaks, keeping the tension wrench steady. It too will give a sound and sensation when it breaks or aligns.
STEP THREE
The third or middle tumbler is next. Again, it too will click. Maintain a constant, even pressure on the wrench - about the same pressure that you would use to replace a cap on a ketchup bottle. You may feel the “clicks” in your tension wrench as well as hear them. (See Fig.8-11. page 28)
STEPS FOUR AND FIVE
Continue on to the next tumbler out, working toward you. When it breaks, raise the last (front) tumbler to its braking point and the cylinder should be free to rotate and unlock the door. Sometimes you may have to play with the wrench to open the lock because you may have raised a tumbler too high, past its breaking point. If this is the case, very slowly and gradu-ally release the tension wrench pressure and the overly extended tumbler will drop into its breaking point before the other tumblers have a chance to fall. The cylinder should pop open at that point. I have found that this technique is responsible for over 30 percent of my successes in opening all tumbler locks.
If the lock still refuses to open after all that treatment, release the tension wrench pressure, allowing all of the tumblers to drop and start over. You may have more than one tumbler too high and would be better off to re-peat the picking process.
WAFER TUMBLER LOCKS
Wafer tumbler locks make up over one-fourth of the locks in use in the world. Since they are generally easier to pick than most pin tum-bler locks, you will be 75 percent master after fooling around with these mechanisms. That is why I wrote about pin tumbler locks first-they are more difficult and make up over one-half of the locks used today. (See Fig.12-14. page 29)
Claire_FONTAINE_INT.indd 128-129 03/03/11 18:22

8
The term wafer refers to the general shape of the tumblers. The wafers are flat, spring-loaded tumblers that are much thinner than pins and the distance between them is less. Wafer locks are picked in the same way as pin tumbler locks, but you must compensate for the smaller dimensions. You can identify wafer locks simply by looking down the keyway and locating the first flat tumbler. The last tumbler on most wafer locks is located about one half inch into the lock.
Wafer locks are used on filing cabinets, lockers, most cars, garage doors, desks, and wherever medium security is required. The only wafer tumbler lock in common use that is difficult to pick is the side-bar wafer lock. It is the most popular type of auto lock. This lock is of different design than most other locks and offers much more security than a regular wafer tumbler lock, or even a pin tumbler lock.
The side bar lock is used mostly on General Motors cars and trucks since 1935. It is used on ignitions, door, and trunk locks. Side bar locks are hard to pick because you cannot feel or hear the tumblers align with the cylinders breaking point. A spring-loaded bar falls into place to allow the cylinder to turn when all of the tumblers are aligned. There is no way to tell when that happens. One learns to sense the bar while picking so that it seems to fall into place by itself. But for beginners, I recommend this technique for emergency openings: Peer down the keyway and locate the side groove of any of the tumblers using a pick as a searching tool. Drill a small hole in the shell of the lock above the bar which is above the groove on the tumblers. Since side bar locks have off-centered keyways, the usual place to drill is opposite of the keyway. Using an L-shaped steel wire, put pressure on the sidebar and rake the tumblers using a tension wrench for cylinder rotation and the lock will open.
Fortunately, most GMC autos have inferior window seals; with a coat hanger, one can lasso the locking door knob to open the door. If you are going to be successful at opening side bars, you will do it within two minutes; otherwise, you are causing unnecessary wear on your picks not to mention wasting your time.
Ford auto locks are relatively simple to pick. They have pin tumblers and you have to remember that the door locks turn counter clockwise. Most other auto locks turn clockwise. If you are not sure, remember this: If the tumblers will not catch at their breaking points, you are going in the wrong direction with the tension wrench.
9
Wafer locks are a cinch to pick if you have learned how to pick pin tum-blers. Just remember that wafers are thinner than pins and there is less distance between them.
Generally you need less tension-wrench pressure with these locks, yet car locks can be quite stubborn and require a great deal of tension. Any heav-ily spring-loaded cylinder needs a substantial amount of tension.
As a rule, though, wafer locks need less play with the tension wrench than with pin tumbler locks. But if you find yourself having difficulty in opening these, you may try a little tension-wrench play. Usually they won’t pop open like pin tumbler locks, they just slide open; you don’t get the warning that a pin tumbler gives before it opens because there is less contact area on the wafer’s edge than on a pin, so the sense of climax is reduced with these types of locks. Still, they open quite easily.
DOUBLE WAFER LOCKS
Double-wafer locks are picked in the same way as single wafer locks, but there are two sides to the story. Not only do you have to align the top wafers, but you have ones in the bottom of the cylinder to align as well.
The Chicago Lock Company was the first to come up with this type of lock. It is a classic example of the race toward better security. Certain tension wrenches allow uninterrupted picking using ball picks. You can also use a standard tension wrench or small screwdriver and place it at the center of the keyway. To eliminate unnecessary baggage, use a diamond pick, reversing it to encounter both top and bottom wafers. (See Fig.15-16. page 29)
The last tumbler in this type of lock is located less than one-half of an inch in. The picking procedure may have to be repeated more than one time; top wafers, then bottom wafers, top, bottom-back and forth. Yet these locks are easier to pick than most pin tumblers.
Locate the last wafer on the top side and move it to its breaking point. Do the same with the other top wafers. Keep the tension wrench firm, re-move the pick, turn it upside down (if you are using a diamond or home-made pick), and reinsert it to work the bottom wafers. You may have to repeat this process a few times, but double-wafer locks can and will open
Claire_FONTAINE_INT.indd 130-131 03/03/11 18:22
10
with such treatment. Schlage has a doorknob lock that opens this way, but the last tumbler is about one and one-half inches in. Double-wafer locks are easy to master if you have learned to pick pin and wafer tumbler locks. Since doublewafer locks are more compact, you have to compensate for the fact-slightly closer tolerances. These type of locks are used on old pop and candy machines, gas caps, cabinets, etc.
PIN AND WAFER TUMBLER PADLOCKS
Cylinder padlocks require a technique of holding them with the same hand with which you are using the tension wrench. This technique allows one to pick the padlock without going into contortions over a dangling padlock. Assuming that you are right-handed, hold the padlock in your left hand by gripping the body of the padlock with your thumb and fore-finger. Insert the tension wrench at the bottom of the keyway and hold it in a clockwise turn with your ring and little finger, causing a slight binding pressure on the cylinder. Now your right hand is free to pick, and your left hand does the job of holding both the lock and tension wrench. The overhand method works well, too, but the thumb controls the ten-sion wrench instead. Switch around to find which is most comfortable for you. When tumbler padlocks pop open, it is quite a sensation because the shackle is spring-loaded and gives one quite a jolt. It’s a feeling of accomplishment. You may need a little more tension on padlocks than on door locks because the cylinder cam has to operate a spring-loaded bolt. Overall, padlocks are the most fun to open. Practice using old or discarded padlocks that you have found. I’ve worn out hundreds of them.
TUBULAR CYLINDER LOCKS
(Note: Diagrams of tubular lock were omitted due to the fact that picking them with conventional methods is a complete waste of time. There are picks available that are specifically designed to pick this kind of lock in a matter of seconds)
We will gradually proceed to more sophisticated locks from here. I would like to remind you that success is not based on personality. If one is arro-gant about one’s lockpicking skills, one could easily be made a fool of by a lock. And no matter how many times you bash a cylinder, you will still be locked out. The only thing you accomplish is attracting an audience-so be cool. If at this point you have had much difficulty under standing
11
the principles of pin and wafer locks, please restudy this book from the beginning. Read it several times so as to absorb it. The information that you now have has taken me almost two decades to gather, so please be mindful of that.
Now you are about to learn how to open the more difficult locking mech-anisms- some of the other 25 percent of the locks used today. You should feel confident with pin, wafer and double-wafer tumbler locks before you attempt rim cylinder locks.
Tubular cylinder locks stand out as the most generally accepted lock in all important industries using high-quality locks for protection of prop-erty, merchandise, and cash. They are recognized as giving the maximum amount of security for their price range.
Tubular cylinder locks are pin tumbler locks arranged on a circular plane. Unlike conventional pin tumbler locks, all of the pins are exposed to the eye. The central section of the lock rotates to operate the cam when all of the seven pins have reached their breaking points. When the proper key is entered into the lock, the tumblers are pressed into position so that the central section (plug) can be turned. This manual operation of inserting the key places the tumblers in position so that the lock can be operated and ensures that frost, dust, salt, or unfavorable climatic conditions will not affect the smooth operation of the lock.
The Chicago Ace lock is a product of the Chicago Lock Company of Chicago, Illinois. It is an effective security device and is used on vend-ing machines, coin boxes, and burglar alarms. A larger, more complex version of it is used on bank doors and electronic teller machines. The key is of tubular shape with the cuts arranged in a circle around the key. The pick used for this lock is the tubular cylinder pick, or you may use a straight pin or your homemade safety pin pick. The one-pronged end of the tension wrench is a little more specialized and is used for rim cylin-der locks. It must be .062 inches square for best results. Any square steel stock is acceptable, as long as it fits snugly into the groove of the tubular cylinder plug.
This type of lock is a burglar’s nightmare because it takes so long to pick. You have to pick it three or four times to accomplish the unlocking radius of 120 to 180 degrees. And the cylinder locks after each time you pick it every one-seventh of a turn.
Claire_FONTAINE_INT.indd 132-133 03/03/11 18:22
12
If you leave the lock only partly picked, the key will not be able to open it, so you must pick it back into the locked position after opening it-another three or four picking sessions. In all, to unlock and lock the cyl-inder, you have to pick it up to eight times-quite a chore if you don’t have the right tools or time.
These locks almost always pick in the clockwise direction. Make certain that the tension wrench fits snugly into the groove on the cylinder. Very slowly push the first pin down until it clicks, maintaining a definite clock-wise pressure on the tension wrench. Once the tumbler has broken, do not push any further and proceed to the next one, and so on. As you reach the last tumbler, the tension wrench will feel more slack and give way if the lock were properly picked.
There are special keyhole saws for these locks in which you drill out the tumblers and turn the cylinder. Also there is a special tool used by lock-smiths to open rim cylinder locks.
MUSHROOM AND SPOOL PIN TUMBLER LOCKS
High-security pin tumbler locks may contain specially made pins to make picking them more challenging. The pins are machined so as to make picking them quite difficult. When picking these locks, the pins give the impression that they have broken, when in fact they could be a long way from breaking. You can tell whether or not you are picking a pin tumbler lock that has these pins by the fact that the pins seem to align so easily with a louder than normal click. The cylinder seems eager to open but to no avail. The picking procedure relies on a well-yielding tension wrench. The tension wrench has to be lightly spring-loaded so that the pins can bypass their false breaking points. You also have to “rake” (seesaw in and out) the pins with your pick. The feather-touch tension wrench is ideal for the job. Use light pressure with it, and it will let you in.
(Note: A feather-touch tension wrench is not necessarily required. A nor-mal tension wrench will work fine with an extremely light tension on it. The weight of just your index finger alone should be enough in most cases).
The mushroom and spool pins are used in locks for high-security pur-poses such as bank doors. The American Lock Company uses them in some of their padlocks.
13
MAGNETIC LOCKS
Magnetic locks are fascinating. I almost hate to open them because I feel that I have breached their uniqueness. In reality, you do not pick them, but “confuse” them. They generally work on the principle that like magnetic polarities repel each other. The key is a set of Small magnets arranged in a certain order to repel other magnets in the lock, thereby al-lowing the springloaded bolt or cam to open the lock.
By using a pulsating electromagnetic field, you can cause the magnets in the lock to vibrate violently at thirty vibrations per second, thereby allowing it to be opened by intermittent tugging of the bolt or turning of the door knob.
This method may also ruin the small magnets in the lock by changing their magnetic status or properties. So, if you have to perform an emer-gency break-in with these locks, do not relock the door. The card or key will not operate the lock.
The magnetic pick can be used on padlocks by stroking it across the place where the key is placed. It is also designed to fit into the doorknob and is used by stroking one pole in and out or by using the other pole the same way. If you have had little or no training and expérience building something like this, please have a friend who is familiar with basic electronics do it for you. Do not take the chance of electrocuting yourself. Make sure that the coil is also completely covered with electrician’s tape after you have wound the 34 gauge wire. Also make sure that the steel core has at least three layers of tape over it. Do not leave the unit plugged in for more than two to three minutes at any one time as this may cause overheating which could cause it to burn out or start a fire. It is safe to use if constructed properly and not left plugged in unattended. Opening magnetic locks re-quires only 30 to 60 seconds anyway, so don’t leave the unit plugged in for longer. For magnetic padlocks, use a back-and-forth stroking action along the length of the keyway. For magnetic door locks, use a stroking in-and-out action in the slot of the knob alternating from one side (pole) of the pick to the other.
The “key” for a magnetic door lock is a metal or plastic card containing an array of magnetic domains or régions coded in a specific order to al-low entry. The magnetic pick bypasses that.(See Fig. 17-19. page 31)
Claire_FONTAINE_INT.indd 134-135 03/03/11 18:22
14
DISK TUMBLER LOCKS
Combination or “puzzle” locks were invented to further improve security and the protection of valuables. The older safes and lockboxes were good security devices when they came into the market, but some people be-came curious and realized that these safe locks had inhérent weaknesses. One of the main problems was that the disk tumblers were not mechani-cally isolated from the bolt that unlocks the safe door. In other words, you could feel and hear the tumblers while turning the dial by applying pressure on the handle of the bolt.
When that problem was recognized and solved, thieves started drilling through strategic places in the lock itself to open it. Knocking off hinges was an all-time favorite tactic as well. Then came punching out the dial shaft, blowtorching, and just plain blowing the door with explosives. Greed can breed great creativity.
The first problem, that of manipulating the tumblers open, was rectified by making use of the dial to operate the bolt upon completion of the dial-ing of the correct combination. This made it nearly impossible to feel or hear the tumblers. Drilling was deterred by laminating the safe door with hard steel and beryllium-copper plates. The beryllium-copper plates pull heat away from the drill tip quickly, and the bit just spins without effect; drilling cannot take place without the generation of heat at the bit’s cut-ting edges. Knocking off hinges was discouraged by using three or more bolts operated by a main linkage network. Punching out the dial shaft to let the tumblers fall out of the way of the bolt was corrected by beveling the shaft into the wall of the safe door.
Presently, safe locks are quite sophisticated. Picking them would require supernatural power. The older safes, however, are much easier and even fun to pick. Picking combination padlocks is a good way to start learning how to open safes, and we will get to them shortly. But first, let us discuss some basic principles of disk tumbler locks.
Disk tumbler locks work by the use of flat, round disks of metal or plastic with a notch and a peg on each disk. The notch is called the tumbler gate. The gate of each tumbler has to be lined up with the pawl of the bolt mechanism by usage of the linking capabilities of the pegs.
15
The first tumbler of the disk tumbler lock (also the last combination number dialed) is mechanically connected to the dial through the safe door. When the dial is turned, the first tumbler picks up the middle tum-bler when their pegs connect. The middle tumbler in turn picks up the last tumbler for one more complete turn and the tumblers have been “cleared”-you are ready to dial the first combination number by aligning the last tumbler’s gate to the pawl. After you have reached this number or position, rotate the dial in the opposite direction one complete turn (for three tumbler locks; two turns for four tumbler locks) to engage the mid-dle tumbler and drive it to the second combination number. By rotating the dial back into the opposite direction to the last combination number, the bolt can be operated to open the lock, or as in the case of newer safes, the dial will operate the bolt by turning it once again in the opposite direction.
One of the innovations that developed to deter sensual manipulation of combination locks was the use of serrated front tumblers (last combina-tion number dialed). These were designed to foil listening and feeling of the tumblers’ gates by burglars.
When the bolt encountered any one of these shallow gates, the safecrack-er could never be sure whether or not a tumbler was actually aligned with the pawl-bolt mechanism. Some burglars solved this problem by attach-ing high-speed drills to the dial knob to rotate and wear down the first tumbler’s shallow false gates against the bolt, thereby eliminating them altogether, or at least minimizing their effects. Still, today the serrated tumbler is used as an effective deterrent to manipulation in combination padlocks where space is a factor.
Let us move on to combination padlocks. The most common and difficult to open of these small disk tumbler locks are the Master combination padlocks, and they are quite popular. I have had good luck in opening these locks with a wooden mallet or soft-faced hammer. The manipula-tion of Master combination padlocks is quite easy-I have done it thou-sands of times, and you can learn it, too. The newer the lock is, though,
the more difficult it will be to open at first. If the lock has had a lot of use, such as that on a locker-room door where the shackle gets pulled down and encounters the tumblers while the combination is being dialed, the serrated front tumblers will become smoothed down, allowing easier
Claire_FONTAINE_INT.indd 136-137 03/03/11 18:22
16
sensing of the tumblers. So, until you have become good at opening these locks, practice extensively on an old one. Let’s try to open one:
OPENING A COMBINATION PADLOCK
STEP ONE
First, clear the tumblers by engaging all of them. This is done by turn-ing the dial clockwise (sometimes these locks open more easily starting in the opposite direction) three to four times. Now bring your ear close to the lock and gently press the bottom back edge to the bony area just forward of your ear canal opening so that vibrations can be heard and felt. Slowly turn the dial in the opposite direction. As you turn, you will hear a very light click as each tumbler is picked up by the previous tumbler. This is the sound of the pickup pegs on each disk as they engage each other. Clear the tumblers again in a clockwise manner and proceed to step two.
STEP TWO
After you have cleared the tumblers, apply an upward pressure on the shackle of the padlock. Keeping your ear on the lock, try to hear the tumblers as they rub across the pawl; keep the dial rotating in a clockwise direction. You will hear two types of clicks, each with a subtle difference in pitch. The shallow, higher pitched clicks are the sound of the false gates on the first disk tumbler. Do not let them fool you-the real gates sound hollow and empty, almost nonexistent.
When you feel a greater than normal relief in the shackle once every full turn, this is the gate of the first tumbler (last number dialed). This tumbler is connected directly to the dial as mentioned earlier. Ignore that sound for now. When you have aligned the other two tumblers, the last tumbler’s sound will be drowned out by the sound of the shackle popping open.
STEP THREE
While continuing in a clockwise direction with the dial, listen carefully for the slight hollow sound of either one of the first two tumblers. Note on the dial face where these sounds are by either memorizing them or writing them down. Make certain that you do not take note of the driving
17
tumbler (last number dialed). If you hear and feel only one hollow click (sounds like “dumpf”), chances are that the first number could be the same as the last one.
You should have two numbers now. Let us say one of them is 12 and the other is 26. Clear the tumblers again just to be safe and stop at the number 12. Go counterclockwise one complete turn from 12. Continue until there is another “dumpf” sound. After the complete turn pass 12, if you feel and hear a louder than normal sound of a tumbler rubbing on the pawl, the first tumbler is properly aligned and the second tumbler is taking the brunt of the force from the shackle-you are on the right track. When the second tumbler has aligned in this case, you will feel a definite resistance with the last turn of the dial going clockwise. The final turn will automatically open the shackle of the lock. If none of these symp-toms are evident, try starting with the number of the combination, 26, in the same way.
STEP FOUR
If the lock still does not open, don’t give up. Try searching for a differ-ent first number. Give it a good thirty- or forty-minute try. If you play with it long enough, it will eventually open. The more practice you have under your belt, the quicker you will be able to open these padlocks in the future.
Using a stethoscope to increase audibility of the clicks is not out of the question when working on disk tumbler locks, though I never use them for padlocks. A miniature wide-audio-range electronic stethoscope with a magnetic base for coupling a piezoelectric-type microphone is ideal for getting to know the tumblers better.
Filing your fingertips to increase sensitivity might not be such a good idea for beginners since their fingertips will not be accustomed to op-erating dials for a long period of time. With practice, you may develop calluses and need to file your fingertips. But I don’t recommend it at first.
After some time you may find that in some cases you can whiz right through the combination of an unknown lock without looking at it and pop it open in seconds. It becomes second nature. I’ve done this on many occasions - something beyond my conscious control seems to line up the tumblers without my thinking about it.
Claire_FONTAINE_INT.indd 138-139 03/03/11 18:22

18
Another type of disk tumbler padlock is the Sesame lock made by the Corbin Lock Co. Its unique design makes it more difficult to open than Master padlocks, but it can be opened. Let’s take one of the three or four Wheel mechanisms, look at a cross section, and see how it works. The wheel has numbers from zero to nine. Attached to the wheel is a small cam. Both the wheel and cam turn on the shaft. Each wheel in this lock operates independently with its own cam and shaft. The locking dog is locked to the shackle. In this position the shackle cannot be opened. The locking dog operates with all three or four wheels. The locking dog is riding on the round edge of the cam. The spring is pushing up on the cam. The locking dog cannot move up because it is resting on the round part of the cam. When the wheel is turned to the proper combination number, the locking dog rests on the flat of the cam. The spring can then raise the locking dog to release the shackle, and this opens the lock.
TIPS FOR SUCCESS
You will undoubtedly encounter a pin tumbler lock in which there will be a pin or two that is keyed too low (the shear line of the pin is too high). In this case the lock is difficult to open because the breaking point of a long bottom pin doesn’t allow room in the keyway for the pick to manipulate the other pins. Your success in opening “tight” locks will depend on the skill you have developed with your tension wrench. Sometimes it helps to play with the tension wrench. Try bouncing it left and right slightly while picking, allowing some of the tumblers to drop occasionally. You may also try picking the front tumblers first or picking at random on these locks. You can tell if you have a lock that is keyed like this because your pick may get jammed during the picking process.
After you have opened a cylinder and unlocked a lock, be sure to return it to the locked position. You will hear the tumblers click into place when this happens. Otherwise it may be difficult to unlock it with its key be-cause the bottom pins cannot “float” like they normally would.
To tell whether or not the cylinder should go clockwise or counterclock-wise when picking a tumbler lock, there is an easy rule to follow. If the tumblers (pin or wafer) will not break, or stay broken, you are going in the wrong direction with the tension wrench. There will be little or no progress with the cylinder, and few, if any, “clicks.”
19
Some keyways are cut at an angle (Yale, Dexter, and Schlage, for exam-ple) so you want to be sure that you tilt your pick to follow that angle while picking or your pick will get hung up. A slight twist of the wrist will compensate for this problem.
Should your fingers become tired while picking a lock, lay down your tools and shake your hands and fingers to relieve any tension. After some time the muscles in your hands will become accustomed to such activ-ity. Practice and persistence will tone your hands and senses to the point where you will be able to pop open a cylinder in three to five seconds (that’s seconds) in total darkness. The combination of touch and sound lets you know almost a split second before you open the lock that you have succeeded.
If the lock is a well-machined one, the cylinder will feel tight and you will need a little firmer hand on the tension wrench. While picking, if any one of the pins at any time feels firm or difficult to move, chances are it’s aligned. If it feels springy, it is not.
Use the shaft of the pick if you have to when working the frontal pin of a pin tumbler lock. This may save you the trouble of aligning the tip of the pick on the front pin where there is little or no support for the pick. All of the other pins allow the pick to be supported by the inside wall of the keyway.
Master keyed pin tumbler locks are generally easier to pick open because they have more than one shear line or breaking point in the pins. Master keying allows a group of locks to be controlled by a master key holder while the individual locks in that group are controlled by individual keys. Hotels and apartment complexes are usually master keyed.
There is a simple technique to open pin and wafer tumbler locks. Simply drill through the shear lines of the tumblers. This point is located just above the center of the keyway on the face of the cylinder. By doing this, though, you obviously ruin the lock and make a lot of racket. If the lock is a Medeco or some other high-security - lock, you risk damage of one hundred dollars or more, so be sure you know the value of the situation before you decide to rape the lock. Use a center punch to start a reliable hole on the cylinder face and use a one-quarter inch drill bit with a vari-able speed drill. With a large screwdriver, turn it to unlock. The cylinder
Claire_FONTAINE_INT.indd 140-141 03/03/11 18:22
20
will be difficult to turn because you may be shearing the tumbler springs that have fallen down past the cylinder’s shear line.
Dead bolt locks are those mounted on a door above the knob. All dead bolt locks unlock counterclockwise with left-hand doors and clockwise with righthand doors. If you have trouble remembering this, just remem-ber that the bolt of the lock has to go in the opposite direction of the doorjam.
Dead bolt locks are just as easy to pick open as knob locks are. They both have cylinders that can be picked open. The main difference is that dead bolts cannot be opened by sliding a plastic or metal card through to the bolt so as to work it back. In other words, they are not spring loaded.
That’s why they are called dead bolts. Most knob locks now have guards in front of the bolts to deter opening with cards.
Kwik-sets, Weisers, and some of the less-expensive knob locks may open in either direction. Schlage and Corbin, along with more sophisticated locks, can open only in one direction. Auto locks will open either way. Another method of picking pin tumbler locks is with a pick gun. As the pick snaps up, it hits the bottom pin. This bounces the top pin out of the cylinder and into the shell. As you apply light turning pressure with the tension wrench, the top pins are caught in the shell, the cylinder will turn. I’ve never used a pick gun, but they do work well for locksmiths who use them. They are cumbersome and expensive, and show some lack of professionalism.
(Note: If you don’t care about professionalism and want to open 95% of all pin tumbler locks out there - and fast- buy this device. It is very awe-some. I even recommend it over a Cobra Electronic lockpick. Trust me, I have both, and I feel the $60 Lockaid pick gun blows away the $350 Cobra).
SOME PRECAUTIONS
If you bought this book to learn how to pick locks in order to become a more efficient burglar, then there is not a whole lot I can say or do to stop you. But I must say this: the locks used in prisons are nearly impossible to pick even if you get or make the right tools. They are usually electrically controlled from an external station.
21
Do not carry lock picks on your person. If you get caught with them, you could get nailed for most any Professional job in town for the last seven years. If you must carry them, as in the case of rescue workers, etc., please consult your local authorities about details and ask about register-ing with them. As a former locksmith, I do not have that problem.
I advise that you do not teach your friends how to pick locks. The choice is yours, of course. You paid the price of this book and the knowledge is yours - be selfish with it. It is for your own protection as well. The fewer people who know you have this skill, the better. Getting blamed for something you didn’t do is unfair and a hassle.
When you become proficient at picking locks, you may decide to get a job as a locksmith. But believe me, there is more to being a locksmith than being able to pick locks. You have to be a good carpenter as well as a fair mechanic. But you may want to approach the owner of a lock shop and ask if you could get on as an apprentice.
NOBODY’S PERFECT
There isn’t a locking device on earth that cannot be opened with means other than its key or code. It’s just that some are easier to open than others. Anything with a keyhole, dial, or access port is subject to being opened with alternate means, though some of the newer electronic and computer controlled security devices would be a nightmare even if you had extensive knowledge of electronics and electromagnetics. Some de-vices also use palm prints as a readout to allow entry.
On the mechanical side, there are locks that have normal pin tumblers, but they are situated in various places 360 degrees around the cylinder. Some locks use pin tumblers that not only have to be aligned vertically within the cylinder, but also have to “twist” or turn a certain number of degrees to allow the cylinder to open. This is because the pins’ shear line is cut at an angle. These locks are made by Medeco.
I have witnessed only one Medeco lock being pickedby a fellow lock-smith. We both spent hours trying to pick it again, but it was futile. We estimated the chances of opening it again to be one out of 10,000. They are excellent security devices, but their price keeps them limited to areas prone to security problems such as isolated vending machines and for
Claire_FONTAINE_INT.indd 142-143 03/03/11 18:22

22
government use. The only one I have been successful at opening (after an hour of picking) was one I drilled. By the way, they are easy to drill because the brass that’s used is soft.
LEARNING TO TOUCH AND FEEL
Most of us know how to touch. We touch objects every day, and yet we do not truly feel them. It seems so commonplace that we forget that we are actually feeling while we touch.
Here is an exercise that will develop a delicate touch. Gently rub and massage your hands and fingers preferably with hand lotion. Do this for five minutes. Once the lotion has evaporated, shake your hands and fingers so that they flop loosely. Gently pull each finger to relax each joint.
Now with a piece of fine sandpaper, gently draw the tips of your fingers across it. Try to feel the texture of the grains on its surface. Relax your fingers, hands, forearms, shoulders, and chest. Take your time. Do this for several minutes.
After a few weeks of practice, you will be able to feel each individual grain of sand on the sandpaper. This allows you to feel the slightest sensa-tion vibrate through your bones.
Try to remember to practice touching and feeling during your everyday experiences. Practice feeling wood, metal, and various other objects. Play with the feel of mechanical vibrations, even your television set. Try to sense the world around you as a source of information. This could and will open a whole new horizon of experience. After a while, you will be able to feel or sense the movement of the tumblers of a Sargeant and Greenleaf safe. My first safe opened in three minutes because of that technique that took me years to discover.
VISUALIZATION
If you respect the security of the lock and do not become over confident, you will never become disappointed if you fail to open it. You also in-crease your chances of opening the lock because you personally have nothing to gain or lose by opening it. Give up trying to be an expert and just pick the lock.
23
With such an attitude, you may find the lock will usually pop right open. I never received a trophy for being the best lock picker in the state. My satisfaction is in knowing that I am never helpless in a lockout situation. The quality of your success is almost romantic; it involves sensitivity and compassion in the face of curiosity as a means to help others.
Visualization and imagination are important to the lock picker. I’ve no-ticed that people who have the ability to visualize the internal parts of the lock that they are picking seldom fail to open it in moments. Anyone can learn to do this by simply remembering to do it while picking a lock. Since sight, sound, and touch are involved with the process, visualization is very easy to do. Try to keep all of your attention on the lock during the picking process. This will help you to learn how to use heightened sensitivity for picking locks.
So in that respect, an unopened lock is like a new and unexplored lover. You imagine all of the qualities of an attractive person whom you’ve just met and apply that feeling to the lock that you are picking. Use visualiza-tion. It will help immensely.
Claire_FONTAINE_INT.indd 144-145 03/03/11 18:22

ILLUSTRATIONS
Claire_FONTAINE_INT.indd 146-147 03/03/11 18:22

24
Figure 1. The pin tumbler lock, cutaway. view.
Figure 2. The pin tumbler lock, front view.
SHELL
TUMBLER SPRING
CYLINDER
TOP PIN
BOTTOM PIN
KEYWAY
TOP PIN
SHEARLINE
PIN SHEARLINE
SHELL
SHEARLINE
KEYWAY
PLUG
25
Figure 3. A. a diamond pick B. a small diamond pick C. a tubular cylinder lock pick D. a tension wrench, used with the diamond picks E. a tension wrench-intended for double-wafer cylinder locks and tubular locks.
A
B
C
D
f
E
Claire_FONTAINE_INT.indd 148-149 03/03/11 18:22

26
Figure 4. A. a rake pick B. a ball pick C. a double ball pick D. a diamond pick.
Figure 5. A. a hook pick B. a pin and wafer lock tension wrench C. a double-wafer tension wrench D. a Feather Touch tension wrench E. a homemade Feather Touch tension wrench,
27
Figure 6. A. a pin tumbler lock B. a wafer tumber lockC. a double-wafer tumbler lock.
Figure 7. A. a warded lock B. a lever lock C. a tubilar cylinder lock.
A
B
C
A
B
C
Claire_FONTAINE_INT.indd 150-151 03/03/11 18:22
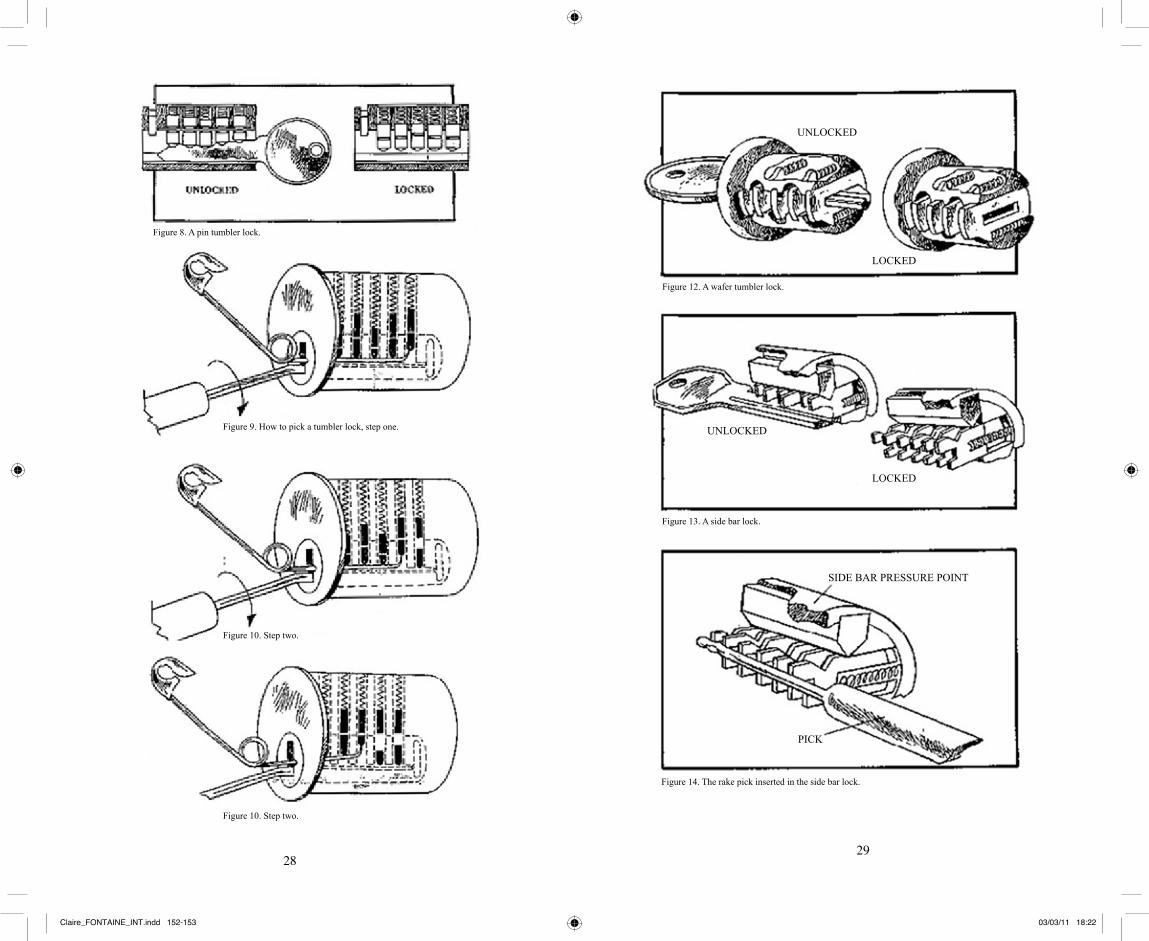
28
Figure 8. A pin tumbler lock.
Figure 9. How to pick a tumbler lock, step one.
Figure 10. Step two.
Figure 10. Step two.
29
UNLOCKED
LOCKED
UNLOCKED
LOCKED
SIDE BAR PRESSURE POINT
PICK
Figure 14. The rake pick inserted in the side bar lock.
Figure 13. A side bar lock.
Figure 12. A wafer tumbler lock.
Claire_FONTAINE_INT.indd 152-153 03/03/11 18:22
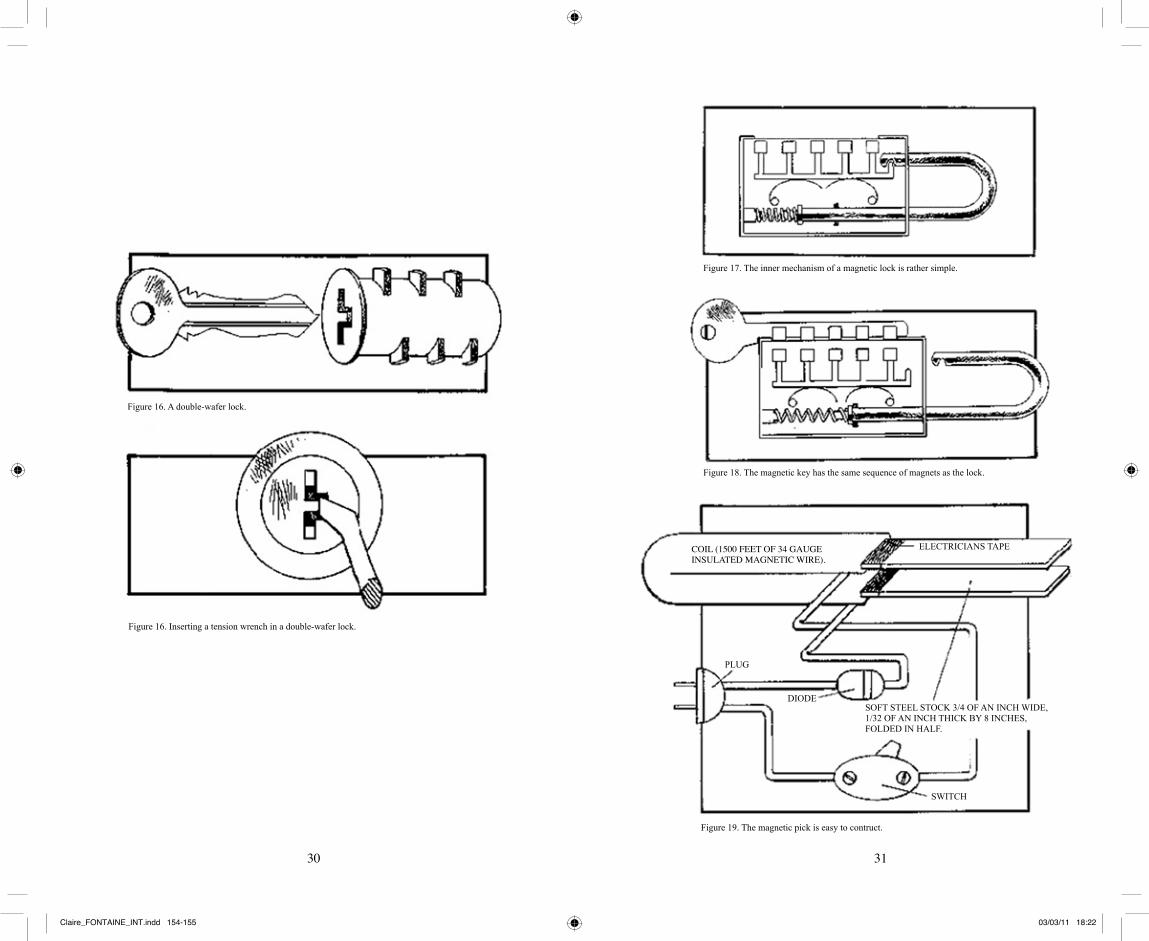
30
Figure 16. Inserting a tension wrench in a double-wafer lock.
Figure 16. A double-wafer lock.
3130
Figure 17. The inner mechanism of a magnetic lock is rather simple.
Figure 18. The magnetic key has the same sequence of magnets as the lock.
COIL (1500 FEET OF 34 GAUGE INSULATED MAGNETIC WIRE).
ELECTRICIANS TAPE
PLUG
DIODE
SWITCH
SOFT STEEL STOCK 3/4 OF AN INCH WIDE, 1/32 OF AN INCH THICK BY 8 INCHES, FOLDED IN HALF.
Figure 19. The magnetic pick is easy to contruct.
Claire_FONTAINE_INT.indd 154-155 03/03/11 18:22
32
Distribution Copyright 1987, 1991 Theodore T. Tool. All rights reserved. Permission to reproduce
this document on a non-profit basis is granted provided that this copyright and distribution notice
is included in full. The information in this booklet is provided for educational purposes only.
August 1991 revision. Edition limited to 250 numbered copies.In addition to this book a limited edition multiple by the artistis available from onestar press.
Printed and bound in France
2011
onestar press49, rue Albert75013 Paris [email protected]
/250
claire fontaine some instructions for the sharing of private property
Claire_FONTAINE_INT.indd 156-157 03/03/11 18:22

Claire_FONTAINE_INT.indd 158 03/03/11 18:22

Achetez en toute sérénité.
Avec nos Offres Garanties.
www.bourse-immobilier.fr10
PR
IX • FINANCEMENT • R
EVE
NT
E
OffresGaranties
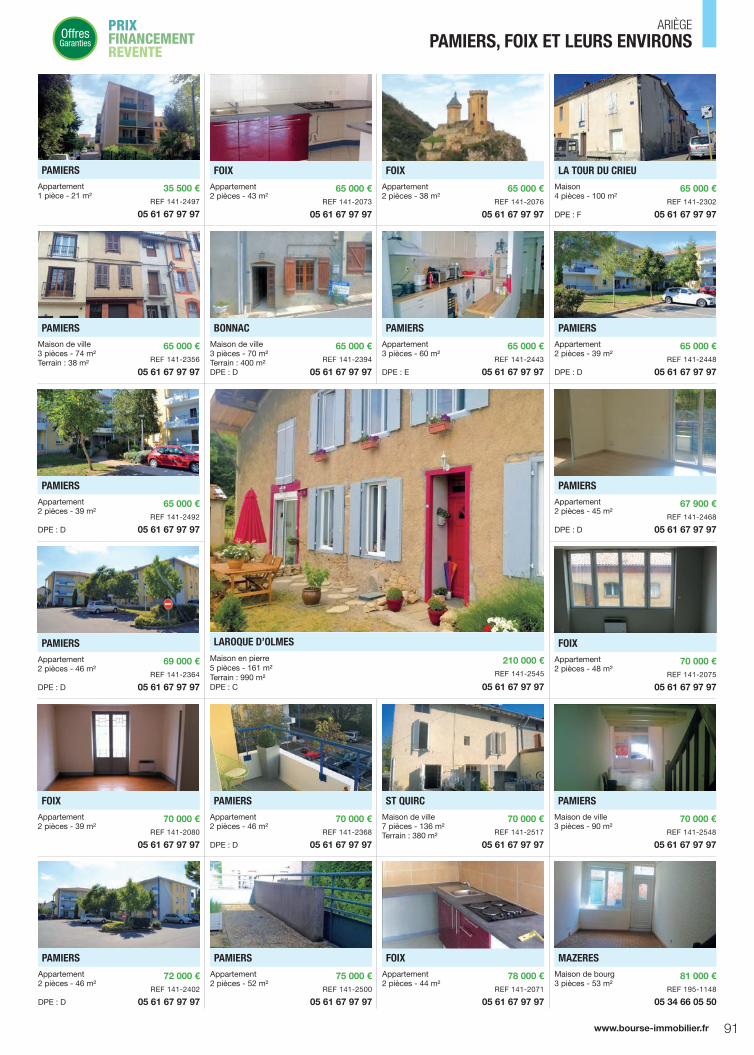
91www.bourse-immobilier.fr
PRIX FINANCEMENT REVENTE
OffresGaranties PAMIERS, FOIX ET LEURS ENVIRONS
ARIÈGE
LAROQUE D’OLMES Maison en pierre
REF 141-2545
05 61 67 97 97
210 000 €5 pièces - 161 m²Terrain : 990 m²DPE : C
PAMIERS Appartement
REF 141-2497
05 61 67 97 97
35 500 €1 pièce - 21 m²
FOIX Appartement
REF 141-2073
05 61 67 97 97
65 000 €2 pièces - 43 m²
FOIX Appartement
REF 141-2076
05 61 67 97 97
65 000 €2 pièces - 38 m²
LA TOUR DU CRIEU Maison
REF 141-2302
05 61 67 97 97
65 000 €4 pièces - 100 m²
DPE : F
PAMIERS Maison de ville
REF 141-2356
05 61 67 97 97
65 000 €3 pièces - 74 m²Terrain : 38 m²
BONNAC Maison de ville
REF 141-2394
05 61 67 97 97
65 000 €3 pièces - 70 m²Terrain : 400 m²DPE : D
PAMIERS Appartement
REF 141-2443
05 61 67 97 97
65 000 €3 pièces - 60 m²
DPE : E
PAMIERS Appartement
REF 141-2448
05 61 67 97 97
65 000 €2 pièces - 39 m²
DPE : D
PAMIERS Appartement
REF 141-2492
05 61 67 97 97
65 000 €2 pièces - 39 m²
DPE : D
PAMIERS Appartement
REF 141-2468
05 61 67 97 97
67 900 €2 pièces - 45 m²
DPE : D
PAMIERS Appartement
REF 141-2364
05 61 67 97 97
69 000 €2 pièces - 46 m²
DPE : D
FOIX Appartement
REF 141-2075
05 61 67 97 97
70 000 €2 pièces - 48 m²
FOIX Appartement
REF 141-2080
05 61 67 97 97
70 000 €2 pièces - 39 m²
PAMIERS Appartement
REF 141-2368
05 61 67 97 97
70 000 €2 pièces - 46 m²
DPE : D
ST QUIRC Maison de ville
REF 141-2517
05 61 67 97 97
70 000 €7 pièces - 136 m²Terrain : 380 m²
PAMIERS Maison de ville
REF 141-2548
05 61 67 97 97
70 000 €3 pièces - 90 m²
PAMIERS Appartement
REF 141-2402
05 61 67 97 97
72 000 €2 pièces - 46 m²
DPE : D
PAMIERS Appartement
REF 141-2500
05 61 67 97 97
75 000 €2 pièces - 52 m²
FOIX Appartement
REF 141-2071
05 61 67 97 97
78 000 €2 pièces - 44 m²
MAZERES Maison de bourg
REF 195-1148
05 34 66 05 50
81 000 €3 pièces - 53 m²
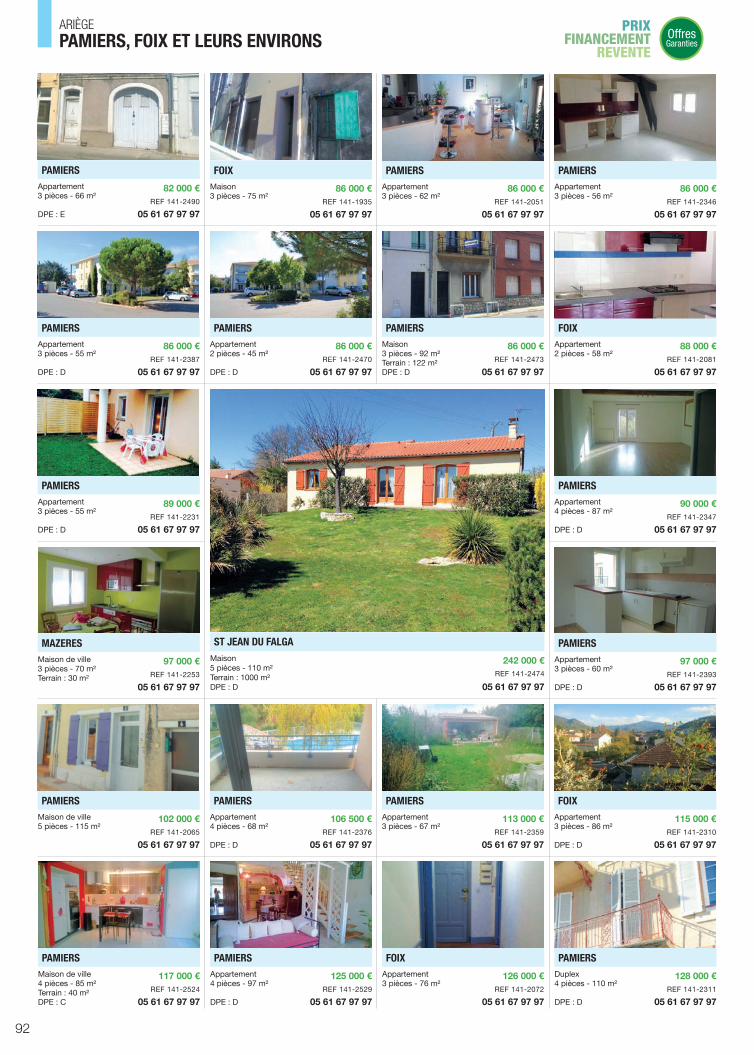
92
PRIX FINANCEMENT
REVENTEOffresGarantiesPAMIERS, FOIX ET LEURS ENVIRONS
ARIÈGE
PAMIERS Appartement
REF 141-2490
05 61 67 97 97
82 000 €3 pièces - 66 m²
DPE : E
FOIX Maison
REF 141-1935
05 61 67 97 97
86 000 €3 pièces - 75 m²
PAMIERS Appartement
REF 141-2051
05 61 67 97 97
86 000 €3 pièces - 62 m²
PAMIERS Appartement
REF 141-2346
05 61 67 97 97
86 000 €3 pièces - 56 m²
PAMIERS Appartement
REF 141-2387
05 61 67 97 97
86 000 €3 pièces - 55 m²
DPE : D
PAMIERS Appartement
REF 141-2470
05 61 67 97 97
86 000 €2 pièces - 45 m²
DPE : D
PAMIERS Maison
REF 141-2473
05 61 67 97 97
86 000 €3 pièces - 92 m²Terrain : 122 m²DPE : D
FOIX Appartement
REF 141-2081
05 61 67 97 97
88 000 €2 pièces - 58 m²
PAMIERS Appartement
REF 141-2231
05 61 67 97 97
89 000 €3 pièces - 55 m²
DPE : D
PAMIERS Appartement
REF 141-2347
05 61 67 97 97
90 000 €4 pièces - 87 m²
DPE : D
MAZERES Maison de ville
REF 141-2253
05 61 67 97 97
97 000 €3 pièces - 70 m²Terrain : 30 m²
PAMIERS Appartement
REF 141-2393
05 61 67 97 97
97 000 €3 pièces - 60 m²
DPE : D
PAMIERS Maison de ville
REF 141-2065
05 61 67 97 97
102 000 €5 pièces - 115 m²
PAMIERS Appartement
REF 141-2376
05 61 67 97 97
106 500 €4 pièces - 68 m²
DPE : D
PAMIERS Appartement
REF 141-2359
05 61 67 97 97
113 000 €3 pièces - 67 m²
FOIX Appartement
REF 141-2310
05 61 67 97 97
115 000 €3 pièces - 86 m²
DPE : D
PAMIERS Maison de ville
REF 141-2524
05 61 67 97 97
117 000 €4 pièces - 85 m²Terrain : 40 m²DPE : C
PAMIERS Appartement
REF 141-2529
05 61 67 97 97
125 000 €4 pièces - 97 m²
DPE : D
FOIX Appartement
REF 141-2072
05 61 67 97 97
126 000 €3 pièces - 76 m²
PAMIERS Duplex
REF 141-2311
05 61 67 97 97
128 000 €4 pièces - 110 m²
DPE : D
ST JEAN DU FALGA Maison
REF 141-2474
05 61 67 97 97
242 000 €5 pièces - 110 m²Terrain : 1000 m²DPE : D

93www.bourse-immobilier.fr
PRIX FINANCEMENT REVENTE
OffresGaranties PAMIERS, FOIX ET LEURS ENVIRONS
ARIÈGE
PAMIERS Maison
REF 141-2329
05 61 67 97 97
133 000 €4 pièces - 79 m²Terrain : 70 m²DPE : D
LA TOUR DU CRIEU Maison de ville
REF 141-2549
05 61 67 97 97
133 000 €3 pièces - 103 m²
PAMIERS Maison
REF 141-2558
05 61 67 97 97
133 000 €4 pièces - 79 m²Terrain : 80 m²DPE : D
SERRES SUR ARGET Maison en pierre
REF 141-2523
05 61 67 97 97
139 500 €4 pièces - 110 m²Terrain : 327 m²DPE : D
PAMIERS Maison
REF 141-2546
05 61 67 97 97
152 000 €4 pièces - 83 m²Terrain : 428 m²
FOIX Appartement
REF 141-2067
05 61 67 97 97
154 000 €4 pièces - 93 m²
PAMIERS Maison
REF 141-2256
05 61 67 97 97
155 000 €5 pièces - 90 m²Terrain : 1000 m²DPE : D
PAMIERS Maison
REF 141-2483
05 61 67 97 97
156 000 €4 pièces - 102 m²Terrain : 316 m²DPE : D
RIEUCROS Villa
REF 141-1956
05 61 67 97 97
160 000 €5 pièces - 120 m²Terrain : 625 m²DPE : E
PAMIERS Maison
REF 141-2531
05 61 67 97 97
165 000 €4 pièces - 76 m²Terrain : 660 m²DPE : D
PAMIERS Maison art déco
REF 141-2484
05 61 67 97 97
167 000 €4 pièces - 121 m²Terrain : 489 m²DPE : D
ST JEAN DU FALGA Villa
REF 141-2526
05 61 67 97 97
169 000 €4 pièces - 71 m²Terrain : 735 m²DPE : D
ST JEAN DU FALGA Villa
REF 141-2550
05 61 67 97 97
170 000 €5 pièces - 98 m²Terrain : 500 m²
RIEUX DE PELLEPORT Villa
REF 141-2316
05 61 67 97 97
177 000 €4 pièces - 102 m²Terrain : 2000 m²
LA TOUR DU CRIEU Maison
REF 141-2480
05 61 67 97 97
178 000 €4 pièces - 88 m²Terrain : 453 m²DPE : C
SAVERDUN Villa
REF 141-2333
05 61 67 97 97
180 000 €6 pièces - 127 m²Terrain : 1400 m²DPE : E
PRAYOLS Villa
REF 141-1931
05 61 67 97 97
187 000 €4 pièces - 89 m²Terrain : 900 m²DPE : E
LABATUT Villa
REF 141-2374
05 61 67 97 97
197 000 €4 pièces - 110 m²Terrain : 1100 m²
MAZERES Maison de ville
REF 141-2350
05 61 67 97 97
199 000 €5 pièces - 200 m²
MAZERES Maison
REF 195-1532
05 34 66 05 50
199 000 €4 pièces - 92 m²Terrain : 700 m²DPE : D
LAROQUE D’OLMES Maison de bourg
REF 141-2521
05 61 67 97 97
292 000 €10 pièces - 240 m²Terrain : 1030 m²DPE : D

94
PRIX FINANCEMENT
REVENTEOffresGarantiesPAMIERS, FOIX ET LEURS ENVIRONS
ARIÈGE
PAMIERS Immeuble
REF 141-2263
05 61 67 97 97
212 000 €170 m²
DPE : D
FOIX Maison de ville
REF 141-2467
05 61 67 97 97
212 000 €7 pièces - 200 m²Terrain : 80 m²DPE : C
SAVERDUN Maison
REF 121-2613
05 61 67 97 97
217 000 €5 pièces - 110 m²Terrain : 922 m²DPE : D
VIVIES Maison
REF 141-2489
05 61 67 97 97
217 000 €5 pièces - 145 m²Terrain : 2800 m²
SAVERDUN Immeuble
REF 141-2552
05 61 50 94 94
225 000 €10 pièces - 195 m²Terrain : 453 m²
PAMIERS Maison art déco
REF 141-2068
05 61 67 97 97
258 000 €7 pièces - 195 m²Terrain : 232 m²DPE : D
PAMIERS Maison de ville
REF 141-2401
05 61 67 97 97
275 000 €8 pièces - 242 m²Terrain : 200 m²DPE : C
PAMIERS Maison en pierre
REF 141-2495
05 61 67 97 97
275 000 €7 pièces - 192 m²Terrain : 4800 m²
ST MICHEL Maison
REF 141-2357
05 61 67 97 97
285 000 €7 pièces - 200 m²Terrain : 52000 m²
PAMIERS Villa
REF 141-2240
05 61 67 97 97
317 000 €6 pièces - 214 m²Terrain : 700 m²DPE : D
PAMIERS Immeuble
REF 141-2351
05 61 67 97 97
400 000 €300 m²
ST AMADOU Domaine
REF 141-2165
05 61 67 97 97
499 000 €12 pièces - 500 m²Terrain : 100000 m²DPE : D
VERNIOLLE Villa
REF 141-2514
05 61 67 97 97
368 000 €7 pièces - 250 m²Terrain : 1600 m²DPE : D
PR
IX • FINANCEMENT • R
EVE
NT
E
OffresGaranties
Achetez en toute sérénité.Toutes les offres présentées dans notre catalogue sont garanties.

95www.bourse-immobilier.fr
PÉRIPHÉRIE DE TOULOUSE
NORD DE TOULOUSE
LE SUD TOULOUSAIN, CAZÈRES ET SAINT-GAUDENS
CASTELNAUDARY ET LE LAURAGAIS
MURET 500 m² 100-2601 05 34 46 12 13 107 000 €
MURET 500 m² 100-2617 05 34 46 12 13 107 000 €
SEYSSES 1250 m² 65-2869 05 62 87 22 44 118 000 €
CASTANET TOLOSAN 1250 m² 81-2738 05 34 66 11 11 139 000 €
TOURNEFEUILLE 520 m² 50-2508 05 62 48 71 48 160 000 €
CUGNAUX 800 m² 65-3112 05 62 87 22 44 192 000 €
FRONTON 50 m² 133-1463 05 62 79 01 03 39 900 €
FRONTON 702 m² 133-1867 05 62 79 01 03 60 000 €
MONTJOIRE 3495 m² 165-2698 05 34 26 12 12 68 000 €
MONTJOIRE 678 m² 165-2588 05 34 26 12 12 70 000 €
MONTJOIRE 729 m² 165-2587 05 34 26 12 12 73 000 €
AZAS 1000 m² 165-2681 05 34 26 12 12 76 000 €
VILLENEUVE LES BOULOC 1500 m² 133-1840 05 62 79 01 03 81 000 €
AZAS 1000 m² 165-2680 05 34 26 12 12 81 000 €
BOULOC 743 m² 133-1870 05 62 79 01 03 86 000 €
BOULOC 748 m² 133-1871 05 62 79 01 03 86 000 €
VACQUIERS 667 m² 133-1875 05 62 79 01 03 86 000 €
BOULOC 1200 m² 133-1883 05 62 79 01 03 99 000 €
MONTASTRUC LA CONSEILLERE
1000 m² 165-2725 05 34 26 12 12 102 000 €
BUZET SUR TARN 851 m² 165-2525 05 34 26 12 12 113 000 €
FRONTON 2000 m² 133-1861 05 62 79 01 03 116 000 €
FRONTON 1000 m² 133-1835 05 62 79 01 03 118 000 €
FRONTON 2428 m² 133-1869 05 62 79 01 03 118 000 €
LABASTIDE ST SERNIN 687 m² 133-1844 05 62 79 01 03 120 000 €
FRONTON 1020 m² 133-1853 05 62 79 01 03 123 000 €
AURAGNE 375 m² 195-1460 05 34 66 05 50 34 000 €
ALAN 117700 m² 251-1432 05 61 97 71 50 34 000 €
GAILLAC TOULZA 2500 m² 121-2745 05 61 50 94 94 55 000 €
LONGAGES 766 m² 252-1639 05 61 87 34 94 86 000 €
RIEUX 1500 m² 252-1520 05 61 87 34 94 97 000 €
CARBONNE 2400 m² 252-1660 05 61 87 34 94 103 000 €
PUYDANIEL 3880 m² 153-1113 05 61 50 94 94 180 000 €
GOURVIEILLE 1120 m² 195-1281 05 34 66 05 50 Nous consulter
CAIGNAC 376 m² 195-1461 05 34 66 05 50 35 000 €
CAIGNAC 377 m² 195-1462 05 34 66 05 50 35 000 €
CAIGNAC 655 m² 195-1466 05 34 66 05 50 45 000 €
CAIGNAC 638 m² 195-1467 05 34 66 05 50 45 000 €
CAIGNAC 795 m² 195-1468 05 34 66 05 50 50 000 €
NAILLOUX 705 m² 195-1427 05 34 66 05 50 50 500 €
NAILLOUX 826 m² 195-1423 05 34 66 05 50 54 500 €
NAILLOUX 1391 m² 195-1428 05 34 66 05 50 72 000 €
CAIGNAC 1470 m² 195-1469 05 34 66 05 50 75 000 €
TREBONS SUR LA GRASSE 1330 m² 140-2459 05 61 24 02 02 76 000 €
TREBONS SUR LA GRASSE 3476 m² 140-2458 05 61 24 02 02 118 000 €
AIGREFEUILLE 1011 m² 222-936 05 34 66 02 20 185 000 €
FRONTON 1003 m² 133-1854 05 62 79 01 03 123 000 €
CEPET 2240 m² 133-1884 05 62 79 01 03 128 000 €
AZAS 2000 m² 165-2679 05 34 26 12 12 133 000 €
FRONTON 4091 m² 133-1868 05 62 79 01 03 134 000 €
TERRAINS À BÂTIRDécouvrez nos Offres Garanties.
OffresGaranties
CASTANET TOLOSAN1250 m²REF 81-2738
05 34 66 11 11
139 000 €
PUYDANIEL3880 m²REF 153-1113
05 61 50 94 94
180 000 €

96
CASTRES, LAVAUR ET LEURS ENVIRONS
MONTAUBAN ET SES ENVIRONS
CASTELSARRASIN, MOISSAC ET LEURS ENVIRONS
CAHORS, GOURDON ET LEURS ENVIRONS
FIGEAC ET LES CAUSSES DU QUERCY
COUFOULEUX 500 m² 300-1033 05 63 42 22 27 54 500 €
COUFOULEUX 500 m² 300-1034 05 63 42 22 27 54 500 €
COUFOULEUX 500 m² 300-1035 05 63 42 22 27 54 500 €
LAVAUR 955 m² 300-958 05 63 42 22 27 55 000 €
LAVAUR 615 m² 300-968 05 63 42 22 27 59 500 €
GRAULHET 5166 m² 300-930 05 63 42 22 27 70 000 €
GRAULHET 5000 m² 300-931 05 63 42 22 27 70 000 €
LAVAUR 774 m² 300-970 05 63 42 22 27 79 500 €
ST AGNAN 1013 m² 300-718 05 63 42 22 27 86 000 €
AMBRES 2000 m² 300-997 05 63 42 22 27 86 000 €
AMBRES 2000 m² 300-998 05 63 42 22 27 86 000 €
LAVAUR 2500 m² 300-639 05 63 42 22 27 97 000 €
CAYLUS 292 m² 264-1196 05 65 20 07 08 8 000 €
ST GEORGES 2793 m² 260-1221 05 63 02 04 40 38 000 €
BIOULE 3000 m² 254-1672 05 63 02 04 40 39 500 €
BIOULE 2016 m² 260-1216 05 63 02 04 40 54 000 €
BIOULE 1940 m² 260-1234 05 63 02 04 40 55 000 €
BIOULE 1959 m² 260-1235 05 63 02 04 40 55 000 €
BIOULE 1853 m² 260-1233 05 63 02 04 40 61 000 €
BIOULE 1813 m² 260-1236 05 63 02 04 40 66 000 €
ST NAZAIRE DE VALENTANE
2850 m² 196-1639 05 63 04 01 20 22 950 €
CASTELFERRUS 532 m² 248-1861 05 63 05 08 20 31 000 €
CASTELFERRUS 525 m² 248-1874 05 63 05 08 20 31 000 €
CASTELFERRUS 525 m² 248-1875 05 63 05 08 20 31 000 €
CASTELFERRUS 833 m² 248-1862 05 63 05 08 20 34 500 €
GRAMAT 290 m² 185-1568 05 65 10 02 20 11 000 €
FLAUJAC GARE 1750 m² 185-1352 05 65 10 02 20 13 750 €
GRAMAT 1500 m² 232-1467 05 65 10 02 20 18 000 €
LISSAC ET MOURET 1340 m² 238-1694 05 65 10 60 00 18 500 €
LACAPELLE MARIVAL 1624 m² 238-1742 05 65 33 41 57 23 000 €
LEYME 1985 m² 310-111 05 65 33 41 57 24 835 €
GRAMAT 1433 m² 185-1351 05 65 10 02 20 30 000 €
GRAMAT 2393 m² 185-1608 05 65 10 02 20 40 300 €
GRAMAT 4998 m² 185-1609 05 65 10 02 20 40 500 €
GRAMAT 6000 m² 185-1528 06 82 63 67 42 61 000 €
FIGEAC 15427 m² 238-1479 05 65 10 60 00 320 000 €
FIGEAC 18289 m² 238-1486 05 65 10 60 00 389 780 €
AMBRES2000 m²REF 300-997
05 63 42 22 27
86 000 €
GRAMAT4998 m²REF 185-1609
05 65 10 02 20
40 500 €
CASTELFERRUS 863 m² 248-1864 05 63 05 08 20 34 500 €
CASTELFERRUS 997 m² 248-1872 05 63 05 08 20 34 500 €
CASTELFERRUS 851 m² 248-1873 05 63 05 08 20 34 500 €
BOUDOU 2169 m² 248-1884 05 63 05 08 20 39 500 €
BOUDOU 2329 m² 248-1886 05 63 05 08 20 39 500 €
BOUDOU 2595 m² 248-1887 05 63 05 08 20 39 500 €
BOUDOU 3030 m² 248-1983 05 63 05 08 20 39 500 €
MALAUSE 3000 m² 196-1674 05 63 04 01 20 55 000 €
MALAUSE 2099 m² 196-1702 05 63 04 01 20 55 000 €
CASTELSARRASIN 1560 m² 248-1936 05 63 05 08 20 61 000 €
GOUDOURVILLE 4000 m² 196-1715 05 63 04 01 20 98 000 €
GOLFECH 11400 m² 196-1664 05 63 04 01 20 146 800 €
GOURDON 981 m² 266-1532 05 65 27 12 22 11 800 €
CAZALS 781 m² 266-1544 05 65 27 12 22 15 000 €
PRIX FINANCEMENT
REVENTEOffresGarantiesTERRAINS A BATIR
MIDI-PYRENEES
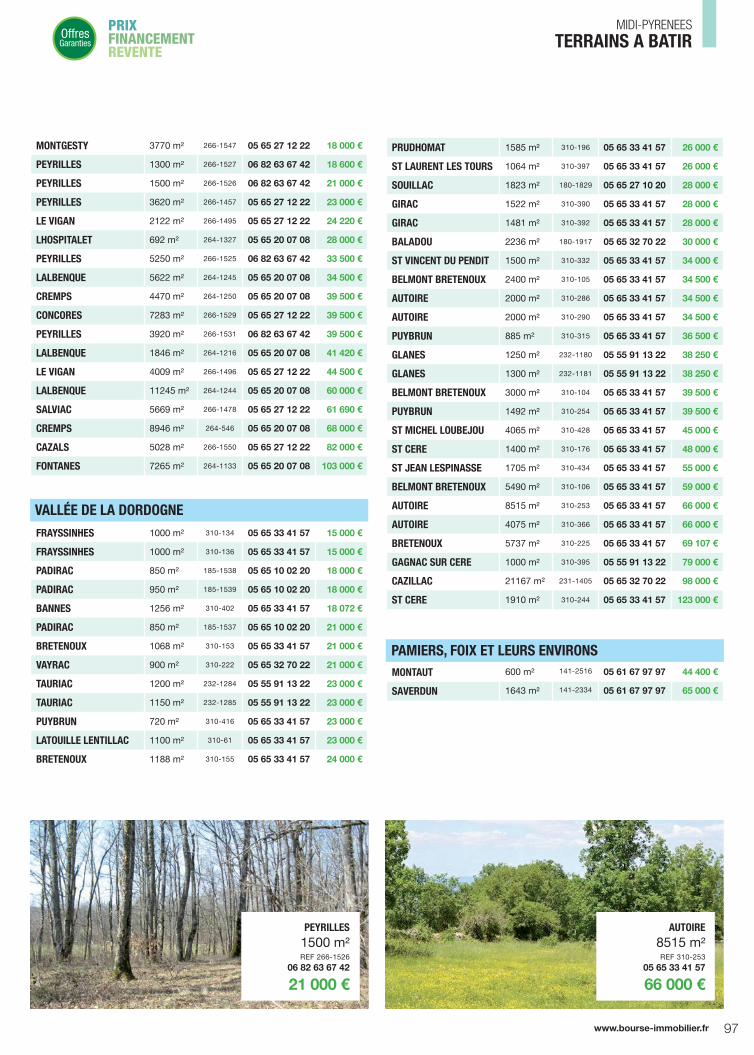
97www.bourse-immobilier.fr
VALLÉE DE LA DORDOGNE
PAMIERS, FOIX ET LEURS ENVIRONS
FRAYSSINHES 1000 m² 310-134 05 65 33 41 57 15 000 €
FRAYSSINHES 1000 m² 310-136 05 65 33 41 57 15 000 €
PADIRAC 850 m² 185-1538 05 65 10 02 20 18 000 €
PADIRAC 950 m² 185-1539 05 65 10 02 20 18 000 €
BANNES 1256 m² 310-402 05 65 33 41 57 18 072 €
PADIRAC 850 m² 185-1537 05 65 10 02 20 21 000 €
BRETENOUX 1068 m² 310-153 05 65 33 41 57 21 000 €
VAYRAC 900 m² 310-222 05 65 32 70 22 21 000 €
TAURIAC 1200 m² 232-1284 05 55 91 13 22 23 000 €
TAURIAC 1150 m² 232-1285 05 55 91 13 22 23 000 €
PUYBRUN 720 m² 310-416 05 65 33 41 57 23 000 €
LATOUILLE LENTILLAC 1100 m² 310-61 05 65 33 41 57 23 000 €
BRETENOUX 1188 m² 310-155 05 65 33 41 57 24 000 €
MONTAUT 600 m² 141-2516 05 61 67 97 97 44 400 €
SAVERDUN 1643 m² 141-2334 05 61 67 97 97 65 000 €
PEYRILLES1500 m²REF 266-1526
06 82 63 67 42
21 000 €
AUTOIRE8515 m²REF 310-253
05 65 33 41 57
66 000 €
PRUDHOMAT 1585 m² 310-196 05 65 33 41 57 26 000 €
ST LAURENT LES TOURS 1064 m² 310-397 05 65 33 41 57 26 000 €
SOUILLAC 1823 m² 180-1829 05 65 27 10 20 28 000 €
GIRAC 1522 m² 310-390 05 65 33 41 57 28 000 €
GIRAC 1481 m² 310-392 05 65 33 41 57 28 000 €
BALADOU 2236 m² 180-1917 05 65 32 70 22 30 000 €
ST VINCENT DU PENDIT 1500 m² 310-332 05 65 33 41 57 34 000 €
BELMONT BRETENOUX 2400 m² 310-105 05 65 33 41 57 34 500 €
AUTOIRE 2000 m² 310-286 05 65 33 41 57 34 500 €
AUTOIRE 2000 m² 310-290 05 65 33 41 57 34 500 €
PUYBRUN 885 m² 310-315 05 65 33 41 57 36 500 €
GLANES 1250 m² 232-1180 05 55 91 13 22 38 250 €
GLANES 1300 m² 232-1181 05 55 91 13 22 38 250 €
BELMONT BRETENOUX 3000 m² 310-104 05 65 33 41 57 39 500 €
PUYBRUN 1492 m² 310-254 05 65 33 41 57 39 500 €
ST MICHEL LOUBEJOU 4065 m² 310-428 05 65 33 41 57 45 000 €
ST CERE 1400 m² 310-176 05 65 33 41 57 48 000 €
ST JEAN LESPINASSE 1705 m² 310-434 05 65 33 41 57 55 000 €
BELMONT BRETENOUX 5490 m² 310-106 05 65 33 41 57 59 000 €
AUTOIRE 8515 m² 310-253 05 65 33 41 57 66 000 €
AUTOIRE 4075 m² 310-366 05 65 33 41 57 66 000 €
BRETENOUX 5737 m² 310-225 05 65 33 41 57 69 107 €
GAGNAC SUR CERE 1000 m² 310-395 05 55 91 13 22 79 000 €
CAZILLAC 21167 m² 231-1405 05 65 32 70 22 98 000 €
ST CERE 1910 m² 310-244 05 65 33 41 57 123 000 €
PRIX FINANCEMENT REVENTE
OffresGaranties TERRAINS A BATIR
MIDI-PYRENEES
MONTGESTY 3770 m² 266-1547 05 65 27 12 22 18 000 €
PEYRILLES 1300 m² 266-1527 06 82 63 67 42 18 600 €
PEYRILLES 1500 m² 266-1526 06 82 63 67 42 21 000 €
PEYRILLES 3620 m² 266-1457 05 65 27 12 22 23 000 €
LE VIGAN 2122 m² 266-1495 05 65 27 12 22 24 220 €
LHOSPITALET 692 m² 264-1327 05 65 20 07 08 28 000 €
PEYRILLES 5250 m² 266-1525 06 82 63 67 42 33 500 €
LALBENQUE 5622 m² 264-1245 05 65 20 07 08 34 500 €
CREMPS 4470 m² 264-1250 05 65 20 07 08 39 500 €
CONCORES 7283 m² 266-1529 05 65 27 12 22 39 500 €
PEYRILLES 3920 m² 266-1531 06 82 63 67 42 39 500 €
LALBENQUE 1846 m² 264-1216 05 65 20 07 08 41 420 €
LE VIGAN 4009 m² 266-1496 05 65 27 12 22 44 500 €
LALBENQUE 11245 m² 264-1244 05 65 20 07 08 60 000 €
SALVIAC 5669 m² 266-1478 05 65 27 12 22 61 690 €
CREMPS 8946 m² 264-546 05 65 20 07 08 68 000 €
CAZALS 5028 m² 266-1550 05 65 27 12 22 82 000 €
FONTANES 7265 m² 264-1133 05 65 20 07 08 103 000 €

98 www.bourse-immobilier.fr
HAUTE-GARONNE 26 agences
Aucamville39 route de Fronton 31140 Aucamville05 62 75 20 00
Auterive48 rue Jean Jaurès 31190 Auterive05 61 50 94 94
Balma1 avenue de Toulouse 31130 Balma05 62 80 02 01
Blagnac15 rue Pasteur 31700 Blagnac05 62 74 50 50
Bouloc41 rue Jean Jaurès 31620 Bouloc05 62 79 01 03
Carbonne29 rue Jean Jaurès 31390 Carbonne05 61 87 34 94
Castanet-Tolosan11 avenue du Lauragais 31320 Castanet-Tolosan 05 34 66 11 11
Cazères7 boulevard Jean Jaurès 31220 Cazères05 61 97 71 50
Cugnaux24 avenue de Toulouse 31270 Cugnaux05 62 87 22 44
Lanta5 avenue de Toulouse 31570 Lanta05 34 66 02 20
Léguevin43 boulevard des Pyrénées 31490 Léguevin05 34 52 10 00
Montastruc-la-Conseillère1 place de la Mairie 31380 Montastruc-La-Conseillère05 34 26 12 12
Muret43 allée Niel 31600 Muret05 34 46 12 13
Nailloux3 rue de la Liberté 31560 Nailloux05 34 66 05 50
St Jean14 allée Victor Hugo 31240 St Jean05 62 10 57 31
St Lys15 rue François Mitterrand 31470 St Lys05 61 08 54 54
St-Orens-de-Gameville60 avenue de Gameville 31650 St-Orens-de-Gameville05 34 31 50 50
Toulouse Bonnefoy74 rue du Faubourg Bonnefoy 31500 Toulouse05 34 25 87 87
Toulouse Demoiselles13 avenue Antoine de Saint Exupéry 31400 Toulouse05 34 31 18 19
Toulouse Guilhemery67 avenue Camille Pujol 31500 Toulouse05 62 47 48 00
Toulouse les Carmes11 rue de Metz31000 Toulouse05 34 30 07 00
Toulouse Minimes24 avenue des Minimes 31200 Toulouse05 61 11 21 11
Toulouse St Agne52 bis avenue Jules Julien 31400 Toulouse05 61 14 61 99
Toulouse St Cyprien68 avenue Etienne Billières 31300 Toulouse05 34 50 59 60
Tournefeuille58 rue Gaston Doumergue 31170 Tournefeuille05 62 48 71 48
Villefranche-de-Lauragais 111 rue de la République 31290 Villefranche-de-Lauragais05 61 24 02 02
LOT 8 agences
Cahors43 rue Nationale 46000 Cahors05 65 20 06 66
Figeac10 boulevard Georges Juskiewenski 46100 Figeac05 65 10 60 00
Gourdon4 place de La Libération 46300 Gourdon05 65 27 12 22
Gramat9 place de La Halle 46500 Gramat05 65 10 02 20
Lalbenquerue du Marché aux Truffes 46230 Lalbenque05 65 20 07 08
MartelAvenue du Général de Gaulle 46600 Martel05 65 32 70 22
Souillac28 boulevard Louis Jean Malvy 46200 Souillac05 65 27 10 20
St-Céré18 rue de la République 46400 St-Céré05 65 33 41 57
TARN 1 agence
Lavaur16 place du Vieux Marché 81500 Lavaur05 63 42 22 27
TARN-ET-GARONNE 5 agences
Beaumont-de-Lomagne 17 place Gambetta 82500 Beaumont-de-Lomagne05 63 02 02 10
Castelsarrasin64 rue de l’Egalité 82100 Castelsarrasin05 63 05 08 20
Montauban2 av du 11ème Régiment d’Infanterie 82000 Montauban05 63 03 87 00
Nègrepelisse2 avenue du Château 82800 Nègrepelisse05 63 02 04 40
Valence d’Agen10 place Nationale 82400 Valence05 63 04 01 20
ARIEGE 1 agence
Pamiers8 rue Victor Hugo 09100 Pamiers05 61 67 97 97
ANNUAIREMIDI-PYRÉNÉES
302Agences
en France
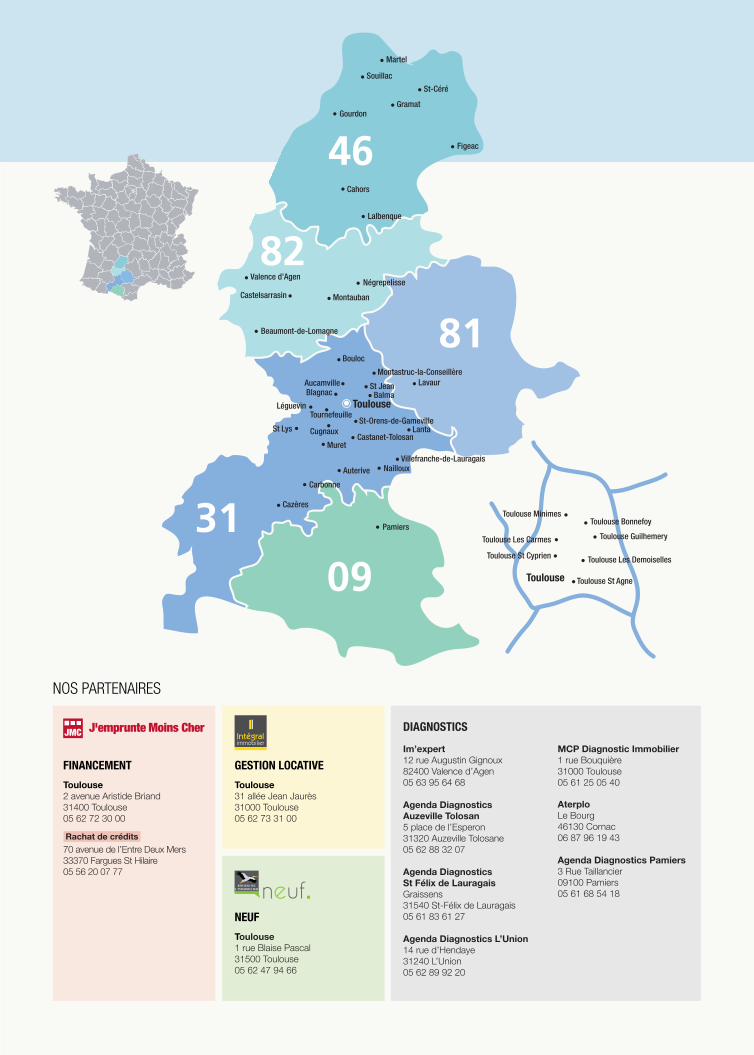
Im’expert12 rue Augustin Gignoux82400 Valence d’Agen05 63 95 64 68
Agenda Diagnostics Auzeville Tolosan5 place de l’Esperon31320 Auzeville Tolosane05 62 88 32 07
Agenda DiagnosticsSt Félix de LauragaisGraissens31540 St-Félix de Lauragais05 61 83 61 27
Agenda Diagnostics L’Union14 rue d’Hendaye31240 L’Union05 62 89 92 20
DIAGNOSTICS
MCP Diagnostic Immobilier1 rue Bouquière31000 Toulouse05 61 25 05 40
AterploLe Bourg 46130 Cornac06 87 96 19 43
Agenda Diagnostics Pamiers3 Rue Taillancier09100 Pamiers05 61 68 54 18
Intégralimmobilier
II
neuf
FINANCEMENT
Toulouse2 avenue Aristide Briand31400 Toulouse05 62 72 30 00
Rachat de crédits
70 avenue de l’Entre Deux Mers 33370 Fargues St Hilaire05 56 20 07 77
GESTION LOCATIVE
Toulouse31 allée Jean Jaurès31000 Toulouse05 62 73 31 00
NEUF
Toulouse1 rue Blaise Pascal31500 Toulouse05 62 47 94 66
81
0931
82
46
Pamiers
Cazères
Carbonne
Auterive NaillouxVillefranche-de-Lauragais
Toulouse MinimesToulouse Bonnefoy
Toulouse Guilhemery
Toulouse Les Demoiselles
Toulouse St Agne
Toulouse St Cyprien
Toulouse Les Carmes
MuretCastanet-Tolosan
St-Orens-de-GamevilleLanta
BalmaSt Jean
Tournefeuille
CugnauxSt Lys
Blagnac
Léguevin
AucamvilleMontastruc-la-Conseillère
Bouloc
Lavaur
Beaumont-de-Lomagne
Castelsarrasin
Valence d’AgenNégrepelisse
Montauban
Lalbenque
Cahors
Figeac
Gramat
St-Céré
Souillac
Martel
Gourdon
Toulouse
Toulouse
NOS PARTENAIRES
81
0931
82
46
Pamiers
Cazères
Carbonne
Auterive NaillouxVillefranche-de-Lauragais
Toulouse MinimesToulouse Bonnefoy
Toulouse Guilhemery
Toulouse Les Demoiselles
Toulouse St Agne
Toulouse St Cyprien
Toulouse Les Carmes
MuretCastanet-Tolosan
St-Orens-de-GamevilleLanta
BalmaSt Jean
Tournefeuille
CugnauxSt Lys
Blagnac
Léguevin
AucamvilleMontastruc-la-Conseillère
Bouloc
Lavaur
Beaumont-de-Lomagne
Castelsarrasin
Valence d’AgenNégrepelisse
Montauban
Lalbenque
Cahors
Figeac
Gramat
St-Céré
Souillac
Martel
Gourdon
Toulouse
Toulouse

LA SOLUTION POUR VENDRE
Le Mandat
PRO
www.bourse-immobilier.fr
Toujours sans exclusivité *
• Chez tous nos partenaires web• Dans notre catalogue• En vitrine de votre agence• Dans notre réseau (300 agences)• Sur internet et smartphones
• Estimation OFFERTE• DPE OFFERT• Diagnostics OFFERTS
• Garantie du prix• Garantie du financement• Garantie de revente
Le risque d’annulation est limité, votre vente est sécurisée.
LES MEILLEURES GARANTIES POUR VOS ACQUÉREURS*
LA MEILLEURE VISIBILITÉ POUR VOTRE ANNONCE*
LA MEILLEURE OFFRE DU MARCHÉ*
*Conditions de l’offre : signature d’un Mandat PRO, ne pas excéder plus de 2 autres mandats au bénéfice d’autres intermédiaires, et respecter un prix de vente commission incluse égal ou supérieur à celui de la Bourse de l’Immobilier. Détails de l’offre consultables en agence.