KCA-RC107MRcontent.etilize.com/User-Manual/1016483697.pdf · 2010. 3. 26. · kca-rc107mr remote...
40
KCA-RC107MR REMOTE CONTROL UNIT INSTRUCTION MANUAL UNITÉ DE TÉLÉCOMMANDE MODE D’EMPLOI FERNBEDIENUNG BEDIENUNGSANLEITUNG AFSTANDSBEDIENING GEBRUIKSAANWIJZING TELECOMANDO ISTRUZIONI PER L’USO UNIDAD DE MANDO A DISTANCIA MANUAL DE INSTRUCCIONES UNIDADE DE CONTROLO REMOTO MANUAL DE INSTRUÇÕES リモートコントローラー 取扱説明書 © B64-4448-00/00 (W) US Residence Only Register Online Register your Kenwood product at www.Kenwoodusa.com
Transcript of KCA-RC107MRcontent.etilize.com/User-Manual/1016483697.pdf · 2010. 3. 26. · kca-rc107mr remote...

KCA-RC107MRREMOTE CONTROL UNIT
INSTRUCTION MANUALUNITÉ DE TÉLÉCOMMANDE
MODE D’EMPLOIFERNBEDIENUNG
BEDIENUNGSANLEITUNGAFSTANDSBEDIENING
GEBRUIKSAANWIJZINGTELECOMANDO
ISTRUZIONI PER L’USOUNIDAD DE MANDO A DISTANCIA
MANUAL DE INSTRUCCIONESUNIDADE DE CONTROLO REMOTO
MANUAL DE INSTRUÇÕESリモートコントローラー
取扱説明書
© B64-4448-00/00 (W)
US Residence Only
Register OnlineRegister your Kenwood product at www.Kenwoodusa.com
KCA-RC107MR_r1.indb 1KCA-RC107MR_r1.indb 1 09.2.13 0:32:07 PM09.2.13 0:32:07 PM
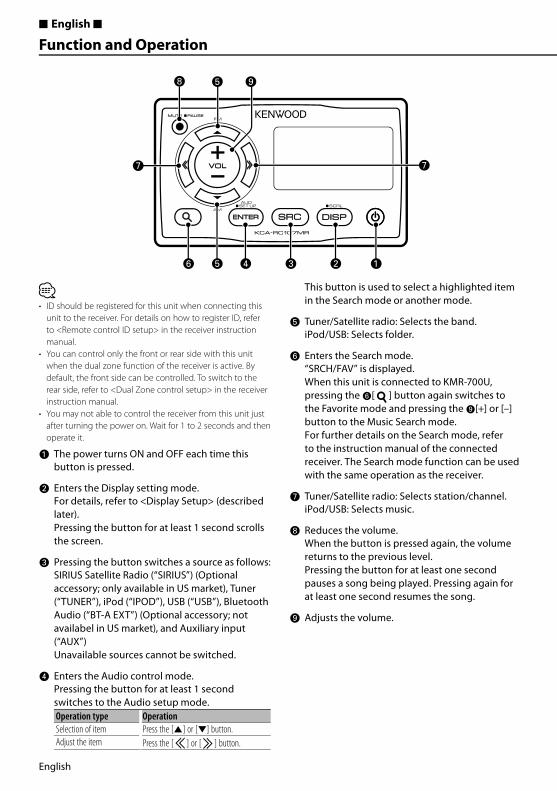
English
■ English ■
Function and Operation
ڥ ID should be registered for this unit when connecting this
unit to the receiver. For details on how to register ID, refer
to <Remote control ID setup> in the receiver instruction
manual.
• You can control only the front or rear side with this unit
when the dual zone function of the receiver is active. By
default, the front side can be controlled. To switch to the
rear side, refer to <Dual Zone control setup> in the receiver
instruction manual.
• You may not able to control the receiver from this unit just
after turning the power on. Wait for 1 to 2 seconds and then
operate it.
¡ The power turns ON and OFF each time this button is pressed.
™ Enters the Display setting mode.For details, refer to <Display Setup> (described later).Pressing the button for at least 1 second scrolls the screen.
£ Pressing the button switches a source as follows:SIRIUS Satellite Radio (“SIRIUS”) (Optional accessory; only available in US market), Tuner (“TUNER”), iPod (“IPOD”), USB (“USB”), Bluetooth Audio (“BT-A EXT”) (Optional accessory; not availabel in US market), and Auxiliary input (“AUX”)Unavailable sources cannot be switched.
¢ Enters the Audio control mode.Pressing the button for at least 1 second switches to the Audio setup mode.Operation type OperationSelection of item Press the [5] or [∞] button.
Adjust the item Press the [ ] or [ ] button.
This button is used to select a highlighted item in the Search mode or another mode.
∞ Tuner/Satellite radio: Selects the band.iPod/USB: Selects folder.
§ Enters the Search mode.“SRCH/FAV” is displayed.When this unit is connected to KMR-700U, pressing the §[ ] button again switches to the Favorite mode and pressing the ª[+] or [–] button to the Music Search mode.For further details on the Search mode, refer to the instruction manual of the connected receiver. The Search mode function can be used with the same operation as the receiver.
¶ Tuner/Satellite radio: Selects station/channel.iPod/USB: Selects music.
• Reduces the volume.When the button is pressed again, the volume returns to the previous level.Pressing the button for at least one second pauses a song being played. Pressing again for at least one second resumes the song.
ª Adjusts the volume.
KCA-RC107MR_r1.indb 2KCA-RC107MR_r1.indb 2 09.2.13 0:32:08 PM09.2.13 0:32:08 PM

English
Display SetupYou can adjust following Display items;
Display Item Setting“DISP SEL” Refer to <Text Display Selection>. —
“DIM” Sets whether the display illumination is dimmed in conjunction with the light switch of the vessel or it is dimmed constantly.
“AUTO”, “MANU”, “OFF”
“CNTRST” Adjusting the display contrast. “0” – “10”
“ID:” Display the Remote control ID. —
ڥ For details on Remote control ID, refer to <Remote
control ID setup> in the receiver instruction manual.
1 Enter Display setup mode
Press the [DISP] button.
2 Select the Display setup item
Press the [5] or [∞] button.
3 Adjust the Display setup item
Press the [ ] or [ ] button.
4 Exit Display setup mode
Press the [DISP] button.
Text Display SelectionDisplays the following abbreviated text for settings and functions;
In Tuner sourceInformation DisplayFrequency & Program Service name (RDS) “FREQ/PS”
Music title (RDS) & Artist name (RDS) “TITLE”
Station Name (RDS) “ST NAME”
Radio text Plus (RDS) “R-TEXT+“
Radio text (RDS) “R-TEXT”
Frequency (FM/AM) “FREQ”
Clock “CLOCK”
Date “DATE”
In iPod/ USB sourceInformation DisplayMusic title & Artist name “TITLE”
Album name & Artist name “ALBUM”
Folder name “FOLDER”
File name “FILE”
Play time & Music number “P-TIME”
Clock “CLOCK”
Date “DATE”
In Auxiliary input sourceInformation DisplayAUX name “SRC NAME”
Clock “CLOCK”
Date “DATE”
In SIRIUS source (Optional)Information DisplayChannel Name “CH-NAME”
Music Title “SONG”
Artist Name “ARTIST”
Composer Name “COMPOSER”
Category Name “CATEGORY”
Label Name “LABEL”
Comment “COMMENT”
Channel Number “CH NUM”
Clock “CLOCK”
Date “DATE”
1 Enter Display setup mode
Press the [DISP] button.
2 Select the Display text select item
Press the [5] or [∞] button.
Select the “DISP SEL” display.
3 Enter Display text select mode
Press the [ENTER] button.
4 Select the text display part
Press the [5] or [∞] button.
5 Select the Display text
Press the [ ] or [ ] button.
6 Exit Display text select mode
Press the [ENTER] button.
ڥ If the selected display item does not have any
information, alternative information is displayed.
• When selecting “FOLDER” while playing with iPod, text
will be displayed depending on the currently selected
browsing mode.
• If all characters cannot be displayed while playing with
iPod, the file number in the list is displayed.
Information DisplayMusic title “TITLE***”
Folder name “FLD***”
File name “FILE***”
KCA-RC107MR_r1.indb 3KCA-RC107MR_r1.indb 3 09.2.13 0:32:09 PM09.2.13 0:32:09 PM

English
Before Installation Connection
Connectable model (as of February 2009)
• KMR-700U
¤• Mounting and wiring this product requires skills and
experience. For safety’s sake, leave the mounting and wiring
work to professionals.
• Do not install the unit in a spot exposed to direct sunlight
or excessive heat or humidity.
• Do not use your own screws. Use only the screws provided.
If you use the wrong screws, you could damage the unit.
• After installing the unit, check to make sure that electrical
equipment such as the signal lamps and gauges operate
normally.
When connecting single KCA-RC107MR
Remote control input
Marine Receiver
KCA-RC107MR
When connecting two KCA-RC107MRs
Remote control input
Marine Receiver
KCA-RC107MR
CA-Y107MR (Optional accessory)
When connecting three KCA-RC107MRs
Remote control input
Marine Receiver
KCA-RC107MR
CA-Y107MR (Optional accessory)
CA-Y107MR (Optional accessory)
ڥ You can use the extension cable CA-EX7MR (7m) or
CA-EX3MR (3m) to extend the wiring cable up to 15
meters, if the installation positions of the receiver and KCA-
RC107MR are long distance apart.
KCA-RC107MR_r1.indb 4KCA-RC107MR_r1.indb 4 09.2.13 0:32:09 PM09.2.13 0:32:09 PM
English
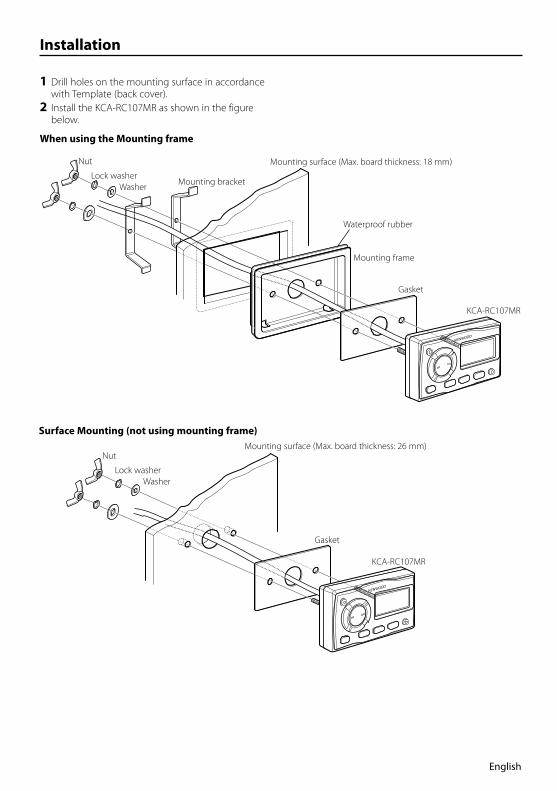
Installation
1 Drill holes on the mounting surface in accordance
with Template (back cover).
2 Install the KCA-RC107MR as shown in the figure
below.
When using the Mounting frame
Surface Mounting (not using mounting frame)
Nut
Lock washer
Mounting surface (Max. board thickness: 18 mm)
Mounting frame
Waterproof rubber
Gasket
KCA-RC107MR
WasherMounting bracket
Nut
Lock washer
Mounting surface (Max. board thickness: 26 mm)
Gasket
KCA-RC107MR
Washer
KCA-RC107MR_r1.indb 5KCA-RC107MR_r1.indb 5 09.2.13 0:32:12 PM09.2.13 0:32:12 PM

Français
■ Français ■
Fonctionnement et utilisation
⁄• L'ID de la télécommande doit être enregistrée pour
l'associer au récepteur. Consultez la section <Configuration
de l'ID de télécommande> du mode d'emploi du récepteur
pour savoir comment enregistrer l'ID de la télécommande.
• Lorsque la fonction double zone est activée sur le récepteur,
vous ne pouvez contrôler qu'un seul canal (avant ou arrière)
à l'aide de la télécommande. Le contrôle du canal avant est
établi par défaut. Consultez la section <Configuration de la
commande Double Zone> du mode d'emploi du récepteur
pour savoir comment passer au canal arrière.
• Juste après la mise en marche du récepteur, il est possible
que l'action de la télécommande ne soit pas instantanée.
Patientez 1 ou 2 secondes avant de l'utiliser.
¡ L'appareil s'allume ou s'éteint sur une pression de cette touche.
™ Active le mode de réglage de l'affi chage.Consultez la section <Confi guration de l'affi chage> (détaillée plus loin) pour en savoir plus.Appuyez sur cette touche pendant au moins une 1 seconde pour faire défi ler l'écran.
£ Appuyez sur cette touche pour changer de source, qui s'alternent dans l'ordre suivant:Radio satellite SIRIUS (“SIRIUS”) (accessoire en option ; en vente aux États-Unis uniquement), syntoniseur (“TUNER”), iPod (“IPOD”), USB (“USB”), audio Bluetooth (“BT-A EXT”) (accessoire en option) et entrée auxiliaire (“AUX”)Les sources non disponibles ne peuvent pas être sélectionnées
¢ Active le mode de commande audio.Appuyez sur cette touche pendant au moins une 1 seconde pour passer en mode de réglage audio.Type d’opération OpérationSélection de l'élément Appuyez sur la touche [5] ou [∞].
Réglage de l'élément Appuyez sur la touche [ ] ou [ ].
Cette touche sert à sélectionner un élément mis en surbrillance en mode de recherche ou dans un autre mode.
∞ Syntoniseur/Radio Satellite: Permet de sélectionner la bande.iPod/USB: Permet de sélectionner le dossier.
§ Active le mode de recherche.L'indication “SRCH/FAV” s'affi che.Quand la télécommande est connectée au KMR-700U, appuyez à nouveau sur la touche §[ ] pour passer en mode Favoris et appuyez sur la touche ª[+] ou [–] pour passer en mode de recherche de morceaux.Pour plus d'informations sur le mode de recherche, veuillez consulter le mode d'emploi du récepteur connecté. Les fonctions du mode de recherche peuvent être utilisées de la même façon que sur le récepteur.
¶ Syntoniseur/Radio Satellite: Permet de sélectionner une station.iPod/USB: Permet de sélectionner des morceaux de musique.
• Baisse le volume.Appuyez à nouveau sur cette touche pour rétablir le volume au niveau précédent.Appuyez sur cette touche pendant au moins 1 seconde pour mettre en pause le morceau en cours de lecture. Appuyez à nouveau sur cette touche pendant au moins 1 seconde pour relancer la lecture.
ª Règle le volume.
KCA-RC107MR_r1.indb 6KCA-RC107MR_r1.indb 6 09.2.13 0:32:13 PM09.2.13 0:32:13 PM

Français
Configuration de l'affichageVous pouvez régler les éléments d'affichage suivants;
Affichage Élément Réglage“DISP SEL” Consultez la section <Sélection de
l'affichage du texte>.—
“DIM” Permet de définir si l'éclairage de l'affichage s'atténue en conjonction avec l'allumage des lumières du bateau ou bien s'il reste atténué de façon permanente.
“AUTO”, “MANU”, “OFF”
“CNTRST” Permet de régler le contraste de l'affichage. “0” – “10”
“ID:” Affiche l'ID de la télécommande. —
⁄• Consultez la section <Définition de l'ID de la
télécommande> du mode d'emploi du récepteur pour
en savoir plus sur l'ID de la télécommande.
1 Entrer en mode de configuration de l'affichage
Appuyez sur la touche [DISP].
2 Sélectionner un élément de configuration de
l'affichage
Appuyez sur la touche [5] ou [∞].
3 Régler l'élément de configuration de l'affichage
Appuyez sur la touche [ ] ou [ ].
4 Quitter le mode de configuration de l'affichage
Appuyez sur la touche [DISP].
Sélection de l'affichage du texteLes informations affichées changent en fonction de chaque source;
En source syntoniseur (Tuner)Information AffichageFréquence & nom du service de programme (RDS)
“FREQ/PS”
Titre du morceau (RDS) & nom de l'artiste (RDS) “TITLE”
Nom de la station (RDS) “ST NAME”
Texte radio Plus (RDS) “R-TEXT+“
Texte radio (RDS) “R-TEXT”
Fréquence (FM/AM) “FREQ”
Horloge “CLOCK”
Date “DATE”
En source iPod/ USBInformation AffichageTitre du morceau & Nom d’artiste “TITLE”
Nom d’album & Nom d’artiste “ALBUM”
Nom du dossier “FOLDER”
Nom du fichier “FILE”
Temps de lecture & Numéro du morceau “P-TIME”
Horloge “CLOCK”
Date “DATE”
En source Entrée auxiliaireInformation AffichageNom de la source auxiliaire “SRC NAME”
Horloge “CLOCK”
Date “DATE”
En source SIRIUS (en option)Information AffichageNom de la station “CH-NAME”
Titre du morceau “SONG”
Nom de l’artiste “ARTIST”
Nom du compositeur “COMPOSER”
Nom de catégorie “CATEGORY”
Identification d'étiquette “LABEL”
Commentaire “COMMENT”
Numéro de la station “CH NUM”
Horloge “CLOCK”
Date “DATE”
1 Entrer en mode de configuration de l'affichage
Appuyez sur la touche [DISP].
2 Sélectionner l'élément de sélection d'affichage
de texte
Appuyez sur la touche [5] ou [∞].
Sélectionnez “DISP SEL”.
3 Entrer en mode de sélection de l'affichage du
texte
Appuyez sur la touche [ENTER].
4 Sélectionner la section d'affichage de texte
Appuyez sur la touche [5] ou [∞].
5 Sélectionner l'affichage de texte
Appuyez sur la touche [ ] ou [ ].
6 Quitter le mode de sélection de l'affichage du
texte
Appuyez sur la touche [ENTER].
⁄• Si l'élément affiché sélectionné ne possède aucune
information, une information alternative s'affiche.
• Si vous sélectionnez “FOLDER” (dossier) pendant la
lecture sur iPod, les noms qui s'affichent varient en
fonction des éléments sélectionnés pour la recherche en
cours.
• Lorsqu'il est impossible d'afficher tous les caractères
pendant une lecture sur iPod, seul le numéro du fichier
dans la liste sera affiché.
Information AffichageTitre du morceau “TITLE***”
Nom du dossier “FLD***”
Nom du fichier “FILE***”
KCA-RC107MR_r1.indb 7KCA-RC107MR_r1.indb 7 09.2.13 0:32:14 PM09.2.13 0:32:14 PM

Français
Avant l'installation Connexion
Modèle pouvant être connecté(à compter de février 2009)
• KMR-700U
¤• Le montage et le câblage de ce produit requièrent certaines
compétences et de l'expérience. Pour des raisons de
sécurité, laissez un professionnel effectuer le travail de
montage et de câblage.
• N’installez pas l’appareil dans un endroit exposé
directement à la lumière du soleil, à une chaleur excessive
ou à l’humidité.
• N'utilisez pas vos propres vis. N'utilisez que les vis fournies.
L’utilisation de vis incorrectes pourrait endommager
l’appareil.
• Après avoir installé l’appareil, vérifiez que l'installation
électrique, dont les lumières et les indicateurs de niveau,
fonctionnent correctement.
Connexion d'une seule télécommandeKCA-RC107MR
Entrée télécommande
Récepteur audio marin
KCA-RC107MR
Connexion de deux télécommandesKCA-RC107MRs
Entrée télécommande
Récepteur audio marin
KCA-RC107MR
CA-Y107MR (accessoire en option)
Connexion de trois télécommandesKCA-RC107MRs
Entrée télécommande
Récepteur audio marin
KCA-RC107MR
CA-Y107MR (accessoire en option)
CA-Y107MR (accessoire en option)
⁄• Si le récepteur est installé loin de la KCA-RC107MR, vous
pouvez utiliser la rallonge CA-EX7MR (7m) ou CA-EX3MR
(3m) pour porter la longueur du fil de câblage à 15 mètres.
KCA-RC107MR_r1.indb 8KCA-RC107MR_r1.indb 8 09.2.13 0:32:14 PM09.2.13 0:32:14 PM

Français
Installation
1 Percez des trous sur la surface de fixation d'après le
gabarit (panneau arrière).
2 Fixez la télécommande KCA-RC107MR comme indiqué
sur le schéma.
Avec cadre de montage
Sans cadre de montage
Écrou
Rondelle frein
Surface de fixation (épaisseur maximale : 18 mm)
Cadre de montage
Caoutchouc étanche
Joint d'étanchéité
KCA-RC107MR
RondelleSupport de fixation
Écrou
Rondelle frein
Surface de fixation (épaisseur maximale : 26 mm)
Joint d'étanchéité
KCA-RC107MR
Rondelle
KCA-RC107MR_r1.indb 9KCA-RC107MR_r1.indb 9 09.2.13 0:32:17 PM09.2.13 0:32:17 PM

Deutsch
■ Deutsch ■
Funktionen und Bedienung
⁄• Um dieses Gerät an einen Receiver anzuschließen, muss
die ID des Geräts registriert werden. Nähere Informationen
zur ID-Registrierung finden Sie unter <Einstellung der
Fernbedienungs-ID> in der Bedienungsanleitung des
Receivers.
• Ist die Dualzonenfunktion des Receivers eingeschaltet,
können Sie mit diesem Gerät nur den vorderen oder
hinteren Bereich steuern. Standardmäßig wird der
vordere Bereich gesteuert. Um auf den hinteren Beriech
umzuschalten, lesen Sie den Abschnitt <Einstellung der
Dualzonensteuerung> in der Bedienungsanleitung des
Receivers.
• Möglicherweise können Sie den Receiver nach dem
Einschalten nicht sofort mit diesem Gerät steuern. Warten
Sie eine oder zwei Sekunden und beginnen Sie dann den
Bedienvorgang.
¡ Bei jedem Druck auf diese Taste wird das Gerät ein- oder ausgeschaltet.
™ Aktivierung des Anzeige-Einstellungsmodus.Näheres fi nden Sie unter <Anzeige-Einstellungen> (später beschrieben).Wird diese Taste 1 Sekunde lang gedrückt, kann durch die Anzeige navigiert werden.
£ Durch Drücken dieser Taste wird zwischen den folgenden Quellen umgeschaltet: SIRIUS-Satellitenradio (“SIRIUS”) (optionales Zubehör; nur für Vertriebsgebiet USA), Tuner (“TUNER”), iPod (“IPOD”), USB (“USB”), Bluetooth Audio (“BT-A EXT”) (optionales Zubehör) und Zusatzeingang (“AUX”)Nicht verfügbare Quellen können nicht zugeschaltet werden.
¢ Aktivierung des Audio-Steuerungsmodus. Wird die Taste mindestens 1 Sekunde lang gedrückt, wird auf den Audio-Einstellungsmodus umgeschaltet.
Funktion BedienungAuswahl eines Elements Drücken Sie die [5]- oder [∞]-Taste.
Einstellung des Elements Drücken Sie die [ ]- oder [ ]-Taste.
Mit dieser Taste können Sie im Suchmodus (oder in einem anderen Modus) ein markiertes Element auswählen.
∞ Tuner/Satellitenradio: Auswahl des Wellenbereichs. iPod/USB: Auswahl eines Ordners.
§ Aktivierung des Suchmodus. “SRCH/FAV” wird angezeigt.Ist dieses Gerät an ein KMR-700U angeschlossen, wird durch erneutes Drücken der §[ ]-Taste auf den Favoritenmodus und durch Drücken der Taste ª[+]- oder [–] auf den Musiksuchmodus umgeschaltet.Näheres über den Suchmodus fi nden Sie in der Bedienungsanleitung des angeschlossenen Receivers. Die Suchmodus-Funktion kann mit denselben Bedienvorgängen wie am Receiver verwendet werden.
¶ Tuner/Satellitenradio: Auswahl eines Senders/Kanals.iPod/USB: Auswahl von Musik.
• Absenken der Lautstärke.Bei einem erneuten Drücken der Taste wird wieder der vorherige Lautstärkepegel eingestellt.Wird die Taste mindestens 1 Sekunde lang gedrückt, wird die Wiedergabe des aktuellen Titels auf Pause gestellt. Wird sie erneut mindestens 1 Sekunde lang gedrückt, wird die Wiedergabe des Titels fortgesetzt.
ª Zur Einstellung der Lautstärke.
KCA-RC107MR_r1.indb 10KCA-RC107MR_r1.indb 10 09.2.13 0:32:18 PM09.2.13 0:32:18 PM

Deutsch
Anzeige-EinstellungenSie können die folgenden Anzeigeelemente einstellen:
Anzeige Element Einstellung“DISP SEL” Siehe <Auswahl der Textanzeige>. —
“DIM” Stellt ein, ob die Display-Beleuchtung zusammen mit dem Lichtschalter des Fahrzeugs oder ständig abgeblendet werden soll.
“AUTO”, “MANU”, “OFF”
“CNTRST” Einstellung des Display-Kontrasts. “0” – “10”
“ID:” Anzeige der Fernbedienungs-ID. —
⁄• Nähere Informationen zur Fernbedienungs-ID finden
Sie unter <Einstellung der Fernbedienungs-ID> in der
Bedienungsanleitung des Receivers.
1 Anzeige-Einstellungsmodus aktivieren
Drücken Sie die [DISP]-Taste.
2 Anzeige-Einstellungselement auswählen
Drücken Sie die [5]- oder [∞]-Taste.
3 Anzeige-Einstellungselement einstellen
Drücken Sie die [ ]- oder [ ]-Taste.
4 Anzeige-Einstellungsmodus verlassen
Drücken Sie die [DISP]-Taste.
Auswahl der TextanzeigeÄnderung der angezeigten Informationen für jede der folgenden Quellen;
Im Tuner-BetriebInformationen AnzeigeFrequenz & Name des Programms (RDS) “FREQ/PS”
Musiktitel (RDS) & Interpret (RDS) “TITLE”
Sendername (RDS) “ST NAME”
Radiotext Plus (RDS) “R-TEXT+“
Radiotext (RDS) “R-TEXT”
Frequenz (FM/AM) “FREQ”
Uhr “CLOCK”
Datum “DATE”
Betrieb mit iPod/USBInformationen AnzeigeMusiktitel und Interpret “TITLE”
Albumname und Interpret “ALBUM”
Ordnername “FOLDER”
Dateiname “FILE”
Wiedergabezeit und Musiknummer “P-TIME”
Uhr “CLOCK”
Datum “DATE”
Im Aux-EingangsbetriebInformationen AnzeigeAUX-Name “SRC NAME”
Uhr “CLOCK”
Datum “DATE”
Im SIRIUS-Betrieb (optional)Informationen AnzeigeKanalbezeichnung “CH-NAME”
Musiktitel “SONG”
Interpret “ARTIST”
Komponist “COMPOSER”
Kategoriebezeichnung “CATEGORY”
Label-Bezeichnung “LABEL”
Kommentar “COMMENT”
Kanalnummer “CH NUM”
Uhr “CLOCK”
Datum “DATE”
1 Anzeige-Einstellungsmodus aktivieren
Drücken Sie die [DISP]-Taste.
2 Anzeige-Textauswahlelement auswählen
Drücken Sie die [5]- oder [∞]-Taste.
Wählen Sie die Anzeige “DISP SEL”.
3 Anzeige-Textauswahlmodus aktivieren
Drücken Sie die [ENTER]-Taste.
4 Teil der Textanzeige auswählen
Drücken Sie die [5]- oder [∞]-Taste.
5 Anzeigetext auswählen
Drücken Sie die [ ]- oder [ ]-Taste.
6 Anzeige-Textauswahlmodus verlassen
Drücken Sie die [ENTER]-Taste.
⁄• Wenn für das ausgewählte Display-Element
keine Informationen vorliegen, werden
Alternativinformationen angezeigt.
• Wird “FOLDER” ausgewählt, während vom iPod
wiedergegeben wird, werden die Namen entsprechend
den aktuell ausgewählten Navigationselementen
angezeigt.
• Falls während der Wiedergabe über einen iPod nicht
alle Zeichen angezeigt werden können, wird die
Dateinummer innerhalb des Verzeichnisses angezeigt.
Informationen AnzeigeMusiktitel “TITLE***”
Ordnername “FLD***”
Dateiname “FILE***”
KCA-RC107MR_r1.indb 11KCA-RC107MR_r1.indb 11 09.2.13 0:32:18 PM09.2.13 0:32:18 PM
Deutsch
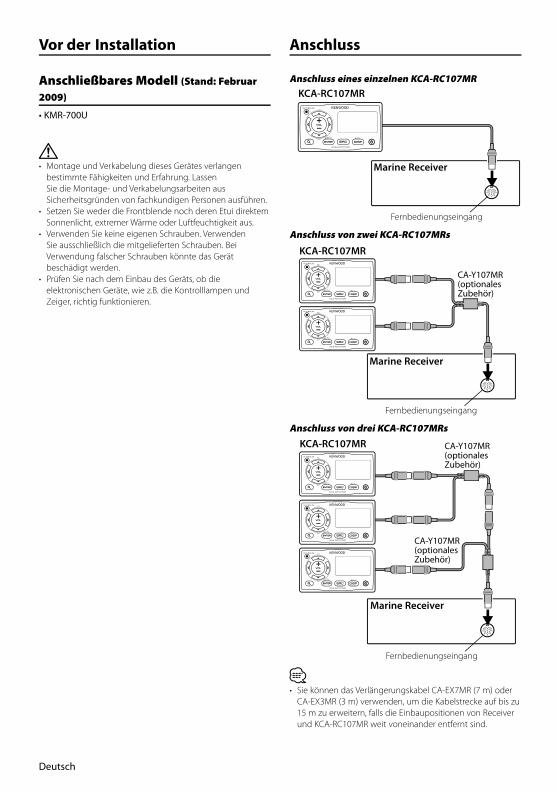
Vor der Installation Anschluss
Anschließbares Modell (Stand: Februar
2009)
• KMR-700U
¤• Montage und Verkabelung dieses Gerätes verlangen
bestimmte Fähigkeiten und Erfahrung. Lassen
Sie die Montage- und Verkabelungsarbeiten aus
Sicherheitsgründen von fachkundigen Personen ausführen.
• Setzen Sie weder die Frontblende noch deren Etui direktem
Sonnenlicht, extremer Wärme oder Luftfeuchtigkeit aus.
• Verwenden Sie keine eigenen Schrauben. Verwenden
Sie ausschließlich die mitgelieferten Schrauben. Bei
Verwendung falscher Schrauben könnte das Gerät
beschädigt werden.
• Prüfen Sie nach dem Einbau des Geräts, ob die
elektronischen Geräte, wie z.B. die Kontrolllampen und
Zeiger, richtig funktionieren.
Anschluss eines einzelnen KCA-RC107MR
Fernbedienungseingang
Marine Receiver
KCA-RC107MR
Anschluss von zwei KCA-RC107MRs
Fernbedienungseingang
Marine Receiver
KCA-RC107MR
CA-Y107MR (optionales Zubehör)
Anschluss von drei KCA-RC107MRs
Fernbedienungseingang
Marine Receiver
KCA-RC107MR
CA-Y107MR (optionales Zubehör)
CA-Y107MR (optionales Zubehör)
⁄• Sie können das Verlängerungskabel CA-EX7MR (7 m) oder
CA-EX3MR (3 m) verwenden, um die Kabelstrecke auf bis zu
15 m zu erweitern, falls die Einbaupositionen von Receiver
und KCA-RC107MR weit voneinander entfernt sind.
KCA-RC107MR_r1.indb 12KCA-RC107MR_r1.indb 12 09.2.13 0:32:19 PM09.2.13 0:32:19 PM

Deutsch
Einbau
1 Bohren Sie Löcher in die Montagefläche. Richten Sie
sich dabei nach der Schablone (Rückseite).
2 Befestigen Sie das KCA-RC107MR wie abgebildet.
Mit Montagerahmen
Ohne Montagerahmen
Flügelmutter
Sicherungsscheibe
Montagefläche (maximale Wanddicke: 18 mm)
Montagerahmen
Gummidichtung
Dichtungsplatte
KCA-RC107MR
ScheibeHalterung
Flügelmutter
Sicherungsscheibe
Montagefläche (maximale Wanddicke: 26 mm)
Dichtungsplatte
KCA-RC107MR
Scheibe
KCA-RC107MR_r1.indb 13KCA-RC107MR_r1.indb 13 09.2.13 0:32:21 PM09.2.13 0:32:21 PM
Nederlands
■ Nederlands ■
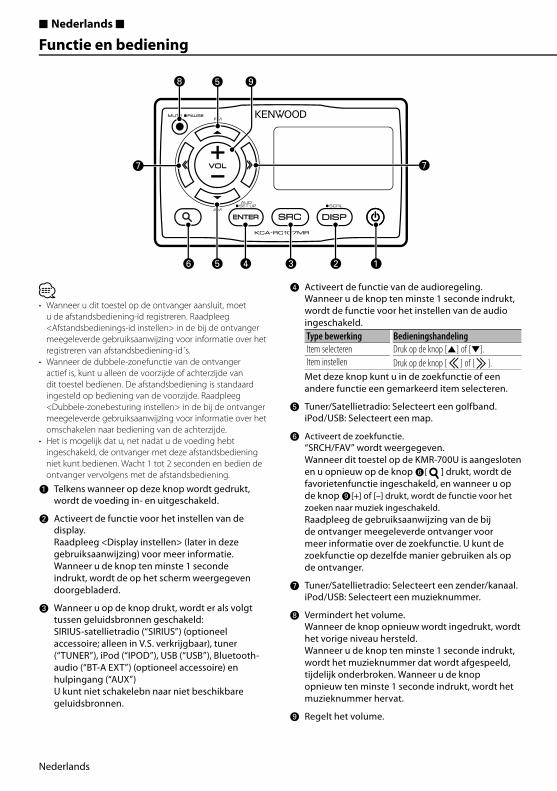
Functie en bediening
ڥ Wanneer u dit toestel op de ontvanger aansluit, moet
u de afstandsbediening-id registreren. Raadpleeg
<Afstandsbedienings-id instellen> in de bij de ontvanger
meegeleverde gebruiksaanwijzing voor informatie over het
registreren van afstandsbediening-id´s.
• Wanneer de dubbele-zonefunctie van de ontvanger
actief is, kunt u alleen de voorzijde of achterzijde van
dit toestel bedienen. De afstandsbediening is standaard
ingesteld op bediening van de voorzijde. Raadpleeg
<Dubbele-zonebesturing instellen> in de bij de ontvanger
meegeleverde gebruiksaanwijzing voor informatie over het
omschakelen naar bediening van de achterzijde.
• Het is mogelijk dat u, net nadat u de voeding hebt
ingeschakeld, de ontvanger met deze afstandsbediening
niet kunt bedienen. Wacht 1 tot 2 seconden en bedien de
ontvanger vervolgens met de afstandsbediening.
¡ Telkens wanneer op deze knop wordt gedrukt, wordt de voeding in- en uitgeschakeld.
™ Activeert de functie voor het instellen van de display.Raadpleeg <Display instellen> (later in deze gebruiksaanwijzing) voor meer informatie.Wanneer u de knop ten minste 1 seconde indrukt, wordt de op het scherm weergegeven doorgebladerd.
£ Wanneer u op de knop drukt, wordt er als volgt tussen geluidsbronnen geschakeld:SIRIUS-satellietradio (“SIRIUS”) (optioneel accessoire; alleen in V.S. verkrijgbaar), tuner (“TUNER”), iPod (“IPOD”), USB (“USB”), Bluetooth-audio (“BT-A EXT”) (optioneel accessoire) en hulpingang (“AUX”)U kunt niet schakelebn naar niet beschikbare geluidsbronnen.
¢ Activeert de functie van de audioregeling.Wanneer u de knop ten minste 1 seconde indrukt, wordt de functie voor het instellen van de audio ingeschakeld.Type bewerking BedieningshandelingItem selecteren Druk op de knop [5] of [∞].
Item instellen Druk op de knop [ ] of [ ].
Met deze knop kunt u in de zoekfunctie of een andere functie een gemarkeerd item selecteren.
∞ Tuner/Satellietradio: Selecteert een golfband.iPod/USB: Selecteert een map.
§ Activeert de zoekfunctie.“SRCH/FAV” wordt weergegeven.Wanneer dit toestel op de KMR-700U is aangesloten en u opnieuw op de knop §[ ] drukt, wordt de favorietenfunctie ingeschakeld, en wanneer u op de knop ª[+] of [–] drukt, wordt de functie voor het zoeken naar muziek ingeschakeld.Raadpleeg de gebruiksaanwijzing van de bij de ontvanger meegeleverde ontvanger voor meer informatie over de zoekfunctie. U kunt de zoekfunctie op dezelfde manier gebruiken als op de ontvanger.
¶ Tuner/Satellietradio: Selecteert een zender/kanaal.iPod/USB: Selecteert een muzieknummer.
• Vermindert het volume.Wanneer de knop opnieuw wordt ingedrukt, wordt het vorige niveau hersteld.Wanneer u de knop ten minste 1 seconde indrukt, wordt het muzieknummer dat wordt afgespeeld, tijdelijk onderbroken. Wanneer u de knop opnieuw ten minste 1 seconde indrukt, wordt het muzieknummer hervat.
ª Regelt het volume.
KCA-RC107MR_r1.indb 14KCA-RC107MR_r1.indb 14 09.2.13 0:32:22 PM09.2.13 0:32:22 PM

Nederlands
Display instellenU kunt de volgende weergave-items instellen;
Display-item Beschrijving Instelling“DISP SEL” Raadpleeg <Tekstweergave selecteren>. —
“DIM” Stelt in of de verlichting van de display wordt gedimd als de lichtschakelaar van de auto is ingeschakeld of continu wordt gedimd.
“AUTO”, “MANU”, “OFF”
“CNTRST” Stelt het contrast van de display in. “0” – “10”
“ID:” Geeft de afstandsbediening-id weer. —
ڥ Raadpleeg <Afstandsbedienings-id instellen> in de bij
de ontvanger meegeleverde gebruiksaanwijzing voor
informatie over de afstandsbediening-id´s.
1 Activeer de functie voor het instellen van de
display
Druk op de knop [DISP].
2 Selecteer het item voor het instellen van de
display
Druk op de knop [5] of [∞].
3 Stel het item voor het instellen van de display in
Druk op de knop [ ] of [ ].
4 Sluit de functie voor het instellen van de display
Druk op de knop [DISP].
Tekstweergave selecterenVerandert de weergegeven informatie van elke bron als volgt;
Met tuner als geluidsbronInformatie Display-itemFrequentie en programmaservicenaam (RDS) “FREQ/PS”
Muziektitel (RDS) en artiestnaam (RDS) “TITLE”
Zendernaam (RDS) “ST NAME”
Radiotekst Plus (RDS) “R-TEXT+“
Radiotekst (RDS) “R-TEXT”
Frequentie (FM/AM) “FREQ”
Klok “CLOCK”
Datum “DATE”
Met iPod/USB-apparaat als geluidsbronInformatie Display-itemMuziektitel & artiestnaam “TITLE”
Albumnaam & artiestnaam “ALBUM”
Mapnaam “FOLDER”
Bestandsnaam “FILE”
Speelduur & muzieknummer “P-TIME”
Klok “CLOCK”
Datum “DATE”
Met hulpingang als geluidsbronInformatie Display-itemAUX-naam “SRC NAME”
Klok “CLOCK”
Datum “DATE”
Met SIRIUS als geluidsbron (optioneel)Informatie Display-itemZendernaam “CH-NAME”
Muziektitel “SONG”
Artiestnaam “ARTIST”
Auteursnaam “COMPOSER”
Categorienaam “CATEGORY”
Labelnaam “LABEL”
Commentaar “COMMENT”
Kanaalnummer “CH NUM”
Klok “CLOCK”
Datum “DATE”
1 Activeer de functie voor het instellen van de
display
Druk op de knop [DISP].
2 Selecteer het item voor het selecteren van de
displaytekst
Druk op de knop [5] of [∞].
Selecteer het display-item “DISP SEL”.
3 Activeer de functie voor het selecteren van de
displaytekst
Druk op de knop [ENTER].
4 Selecteer het item voor tekstweergave
Druk op de knop [5] of [∞].
5 Selecteer de displaytekst
Druk op de knop [ ] of [ ].
6 Sluit de functie voor het selecteren van de
displaytekst
Druk op de knop [ENTER].
ڥ Als het geselecteerde display-item geen informatie
bevat, wordt alternatieve informatie weergegeven.
• Wanneer u terwijl muzieknummers op een iPod worden
afgespeeld “FOLDER” selecteert, worden afhankelijk van
de momenteel geselecteerde doorbladerbare items
namen weergegeven.
• Wanneer niet alle tekens kunnen worden weergegeven
wanneer de iPod wordt afgespeeld, wordt het
bestandsnummer in de lijst weergegeven.
Informatie Display-itemMuziektitel “TITLE***”
Mapnaam “FLD***”
Bestandsnaam “FILE***”
KCA-RC107MR_r1.indb 15KCA-RC107MR_r1.indb 15 09.2.13 0:32:23 PM09.2.13 0:32:23 PM

Nederlands
Vóór de installatie Aansluiten
Aansluitbaar model (vanaf februari 2009)
• KMR-700U
¤• De bevestiging en bedrading van dit product vereist
vakbekwaamheid en ervaring. Laat de bevestiging en
bedrading om veiligheidsredenen door vaklui uitvoeren.
• Installeer het toestel niet op plaatsen die aan direct zonlicht,
hitte of extreme vochtigheid blootstaan.
• Gebruik bij het installeren uitsluitend de bijgeleverde
schroeven. Gebruik uitsluitend de bij het toestel geleverde
schroeven. Als u de verkeerde schroeven gebruikt, kunt u
het toestel beschadigen.
• Controleer na het installeren van het toestel of de
elektrische apparatuur, zoals de richtingaanwijzers en
meters, normaal functioneren.
Bij aansluiten van één KCA-RC107MR-toestel
Ingang afstandsbediening
Marine-ontvanger
KCA-RC107MR
Bij aansluiten van twee KCA-RC107MR-toestellen
Ingang afstandsbediening
Marine-ontvanger
KCA-RC107MR
CA-Y107MR (optioneel accessoire)
Bij aansluiten van drie KCA-RC107MR-toestellen
Ingang afstandsbediening
Marine-ontvanger
KCA-RC107MR
CA-Y107MR (optioneel accessoire)
CA-Y107MR (optioneel accessoire)
ڥ Als de installatieposties van de ontvanger en de KCA-
RC107MR-toestellen ver uit elkaar liggen, kunt u een
CA-EX7MR- (7 m) of CA-EX3MR-verlengsnoer (3 m)
gebruiken om de bekabeling tot maximaal 15 m uit te
breiden.
KCA-RC107MR_r1.indb 16KCA-RC107MR_r1.indb 16 09.2.13 0:32:23 PM09.2.13 0:32:23 PM

Nederlands
Installatie
1 Boor met behulp van de sjabloon (zie achterblad)
gaten in het montageoppervlak.
2 Monteer de KCA-RC107MR zoals in de afbeelding
wordt aangeduid.
Wanneer montageframe wordt gebruikt
Wanneer montageframe niet wordt gebruikt
Moer
Vergrendelingsring
Montageoppervlak (max. plaatdikte: 18 mm)
Montageframe
Waterdicht rubberen materiaal
Pakking
KCA-RC107MR
RingMontagesteun
Moer
Vergrendelingsring
Montageoppervlak (max. plaatdikte: 26 mm)
Pakking
KCA-RC107MR
Ring
KCA-RC107MR_r1.indb 17KCA-RC107MR_r1.indb 17 09.2.13 0:32:26 PM09.2.13 0:32:26 PM

Italiano
■ Italiano ■
Funzionamento e comandi
⁄• L'ID di questa unità deve essere registrato quando la si
collega al ricevitore. Per informazioni su come registrare
l'ID, vedere <Impostazione dell'ID del telecomando> nelle
istruzioni per l'uso del ricevitore.
• È possibile controllare solo il lato anteriore o posteriore con
questa unità quando la funzione Dual Zone del ricevitore è
attivata. Per impostazione predefinita, il lato anteriore può
essere controllato. Per passare al lato posteriore, vedere
<Impostazione del Controllo Dual Zone> nelle istruzioni per
l'uso del ricevitore.
• Subito dopo aver acceso il dispositivo, è possibile che non si
riesca a comandare il ricevitore da questa unità. Attendere
1 - 2 secondi prima di utilizzarlo.
¡ Il dispositivo viene acceso/spento ogni volta che viene premuto questo tasto.
™ Permette di accedere al modo di impostazione del display.Per informazioni, vedere <Impostazione del display> (descritto successivamente).Premendo questo tasto per almeno 1 secondo, la schermata viene fatta scorrere.
£ Premendo questo tasto, la sorgente viene commutata come segue:Radio satellitare SIRIUS (“SIRIUS”) (accessorio opzionale; in vendita solo negli U.S.A.), sintonizzatore (“TUNER”), iPod (“IPOD”), USB (“USB”), audio Bluetooth (“BT-A EXT”) (accessorio opzionale) e ingresso ausiliario (“AUX”)Le sorgenti non disponibili non possono essere commutate.
¢ Accede al modo di controllo dell'audio.Premendo questo tasto per almeno 1 secondo si passa la modo di impostazione dell'audio.Tipo di operazione OperazioneSelezione delle voci Premere il tasto [5] o [∞].
Regolazione della voce Premere il tasto [ ] o [ ].
Questo tasto serve per selezionare una voce evidenziata nel modo di ricerca o in un altro modo.
∞ Sintonizzatore/radio satellitare: Seleziona la banda.iPod/USB: Seleziona la cartella.
§ Accede al modo di ricerca.Viene visualizzato “SRCH/FAV”.Quando questa unità viene collegata a KMR-700U, se si preme di nuovo il tasto § [ ] si passa al modo preferiti e premendo il tasto ª[+] o [–] si passa al modo di ricerca brano.Per ulteriori dettagli sul modo di ricerca, vedere le Istruzioni per l'uso del ricevitore collegato. La funzione del modo di ricerca può essere utilizzata come per il ricevitore.
¶ Sintonizzatore/radio satellitare: Seleziona la stazione/il canale.iPod/USB: Seleziona la musica.
• Abbassa il volume.Se si preme di nuovo il tasto, il volume ritorna al livello precedente.Premendo questo tasto per almeno 1 secondo, il brano riprodotto viene messo in pausa. Premendo di nuovo il tasto per almeno 1 secondo la riproduzione del brano riprende.
ª Regolazione del volume.
KCA-RC107MR_r1.indb 18KCA-RC107MR_r1.indb 18 09.2.13 0:32:27 PM09.2.13 0:32:27 PM

Italiano
Impostazione del displayÈ possibile regolare le seguenti voci sul display;
Display Informazioni Impostazione“DISP SEL” Vedere <Selezione della visualizzazione
del testo>.—
“DIM” Imposta se modificare l'illuminazione del display in combinazione con l'interruttore delle luci dell'imbarcazione oppure in modo costante
“AUTO”, “MANU”, “OFF”
“CNTRST” Regolazione del contrasto del display. “0” – “10”
“ID:” Visualizza l'ID del telecomando. —
ڥ Per dettagli sull'ID del telecomando, vedere
<Impostazione dell'ID del telecomando> nelle istruzioni
per l'uso del ricevitore.
1 Accedere al modo di impostazione del display
Premere il tasto [DISP].
2 Selezionare la voce di impostazione del display
Premere il tasto [5] o [∞].
3 Regolare la voce di impostazione del display
Premere il tasto [ ] o [ ].
4 Uscire dal modo di impostazione del display
Premere il tasto [DISP].
Selezione della visualizzazione del testoCommuta le informazioni sul display a seconda della sorgente, come illustrato di seguito;
Sorgente sintonizzatoreInformazioni DisplayFrequenza e nome dell'emittente (RDS) “FREQ/PS”
Titolo del brano (RDS) e nome dell'artista (RDS) “TITLE”
Nome della stazione (RDS) “ST NAME”
Testo radio avanzato (RDS) “R-TEXT+”
Testo radio (RDS) “R-TEXT”
Frequenza (FM/AM) “FREQ”
Orologio “CLOCK”
Data “DATE”
Sorgente di ingresso iPod/USBInformazioni DisplayTitolo del brano e nome dell'artista “TITLE”
Nome dell’album e nome dell’artista “ALBUM”
Nome della cartella “FOLDER”
Nome del file “FILE”
Tempo di riproduzione e numero del brano “P-TIME”
Orologio “CLOCK”
Data “DATE”
Sorgente d'ingresso ausiliarioInformazioni DisplayNome AUX “SRC NAME”
Orologio “CLOCK”
Data “DATE”
Sorgente SIRIUS (opzionale)Informazioni DisplayNome del canale “CH-NAME”
Titolo del brano “SONG”
Nome dell'artista “ARTIST”
Nome compositore “COMPOSER”
Nome della categoria “CATEGORY”
Nome etichetta “LABEL”
Commenti “COMMENT”
Numero canale “CH NUM”
Orologio “CLOCK”
Data “DATE”
1 Accedere al modo di impostazione del display
Premere il tasto [DISP].
2 Scegliere la voce di selezione del testo di
visualizzazione
Premere il tasto [5] o [∞].
Selezionare il display “DISP SEL”.
3 Accedere al modo di selezione del testo di
visualizzazione
Premere il tasto [ENTER].
4 Selezionare la parte di testo visualizzata
Premere il tasto [5] o [∞].
5 Selezionare il testo di visualizzazione
Premere il tasto [ ] o [ ].
6 Uscire dal modo di selezione del testo di
visualizzazione
Premere il tasto [ENTER].
ڥ Se l'elemento selezionato non contiene informazioni,
vengono visualizzate informazioni alternative.
• Se si seleziona “FOLDER” durante la riproduzione con
l'iPod, i nomi verranno visualizzati in base alle voci di
ricerca attualmente selezionate.
• Se non è possibile visualizzare tutti i caratteri durante la
riproduzione con iPod, viene visualizzato il numero del
file nell'elenco.
Informazioni DisplayTitolo del brano “TITLE***”
Nome della cartella “FLD***”
Nome del file “FILE***”
KCA-RC107MR_r1.indb 19KCA-RC107MR_r1.indb 19 09.2.13 0:32:28 PM09.2.13 0:32:28 PM

Italiano
Prima dell' installazione Collegamento
Modello collegabile (febbraio 2009)
• KMR-700U
¤• Il montaggio e il cablaggio di questo prodotto richiedono
conoscenze specifiche ed esperienza. Per questioni di
sicurezza, incaricare del montaggio e dell'applicazione del
cablaggio personale specializzato.
• Non installare l’unità in un luogo esposto a luce solare
diretta o a calore o umidità eccessivi.
• Non usare viti diverse da quelle in dotazione. Utilizzare
esclusivamente le viti fornite. Se si utilizzano viti errate,
l'unità potrebbe danneggiarsi.
• Dopo aver installato l'unità, controllare che
l'equipaggiamento elettrico, come le luci di segnalazione e
il pannello strumenti, funzionino regolarmente.
Collegamento di un'unità KCA-RC107MR
Ingresso per il telecomando
Ricevitore marino
KCA-RC107MR
Collegamento di due unità KCA-RC107MR
Ingresso per il telecomando
Ricevitore marino
KCA-RC107MR
CA-Y107MR (accessorio opzionale)
Collegamento di tre unità KCA-RC107MR
Ingresso per il telecomando
Ricevitore marino
KCA-RC107MR
CA-Y107MR (accessorio opzionale)
CA-Y107MR (accessorio opzionale)
⁄• È possibile utilizzare le prolunghe CA-EX7MR (7 m) o
CA-EX3MR (3 m) per estendere il cavo fino a 15 metri, se il
ricevitore e l'unità KCA-RC107MR sono molto distanti tra
loro.
KCA-RC107MR_r1.indb 20KCA-RC107MR_r1.indb 20 09.2.13 0:32:28 PM09.2.13 0:32:28 PM

Italiano
Installazione
1 Praticare dei fori sulla superficie di fissaggio in base al
modello (coperchio posteriore).
2 Fissare l'unità KCA-RC107MR come illustrato nella
figura.
Con inserimento del telaio di fissaggio
Senza inserire il telaio di fissaggio
Dado
Rondella di bloccaggio
Superficie di fissaggio (spessore massimo: 18 mm)
Telaio di fissaggio
Gomma impermeabile
Guarnizione
KCA-RC107MR
RondellaStaffa di fissaggio
Dado
Rondella di bloccaggio
Superficie di fissaggio (spessore massimo: 26 mm)
Guarnizione
KCA-RC107MR
Rondella
KCA-RC107MR_r1.indb 21KCA-RC107MR_r1.indb 21 09.2.13 0:32:31 PM09.2.13 0:32:31 PM

Español
■ Español ■
Funciones y funcionamiento
ڥ Se debe registrar el ID de esta unidad al conectarla al
receptor. Para obtener detalles sobre cómo registrar el ID,
consulte <Configuración de ID de control remoto> en el
manual de instrucciones del receptor.
• Sólo puede controlar la parte delantera o trasera con esta
unidad cuando está activa la función de zona dual del
receptor. De forma predeterminada, se puede controlar la
parte delantera. Para cambiar a la parte trasera, consulte
<Configuración de control de doble zona> en el manual de
instrucciones del receptor.
• Es posible que no pueda controlar el receptor desde esta
unidad justo después del encendido. Espere de 1 a 2
segundos y, a continuación, póngala en funcionamiento.
¡ La unidad se enciende y se apaga cada vez que se pulsa este botón.
™ Accede al modo de confi guración de visualización.Para obtener más detalles, consulte <Confi guración de visualización> (que se describe más adelante).Al pulsar el botón durante al menos 1 segundo, se despliega la pantalla.
£ Al pulsar el botón, se cambia a una fuente de la siguiente forma:Radio por satélite SIRIUS (“SIRIUS”) (accesorio opcional; sólo de venta en EE.UU.), sintonizador (“TUNER”), iPod (“IPOD”), USB (“USB”), audio Bluetooth (“BT-A EXT”) (accesorio opcional) y entrada auxiliar (“AUX”)No se puede cambiar a fuentes no disponibles.
¢ Accede al modo de control de audio.Al pulsar el botón durante al menos 1 segundo, se cambia al modo de confi guración de audio.Tipo de operación OperaciónSelección de elemento Pulse el botón [5] o [∞].
Ajustar el elemento Pulse el botón [ ] o [ ].
Este botón se utiliza para seleccionar un elemento resaltado en el modo de búsqueda u otro modo.
∞ Sintonizador/radio por satélite: Seleccione la banda.iPod/USB: Selecciona una carpeta.
§ Accede al modo de búsqueda.Se muestra “SRCH/FAV”.Cuando esta unidad se conecta a KMR-700U, al volver a pulsar el botón §[ ], se cambia al modo de favoritos y, al pulsar el botón ª[+] o [–], se cambia al modo de búsqueda de música.Para obtener más detalles sobre el modo de búsqueda, consulte el manual de instrucciones del receptor conectado. La función de modo de búsqueda se puede utilizar con la misma operación que el receptor.
¶ Sintonizador/radio por satélite: Selecciona la emisora/canal.iPod/USB: Selecciona música.
• Reduce el volumen.Al pulsar de nuevo el botón, el volumen vuelve al nivel anterior.Al pulsar el botón durante al menos 1 segundo, se pausa una canción que se esté reproduciendo. Al volver a pulsar el botón durante al menos 1 segundo, se reanuda la canción.
ª Ajuste del volumen.
KCA-RC107MR_r1.indb 22KCA-RC107MR_r1.indb 22 09.2.13 0:32:32 PM09.2.13 0:32:32 PM
Español
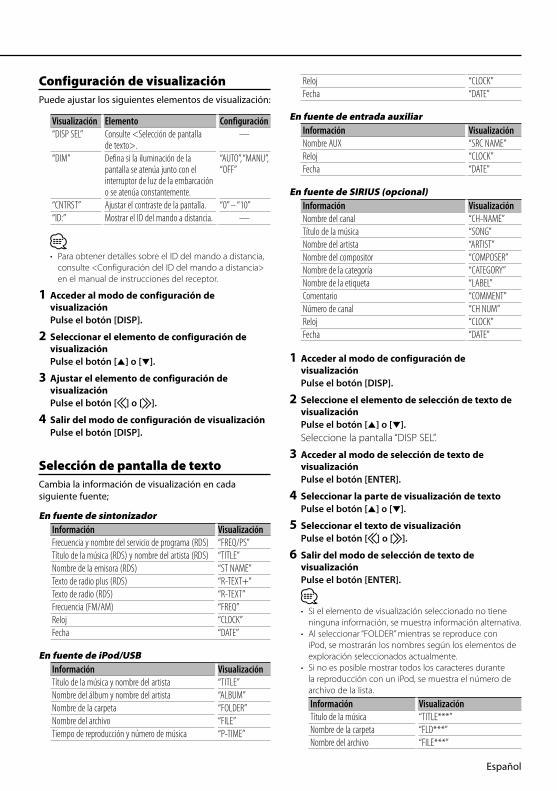
Configuración de visualizaciónPuede ajustar los siguientes elementos de visualización:
Visualización Elemento Configuración“DISP SEL” Consulte <Selección de pantalla
de texto>.—
“DIM” Defina si la iluminación de la pantalla se atenúa junto con el interruptor de luz de la embarcación o se atenúa constantemente.
“AUTO”, “MANU”, “OFF”
“CNTRST” Ajustar el contraste de la pantalla. “0” – “10”
“ID:” Mostrar el ID del mando a distancia. —
ڥ Para obtener detalles sobre el ID del mando a distancia,
consulte <Configuración del ID del mando a distancia>
en el manual de instrucciones del receptor.
1 Acceder al modo de configuración de
visualización
Pulse el botón [DISP].
2 Seleccionar el elemento de configuración de
visualización
Pulse el botón [5] o [∞].
3 Ajustar el elemento de configuración de
visualización
Pulse el botón [ ] o [ ].
4 Salir del modo de configuración de visualización
Pulse el botón [DISP].
Selección de pantalla de textoCambia la información de visualización en cada siguiente fuente;
En fuente de sintonizadorInformación VisualizaciónFrecuencia y nombre del servicio de programa (RDS) “FREQ/PS”
Título de la música (RDS) y nombre del artista (RDS) “TITLE”
Nombre de la emisora (RDS) “ST NAME”
Texto de radio plus (RDS) “R-TEXT+“
Texto de radio (RDS) “R-TEXT”
Frecuencia (FM/AM) “FREQ”
Reloj “CLOCK”
Fecha “DATE”
En fuente de iPod/USBInformación VisualizaciónTítulo de la música y nombre del artista “TITLE”
Nombre del álbum y nombre del artista “ALBUM”
Nombre de la carpeta “FOLDER”
Nombre del archivo “FILE”
Tiempo de reproducción y número de música “P-TIME”
Reloj “CLOCK”
Fecha “DATE”
En fuente de entrada auxiliarInformación VisualizaciónNombre AUX “SRC NAME”
Reloj “CLOCK”
Fecha “DATE”
En fuente de SIRIUS (opcional)Información VisualizaciónNombre del canal “CH-NAME”
Título de la música “SONG”
Nombre del artista “ARTIST”
Nombre del compositor “COMPOSER”
Nombre de la categoría “CATEGORY”
Nombre de la etiqueta “LABEL”
Comentario “COMMENT”
Número de canal “CH NUM”
Reloj “CLOCK”
Fecha “DATE”
1 Acceder al modo de configuración de
visualización
Pulse el botón [DISP].
2 Seleccione el elemento de selección de texto de
visualización
Pulse el botón [5] o [∞].
Seleccione la pantalla “DISP SEL”.
3 Acceder al modo de selección de texto de
visualización
Pulse el botón [ENTER].
4 Seleccionar la parte de visualización de texto
Pulse el botón [5] o [∞].
5 Seleccionar el texto de visualización
Pulse el botón [ ] o [ ].
6 Salir del modo de selección de texto de
visualización
Pulse el botón [ENTER].
⁄• Si el elemento de visualización seleccionado no tiene
ninguna información, se muestra información alternativa.
• Al seleccionar “FOLDER” mientras se reproduce con
iPod, se mostrarán los nombres según los elementos de
exploración seleccionados actualmente.
• Si no es posible mostrar todos los caracteres durante
la reproducción con un iPod, se muestra el número de
archivo de la lista.
Información VisualizaciónTítulo de la música “TITLE***”
Nombre de la carpeta “FLD***”
Nombre del archivo “FILE***”
KCA-RC107MR_r1.indb 23KCA-RC107MR_r1.indb 23 09.2.13 0:32:33 PM09.2.13 0:32:33 PM

Español
Antes de la instalación Conexión
Modelo conectable(a partir de febrero de 2009)
• KMR-700U
¤• La instalación y cableado de este producto requiere de
habilidad y experiencia. Por motivos de seguridad, deje la
labor de conexión y conexión en manos de profesionales.
• No instale la unidad en un sitio expuesto a la luz directa del
sol, o excesivamente húmedo o caluroso.
• No utilice sus propios tornillos. Utilice sólo los tornillos
proporcionados. Si utiliza tornillos incorrectos, puede dañar
la unidad.
• Después de instalar la unidad, asegúrese de que el equipo
eléctrico, como las luces de señales y medidores, funciona
normalmente.
Si se conecta un único KCA-RC107MR
Entrada del mando a distancia
Receptor de la marina
KCA-RC107MR
Si se conectan dos KCA-RC107MR
Entrada del mando a distancia
Receptor de la marina
KCA-RC107MR
CA-Y107MR (accesorio opcional)
Si se conectan tres KCA-RC107MR
Entrada del mando a distancia
Receptor de la marina
KCA-RC107MR
CA-Y107MR (accesorio opcional)
CA-Y107MR (accesorio opcional)
⁄• Puede utilizar el cable de extensión CA-EX7MR (7 m) o
CA-EX3MR (3 m) para extender el cableado hasta 15 metros,
si las ubicaciones de instalación del receptor y de KCA-
RC107MR están muy alejadas.
KCA-RC107MR_r1.indb 24KCA-RC107MR_r1.indb 24 09.2.13 0:32:33 PM09.2.13 0:32:33 PM
Español
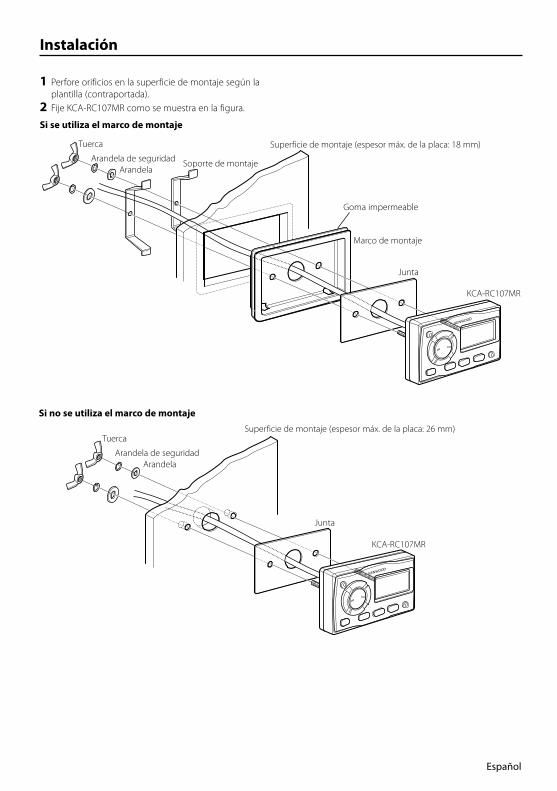
Instalación
1 Perfore orificios en la superficie de montaje según la
plantilla (contraportada).
2 Fije KCA-RC107MR como se muestra en la figura.
Si se utiliza el marco de montaje
Si no se utiliza el marco de montaje
Tuerca
Arandela de seguridad
Superficie de montaje (espesor máx. de la placa: 18 mm)
Marco de montaje
Goma impermeable
Junta
KCA-RC107MR
ArandelaSoporte de montaje
Tuerca
Arandela de seguridad
Superficie de montaje (espesor máx. de la placa: 26 mm)
Junta
KCA-RC107MR
Arandela
KCA-RC107MR_r1.indb 25KCA-RC107MR_r1.indb 25 09.2.13 0:32:35 PM09.2.13 0:32:35 PM
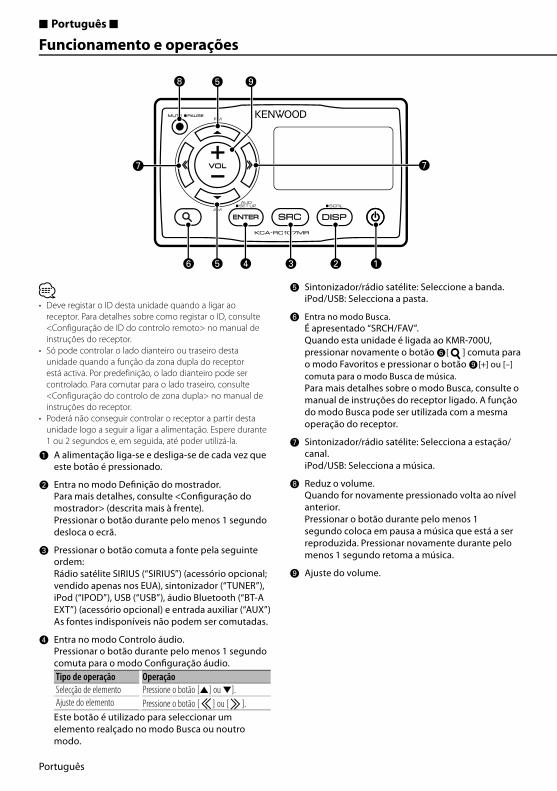
Português
■ Português ■
Funcionamento e operações
ڥ Deve registar o ID desta unidade quando a ligar ao
receptor. Para detalhes sobre como registar o ID, consulte
<Configuração de ID do controlo remoto> no manual de
instruções do receptor.
• Só pode controlar o lado dianteiro ou traseiro desta
unidade quando a função da zona dupla do receptor
está activa. Por predefinição, o lado dianteiro pode ser
controlado. Para comutar para o lado traseiro, consulte
<Configuração do controlo de zona dupla> no manual de
instruções do receptor.
• Poderá não conseguir controlar o receptor a partir desta
unidade logo a seguir a ligar a alimentação. Espere durante
1 ou 2 segundos e, em seguida, até poder utilizá-la.
¡ A alimentação liga-se e desliga-se de cada vez que este botão é pressionado.
™ Entra no modo Defi nição do mostrador.Para mais detalhes, consulte <Confi guração do mostrador> (descrita mais à frente).Pressionar o botão durante pelo menos 1 segundo desloca o ecrã.
£ Pressionar o botão comuta a fonte pela seguinte ordem:Rádio satélite SIRIUS (“SIRIUS”) (acessório opcional; vendido apenas nos EUA), sintonizador (“TUNER”), iPod (“IPOD”), USB (“USB”), áudio Bluetooth (“BT-A EXT”) (acessório opcional) e entrada auxiliar (“AUX”)As fontes indisponíveis não podem ser comutadas.
¢ Entra no modo Controlo áudio.Pressionar o botão durante pelo menos 1 segundo comuta para o modo Confi guração áudio.Tipo de operação OperaçãoSelecção de elemento Pressione o botão [5] ou ∞].
Ajuste do elemento Pressione o botão [ ] ou [ ].
Este botão é utilizado para seleccionar um elemento realçado no modo Busca ou noutro modo.
∞ Sintonizador/rádio satélite: Seleccione a banda.iPod/USB: Selecciona a pasta.
§ Entra no modo Busca.É apresentado “SRCH/FAV”.Quando esta unidade é ligada ao KMR-700U, pressionar novamente o botão §[ ] comuta para o modo Favoritos e pressionar o botão ª[+] ou [–] comuta para o modo Busca de música.Para mais detalhes sobre o modo Busca, consulte o manual de instruções do receptor ligado. A função do modo Busca pode ser utilizada com a mesma operação do receptor.
¶ Sintonizador/rádio satélite: Selecciona a estação/canal.iPod/USB: Selecciona a música.
• Reduz o volume.Quando for novamente pressionado volta ao nível anterior.Pressionar o botão durante pelo menos 1 segundo coloca em pausa a música que está a ser reproduzida. Pressionar novamente durante pelo menos 1 segundo retoma a música.
ª Ajuste do volume.
KCA-RC107MR_r1.indb 26KCA-RC107MR_r1.indb 26 09.2.13 0:32:36 PM09.2.13 0:32:36 PM

Português
Configuração do mostradorPode ajustar os seguintes elementos do mostrador;
Indicação Elemento Ajuste“DISP SEL” Consulte <Selecção da apresentação do
texto>.—
“DIM” Define se a iluminação do mostrador é reduzida juntamente com o interruptor de luz do barco ou se está sempre reduzida.
“AUTO”, “MANU”, “OFF”
“CNTRST” Ajusta o contraste do mostrador. “0” – “10”
“ID:” Apresenta o ID do controlo remoto. —
ڥ Para mais detalhes sobre o ID do controlo remoto,
consulte <Configuração do ID do controlo remoto> no
manual de instruções do receptor.
1 Entre no modo Configuração do mostrador
Pressione o botão [DISP].
2 Seleccione o elemento de configuração do
mostrador
Pressione o botão [5] ou [∞].
3 Ajuste o elemento de configuração do mostrador
Pressione o botão [ ] ou [ ].
4 Saia do modo Configuração do mostrador
Pressione o botão [DISP].
Selecção da apresentação do textoMuda a informação apresentada em cada fonte;
Fonte sintonizadorInformação IndicaçãoFrequência e nome do serviço do programa (RDS)
“FREQ/PS”
Título da música (RDS) e nome do artista (RDS) “TITLE”
Nome da estação (RDS) “ST NAME”
Texto rádio Plus (RDS) “R-TEXT+“
Texto rádio (RDS) “R-TEXT”
Frequência (FM/AM) “FREQ”
Relógio “CLOCK”
Data “DATE”
Na fonte iPod/ USBInformação IndicaçãoTítulo da música e nome do artista “TITLE”
Nome do álbum e nome do artista “ALBUM”
Nome da pasta “FOLDER”
Nome do ficheiro “FILE”
Tempo de reprodução e número da música “P-TIME”
Relógio “CLOCK”
Data “DATE”
Na fonte entrada auxiliarInformação IndicaçãoNome AUX “SRC NAME”
Relógio “CLOCK”
Data “DATE”
Na fonte SIRIUS (opcional)Informação IndicaçãoNome de canal “CH-NAME”
Título da música “SONG”
Nome do artista “ARTIST”
Nome do compositor “COMPOSER”
Nome da categoria “CATEGORY”
Nome da etiqueta “LABEL”
Comentário “COMMENT”
Número do canal “CH NUM”
Relógio “CLOCK”
Data “DATE”
1 Entre no modo Configuração do mostrador
Pressione o botão [DISP].
2 Seleccione o elemento seleccionar texto da
apresentação
Pressione o botão [5] ou [∞].
Seleccione a apresentação “DISP SEL”.
3 Entre no modo Seleccionar texto da apresentação
Pressione o botão [ENTER].
4 Seleccione a parte de apresentação do texto
Pressione o botão [5] ou [∞].
5 Seleccione o texto da apresentação
Pressione o botão [ ] ou [ ].
6 Saia domodo Seleccionar texto da apresentação
Pressione o botão [ENTER].
⁄• Se o elemento do mostrador seleccionado não tiver
nenhuma informação, aparecem as informações
alternativas.
• Quando seleccionar “FOLDER” enquanto reproduz o
iPod, os nomes serão apresentados dependendo dos
elementos de navegação actualmente seleccionados.
• Se não for possível apresentar todos os caracteres
ao reproduzir com iPod, é apresentado o número do
ficheiro na lista.
Informação IndicaçãoTítulo da música “TITLE***”
Nome da pasta “FLD***”
Nome do ficheiro “FILE***”
KCA-RC107MR_r1.indb 27KCA-RC107MR_r1.indb 27 09.2.13 0:32:37 PM09.2.13 0:32:37 PM

Português
Antes da instalação Ligação
Modelo que pode ser ligado(a partir de Fevereiro de 2009)
• KMR-700U
¤• A montagem e a ligação deste produto requerem perícia
e experiência. Para sua segurança. deixe o trabalho de
montagem e ligação ser feito por profissionais.
• Não instalar o aparelho num local exposto à luz solar directa
ou calor e humidade excessivos.
• Não use os seus próprios parafusos. Use apenas os
parafusos fornecidos. O uso de parafusos não apropriados
pode resultar em danos ao aparelho principal.
• Depois de instalar a unidade, verifique se o equipamento
eléctrico está a funcionar normalmente, por exemplo as
lâmpadas de sinalização e os manómetros.
Quando liga um KCA-RC107MR
Entrada do controlo remoto
Receptor marítimo
KCA-RC107MR
Quando liga dois KCA-RC107MRs
Entrada do controlo remoto
Receptor marítimo
KCA-RC107MR
CA-Y107MR (acessório opcional)
Quando liga três KCA-RC107MRs
Entrada do controlo remoto
Receptor marítimo
KCA-RC107MR
CA-Y107MR (acessório opcional)
CA-Y107MR (acessório opcional)
⁄• Pode utilizar o cabo de extensão CA-EX7MR (7 m) ou
CA-EX3MR (3 m) para criar uma extensão do cabo de
ligação até aos 15 metros, se as posições de instalação do
receptor e do KCA-RC107MR forem muito distantes.
KCA-RC107MR_r1.indb 28KCA-RC107MR_r1.indb 28 09.2.13 0:32:38 PM09.2.13 0:32:38 PM

Português
Instalação
1 Crie orifícios na superfície de montagem segundo o
modelo (contra-capa).
2 Fixe o KCA-RC107MR como apresentado na figura.
Quando a estrutura de montagem é utilizada
Quando a estrutura de montagem não é utilizada
Porca
Anilha de bloqueio
Superfície de montagem (espessura máxima da placa: 18 mm)
Estrutura de montagem
Borracha à prova de água
Junta
KCA-RC107MR
AnilhaSuporte de montagem
Porca
Anilha de bloqueio
Superfície de montagem (espessura máxima da placa: 26 mm)
Junta
KCA-RC107MR
Anilha
KCA-RC107MR_r1.indb 29KCA-RC107MR_r1.indb 29 09.2.13 0:32:40 PM09.2.13 0:32:40 PM

日本語
■ 日本語 ■
各部の機能と操作方法
⁄• レシーバーに接続するときは、本機にIDを設定する必要があります。IDの設定方法はレシーバー取扱説明書の<リモコンIDセットアップ>を参照してください。
• レシーバーのデュアルゾーンコントロール機能を使用中は、本機からの操作はフロント側またはリア側専用となります。初期設定ではフロント側のコントロールが可能です。リア側のコントロールに切り替える場合は、レシーバー取扱説明書の<デュアルゾーンコントロール>を参照してください。
¡ 押すたびに電源がオン・オフします。
™ ディスプレイ設定モードに入ります。 詳しくは<ディスプレイ設定> (後記)参照してください。 1秒以上押すと、表示がスクロールします。
£ 押すたびにソースが以下の順に切り替わります。チューナー(“TUNER”)、iPod(“IPOD”)、USB(“USB”), Bluetooth オーディオ(“BT-A EXT”)(別売品)、AUX入力(“AUX”)使用できないソースには切り替わりません。
¢ オーディオコントロールモードに入ります. 1秒以上押すとオーディオセットアップモードに入ります.
動作 操作項目を選択する [5]/[∞]ボタンを押す。項目を調整する [ ]/[ ]ボタンを押す。
Search modeサーチモード時などでは選択項目を決定します.
∞ チューナー : バンドを選択します。iPod/USB: フォルダを選択します。
§ サーチモードになります。 “SRCH/FAV”と表示されます。 KMR-700Uに接続時は、もう一度§[ ] buttonを押すとFavorite モードになり、ª[+] or [‒] buttonを押すとブラウジングモードになります。
詳しいサーチモードの操作については、接続したレシーバーの取扱説明書を参照してください。レシーバーと同様の操作でサーチモード機能が使用できます。
¶ チューナー : 放送局を選択します。iPod/USB: 曲を選択します。
• 音量を素早く小さくします。もう一度押すと、元の音量に戻ります。1秒以上押すと、プレイが一時停止します。もう一度1秒以上押すとプレイを再開します。
ª 音量を調整します。
KCA-RC107MR_r1.indb 30KCA-RC107MR_r1.indb 30 09.2.13 0:32:41 PM09.2.13 0:32:41 PM

日本語
ディスプレイ設定以下の表示設定項目の調整をします。
表示 項目 設定“DISP SEL” <テキスト表示設定>を参照し
てください。̶
“DIM” ライトスイッチに合わせてティスプレイの輝度が変化します。
“AUTO”, “MANU”, “OFF”
“CNTRST” ディスプレイのコントラストを調整します。
“0” ‒ “10”
“ID:” リモコンのIDを表示します。 ̶
⁄• リモコンのIDについては、レシーバー取扱説明書の<リモコンIDセットアップ>を参照してください。
1 ディスプレイ設定モードにします[DISP]ボタンを押す。
2 設定する項目を選択します[5] / [∞]ボタンを押す
3 設定する各項目を調整します[ ] / [ ]ボタンを押す
4 ディスプレイ設定モードを終了します[DISP]ボタンを押す。
テキスト表示設定以下のテキストから表示する情報を選択します。
チューナー受信時設定内容 表示周波数表示 “FREQ”時計表示 “CLOCK”日付表示 “DATE”
iPod/USBプレイ時表示 設定内容曲名&アーティスト名 “TITLE”アルバム名&アーティスト名 “ALBUM”フォルダ名 “FOLDER”ファイル名 “FILE”プレイタイム&ファイル番号 “P-TIME”時計表示 “CLOCK”日付表示 “DATE”
AUXソース時表示 設定内容AUX name “SRC NAME”時計表示 “CLOCK”日付表示 “DATE”
1 ディスプレイ設定モードにします[DISP]ボタンを押す。
2 テキスト表示設定項目を選択します[5] / [∞]ボタンを押す“DISP SEL”表示を選択します。
3 テキスト表示設定モードにします[ENTER]ボタンを押す。
4 表示を設定するテキスト位置を選択します[5] / [∞]ボタンを押す
5 表示するテキストを選択します[ ] / [ ]ボタンを押す
6 テキスト表示設定モードを終了します[ENTER]ボタンを押す。⁄• 選択した情報がない場合は、代替の情報が表示されます。• iPodのプレイ中にフォルダ名表示を選択すると、現在選択中のブラウズ項目に沿った名称が表示されます。
• iPodのプレイ中の表示で、すべての文字を表示できない場合は、リスト内のファイル番号で示します。表示内容 表示曲名 “TITLE***”フォルダ名 “FLD***”ファイル名 “FILE***”
KCA-RC107MR_r1.indb 31KCA-RC107MR_r1.indb 31 09.2.13 0:32:42 PM09.2.13 0:32:42 PM

日本語
取付の前に
接続可能モデル(2009年2月現在)• KMR-700U
注 意穴を開けて取り付ける際は、パイプ類・タンク・電気配線などの位置を確認のうえ、これらと当たったり接触することがないようにしてください。火災の原因になります。
実 施本製品の取り付け終了後に、電装系などが正常に動作することを確認してください。正常に動作しない場合は、正常に動作するように取り付けをやり直してください。
実 施事故防止のため、電池やネジなどの小物類は幼児の手の届かないところに保管してください。万一飲み込んだ場合は、直ちに医師に相談してください。
実 施車両の板金部の近くを通るコードには、保護用テープを巻いてください。コードが切れると、ショート事故により、火災となるおそれがあります。
実 施本製品の取り付け・配線は技術と経験が必要です。安全のため<お買い上げの販売店>にご依頼ください。
接続方法
KCA-RC107MRを1台接続する場合
リモコン入力
レシーバー
KCA-RC107MR
KCA-RC107MRを2台接続する場合
リモコン入力
レシーバー
KCA-RC107MR
CA-Y107MR(オプション)
KCA-RC107MRを3台接続する場合
リモコン入力
レシーバー
KCA-RC107MR
CA-Y107MR(オプション)
CA-Y107MR(オプション)
⁄• レシーバーとKCA-RC107MRの取り付け位置が離れているときは、延長ケーブルCA-EX7MR (7m)またはMRCA-EX3MR (3m)を使用して最大15mまで配線ケーブルを伸ばすことができます。
KCA-RC107MR_r1.indb 32KCA-RC107MR_r1.indb 32 09.2.13 0:32:42 PM09.2.13 0:32:42 PM

日本語
取付方法
1 テンプレート(裏表紙)に合わせて、取付面に取り付け穴を開けます。
2 下図のように取り付けます。
取付フレームを使用する場合
取付フレームを使用しない場合
ナットスプリングワッシャー
取付面(最大板厚18 mm)
取付フレーム
防水ゴム
ガスケット
KCA-RC107MR
ワッシャー取付ブラケット
ナットスプリングワッシャー
取付面(最大板厚26 mm)
ガスケット
KCA-RC107MR
ワッシャー
KCA-RC107MR_r1.indb 33KCA-RC107MR_r1.indb 33 09.2.13 0:32:46 PM09.2.13 0:32:46 PM

Declaration of Conformity with regard to the EMC Directive 2004/108/EC
Manufacturer:Kenwood Corporation
2967-3 Ishikawa-machi, Hachioji-shi, Tokyo, 192-8525 Japan
EU Representative's:Kenwood Electronics Europe BVAmsterdamseweg 37, 1422 AC UITHOORN, The Netherlands
Déclaration de conformité se rapportant à la directive EMC 2004/108/EC
Fabricant:Kenwood Corporation
2967-3 Ishikawa-machi, Hachioji-shi, Tokyo, 192-8525 Japon
Représentants dans l’UE:Kenwood Electronics Europe BVAmsterdamseweg 37, 1422 AC UITHOORN, Pays-Bas
Konformitätserklärung in Bezug auf die EMC-Vorschrift 2004/108/EC
Hersteller:Kenwood Corporation
2967-3 Ishikawa-machi, Hachioji-shi, Tokyo, 192-8525 Japan
EU-Vertreter:Kenwood Electronics Europe BVAmsterdamseweg 37, 1422 AC UITHOORN, Niederlande
Conformiteitsverklaring met betrekking tot de EMC-richtlijn van de Europese Unie (2004/108/EC)
Fabrikant:Kenwood Corporation
2967-3 Ishikawa-machi, Hachioji-shi, Tokyo, 192-8525 Japan
EU-vertegenwoordiger:Kenwood Electronics Europe BVAmsterdamseweg 37, 1422 AC UITHOORN, Nederland
Dichiarazione di conformità relativa alla direttiva EMC 2004/108/CE
Produttore:Kenwood Corporation
2967-3 Ishikawa-machi, Hachioji-shi, Tokyo, 192-8525 Japan
Rappresentante UE:Kenwood Electronics Europe BVAmsterdamseweg 37, 1422 AC UITHOORN, The Netherlands
Declaración de conformidad con respecto a la Directiva EMC 2004/108/CE
Fabricante:Kenwood Corporation
2967-3 Ishikawa-machi, Hachioji-shi, Tokyo, 192-8525 Japón
Representante en la UE:Kenwood Electronics Europe BVAmsterdamseweg 37, 1422 AC UITHOORN, Países Bajos
Declaração de conformidade relativa à Directiva EMC 2004/108/CE
Fabricante:Kenwood Corporation
2967-3 Ishikawa-machi, Hachioji-shi, Tóquio, 192-8525 Japão
Representante na UE:Kenwood Electronics Europe BVAmsterdamseweg 37, 1422 AC UITHOORN, Holanda
Information on Disposal of Old Electrical and Electronic Equipment and Batteries (applicable for EU countries that have adopted separate waste collection systems)
Products and batteries with the symbol (crossed-out wheeled bin) cannot be disposed as household waste.Old electrical and electronic equipment and batteries should be recycled at a facility capable of handling these items and their waste byproducts.Contact your local authority for details in locating a recycle facility nearest to you.Proper recycling and waste disposal will help conserve resources whilst preventing detrimental effects on our health and the environment.Notice: The sign “Pb” below the symbol for
batteries indicates that this battery contains lead.
KCA-RC107MR_r1.indb 34KCA-RC107MR_r1.indb 34 09.2.13 0:32:47 PM09.2.13 0:32:47 PM
Information sur l’élimination des anciens équipements électriques et électroniques et piles électriques (applicable dans les pays de l’Union Européenne qui ont adopté des systèmes de collecte sélective)
Les produits et piles électriques sur lesquels le pictogramme (poubelle barrée) est apposé ne peuvent pas être éliminés comme ordures ménagères.Les anciens équipements électriques et électroniques et piles électriques doivent être recyclés sur des sites capables de traiter ces produits et leurs déchets. Contactez vos autorités locales pour connaître le site de recyclage le plus proche. Un recyclage adapté et l’élimination des déchets aideront à conserver les ressources et à nous préserver des leurs effets nocifs sur notre santé et sur l’environnement.Remarque: Le symbole “Pb” ci-dessous sur des
piles électrique indique que cette pile contient du plomb.
Entsorgung von gebrauchten elektrischen und elektronischen Geräten und Batterien (anzuwenden in den Ländern der Europäischen Union und anderen europäischen Ländern mit einem separaten Sammelsystem für solche Geräte)
Das Symbol (durchgestrichene Mülltonne) auf dem Produkt oder seiner Verpackung weist darauf hin, dass dieses Produkt nicht als normaler Haushaltsabfall behandelt werden darf, sondern an einer Annahmestelle für das Recycling von elektrischen und elektronischen Geräten und batterien abgegeben werden muss. Durch Ihren Beitrag zur korrekten Entsorgung dieses Produktes schützen Sie die Umwelt und die Gesundheit Ihrer Mitmenschen. Unsachgemässe oder falsche Entsorgung gefährden Umwelt und Gesundheit. Weitere Informationen über das Recycling dieses Produktes erhalten Sie von Ihrer Gemeinde oder den kommunalen Entsorgungsbetrieben.Achtung: Das Zeichen “Pb” unter dem Symbol
fur Batterien zeigt an, dass diese Batterie Blei enthalt.
Informatie over het weggooien van elektrische en elektronische apparatuur en batterijen (particulieren)
Dit symbool geeft aan dat gebruikte elektrische, elektronische producten en batterijen niet bij het normale huishoudelijke afval mogen.Lever deze producten in bij de aangewezen inzamelingspunten, waar ze gratis worden geaccepteerd en op de juiste manier worden verwerkt, teruggewonnen en hergebruikt. Voor inleveradressen zie www.nvmp.nl, www.ictmilieu.nl, www.stibat.nl. Wanneer u dit product op de juiste manier als afval inlevert, spaart u waardevolle hulpbronnen en voorkomt u potentiële negatieve gevolgen voor de volksgezondheid en het milieu, die anders kunnen ontstaan door een onjuiste verwerking van afval.Opgelet: Het teken “Pb” onder het teken van de
batterijen geeft aan dat deze batterij lood bevat.
Informazioni sullo smaltimento delle vecchie apparecchiature elettriche ed elettroniche e delle batterie (valide per i Paesi Europei che hanno adottato sistemi di raccolta differenziata)
I prodotti e le batterie recanti il simbolo di un cassonetto della spazzatura su ruote barrato non possono essere smaltiti insieme ai normali rifiuti di casa.I vecchi prodotti elettrici ed elettronici e le batterie devono essere riciclati presso un’apposita struttura in grado di trattare questi prodotti e di smaltirne i loro componenti.Per conoscere dove e come recapitare tali prodotti nel luogo a voi più vicino, contattare l’apposito ufficio comunale.Un appropriato riciclo e smaltimento aiuta a conservare la natura e a prevenire effetti nocivi alla salute e all’ambiente.Nota: Il simbolo “Pb” sotto al simbolo delle
batterie indica che questa batteria contiene piombo.
Información acerca de la eliminación de equipos eléctricos, electrónicos y baterías al final de la vida útil (aplicable a los países de la Unión Europea que hayan adoptado sistemas independientes de recogida de residuos)
Los productos y las baterías con el símbolo de un contenedor con ruedas tachado no podrán ser desechados como residuos domésticos.Los equipos eléctricos, electrónicos y baterías al final de la vida útil, deberán ser reciclados en instalaciones que puedan dar el tratamiento adecuado a estos productos y a sus subproductos residuales correspondientes. Póngase en contacto con su administración local para obtener información sobre el punto de recogida más cercano. Un tratamiento correcto del reciclaje y la eliminación de residuos ayuda a conservar los recursos y evita al mismo tiempo efectos perjudiciales en la salud y el medio ambiente.Nota: El símbolo “Pb” debajo del (contenedor
con ruedas tachado) en baterías indica que dicha batería contiene plomo.
Informação sobre a forma de deitar fora Velho
Equipamento Eléctrico, Electrónico e baterias
(aplicável nos países da UE que adoptaram sistemas
de recolha de lixos separados)
Produtos e baterias com o símbolo (caixote do
lixo com um X) não podem ser deitados fora
junto com o lixo doméstico.
Equipamentos velhos eléctricos, electrónicos e
baterias deverão ser reciclados num local capaz
de o fazer bem assim como os seus
subprodutos. Contacte as autoridades locais
para se informar de um local de reciclagem
próximo de si. Reciclagem e tratamento de lixo
correctos ajudam a poupar recursos e
previnem efeitos prejudiciais na nossa saúde e
no ambiente.
Note: o símbolo “Pb” abaixo do símbolo em
baterias indica que esta bateria contém
chumbo.
KCA-RC107MR_r1.indb 35KCA-RC107MR_r1.indb 35 09.2.13 0:32:48 PM09.2.13 0:32:48 PM
This symbol mark indicates that Kenwood manufactured this product so as to decrease harmful infl uence on the environment.
FCC WARNING:
This equipment may generate or use radio frequency energy.
Changes or modifications to this equipment may cause
harmful interference unless the modifications are expressly
approved in the instruction manual. The user could lose
the authority to operate this equipment if an unauthorized
change or modification is made.
NOTE:
This equipment has been tested and found to comply
with the limits for a Class B digital device, pursuant to Part
15 of the FCC Rules. These limits are designed to provide
reasonable protection against harmful interference in a
residential installation. This equipment may cause harmful
interference to radio communications, if it is not installed and
used in accordance with the instructions. However, there is
no guarantee that interference will not occur in a particular
installation. If this equipment does cause harmful interference
to radio or television reception, which can be determined by
turning the equipment off and on, the user is encouraged to
try to correct the interference by one or more of the following
measures:
- Reorient or relocate the receiving antenna.
- Increase the separation between the equipment and
receiver.
- Connect the equipment into an outlet on a circuit different
from that to which the receiver is connected.
- Consult the dealer or an experienced radio/TV technician for
help.
THIS DEVICE COMPLIES WITH PART 15 OF THE FCC
RULES. OPERATION IS SUBJECT TO THE FOLLOWING TWO
CONDITIONS:
(1) THIS DEVICE MAY NOT CAUSE HARMFUL INTERFERENCE,
AND
(2) THIS DEVICE MUST ACCEPT ANY INTERFERENCE RECEIVED,
INCLUDING INTERFERENCE THAT MAY CAUSE UNDESIRED
OPERATION.
KCA-RC107MR_r1.indb 36KCA-RC107MR_r1.indb 36 09.2.13 0:32:48 PM09.2.13 0:32:48 PM

KCA-RC107MR_r1.indb 37KCA-RC107MR_r1.indb 37 09.2.13 0:32:49 PM09.2.13 0:32:49 PM

KCA-RC107MR_r1.indb 38KCA-RC107MR_r1.indb 38 09.2.13 0:32:49 PM09.2.13 0:32:49 PM

KCA-RC107MR_r1.indb 39KCA-RC107MR_r1.indb 39 09.2.13 0:32:49 PM09.2.13 0:32:49 PM

When using the Mounting frame/Avec cadre de montage/Mit Montagerahmen/Wanneer montageframe wordt gebruikt/Con inserimento del telaio di fissaggio/Si se utiliza el marco de montaje/Quando a estrutura de montagem é utilizada/取付フレームを使用する場合
Template/Gabarit/Schablone/Sjabloon/Modello/Plantilla/Modelo/テンプレート
111
4 – R5
67
2 – Ø8
Ø27
110
25 30 3066
33
Surface Mounting (not using mounting frame)/Sans cadre de montage/Ohne Montagerahmen/Wanneer montageframe niet wordt gebruikt/Senza inserire il telaio di fissaggio/Si no se utiliza el marco de montaje/Quando a estrutura de montagem não é utilizada/取付フレームを使用しない場合
KCA-RC107MR_r1.indb 40KCA-RC107MR_r1.indb 40 09.2.13 0:32:49 PM09.2.13 0:32:49 PM