dell.com/support OptiPlex 3240 All-in-One · 2016-01-31 · N.B.: se ci si sta connettendo a una...
2
Snelstartgids Guide d’information rapide Schnellstart-Handbuch Guida introduttiva rapida OptiPlex 3240 All-in-One Quick Start Guide 1 Connect the power cable and other devices Sluit de stroomkabel en andere apparaten aan Branchez le câble d’alimentation et les autres périphériques Stromkabel und andere Geräte anschließen Collegare il cavo dell’alimentazione e altri dispositivi NOTE: If you are connecting a wireless keyboard or mouse, see the documentation that shipped with it. N.B.: Als u een draadloos toetsenbord of draadloze muis aansluit, raadpleeg dan de meegeleverde documentatie. REMARQUE : si vous connectez un clavier ou une souris sans fil, consultez la documentation fournie. ANMERKUNG: Wenn Sie eine Wireless-Tastatur oder eine Maus anschließen, finden Sie weiter Informationen in der Dokumentation, dieser beilagen. N.B.: se si utilizza una tastiera o un mouse senza fili, visualizzare la documentazione fornita. 3 Install the cable cover (Optional) Plaats het kabelafdekplaatje (optioneel) Installez le cache-câbles (en option) Kabelabdeckung installieren (optional) Installare il coperchio del cavo (opzionale) 2 Remove the torx screw from the cable cover (Optional) Verwijder de torxschroef uit het kabelafdekplaatje (optioneel) Retirez la vis torx du cache-câbles (en option) Torx-Schraube von der Kabelabdeckung lösen (optional) Rimuovere la vite Torx dal coperchio del cavo (opzionale) 5 Press the power button Druk op de aan-uitknop | Appuyez sur le bouton d’alimentation Betriebsschalter drücken | Premere l’Accensione Product support and manuals Productondersteuning en handleidingen Support produits et manuels Produktsupport und Handbücher Supporto prodotto e manuali dell.com/support dell.com/support/manuals dell.com/support/linux Contact Dell Neem contact op met Dell | Contacter Dell Kontaktaufnahme mit Dell | Contattare Dell dell.com/contactdell Regulatory and safety Regelgeving en veiligheid Réglementations et sécurité Sicherheitshinweise und Zulassungsinformationen Normative e sicurezza dell.com/regulatory_compliance Regulatory model Wettelijk model Modèle réglementaire Muster-Modellnummer Modello di conformità alle normative W14B Regulatory type Wettelijk type | Type réglementaire Muster-Typnummer | Tipo di conformità W14B001 Computer model Computermodel | Modèle de l’ordinateur Computermodell | Modello computer OptiPlex 3240 AIO © 2015 Dell Inc. © 2015 Canonical Ltd © 2015 Microsoft Corporation. Printed in China. 2015-08 4 Install the stand De standaard installeren | Installez le socle Standrahmen installieren | Installare il piedistallo 6 Finish operating system setup Voltooi de installatie van het besturingssysteem Terminez la configuration du système d’exploitation Betriebssystem-Setup abschließen Terminare la configurazione del sistema operativo Windows 8.1 Enable security and updates Schakel de beveiliging en updates in Activez la sécurité et les mises à jour Sicherheit und Aktualisierungen aktivieren Abilitare sicurezza e aggiornamenti Connect to your network Maak verbinding met uw netwerk Connectez-vous à votre réseau Mit dem Netzwerk verbinden Connettere alla rete NOTE: If you are connecting to a secured wireless network, enter the password for the wireless network access when prompted. N.B.: Als u verbinding maakt met een beveiligd draadloos netwerk, vul dan het wachtwoord voor het netwerk in wanneer daar om gevraagd wordt. REMARQUE : si vous vous connectez à un réseau sans fil sécurisé, saisissez le mot de passe d’accès au réseau sans fil lorsque vous y êtes invité. ANMERKUNG: Wenn Sie sich mit einem geschützten Wireless-Netzwerk verbinden, geben Sie das Kennwort für das Wireless-Netzwerk ein, wenn Sie dazu aufgefordert werden. N.B.: se ci si sta connettendo a una rete wireless protetta, inserire la password di accesso alla rete wireless quando richiesto. Sign in to your Microsoft account or create a local account Meld u aan bij uw Microsoft-account of maak een lokale account aan Connectez-vous à votre compte Microsoft ou créez un compte local Bei Ihrem Microsoft-Konto anmelden oder lokales Konto erstellen Effettuare l’accesso al proprio account Microsoft oppure creare un account locale
Transcript of dell.com/support OptiPlex 3240 All-in-One · 2016-01-31 · N.B.: se ci si sta connettendo a una...
Snelstartgids
Guide d’information rapide
Schnellstart-Handbuch
Guida introduttiva rapida
OptiPlex 3240 All-in-One
Quick Start Guide
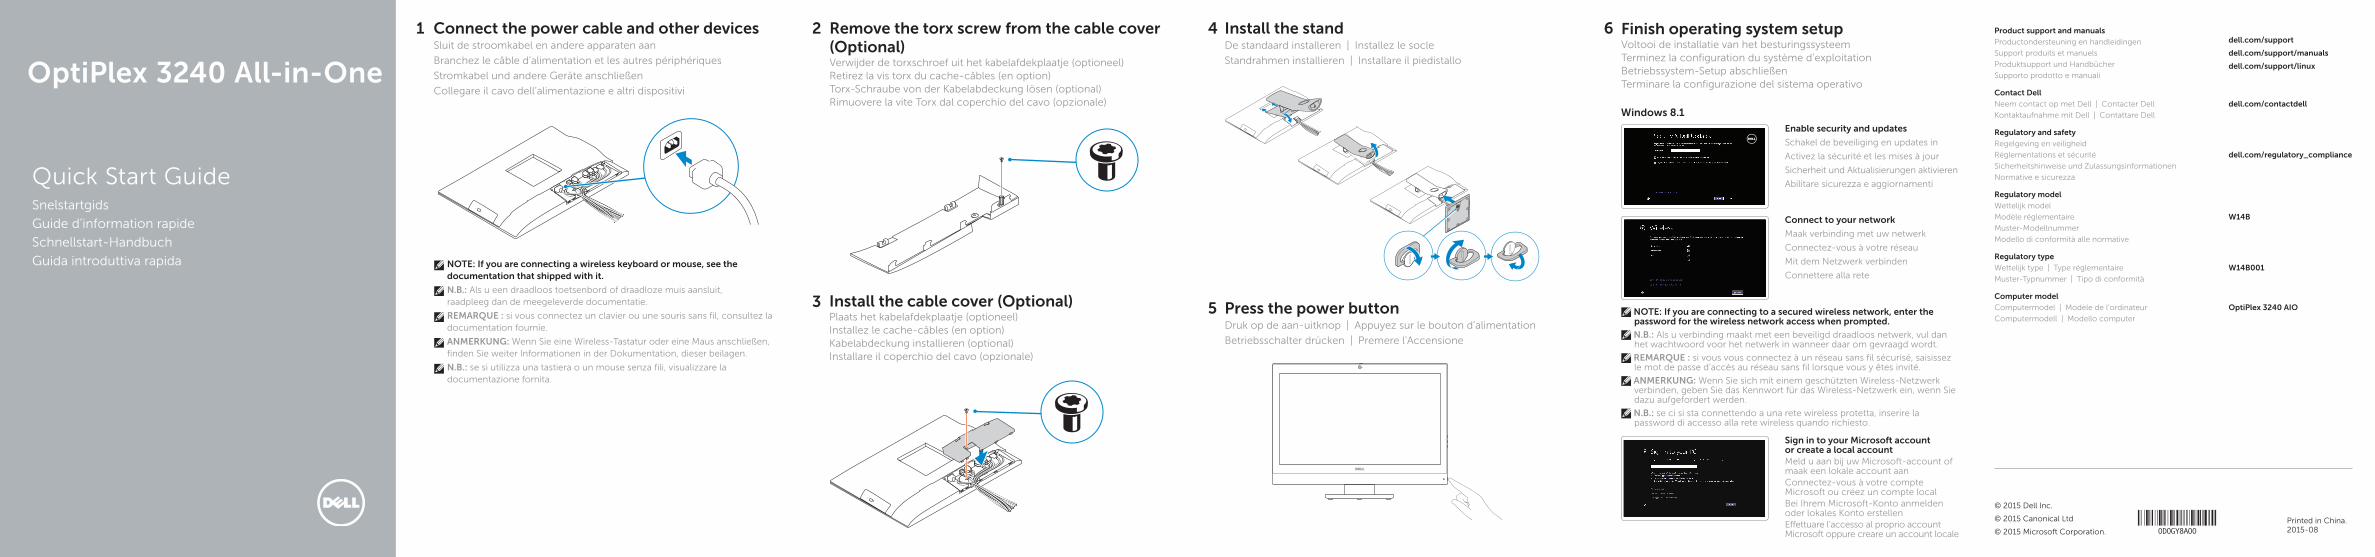
1 Connect the power cable and other devicesSluit de stroomkabel en andere apparaten aan
Branchez le câble d’alimentation et les autres périphériques
Stromkabel und andere Geräte anschließen
Collegare il cavo dell’alimentazione e altri dispositivi
NOTE: If you are connecting a wireless keyboard or mouse, see the documentation that shipped with it.
N.B.: Als u een draadloos toetsenbord of draadloze muis aansluit, raadpleeg dan de meegeleverde documentatie.
REMARQUE : si vous connectez un clavier ou une souris sans fil, consultez la documentation fournie.
ANMERKUNG: Wenn Sie eine Wireless-Tastatur oder eine Maus anschließen, finden Sie weiter Informationen in der Dokumentation, dieser beilagen.
N.B.: se si utilizza una tastiera o un mouse senza fili, visualizzare la documentazione fornita.
3 Install the cable cover (Optional)Plaats het kabelafdekplaatje (optioneel)Installez le cache-câbles (en option)Kabelabdeckung installieren (optional)Installare il coperchio del cavo (opzionale)
2 Remove the torx screw from the cable cover(Optional) Verwijder de torxschroef uit het kabelafdekplaatje (optioneel)Retirez la vis torx du cache-câbles (en option)Torx-Schraube von der Kabelabdeckung lösen (optional)Rimuovere la vite Torx dal coperchio del cavo (opzionale)
5 Press the power buttonDruk op de aan-uitknop | Appuyez sur le bouton d’alimentation
Betriebsschalter drücken | Premere l’Accensione
Product support and manuals
Productondersteuning en handleidingen
Support produits et manuels
Produktsupport und Handbücher
Supporto prodotto e manuali
dell.com/support
dell.com/support/manuals
dell.com/support/linux
Contact Dell
Neem contact op met Dell | Contacter Dell
Kontaktaufnahme mit Dell | Contattare Dell
dell.com/contactdell
Regulatory and safety
Regelgeving en veiligheid
Réglementations et sécurité
Sicherheitshinweise und Zulassungsinformationen
Normative e sicurezza
dell.com/regulatory_compliance
Regulatory model
Wettelijk model
Modèle réglementaire
Muster-Modellnummer
Modello di conformità alle normative
W14B
Regulatory type
Wettelijk type | Type réglementaire
Muster-Typnummer | Tipo di conformità
W14B001
Computer model
Computermodel | Modèle de l’ordinateur
Computermodell | Modello computer
OptiPlex 3240 AIO
© 2015 Dell Inc.
© 2015 Canonical Ltd
© 2015 Microsoft Corporation.
Printed in China.2015-08
4 Install the standDe standaard installeren | Installez le socle
Standrahmen installieren | Installare il piedistallo
6 Finish operating system setupVoltooi de installatie van het besturingssysteemTerminez la configuration du système d’exploitationBetriebssystem-Setup abschließenTerminare la configurazione del sistema operativo
Windows 8.1
Enable security and updates
Schakel de beveiliging en updates in
Activez la sécurité et les mises à jour
Sicherheit und Aktualisierungen aktivieren
Abilitare sicurezza e aggiornamenti
Connect to your network
Maak verbinding met uw netwerk
Connectez-vous à votre réseau
Mit dem Netzwerk verbinden
Connettere alla rete
NOTE: If you are connecting to a secured wireless network, enter the password for the wireless network access when prompted.
N.B.: Als u verbinding maakt met een beveiligd draadloos netwerk, vul dan het wachtwoord voor het netwerk in wanneer daar om gevraagd wordt.
REMARQUE : si vous vous connectez à un réseau sans fil sécurisé, saisissez le mot de passe d’accès au réseau sans fil lorsque vous y êtes invité.
ANMERKUNG: Wenn Sie sich mit einem geschützten Wireless-Netzwerk verbinden, geben Sie das Kennwort für das Wireless-Netzwerk ein, wenn Sie dazu aufgefordert werden.
N.B.: se ci si sta connettendo a una rete wireless protetta, inserire la password di accesso alla rete wireless quando richiesto.
Sign in to your Microsoft account or create a local accountMeld u aan bij uw Microsoft-account of maak een lokale account aanConnectez-vous à votre compte Microsoft ou créez un compte localBei Ihrem Microsoft-Konto anmelden oder lokales Konto erstellenEffettuare l’accesso al proprio account Microsoft oppure creare un account locale
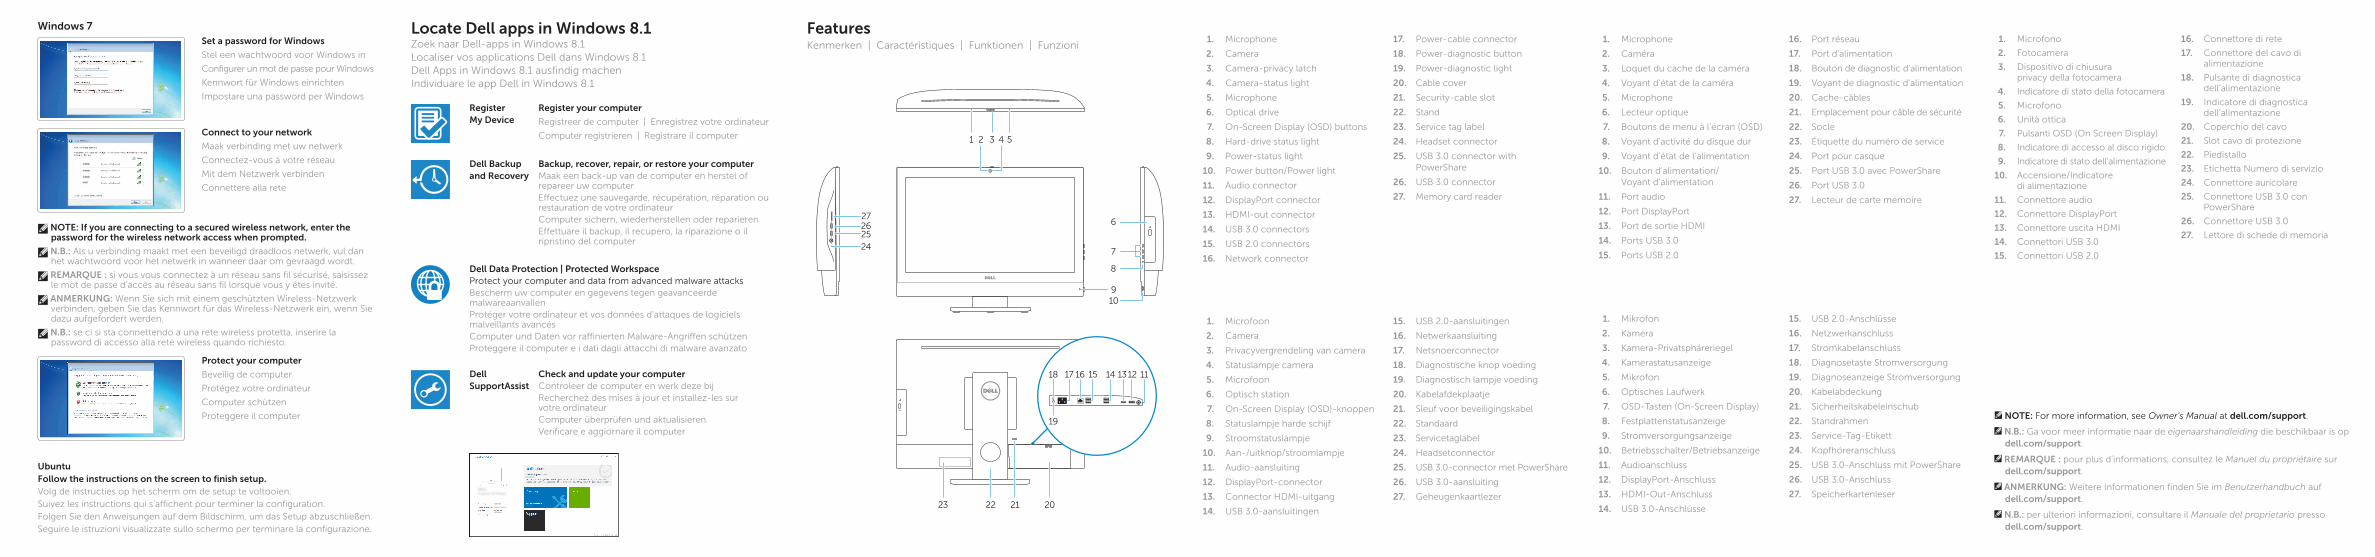
1. Microphone
2. Camera
3. Camera-privacy latch
4. Camera-status light
5. Microphone
6. Optical drive
7. On-Screen Display (OSD) buttons
8. Hard-drive status light
9. Power-status light
10. Power button/Power light
11. Audio connector
12. DisplayPort connector
13. HDMI-out connector
14. USB 3.0 connectors
15. USB 2.0 connectors
16. Network connector
17. Power-cable connector
18. Power-diagnostic button
19. Power-diagnostic light
20. Cable cover
21. Security-cable slot
22. Stand
23. Service tag label
24. Headset connector
25. USB 3.0 connector with PowerShare
26. USB 3.0 connector
27. Memory card reader
1. Microfoon
2. Camera
3. Privacyvergrendeling van camera
4. Statuslampje camera
5. Microfoon
6. Optisch station
7. On-Screen Display (OSD)-knoppen
8. Statuslampje harde schijf
9. Stroomstatuslampje
10. Aan-/uitknop/stroomlampje
11. Audio-aansluiting
12. DisplayPort-connector
13. Connector HDMI-uitgang
14. USB 3.0-aansluitingen
15. USB 2.0-aansluitingen
16. Netwerkaansluiting
17. Netsnoerconnector
18. Diagnostische knop voeding
19. Diagnostisch lampje voeding
20. Kabelafdekplaatje
21. Sleuf voor beveiligingskabel
22. Standaard
23. Servicetaglabel
24. Headsetconnector
25. USB 3.0-connector met PowerShare
26. USB 3.0-aansluiting
27. Geheugenkaartlezer
1. Microfono
2. Fotocamera
3. Dispositivo di chiusura privacy della fotocamera
4. Indicatore di stato della fotocamera
5. Microfono
6. Unità ottica
7. Pulsanti OSD (On Screen Display)
8. Indicatore di accesso al disco rigido
9. Indicatore di stato dell’alimentazione
10. Accensione/Indicatore di alimentazione
11. Connettore audio
12. Connettore DisplayPort
13. Connettore uscita HDMI
14. Connettori USB 3.0
15. Connettori USB 2.0
16. Connettore di rete
17. Connettore del cavo di alimentazione
18. Pulsante di diagnostica dell’alimentazione
19. Indicatore di diagnostica dell’alimentazione
20. Coperchio del cavo
21. Slot cavo di protezione
22. Piedistallo
23. Etichetta Numero di servizio
24. Connettore auricolare
25. Connettore USB 3.0 con PowerShare
26. Connettore USB 3.0
27. Lettore di schede di memoria
FeaturesKenmerken | Caractéristiques | Funktionen | Funzioni
NOTE: For more information, see Owner’s Manual at dell.com/support.
N.B.: Ga voor meer informatie naar de eigenaarshandleiding die beschikbaar is op dell.com/support.
REMARQUE : pour plus d’informations, consultez le Manuel du propriétaire sur dell.com/support.
ANMERKUNG: Weitere Informationen finden Sie im Benutzerhandbuch auf dell.com/support.
N.B.: per ulteriori informazioni, consultare il Manuale del proprietario presso dell.com/support.
1. Microphone
2. Caméra
3. Loquet du cache de la caméra
4. Voyant d’état de la caméra
5. Microphone
6. Lecteur optique
7. Boutons de menu à l’écran (OSD)
8. Voyant d’activité du disque dur
9. Voyant d’état de l’alimentation
10. Bouton d’alimentation/ Voyant d’alimentation
11. Port audio
12. Port DisplayPort
13. Port de sortie HDMI
14. Ports USB 3.0
15. Ports USB 2.0
16. Port réseau
17. Port d’alimentation
18. Bouton de diagnostic d’alimentation
19. Voyant de diagnostic d’alimentation
20. Cache-câbles
21. Emplacement pour câble de sécurité
22. Socle
23. Étiquette du numéro de service
24. Port pour casque
25. Port USB 3.0 avec PowerShare
26. Port USB 3.0
27. Lecteur de carte mémoire
1. Mikrofon
2. Kamera
3. Kamera-Privatsphäreriegel
4. Kamerastatusanzeige
5. Mikrofon
6. Optisches Laufwerk
7. OSD-Tasten (On-Screen Display)
8. Festplattenstatusanzeige
9. Stromversorgungsanzeige
10. Betriebsschalter/Betriebsanzeige
11. Audioanschluss
12. DisplayPort-Anschluss
13. HDMI-Out-Anschluss
14. USB 3.0-Anschlüsse
15. USB 2.0-Anschlüsse
16. Netzwerkanschluss
17. Stromkabelanschluss
18. Diagnosetaste Stromversorgung
19. Diagnoseanzeige Stromversorgung
20. Kabelabdeckung
21. Sicherheitskabeleinschub
22. Standrahmen
23. Service-Tag-Etikett
24. Kopfhöreranschluss
25. USB 3.0-Anschluss mit PowerShare
26. USB 3.0-Anschluss
27. Speicherkartenleser
UbuntuFollow the instructions on the screen to finish setup.Volg de instructies op het scherm om de setup te voltooien.Suivez les instructions qui s’affichent pour terminer la configuration.Folgen Sie den Anweisungen auf dem Bildschirm, um das Setup abzuschließen.Seguire le istruzioni visualizzate sullo schermo per terminare la configurazione.
Windows 7Set a password for Windows
Stel een wachtwoord voor Windows in
Configurer un mot de passe pour Windows
Kennwort für Windows einrichten
Impostare una password per Windows
Connect to your network
Maak verbinding met uw netwerk
Connectez-vous à votre réseau
Mit dem Netzwerk verbinden
Connettere alla rete
NOTE: If you are connecting to a secured wireless network, enter the password for the wireless network access when prompted.
N.B.: Als u verbinding maakt met een beveiligd draadloos netwerk, vul dan het wachtwoord voor het netwerk in wanneer daar om gevraagd wordt.
REMARQUE : si vous vous connectez à un réseau sans fil sécurisé, saisissez le mot de passe d’accès au réseau sans fil lorsque vous y êtes invité.
ANMERKUNG: Wenn Sie sich mit einem geschützten Wireless-Netzwerk verbinden, geben Sie das Kennwort für das Wireless-Netzwerk ein, wenn Sie dazu aufgefordert werden.
N.B.: se ci si sta connettendo a una rete wireless protetta, inserire la password di accesso alla rete wireless quando richiesto.
Protect your computer
Beveilig de computer
Protégez votre ordinateur
Computer schützen
Proteggere il computer
Locate Dell apps in Windows 8.1Zoek naar Dell-apps in Windows 8.1Localiser vos applications Dell dans Windows 8.1Dell Apps in Windows 8.1 ausfindig machenIndividuare le app Dell in Windows 8.1
Register My Device
Register your computer
Registreer de computer | Enregistrez votre ordinateur
Computer registrieren | Registrare il computer
Dell Backup and Recovery
Backup, recover, repair, or restore your computerMaak een back-up van de computer en herstel of repareer uw computerEffectuez une sauvegarde, récupération, réparation ou restauration de votre ordinateurComputer sichern, wiederherstellen oder reparierenEffettuare il backup, il recupero, la riparazione o il ripristino del computer
Dell Data Protection | Protected WorkspaceProtect your computer and data from advanced malware attacksBescherm uw computer en gegevens tegen geavanceerde malwareaanvallenProtéger votre ordinateur et vos données d’attaques de logiciels malveillants avancésComputer und Daten vor raffinierten Malware-Angriffen schützenProteggere il computer e i dati dagli attacchi di malware avanzato
Dell SupportAssist
Check and update your computerControleer de computer en werk deze bijRecherchez des mises à jour et installez-les sur votre ordinateurComputer überprüfen und aktualisierenVerificare e aggiornare il computer


![Applicazioni di rete a.a. 2003-2003 · 2003. 2. 27. · 1 Applicazioni di Rete – M. Ribaudo - DISI Applicazioni di rete a.a. 2003-2003 [terzo anno nuovo ordinamento] Marina Ribaudo](https://static.fdocuments.fr/doc/165x107/5fc27efd742f12763c26377e/applicazioni-di-rete-aa-2003-2003-2003-2-27-1-applicazioni-di-rete-a-m.jpg)