DE Bedienungsanleitung KOCHFELD - Lancaster University · menos de 8 anos, caso não estejam a ser...
84
English GB Operating Instructions HOB Contents Operating Instructions,1 WARNING,2 Description of the appliance-Control Panel,7 Installation,11 Start-up and use,14 Precautions and tips,17 Care and maintenance,18 Technical description of the models,18 FR Français Mode d’emploi TABLE DE CUISSON Sommaire Mode d’emploi,1 ATTENTION,2 Description de l’appareil-Tableau de bord, 7 Installation,19 Mise en marche et utilisation,22 Précautions et conseils, 25 Nettoyage et entretien,26 Description technique des modèles,26 Español ES Manual de instrucciones ENCIMERA Sumario Manual de instrucciones,1 ATENCIÓN,2 Descripción del aparato-Panel de control,7 Instalación,27 Puesta en funcionamiento y uso,30 Precauciones y consejos,33 Mantenimiento y cuidados,34 Descripción técnica de los modelos,34 Instruções para a utilização PLANO Índice Instruções para a utilização,1 ATENÇÃO,2 Descrição do aparelho-Painel de comandos,7 Instalação, 35 Início e utilização, 38 Precauções e conselhos,41 Manutenção e cuidados,42 Descrição técnica dos modelos,42 PT Português DE Bedienungsanleitung KOCHFELD Inhaltsverzeichnis Bedienungsanleitung,1 ZUR BEACHTUNG,2 Beschreibung des Gerätes- Bedienfeld,7 Installation, 43 Inbetriebsetzung und Gebrauch,46 Vorsichtsmaßregeln und Hinweise, 49 Reinigung und Pflege, 50 Technische Beschreibung der Modelle, 50 NL PL RS Italiano IT Istruzioni per l’uso PIANO COTTURA Sommario Istruzioni per l’uso,1 ATTENZIONE,2 Descrizione dell’apparecchio- Pannello di controllo,7 Installazione, 51 Avvio e utilizzo,54 Precauzioni e consigli,57 Manutenzione e cura,58 Descrizione tecnica dei modelli,58 Deutsch Nederland Gebruiksaanwijzing KOOKPLAAT Inhoud Gebruiksaanwijzing,1 PAS OP,2 Beschrijving van het apparaat-Bedieningspaneel,7 Installatie, 59 Starten en gebruik, 62 Voorzorgsmaatregelen en advies,65 Onderhoud en verzorging,66 Technische beschrijving van de modellen,66 Polski Instrukcja obs ugi P YTA GRZEJNA Spis tre ci Instrukcja obs ugi,1 UWAGA,2 Opis urz dzenia-Panel sterowania,7 Instalacja,67 Uruchomienie i u ytkowanie,70 Zalecenia i rodki ostro no ci,73 Konserwacja i utrzymanie,74 Opis Techniczny,74 - ,7 ,75 B ,78 ,81 ,82 ,82 VRA 641 D X S VRA 641 D B S VRA 640 X S ,1 ,2 Português Português Español Español English English VRA 640 C S
Transcript of DE Bedienungsanleitung KOCHFELD - Lancaster University · menos de 8 anos, caso não estejam a ser...
EnglishGB Operating Instructions
HOBContentsOperating Instructions,1WARNING,2Description of the appliance-Control Panel,7Installation,11Start-up and use,14Precautions and tips,17Care and maintenance,18Technical description of the models,18
FRFrançais
Mode d’emploi TABLE DE CUISSONSommaireMode d’emploi,1ATTENTION,2 Description de l’appareil-Tableau de bord, 7Installation,19Mise en marche et utilisation,22Précautions et conseils, 25Nettoyage et entretien,26Description technique des modèles,26
EspañolES Manual de instrucciones
ENCIMERASumarioManual de instrucciones,1ATENCIÓN,2Descripción del aparato-Panel de control,7Instalación,27Puesta en funcionamiento y uso,30Precauciones y consejos,33Mantenimiento y cuidados,34Descripción técnica de los modelos,34
Instruções para a utilizaçãoPLANOÍndiceInstruções para a utilização,1ATENÇÃO,2Descrição do aparelho-Painel de comandos,7Instalação, 35Início e utilização, 38Precauções e conselhos,41Manutenção e cuidados,42Descrição técnica dos modelos,42
PTPortuguês
DE BedienungsanleitungKOCHFELDInhaltsverzeichnisBedienungsanleitung,1ZUR BEACHTUNG,2Beschreibung des Gerätes- Bedienfeld,7Installation, 43Inbetriebsetzung und Gebrauch,46Vorsichtsmaßregeln und Hinweise, 49Reinigung und Pflege, 50Technische Beschreibung der Modelle, 50
NL
PL
RS
ItalianoIT Istruzioni per l’uso
PIANO COTTURASommarioIstruzioni per l’uso,1ATTENZIONE,2Descrizione dell’apparecchio- Pannello di controllo,7Installazione, 51Avvio e utilizzo,54Precauzioni e consigli,57Manutenzione e cura,58Descrizione tecnica dei modelli,58
Deutsch
Nederland
GebruiksaanwijzingKOOKPLAATInhoudGebruiksaanwijzing,1PAS OP,2Beschrijving van het apparaat-Bedieningspaneel,7Installatie, 59Starten en gebruik, 62Voorzorgsmaatregelen en advies,65Onderhoud en verzorging,66Technische beschrijving van de modellen,66
Polski
Instrukcja obs ugiP YTA GRZEJNASpis tre ciInstrukcja obs ugi,1UWAGA,2Opis urz dzenia-Panel sterowania,7Instalacja,67Uruchomienie i u ytkowanie,70Zalecenia i rodki ostro no ci,73Konserwacja i utrzymanie,74Opis Techniczny,74
- ,7,75
B ,78 ,81
,82 ,82
VRA 641 D X S VRA 641 D B S VRA 640 X S
,1,2
PortuguêsPortuguês
EspañolEspañol
EnglishEnglish
VRA 640 C S
2
• WARNING: The appliance and its accessible parts become hot during use.
• Care should be taken to avoid touching heating elements.
• Children less than 8 years of age shall be kept away unless continuously supervised.
• This appliance can be used by children aged from 8 years and above and persons with reduced physical, sensory or mental capabilities or lack of experience and knowledge if they have been given supervision or instruction concerning use of the appliance in a safe way and understand the hazards involved. Children shall not play with the appliance. Cleaning and user maintenance shall not be made by children without supervision.
• WARNING: Unattended cooking on a hob with fat or oil can be dangerous and may result in fire.
• NEVER try to extinguish a fire with water, but switch off the appliance and then cover flame e.g. with a lid or a fire blanket.
• WARNING: Danger of fire: do not store items on the cooking surfaces.
• WARNING: If the surface in glass-ceramic is cracked, switch off the appliance to avoid the possibility of electric shock.
•Never use steam cleaners or pressure cleaners on the appliance.
•The appliance is not intended to be operated by means of an external timer or separate remote control system.
EnglishGB WARNING! FR
Français
• ATTENTION : cet appareil ainsi que ses parties accessibles deviennent très chauds pendant leur fonctionnement.
• Il faut faire attention de ne pas toucher les éléments chauffants.
•Ne laisser s’approcher les enfants de moins de 8 ans à moins qu’ils ne soient sous surveillance constante.
• Le présent appareil peut être utilisé par des enfants de plus de 8 ans et par des personnes présentant des capacités physiques, sensorielles ou mentales réduites ou n’ayant pas l’expérience ou les connaissances nécessaires, à condition qu’ils soient sous bonne surveillance ou qu’ils aient reçu les instructions nécessaires pour une utilisation de l’appareil en toute sécurité et à condition qu’ils se rendent compte des dangers encourus. Les enfants ne doivent pas jouer avec l’appareil. Les opérations de nettoyage et d’entretien ne doivent pas être effectuées par des enfants non surveillés.
• ATTENTION : laisser un récipient de cuisson contenant de l’huile ou de la graisse sur le foyer est dangereux et risque d’entraîner un incendie
• Il ne faut JAMAIS essayer d’éteindre une flamme ou un incendie avec de l’eau ! Il faut éteindre l’appareil et couvrir la flamme avec un couvercle, par exemple, ou avec une couverture anti-feu.
• ATTENTION : risque d’incendie : ne pas laisser d’objets sur les surfaces de cuisson.
• ATTENTION : si la surface vitrocéramique est fêlée, éteindre l’appareil afin d’éviter tout risque d’électrocution.
• Ne jamais nettoyer l’appareil avec des nettoyeurs vapeur ou haute pression.
•Cet appareil ne peut pas être allumé au moyen d’un temporisateur extérieur ou d’un système de commande à distance séparé.
ATTENTION !
GB
3
EspañolES
• ATENCIÓN: Este aparato y sus partes accesibles se calientan mucho durante el uso.
• Por lo tanto, es importante evitar tocar los elementos calentadores.
• Mantenga alejados a los niños menores de 8 años si no son continuamente vigilados.
• El presente aparato puede ser utilizado por niños mayores de 8 años y por personas con capacidades físicas, sensoriales o mentales disminuidas o sin experiencia ni conocimientos, si se encuentran bajo una adecuada vigilancia o si han sido instruidos sobre el uso del aparato de modo seguro y comprenden los peligros relacionados con el mismo. Los niños no deben jugar con el aparato. Las operaciones de limpieza y de mantenimiento no deben ser realizadas por niños sin vigilancia.
• ATENCIÓN: Dejar un quemador con grasas o aceites sin vigilancia puede ser peligroso y provocar un incendio.
• NUNCA intente apagar una llama/incendio con agua, se debe apagar el aparato y cubrir la llama, por ejemplo, con una tapa o con una manta ignífuga.
• ATENCIÓN: Riesgo de incendio: no deje objetos sobre las superficies de cocción.
• ATENCIÓN: Si la superficie de vitrocerámica está agrietada, apague el aparato para evitar sacudidas eléctricas.
• No utilice nunca limpiadores a vapor o de alta presión para la limpieza del aparato.
• El aparato no se debe poner en funcionamiento a través de un temporizador externo o de un sistema de mando a distancia.
ATENCIÓN ! PTPortuguês
ATENÇÃO !
• ATENÇÃO: Este aparelho e as suas partes acessíveis aquecem muito durante a utilização.
• É preciso ter atenção e evitar tocar os elementos que aquecem.
• Manter afastadas as crianças com menos de 8 anos, caso não estejam a ser vigiadas.
• O presente aparelho pode ser utilizado por crianças com mais de 8 anos e por pessoas com capacidades físicas, sensoriais ou mentais reduzidas ou com pouca experiência e conhecimentos, caso sejam adequadamente vigiadas ou caso tenham recebido instruções em relação ao uso do aparelho de forma segura e tenham conhecimento dos perigos associados. As crianças não devem brincar com o aparelho. As operações de limpeza e manutenção não devem ser efectuadas por crianças sem vigilância.
• ATENÇÃO: Deixar um fogão com gordura e óleo sem vigilância pode ser perigoso e provocar um incêndio.
• NUNCA tente apagar as chamas com água. É necessário desligar o aparelho e cobrir as chamas com uma tampa ou com uma manta ignífuga.
• ATENÇÃO: Risco de incêndio: não deixe objectos sobre as superfícies de cozedura.
• ATENÇÃO: Se a superfície vitrocerâmica estiver rachada, desligue o aparelho para evitar a possibilidade de choques eléctricos.
• Nunca utilize equipamento de limpeza a vapor ou de alta pressão para limpar o aparelho.
• O aparelho não é destinado a ser colocado em funcionamento por meio de um temporizador externo ou por um sistema de comando à distância separado.

4
DEDeutsch
• ZUR BEACHTUNG: Bei Gebrauch wird dieses Gerät und alle zugänglichen Teile sehr heiß.
• Es ist darauf zu achten, dass die Heizelemente nicht berührt werden.
• Kinder unter 8 Jahren, die nicht ständig beaufsichtigt sind, von dem Gerät fernhalten.
• Das Gerät darf von Kindern ab 8 Jahren und Personen mit eingeschränkten körperlichen, geistigen oder Wahrnehmungsfähigkeiten oder aber ohne ausreichende Erfahrung und Kenntnis verwendet werden, vorausgesetzt sie werden ausreichend überwacht oder sie wurden in den sicheren Gebrauch des Geräts eingewiesen und haben eine ausreichende Wahrnehmung der mit dem Gebrauch des Geräts verbundenen Gefahren. Erlauben Sie Kindern nicht, mit dem Gerät zu spielen. Reinigungs- und Wartungsarbeiten dürfen nicht von unbewachten Kindern ausgeführt werden.
• ZUR BEACHTUNG: Lassen Sie keine Fette oder Öle unbewacht auf dem Herd stehen. Das ist gefährlich und kann einen Brand verursachen.
• NIEMALS eine Flamme/Brandherd mit Wasser löschen. Schalten Sie das Gerät aus und ersticken Sie die Flamme mit einem Deckel oder einer feuerfesten Decke.
• ZUR BEACHTUNG: Brandgefahr: Keine Gegenstände auf den Kochstellen liegen lassen.
• ZUR BEACHTUNG: Sollte die Glaskeramitoberfläche gesprungen sein, schalten Sie das Gerät aus, um so mögliche Stromschläge zu vermeiden.
• Verwenden Sie zur Reinigung des Kochfeldes keine Dampf- oder Hochdruckreinigungsgeräte.
• Dieses Gerät kann nicht mit einem externen Timer oder einem getrennten Fernsteuerungssystem betrieben werden.
ZUR BEACHTUNG !
• ATTENZIONE: Questo apparecchio e le sue parti accessibili diventano molto caldi durante l’uso.
• Bisogna fare attenzione ed evitare di toccare gli elementi riscaldanti.
• Tenere lontani i bambini inferiori agli 8 anni se non continuamente sorvegliati.
• Il presente apparecchio puo’ essere utilizzato dai bambini a partire dagli 8 anni e da persone con ridotte capacita’ fisiche, sensoriali o mentali oppure con mancanza di esperienza e di conoscenza se si trovano sotto adeguata sorveglianza oppure se sono stati istruiti circa l’uso dell’apparecchio in modo sicuro e se si rendono conto dei pericoli correlati. I bambini non devono giocare con l’apparecchio. Le operazioni di pulizia e di manutenzione non devono essere effettuate dai bambini senza sorveglianza.
• ATTENZIONE: Lasciare un fornello incustodito con grassi e olii puo’ essere pericoloso e puo’ provocare un incendio.
• Non bisogna MAI tentare di spegnere una fiamma/incendio con acqua, bense bisogna spegnere l’apparecchio e coprire la fiamma per esempio con un coperchio o con una coperta ignifuga
•ATTENZIONE: Rischio di incendio: non lasciare oggetti sulle superfici di cottura.
•ATTENZIONE: Se la superficie vetroceramica e’ incrinata, spegnere l’apparecchio per evitare la possibilit? di scossa elettrica.
•Non utilizzare mai pulitori a vapore o ad alta pressione per la pulizia dell’apparecchio.
•L’apparecchio non e’ destinato a essere messo in funzione per mezzo di un temporizzatore esterno oppure di un sistema di comando a distanza separato.
ATTENZIONE!
ItalianoIT

GB
5
NLNederland
PLPolski
• PAS OP: Dit apparaat en zijn bereikbare onderdelen worden tijdens gebruik zeer heet.
• Zorg ervoor de verwarmende elementen niet aan te raken.
• Zorg ervoor dat kinderen die kleiner dan 8 jaar oud zijn niet dichtbij het apparaat kunnen komen, tenzij onder constant toezicht.
• Het huidige apparaat mag alleen door kinderen van 8 jaar en ouder en door personen met een beperkt lichamelijk, sensorieel of geestelijk vermogen, of zonder ervaring en kennis worden gebruikt, mits ze onder adequaat toezicht zijn, of mits ze zijn onderricht m.b.t. het veilige gebruik van het apparaat en zich bewust zijn van de betreffende gevaren. Voorkom dat kinderen met het apparaat spelen. De reinigings- en onderhoudshandelingen mogen niet door kinderen worden uitgevoerd, tenzij onder toezicht.
• PAS OP: Het kan gevaarlijk zijn een fornuis met vet of olie onbewaakt te laten. Er kan brand ontstaan.
• U moet NOOIT proberen een vlam/brand te blussen met water. U dient daarentegen het apparaat uit te schakelen en de vlam te bedekken met bijvoorbeeld een (blus)deken.
• PAS OP: Brandgevaar: laat nooit voorwerpen op het kookoppervlak liggen.
• PAS OP: Als het oppervlak van de glaskeramische kookplaat gebarsten is, moet u het apparaat uitschakelen om te voorkomen dat u een elektrische schok krijgt.
• Gebruik nooit huishoudapparaten met stoom of hoge druk voor het reinigen van de kookplaat.
• Het apparaat is niet geschikt om te worden ingeschakeld m.b.v. een externe timer of door een gescheiden afstandsbedieningssysteem.
PAS OP !
• UWAGA: To urz dzenie oraz jego dost pne cz ci silnie si rozgrzewajpodczas u ytkowania.
• Nale y uwa a , aby nie dotknelementów grzejnych.
• Nie pozwala , aby dzieci poni ej 8 roku ycia zbli a y si do urz dzenia, je li
nie s pod sta ym nadzorem doros ych.• Z niniejszego urz dzenia mog
korzysta dzieci powy ej 8 roku ycia i osoby o ograniczonych
zdolno ciach fi zycznych, zmys owychb d umys owych, jak równie osoby nieposiadaj ce do wiadczenia lub znajomo ci urz dzenia, je li znajdujsi one pod nadzorem innych osób lub je li zosta y pouczone na temat bezpiecznego sposobu u yciaurz dzenia oraz zdaj sobie sprawze zwi zanych z nim zagro e . Dzieci nie powinny bawi si urz dzeniem.Prace zwi zane z czyszczeniem i konserwacj nie mog bywykonywane przez dzieci, je li nie sone nadzorowane.
• UWAGA: Pozostawienie bez nadzoru na kuchence t uszczów i olejów mo e by niebezpieczne i mo espowodowa po ar.
• Nie nale y NIGDY próbowa ugasip omieni/po aru wod ; nale y wy czyurz dzenie i przykry p omie np. pokrywk lub ognioodpornym kocem.
• UWAGA: Ryzyko po aru: nie pozostawia przedmiotów na powierzchniach grzejnych.
• UWAGA: Je eli powierzchnia ze szk aceramicznego jest p kni ta, nale ywy czy urz dzenie, aby uniknniebezpiecze stwa pora enia pr demelektrycznym.
•Nie stosowa nigdy oczyszczaczy parowych lub ci nieniowych do czyszczenia urz dzenia.
• Urz dzenie nie jest przeznaczone do w czania przy u yciu zewn trznegoprzeka nika czasowego lub zdalnego systemu sterowania.
UWAGA !
6
RS !
• :
.•
.• 8
.•
8
,
..
.• :
,.
•/ .
.• : :
.• :
,.
•
.•
.

GB
7
Description of the applianceControl panel
GBDescription de l’appareilTableau de bord
FR
The control panel described in this manual is only a representative example: it may not exactly match the panelon your appliance.
1 INCREASE POWER button switches on the hotplate and controls the power (see Start-up and use).
2 REDUCE POWER button controls the power and switches off the hotplate (see Start-up and use).
3 COOKING ZONE SELECTOR indicator shows a particular cooking zone has been selected and therefore various adjustments are possible.
4 COOKING ZONE SELECTOR button is used to select the desired cooking zone.
5 POWER indicator provides a visual display for the current heat level.
6 ON/OFF button switches the appliance on and off.7 ON/OFF indicator light shows whether the appliance
is on or off.8 CONTROL PANEL LOCK button prevents
accidental changes to the hob settings (see Start-up and use).
9 CONTROL PANEL LOCK indicator light shows the control panel has been locked (see Start-up and use).
! This product complies with the requirements of thelatest European Directive on the limitation of powerconsumption of the standby mode.If no operations are carried out for a period of 2minutes, after the residual heat indicator lights turnoff and the fan stops (if present), the applianceautomatically switches to the .off mode..The appliance resumes the operating mode once theON/OFF button is pressed.
Le tableau de bord qui est décrit n.a qu.une valeur d.exemple :
il peut ne pas correspondre au modèle acheté.
1 Touche AUGMENTATION DE PUISSANCE pourallumer le foyer et régler sa puissance (voir Mise en marche et utilisation).
2 Touche DIMINUTION DE PUISSANCE pour régler la puissance et éteindre le foyer (voir Mise en marche et utilisation).
3 Voyant FOYER SELECTIONNÉ pour signaler que le foyer correspondant a été sélectionné et que les régulations sont donc possibles.
4 Touche SÉLECTION FOYER pour sélectionner le foyer souhaité
5 Indicateur de PUISSANCE : une colonne lumineuse pour signaler le niveau de puissance atteint.
6 Touche ON/OFF pour allumer ou éteindre l’appareil.
7 Voyant ON/OFF : il signale si l’appareil est allumé ou éteint.
8 Touche VERROUILLAGE DES COMMANDES pour empêcher toute intervention extérieure sur les réglages de la table de cuisson (voir Mise en marche et Utilisation).
9 Voyant COMMANDES VERROUILLÉES : pour signaler le verrouillage des commandes (voir Mise en marche et Utilisation).
! Ce produit est conforme à la nouvelle Directive Européenne sur la réduction de la consommation d’énergie en mode standby.Sans opérations pendant 2 minutes, après l’extinction des voyants de chaleur résiduelle et l’arrêt du ventilateur (si existants), l’appareil se place automatiquement en „off mode”.Pour remettre l’appareil en mode de fonctionnement normal, appuyer sur la touche ON/OFF.
13 1
2
3 5
4
6
7
8
9 10
11
12
14 15

8
Descripción del aparatoPanel de control
ES
Descrição do aparelhoPainel de comandosPT
El panel de control se describe a continuación a modo de ejemplo: puede no ser una exacta reproducción delmodelo adquirido.
1 Botón AUMENTO DE POTENCIA para encender la placa y regular la potencia (ver Puesta en funcionamiento y uso).
2 Botón DISMINUCIÓN DE POTENCIA para regular la potencia y apagar la placa (ver Puesta en funcionamiento y uso).
3 Piloto ZONA DE COCCIÓN SELECCIONADA indicaque ha sido seleccionada dicha zona de cocción y, por lo tanto, se pueden realizar las distintas regulaciones
4 Botón SELECCIÓN DE ZONA DE COCCIÓN para seleccionar la zona de cocción deseada
5 Indicador de POTENCIA: indica visualmente el nivel de calor alcanzado.
6 Botón ON/OFF para encender y apagar el aparato.7 Piloto ON/OFF: indica si el aparato está encendido o
apagado.8 Botón BLOQUEO DE MANDOS para impedir
modificaciones fortuitas a las regulaciones de la encimera (ver Puesta en funcionamiento y uso).
9 Piloto MANDOS BLOQUEADOS: indica que se ha producido el bloqueo de los mandos (ver Puesta en funcionamiento y uso).
! Este producto satisface los requisitos establecidospor la nueva Directiva europea sobre la limitación delos consumos energéticos en standby.Si no se realizan operaciones por 2 minutos, una vezque se apagan los luces piloto del calor residual ydel ventilador (si están presentes), el aparato secoloca de forma automática en el modo .off mode..El aparato vuelve al modo operativo utilizando la
tecla ON/OFF.
O painel de comandos descrito a seguir está representado para fins explicativos: pode não ser uma exactareprodução do modelo comprado.
1 Botão AUMENTO POTÊNCIA para ligar a chapa e regular a potência (veja Início e utilização).
2 Botão DIMINUIÇÃO POTÊNCIA para regular a potência e desligar a chapa (veja Início e utilização).
3 Indicador luminoso ZONA DE COZEDURA SELECCIONADA indica que a zona de cozedura relativa foi seleccionada e são portanto possíveis as várias regulações.
4 Botão SELECÇÃO ZONA DE COZEDURA para seleccionar a zona de cozedura desejada.
5 Indicador POTÊNCIA sinaliza visualmente o nível de calor alcançado.
6 Botão ON/OFF para ligar e desligar o aparelho.7 Indicador ON/OFF: sinaliza se o aparelho está
aceso ou apagado.8 Botão BLOQUEIO DOS COMANDOS para impedir
modificações acidentais das regulações do plano de cozedura (veja Início e utilização).
9 Indicador luminoso COMANDOS BLOQUEADOS:sinaliza o bloqueio dos comandos (veja Início e utilização).
! Este produto satisfaz os requisitos impostos pelanova Directiva Europeia sobre a limitação dosconsumos energéticos em stand-by.Se não se efectuarem operações por 2 minutos,depois que os indicadores de calor resíduo e daventoinha (se presentes) se desligarem, o aparelhocoloca-se automaticamente na modalidade .offmode..O aparelho voltará para a modalidade operativa aocarregar na tecla ON/OFF.
DE Beschreibung des GerätesBedienfeld
Das hier beschriebene Bedienfeld dient nur als Beispiel, es handelt sich nicht unbedingt um eine genaueWidergabe des von Ihnen erworbenen Modells.
1 Taste ERHÖHEN DER LEISTUNG: Zum Einschalten sowie zur Leistungsregelung der Kochzone (siehe Inbetriebsetzung und Gebrauch).
2 Taste HERABSETZEN DER LEISTUNG: Zur Leistungsregelung sowie zum Ausschalten der Kochzone (siehe Inbetriebsetzung und Gebrauch).
3 Kontrollleuchte GEWÄHLTE KOCHZONE: Diese zeigt an, dass die der Kontrollleuchte entsprechende Kochzone gewählt wurde und die gewünschten Einstellungen demnach vorgenommen werden können.
4 Taste WAHL DER KOCHZONE: Mittels dieser wird die gewünschte Kochzone gewählt.
5 LEISTUNGSANZEIGE: Auf dieser ist der jeweils erreichte Heizwert ersichtlich.
6 Taste ON/OFF: Zum Ein- bzw. Ausschalten des Gerätes.
7 Kontrollleuchte ON/OFF: Diese zeigt an, ob das Gerät ein- oder ausgeschaltet ist.
8 Taste SPERRE DER SCHALTELEMENTE: Um versehentliche Änderungen der am Kochfeld erfolgten Einstellungen zu verhindern (siehe Inbetriebsetzung und Gebrauch).
9 Kontrollleuchte SCHALTELEMENTE GESPERRT:Diese signalisiert, dass die Schaltelemente gesperrt wurden (siehe Inbetriebsetzung und Gebrauch).
! Dieses Produkt entspricht den Vorschriften der neuen Europäischen Richtlinie zur Einschränkung des Energieverbrauchs im Standby. Werden für 2 Minuten keine Tasten gedrückt, dann stellt sich das Gerät nach Ausschalten der Anzeigen für Resthitze und des Lüfters (wenn vorhanden) automatisch in den “off mode”. Das Gerät kehrt durch Drücken der Taste ON/OFF in den Betriebsmodus zurück.
GB
9
IT
Il pannello di controllo che qui viene descritto è rappresentato a fini esemplificativi: può non essere una esatta riproduzione del modello acquistato.
1 Tasto AUMENTO POTENZA per accendere la piastra e regolare la potenza (vedi Avvio e utilizzo).
2 Tasto DIMINUZIONE POTENZA per regolare la potenza e spegnere la piastra (vedi Avvio e utilizzo).
3 Spia ZONA DI COTTURA SELEZIONATA indicache la zona di cottura relativa è stata selezionata e quindi sono possibili le varie regolazioni
4 Tasto SELEZIONE ZONA DI COTTURA per selezionare la zona di cottura desiderata
5 Indicatore POTENZA: segnala visivamente il livello di calore raggiunto.
6 Tasto ON/OFF per accendere e spegnere l’apparecchio.
7 Spia ON/OFF: segnala se l’apparecchio è acceso o spento.8 Tasto BLOCCO DEI COMANDI per impedire
modifiche fortuite alle regolazioni del piano cottura (vedi Avvio e utilizzo).
9 Spia COMANDI BLOCCATI: segnala l’avvenuto blocco dei comandi (vedi Avvio e utilizzo).
! Questo prodotto soddisfa i requisiti imposti dalla nuova Direttiva Europea sulla limitazione dei consumi energetici in standby. Se non si eseguono operazioni per 2 minuti, dopo lo spegnimento delle spie di calore residuo e della ventola (ove presenti), l’apparecchio si dispone automaticamente in modalità “off mode”. L’apparecchio ritorna in modalità operativa agendo sul tasto ON/OFF.
Descrizione dell’apparecchioPannello di controllo
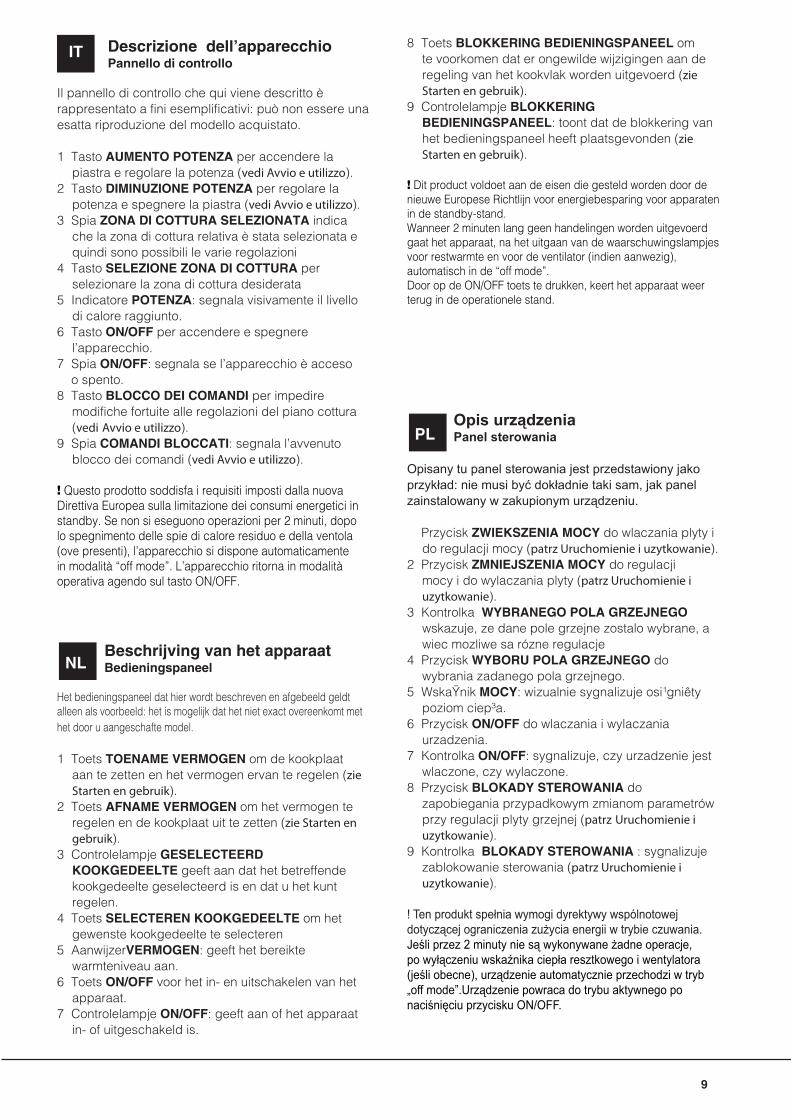
NLBeschrijving van het apparaatBedieningspaneel
Het bedieningspaneel dat hier wordt beschreven en afgebeeld geldt alleen als voorbeeld: het is mogelijk dat het niet exact overeenkomt met het door u aangeschafte model.
1 Toets TOENAME VERMOGEN om de kookplaat aan te zetten en het vermogen ervan te regelen (zie Starten en gebruik).
2 Toets AFNAME VERMOGEN om het vermogen te regelen en de kookplaat uit te zetten (zie Starten en gebruik).
3 Controlelampje GESELECTEERDKOOKGEDEELTE geeft aan dat het betreffende kookgedeelte geselecteerd is en dat u het kunt regelen.
4 Toets SELECTEREN KOOKGEDEELTE om het gewenste kookgedeelte te selecteren
5 AanwijzerVERMOGEN: geeft het bereikte warmteniveau aan.
6 Toets ON/OFF voor het in- en uitschakelen van het apparaat.
7 Controlelampje ON/OFF: geeft aan of het apparaat in- of uitgeschakeld is.
8 Toets BLOKKERING BEDIENINGSPANEEL om te voorkomen dat er ongewilde wijzigingen aan de regeling van het kookvlak worden uitgevoerd (zieStarten en gebruik).
9 Controlelampje BLOKKERINGBEDIENINGSPANEEL: toont dat de blokkering van het bedieningspaneel heeft plaatsgevonden (zie Starten en gebruik).
! Dit product voldoet aan de eisen die gesteld worden door de nieuwe Europese Richtlijn voor energiebesparing voor apparaten in de standby-stand.Wanneer 2 minuten lang geen handelingen worden uitgevoerd gaat het apparaat, na het uitgaan van de waarschuwingslampjes voor restwarmte en voor de ventilator (indien aanwezig), automatisch in de “off mode”. Door op de ON/OFF toets te drukken, keert het apparaat weer terug in de operationele stand.
PLOpis urz dzeniaPanel sterowania
Opisany tu panel sterowania jest przedstawiony jako przyk ad: nie musi by dok adnie taki sam, jak panel zainstalowany w zakupionym urz dzeniu.
Przycisk ZWIEKSZENIA MOCY do wlaczania plyty i do regulacji mocy (patrz Uruchomienie i uzytkowanie).
2 Przycisk ZMNIEJSZENIA MOCY do regulacji mocy i do wylaczania plyty (patrz Uruchomienie i uzytkowanie).
3 Kontrolka WYBRANEGO POLA GRZEJNEGO wskazuje, ze dane pole grzejne zostalo wybrane, a wiec mozliwe sa rózne regulacje
4 Przycisk WYBORU POLA GRZEJNEGO do wybrania zadanego pola grzejnego.
5 WskaŸnik MOCY: wizualnie sygnalizuje osi¹gniêty poziom ciep³a.
6 Przycisk ON/OFF do wlaczania i wylaczania urzadzenia.
7 Kontrolka ON/OFF: sygnalizuje, czy urzadzenie jest wlaczone, czy wylaczone.
8 Przycisk BLOKADY STEROWANIA do zapobiegania przypadkowym zmianom parametrów przy regulacji plyty grzejnej (patrz Uruchomienie i uzytkowanie).
9 Kontrolka BLOKADY STEROWANIA : sygnalizuje zablokowanie sterowania (patrz Uruchomienie i uzytkowanie).
! Ten produkt spe nia wymogi dyrektywy wspólnotowej dotycz cej ograniczenia zu ycia energii w trybie czuwania.Je li przez 2 minuty nie s wykonywane adne operacje, po wy czeniu wska nika ciep a resztkowego i wentylatora (je li obecne), urz dzenie automatycznie przechodzi w tryb „off mode”.Urz dzenie powraca do trybu aktywnego po naci ni ciu przycisku ON/OFF.

10
RS
,, :
1
( . ).2
( . ).3
,
.4
.5 :
.6 ON/OFF ( ./ .)
.7 ON/OFF ( ./ .):
, .8
( .).
9, ( .
).
!
. 2-
(),
« .».
./ .

11
GB
Installation
! Before operating your new appliance please read this instruction booklet carefully. It contains important information concerning the safe operation, installation and maintenance of the appliance.! Please keep these operating instructions for future reference. Pass them on to any new owners of the appliance.
Positioning
! Keep all packaging material out of the reach of children. It may present a choking or suffocation hazard (see Precautions and tips).! The appliance must be installed by a qualified professional in accordance with the instructions provided. Incorrect installation may cause harm to people and animals or may damage property.
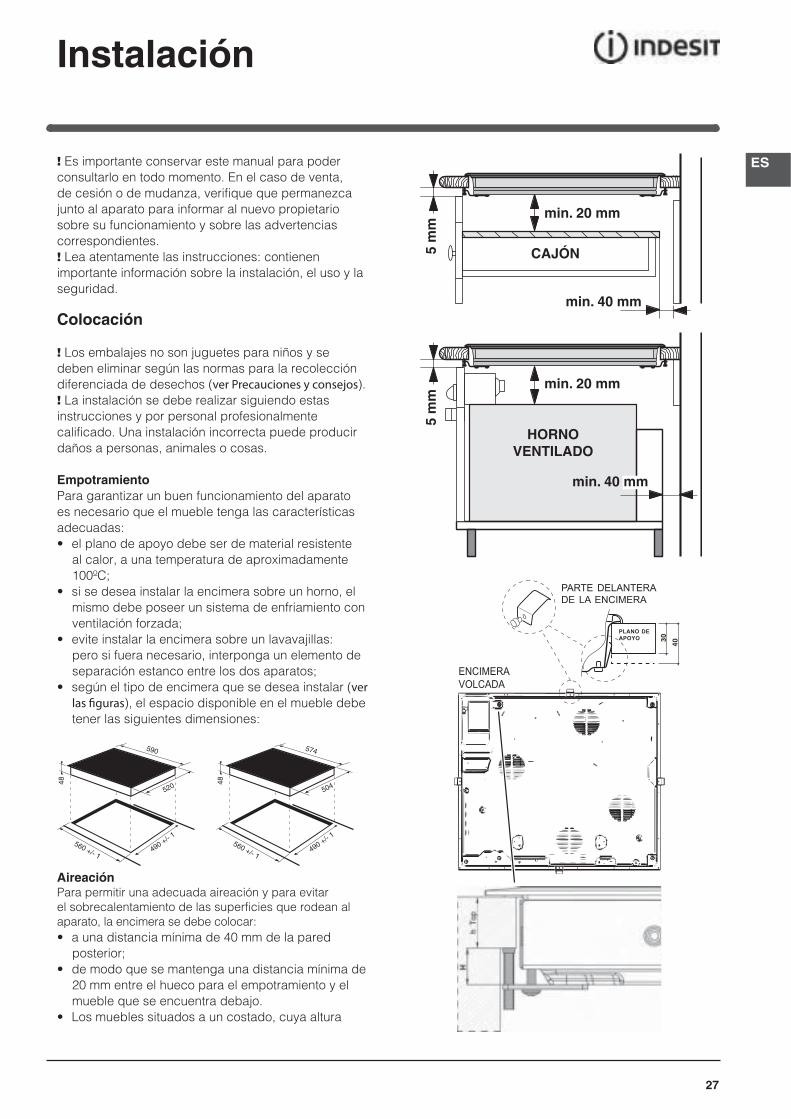
Built-in applianceUse a suitable cabinet to ensure that the appliance functions properly.• The supporting surface must be heat-resistant up to
a temperature of approximately 100°C.• If the appliance is to be installed above an oven,
the oven must be equipped with a forced ventilation cooling system.
• Avoid installing the hob above a dishwasher: if this cannot be avoided, place a waterproof separation device between the two appliances.
• Depending on the hob you want to install, the cabinet must have the following dimensions (see fi gure):
560 +/- 1490 +/- 1
48
590
520
560 +/- 1490 +/- 1
48
574
504
VentilationTo allow adequate ventilation and to avoid overheating of the surrounding surfaces the hob should be positioned as follows:• At a minimum distance of 40 mm from the back
panel.• So that a minimum distance of 20 mm is maintained
between the installation cavity and the cabinet underneath.
• Kitchen cabinets adjacent to the appliance and taller than the top of the hob must be at least 600 mm from the edge of the hob.
FRONT SIDEOF HOB
SUPPORTINGSURFACE
30
40UNDERSIDEOF HOB
5 m
m
min. 20 mm
min. 20 mm
min. 40 mm
COMPARTMENT5 m
m
min. 40 mm
FAN-ASSISTEDOVEN

12
GBFixingThe appliance must be installed on a perfectly level supporting surface. Any deformities caused by improper fixing could affect the features and operation of the hob.
The thickness of the supporting surface should be taken into account when choosing the length of the screws for the fixing hooks:• 30 mm thick: 17.5 mm screws• 40 mm thick: 7.5 mm screws
Fix the hob as follows:1. Use short flat-bottomed screws to fix the 4 alignment springs in the holes provided at the central point of each side of the hob.2. Place the hob in the cavity, make sure it is in a central position and push down on the whole perimeter until the hob is stuck to the supporting surface.3. For hobs with raised sides: After inserting the hob into its cavity, insert the 4 fixing hooks (each has its own pin) into the lower edges of the hob, using the long pointed screws to fix them in place, until the glass is stuck to the supporting surface.
! The screws for the alignment springs must remain accessible.
! In order to adhere to safety standards, the appliance must not come into contact with electrical parts once it has been installed.
! All parts which ensure the safe operation of the appliance must not be removable without the aid of a tool.
Electrical connection
! The electrical connection for the hob and for any built-in oven must be carried out separately, both for safety purposes and to make extracting the oven easier.
Terminal boardOn the lower part of the appliance there is a
connection box for the different types of electricity supply (the picture is only an indication and is not an exact representation of the purchased model).
Single-phase connection
The hob is equipped with a pre-connected electricity supply cable, which is designed for single-phase
connection. Connect the wires in accordance with the instructions given in the following table and diagrams:
Voltage and mains frequency Electrical cable Wire connection
230-240V 1+N ~220-240V 1+N ~
50/60 Hz
: yellow/green
N: the two blue wires together
L: brown and black together
Other types of connection
If the mains supply corresponds with one of the following:Voltage and mains frequency• 400V - 2+N ~ 50/60 Hz• 220-240V 3 ~ 50/60 Hz• 230-240V 3 ~ 50/60 Hz• 400V - 2+2N ~ 50/60 HzSeparate the wires and connect them in accordance with the instructions given in the following table and diagrams:
Voltage and mains frequency Electrical cable Wire connection
400V - 2+N ~50/60 Hz
230-240V 3 ~220-240V 3 ~
50/60 Hz
: yellow/green;
N: the two blue wires
together
L1: black
L2: brown
400V - 2+2N ~50/60 Hz
: yellow/green;
N1: blue
N2: blue
L1: black
L2: brown
If the mains supply corresponds with one of the following:Voltage and mains frequency• 400V 3 - N ~ 50/60 Hzproceed as follows:
! The cable provided is not suitable for the following types of installation.
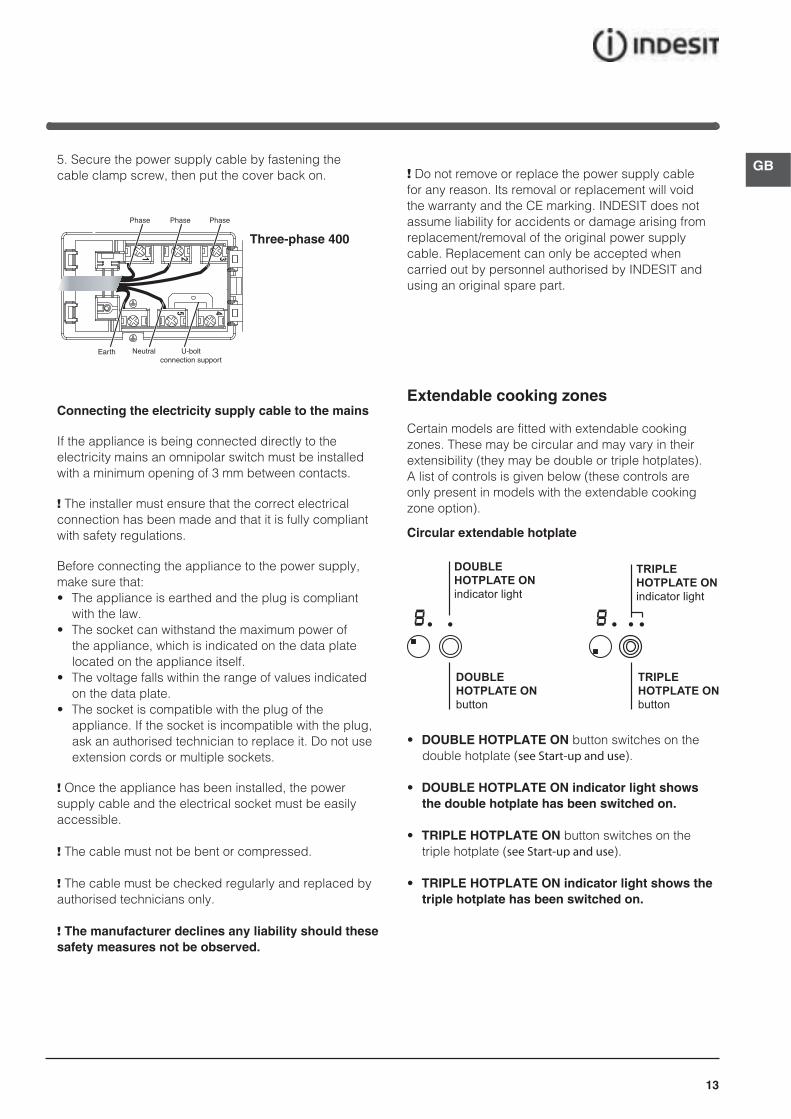
1. Use a suitable supply cable, H05RR-F or higher, with the right dimensions (cable cross section: 25 mm).2. To open the terminal board, use a screwdriver as a lever under the side tabs of the cover (see Terminal board picture).3. Loosen the cable clamp screw and the terminal board screws in accordance with the type of connection required and position the connection supports as shown in the following table and diagrams.4. Position the wires in accordance with the information given in the following table and diagrams and connect the appliance by tightening all the screws for the springs as much as possible.
Voltage and mains frequency Electrical connections Terminal board
400V 3-N ~50/60 Hz
Three-phase 400
UNDERSIDE OF HOB
13
GB5. Secure the power supply cable by fastening the cable clamp screw, then put the cover back on.
Three-phase 400
U-boltconnection support
NeutralEarth
Phase Phase Phase
1 2 3
5 4
Connecting the electricity supply cable to the mains
If the appliance is being connected directly to the electricity mains an omnipolar switch must be installed with a minimum opening of 3 mm between contacts.
! The installer must ensure that the correct electrical connection has been made and that it is fully compliant with safety regulations.
Before connecting the appliance to the power supply, make sure that:• The appliance is earthed and the plug is compliant
with the law.• The socket can withstand the maximum power of
the appliance, which is indicated on the data plate located on the appliance itself.
• The voltage falls within the range of values indicated on the data plate.
• The socket is compatible with the plug of the appliance. If the socket is incompatible with the plug, ask an authorised technician to replace it. Do not use extension cords or multiple sockets.
! Once the appliance has been installed, the power supply cable and the electrical socket must be easily accessible.
! The cable must not be bent or compressed.
! The cable must be checked regularly and replaced by authorised technicians only.
! The manufacturer declines any liability should these safety measures not be observed.
! Do not remove or replace the power supply cable for any reason. Its removal or replacement will void the warranty and the CE marking. INDESIT does not assume liability for accidents or damage arising from replacement/removal of the original power supply cable. Replacement can only be accepted when carried out by personnel authorised by INDESIT and using an original spare part.
Extendable cooking zones
Certain models are fitted with extendable cooking zones. These may be circular and may vary in their extensibility (they may be double or triple hotplates). A list of controls is given below (these controls are only present in models with the extendable cooking zone option).
Circular extendable hotplate
• DOUBLE HOTPLATE ON button switches on the double hotplate (see Start-up and use).
• DOUBLE HOTPLATE ON indicator light shows the double hotplate has been switched on.
• TRIPLE HOTPLATE ON button switches on the triple hotplate (see Start-up and use).
• TRIPLE HOTPLATE ON indicator light shows the triple hotplate has been switched on.
DOUBLE
HOTPLATE ON
indicator light
DOUBLE
HOTPLATE ON
button
TRIPLE
HOTPLATE ON
indicator light
TRIPLE
HOTPLATE ON
button
14
GB
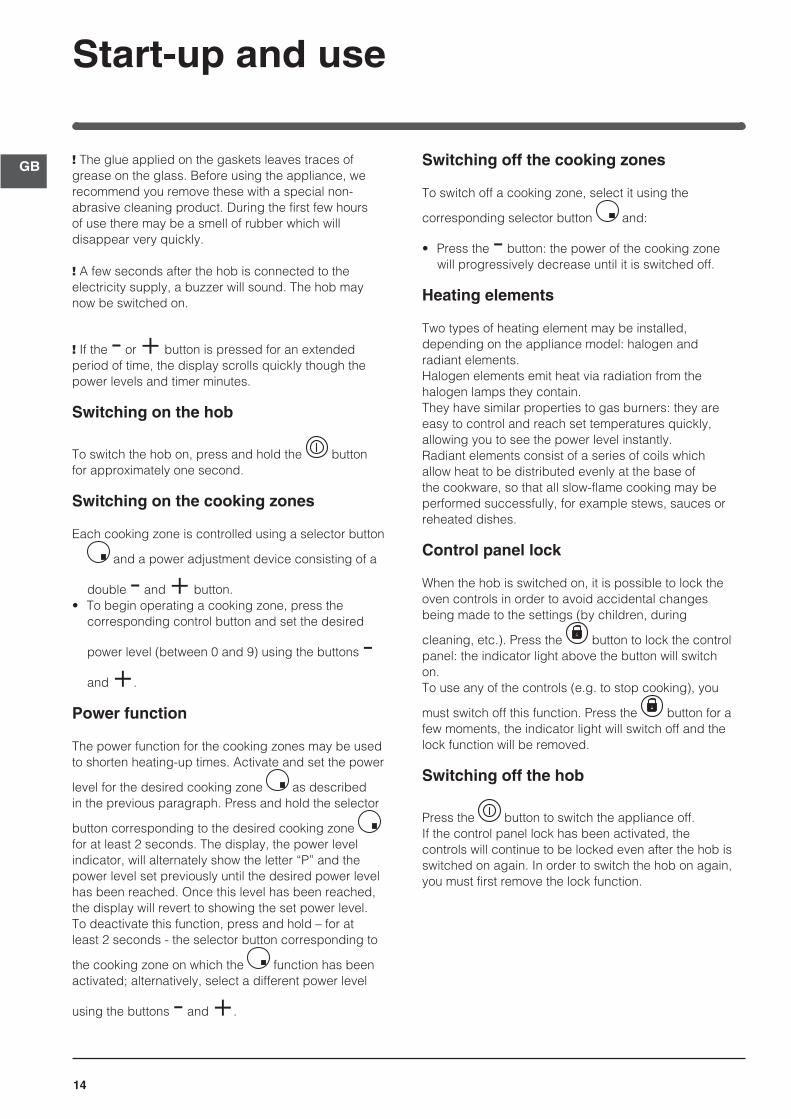
Start-up and use
! The glue applied on the gaskets leaves traces of grease on the glass. Before using the appliance, we recommend you remove these with a special non-abrasive cleaning product. During the first few hours of use there may be a smell of rubber which will disappear very quickly.
! A few seconds after the hob is connected to the electricity supply, a buzzer will sound. The hob may now be switched on.
! If the - or + button is pressed for an extended period of time, the display scrolls quickly though the power levels and timer minutes.
Switching on the hob
To switch the hob on, press and hold the button for approximately one second.
Switching on the cooking zones
Each cooking zone is controlled using a selector button
and a power adjustment device consisting of a
double - and + button.• To begin operating a cooking zone, press the
corresponding control button and set the desired
power level (between 0 and 9) using the buttons -and +.
Power function
The power function for the cooking zones may be used to shorten heating-up times. Activate and set the power
level for the desired cooking zone as described in the previous paragraph. Press and hold the selector
button corresponding to the desired cooking zone for at least 2 seconds. The display, the power level indicator, will alternately show the letter “P” and the power level set previously until the desired power level has been reached. Once this level has been reached, the display will revert to showing the set power level. To deactivate this function, press and hold – for at least 2 seconds - the selector button corresponding to
the cooking zone on which the function has been activated; alternatively, select a different power level
using the buttons - and +.
Switching off the cooking zones
To switch off a cooking zone, select it using the
corresponding selector button and:
• Press the - button: the power of the cooking zone will progressively decrease until it is switched off.
Heating elements
Two types of heating element may be installed, depending on the appliance model: halogen and radiant elements.Halogen elements emit heat via radiation from the halogen lamps they contain.They have similar properties to gas burners: they are easy to control and reach set temperatures quickly, allowing you to see the power level instantly.Radiant elements consist of a series of coils which allow heat to be distributed evenly at the base of the cookware, so that all slow-flame cooking may be performed successfully, for example stews, sauces or reheated dishes.
Control panel lock
When the hob is switched on, it is possible to lock the oven controls in order to avoid accidental changes being made to the settings (by children, during
cleaning, etc.). Press the button to lock the control panel: the indicator light above the button will switch on.To use any of the controls (e.g. to stop cooking), you
must switch off this function. Press the button for a few moments, the indicator light will switch off and the lock function will be removed.
Switching off the hob
Press the button to switch the appliance off.If the control panel lock has been activated, the controls will continue to be locked even after the hob is switched on again. In order to switch the hob on again, you must first remove the lock function.

15
GBPractical advice on using the appliance
To obtain the best results from your hob:• Use pans with a thick, flat base in order to fully
utilise the cooking zone.
• Always use pans with a diameter which is large enough to cover the hotplate fully, in order to use all the available heat.
• Make sure that the base of the cookware is always clean and dry, in order to fully utilise and extend the life of both the cooking zones and the cookware.
• Avoid using the same cookware which has been used on gas burners: the heat concentration on gas burners may distort the base of the pan, causing it not to adhere correctly.
Safety devices
Pan sensor
Each cooking zone is equipped with a pan sensor device. The hotplate only emits heat when a pan with suitable measurements for the cooking zone is placed on it. If the indicator light is flashing, it may indicate:• An incompatible pan• A pan whose diameter is too small• The pan has been removed from the hotplate.
Residual heat indicators
Each cooking zone is equipped with a residual heat indicator. This indicator signals which cooking zones are still at a high temperature. If the power display
shows , the cooking zone is still hot. It is possible, for example, to keep a dish warm or melt butter or chocolate. As the cooking zone cools, the power
display will show . The display switches off when the cooking zone has cooled sufficiently.
Overheating protection
If the electronic elements overheat, the hob switches
off automatically and F appears on the display, followed by a flashing number. When the temperature has reached a suitable level, this message disappears and the hob may be used again.
Safety switch
The appliance has a safety switch which automatically switches the cooking zones off after they have been in operation for a certain amount of time at a particular power level. When the safety switch has been triggered, the display shows “0”.For example: the right rear hotplate is set to 5 and will switch off after 5 hours of continuous operation, while the front left hotplate is set to 2 and will switch off after 8 hours.
Power level
1
2
3
4
5
6
7
8
9
Maximum operating time in hours
9
8
7
6
5
4
3
2
1
Buzzer
This can also indicate several irregularities:• An object (a pan, cutlery, etc.) has been placed on
the control panel for more than 10 seconds.• Something has been spilt on the control panel.• A button has been pressed for too long. All of the
above situations may cause the buzzer to sound. Remove the cause of the malfunction to stop the buzzer. If the cause of the problem is not removed, the buzzer will keep sounding and the hob will switch off.

16
GB Practical cooking advice
ªPressure cookingPressure cooker
Frying
Grilling Boiling
Ver
y hi
gh-f
lam
e co
okin
gH
igh-
flam
eco
okin
gM
ediu
m-f
lam
e co
okin
gLo
w-f
lam
eco
okin
gV
ery
low
-fla
me
cook
ing
•
•
¶Crêpes Cooking on a high flame and browning
(roasts, steaks, escalopes, fish fillets, fried eggs)
¶
§Fast thickening (liquid juices)Boiling water (pasta, rice, vegetables)Milk
§
SSlow thickening (dense juices)
S
¢Bain-marie cooking Pressure cooking after whistle
¢
£
™
Low-flame cooking (stews)Reheating dishes
™
¡Chocolate sauce Keeping food hot
17
GB
Precautions and tips
! This appliance has been designed and manufactured in compliance with international safety standards. The following warnings are provided for safety reasons and must be read carefully.
This appliance conforms to the following European Economic Community directives:
- 2006/95/EEC dated 12/12/06 (Low Voltage) and subsequent amendments;- 2004/108/EEC dated 15/12/04 (Electromagnetic Compatibility) and subsequent amendments;- 93/68/EEC dated 22/07/93 and subsequent amendments.- 1275/2008 stand-by/off mode.
General safety
! Make sure that the air inlet behind the fan grille is never obstructed. The built-in hob should, in fact, be provided with suitable ventilation for the cooling of the electronic components used in the appliance.• The appliance was designed for domestic use inside
the home and is not intended for commercial or industrial use.
• The appliance must not be installed outdoors, even in covered areas. It is extremely dangerous to leave the appliance exposed to rain and storms.
• Do not touch the appliance when barefoot or with wet or damp hands and feet.
• The appliance must be used by adults only for the preparation of food, in accordance with the instructions outlined in this booklet. Any other use of the appliance (e.g. for heating the room) constitutes improper use and is dangerous. The manufacturer may not be held liable for any damage resulting from improper, incorrect and unreasonable use of the appliance.
• The glass ceramic hob is resistant to mechanical shocks, but it may crack (or even break) if hit with a sharp object such as a tool. If this happens, disconnect the appliance from the electricity mains immediately and contact a Service Centre.
• Ensure that power supply cables of other electrical appliances do not come into contact with the hot parts of the hob.
• Remember that the cooking zones remain relatively hot for at least thirty minutes after they have been switched off. An indicator light provides a warning when residual heat is present (see Start-up and use).
• Keep any object which could melt away from the hob, for example plastic and aluminium objects, or products with a high sugar content. Be especially careful when using plastic film and aluminium foil or packaging: if placed on surfaces which are still hot, they may cause serious damage to the hob.
• Always make sure that pan handles are turned towards the centre of the hob in order to avoid accidental burns.
• When unplugging the appliance, always pull the plug from the mains socket; do not pull on the cable.
• Never perform any cleaning or maintenance work without having disconnected the appliance from the electricity mains.
• The appliance should not be operated by people (including children) with reduced physical, sensory or mental capacities, by inexperienced individuals or by anyone who is not familiar with the product. These individuals should, at the very least, be supervised by someone who assumes responsibility for their safety or receive preliminary instructions relating to the operation of the appliance.
• Do not look at the halogen lamps in the cooking zones for long if they are present.
• Do not let children play with the appliance.• Do not place metal objects (knives, spoons, pan
lids, etc.) on the hob as they may become hot.• The appliance is not intended to be operated by
means of an external timer or separate remote-control system.
Disposal• When disposing of packaging material: observe local
legislation so that the packaging may be reused.• The European Directive 2002/96/EC relating to Waste
Electrical and Electronic Equipment (WEEE) states that household appliances should not be disposed of using the normal solid urban waste cycle. Exhausted appliances should be collected separately in order to optimise the cost of re-using and recycling the materials inside the machine, while preventing potential damage to the atmosphere and to public health. The crossed-out dustbin is marked on all products to remind the owner of their obligations regarding separated waste collection.
For further information relating to the correct disposal of exhausted household appliances, owners may contact the public service provided or their local dealer.

18
GB
Care and maintenance
Switching the appliance offDisconnect your appliance from the electricity supply before carrying out any work on it.
Cleaning the appliance! Do not use abrasive or corrosive detergents (for example, products in spray cans for cleaning barbecues and ovens), stain removers, anti-rust products, powder detergents or sponges with abrasive surfaces: these may scratch the surface beyond repair.! Never use steam cleaners or pressure cleaners on the appliance.
• It is usually sufficient simply to wash the hob using a damp sponge and dry it with absorbent kitchen towel.
• If the hob is particularly dirty, rub it with a special glass ceramic cleaning product, then rinse well and dry thoroughly.
• To remove more stubborn dirt, use a suitable scraper. Remove spills as soon as possible, without waiting for the appliance to cool, to avoid residues forming crusty deposits. You can achieve excellent results by using a rust-proof steel wire sponge - specifically designed for glass ceramic surfaces - soaked in soapy water.
• If any plastic or sugary substances are accidentally melted on the hob, remove them immediately with the scraper, while the surface is still hot.
• Once it is clean, the hob may be treated with a special protective maintenance product: the invisible film left by this product protects the surface from drips during cooking. This maintenance task should be carried out
while the appliance is warm (not hot) or cold.• Always remember to rinse the appliance well with clean
water and dry it thoroughly: residues can become encrusted during subsequent cooking processes.
Stainless steel frame (only in models with outer frame)Stainless steel can be marked by hard water which has been left on the surface for a long time, or by cleaning products containing phosphorus.After cleaning, it is advisable to rinse the surface well and dry it thoroughly. If water is spilt on the surface, dry it quickly and thoroughly.! Some hobs have an aluminium frame which is similar to stainless steel. Do not use any cleaning or degreasing products which are not suitable for use with aluminium.
Disassembling the hobIf it is necessary to disassemble the hob:1. Loosen the screws fixing the alignment springs on each side.2. Loosen the screws holding the fixing hooks in each corner.3. Take the hob out of its installation cavity.
! Do not attempt to repair the appliance yourself. If the appliance breaks down, contact a Service Centre.
Technical description of the modelsThis table provides a model-by-model list of the energy absorption values, type of heating elements and diameters of each cooking zone.
Key:H = single hilight HD = double hilight HT = triple hilight AD = double halogen
Hobs
Cooking zone
Back Left
Back Right
Front Left
Front Right
Total power
Power (W)
HD 2300
H 1400
H 1200
H 1800
Diameter (mm)
210
160
145
180
6700
VRA 640 X S
Power (W)
HT 2200/1000
H 1400
H 1200
H 1800
Diameter (mm)
210/140
160
145
180
6600
VRA 641 D B SVRA 641 D X SVRA 640 C S

19
FR
Installation
! Conserver ce mode d’emploi pour pouvoir le consulter à tout moment. En cas de vente, de cession ou de déménagement, veiller à ce qu’il suive l’appareil pour informer le nouveau propriétaire sur son fonctionnement et lui fournir les conseils correspondants.! Lire attentivement les instructions : elles contiennent des conseils importants sur l’installation, l’utilisation et la sécurité de cet appareil.
Positionnement! Les emballages ne sont pas des jouets pour enfants, il faut les mettre au rebut en respectant la réglementation sur le tri sélectif des déchets (voir Précautions et conseils).! L’installation doit être effectuée par un professionnel du secteur conformément aux instructions du fabricant. Une mauvaise installation peut causer des dommages à des personnes, des animaux ou des biens.
EncastrementPour garantir le bon fonctionnement de l’appareil, il faut que le meuble possède des caractéristiques bien précises :• le matériau du plan d’appui doit pouvoir résister à
une température d’environ 100°C;• en cas d’installation de la table de cuisson au-
dessus d’un four, il faut que ce dernier soit équipé d’un dispositif de refroidissement par ventilation forcée ;
• éviter d’installer la table de cuisson au-dessus d’un lave-vaisselle : si c’est le cas, prévoir une séparation étanche entre les deux appareils ;
• selon la table de cuisson à installer (voir fi gures),la découpe du meuble doit avoir les dimensions suivantes :
560 +/- 1490 +/- 1
48
590
520
560 +/- 1490 +/- 1
48
574
504
AérationPour permettre une bonne aération et pour éviter toute surchauffe des surfaces autour de l’appareil, la table de cuisson doit être positionnée :• à au moins 40 mm de distance du mur arrière;• de manière à ce qu’il reste au moins 20 mm de
distance entre la découpe d’encastrement et le meuble en dessous.
• Les meubles jouxtant la table, dont la hauteur
5 m
m
min. 20 mm
min. 20 mm
min. 40 mm
TIROIR5 m
m
min. 40 mm
CHALEURTOURNANTE
CÔTÉ AVANT DE LATABLE DE CUISSON
PLAN DETRAVAIL 30
40TABLE DE CUISSON RETOURNÉE
20
FRdépasse celle du plan de cuisson, doivent être placés à au moins 600 mm du bord du plan.
FixationIl est impératif d’assurer l’encastrement de l’appareil sur un plan d’appui parfaitement plat. Les déformations provoquées par une mauvaise fixation risquent d’altérer les caractéristiques de la table de cuisson ainsi que ses performances.
La longueur de la vis de réglage des crochets defixation doit être réglée avant leur montage selonl’épaisseur du plan d’appui :• épaisseur 30 mm : vis 17,5 mm;• épaisseur 40 mm : vis 7,5 mm
Pour sa fixation, procéder comme suit :1. Se servir des vis courtes sans pointe pour visser les 4 ressorts de centrage dans les trous prévus sur chaque côté de la table, en leur milieu;2. insérer la table de cuisson dans la découpe prévue, bien au centre et bien appuyer tout autour du cadre pour que la table adhère parfaitement au plan d’appui.3. pour les tables avec profils latéraux : après avoir encastré la table de cuisson dans la découpe, insérer les 4 crochets de fixation (chacun avec son goujon) sur le périmètre inférieur de la table de cuisson et visser avec les vis longues à pointe jusqu’à ce que le verre adhère bien au plan d’appui.
! Il faut absolument que les vis des ressorts de centrage soient accessibles.
! Conformément aux normes de sécurité, après encastrement de l’appareil, il ne doit plus y avoir possibilité de contact avec les parties électrifiées.
! Toutes les parties qui servent de protection doivent être fixées de manière à ne pouvoir être enlevées qu’avec l’aide d’un outil.
Raccordement électrique
! Le branchement électrique de la table de cuisson et celui d’un éventuel four à encastrer doivent être effectués séparément, pour des raisons de sécurité électrique et pour pouvoir démonter plus facilement le four en cas de besoin.
BornierL’appareil est équipé, sur le dessous, d’un boîtier de raccordement à plusieurs types d’alimentation électrique (la figure n’est qu’indicative, elle peut ne pas correspondre au modèle acheté).
Raccordement monophasé
La table est fournie déjà équipée d’un cordon d’alimentation prévu pour raccordement monophasé. Procéder au raccordement des fils en suivant les indications du tableau et des dessins suivants :
Autres types de branchement
Si l’installation électrique correspond à une des caractéristiques suivantes :Tension type et fréquence réseau• 400V - 2+N ~ 50/60 Hz• 220-240V 3 ~ 50/60 Hz• 230-240V 3 ~ 50/60 Hz• 400V - 2+2N ~ 50/60 HzSéparer les câbles et procéder au raccordement des fils en suivant les indications du tableau et des dessins suivants :Tension type et
fréquence réseau Cordon électrique Raccordement fils
400V - 2+N ~50/60 Hz
230-240V 3 ~220-240V 3 ~
50/60 Hz
: jaune/vert;
N: les 2 fils bleus
ensemble
L1: noir
L2: marron
400V - 2+2N ~50/60 Hz
: jaune/vert;
N1: bleu
N2: bleu
L1: noir
L2: marron
caractéristiques suivantes :Tension type et fréquence réseau• 400V 3 - N ~ 50/60 Hzprocéder comme suit :
! Le câble éventuellement fourni n’est pas prévu pour ces types d’installation.
1. Utiliser un câble d’alimentation approprié, type H05RR-F ou supérieur, aux dimensions adéquates (section câble : 25 mm).2. Faire levier à l’aide d’un tournevis sur les languettes du couvercle du bornier pour l’ouvrir (voir fi gure Bornier).3. Dévisser la vis du serre-câble et les vis des bornes correspondant au type de raccordement nécessaire
TABLE DE CUISSON RETOURNEE
Tension type et fréquence réseau Cordon électrique Raccordement fils
230-240V 1+N ~220-240V 1+N ~
50/60 Hz
: jaune/vert;
N: les 2 fils bleus ensemble
L: le marron avec le noir
21
FRet positionner les cavaliers de raccordement conformément aux indications du tableau et des figures ci-dessous.4. Positionner les fils conformément aux indications du tableau et des figures ci-dessous et procéder au raccordement en serrant à fond toutes les vis des bornes.
Tension type et fréquence réseau Raccordements électriques Bornier
400V 3-N ~50/60 Hz
Triphasé 400
5. Fixer le câble d’alimentation dans le serre-câble correspondant et fermer le couvercle.
Triphasé 400
Branchement du câble d’alimentation au réseau électrique
En cas de raccordement direct au réseau, il faut intercaler entre l’appareil et le réseau un interrupteur à coupure omnipolaire ayant au moins 3 mm d’écartement entre les contacts.
! L’installateur est responsable du bon raccordement électrique de l’appareil et du respect des normes de sécurité.
Avant de procéder au branchement, s’assurer que :• la prise est bien munie d’une terre conforme à la loi;• la prise est bien apte à supporter la puissance
maximale de l’appareil, indiquée sur la plaque signalétique de l’appareil ;
• la tension d’alimentation est bien comprise entre les valeurs indiquées sur la plaque signalétique;
• la prise est bien compatible avec la fiche de l’appareil. Si ce n’est pas le cas, remplacer la prise ou la fiche, ne pas utiliser de rallonges ni de prises multiples.
! Après installation de l’appareil, le câble électrique et la prise de courant doivent être facilement accessibles
CavalierNeutreTerre
Phase Phase Phase
1 2 3
5 4
! Le câble ne doit être ni plié ni excessivement écrasé.
! Le câble doit être contrôlé périodiquement et ne peut être remplacé que par un technicien agréé.
! Nous déclinons toute responsabilité en cas de non respect des normes énumérées ci-dessus.
! Ne retirer ou ne remplacer en aucun cas le câble d’alimentation. Toute opération d’enlèvement ou de remplacement annule automatiquement la garantie et la marque CE INDESIT décline toute responsabilité en cas d’accidents ou de dommages dérivants de l’enlèvement ou du remplacement du câble d’alimentation original. Seul le remplacement effectué par un technicien agréé INDESIT utilisant une pièce détachée originale est autorisé.
Foyers extensibles
Certains modèles sont équipés de foyers extensibles. Ces derniers peuvent avoir soit une forme circulaire et s’étendre pour former des foyers doubles ou triples. Illustration des commandes présentes sur les modèles équipés de ces options.
Foyer extensible circulaire
• Touche ALLUMAGE FOYER DOUBLE pour activer le foyer double (voir Mise en marche et Utilisation).
• Voyant FOYER DOUBLE ALLUMÉ : il signale l’allumage du foyer double.
• Touche ALLUMAGE FOYER TRIPLE pour activer le foyer triple (voir Mise en marche et Utilisation).
• Voyant FOYER TRIPLE ALLUMÉ : il signale l’allumage du foyer triple.
Voyant
FOYER
DOUBLE
ALLUMÉ
Touche
ALLUMAGE
FOYER DOUBLE
Voyant
FOYER
TRIPLE ALLUMÉ
Touche
ALLUMAGE
FOYER TRIPLE

22
FR
Mise en marche et utilisation
! La colle utilisée pour les joints laisse des traces de graisse sur le verre. Nous conseillons de les éliminer avant d’utiliser l’appareil à l’aide d’un produit d’entretien non abrasif. Une odeur de caoutchouc peut se dégager au cours des premières heures d’utilisation, elle disparaîtra très vite.
! Un bip retentit quelques secondes après la mise sous tension de la table de cuisson. A partir de ce moment-là, l’allumage de la table est possible.! Une pression prolongée sur les touches - et
+ accélère l’avancement rapide des niveaux de puissance et des minutes du minuteur.
Mise sous tension de la table de cuisson
Pour mettre la table de cuisson sous tension, appuyer
sur la touche pendant une seconde environ.
Allumage des foyers
Chaque foyer est activé par une touche de sélection
et par un dispositif de réglage de la puissance à
double touche - et +.• Pour mettre en marche un foyer, appuyer sur la
commande correspondante et sélectionner la
puissance voulue à l’aide des touches - et +.
Extinction des foyers
Pour éteindre un foyer, le sélectionner à l’aide de la
touche de sélection correspondante et :• Appuyer sur la touche - : la puissance du foyer
descend progressivement jusqu’à extinction.
Fonction power
Une fonction power permet d’accélérer la montée en température des foyers. Allumer le foyer désiré
et régler sa puissance comme décrit dans le paragraphe précédent.. Appuyer pendant au moins 2 secondes de suite sur la touche de sélection du
foyer choisi . L’afficheur, indicateur de puissance, affiche alternativement la lettre “P” et le niveau de puissance sélectionné précédemment jusqu’à ce que le niveau de puissance voulu soit atteint. Dès qu’il est atteint, l’afficheur retourne à l’affichage du niveau de puissance sélectionné. Pour désactiver cette fonction, appuyer pendant au moins 2 secondes de suite sur
la touche de sélection du foyer où la fonction est activée, ou bien choisir un autre niveau de puissance à
l’aide des touches - et +.
Les éléments chauffants
La table de cuisson, selon les modèles, peut être équipée de deux types d’éléments chauffants :halogènes et radiants.Les halogènes transmettent la chaleur par irradiation de la lampe halogène qu’ils contiennent.Ils se caractérisent par leurs propriétés qui rappellent celles du gaz : une prompte réponse aux commandes, visualisation immédiate de la puissance.Les radiants sont composés d’une multitude de spires qui garantissent une répartition uniforme de la chaleur sur le fond du récipient pour réussir parfaitement toutes les cuissons lentes et le mijotage : daubes, sauces ou plats à réchauffer.
Verrouillage des commandes
Pendant le fonctionnement de la table, il est possible de verrouiller les commandes pour empêcher toute intervention extérieure sur le réglage (enfants,
nettoyage...). Appuyer sur la touche pour verrouiller les commandes, le voyant situé au - dessus de la touche s’allume.Pour pouvoir modifier les réglages (interrompre la cuisson par ex.) il faut déverrouiller les commandes
: appuyer sur la touche pendant quelques instants, le voyant s’éteint et les commandes sont déverrouillées.
Extinction de la table de cuisson
Appuyer sur la touche pour éteindre l’appareil.Si les commandes de l’appareil ont été verrouillées, elles le seront encore au rallumage de la table. Pour pouvoir rallumer la table de cuisson, il faut d’abord déverrouiller les commandes.
Conseils d’utilisation de l’appareil
Pour obtenir de meilleures performances de la table de cuisson :• Utiliser des casseroles à fond plat et de forte
épaisseur pour qu’elles adhèrent parfaitement à la zone de chauffe

23
FR
• Utiliser des casseroles dont le diamètre couvre complètement la zone de chauffe de façon à ce que toute la chaleur disponible puisse être utilisée.
• Veiller à ce que la base des casseroles soit toujours parfaitement sèche et propre pour garantir un bon contact et une longue durée de vie des foyers mais aussi des casseroles.
• Eviter d’utiliser les mêmes casseroles que sur les brûleurs à gaz. la concentration de chaleur sur les brûleurs à gaz peut déformer le fond de la casserole qui perd de son adhérence.
Les sécurités
Détection de récipient
Chaque foyer est équipé d’une détection de casserole. Le foyer ne délivre de puissance qu’en présence d’une casserole adaptée au foyer. Le voyant clignotant peut signaler :• une casserole incompatible• une casserole de trop petit diamètre• que la casserole a été soulevée
Indicateurs de chaleur résiduelle
Chaque foyer est équipé d’un indicateur de chaleur résiduelle. Cet indicateur signale les foyers dont la température est encore élevée. Si l’afficheur de
puissance affiche , c’est que le foyer est encore chaud. On peut par exemple s’en servir pour garder un plat au chaud ou faire fondre du beurre ou du chocolat. Lors du refroidissement du foyer, l’afficheur
de puissance affiche . L’afficheur s’éteint dès que le foyer a suffisamment refroidi.
Surchauffe
En cas de surchauffe de ses composants électroniques, la table s’éteint automatiquement et
l’afficheur indique F suivi d’un chiffre clignotant. Cet affichage disparaît et la table est à nouveau utilisable dès que la température est redescendue à un niveau acceptable.
Interrupteur sécurité
L’appareil est équipé d’un interrupteur de sécurité qui interrompt instantanément le fonctionnement des foyers dès qu’un temps limite de fonctionnement à un niveau de puissance donné est atteint. Pendant l’interruption de sécurité, l’afficheur indique “0”.Exemple : le foyer arrière droit est réglé sur 5, tandis que le foyer avant gauche est réglé sur 2. Le foyer arrière droit s’éteindra au bout de 5 heures de fonctionnement tandis que le foyer avant gauche s’éteindra au bout de 8 heures.
Puissance
1
2
3
4
5
6
7
8
9
Durée limite de fonctionnement
9
8
7
6
5
4
3
2
1
Signal sonore
Des anomalies, comme par exemple :• un objet (casserole, couvert, ...) placé plus de 10
secondes sur la zone de commande,• un débordement sur la zone de commande,• une pression prolongée sur une touche, peuvent
déclencher un signal acoustique. Eliminer la cause de dysfonctionnement pour stopper le signal sonore. Si la cause de l’anomalie n’est pas éliminée, le signal sonore continue à retentir et la table s’éteint.
24
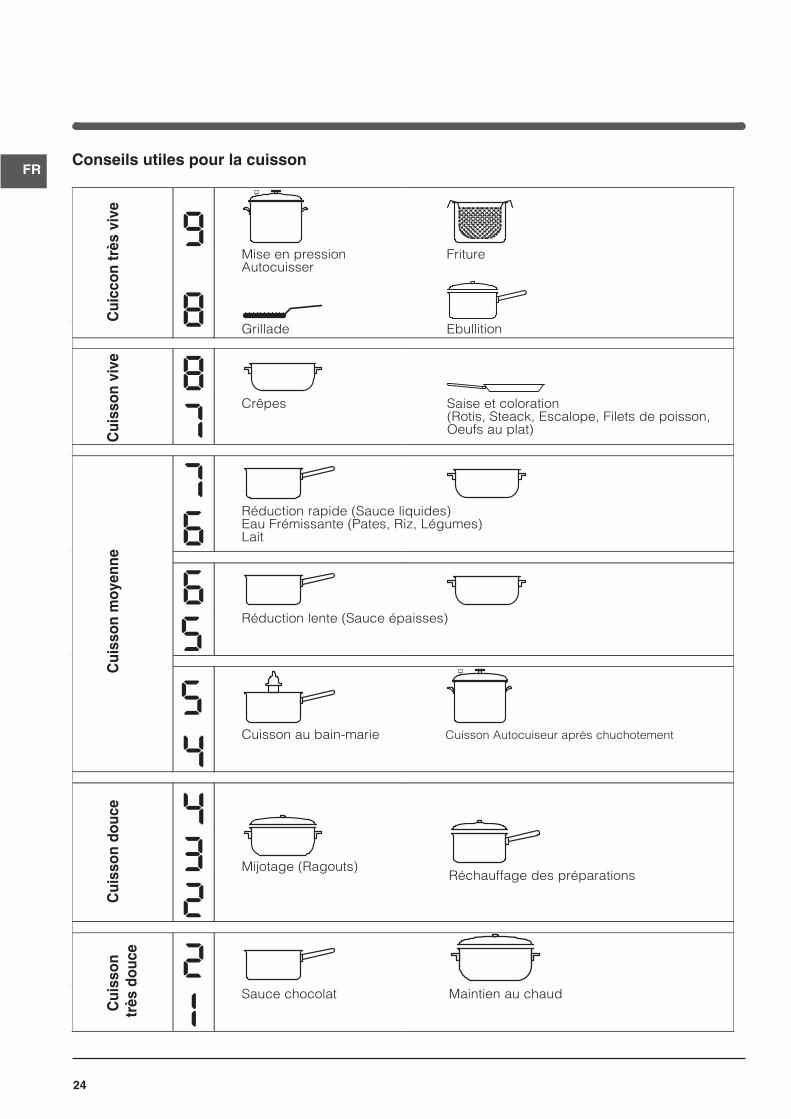
FRConseils utiles pour la cuisson
ªMise en pressionAutocuisser
Friture
Grillade Ebullition
Cui
ccon
très
viv
eC
uiss
on v
ive
Cui
sson
moy
enne
Cui
sson
dou
ceC
uiss
ontr
ès d
ouce
•
•
¶Crêpes Saise et coloration
(Rotis, Steack, Escalope, Filets de poisson,Oeufs au plat)
¶
§Réduction rapide (Sauce liquides)Eau Frémissante (Pates, Riz, Légumes)Lait
§
SRéduction lente (Sauce épaisses)
S
¢Cuisson au bain-marie Cuisson Autocuiseur après chuchotement
¢
£
™
Mijotage (Ragouts)Réchauffage des préparations
™
¡Sauce chocolat Maintien au chaud

25
FR
Précautions et conseils
! Cet appareil a été conçu et fabriqué conformément aux normes internationales de sécurité. Ces consignes de sécurité sont très importantes et doivent être lues attentivement.
Cet appareil est conforme aux Directives Communautaires suivantes :
- 2006/95/CEE du 12.12.06 (Basse Tension) et modifications successives- 2004/108/CEE du 15/12/04 (Compatibilité électromagnétique) et modifications successives - 93/68/CEE du 22/07/93 et modifications successives.- 1275/2008 stand-by/off mode.
Sécurité générale
! S’assurer que la prise d’air à travers la grille du ventilateur ne soit jamais bouchée. La table à encastrer exige en effet une bonne aération pour le refroidissement des composants électroniques.• Cet appareil a été conçu pour un usage familial, de
type non professionnel.• Cet appareil ne doit pas être installé en extérieur, même
dans un endroit abrité, il est en effet très dangereux de le laisser exposé à la pluie et aux orages.
• Ne pas toucher à l’appareil si l’on est pieds nus ou si l’on a les mains ou les pieds mouillés ou humides.
• Cet appareil qui sert à cuire des aliments ne doit être utilisé que par des adultes conformément aux instructions du mode d’emploi. Toute autre utilisation (comme par exemple le chauffage d’une pièce) est impropre et donc dangereux. Le fabricant décline toute responsabilité en cas de dommages provoqués par un usage impropre ou erroné.
• Le plan vitrocéramique résiste aux chocs mécaniques, il peut toutefois se fendre (ou même se briser) sous l’effet d’un choc provoqué par un objet pointu, tel qu’un ustensile par exemple. Dans ce cas, débrancher immédiatement l’appareil du réseau électrique et s’adresser à un centre d’assistance technique.
• Eviter que le cordon d’alimentation d’autres petits électroménagers touche à des parties chaudes de la table de cuisson.
• Ne pas oublier que la température des foyers reste assez élevée pendant trente minutes au moins après leur extinction. La chaleur résiduelle est aussi signalée par un voyant (voir Mise en marche et Utilisation).
• Garder à bonne distance de la table de cuisson tout objet qui pourrait fondre, des objets en plastique ou en aluminium par exemple, ou des produits à haute teneur en sucre. Faire très attention aux emballages,
au film plastique et au papier aluminium : au contact des surfaces encore chaudes ou tièdes, ils risquent d’endommager gravement la table.
• S’assurer que les manches des casseroles soient toujours tournés vers l’intérieur de la table de cuisson pour éviter tout risque d’accident.
• Ne pas tirer sur le câble pour débrancher la fiche de la prise de courant.
• N’effectuer aucune opération de nettoyage ou d’entretien sans avoir auparavant débranché la fiche de la prise de courant.
• Il n’est pas prévu que cet appareil soit utilisé par des personnes (enfants compris) présentant des capacités physiques, sensorielles ou mentales réduites ou qui n’ont pas l’expérience ou les connaissances indispensables, à moins qu’elles ne le fassent sous la surveillance de quelqu’un responsable de leur sécurité ou qu’elles aient été dûment formées sur l’utilisation de l’appareil.
• Si des foyers halogènes équipent votre appareil, ne les fixez pas des yeux trop longtemps.
• S’assurer que les enfants ne jouent pas avec l’appareil.
• Ne pas poser d’objets métalliques (couteaux, cuillères, couvercles, etc.) sur la table, ils risquent de devenir brûlants.
• Le dispositif n’est pas destiné à être mis en œuvre par une minuterie externe ou un système de télécommande séparée.
Mise au rebut
• Mise au rebut du matériel d’emballage : se conformer aux réglementations locales, les emballages pourront ainsi être recyclés.
• La directive européenne 2002/96/CE relative aux déchets d’équipements électriques et électroniques (DEEE), prévoit que les électroménagers ne peuvent pas être traités comme des déchets solides urbains courants. Les appareils usagés doivent faire l’objet d’une collecte séparée pour optimiser le taux de récupération et de recyclage des matériaux qui les composent et empêcher tout danger pour la santé et pour l’environnement. Le symbole de la poubelle barrée est appliqué sur tous les produits pour rappeler qu’ils font l’objet d’une collecte sélective.
Pour de plus amples renseignements sur la mise au rebut des électroménagers, les possesseurs peuvent s’adresser au service public prévu à cet effet ou aux commerçants.
26
FR
Nettoyage et entretien
Mise hors tensionAvant toute opération de nettoyage ou d’entretien couper l’alimentation électrique de l’appareil.
Nettoyage de l’appareil! Ne jamais utiliser de détergents abrasifs ou corrosifs, tels que des bombes aérosols pour grilloirs et fours, des détacheurs et des anti-rouille, des poudres à récurer ou des éponges à surface abrasive : ils risquent de rayer irrémédiablement la surface.! Ne jamais nettoyer l’appareil avec des nettoyeurs vapeur ou haute pression.
• Pour un entretien courant, passer une éponge humide sur la surface de la table et essuyer avec du papier essuie-tout.
• Si la table est particulièrement sale, frotter avec un produit d’entretien adapté au verre vitrocéramique, rincer et essuyer.
• Pour enlever les salissures en relief, utiliser un grattoir prévu à cet effet. Intervenir dès que possible, ne pas attendre que l’appareil ait refroidi afin d’éviter toute incrustation des salissures. L’utilisation d’une éponge en fil d’acier inoxydable, spéciale verre vitrocéramique, imprégnée d’eau savonneuse donne d’excellents résultats.
• Tout objet, matière plastique ou sucre ayant accidentellement fondu sur la table de cuisson doit être aussitôt enlevé à l’aide du grattoir tant que la surface est encore chaude.
• Une fois que la table est propre, elle peut être traitée avec un produit d’entretien et de protection spécial : celui-ci forme un film invisible qui protège la surface en cas de débordement accidentel. Opérer de
préférence quand l’appareil est tiède ou froid.• Prendre soin de toujours bien rincer à l’eau claire
et d’essuyer la table : les résidus des produits pourraient en effet s’incruster lors d’une prochaine cuisson.
Cadre en acier inox(uniquement pour les modèles avec encadrement)Un contact prolongé avec une eau très calcaire ou l’utilisation de nettoyants contenant du phosphore peuvent tacher l’acier inox.Nous conseillons de rincer abondamment et de bien essuyer après entretien. Il est préférable d’éliminer aussitôt tout débordement d’eau.! Certaines tables ont un cadre en aluminium ressemblant à de l’acier inox. Ne pas utiliser de produits d’entretien et de dégraissage ne convenant pas pour l’aluminium.
Démontage de la tableSi le démontage de la table de cuisson s’avère nécessaire : 1. enlever les vis qui fixent les ressorts de centrage sur les côtés;2. desserrer les vis des crochets de fixation dans les coins;3. dégager la table de cuisson du meuble.
! Il est vivement déconseillé d’essayer d’accéder aux mécanismes internes pour tenter une réparation. En cas de panne, contacter le service d’assistance technique.
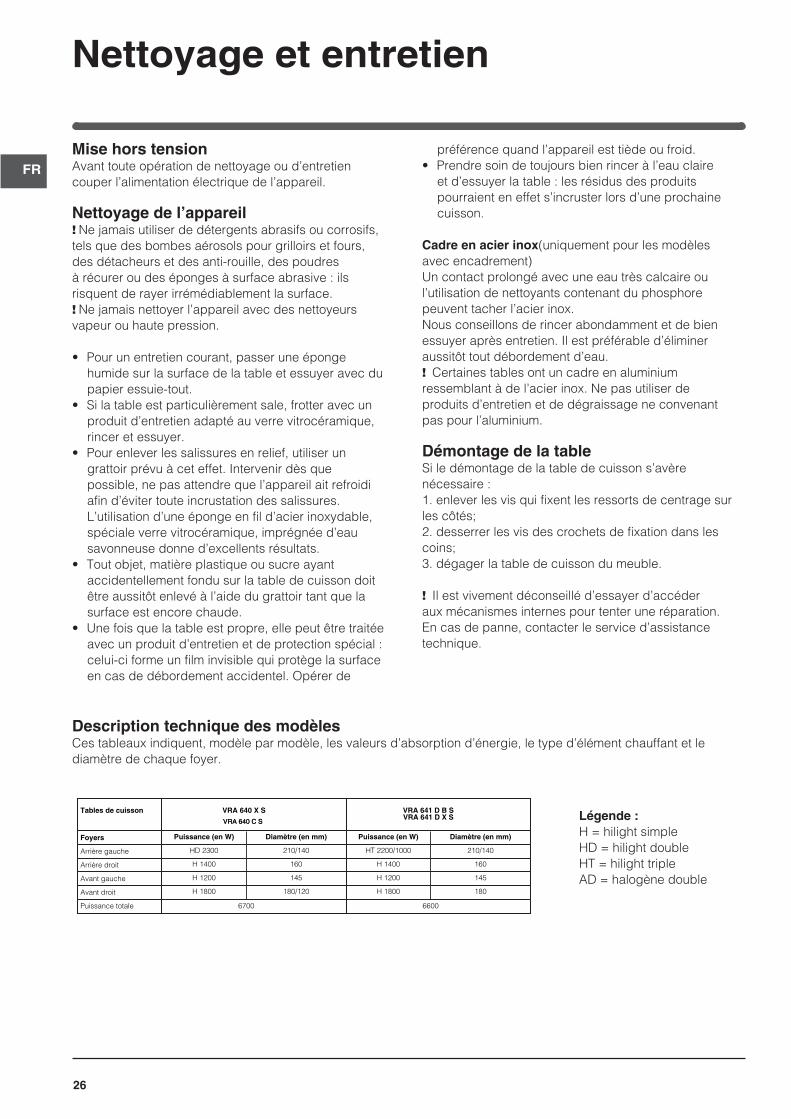
Description technique des modèlesCes tableaux indiquent, modèle par modèle, les valeurs d’absorption d’énergie, le type d’élément chauffant et le diamètre de chaque foyer.
Légende :H = hilight simpleHD = hilight doubleHT = hilight tripleAD = halogène double
Tables de cuisson
Foyers
Arrière gauche
Arrière droit
Avant gauche
Avant droit
Puissance totale
Puissance (en W)
HD 2300
H 1400
H 1200
H 1800
Diamètre (en mm)
210/140
160
145
180/120
6700
Puissance (en W)
HT 2200/1000
H 1400
H 1200
H 1800
Diamètre (en mm)
210/140
160
145
180
6600
VRA 640 X S VRA 641 D B SVRA 641 D X S
VRA 640 C SVRA 640 C S
27
ES
Instalación
! Es importante conservar este manual para poder consultarlo en todo momento. En el caso de venta, de cesión o de mudanza, verifique que permanezca junto al aparato para informar al nuevo propietario sobre su funcionamiento y sobre las advertencias correspondientes.! Lea atentamente las instrucciones: contienen importante información sobre la instalación, el uso y la seguridad.
Colocación
! Los embalajes no son juguetes para niños y se deben eliminar según las normas para la recolección diferenciada de desechos (ver Precauciones y consejos).! La instalación se debe realizar siguiendo estas instrucciones y por personal profesionalmente calificado. Una instalación incorrecta puede producir daños a personas, animales o cosas.
EmpotramientoPara garantizar un buen funcionamiento del aparato es necesario que el mueble tenga las características adecuadas:• el plano de apoyo debe ser de material resistente
al calor, a una temperatura de aproximadamente 100ºC;
• si se desea instalar la encimera sobre un horno, el mismo debe poseer un sistema de enfriamiento con ventilación forzada;
• evite instalar la encimera sobre un lavavajillas: pero si fuera necesario, interponga un elemento de separación estanco entre los dos aparatos;
• según el tipo de encimera que se desea instalar (ver las fi guras), el espacio disponible en el mueble debe tener las siguientes dimensiones:
560 +/- 1490 +/- 1
48
590
520
560 +/- 1490 +/- 1
48
574
504
AireaciónPara permitir una adecuada aireación y para evitarel sobrecalentamiento de las superficies que rodean al aparato, la encimera se debe colocar:• a una distancia mínima de 40 mm de la pared
posterior;• de modo que se mantenga una distancia mínima de
20 mm entre el hueco para el empotramiento y el mueble que se encuentra debajo.
• Los muebles situados a un costado, cuya altura
PARTE DELANTERADE LA ENCIMERA
PLANO DEAPOYO 30
40ENCIMERAVOLCADA
5 m
m
min. 20 mm
min. 20 mm
min. 40 mm
CAJÓN5 m
m
min. 40 mm
HORNOVENTILADO
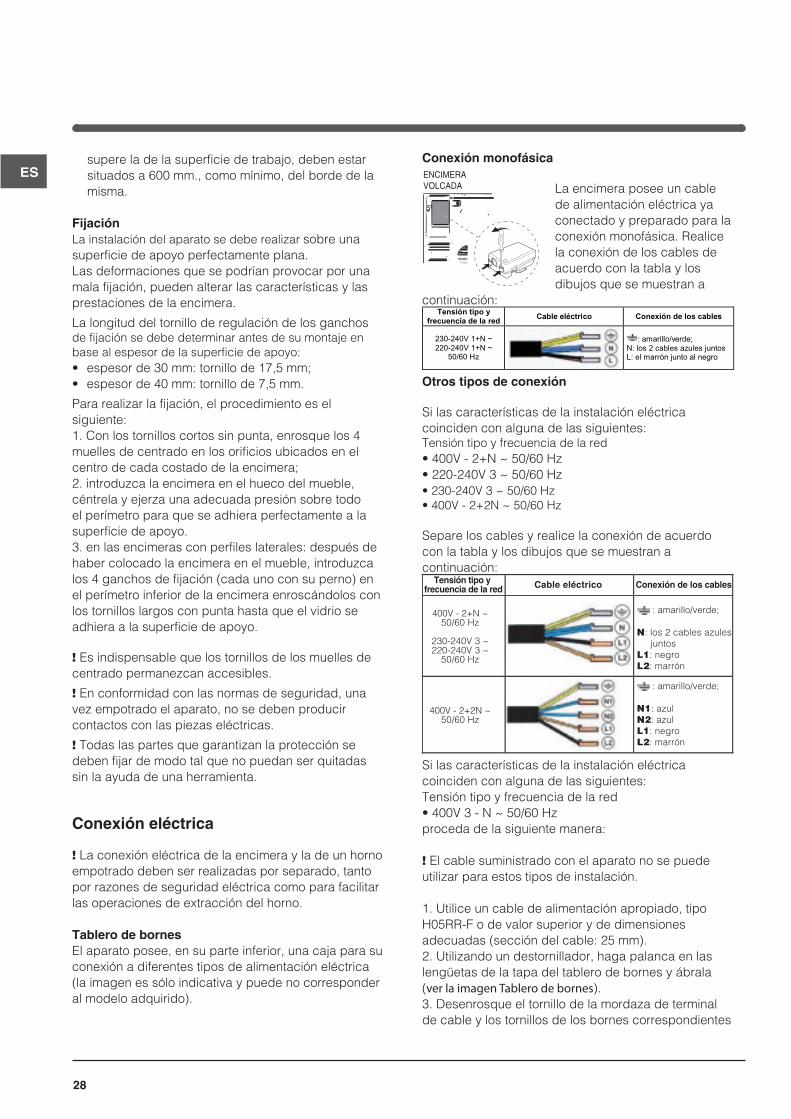
28
ESsupere la de la superficie de trabajo, deben estar situados a 600 mm., como mínimo, del borde de la misma.
FijaciónLa instalación del aparato se debe realizar sobre una superficie de apoyo perfectamente plana. Las deformaciones que se podrían provocar por una mala fijación, pueden alterar las características y las prestaciones de la encimera.
La longitud del tornillo de regulación de los ganchos de fijación se debe determinar antes de su montaje en base al espesor de la superficie de apoyo:• espesor de 30 mm: tornillo de 17,5 mm;• espesor de 40 mm: tornillo de 7,5 mm.
Para realizar la fijación, el procedimiento es el siguiente:1. Con los tornillos cortos sin punta, enrosque los 4 muelles de centrado en los orificios ubicados en el centro de cada costado de la encimera;2. introduzca la encimera en el hueco del mueble, céntrela y ejerza una adecuada presión sobre todo el perímetro para que se adhiera perfectamente a la superficie de apoyo.3. en las encimeras con perfiles laterales: después de haber colocado la encimera en el mueble, introduzca los 4 ganchos de fijación (cada uno con su perno) en el perímetro inferior de la encimera enroscándolos con los tornillos largos con punta hasta que el vidrio se adhiera a la superficie de apoyo.
! Es indispensable que los tornillos de los muelles de centrado permanezcan accesibles.
! En conformidad con las normas de seguridad, una vez empotrado el aparato, no se deben producir contactos con las piezas eléctricas.
! Todas las partes que garantizan la protección se deben fijar de modo tal que no puedan ser quitadas sin la ayuda de una herramienta.
Conexión eléctrica
! La conexión eléctrica de la encimera y la de un horno empotrado deben ser realizadas por separado, tanto por razones de seguridad eléctrica como para facilitar las operaciones de extracción del horno.
Tablero de bornesEl aparato posee, en su parte inferior, una caja para su conexión a diferentes tipos de alimentación eléctrica (la imagen es sólo indicativa y puede no corresponder al modelo adquirido).
Conexión monofásica
La encimera posee un cable de alimentación eléctrica ya conectado y preparado para la conexión monofásica. Realice la conexión de los cables de acuerdo con la tabla y los dibujos que se muestran a
continuación:Tensión tipo y
frecuencia de la red Cable eléctrico Conexión de los cables
230-240V 1+N ~ 220-240V 1+N ~
50/60 Hz
: amarillo/verde; N: los 2 cables azules juntos L: el marrón junto al negro
Otros tipos de conexión
Si las características de la instalación eléctrica coinciden con alguna de las siguientes:Tensión tipo y frecuencia de la red• 400V - 2+N ~ 50/60 Hz• 220-240V 3 ~ 50/60 Hz• 230-240V 3 ~ 50/60 Hz• 400V - 2+2N ~ 50/60 Hz
Separe los cables y realice la conexión de acuerdo con la tabla y los dibujos que se muestran a continuación:
Tensión tipo y frecuencia de la red Cable eléctrico Conexión de los cables
400V - 2+N ~50/60 Hz
230-240V 3 ~220-240V 3 ~
50/60 Hz
: amarillo/verde;
N: los 2 cables azules
juntos
L1: negro
L2: marrón
400V - 2+2N ~50/60 Hz
: amarillo/verde;
N1: azul
N2: azul
L1: negro
L2: marrón
Si las características de la instalación eléctrica coinciden con alguna de las siguientes:Tensión tipo y frecuencia de la red• 400V 3 - N ~ 50/60 Hzproceda de la siguiente manera:
! El cable suministrado con el aparato no se puede utilizar para estos tipos de instalación.
1. Utilice un cable de alimentación apropiado, tipo H05RR-F o de valor superior y de dimensiones adecuadas (sección del cable: 25 mm).2. Utilizando un destornillador, haga palanca en las lengüetas de la tapa del tablero de bornes y ábrala (ver la imagen Tablero de bornes).3. Desenrosque el tornillo de la mordaza de terminal de cable y los tornillos de los bornes correspondientes
ENCIMERAVOLCADA

29
ESal tipo de conexión necesaria y coloque los puentes de conexión de acuerdo con la tabla y los dibujos que se muestran a continuación.4. Coloque los cables de acuerdo con la tabla y los dibujos que se muestran a continuación y realice la conexión apretando a fondo todos los tornillos de los bornes.
Tensión tipo y frecuencia de la red Conexiones eléctricas Tablero de bornes
400V 3-N ~50/60 Hz
Trifásico 400
5. Fije el cable de alimentación en el correspondiente sujetacable y cierre la tapa.
Trifásica 400
Conexión del cable de alimentación eléctrica a la redEn el caso de conexión directa a la red, es necesario interponer entre el aparato y la red, un interruptor omnipolar con apertura mínima entre los contactos de 3 mm.
! El instalador es responsable de la correcta conexión eléctrica y del cumplimiento de las normas de seguridad.
Antes de efectuar la conexión verifique que:• la toma tenga conexión a tierra y que sea conforme
con la ley;• la toma sea capaz de soportar la carga máxima de
potencia de la máquina indicada en la placa de características que se encuentra en el aparato;
• la tensión de alimentación eléctrica esté comprendida dentro de los valores indicados en la placa de características;
• la toma sea compatible con el enchufe del aparato. Si no es así, sustituya la toma o el enchufe; no utilice prolongaciones ni conexiones múltiples.
! Una vez instalado el aparato, el cable eléctrico y la toma de corriente deben ser fácilmente accesibles.! El cable no debe sufrir pliegues ni compresiones.! El cable debe ser revisado periódicamente y sustituido sólo por técnicos autorizados.! La empresa declina toda responsabilidad cuando estas normas no sean respetadas.
! No quitar ni sustituir por ninguna razón el cable de alimentación. Si se sustituye o extrae caduca la garantía y la marca CE. INDESIT no se asume la responsabilidad en caso de accidentes o daños derivados de la sustitución o remoción del cable de alimentación original. Se admite exclusivamente la sustitución con un repuesto original y realizada por personal autorizado por INDESIT.
Fase Fase Fase
NeutroTierra
1 2 3
5 4
Puente
Zonas de cocción extensibles
Algunos modelos poseen placas extensibles. Dichas placas pueden tener distinta forma y distinta extensibilidad (placa doble o triple). Se muestran a continuación los mandos correspondientes, presentes sólo en los modelos que poseen estas opciones.
Placa extensible circular
• Botón ENCENDIDO DE LA PLACA DOBLE para activar la placa doble (ver Puesta en funcionamiento y uso).
• Piloto PLACA DOBLE ENCENDIDA: indica el encendido de la placa doble.
• Botón ENCENDIDO DE LA PLACA TRIPLE para activar la placa triple (ver Puesta en funcionamiento y uso).
• Piloto PLACA TRIPLE ENCENDIDA: indica el encendido de la placa triple.
Piloto PLACA
DOBLE
ENCENDIDA
Botón
ENCENDIDO
DE PLACA DOBLE
Piloto PLACA
TRIPLE
ENCENDIDA
Botón
ENCENDIDO
DE PLACA
TRIPLE

30
ES
Puesta en funcionamiento y uso
! La cola aplicada sobre las juntas deja algunas trazas de grasa en el vidrio. Antes de utilizar el aparato, se recomienda eliminarlas con un producto específico para el mantenimiento, no abrasivo. Durante las primeras horas de funcionamiento, es posible advertir un olor a goma que pronto desaparecerá.
! Cuando la encimera se conecta a la red de alimentación eléctrica, después de algunos segundos se emite una breve señal sonora. Sólo a partir de ese momento es posible encender la encimera.
! La presión prolongada de los botones - y +permite el avance veloz de los niveles de potencia y de los minutos del temporizador.
Encendido de la encimera
El encendido de la encimera se produce manteniendo
presionado el botón durante un segundo aproximadamente.
Encendido de las zonas de cocción
Cada zona de cocción se acciona utilizando un botón
de selección y un dispositivo de regulación de
la potencia compuesto por un doble botón - y +.• Para poner en funcionamiento una zona de cocción,
pulse el correspondiente botón de mando y fije la
potencia deseada utilizando los botones - y +.
Apagado de las zonas de cocción
Para apagar una zona de cocción, selecciónela
mediante el correspondiente botón de selección y:• Presione el botón -: la potencia de la zona de
cocción desciende progresivamente, hasta que se apaga.
Función power
Para disminuir los tiempos de calentamiento de las zonas de cocción, es posible activar la función power. Encienda y fije la potencia de la zona de
cocción deseada como se describe en el párrafo precedente. Presione y mantenga presionado durante 2 segundos, como mínimo, el botón de selección
de la zona de cocción elegida . En la pantalla indicadora de la potencia, se alterna la visualización de la letra “P” y del nivel de potencia precedentemente
fijado durante todo el tiempo necesario para que se alcance dicho nivel de potencia. Una vez alcanzado, la pantalla volverá a visualizar el nivel de potencia fijado. Para desactivar esta función, presione y mantenga presionado durante 2 segundos, el botón de selección de la zona de cocción para la que está activada la
función , o elija un nivel de potencia diferente
utilizando los botones - y +.
Los elementos calentadores
Según el modelo, en la encimera se pueden instalar dos tipos diferentes de elementos calentadores: halógenos y radiantes.Los halógenos transmiten el calor debido a la irradiación de la lámpara halógena que contienen.Se caracterizan por las propiedades muy similares a los típicos de gas: rápida respuesta a los mandos, visualización instantánea de la potencia.Los radiantes están compuestos por múltiples espiras que garantizan la distribución uniforme del calor en el fondo del recipiente, logrando perfectas cocciones con el fuego bajo: estofados, salsas o platos para calentar.
Bloqueo de los mandosCuando la encimera está en funcionamiento, es posible bloquear el panel de control para evitar el peligro de modificaciones fortuitas de las regulaciones (niños, operaciones de limpieza, etc.). Presionando el
botón , los mandos se bloquean y el piloto que se encuentra encima del botón se enciende.Para poder volver a realizar regulaciones (por ej.: interrumpir la cocción), es necesario desbloquear
los mandos: presione el botón durante algunos instantes, la luz testigo se apagará y el panel de control se desbloqueará.
Apagado de la encimera
Presionando el botón , el aparato se apagará.Si los mandos del aparato fueron bloqueados, continuarán estando bloqueados incluso después de haber vuelto a encender la encimera. Para poder encender nuevamente la encimera, es necesario primero desbloquear los mandos.
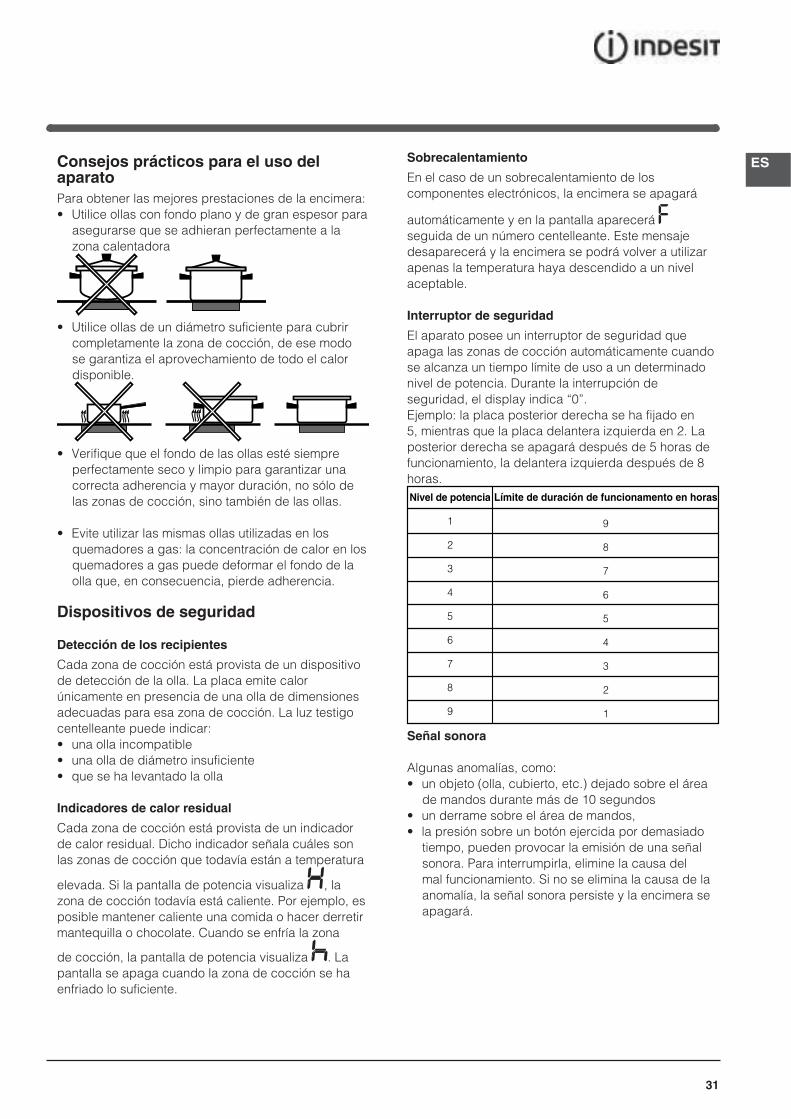
31
ESConsejos prácticos para el uso del aparatoPara obtener las mejores prestaciones de la encimera:• Utilice ollas con fondo plano y de gran espesor para
asegurarse que se adhieran perfectamente a la zona calentadora
• Utilice ollas de un diámetro suficiente para cubrir completamente la zona de cocción, de ese modo se garantiza el aprovechamiento de todo el calor disponible.
• Verifique que el fondo de las ollas esté siempre perfectamente seco y limpio para garantizar una correcta adherencia y mayor duración, no sólo de las zonas de cocción, sino también de las ollas.
• Evite utilizar las mismas ollas utilizadas en los quemadores a gas: la concentración de calor en los quemadores a gas puede deformar el fondo de la olla que, en consecuencia, pierde adherencia.
Dispositivos de seguridad
Detección de los recipientes
Cada zona de cocción está provista de un dispositivo de detección de la olla. La placa emite calor únicamente en presencia de una olla de dimensiones adecuadas para esa zona de cocción. La luz testigo centelleante puede indicar:• una olla incompatible• una olla de diámetro insuficiente• que se ha levantado la olla
Indicadores de calor residual
Cada zona de cocción está provista de un indicador de calor residual. Dicho indicador señala cuáles son las zonas de cocción que todavía están a temperatura
elevada. Si la pantalla de potencia visualiza , la zona de cocción todavía está caliente. Por ejemplo, es posible mantener caliente una comida o hacer derretir mantequilla o chocolate. Cuando se enfría la zona
de cocción, la pantalla de potencia visualiza . La pantalla se apaga cuando la zona de cocción se ha enfriado lo suficiente.
Sobrecalentamiento
En el caso de un sobrecalentamiento de los componentes electrónicos, la encimera se apagará
automáticamente y en la pantalla aparecerá Fseguida de un número centelleante. Este mensaje desaparecerá y la encimera se podrá volver a utilizar apenas la temperatura haya descendido a un nivel aceptable.
Interruptor de seguridad
El aparato posee un interruptor de seguridad que apaga las zonas de cocción automáticamente cuando se alcanza un tiempo límite de uso a un determinado nivel de potencia. Durante la interrupción de seguridad, el display indica “0”.Ejemplo: la placa posterior derecha se ha fijado en 5, mientras que la placa delantera izquierda en 2. La posterior derecha se apagará después de 5 horas de funcionamiento, la delantera izquierda después de 8 horas.Nivel de potencia
1
2
3
4
5
6
7
8
9
Límite de duración de funcionamento en horas
9
8
7
6
5
4
3
2
1
Señal sonora
Algunas anomalías, como:• un objeto (olla, cubierto, etc.) dejado sobre el área
de mandos durante más de 10 segundos• un derrame sobre el área de mandos,• la presión sobre un botón ejercida por demasiado
tiempo, pueden provocar la emisión de una señal sonora. Para interrumpirla, elimine la causa del mal funcionamiento. Si no se elimina la causa de la anomalía, la señal sonora persiste y la encimera se apagará.
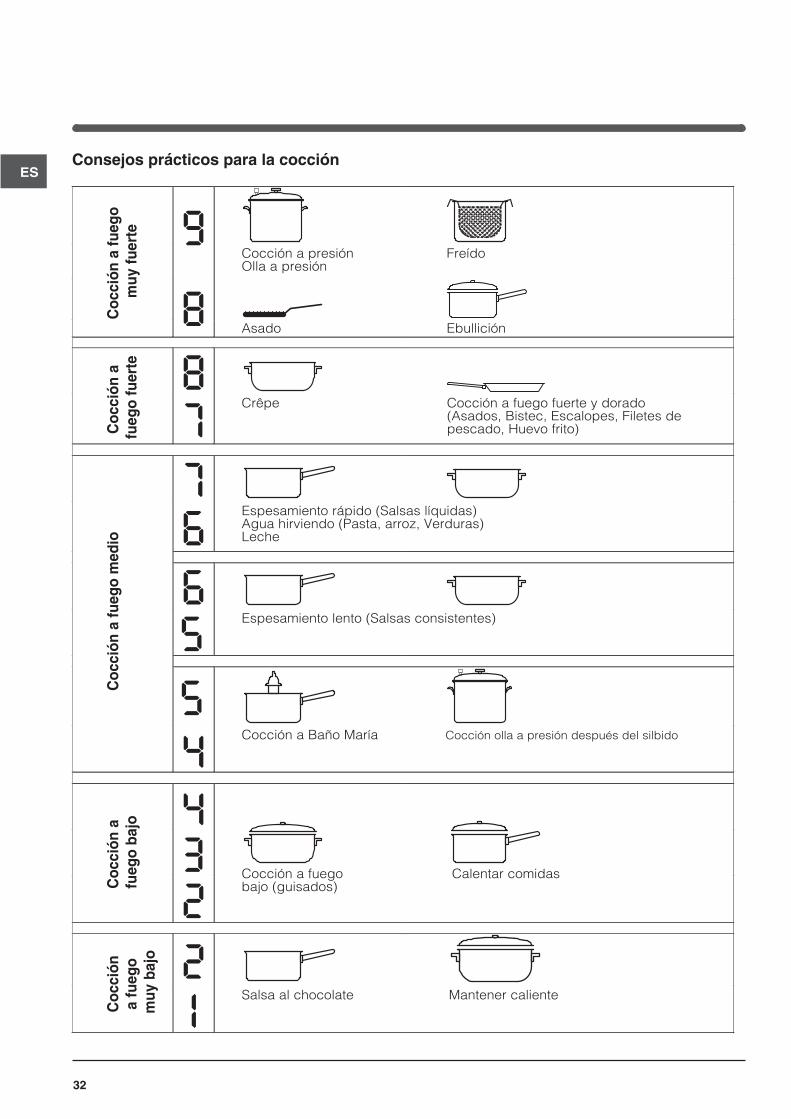
32
ESConsejos prácticos para la cocción
ªCocción a presiónOlla a presión
Freído
Asado Ebullición
Coc
ción
a fu
ego
muy
fuer
teC
occi
ón a
fu
ego
fuer
teC
occi
ón a
fueg
o m
edio
Coc
ción
a
fueg
o ba
joC
occi
óna
fueg
o m
uy b
ajo
•
•
¶Crêpe Cocción a fuego fuerte y dorado
(Asados, Bistec, Escalopes, Filetes de pescado, Huevo frito)
¶
§Espesamiento rápido (Salsas líquidas)Agua hirviendo (Pasta, arroz, Verduras)Leche
§
SEspesamiento lento (Salsas consistentes)
S
¢Cocción a Baño María Cocción olla a presión después del silbido
¢
£
™Cocción a fuego bajo (guisados)
Calentar comidas
™
¡Salsa al chocolate Mantener caliente

33
ES
Precauciones y consejos
! El aparato ha sido proyectado y fabricado en conformidad con las normas internacionales sobre seguridad. Estas advertencias se suministran por razones de seguridad y deben ser leídas atentamente.
Este aparato es conforme con las siguientes Normas Comunitarias:
-2006/95/CEE del 12.12.06 (Baja Tensión) y sucesivas modificaciones- 2004/108/CEE del 15/12/04 (Compatibilidad Electromagnética) y sucesivas modificaciones- 93/68/CEE del 22/07/93 y sucesivas modificaciones.- 1275/2008 stand-by/off mode.
Seguridad general
! Controle que no se obstruya nunca la toma de aire a través de la rejilla del ventilador. La encimera para empotrar necesita una correcta aireación para el enfriamiento de los componentes electrónicos.• El aparato ha sido fabricado para un uso de tipo no
profesional en el interior de una vivienda.• El aparato no se debe instalar al aire libre, tampoco
si el espacio está protegido porque es muy peligroso dejarlo expuesto a la lluvia y a las tormentas.
• No toque la máquina descalzo o con las manos y pies mojados o húmedos.
• El aparato debe ser utilizado para cocinar alimentos, sólo por personas adultas y siguiendo las instrucciones contenidas en este manual. Cualquier otro uso (como por ejemplo: calefacción de ambientes) se debe considerar impropio y, por lo tanto, peligroso. El fabricante no puede ser considerado responsable por los daños derivados de usos impropios, erróneos e irracionales.
• La encimera de vidriocerámica es resistente a los choques mecánicos, no obstante, se puede rajar (o eventualmente quebrantarse) si es golpeada con un objeto con punta, como por ejemplo un utensilio. Si esto sucediera, desconecte inmediatamente el aparato de la red de alimentación eléctrica y llame al Servicio de Asistencia Técnica.
• Evite que el cable de alimentación eléctrica de otros electrodomésticos entre en contacto con las partes calientes de la encimera.
• No olvide que la temperatura de las zonas de cocción permanece bastante elevada durante treinta minutos, como mínimo, después que se han apagado. El calor residual también está señalado por un indicador (ver Puesta en funcionamiento y uso).
• Mantenga cualquier objeto que se pueda fundir a una debida distancia de la encimera, por ejemplo,
objetos de plástico, de aluminio o productos con un elevado contenido de azúcar. Tenga particular cuidado con los embalajes y películas de plástico o aluminio: si se dejan sobre las superficies todavía calientes o tibias pueden causar un grave daño a la encimera.
• Verifique que los mangos de las ollas estén siempre dirigidos hacia dentro de la encimera para evitar que sean chocados accidentalmente.
• No desconecte el aparato de la toma de corriente tirando del cable sino sujetando el enchufe.
• No realice la limpieza o el mantenimiento sin haber desconectado primero el aparato de la red eléctrica.
• No está previsto que el aparato sea utilizado por personas (incluidos los niños) con capacidades físicas, sensoriales o mentales disminuidas, por personas inexpertas o que no tengan familiaridad con el producto, salvo que estén vigiladas por una persona responsable de su seguridad, o que no hayan recibido instrucciones preliminares sobre el uso del aparato.
• Si están presentes, no guarde mucho tiempo las zonas de cocción halógenas.
• Evitar que los niños jueguen con el aparato.• No coloque objetos metálicos (cuchillos, cucharas,
cubiertos, etc.) sobre la encimera porque pueden calentarse.
• El aparato no se debe poner en funcionamiento a través de un temporizador externo o de un sistema de mando a distancia.
Eliminación
• Eliminación del material de embalaje: respete las normas locales, de esta manera los embalajes podrán ser reutilizados.
• La norma europea 2002/96/CE sobre la eliminación de aparatos eléctricos y electrónicos (RAEE), establece que los electrodomésticos no se deben eliminar de la misma manera que los desechos sólidos urbanos. Los aparatos en desuso se deben recoger separadamente para optimizar la tasa de recuperación y reciclaje de los materiales que los componen e impedir potenciales daños para la salud y el medio ambiente. El símbolo de la papelera tachada se encuentra en todos los productos para recordar la obligación de recolección separada.
Para obtener mayor información sobre la correcta eliminación de electrodomésticos, los poseedores de los mismos podrán dirigirse al servicio público responsable o a los revendedores.

34
ES
Mantenimiento y cuidados
Interrumpir el suministro de corriente eléctricaAntes de realizar cualquier operación, desconecte el aparato de la red de alimentación eléctrica.
Limpiar el aparato
! Evite el uso de detergentes abrasivos o corrosivos, como aerosoles para barbacoas y hornos, quitamanchas y productos anticorrosivos, jabones en polvo y esponjas con superficie abrasiva, pueden rayar irremediablemente la superficie.! No utilice nunca limpiadores a vapor o de alta presión para la limpieza del aparato.
• Para un mantenimiento ordinario, es suficiente lavar la encimera con una esponja húmeda, secándola luego con un papel absorbente para cocina.
• Si la encimera está particularmente sucia, refriéguela con un producto específico para la limpieza de las superficies de vidriocerámica, enjuáguela y séquela.
• Para eliminar las acumulaciones de suciedad más consistentes utilice una raedera especial. Intervenga lo antes posible, sin esperar que el aparato se enfríe para evitar que los residuos formen costras. Se pueden obtener excelentes resultados usando una esponja con hilos de acero inoxidable especial para encimeras de vidriocerámica, embebida en agua y jabón.
• Si sobre la encimera se hubieran fundido accidentalmente objetos o materiales como plástico o azúcar, elimínelos inmediatamente con la raedera, mientras la superficie está todavía caliente.
• Una vez limpia, la encimera se puede tratar con un producto específico para el mantenimiento y la protección: la película invisible que deja este producto protege la superficie en caso de escurrimientos durante la cocción. Se recomienda realizar estas operaciones con el aparato tibio o frío.
• Recuerde siempre enjuagar la encimera con agua limpia y secarla cuidadosamente: en efecto, los residuos de productos podrían encostrarse durante la siguiente cocción.
Estructura de acero inoxidable (sólo en los modelos con marco)El acero inoxidable puede mancharse por la acción de agua muy calcárea dejada por un período de tiempo prolongado en contacto con el mismo o debido a productos para la limpieza con contenido de fósforo.Se aconseja enjuagar abundantemente y secar con cuidado después de la limpieza de la encimera. Si se derramara agua, seque rápidamente y con cuidado.! Algunas encimeras poseen un marco de aluminio que se asemeja al acero inoxidable. No utilice productos para la limpieza y el desengrase no adecuados para el aluminio.
Desmontar la encimeraCuando sea necesario, se puede desmontar la encimera:1. quite los tornillos que fijan los muelles de centrado en los costados;2. afloje los tornillos de los ganchos de fijación en las esquinas;3. extraiga la encimera del mueble.
! Se recomienda evitar acceder a los mecanismos internos para intentar una reparación. En caso de avería, llame al Servicio de Asistencia Técnica.
Descripción técnica de los modelosEn estas tablas se encuentran, modelo por modelo, los valores de absorción energética, el tipo de elemento calentador y el diámetro de cada zona de cocción.
Leyenda:H = hilight individualHD = hilight dobleHT = hilight tripleAD = halógena doble
Encimeras
Zonas de cocción
Posterior izquierda
Posterior derecha
Delantera izquierda
Delantera derecha
Potencia total
Potencia (en W)
HD 2300
H 1400
H 1200
H 1800
Diámetro (en mm)
210
160
145
180
6700
Potencia (en W)
HT 2200/1000
H 1400
H 1200
H 1800
Diámetro (en mm)
210/140
160
145
180
6600
VRA 640 X S VRA 641 D B SVRA 641 D X S
VRA 640 C SVRA 640 C S
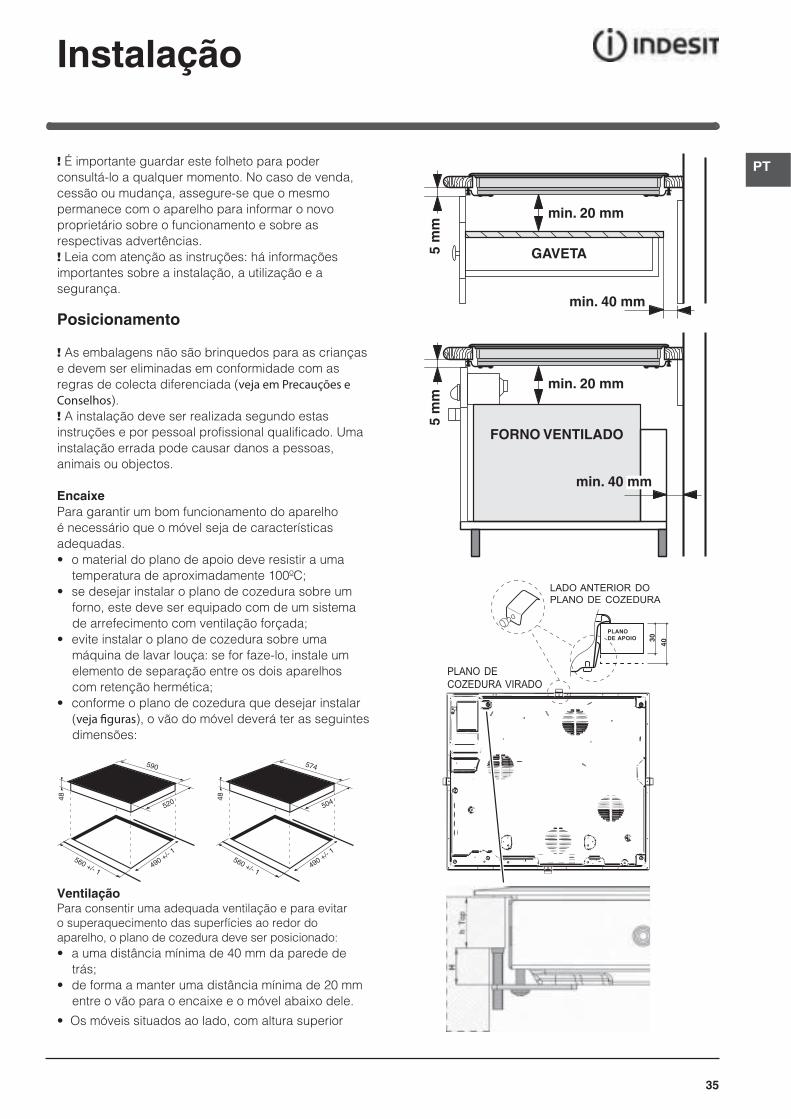
35
PT
Instalação
! É importante guardar este folheto para poder consultá-lo a qualquer momento. No caso de venda, cessão ou mudança, assegure-se que o mesmo permanece com o aparelho para informar o novo proprietário sobre o funcionamento e sobre as respectivas advertências.! Leia com atenção as instruções: há informações importantes sobre a instalação, a utilização e a segurança.
Posicionamento
! As embalagens não são brinquedos para as crianças e devem ser eliminadas em conformidade com as regras de colecta diferenciada (veja em Precauções e Conselhos).! A instalação deve ser realizada segundo estas instruções e por pessoal profissional qualificado. Uma instalação errada pode causar danos a pessoas, animais ou objectos.
EncaixePara garantir um bom funcionamento do aparelho é necessário que o móvel seja de características adequadas.• o material do plano de apoio deve resistir a uma
temperatura de aproximadamente 100ºC;• se desejar instalar o plano de cozedura sobre um
forno, este deve ser equipado com de um sistema de arrefecimento com ventilação forçada;
• evite instalar o plano de cozedura sobre uma máquina de lavar louça: se for faze-lo, instale um elemento de separação entre os dois aparelhos com retenção hermética;
• conforme o plano de cozedura que desejar instalar (veja fi guras), o vão do móvel deverá ter as seguintes dimensões:
560 +/- 1490 +/- 1
48
590
520
560 +/- 1490 +/- 1
48
574
504
VentilaçãoPara consentir uma adequada ventilação e para evitaro superaquecimento das superfícies ao redor do aparelho, o plano de cozedura deve ser posicionado:• a uma distância mínima de 40 mm da parede de
trás;• de forma a manter uma distância mínima de 20 mm
entre o vão para o encaixe e o móvel abaixo dele.
• Os móveis situados ao lado, com altura superior
LADO ANTERIOR DOPLANO DE COZEDURA
PLANODE APOIO 30
40PLANO DECOZEDURA VIRADO
5 m
m
min. 20 mm
min. 20 mm
min. 40 mm
GAVETA5 m
m
min. 40 mm
FORNO VENTILADO
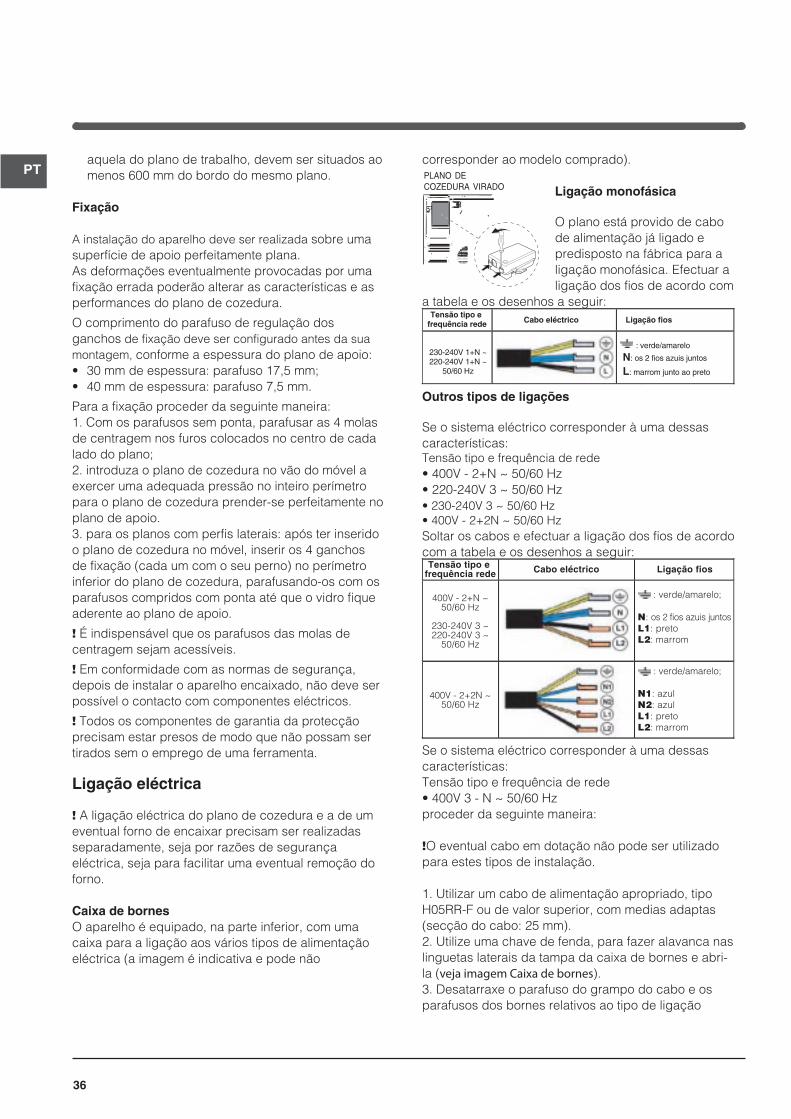
36
PTaquela do plano de trabalho, devem ser situados ao menos 600 mm do bordo do mesmo plano.
Fixação
A instalação do aparelho deve ser realizada sobre uma superfície de apoio perfeitamente plana. As deformações eventualmente provocadas por uma fixação errada poderão alterar as características e as performances do plano de cozedura.
O comprimento do parafuso de regulação dos ganchos de fixação deve ser configurado antes da sua montagem, conforme a espessura do plano de apoio:• 30 mm de espessura: parafuso 17,5 mm;• 40 mm de espessura: parafuso 7,5 mm.
Para a fixação proceder da seguinte maneira:1. Com os parafusos sem ponta, parafusar as 4 molas de centragem nos furos colocados no centro de cada lado do plano;2. introduza o plano de cozedura no vão do móvel a exercer uma adequada pressão no inteiro perímetro para o plano de cozedura prender-se perfeitamente no plano de apoio.3. para os planos com perfis laterais: após ter inserido o plano de cozedura no móvel, inserir os 4 ganchos de fixação (cada um com o seu perno) no perímetro inferior do plano de cozedura, parafusando-os com os parafusos compridos com ponta até que o vidro fique aderente ao plano de apoio.
! É indispensável que os parafusos das molas de centragem sejam acessíveis.
! Em conformidade com as normas de segurança, depois de instalar o aparelho encaixado, não deve ser possível o contacto com componentes eléctricos.
! Todos os componentes de garantia da protecção precisam estar presos de modo que não possam ser tirados sem o emprego de uma ferramenta.
Ligação eléctrica
! A ligação eléctrica do plano de cozedura e a de um eventual forno de encaixar precisam ser realizadas separadamente, seja por razões de segurança eléctrica, seja para facilitar uma eventual remoção do forno.
Caixa de bornesO aparelho é equipado, na parte inferior, com uma caixa para a ligação aos vários tipos de alimentação eléctrica (a imagem é indicativa e pode não
corresponder ao modelo comprado).
Ligação monofásica
O plano está provido de cabo de alimentação já ligado e predisposto na fábrica para a ligação monofásica. Efectuar a ligação dos fios de acordo com
a tabela e os desenhos a seguir:Tensão tipo e
frequência rede Cabo eléctrico Ligação fios
230-240V 1+N ~220-240V 1+N ~
50/60 Hz
: verde/amarelo
N: os 2 fios azuis juntos
L: marrom junto ao preto
Outros tipos de ligações
Se o sistema eléctrico corresponder à uma dessas características:Tensão tipo e frequência de rede• 400V - 2+N ~ 50/60 Hz• 220-240V 3 ~ 50/60 Hz• 230-240V 3 ~ 50/60 Hz• 400V - 2+2N ~ 50/60 HzSoltar os cabos e efectuar a ligação dos fios de acordo com a tabela e os desenhos a seguir:
Tensão tipo e frequência rede Cabo eléctrico Ligação fios
400V - 2+N ~50/60 Hz
230-240V 3 ~220-240V 3 ~
50/60 Hz
: verde/amarelo;
N: os 2 fios azuis juntos
L1: preto
L2: marrom
400V - 2+2N ~50/60 Hz
: verde/amarelo;
N1: azul
N2: azul
L1: preto
L2: marrom
Se o sistema eléctrico corresponder à uma dessas características:Tensão tipo e frequência de rede• 400V 3 - N ~ 50/60 Hzproceder da seguinte maneira:
!O eventual cabo em dotação não pode ser utilizado para estes tipos de instalação.
1. Utilizar um cabo de alimentação apropriado, tipo H05RR-F ou de valor superior, com medias adaptas (secção do cabo: 25 mm).2. Utilize uma chave de fenda, para fazer alavanca nas linguetas laterais da tampa da caixa de bornes e abri-la (veja imagem Caixa de bornes).3. Desatarraxe o parafuso do grampo do cabo e os parafusos dos bornes relativos ao tipo de ligação
PLANO DE COZEDURA VIRADO
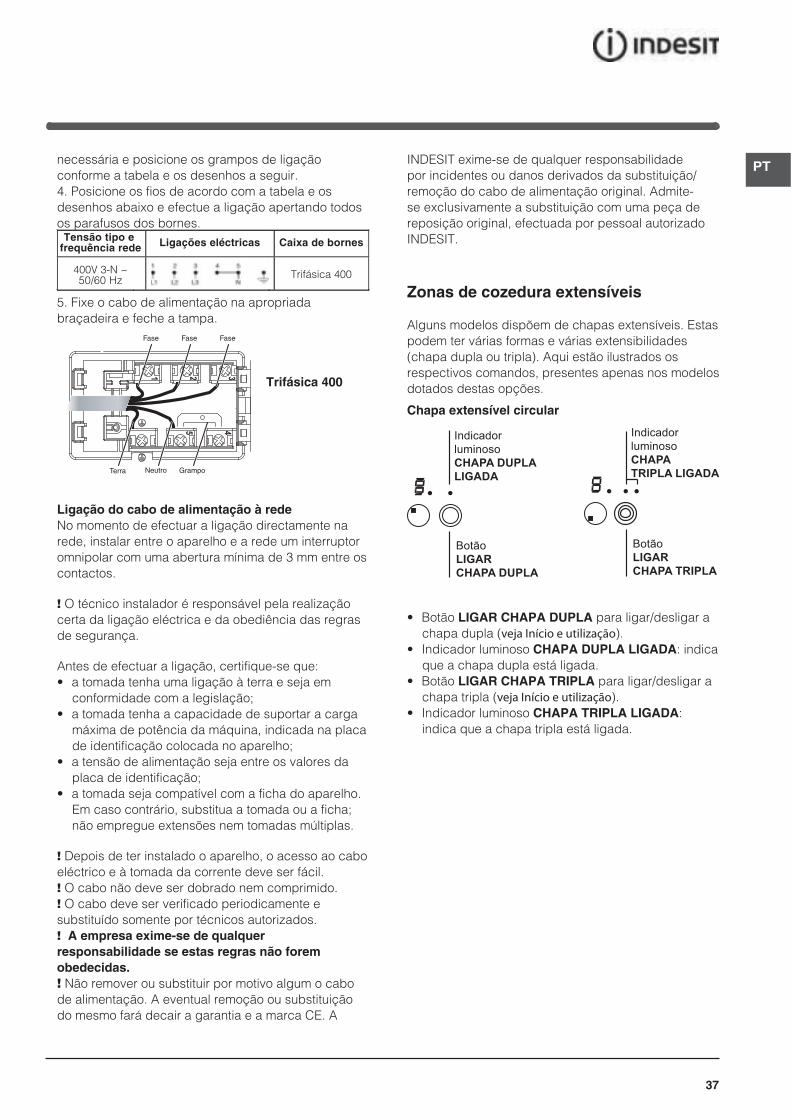
37
PTnecessária e posicione os grampos de ligação conforme a tabela e os desenhos a seguir.4. Posicione os fios de acordo com a tabela e os desenhos abaixo e efectue a ligação apertando todos os parafusos dos bornes.
Tensão tipo e frequência rede Ligações eléctricas Caixa de bornes
400V 3-N ~50/60 Hz
Trifásica 400
5. Fixe o cabo de alimentação na apropriada braçadeira e feche a tampa.
Trifásica 400
Ligação do cabo de alimentação à redeNo momento de efectuar a ligação directamente na rede, instalar entre o aparelho e a rede um interruptor omnipolar com uma abertura mínima de 3 mm entre os contactos.
! O técnico instalador é responsável pela realização certa da ligação eléctrica e da obediência das regras de segurança.
Antes de efectuar a ligação, certifique-se que:• a tomada tenha uma ligação à terra e seja em
conformidade com a legislação;• a tomada tenha a capacidade de suportar a carga
máxima de potência da máquina, indicada na placa de identificação colocada no aparelho;
• a tensão de alimentação seja entre os valores da placa de identificação;
• a tomada seja compatível com a ficha do aparelho. Em caso contrário, substitua a tomada ou a ficha; não empregue extensões nem tomadas múltiplas.
! Depois de ter instalado o aparelho, o acesso ao cabo eléctrico e à tomada da corrente deve ser fácil.! O cabo não deve ser dobrado nem comprimido.! O cabo deve ser verificado periodicamente e substituído somente por técnicos autorizados.! A empresa exime-se de qualquer responsabilidade se estas regras não forem obedecidas.! Não remover ou substituir por motivo algum o cabo de alimentação. A eventual remoção ou substituição do mesmo fará decair a garantia e a marca CE. A
INDESIT exime-se de qualquer responsabilidade por incidentes ou danos derivados da substituição/remoção do cabo de alimentação original. Admite-se exclusivamente a substituição com uma peça de reposição original, efectuada por pessoal autorizado INDESIT.
Fase Fase Fase
NeutroTerra
1 2 3
5 4
Grampo
Zonas de cozedura extensíveis
Alguns modelos dispõem de chapas extensíveis. Estas podem ter várias formas e várias extensibilidades (chapa dupla ou tripla). Aqui estão ilustrados os respectivos comandos, presentes apenas nos modelos dotados destas opções.
Chapa extensível circular
• Botão LIGAR CHAPA DUPLA para ligar/desligar a chapa dupla (veja Início e utilização).
• Indicador luminoso CHAPA DUPLA LIGADA: indica que a chapa dupla está ligada.
• Botão LIGAR CHAPA TRIPLA para ligar/desligar a chapa tripla (veja Início e utilização).
• Indicador luminoso CHAPA TRIPLA LIGADA:indica que a chapa tripla está ligada.
Indicador
luminoso
CHAPA DUPLA
LIGADA
Botão
LIGAR
CHAPA DUPLA
Indicador
luminoso
CHAPA
TRIPLA LIGADA
Botão
LIGAR
CHAPA TRIPLA
38
PT
Início e utilização
! A cola aplicada nas guarnições deixa alguns traços de graxa no vidro. Antes de utilizar o aparelho, é recomendável eliminá-la com um produto não abrasivo específico para a manutenção. Durante as primeiras horas de funcionamento, pode ser que note odor de borracha, que em todo o caso logo desaparecerá.
! Quando o plano de cozedura for ligado electricamente, toca um breve sinal acústico depois de alguns segundos. Somente neste ponto será possível ligar o plano de cozedura.
! Uma prolongada pressão das teclas - e + permite um avançamento rápido dos níveis de potência e dos minutos do timer.
Acender o plano de cozedura
Para acender o plano de cozedura manter
pressionada a tecla por aproximadamente um segundo.
Acender as zonas de cozedura
Cada uma as zonas de cozedura é accionada
mediante um botão de selecção e um dispositivo de regulação da potência constituído por
um botão - e +.• Para colocar em funcionamento uma zona de
cozedura, carregue na respectivo botão de comando e defina a potência que desejar mediante
os botões - e +.
Desligar as zonas de cozedura
Para desligar uma zona de cozedura, seleccione-a
mediante o respectivo botão de selecção e:
• Carregue na tecla -: a potência da zona de cozedura descerá progressivamente até desligar-se.
Função power
Para acelerar os tempos de aquecimento das zonas de cozedura, é possível activar a função power. Ligar e configurar a potência da zona de cozedura
desejada como descrito no parágrafo anterior. Pressionar e manter pressionado por no mínimo 2 segundos, o botão de selecção da zona de cozedura
escolhida . No display, indicador da potência, alterna-se a visualização da letra “P” e do nível de potência configurado anteriormente, por todo o tempo necessário ao alcance do nível de potência desejado. Quando o nível for alcançado, o display voltará a visualizar o nível de potência configurado. Para desactivar esta função, pressionar e manter pressionado por no mínimo 2 segundos o botão de selecção da zona de cozedura na qual foi activada
a função ou escolher um outro nível de potência
através dos botão - e +.
Elementos aquecedores
No plano de cozedura, conforme os modelos, podem ser instalados elementos aquecedores de dois tipos: halógenos e irradiantes.Os halógenos transmitem o calor mediante irradiação da lâmpada halógena que contém.Caracterizam-se pelas propriedades similares às típicas do gás: rápida resposta aos comandos, visualização instantânea da potência.Os elementos radiantes são constituídos por uma multiplicidade de espirais que asseguram uma repartição uniforme do calor no fundo do recipiente, para um resultado perfeito de todas as cozeduras com fogo lento: cozidos, molhos ou para aquecer pratos.
Bloqueio dos comandosQuando um plano de cozedura estiver a funcionar, é possível bloquear os comandos para evitar riscos de modificações acidentais das regulações (crianças,
operações de limpeza etc.). Carregando no botão os comandos se bloquearão e o indicador luminoso situado acima do botão se acenderá.Para voltar a modificar as regulações (por. exemplo interromper a cozedura), será necessário desbloquear
os comandos: carregue no botão por alguns instantes; o indicador luminoso se apagará e os comandos se desbloquearão.
Desligar o plano de cozedura
Carregue no botão ; o aparelho se desligará.Se os comandos do aparelhagem estiverem bloqueados, continuarão bloqueados mesmo depois de ter acendido novamente o plano de cozedura. Para poder acender novamente o plano, será necessário primeiro desbloquear os comandos.
39
PTConselhos práticos para utilizar esta aparelhagem
Para obter as melhores performances do plano de cozedura:• Empregue panelas com fundo chato e elevada
espessura, para ter a certeza que haverá uma perfeita aderência à zona de aquecimento.
• Empregue panelas com diâmetro suficiente para cobrir inteiramente a zona de aquecimento, de maneira que se aproveite inteiramente o calor disponível.
• Certifique-se que o fundo das panelas esteja sempre perfeitamente enxuto e limpo, para assegurar uma aderência certa e uma longa durabilidade não somente das zonas de cozedura, mas também das próprias panelas.
• Evite utilizar as mesmas panelas que emprega nos queimadores a gás: a concentração de calor nos queimadores a gás poderá deformar o fundo das panelas, que desta maneira perderá aderência.
Dispositivos de segurançaDetecção de recipientes
Cada uma das zonas de cozedura é equipada com um dispositivo de detecção de panela. A chapa emite calor unicamente se houver uma panela de medidas adequadas na respectiva zona de cozedura. O indicador a piscar pode indicar:• uma panela incompatível• uma panela de diâmetro insuficiente• que a panela está levantada
Indicadores de calor resíduo.
Cada uma das zonas de cozedura é equipada com um indicador de calor resíduo. Este indicador sinaliza as zonas de cozedura que ainda estão com uma temperatura elevada. Se o display de potência
visualizar , a zona de cozedura ainda está quente. É possível, por exemplo, manter os alimentos aquecidos ou derreter manteiga ou chocolate. Com o arrefecimento da zona de cozedura, o display
visualizará . O display desliga-se quando a zona de cozedura estiver suficientemente arrefecida.
Aquecimento excessivo
No caso de superaquecimento dos componentes electrónicos, o plano de cozedura desliga-se
automaticamente e no display aparece F seguido por um número intermitente. Esta mensagem desaparece e o plano volta a ser utilizável mal a temperatura desceu a um nível aceitável.
Interruptor de segurança
O aparelho é dotado de um interruptor de segurança que desliga as zonas de cozedura automaticamente quando é alcançado um tempo máximo de utilização a um determinado nível de potência. Durante uma interrupção de segurança, o display indicará “0”.Exemplo: a chapa posterior direita está programada no 5, enquanto a chapa anterior esquerda no 2. A posterior direita irá desligar-se após 5 horas de funcionamento, a anterior esquerda após 8 horas.
Nível de potência
1
2
3
4
5
6
7
8
9
Limitação da duração de functionamento em horas
9
8
7
6
5
4
3
2
1
Sinal acústico
Algumas anomalias, nomeadamente:• um objecto (panela, talher etc.) foi deixado mais de
10 segundos na área de comandos;• um derramamento na área dos comandos,• uma pressão exercida por muito tempo em um
botão, podem provocar uma sinalização acústica. Resolva a causa do mau funcionamento para o sinal sonoro deixar de tocar. Se a causa da anomalia não for removida, o sinal acústico persistirá e o plano irá desligar-se.

40
PTConselhos práticos para a cozedura
ªCozedura à pressãoPanela de pressão
Frituras
Assado Ebulição
Coz
edur
a em
fo
go a
ltíss
imo
Coz
edur
aem
fogo
alto
Coz
edur
a em
fogo
méd
ioC
ozed
ura
em fo
go
bran
doC
ozed
ura
em
fogo
mui
to
bran
do
•
•
¶Crêpe Cozedura em fogo alto e doiramento
(Assados, Bifes, Escalopes, Filés de peixe, Ovos fritos)
¶
§Adensamento rápido (molhos líquidos)Água fervente (Massas, Arroz, Verduras)Leite
§
SAdensamento lento (molhos consistentes)
S
¢Cozedura em banho-maria Cozedura Panela de pressão após o síbilo
¢
£
™
Cozedura em fogo brando (estufados) Aquecimento dos alimentos
™
¡Caldo de chocolate Manter o alimento quente
41
PT
Precauções e conselhos
! Este aparelho foi projectado e fabricado em conformidade com as normas internacionais de segurança. Estas advertências são fornecidas por razões de segurança e devem ser lidas com atenção.
Este aparelho é em conformidade com as seguintes Directivas da Comunidade Europeia:
-2006/95/CEE de 12.12.06 (Baixa Tensão) e posteriores modificações- 2004/108/CEE de 15/12/04 (Compatibilidade Electromagnética) e posteriores modificações- 93/68/CEE de 22/07/93 e posteriores modificações.- 1275/2008 stand-by/off mode.
Segurança geral
!Controlar que a tomada de ar através da grelha do ventilador não esteja obstruída. O plano de encaixar, de facto, necessita de uma correcta ventilação para o arrefecimento dos componentes electrónicos.• Este aparelho foi concebido para utilização de tipo não
profissional no âmbito de moradas.• Este aparelho não deve ser instalado ao ar livre, mesmo
num sítio protegido, porque é muito perigoso deixá-lo exposto a chuva e temporais.
• Não toque na máquina se estiver descalço, ou se as suas mãos ou pés estiverem molhados ou húmidos.
• O aparelho deve ser utilizado para cozinhar alimentos, somente por pessoas adultas e conforme as instruções contidas neste livrete. Qualquer outro uso (como por exemplo, aquecedor de ambientes) deve ser considerado impróprio e portanto perigoso. O fabricante não pode ser considerado responsável por eventuais danos derivados de usos impróprios, errados e irrazoáveis.
• A placa de vitrocerâmica é resistente às batidas mecânicas, entretanto pode rachar-se (ou eventualmente partir-se) se for batida com um objecto pontiagudo, como um utensílio. Nestes casos, desligue imediatamente o aparelho da rede de alimentação e contacte a assistência técnica.
• Evite que o cabo de alimentação de outros electrodomésticos encoste-se em partes quentes do plano de cozedura.
• Não se esqueça que a temperatura das zonas de cozedura permanece muito alta pelo menos trinta minutos depois de apagadas. O calor resíduo é sinalizado também por um indicador (veja Início e utilização).
• Mantenha a devida distância da placa quaisquer objectos que podem se derreter, por exemplo, objectos de plástico, de alumínio ou produtos com um alto conteúdo de açúcar. Preste muita atenção com as
embalagens e as películas de plástico ou alumínio: se deixá-los sobre as superfícies enquanto ainda estiverem quentes ou mornas, podem causar um dano grave à placa.
• Certifique-se que as pegas das panelas fiquem sempre viradas para o lado interno do plano de cozedura para evitar batidas acidentais.
• Não puxe pelo cabo para desligar a ficha da tomada eléctrica, pegue pela ficha.
• Não realize limpeza nem manutenção sem antes ter desligado a ficha da rede eléctrica.
• Não é previsto que este aparelho seja utilizado por pessoas (incluso crianças) com reduzidas capacidades físicas, sensoriais ou mentais, por pessoas inexperientes ou que não tenham familiaridade com o produto, a não ser que seja vigiadas por uma pessoa responsável pela sua segurança ou que tenham recebido instruções preliminares sobre o uso do aparelho.
• Caso haja zonas de cozedura halógenas, não olhe para elas por muito tempo.
• Não permita que as crianças brinquem com o aparelho.
• Não apoie objectos metálicos (facas, colheres, tampas, etc.) sobre o plano porque podem ficar quentes.
• O aparelho não é destinado a ser colocado em funcionamento por meio de um temporizador externo ou por um sistema de comando à distância separado.
Eliminação• Eliminação do material de embalagem: obedeça as
regras locais, de maneira que as embalagens possam ser reutilizadas.
• A directiva Europeia 2002/96/CE relativa aos resíduos de equipamentos eléctricos e electrónicos (REEE) prevê que os electrodomésticos não devem ser eliminados no normal fluxo dos resíduos sólidos urbanos. Os aparelhos não mais utilizados devem ser recolhidos separadamente para optimizar a taxa de recuperação e reciclagem dos materiais que os compõem e impedir potenciais danos à saúde e ao meio ambiente. O símbolo da lixeira cancelada está indicado em todos os produtos para lembrar o dever de colecta selectiva.
Para maiores informações sobre a correcta eliminação dos electrodomésticos, os proprietários poderão contactar o serviço de colecta público ou os revendedores.
42
PT
Manutenção e cuidados
Desligar a corrente eléctricaAntes de realizar qualquer operação, desligue o aparelho da alimentação eléctrica.
Limpeza do aparelho! Evite o emprego de detergentes abrasivos ou corrosivos, tais como sprays para churrasqueiras e fornos, tira-manchas e produtos contra ferrugem, detergentes em pó e esponjas com superfície abrasiva: podem arranhar irremediavelmente a superfície.! Nunca utilize equipamento de limpeza a vapor ou de alta pressão para limpar a aparelhagem.
• Para a manutenção ordinária, é suficiente lavar o plano com uma esponja húmida e, em seguida, enxugar com papel absorvente de cozinha.
• Se o plano estiver muito sujo, esfregue com um produto específico para limpeza de superfícies em vidro cerâmica *, enxagúe e enxugue.
• Para tirar as acumulações de sujidade maiores, use uma espátula apropriada. Intervenha assim que possível, sem aguardar que o aparelho arrefeça, para evitar que resíduos grudem. Podem ser obtidos excelentes resultados se usar uma esponja especial de fios de aço inoxidável - específica para planos em vidro cerâmica- molhada de água e sabão.
• No caso em que no plano de cozedura tenham-se acidentalmente fundidos objectos ou materiais como plástico ou açúcar, remova-os imediatamente com a espátula, até que a superfície esteja ainda quente.
• Depois de limpo, o plano poderá ser tratado com um produto específico para a manutenção e a protecção: a
película invisível deixada por este produto protegerá a superfície se algo for derramado durante a cozedura. É recomendável realizar estas operações com o aparelho morno ou frio.
• Lembre-se sempre de enxaguar com água limpa e enxugar o plano com cuidado: para não acontecer de resíduos de produtos grudarem-se na sucessiva cozedura.
Quadro em aço inoxidável (somente nos modelos com moldura)O aço inoxidável pode manchar-se por causa da alta quantidade de calcário na água em contacto durante muito tempo com o metal, ou por causa de produtos de limpeza muito agressivos que contenham fósforo.É aconselhável enxaguar com água abundante e enxugar com cuidado, depois de ter limpado o plano. Se for derramada água, enxugue-a rapidamente com cuidado.! Alguns planos de cozedura tem uma moldura de alumínio parecida com o aço inoxidável. Não utilize produtos para a limpeza e o desengorduramento não idóneos para o alumínio.
Desmontar o planoCaso seja necessário desmontar o plano de cozedura:1. remova os parafusos que fixam as molas de centragem nos lados;2. solte os parafusos dos ganchos de fixação nos ângulos;3. extraia o plano de cozedura do vão do móvel.
! Recomendamos que se evite tentar o acesso aos mecanismos internos para tentar uma reparação. Em caso de avaria, contactar a Assistência técnica.
Descrição técnica dos modelos
Nestas tabelas estão indicados, modelo por modelo, os valores de absorção energética, o tipo de elemento aquecedor e o diâmetro de cada zona de cozedura.
Legenda:H = hilight unitárioHD = hilight duploHT = hilight triploAD = halógena dupla
Planos de cozedura
Zonas de cozedura
Traseiro esq.
Traseiro dir.
Dianteiro esq.
Dianteiro dir.
Potência total
Potência (em W)
HD 2300
H 1400
H 1200
H 1800
Diâmetro (em mm)
210
160
145
180
6700
Potência (em W)
HT 2200/1000
H 1400
H 1200
H 1800
Diâmetro (em mm)
210/140
160
145
180
6600
VRA 640 X S VRA 641 D B SVRA 641 D X S
VRA 640 C SVRA 640 C S

43
DE
Installation
! Bewahren Sie diese Bedienungsanleitung bitte sorgfältig auf, damit Sie sie jederzeit zu Rate ziehen können. Sorgen Sie dafür, dass sie im Falle eines Verkaufs, eines Umzugs oder einer Übergabe an einen anderen Benutzer das Gerät stets begleitet, damit auch der Nachbesitzer die Möglichkeit hat, darin nachschlagen zu können.! Lesen Sie bitte die nachfolgenden Hinweise aufmerksam durch: sie liefern wichtige Informationen hinsichtlich der Installation, des Gebrauchs und der Sicherheit.
Aufstellung
! Verpackungsmaterial ist kein Spielzeug für Kinder. Es ist entsprechend den Vorschriften zur getrennten Müllsammlung zu entsorgen (siehe Vorsichtsmaßregeln und Hinweise).! Die Installation ist gemäß den vorliegenden Anweisungen und von Fachpersonal durchzuführen. Jede unsachgemäße Installation kann Menschen und Tiere gefährden oder Sachschaden verursachen.
EinbauUm eine einwandfreie Betriebsweise des Gerätes zu gewährleisten, muss der Umbauschrank folgende Eigenschaften aufweisen:• Die Auflagefläche muss aus hitzebeständigem
Material beschaffen sein, um einer Temperatur von ca. 100°C standzuhalten.
• Soll das Kochfeld über einem Backofen installiert werden, muss letzterer mit einem Kühlsystem mit Zwangsbelüftung ausgestattet sein.
• Von der Installation eines Kochfeldes über einem Geschirrspüler wird abgeraten. Gegebenenfalls ist zur Abdichtung ein Zwischenteil zwischen beiden Geräten zu installieren.
• Je nach dem zu installierenden Kochfeld (siehe Abbildungen) sind Arbeitsflächenausschnitte folgender Abmessungen vorzusehen:
560 +/- 1490 +/- 1
48
590
520
560 +/- 1490 +/- 1
48
574
504
BelüftungZur ausreichenden Belüftung und zur Vermeidung der Überhitzung der Flächen rund um das Gerät muss das Kochfeld wie folgt positioniert werden:• in einem Abstand von mindestens 40 mm von der
dahinter liegenden Wand;• um einen Abstand von mindestens 20 mm zwischen
dem für den Einbau bestimmten Ausschnitt und dem entsprechenden Unterschrank zu gewährleisten.
• Angrenzende Schränke, deren Höhe die der
5 m
m
min. 20 mm
min. 20 mm
min. 40 mm
WÄRMEFACH5 m
m
min. 40 mm
HEIßLUFT
FRONTSEITE DESKOCHFELDES
AUFLAGEFLÄCHEAUFLAGEFLÄCHE
30
40KOCHFELD UMGEDREHT
AUFLAGEFLÄCHE
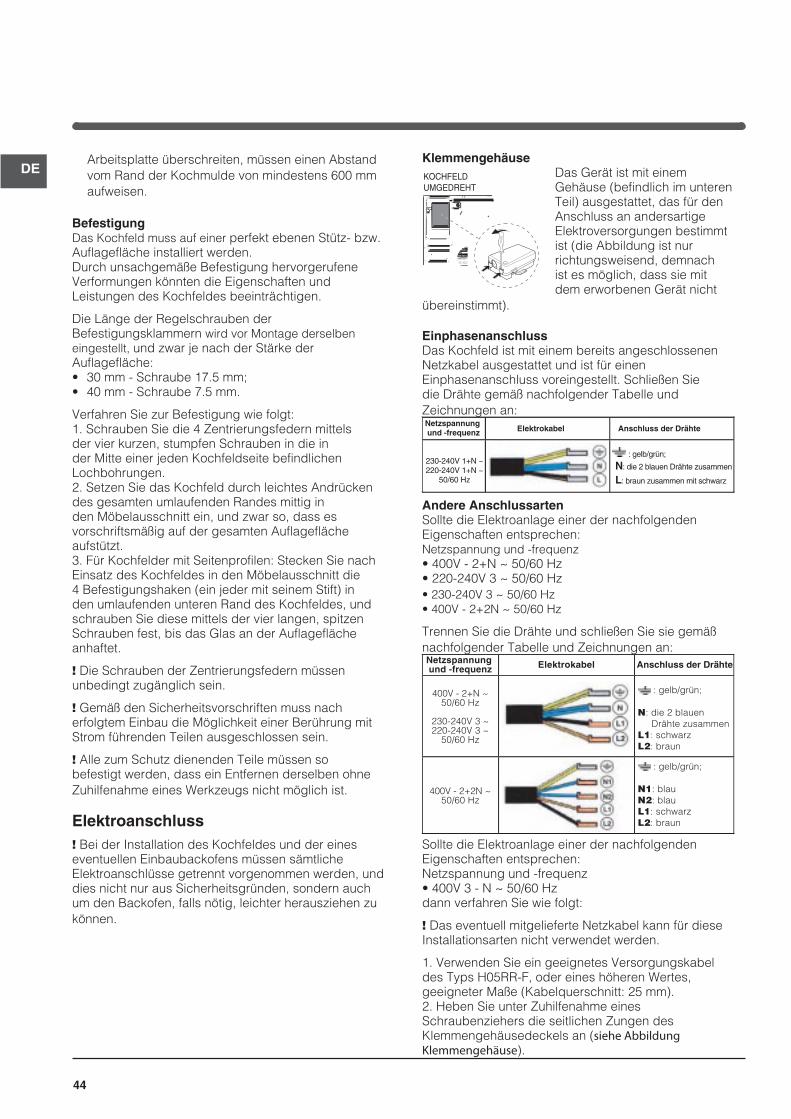
44
DEArbeitsplatte überschreiten, müssen einen Abstand vom Rand der Kochmulde von mindestens 600 mm aufweisen.
BefestigungDas Kochfeld muss auf einer perfekt ebenen Stütz- bzw. Auflagefläche installiert werden. Durch unsachgemäße Befestigung hervorgerufene Verformungen könnten die Eigenschaften und Leistungen des Kochfeldes beeinträchtigen.
Die Länge der Regelschrauben der Befestigungsklammern wird vor Montage derselben eingestellt, und zwar je nach der Stärke der Auflagefläche:• 30 mm - Schraube 17.5 mm;• 40 mm - Schraube 7.5 mm.
Verfahren Sie zur Befestigung wie folgt:1. Schrauben Sie die 4 Zentrierungsfedern mittels der vier kurzen, stumpfen Schrauben in die in der Mitte einer jeden Kochfeldseite befindlichen Lochbohrungen.2. Setzen Sie das Kochfeld durch leichtes Andrücken des gesamten umlaufenden Randes mittig in den Möbelausschnitt ein, und zwar so, dass es vorschriftsmäßig auf der gesamten Auflagefläche aufstützt.3. Für Kochfelder mit Seitenprofilen: Stecken Sie nach Einsatz des Kochfeldes in den Möbelausschnitt die 4 Befestigungshaken (ein jeder mit seinem Stift) in den umlaufenden unteren Rand des Kochfeldes, und schrauben Sie diese mittels der vier langen, spitzen Schrauben fest, bis das Glas an der Auflagefläche anhaftet.
! Die Schrauben der Zentrierungsfedern müssen unbedingt zugänglich sein.
! Gemäß den Sicherheitsvorschriften muss nach erfolgtem Einbau die Möglichkeit einer Berührung mit Strom führenden Teilen ausgeschlossen sein.
! Alle zum Schutz dienenden Teile müssen so befestigt werden, dass ein Entfernen derselben ohne Zuhilfenahme eines Werkzeugs nicht möglich ist.
Elektroanschluss! Bei der Installation des Kochfeldes und der eines eventuellen Einbaubackofens müssen sämtliche Elektroanschlüsse getrennt vorgenommen werden, und dies nicht nur aus Sicherheitsgründen, sondern auch um den Backofen, falls nötig, leichter herausziehen zu können.
KlemmengehäuseDas Gerät ist mit einem Gehäuse (befindlich im unteren Teil) ausgestattet, das für den Anschluss an andersartige Elektroversorgungen bestimmt ist (die Abbildung ist nur richtungsweisend, demnach ist es möglich, dass sie mit dem erworbenen Gerät nicht
übereinstimmt).
EinphasenanschlussDas Kochfeld ist mit einem bereits angeschlossenen Netzkabel ausgestattet und ist für einen Einphasenanschluss voreingestellt. Schließen Sie die Drähte gemäß nachfolgender Tabelle und Zeichnungen an:Netzspannungund -frequenz Elektrokabel Anschluss der Drähte
230-240V 1+N ~220-240V 1+N ~
50/60 Hz
: gelb/grün;
N: die 2 blauen Drähte zusammen
L: braun zusammen mit schwarz
Andere AnschlussartenSollte die Elektroanlage einer der nachfolgenden Eigenschaften entsprechen:Netzspannung und -frequenz• 400V - 2+N ~ 50/60 Hz• 220-240V 3 ~ 50/60 Hz• 230-240V 3 ~ 50/60 Hz• 400V - 2+2N ~ 50/60 Hz
Trennen Sie die Drähte und schließen Sie sie gemäß nachfolgender Tabelle und Zeichnungen an:Netzspannungund -frequenz Elektrokabel Anschluss der Drähte
400V - 2+N ~50/60 Hz
230-240V 3 ~220-240V 3 ~
50/60 Hz
: gelb/grün;
N: die 2 blauen
Drähte zusammen
L1: schwarz
L2: braun
400V - 2+2N ~50/60 Hz
: gelb/grün;
N1: blau
N2: blau
L1: schwarz
L2: braun
Sollte die Elektroanlage einer der nachfolgenden Eigenschaften entsprechen:Netzspannung und -frequenz• 400V 3 - N ~ 50/60 Hzdann verfahren Sie wie folgt:
! Das eventuell mitgelieferte Netzkabel kann für diese Installationsarten nicht verwendet werden.
1. Verwenden Sie ein geeignetes Versorgungskabel des Typs H05RR-F, oder eines höheren Wertes, geeigneter Maße (Kabelquerschnitt: 25 mm).2. Heben Sie unter Zuhilfenahme eines Schraubenziehers die seitlichen Zungen des Klemmengehäusedeckels an (siehe Abbildung Klemmengehäuse).
KOCHFELDUMGEDREHT
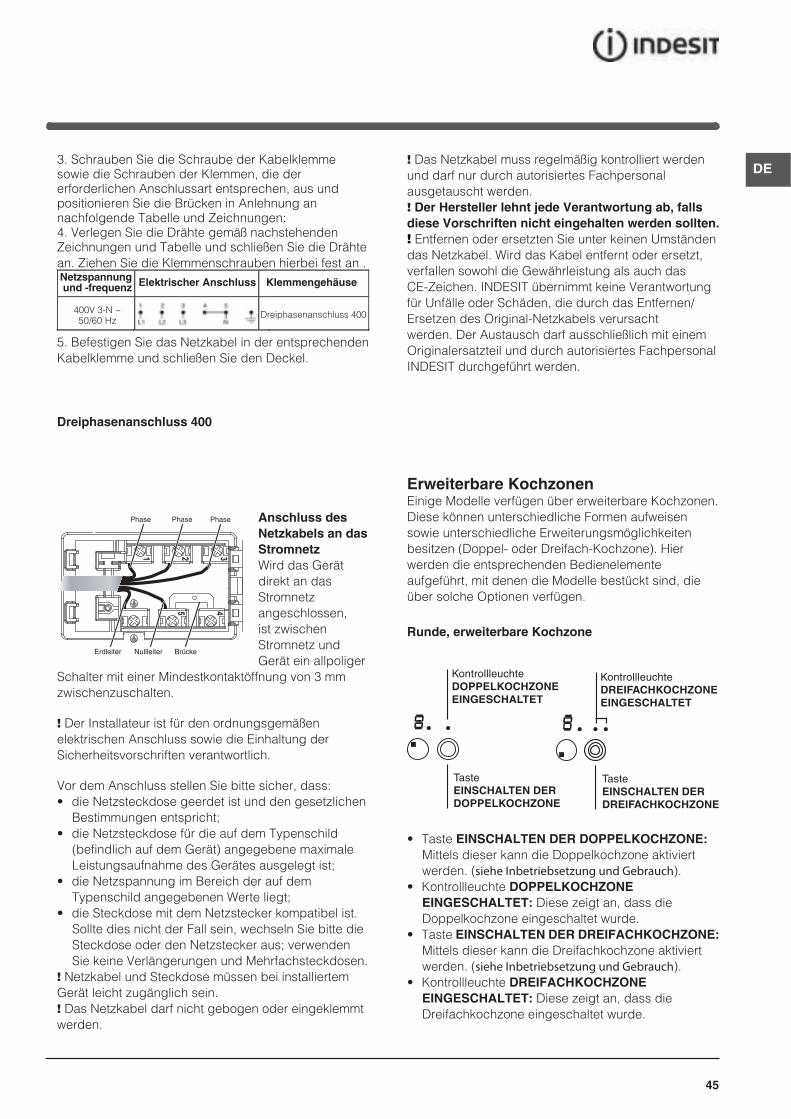
45
DE3. Schrauben Sie die Schraube der Kabelklemme sowie die Schrauben der Klemmen, die der erforderlichen Anschlussart entsprechen, aus und positionieren Sie die Brücken in Anlehnung an nachfolgende Tabelle und Zeichnungen:4. Verlegen Sie die Drähte gemäß nachstehenden Zeichnungen und Tabelle und schließen Sie die Drähte an. Ziehen Sie die Klemmenschrauben hierbei fest an .Netzspannungund -frequenz Elektrischer Anschluss Klemmengehäuse
400V 3-N ~50/60 Hz
Dreiphasenanschluss 400
5. Befestigen Sie das Netzkabel in der entsprechenden Kabelklemme und schließen Sie den Deckel.
Dreiphasenanschluss 400
Anschluss des Netzkabels an das StromnetzWird das Gerät direkt an das Stromnetzangeschlossen,ist zwischen Stromnetz und Gerät ein allpoliger
Schalter mit einer Mindestkontaktöffnung von 3 mm zwischenzuschalten.
! Der Installateur ist für den ordnungsgemäßen elektrischen Anschluss sowie die Einhaltung der Sicherheitsvorschriften verantwortlich.
Vor dem Anschluss stellen Sie bitte sicher, dass:• die Netzsteckdose geerdet ist und den gesetzlichen
Bestimmungen entspricht;• die Netzsteckdose für die auf dem Typenschild
(befindlich auf dem Gerät) angegebene maximale Leistungsaufnahme des Gerätes ausgelegt ist;
• die Netzspannung im Bereich der auf dem Typenschild angegebenen Werte liegt;
• die Steckdose mit dem Netzstecker kompatibel ist. Sollte dies nicht der Fall sein, wechseln Sie bitte die Steckdose oder den Netzstecker aus; verwenden Sie keine Verlängerungen und Mehrfachsteckdosen.
! Netzkabel und Steckdose müssen bei installiertem Gerät leicht zugänglich sein.! Das Netzkabel darf nicht gebogen oder eingeklemmt werden.
! Das Netzkabel muss regelmäßig kontrolliert werden und darf nur durch autorisiertes Fachpersonal ausgetauscht werden.! Der Hersteller lehnt jede Verantwortung ab, falls diese Vorschriften nicht eingehalten werden sollten.! Entfernen oder ersetzten Sie unter keinen Umständen das Netzkabel. Wird das Kabel entfernt oder ersetzt, verfallen sowohl die Gewährleistung als auch das CE-Zeichen. INDESIT übernimmt keine Verantwortung für Unfälle oder Schäden, die durch das Entfernen/Ersetzen des Original-Netzkabels verursacht werden. Der Austausch darf ausschließlich mit einem Originalersatzteil und durch autorisiertes Fachpersonal INDESIT durchgeführt werden.
BrückeNullleiterErdleiter
Phase Phase Phase
1 2 3
5 4
Erweiterbare KochzonenEinige Modelle verfügen über erweiterbare Kochzonen. Diese können unterschiedliche Formen aufweisen sowie unterschiedliche Erweiterungsmöglichkeiten besitzen (Doppel- oder Dreifach-Kochzone). Hier werden die entsprechenden Bedienelemente aufgeführt, mit denen die Modelle bestückt sind, die über solche Optionen verfügen.
Runde, erweiterbare Kochzone
• Taste EINSCHALTEN DER DOPPELKOCHZONE:Mittels dieser kann die Doppelkochzone aktiviert werden. (siehe Inbetriebsetzung und Gebrauch).
• Kontrollleuchte DOPPELKOCHZONEEINGESCHALTET: Diese zeigt an, dass die Doppelkochzone eingeschaltet wurde.
• Taste EINSCHALTEN DER DREIFACHKOCHZONE:Mittels dieser kann die Dreifachkochzone aktiviert werden. (siehe Inbetriebsetzung und Gebrauch).
• Kontrollleuchte DREIFACHKOCHZONEEINGESCHALTET: Diese zeigt an, dass die Dreifachkochzone eingeschaltet wurde.
KontrollleuchteDOPPELKOCHZONEEINGESCHALTET
TasteEINSCHALTEN DERDOPPELKOCHZONE
KontrollleuchteDREIFACHKOCHZONEEINGESCHALTET
TasteEINSCHALTEN DERDREIFACHKOCHZONE
46
DE
Inbetriebsetzung und Gebrauch
! Der auf die Dichtungen aufgetragene Leim könnte Fettspuren auf dem Glas hinterlassen. Wir empfehlen Ihnen, diese vor Einsatz des Gerätes mit einem herkömmlichen Reinigungsmittel (eine nicht scheuernde Poliercreme) zu entfernen. Während der ersten Betriebsstunden könnte ein Geruch verbrannten Gummis zu vernehmen sein. Dies wird sich nach kurzer Zeit geben.
! Wird das Kochfeld an das Stromnetz angeschlossen, ertönt nach einigen Sekunden ein kurzes akustisches Signal. Nur daraufhin kann das Kochfeld eingeschaltet werden.
! Durch längeres Drücken der Tasten - und +können die Leistungswerte und die Minuten des Timers im Schnelllauf verändert werden.
Einschalten des Kochfeldes
Das Kochfeld wird über die Taste (für ca. 1 Sekunde gedrückt halten) eingeschaltet.
Einschalten der Kochzonen
Eine jede Kochzone wird über eine Bedienungstaste
und über einen aus einer Doppeltaste (- und +)bestehenden Leistungsregler eingeschaltet.• Um eine Kochzone einzuschalten, drücken
Sie die entsprechende Bedienungstaste und
stellen daraufhin über die Tasten - und + die gewünschte Leistungsstufe ein.
Ausschalten der Kochzonen
Um eine Kochzone auszuschalten, wählen Sie diese
zuerst über die entsprechende Bedienungstaste und:• Drücken Sie die Taste - : Die Kochzonenleistung
sinkt allmählich bis zum völligen Ausschalten der Kochzone.
Power-Funktion
Zur Beschleunigung der Aufheizzeit der hinteren Kochzonen kann die Funktion Power eingesetzt werden: Schalten und stellen Sie das gewünschte
Kochfeld ein, wie im vorangegangenen Abschnitt beschrieben. Halten Sie die Bedienungstaste des
gewählten Kochfelds für mindestens 2 Sekunden gedrückt. Auf dem Display „Leistungsanzeige“ wechselt die Anzeige vom Buchstaben “P” zur zuvor eingestellen Leistungsstufe solange, bis die gewünschte Leistungsstufe erreicht ist. Sobald sie erreicht ist, zeigt das Display wieder die eingestellte Leistungsstufe. Um diese Funktion zu deaktivieren,
halten Sie die Bedieungstaste des Kochfelds, auf dem
die Funktion aktiv ist, für mindestens 2 Sekunden gedrückt oder wählen Sie eine andere Leistungsstufe
von 0 bis 9 über den Leistungswähler - und +.
Die Heizelemente
Das Kochfeld kann, je nach Modell, mit zwei Arten von Heizelementen bestückt sein: Halogen- und Strahlungsbeheizungselemente.Bei den Halogen-Heizelementen erfolgt die Wärmeübertragung mittels der in diesen Heizelementen befindlichen Halogenlampe.Diese zeichnen sich besonders aufgrund ihrer Eigenschaften aus, die den typischen Eigenschaften des Gases nahe kommen: sofortige Reaktion auf die jeweiligen Einstellungen, umgehende Anzeige der Leistungsstufe.Bei den Strahlungsbeheizungselementen handelt es sich um Heizkörper, die aus einer Vielzahl von Ringen bzw. Spiralen bestehen, welche eine optimale Wärmeverteilung über den gesamten Topfboden gewährleisten und somit bestmögliche Garergebnisse bei Niedrigtemperaturen ermöglichen. Schmorgerichte, Soßen oder aufzuwärmende Fertiggerichte.
Sperre der Schaltelemente
Während der Betriebszeit des Kochfeldes können die Schaltelemente gesperrt werden, um irrtümliche Einstellungsänderungen zu verhindern (durch Kinder,
bei der Reinigung usw.). Drücken Sie die Taste , dann werden die Schaltelemente gesperrt. Die über der Taste befindliche Kontrollleuchte leuchtet auf.Zu weiteren Einstellungen (z.B. um den Garvorgang zu unterbrechen) müssen die Schaltelemente erst wieder
freigegeben werden. Drücken Sie die Taste für einige Sekunden; die Kontrollleuchte erlischt, die Schaltelemente werden freigegeben.
Ausschalten des Kochfeldes
Durch Drücken der Taste wird das Kochfeld ausgeschaltet.Sollten die Schaltelemente gesperrt worden sein, bleiben diese auch bei Wiedereinschalten des Gerätes gesperrt. Um das Kochfeld wieder einschalten zu können, müssen die Schaltelemente vorher entsperrt werden.
47
DEPraktische Ratschläge zum Einsatz des Gerätes
So gibt Ihnen Ihr Kochfeld sein Bestes:• Verwenden Sie Kochgeschirr mit dickem und
ebenem Boden, um sicher zu sein, dass dieser perfekt auf der Kochzone aufliegt.
• Benutzen Sie stets nur Kochgeschirr, dessen Durchmesser mit dem der Kochzone übereinstimmt, d.h. dessen Boden die Kochzone ganz bedeckt, und somit die gesamte Wärme genutzt wird.
• Achten Sie darauf, dass der Boden des Kochgeschirrs trocken und sauber ist; nur so ist ein perfektes Aufliegen des Geschirrbodens sowie eine lange Lebensdauer von Kochzone und Geschirr gewährleistet.
• Vermeiden Sie den Einsatz von Kochgeschirr, das auch auf Gasflammen verwendet wird. Die äußerst hohe Hitzekonzentration der Gasbrenner könnte die Topfböden leicht verformen und demnach die korrekte Auflage beeinträchtigen.
Sicherheitsvorrichtungen
Topferkennung
Jede Kochzone ist mit einer Topferkennungs-Vorrichtung ausgerüstet. Die Kochzone bewirkt ein Erhitzen des Topfbodens nur bei einer angemessenen, der Kochzone entsprechenden Topfgröße. Das Blinken der Anzeigeleuchte kann Folgendes signalisieren:• ungeeignetes Kochgeschirr,• ein zu geringer Topfdurchmesser,• der Topf wurde abgenommen.
Restwärmeanzeigen
Jede Kochzone ist mit einer Restwärmeanzeige ausgerüstet. Diese Anzeige signalisiert, welche Kochzonen noch eine erhöhte Temperatur haben.
Zeigt die Leistungsanzeige , dann ist die Kochzone noch warm. Es ist beispielsweise möglich, eine Speise warm zu halten oder Schokolade oder Butter zu schmelzen. Mit dem Abkühlen der Kochzone zeigt die
Leistungsanzeige . Die Anzeige schaltet sich ab, sobald die Kochzone ausreichend abgekühlt ist.
Überhitzung
Im Falle einer Überhitzung der elektronischen Gerätekomponenten schaltet sich das Kochfeld automatisch aus, auf dem Display erscheint die
Anzeige F gefolgt von einer blinkenden Zahl. Diese Meldung erlischt, und das Kochfeld kann wieder eingesetzt werden, sobald die Temperatur auf einen akzeptablen Wert gesunken ist.
Sicherheitsautomatik
Das Gerät ist mit einer Sicherheitsautomatik ausgestattet, die die Kochzone automatisch abschaltet, wenn die maximale Betriebszeit auf einer gewissen Leistungsstufe erreicht wird. Bei Auftreten eines solchen Sicherheitsintervalls erscheint auf dem Display die Anzeige „0“.Beispiel: Die hintere rechte Kochzone wird auf Leistungsstufe 5 eingestellt, die vordere linke dagegen auf 2. Die hintere rechte Kochzone wird nach 5 Std. Betriebszeit ausgeschaltet, die vordere linke erst nach 8 Stunden.
Heizleistung
1
2
3
4
5
6
7
8
9
Beschränkung der Funktionsdauer in Stunden
9
8
7
6
5
4
3
2
1
Tonsignal
Einige Anomalien, wie:• Gegenstände (Topf, Besteck usw.), die für länger als
10 Sekunden auf dem Schaltfeld liegen,• Flüssigkeit, die über das Schaltfeld gegossen
wurde,• ein zu langer Druck auf eine Taste, können die
Ursache für ein Warnsignal sein. Um das Warnsignal auszuschalten, muss der Grund der Störung beseitigt werden. Wird die Störung nicht beseitigt, bleibt das Warnsignal eingeschaltet und das Kochfeld wird ausgeschaltet.

48
DEPraktische Back-/Brathinweise
ªSchnellgarenSchnellkochtopf
Fritieren
Grillen Kochen
Seh
r st
ark
gare
nS
tark
gar
enS
anft
gare
nS
ehr
sanf
t Gar
enE
xtre
msa
nft
Gar
en
•
•
¶Crêpes Stark garen und bräunen
(Braten, Koteletts, Schnitzel, Fischfilets, Spiegeleier)
¶
§Schnell eindicken (flüssige Soßen)Kochendes Wasser (Nudeln, Reis, Gemüse)Milch
§
SLangsam eindicken (dickflüssige Soßen)
S
¢Wasserbad Garen im Schnellkochtopf nach dem Dampfaustritt
¢
£
™Sehr sanft Garen Aufwärmen von Speisen
™
¡Schokoladensoße Warmhalten
49
DE
Vorsichtsmaßregelnund Hinweise
! Das Gerät wurde entsprechend den strengsten internationalen Sicherheitsvorschriften entworfen und gebaut. Nachstehende Hinweise werden aus Sicherheitsgründen geliefert und sollten aufmerksam gelesen werden.
Dieses Gerät entspricht den folgenden EG-Richtlinien:
- 2006/95/EWG vom 12.12.06 (Niederspannung) und nachfolgenden Änderungen- 2004/108/EWG vom 15/12/04 (elektromagnetische Verträglichkeit) und nachfolgenden Änderungen- 93/68/EWG vom 22.07.93 und nachfolgenden Änderungen.- 1275/2008 stand-by/off mode.
Allgemeine Sicherheit
! Stellen Sie bitte sicher, dass das Belüftungsgitter des Gebläses niemals verstopft bzw. abgedeckt wird. Das Einbaukochfeld erfordert eine korrekte Belüftung zur Kühlung der elektronischen Teile.• Dieses Gerät ist für den nicht professionellen Einsatz im
privaten Haushalt bestimmt.• Das Gerät darf nicht im Freien aufgestellt werden, auch
nicht, wenn es sich um einen geschützten Platz handelt. Es ist hoch gefährlich, das Gerät Gewittern und Unwettern auszusetzen.
• Berühren Sie das Gerät nicht mit nassen oder feuchten Händen oder Füßen und auch nicht, wenn Sie barfuß sind.
• Das Gerät darf nur von Erwachsenen und gemäß den Hinweisen der vorliegenden Bedienungsanleitung zur Zubereitung von Lebensmitteln verwendet werden. Jeder andere Einsatz (zum Beispiel: zum Beheizen von Räumen) ist als unsachgemäß und gefährlich anzusehen. Der Hersteller haftet nicht für eventuelle, durch unsachgemäßen, falschen oder unangemessenen Gebrauch verursachte Schäden.
• Das Glaskeramikkochfeld ist stoßfest; dennoch kann es durch Stöße bzw. Aufprall von spitzen Gegenständen springen (oder sogar zerbrechen), Schalten Sie das Kochfeld in einem solchen Fall vom Stromnetz und wenden Sie sich an die Kundendienststelle.
• Vermeiden Sie, dass das Netzkabel anderer Elektrogeräte in Kontakt mit heißen Kochfeldteilen gelangt.
• Bitte berücksichtigen Sie, dass die Kochzonen noch für ca. 30 Minuten nach dem Ausschalten sehr heiß bleiben. Die Restwärme wird auf der entsprechenden Anzeige eingeblendet (siehe Inbetriebsetzung und Gebrauch).
• Halten Sie sämtliche Gegenstände, die schmelzen könnten, wie Plastikteile oder Kunststoffe sowie
Zucker oder stark zuckerhaltige Speisen von dem Kochfeld fern. Achten Sie besonders auf Verpackungsmaterial, Frischhaltefolie und Alufolie: Wird derartiges Material auf den noch heißen oder warmen Oberflächen belassen, können sie das Kochfeld dauerhaft beschädigen.
• Stellen Sie Stieltöpfe und Pfannen immer mit nach innen gerichteten Griffen auf die Kochstelle, um jegliches Risiko durch unbeabsichtigtes Anstoßen auszuschließen.
• Ziehen Sie den Netzstecker nicht am Netzkabel aus der Steckdose, sondern nur am Netzstecker selbst.
• Ziehen Sie vor der Reinigung oder vor Wartungsmaßnahmen stets den Netzstecker aus der Steckdose.
• Das Gerät ist nicht zur Verwendung durch Personen (einschließlich Kinder) mit eingeschränkten körperlichen, geistigen oder Wahrnehmungsfähigkeiten oder aber ohne ausreichende Erfahrung und Produktkenntnis geeignet, sofern sie nicht durch eine für ihre Sicherheit verantwortliche Person beaufsichtigt werden oder zuvor Anleitungen zum Gerätegebrauch erhalten haben.
• Schauen Sie nicht zu intensiv auf die eingeschalteten Halogen-Kochzonen, soweit vorhanden.
• Legen Sie bitte keine Metallgegenstände (Messer, Löffel, Deckel usw.) auf das Kochfeld; sie könnten sehr heiß werden.
• Dieses Gerät kann nicht mit einem externen Timer oder einem getrennten Fernsteuerungssystem betrieben werden.
Entsorgung
• Entsorgung des Verpackungsmaterials: Befolgen Sie die lokalen Vorschriften; Verpackungsmaterial kann wiederverwertet werden.
• Die europäische Richtlinie 2002/96/EG über Elektro- und Elektronik-Altgeräte (WEEE) sieht vor, dass Haushaltsgeräte nicht mit dem normalen Hausmüll entsorgt werden dürfen. Die Altgeräte müssen getrennt gesammelt werden, um die Rückführung und das Recycling der Materialen zu optimieren, aus denen die Geräte hergestellt sind, und um mögliche Belastungen der Gesundheit und der Umwelt zu verhindern. Das Mülleimersymbol ist auf allen Produkten dargestellt, um an die Verpflichtung zur getrennten Abfallsammlung zu erinnern.
Für weitere Informationen zur korrekten Entsorgung können sich die Besitzer von elektrischen Haushaltsgeräten an die übergeordnete öffentliche Einrichtung oder an ihren Händler wenden.
50
DE
Reinigung und Pflege
Abschalten Ihres Gerätes vom StromnetzVor jeder Reinigung und Pflege ist das Gerät vom Stromnetz zu trennen.
Reinigung des Gerätes! Der Einsatz von Scheuermitteln oder scharfen oder chemischen Reinigungsmitteln wie Backofensprays, Fleckenentferner, Rostentfernungsmittel, Reiniger in Pulverform und Scheuerschwämme ist zu vermeiden: diese können die Oberfläche des Kochfeldes dauerhaft beschädigen.! Verwenden Sie zur Reinigung des Kochfeldes keine Dampf- oder Hochdruckreinigungsgeräte.
• Zur täglichen Pflege genügt es, das Kochfeld mit einem feuchten Schwamm abzuwischen und mit Küchenpapier abzutrocknen.
• Bei besonders starker Verschmutzung sollte ein spezielles Reinigungsmittel für Glaskeramik verwendet werden; anschließend ist das Kochfeld mit Wasser abzuspülen und sorgfältig abzutrocknen.
• Starke Verschmutzungen lassen sich mit einem Schaber (Klingenschaber) entfernen. Sie sollten so schnell wie möglich - und nicht erst nach Abkühlen des Kochfeldes - entfernt werden, um zu vermeiden, dass sich die Verschmutzungen festsetzen. Gute Ergebnisse lassen sich auch mit einem für Glaskeramik geeigneten Spezialschwamm aus Edelstahlwolle und einer einfachen Spüllauge erzielen.
• Auf dem Kochfeld versehentlich geschmolzene Alufolie, Plastikteile oder Kunststoffe, sowie Zuckerreste müssen umgehend mit einem Schaber von der noch warmen Oberfläche entfernt werden.
• Nach der Reinigung kann das Kochfeld mit einem Pflegeprodukt nachbehandelt werden: Der unsichtbare Schutzfilm, den ein solches Produkt hinterlässt, schützt
die Oberfläche vor eventuell überkochenden Speisen. Es empfiehlt sich, diese Nachbehandlung bei lauwarmem oder abgekühltem Gerät vorzunehmen.
• Achten Sie darauf, das Kochfeld nach der Reinigung stets mit klarem Wasser abzuspülen und anschließend abzutrocknen. Rückstände der Reinigungsmittel könnten sich nämlich bei der nächsten Benutzung des Kochfeldes ihrerseits festsetzen.
Edelstahlrahmen (nur bei mit Rahmen versehenen Modellen)
Auf den Edelstahlteilen könnten Flecken zurückbleiben, sollte stark kalkhaltiges Wasser oder phosphorhaltiges Spülmittel für längere Zeit darauf vorhanden sein.Es ist ratsam, das Kochfeld nach der Reinigung gut nachzuspülen und abzutrocknen. Wird versehentlich Wasser darauf verschüttet, muss es sofort sorgsam getrocknet werden.! Einige Kochfelder sind mit einem Aluminiumrahmen versehen, der Edelstahl sehr ähnlich ist. Verwenden Sie bitte keine Produkte zur Reinigung und Entfettung, die nicht für Aluminium geeignet sind.
Demontage des KochfeldesSollte sich die Abnahme des Kochfeldes als erforderlich erweisen, verfahren Sie bitte wie folgt:1. Schrauben Sie die Schrauben aus, die zur Befestigung der seitlichen Zentrierungsfedern dienen;2. lockern Sie die Schrauben der Eck-Befestigungsbügel;3. nehmen Sie das Kochfeld aus dem Möbelausschnitt heraus.
! Wir empfehlen dringlich, Innenmechanismen nicht eigenhändig zu reparieren. Kontaktieren Sie bei Störungen bitte den Kundendienst.
Technische Beschreibung der ModelleIn den angeführten Tabellen werden, Modell für Modell, die Energiebedarfswerte, die Art der Heizelemente und der Durchmesser einer jeden Kochzone ausgewiesen.Kochfelder
Kochzonen
Hinten links
Hinten rechts
Vorne links
Vorne rechts
Gesamtleistung
Leistung (W)
HD 2300
H 1400
H 1200
H 1800
Durchmesser (mm)
210
160
145
180
6700
Leistung (W)
HT 2200/1000
H 1400
H 1200
H 1800
Durchmesser (mm)
210/140
160
145
180
6600
VRA 640 X S VRA 641 D B SVRA 641 D X S
Legende:H = hilight einfachHD = hilight doppeltHT = hilight dreifachAD = Halogen doppelt
VRA 640 C SVRA 640 C S
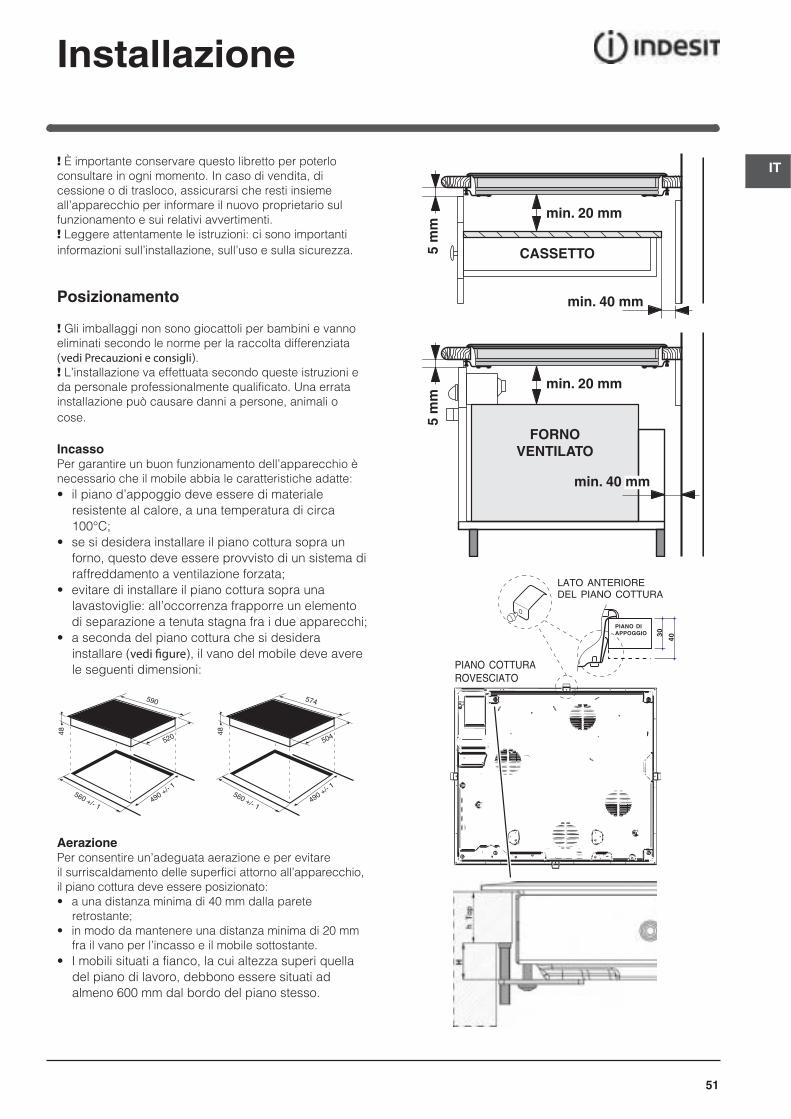
IT
51
Installazione
! È importante conservare questo libretto per poterlo consultare in ogni momento. In caso di vendita, di cessione o di trasloco, assicurarsi che resti insieme all’apparecchio per informare il nuovo proprietario sul funzionamento e sui relativi avvertimenti.! Leggere attentamente le istruzioni: ci sono importanti informazioni sull’installazione, sull’uso e sulla sicurezza.
Posizionamento
! Gli imballaggi non sono giocattoli per bambini e vanno eliminati secondo le norme per la raccolta differenziata (vedi Precauzioni e consigli).! L’installazione va effettuata secondo queste istruzioni e da personale professionalmente qualificato. Una errata installazione può causare danni a persone, animali o cose.
IncassoPer garantire un buon funzionamento dell’apparecchio è necessario che il mobile abbia le caratteristiche adatte:• il piano d’appoggio deve essere di materiale
resistente al calore, a una temperatura di circa 100°C;
• se si desidera installare il piano cottura sopra un forno, questo deve essere provvisto di un sistema di raffreddamento a ventilazione forzata;
• evitare di installare il piano cottura sopra una lavastoviglie: all’occorrenza frapporre un elemento
di separazione a tenuta stagna fra i due apparecchi;• a seconda del piano cottura che si desidera
installare (vedi fi gure), il vano del mobile deve avere le seguenti dimensioni:
560 +/- 1490 +/- 1
48
590
520
560 +/- 1490 +/- 1
48
574
504
AerazionePer consentire un’adeguata aerazione e per evitare il surriscaldamento delle superfici attorno all’apparecchio,il piano cottura deve essere posizionato:• a una distanza minima di 40 mm dalla parete
retrostante;• in modo da mantenere una distanza minima di 20 mm
fra il vano per l’incasso e il mobile sottostante.• I mobili situati a fianco, la cui altezza superi quella
del piano di lavoro, debbono essere situati ad almeno 600 mm dal bordo del piano stesso.
5 m
m
min. 20 mm
min. 20 mm
min. 40 mm
CASSETTO5 m
m
min. 40 mm
FORNOVENTILATO
LATO ANTERIORE DEL PIANO COTTURA
PIANO DIAPPOGGIO 30
40PIANO COTTURA ROVESCIATO

52
ITFissaggioL’installazione dell’apparecchio deve essere effettuata su un piano d’appoggio perfettamente piano. Le eventuali deformazioni provocate da un errato fissaggio potrebbero alterare le caratteristiche e le prestazioni del piano cottura.
La lunghezza della vite di regolazione dei ganci di fissaggio va impostata prima del loro montaggio, in base allo spessore del piano d’appoggio:• spessore di 30 mm: vite 17,5 mm;• spessore di 40 mm: vite 7,5 mm.
Per il fissaggio agire come segue:1. Con le viti corte senza punta, avvitare le 4 molle di centraggio nei fori posti al centro di ogni lato del piano;2. inserire il piano cottura nel vano del mobile, centrarlo ed esercitare una adeguata pressione sull’intero perimetro affinché il piano di cottura aderisca bene al piano d’appoggio.3. per i piani con profili laterali: dopo aver inserito il piano cottura nel mobile, inserire i 4 ganci di fissaggio (ognuno con il suo perno) sul perimetro inferiore del piano cottura, avvitandoli con le viti lunghe con punta finché il vetro non aderisce al piano d’appoggio.
! È indispensabile che le viti delle molle di centraggio rimangano accessibili.
! In conformità alle norme di sicurezza, una volta incassato l’apparecchio, non debbono essere possibili eventuali contatti con le parti elettriche.
! Tutte le parti che assicurano la protezione debbono essere fissate in modo tale da non poter essere tolte senza l’aiuto di qualche utensile.
Collegamento elettrico
! L’allacciamento elettrico del piano cottura e quello di un eventuale forno da incasso devono essere realizzati separatamente, sia per ragioni di sicurezza elettrica sia per facilitare le operazioni di estrazione del forno.
MorsettieraL’apparecchio è provvisto, nella parte inferiore, di una scatola per il collegamento a differenti tipi di alimentazione elettrica (l’immagine è indicativa e può non corrispondere al modello acquistato).
Collegamento monofase
Il piano è dotato di cavo di alimentazione già collegato e predisposto per il collegamento monofase. Effettuare l’allaccio dei fili in accordo con la tabella e i disegni che seguono:
Tensione tipo efrequenza rete Cavo elettrico Collegamento fili
230-240V 1+N ~220-240V 1+N ~
50/60 Hz
: giallo/verde
N: i 2 fili blu insieme
L: marrone insieme al nero
Altri tipi di collegamento
Se l’impianto elettrico corrisponde a una delle seguenti caratteristiche:Tensione tipo e frequenza di rete• 400V - 2+N ~ 50/60 Hz• 220-240V 3 ~ 50/60 Hz• 230-240V 3 ~ 50/60 Hz• 400V - 2+2N ~ 50/60 HzSeparare i cavi ed effettuare il collegamento dei fili in accordo con la tabella e i disegni che seguono:Tensione tipo efrequenza rete Cavo elettrico Collegamento fili
400V - 2+N ~50/60 Hz
230-240V 3 ~220-240V 3 ~
50/60 Hz
: giallo/verde;
N: i 2 fili blu insieme
L1: nero
L2: marrone
400V - 2+2N ~50/60 Hz
: giallo/verde;
N1: blu
N2: blu
L1: nero
L2: marrone
Se l’impianto elettrico corrisponde a una delle seguenti caratteristiche:Tensione tipo e frequenza di rete• 400V 3 - N ~ 50/60 Hzprocedere come segue:
! L’eventuale cavo in dotazione non è utilizzabile per questi tipi di installazione.
1. Utilizzare un cavo di alimentazione appropriato, tipo H05RR-F o di valore superiore, delle dimensioni adatte (sezione cavo: 25 mm).2. Servendosi di un cacciavite, far leva sulle linguette del coperchio della morsettiera e aprirla (vedi immagine Morsettiera).3. Svitare la vite del serracavo e le viti dei morsetti relativi al tipo di allaccio necessario e posizionare i cavallotti di collegamento secondo la tabella e i disegni che seguono.4. Posizionare i fili in accordo con la tabella e i disegni che seguono ed effettuare il collegamento stringendo a fondo tutte le viti dei morsetti.Tensione tipo efrequenza rete Cavo elettrico Collegamento fili
400V 3-N ~50/60 Hz
Trifase 400
PIANO COTTURA ROVESCIATO
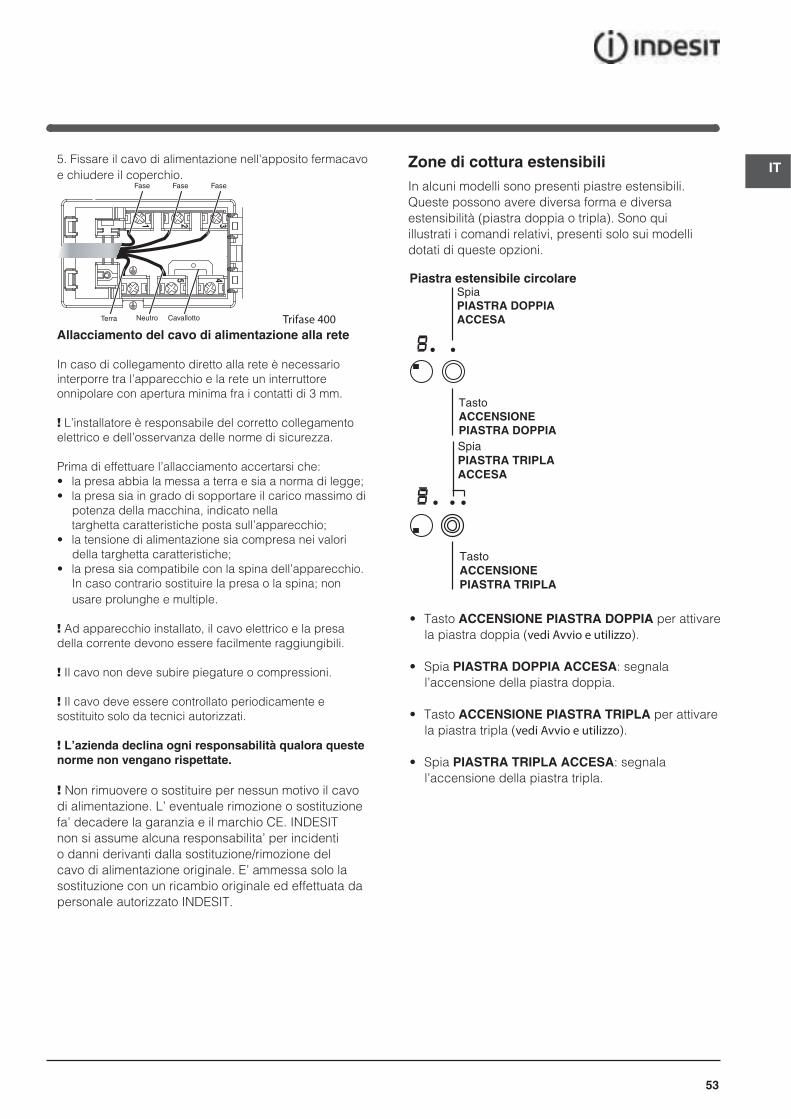
IT
53
5. Fissare il cavo di alimentazione nell’apposito fermacavo e chiudere il coperchio.
Fase Fase Fase
CavallottoNeutroTerra
1 2 3
5 4
Trifase 400Allacciamento del cavo di alimentazione alla rete
In caso di collegamento diretto alla rete è necessario interporre tra l’apparecchio e la rete un interruttore onnipolare con apertura minima fra i contatti di 3 mm.
! L’installatore è responsabile del corretto collegamento elettrico e dell’osservanza delle norme di sicurezza.
Prima di effettuare l’allacciamento accertarsi che:• la presa abbia la messa a terra e sia a norma di legge;• la presa sia in grado di sopportare il carico massimo di
potenza della macchina, indicato nella targhetta caratteristiche posta sull’apparecchio;• la tensione di alimentazione sia compresa nei valori
della targhetta caratteristiche;• la presa sia compatibile con la spina dell’apparecchio.
In caso contrario sostituire la presa o la spina; non usare prolunghe e multiple.
! Ad apparecchio installato, il cavo elettrico e la presa della corrente devono essere facilmente raggiungibili.
! Il cavo non deve subire piegature o compressioni.
! Il cavo deve essere controllato periodicamente e sostituito solo da tecnici autorizzati.
! L’azienda declina ogni responsabilità qualora queste norme non vengano rispettate.
! Non rimuovere o sostituire per nessun motivo il cavo di alimentazione. L’ eventuale rimozione o sostituzione fa’ decadere la garanzia e il marchio CE. INDESIT non si assume alcuna responsabilita’ per incidenti o danni derivanti dalla sostituzione/rimozione del cavo di alimentazione originale. E’ ammessa solo la sostituzione con un ricambio originale ed effettuata da personale autorizzato INDESIT.
Zone di cottura estensibiliIn alcuni modelli sono presenti piastre estensibili. Queste possono avere diversa forma e diversa estensibilità (piastra doppia o tripla). Sono qui illustrati i comandi relativi, presenti solo sui modelli dotati di queste opzioni.
Piastra estensibile circolareSpiaPIASTRA DOPPIAACCESA
TastoACCENSIONEPIASTRA DOPPIASpiaPIASTRA TRIPLAACCESA
TastoACCENSIONEPIASTRA TRIPLA
• Tasto ACCENSIONE PIASTRA DOPPIA per attivare la piastra doppia (vedi Avvio e utilizzo).
• Spia PIASTRA DOPPIA ACCESA: segnala l’accensione della piastra doppia.
• Tasto ACCENSIONE PIASTRA TRIPLA per attivare la piastra tripla (vedi Avvio e utilizzo).
• Spia PIASTRA TRIPLA ACCESA: segnala l’accensione della piastra tripla.

54
IT
Avvio e utilizzo
! La colla applicata sulle guarnizioni lascia alcune tracce di grasso sul vetro. Prima di utilizzare l’apparecchio, si raccomanda di eliminarle con un prodotto specifico per la manutenzione non abrasivo. Durante le prime ore di funzionamento è possibile avvertire un odore di gomma, che comunque scomparirà presto.
! Quando il piano cottura viene collegato elettricamente, dopo acuni secondi viene emesso un breve segnale acustico. Soltanto a questo punto è possibile accendere il piano cottura.
! La pressione prolungata dei tasti - e + consente l’avanzamento veloce dei minuti del timer.
Accensione del piano cotturaL’accensione del piano cottura avviene tenendo
premuto il tasto per circa un secondo.
Accensione delle zone di cotturaCiascuna zona di cottura viene azionata tramite un tasto
di selezione e un dispositivo di regolazione della
potenza composto da un doppio tasto - e +.• Per mettere in funzione una zona di cottura, premere
il relativo tasto di comando e impostare la potenza
desiderata tramite i tasti - e +.
Funzione powerPer accelerare i tempi di riscaldamento delle zone di cottura, è possibile attivare la funzione power. Accendere e impostare la potenza della zona di
cottura desiderata come descritto nel paragrafo precedente. Premere e mantenere premuto per almeno 2 secondi, il tasto di selezione della zona
di cottura scelta Sul display, indicatore della potenza, si alterna la visualizzazione della lettera “P” e del livello di potenza precedentemente impostato per tutto il tempo necessario al raggiungimento del livello di potenza desiderato. A raggiungimento avvenuto il display tornerà a visualizzare il livello di potenza impostato. Per disattivare questa funzione, premere e mantenere premuto per almeno 2 secondi, il tasto di selezione della zona di cottura su cui è attiva la
funzione oppure scegliere un diverso livello di
potenza tramite i tasti - e +.
Spegnimento delle zone di cotturaPer spegnere una zona di cottura, selezionarla tramite
il relativo tasto di selezione e:
• Premere il tasto -: la potenza della zona di cottura scende progressivamente, fino allo spegnimento.
Gli elementi riscaldantiSul piano cottura, a seconda dei modelli, possono essere installati elementi riscaldanti di due tipi: alogeni e radianti.Gli alogeni trasmettono il calore tramite l’irradiazione della lampada alogena che contengono. Si caratterizzano per le proprietà che ricordano quelle tipiche del gas: rapida risposta ai comandi, visualizzazione istantanea della potenza.I radianti sono composti da una molteplicità di spire che garantiscono la ripartizione uniforme del calore sul fondo del recipiente, per una perfetta riuscita di tutte le cotture a fuoco basso: stufati, salse o piatti da riscaldare.
Blocco dei comandiQuando il piano cottura è in funzione, è possibile bloccare i comandi per evitare il rischio di modifiche fortuite alle regolazioni (bambini, operazioni di pulizia,
ecc.). Premendo il tasto i comandi si bloccano e la spia che si trova sopra al tasto si accende. Per tornare ad agire sulle regolazioni (es. interrompere la cottura) è necessario sbloccare i comandi: premere
il tasto per qualche istante, la spia si spegne e i comandi si sbloccano.
Spegnimento del piano cottura
Premendo il tasto l’apparecchio si spegne. Se i comandi dell’apparecchio sono stati bloccati, continueranno ad essere bloccati anche dopo aver riacceso il piano di cottura. Per poter riaccendere il piano è necessario prima sbloccare i comandi.
Consigli pratici per l’uso dell’apparecchioPer ottenere le migliori prestazioni dal piano di cottura:• Adoperare pentole con fondo piatto e di elevato
spessore, per essere certi che aderiscano perfettamente alla zona riscaldante.
• Adoperare pentole di diametro sufficiente a coprire completamente la zona riscaldante, in modo da
IT
55
garantire lo sfruttamento di tutto il calore disponibile.
• Accertarsi che il fondo delle pentole sia sempre perfettamente asciutto e pulito, per garantire la corretta aderenza e una lunga durata, sia alle zone di cottura che alle pentole stesse.
• Evitare di utilizzare le stesse pentole utilizzate sui bruciatori a gas: la concentrazione di calore sui bruciatori a gas può deformare il fondo della
pentola, che perde aderenza.
Dispositivi di sicurezza
Rilevamento dei recipientiCiascuna zona di cottura è provvista di un dispositivo di rilevamento della pentola. La piastra emette calore unicamente in presenza di una pentola di dimensioni adeguate alla zona di cottura stessa. La spia lampeggiante può indicare:• una pentola incompatibile• una pentola di diametro insufficiente• il sollevamento della pentola
Indicatori di calore residuoCiascuna zona di cottura è provvista di un inciatore di calore residuo. Tale indicatore segnala quali sono le zone di cottura ancora a temperatura elevata. Se il
display di potenza visualizza , la zona di cottura è ancora calda. E’ possibile ad esempio mantenere in caldo una pietanza o far scigliere burro o cioccolato. Con il raffreddamento della zona di cottura, il display di
potenza visualizza . Il display si spegne quando la zona di cottura si è sufficientemente raffreddata.
SurriscaldamentoIn caso di surriscaldamento dei componenti elettronici, il piano cottura si spegne automaticamente e sul display appare F seguito da un numero lampeggiante. Questo messaggio scompare e il piano torna utilizzabile non appena la temperatura è scesa a un livello accettabile.
Interruttore di sicurezzaL’apparecchio è dotato di un interruttore di sicurezza che spegne le zone di cottura automaticamente quando viene raggiunto un tempo limite di utilizzo a un dato livello di potenza. Durante l’interruzione di sicurezza, il display indica “0”.Esempio: la piastra posteriore destra è impostata su 5,
mentre la piastra anteriore sinistra su 2. La posteriore destra si spegnerà dopo 5 ore di funzionamento, la anteriore sinistra dopo 8 ore.
Livello di potenza
1
2
3
4
5
6
7
8
9
Tempo limite di funzionamento in ore
9
8
7
6
5
4
3
2
1
Segnale acusticoAlcune anomalie, quali:• un oggetto (pentola, posata, ecc.) posto per oltre 10
secondi sull’area dei comandi,• un versamento sull’area dei comandi,• una pressione esercitata a lungo su un tasto, possono provocare l’emissione di un segnale
acustico. Rimuovere la causa del malfunzionamento per interrompere il segnale acustico. Se la causa dell’anomalia non viene rimossa, il segnale acustico persiste e il piano si spegne.
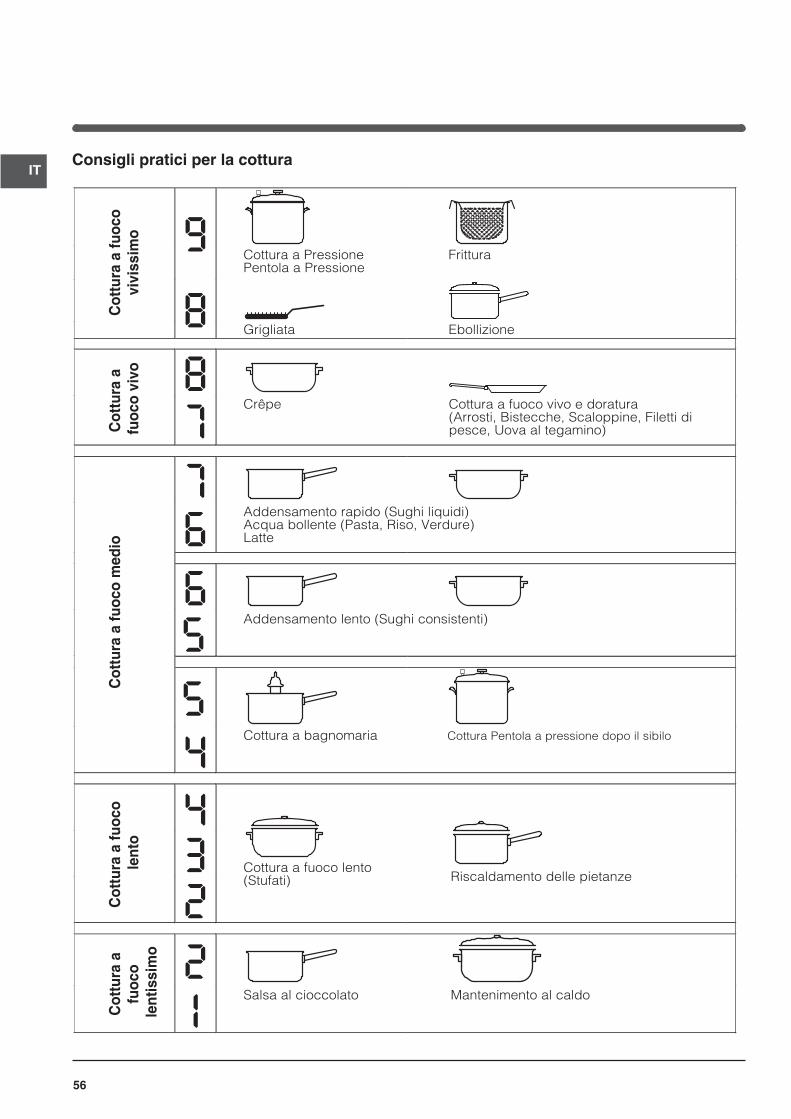
56
ITConsigli pratici per la cottura
ªCottura a PressionePentola a Pressione
Frittura
Grigliata Ebollizione
Cot
tura
a fu
oco
vivi
ssim
oC
ottu
ra a
fu
oco
vivo
Cot
tura
a fu
oco
med
ioC
ottu
ra a
fuoc
o le
nto
Cot
tura
a
fuoc
ole
ntis
sim
o
•
•
¶Crêpe Cottura a fuoco vivo e doratura
(Arrosti, Bistecche, Scaloppine, Filetti dipesce, Uova al tegamino)
¶
§Addensamento rapido (Sughi liquidi)Acqua bollente (Pasta, Riso, Verdure)Latte
§
SAddensamento lento (Sughi consistenti)
S
¢Cottura a bagnomaria Cottura Pentola a pressione dopo il sibilo
¢
£
™
Cottura a fuoco lento(Stufati) Riscaldamento delle pietanze
™
¡Salsa al cioccolato Mantenimento al caldo
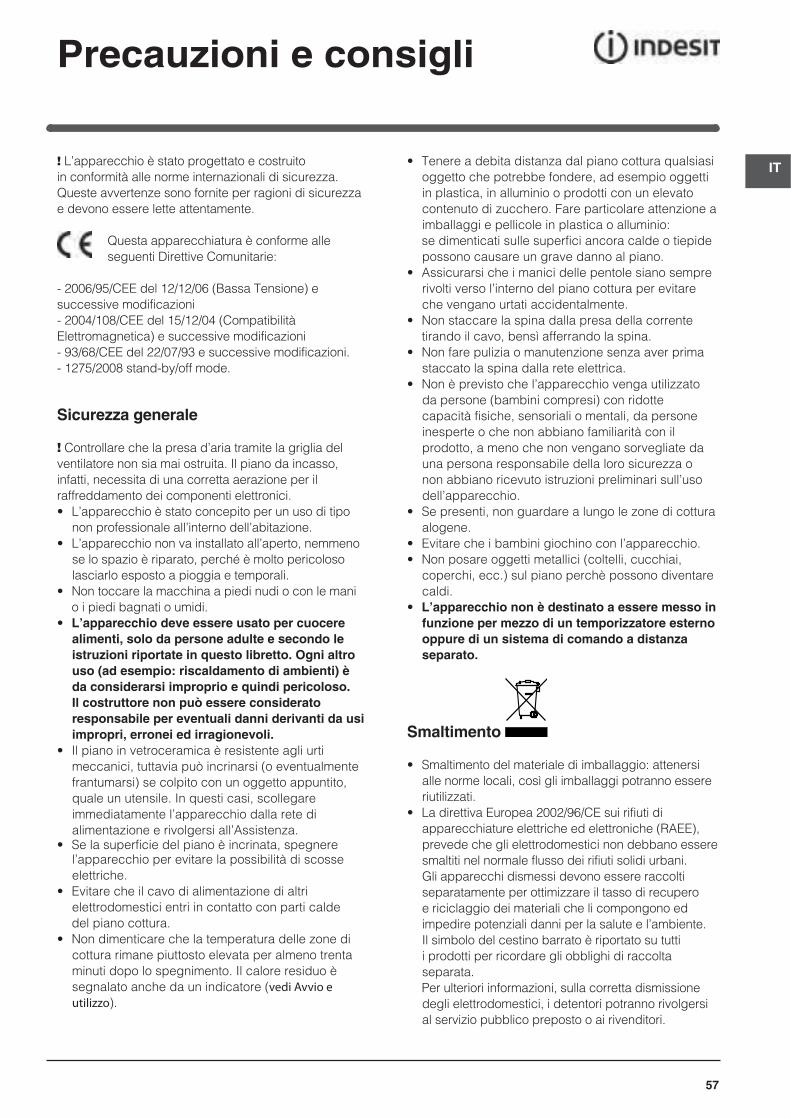
IT
57
Precauzioni e consigli
! L’apparecchio è stato progettato e costruito in conformità alle norme internazionali di sicurezza. Queste avvertenze sono fornite per ragioni di sicurezza e devono essere lette attentamente.
Questa apparecchiatura è conforme alle seguenti Direttive Comunitarie:
- 2006/95/CEE del 12/12/06 (Bassa Tensione) e successive modificazioni- 2004/108/CEE del 15/12/04 (Compatibilità Elettromagnetica) e successive modificazioni- 93/68/CEE del 22/07/93 e successive modificazioni.- 1275/2008 stand-by/off mode.
Sicurezza generale
! Controllare che la presa d’aria tramite la griglia del ventilatore non sia mai ostruita. Il piano da incasso, infatti, necessita di una corretta aerazione per il raffreddamento dei componenti elettronici.• L’apparecchio è stato concepito per un uso di tipo
non professionale all’interno dell’abitazione.• L’apparecchio non va installato all’aperto, nemmeno
se lo spazio è riparato, perché è molto pericoloso lasciarlo esposto a pioggia e temporali.
• Non toccare la macchina a piedi nudi o con le mani o i piedi bagnati o umidi.• L’apparecchio deve essere usato per cuocere
alimenti, solo da persone adulte e secondo le istruzioni riportate in questo libretto. Ogni altro uso (ad esempio: riscaldamento di ambienti) è da considerarsi improprio e quindi pericoloso. Il costruttore non può essere considerato responsabile per eventuali danni derivanti da usi impropri, erronei ed irragionevoli.
• Il piano in vetroceramica è resistente agli urti meccanici, tuttavia può incrinarsi (o eventualmente frantumarsi) se colpito con un oggetto appuntito, quale un utensile. In questi casi, scollegare immediatamente l’apparecchio dalla rete di alimentazione e rivolgersi all’Assistenza.
• Se la superficie del piano è incrinata, spegnere l’apparecchio per evitare la possibilità di scosse elettriche.
• Evitare che il cavo di alimentazione di altri elettrodomestici entri in contatto con parti calde
del piano cottura.• Non dimenticare che la temperatura delle zone di
cottura rimane piuttosto elevata per almeno trenta minuti dopo lo spegnimento. Il calore residuo è segnalato anche da un indicatore (vedi Avvio e utilizzo).
• Tenere a debita distanza dal piano cottura qualsiasi oggetto che potrebbe fondere, ad esempio oggetti in plastica, in alluminio o prodotti con un elevato contenuto di zucchero. Fare particolare attenzione a imballaggi e pellicole in plastica o alluminio:
se dimenticati sulle superfici ancora calde o tiepide possono causare un grave danno al piano.
• Assicurarsi che i manici delle pentole siano sempre rivolti verso l’interno del piano cottura per evitare che vengano urtati accidentalmente.
• Non staccare la spina dalla presa della corrente tirando il cavo, bensì afferrando la spina.• Non fare pulizia o manutenzione senza aver prima
staccato la spina dalla rete elettrica.• Non è previsto che l’apparecchio venga utilizzato
da persone (bambini compresi) con ridotte capacità fisiche, sensoriali o mentali, da persone inesperte o che non abbiano familiarità con il prodotto, a meno che non vengano sorvegliate da una persona responsabile della loro sicurezza o non abbiano ricevuto istruzioni preliminari sull’uso dell’apparecchio.
• Se presenti, non guardare a lungo le zone di cottura alogene.
• Evitare che i bambini giochino con l’apparecchio.• Non posare oggetti metallici (coltelli, cucchiai,
coperchi, ecc.) sul piano perchè possono diventare caldi.
• L’apparecchio non è destinato a essere messo in funzione per mezzo di un temporizzatore esterno oppure di un sistema di comando a distanza separato.
Smaltimento
• Smaltimento del materiale di imballaggio: attenersi alle norme locali, così gli imballaggi potranno essere riutilizzati.
• La direttiva Europea 2002/96/CE sui rifiuti di apparecchiature elettriche ed elettroniche (RAEE), prevede che gli elettrodomestici non debbano essere smaltiti nel normale flusso dei rifiuti solidi urbani. Gli apparecchi dismessi devono essere raccolti separatamente per ottimizzare il tasso di recupero e riciclaggio dei materiali che li compongono ed impedire potenziali danni per la salute e l’ambiente. Il simbolo del cestino barrato è riportato su tutti i prodotti per ricordare gli obblighi di raccolta separata.
Per ulteriori informazioni, sulla corretta dismissione degli elettrodomestici, i detentori potranno rivolgersi al servizio pubblico preposto o ai rivenditori.
58
IT
Manutenzione e cura
Escludere la corrente elettricaPrima di ogni operazione isolare l’apparecchio dalla rete di alimentazione elettrica.
Pulire l’apparecchio! Evitare l’uso di detergenti abrasivi o corrosivi, quali i prodotti in bombolette spray per barbecue e forni, smacchiatori e prodotti antiruggine, i detersivi in polvere e le spugne con superficie abrasiva: possono graffiare irrimediabilmente la superficie.! Non utilizzare mai pulitori a vapore o ad alta pressione per la pulizia dell’apparecchio.
• Per una manutenzione ordinaria, è sufficiente lavare il piano con una spugna umida, asciugando quindi con una carta assorbente per cucina.
• Se il piano è particolarmente sporco, strofinare con un prodotto specifico per la pulizia delle superfici
in vetroceramica, sciacquare e asciugare.• Per rimuovere gli accumuli di sporco più consistenti
servirsi di un apposito raschietto. Intervenire non appena possibile, senza attendere che l’apparecchio si sia raffreddato, per evitare l’incrostazione dei residui. Eccellenti risultati si possono ottenere usando una spugnetta in filo d’acciaio inossidabile - specifica per piani in vetroceramica - imbevuta di acqua e sapone.
• In caso sul piano cottura si fossero accidentalmente fusi oggetti o materiali quali plastica o zucchero, rimuoverli con il raschietto immediatamente, finché la superficie è ancora calda.
• Una volta pulito, il piano può essere trattato con un prodotto specifico per la manutenzione
e la protezione: la pellicola invisibile lasciata da questo prodotto protegge la superficie in caso di
scolamenti durante la cottura. Si raccomanda di eseguire queste operazioni con l’apparecchio
tiepido o freddo.• Ricordarsi sempre di risciacquare con acqua pulita
e asciugare accuratamente il piano: i residui di prodotti potrebbero infatti incrostarsi durante la successiva cottura.
Telaio in acciaio inox (solo nei modelli con cornice)L’acciaio inossidabile può macchiarsi per effetto di un’acqua molto calcarea lasciata per un periodo di tempo prolungato a contatto dello stesso oppure a causa di prodotti per la pulizia contenenti fosforo. Si consiglia di sciacquare abbondantemente e asciugare con cura dopo la pulizia del piano. In caso di versamenti d’acqua, intervenire rapidamente asciugando con cura.
! Alcuni piani cottura hanno una cornice in alluminio somigliante all’acciaio inox. Non utilizzare prodotti per la pulizia e lo sgrassaggio non idonei per l’alluminio.
Smontare il pianoNel caso si renda necessario smontare il piano cottura:1. togliere le viti che fissano le molle di centraggio sui lati;2. allentare le viti dei ganci di fissaggio sugli angoli;3. estrarre il piano cottura dal vano del mobile.
! Raccomandiamo di evitare di accedere ai meccanismi interni per tentare una riparazione. In caso di guasto, contattare l’Assistenza.
Descrizione tecnica dei modelliIn queste tabelle sono riportati, modello per modello, i valori di assorbimento energetico, il tipo di elemento riscaldante e il diametro di ciascuna zona di cottura.
Legenda:H = hilight singoloHD = hilight doppioHT = hilight triploAD = alogena doppio
Piani cottura
Zone di cottura
Posteriore sx
Posteriore dx
Anteriore sx
Anteriore dx
Potenza totale
Potenza (in W)
HD 2300
H 1400
H 1200
H 1800
Diametro (in mm)
210
160
145
180
6700
Potenza (in W)
HT 2200/1000
H 1400
H 1200
H 1800
Diametro (in mm)
210/140
160
145
180
6600
VRA 640 X S VRA 641 D B SVRA 641 D X SVRA 640 C SVRA 640 C S
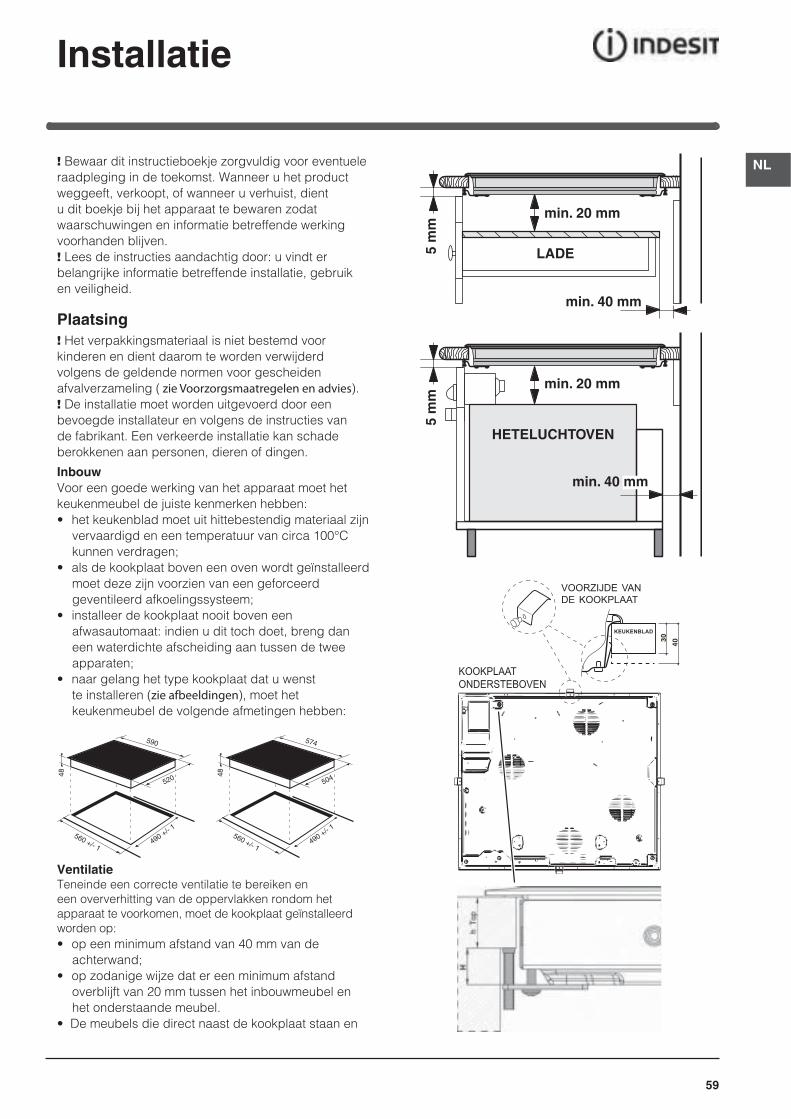
59
NL
Installatie
! Bewaar dit instructieboekje zorgvuldig voor eventuele raadpleging in de toekomst. Wanneer u het product weggeeft, verkoopt, of wanneer u verhuist, dient u dit boekje bij het apparaat te bewaren zodatwaarschuwingen en informatie betreffende werking voorhanden blijven.! Lees de instructies aandachtig door: u vindt er belangrijke informatie betreffende installatie, gebruik en veiligheid.
Plaatsing! Het verpakkingsmateriaal is niet bestemd voor kinderen en dient daarom te worden verwijderd volgens de geldende normen voor gescheiden afvalverzameling ( zie Voorzorgsmaatregelen en advies).! De installatie moet worden uitgevoerd door een bevoegde installateur en volgens de instructies van de fabrikant. Een verkeerde installatie kan schade berokkenen aan personen, dieren of dingen.
InbouwVoor een goede werking van het apparaat moet het keukenmeubel de juiste kenmerken hebben:• het keukenblad moet uit hittebestendig materiaal zijn
vervaardigd en een temperatuur van circa 100°C kunnen verdragen;
• als de kookplaat boven een oven wordt geïnstalleerd moet deze zijn voorzien van een geforceerd geventileerd afkoelingssysteem;
• installeer de kookplaat nooit boven een afwasautomaat: indien u dit toch doet, breng dan een waterdichte afscheiding aan tussen de twee apparaten;
• naar gelang het type kookplaat dat u wenst te installeren (zie afbeeldingen), moet het keukenmeubel de volgende afmetingen hebben:
560 +/- 1490 +/- 1
48
590
520
560 +/- 1490 +/- 1
48
574
504
VentilatieTeneinde een correcte ventilatie te bereiken eneen oververhitting van de oppervlakken rondom het apparaat te voorkomen, moet de kookplaat geïnstalleerd worden op:• op een minimum afstand van 40 mm van de
achterwand;• op zodanige wijze dat er een minimum afstand
overblijft van 20 mm tussen het inbouwmeubel en het onderstaande meubel.
• De meubels die direct naast de kookplaat staan en
VOORZIJDE VANDE KOOKPLAAT
KEUKENBLAD
30
40KOOKPLAAT ONDERSTEBOVEN
5 m
m
min. 20 mm
min. 20 mm
min. 40 mm
LADE5 m
m
min. 40 mm
HETELUCHTOVEN
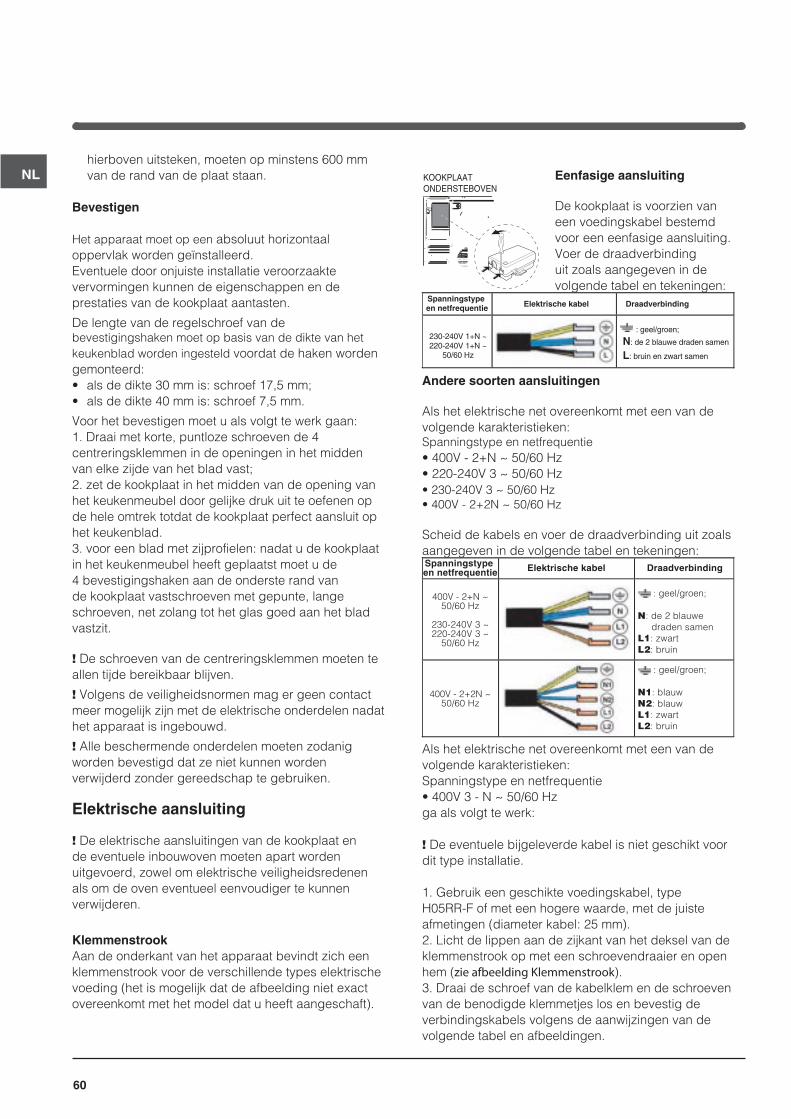
60
NLhierboven uitsteken, moeten op minstens 600 mm van de rand van de plaat staan.
Bevestigen
Het apparaat moet op een absoluut horizontaal oppervlak worden geïnstalleerd. Eventuele door onjuiste installatie veroorzaakte vervormingen kunnen de eigenschappen en de prestaties van de kookplaat aantasten.
De lengte van de regelschroef van de bevestigingshaken moet op basis van de dikte van het keukenblad worden ingesteld voordat de haken worden gemonteerd:• als de dikte 30 mm is: schroef 17,5 mm;• als de dikte 40 mm is: schroef 7,5 mm.
Voor het bevestigen moet u als volgt te werk gaan:1. Draai met korte, puntloze schroeven de 4 centreringsklemmen in de openingen in het midden van elke zijde van het blad vast;2. zet de kookplaat in het midden van de opening van het keukenmeubel door gelijke druk uit te oefenen op de hele omtrek totdat de kookplaat perfect aansluit op het keukenblad.3. voor een blad met zijprofielen: nadat u de kookplaat in het keukenmeubel heeft geplaatst moet u de 4 bevestigingshaken aan de onderste rand van de kookplaat vastschroeven met gepunte, lange schroeven, net zolang tot het glas goed aan het blad vastzit.
! De schroeven van de centreringsklemmen moeten te allen tijde bereikbaar blijven.
! Volgens de veiligheidsnormen mag er geen contact meer mogelijk zijn met de elektrische onderdelen nadat het apparaat is ingebouwd.
! Alle beschermende onderdelen moeten zodanig worden bevestigd dat ze niet kunnen worden verwijderd zonder gereedschap te gebruiken.
Elektrische aansluiting
! De elektrische aansluitingen van de kookplaat en de eventuele inbouwoven moeten apart worden uitgevoerd, zowel om elektrische veiligheidsredenen als om de oven eventueel eenvoudiger te kunnen verwijderen.
KlemmenstrookAan de onderkant van het apparaat bevindt zich een klemmenstrook voor de verschillende types elektrische voeding (het is mogelijk dat de afbeelding niet exact overeenkomt met het model dat u heeft aangeschaft).
Eenfasige aansluiting
De kookplaat is voorzien van een voedingskabel bestemd voor een eenfasige aansluiting. Voer de draadverbinding uit zoals aangegeven in de volgende tabel en tekeningen:
Spanningstypeen netfrequentie Elektrische kabel Draadverbinding
230-240V 1+N ~220-240V 1+N ~
50/60 Hz
: geel/groen;
N: de 2 blauwe draden samen
L: bruin en zwart samen
Andere soorten aansluitingen
Als het elektrische net overeenkomt met een van de volgende karakteristieken:Spanningstype en netfrequentie• 400V - 2+N ~ 50/60 Hz• 220-240V 3 ~ 50/60 Hz• 230-240V 3 ~ 50/60 Hz• 400V - 2+2N ~ 50/60 Hz
Scheid de kabels en voer de draadverbinding uit zoals aangegeven in de volgende tabel en tekeningen:Spanningstypeen netfrequentie Elektrische kabel Draadverbinding
400V - 2+N ~50/60 Hz
230-240V 3 ~220-240V 3 ~
50/60 Hz
: geel/groen;
N: de 2 blauwe
draden samen
L1: zwart
L2: bruin
400V - 2+2N ~50/60 Hz
: geel/groen;
N1: blauw
N2: blauw
L1: zwart
L2: bruin
Als het elektrische net overeenkomt met een van de volgende karakteristieken:Spanningstype en netfrequentie• 400V 3 - N ~ 50/60 Hzga als volgt te werk:
! De eventuele bijgeleverde kabel is niet geschikt voor dit type installatie.
1. Gebruik een geschikte voedingskabel, type H05RR-F of met een hogere waarde, met de juiste afmetingen (diameter kabel: 25 mm).2. Licht de lippen aan de zijkant van het deksel van de klemmenstrook op met een schroevendraaier en open hem (zie afbeelding Klemmenstrook).3. Draai de schroef van de kabelklem en de schroeven van de benodigde klemmetjes los en bevestig de verbindingskabels volgens de aanwijzingen van de volgende tabel en afbeeldingen.
KOOKPLAATONDERSTEBOVEN
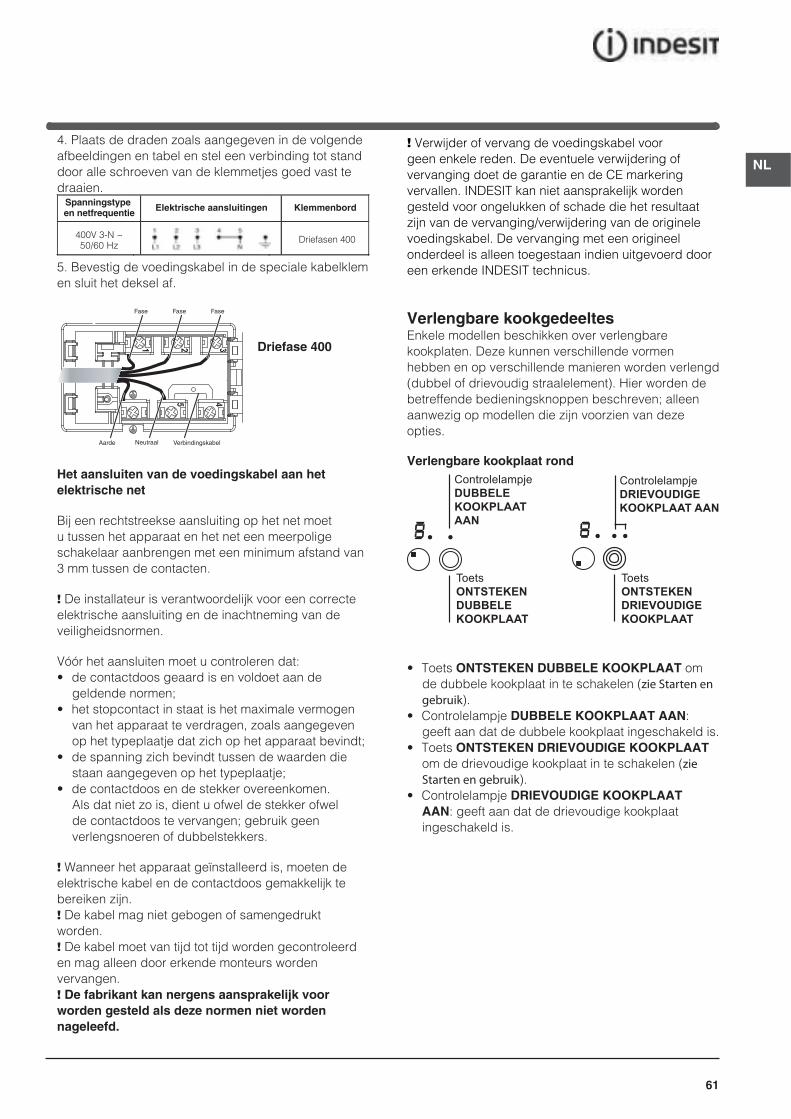
61
NL
4. Plaats de draden zoals aangegeven in de volgende afbeeldingen en tabel en stel een verbinding tot stand door alle schroeven van de klemmetjes goed vast te draaien.
Spanningstypeen netfrequentie Elektrische aansluitingen Klemmenbord
400V 3-N ~50/60 Hz
Driefasen 400
5. Bevestig de voedingskabel in de speciale kabelklem en sluit het deksel af.
Driefase 400
Het aansluiten van de voedingskabel aan het elektrische net
Bij een rechtstreekse aansluiting op het net moet u tussen het apparaat en het net een meerpolige schakelaar aanbrengen met een minimum afstand van 3 mm tussen de contacten.
! De installateur is verantwoordelijk voor een correcte elektrische aansluiting en de inachtneming van de veiligheidsnormen.
Vóór het aansluiten moet u controleren dat:• de contactdoos geaard is en voldoet aan de
geldende normen;• het stopcontact in staat is het maximale vermogen
van het apparaat te verdragen, zoals aangegeven op het typeplaatje dat zich op het apparaat bevindt;
• de spanning zich bevindt tussen de waarden die staan aangegeven op het typeplaatje;
• de contactdoos en de stekker overeenkomen. Als dat niet zo is, dient u ofwel de stekker ofwel de contactdoos te vervangen; gebruik geen verlengsnoeren of dubbelstekkers.
! Wanneer het apparaat geïnstalleerd is, moeten de elektrische kabel en de contactdoos gemakkelijk te bereiken zijn.! De kabel mag niet gebogen of samengedrukt worden.! De kabel moet van tijd tot tijd worden gecontroleerd en mag alleen door erkende monteurs worden vervangen.! De fabrikant kan nergens aansprakelijk voor worden gesteld als deze normen niet worden nageleefd.
! Verwijder of vervang de voedingskabel voor geen enkele reden. De eventuele verwijdering of vervanging doet de garantie en de CE markering vervallen. INDESIT kan niet aansprakelijk worden gesteld voor ongelukken of schade die het resultaat zijn van de vervanging/verwijdering van de originele voedingskabel. De vervanging met een origineel onderdeel is alleen toegestaan indien uitgevoerd door een erkende INDESIT technicus.
Fase Fase Fase
VerbindingskabelNeutraalAarde
1 2 3
5 4
Verlengbare kookgedeeltesEnkele modellen beschikken over verlengbare kookplaten. Deze kunnen verschillende vormen hebben en op verschillende manieren worden verlengd (dubbel of drievoudig straalelement). Hier worden de betreffende bedieningsknoppen beschreven; alleen aanwezig op modellen die zijn voorzien van deze opties.
Verlengbare kookplaat rond
• Toets ONTSTEKEN DUBBELE KOOKPLAAT om de dubbele kookplaat in te schakelen (zie Starten en gebruik).
• Controlelampje DUBBELE KOOKPLAAT AAN:geeft aan dat de dubbele kookplaat ingeschakeld is.
• Toets ONTSTEKEN DRIEVOUDIGE KOOKPLAATom de drievoudige kookplaat in te schakelen (zie Starten en gebruik).
• Controlelampje DRIEVOUDIGE KOOKPLAAT AAN: geeft aan dat de drievoudige kookplaat ingeschakeld is.
Controlelampje
DUBBELE
KOOKPLAAT
AAN
Toets
ONTSTEKEN
DUBBELE
KOOKPLAAT
Controlelampje
DRIEVOUDIGE
KOOKPLAAT AAN
Toets
ONTSTEKEN
DRIEVOUDIGE
KOOKPLAAT
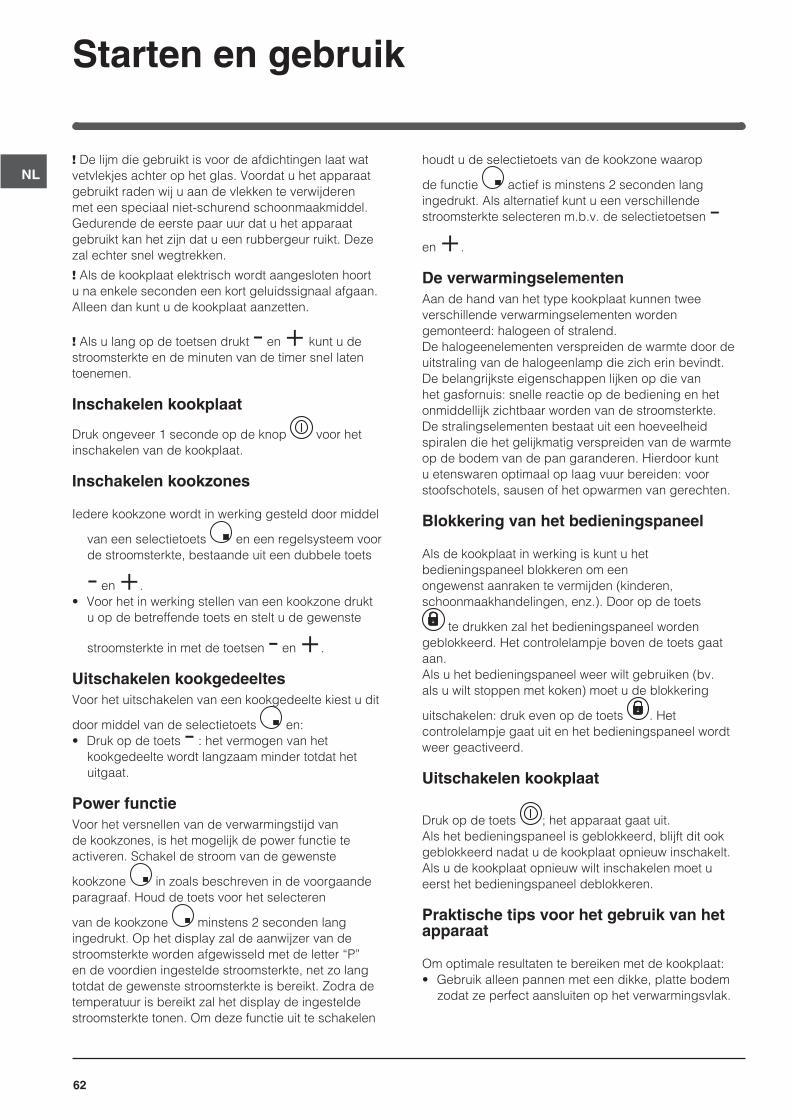
62
NL
Starten en gebruik
! De lijm die gebruikt is voor de afdichtingen laat wat vetvlekjes achter op het glas. Voordat u het apparaat gebruikt raden wij u aan de vlekken te verwijderen met een speciaal niet-schurend schoonmaakmiddel. Gedurende de eerste paar uur dat u het apparaat gebruikt kan het zijn dat u een rubbergeur ruikt. Deze zal echter snel wegtrekken.
! Als de kookplaat elektrisch wordt aangesloten hoort u na enkele seconden een kort geluidssignaal afgaan. Alleen dan kunt u de kookplaat aanzetten.
! Als u lang op de toetsen drukt - en + kunt u de stroomsterkte en de minuten van de timer snel laten toenemen.
Inschakelen kookplaat
Druk ongeveer 1 seconde op de knop voor het inschakelen van de kookplaat.
Inschakelen kookzones
Iedere kookzone wordt in werking gesteld door middel
van een selectietoets en een regelsysteem voor de stroomsterkte, bestaande uit een dubbele toets
- en +.• Voor het in werking stellen van een kookzone drukt
u op de betreffende toets en stelt u de gewenste
stroomsterkte in met de toetsen - en +.
Uitschakelen kookgedeeltesVoor het uitschakelen van een kookgedeelte kiest u dit
door middel van de selectietoets en:• Druk op de toets - : het vermogen van het
kookgedeelte wordt langzaam minder totdat het uitgaat.
Power functieVoor het versnellen van de verwarmingstijd van de kookzones, is het mogelijk de power functie te activeren. Schakel de stroom van de gewenste
kookzone in zoals beschreven in de voorgaande paragraaf. Houd de toets voor het selecteren
van de kookzone minstens 2 seconden lang ingedrukt. Op het display zal de aanwijzer van de stroomsterkte worden afgewisseld met de letter “P” en de voordien ingestelde stroomsterkte, net zo lang totdat de gewenste stroomsterkte is bereikt. Zodra de temperatuur is bereikt zal het display de ingestelde stroomsterkte tonen. Om deze functie uit te schakelen
houdt u de selectietoets van de kookzone waarop
de functie actief is minstens 2 seconden lang ingedrukt. Als alternatief kunt u een verschillende stroomsterkte selecteren m.b.v. de selectietoetsen -en +.
De verwarmingselementenAan de hand van het type kookplaat kunnen twee verschillende verwarmingselementen worden gemonteerd: halogeen of stralend.De halogeenelementen verspreiden de warmte door de uitstraling van de halogeenlamp die zich erin bevindt.De belangrijkste eigenschappen lijken op die van het gasfornuis: snelle reactie op de bediening en het onmiddellijk zichtbaar worden van de stroomsterkte.De stralingselementen bestaat uit een hoeveelheid spiralen die het gelijkmatig verspreiden van de warmte op de bodem van de pan garanderen. Hierdoor kunt u etenswaren optimaal op laag vuur bereiden: voor stoofschotels, sausen of het opwarmen van gerechten.
Blokkering van het bedieningspaneel
Als de kookplaat in werking is kunt u het bedieningspaneel blokkeren om een ongewenst aanraken te vermijden (kinderen, schoonmaakhandelingen, enz.). Door op de toets
te drukken zal het bedieningspaneel worden geblokkeerd. Het controlelampje boven de toets gaat aan.Als u het bedieningspaneel weer wilt gebruiken (bv. als u wilt stoppen met koken) moet u de blokkering
uitschakelen: druk even op de toets . Het controlelampje gaat uit en het bedieningspaneel wordt weer geactiveerd.
Uitschakelen kookplaat
Druk op de toets ; het apparaat gaat uit.Als het bedieningspaneel is geblokkeerd, blijft dit ook geblokkeerd nadat u de kookplaat opnieuw inschakelt. Als u de kookplaat opnieuw wilt inschakelen moet u eerst het bedieningspaneel deblokkeren.
Praktische tips voor het gebruik van het apparaat
Om optimale resultaten te bereiken met de kookplaat:• Gebruik alleen pannen met een dikke, platte bodem
zodat ze perfect aansluiten op het verwarmingsvlak.
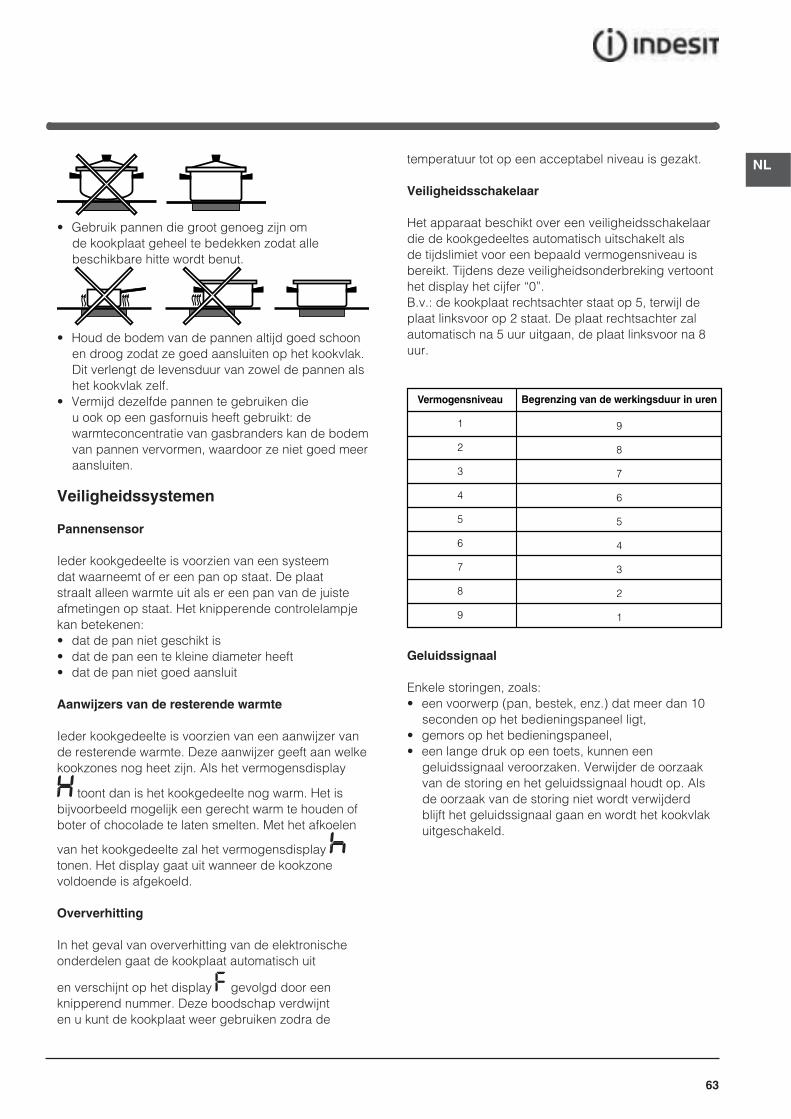
63
NL
• Gebruik pannen die groot genoeg zijn om de kookplaat geheel te bedekken zodat alle beschikbare hitte wordt benut.
• Houd de bodem van de pannen altijd goed schoon en droog zodat ze goed aansluiten op het kookvlak. Dit verlengt de levensduur van zowel de pannen als het kookvlak zelf.
• Vermijd dezelfde pannen te gebruiken die u ook op een gasfornuis heeft gebruikt: de warmteconcentratie van gasbranders kan de bodem van pannen vervormen, waardoor ze niet goed meer aansluiten.
Veiligheidssystemen
Pannensensor
Ieder kookgedeelte is voorzien van een systeem dat waarneemt of er een pan op staat. De plaat straalt alleen warmte uit als er een pan van de juiste afmetingen op staat. Het knipperende controlelampje kan betekenen:• dat de pan niet geschikt is• dat de pan een te kleine diameter heeft• dat de pan niet goed aansluit
Aanwijzers van de resterende warmte
Ieder kookgedeelte is voorzien van een aanwijzer van de resterende warmte. Deze aanwijzer geeft aan welke kookzones nog heet zijn. Als het vermogensdisplay
toont dan is het kookgedeelte nog warm. Het is bijvoorbeeld mogelijk een gerecht warm te houden of boter of chocolade te laten smelten. Met het afkoelen
van het kookgedeelte zal het vermogensdisplay tonen. Het display gaat uit wanneer de kookzone voldoende is afgekoeld.
Oververhitting
In het geval van oververhitting van de elektronische onderdelen gaat de kookplaat automatisch uit
en verschijnt op het display F gevolgd door een knipperend nummer. Deze boodschap verdwijnt en u kunt de kookplaat weer gebruiken zodra de
temperatuur tot op een acceptabel niveau is gezakt.
Veiligheidsschakelaar
Het apparaat beschikt over een veiligheidsschakelaar die de kookgedeeltes automatisch uitschakelt als de tijdslimiet voor een bepaald vermogensniveau is bereikt. Tijdens deze veiligheidsonderbreking vertoont het display het cijfer “0”.B.v.: de kookplaat rechtsachter staat op 5, terwijl de plaat linksvoor op 2 staat. De plaat rechtsachter zal automatisch na 5 uur uitgaan, de plaat linksvoor na 8 uur.
Vermogensniveau
1
2
3
4
5
6
7
8
9
Begrenzing van de werkingsduur in uren
9
8
7
6
5
4
3
2
1
Geluidssignaal
Enkele storingen, zoals:• een voorwerp (pan, bestek, enz.) dat meer dan 10
seconden op het bedieningspaneel ligt,• gemors op het bedieningspaneel,• een lange druk op een toets, kunnen een
geluidssignaal veroorzaken. Verwijder de oorzaak van de storing en het geluidssignaal houdt op. Als de oorzaak van de storing niet wordt verwijderd blijft het geluidssignaal gaan en wordt het kookvlak uitgeschakeld.
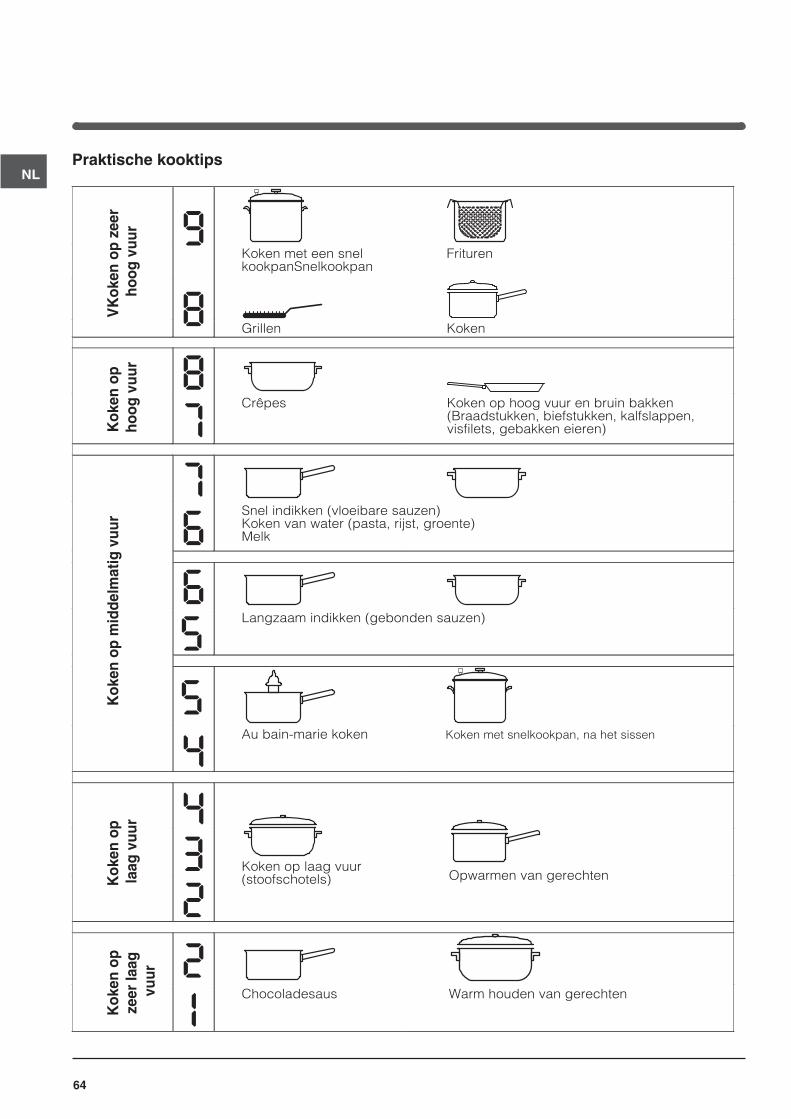
64
NLPraktische kooktips
ªKoken met een snelkookpanSnelkookpan
Frituren
Grillen Koken
VK
oken
op
zeer
ho
og v
uur
Kok
en o
p ho
og v
uur
Kok
en o
p m
idde
lmat
ig v
uur
Kok
en o
p la
ag v
uur
Kok
en o
p ze
er la
ag
vuur
•
•
¶Crêpes Koken op hoog vuur en bruin bakken
(Braadstukken, biefstukken, kalfslappen, visfilets, gebakken eieren)
¶
§Snel indikken (vloeibare sauzen)Koken van water (pasta, rijst, groente)Melk
§
SLangzaam indikken (gebonden sauzen)
S
¢Au bain-marie koken Koken met snelkookpan, na het sissen
¢
£
™
Koken op laag vuur (stoofschotels) Opwarmen van gerechten
™
¡Chocoladesaus Warm houden van gerechten
65
NL
Voorzorgsmaatregelenen advies
! Dit apparaat is ontwikkeld en gefabriceerd volgens de geldende internationale veiligheidsvoorschriften. Deze aanwijzingen zijn geschreven voor uw veiligheid en u dient ze derhalve goed door te nemen.
Dit apparaat voldoet aan de volgende EU Richtlijnen:
- 2006/95/EEG van 12/12/06 (Laagspanning) en daaropvolgende wijzigingen- 2004/108/EEG van 15/12/04 (Elektromagnetische Compatibiliteit) en daaropvolgende wijzigingen- 93/68/EEG van 22/07/93 en daaropvolgende wijzigingen.- 1275/2008 stand-by/off mode.
Algemene veiligheidsmaatregelen
!Controleer dat de luchttoevoeropening van het rooster van de ventilator niet verstopt is. De inbouwkookplaat moet voorzien zijn van een goede ventilatie voor het afkoelen van de elektronische componenten.• Dit apparaat is vervaardigd voor niet-professioneel
gebruik binnenshuis.• Het apparaat dient niet buitenshuis te worden geplaatst,
ook niet in overdekte toestand. Het is erg gevaarlijk als het in aanraking komt met regen of onweer.
• Raak het apparaat niet aan als u blootsvoets bent of met natte of vochtige handen of voeten.
• Het apparaat dient gebruikt te worden om voedsel te bereiden. Het mag uitsluitend door volwassenen worden gebruikt en alleen volgens de instructies die in deze handleiding beschreven staan. Elk ander gebruik (bv.: verwarming van ruimten) is als oneigenlijk te beschouwen en dus gevaarlijk. De fabrikant kan niet aansprakelijk worden gesteld voor eventuele schade die te wijten is aan onjuist, verkeerd of onredelijk gebruik.
• Het glaskeramische kookvlak is bestand tegen mechanische stoten. Het kan echter worden beschadigd (of barsten) als het wordt geraakt door een puntig object, bijvoorbeeld door gereedschap. Als dit gebeurt moet u onmiddellijk het apparaat afsluiten van de elektrische stroom en contact opnemen met de Technische Dienst.
• Voorkom dat elektrische snoeren van andere kleine keukenapparaten op warme delen van de kookplaat terechtkomen.
• Vergeet niet dat de temperatuur in het kookgedeelte aanzienlijk hoog blijft tot minstens 30 minuten nadat u het heeft uitgeschakeld. De resterende warmte wordt aangeduid door een aanwijzer (zie Starten en gebruik).
• Houd voorwerpen die kunnen smelten op afstand van de kookplaat, zoals bv. plastic, aluminium of suikerhoudende etenswaren. Let vooral op plastic of aluminium verpakkingen en folie: als u ze op het nog warme of lauwe kookvlak neerlegt, kunt u zware schade aanrichten.
• Richt de handvaten van de pannen altijd naar de binnenzijde van de kookplaat zodat u er niet per ongeluk tegenaan stoot.
• Trek nooit de stekker aan het snoer uit het stopcontact, maar pak altijd de stekker direct beet.
• Maak het apparaat niet schoon of voer geen onderhoud uit als de stekker nog in het stopcontact zit.
• Dit apparaat mag niet worden gebruikt door personen (kinderen inbegrepen) met een beperkt lichamelijk, sensorieel of geestelijk vermogen of personen die niet de nodige ervaring of kennis hebben met het apparaat, tenzij onder toezicht van een persoon die verantwoordelijk is voor hun veiligheid of nadat hun is uitgelegd hoe het apparaat werkt.
• Als de kookplaat halogene kookzones heeft moet u vermijden er lang naar te kijken.
• Voorkom dat kinderen met het apparaat spelen.• Plaats geen metalen voorwerpen (messen, lepels,
deksels enz.) op de kookplaat aangezien zij heet kunnen worden..
• Het apparaat is niet geschikt om te worden ingeschakeld m.b.v. een externe timer ofwel door een gescheiden afstandsbedieningssysteem.
Afvalverwijdering
• Het verwijderen van het verpakkingsmateriaal: houdt u aan de plaatselijke normen zodat het materiaal hergebruikt kan worden.
• De Europese richtlijn 2002/96/EG, betreffende afgedankte elektrische en elektronische apparatuur (AEEA), voorziet dat huishoudelijke apparatuur niet met het normale afval mag worden meegegeven. De verwijderde apparaten moeten apart worden opgehaald om het terugwinnen en recyclen van de materialen waaruit ze bestaan te optimaliseren en te voorkomen dat er eventuele schade voortvloeit voor de gezondheid en het milieu. Het symbool van de afvalemmer met een kruis staat op alle producten om de consument eraan te herinneren dat dit gescheiden afval is.
Om meer informatie te verkrijgen betreffende een juiste verwijdering van huishoudapparaten kan de consument zich richten tot de gemeentelijke reinigingsdienst of de verkopers.

66
NL
Onderhoud en verzorging
De elektrische stroom afsluitenSluit altijd eerst de stroom af voordat u tot enige handeling overgaat.
Reinigen van het apparaat! Vermijd het gebruik van schuurmiddelen of bijtende middelen, zoals sprays voor barbecues en ovens, vlekkenmiddelen, roestverwijderende producten, schoonmaakmiddelen in poedervorm of schuursponzen: deze kunnen het oppervlak onherstelbaar krassen.! Gebruik nooit stoom- of hogedrukreinigers voor het reinigen van het apparaat.
• Voor normaal onderhoud moet u de kookplaat met een vochtige spons reinigen en afdrogen met keukenpapier.
• Als de plaat erg vuil is moet hij worden schoongemaakt met een speciaal middel voor keramiekplaten. Daarna moet u hem afspoelen en afdrogen.
• Voor het verwijderen van hardnekkig vuil kunt u een hiervoor bestemd schrapertje gebruiken. Doe dit zo snel mogelijk voordat het apparaat afkoelt, zodat de etensresten niet aankoeken. Uitstekende resultaten bereikt u ook met een speciaal voor keramiekplaten vervaardigd roestvrij staal sponsje dat u in een sopje doopt.
• Als er op de kookplaat onverhoopt voorwerpen of plastic materiaal of suiker zouden smelten, moet u ze onmiddellijk met het schrapertje verwijderen zolang het oppervlak nog warm is.
• Als de plaat is schoongemaakt, kan hij worden behandeld met een speciaal product voor onderhoud
en bescherming: het onzichtbare laagje dat dit product achterlaat beschermt de plaat in het geval er iets overkookt. Dit soort handelingen moeten worden uitgevoerd als de plaat lauw of koud is.
• Vergeet niet de kookplaat altijd met schoon water af te spoelen en goed af te drogen: restjes schoonmaakmiddel kunnen de volgende keer dat u kookt aankoeken.
Raamwerk van roestvrij staal(alleen bij modellen met lijst)Roestvrij staal kan vlekken gaan vertonen als er voor langere tijd kalkhoudend water op blijft liggen of als gevolg van gebruik van schoonmaakmiddelen die fosfor bevatten.Spoel en droog de kookplaat altijd goed af nadat u hem heeft schoongemaakt. Droog gemorst water altijd meteen goed af.! Enkele kookplaten hebben een lijst van aluminium die lijkt op roestvrij staal. Gebruik voor het reinigen en ontvetten geen producten die niet geschikt zijn voor aluminium.
De kookplaat verwijderenAls u de kookplaat uit elkaar moet halen:1. verwijder de schroeven die de centreringsklemmen aan de zijkant vasthouden;2. maak de schroeven van de bevestigingshaken op de hoeken los;3. haal de kookplaat uit het meubel.
! U mag nooit aan het interne systeem sleutelen om een reparatie proberen uit te voeren. Als er een storing is moet u contact opnemen met de Service Dienst.
Technische beschrijving van de modellenIn deze tabellen vindt u de waarden terug van de stroomopname voor ieder afzonderlijk model, het type verwarmingselement en de diameter van ieder kookgedeelte.
Legenda:H = hilight enkelHD = hilight dubbelHT = hilight drievoudigAD = dubbel halogeen
Kookplaten
Kookgedeeltes
Linksachter
Rechtsachter
Linksvoor
Rechtsvoor
Totaal vermogen
Vermogen (in W)
HD 2300
H 1400
H 1200
H 1800
Diameter (in mm)
210
160
145
180
6700
Vermogen (in W)
HT 2200/1000
H 1400
H 1200
H 1800
Diameter (in mm)
210/140
160
145
180
6600
VRA 640 X S VRA 641 D B SVRA 641 D X S
VRA 640 C SVRA 640 C S

67
PL
Instalacja
! Nale y zachowa niniejsz instrukcj , aby móc z niej skorzysta w ka dej chwili. W razie sprzeda y, odst pienia lub przeniesienia urz dzenia, nale y siupewni , czy instrukcja zosta a przekazana wraz z nim, aby nowy w a ciciel p yty grzejnej móg si zapozna z jej dzia aniem i z w a ciwymi ostrze eniami.! Nale y uwa nie przeczyta instrukcj : zawiera ona wa ne informacje dotycz ce instalacji, u ytkowania i bezpiecze stwa.
Ustawienie
! Elementy opakowania nie sa zabawkami dla dzieci i nalezy je usunac zgodnie z normami dotyczacymi selektywnego gromadzenia odpadów (patrz Zalecenia i srodki ostroznosci ).! Instalacja powinna zosta wykonana zgodnie z niniejszymi instrukcjami przez wykwalifi kowany personel. Niew a ciwa instalacja mo e spowodowaszkody w stosunku do osób, zwierz t lub mienia.
ZabudowaAby zapewni prawid owe dzia anie urz dzenia, mebel musi posiada odpowiednie w a ciwo ci:• blat musi by wykonany z materia u odpornego na
ciep o, na temperatur oko o 100°C; • je li p yta grzejna ma by zainstalowana na piecu,
musi on posiada system ch odzenia z wentylacjwymuszon ;
• nale y unika instalowania p yty grzejnej na zmywarce: w przypadku takiej konieczno ci,umie ci pomi dzy dwoma urz dzeniami szczelny element oddzielaj cy;
• w zaleznosci od plyty grzejnej, jaka ma byc zainstalowana (patrz rysunki), wewnetrzna czesc mebla powinna miec nastepujace wymiary:
560 +/- 1490 +/- 1
48
590
520
560 +/- 1490 +/- 1
48
574
504
Obieg powietrzaAby umo liwi w a ciwy obieg powietrza i aby uniknprzegrzania powierzchni wokó urz dzenia, p yta grzejna powinna by umieszczona:• w odleg o ci co najmniej 40 mm od tylnej ciany lub;• w taki sposób, aby zachowa odleg o minimum
20 mm pomi dzy przestrzeni do zabudowy a znajduj cym si pod ni meblem.
• Meble znajduj ce si obok, a których wysoko przekracza wysoko p yty roboczej, powinny zosta odsuni te przynajmniej na 600 mm od kraw dzi p yty roboczej.
5 m
m
min. 20 mm
min. 20 mm
min. 40 mm
SZUFLADY5 m
m
min. 40 mm
PIEKARNKWENTYLATOROWY

68
PL Mocowanie
Urz dzenie powinno by zainstalowane na idealnie p askim blacie. Ewentualne odkszta cenia, spowodowane nieprawid owym zamocowaniem, mog by przyczynzmiany w a ciwo ci urz dzenia i, w konsekwencji, wp ywaj c niekorzystnie na jego prac .D ugo ruby regulacyjnej uchwytów mocuj cychnale y ustawi przed ich zamontowaniem, na podstawie grubo ci blatu:• grubo 30 mm: ruba 17,5 mm;• grubo 40 mm: ruba 7,5 mm.W celu zamocowania urz dzenia nale y wykonanast puj ce czynno ci:1. Przy pomocy krótkich rub bez ba przykr ci 4 spr yny centruj ce do otworów umieszczonych w rodkowej cz ci ka dego boku p yty;
2. umie ci p yt grzejn w meblu, wy rodkowa j i wywrze odpowiedni nacisk na ca y jej obwód, tak aby p yta dobrze przylega a do blatu. 3. w przypadku p yt z profi lami bocznymi: po zainstalowaniu p yty grzejnej w meblu umie ci 4 uchwyty mocuj ce (ka dy ze sworzniem) na dolnym obwodzie p yty grzejnej i przykr ci je d ugimi rubami z bem w taki sposób, aby szk o przylega o do blatu.! ruby spr yn centruj cych musz pozostadost pne.! Zgodnie z normami bezpiecze stwa, po zabudowaniu urz dzenia nie powinien by mo liwy kontakt z jego elementami elektrycznymi.! Wszystkie cz ci, które stanowi zabezpieczenie, powinny by zamocowane w taki sposób, aby nie mo na by o ich zdj bez u ycia narz dzia.
Pod czenie do sieci elektrycznej
! Pod czenie do sieci elektrycznej p yty grzejnej oraz ewentualnego pieca do zabudowy powinno by wykonane oddzielnie, zarówno ze wzgl dówbezpiecze stwa elektrycznego, jak i dla u atwieniaczynno ci zwi zanych z wyjmowaniem pieca.
Skrzynka zaciskowaW dolnej cz ci urz dzenia znajduje si puszka umo liwiaj ca pod czenie ró nych typów zasilania elektrycznego (rysunek jest przyk adowy i mo eprzedstawia inny model ni zakupiony).
Pod czenie jednofazowe
P yta jest wyposa ona w kabel zasilaj cy przygotowany do pod czenia jednofazowego. Nale y po czy przewody zgodnie z tabel i z rysunkami umieszczonymi poni ej:
Inne typy pod cze
Je li instalacja elektryczna posiada jedn z nast puj cych cech:Typowe napi cie i cz stotliwo sieci• 400V - 2+N ~ 50/60 Hz• 220-240V 3 ~ 50/60 Hz• 230-240V 3 ~ 50/60 Hz• 400V - 2+2N ~ 50/60 Hz
Oddzieli kable i po czy przewody zgodnie z tabel i z rysunkami umieszczonymi poni ej:Typowe napięcie i częstotliwość sieci
Kabel elektryczny Połączenie przewodów
400V - 2+N ~50/60 Hz
230-240V 3 ~220-240V 3 ~
50/60 Hz
: żółty/zielony;
N: 2 przewody niebieskie razem
L1: czarny
L2: brązowy
400V - 2+2N ~50/60 Hz
: żółty/zielony;
N1: niebieski
N2: niebieski
L1: czarny
L2: brązowy
Je li instalacja elektryczna posiada jedn z nast puj cych cech:Typowe napi cie i cz stotliwo sieci• 400V 3 - N ~ 50/60 Hznale y wykona nast puj ce czynno ci:
! Ewentualny kabel znajduj cy si w wyposa eniuurz dzenia nie nadaje si do tego typu instalacji.
1. Nalezy zastosowac kabel zasilajacy typu H05RR-F lub o wyzszych wlasciwosciach, posiadajacy odpowiednie wymiary (przekrój kabla: 25 mm).2. Przy pomocy srubokretu podwazyc zatrzaski pokrywy skrzynki zaciskowej i otworzyc ja (patrz rysunek Skrzynka zaciskowa).3. Odkr ci rub zacisku kabla oraz ruby zacisków odpowiadaj cych danemu typowi pod czenia i
Typowe napięcie i częstotliwość sieci
Kabel elektryczny Połączenie przewodów
230-240V 1+N ~220-240V 1+N ~
50/60 Hz
: żółty/zielony;
N: 2 przewody niebieskie razem
L: brązowy razem z czarnym
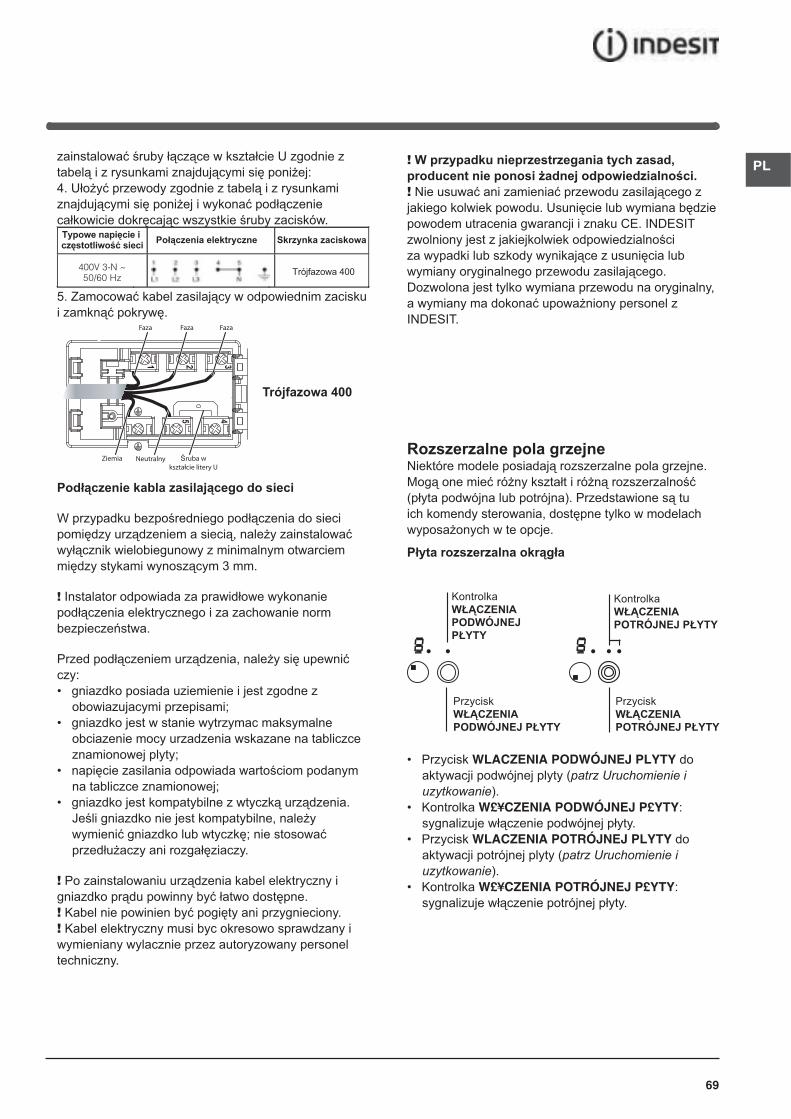
69
PLzainstalowa ruby cz ce w kszta cie U zgodnie z tabel i z rysunkami znajduj cymi si poni ej:4. U o y przewody zgodnie z tabel i z rysunkami znajduj cymi si poni ej i wykona pod czenieca kowicie dokr caj c wszystkie ruby zacisków.Typowe napięcie i częstotliwość sieci
Połączenia elektryczne Skrzynka zaciskowa
400V 3-N ~50/60 Hz
Trójfazowa 400
5. Zamocowa kabel zasilaj cy w odpowiednim zacisku i zamkn pokryw .
Trójfazowa 400
Pod czenie kabla zasilaj cego do sieci
W przypadku bezpo redniego pod czenia do sieci pomi dzy urz dzeniem a sieci , nale y zainstalowawy cznik wielobiegunowy z minimalnym otwarciem mi dzy stykami wynosz cym 3 mm.
! Instalator odpowiada za prawid owe wykonanie pod czenia elektrycznego i za zachowanie norm bezpiecze stwa.
Przed pod czeniem urz dzenia, nale y si upewniczy:• gniazdko posiada uziemienie i jest zgodne z
obowiazujacymi przepisami;• gniazdko jest w stanie wytrzymac maksymalne
obciazenie mocy urzadzenia wskazane na tabliczce znamionowej plyty;
• napi cie zasilania odpowiada warto ciom podanym na tabliczce znamionowej;
• gniazdko jest kompatybilne z wtyczk urz dzenia.Je li gniazdko nie jest kompatybilne, nale ywymieni gniazdko lub wtyczk ; nie stosowaprzed u aczy ani rozga ziaczy.
! Po zainstalowaniu urz dzenia kabel elektryczny i gniazdko pr du powinny by atwo dost pne.! Kabel nie powinien by pogi ty ani przygnieciony.! Kabel elektryczny musi byc okresowo sprawdzany i wymieniany wylacznie przez autoryzowany personel techniczny.
! W przypadku nieprzestrzegania tych zasad, producent nie ponosi adnej odpowiedzialno ci.! Nie usuwa ani zamienia przewodu zasilaj cego z jakiego kolwiek powodu. Usuni cie lub wymiana b dziepowodem utracenia gwarancji i znaku CE. INDESIT zwolniony jest z jakiejkolwiek odpowiedzialno ciza wypadki lub szkody wynikaj ce z usuni cia lub wymiany oryginalnego przewodu zasilaj cego.Dozwolona jest tylko wymiana przewodu na oryginalny, a wymiany ma dokona upowa niony personel z INDESIT.
1 2 3
5 4
Rozszerzalne pola grzejneNiektóre modele posiadaj rozszerzalne pola grzejne. Mog one mie ró ny kszta t i ró n rozszerzalno(p yta podwójna lub potrójna). Przedstawione s tu ich komendy sterowania, dost pne tylko w modelach wyposa onych w te opcje.
P yta rozszerzalna okr g a
• Przycisk WLACZENIA PODWÓJNEJ PLYTY do aktywacji podwójnej plyty (patrz Uruchomienie i uzytkowanie).
• Kontrolka W£¥CZENIA PODWÓJNEJ P£YTY:sygnalizuje w czenie podwójnej p yty.
• Przycisk WLACZENIA POTRÓJNEJ PLYTY do aktywacji potrójnej plyty (patrz Uruchomienie i uzytkowanie).
• Kontrolka W£¥CZENIA POTRÓJNEJ P£YTY:sygnalizuje w czenie potrójnej p yty.

70
PL
Uruchomienie i u ytkowanie! Klej stosowany do uszczelek pozostawia na szkle t uste plamy. Przed przyst pieniem do eksploatacji urz dzenia zaleca si usun te plamy przy pomocy odpowiedniego produktu nieposiadaj cego w a ciwo ciciernych. Podczas pierwszych godzin dzia ania
urz dzenia mo e by wyczuwalny zapach gumy, który jednak szybko zanika.! Kiedy p yta grzejna zostanie pod czona do zasilania elektrycznego, po kilku sekundach w cza si krótki sygna d wi kowy. Dopiero po tym sygnale mo naw czy p yt grzejn .
! Dluzsze nacisniecie przycisków - i + umozliwia szybki wybór poziomów mocy i minut regulatora czasowego.
W czanie p yty grzejnej
P yt grzejn w cza si trzymaj c wci ni ty przycisk
przez oko o sekund .
W czanie pól grzejnych
Ka de pole grzejne jest aktywowane za pomoc
przycisku wyboru oraz regulatora mocy
sk adaj cego si z podwójnego przycisku - i +.• Aby w czy pole grzejne, nale y nacisn jego
przycisk sterowania i ustawi dan moc za
pomoc przycisków - i +.
Wy czanie pól grzejnych
Aby wy czy pole grzejne, nale y je wybra za
pomoc jego przycisku wyboru i:
• Nacisn przycisk -: moc pola grzejnego stopniowo spada, a do jego wy czenia.
Funkcja power
Aby przyspieszyc czas nagrzewania pól grzejnych, mozna wlaczyc funkcje power. Wlaczyc zadane pole
grzejne i ustawic jego moc zgodnie z opisem zawartym w poprzednim rozdziale. Nacisnac i przytrzymac wcisniety przez co najmniej 2 sekundy
przycisk wyboru pola grzejnego . Na wyswietlaczu, na wskazniku mocy, przez caly czas konieczny dla osiagniecia zadanego poziomu mocy wyswietla sie naprzemiennie litera „P” oraz wczesniej ustawiony poziom mocy. Po osiagnieciu zadanego poziomu mocy
na wyswietlaczu bedzie wskazany ustawiony poziom mocy. Aby wylaczyc te funkcje, nalezy nacisnac i przytrzymac wcisniety przez co najmniej 2 sekundy
przycisk wyboru pola grzejnego , dla którego funkcja jest wlaczona, lub wybrac inny poziom mocy za
pomoca przycisków - i +.
Elementy grzejne
Na plycie grzejnej, w zaleznosci od modelu, moga byc zainstalowane dwa typy elementów grzejnych: halogenowe i promiennikowe.Elementy halogenowe przekazuj ciep o poprzez promieniowanie zawartej w nich arówki halogenowej.Charakteryzuj si w asno ciami, które przypominajtypowe w asno ci gazu: szybk reakcj na sterowanie i wy wietlaniem mocy chwilowej.Elementy promiennikowe sa zbudowane z duzej liczby zwojów, które zapewniaja równomierne rozlozenie ciepla na dno naczynia, dzieki czemu uzyskuje sie doskonale wyniki gotowania na wolnym ogniu: jest to idealne rozwiazanie w przypadku takich potraw jak na przyklad duszone miesa, sosy lub dania do podgrzania.
Blokada sterowania
Kiedy p yta grzejna jest w trakcie pracy, mo nazablokowa jej sterowanie, aby uniknniebezpiecze stwa przypadkowej zmiany ustawie(dzieci, czynno ci konserwacyjne, itp.). Po naci ni ciu
przycisku sterowanie zostaje zablokowane i w czasi kontrolka umieszczona nad tym przyciskiem.Aby przywróci mo liwo dokonywania regulacji (np. przerwa gotowanie), nale y odblokowa sterowanie:
nacisn na chwil przycisk , kontrolka wy czy si ,a sterowanie zostanie odblokowane.
Wy czanie p yty grzejnej
Po naci ni ciu przycisku urz dzenie wy cza si .Je li sterowanie zosta o zablokowane, pozostanie ono zablokowane równie po ponownym w czeniu p ytygrzejnej. Aby móc ponownie w czy p yt , nale ynajpierw odblokowa jej sterowanie.
71
PLPraktyczne porady dotycz ceu ytkowania urz dzenia
Aby uzyska jak najlepsze wyniki u ytkowania p ytygrzejnej:• Stosowa garnki z p askim dnem i znacznej grubo ci,
aby mie pewno , e dok adnie przylegaj do pola grzejnego.
• Stosowa garnki o rednicy wystarczaj cej do ca kowitego przykrycia pola grzejnego, tak aby zapewni wykorzystanie ca ego ciep a;
• Upewni si czy dno garnka jest zawsze dok adnieosuszone i czyste, aby zagwarantowa dok adneprzyleganie i d ugotrwa o u ytkowania zarówno pól grzejnych, jak i garnków.
• Unika stosowania tych samych garnków co u ywane na palnikach gazowych: skupienie ciep a w przypadku palników gazowych mo e odkszta ci dno garnka, przez co nie b dzie on dok adnie przylega ;
Urz dzenia zabezpieczaj ceRozpoznawanie naczy
Ka de pole grzejne posiada system rozpoznawania naczy . Pole grzejne wydziela ciep o wy cznie, je liznajduje si na nim garnek o dostosowanej do niego wielko ci. Pulsuj ca kontrolka mo e wskazywa na:• nieodpowiedni garnek• garnek o zbyt ma ej rednicy• uniesienie garnka
Wska niki ciep a szcz tkowegoKa de pole grzejne posiada wska nik ciep aszcz tkowego. Wska nik ten sygnalizuje, które pola grzejne maj jeszcze wysok temperatur . Je li
na wy wietlaczu mocy jest wy wietlony symbol , pole grzejne jest jeszcze ciep e. Mo na na przyk adpozostawi na nim danie, aby nie wystyg o, albo roztopi mas o lub czekolad . Kiedy temperatura pola grzejnego spadnie, na wy wietlaczu mocy pojawi si
symbol . Wy wietlacz wy czy si , kiedy pole grzejne b dzie dostatecznie zimne.
PrzegrzanieW przypadku przegrzania elementów elektronicznych p yta grzejna wy cza si automatycznie, a na
wy wietlaczu pojawia si symbol F, po którym nast puje pulsuj ca cyfra. Komunikat ten znika i p ytagrzejna mo e by znowu u ytkowana zaraz jak tylko temperatura spadnie do akceptowalnego poziomu.
Wy cznik bezpiecze stwaUrz dzenie jest wyposa one w wy cznikbezpiecze stwa, który automatycznie wy cza pola grzejne, kiedy zostanie osi gni ty graniczny czas ich u ytkowania na danym poziomie mocy. W przypadku zadzia ania wy cznika bezpiecze stwa wy wietlaczwskazuje „0”.Przyklad: prawe tylne pole grzejne jest ustawione na 5, natomiast lewe przednie pole grzejne na 2. Prawe tylne pole wylaczy sie po 5 godzinach dzialania, lewe przednie po 8 godzinach.
Poziom mocy
1
2
3
4
5
6
7
8
9
Graniczny czas działania w godzinach
9
8
7
6
5
4
3
2
1
Sygna d wi kowyNiektóre anomalie, takie jak:• umieszczenie przedmiotu (garnka, sztu ca itp.) na
ponad 10 sekund w strefi e panelu sterowania,• zalanie strefy panelu sterowania,• d ugi nacisk na jaki przycisk, mog spowodowa
w czenie si sygna u d wi kowego. Aby przerwasygna d wi kowy, nale y usun przyczynnieprawid owo ci dzia ania. Je li przyczyna anomalii nie zostanie usuni ta, sygna d wi kowy pozostanie w czony a p yta wy czy si .

72
PLPraktyczne porady dotycz ce gotowania
ªGotowanie pod ciśnieniemGarnek ciśnieniowy
Smażenie
Grilowanie Gotowanie
Go
tow
an
ie n
a
du
żym
og
niu
Go
tow
an
ie
na d
uży
m
og
niu
Go
tow
an
ie n
a ś
red
nim
og
niu
Go
tow
an
ie n
a
wo
lnym
og
niu
Go
tow
an
ie
na b
ard
zo
wo
lnym
og
niu
•
•
¶Naleśniki Gotowanie na dużym ogniu i przysmażanie
(Pieczenie, Befsztyki, Zrazy, Filety rybne, Smażone jajka)
¶
§Szybkie zagęszczenie (Płynne sosy)Woda gorąca (Makarony, Ryż, Warzywa)Mleko
§
SWolne zagęszczanie (Sosy gęste)
S
¢Gotowanie na wodzie Gotowanie pod ciśnieniem po gwizdku
¢
£
™
Gotowanie na wolnym ogniu (mięso duszone) Podgrzewanie potraw
™
¡Czekolada rozpuszczona Utrzymywanie potraw w temperaturze
73
PL
Zalecenia i rodki ostro no ci
! Urz dzenie zosta o zaprojektowane i wyprodukowane zgodnie z mi dzynarodowymi normami bezpiecze stwa. Poni sze ostrze enia dotycz zasad bezpiecze stwa i nale y je uwa nie przeczyta .
Niniejsze urz dzenie jest zgodne z nast puj cymi dyrektywami unijnymi:
- 2006/95/EWG z 12/12/06 (Niskie napiecie) wraz z pózniejszymi zmianami- 2004/108/EWG z 15/12/04 (Kompatybilno elektromagnetyczna) wraz z pó niejszymi zmianami- 93/68/EWG z 22/07/93 wraz z pó niejszymi zmianami.- 1275/2008 stand-by/off mode.
Ogólne zasady bezpiecze stwa
! Sprawdza , czy wlot powietrza poprzez kratk wentylatora nigdy nie jest zatkany. Zabudowana p yta grzejna wymaga dobrego obiegu powietrza dla zapewnienia ch odzenia elementów elektronicznych.• Niniejsze urz dzenie przeznaczone jest do u ytku
domowego.• Nie nale y instalowa urz dzenia na zewn trz, nawet
w zadaszonym miejscu, poniewa wystawienie go na dzia anie deszczu i burz jest bardzo niebezpieczne.
• Nie dotykac urzadzenia stojac przy nim boso lub majac mokre albo wilgotne rece badz stopy.
• Urz dzenie powinno by u ywane przez osoby doros e jedynie w celach kulinarnych, zgodnie ze wskazówkami zawartymi w instrukcji u ytkownika. Wszelkie inne próby u ycia urz dzenia (np. do ogrzewania pomieszcze ) uwa a si za niew a ciwe i niebezpieczne. Producent nie ponosi odpowiedzialno ci za uszkodzenia wynikaj ce z niew a ciwej i nierozs dnej eksploatacji urz dzenia.
• Plyta szklano-ceramiczna jest odporna na uderzenia, moze jednak ulec uszkodzeniu (lub ewentualnie peknieciu), jesli zostanie uderzona ostrym przedmiotem, np. jakims narzedziem. W takim przypadku nalezy natychmiast odlaczyc urzadzenie od zasilania elektrycznego i wezwac Serwis Techniczny.
• Nale y uwa a , aby przewody zasilaj ce pozosta e domowe urz dzenia elektryczne nie styka y si z rozgrzanymi elementami p yty grzejnej.
• Nie nalezy zapominac, ze temperatura pól grzejnych pozostaje wysoka przez co najmniej trzydziesci minut po ich wylaczeniu. Cieplo szczatkowe jest równiez sygnalizowane przez odpowiedni wskaznik (patrz Uruchomienie i uzytkowanie).
• Utrzymywa w odpowiedniej odleg o ci od p yty grzejnej ka dy przedmiot, który mo e si stopi , np. przedmioty plastikowe, aluminiowe lub produkty
z du zawarto ci cukru. Szczególnie uwa a na wszelkie opakowania i ta my plastikowe lub aluminiowe: ich pozostawienie na jeszcze gor cych lub ciep ych powierzchniach mo e spowodowa powa ne uszkodzenie p yty.
• Nale y si upewnia , czy uchwyty garnków s zawsze zwrócone w kierunku wewn trznej cz ci p yty grzejnej, aby unikn ich przypadkowego potr cenia.
• Nie wyci ga wtyczki z gniazdka ci gn c za kabel - nale y trzyma za wtyczk .
• Nie czy ci urz dzenia ani nie wykonywa czynno ci konserwacyjnych bez uprzedniego od czenia wtyczki od sieci elektrycznej.
• Nie jest przewidziane, aby urz dzenie by o u ywane przez osoby (w tym dzieci) o ograniczonych mo liwo ciach fi zycznych lub umys owych, przez osoby bez do wiadczenia lub bez znajomo ci urz dzenia, chyba e pod nadzorem osoby odpowiedzialnej za ich bezpiecze stwo, jak równie przez osoby, które nie zosta y zapoznane ze wst pnymi instrukcjami dotycz cymi u ytkowania urz dzenia.
• Je li s , nie patrze d ugo na gor ce pole alogenowe.
• Nie dopu ci aby dzieci bawi y si urz dzeniem.• Zabroni dzieciom bawienia si z urz dzeniem.• Na pycie nie nale y ka metalowych przedmiotów (no y,
y ek, pokrywek itp.), poniewa mog si nagrzewa .• Urz dzenie nie jest przeznaczone do tego,
aby by o w czane przy u yciu zewn trznego przeka nika czasowego lub osobnego systemu sterowania zdalnego.
Utylizacja • Utylizacja opakowania: nale y stosowa si do lokalnych
przepisów, dzi ki temu opakowania b d mog y zosta poddane reutylizacji.
• Dyrektywa europejska 2002/96/WE w sprawie zu ytego sprz tu elektrycznego oraz elektronicznego (RAEE) przewiduje, e domowe urz dzenia elektryczne nie mog podlega zwyk emu cyklowi utylizacji sta ych odpadów miejskich. Zu yte urz dzenia powinny by zbierane oddzielnie w celu zoptymalizowania stopnia odzysku i recyklingu materia ów, które zawieraj , oraz aby zapobiec potencjalnym szkodom dla zdrowia i rodowiska. Symbol przekre lonego kosza umieszczony
na wszystkich produktach przypomina o obowi zku selektywnego gromadzenia tych odpadów.
W celu uzyskania bli szych informacji dotycz cych prawid owego z omowania sprz tu domowego, u ytkownicy mog si zwróci do w a ciwych s u b miejskich lub do skupuj cych go sprzedawców.

74
PL
Konserwacja i utrzymanie
Od czenie pr du elektrycznegoPrzed ka d czynno ci nale y od czy urz dzenie od sieci zasilania elektrycznego.
Mycie urz dzenia! Unika stosowania rodków czyszcz cych o w a ciwo ciach ciernych lub korozyjnych, takich jak produkty w sprayu do
barbecue i piecyków, odplamiacze i rodki przeciwrdzewne, detergenty w proszku oraz g bki z powierzchni cieraj c : mog one w sposób nieodwracalny zarysowa powierzchni .! Do czyszczenia urzadzenia nigdy nie nalezy uzywac oczyszczaczy parowych lub wysokocisnieniowych.
• W ramach zwyk ej konserwacji wystarczy przemywa p yt wilgotn g bk i osusza j papierowym r cznikiem kuchennym.
• Je li p yta jest szczególnie silnie zabrudzona, wyczy ci j przy pomocy odpowiedniego produktu do czyszczenia powierzchni szklano-ceramicznych, sp uka i osuszy .
• W celu eliminacji najtrudniejszych do usuni cia zanieczyszcze pos ugiwa si odpowiedni skrobaczk . Usuwa zanieczyszczenia zaraz jak tylko jest to mo liwe, nie czekaj c a urz dzenie ostygnie, tak aby resztki ywno ci nie stwardnia y. Znakomite wyniki mo na
uzyska stosuj c g bk drucian ze stali nierdzewnej - specjaln do szklano-ceramicznych p yt grzejnych - nas czon wod i myd em.
• Je li na p ycie grzejnej stopi si przypadkowo przedmioty lub materia y, takie jak plastik albo cukier, nale y je usun przy pomocy skrobaczki, dopóki powierzchnia jest jeszcze ciep a.
• Po oczyszczeniu p yta mo e zosta pokryta odpowiednim
produktem do konserwacji i ochrony: jego niewidoczna warstwa chroni powierzchni w przypadku wykipienia potraw podczas gotowania. Zaleca si wykonywanie tych czynno ci, gdy urz dzenie jest letnie lub zimne.
• Nale y pami ta , aby zawsze sp uka p yt czyst wod i dok adnie j osuszy : resztki produktów mog yby bowiem przyklei si do jej powierzchni podczas nast pnego gotowania.
Rama ze stali nierdzewnej (tylko w modelach z ramka)Na stali nierdzewnej moga powstac plamy w przypadku pozostawienia na jej powierzchni przez dluzszy czas bardzo twardej wody lub w przypadku stosowania srodków czystosci zawierajacych fosfor.Zaleca si obfi cie sp uka i dok adnie osuszy p yt po umyciu. W przypadku rozlania wody, nale y j jak najszybciej dok adnie wytrze .
! Niektóre p yty grzejne maj ramk aluminiow , która jest podobna do ramki ze stali nierdzewnej. Nie nale y stosowa produktów do mycia i odt uszczania innych ni przeznaczone do aluminium.
Demonta p ytyW razie konieczno ci zdemontowania p yty grzejnej:1. odkr ci ruby przy pomocy których spr yny centruj ce s przymocowane do boków p yty;2. poluzowa ruby uchwytów mocuj cych w rogach;3. wyj p yt grzejn z mebla.
! Odradza si ingerencj w wewn trzne mechanizmy urz dzenia z zamiarem dokonania naprawy. W przypadku awarii skontaktowa si z Serwisem.
Opis techniczny modeli
W tych tabelach podane s , kolejno dla ka dego modelu, warto poch anianej energii, typ elementu grzejnego oraz rednica ka dego pola grzejnego.
Legenda:H = hilight pojedynczeHD = hilight podwójneHT = hilight potrójneAD = halogenowe podwójne
Płyty grzejne
Pola grzejne
Tylne lewe
Tylne prawe
Przednie lewe
Przednie prawe
Moc całkowita
Moc (w W)
HD 2300
H 1400
H 1200
HD 1800
Œrednica (w mm)
210
160
145
180
6700
Moc (w W)
HT 2200/1000
H 1400
H 1200
H 1800
Œrednica (w mm)
230/180/120
145
145
180
6600
VRA 640 X S VRA 641 D B SVRA 641 D X S
VRA 640 C SVRA 640 C S
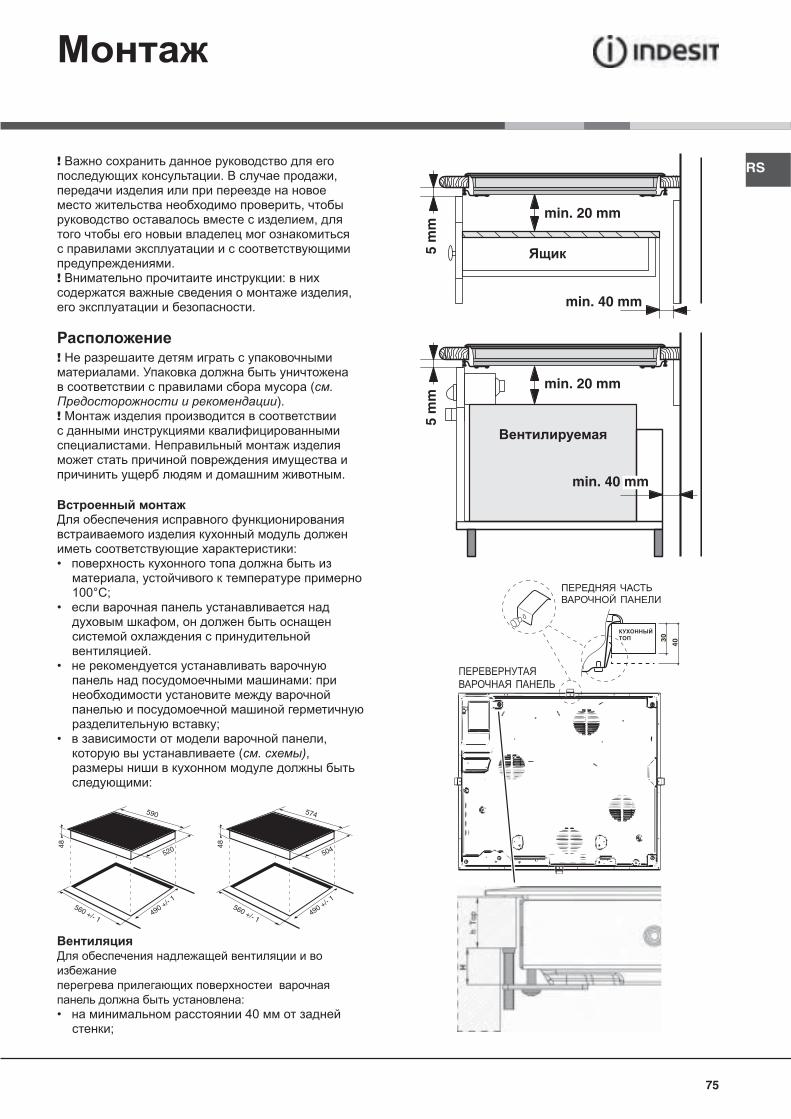
75
RS!. ,
,,
.! :
,.
!.
( .).
!
.
.
:•
,100°C;
•,
.•
:
;• ,
( . ),
:
560 +/- 1490 +/- 1
48
590
520
560 +/- 1490 +/- 1
48
574
504
:• 40
;
5 m
m
min. 20 mm
min. 20 mm
min. 40 mm
Ящик5 m
m
min. 40 mm
Вентилируемая

76
RS•
20 .• ,
,,
600 .
.,
,
.
:• 30 : 17,5 ;• 40 : 7,5 ;
:1.
4 ,;
2.,
.3. :
, 4 () ,
,.
! ,.
!
.!
,.
!
,.
(
).
,.
:Типовое
напряжение и частота сети
Электрический провод Подсоединение проводов
230-240V 1+N ~220-240V 1+N ~
50/60 Hz
: желто-зеленый;
N: 2 синий провода
вместе на
L: коричневый
вместе с черным
:
• 400 - 2+N ~ 50/60 • 220-240 3 ~ 50/60 • 230-240B 3 ~ 50/60 Hz• 400 - 2+2N ~ 50/60
:Типовое
напряжение и частота сети
Электрический провод Подсоединение проводов
400V - 2+N ~50/60 Hz
230-240V 3 ~220-240V 3 ~
50/60 Hz
: желто-зеленый;
N: 2 синий провода
вместе на
L1: черный
L2: коричневый
400V - 2+2N ~50/60 Hz
: желто-зеленый;
N1: синий
N2: синий
L1: черный
L2: коричневый
:
• 400 3 - N ~ 50/60 :
!.
1.H05RR-F ,
( : 25 ).2.
( .).
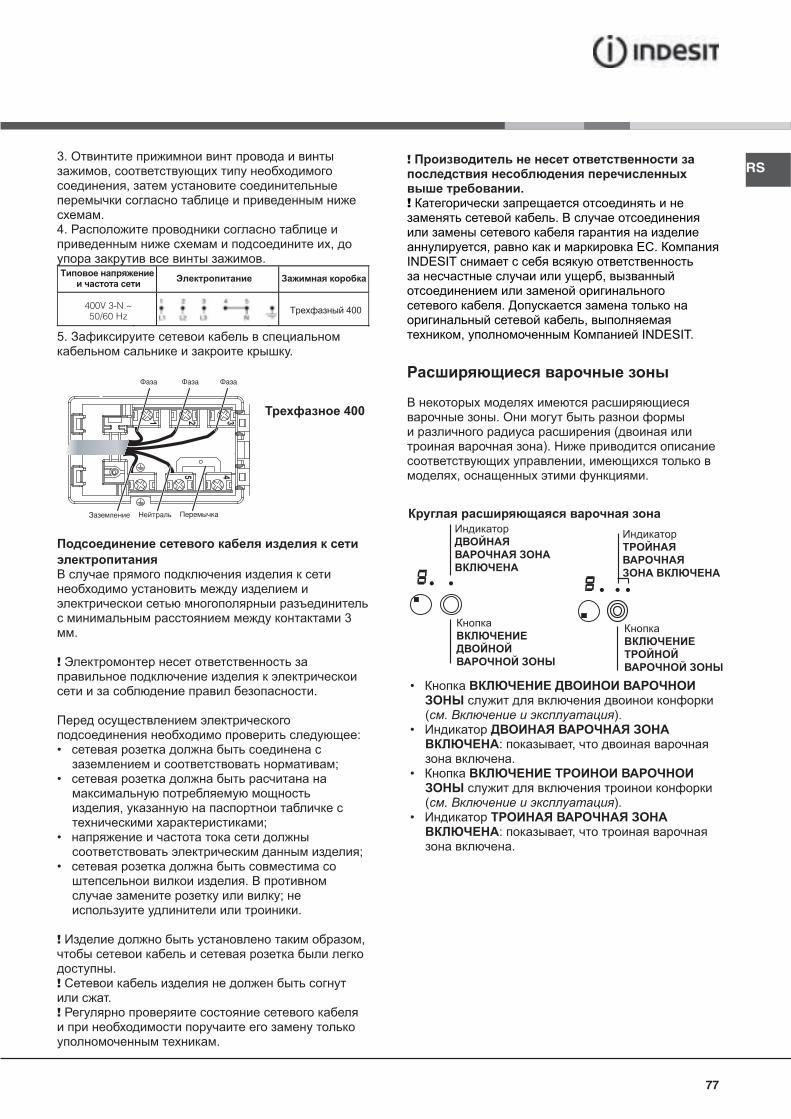
77
RS3.
,,
.4.
,.
Типовое напряжение и частота сети
Электропитание Зажимная коробка
400V 3-N ~50/60 Hz
Трехфазный 400
5..
400
3 .
!
.
:•
;•
,;
•;
•.
;.
! ,
.!
.!
.
!
.!
.
, .INDESIT
,
.,
, INDESIT.
1 2 3
5 4
. (
).,
, .
•
( . ).•
: ,.
•
( . ).•
: ,.

78
RS!
,
.
, .
!
..
! - +.
,.
,
- +.•
- +.
:
• -:.
power
power.
,.
2
.,
« »,
.
. 2
,
,
- +.
:.
.
: ,.
,
:, .
( ,
. .).,
. ( .,
) :
, ,.
.
,
..
:
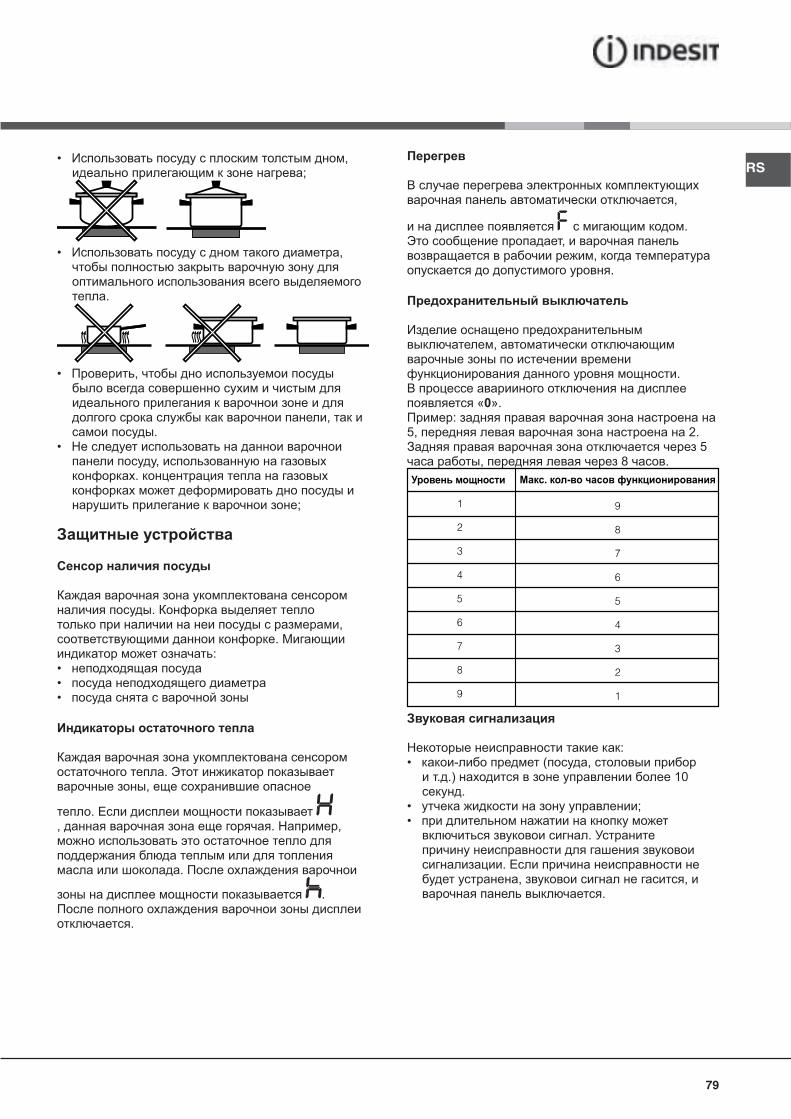
79
RS• ,
;
• ,
.
• ,
,.
•,
.
;
.,
.:
•••
.,
., . ,
.
.
.
,
F .,
,.
,
.
«0».:
5, 2. 5
, 8 .Уровень мощности
1
2
3
4
5
6
7
8
9
Макс. кол-во часов функционирования
9
8
7
6
5
4
3
2
1
:• - ( ,
. .) 10 .
• ;•
.
., ,
.
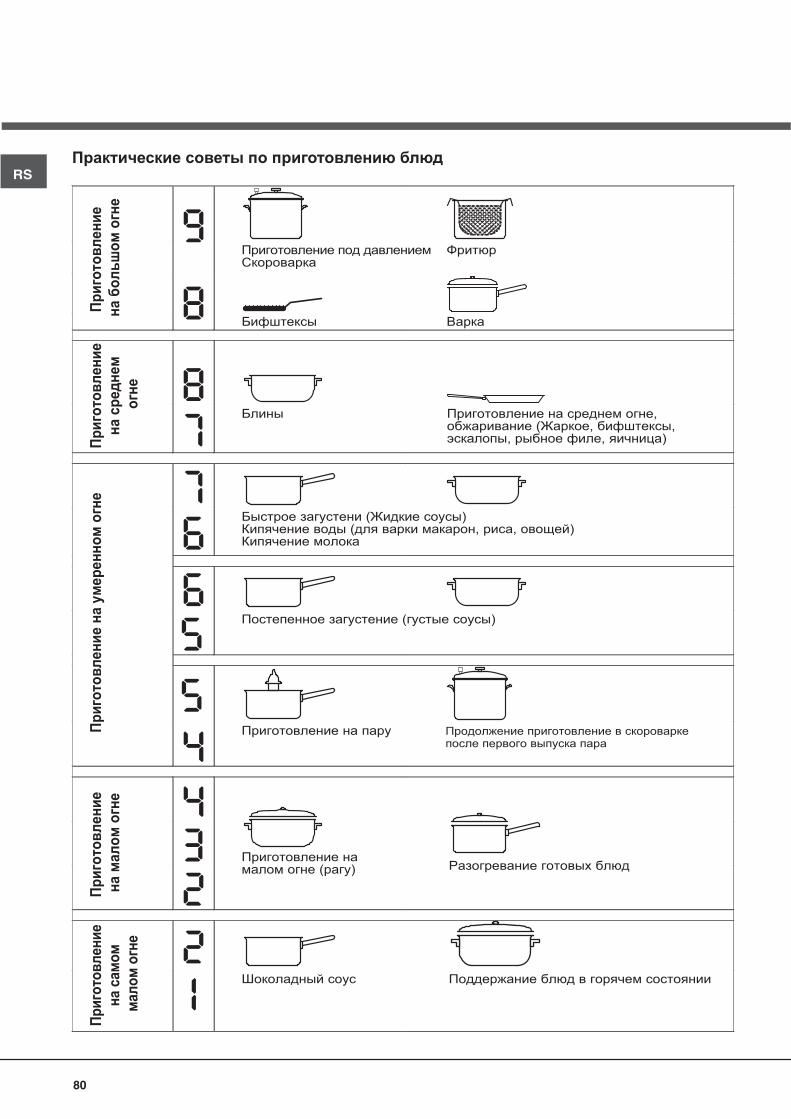
80
RS
ªПриготовление под давлениемСкороварка
Фритюр
Бифштексы Варка
Пр
иго
тов
лен
ие
на
бо
ль
шо
м о
гне
Пр
иго
тов
лен
ие
на
ср
ед
не
м
огн
е
Пр
иго
тов
лен
ие н
а у
мер
ен
но
м о
гне
Пр
иго
тов
лен
ие
на
ма
ло
м о
гне
Пр
иго
тов
лен
ие
на с
ам
ом
мал
ом
огн
е
•
•
¶Блины Приготовление на среднем огне,
обжаривание (Жаркое, бифштексы, эскалопы, рыбное филе, яичница)
¶
§Быстрое загустени (Жидкие соусы)Кипячение воды (для варки макарон, риса, овощей)Кипячение молока
§
SПостепенное загустение (густые соусы)
S
¢Приготовление на пару Продолжение приготовление в скороварке
после первого выпуска пара
¢
£
™
Приготовление на малом огне (рагу) Разогревание готовых блюд
™
¡Шоколадный соус Поддержание блюд в горячем состоянии

81
RS!
.,
.
:
- 2006/95/CEE 12/12/06 ( )
- 2004/108/ 15/12/04 ()
- 93/68/ 22.07.93 .- 1275/2008 stand-by/off mode.
! ,.
.•
.• ,
,.
• ,.
•,
,.
( : )
., ,
.•
, ( )
.
.•
.• ,
. ( .
).•
,
, , ,.
,:
,.
• ,,
.•
,.
•
.• ( )
,,
,,,
,.
•,
.•
.• ( , ,
. .) ,.
•
.
• :
.• 2002/96/
.
,.
, ,.
.
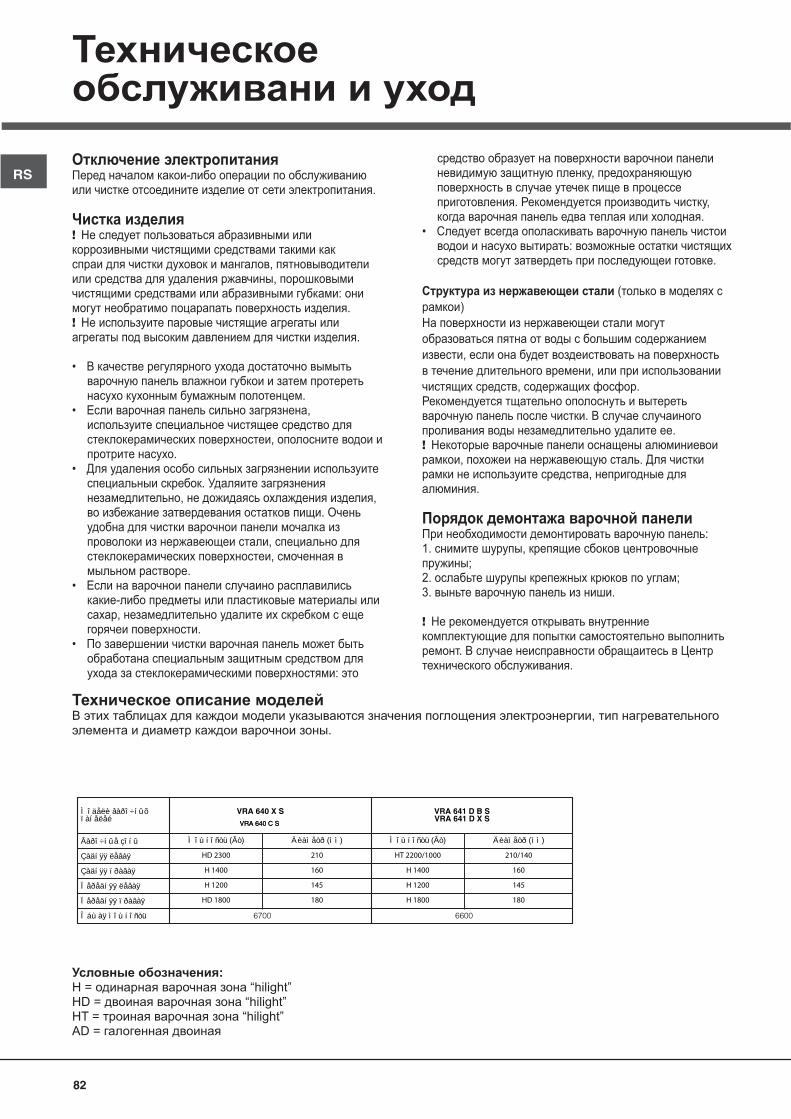
82
RS
- .
!
,
, :
.!
.
•
.• ,
,
.•
. , ,
.
, ,
.•
- ,
.•
:
,
. , .
• :
.
( )
, ,
, .
. .
! , .
, .
:
1. , ;
2. ;3. .
!
. .
,
.
:H = “hilight”HD = “hilight”HT = “hilight”AD =
Ìîäåëè âàðî÷íûõïàíåëåé
Âàðî÷íûå çîíû
Çàäíÿÿ ëåâàÿ
Çàäíÿÿ ïðàâàÿ
Ïåðåäíÿÿ ëåâàÿ
Ïåðåäíÿÿ ïðàâàÿ
Îáùàÿ ìîùíîñòü
Ìîùíîñòü (Âò)
HD 2300
H 1400
H 1200
HD 1800
Äèàìåòð (ìì)
210
160
145
180
6700
Ìîùíîñòü (Âò)
HT 2200/1000
H 1400
H 1200
H 1800
Äèàìåòð (ìì)
210/140
160
145
180
6600
VRA 640 X S VRA 641 D B SVRA 641 D X S
VRA 640 C SVRA 640 C S
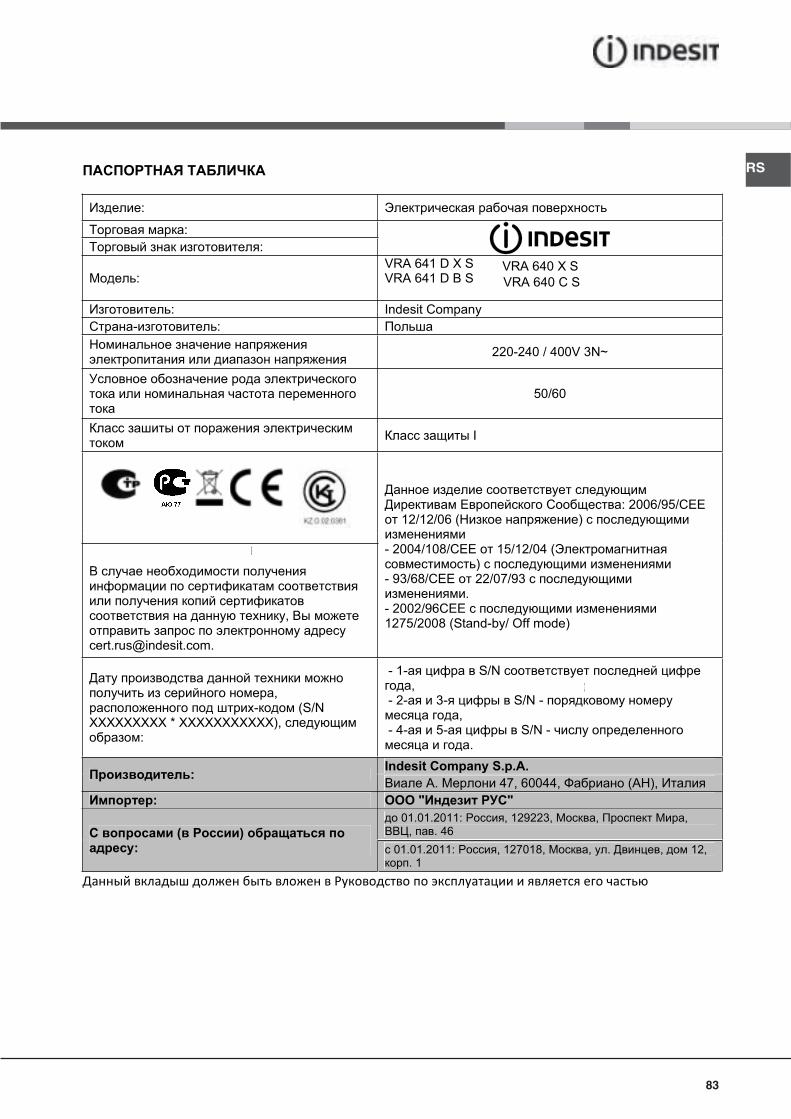
83
RS
: :
:
: VRA 641 D X S VRA 641 D B S
VRA 640 X S
: Indesit Company
- :
220-240 / 400V 3N~
50/60
I
: 2006/95/CEE
12/12/06 ( )
- 2004/108/ 15/12/04 ( )
- 93/68/ 22/07/93 .
- 2002/96CEE 1275/2008 (Stand-by/ Off mode)
,
,
- (S/N XXXXXXXXX * XXXXXXXXXXX),
:
- 1- S/N ,
- 2- 3- S/N - ,
- 4- 5- S/N - .
: Indesit Company S.p.A. . 47, 60044, ( ),
: " "
( ) :
01.01.2011: , 129223, , , , . 46
01.01.2011: , 127018, , . , 12, . 1
VRA 640 C S
84
RS
04/2012 - 195101077.00XEROX FABRIANO