Artlantis introduction -...
15
Artlantis introduction L' interface d'Artlantis De quoi se compose Artlantis La navigation La radiosité Les textures Les cartes postales Les arrière-plans Gestion du soleil (héliodon) Les objets 3D Les vues parallèles Les panoramas Quicktime VR Les animations
Transcript of Artlantis introduction -...
Artlantisintroduction
L' interface d'Artlantis De quoi se compose Artlantis La navigation La radiosité Les textures Les cartes postales Les arrière-plans Gestion du soleil (héliodon) Les objets 3D Les vues parallèles Les panoramas Quicktime VR Les animations
SketchUp version 6.0 exercices
254
Artlantis Studio 2 Tutorial 3 /17
A/ The Interface of Artlantis Studio
NOTE: The size of the real-time preview window can be enlarged or reduced. You can even
organize your work on two screens as there is no limitation in size. In the main menu go to Display
> Enlarge; or Display > Reduce
Real-Time Preview Window One of the strengths of Artlantis is its real-
time preview window. Every change you
make to camera positions, shaders,
textures, objects, sun, lights, etc. will
immediately appear in the preview window.
It displays scenes in permanent radiosity that are consistent with the final rendering.
Customizable Toolbar With a right-click you can
add or remove buttons
from the toolbar
Catalog Here you can find all the Artlantis library features
known as Media: shaders, objects,
pictures/textures, and postcards. Organized in
three main partitions, the Catalog offers a very
user-friendly interface that reflects the structure of
your hard drive. New folders can be added by
clicking the + sign in the bottom right-hand corner
of the Catalog.
To open it, go to Windows/Catalog menu.
Camera Inspector This is the main organizer of your
presentations. Each camera position
can have different sun, light,
background or other customized
parameters. This way you can work
and store day scenes and night
scenes in the same file.
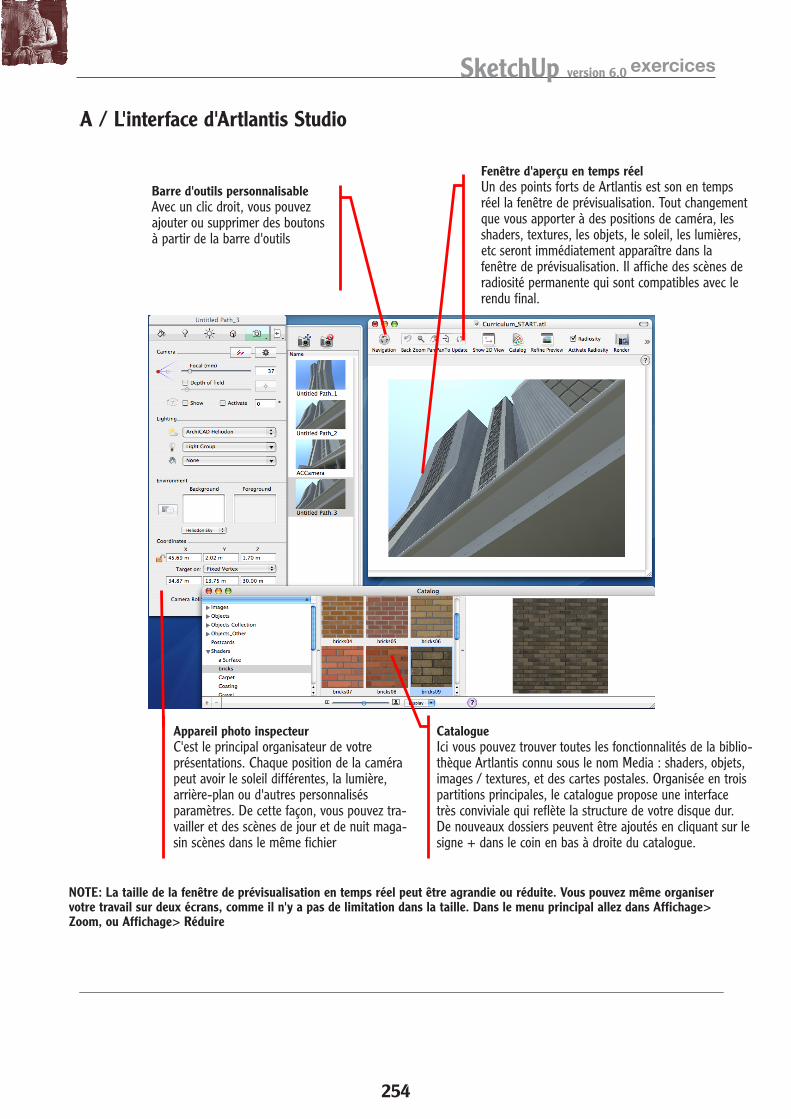
Barre d'outils personnalisableAvec un clic droit, vous pouvez ajouter ou supprimer des boutons à partir de la barre d'outils
Appareil photo inspecteurC'est le principal organisateur de votreprésentations. Chaque position de la camérapeut avoir le soleil différentes, la lumière,arrière-plan ou d'autres personnalisésparamètres. De cette façon, vous pouvez tra-vailler et des scènes de jour et de nuit maga-sin scènes dans le même fichier
NOTE: La taille de la fenêtre de prévisualisation en temps réel peut être agrandie ou réduite. Vous pouvez même organiser votre travail sur deux écrans, comme il n'y a pas de limitation dans la taille. Dans le menu principal allez dans Affichage> Zoom, ou Affichage> Réduire
CatalogueIci vous pouvez trouver toutes les fonctionnalités de la biblio-thèque Artlantis connu sous le nom Media : shaders, objets, images / textures, et des cartes postales. Organisée en trois partitions principales, le catalogue propose une interface très conviviale qui reflète la structure de votre disque dur. De nouveaux dossiers peuvent être ajoutés en cliquant sur le signe + dans le coin en bas à droite du catalogue.
A / L'interface d'Artlantis Studio
Fenêtre d'aperçu en temps réelUn des points forts de Artlantis est son en temps réel la fenêtre de prévisualisation. Tout changement que vous apporter à des positions de caméra, les shaders, textures, les objets, le soleil, les lumières, etc seront immédiatement apparaître dans la fenêtre de prévisualisation. Il affiche des scènes de radiosité permanente qui sont compatibles avec le rendu final.
SketchUp version 6.0 exercices
255
Artlantis Studio 2 Tutorial 4 /17
B/ What are Artlantis Media?
The Media are the library parts of Artlantis:
All Artlantis Media can be applied with a simple drag & drop into the scenes.
To apply them, open the Catalog by clicking on its icon in the Toolbar, or from the menu:
Windows > Catalog.
To make the Media you’ll work with in the Catalog appear, click on the sign in the bottomleft-
hand corner of the Catalog. Browse for the Tutorial folder, select it and click Open. All three sub-
folders containing Shaders, Objects and Pictures will appear with the appropriate content.
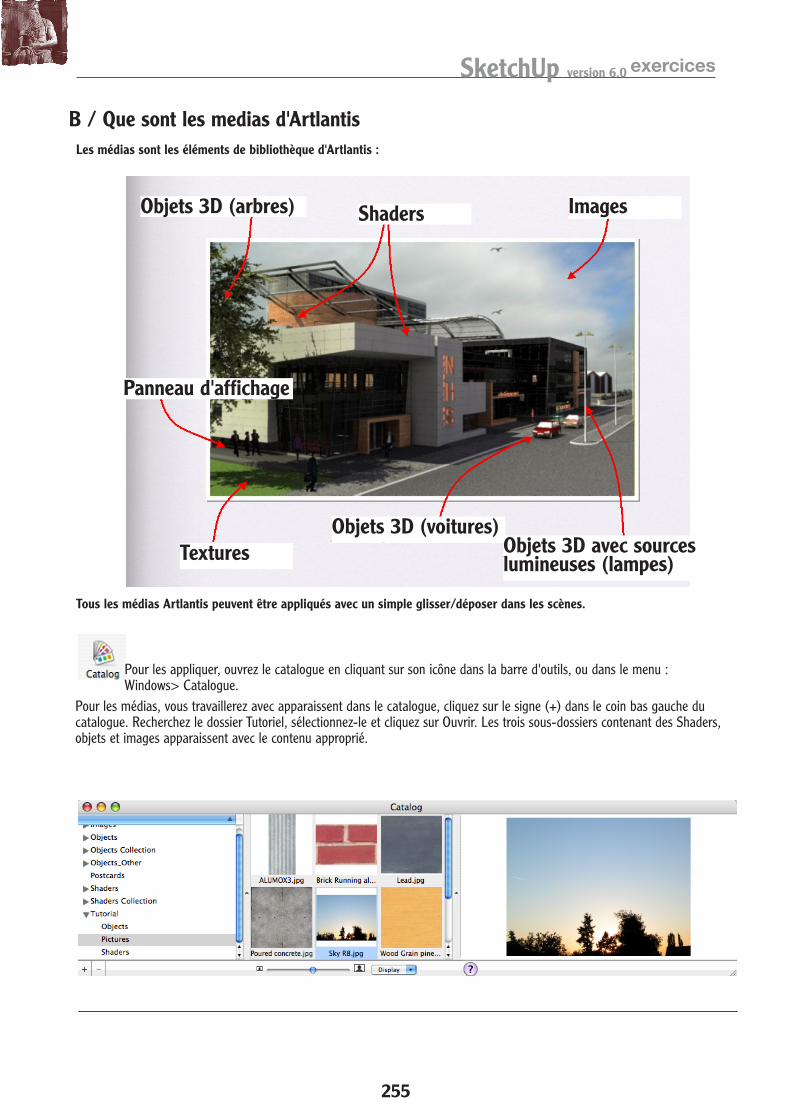
Les médias sont les éléments de bibliothèque d'Artlantis :
Tous les médias Artlantis peuvent être appliqués avec un simple glisser/déposer dans les scènes.
Pour les appliquer, ouvrez le catalogue en cliquant sur son icône dans la barre d'outils, ou dans le menu : Windows> Catalogue.
Pour les médias, vous travaillerez avec apparaissent dans le catalogue, cliquez sur le signe (+) dans le coin bas gauche du catalogue. Recherchez le dossier Tutoriel, sélectionnez-le et cliquez sur Ouvrir. Les trois sous-dossiers contenant des Shaders, objets et images apparaissent avec le contenu approprié.
B / Que sont les medias d'Artlantis
Objets 3D (arbres)
Objets 3D (voitures)Objets 3D avec sources lumineuses (lampes)
Shaders Images
Textures
Panneau d'affichage
SketchUp version 6.0 exercices
256
Artlantis Studio 2 Tutorial 5 /17
C/ Navigation
Each Inspector has a drawer with a list of the appropriate items present in the scene. The list in the
Perspective Camera Inspector will highlight the existing camera positions.
In the upper part of the drawers you will find + and x signs. Click on the + to duplicate a camera.
1/ Set the right camera position:
D/ Radiosity
Activate Radiosity in the toolbar! At that very moment the preview will be
recalculated and displayed in permanent radiosity. The image is
consistent with the final rendering.
NOTE: If the checkbox is not visible, right-click on the Toolbar and select it from the list. You can
also customize the toolbar.
E/ Shaders
Shaders are parametric textures applied to surfaces of the 3D model. To detect the right one,
simply click on its surface in the real-time preview window.
Choose the Shaders icon in the toolbar and go to the shaders’ inspector.
Choose a surface directly in the preview window and the settings of the material will be
automatically highlighted in the inspector. Change the parameters and the preview window will
display the changes instantly.
Apply shaders from the catalog. Choose a shader (from the middle part of the Catalog) and drag &
drop it on a surface directly in the preview window. To change the shader, drag another one from
the Catalog and drop it onto the same surface.
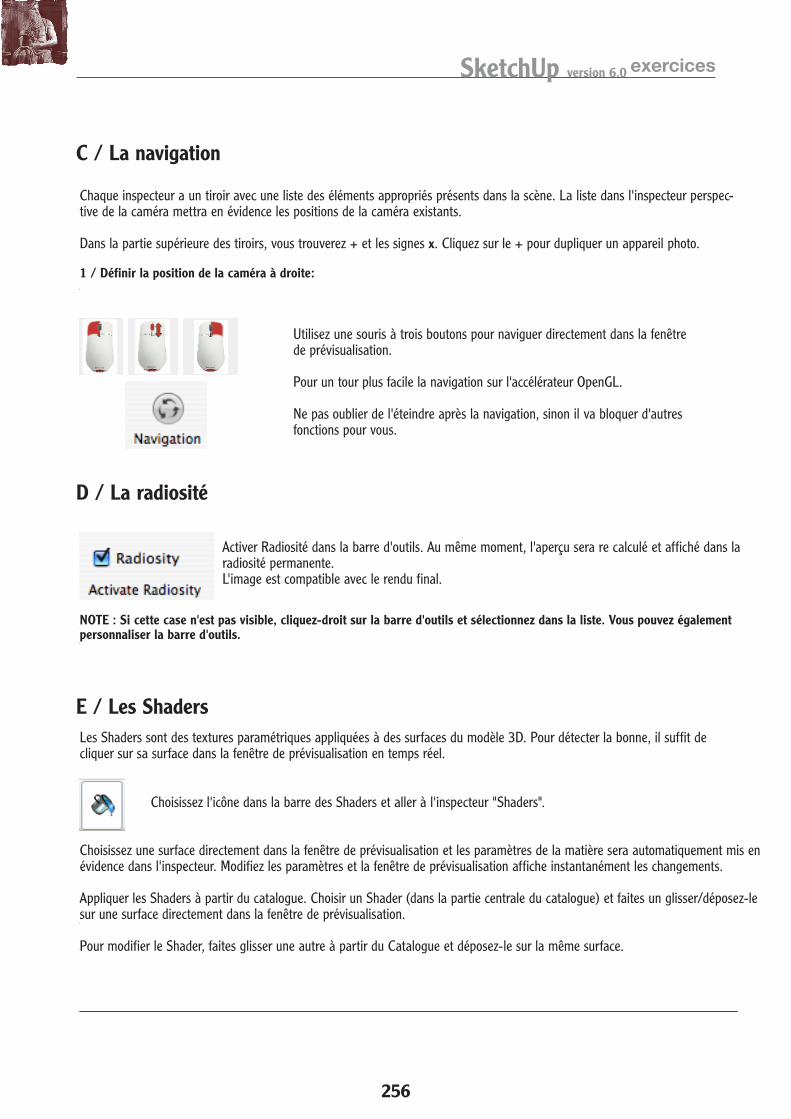
Use a three-button mouse to navigate directly in
the preview window.
For an easier navigation turn on the OpenGL
accelerator. Don’t forget to turn it off after
navigation, otherwise it will block further functions
for you.
C / La navigation
D / La radiosité
E / Les Shaders
Chaque inspecteur a un tiroir avec une liste des éléments appropriés présents dans la scène. La liste dans l'inspecteur perspec-tive de la caméra mettra en évidence les positions de la caméra existants.
Dans la partie supérieure des tiroirs, vous trouverez + et les signes x. Cliquez sur le + pour dupliquer un appareil photo.
1 / Définir la position de la caméra à droite:
Utilisez une souris à trois boutons pour naviguer directement dans la fenêtre de prévisualisation.
Pour un tour plus facile la navigation sur l'accélérateur OpenGL.
Ne pas oublier de l'éteindre après la navigation, sinon il va bloquer d'autres fonctions pour vous.
Choisissez une surface directement dans la fenêtre de prévisualisation et les paramètres de la matière sera automatiquement mis en évidence dans l'inspecteur. Modifiez les paramètres et la fenêtre de prévisualisation affiche instantanément les changements.
Appliquer les Shaders à partir du catalogue. Choisir un Shader (dans la partie centrale du catalogue) et faites un glisser/déposez-le sur une surface directement dans la fenêtre de prévisualisation.
Pour modifier le Shader, faites glisser une autre à partir du Catalogue et déposez-le sur la même surface.
Activer Radiosité dans la barre d'outils. Au même moment, l'aperçu sera re calculé et affiché dans la radiosité permanente.L'image est compatible avec le rendu final.
Les Shaders sont des textures paramétriques appliquées à des surfaces du modèle 3D. Pour détecter la bonne, il suffit de cliquer sur sa surface dans la fenêtre de prévisualisation en temps réel.
Choisissez l'icône dans la barre des Shaders et aller à l'inspecteur "Shaders".
NOTE : Si cette case n'est pas visible, cliquez-droit sur la barre d'outils et sélectionnez dans la liste. Vous pouvez également personnaliser la barre d'outils.
SketchUp version 6.0 exercices
257
Artlantis Studio 2 Tutorial 6 /17
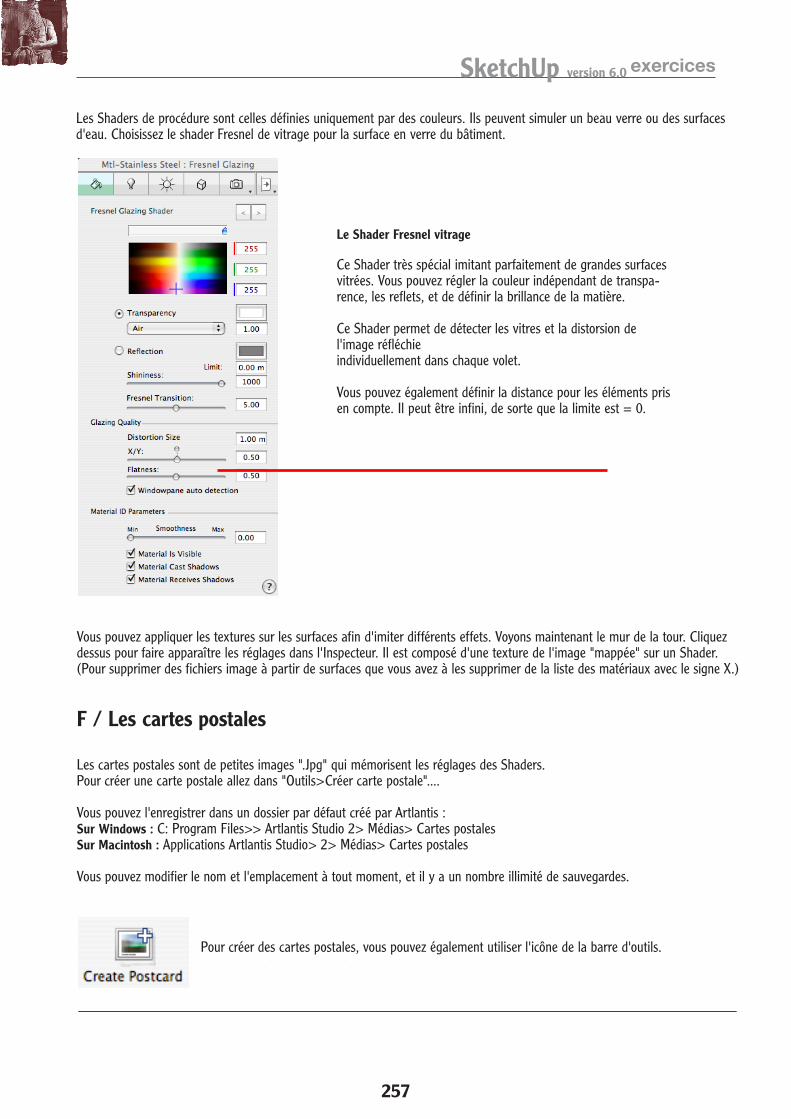
Procedural Shaders are those defined only by colors. They can simulate beautiful glass or water
surfaces. Choose the Fresnel Glazing shader for the glass surface of the building.
You can map textures on surfaces to imitate different effects. Let’s check the wall of the tower, so
click on it to make the settings in the inspector appear. It is composed of an image texture mapped
on a shader. (To delete image files from surfaces you have to delete them from the list of materials
with the X sign.)
F/ Postcards
Postcards are small .jpg images that memorize the settings of shaders.
To create a postcard go to Tools > Create Postcard….
You can save it in a default folder created by Artlantis:
On Windows: C: > Program Files > Artlantis Studio 2 > Media > Postcards
On Macintosh: Applications > Artlantis Studio 2 > Media > Postcards
You can change the name and the location at any time, and there are an unlimited number of
saves.
To create postcards, you can also use the icon from the toolbar.
Fresnel Glazing Shader This very special shader perfectly
imitates large glass surfaces. You can set
independent color to transparency,
reflections, and define the shininess of
the material.
This shader can detect the windowpanes
and the distortion of the reflected image
individually in each pane.
You can also set the distance for the
reflected elements. It can be infinite, so
the limit is = 0.
F / Les cartes postales
Le Shader Fresnel vitrage
Ce Shader très spécial imitant parfaitement de grandes surfaces vitrées. Vous pouvez régler la couleur indépendant de transpa-rence, les reflets, et de définir la brillance de la matière.
Ce Shader permet de détecter les vitres et la distorsion de l'image réfléchieindividuellement dans chaque volet.
Vous pouvez également définir la distance pour les éléments pris en compte. Il peut être infini, de sorte que la limite est = 0.
Vous pouvez appliquer les textures sur les surfaces afin d'imiter différents effets. Voyons maintenant le mur de la tour. Cliquez dessus pour faire apparaître les réglages dans l'Inspecteur. Il est composé d'une texture de l'image "mappée" sur un Shader. (Pour supprimer des fichiers image à partir de surfaces que vous avez à les supprimer de la liste des matériaux avec le signe X.)
Les cartes postales sont de petites images ".Jpg" qui mémorisent les réglages des Shaders.Pour créer une carte postale allez dans "Outils>Créer carte postale"....
Vous pouvez l'enregistrer dans un dossier par défaut créé par Artlantis :Sur Windows : C: Program Files>> Artlantis Studio 2> Médias> Cartes postalesSur Macintosh : Applications Artlantis Studio> 2> Médias> Cartes postales
Vous pouvez modifier le nom et l'emplacement à tout moment, et il y a un nombre illimité de sauvegardes.
Les Shaders de procédure sont celles définies uniquement par des couleurs. Ils peuvent simuler un beau verre ou des surfaces d'eau. Choisissez le shader Fresnel de vitrage pour la surface en verre du bâtiment.
Pour créer des cartes postales, vous pouvez également utiliser l'icône de la barre d'outils.
SketchUp version 6.0 exercices
258
Artlantis Studio 2 Tutorial 7 /17
The new postcard will appear automatically in the Postcard folder of the Catalog. To apply the
attributes of a material from the postcard, simply drag & drop it into the preview window on the
desired surface.
Drag the postcards you’ve received with this tutorial in the same folders with the existing ones to
make them appear in the Catalog (or you can reorganize the folders any way you like).
NOTE: If you need to refresh the contents of any folder in the Catalog, select it and right- click on
Reload Favorites.
Let’s apply settings from these postcards into the scene:
building support glass surface infinite ground
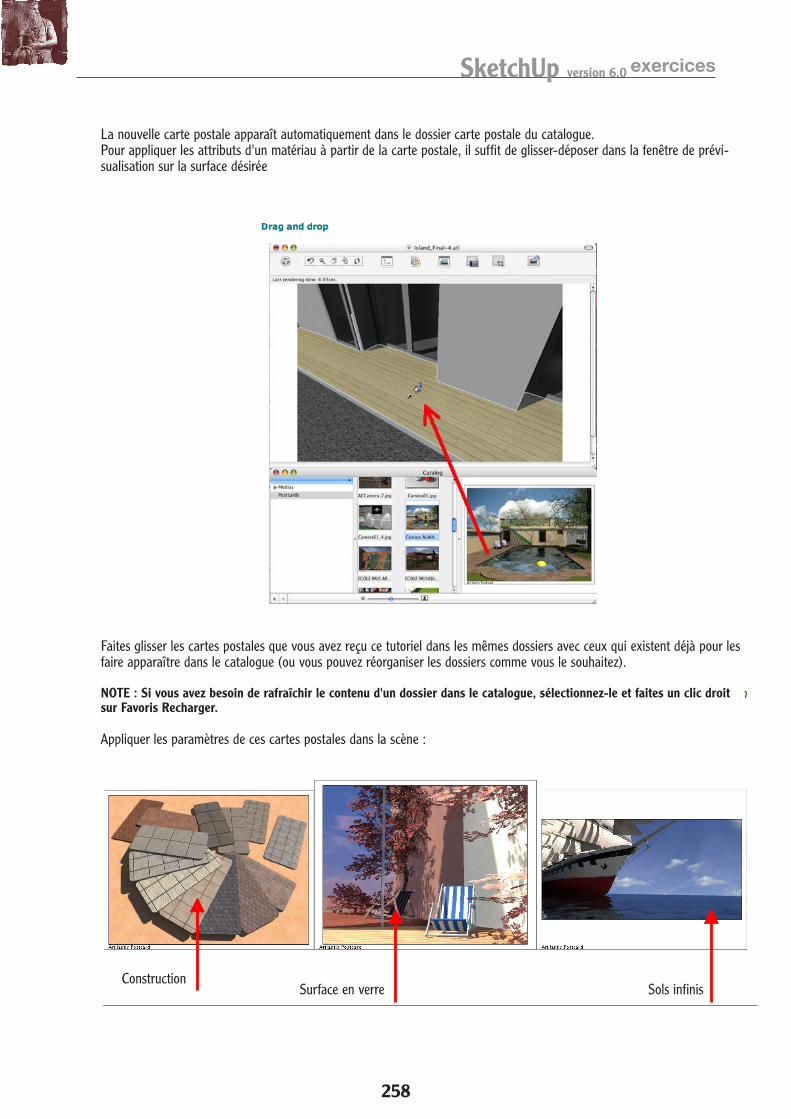
La nouvelle carte postale apparaît automatiquement dans le dossier carte postale du catalogue.Pour appliquer les attributs d'un matériau à partir de la carte postale, il suffit de glisser-déposer dans la fenêtre de prévi-sualisation sur la surface désirée
Faites glisser les cartes postales que vous avez reçu ce tutoriel dans les mêmes dossiers avec ceux qui existent déjà pour les faire apparaître dans le catalogue (ou vous pouvez réorganiser les dossiers comme vous le souhaitez).
NOTE : Si vous avez besoin de rafraîchir le contenu d'un dossier dans le catalogue, sélectionnez-le et faites un clic droit sur Favoris Recharger.
Appliquer les paramètres de ces cartes postales dans la scène :
ConstructionSurface en verre Sols infinis
SketchUp version 6.0 exercices
259
Artlantis Studio 2 Tutorial 8 /17
NOTE: These postcards are independent of your projects; you can use them at any time. You can
even send them to your colleagues, store them on a server, and share them with others. They will
remember the stored information until you re-save or edit them.
G/ Backgrounds
Go to the Perspective Inspector and choose the following camera position from the drawer:
General_View
In the Inspector you will find a list of possible backgrounds:
Heliodon Sky: allows you to use the “Ground”, and
“Clouds” features as well as to display a night sky
Gradient: the background is composed of three
colors
2D Image: any photo can be used as background.
The preview window will be stretched automatically
to the appropriate size.
3D Image and 3D Cubic: 3D images can also be
applied as backgrounds.
1/ First, let’s set a 2D image as a background. How?
- Drag and drop the photo directly into the preview window (in the background and not on a
surface), or
NOTE : Ces cartes postales sont indépendantes de vos projets, vous pouvez les utiliser à tout moment. Vous pouvez même les envoyer à vos collègues, de les stocker sur un serveur, et de les partager avec les autres. Ils se souviendront de l'information stockée jusqu'à ce que vous re-enregistrer ou de les modifier.
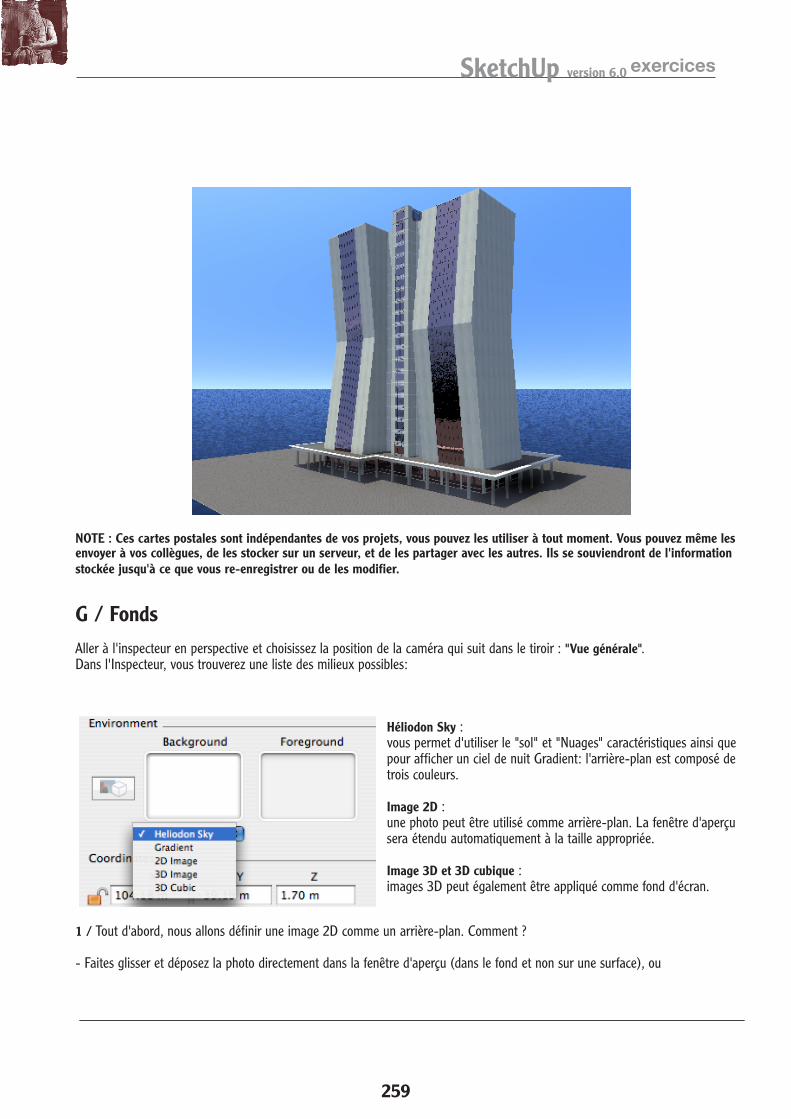
G / FondsAller à l'inspecteur en perspective et choisissez la position de la caméra qui suit dans le tiroir : "Vue générale".Dans l'Inspecteur, vous trouverez une liste des milieux possibles:
Héliodon Sky :vous permet d'utiliser le "sol" et "Nuages" caractéristiques ainsi que pour afficher un ciel de nuit Gradient: l'arrière-plan est composé de trois couleurs.
Image 2D :une photo peut être utilisé comme arrière-plan. La fenêtre d'aperçu sera étendu automatiquement à la taille appropriée.
Image 3D et 3D cubique :images 3D peut également être appliqué comme fond d'écran.
1 / Tout d'abord, nous allons définir une image 2D comme un arrière-plan. Comment ?
- Faites glisser et déposez la photo directement dans la fenêtre d'aperçu (dans le fond et non sur une surface), ou
SketchUp version 6.0 exercices
260
Artlantis Studio 2 Tutorial 9 /17
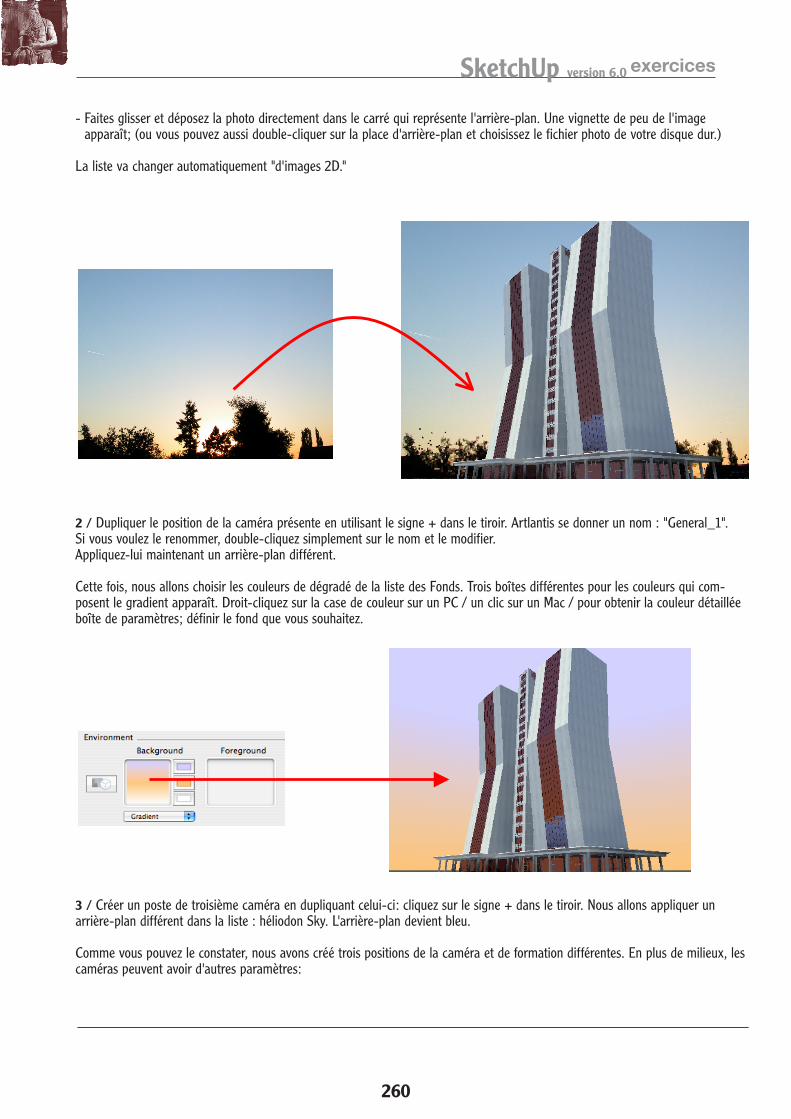
- Drag and drop the photo directly into the square that represents the background. A little
thumbnail of the image will appear; (or you can also double-click in the background square and
choose the photo file from your hard drive.)
The list will change automatically to “2D Image.”
2/ Duplicate the present camera position by using the + sign from the drawer. Artlantis will set a
name: General_1. If you want to rename it, just double click on the name and change it.
Let’s apply a different background to it:
This time we will choose the Gradient Colors from the list of Backgrounds. Three different boxes for
the colors composing the gradient will appear. Right-click on the color box on a PC / one click on a
Mac / to get the detailed color settings box; set the background you wish.
3/ Create a third camera position by duplicating this one: click on the + sign in the drawer. We will
apply a different background from the list: Heliodon Sky. The background will turn blue.
As you can see, we’ve created three different camera positions with different backgrounds. In
addition to backgrounds, cameras may have other individual parameters:
- Faites glisser et déposez la photo directement dans le carré qui représente l'arrière-plan. Une vignette de peu de l'image apparaît; (ou vous pouvez aussi double-cliquer sur la place d'arrière-plan et choisissez le fichier photo de votre disque dur.)
La liste va changer automatiquement "d'images 2D."
2 / Dupliquer le position de la caméra présente en utilisant le signe + dans le tiroir. Artlantis se donner un nom : "General_1".Si vous voulez le renommer, double-cliquez simplement sur le nom et le modifier.Appliquez-lui maintenant un arrière-plan différent.
Cette fois, nous allons choisir les couleurs de dégradé de la liste des Fonds. Trois boîtes différentes pour les couleurs qui com-posent le gradient apparaît. Droit-cliquez sur la case de couleur sur un PC / un clic sur un Mac / pour obtenir la couleur détaillée boîte de paramètres; définir le fond que vous souhaitez.
3 / Créer un poste de troisième caméra en dupliquant celui-ci: cliquez sur le signe + dans le tiroir. Nous allons appliquer un arrière-plan différent dans la liste : héliodon Sky. L'arrière-plan devient bleu.
Comme vous pouvez le constater, nous avons créé trois positions de la caméra et de formation différentes. En plus de milieux, les caméras peuvent avoir d'autres paramètres:
SketchUp version 6.0 exercices
261
Artlantis Studio 2 Tutorial 10 /17
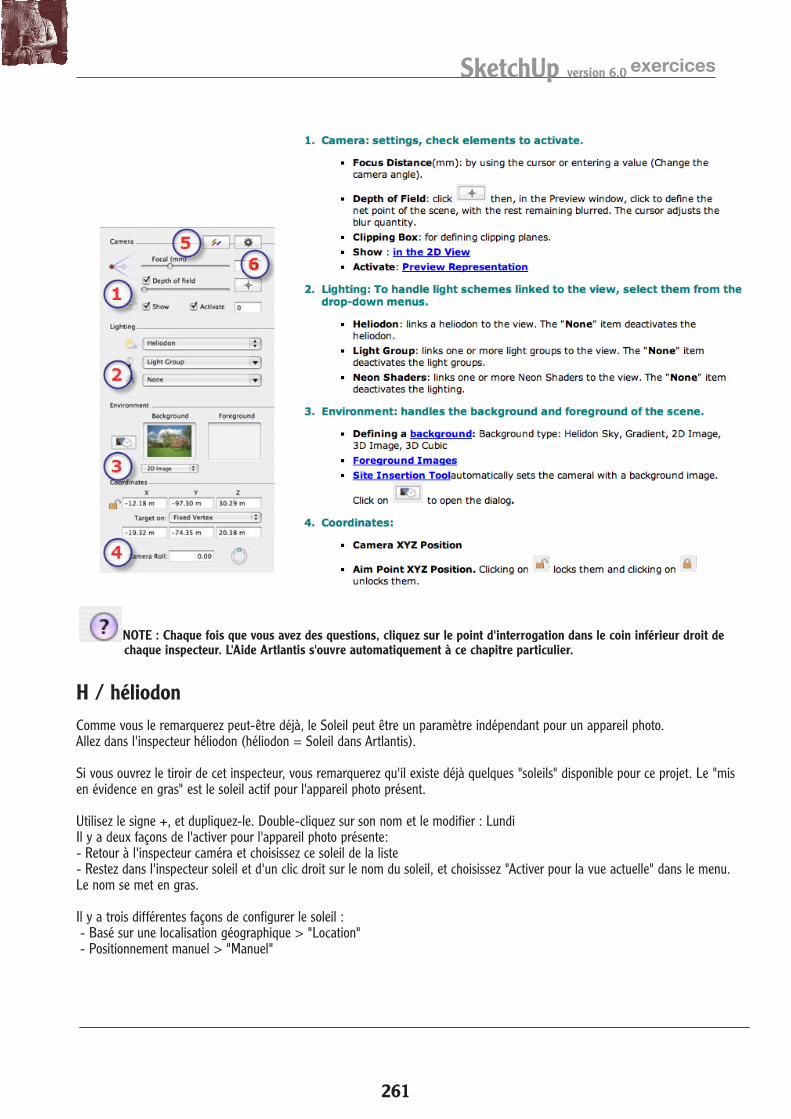
NOTE: Whenever you have questions, click on the question mark at the bottom –right-hand
corner of each inspector. The Artlantis Help will open up automatically at that particular chapter.
H/ Heliodon
As you may notice already, the Sun can be an independent parameter for a camera.
Go into the Heliodon inspector (Heliodon = Sun in Artlantis)
If you open the drawer of this inspector, you will notice that there are already a few “suns”
available for this project. The one highlighted in bold is the active sun for the present camera.
Use the + sign, and duplicate it. Double-click on its name and change it: Monday
There are two ways to activate it for the present camera:
- Go back to the camera inspector and choose this sun from the list
- Stay in the Heliodon inspector and right-click on the name of the sun, and choose “Activate for
current view” from the menu. The name will turn bold.
There are three different ways to set the sun:
- Based on a geographical location: “Location”
- Manual positioning: “Manual”
NOTE : Chaque fois que vous avez des questions, cliquez sur le point d'interrogation dans le coin inférieur droit de chaque inspecteur. L'Aide Artlantis s'ouvre automatiquement à ce chapitre particulier.
H / héliodonComme vous le remarquerez peut-être déjà, le Soleil peut être un paramètre indépendant pour un appareil photo.Allez dans l'inspecteur héliodon (héliodon = Soleil dans Artlantis).
Si vous ouvrez le tiroir de cet inspecteur, vous remarquerez qu'il existe déjà quelques "soleils" disponible pour ce projet. Le "mis en évidence en gras" est le soleil actif pour l'appareil photo présent.
Utilisez le signe +, et dupliquez-le. Double-cliquez sur son nom et le modifier : LundiIl y a deux façons de l'activer pour l'appareil photo présente:- Retour à l'inspecteur caméra et choisissez ce soleil de la liste- Restez dans l'inspecteur soleil et d'un clic droit sur le nom du soleil, et choisissez "Activer pour la vue actuelle" dans le menu. Le nom se met en gras.
Il y a trois différentes façons de configurer le soleil : - Basé sur une localisation géographique > "Location" - Positionnement manuel > "Manuel"
SketchUp version 6.0 exercices
262
Artlantis Studio 2 Tutorial 11 /17
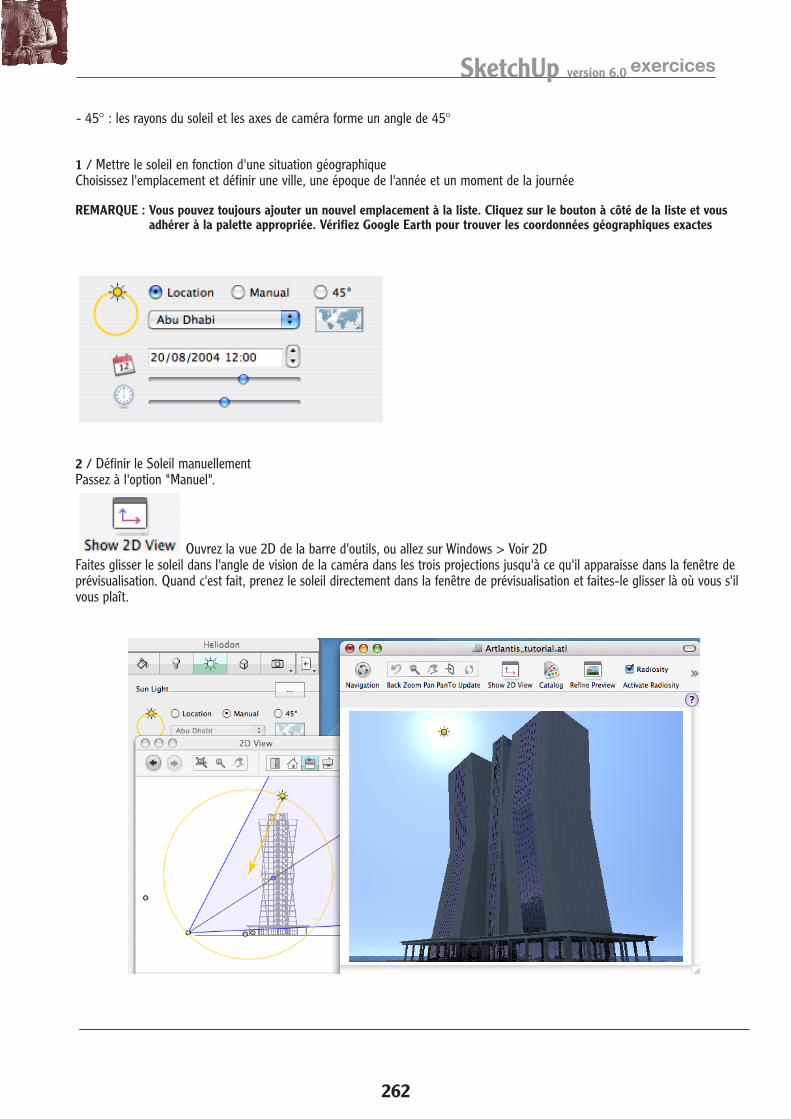
- 450: the sunrays and the camera axes will form an angle of 450
1/ Set the sun based on a geographical location
Choose Location and set a city, a time of year and a time of day
NOTE: You can always add a new location to the list. Click on the button next to the list and you
will accede to the appropriate palette. Check Google Earth to find the exact geographical
coordinates.
2/ Set the Sun manually
Switch to the “Manual” option.
Open the 2D View from the Toolbar, or go to Windows > 2D View
Drag the sun into the viewing angle of the camera in all three projections until it appears in the
preview window. When it’s done, grab the sun directly in the preview window and drag it wherever
you please.
1 / Mettre le soleil en fonction d'une situation géographiqueChoisissez l'emplacement et définir une ville, une époque de l'année et un moment de la journée
REMARQUE : Vous pouvez toujours ajouter un nouvel emplacement à la liste. Cliquez sur le bouton à côté de la liste et vous adhérer à la palette appropriée. Vérifiez Google Earth pour trouver les coordonnées géographiques exactes
2 / Définir le Soleil manuellementPassez à l'option "Manuel".
Ouvrez la vue 2D de la barre d'outils, ou allez sur Windows > Voir 2DFaites glisser le soleil dans l'angle de vision de la caméra dans les trois projections jusqu'à ce qu'il apparaisse dans la fenêtre de prévisualisation. Quand c'est fait, prenez le soleil directement dans la fenêtre de prévisualisation et faites-le glisser là où vous s'il vous plaît.
- 45° : les rayons du soleil et les axes de caméra forme un angle de 45°
SketchUp version 6.0 exercices
263
Artlantis Studio 2 Tutorial 12 /17
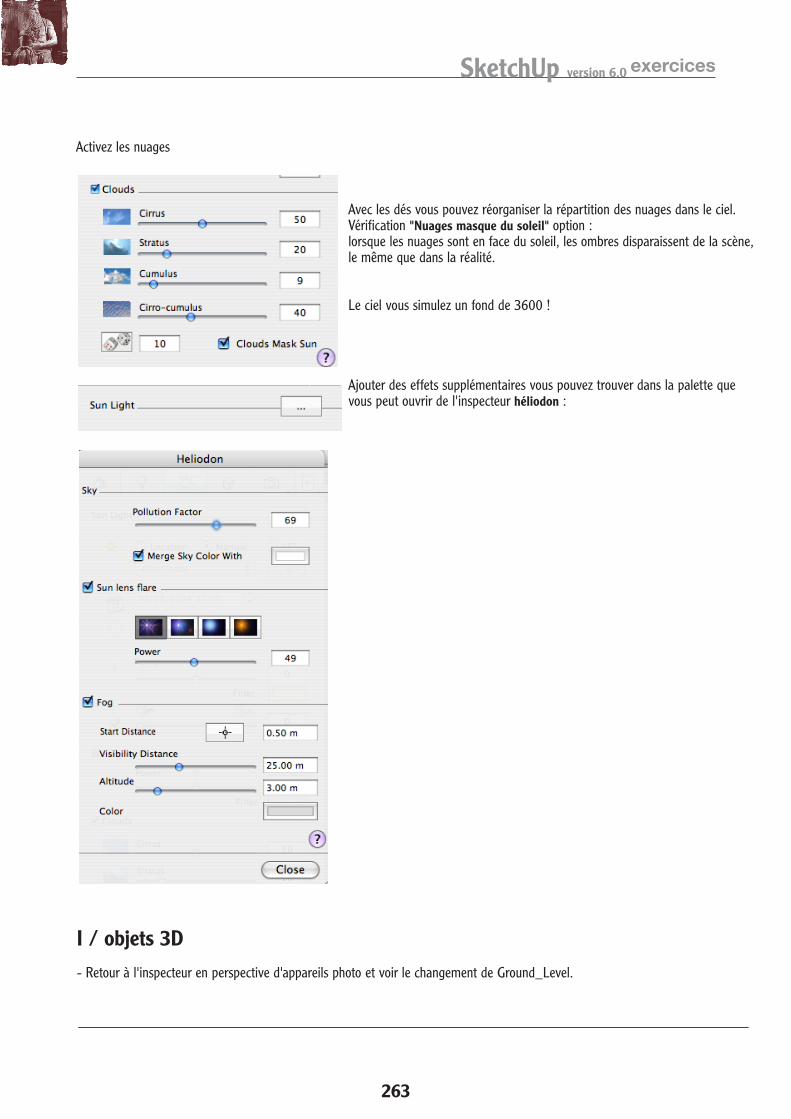
Activate Clouds:
With the dice you can reorganize the repartition of the
clouds in the sky. Checking “Clouds Mask Sun” option:
when clouds are in front of the sun, shadows will disappear
from the scene, the same as in reality.
The sky you are simulating is a background of 3600!
Add additional effects you can find in the palette that you
can open from the Heliodon Inspector:
I/ 3D Objects
- Go back to the Perspective inspector of still cameras and change view to Ground_level.
Activez les nuages
Avec les dés vous pouvez réorganiser la répartition des nuages dans le ciel. Vérification "Nuages masque du soleil" option :lorsque les nuages sont en face du soleil, les ombres disparaissent de la scène, le même que dans la réalité.
Le ciel vous simulez un fond de 3600 !
Ajouter des effets supplémentaires vous pouvez trouver dans la palette que vous peut ouvrir de l'inspecteur héliodon :
I / objets 3D- Retour à l'inspecteur en perspective d'appareils photo et voir le changement de Ground_Level.
SketchUp version 6.0 exercices
264
Artlantis Studio 2 Tutorial 13 /17
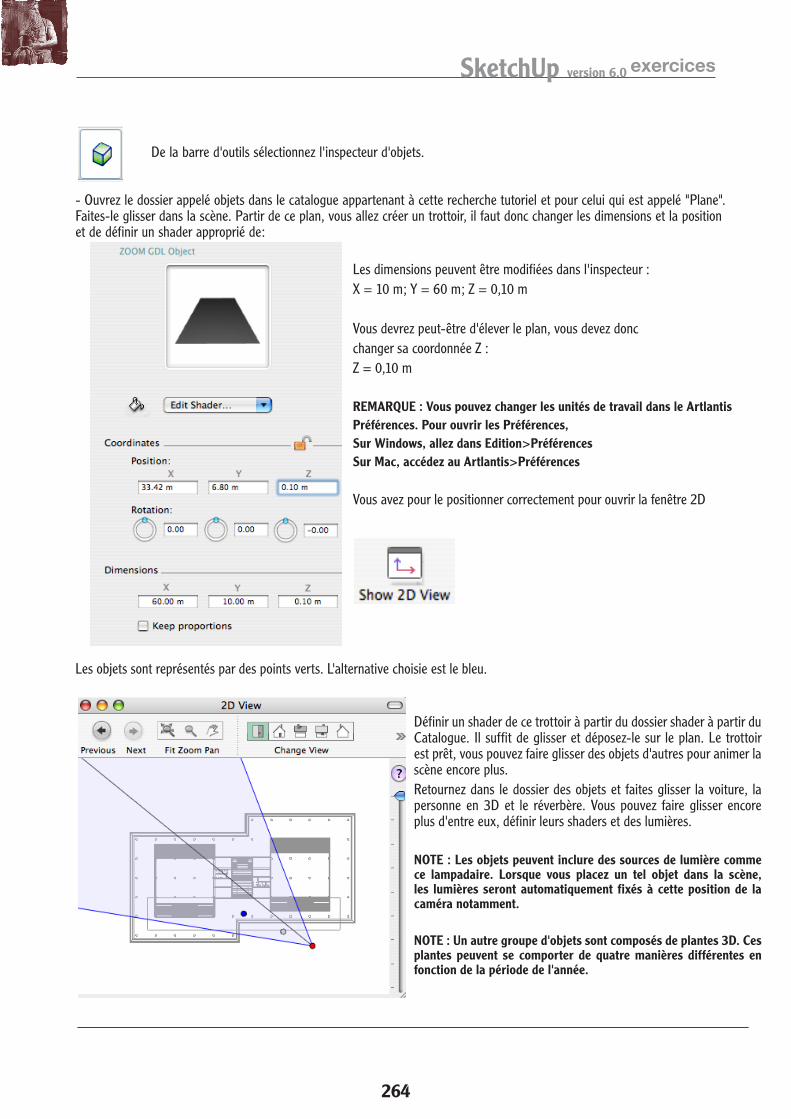
From the Toolbar select the Objects inspector.
- Open the folder called Objects in the Catalog belonging to this tutorial and search for the one
called “Plane”. Drag it into the scene. From this plane you will create a sidewalk, so you have to
change its dimensions, and position and set an appropriate shader to it:
Dimensions can be changed in the inspector:
X = 10 m; Y = 60 m; Z = 0.10 m
You may need to elevate the plane, so you need to
change its Z coordinate:
Z = 0.10 m
NOTE: You can change the working units in the Artlantis
Preferences. To open the Preferences,
On Windows go to Edit > Preferences
On Mac go to Artlantis > Preferences
You have to position it correctly so open the 2D Window
Objects are represented by green dots. The selected one is blue.
Set a shader to this sidewalk from the shader
folder from the Catalog. Simply drag and drop it
on the plane. The sidewalk is ready; you can
drag some other objects to animate the scene
even more.
Go back to the Objects folder and drag the car,
the 3D person and the street lamp. You can drag
even more of them, set their shaders and lights.
NOTE: Objects may include light sources like
this street lamp. When you place such an object
in the scene, the lights will be automatically set
for that particular camera position.
NOTE: Another group of objects are composed
De la barre d'outils sélectionnez l'inspecteur d'objets.
- Ouvrez le dossier appelé objets dans le catalogue appartenant à cette recherche tutoriel et pour celui qui est appelé "Plane". Faites-le glisser dans la scène. Partir de ce plan, vous allez créer un trottoir, il faut donc changer les dimensions et la position et de définir un shader approprié de:
Les dimensions peuvent être modifiées dans l'inspecteur :X = 10 m; Y = 60 m; Z = 0,10 m
Vous devrez peut-être d'élever le plan, vous devez doncchanger sa coordonnée Z :Z = 0,10 m
REMARQUE : Vous pouvez changer les unités de travail dans le ArtlantisPréférences. Pour ouvrir les Préférences,Sur Windows, allez dans Edition>PréférencesSur Mac, accédez au Artlantis>Préférences
Vous avez pour le positionner correctement pour ouvrir la fenêtre 2D
Les objets sont représentés par des points verts. L'alternative choisie est le bleu.
Définir un shader de ce trottoir à partir du dossier shader à partir du Catalogue. Il suffit de glisser et déposez-le sur le plan. Le trottoir est prêt, vous pouvez faire glisser des objets d'autres pour animer la scène encore plus.Retournez dans le dossier des objets et faites glisser la voiture, la personne en 3D et le réverbère. Vous pouvez faire glisser encore plus d'entre eux, définir leurs shaders et des lumières.
NOTE : Les objets peuvent inclure des sources de lumière comme ce lampadaire. Lorsque vous placez un tel objet dans la scène, les lumières seront automatiquement fixés à cette position de la caméra notamment.
NOTE : Un autre groupe d'objets sont composés de plantes 3D. Ces plantes peuvent se comporter de quatre manières différentes en fonction de la période de l'année.
SketchUp version 6.0 exercices
265
Artlantis Studio 2 Tutorial 14 /17
of 3D plants. These plants can behave in four different ways depending on the time of year.
NOTE: In the 2D window you can duplicate objects.
= Drag a copy of an object
J/ Parallel Views
Open the drop-down list in the Toolbar and choose the Parallel Views Inspector. The
Inspector box looks similar -- each camera can group different settings for the sun,
lights, background, etc.
Among the rendering parameters for parallel views you will find that for the scale.
This way your renderings can become part of your building documentation.
K/ Panoramas
Open the drop-down list in the Toolbar and select the Panoramas Inspector. The
Inspector box looks similar -- each camera can group different settings for the sun,
lights, background, etc.
The camera revolves around a fixed point. Use it for interior scenes.
L/ QT VR
Open the drop-down list in the Toolbar and select the VR Objects Inspector. The
Inspector box looks similar -- each camera can group different settings for the sun,
lights, background, etc.
The model is still while the camera revolves around it. Use it to present volumetry.
M/ Animations
Open the drop-down list in the Toolbar and select the Animations Inspector. The
Inspector box looks similar -- each camera can group different settings for the sun,
lights, background, etc.
When you create an animation you can set:
1/ a path to the camera
2/ different actions on the timeline
Ouvrez la liste déroulante dans la barre d'outils et choisissez Inspecteur des vues parallèles. Chaque caméra peut paramétrer un groupe différent pour le soleil, lumières, de fond, etc
Parmi les paramètres de rendu pour des vues parallèles, vous constaterez que pour l'échelle.De cette façon, vos rendus peuvent faire partie de la documentation de votre bâtiment.
Ouvrez la liste déroulante dans la barre d'outils et sélectionnez l'inspecteur Panoramas. Chaque caméra peut paramètres d'un groupe différent pour le soleil, lumières, de fond, etc
Ouvrez la liste déroulante dans la barre d'outils et sélectionnez les objets VR inspecteur. Chaque caméra peut paramètres d'un groupe différent pour le soleil, lumières, de fond, etc.
Ouvrez la liste déroulante dans la barre d'outils et sélectionnez l'inspecteur Animations. Chaque caméra peut paramètres d'un groupe différent pour le soleil, lumières, de fond, etc.
La caméra tourne autour d'un point fixe. Utilisez-le pour les scènes d'intérieur.
Le modèle reste fixe tandis que la caméra tourne autour d'elle. Utilisez-le pour présenter la volumétrie
Lorsque vous créez une animation, vous pouvez définir :1 / un chemin vers la caméra2 / les différentes actions sur la timeline
NOTE: Dans la fenêtre 2D, vous pouvez dupliquer des objets.
= Faites glisser une copie d'un objet
J / Vues parallèles
K / Panoramas
L / QT VR
SketchUp version 6.0 exercices
266
Artlantis Studio 2 Tutorial 15 /17
1/ Create a path
- Open the 2D window. To create paths you will always work in the 2D window.
Activate the Edit Path function in the 2D window’s toolbar. (Don’t forget to
deactivate this command after you’ve ended the edition of the path!)
- The initial location of the camera will serve as the starting point of the path. Drag it to the end
point of the path. Tangents help you to edit the path. You can add new control points with a right-
click. When finished, switch off the Edit path function.
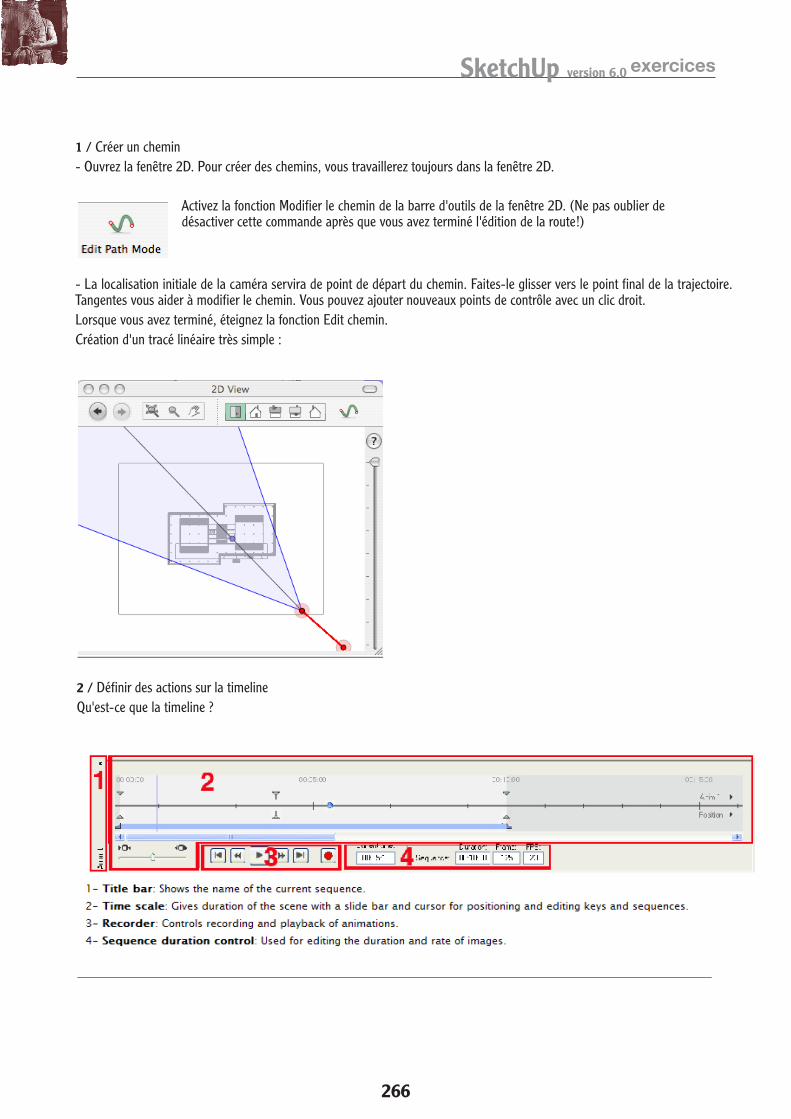
Create a very simple linear path:
2/ Set actions on the timeline
What is the timeline?
1 / Créer un chemin- Ouvrez la fenêtre 2D. Pour créer des chemins, vous travaillerez toujours dans la fenêtre 2D.
Activez la fonction Modifier le chemin de la barre d'outils de la fenêtre 2D. (Ne pas oublier de désactiver cette commande après que vous avez terminé l'édition de la route!)
2 / Définir des actions sur la timelineQu'est-ce que la timeline ?
- La localisation initiale de la caméra servira de point de départ du chemin. Faites-le glisser vers le point final de la trajectoire. Tangentes vous aider à modifier le chemin. Vous pouvez ajouter nouveaux points de contrôle avec un clic droit.Lorsque vous avez terminé, éteignez la fonction Edit chemin.Création d'un tracé linéaire très simple :
SketchUp version 6.0 exercices
267
Artlantis Studio 2 Tutorial 16 /17
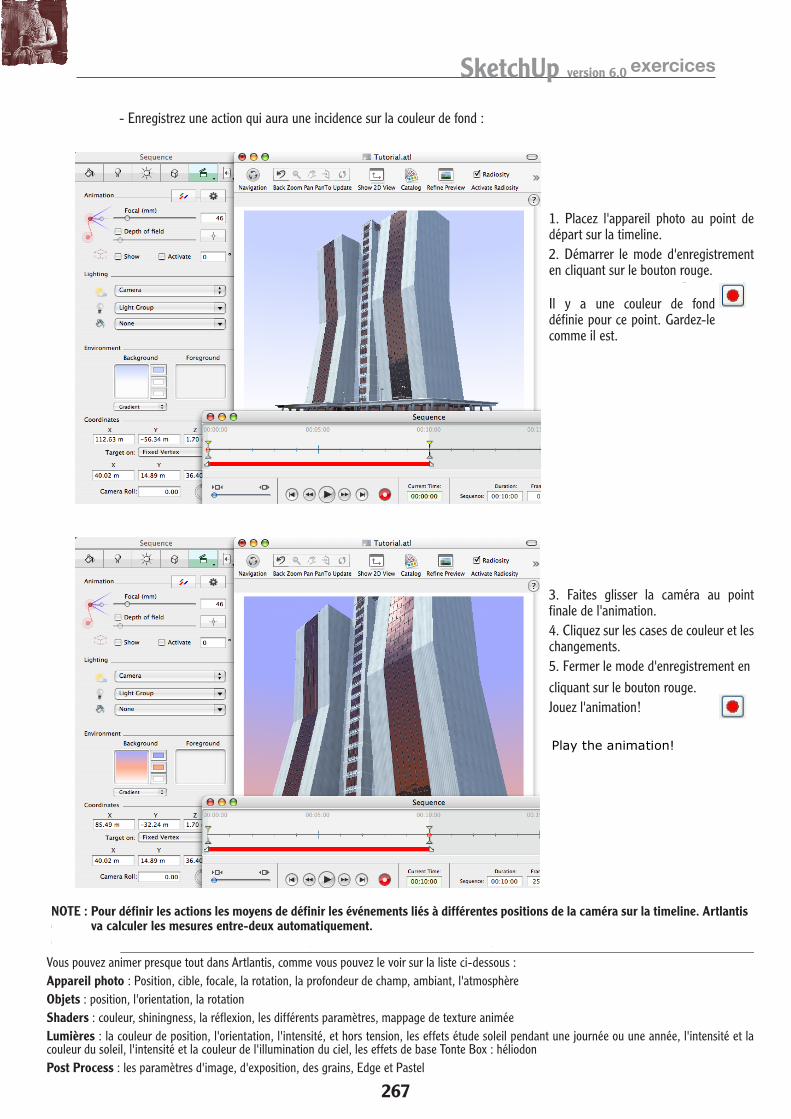
- Record an action that will affect the background color:
1. Place the camera at the
starting point on the timeline
2. Start the recording mode by
clicking on the red button
There is a background color set
for this point. Keep it as it is.
3. Drag the camera to the final
point of the animation
4. Click on the color boxes and
change them
5. Close the recording mode by
clicking on the red button
Play the animation!
Artlantis Studio 2 Tutorial 17 /17
NOTE: To set actions means to define the events linked to different positions of the camera on the
timeline. Artlantis will calculate the steps in-between automatically.
You can animate almost everything in Artlantis, as you can see on the list below:
Camera: Position, target, focal, rotation, depth of field, ambient, atmosphere
Objects: Position, orientation, rotation
Shaders: Color, shiningness, reflection, individual parameters, animated texture mapping
Lights: Position, orientation, color, intensity, off and on, effects
Heliodon: Sun study for a day or a year, intensity and color of the sun, intensity and color of the sky
illumination, effects
Background
Clipping Box
Post Process: Image settings, Exposure, Grain, Edge and Pastel
CONCLUSION For more details consult our website: www.artlantis.com
Visit our user gallery and share your renderings with us!
Chat with users on our forums, share your experiences and learn even more!
We all wish you great success with Artlantis.
Team Abvent
- Enregistrez une action qui aura une incidence sur la couleur de fond :
Il y a une couleur de fond définie pour ce point. Gardez-le comme il est.
1. Placez l'appareil photo au point de départ sur la timeline.2. Démarrer le mode d'enregistrement en cliquant sur le bouton rouge.
3. Faites glisser la caméra au point finale de l'animation.4. Cliquez sur les cases de couleur et les changements.5. Fermer le mode d'enregistrement en
Vous pouvez animer presque tout dans Artlantis, comme vous pouvez le voir sur la liste ci-dessous :Appareil photo : Position, cible, focale, la rotation, la profondeur de champ, ambiant, l'atmosphèreObjets : position, l'orientation, la rotationShaders : couleur, shiningness, la réflexion, les différents paramètres, mappage de texture animéeLumières : la couleur de position, l'orientation, l'intensité, et hors tension, les effets étude soleil pendant une journée ou une année, l'intensité et la couleur du soleil, l'intensité et la couleur de l'illumination du ciel, les effets de base Tonte Box : héliodonPost Process : les paramètres d'image, d'exposition, des grains, Edge et Pastel
cliquant sur le bouton rouge.Jouez l'animation!
NOTE : Pour définir les actions les moyens de définir les événements liés à différentes positions de la caméra sur la timeline. Artlantis va calculer les mesures entre-deux automatiquement.