


Langages
Pages
Légal

8/8/2019 Handling Techniques Agililty
http://slidepdf.com/reader/full/handling-techniques-agililty 1/27
an ng ec n ques
in
AGILITY
by
Solveig Trippestad
August 2000
Copyright: Solveig Trippestad
8/8/2019 Handling Techniques Agililty
http://slidepdf.com/reader/full/handling-techniques-agililty 2/27
INDEX
HANDLING TECHNIQUES IN AGILITYPage
1 ) FOREWORD . . . . . . . . . . . . . . . . . . . . . . . . . . . . . . . . . . . . . . . . . . . . . . . . . . . . . . . . . . . . . . . . . . . . . . . . . . . . . . . . . . . . . 2
2) RIGHT- SIDE + LEFT- SIDE . . . . . . . . . . . . . . . . . . . . . . . . . . . . . . . . . . . . . . . . . . . . . . . . . . . . . . . . . . . . . . . . . . . 3
3) POST TURN . . . . . . . . . . . . . . . . . . . . . . . . . . . . . . . . . . . . . . . . . . . . . . . . . . . . . . . . . . . . . . . . . . . . . . . . . . . . . . . . . . . . . 3
4) CROSS IN FRONT OF YOUR DOG. . . . . . . . . . . . . . . . . . . . . . . . . . . . . . . . . . . . . . . . . . . . . . . . . . . . . . . . . . . . 4
a) Front Cross..................................................................................................................................................... 4b) Counter Rotation /Crossing Turn /Belgian Side Change /Double Back Turn /Twizzle ................. 5c) Axford Cross / Axford Axel...................................................................................................................... 6d) Static Cross (+ Dynamic Cross)................................................................................................................. 7e) Blind Cross / Blind Turn / French Turn................................................................................................... 7f) Turns and crosses in general...................................................................................................................... 8
5) CROSS BEHIND YOUR DOG . . . . . . . . . . . . . . . . . . . . . . . . . . . . . . . . . . . . . . . . . . . . . . . . . . . . . . . . . . . . . . . . . . . 9
a) Back Cross / Rear cross / Cross behind .................................................................................................. 9b) Aeroplane Turn /Tandem Turn /Swimmer /Counter Hand Turn.......................................................10
6) FOR OBSTACLE DISCRIMINATION / CONTACT ZONES . . . . . . . . . . . . . . . . . . . . . . . . . . . . . . . . 11
a) Reverse Flow Pivot (RFP) / East Coast Fakeout.................................................................................... 11b) Top Spin / Top Turn....................................................................................................................................12c) Mitchell Flip / Mitchell’s Turn ..................................................................................................................12
7) BODY LANGUAGE + ARM SIGNALS . . . . . . . . . . . . . . . . . . . . . . . . . . . . . . . . . . . . . . . . . . . . . . . . . . . . . . . . . 13
a) Dog’s nose ......................................................................................................................................................14b) Block + Body Magnet (Push + Pull) ............................................................................................................14c) Shoulder + toes ............................................................................................................................................14d) Counter arm / Off arm / Opposite arm / Airplane arm signal .........................................................15e) Prayer / Pastor / Preacher Position + Threadle....................................................................................16
f) High Hand Signals........................................................................................................................................16g) Scoop..............................................................................................................................................................17
8) DISTANCE WORK . . . . . . . . . . . . . . . . . . . . . . . . . . . . . . . . . . . . . . . . . . . . . . . . . . . . . . . . . . . . . . . . . . . . . . . . . . . . . 1 8
a) Send Away / Go On......................................................................................................................................18b) High-Way / Framing....................................................................................................................................19c) Layering..........................................................................................................................................................19d) Find The Line...............................................................................................................................................20e) Lead-Out / Recall.........................................................................................................................................21f) Lead-Out Pivot..............................................................................................................................................21
9) USING DIRECTIONALS . . . . . . . . . . . . . . . . . . . . . . . . . . . . . . . . . . . . . . . . . . . . . . . . . . . . . . . . . . . . . . . . . . . . . . 22
a) Go....................................................................................................................................................................22b) Get Out .........................................................................................................................................................22c) Come/here....................................................................................................................................................23d) Left + right ..................................................................................................................................................23e) Go Around.....................................................................................................................................................24f) Turn / Turn Back.........................................................................................................................................24g) Call-off / Call-to.........................................................................................................................................25
10) KISS = KEEP IT SIMPLE . . . . . . . . . . . . . . . . . . . . . . . . . . . . . . . . . . . . . . . . . . . . . . . . . . . . . . . . . . . . . . . . . . . . . . . 26
On the cover: Imagineer’s Patriot Red (Banner), owned by Marsha Martin of Ostrander, OH.
8/8/2019 Handling Techniques Agililty
http://slidepdf.com/reader/full/handling-techniques-agililty 3/27
1 ) FOREWORD
The handling techniques mentioned in this document, come from competitors andinstructors in USA, Canada, UK, Belgium, Holland, France and Germany. To make it easierto recognise these techniques later, I have kept all the different names I have found foreach technique.
Descriptions of these techniques have been found in JFF Agility Notebook, Clean RunMagazine and/or in the following mailing lists:
To subsribe – send a mail to:
Agiledogs: [email protected]
Agileteach: [email protected]
Agilit y : [email protected]
Agilit ywit hsmalldogs : [email protected]
J ust f or f unagilit y : [email protected]
Bud Houst on, USA, has allowed me to include some sequences from his monthly ezine JFF
Agility Notebook to illustrate the techniques. If you would like to learn more abouthandling techniques, I recommend you to subscribe to his magazine via his homepage:http://www.dogwoodagility.com/
To see moving pictures of some of the techniques, go to:http://www.dogwoodagility.com/handlermoves.htm
Guy Blancke , Belgium, has described some of the techniques on his home page, and hasallowed me to use photos from his home page: http://home.planetinternet.be/~gblancke/agility.htm.
A video from WC ’99 can be ordered via Guy Blancke’s home page, and this video will show you all the techniques mentioned in this document (only two techniques may not be shown –a logical explanation: They were probably not mentioned or tried out until some monthsafter WC’99).
I have included some sequences just to illustrate the techniques. Some techniques willhave immediate effect (for some dogs) – for other techniques and/or other dogs, time andpractice will be necessary.
August 2000
Solveig Tr ippest ad
Addr: Östenaasveien 42, 1344 HaslumPhone: +47 67 53 55 76E.mail: [email protected]
8/8/2019 Handling Techniques Agililty
http://slidepdf.com/reader/full/handling-techniques-agililty 4/27
2) RIGHT-SIDE + LEFT- SIDE
How: The dog should be comfortable on both your left and right side for allobstacles.
From the very beginning you should practise having your dog on leftand on right on all obstacles – also when introducing your dog to the
weave poles.
Why:
• By crossing in front or behind the dog you should be able to make your dog change sides (see chapters about crossing infront/behind).
• Makes it possible for you to stay on the inside when turning andto let your dog move at his fastest pace without being limited by your speed.
3) POST TURN
How: Handler turns with the dog.
Try to always be on the side to which you want your dog to turn, i.e. you should be on the right side of your dog if your dog is to turnright, and you should be on the left side of your dog if your dog is toturn left.
Be aware of:
• You should slow down(stop) when your dogreaches the obstaclewhere he is supposedto turn.
• This way of turningvery often reducesboth your dog’s speed
and motivation as youare more or lessstanding still.
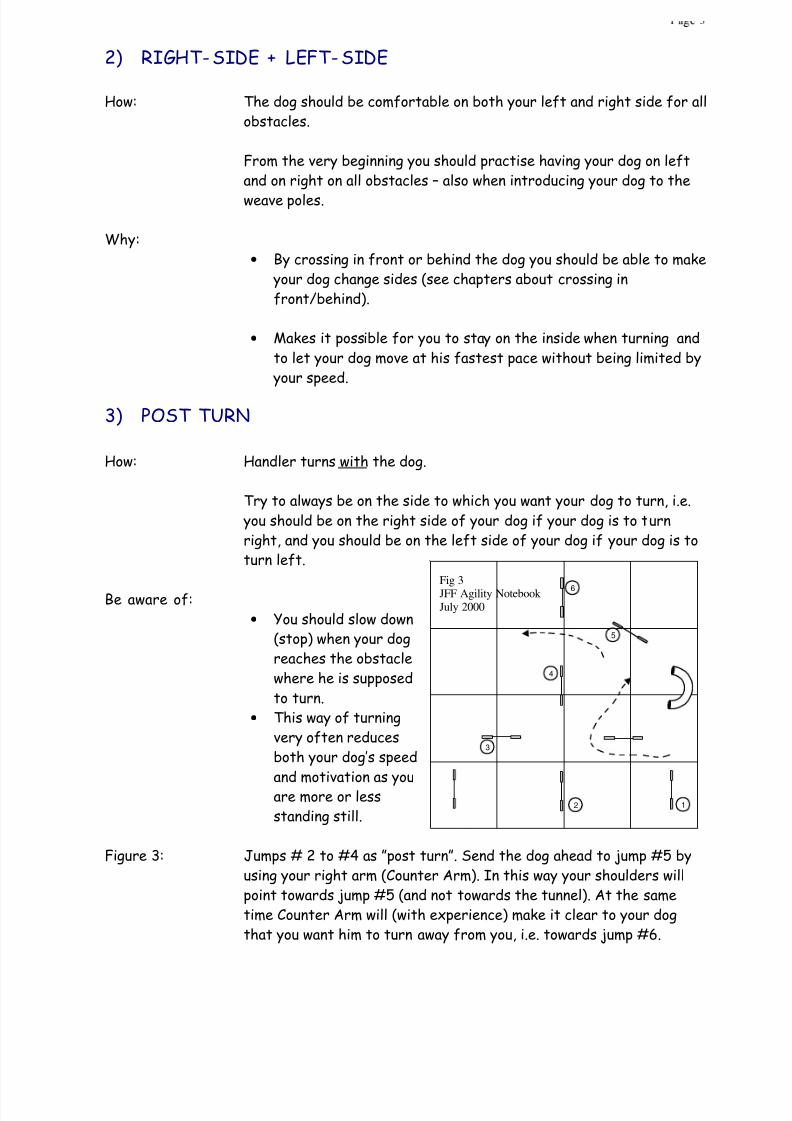
Figure 3: Jumps # 2 to #4 as ”post turn”. Send the dog ahead to jump #5 byusing your right arm (Counter Arm). In this way your shoulders willpoint towards jump #5 (and not towards the tunnel). At the sametime Counter Arm will (with experience) make it clear to your dogthat you want him to turn away from you, i.e. towards jump #6.
1
4
5
6
2
3
Fig 3
JFF Agility Notebook July 2000
8/8/2019 Handling Techniques Agililty
http://slidepdf.com/reader/full/handling-techniques-agililty 5/27
See also figure 9e
4) CROSS IN FRONT OF YOUR DOG
To cross in front of fast dogs is broadly speaking no problem. You can send the dog aheadand cross before the dog comes back to you. Any time the course turns, you have anopportunity to get in front of your dog. This means that you should keep moving instead ofwaiting – and run in parallel to your dog even if you are at some distance from the dog.
Some instructors prefer teaching crossing in front before teaching crossing behind, andalso to teach crossing behind on the landing side of a jump before teaching crossing behindon the take-off side of an obstacle.
a) Front Cross
How: The dog’s direction of motion will not be changed.
• You should cross the path your dog will take before the dog getsthere.
• You turn towards your dog instead of with your dog.• You should turn towards your dog by turning your opposite shoulder
towards the dog, but not turn your back to your dog.• Before executing the Front Cross, your dog is on one side. After the
Front Cross your dog is on the other side (change in lead hand)
See also Counter Rotation – whereby the dog’s direction of motion willbe changed.
Why and
Be aware of: See Counter Rotation

8/8/2019 Handling Techniques Agililty
http://slidepdf.com/reader/full/handling-techniques-agililty 6/27
b) Counter Rotation /Crossing Turn /Belgian Side Change /Double
Back Turn /Twizzle
How: The dog’s direction of motion will be changed.
• You should cross the path your dog will take before your dog gets
there.• You turn towards your dog instead of with your dog.• You should turn towards your dog by turning your opposite shoulder
towards your dog, but not turn your back to your dog.• Before executing the Counter Rotation, your dog is on one side.
After the Counter Rotation your dog is on the other side (change inlead hand)
Why:
• This turn allows you to position yourself for the next obstacle.•
Changes your dog’s direction of motion quickly.• Shortens your dog’s stride• Ensures tighter turns• Makes your handling clearer to your dog because the move itself pulls
the dog towards you and away from the wrong obstacle and/orprobably because your shoulders will be turned in the correctdirection.
• Useful when you want to make a corner in the course to line your dogup for the next obstacle.
Be aware of:• Dog is turning when you are turning, so do not turn too early – that
may result in a dropped bar.• The dog’s path onwards is parallel to yours, so make sure you turn
your shoulders in the correct direction.• Are you slowing your dog down when turning towards it? (make sure
that your body is turned towards your dog and that you look at yourdog just for a short moment).
• The closer you are to your dog, the more likely your dog will slowdown more than you want him to.
•
It is necessary to practice this move so your dog will be accustomedto you turning in this way, and not the least for you to beaccustomed to turning.
8/8/2019 Handling Techniques Agililty
http://slidepdf.com/reader/full/handling-techniques-agililty 7/27
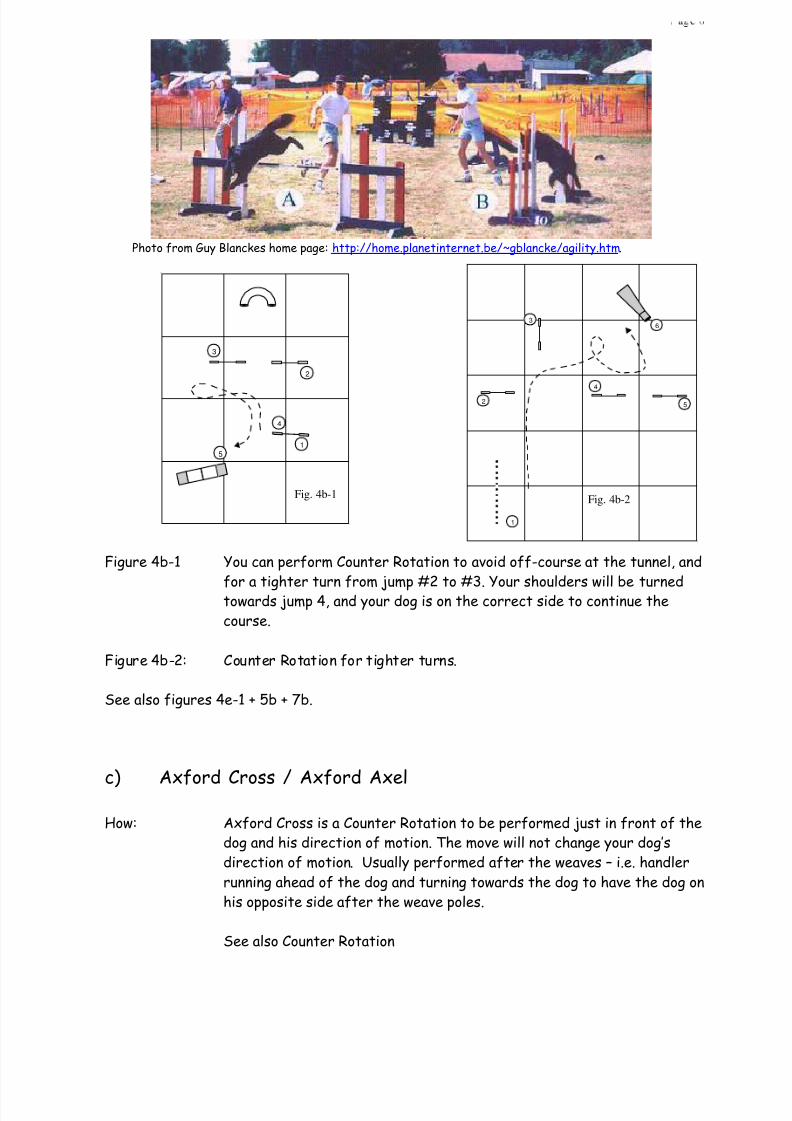
Photo from Guy Blanckes home page: http://home.planetinternet.be/~gblancke/agility.htm.
Figure 4b-1 You can perform Counter Rotation to avoid off-course at the tunnel, and
for a tighter turn from jump #2 to #3. Your shoulders will be turnedtowards jump 4, and your dog is on the correct side to continue thecourse.
Figure 4b-2: Counter Rotation for tighter turns.
See also figures 4e-1 + 5b + 7b.
c)
Axford Cross / Axford Axel
How: Axford Cross is a Counter Rotation to be performed just in front of thedog and his direction of motion. The move will not change your dog’sdirection of motion. Usually performed after the weaves – i.e. handlerrunning ahead of the dog and turning towards the dog to have the dog onhis opposite side after the weave poles.
See also Counter Rotation
5
4
3
2
1
Fig. 4b-1
1
6
5
4
3
2
Fig. 4b-2
8/8/2019 Handling Techniques Agililty
http://slidepdf.com/reader/full/handling-techniques-agililty 8/27
d) Static Cross (+ Dynamic Cross)
How: Static Cross: Handler changes side while the dog is stationary (i.e. onthe table, stopped in contact zone)Dynamic Cross: Dog and handler can see each other and are bothmoving when crossing. Dynamic Dross includes both crossing behind andcrossing in front of the dog.
e) Blind Cross / Blind Turn / French Turn
How: The dog’s direction of motion will not be changed.
• You should cross the path your dog will take before your dog getsthere.
• You will cross in front of your dog and turn your back to your dog, i.e. you cannot see your dog for a short while.
• With a distinct hand signal you will “pick” your dog up on youropposite side.
• Before executing the Blind Cross, your dog is on one side. After theBlind Cross your dog is on the other side (change in lead hand)
• It is important for you to keep moving ahead.• You will have to move further ahead than if you should have turned
towards your dog, but you need fewer paces as you are not to turn.
Why:
• This move allows you to position yourself for the next obstacle.•
You are facing the course.• As the dog sees your back, he will immediately know in whichdirection to go, and he will speed up.
• This move can (as a start) be used for instance after U-shapedtunnels, after collapsed tunnel, after jumps requiring a 120 – 180degrees turn where a switch of side is required or where there is norisk for off-course (see figure 5b).
Be aware of:
• It is difficult to keep contact with your dog when turning your back
on your dog.• Make sure to turn your back on your dog for just a very short
moment.• It is important that your arm signals are clear to your dog as he
comes up behind you – your dog has to immediately understand towhich side you want him.
• Some dogs slow down when their handler is running ahead of them onthe course (for other dogs running ahead will have the oppositeeffect).

8/8/2019 Handling Techniques Agililty
http://slidepdf.com/reader/full/handling-techniques-agililty 9/27
• You have to be absolutely sure that you can beat your dog to thenext obstacle – make sure that you do not run into your dog.
• Timing is extremely important.• Don’t stop – keep moving!
Figure 4e-1: Jump #1- #2: “Find the Line”Before the dog exits the tunnel, you can perform a blind cross to have your dog on your right for the rest of the course. In this sequence
Counter Rotation can replace Blind Cross.
Figure 4e-2: Blind Cross can be performed after jump 3.
f) Turns and crosses in general
• In some jumping sequences these moves can beperformed just to keep the handler in motioninstead of standing back in one spot. When handleris moving, the dog will speed up. For some dogsturning can contribute to the dog losing motivationand speed.
• If you prefer to stand still, bending your knees maypull your dog towards you and in this way you may ensure a tighter turn.
• You should always try to stay on the inside of a curve. This is an advantage for dogslacking forward momentum. If you aim at being on the inside, you will be able tokeep moving and to make your dog go at full speed. Your dog will naturally turntowards you, and if you are on the side of your dog to which you want him to turn, your dog will look at you, i.e. in the correct direction and avoid spinning.
5
6 7 1
2
34
Fig 4e-1JFF AgilityNotebook
July 2000
3
2
1
4
Fig. 4e-2
8/8/2019 Handling Techniques Agililty
http://slidepdf.com/reader/full/handling-techniques-agililty 10/27
5) CROSS BEHIND YOUR DOG
a) Back Cross / Rear cross / Cross behind
How: Handler crosses behind the dog before an obstacle.
Handler sends dog ahead towards an obstacle, and runs quickly to theopposite side, and thereby signalling to the dog that a side change hastaken place.
Why:
• To enable you to take the shortest path• To signal change of direction to the dog.
Be aware of:
• If crossing behind is not signalled properly, the dog may spin. Seealso Counter Arm to avoid spins.
• The dog quickly learns that when you are crossing, this means heshould turn in the direction you go.
• The novice dog may follow the handler’s sideways motion and mayconsequently leave the contact zones and stop weaving to follow hishandler.
• If the handler runs towards an obstacle and has to wait for the dog,he is inevitably standing still, and a handler not moving, is signallingto the dog to stop. Crossing behind your dog on the landing side of a jump (see Aeroplane Turn) or crossing in front of your dog may bebetter alternatives.
8/8/2019 Handling Techniques Agililty
http://slidepdf.com/reader/full/handling-techniques-agililty 11/27
b) Aeroplane Turn /Tandem Turn /Swimmer /Counter Hand Turn
How: Handler crosses behind the dog after an obstacle.
• When your dog has finished an obstacle (for instance landing after a jump) you should cross behind your dog.
• At the same time you could indicate by lifting your arm opposite to
your dog that your dog should turn away from you (See also CounterArm)
• You should “pick up” your dog on your opposite side. You and your doghave moved in tandem.
Why:
• To enable you to take the shortest path• To signal change of direction to your dog.• To perform a side change with dogs lacking forward momentum
Aeroplane Turn should be used instead of crossing behind.• To avoid dropped bars.• To square up the dog for the weave poles or for contact zones.• To make sure the dog lands facing the correct direction and not
spinning in the wrong direction.
Be aware of: When you are elevating your opposite arm, this will very soon signal to your dog that you want him to turn away from you. Correct timing isessential.
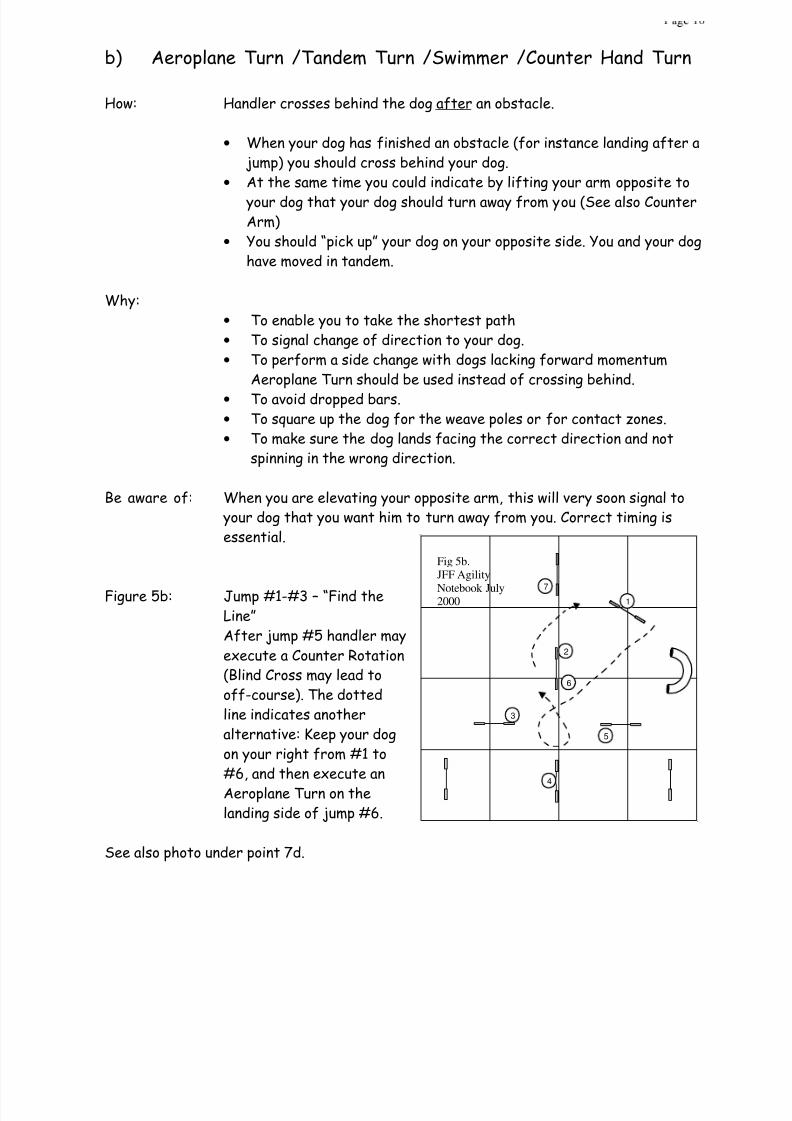
Figure 5b: Jump #1-#3 – “Find theLine”After jump #5 handler mayexecute a Counter Rotation(Blind Cross may lead tooff-course). The dottedline indicates anotheralternative: Keep your dogon your right from #1 to#6, and then execute anAeroplane Turn on thelanding side of jump #6.
See also photo under point 7d.
2
1
3
4
5
6
7
Fig 5b.JFF Agility
Notebook July2000
8/8/2019 Handling Techniques Agililty
http://slidepdf.com/reader/full/handling-techniques-agililty 12/27
6) FOR OBSTACLE DISCRIMINATION / CONTACT ZONES
a) Reverse Flow Pivot (RFP) / East Coast Fakeout
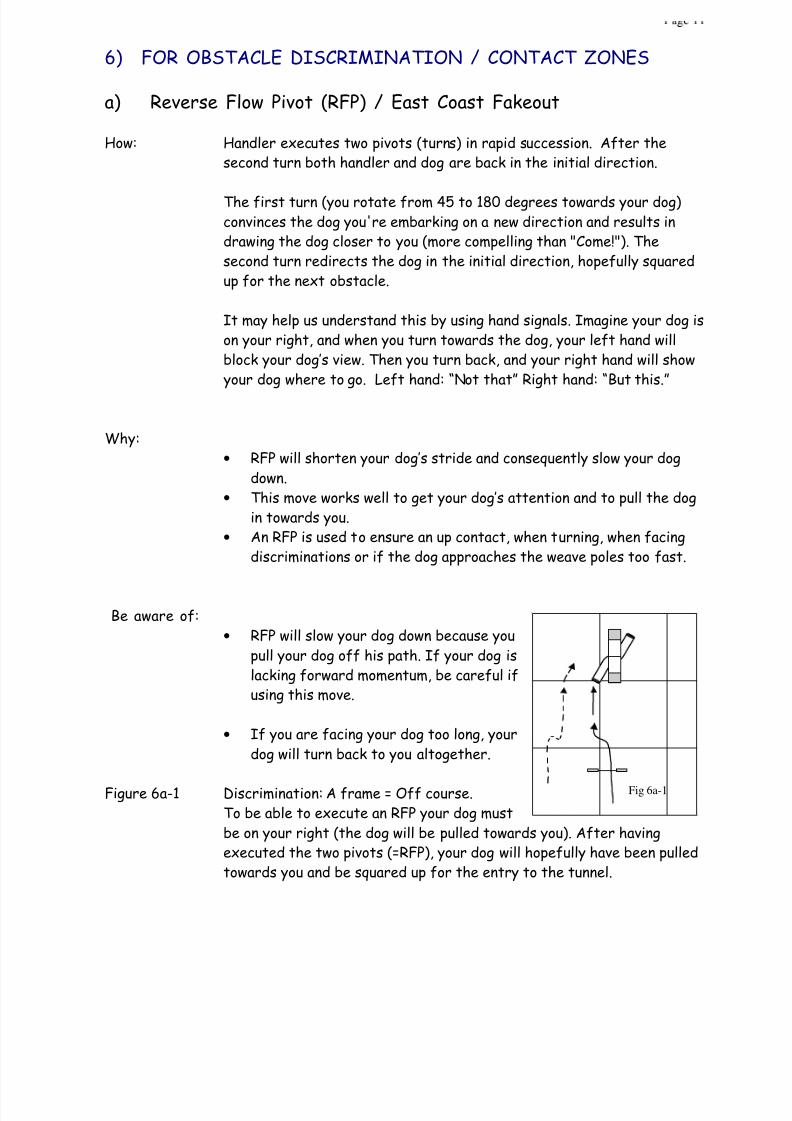
How: Handler executes two pivots (turns) in rapid succession. After thesecond turn both handler and dog are back in the initial direction.
The first turn (you rotate from 45 to 180 degrees towards your dog)convinces the dog you're embarking on a new direction and results indrawing the dog closer to you (more compelling than "Come!"). Thesecond turn redirects the dog in the initial direction, hopefully squaredup for the next obstacle.
It may help us understand this by using hand signals. Imagine your dog ison your right, and when you turn towards the dog, your left hand willblock your dog’s view. Then you turn back, and your right hand will show your dog where to go. Left hand: “Not that” Right hand: “But this.”
Why:
• RFP will shorten your dog’s stride and consequently slow your dogdown.
• This move works well to get your dog’s attention and to pull the dogin towards you.
• An RFP is used to ensure an up contact, when turning, when facingdiscriminations or if the dog approaches the weave poles too fast.
Be aware of:
• RFP will slow your dog down because youpull your dog off his path. If your dog islacking forward momentum, be careful ifusing this move.
• If you are facing your dog too long, yourdog will turn back to you altogether.
Figure 6a-1 Discrimination: A frame = Off course.To be able to execute an RFP your dog mustbe on your right (the dog will be pulled towards you). After havingexecuted the two pivots (=RFP), your dog will hopefully have been pulledtowards you and be squared up for the entry to the tunnel.
Fig 6a-1
8/8/2019 Handling Techniques Agililty
http://slidepdf.com/reader/full/handling-techniques-agililty 13/27
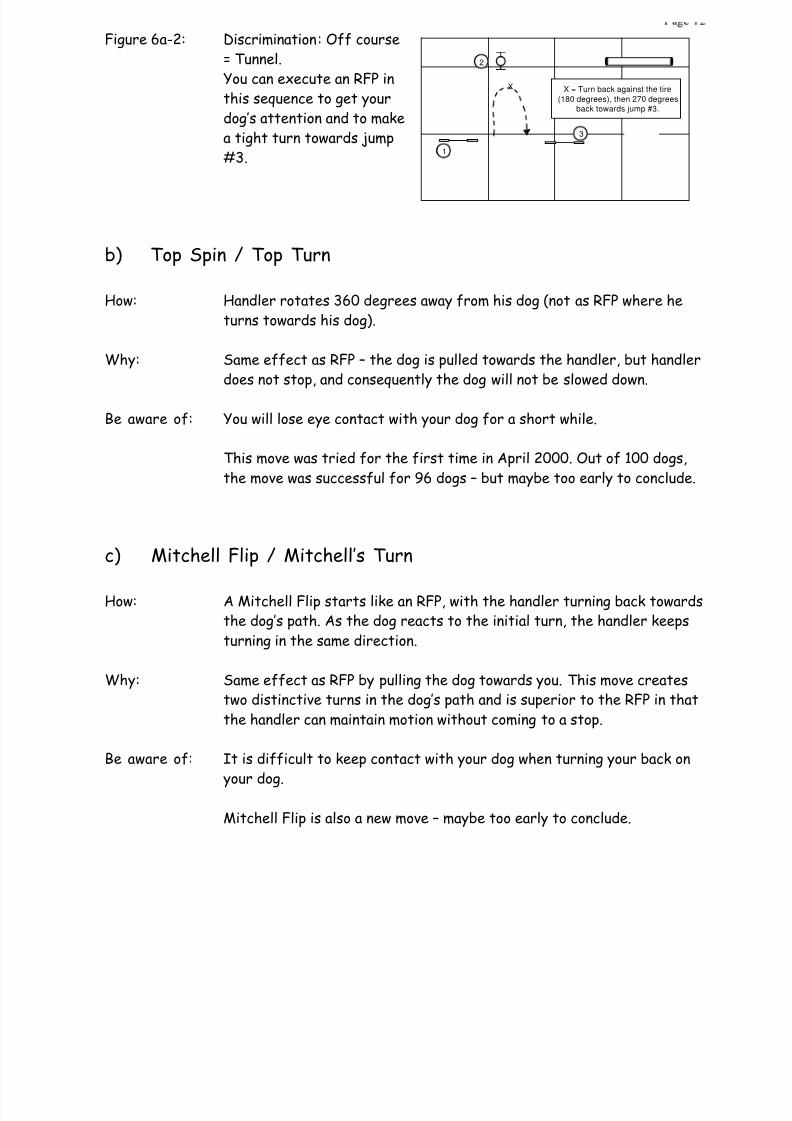
Figure 6a-2: Discrimination: Off course= Tunnel.You can execute an RFP inthis sequence to get yourdog’s attention and to makea tight turn towards jump#3.
b) Top Spin / Top Turn
How: Handler rotates 360 degrees away from his dog (not as RFP where heturns towards his dog).
Why: Same effect as RFP – the dog is pulled towards the handler, but handlerdoes not stop, and consequently the dog will not be slowed down.
Be aware of: You will lose eye contact with your dog for a short while.
This move was tried for the first time in April 2000. Out of 100 dogs,the move was successful for 96 dogs – but maybe too early to conclude.
c) Mitchell Flip / Mitchell’s Turn
How: A Mitchell Flip starts like an RFP, with the handler turning back towardsthe dog’s path. As the dog reacts to the initial turn, the handler keepsturning in the same direction.
Why: Same effect as RFP by pulling the dog towards you. This move createstwo distinctive turns in the dog’s path and is superior to the RFP in thatthe handler can maintain motion without coming to a stop.
Be aware of: It is difficult to keep contact with your dog when turning your back on
your dog.
Mitchell Flip is also a new move – maybe too early to conclude.
X
Fig 6a 2
X = Turn back against the tire
(180 degrees), then 270 degrees
back towards jump #3.
1
3
2
8/8/2019 Handling Techniques Agililty
http://slidepdf.com/reader/full/handling-techniques-agililty 14/27
7) BODY LANGUAGE + ARM SIGNALS
• Keep your back straight if you would like full speed!• If you bend down or over your dog, you will slow your dog down!• If you turn your body towards your dog and/or stare at your dog, you will slow
your dog down.
Recommended reading: Turid Rugaas’ book about Calming Signalshttp://www.legacy-by-mail.com/books.htm
To bend over your dog is a threatening signal which may cause your dog to jump off thecontacts, to weave slower or to be uncomfortable and perhaps get up when supposed to liedown on the table.
If you are facing your dog and/or if you are staring at your dog when he is at the startline/at the table, you may slow your dog down.
Some dogs /breeds are more sensitive to these signals than others. If a judge is facing adog, running straight towards a dog, staring at or bending over a dog - even the judge mayslow such a dog down. Usually you see this happen when the dog is on contact obstacles, inthe weave poles or at the start line.
The majority of the off-courses are because the handler is facing the off course –although he is calling the course direction. If there is a conflict between the verbal cueand the handler's body language, the dog will always give preference to the body language
Always finish the course – don’t stop/don’t slow down – until you have crossed the finishline. If you stop running, bars may be knocked, and after a collapsed tunnel many dogs willturn back to their handler instead of running forward.
When approaching a close discrimination problem you should first grab eye contact with your dog before giving your command.
If you wear a white T shirt your dog will at a distance be able to see your arm andshoulder movements better.
Many people leave out giving the command “jump” – instead they just give the command “goon” which to their dog will mean continue forward in a straight line. Try to run the coursewithout giving any commands to find out how your dog reacts (some dogs will speed up), or you may find out where it is necessary to give a command. To skip commands will improve your body language, and your dog will learn to pay closer attention.
8/8/2019 Handling Techniques Agililty
http://slidepdf.com/reader/full/handling-techniques-agililty 15/27
a) Dog’s nose
All dogs will go in the direction their nose is pointing. Unless your dog’s nose is pointing inthe correct direction, there is no point giving any command for the next obstacle. Givedirectionals to make your dog’s nose point in the correct direction. You should not give anycommand for any obstacle until your dog’s nose turns to the next obstacle.
b) Block + Body Magnet (Push + Pull)
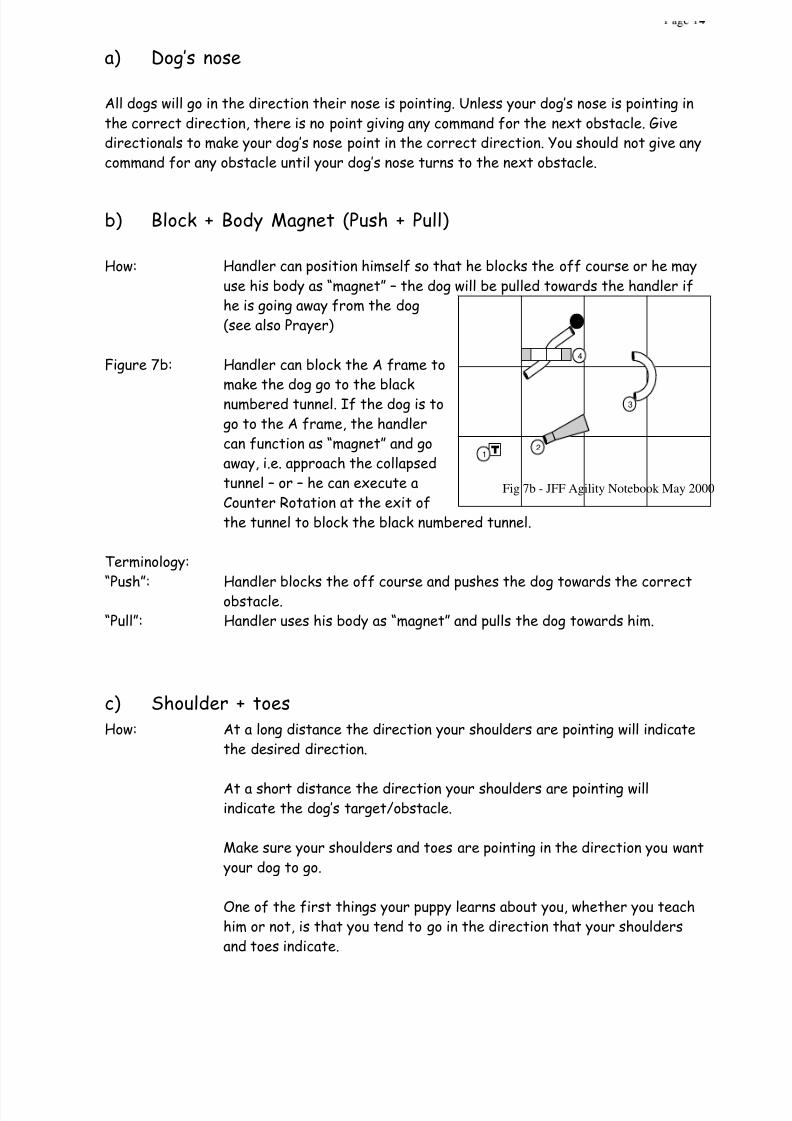
How: Handler can position himself so that he blocks the off course or he mayuse his body as “magnet” – the dog will be pulled towards the handler ifhe is going away from the dog(see also Prayer)
Figure 7b: Handler can block the A frame to
make the dog go to the blacknumbered tunnel. If the dog is togo to the A frame, the handlercan function as “magnet” and goaway, i.e. approach the collapsedtunnel – or – he can execute aCounter Rotation at the exit ofthe tunnel to block the black numbered tunnel.
Terminology:
“Push”: Handler blocks the off course and pushes the dog towards the correctobstacle.“Pull”: Handler uses his body as “magnet” and pulls the dog towards him.
c) Shoulder + toes
How: At a long distance the direction your shoulders are pointing will indicate
the desired direction.
At a short distance the direction your shoulders are pointing willindicate the dog’s target/obstacle.
Make sure your shoulders and toes are pointing in the direction you want your dog to go.
One of the first things your puppy learns about you, whether you teachhim or not, is that you tend to go in the direction that your shouldersand toes indicate.
2
3
1
4
4
Fig 7b - JFF Agility Notebook May 2000
8/8/2019 Handling Techniques Agililty
http://slidepdf.com/reader/full/handling-techniques-agililty 16/27
Why: You can steer your dog by turning your shoulders in the correctdirection (no arm signals necessary).
Be aware of: Your positioning in relation to your dog + from where your dog will hear your voice, may be vital for in which direction your dog will turn.
Always be aware in which direction your shoulders are turned. If yourdog has gone off course – don’t believe that your dog was wrong – find
out in which direction your shoulders were turned.
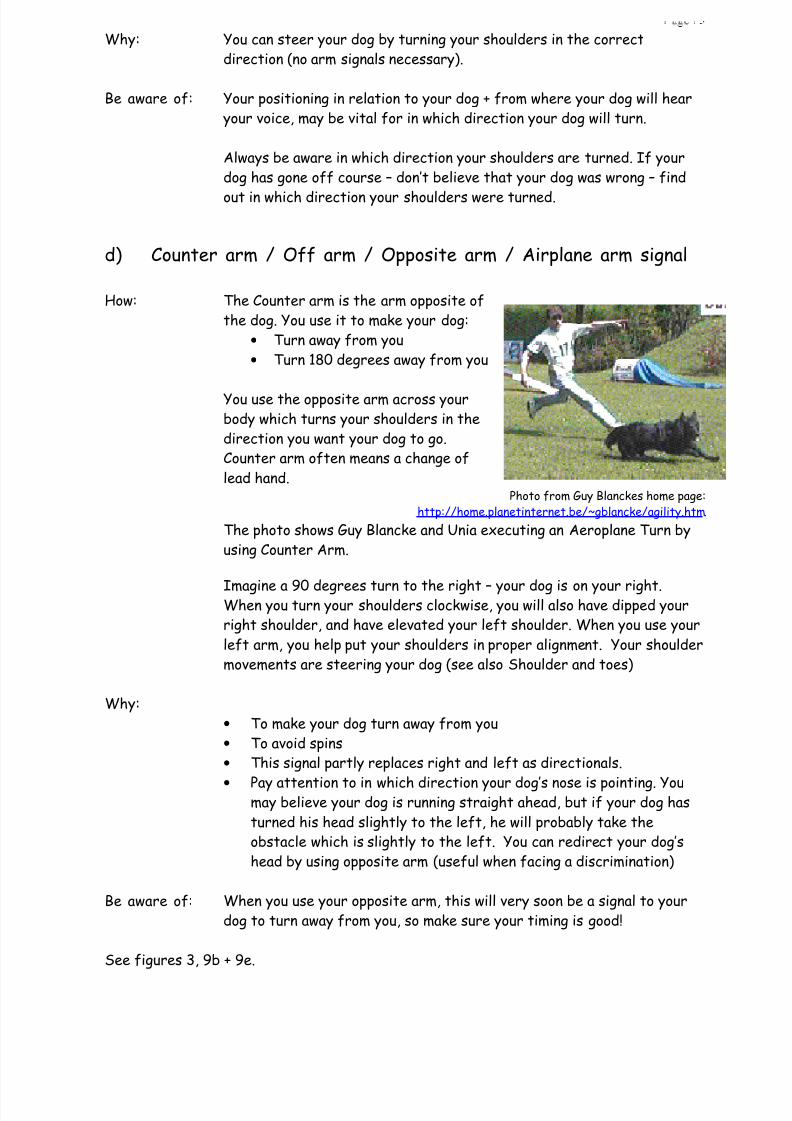
d) Counter arm / Off arm / Opposite arm / Airplane arm signal
How: The Counter arm is the arm opposite ofthe dog. You use it to make your dog:
• Turn away from you• Turn 180 degrees away from you
You use the opposite arm across yourbody which turns your shoulders in thedirection you want your dog to go.Counter arm often means a change oflead hand.
Photo from Guy Blanckes home page: http://home.planetinternet.be/~gblancke/agility.htm.
The photo shows Guy Blancke and Unia executing an Aeroplane Turn byusing Counter Arm.
Imagine a 90 degrees turn to the right – your dog is on your right.When you turn your shoulders clockwise, you will also have dipped yourright shoulder, and have elevated your left shoulder. When you use yourleft arm, you help put your shoulders in proper alignment. Your shouldermovements are steering your dog (see also Shoulder and toes)
Why:
• To make your dog turn away from you• To avoid spins• This signal partly replaces right and left as directionals.• Pay attention to in which direction your dog’s nose is pointing. Youmay believe your dog is running straight ahead, but if your dog has
turned his head slightly to the left, he will probably take theobstacle which is slightly to the left. You can redirect your dog’shead by using opposite arm (useful when facing a discrimination)
Be aware of: When you use your opposite arm, this will very soon be a signal to yourdog to turn away from you, so make sure your timing is good!
See figures 3, 9b + 9e.
8/8/2019 Handling Techniques Agililty
http://slidepdf.com/reader/full/handling-techniques-agililty 17/27
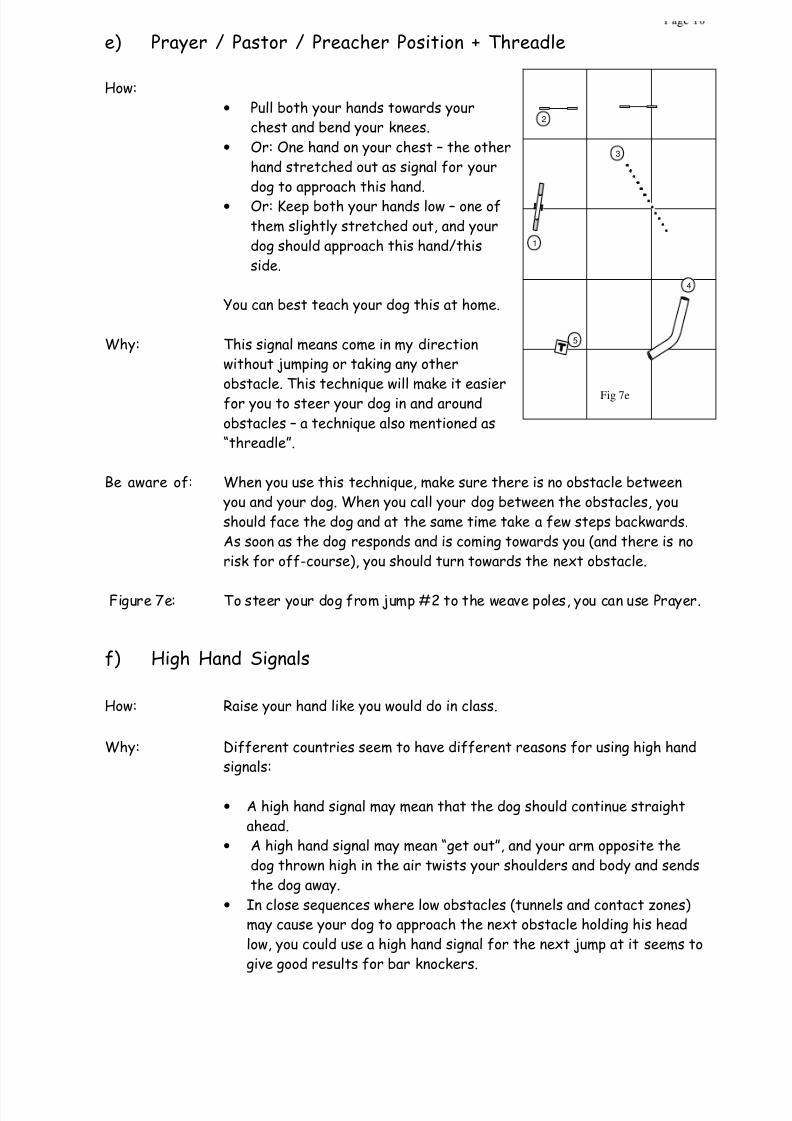
e) Prayer / Pastor / Preacher Position + Threadle
How:
• Pull both your hands towards yourchest and bend your knees.
• Or: One hand on your chest – the otherhand stretched out as signal for yourdog to approach this hand.
• Or: Keep both your hands low – one ofthem slightly stretched out, and yourdog should approach this hand/thisside.
You can best teach your dog this at home.
Why: This signal means come in my directionwithout jumping or taking any otherobstacle. This technique will make it easierfor you to steer your dog in and aroundobstacles – a technique also mentioned as“threadle”.
Be aware of: When you use this technique, make sure there is no obstacle between you and your dog. When you call your dog between the obstacles, youshould face the dog and at the same time take a few steps backwards.As soon as the dog responds and is coming towards you (and there is norisk for off-course), you should turn towards the next obstacle.
Figure 7e: To steer your dog from jump #2 to the weave poles, you can use Prayer.
f) High Hand Signals
How: Raise your hand like you would do in class.
Why: Different countries seem to have different reasons for using high handsignals:
• A high hand signal may mean that the dog should continue straightahead.
• A high hand signal may mean “get out”, and your arm opposite thedog thrown high in the air twists your shoulders and body and sendsthe dog away.
• In close sequences where low obstacles (tunnels and contact zones)may cause your dog to approach the next obstacle holding his headlow, you could use a high hand signal for the next jump at it seems togive good results for bar knockers.
5
4
3
2
1
Fig 7e
8/8/2019 Handling Techniques Agililty
http://slidepdf.com/reader/full/handling-techniques-agililty 18/27
g) Scoop
How:
• Give a low scooping arm signal - your arm slightly bent – palm flat andfacing up, to send your dog in the direction you want your dog to go.
• Scoop and run may also be the action of your body language. Instead
of getting ahead of your dog, you stay with your dog, and run withhim. So if your dog exits a tunnel, and you plan going ahead to a lineof jumps - rather than going - you should stay at the exit of thetunnel, and when your dog comes out you "scoop" him up with yourbody language and run alongside him. This gives your dog amotivational boost.
Why: This method works very well for slower, hard to motivate dogs..
8/8/2019 Handling Techniques Agililty
http://slidepdf.com/reader/full/handling-techniques-agililty 19/27
8) DISTANCE WORK
Recommended reading:
”Go the Distance” by Bud Houston and Stacy Peardot - a workbook over 8 weeks - how totrain your dog to work away.
"Unleashing the 'Velcro' Dog" - an article in Clean Run Magazine July'99 by Jane Simmons-Moake.
Distance work is also a technique (or several techniques) that have to be learned. You startpractising on just one obstacle at the time. You should gradually increase the distance andangle to the obstacle: You should practice on recalls over each obstacle, on sending yourdog ahead towards each obstacle and on having more and more parallel distance between you and the dog. When the dog manages this, you can add more obstacles before startingdistance work on a simple course.
a) Send Away / Go On
How: The dog is running ahead with confidence and performs one/severalobstacles.
Start close to an obstacle - increase gradually the distance and angle tothe obstacle. Use a toy/food container or an assistant (holding andshowing a toy or a treat) or a target to lure the dog forward over the
obstacle. For target training towards an object, you should try touchtraining with a clicker. The target itself can be a piece of plexi glaswhich hardly will be visible for the dog on the ground - and consequentlyeasier to remove than a visible target.
For sending the dog ahead towards jumps, throw a ball or use a target asreinforcement. Teach the dog to touch the target with his nose or a paw.If you are teaching the dog to touch the contact zone, the dog shouldtouch the target with his nose (not a paw). To avoid confusing the dog -use two different commands; one for sending the dog ahead towards jumps and another for the contact zone.
Why: Forward momentum is necessary for most of the techniques used inagility, and last but not least: THE DOGS LOVE IT!! (Round off everyclass with some simple sequences to encourage your dog to run ahead).
Be aware of:
• Slow dogs lacking forward momentum should be given the possibilityto work without call-offs.

8/8/2019 Handling Techniques Agililty
http://slidepdf.com/reader/full/handling-techniques-agililty 20/27
• You can practise ”call-offs” (or preferably call-to’s) for very fastdogs with a good forward momentum.
b) High- Way / Framing
How: The dog should focus on the next obstacles while he is performing theprior. Remember to teach him a signal in addition to the command,meaning: Run ahead and perform the obstacles which you see!
An easy sequence for learning could consist of 2 jumps and a tunnel witha target (e.g. a food container) at the end. The dog will learn (and love)to work with a target in the course by gradually increasing the numberof obstacles in front of the 2 jumps and tunnel. The target is always atthe end, but more difficult sequencing can be done prior to sending thedog to the final 3 obstacles and target. The challenge for most handlersis to avoid that their dog runs towards the target before he is supposedto do so. Every time your dog approaches the final three obstacles, youshould give command and signal to run ahead at full speed.
Why: Teaches the dog to change focus between handler and obstacles so that you can increase your dog’s speed on the course when there is no risk foroff course (highway) and slow down when there is need for control (city).By giving command and signal the handler will later on be able to make hisdog run at full speed.
Be aware of: The handler should stay behind the dog while practising highway - youare aiming for your dog to run independently and confidently.
c) Layering
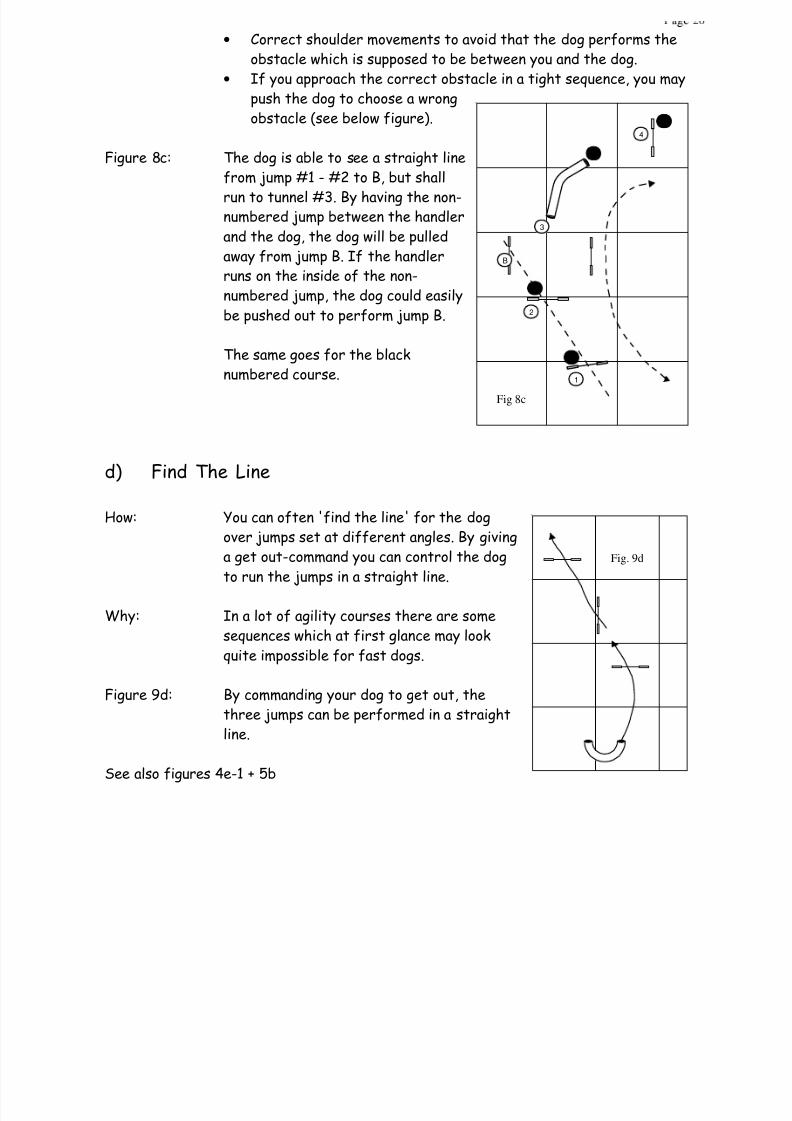
How: Layering is a technique for distance handling which comes very handywhen a group of obstacles are tight together. The handler gives acommand to his dog to perform one obstacle while another obstacle isbetween the handler and the dog (the handler is running on the “utterlayer” - see figure 8c).
Start practising by making it easy to have an obstacle between you and your dog. Move the obstacle further and further out to graduallyincrease difficulty and distance to your dog.
Why: When a group of obstacles are placed tight together, it is easy for thedog to be pushed towards a wrong obstacle. By using the Layer-technique you learn to find 'higways' in the course and aim for full speed.
Be aware of:
8/8/2019 Handling Techniques Agililty
http://slidepdf.com/reader/full/handling-techniques-agililty 21/27
• Correct shoulder movements to avoid that the dog performs theobstacle which is supposed to be between you and the dog.
• If you approach the correct obstacle in a tight sequence, you maypush the dog to choose a wrongobstacle (see below figure).
Figure 8c: The dog is able to see a straight linefrom jump #1 - #2 to B, but shall
run to tunnel #3. By having the non-numbered jump between the handlerand the dog, the dog will be pulledaway from jump B. If the handlerruns on the inside of the non-numbered jump, the dog could easilybe pushed out to perform jump B.
The same goes for the blacknumbered course.
d) Find The Line
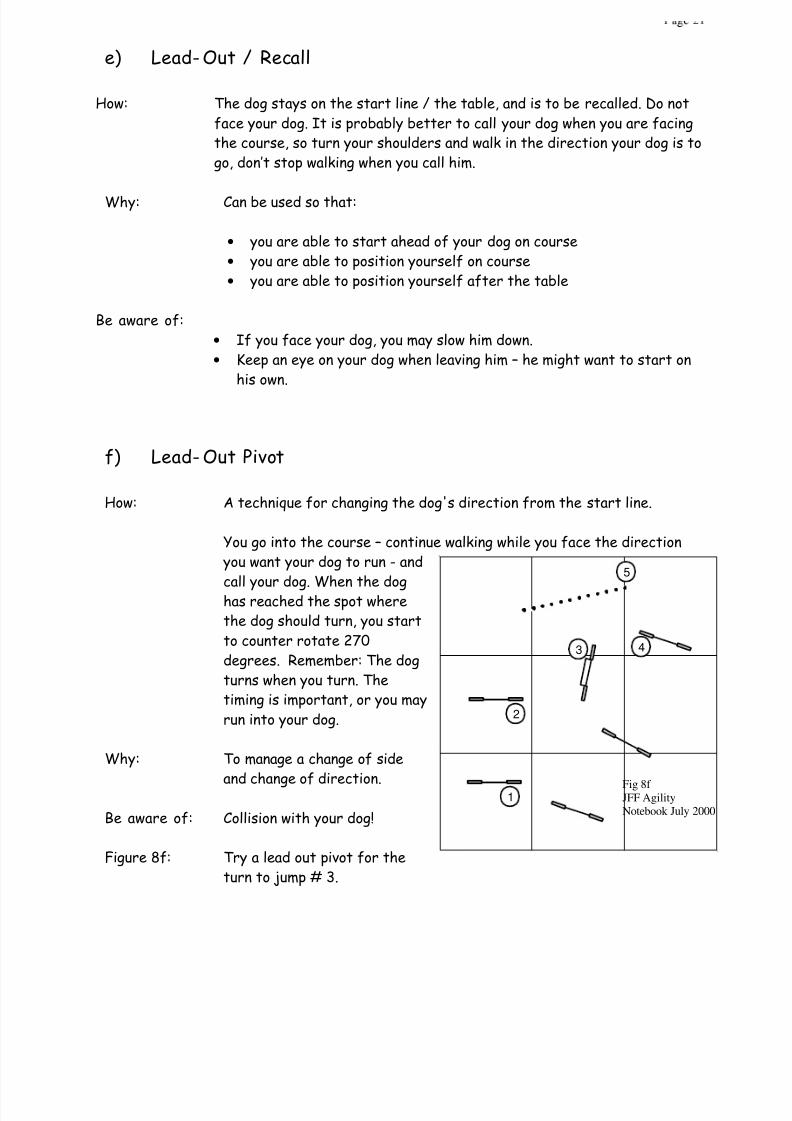
How: You can often 'find the line' for the dogover jumps set at different angles. By givinga get out-command you can control the dogto run the jumps in a straight line.
Why: In a lot of agility courses there are somesequences which at first glance may lookquite impossible for fast dogs.
Figure 9d: By commanding your dog to get out, thethree jumps can be performed in a straightline.
See also figures 4e-1 + 5b
Fig. 9d
B
4
3
2
1
4
3
2
1
Fig 8c
8/8/2019 Handling Techniques Agililty
http://slidepdf.com/reader/full/handling-techniques-agililty 22/27
e) Lead- Out / Recall
How: The dog stays on the start line / the table, and is to be recalled. Do notface your dog. It is probably better to call your dog when you are facingthe course, so turn your shoulders and walk in the direction your dog is togo, don’t stop walking when you call him.
Why: Can be used so that:
• you are able to start ahead of your dog on course• you are able to position yourself on course• you are able to position yourself after the table
Be aware of:
• If you face your dog, you may slow him down.• Keep an eye on your dog when leaving him – he might want to start on
his own.
f) Lead- Out Pivot
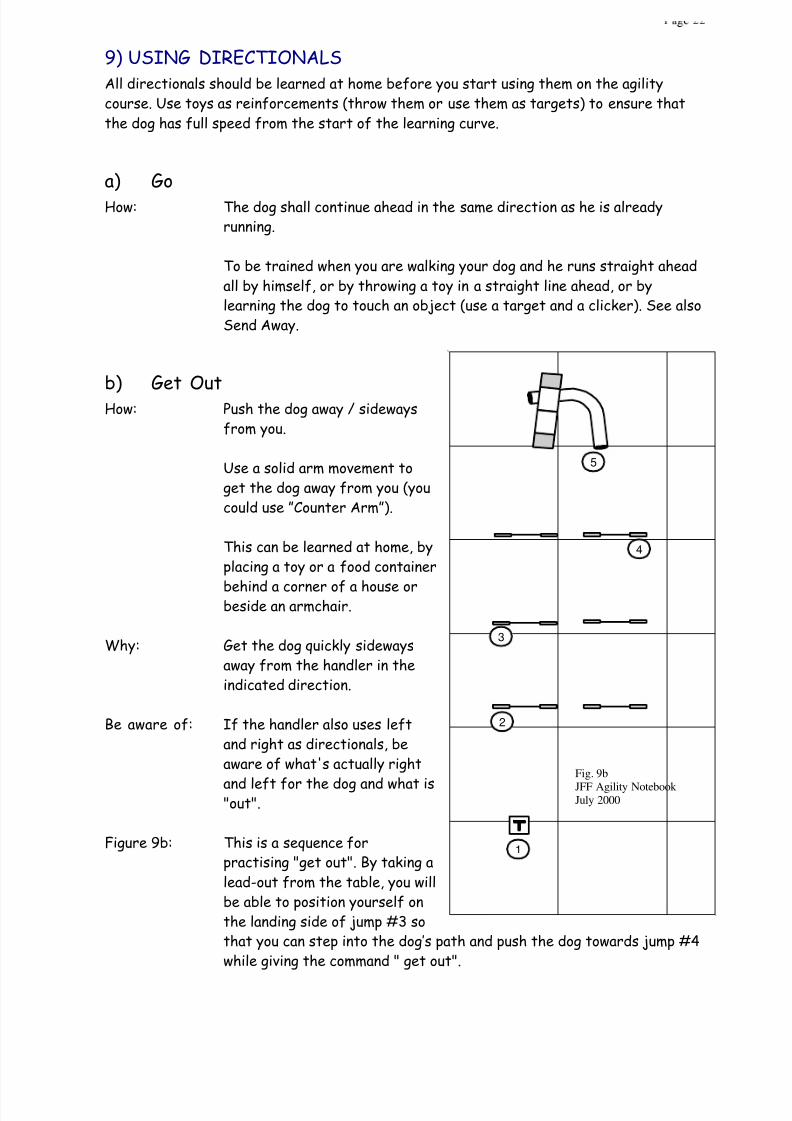
How: A technique for changing the dog's direction from the start line.
You go into the course – continue walking while you face the direction you want your dog to run - and
call your dog. When the doghas reached the spot wherethe dog should turn, you startto counter rotate 270degrees. Remember: The dogturns when you turn. Thetiming is important, or you mayrun into your dog.
Why: To manage a change of side
and change of direction.
Be aware of: Collision with your dog!
Figure 8f: Try a lead out pivot for theturn to jump # 3.
2
3 4
5
1Fig 8f JFF Agility
Notebook July 2000
8/8/2019 Handling Techniques Agililty
http://slidepdf.com/reader/full/handling-techniques-agililty 23/27
9) USING DIRECTIONALS
All directionals should be learned at home before you start using them on the agilitycourse. Use toys as reinforcements (throw them or use them as targets) to ensure thatthe dog has full speed from the start of the learning curve.
a) Go
How: The dog shall continue ahead in the same direction as he is alreadyrunning.
To be trained when you are walking your dog and he runs straight aheadall by himself, or by throwing a toy in a straight line ahead, or bylearning the dog to touch an object (use a target and a clicker). See alsoSend Away.
b)
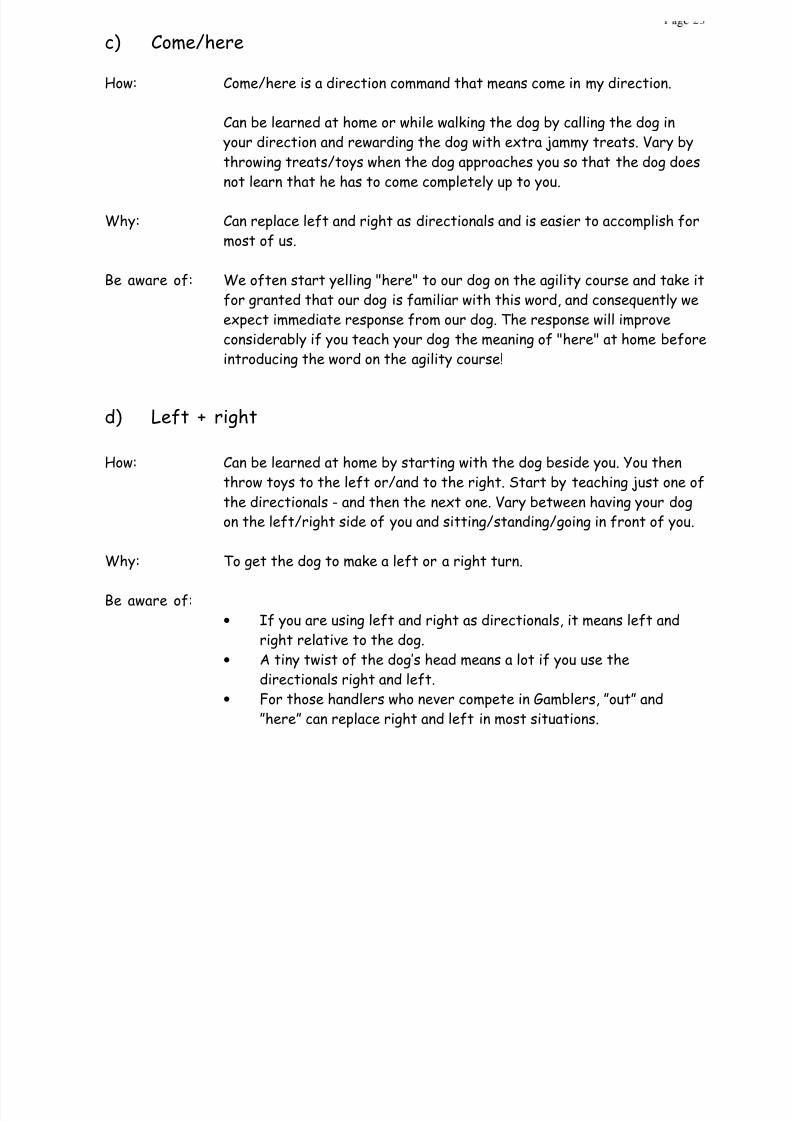
Get OutHow: Push the dog away / sidewaysfrom you.
Use a solid arm movement toget the dog away from you (youcould use ”Counter Arm”).
This can be learned at home, byplacing a toy or a food container
behind a corner of a house orbeside an armchair.
Why: Get the dog quickly sidewaysaway from the handler in theindicated direction.
Be aware of: If the handler also uses leftand right as directionals, beaware of what's actually right
and left for the dog and what is"out".
Figure 9b: This is a sequence forpractising "get out". By taking alead-out from the table, you willbe able to position yourself onthe landing side of jump #3 sothat you can step into the dog’s path and push the dog towards jump #4while giving the command " get out".
2
1
5
4
3
Fig. 9b
JFF Agility Notebook July 2000
8/8/2019 Handling Techniques Agililty
http://slidepdf.com/reader/full/handling-techniques-agililty 24/27
c) Come/here
How: Come/here is a direction command that means come in my direction.
Can be learned at home or while walking the dog by calling the dog in your direction and rewarding the dog with extra jammy treats. Vary bythrowing treats/toys when the dog approaches you so that the dog doesnot learn that he has to come completely up to you.
Why: Can replace left and right as directionals and is easier to accomplish formost of us.
Be aware of: We often start yelling "here" to our dog on the agility course and take itfor granted that our dog is familiar with this word, and consequently weexpect immediate response from our dog. The response will improveconsiderably if you teach your dog the meaning of "here" at home beforeintroducing the word on the agility course!
d) Left + right
How: Can be learned at home by starting with the dog beside you. You thenthrow toys to the left or/and to the right. Start by teaching just one ofthe directionals - and then the next one. Vary between having your dogon the left/right side of you and sitting/standing/going in front of you.
Why: To get the dog to make a left or a right turn.
Be aware of:
• If you are using left and right as directionals, it means left andright relative to the dog.
• A tiny twist of the dog’s head means a lot if you use thedirectionals right and left.
• For those handlers who never compete in Gamblers, ”out” and”here” can replace right and left in most situations.
8/8/2019 Handling Techniques Agililty
http://slidepdf.com/reader/full/handling-techniques-agililty 25/27
e) Go Around
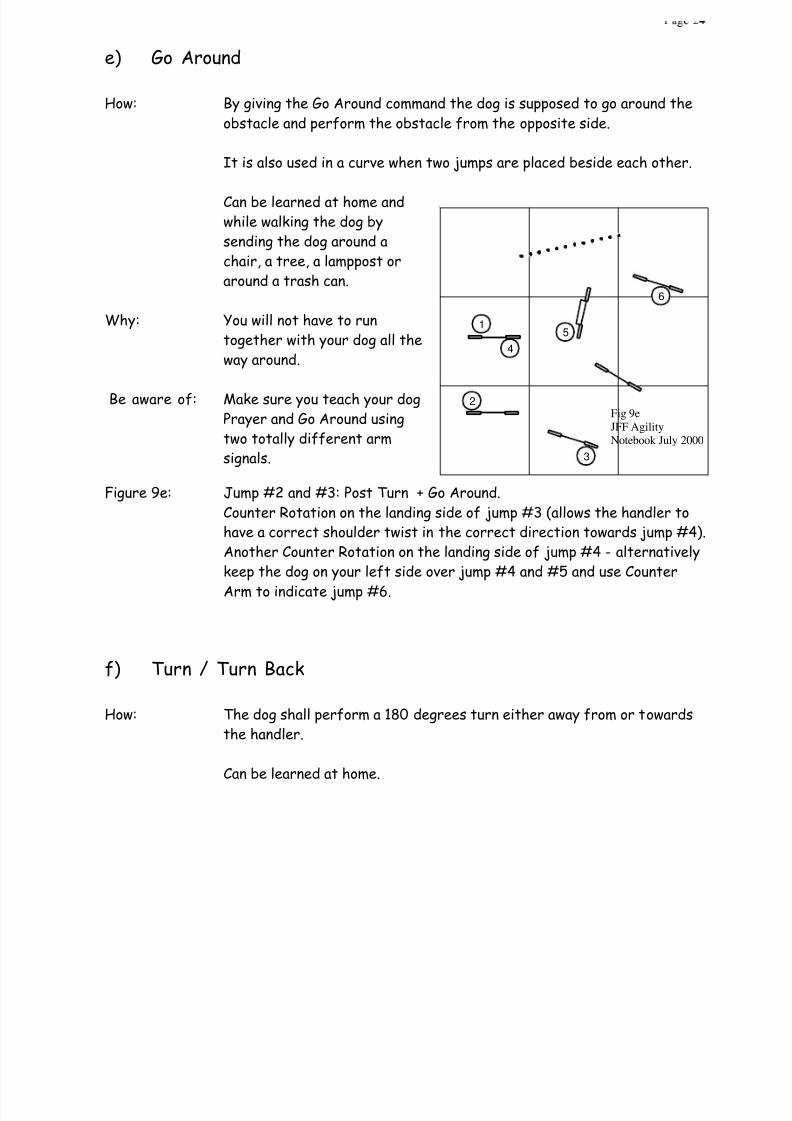
How: By giving the Go Around command the dog is supposed to go around theobstacle and perform the obstacle from the opposite side.
It is also used in a curve when two jumps are placed beside each other.
Can be learned at home andwhile walking the dog bysending the dog around achair, a tree, a lamppost oraround a trash can.
Why: You will not have to runtogether with your dog all theway around.
Be aware of: Make sure you teach your dogPrayer and Go Around usingtwo totally different armsignals.
Figure 9e: Jump #2 and #3: Post Turn + Go Around.Counter Rotation on the landing side of jump #3 (allows the handler tohave a correct shoulder twist in the correct direction towards jump #4).Another Counter Rotation on the landing side of jump #4 - alternativelykeep the dog on your left side over jump #4 and #5 and use Counter
Arm to indicate jump #6.
f) Turn / Turn Back
How: The dog shall perform a 180 degrees turn either away from or towardsthe handler.
Can be learned at home.
1
2
3
4
5
6
Fig 9e
JFF Agility
Notebook July 2000
8/8/2019 Handling Techniques Agililty
http://slidepdf.com/reader/full/handling-techniques-agililty 26/27
g) Call- off / Call- to
How: If the handler misdirects the dog, or when the judge has placed anobstacle in the dogs path, the result can be that the dog is runningtowards the wrong obstacle, and the handler has to call his dog off. If you do not practice this, the call-off might kill your dog's motivation.
The easiest suggestion for training is to change the way you are thinking.Instead of training Call-off, that actually focuses on the dog doingsomething wrong, practice a Call-to (calling the dog to you), and focusand reward the correct behaviour.
You could start training at home whilst you and your dog are running tothe door (someone rings the doorbell). Change your mind and run toanother door - treat the dog a jackpot when he comes to you by anotherdoor.
For dogs with a good forward momentum Call-to can be practised in asequence with jumps in a straight line. Make sure that your ownmovement also stops - help the dog by taking a few steps backwards.Reward the dog for stopping.
Place two jumps in front of a tunnel/A-frame discrimination - let the dogperform the jumps, but run past tunnel/A-frame - reward!
Be aware of:
• If your dog lacks forward momentum, do not call your dog off when your dog is running towards a wrong obstacle – continue as if he wasrunning towards the correct obstacle (probably you were giving asignal causing him to go to the wrong obstacle).
• If you by accident sends your dog towards an obstacle, and you haveto call your dog back to you, you have to praise and reward the dogwhen he comes up to you. Do not send your dog immediately toanother obstacle, because by doing that you are ignoring the correctbehaviour, and then that behaviour will most likely disappear.
8/8/2019 Handling Techniques Agililty
http://slidepdf.com/reader/full/handling-techniques-agililty 27/27
1 0) KISS = KEEP IT SIMPLE
You need to practise these techniques to make them natural elements of your way tohandle your dog. Do not use these techniques just because you think you should, but use your own judgement and find out which ones work best for you and your dog. It will takeboth experience and practice to be able to use the techniques and to know when to usethem. After some practice the techniques will simplify difficult courses and make your
dog’s turns tighter, so do not be afraid to try them out!
Bud Houston:“Simplicity comes from a complete and well-rounded repertoire of handling possibilities.The only way to accomplish this is to know what the moves are and to practise them. When
you see the great handlers out there, making it look simple, pushing through complex
challenges as though they were no challenge at all….. what you are seeing is a handler who
knows what to do in whatever situation presents itself, and has practised the movements
to the extent that muscle memory and a refined team bond, make the KISS principle
possible.
The great instructors in this country, and presumably anywhere agility is played, are those
who continue to stretch their students and build repertoire. They teach with an open mind,
and work on all possibilities, even when they are all the rage.”
Solveig Trippestad
1st August 2000
Top Related