Langages
Pages
Légal

Instruction manual
XS WIRELESS
A
B
ANT B
BALANCED
UNBALANCEDLINE
SQ
MIC
AUDIO OUT
DC 12V 300mA
ANT A
ANT AB
TUNE
PRESET
SCAN RF AFSYNC B.2 CH.12
N
O
G H I
M L K
J615.375
TRUE DIVERSITY RECEIVER
volume
set
sync
XS WIRELESS
Typenschild
8 9 0 A B C E
F
D
1 2 4 5 763
C
D
1 2 3
4
9
8
7
0
5
6
A
0 dB
– 10
– 20
– 30
V AA
PUSH OPEN
1
5
2
6
3 4
0A
9 87
615.375
615.375
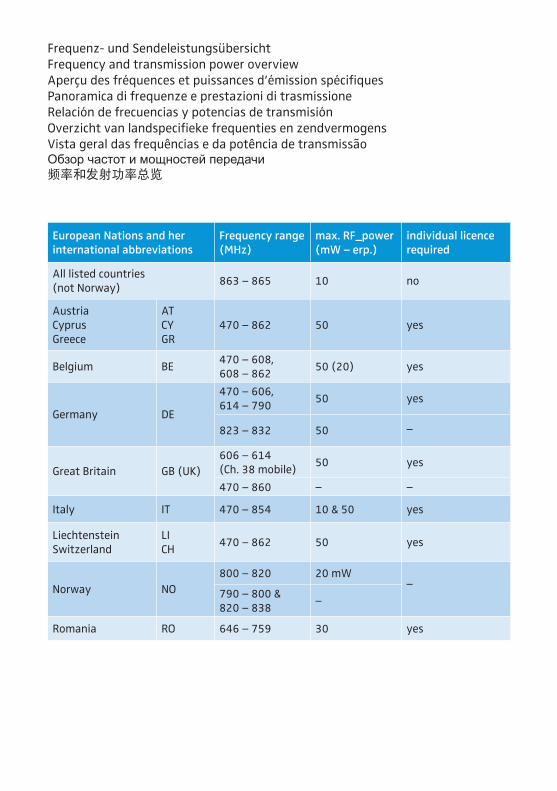
European Nations and her international abbreviations
Frequency range (MHz)
max. RF_power (mW – erp.)
individual licence required
All listed countries (not Norway)
863 – 865 10 no
AustriaCyprusGreece
ATCYGR
470 – 862 50 yes
Belgium BE470 – 608, 608 – 862
50 (20) yes
Germany DE
470 – 606, 614 – 790
50 yes
823 – 832 50
Great Britain GB (UK)
606 – 614(Ch. 38 mobile)
50 yes
470 – 860
Italy IT 470 – 854 10 & 50 yes
LiechtensteinSwitzerland
LICH
470 – 862 50 yes
Norway NO
800 – 820 20 mW
790 – 800 & 820 – 838
–
–
– –
–
Romania RO 646 – 759 30 yes
Frequenz- und Sendeleistungsübersicht Frequency and transmission power overviewAperçu des fréquences et puissances d’émission spécifiquesPanoramica di frequenze e prestazioni di trasmissioneRelación de frecuencias y potencias de transmisiónOverzicht van landspecifieke frequenties en zendvermogens Vista geral das frequências e da potência de transmissãoОбзор частот и мощностей передачи频率和发射功率总览
Contents
XS WIRELESS | 1
EN
FR
ITNL
PT
RU
ZH
ES
DE
ContentsImportant safety instructions ......................................................................................................2
The XS WIRELESS systems ............................................................................................................4
Delivery includes .............................................................................................................................5
Product overview ............................................................................................................................6
EM 10 receiver ...........................................................................................................................6
SK 20 bodypack transmitter ..................................................................................................6
SKM 35/SKM 65 radio microphone .......................................................................................6
Putting the XS WIRELESS systems into operation ...................................................................7
Putting the receiver into operation ......................................................................................7
Putting the bodypack transmitter into operation .............................................................8
Putting the radio microphone into operation ....................................................................8
Using the XS WIRELESS systems ..................................................................................................9
Switching the receiver on/off ................................................................................................9
Switching the transmitters on/off .......................................................................................9
Muting the transmitters ...................................................................................................... 10
Adjusting the sensitivity ..................................................................................................... 10
Selecting and changing a receiver channel ...................................................................... 10
Synchronizing a transmitter with the receiver ............................................................... 11
Adjusting the squelch threshold ........................................................................................ 11
Cleaning and maintaining the XS WIRELESS systems .......................................................... 12
If a problem occurs ... .................................................................................................................. 12
Specifications ................................................................................................................................ 13
Manufacturer Declarations ......................................................................................................... 16
Important safety instructions
2 | XS WIRELESS
Important safety instructions
System
� Read this instruction manual.
� Keep this instruction manual. Always include this instruction manual when passing theproducts on to third parties.
� Heed all warnings and follow all instructions in this instruction manual.
� Only clean the products when they are not connected to the mains. Use a cloth forcleaning.
� Only use attachments/accessories specified by Sennheiser.
� Refer all servicing to qualified service personnel.Servicing is required if the products have been damaged in any way, liquid has beenspilled, objects have fallen inside, the products have been exposed to rain or moisture,do not operate properly or have been dropped.
� WARNING: To reduce the risk of fire or electric shock, do not use the products near waterand do not expose them to rain or moisture.
Receiver
� Only use the supplied mains unit.
� Unplug the mains unit from the wall socket,
– to completely disconnect the product from the mains,
– during lightning storms or
– when unused for long periods of time.
� Only operate the mains unit from the type of power source specified in the chapter“Specifications” (see page 13).
� Ensure that the mains unit is
– in a safe operating condition and easily accessible,
– properly plugged into the wall socket,
– only operated within the permissible temperature range,
– not covered or exposed to direct sunlight for longer periods of time in order to
prevent heat accumulation (see “Specifications” on page 13).
� Do not block any ventilation openings. Install the products in accordance with theinstructions given in this instruction manual.
� Do not install the products near any heat sources such as radiators, stoves, or otherdevices (including amplifiers) that produce heat.
� Do not overload wall outlets and extension cables as this may result in fire and electricshock.
� Ensure that the mains unit is always accessible so that the connected product can beeasily disconnected from the mains at any time.
EN
FR
ITNL
PT
RU
ZH
ES
DE
Important safety instructions
XS WIRELESS | 3
Bodypack transmitter and radio microphone
� Do not place the products near any heat sources such as radiators, stoves, or otherdevices (including amplifiers) that produce heat.
� WARNING: These products should be protected against the ingress of liquids (eg: water,sweat, etc.) as this can cause malfunctions due to shortages or corrosion, etc.
Intended use
Intended use of the product of the XS WIRELESS systems includes:
� having read this instruction manual especially the chapter “Important safety instruc-tions” on page 2,
� using the products within the operating conditions and limitations described in thisinstruction manual.
“Improper use” means using the products other than as described in these instructions, orunder operating conditions which differ from those described herein.
Framework requirements and restrictions on frequency usage
Before putting your radio microphone system or other audio transmission systems intooperation, ask the relevant wireless regulatory authority for the exact frequency alloca-tions and apply for an individual license if necessary. The table on the inside back coverprovides an overview of the different European framework requirements and restrictionson frequency usage. If there is no entry in the supplement, ask the relevant wireless regu-latory authority for the current rules governing frequency usage.
The XS WIRELESS systems
4 | XS WIRELESS
The XS WIRELESS systemsDesigned for different areas of application, the XS WIRELESS systems are available in fivevariants.
Presentation Set XSW 12: This system is ideal for presentation applications. The unobtru-sive ME 2-2 clip-on microphone is virtually invisible.
Instrument Set XSW 72: This system is for connecting musical instruments (e.g. guitar)which have a ¼” (6.3 mm) jack socket directly to the bodypack transmitter.
Vocal Set XSW 35 and Vocal Set XSW 65: These systems are ideal for vocal and speechapplications.
Headset Set XSW 52: The lightweight and comfortable headset system gives absolutefreedom of movement for a more animated and impressive performance. High-qualitymicrophone technology provides clear, brilliant sound.
The XS WIRELESS systems are available in five UHF frequency ranges with 960 frequenciesper frequency range (except range E = 520 frequencies). Each frequency range (A, GB, B,C, E) offers 8 frequency banks with up to 12 channels each. The frequency banks containfactory-preset frequencies (frequency presets).
Features
� Up to 12 transmission links per frequency range which can be operated simultaneously
� Reliable transmission technology
� True diversity technology for minimizing dropouts in the reception
� Adjustable squelch for eliminating RF interference
� Rugged metal housing for EM 10 receiver
� Crystal-clear reception due to dynamic processor
� Sync function for wireless transmission of frequencies to transmitters
� Scan function searches for unused frequencies
Frequency range A 548 to 572 MHz
Frequency range GB 606 to 630 MHz
Frequency range B 614 to 638 MHz
Frequency range C 766 to 790 MHz
Frequency range E 821 to 832 MHz and 863 to 865 MHz

EN
FR
ITNL
PT
RU
ZH
ES
DE
Delivery includes
XS WIRELESS | 5
Delivery includes
XS WIRELESS systems
EM
10
re
ceiv
er
SK
M 3
5 r
ad
io m
icro
ph
on
e, d
yn
am
ic
SK
M 6
5 r
ad
io m
icro
ph
on
e, c
on
de
nse
r
SK
20
bo
dy
pa
ck t
ran
smit
ter
Tra
nsm
itte
r b
ag
NT
2-3
ma
ins
un
it
ME
2-2
cli
p-o
n m
icro
ph
on
e
CI
1 ¼
” (6
.3 m
m)
jack
ca
ble
MZ
Q 1
sta
nd
mo
un
t
ME
3 h
ea
dm
ic
2 r
od
an
ten
na
s
2 A
A s
ize
ba
tte
rie
s
Inst
ruct
ion
ma
nu
al
Vocal Set XSW 35
Vocal Set XSW 65
Presentation Set
XSW 12
Instrument Set XSW 72
Headset Set XSW 52
A list of accessories can be found on the XS WIRELESS product page at www.sen-nheiser.com. For information on suppliers, contact your local Sennheiser partner:www.sennheiser.com > “Service & Support“.
Product overview
6 | XS WIRELESS
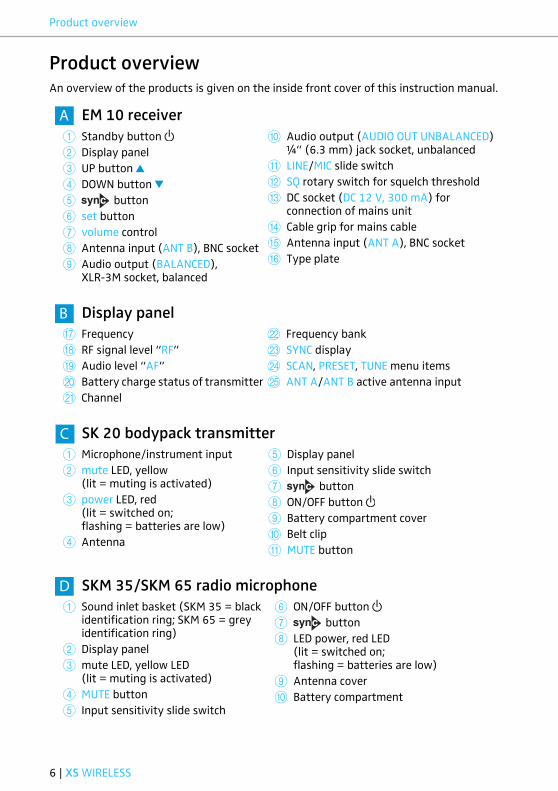
Product overviewAn overview of the products is given on the inside front cover of this instruction manual.
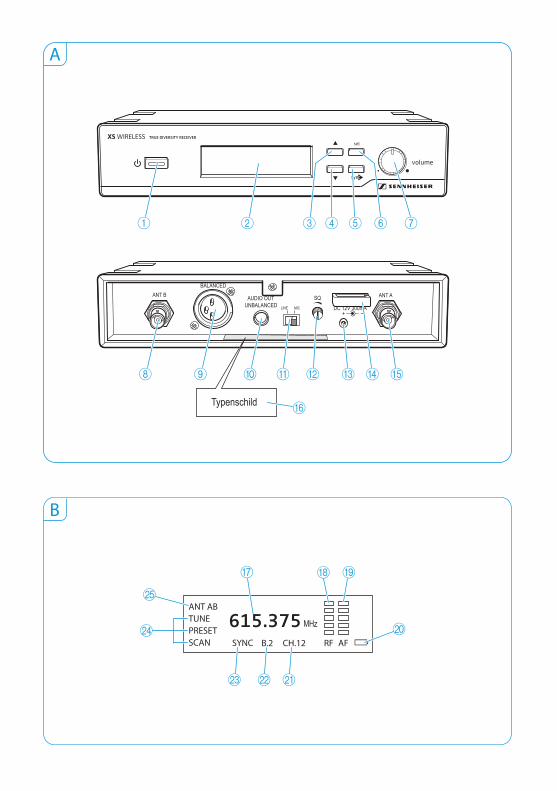
EM 10 receiver
1 Standby button
2 Display panel
3 UP button
4 DOWN button
5 button
6 set button
7 volume control
8 Antenna input (ANT B), BNC socket
9 Audio output (BALANCED), XLR-3M socket, balanced
0 Audio output (AUDIO OUT UNBALANCED) ¼” (6.3 mm) jack socket, unbalanced
A LINE/MIC slide switch
B SQ rotary switch for squelch threshold
C DC socket (DC 12 V, 300 mA) for connection of mains unit
D Cable grip for mains cable
E Antenna input (ANT A), BNC socket
F Type plate
Display panel
G Frequency
H RF signal level “RF”
I Audio level “AF”
J Battery charge status of transmitter
K Channel
L Frequency bank
M SYNC display
N SCAN, PRESET, TUNE menu items
O ANT A/ANT B active antenna input
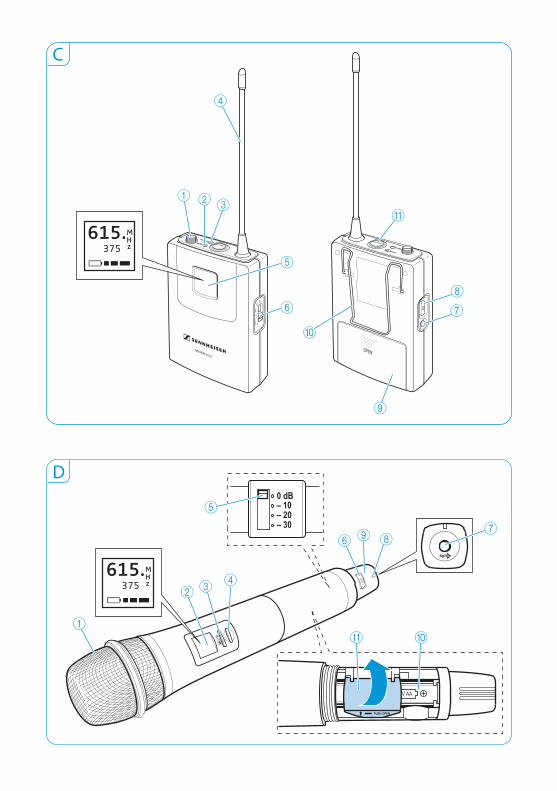
SK 20 bodypack transmitter
1 Microphone/instrument input
2 mute LED, yellow (lit = muting is activated)
3 power LED, red(lit = switched on; flashing = batteries are low)
4 Antenna
5 Display panel
6 Input sensitivity slide switch
7 button
8 ON/OFF button
9 Battery compartment cover
0 Belt clip
A MUTE button
SKM 35/SKM 65 radio microphone
1 Sound inlet basket (SKM 35 = black identification ring; SKM 65 = grey identification ring)
2 Display panel
3 mute LED, yellow LED (lit = muting is activated)
4 MUTE button
5 Input sensitivity slide switch
6 ON/OFF button
7 button
8 LED power, red LED (lit = switched on; flashing = batteries are low)
9 Antenna cover
0 Battery compartment
A
B
C
D
EN
FR
ITNL
PT
RU
ZH
ES
DE
Putting the XS WIRELESS systems into operation
XS WIRELESS | 7
Putting the XS WIRELESS systems into operation
Putting the receiver into operation
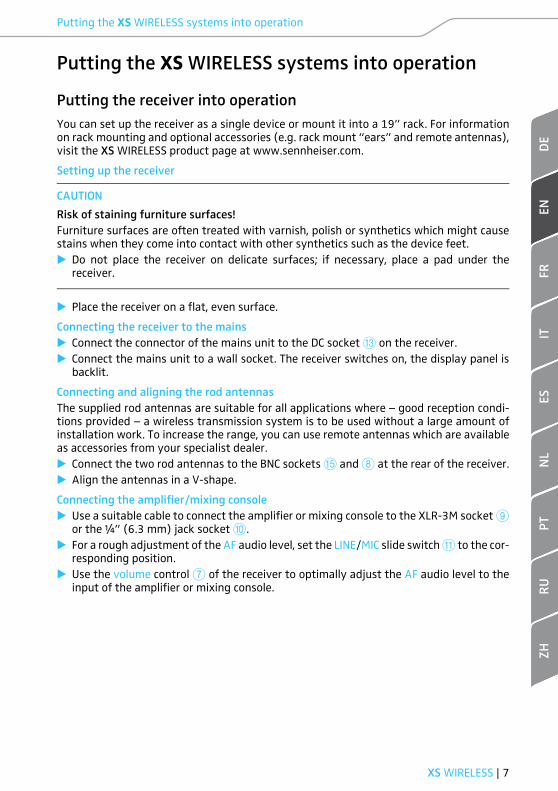
You can set up the receiver as a single device or mount it into a 19” rack. For informationon rack mounting and optional accessories (e.g. rack mount “ears” and remote antennas),visit the XS WIRELESS product page at www.sennheiser.com.
Setting up the receiver
� Place the receiver on a flat, even surface.
Connecting the receiver to the mains
� Connect the connector of the mains unit to the DC socket C on the receiver.
� Connect the mains unit to a wall socket. The receiver switches on, the display panel isbacklit.
Connecting and aligning the rod antennas
The supplied rod antennas are suitable for all applications where – good reception condi-tions provided – a wireless transmission system is to be used without a large amount ofinstallation work. To increase the range, you can use remote antennas which are availableas accessories from your specialist dealer.
� Connect the two rod antennas to the BNC sockets E and 8 at the rear of the receiver.
� Align the antennas in a V-shape.
Connecting the amplifier/mixing console
� Use a suitable cable to connect the amplifier or mixing console to the XLR-3M socket9or the ¼” (6.3 mm) jack socket 0.
� For a rough adjustment of the AF audio level, set the LINE/MIC slide switch A to the cor-responding position.
� Use the volume control 7 of the receiver to optimally adjust the AF audio level to theinput of the amplifier or mixing console.
CAUTION
Risk of staining furniture surfaces!
Furniture surfaces are often treated with varnish, polish or synthetics which might causestains when they come into contact with other synthetics such as the device feet.
� Do not place the receiver on delicate surfaces; if necessary, place a pad under thereceiver.
Putting the XS WIRELESS systems into operation
8 | XS WIRELESS
Putting the bodypack transmitter into operation
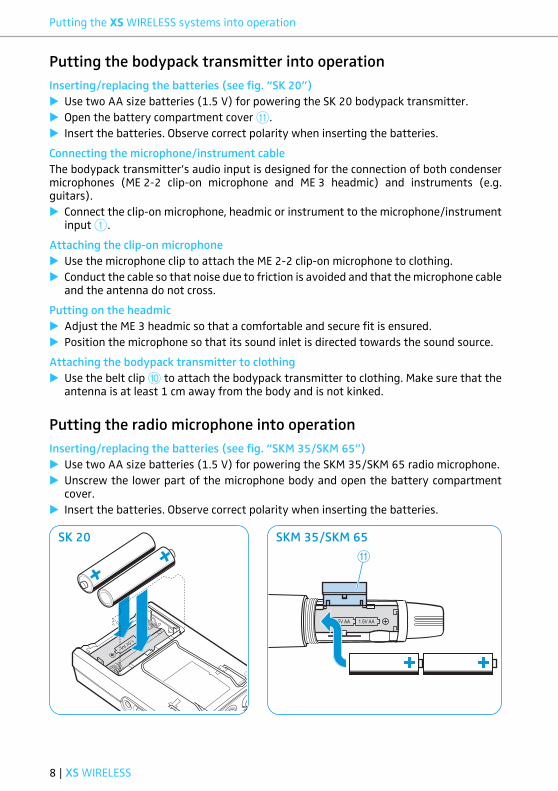
Inserting/replacing the batteries (see fig. “SK 20”)
� Use two AA size batteries (1.5 V) for powering the SK 20 bodypack transmitter.
� Open the battery compartment cover A.
� Insert the batteries. Observe correct polarity when inserting the batteries.
Connecting the microphone/instrument cable
The bodypack transmitter’s audio input is designed for the connection of both condensermicrophones (ME 2-2 clip-on microphone and ME 3 headmic) and instruments (e.g.guitars).
� Connect the clip-on microphone, headmic or instrument to the microphone/instrumentinput 1.
Attaching the clip-on microphone
� Use the microphone clip to attach the ME 2-2 clip-on microphone to clothing.
� Conduct the cable so that noise due to friction is avoided and that the microphone cableand the antenna do not cross.
Putting on the headmic
� Adjust the ME 3 headmic so that a comfortable and secure fit is ensured.
� Position the microphone so that its sound inlet is directed towards the sound source.
Attaching the bodypack transmitter to clothing
� Use the belt clip 0 to attach the bodypack transmitter to clothing. Make sure that theantenna is at least 1 cm away from the body and is not kinked.
Putting the radio microphone into operation
Inserting/replacing the batteries (see fig. “SKM 35/SKM 65”)
� Use two AA size batteries (1.5 V) for powering the SKM 35/SKM 65 radio microphone.
� Unscrew the lower part of the microphone body and open the battery compartmentcover.
� Insert the batteries. Observe correct polarity when inserting the batteries.
SK 20 SKM 35/SKM 65
1.5V AA 1.5V AA
A
EN
FR
ITNL
PT
RU
ZH
ES
DE
Using the XS WIRELESS systems
XS WIRELESS | 9
Using the XS WIRELESS systems
Switching the receiver on/off
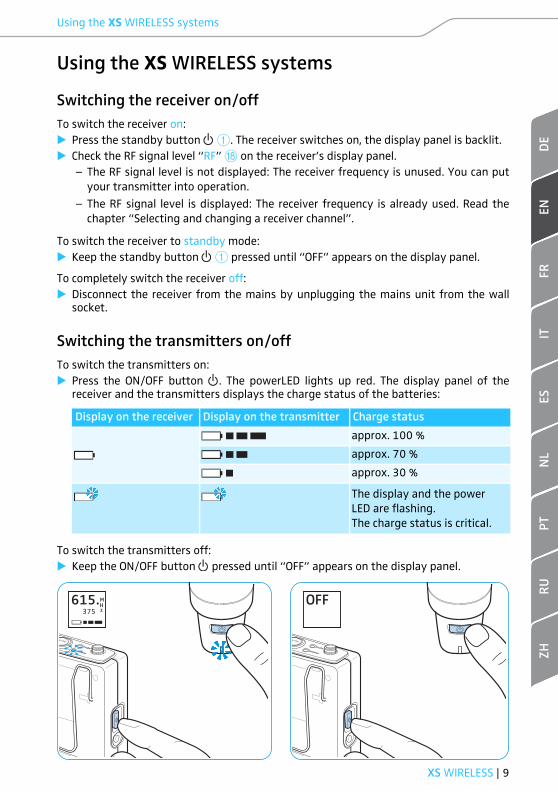
To switch the receiver on:
� Press the standby button 1. The receiver switches on, the display panel is backlit.
� Check the RF signal level “RF” H on the receiver’s display panel.
– The RF signal level is not displayed: The receiver frequency is unused. You can put
your transmitter into operation.
– The RF signal level is displayed: The receiver frequency is already used. Read the
chapter “Selecting and changing a receiver channel”.
To switch the receiver to standby mode:
� Keep the standby button 1 pressed until “OFF” appears on the display panel.
To completely switch the receiver off:
� Disconnect the receiver from the mains by unplugging the mains unit from the wallsocket.
Switching the transmitters on/off
To switch the transmitters on:
� Press the ON/OFF button . The powerLED lights up red. The display panel of thereceiver and the transmitters displays the charge status of the batteries:
To switch the transmitters off:
� Keep the ON/OFF button pressed until “OFF” appears on the display panel.
Display on the receiver Display on the transmitter Charge status
approx. 100 %
approx. 70 %
approx. 30 %
The display and the power
LED are flashing.
The charge status is critical.
OFF615.375
Using the XS WIRELESS systems
10 | XS WIRELESS
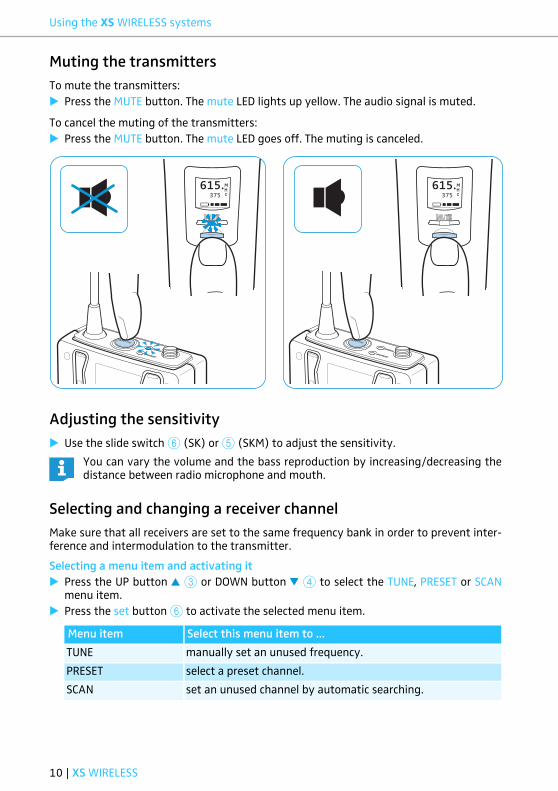
Muting the transmitters
To mute the transmitters:
� Press the MUTE button. The mute LED lights up yellow. The audio signal is muted.
To cancel the muting of the transmitters:
� Press the MUTE button. The mute LED goes off. The muting is canceled.
Adjusting the sensitivity
� Use the slide switch 6 (SK) or 5 (SKM) to adjust the sensitivity.
Selecting and changing a receiver channel
Make sure that all receivers are set to the same frequency bank in order to prevent inter-ference and intermodulation to the transmitter.
Selecting a menu item and activating it
� Press the UP button 3 or DOWN button 4 to select the TUNE, PRESET or SCANmenu item.
� Press the set button 6 to activate the selected menu item.
You can vary the volume and the bass reproduction by increasing/decreasing thedistance between radio microphone and mouth.
Menu item Select this menu item to ...
TUNE manually set an unused frequency.
PRESET select a preset channel.
SCAN set an unused channel by automatic searching.
615.375
615.375
EN
FR
ITNL
PT
RU
ZH
ES
DE
Using the XS WIRELESS systems
XS WIRELESS | 11
The menu items and their adjustment possibilities
TUNE menu item
� Use the UP button 3 or DOWN button 4 to select an unused frequency.
� Press the set button 6 to store your setting.
PRESET menu item
� Use the UP button 3 or DOWN button 4 to select a frequency bank.
� Press the set button 6 to store your setting.
� Use the UP button 3 or DOWN button 4 to select a channel.
� Press the set button 6 to store your setting.
SCAN menu item
Pressing the set button 6 to activate the SCAN menu item automatically selects anunused channel.
To select another frequency bank:
� Press the UP button 3 or DOWN button 4.
� Press the set button 6 to store your setting.
Synchronizing a transmitter with the receiver
The receiver always transfers the frequencies to the transmitter.
� Switch the transmitter and the receiver on.
� Keep the button 7 of your transmitter pressed until the SYNC display M flasheson the receiver’s display panel.
� Press the button 5 of the receiver to transfer the selected frequency to thetransmitter.
Adjusting the squelch threshold
Interference of the RF signal due to other transmission links can be eliminated as follows:
� Switch the transmitter off. The receiver should no longer receive a signal.
� If the receiver still receives a signal, use the rotary switch for squelch threshold “SQ” Bto increase the squelch threshold so that the signal will no longer be received. If thesignal cannot be eliminated in this way, set the transmitter and the receiver to a dif-ferent channel.
� Switch the transmitter on again and check if the receiver receives the transmittersignal.
You can also synchronize a switched-off transmitter with the receiver. The trans-mitter automatically switches on during the synchronization process.
If the squelch threshold is adjusted too high, the transmission range will be reduced.Therefore, always adjust the squelch threshold to the lowest possible setting.
Cleaning and maintaining the XS WIRELESS systems
12 | XS WIRELESS
Cleaning and maintaining the XS WIRELESS systems
� Before cleaning, disconnect the receiver from the mains.
� Only use a soft, slightly damp cloth to clean the products.
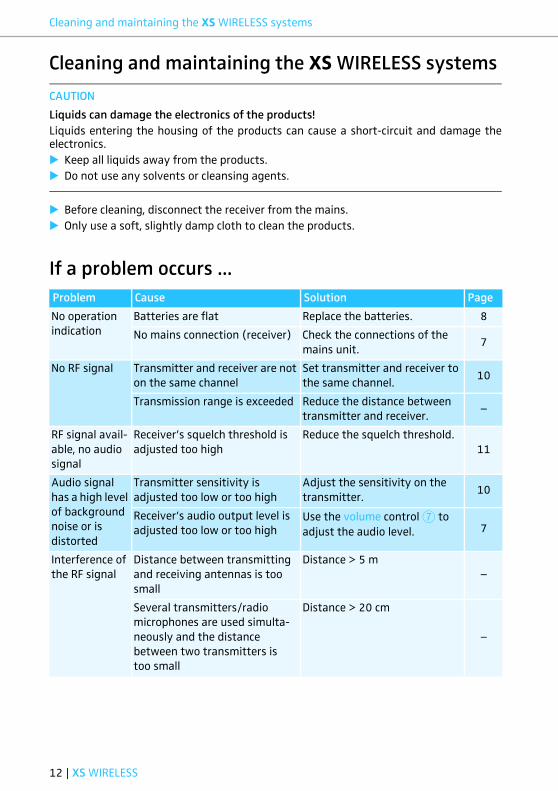
If a problem occurs ...
CAUTION
Liquids can damage the electronics of the products!
Liquids entering the housing of the products can cause a short-circuit and damage theelectronics.
� Keep all liquids away from the products.
� Do not use any solvents or cleansing agents.
Problem Cause Solution Page
No operation
indication
Batteries are flat Replace the batteries. 8
No mains connection (receiver) Check the connections of the
mains unit.7
No RF signal Transmitter and receiver are not
on the same channel
Set transmitter and receiver to
the same channel.10
Transmission range is exceeded Reduce the distance between
transmitter and receiver.–
RF signal avail-
able, no audio
signal
Receiver’s squelch threshold is
adjusted too high
Reduce the squelch threshold.
11
Audio signal
has a high level
of background
noise or is
distorted
Transmitter sensitivity is
adjusted too low or too high
Adjust the sensitivity on the
transmitter.10
Receiver’s audio output level is
adjusted too low or too highUse the volume control 7 to
adjust the audio level. 7
Interference of
the RF signal
Distance between transmitting
and receiving antennas is too
small
Distance > 5 m
–
Several transmitters/radio
microphones are used simulta-
neously and the distance
between two transmitters is
too small
Distance > 20 cm
–
EN
FR
ITNL
PT
RU
ZH
ES
DE
Specifications
XS WIRELESS | 13
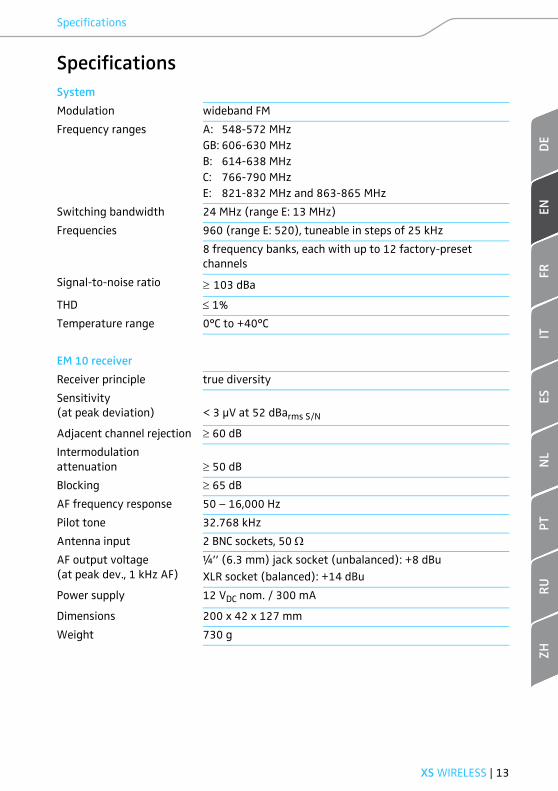
Specifications
System
Modulation wideband FM
Frequency ranges A: 548-572 MHz
GB: 606-630 MHz
B: 614-638 MHz
C: 766-790 MHz
E: 821-832 MHz and 863-865 MHz
Switching bandwidth 24 MHz (range E: 13 MHz)
Frequencies 960 (range E: 520), tuneable in steps of 25 kHz
8 frequency banks, each with up to 12 factory-preset
channels
Signal-to-noise ratio ≥ 103 dBa
THD ≤ 1%
Temperature range 0°C to +40°C
EM 10 receiver
Receiver principle true diversity
Sensitivity
(at peak deviation) < 3 μV at 52 dBarms S/N
Adjacent channel rejection ≥ 60 dB
Intermodulation
attenuation ≥ 50 dB
Blocking ≥ 65 dB
AF frequency response 50 – 16,000 Hz
Pilot tone 32.768 kHz
Antenna input 2 BNC sockets, 50 ΩAF output voltage
(at peak dev., 1 kHz AF)
¼’’ (6.3 mm) jack socket (unbalanced): +8 dBu
XLR socket (balanced): +14 dBu
Power supply 12 VDC nom. / 300 mA
Dimensions 200 x 42 x 127 mm
Weight 730 g
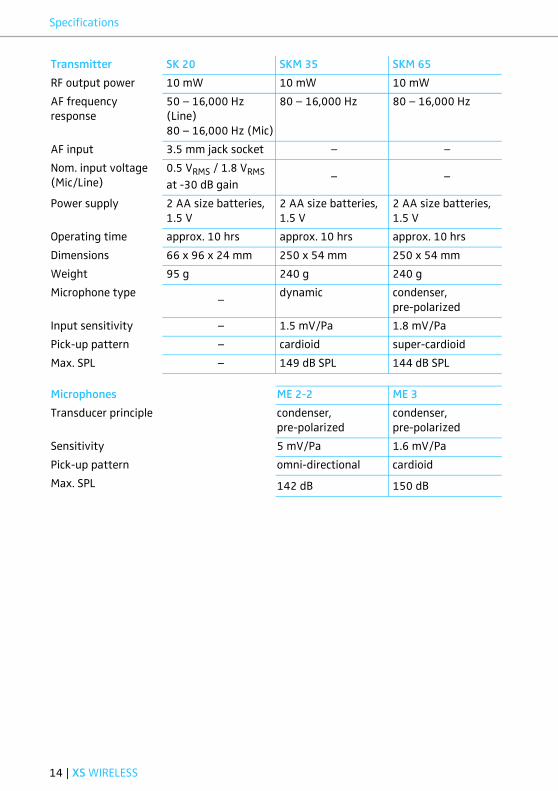
Specifications
14 | XS WIRELESS
Transmitter SK 20 SKM 35 SKM 65
RF output power 10 mW 10 mW 10 mW
AF frequency
response
50 – 16,000 Hz
(Line)
80 – 16,000 Hz (Mic)
80 – 16,000 Hz 80 – 16,000 Hz
AF input 3.5 mm jack socket – –
Nom. input voltage
(Mic/Line)
0.5 VRMS / 1.8 VRMS
at -30 dB gain– –
Power supply 2 AA size batteries,
1.5 V
2 AA size batteries,
1.5 V
2 AA size batteries,
1.5 V
Operating time approx. 10 hrs approx. 10 hrs approx. 10 hrs
Dimensions 66 x 96 x 24 mm 250 x 54 mm 250 x 54 mm
Weight 95 g 240 g 240 g
Microphone type–
dynamic condenser,
pre-polarized
Input sensitivity – 1.5 mV/Pa 1.8 mV/Pa
Pick-up pattern – cardioid super-cardioid
Max. SPL – 149 dB SPL 144 dB SPL
Microphones ME 2-2 ME 3
Transducer principle condenser,
pre-polarized
condenser,
pre-polarized
Sensitivity 5 mV/Pa 1.6 mV/Pa
Pick-up pattern omni-directional cardioid
Max. SPL 142 dB 150 dB
EN
FR
ITNL
PT
RU
ZH
ES
DE
Specifications
XS WIRELESS | 15
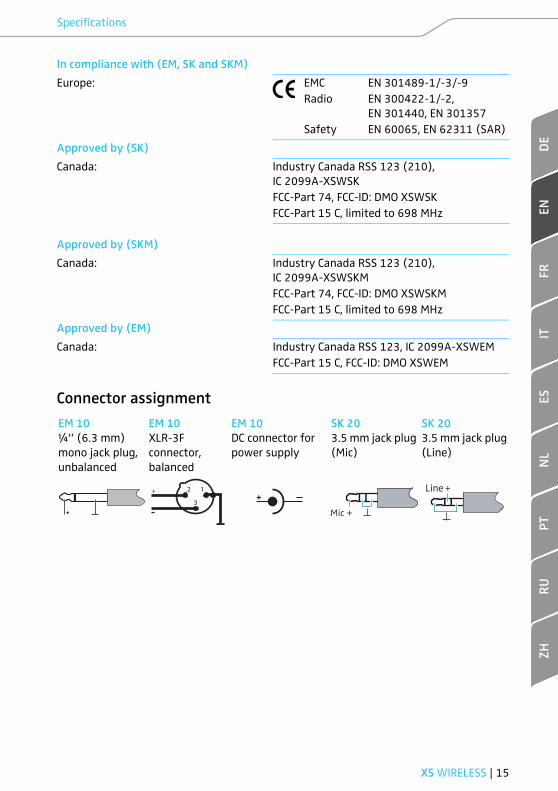
Connector assignment
In compliance with (EM, SK and SKM)
Europe: EMC
Radio
Safety
EN 301489-1/-3/-9
EN 300422-1/-2,
EN 301440, EN 301357
EN 60065, EN 62311 (SAR)
Approved by (SK)
Canada: Industry Canada RSS 123 (210),
IC 2099A-XSWSK
FCC-Part 74, FCC-ID: DMO XSWSK
FCC-Part 15 C, limited to 698 MHz
Approved by (SKM)
Canada: Industry Canada RSS 123 (210),
IC 2099A-XSWSKM
FCC-Part 74, FCC-ID: DMO XSWSKM
FCC-Part 15 C, limited to 698 MHz
Approved by (EM)
Canada: Industry Canada RSS 123, IC 2099A-XSWEM
FCC-Part 15 C, FCC-ID: DMO XSWEM
EM 10 EM 10 EM 10 SK 20 SK 20
¼’’ (6.3 mm)
mono jack plug,
unbalanced
XLR-3F
connector,
balanced
DC connector for
power supply
3.5 mm jack plug
(Mic)
3.5 mm jack plug
(Line)
2 1
3
+

Manufacturer Declarations
16 | XS WIRELESS
Manufacturer DeclarationsWarranty
Sennheiser electronic GmbH & Co. KG gives a warranty of 24 months on this product. Forthe current warranty conditions, please visit our web site at www.sennheiser.com orcontact your Sennheiser partner.
In compliance with the following requirements
� RoHS Directive (2002/95/EC)
� WEEE Directive (2002/96/EC)
Please dispose of the products at the end of their operational lifetime by takingthem to your local collection point or recycling center for such equipment.
� Battery Directive (2006/66/EC)
The batteries supplied with the transmitters can be recycled. Please dispose ofthem as special waste or return them to your specialist dealer. In order to protectthe environment, only dispose of exhausted batteries.
CE Declaration of Conformity
� EM10: , SK20, SKM 35, SKM 65:
� R&TTE Directive (1999/5/EC)
� EMC Directive (2004/108/EC)
� Low Voltage Directive (2006/95/EC)
The declaration is available at www.sennheiser.com. Before putting the products intooperation, please observe the respective country-specific regulations.
Statements regarding FCC and Industry Canada
This device complies with Part 15 of the FCC Rules and with Industry Canada licence-exempt RSS standard(s). Operation is subject to the following two conditions: (1) thisdevice may not cause harmful interference, and (2) this device must accept any interfer-ence received, including interference that may cause undesired operation.
This equipment has been tested and found to comply with the limits for a Class B digitaldevice, pursuant to Part 15 of the FCC Rules. These limits are designed to provide reason-able protection against harmful interference in a residential installation. This equipmentgenerates, uses and can radiate radio frequency energy and, if not installed and used inaccordance with the instructions, may cause harmful interference to radio communica-tions. However, there is no guarantee that interference will not occur in a particular instal-lation. If this equipment does cause harmful interference to radio or television reception,which can be determined by turning the equipment off and on, the user is encouraged totry to correct the interference by one or more of the following measures:
� Reorient or relocate the receiving antenna.
� Increase the separation between the equipment and receiver.
� Connect the equipment into an outlet on a circuit different from that to which thereceiver is connected.
� Consult the dealer or an experienced radio/TV technician for help.
Changes or modifications made to this equipment not expressly approved by Sennheiserelectronic Corp. may void the FCC authorization to operate this equipment. Before puttingthe device into operation, please observe the respective country-specific regulations!
1856 1856

Sennheiser electronic GmbH & Co. KGAm Labor 1, 30900 Wedemark, Germany www.sennheiser.com
Printed in Taiwan, Publ. 01/12, 542696/A03