Yakima Roof Rack & Cargo Carriers Installation InstructionsYour Roof-Top Tent is designed to be a...
11
SkyRise CONTENTS Tent (1X) Ladder (1X) Ladder Bracket (2X) Ladder Hardware (2X) Mounting Hardware (4X) Rainfly (1X) Rainfly Rod (8X) Rod Bag (1X) RoundBar Adapter (4X) Key (2X) Cover (1X)
Transcript of Yakima Roof Rack & Cargo Carriers Installation InstructionsYour Roof-Top Tent is designed to be a...
SkyRise
CONTENTS
Tent (1X)
Ladder (1X)
Ladder Bracket (2X)
Ladder Hardware (2X)
Mounting Hardware (4X)
Rainfly (1X)
Rainfly Rod (8X)
Rod Bag (1X)
RoundBar Adapter (4X)
Key (2X)
Cover (1X)
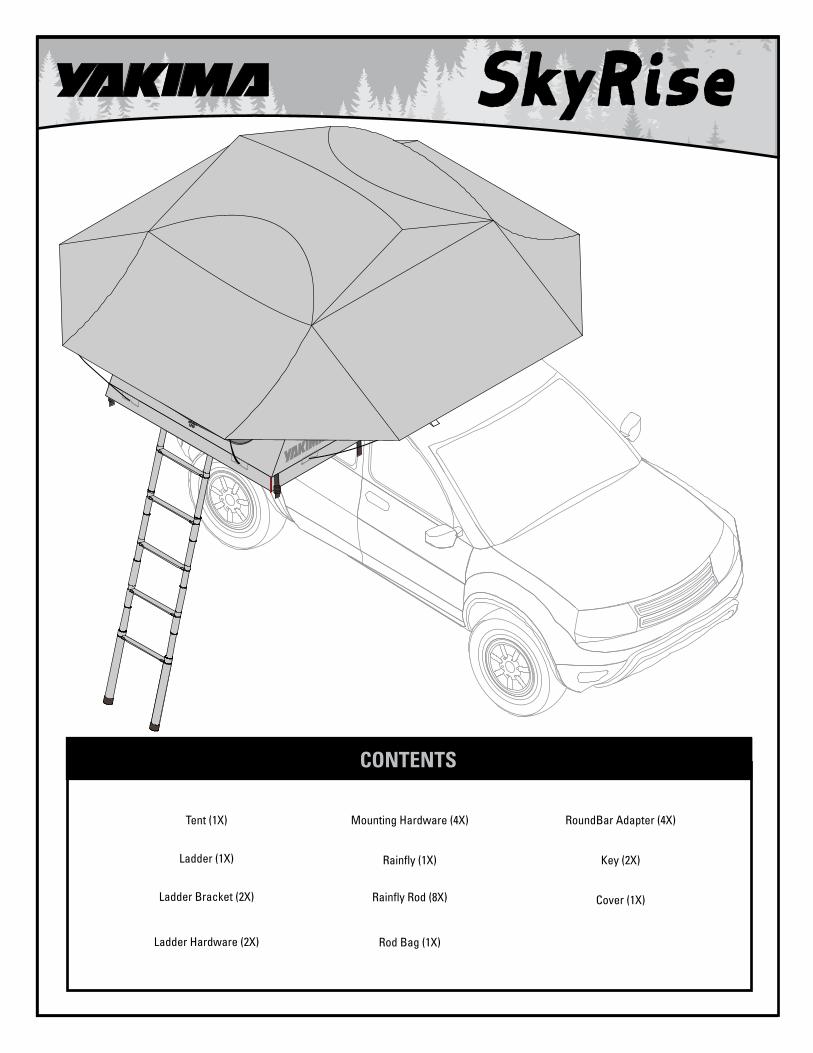
READ ME FIRST!
factory tracks fixed point
fig. 1
fig. 2
1”
� Vehicle and rack system must have a minimum of 165lb load carrying capacity � The following Yakima towers can potentially be used: TimberLine, SkyLine,
RidgeLine, RailGrab (med. or large claw), ControlTower, LowRider, 1A Rain gutter,BedRock, and Outdoorsman.
� Use with Yakima Round, CoreBar, or JetStream bars � For factory tracks or fixed points (see figure 1), ensure roof does not deform when
heavy loads are applied � For vehicles with raised rails, position crossbars as close as possible to rail supports � Crossbar spread must be between 26” and 36” � Do not use Roof-Top Tent with any clamp type towers (including Q-Tower and
BaseLine) or RailGrab Towers with Small Claw or Pin Adaptor. � Do not use with factory crossbars, they are too flexible � Do not position mounting hardware more than 1” outside of Tower (see figure 2). � Max distance from top of crossbar to to ground; SkyRise Small = 86”, SkyRise
Medium = 98” � Do not install on cantilever rails, or rails without sufficient support (see figure 3).
; Do have a friend or dealer help with installation. ; Do use tent when parked on level ground. ; Do remove tent when not in use. ; Do dry tent before storage. ; Do use tent on level ground. ; Do close tent cover fully before driving away. ; Do assist children on the ladder. ; Do close and secure cover before driving.
SOME DO’S AND DON’TS(additional warnings are contained in these instructions)
: Do not climb on your vehicle’s roof. : Do not use tent unless ladder is securely in place. : Do not allow more than one adult on the ladder at a time. : Do not use tent in high winds or heavy snow. : Do not transport anything on top of closed tent. : Do not use open flame nor cook inside tent.
WATCH FOR
THESE SYMBOLS!
= SAFETY – Keep safe by reading the important safety warnings included in the product instructions! Safety warnings are identified with this symbol.
= STOP – Please read all important product notes in the product instructions to ensure proper installation or fit information. These notes are identified with this symbol.
FIRST OFF, THANKS!Welcome to the Yakima family. We appreciate your support and are confident that you’ll get years of solid performance from your new Yakima product. Below are a few helpful hints to make sure that you have a great ownership experience. Please keep these instructions.
IMPORTANT FIT INFORMATION WARNING - DO NOT USE THIS PRODUCT ON A VEHICLE THAT IS INDICATED AS “NO-FIT”
The Yakima Fit List now includes approved SkyRise Fits for many popular vehicles. Updates and additions to the Yakima Fit List for Roof-Top tents are being made continually.
Vehicles that we have seen and tested are designated as “FIT” or “NO-FIT” for SkyRise. Fits for SkyRise are different than for other Yakima products. Please note that virtually all factory crossbars are too flexible for Roof-Top tents. So vehicles on the approved Fit list will still require a Yakima base rack system. If we have not tested your particular vehicle and rack system, you can use the checklist below to evaluate whether your vehicle and rack system may support a SkyRise.
Remember: The checklist below is designed to be a guideline only and any installation not on our approved Fit list is at the sole risk and responsibility of the owner / installer.
unsupported rail supported rail supported railfig. 3
OK OKNOT OK
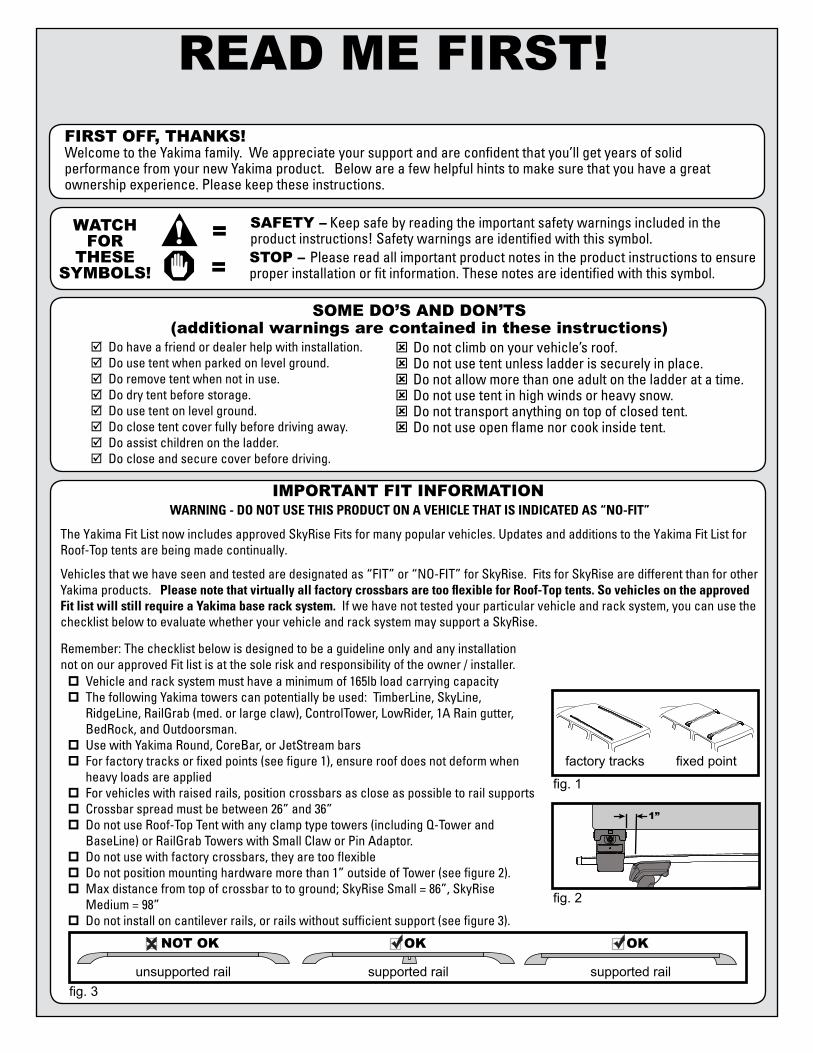
Tip the tent on its end so that you have access to the predrilled holes. Unfasten the velcro straps, and allow the tent to unfold as pictured.
Unzip the windows to access the holes from under the mattress.21
Attach the Mounts to Bottom of the SkyRise.3
fig. 4 fig. 5
Orient mounts horizontally for a side opening: Orient mounts vertically for a rear opening:
4X
Note: Have a friend help hold tent steady.
Slide 2 square nuts into each mount, and align the mounts with the predrilled holes in
the tent floor.
B
Reach in through the tent opening and feed the bolts through the holes into the
tent floor under the matress, and into the square nuts.
Thread the bolts all the way in with your hand.
C
Be sure knobs all face same direction and locks are on same side facing outboard
(see figure 4 and figure 5).
ASSEMBLE & INSTALL
holes
DNow tighten
the bolts down completely
with the supplied hex
wrench.
Using the hex wrench loosen all 4 side bolts.A
5.25 +/- .25 Nm
The ladder, ladder brackets, ladder hardware, rainfly rods, and cover are shipped in the tent. Unzip the tent, remove
them, and set them aside.
locks
no locks
no locks
locks
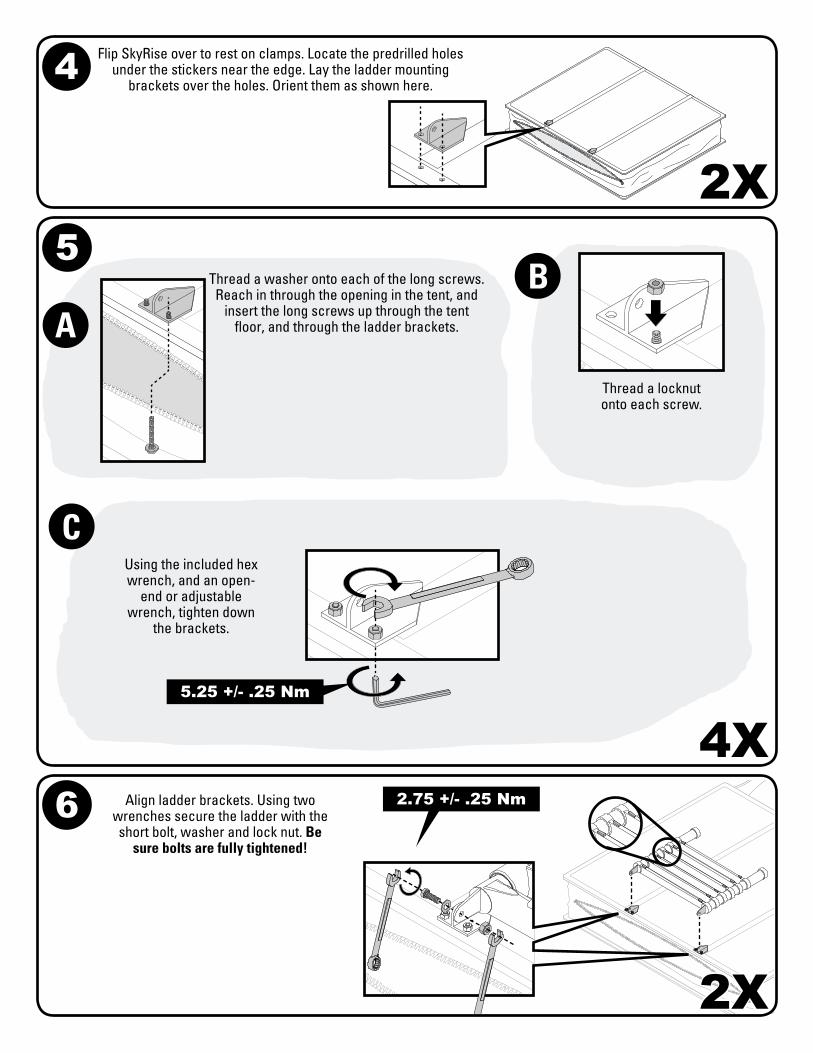
4 Flip SkyRise over to rest on clamps. Locate the predrilled holes under the stickers near the edge. Lay the ladder mounting
brackets over the holes. Orient them as shown here.
52X
2.75 +/- .25 Nm
Thread a washer onto each of the long screws. Reach in through the opening in the tent, and
insert the long screws up through the tent floor, and through the ladder brackets.
4X
Using the included hex wrench, and an open-
end or adjustable wrench, tighten down
the brackets.
C
5.25 +/- .25 Nm
Thread a locknut onto each screw.
BA
2X
Align ladder brackets. Using two wrenches secure the ladder with the short bolt, washer and lock nut. Be
sure bolts are fully tightened!
6

8
7
A. Secure tent with its velcro ties. Put the cover on,and secure the buckles.
B. Measure the distance between the crossbars onyour vehicle.
C. Tilt the SkyRise back on its end. Open all theclamps completely. Set the distance between theclamps by sliding them along their tracks so thatthey will match up with your crossbar spread.(you may need to loosen the side bolts in order tomove the clamps along the extrusions). Partiallytighten side bolts.
X
X
side bolt
boulonlatéral
tornillolateral
X
A
B
C
Thread the cover (velcro side up) into the round channel.
velcro
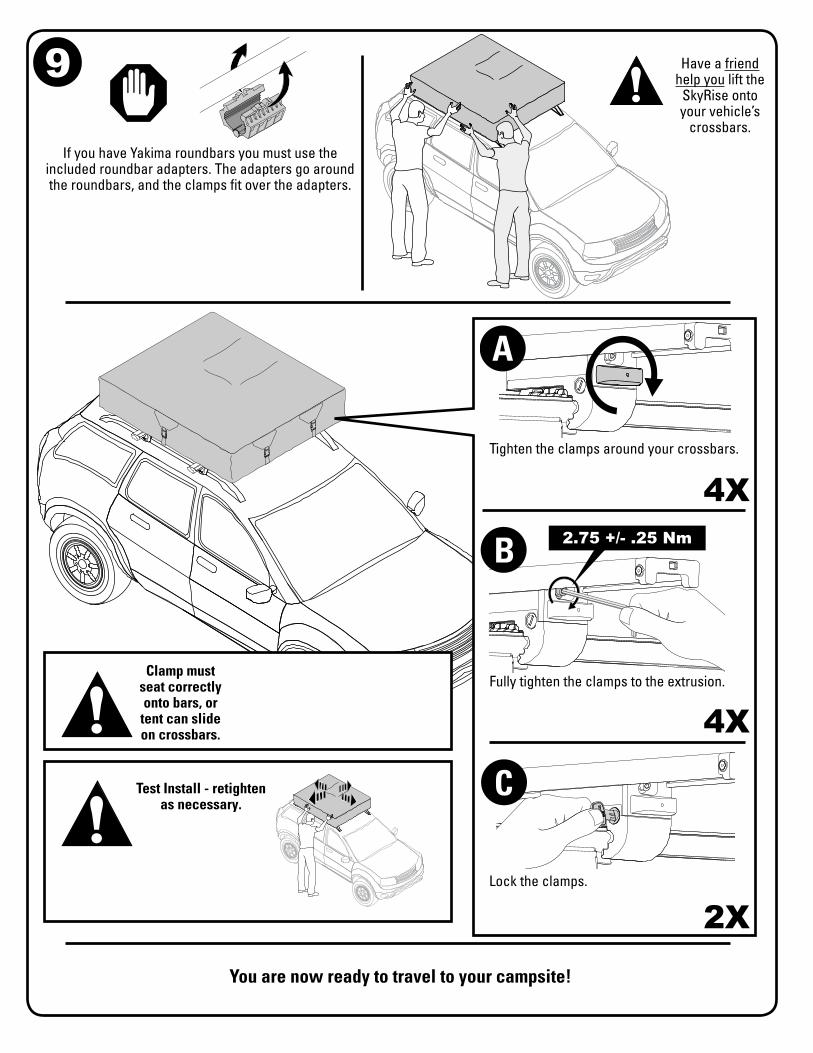
9
If you have Yakima roundbars you must use the included roundbar adapters. The adapters go around the roundbars, and the clamps fit over the adapters.
Have a friend help you lift the
SkyRise onto your vehicle’s
crossbars.
Clamp must seat correctly onto bars, or
tent can slide on crossbars.
Test Install - retighten as necessary.
2X
A
B
C
Tighten the clamps around your crossbars.
Fully tighten the clamps to the extrusion.
Lock the clamps.
4X
4X
You are now ready to travel to your campsite!
2.75 +/- .25 Nm
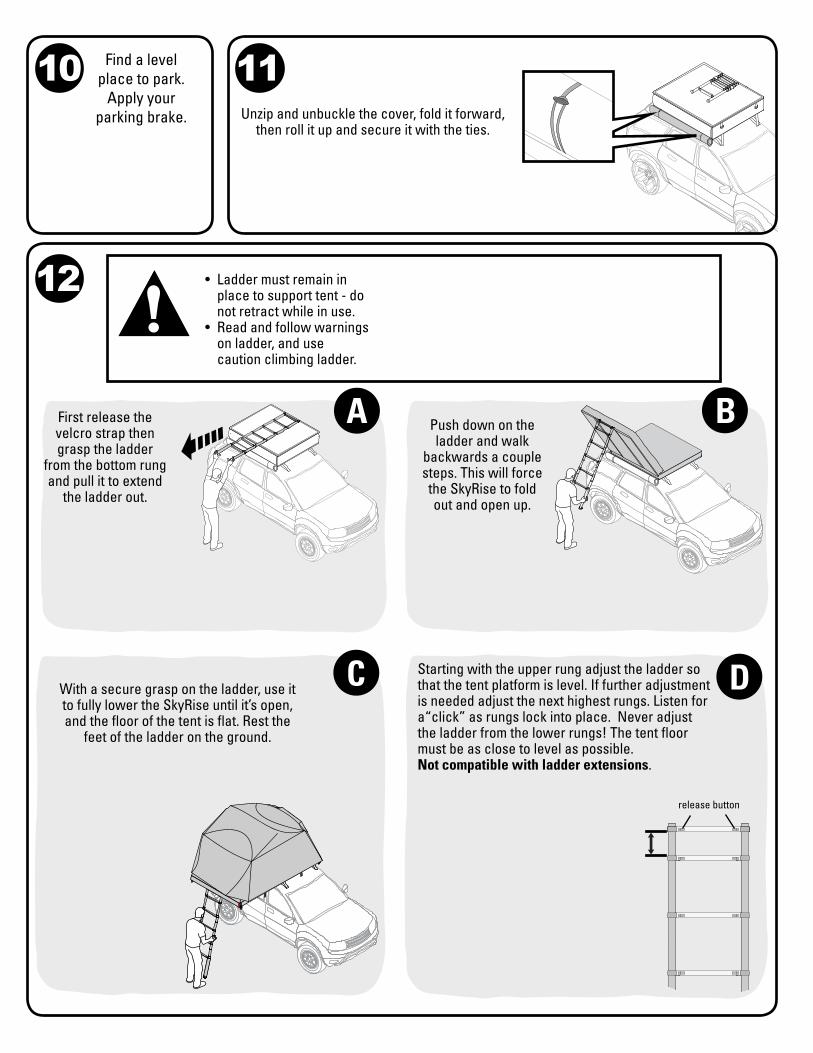
12
First release the velcro strap then grasp the ladder
from the bottom rung and pull it to extend
the ladder out.
A
C
Unzip and unbuckle the cover, fold it forward, then roll it up and secure it with the ties.
10 11
With a secure grasp on the ladder, use it to fully lower the SkyRise until it’s open, and the floor of the tent is flat. Rest the
feet of the ladder on the ground.
Push down on the ladder and walk
backwards a couple steps. This will force the SkyRise to fold out and open up.
B
release button
D
• Ladder must remain inplace to support tent - donot retract while in use.
• Read and follow warningson ladder, and usecaution climbing ladder.
Starting with the upper rung adjust the ladder so that the tent platform is level. If further adjustment is needed adjust the next highest rungs. Listen for a“click” as rungs lock into place. Never adjust the ladder from the lower rungs! The tent floor must be as close to level as possible. Not compatible with ladder extensions.
Find a level place to park.
Apply your parking brake.
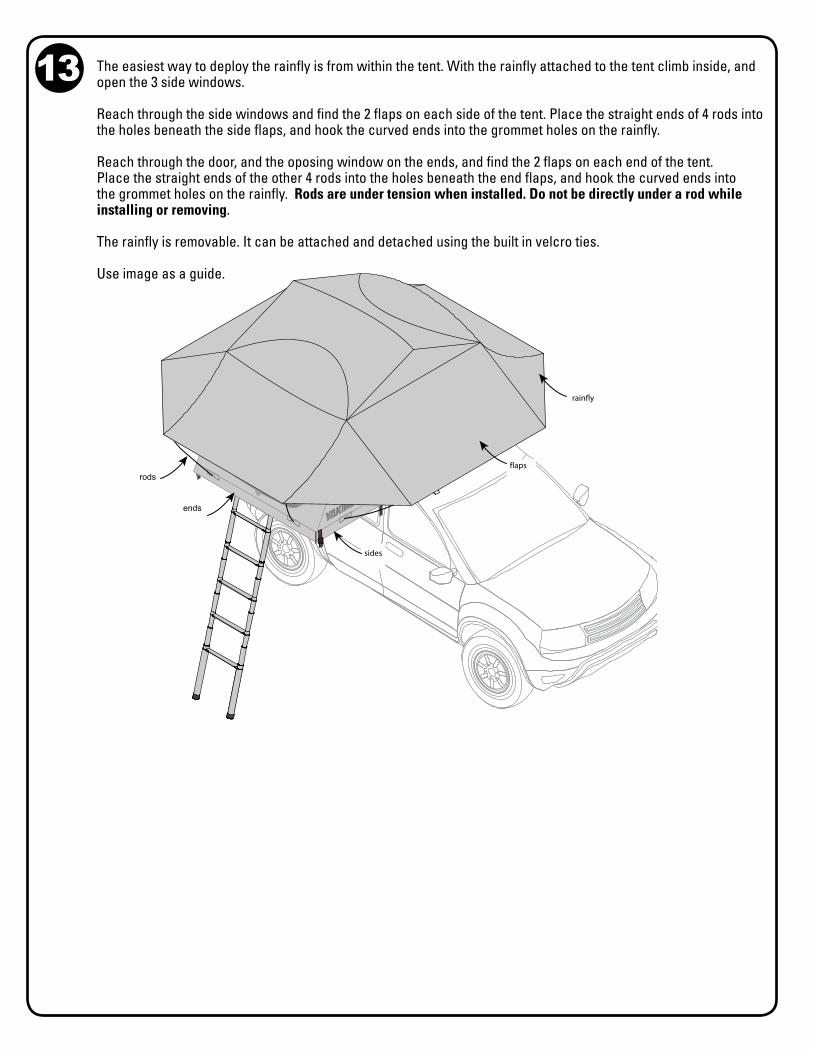
ends
rain�y
rods
sides
flaps
13 The easiest way to deploy the rainfly is from within the tent. With the rainfly attached to the tent climb inside, andopen the 3 side windows.
Reach through the side windows and find the 2 flaps on each side of the tent. Place the straight ends of 4 rods into the holes beneath the side flaps, and hook the curved ends into the grommet holes on the rainfly.
Reach through the door, and the oposing window on the ends, and find the 2 flaps on each end of the tent. Place the straight ends of the other 4 rods into the holes beneath the end flaps, and hook the curved ends into the grommet holes on the rainfly. Rods are under tension when installed. Do not be directly under a rod while installing or removing.
The rainfly is removable. It can be attached and detached using the built in velcro ties.
Use image as a guide.
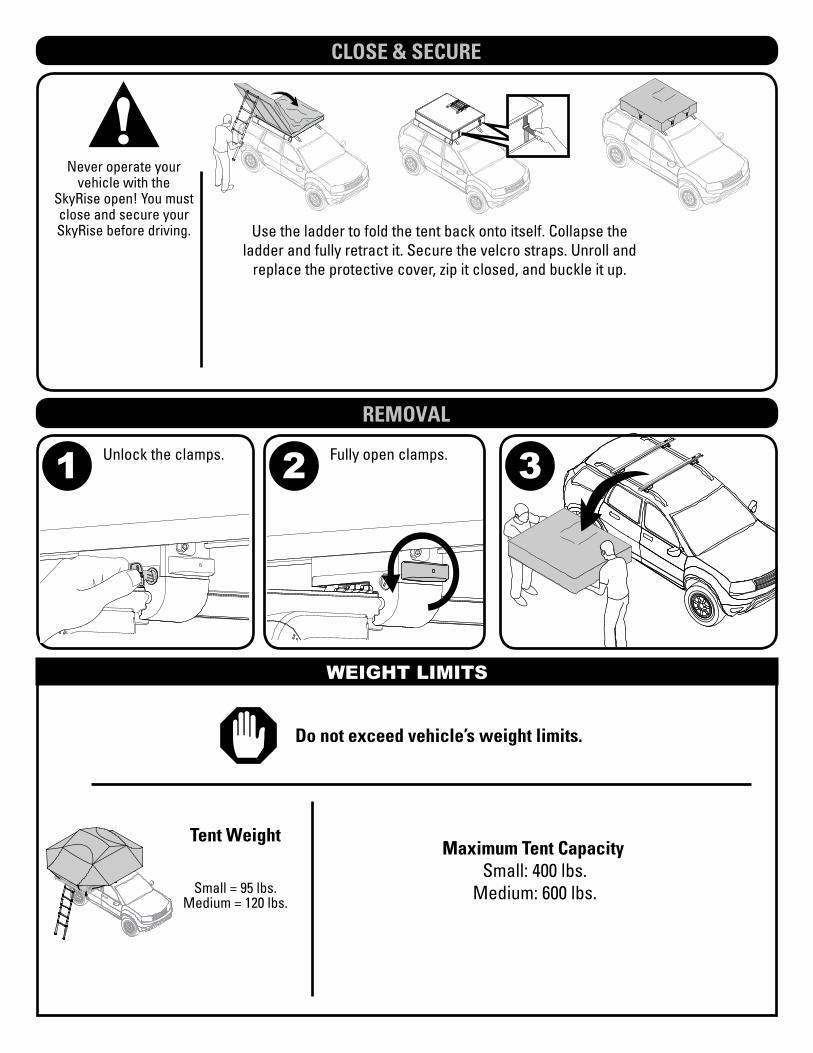
CLOSE & SECURE
Never operate your vehicle with the
SkyRise open! You must close and secure your SkyRise before driving.
REMOVAL
Unlock the clamps. Fully open clamps. 1 2 3
Use the ladder to fold the tent back onto itself. Collapse the ladder and fully retract it. Secure the velcro straps. Unroll and
replace the protective cover, zip it closed, and buckle it up.
WEIGHT LIMITS
Maximum Tent CapacitySmall: 400 lbs.
Medium: 600 lbs.
Do not exceed vehicle’s weight limits.
Tent Weight
Small = 95 lbs. Medium = 120 lbs.
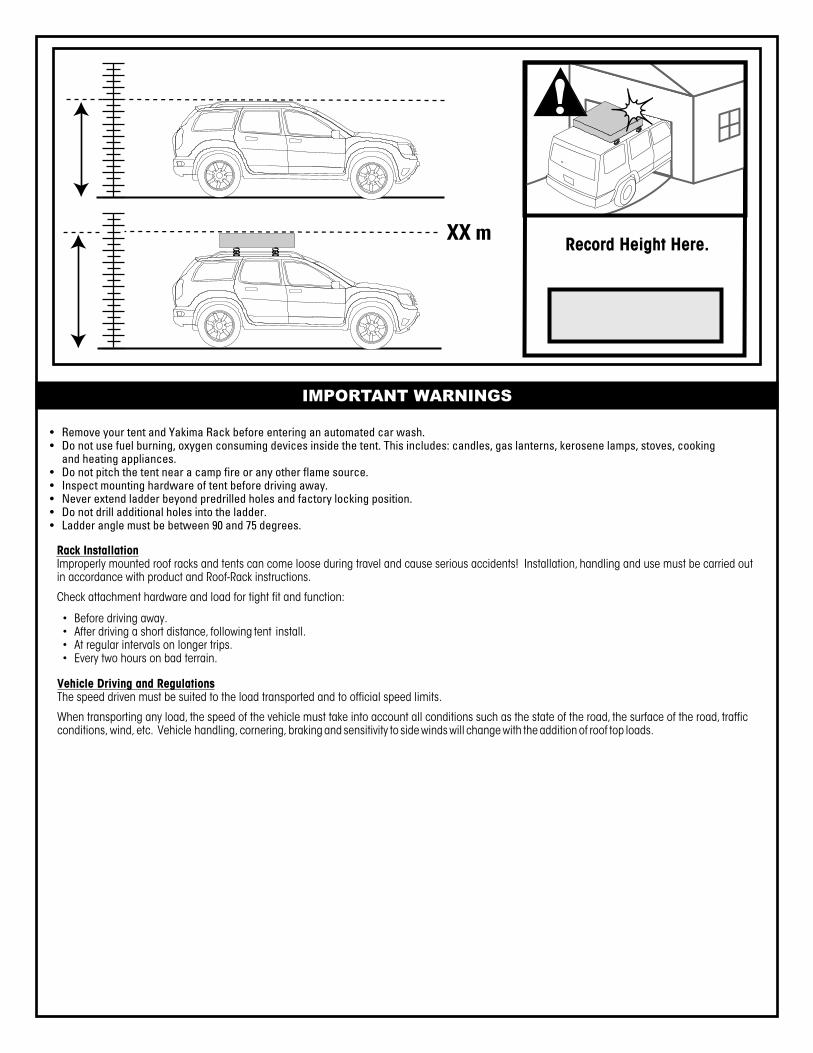
Record Height Here. XX m
• Remove your tent and Yakima Rack before entering an automated car wash.• Do not use fuel burning, oxygen consuming devices inside the tent. This includes: candles, gas lanterns, kerosene lamps, stoves, cooking
and heating appliances. • Do not pitch the tent near a camp fire or any other flame source. • Inspect mounting hardware of tent before driving away. • Never extend ladder beyond predrilled holes and factory locking position.• Do not drill additional holes into the ladder.• Ladder angle must be between 90 and 75 degrees.
IMPORTANT WARNINGS
Rack InstallationImproperly mounted roof racks and tents can come loose during travel and cause serious accidents! Installation, handling and use must be carried outin accordance with product and Roof-Rack instructions.
Check attachment hardware and load for tight fit and function:
• Before driving away.• After driving a short distance, following tent install.• At regular intervals on longer trips.• Every two hours on bad terrain.
Vehicle Driving and RegulationsThe speed driven must be suited to the load transported and to official speed limits.
When transporting any load, the speed of the vehicle must take into account all conditions such as the state of the road, the surface of the road, traffic conditions, wind, etc. Vehicle handling, cornering, braking and sensitivity to side winds will change with the addition of roof top loads.

Roof-Top Tent Care and MaintenanceYour Roof-Top Tent is designed to be a durable companion on your adventures. In order to keep it performing at its best, we recommend some simple care and maintenance steps that will help prolong the life of your Roof-Top Tent.
• Prior to each use, inspect your Roof-Top Tent mounting hardware. If necessary, clean with a solution of mild detergent andwater. Periodically lubricate the threads on your hardware with a light synthetic bicycle lubricant to maintain performance.
• Dry your Roof-Top Tent thoroughly before you close it. If unable to properly dry your Roof-Top Tent prior to closing, open itup and air dry it at your next opportunity. Failure to properly dry your tent out can lead to the growth of mold and mildewwhich can degrade the tent material, cause discoloration, and foul odor. Mold and mildew growth is not covered underyour Roof-Top tent warranty.
• Proper storage of your Roof-Top Tent when not in use will prolong the life of your tent. Ensure it is fully dry prior to storageand store in a cool dry location free from direct sunlight.
• Zippers should be pulled with even force and in gentle fashion. Never force a zipper open or closed as it may damageyour zipper. Keep your zippers free from dust and dirt and periodically apply non-scented bees wax to the zipper teeth aslubrication. This will prolong the life of your zippers.
• Ladder should be wiped free of any dirt or dust prior to collapsing the tent. Periodically wipe down the aluminumtelescoping side rails of the ladder with silicone spray and a cloth. DO NOT spray silicone spray directly on the laddertread surfaces.
• Keep your mattress dry and free from dirt. Prior to closing your Roof-Top tent lift your mattress and ensure the underside isdry. Remove mattress and air dry if necessary. To clean mattress cover, remove cover and machine wash gentle cycle withWoolite™ detergent. Hang dry, DO NOT TUMBLE DRY.
• To clean your Roof-Top Tent use a mild detergent and warm water gently applied with a sponge. Rinse with a clean wetsponge and allow to thoroughly dry.
• If mildew and or mold have begun to grow on your tent, we recommend cleaning the affected tent fabric by sponging ona solution of 1 cup Lysol™ mixed in 1 gallon of hot water and allow to dry. Next, prepare a solution of 1 cup lemon juiceconcentrate and 1 cup salt in 1 gallon of hot water. Sponge this solution directly into the affected areas to rinse out theLysol™ solution. Allow to air dry completely. Taking these steps will stop the growth of the mildew and help eliminateodor, however it may not completely remove the stains.
• Avoid excessive sun exposure to your tent to prolong the life of the fabric. Over time, UV rays can degrade tent fabric andwater proof coatings. If your rain fly material begins to break down due to exposure and use, we suggest washing thefabric with mild detergent and water followed by a treatment of water repellent such as 303 Fabric Guard™. Consultyour local outdoor store for other tent fabric care products and use as directed.
Buy quality roof racks and cargo carriers in our online store.