TLKR T7 Owner’s Manual Manuel de l’utilisateur TLKR … · Manual del usuario de TLKR T7 TLKR...
184
Manuel de l’utilisateur TLKR T7 TLKR T7 Benutzerhandbuch Manual del usuario de TLKR T7 TLKR T7 – Manuale per l’utente Manual do Propriátrio TLKR T7 TLKR T7 Gebruikershandleiding TLKR T7 Owner’s Manual Instrukcja obsugi radiotelefonu TLKR T7 TLKR T7 Kullanc Klavuzu TLKR T7
Transcript of TLKR T7 Owner’s Manual Manuel de l’utilisateur TLKR … · Manual del usuario de TLKR T7 TLKR...
Manuel de l’utilisateur TLKR T7
TLKR T7 Benutzerhandbuch
Manual del usuario de TLKR T7
TLKR T7 – Manuale per l’utente
Manual do Propriátrio TLKR T7
TLKR T7 Gebruikershandleiding
TLKR T7 Owner’s Manual
Instrukcja obs�ugi radiotelefonu TLKR T7
TLKR T7 Kullan�c� K�lavuzu
TLKR T7 ��������� �� ����

1
English
CONTENTSProduct Safety and RF Exposure for Portable Two-Way Radios . . . . . . . . . . . . . . . . . . . . . . . . 2Features. . . . . . . . . . . . . . . . . . . . . . . . . . . . . . . . . . . . . . . . . 2Control and Functions . . . . . . . . . . . . . . . . . . . . . . . . . . . . . . 3Display . . . . . . . . . . . . . . . . . . . . . . . . . . . . . . . . . . . . . . . . . . 3Package Contents . . . . . . . . . . . . . . . . . . . . . . . . . . . . . . . . . 5Install the Battery . . . . . . . . . . . . . . . . . . . . . . . . . . . . . . . . . . 5Battery Level and Low Battery Alert. . . . . . . . . . . . . . . . . . . . 5Charging the Radio . . . . . . . . . . . . . . . . . . . . . . . . . . . . . . . . 5Direct Charge . . . . . . . . . . . . . . . . . . . . . . . . . . . . . . . . . . . . 5Using the Charging Cradle . . . . . . . . . . . . . . . . . . . . . . . . . . 5Charging the battery . . . . . . . . . . . . . . . . . . . . . . . . . . . . . . . 6Using the Radio . . . . . . . . . . . . . . . . . . . . . . . . . . . . . . . . . . . 6Turning the Radio On and Adjusting the Volume . . . . . . . . . 6Adjusting the Sound (Key Beeps) . . . . . . . . . . . . . . . . . . . . . 6Roger Beep . . . . . . . . . . . . . . . . . . . . . . . . . . . . . . . . . . . . . . 6Talking on Your Radio . . . . . . . . . . . . . . . . . . . . . . . . . . . . . 6Navigating through the Menu . . . . . . . . . . . . . . . . . . . . . . . . 7Select Menu . . . . . . . . . . . . . . . . . . . . . . . . . . . . . . . . . . . . . 7Choosing a Channel . . . . . . . . . . . . . . . . . . . . . . . . . . . . . . . 7Choosing a Sub-code . . . . . . . . . . . . . . . . . . . . . . . . . . . . . . 7Common Menu . . . . . . . . . . . . . . . . . . . . . . . . . . . . . . . . . . . 8Channel Scan Feature . . . . . . . . . . . . . . . . . . . . . . . . . . . . . 8Dual Watch Mode . . . . . . . . . . . . . . . . . . . . . . . . . . . . . . . . . 9Voice Operated Transmission . . . . . . . . . . . . . . . . . . . . . . . . 9Room Monitor Feature . . . . . . . . . . . . . . . . . . . . . . . . . . . . . 9Transmitting a Call Tone . . . . . . . . . . . . . . . . . . . . . . . . . . . 10Silent Mode . . . . . . . . . . . . . . . . . . . . . . . . . . . . . . . . . . . . . 10Up timer . . . . . . . . . . . . . . . . . . . . . . . . . . . . . . . . . . . . . . . 11Group Mode . . . . . . . . . . . . . . . . . . . . . . . . . . . . . . . . . . . . 11Channel Setting in Group Mode . . . . . . . . . . . . . . . . . . . . . 11Set Auto Channel Change . . . . . . . . . . . . . . . . . . . . . . . . . 11Set Manual Channel in Group Mode . . . . . . . . . . . . . . . . . . 11Set All/Direct Call . . . . . . . . . . . . . . . . . . . . . . . . . . . . . . . . 12Set All Call . . . . . . . . . . . . . . . . . . . . . . . . . . . . . . . . . . . . . 12
Set Direct Call . . . . . . . . . . . . . . . . . . . . . . . . . . . . . . . . . . . .12Group Menu . . . . . . . . . . . . . . . . . . . . . . . . . . . . . . . . . . . . .13Set Group Mode . . . . . . . . . . . . . . . . . . . . . . . . . . . . . . . . . .14Set Group Code . . . . . . . . . . . . . . . . . . . . . . . . . . . . . . . . . .14Set Ring Tone . . . . . . . . . . . . . . . . . . . . . . . . . . . . . . . . . . .14Set ID . . . . . . . . . . . . . . . . . . . . . . . . . . . . . . . . . . . . . . . . . .14Set ID Name . . . . . . . . . . . . . . . . . . . . . . . . . . . . . . . . . . . . .14Key Lock . . . . . . . . . . . . . . . . . . . . . . . . . . . . . . . . . . . . . . . .15Automatic Power Save Feature . . . . . . . . . . . . . . . . . . . . . .15Battery Low Alert . . . . . . . . . . . . . . . . . . . . . . . . . . . . . . . . .15LCD Backlight . . . . . . . . . . . . . . . . . . . . . . . . . . . . . . . . . . . .15Monitor Mode Feature . . . . . . . . . . . . . . . . . . . . . . . . . . . . .15Specificatons . . . . . . . . . . . . . . . . . . . . . . . . . . . . . . . . . . . .16Frequency Chart (MHz) . . . . . . . . . . . . . . . . . . . . . . . . . . . .16Approved Accessories List . . . . . . . . . . . . . . . . . . . . . . . . . .16CTCSS Chart (Hz) . . . . . . . . . . . . . . . . . . . . . . . . . . . . . . . .17DCS Code . . . . . . . . . . . . . . . . . . . . . . . . . . . . . . . . . . . . . . .17Warranty Information . . . . . . . . . . . . . . . . . . . . . . . . . . . . . .18What Is Not Covered By The Warranty . . . . . . . . . . . . . . . .18Copyright Information . . . . . . . . . . . . . . . . . . . . . . . . . . . . . .18
2
English
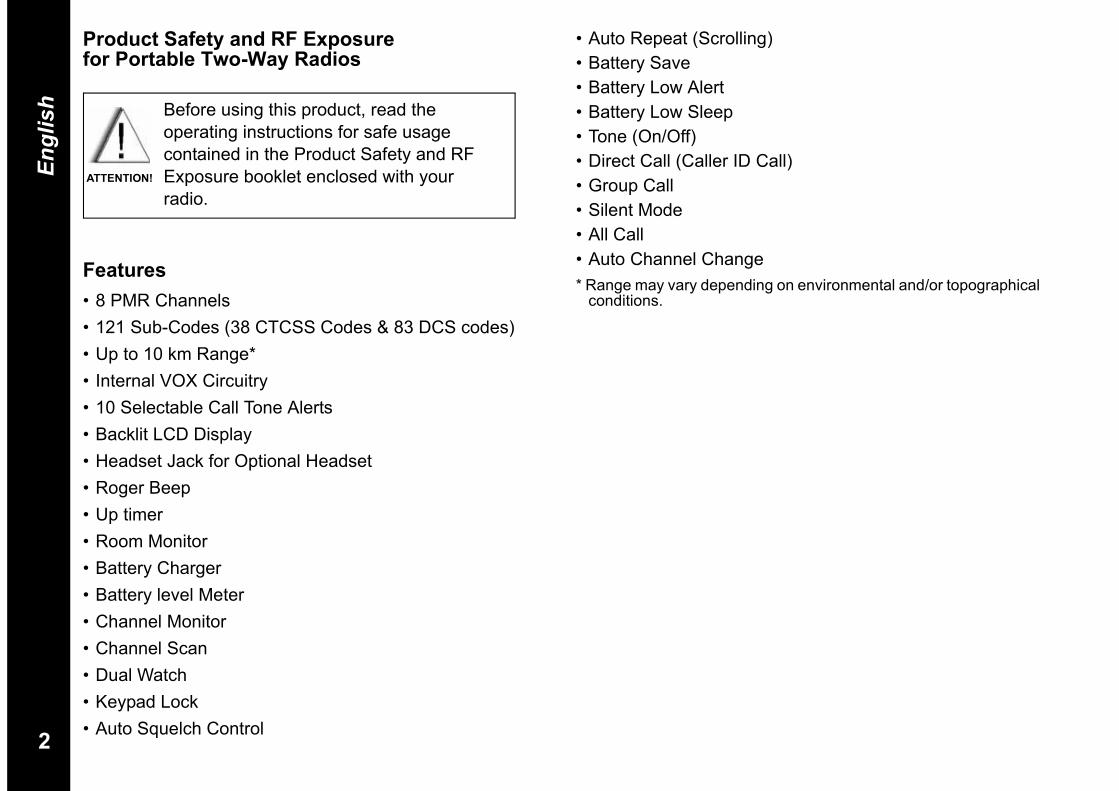
Product Safety and RF Exposure for Portable Two-Way Radios
Features• 8 PMR Channels• 121 Sub-Codes (38 CTCSS Codes & 83 DCS codes)• Up to 10 km Range*• Internal VOX Circuitry• 10 Selectable Call Tone Alerts• Backlit LCD Display• Headset Jack for Optional Headset• Roger Beep• Up timer• Room Monitor• Battery Charger• Battery level Meter• Channel Monitor• Channel Scan• Dual Watch• Keypad Lock• Auto Squelch Control
• Auto Repeat (Scrolling)• Battery Save• Battery Low Alert• Battery Low Sleep• Tone (On/Off)• Direct Call (Caller ID Call)• Group Call• Silent Mode• All Call• Auto Channel Change* Range may vary depending on environmental and/or topographical
conditions.
Before using this product, read the operating instructions for safe usage contained in the Product Safety and RF Exposure booklet enclosed with your radio.
ATTENTION!
3
English
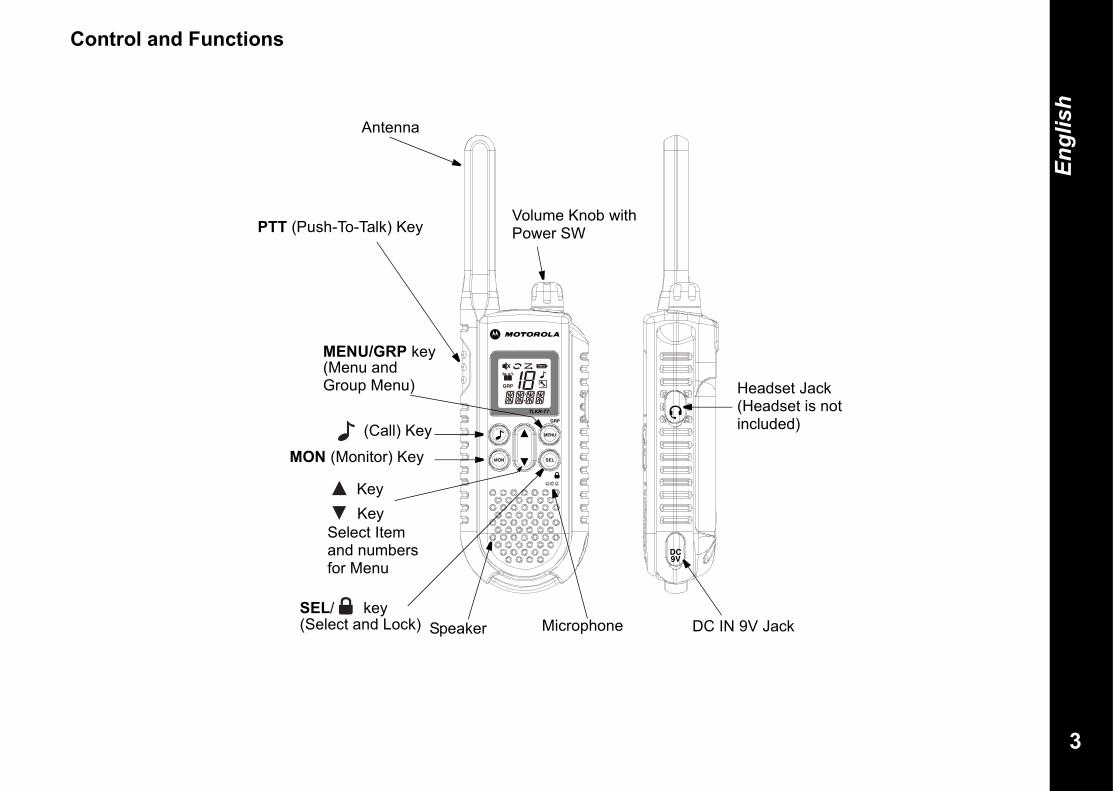
Control and Functions
Headset Jack(Headset is not included)
Antenna
Volume Knob with Power SWPTT (Push-To-Talk) Key
(Call) Key
MON (Monitor) Key
Key Key
Select Item and numbers for Menu
MENU/GRP key(Menu and Group Menu)
SEL/ key(Select and Lock) Speaker Microphone DC IN 9V Jack

4
English
Display 1. Dual Watch Indicator2. Silent Indicator3. Transmit Indicator4. Receive Indicator5. Group Indicator6. Scan Indicator7. Battery Level Meter8. Channel Indicator9. Call Indicator10. VOX/Room Monitor Indicator11. Sub-code (Group ID/Code) Indicator12. Colon (for Up timer)
1
23
4
5
12
11
10
6
9
7
8
5
English
Congratulations on your purchase of the TLKR T7 radio. This product is a lightweight, palm-sized radio. Use it at sporting events to stay in contact with family and friends, hiking, skiing, outdoors, or in a neighborhood watch for vital communication. This compact, state-of-the-art device is equipped with many features.
Package ContentsYour package contains two TLKR T7 radios, two belt clips, one charging cradle, AC adapter, two battery support brackets, two rechargeable NiMH battery packs, and this reference guide. You may operate the unit 4 AAA alkaline batteries (not included).
Install the Battery Your TLKR T7 radio uses the NiMH battery pack or 4 AAA alkaline batteries (not included). If alkaline batteries are used, we recommend using high quality alkaline batteries.
To install the NiMH battery pack:1) Make sure your radio is OFF.2) Remove the battery compartment door by pressing the tab at the bottom of the compartment door, allowing the door to be removed.3) Install the NiMH batteries into the battery compartment. Be certain to follow the + and – symbols in the compartment. Installing the batteries incorrectly will prevent the unit from operating.4) Replace the battery compartment door.
Battery Level and Low Battery Alert This unit has a battery level meter on the display to indicate the status of the batteries. When the battery in the unit is low, the battery level meter icon will flash. Replace the alkaline batteries immediately.
Charging the RadioIf you use the rechargeable NiMH battery pack, two TLKR T7 radios can be charged directly or by using the supplied charging cradle. Make sure the radio is turned OFF before placing the radio in the charging cradle. Otherwise the battery level meter icon will not indicate properly.Direct Charge1. Connect the DC adapter’s plug to the radio’s DC IN 9V
jack and plug the other end to a vehicle's accessory power outlet.
2. Charge the battery pack for 16 hours.
Using the Charging Cradle1. Connect the AC adapter to DC IN 9V and to a standard
electrical outlet.2. Set the charging cradle on the desk or tabletop, and
place the radio in the charging cradle with the keypad facing forward.
3. Make sure that the LED illuminates. Charge the battery pack for 16 hours and remove the radio from the charg-ing cradle after charge.
Note: The charge indicator LEDs will remain on as long as the radios are left in the charger.
6
English
Charging the batteryYou can charge the NiMH battery pack itself using the included battery support bracket.1. Place the battery support bracket into the charging cra-
dle.2. Install the NiMH battery pack applying its charging
contacts to those of charging cradle. Installing the battery pack incorrectly will prevent the battery pack from charging.
3. Make sure that the LED illuminates. Charge the battery pack for 16 hours.
Note: The charge indicator LEDs will remain on as long as the battery is left in the charger.
Using the RadioIn order to get the most out of your new radio, read this ref-erence guide completely before attempting to operate the unit.Turning the Radio On and Adjusting the Volume1. Turn the rotary knob to clockwise to turn the radio ON,
and increase the volume by turning the rotary knob.To decrease the volume, turn the rotary knob to counter clockwise.
2. Turn the rotary knob to the end of counterclockwise to turn the radio OFF.
Adjusting the Sound (Key Beeps) Your radio emits a beep each time one of the keys (except for the PTT and key) is pressed. To switch this sound OFF or ON, press and hold the key while turning the radio ON.
Roger Beep Roger Beep is a BEEP that is sent to notify the end of transmission (PTT and VOX transmission). Roger Beep can be heard through the speaker when Key Beep is on. It is transmitted even if Key Beep is turned off. However, Roger Beep will not be heard from the speaker.To turn Roger Beep OFF or ON:Press and hold the key while turning the radio ON.
Talking on Your RadioTo talk to others using the radio:1. Press and hold the PTT key and speak in a clear, normal
voice about 5-8 cms away from the microphone. While you are transmitting, the icon will appear on the display. To avoid cutting off the first part of your transmission, pause slightly after pressing the PTTbutton before you start talking.
2. When you have finished speaking, release the PTT key. You can now receive incoming calls. While receiving, the
icon will appear on the display.Note: When you continue to transmit for 60 seconds, the
radio emits TX Time Out tone and the icon flashes. The radio will stop transmitting.
7
English
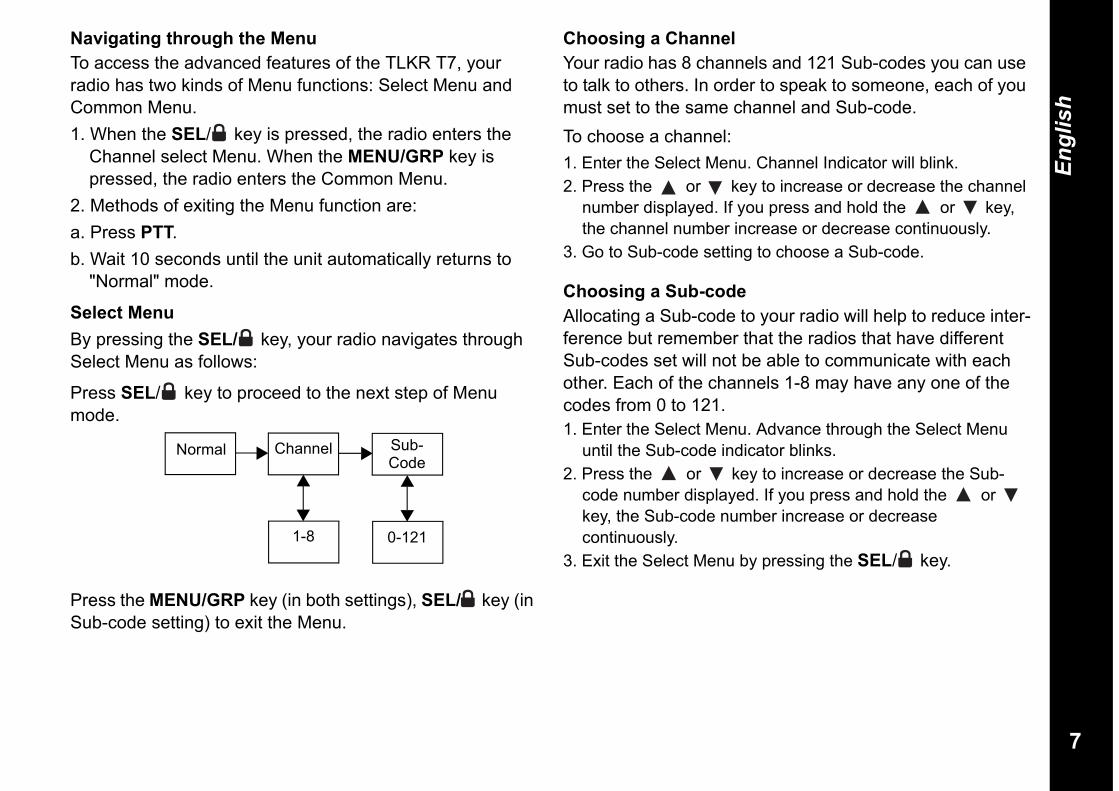
Navigating through the MenuTo access the advanced features of the TLKR T7, your radio has two kinds of Menu functions: Select Menu and Common Menu.1. When the SEL/ key is pressed, the radio enters the
Channel select Menu. When the MENU/GRP key is pressed, the radio enters the Common Menu.
2. Methods of exiting the Menu function are:a. Press PTT.b. Wait 10 seconds until the unit automatically returns to
"Normal" mode.
Select MenuBy pressing the SEL/ key, your radio navigates through Select Menu as follows:
Press SEL/ key to proceed to the next step of Menu mode.
Press the MENU/GRP key (in both settings), SEL/ key (in Sub-code setting) to exit the Menu.
Choosing a ChannelYour radio has 8 channels and 121 Sub-codes you can use to talk to others. In order to speak to someone, each of you must set to the same channel and Sub-code.To choose a channel:1. Enter the Select Menu. Channel Indicator will blink. 2. Press the or key to increase or decrease the channel
number displayed. If you press and hold the or key, the channel number increase or decrease continuously.
3. Go to Sub-code setting to choose a Sub-code.
Choosing a Sub-codeAllocating a Sub-code to your radio will help to reduce inter-ference but remember that the radios that have different Sub-codes set will not be able to communicate with each other. Each of the channels 1-8 may have any one of the codes from 0 to 121. 1. Enter the Select Menu. Advance through the Select Menu
until the Sub-code indicator blinks.2. Press the or key to increase or decrease the Sub-
code number displayed. If you press and hold the or key, the Sub-code number increase or decrease continuously.
3. Exit the Select Menu by pressing the SEL/ key.
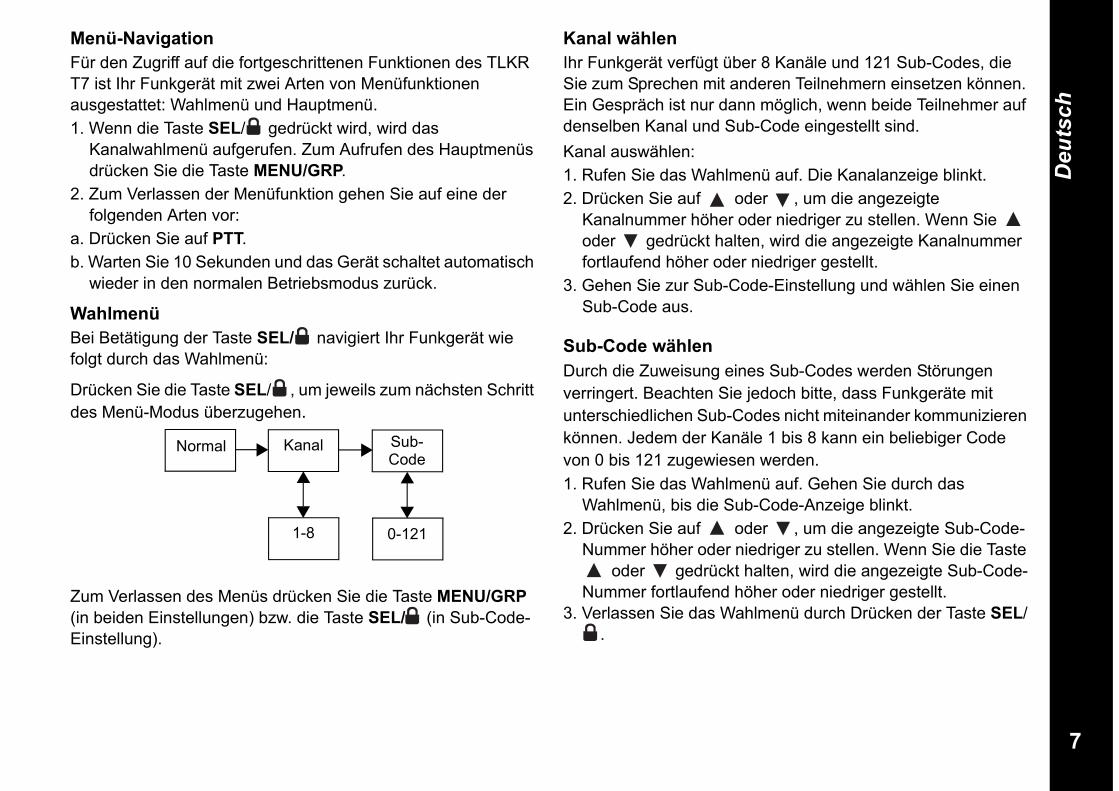
Normal Channel Sub-Code
0-1211-8
8
English
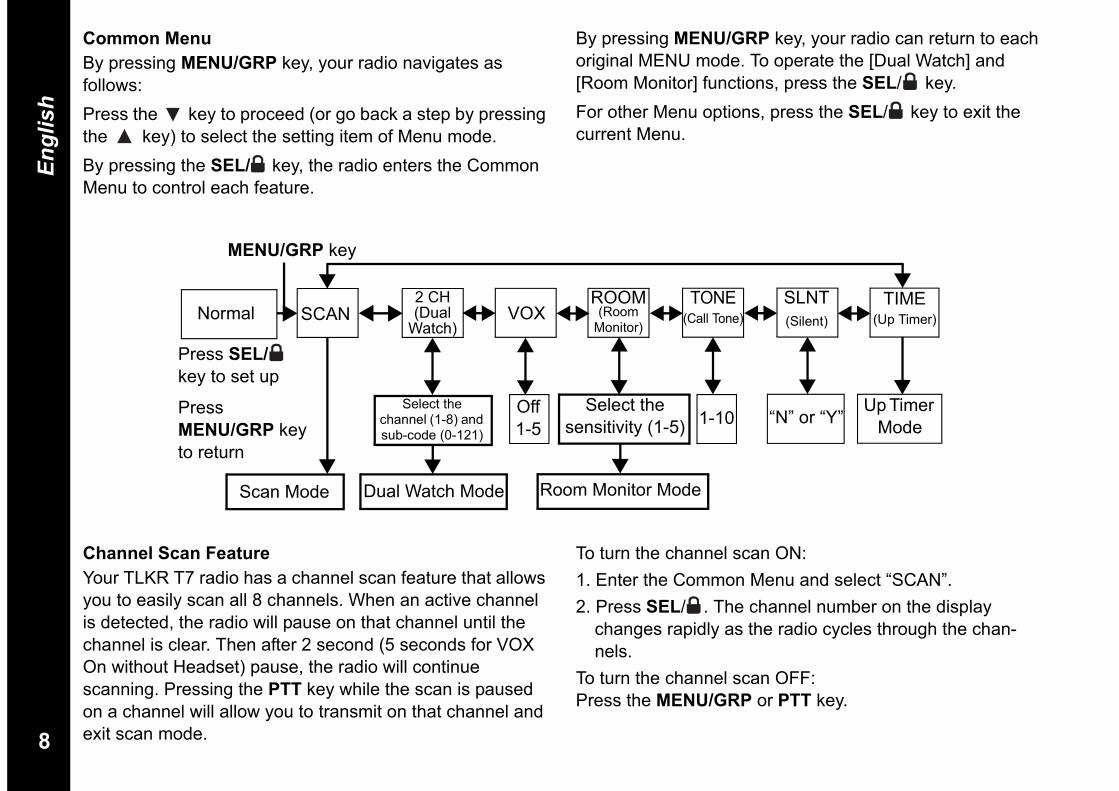
Common MenuBy pressing MENU/GRP key, your radio navigates as follows:Press the key to proceed (or go back a step by pressing the key) to select the setting item of Menu mode.By pressing the SEL/ key, the radio enters the Common Menu to control each feature.
By pressing MENU/GRP key, your radio can return to each original MENU mode. To operate the [Dual Watch] and [Room Monitor] functions, press the SEL/ key.For other Menu options, press the SEL/ key to exit the current Menu.
Normal SCAN2 CH (Dual
Watch)VOX
ROOM(Room
Monitor)
TONE (Call Tone)
SLNT(Silent)
TIME(Up Timer)
Select the channel (1-8) and sub-code (0-121)
Up Timer Mode
Select the sensitivity (1-5)
Off 1-5 1-10 “N” or “Y”
Scan Mode Dual Watch Mode Room Monitor Mode
MENU/GRP key
Press SEL/key to set up
Press MENU/GRP key to return
Channel Scan FeatureYour TLKR T7 radio has a channel scan feature that allows you to easily scan all 8 channels. When an active channel is detected, the radio will pause on that channel until the channel is clear. Then after 2 second (5 seconds for VOX On without Headset) pause, the radio will continue scanning. Pressing the PTT key while the scan is paused on a channel will allow you to transmit on that channel and exit scan mode.
To turn the channel scan ON:1. Enter the Common Menu and select “SCAN”. 2. Press SEL/ . The channel number on the display
changes rapidly as the radio cycles through the chan-nels.
To turn the channel scan OFF:Press the MENU/GRP or PTT key.
9
English
Dual Watch ModeYour radio can scan the current channel and another chan-nel alternately. You need to set a channel number and its Sub-code for another channel.To set the another channel and start Dual Watch:1. Enter the Common Menu and select “2CH”, then press
SEL/ key to proceed to Dual Watch Mode setting.The Dual Watch icon appears.
2. Press the or to select the channel number, then press the SEL/ key.
3. Press the or to select the Sub-code number, then press the SEL/ key.
4. The radio starts Dual Watch.Note: If you set the same channel number and Sub-code as
the current channel, Dual Watch does not work.To turn the Dual Watch mode OFF:Press the MENU/GRP key.
Voice Operated TransmissionYour TLKR T7 radio is equipped with a user selectable Voice Operated Transmitter (VOX) that can be used for automatic voice transmissions. The VOX feature is designed for hands-free purpose. Transmission is initiated by speaking into the microphone of radio or headset (headset is not included) instead of pushing the PTT key.To select the VOX level:1. Enter the Common Menu and select “VOX”. Then press
SEL/ key. The current level (OFF. 1-5) blinks. Level “N”(OFF) disables VOX, while levels 1-5 set the sensitivity of the VOX circuit.
2. Press the or key to select the desired VOX
sensitivity level. Use Level 1 in quiet environments, and use level 5 in very noisy environments. You can find the appropriate sensitivity level by speaking into the microphone. If the VOX icon flashes, your voice is accepted.
3. Exit the Common Menu.Note: When you continue to transmit using VOX function for
60 seconds, the radio emits TX Time Out tone and the icon flashes for 5 seconds.
Room Monitor FeatureYou can use one of your TLKR T7 radios as a room monitor and use the other radio to listen to and keep a check on the voice in another room. When you set the room monitor fea-ture, the monitoring radio will detect voice/noises (accord-ing to the sensitivity level you set) and transmit back to the listening radio without pushing the PTT key. The monitoring radio is not able to receive any transmissions in this mode.To turn the Room Monitor ON:1. Enter the Common Menu and select “ROOM”. Then
press SEL/ key.2. Press the or key to select the desired room moni-
tor sensitivity level. Use level 1 in quiet environments, and use level 5 in very noisy environments.
3. Press the SEL/ key to operate the Room Monitor.To turn the Room Monitor OFF:Press the MENU/GRP key.
10
English
Note:- Pressing the PTT key in Room Monitor mode is invalid and
the radio emits PTT Error Tone.- When the voice/noise in another room continues more than
60 seconds, the monitoring radio stops monitoring for 5 second, and resumes.
Transmitting a Call ToneYour TLKR T7 radio is equipped with 10 selectable call
tones that will be transmitted when the key is pressed in Normal Mode.To select a call tone:1. Enter Common Menu and select “TONE”. Then press
SEL/ key.The current call tone number (1-10) blinks.
2. Press the or key to choose the number of the desired call tone. Each tone will be heard through the speaker.
3. Exit the Common Menu.
To transmit the selected call tone, press the key in Nor-mal Mode. The selected tone will automatically be transmit-ted for a fixed length of time. Call tone will be cancelled when the PTT key is pressed.
Silent ModeWhen you turn on the silent mode, all incoming calls are muted: the radio blinks the backlight to alert you to an incoming call.If you do not respond to the call, the backlight turns off, and the CALL icon will blink until there is no signal.The TLKR T7 will also vibrate to remind you that you missed a call.Silent mode is disabled for 15 seconds when you transmit, receive, or press any other button.To set the silent mode:1. Enter the Common Menu and select “SLNT”. Then press
SEL/ key.2. Press the to set Silent Mode to On. The Channel
Indicator shows “Y” and SILENT icon appears.3. Press the to set Silent Mode to Off. The Channel
Indicator shows “N” and SILENT icon disappears.
11
English
Up timer You can use this radio as a up timer. It can time up to 59 minutes 59 seconds.After this period of time, it will continue starting with “00:00”.To use up timer:1. Enter the Common Menu and select “TIME”.2. Press the SEL/ key to choose this menu.3. Press the SEL/ key. Up timer starts.4. Press the SEL/ key, it goes to pause status.
Pressing the SEL/ key controls the On/Off for timer start.
5. Pressing the MENU/GRP key while counting or pausing, reverts the radio to idle time (time reset 00:00) mode.
6. Press the PTT key or press MENU/GRP key at idle sta-tus to stop up timer.
Note: You can receive incoming signals during this mode.If an All Call is received, the ID Name will be indicated for 10 seconds. If a Direct Call is recieved, the ID Name will be indicated for the status. Then the radio will return to the timer mode and the Call Icon will blink.
Group ModePress and hold the the MENU/GRP key to go to Group Menu.
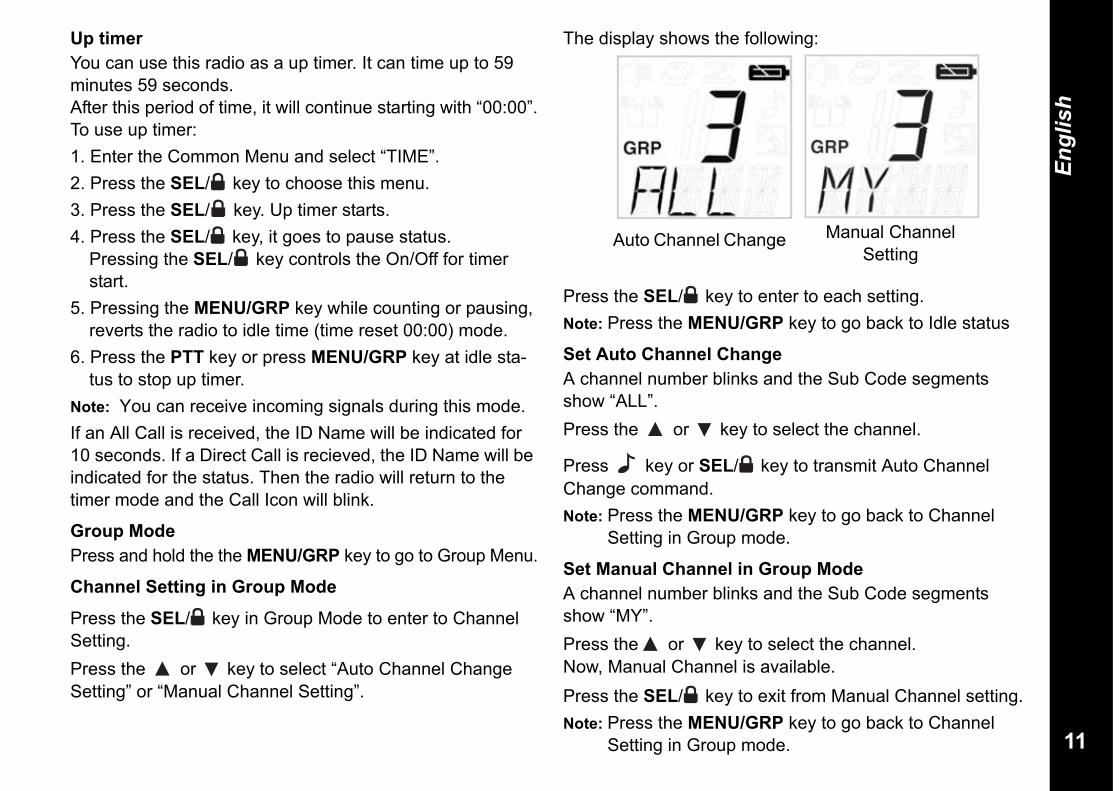
Channel Setting in Group Mode
Press the SEL/ key in Group Mode to enter to Channel Setting.Press the or key to select “Auto Channel Change Setting” or “Manual Channel Setting”.
The display shows the following:
Press the SEL/ key to enter to each setting.Note: Press the MENU/GRP key to go back to Idle status
Set Auto Channel ChangeA channel number blinks and the Sub Code segments show “ALL”.Press the or key to select the channel.
Press key or SEL/ key to transmit Auto Channel Change command.Note: Press the MENU/GRP key to go back to Channel
Setting in Group mode.
Set Manual Channel in Group ModeA channel number blinks and the Sub Code segments show “MY”.Press the or key to select the channel.Now, Manual Channel is available.Press the SEL/ key to exit from Manual Channel setting.Note: Press the MENU/GRP key to go back to Channel
Setting in Group mode.
Auto Channel Change Manual Channel Setting
12
English
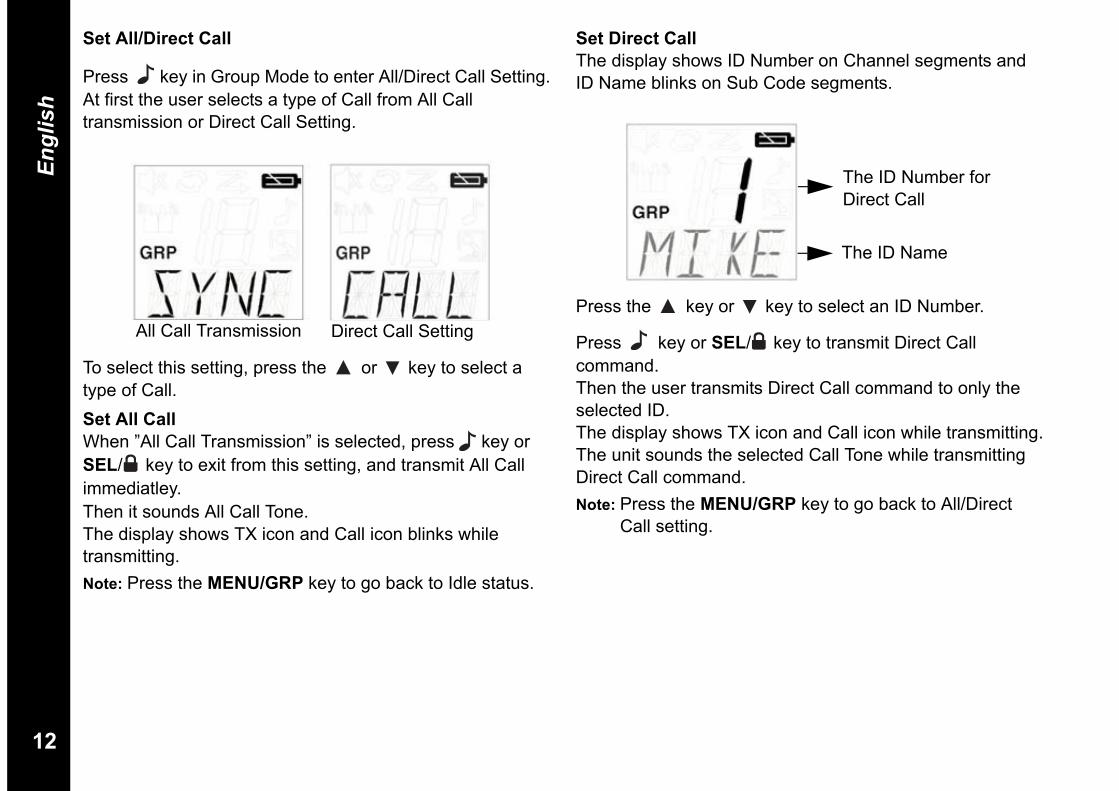
Set All/Direct Call
Press key in Group Mode to enter All/Direct Call Setting.At first the user selects a type of Call from All Call transmission or Direct Call Setting.
To select this setting, press the or key to select a type of Call.Set All CallWhen ”All Call Transmission” is selected, press key or SEL/ key to exit from this setting, and transmit All Call immediatley.Then it sounds All Call Tone.The display shows TX icon and Call icon blinks while transmitting.Note: Press the MENU/GRP key to go back to Idle status.
Set Direct CallThe display shows ID Number on Channel segments and ID Name blinks on Sub Code segments.
Press the key or key to select an ID Number.
Press key or SEL/ key to transmit Direct Call command.Then the user transmits Direct Call command to only the selected ID.The display shows TX icon and Call icon while transmitting.The unit sounds the selected Call Tone while transmitting Direct Call command.Note: Press the MENU/GRP key to go back to All/Direct
Call setting.
All Call Transmission Direct Call Setting
The ID Number for Direct Call
The ID Name
13
English
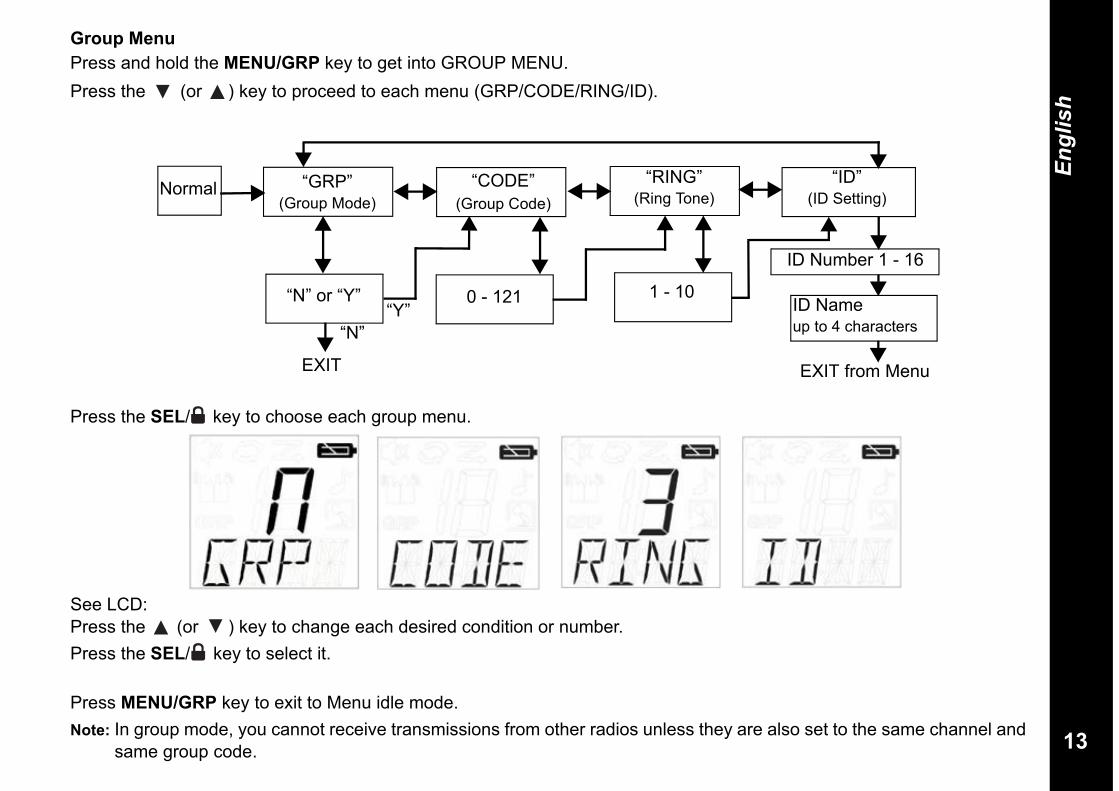
Group MenuPress and hold the MENU/GRP key to get into GROUP MENU.Press the (or ) key to proceed to each menu (GRP/CODE/RING/ID).
Press the SEL/ key to choose each group menu.
See LCD:Press the (or ) key to change each desired condition or number. Press the SEL/ key to select it.
Press MENU/GRP key to exit to Menu idle mode.Note: In group mode, you cannot receive transmissions from other radios unless they are also set to the same channel and
same group code.
Normal “GRP”(Group Mode)
“CODE”(Group Code)
“ID” (ID Setting)
ID Number 1 - 16
0 - 121 1 - 10
EXIT
ID Name up to 4 characters
“N” or “Y”
“N”“Y”
EXIT from Menu
“RING”(Ring Tone)
14
English
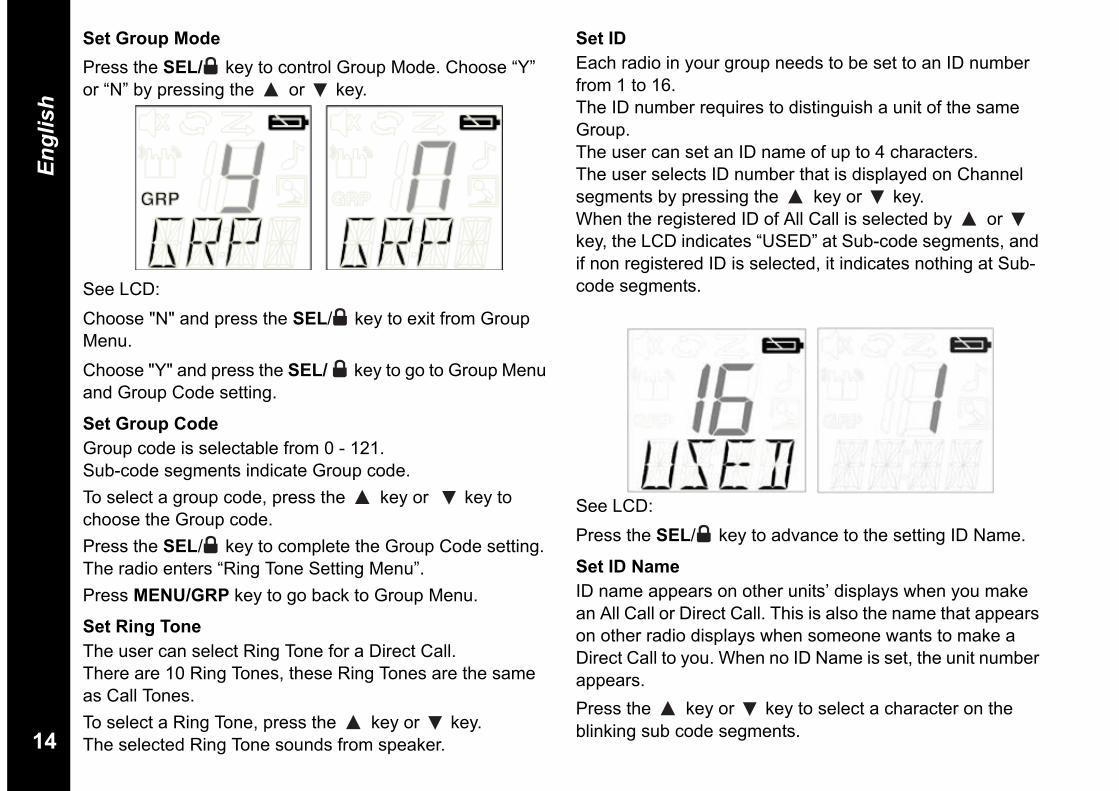
Set Group ModePress the SEL/ key to control Group Mode. Choose “Y” or “N” by pressing the or key.
See LCD:Choose "N" and press the SEL/ key to exit from Group Menu.Choose "Y" and press the SEL/ key to go to Group Menu and Group Code setting.
Set Group Code Group code is selectable from 0 - 121.Sub-code segments indicate Group code.To select a group code, press the key or key to choose the Group code.Press the SEL/ key to complete the Group Code setting.The radio enters “Ring Tone Setting Menu”.Press MENU/GRP key to go back to Group Menu.
Set Ring Tone The user can select Ring Tone for a Direct Call.There are 10 Ring Tones, these Ring Tones are the same as Call Tones.To select a Ring Tone, press the key or key.The selected Ring Tone sounds from speaker.
Set IDEach radio in your group needs to be set to an ID number from 1 to 16.The ID number requires to distinguish a unit of the same Group.The user can set an ID name of up to 4 characters. The user selects ID number that is displayed on Channel segments by pressing the key or key. When the registered ID of All Call is selected by or key, the LCD indicates “USED” at Sub-code segments, and if non registered ID is selected, it indicates nothing at Sub-code segments.
See LCD:Press the SEL/ key to advance to the setting ID Name.
Set ID NameID name appears on other units’ displays when you make an All Call or Direct Call. This is also the name that appears on other radio displays when someone wants to make a Direct Call to you. When no ID Name is set, the unit number appears.Press the key or key to select a character on the blinking sub code segments.
15
English
Then, press the SEL/ key to move to the next character.The ID Name characters can be selected up to 4 characters.
Finally, press the SEL/ key to register the ID number and ID Name. The radio exits from ID setting.Note: Whenever the user presses MENU/GRP key, the unit
cancels selected ID Number and entered ID Name, then it exits from Group Menu.
Key LockTo lock the keypad:Press and hold the SEL/ key for 2 seconds. Sub Code segments shows “LOCK” for 2 seconds, then it returns to previous screen.To unlock the keypad:Press and hold the SEL/ key for 2 seconds. Sub Code segments shows “UNLK” for 2 seconds, then it returns to previous screen.Note: If any key (except PTT) is pressed while “Key Lock”
is ON, “LOCK” appears for 2 seconds with error tone.
Automatic Power Save FeatureYour radio has a unique circuit designed to dramatically extend the life of the batteries. If there is no transmission nor an incoming call within 3 seconds, your radio switches to the Power Save mode. The radio is still able to receive transmissions in this mode.
Battery Low Alert Battery Low alerts when the battery level becomes empty.The alert starts 30 seconds after the Battery Low icon starts blinking.The Sub Code indicates “BATT” and the Battery Low icon
blinks.The Alert Tone sounds every 5 seconds for 30 seconds when the Battery is Low.The Sub Code
LCD BacklightThe LCD backlight will automatically turn ON when any key (except for PTT) is pressed. The LCD display will illuminate for 10 seconds after the last key press.
Monitor Mode FeatureYour TLKR T7 allows you to listen for weak signals on the current channel at the press of MON key.To turn the Monitor Mode ON:- Press the MON key for brief listening. The RX icon blinks.- Press and hold the MON key for 1.5 seconds for continuous listening. The RX icon continues to blink.To turn the Monitor Mode OFF:- Press the MON, MENU/GRP, or SEL/ key to return the “Normal” mode. The RX icon stops blinking.
16
English
Specificatons Frequency Chart (MHz)
Approved Accessories ListPlease contact your dealer or retailer to purchase theseaccessories.
Channels 8 PMR
Sub-Codes 121 (38 CTCSS and 83 DCS Codes)
Operating Frequency
446.00625 - 446.09375 MHz
Power Source AAA Ni-MH battery Pack
4 AAA Alkaline Batteries (not included)
Range Up to 10 km
Battery Life 20 Hours typ. - Alkaline Bateries
(5/5/90 duty cycle)
18 Hours typ. - NiMH Battery pack (5/5/90 duty cycle)
Ch. Freq.
1 446.00625
2 446.01875
3 446.03125
4 446.04375
5 446.05625
6 446.06875
7 446.08125
8 446.09375
Motorola Part No. Description
00275 TLKR-T5/T7 Car Charger Cable
00276 TLKR-T5/T7 Unit Charger (EU)
00277 TLKR-T5/T7 Unit Charger (UK)
00278 TLKR-T5/T7 Battery
00279 TLKR-T5/T7 Belt Clip
00174 Consumer Earbud
00179 Consumer Headset
17
English
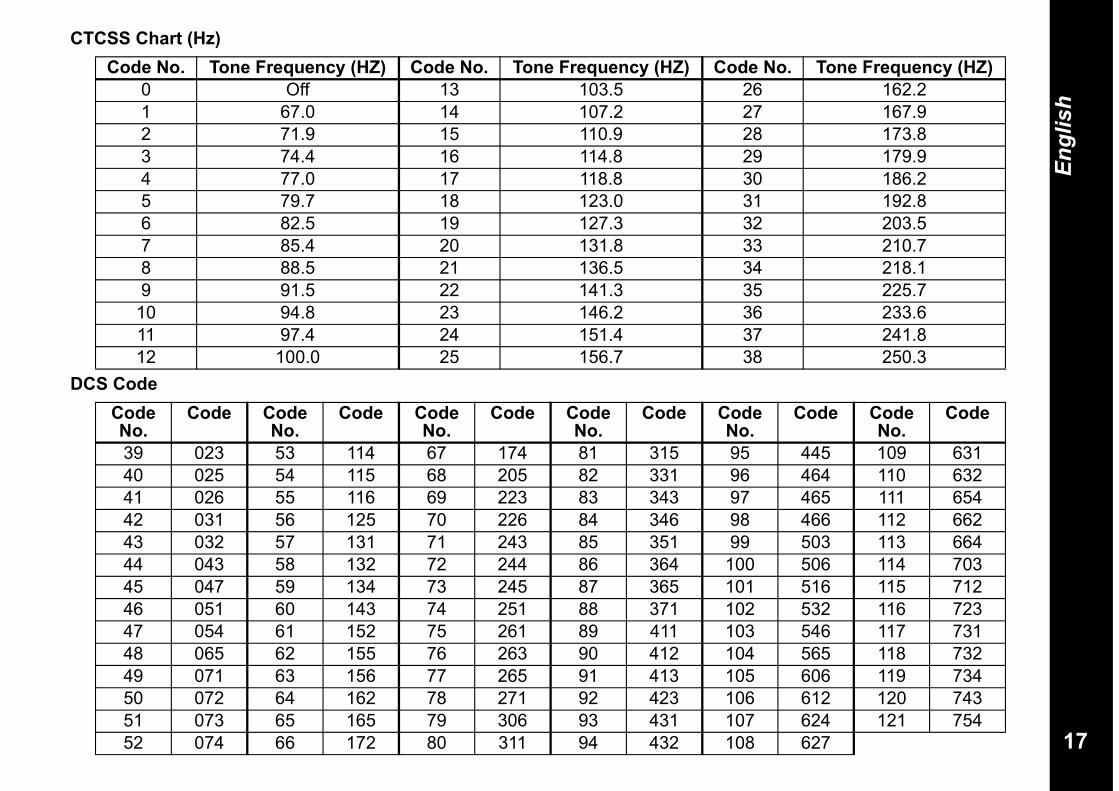
CTCSS Chart (Hz)
DCS Code
Code No. Tone Frequency (HZ) Code No. Tone Frequency (HZ) Code No. Tone Frequency (HZ)0 Off 13 103.5 26 162.21 67.0 14 107.2 27 167.92 71.9 15 110.9 28 173.83 74.4 16 114.8 29 179.94 77.0 17 118.8 30 186.25 79.7 18 123.0 31 192.86 82.5 19 127.3 32 203.57 85.4 20 131.8 33 210.78 88.5 21 136.5 34 218.19 91.5 22 141.3 35 225.7
10 94.8 23 146.2 36 233.611 97.4 24 151.4 37 241.812 100.0 25 156.7 38 250.3
Code No.
Code Code No.
Code Code No.
Code Code No.
Code Code No.
Code Code No.
Code
39 023 53 114 67 174 81 315 95 445 109 63140 025 54 115 68 205 82 331 96 464 110 63241 026 55 116 69 223 83 343 97 465 111 65442 031 56 125 70 226 84 346 98 466 112 66243 032 57 131 71 243 85 351 99 503 113 66444 043 58 132 72 244 86 364 100 506 114 70345 047 59 134 73 245 87 365 101 516 115 71246 051 60 143 74 251 88 371 102 532 116 72347 054 61 152 75 261 89 411 103 546 117 73148 065 62 155 76 263 90 412 104 565 118 73249 071 63 156 77 265 91 413 105 606 119 73450 072 64 162 78 271 92 423 106 612 120 74351 073 65 165 79 306 93 431 107 624 121 75452 074 66 172 80 311 94 432 108 627
18
English
Warranty InformationThe authorized Motorola dealer or retailer where you purchased your Motorola two-way radio and/or original accessories will honour a warranty claim and/or provide warranty service. Please return your radio to your dealer or retailer to claim your warranty service. Do not return your radio to Motorola.In order to be eligible to receive warranty service, you must present your receipt of purchase or a comparable substitute proof of purchase bearing the date of purchase. The two-way radio should also clearly display the serial number. The warranty will not apply if the type or serial numbers on the product have been altered, deleted, removed, or made illegible.
What Is Not Covered By The WarrantyDefects or damage resulting from use of the Product in other than its normal and customary manner or by not following the instructions in this user manual.Defects or damage from misuse, accident or neglect.Defects of damage from improper testing, operation, maintenance, adjustment, or any alteration or modification of any kind.Breakage or damage to aerials unless caused directly by defects in material or workmanship. Products disassembled or repaired in such a manner as to adversely affect performance or prevent adequate inspection and testing to verify any warranty claim.Defects or damage due to range.Defects or damage due to moisture, liquid or spills.All plastic surfaces and all other externally exposed parts that are scratched or damaged due to normal use.Products rented on a temporary basis. Periodic
maintenance and repair or replacement of parts due to normal usage, wear and tear.
Copyright InformationThe Motorola products described in this manual may include copyrighted Motorola programs, stored semiconductor memories or other media. Laws in the United States and other countries preserve for Motorola, certain exclusive rights for copyrighted computer programs, including the exclusive right to copy or reproduce in any form, the copyrighted Motorola programs.Accordingly, any copyrighted Motorola computer programs contained in the Motorola products described in this manual may not be copied or reproduced in any manner without express written permission of Motorola. Furthermore, the purchase of Motorola products shall not be deemed to grant either directly or by implication, estoppel, or otherwise, any license under the copyrights, patents or patent applications of Motorola, except for the normal non-exclusive royalty free license to use that arises by operation of law in the sale of a product.MOTOROLA, the Stylized M Logo and all other trademarks indicated as such herein are trademarks of Motorola, Inc. ® Reg. U.S. Pat. & Tm. Off.
© Motorola, Inc. 2008

1
Français
SOMMAIRESécurité et exposition aux fréquences radio pour portatifs émetteurs-récepteurs. . . . . . . . . . . . . . . . . . . . 2Caractéristiques. . . . . . . . . . . . . . . . . . . . . . . . . . . . . . . . . . . 2Commandes et fonctions . . . . . . . . . . . . . . . . . . . . . . . . . . . . 3Ecran . . . . . . . . . . . . . . . . . . . . . . . . . . . . . . . . . . . . . . . . . . . 4Contenu de l'emballage . . . . . . . . . . . . . . . . . . . . . . . . . . . . . 5Installation de la batterie . . . . . . . . . . . . . . . . . . . . . . . . . . . . 5Niveau de charge et avertissement de batterie faible . . . . . . . . . . . . . . . . . . . . . . . . . . . . . . . . . . . . . 5Pour charger la radio . . . . . . . . . . . . . . . . . . . . . . . . . . . . . . . 5Pour effectuer une charge directe . . . . . . . . . . . . . . . . . . . . . 5Pour effectuer la charge avec le bac chargeur . . . . . . . . . . . 5Charge de la batterie . . . . . . . . . . . . . . . . . . . . . . . . . . . . . . . 6Utilisation de la radio . . . . . . . . . . . . . . . . . . . . . . . . . . . . . . . 6Pour allumer la radio et régler le volume sonore . . . . . . . . . 6Pour régler la tonalité des touches . . . . . . . . . . . . . . . . . . . . 6Bip de confirmation . . . . . . . . . . . . . . . . . . . . . . . . . . . . . . . . 6Pour émettre avec votre radio . . . . . . . . . . . . . . . . . . . . . . . . 6Navigation dans le menu . . . . . . . . . . . . . . . . . . . . . . . . . . . 7Menu Sélection . . . . . . . . . . . . . . . . . . . . . . . . . . . . . . . . . . . 7Choisir un canal . . . . . . . . . . . . . . . . . . . . . . . . . . . . . . . . . . 7Choisir un sous-code . . . . . . . . . . . . . . . . . . . . . . . . . . . . . . 7Menu Commun . . . . . . . . . . . . . . . . . . . . . . . . . . . . . . . . . . . 8Balayage des canaux . . . . . . . . . . . . . . . . . . . . . . . . . . . . . . 8Mode Double écoute . . . . . . . . . . . . . . . . . . . . . . . . . . . . . . . 8Émission avec commande vocale . . . . . . . . . . . . . . . . . . . . . 9Écoute Bébé . . . . . . . . . . . . . . . . . . . . . . . . . . . . . . . . . . . . . 9Pour envoyer une tonalité d’appel . . . . . . . . . . . . . . . . . . . 10Mode silencieux . . . . . . . . . . . . . . . . . . . . . . . . . . . . . . . . . 10Chronomètre . . . . . . . . . . . . . . . . . . . . . . . . . . . . . . . . . . . . 11Mode Groupe . . . . . . . . . . . . . . . . . . . . . . . . . . . . . . . . . . . 11Paramètre du canal en mode Groupe . . . . . . . . . . . . . . . . . 11Définir Changement canal auto . . . . . . . . . . . . . . . . . . . . . 11Définir canal manuel en mode Groupe . . . . . . . . . . . . . . . . 11Définir Appel direct/général . . . . . . . . . . . . . . . . . . . . . . . . . 12
Définir Appel général . . . . . . . . . . . . . . . . . . . . . . . . . . . . . .12Définir Appel Direct . . . . . . . . . . . . . . . . . . . . . . . . . . . . . . . .12Menu Groupe . . . . . . . . . . . . . . . . . . . . . . . . . . . . . . . . . . . .13Définir Mode Groupe . . . . . . . . . . . . . . . . . . . . . . . . . . . . . .14Définir Code Groupe . . . . . . . . . . . . . . . . . . . . . . . . . . . . . .14Régler sonnerie . . . . . . . . . . . . . . . . . . . . . . . . . . . . . . . . . .14Définir ID . . . . . . . . . . . . . . . . . . . . . . . . . . . . . . . . . . . . . . . .14Définir Nom ID . . . . . . . . . . . . . . . . . . . . . . . . . . . . . . . . . . .14Verrouillage du clavier . . . . . . . . . . . . . . . . . . . . . . . . . . . . .15Économiseur automatique d’énergie . . . . . . . . . . . . . . . . . .15Avertissement de batterie faible . . . . . . . . . . . . . . . . . . . . .15Éclairage de l’écran . . . . . . . . . . . . . . . . . . . . . . . . . . . . . . .15Mode Écoute . . . . . . . . . . . . . . . . . . . . . . . . . . . . . . . . . . . . .15Spécifications . . . . . . . . . . . . . . . . . . . . . . . . . . . . . . . . . . . .16Table des fréquences (MHz) . . . . . . . . . . . . . . . . . . . . . . . . .16Liste des accessoires autorisés . . . . . . . . . . . . . . . . . . . . . .16Table des codes CTCSS (Hz) . . . . . . . . . . . . . . . . . . . . . . .17Table des codes DCS . . . . . . . . . . . . . . . . . . . . . . . . . . . . . .17Informations sur La Garantie . . . . . . . . . . . . . . . . . . . . . . . .18Ce Qui N'est Pas Couvert Par La Garantie . . . . . . . . . . . . .18Informations sur Les Droits d'Auteur . . . . . . . . . . . . . . . . . . .18
2
Français
Sécurité et exposition aux fréquences radio pour portatifs émetteurs-récepteurs
Caractéristiques• 8 canaux PMR• 121 sous-codes (38 codes CTCSS et 83 codes DCS)• Jusqu’à 10 km de portée *• Circuit interne VOX• 10 tonalités d’avertissement d’appel sélectionnables• Affichage LCD rétroéclairé• Jack pour casque audio optionnel• Bip de confirmation• Chronomètre• Écoute Bébé• Chargeur de batterie• Indicateur du niveau de charge• Écoute des canaux• Balayage des canaux• Double écoute• Verrouillage du clavier
• Contrôle Squelch Auto• Répétition auto (défilement)• Économiseur d’énergie• Avertissement de batterie faible• Tonalité (activer/désactiver)• Appel direct (ID appelant)• Appel de groupe• Mode silencieux• Appel général• Changement canal auto* La portée peut varier selon les conditions topographiques et/ou
environnementales.
Avant d’utiliser ce produit, lisez les instructions de sécurité présentées dans la brochure « Normes de sécurité et d’exposition à l’énergie deradiofréquence », fournie avec votre radio.
!C a u t i o nAvertissement
3
Français
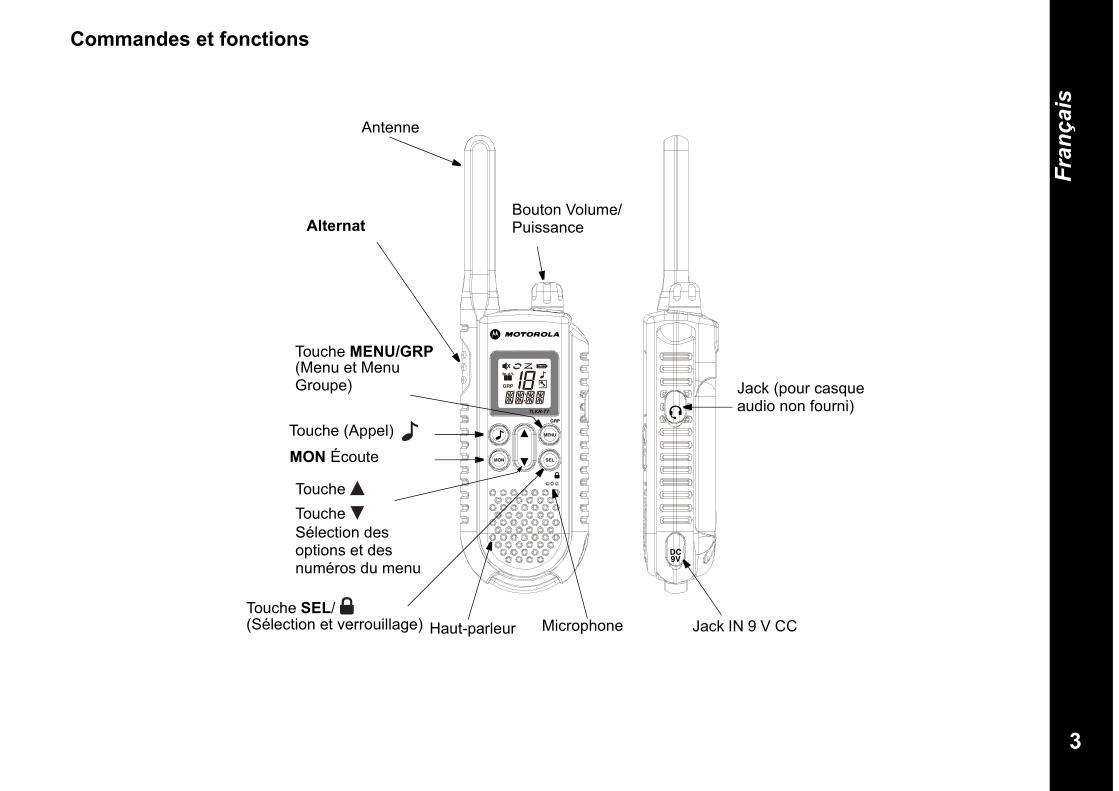
Commandes et fonctions
Jack (pour casque audio non fourni)
Antenne
Bouton Volume/PuissanceAlternat
Touche (Appel)
MON Écoute
ToucheToucheSélection des options et des numéros du menu
Touche MENU/GRP(Menu et Menu Groupe)
Touche SEL/(Sélection et verrouillage) Haut-parleur Microphone Jack IN 9 V CC

4
Français
Ecran 1. Indicateur Double écoute2. Indicateur silencieux3. Indicateur d’émission4. Indicateur de réception5. Indicateur de groupe6. Indicateur de balayage7. Indicateur du niveau de charger8. Indicateur du numéro de canal9. Indicateur d’appel10. Indicateur d’écoute VOX/Bébé11. Indicateur du sous-code (ID/code Groupe)12. Séparateur (pour le chronomètre)
1
23
4
5
12
11
10
6
9
7
8
5
Français
Nous vous félicitons d’avoir choisi une radio TLKR T7. C’est un modèle léger qui tient facilement dans la main. Vous pouvez l’utiliser pour rester en contact avec la famille, les amis, en randonnée, au ski, ou autres activités de plein-air, ou pour participer à la surveillance du voisinage et assurer des communications vitales. Ce modèle état de l’art est compact, mais offre un grand nombre de fonctions.
Contenu de l'emballageL’emballage contient deux radios TLKR T7, deux pinces de ceinture, un bac chargeur, un adaptateur CA, deux supports de batterie, deux packs batteries rechargeables NiMH et ce guide d’utilisation. Vous pouvez utiliser votre radio avec quatre piles alcalines AAA (non fournies).
Installation de la batterie Votre radio TLKR T7 peut être alimentée par un pack batterie NiMH ou par quatre piles alcalines AAA (non fournies). Si vous choisissez cette dernière option, nous vous conseillons d’utiliser des piles alcalines de haute qualité.Pour installer le pack batterie NiMH :1. Vérifiez que la radio est éteinte.2. Retirez la porte du compartiment en appuyant sur
l’onglet situé à sa partie inférieure. 3. Installez le pack batterie NiMH dans le compartiment.
Vérifiez que les polarités (symboles + et –) sont respectées, comme indiqué dans le compartiment. Si la batterie n’est pas installée correctement, la radio ne peut pas fonctionner.
4) Remettez en place la porte du compartiment.
Niveau de charge et avertissement de batterie faible Votre radio est équipée d’un indicateur de charge affiché à l’écran qui vous permet de connaître l’état de la batterie. Lorsque le niveau de la batterie est faible, l’indicateur clignote. Rechargez le pack batterie ou mettez immédiatement des piles alcalines neuves.
Pour charger la radioSi vous utilisez le pack batterie rechargeable NiMH, vous pouvez recharger directement deux radios TLKR T7 avec le bac chargeur fourni. Vérifiez que la radio est éteinte avant de la mettre dans le bac chargeur. L’indicateur de charge ne peut pas fonctionner correctement lorsque la radio n’est pas éteinte avant d’effectuer une recharge.Pour effectuer une charge directe :1. Branchez la prise de l’adaptateur CC au jack IN 9 V CC
de la radio. Branchez l’autre connecteur à une prise d’alimentation pour accessoires sur le véhicule.
2. Chargez le pack batterie pendant 16 heures.Pour effectuer la charge avec le bac chargeur :1. Branchez l’adaptateur CA au jack IN 9 V CC de la radio
et à une prise d’alimentation secteur standard. 2. Posez le bac chargeur sur une surface horizontale.
Positionnez la radio dans le bac chargeur pour que son clavier soit orienté vers l’avant.
3. Vérifiez que le témoin s’allume. Chargez le pack batterie pendant 16 heures et retirez la radio du bac chargeur dès que l'opération de charge est terminée.
Remarque : Le témoin d’indicateur de charge reste allumé tant que la radio reste dans le chargeur.

6
Français
Charge de la batterieVous pouvez charger le pack batterie NiMH seul à l’aide du support de batterie fourni.1. Placez le support de batterie dans le bac chargeur. 2. Installez le pack batterie NiMH dans le bac chargeur en
vérifiant que leurs bornes sont en contact. Si le pack batterie n’est pas installé correctement, il ne pourra pas être rechargé.
3. Vérifiez que le témoin s’allume. Chargez le pack batterie pendant 16 heures.
Remarque : Le témoin d’indicateur de charge reste allumé tant que le pack batterie reste dans le chargeur.
Utilisation de la radioPour utiliser votre nouvelle radio de manière optimale, lisez attentivement ce guide dans sa totalité avant d’essayer d’utiliser la radio.Pour allumer la radio et régler le volume sonore1. Tournez le bouton rotatif dans le sens horaire pour
allumer la radio et augmenter le volume. Pour diminuer le niveau du volume, tournez ce bouton dans le sens anti-horaire.
2. Pour éteindre la radio, tournez ce bouton à fond dans le sens anti-horaire.
Pour régler la tonalité des touches Une tonalité retentit chaque fois que vous appuyez sur l'une des touches (sauf l’Alternat et la touche ). Pour activer et désactiver la tonalité des touches, appuyez et maintenez la touche pendant que vous allumez la radio.
Bip de confirmation Ce bip signale la fin d’une émission (Alternat et VOX). Si la tonalité des touches est activée, le bip de confirmation est audible dans le haut-parleur. Il est émis même si la tonalité des touches est désactivée, mais dans ce cas il n’est pas audible dans le haut-parleur.Pour activer ou désactiver le bip de confirmation :Appuyez et maintenez la touche pendant que vous allumez la radio.
Pour émettre avec votre radioLorsque vous voulez parler à d'autres usagers :1. Appuyez et maintenez l’Alternat et parlez d’une voix
normale dans le microphone placé entre 5 et 8 cm de la bouche. Chaque émission est signalée par l’apparition de l’icône à l’écran. Pour éviter que le début l’émission soit tronqué, marquez une courte pause après avoir appuyé sur l’Alternat et avant de parler.
2. Lorsque vous avez terminé de parler, relâchez l’Alternat.Lorsque l’Alternat est relâché, vous pouvez écouter/recevoir des appels. La réception est signalée par l’affichage de l’icône .
Remarque : Lorsque vous parlez sans interruption pendant 60 secondes, une tonalité de limite de temps d’émission retentit et l’icône clignote. La radio cesse d’émettre.
7
Français
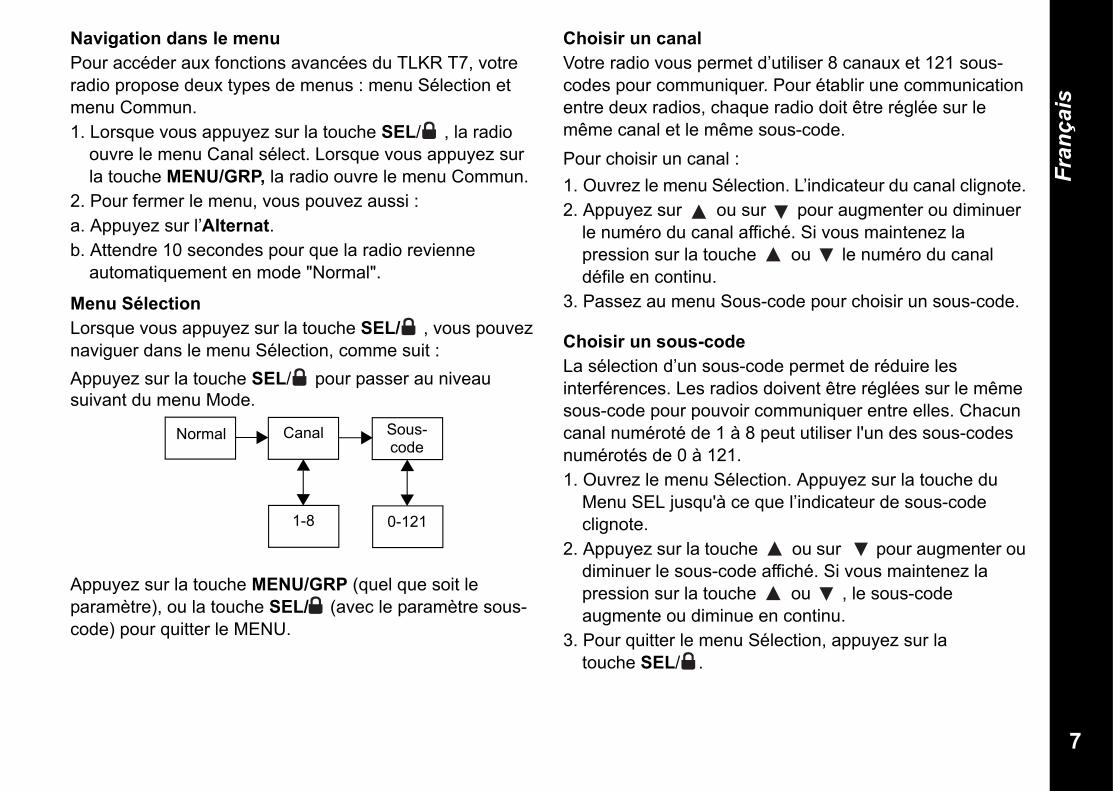
Navigation dans le menuPour accéder aux fonctions avancées du TLKR T7, votre radio propose deux types de menus : menu Sélection et menu Commun.1. Lorsque vous appuyez sur la touche SEL/ , la radio
ouvre le menu Canal sélect. Lorsque vous appuyez sur la touche MENU/GRP, la radio ouvre le menu Commun.
2. Pour fermer le menu, vous pouvez aussi :a. Appuyez sur l’Alternat.b. Attendre 10 secondes pour que la radio revienne
automatiquement en mode "Normal".
Menu SélectionLorsque vous appuyez sur la touche SEL/ , vous pouvez naviguer dans le menu Sélection, comme suit :Appuyez sur la touche SEL/ pour passer au niveau suivant du menu Mode.
Appuyez sur la touche MENU/GRP (quel que soit le paramètre), ou la touche SEL/ (avec le paramètre sous-code) pour quitter le MENU.
Choisir un canalVotre radio vous permet d’utiliser 8 canaux et 121 sous-codes pour communiquer. Pour établir une communication entre deux radios, chaque radio doit être réglée sur le même canal et le même sous-code.Pour choisir un canal :1. Ouvrez le menu Sélection. L’indicateur du canal clignote. 2. Appuyez sur ou sur pour augmenter ou diminuer
le numéro du canal affiché. Si vous maintenez la pression sur la touche ou le numéro du canal défile en continu.
3. Passez au menu Sous-code pour choisir un sous-code.
Choisir un sous-code La sélection d’un sous-code permet de réduire les interférences. Les radios doivent être réglées sur le même sous-code pour pouvoir communiquer entre elles. Chacun canal numéroté de 1 à 8 peut utiliser l'un des sous-codes numérotés de 0 à 121. 1. Ouvrez le menu Sélection. Appuyez sur la touche du
Menu SEL jusqu'à ce que l’indicateur de sous-code clignote.
2. Appuyez sur la touche ou sur pour augmenter ou diminuer le sous-code affiché. Si vous maintenez la pression sur la touche ou , le sous-code augmente ou diminue en continu.
3. Pour quitter le menu Sélection, appuyez sur la touche SEL/ .
Normal Canal Sous-code
0-1211-8
8
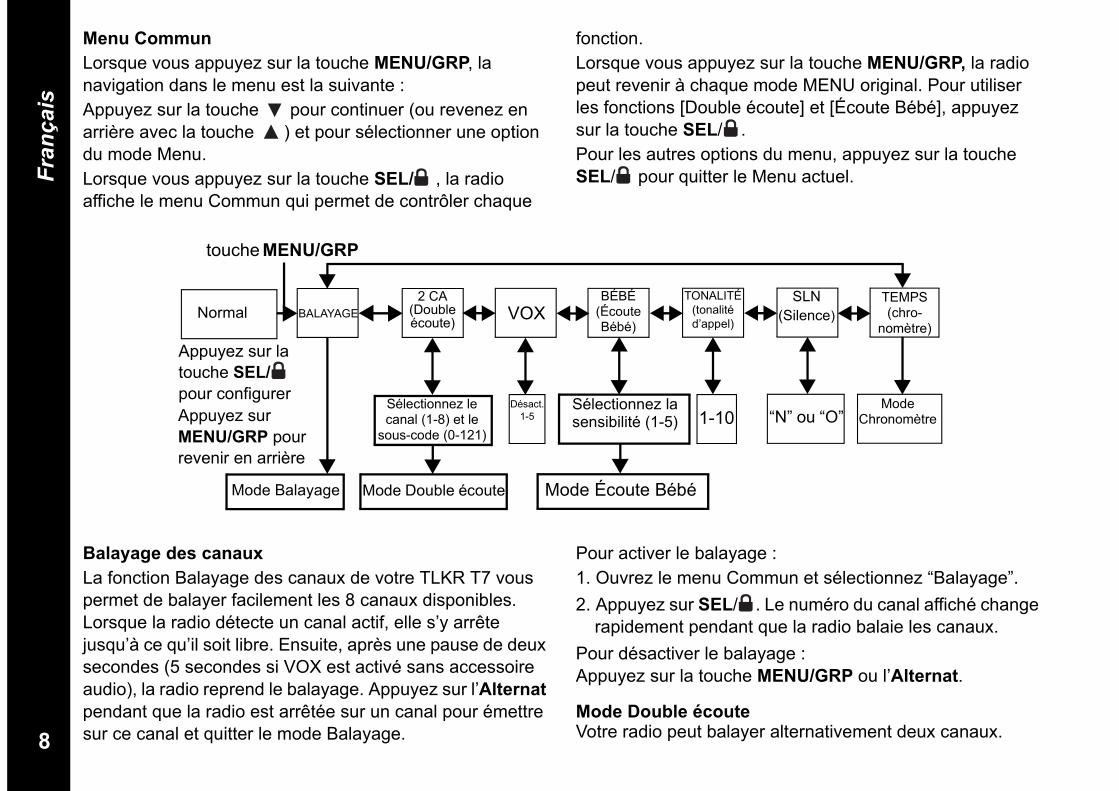
Français
Menu CommunLorsque vous appuyez sur la touche MENU/GRP, la navigation dans le menu est la suivante :Appuyez sur la touche pour continuer (ou revenez en arrière avec la touche ) et pour sélectionner une option du mode Menu.Lorsque vous appuyez sur la touche SEL/ , la radio affiche le menu Commun qui permet de contrôler chaque
fonction.Lorsque vous appuyez sur la touche MENU/GRP, la radio peut revenir à chaque mode MENU original. Pour utiliser les fonctions [Double écoute] et [Écoute Bébé], appuyez sur la touche SEL/ .Pour les autres options du menu, appuyez sur la touche SEL/ pour quitter le Menu actuel.
Normal BALAYAGE2 CA
(Double écoute) VOX
BÉBÉ (Écoute Bébé)
TONALITÉ(tonalité d’appel)
SLN (Silence)
TEMPS (chro-
nomètre)
Sélectionnez le canal (1-8) et le
sous-code (0-121)
Mode Chronomètre
Sélectionnez la sensibilité (1-5)
Désact.1-5 1-10 “N” ou “O”
Mode Balayage Mode Double écoute Mode Écoute Bébé
touche MENU/GRP
Appuyez sur la touche SEL/pour configurerAppuyez sur MENU/GRP pour revenir en arrière
Balayage des canauxLa fonction Balayage des canaux de votre TLKR T7 vous permet de balayer facilement les 8 canaux disponibles. Lorsque la radio détecte un canal actif, elle s’y arrête jusqu’à ce qu’il soit libre. Ensuite, après une pause de deux secondes (5 secondes si VOX est activé sans accessoire audio), la radio reprend le balayage. Appuyez sur l’Alternatpendant que la radio est arrêtée sur un canal pour émettre sur ce canal et quitter le mode Balayage.
Pour activer le balayage :1. Ouvrez le menu Commun et sélectionnez “Balayage”. 2. Appuyez sur SEL/ . Le numéro du canal affiché change
rapidement pendant que la radio balaie les canaux.Pour désactiver le balayage :Appuyez sur la touche MENU/GRP ou l’Alternat.
Mode Double écouteVotre radio peut balayer alternativement deux canaux.
9
Français
Vous devez, pour cela, sélectionner le numéro de canal et le sous-code du deuxième canal.1. Ouvrez le menu Commun et sélectionnez “2CA”, puis
appuyez sur la touche SEL/ pour accéder au paramétrage du mode Double écoute. L’icône Double écoute est affichée.
2. Appuyez sur ou pour sélectionner le numéro du canal, puis sur la touche SEL/ .
3. Appuyez sur la touche ou pour sélectionner le sous-code, puis sur la touche SEL/ .
4. Le mode Double écoute est activé.Remarque : Si vous sélectionnez le même numéro de canal
et le même sous-code que le canal actif, la fonction Double écoute ne peut pas fonctionner.
Pour désactiver le mode Double écoute :Appuyez sur la touche MENU/GRP.Émission avec commande vocaleVotre radio TLKR T7 est équipée d’un système de commande vocale sélectionnable (fonction VOX) qui permet de déclencher automatiquement l’émission. Cette fonction VOX permet d’utiliser la radio en mode Mains libres. L’émission est automatiquement déclenchée lorsque vous parlez dans le microphone de la radio ou du casque (le casque micro-écouteur n’est pas fourni) au lieu d’appuyer sur l’Alternat.Pour régler la sensibilité sonore de la fonction VOX :1. Ouvrez le menu Commun et sélectionnez “VOX”.
Appuyez sur la touche SEL/ . Le niveau actuel clignote (Désactivé, 1-5). Le niveau “N” (désactivé) désactive la fonction VOX. Les niveaux 1 à 5 règlent la sensibilité du circuit VOX.
2. Appuyez sur ou pour sélectionner le niveau de sensibilité VOX requis. Choisissez le niveau 1 lorsque vous êtes dans un environnement calme, et le niveau 5 dans un environnement très bruyant. Parlez dans le microphone pour identifier la sensibilité la mieux adaptée à la situation. Lorsque l’icône VOX clignote, votre voix est correctement perçue par le système.
3. Fermez le menu Commun.Remarque : Lorsque vous parlez sans interruption pendant
60 secondes avec la fonction VOX, une tonalité de limite de temps d’émission retentit et l’icône
clignote pendant 5 secondes.Écoute BébéVous pouvez placer l'une de vos deux radios TLKR T7 dans une pièce et écouter ce qui s’y passe avec l’autre radio depuis une autre pièce. Lorsque cette fonction est activée, la radio source détecte les voix/bruits audibles à proximité (selon le niveau de sensibilité choisi) et les transmet à la radio cible sans qu’il soit nécessaire d’appuyer sur l’Alternat. Dans ce mode, la radio source ne peut pas recevoir.Pour activer la fonction Écoute Bébé :1. Ouvrez le menu Commun et sélectionnez “BÉBÉ”.
Appuyez sur la touche SEL/ .2. Appuyez sur ou pour sélectionner le niveau de
sensibilité requis. Choisissez le niveau 1 lorsque l’environnement est calme, et le niveau 5 dans un environnement très bruyant.
3. Appuyez sur la touche SEL/ pour activer l’écoute Bébé.
Pour désactiver la fonction Écoute Bébé :Appuyez sur la touche MENU/GRP.
10
Français
Remarque :- Si vous appuyez sur l’Alternat lorsque la radio est en
mode Écoute bébé, une tonalité d’erreur retentit. L’Alternat est désactivé dans ce mode.
- Lorsque les voix/bruits captés dans la pièce continuent pendant plus de 60 secondes, l’écoute s’arrête pendant 5 secondes et reprend ensuite.
Pour envoyer une tonalité d’appelVotre radio TLKR T7 offre 10 tonalités d’appel sélectionnables que vous pouvez envoyer lorsque la touche est enfoncée en mode Normal.Pour sélectionner une tonalité d’appel :1. Ouvrez le menu Commun et sélectionnez “TONALITÉ”.
Appuyez sur la touche SEL/ .Le numéro de la tonalité d’appel actuelle clignote (1-10).
2. Appuyez sur la touche ou pour choisir le numéro de la tonalité d’appel voulue. Vous entendez chaque tonalité dans le haut-parleur.
3. Fermez le menu Commun.Pour émettre la tonalité d’appel sélectionnée, appuyez sur la touche en mode Normal. La tonalité sélectionnée est automatiquement émise pendant une durée prédéterminée et fixe. L’émission de la tonalité d’appel est annulée lorsque vous appuyez sur l’Alternat.
Mode silencieuxLorsque le mode Silencieux est activé, tous les appels entrants sont signalés silencieusement. L’éclairage de la radio clignote pour vous avertir de la réception des appels.Si vous ne répondez pas à un appel, l’éclairage s’éteint et l’icône APPEL clignote jusqu’à ce que le signal disparaisse.Le TLKR-T7 vibre aussi pour vous rappeler qu’un appel a été manqué. Le mode Silencieux est désactivé pendant 15 secondes lorsque émettez, recevez ou appuyez sur une autre touche.Pour activer le mode silencieux :1. Ouvrez le menu Commun et sélectionnez “SLN”.
Appuyez sur la touche SEL/ .2. Appuyez sur la touche pour activer le mode
silencieux. L’indicateur de canal affiche “O” et l’icône SILENCE est affichée.
3. Appuyez sur la touche pour désactiver le mode silencieux. L’indicateur de canal affiche “N” et l’icône SILENCE n’est plus affichée.

11
Français
Chronomètre Vous pouvez utiliser votre radio comme un chronomètre. Sa durée maximale est de 59 minutes 59 secondes.Après cela, il reprend à “00:00”.Pour utiliser le chronomètre :1. Ouvrez le menu Commun et sélectionnez “TEMPS”.2. Appuyez sur la touche SEL/ pour choisir ce menu.3. Appuyez sur la touche SEL/ key. Le chronomètre est
activé.4. Appuyez sur la touche SEL/ pour activer la Pause.
La touche SEL/ permet de déclencher et d’arrêter le chronomètre.
5. Appuyez sur la touche MENU/GRP pendant le décompte de temps ou la pause pour mettre le chronomètre en mode Veille (remise à zéro 00:00).
6. Pour arrêter le chronomètre, appuyez sur l’Alternat ou sur la touche MENU/GRP en état Veille.
Remarque : Des appels peuvent être reçus lorsque ce mode est activé.
Lorsque vous recevez un appel général, le Nom ID est affiché pendant 10 secondes. Lorsque vous recevez un appel Direct, le Nom ID de l’état est affiché. Ensuite, la radio revient au mode TEMPS et l’icône Appel clignote.
Mode GroupeMaintenez enfoncée la touche MENU/GRP pour ouvrir le menu Groupe.
Paramétrage du canal en mode GroupeAppuyez sur la touche SEL/ en mode Groupe pour accéder au paramétrage des canaux.
Appuyez sur la touche ou pour sélectionner “Paramètre Changement canal auto” ou “Paramètre manuel du canal”.L’écran affiche :
Appuyez sur la touche SEL/ pour accéder à chaque paramètre.Remarque : Appuyez sur la touche MENU/GRP pour revenir
au mode Veille.
Définir Changement canal autoUn numéro de canal clignote et les segments d’affichage du sous-code indiquent “TOUT”Appuyez sur la touche ou pour sélectionner le canal.Appuyez sur la touche ou SEL/ pour émettre la commande Changement canal auto.Remarque : Appuyez sur la touche MENU/GRP pour revenir
au Paramètre du canal en mode Groupe.
Définir canal manuel en mode GroupeUn numéro de canal clignote et les segments d’affichage du sous-code indiquent “MON”Appuyez sur la touche ou pour sélectionner le canal.
Changement canal auto
Paramètre manuel du canal
12
Français
Le canal à sélection manuelle est maintenant disponible.Appuyez sur la touche SEL/ pour quitter le paramètre manuel du canal.Remarque : Appuyez sur la touche MENU/GRP pour revenir
au Paramètre du canal en mode Groupe.
Définir Appel direct / général Appuyez sur la touche en mode Groupe pour accéder au paramètre Appel direct/général. Pour commencer, vous devez sélectionner un type d’appel, dans Émission d’appel général ou Paramètre d’appel direct.
Pour cela, appuyez sur la touche ou pour sélectionner un type d’appel.Définir Appel généralAprès avoir sélectionné ”Émission d’appel général”, appuyez sur la touche ou SEL/ pour quitter ce paramètre et émettre immédiatement un appel général.La radio fait entendre la tonalité Appel général.L’écran affiche l’icône TX et l’icône Appel clignote pendant l’émission.Remarque : Appuyez sur la touche MENU/GRP pour revenir
au mode Veille.
Définir Appel DirectL’écran affiche le numéro ID sur les segments du canal et le Nom ID clignote sur les segments du sous-code.
Appuyez sur la touche ou pour sélectionner un numéro ID.
Appuyez sur la touche ou la touche SEL/ pour émettre la commande Appel direct.La commande Appel direct est uniquement émise vers l’ID sélectionnée.L’écran affiche l’icône TX et l’icône Appel pendant l’émission.La radio fait entendre la tonalité d’appel sélectionnée pendant l’émission de la commande Appel direct.Remarque : Appuyez sur la touche MENU/GRP pour revenir
au paramètre Appel général/Appel direct.
Émission d’appel général Paramètre d’appel direct
Le numéro ID pour l’appel direct
Le Nom ID
13
Français
Menu GroupeMaintenez enfoncée la touche MENU/GRP pour ouvrir le MENU GROUPE.Appuyez sur la touche (ou ) pour continuer dans chaque menu (GRP/CODE/SONN/ID).
Appuyez sur la touche SEL/ pour choisir chaque menu du groupe.
Regardez l’écran :Appuyez sur (ou ) pour afficher la condition ou le numéro requis. Appuyez sur SEL/ pour confirmer.
Appuyez sur MENU/GRP pour passer au mode Veille du menu.Remarque : En mode Groupe, vous ne pouvez pas recevoir d’appels d’autres radios, sauf si celles-ci utilisent le même
canal et le même code de groupe.
Normal “GRP”(mode Groupe)
“CODE”(code Groupe)
“ID” (paramètre ID)
Numéro ID 1 - 16
0 - 121 1 - 10
QUITTER
Nom ID jusqu’à 4 caractères
“N” ou “O”
“N”“O”
QUITTER le menu
“SONN”(sonnerie)
14
Français
Définir Mode GroupeAppuyez sur la touche SEL/ pour ouvrir le mode Groupe. Choisissez “O” ou “N” en appuyant sur la touche ou la touche
Regardez l’écran :Choisissez "N" et appuyez sur la touche SEL/ pour quitter le menu Groupe.Choisissez "Y" et appuyez sur la touche SEL/ pour passer au menu Groupe et au paramètre Code Groupe.
Définir Code Groupe Vous pouvez choisir un code groupe entre 0 et 121.Le code groupe est affiché sur les segments du sous-code.Pour sélectionner un code groupe, appuyez sur touche ou pour le confirmer.Appuyez sur la touche SEL/ pour terminer le paramétrage du Code Groupe. La radio ouvre le menu Sonnerie.Appuyez sur la touche MENU/GRP pour revenir au mode Groupe.
Régler sonnerie Vous pouvez sélectionner une sonnerie pour les appels directs.Vous disposez de 10 sonneries, qui sont les mêmes que
les tonalités d’appel.Pour choisir une sonnerie, appuyez sur la touche ou la touche .Le haut-parleur fait entendre la sonnerie.
Définir IDSur chaque radio de votre groupe, le numéro ID doit être réglé entre 1 et 16.Le numéro ID permet d’identifier chaque unité dans un même groupe.L’utilisateur peut choisir un Nom ID pouvant contenir jusqu’à 4 caractères. Vous pouvez sélectionner le Numéro ID indiqué sur les segments du canal en appuyant sur la touche ou la touche . Lorsque l’ID enregistrée d’un appel général est sélectionnée avec la touche ou , l’écran affiche “UTIL” sur les segments du sous-code. Si une ID non enregistrée est sélectionnée, les segments du sous-code restent vides.
Regardez l’écran :Appuyez sur la touche SEL/ pour aller jusqu’au Nom ID.
Définir Nom IDLe Nom ID est affiché sur l’écran des unités réceptrices
15
Français
lorsque vous envoyez un appel direct ou général. Ce nom apparaît également sur l’écran des autres radios lorsqu’un utilisateur souhaite vous contacter par un appel direct. Si le Nom ID n’est pas défini, le numéro de l’unité est affiché.Appuyez sur la touche ou pour sélectionner un caractère sur les segments clignotants du sous-code.Appuyez ensuite sur la touche SEL/ pour passer au caractère suivant. Vous pouvez choisir un Nom ID pouvant contenir jusqu’à 4 caractères.Pour terminer, appuyez sur la touche SEL/ pour enregistrer le Numéro ID et le Nom ID.Ceci ferme automatiquement le menu ID.Remarque : Chaque fois que vous appuyez sur MENU/GRP,
la radio annule le Numéro ID sélectionné et le Nom ID entré, puis ferme le menu Groupe.
Verrouillage du clavierPour verrouiller le clavier :Maintenez enfoncée la touche SEL/ pendant 2 secondes. Les segments du sous-code affichent “VERR” pendant 2 secondes, puis la radio affiche l’écran précédent. Pour déverrouiller le clavier :Maintenez enfoncée la touche SEL/ pendant 2 secondes. Les segments du sous-code affichent “DEVE” pendant 2 secondes, puis la radio affiche l’écran précédent.Remarque : Si vous appuyez sur n’importe quelle touche
(sauf l’Alternat) lorsque le clavier est verrouillé, l’écran affiche “VERR” pendant 2 secondes et une tonalité d’erreur retentit.
Économiseur automatique d’énergieVotre radio est équipée d’un circuit spécial qui permet de prolonger considérablement l’autonomie de la batterie. En
l’absence d’émission ou d’appel reçu pendant 3 secondes, votre radio passe en mode Économiseur d’énergie. Dans ce mode, la radio peut recevoir tous les appels qui lui sont destinés.
Avertissement de batterie faible Cet avertissement signale que la batterie sera bientôt vide et doit être rechargée. Il débute 30 secondes après le début du clignotement de l’icône Batterie faible.Les segments du sous-code affichent “BATT” et l’icône Batterie faible clignote.La tonalité d’avertissement Batterie faible retentit toutes les 5 secondes pendant 30 secondes.
Éclairage de l’écranL’éclairage de l’affichage LCD s’allume automatiquement lorsque vous appuyez sur l’une des touches (à l’exception de l’Alternat). L’affichage reste illuminé pendant 10 secondes après la dernière pression sur une touche.
Mode ÉcouteVotre TLKR T7 permet d’entendre les signaux faibles sur le canal sélectionné en appuyant sur la touche Écoute.Pour activer le mode Écoute :- Appuyez sur la touche MON pour écouter brièvement le canal. L’icône RX clignote.- Appuyez et maintenez la touche Écoute pendant 1,5 secondes pour écouter le canal en continu. L’icône RX continue de clignoter.Pour désactiver le mode Écoute :- Appuyez sur MON, MENU/GRP, ou SEL/ pour revenir en mode “Normal”. L’icône RX cesse de clignoter.
16
Français
Spécifications Table des fréquences (MHz)
Liste des accessoires autorisésVeuillez contacter votre distributeur pour acquérir ces nouveaux accessoires.
Canaux 8 PMR
Sous-codes 121 (38 CTCSS et 83 DCS)
Fréquence opérationnelle
446.00625 - 446.09375 MHz
Unité d’alimentation
Pack batterie Ni-MH AAA
4 piles alcalines AAA (non fournies)
Portée Jusqu’à 10 km
Autonomie de la batterie
20 heures (conditions ordinaires) – Piles alcalines
(cycle d’utilisation 5/5/90)
18 heures (conditions ordinaires) – Pack batterie NiMH
(cycle d’utilisation 5/5/90)
Canal Fréquence
1 446.00625
2 446.01875
3 446.03125
4 446.04375
5 446.05625
6 446.06875
7 446.08125
8 446.09375
Référence Motorola
Description
00275 TLKR-T5/T7 Câble de chargeur pour automobile
00276 TLKR-T5/T7 Chargeur d'appareil (UE)
00277 TLKR-T5/T7 Chargeur d'appareil (R.-U.)
00278 TLKR-T5/T7 Batterie
00279 TLKR-T5/T7 Attache ceinture
00174 Capsule écouteur – Usager
00179 Micro-écouteur – Usager
17
Français
Table des codes CTCSS (Hz)
Table des codes DCS
No. du code
Fréquence de la tonalité(HZ)
No. du code
Fréquence de la tonalité(HZ)
No. du code
Fréquence de la tonalité(HZ)
0 Off 13 103.5 26 162.21 67.0 14 107.2 27 167.92 71.9 15 110.9 28 173.83 74.4 16 114.8 29 179.94 77.0 17 118.8 30 186.25 79.7 18 123.0 31 192.86 82.5 19 127.3 32 203.57 85.4 20 131.8 33 210.78 88.5 21 136.5 34 218.19 91.5 22 141.3 35 225.7
10 94.8 23 146.2 36 233.611 97.4 24 151.4 37 241.812 100.0 25 156.7 38 250.3
No. du code
Code No. du code
Code No. du code
Code No. du code
Code No. du code
Code No. du code
Code
39 023 53 114 67 174 81 315 95 445 109 63140 025 54 115 68 205 82 331 96 464 110 63241 026 55 116 69 223 83 343 97 465 111 65442 031 56 125 70 226 84 346 98 466 112 66243 032 57 131 71 243 85 351 99 503 113 66444 043 58 132 72 244 86 364 100 506 114 70345 047 59 134 73 245 87 365 101 516 115 71246 051 60 143 74 251 88 371 102 532 116 72347 054 61 152 75 261 89 411 103 546 117 73148 065 62 155 76 263 90 412 104 565 118 73249 071 63 156 77 265 91 413 105 606 119 73450 072 64 162 78 271 92 423 106 612 120 74351 073 65 165 79 306 93 431 107 624 121 75452 074 66 172 80 311 94 432 108 627
18
Français
Informations sur La GarantieLe fournisseur ou le détaillant Motorola autorisé chez lequel vous avez acheté votre radio Motorola et/ou les accessoires d'origine honorera une réclamation de garantie et/ou fournira un service de garantie.Veuillez renvoyer votre radio à votre fournisseur ou détaillant pour réclamer le service de garantie. Ne renvoyez pas la radio à Motorola.Pour avoir le droit de recevoir un service de garantie, vous devez présenter votre récépissé d'achat ou une autre preuve comparable portant la date de l'achat. La radio devra également afficher clairement le numéro de série. La garantie ne sera pas applicable si le type ou les numéros de série du produit ont été manipulés, supprimés, enlevés ou rendus illisibles.Ce Qui N'est Pas Couvert Par La GarantieLes défauts ou les dommages résultant de l'utilisation du produit d'une façon autre que de la façon normale ou correctement personnalisée, ou bien en ne suivant pas les instructions données dans le manuel d'utilisation.Les défauts ou les dommages provenant d'un usage inadapté, impropre, d'un accident ou d'une négligence.Les défauts ou les dommages causés par des tests, une utilisation, un entretien, un réglage, une manipulation ou une modification incorrects de quelque sorte que ce soit.Une rupture ou un endommagement des antennes, à moins qu'il/elle soit causé(e) directement par des défauts du matériel ou une malfaçon.Les produits démontés ou réparés d'une manière telle que cela affecte défavorablement les performances ou empêche une inspection et des tests adéquats pour vérifier toute réclamation de garantie.Des défauts ou des dommages causés par la portée.Des défauts ou des endommagements causés par l'humidité, les liquides ou les épanchements.Toutes les surfaces en plastique et toutes les autres parties
exposées aux éléments extérieurs qui sont rayées ou endommagées en raison d'un usage normal.Les produits loués sur une base temporaire.Une maintenance et une réparation périodiques ou le remplacement des pièces en raison d'une usure et d'un usage normaux.Informations sur Les Droits d'AuteurLes produits Motorola décrits dans ce manuel peuvent inclure des programmes Motorola, des mémoires à semiconducteurs programmées et d'autres médias protégés par des droits d'auteur. Les lois des États-Unis et des autres pays réservent à Motorola certains droits exclusifs pour les programmes informatiques protégés par des droits d'auteur, y compris le droit exclusif de copier ou de reproduire sous quelque forme que ce soit, les programmes de Motorola protégés par des droits d'auteur.En conséquence, tous les programmes informatiques pour lesquels Motorola est le détenteur des droits d'auteur décrits dans ce manuel ne peuvent pas être copiés ou reproduits de quelque manière que ce soit, sans la permission expresse écrite de Motorola. L'achat des produits de Motorola ne sera en outre pas considéré comme donnant directement ou par implication, non-recevabilité ou autre, de licence aux termes des droits d'auteurs, de brevets ou de demandes de brevets de Motorola, à l'exception de la licence normale non-exclusive sans redevances d'utilisation qui découle de la mise en application de la loi lors de la vente d'un produit.Motorola, le logo M stylisé et les autres marques citées en tant que telles dans le présent document sont des marques de Motorola, Inc. Tous droits réservés.
© Motorola, Inc. 2008
1
Deutsch
INHALTHinweise zur Produktsicherheit und Funkfrequenzstrahlung bei Handfunkgeräten. . . . . . . . . . 2Funktionen und Leistungsmerkmale. . . . . . . . . . . . . . . . . 2Bedienelemente und Funktionen . . . . . . . . . . . . . . . . . . . 3Display . . . . . . . . . . . . . . . . . . . . . . . . . . . . . . . . . . . . . . . 4Lieferumfang. . . . . . . . . . . . . . . . . . . . . . . . . . . . . . . . . . . 5Akku/Batterien installieren . . . . . . . . . . . . . . . . . . . . . . . . 5Akkustandanzeige und Hinweis auf leeren Akku/leere Batterien . . . . . . . . . . . . . . . . . . . . . . . . . . . . . 5Funkgerät aufladen. . . . . . . . . . . . . . . . . . . . . . . . . . . . . . 5Direktes Aufladen . . . . . . . . . . . . . . . . . . . . . . . . . . . . . . 5Aufladen in der Ladeschale . . . . . . . . . . . . . . . . . . . . . . . 5Akku laden . . . . . . . . . . . . . . . . . . . . . . . . . . . . . . . . . . . . 6Funkgerät benutzen . . . . . . . . . . . . . . . . . . . . . . . . . . . . . 6Funkgerät einschalten und Lautstärke regeln . . . . . . . . . 6Toneinstellungen (Tastentöne) . . . . . . . . . . . . . . . . . . . . . 6Roger-Zirpton . . . . . . . . . . . . . . . . . . . . . . . . . . . . . . . . . . 6Sprachrufe tätigen . . . . . . . . . . . . . . . . . . . . . . . . . . . . . . 6Menü-Navigation . . . . . . . . . . . . . . . . . . . . . . . . . . . . . . . 7Wahlmenü . . . . . . . . . . . . . . . . . . . . . . . . . . . . . . . . . . . . 7Kanal wählen . . . . . . . . . . . . . . . . . . . . . . . . . . . . . . . . . . 7Sub-Code wählen . . . . . . . . . . . . . . . . . . . . . . . . . . . . . . 7Hauptmenü . . . . . . . . . . . . . . . . . . . . . . . . . . . . . . . . . . . 8Kanal-Scanfunktion . . . . . . . . . . . . . . . . . . . . . . . . . . . . . 8Zwei-Kanal-Scan . . . . . . . . . . . . . . . . . . . . . . . . . . . . . . . 9Sprachgesteuertes Senden . . . . . . . . . . . . . . . . . . . . . . . 9Raumüberwachungsfunktion . . . . . . . . . . . . . . . . . . . . . . 9Rufton senden . . . . . . . . . . . . . . . . . . . . . . . . . . . . . . . . 10Still-Modus . . . . . . . . . . . . . . . . . . . . . . . . . . . . . . . . . . . 10Betriebstimer . . . . . . . . . . . . . . . . . . . . . . . . . . . . . . . . . 11Gruppenmodus . . . . . . . . . . . . . . . . . . . . . . . . . . . . . . . 11Kanaleinstellung im Gruppenmodus . . . . . . . . . . . . . . . 11Automatische Kanalumschaltung einstellen . . . . . . . . . 11Manuelle Kanalwahl in Gruppenmodus einstellen . . . . . 11
Rundumruf/Direktruf einstellen . . . . . . . . . . . . . . . . . . . .12Rundumruf einstellen . . . . . . . . . . . . . . . . . . . . . . . . . . .12Direktruf einstellen . . . . . . . . . . . . . . . . . . . . . . . . . . . . .12Gruppenmenü . . . . . . . . . . . . . . . . . . . . . . . . . . . . . . . .13Gruppenmenü einstellen . . . . . . . . . . . . . . . . . . . . . . . .14Gruppencode einstellen . . . . . . . . . . . . . . . . . . . . . . . .14Klingelton einstellen . . . . . . . . . . . . . . . . . . . . . . . . . . .14ID einstellen . . . . . . . . . . . . . . . . . . . . . . . . . . . . . . . . . .14ID-Namen einstellen . . . . . . . . . . . . . . . . . . . . . . . . . . . .14Tastatursperre . . . . . . . . . . . . . . . . . . . . . . . . . . . . . . . .15Automat. Sparfunktion . . . . . . . . . . . . . . . . . . . . . . . . . .15Akku-leer-Warnung . . . . . . . . . . . . . . . . . . . . . . . . . . . .15LCD-Hintergrundbeleuchtung . . . . . . . . . . . . . . . . . . . . .15Monitor-Modusfunktion . . . . . . . . . . . . . . . . . . . . . . . . . .15Technische Daten . . . . . . . . . . . . . . . . . . . . . . . . . . . . . .16Frequenztabelle (MHz) . . . . . . . . . . . . . . . . . . . . . . . . . .16Liste des zugelassenen Zubehörs . . . . . . . . . . . . . . . . .16CTCSS-Tabelle (Hz) . . . . . . . . . . . . . . . . . . . . . . . . . . . .17DCS Code . . . . . . . . . . . . . . . . . . . . . . . . . . . . . . . . . . .17Garantieinformationen . . . . . . . . . . . . . . . . . . . . . . . . . .18Garantieausschluss . . . . . . . . . . . . . . . . . . . . . . . . . . . .18Copyrightinformationen . . . . . . . . . . . . . . . . . . . . . . . . .18
2
Deutsch
Hinweise zur Produktsicherheit und Funkfrequenzstrahlung bei Handfunkgeräten
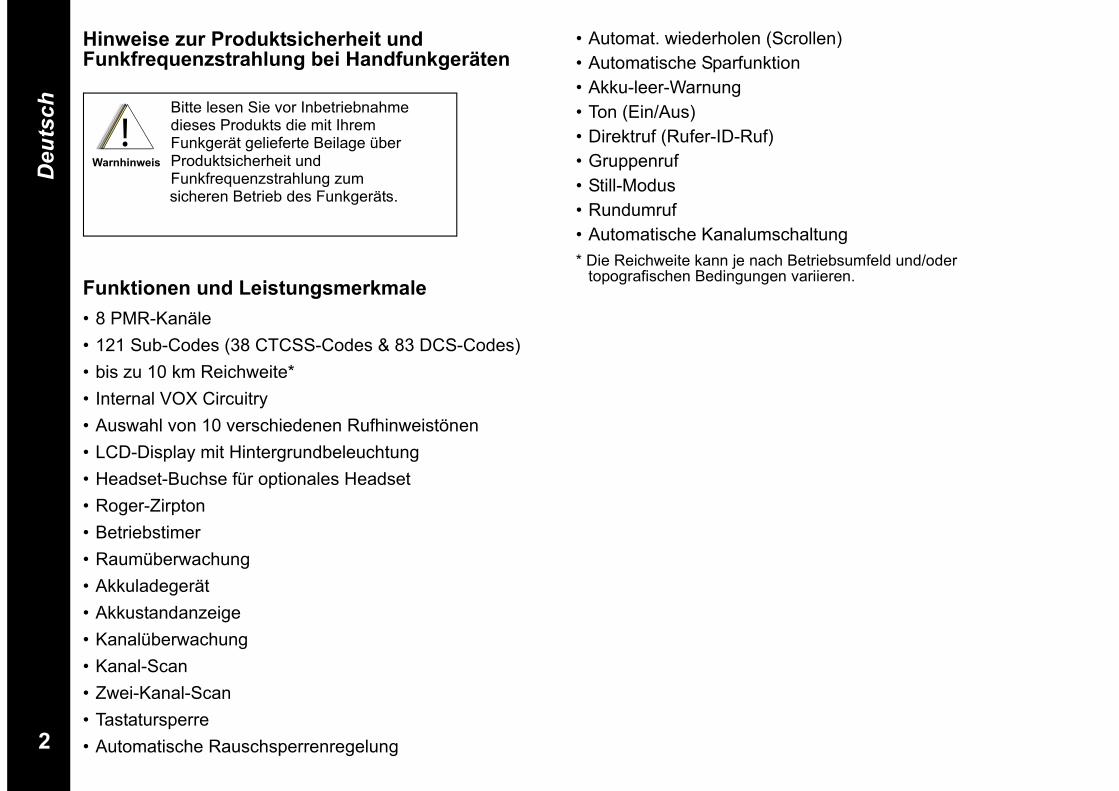
Funktionen und Leistungsmerkmale• 8 PMR-Kanäle• 121 Sub-Codes (38 CTCSS-Codes & 83 DCS-Codes)• bis zu 10 km Reichweite*• Internal VOX Circuitry• Auswahl von 10 verschiedenen Rufhinweistönen• LCD-Display mit Hintergrundbeleuchtung• Headset-Buchse für optionales Headset• Roger-Zirpton• Betriebstimer• Raumüberwachung• Akkuladegerät• Akkustandanzeige• Kanalüberwachung• Kanal-Scan• Zwei-Kanal-Scan• Tastatursperre• Automatische Rauschsperrenregelung
• Automat. wiederholen (Scrollen)• Automatische Sparfunktion• Akku-leer-Warnung• Ton (Ein/Aus)• Direktruf (Rufer-ID-Ruf)• Gruppenruf• Still-Modus• Rundumruf• Automatische Kanalumschaltung* Die Reichweite kann je nach Betriebsumfeld und/oder
topografischen Bedingungen variieren.
Bitte lesen Sie vor Inbetriebnahme dieses Produkts die mit Ihrem Funkgerät gelieferte Beilage über Produktsicherheit und Funkfrequenzstrahlung zumsicheren Betrieb des Funkgeräts.
!C a u t i o nWarnhinweis

3
Deutsch
Bedienelemente und Funktionen
Headset-Buchse (Headset nicht inbegriffen)
Antenne
Ein/Aus/LautstärkereglerPTT (Sendetaste)
(Ruf)-TasteMON (Überwachen-Taste)
-Taste-Taste
Auswahl von Menüpunkt und Nummern
MENU/GRP-Taste(Menü und Gruppenmenü)
SEL/ -Taste(Auswahl-/Sperrtaste) Lautsprecher Mikrofon 9-V-Gleichstrombuchse
(EIN)

4
Deutsch
Display 1. Zwei-Kanal-Scan-Anzeige2. Stille Anzeige3. Senden-Anzeige4. Empfang-Anzeige5. Gruppenanzeige6. Scan-Betriebsanzeige7. Akkustandanzeige8. Kanalanzeige9. Rufanzeige10. VOX/Raumüberwachungsanzeige11. Sub-Code-Anzeige (Gruppen-ID/Code)12. Doppelpunkt (für Betriebstimer)
1
23
4
5
12
11
10
6
9
7
8
5
Deutsch
Wir gratulieren Ihnen zum Erwerb des TLKR T7 Funkgeräts. Sie haben ein leichtes, handliches Funkgerät erstanden, das sich ausgezeichnet zum Einsatz bei sportlichen Betätigungen wie Wandern, Schifahren und anderen Freizeitbeschäftigungen eignet, bei denen Sie in Kontakt mit Familie und Freunden bleiben möchten. Im Urlaub, in der Freizeit oder im Verein - dieses Funkgerät sorgt stets für effiziente Kommunikation. Das kompakte und hochmoderne Gerät ist mit einer Vielzahl von Funktionen ausgestattet.
LieferumfangDer Lieferumfang umfasst 2 TLKR T7 Funkgeräte, zwei Gürtelclips, eine Ladeschale, Wechselstromadapter, zwei Akkustützhalterungen, zwei wieder aufladbare NiMH-Akkus und die vorliegende Anleitung. Das Gerät kann auch mit 4 AAA-Alkalibatterien betrieben werden (nicht inbegriffen).
Akku/Batterien installieren Das TLKR T7 Funkgerät wird mit dem NiMH-Akku oder mit 4 AAA-Alkalibatterien betrieben (nicht inbegriffen). Bei Verwendung von Alkalibatterien wird der Gebrauch qualitativ hochwertiger Batterien empfohlen.
NiMH-Akku anbringen:1) Stellen Sie sicher, dass das Funkgerät abgeschaltet ist (OFF).2) Entfernen Sie den Deckel des Akkufachs, indem Sie auf die Lasche unten am Fach drücken, so dass der Deckel abgenommen werden kann.3) Legen Sie die NiMH-Batterien in das Akkufach ein. Beachten Sie dabei die + und – Symbole innen im Fach. Werden die Batterien nicht korrekt ausgerichtet eingelegt, funktioniert das Funkgerät nicht.4) Bringen Sie den Deckel des Akkufachs wieder an.
Akkustandanzeige und Hinweis auf leeren Akku/leere Batterien Das Gerät ist mit einem Akkustandmesser ausgestattet, der den Status des Akkus/der Batterien am Display anzeigt. Bei niedrigem Stand blinkt das Symbol für die Akkustandanzeige
. In diesem Fall sind die Batterien sofort auszutauschen.
Funkgerät aufladenWenn Sie den wieder aufladbaren NiMH-Akku verwenden, können zwei TLKR T7 Funkgeräte direkt oder in der mitgelieferten Ladeschale aufgeladen werden. Vergewissern Sie sich, dass das Funkgerät abgeschaltet (OFF) ist, bevor Sie es in die Ladeschale geben. Bei eingeschaltetem Funkgerät kann es zu Falschanzeigen des Akkustandmessers kommen.Direktes Aufladen:1. Schließen Sie den WS-Adapterstecker an die 9V-WS-
Buchse des Funkgeräts an und verbinden Sie das andere Ende mit der Stromquelle im Fahrzeug.
2. Eine vollständige Aufladung dauert etwa 16 Stunden.
Aufladen in der Ladeschale:1. Schließen Sie den WS-Adapter an die 9V-WS-Buchse und
an eine standardgemäße Netzsteckdose an.2. Stellen Sie die Ladeschale auf eine ebene Oberfläche
(Tisch/Schreibtisch) und legen Sie das Funkgerät mit der Tastatur nach vorne weisend in die Ladeschale ein.
3. Vergewissern Sie sich, dass die LED aufleuchtet. Laden Sie den Akku 16 Stunden lang und nehmen Sie das Funkgerät danach aus der Ladeschale.
Hinweis: Die LED-Ladeanzeigen leuchten, solange das/die Funkgeräte im Ladegerät belassen werden.
6
Deutsch
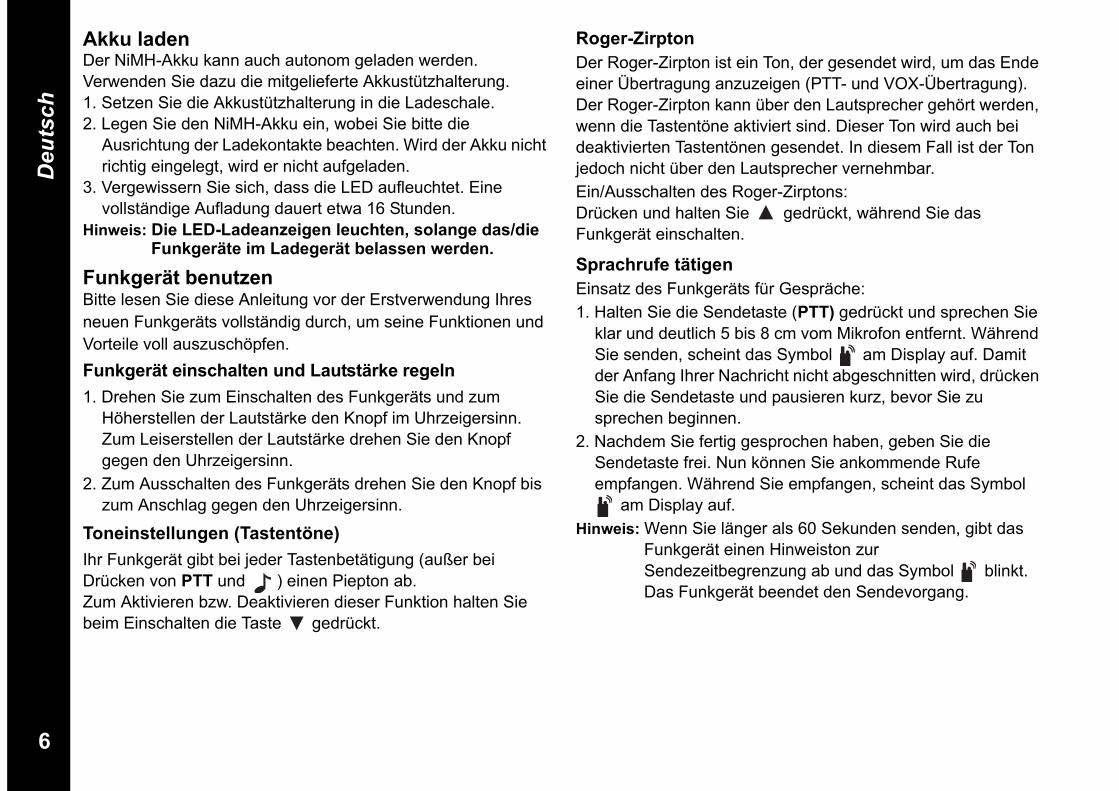
Akku ladenDer NiMH-Akku kann auch autonom geladen werden. Verwenden Sie dazu die mitgelieferte Akkustützhalterung.1. Setzen Sie die Akkustützhalterung in die Ladeschale.2. Legen Sie den NiMH-Akku ein, wobei Sie bitte die
Ausrichtung der Ladekontakte beachten. Wird der Akku nicht richtig eingelegt, wird er nicht aufgeladen.
3. Vergewissern Sie sich, dass die LED aufleuchtet. Eine vollständige Aufladung dauert etwa 16 Stunden.
Hinweis: Die LED-Ladeanzeigen leuchten, solange das/die Funkgeräte im Ladegerät belassen werden.
Funkgerät benutzenBitte lesen Sie diese Anleitung vor der Erstverwendung Ihres neuen Funkgeräts vollständig durch, um seine Funktionen und Vorteile voll auszuschöpfen.Funkgerät einschalten und Lautstärke regeln1. Drehen Sie zum Einschalten des Funkgeräts und zum
Höherstellen der Lautstärke den Knopf im Uhrzeigersinn. Zum Leiserstellen der Lautstärke drehen Sie den Knopf gegen den Uhrzeigersinn.
2. Zum Ausschalten des Funkgeräts drehen Sie den Knopf bis zum Anschlag gegen den Uhrzeigersinn.
Toneinstellungen (Tastentöne) Ihr Funkgerät gibt bei jeder Tastenbetätigung (außer bei Drücken von PTT und ) einen Piepton ab. Zum Aktivieren bzw. Deaktivieren dieser Funktion halten Sie beim Einschalten die Taste gedrückt.
Roger-ZirptonDer Roger-Zirpton ist ein Ton, der gesendet wird, um das Ende einer Übertragung anzuzeigen (PTT- und VOX-Übertragung). Der Roger-Zirpton kann über den Lautsprecher gehört werden, wenn die Tastentöne aktiviert sind. Dieser Ton wird auch bei deaktivierten Tastentönen gesendet. In diesem Fall ist der Ton jedoch nicht über den Lautsprecher vernehmbar.Ein/Ausschalten des Roger-Zirptons:Drücken und halten Sie gedrückt, während Sie das Funkgerät einschalten.
Sprachrufe tätigenEinsatz des Funkgeräts für Gespräche:1. Halten Sie die Sendetaste (PTT) gedrückt und sprechen Sie
klar und deutlich 5 bis 8 cm vom Mikrofon entfernt. Während Sie senden, scheint das Symbol am Display auf. Damit der Anfang Ihrer Nachricht nicht abgeschnitten wird, drücken Sie die Sendetaste und pausieren kurz, bevor Sie zu sprechen beginnen.
2. Nachdem Sie fertig gesprochen haben, geben Sie die Sendetaste frei. Nun können Sie ankommende Rufe empfangen. Während Sie empfangen, scheint das Symbol
am Display auf.Hinweis: Wenn Sie länger als 60 Sekunden senden, gibt das
Funkgerät einen Hinweiston zur Sendezeitbegrenzung ab und das Symbol blinkt. Das Funkgerät beendet den Sendevorgang.
7
Deutsch
Menü-NavigationFür den Zugriff auf die fortgeschrittenen Funktionen des TLKR T7 ist Ihr Funkgerät mit zwei Arten von Menüfunktionen ausgestattet: Wahlmenü und Hauptmenü.1. Wenn die Taste SEL/ gedrückt wird, wird das
Kanalwahlmenü aufgerufen. Zum Aufrufen des Hauptmenüs drücken Sie die Taste MENU/GRP.
2. Zum Verlassen der Menüfunktion gehen Sie auf eine der folgenden Arten vor:
a. Drücken Sie auf PTT.b. Warten Sie 10 Sekunden und das Gerät schaltet automatisch
wieder in den normalen Betriebsmodus zurück.
WahlmenüBei Betätigung der Taste SEL/ navigiert Ihr Funkgerät wie folgt durch das Wahlmenü:
Drücken Sie die Taste SEL/ , um jeweils zum nächsten Schritt des Menü-Modus überzugehen.
Zum Verlassen des Menüs drücken Sie die Taste MENU/GRP(in beiden Einstellungen) bzw. die Taste SEL/ (in Sub-Code-Einstellung).
Kanal wählenIhr Funkgerät verfügt über 8 Kanäle und 121 Sub-Codes, die Sie zum Sprechen mit anderen Teilnehmern einsetzen können. Ein Gespräch ist nur dann möglich, wenn beide Teilnehmer auf denselben Kanal und Sub-Code eingestellt sind.Kanal auswählen:1. Rufen Sie das Wahlmenü auf. Die Kanalanzeige blinkt. 2. Drücken Sie auf oder , um die angezeigte
Kanalnummer höher oder niedriger zu stellen. Wenn Sie oder gedrückt halten, wird die angezeigte Kanalnummer fortlaufend höher oder niedriger gestellt.
3. Gehen Sie zur Sub-Code-Einstellung und wählen Sie einen Sub-Code aus.
Sub-Code wählenDurch die Zuweisung eines Sub-Codes werden Störungen verringert. Beachten Sie jedoch bitte, dass Funkgeräte mit unterschiedlichen Sub-Codes nicht miteinander kommunizieren können. Jedem der Kanäle 1 bis 8 kann ein beliebiger Code von 0 bis 121 zugewiesen werden.1. Rufen Sie das Wahlmenü auf. Gehen Sie durch das
Wahlmenü, bis die Sub-Code-Anzeige blinkt.2. Drücken Sie auf oder , um die angezeigte Sub-Code-
Nummer höher oder niedriger zu stellen. Wenn Sie die Taste oder gedrückt halten, wird die angezeigte Sub-Code-
Nummer fortlaufend höher oder niedriger gestellt.3. Verlassen Sie das Wahlmenü durch Drücken der Taste SEL/
.
Normal Kanal Sub-Code
0-1211-8
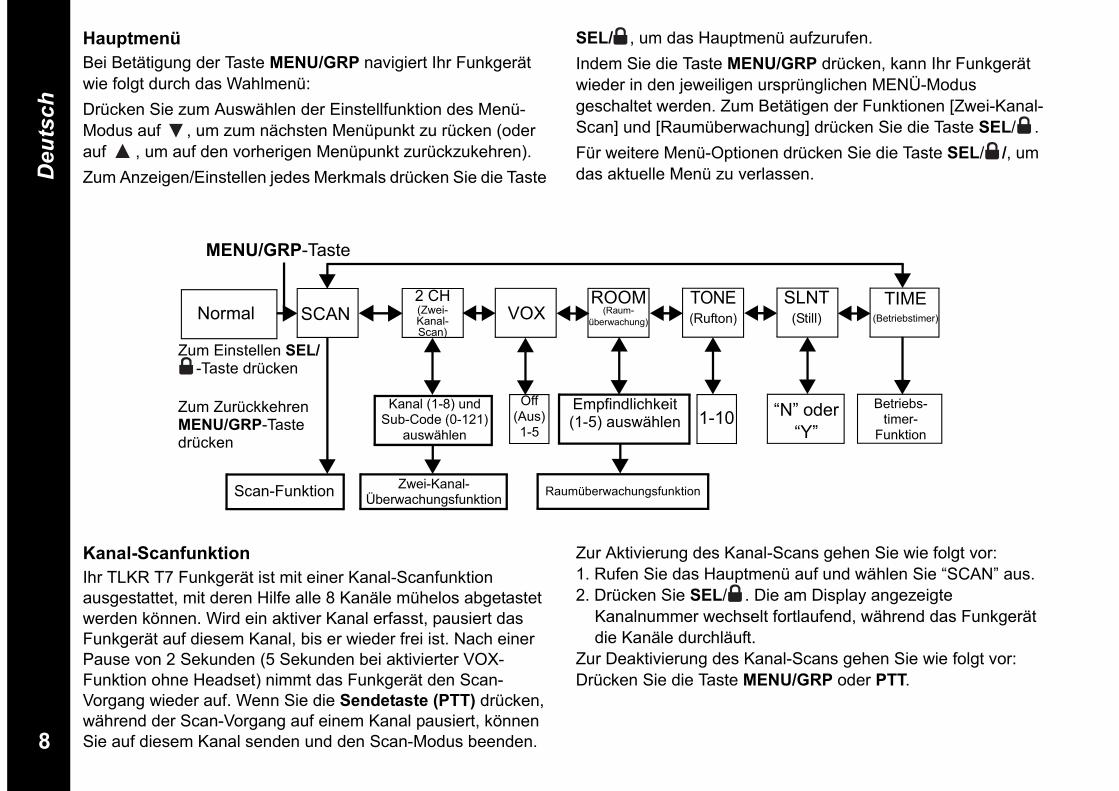
8
Deutsch
HauptmenüBei Betätigung der Taste MENU/GRP navigiert Ihr Funkgerät wie folgt durch das Wahlmenü:Drücken Sie zum Auswählen der Einstellfunktion des Menü-Modus auf , um zum nächsten Menüpunkt zu rücken (oder auf , um auf den vorherigen Menüpunkt zurückzukehren).Zum Anzeigen/Einstellen jedes Merkmals drücken Sie die Taste
SEL/ , um das Hauptmenü aufzurufen. Indem Sie die Taste MENU/GRP drücken, kann Ihr Funkgerät wieder in den jeweiligen ursprünglichen MENÜ-Modus geschaltet werden. Zum Betätigen der Funktionen [Zwei-Kanal-Scan] und [Raumüberwachung] drücken Sie die Taste SEL/ .Für weitere Menü-Optionen drücken Sie die Taste SEL/ /, um das aktuelle Menü zu verlassen.
Normal SCAN2 CH (Zwei-Kanal-Scan)
VOXROOM
(Raum-überwachung)
TONE (Rufton)
SLNT(Still)
TIME(Betriebstimer)
Kanal (1-8) und Sub-Code (0-121)
auswählen
Betriebs-timer-
Funktion
Empfindlichkeit (1-5) auswählen
Off(Aus) 1-5
1-10 “N” oder “Y”
Scan-Funktion Zwei-Kanal-Überwachungsfunktion Raumüberwachungsfunktion
MENU/GRP-Taste
Zum Einstellen SEL/-Taste drücken
Zum ZurückkehrenMENU/GRP-Taste drücken
Kanal-ScanfunktionIhr TLKR T7 Funkgerät ist mit einer Kanal-Scanfunktion ausgestattet, mit deren Hilfe alle 8 Kanäle mühelos abgetastet werden können. Wird ein aktiver Kanal erfasst, pausiert das Funkgerät auf diesem Kanal, bis er wieder frei ist. Nach einer Pause von 2 Sekunden (5 Sekunden bei aktivierter VOX-Funktion ohne Headset) nimmt das Funkgerät den Scan-Vorgang wieder auf. Wenn Sie die Sendetaste (PTT) drücken, während der Scan-Vorgang auf einem Kanal pausiert, können Sie auf diesem Kanal senden und den Scan-Modus beenden.
Zur Aktivierung des Kanal-Scans gehen Sie wie folgt vor:1. Rufen Sie das Hauptmenü auf und wählen Sie “SCAN” aus. 2. Drücken Sie SEL/ . Die am Display angezeigte
Kanalnummer wechselt fortlaufend, während das Funkgerät die Kanäle durchläuft.
Zur Deaktivierung des Kanal-Scans gehen Sie wie folgt vor:Drücken Sie die Taste MENU/GRP oder PTT.
9
Deutsch
Zwei-Kanal-ScanDas Funkgerät kann abwechselnd den aktuellen Kanal und einen anderen Kanal abtasten. Dazu müssen Sie die Kanalnummer und den Sub-Code für den gewünschten Kanal eingeben.Zum Einstellen eines zweiten Kanals und Starten des Zwei-Kanal-Scans gehen Sie wie folgt vor:1. Rufen Sie das Hauptmenü auf und wählen Sie “2CH” aus.
Drücken Sie dann die Taste SEL/ , um die Zwei-Kanal-Scan-Funktion einzustellen. Das Zwei-Kanal-Scan-Symbol erscheint.
2. Drücken Sie auf oder , um die Nummer des Kanals zu wählen und dann auf SEL/ .
3. Drücken Sie auf oder , um die Sub-Code-Nummer zu wählen, und dann auf SEL/ .
4. Das Funkgerät startet den Zwei-Kanal-Scan.Hinweis: Wenn Sie für den zweiten Kanal dieselbe
Kanalnummer und denselben Sub-Code wie für den aktuellen Kanal einstellen, funktioniert der Zwei-Kanal-Scan nicht.
Zum Ausschalten des Zwei-Kanal-Scans:Drücken Sie MENU/GRP.
Sprachgesteuertes SendenIhr TLKR T7 Funkgerät ist mit vom Benutzer wählbarem, sprachgesteuertem Senden (VOX) ausgestattet, das zur automatischen Sprachübertragung eingesetzt werden kann. Durch Einsatz der VOX-Funktion kann das Funkgerät im Freisprechbetrieb verwendet werden. Dabei wird Senden aktiviert, indem Sie in das Mikrofon des Funkgeräts oder Headsets (Headset nicht inbegriffen) sprechen, anstatt die Sendetaste (PTT) zu drücken.
Wahl des VOX-Pegels:1. Rufen Sie das Hauptmenü auf und wählen Sie “VOX” aus.
Drücken Sie dann auf SEL/ . Der aktuell eingestellte Pegel (OFF (AUS), 1-5) blinkt. Bei Pegel “N”(AUS) ist VOX deaktiviert, während Pegel 1 – 5 die Empfindlichkeit der VOX-Schaltung bestimmen.
2. Drücken Sie oder um den gewünschten Empfindlichkeitspegel für VOX zu wählen. Pegel 1 eignet sich für stille Betriebsumfelder, während Pegel 5 in sehr lärmintensiven Umfeldern verwendet wird. Sprechen Sie in das Mikrofon, um den geeigneten Empfindlichkeitspegel festzustellen. Wenn das VOX-Symbol blinkt, wird Ihre Stimme akzeptiert.
3. Verlassen Sie das Hauptmenü.Hinweis: Wenn Sie länger als 60 Sekunden mit aktivierter VOX-
Funktion senden, gibt das Funkgerät einen Hinweiston zur Sendezeitbegrenzung ab und das Symbol blinkt.
RaumüberwachungsfunktionSie können eines Ihrer TLKR T7 Funkgeräte zur Raumüberwachung einsetzen und am anderen Funkgerät abhören, was in einem anderen Raum gesprochen wird. Ist diese Funktion eingestellt, erfasst das Funkgerät (je nach eingestelltem Empfindlichkeitspegel) umliegende Stimmen/Geräusche und sendet zurück zum zuhörenden Funkgerät, ohne dass die Sendetaste (PTT) gedrückt werden muss. Das überwachende Funkgerät kann in diesem Betriebsmodus keine Übertragungen empfangen.Aktivierung der Raumüberwachungsfunktion:1. Rufen Sie das Hauptmenü auf und wählen Sie “ROOM” aus.
Drücken Sie dann auf SEL/ .2. Drücken Sie oder , um den gewünschten
Empfindlichkeitspegel für die Raumüberwachung zu wählen.
10
Deutsch
Pegel 1 eignet sich für stille Betriebsumfelder, während Pegel 5 in sehr lärmintensiven Umfeldern verwendet wird.
3. Drücken Sie dann SEL/ , um die Raumüberwachungsfunktion zu aktivieren.
Deaktivierung der Raumüberwachungsfunktion:Drücken Sie MENU/GRP.Hinweis:- Wenn Sie im Raumüberwachungsmodus die Sendetaste
drücken, gibt das Funkgerät einen Sendetaste-Fehlerton ab.- Erfasst das überwachende Funkgerät länger als 60 Sekunden
Sprache/Geräusche, unterbricht es die Überwachung 5 Sekunden lang und nimmt sie dann wieder auf.
Rufton sendenIhr TLKR T7 Funkgerät ist mit 10 auswhlbaren Ruftnen ausgestattet. Der gewhlte Rufton erklingt, wenn im Normal-Modus gedrckt wird.Zum Auswählen eines Ruftons verfahren Sie wie folgt:1. Rufen Sie das Hauptmenü auf und wählen Sie “TONE”.
Drücken Sie dann auf SEL/ .Die Nummer des aktuellen Ruftons (1-10) wird angezeigt und blinkt.
2. Drücken Sie auf oder , um die angezeigte Ruftonnummer auszuwählen. Jeder Ton wird zur Hörprobe durch den Lautsprecher abgegeben.
3. Verlassen Sie das Hauptmenü.Zum Senden des gewählten Ruftons drücken Sie im Normal-Modus auf . Der gewählte Ton wird automatisch eine bestimmte Zeit lang gesendet. Der Rufton wird abgebrochen, sobald die Sendetaste gedrückt wird.
Still-ModusWenn Sie Ihr Funkgerät auf Still schalten, werden alle ankommenden Rufe stummgeschaltet. Die Hintergrundbeleuchtung des Funkgeräts blinkt, um Sie auf einen ankommenden Ruf hinzuweisen. Wenn Sie den Ruf nicht beantworten, wird die Hintergrundbeleuchtung ausgeschaltet und das RUF-Symbol blinkt, bis kein Signal mehr vorliegt.Das TLKR T7 vibriert außerdem, um Sie auf den verpassten Ruf hinzuweisen.Die Stummschaltung wird beim Senden, beim Empfangen und beim Drücken einer anderen Taste 15 Sekunden lang deaktiviert.Zum Einstellen der Stummschaltung:1. Rufen Sie das Hauptmenü auf und wählen Sie “SLNT” aus.
Drücken Sie dann auf SEL/ .2. Drücken Sie auf , um die Stummschaltung einzuschalten.
Die Kanalanzeige zeigt „Y” an und das STUMMSCHALTUNGS-Symbol erscheint.
3. Drücken Sie auf , um die Stummschaltung auszuschalten. Die Kanalanzeige zeigt dann „N” an und das STUMMSCHALTUNGS-Symbol wird nicht mehr angezeigt.
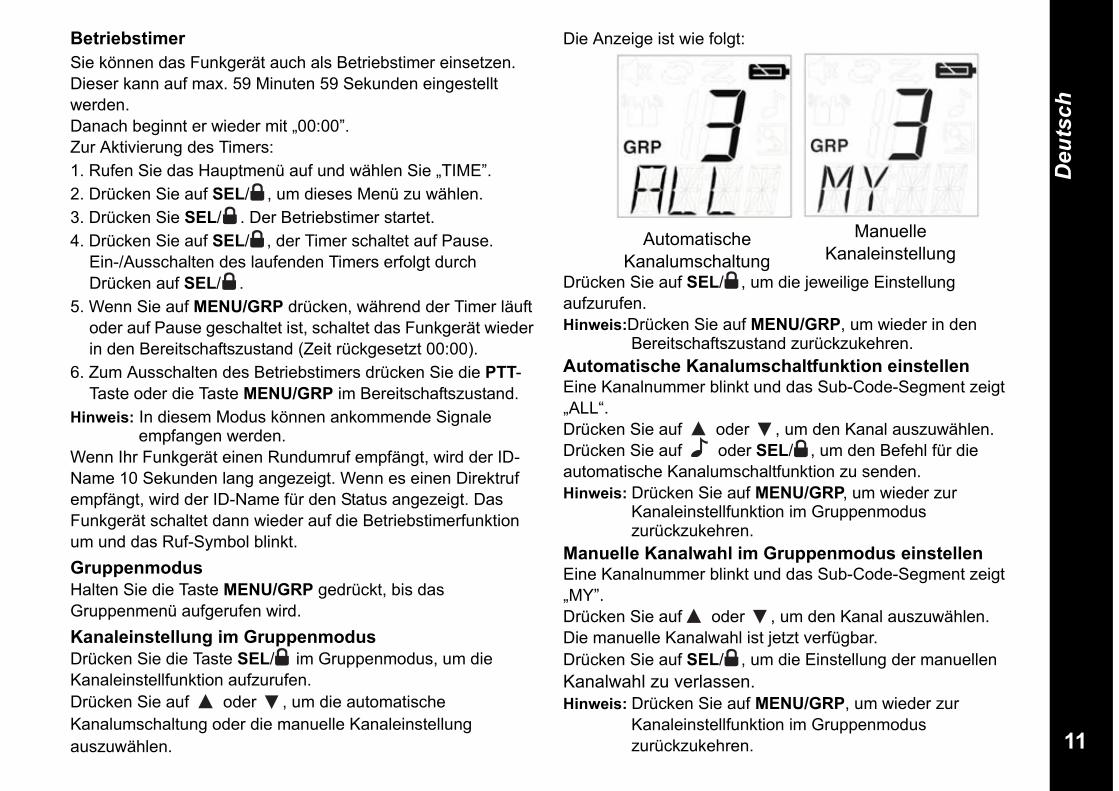
11
Deutsch
Betriebstimer Sie können das Funkgerät auch als Betriebstimer einsetzen. Dieser kann auf max. 59 Minuten 59 Sekunden eingestellt werden.Danach beginnt er wieder mit „00:00”.Zur Aktivierung des Timers:1. Rufen Sie das Hauptmenü auf und wählen Sie „TIME”.2. Drücken Sie auf SEL/ , um dieses Menü zu wählen.3. Drücken Sie SEL/ . Der Betriebstimer startet.4. Drücken Sie auf SEL/ , der Timer schaltet auf Pause.
Ein-/Ausschalten des laufenden Timers erfolgt durch Drücken auf SEL/ .
5. Wenn Sie auf MENU/GRP drücken, während der Timer läuft oder auf Pause geschaltet ist, schaltet das Funkgerät wieder in den Bereitschaftszustand (Zeit rückgesetzt 00:00).
6. Zum Ausschalten des Betriebstimers drücken Sie die PTT-Taste oder die Taste MENU/GRP im Bereitschaftszustand.
Hinweis: In diesem Modus können ankommende Signale empfangen werden.
Wenn Ihr Funkgerät einen Rundumruf empfängt, wird der ID-Name 10 Sekunden lang angezeigt. Wenn es einen Direktruf empfängt, wird der ID-Name für den Status angezeigt. Das Funkgerät schaltet dann wieder auf die Betriebstimerfunktion um und das Ruf-Symbol blinkt.GruppenmodusHalten Sie die Taste MENU/GRP gedrückt, bis das Gruppenmenü aufgerufen wird.Kanaleinstellung im GruppenmodusDrücken Sie die Taste SEL/ im Gruppenmodus, um die Kanaleinstellfunktion aufzurufen. Drücken Sie auf oder , um die automatische Kanalumschaltung oder die manuelle Kanaleinstellungauszuwählen.
Die Anzeige ist wie folgt:
Drücken Sie auf SEL/ , um die jeweilige Einstellung aufzurufen.Hinweis:Drücken Sie auf MENU/GRP, um wieder in den
Bereitschaftszustand zurückzukehren.Automatische Kanalumschaltfunktion einstellenEine Kanalnummer blinkt und das Sub-Code-Segment zeigt „ALL“. Drücken Sie auf oder , um den Kanal auszuwählen.Drücken Sie auf oder SEL/ , um den Befehl für die automatische Kanalumschaltfunktion zu senden.Hinweis: Drücken Sie auf MENU/GRP, um wieder zur
Kanaleinstellfunktion im Gruppenmodus zurückzukehren.
Manuelle Kanalwahl im Gruppenmodus einstellenEine Kanalnummer blinkt und das Sub-Code-Segment zeigt „MY”.Drücken Sie auf oder , um den Kanal auszuwählen.Die manuelle Kanalwahl ist jetzt verfügbar.Drücken Sie auf SEL/ , um die Einstellung der manuellenKanalwahl zu verlassen.Hinweis: Drücken Sie auf MENU/GRP, um wieder zur
Kanaleinstellfunktion im Gruppenmodus zurückzukehren.
Automatische Kanalumschaltung
ManuelleKanaleinstellung
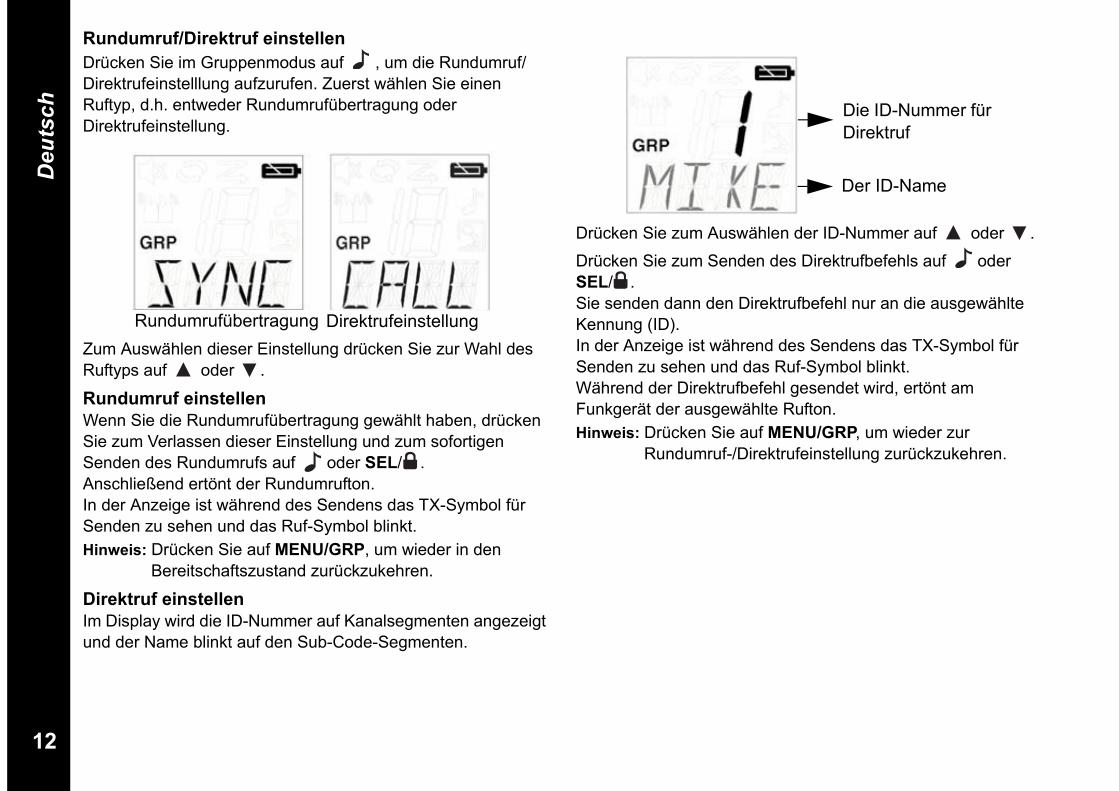
12
Deutsch
Rundumruf/Direktruf einstellen Drücken Sie im Gruppenmodus auf , um die Rundumruf/Direktrufeinstelllung aufzurufen. Zuerst wählen Sie einen Ruftyp, d.h. entweder Rundumrufübertragung oder Direktrufeinstellung.
Zum Auswählen dieser Einstellung drücken Sie zur Wahl des Ruftyps auf oder .
Rundumruf einstellenWenn Sie die Rundumrufübertragung gewählt haben, drücken Sie zum Verlassen dieser Einstellung und zum sofortigen Senden des Rundumrufs auf oder SEL/ .Anschließend ertönt der Rundumrufton.In der Anzeige ist während des Sendens das TX-Symbol für Senden zu sehen und das Ruf-Symbol blinkt.Hinweis: Drücken Sie auf MENU/GRP, um wieder in den
Bereitschaftszustand zurückzukehren.
Direktruf einstellenIm Display wird die ID-Nummer auf Kanalsegmenten angezeigt und der Name blinkt auf den Sub-Code-Segmenten.
Drücken Sie zum Auswählen der ID-Nummer auf oder .
Drücken Sie zum Senden des Direktrufbefehls auf oder SEL/ .Sie senden dann den Direktrufbefehl nur an die ausgewählte Kennung (ID).In der Anzeige ist während des Sendens das TX-Symbol für Senden zu sehen und das Ruf-Symbol blinkt.Während der Direktrufbefehl gesendet wird, ertönt am Funkgerät der ausgewählte Rufton.Hinweis: Drücken Sie auf MENU/GRP, um wieder zur
Rundumruf-/Direktrufeinstellung zurückzukehren.
Rundumrufübertragung Direktrufeinstellung
Die ID-Nummer für Direktruf
Der ID-Name

13
Deutsch
GruppenmenüZum Aufrufen des GRUPPENMENÜS halten Sie die Taste MENU/GRP gedrückt, bis es angezeigt wird.
Drücken Sie auf (oder ) , um jeweils zum nächsten Menü (GRP/CODE/RING/ID) zu rücken.
Drücken Sie auf SEL/ , um das jeweilige Gruppenmenü auszuwählen.
Siehe LCD-Anzeige:Drücken Sie zum Ändern des jeweiligen Zustands bzw. der jeweiligen Nummer auf (oder ). Drücken Sie auf SEL/ , um ihn/sie auszuwählen.
Zum Verlassen des Menüs und zum Zurückkehren zum Menü-Bereitschaftsmodus drücken Sie die Taste MENU/GRP.Hinweis: Im Gruppenmodus können Sie keine Übertragungen von anderen Funkgeräten empfangen, wenn diese nicht auch auf
den gleichen Kanal und den gleichen Gruppencode eingestellt sind.
Normal “GRP”(Gruppenmodus)
“CODE”(Gruppencode)
“ID” (ID-Einstellung)
ID-Nummer 1 - 16
0 - 121 1 - 10
VERLASSEN
ID-Name bis zu 4 Zeichen
“N” oder “Y”
“N”“Y”
VERLASSEN des Menüs
“RING”(Klingelton)
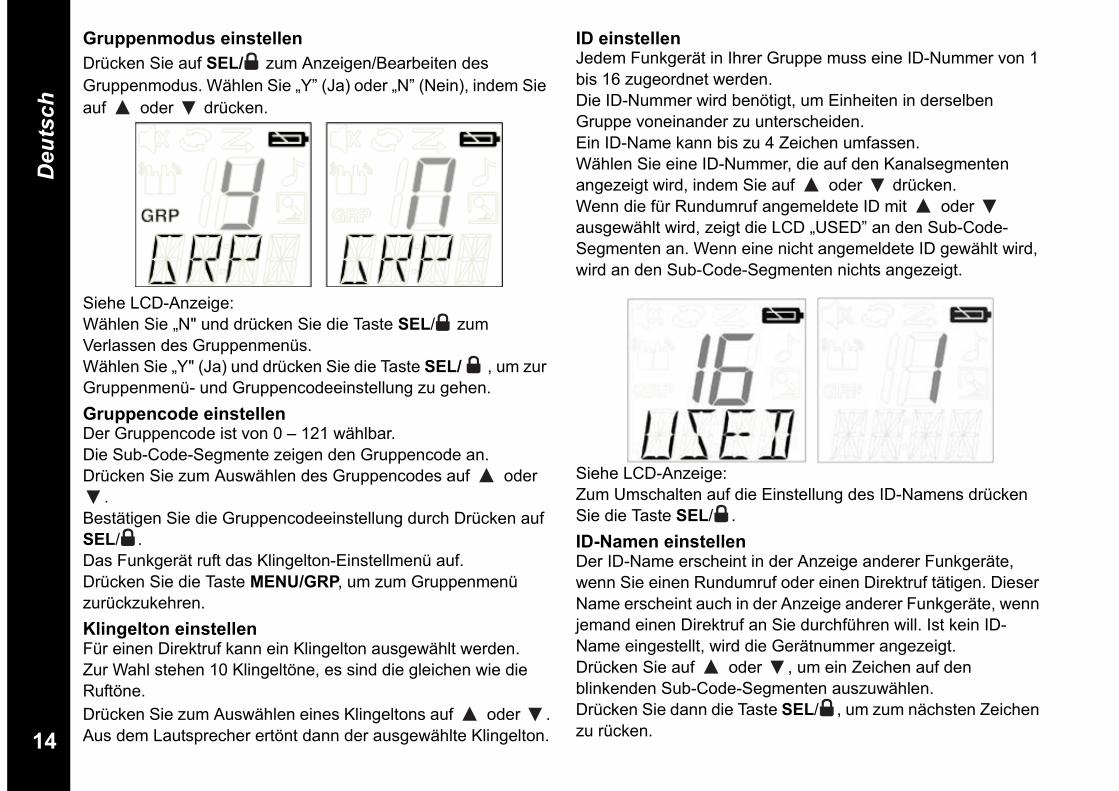
14
Deutsch
Gruppenmodus einstellenDrücken Sie auf SEL/ zum Anzeigen/Bearbeiten des Gruppenmodus. Wählen Sie „Y” (Ja) oder „N” (Nein), indem Sie auf oder drücken.
Siehe LCD-Anzeige:Wählen Sie „N" und drücken Sie die Taste SEL/ zum Verlassen des Gruppenmenüs.Wählen Sie „Y" (Ja) und drücken Sie die Taste SEL/ , um zur Gruppenmenü- und Gruppencodeeinstellung zu gehen.Gruppencode einstellen Der Gruppencode ist von 0 – 121 wählbar.Die Sub-Code-Segmente zeigen den Gruppencode an.Drücken Sie zum Auswählen des Gruppencodes auf oder
.Bestätigen Sie die Gruppencodeeinstellung durch Drücken auf SEL/ . Das Funkgerät ruft das Klingelton-Einstellmenü auf.Drücken Sie die Taste MENU/GRP, um zum Gruppenmenü zurückzukehren.Klingelton einstellen Für einen Direktruf kann ein Klingelton ausgewählt werden.Zur Wahl stehen 10 Klingeltöne, es sind die gleichen wie die Ruftöne.Drücken Sie zum Auswählen eines Klingeltons auf oder .Aus dem Lautsprecher ertönt dann der ausgewählte Klingelton.
ID einstellenJedem Funkgerät in Ihrer Gruppe muss eine ID-Nummer von 1 bis 16 zugeordnet werden.Die ID-Nummer wird benötigt, um Einheiten in derselben Gruppe voneinander zu unterscheiden.Ein ID-Name kann bis zu 4 Zeichen umfassen. Wählen Sie eine ID-Nummer, die auf den Kanalsegmenten angezeigt wird, indem Sie auf oder drücken. Wenn die für Rundumruf angemeldete ID mit oder ausgewählt wird, zeigt die LCD „USED” an den Sub-Code-Segmenten an. Wenn eine nicht angemeldete ID gewählt wird, wird an den Sub-Code-Segmenten nichts angezeigt.
Siehe LCD-Anzeige:Zum Umschalten auf die Einstellung des ID-Namens drücken Sie die Taste SEL/ .ID-Namen einstellenDer ID-Name erscheint in der Anzeige anderer Funkgeräte, wenn Sie einen Rundumruf oder einen Direktruf tätigen. Dieser Name erscheint auch in der Anzeige anderer Funkgeräte, wenn jemand einen Direktruf an Sie durchführen will. Ist kein ID-Name eingestellt, wird die Gerätnummer angezeigt.Drücken Sie auf oder , um ein Zeichen auf den blinkenden Sub-Code-Segmenten auszuwählen.Drücken Sie dann die Taste SEL/ , um zum nächsten Zeichen zu rücken.
15
Deutsch
Für den ID-Namen können bis zu vier Zeichen ausgewählt werden.Drücken Sie anschließend auf SEL/ , um die ID-Nummer und den ID-Namen anzumelden.Das Funkgerät verlässt die ID-Einstellfunktion.Hinweis: Wenn Sie die Taste MENU/GRP drücken, löscht das
Funkgerät die ausgewählte ID-Nummer und den eingegebenen ID-Namen und verlässt dann das Gruppenmenü.
TastatursperreZum Sperren der Tastatur:Halten Sie die Taste SEL/ zwei Sekunden lang gedrückt. An den Sub-Code-Segmenten wird zwei Sekunden lang „LOCK“ angezeigt, dann erscheint wieder die vorhergehende Anzeige.Zum Entsperren der Tastatur:Halten Sie die Taste SEL/ zwei Sekunden lang gedrückt. An den Sub-Code-Segmenten wird zwei Sekunden lang „UNLK“ angezeigt, dann erscheint wieder die vorhergehende Anzeige.Hinweis: Wenn bei aktivierter Tastensperre eine Taste (außer
Sendetaste PTT) gedrückt wird, erscheint „LOCK” zwei Sekunden lang in der Anzeige und das Funkgerät gibt einen Fehlerton ab.
Automat. SparfunktionIhr Funkgerät ist mit einer Sonderschaltung ausgestattet, mit der sich die Lebensdauer des Akkus/der Batterien bedeutend verlängern lässt. Erfolgt innerhalb von 3 Sekunden keine Übertragung oder kommt kein Ruf an, schaltet das Funkgerät auf Sparmodus. Das Funkgerät kann in diesem Betriebsmodus weiterhin Übertragungen empfangen.Akku-leer-Warnung Die Akku-leer-Warnung wird bei niedriger Batterieladung aktiviert. Die Warnung beginnt 30 Sekunden, nachdem das Akku-leer-Symbol zu blinken beginnt.
Die Sub-Code-Segmente zeigen „BATT” an und das Akku-leer-Symbol blinkt.Der Hinweiston ertönt alle 5 Sekunden für jeweils 30 Sekunden, wenn die Batterieladung niedrig ist.LCD-HintergrundbeleuchtungDie LCD-Hintergrundbeleuchtung wird automatisch eingeschaltet, sobald eine beliebige Taste (außer PTT)gedrückt wird. Das LCD-Display bleibt 10 Sekunden nach der letzten Tastenbetätigung eingeschaltet.Monitor-ModusfunktionMit Ihrem TLKR T7 können Sie per Tastendruck auf MON den aktuellen Kanal auf schwache Signale abhören.Zur Aktivierung des Monitor-Modus gehen Sie wie folgt vor:- Wenn Sie nur kurz hinhören möchten, drücken Sie auf MON.Das Symbol RX blinkt weiterhin.- Wenn Sie dauernd hinhören möchten, halten Sie die MON-Taste 1,5 Sekunden lang gedrückt. Das RX-Symbol (Empfang) blinkt weiter.Zur Deaktivierung des Monitor-Modus gehen Sie wie folgt vor:- Drücken Sie MON, MENU/GRP, oder SEL/ um in den normalen Betriebsmodus zu wechseln, und das RX-Symbol (Empfang) blinkt nicht mehr.
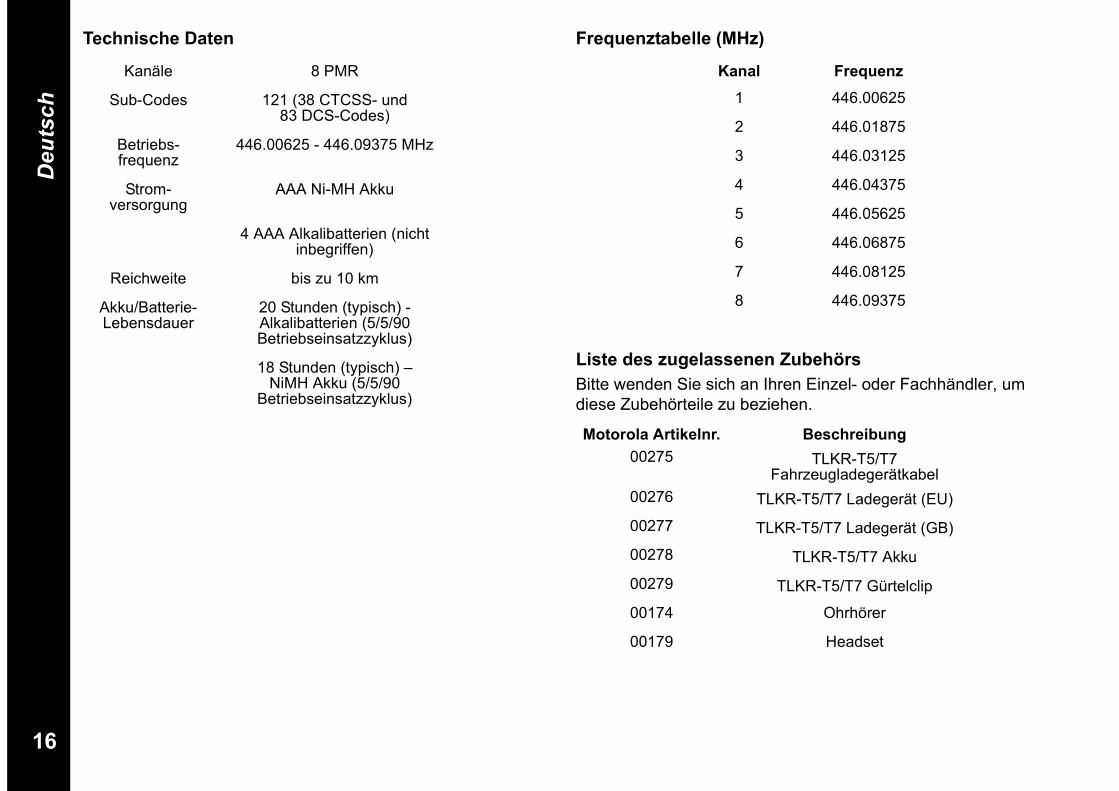
16
Deutsch
Technische Daten Frequenztabelle (MHz)
Liste des zugelassenen ZubehörsBitte wenden Sie sich an Ihren Einzel- oder Fachhändler, um diese Zubehörteile zu beziehen.
Kanäle 8 PMR
Sub-Codes 121 (38 CTCSS- und 83 DCS-Codes)
Betriebs-frequenz
446.00625 - 446.09375 MHz
Strom-versorgung
AAA Ni-MH Akku
4 AAA Alkalibatterien (nicht inbegriffen)
Reichweite bis zu 10 km
Akku/Batterie-Lebensdauer
20 Stunden (typisch) - Alkalibatterien (5/5/90 Betriebseinsatzzyklus)
18 Stunden (typisch) – NiMH Akku (5/5/90
Betriebseinsatzzyklus)
Kanal Frequenz1 446.00625
2 446.01875
3 446.03125
4 446.04375
5 446.05625
6 446.06875
7 446.08125
8 446.09375
Motorola Artikelnr. Beschreibung00275 TLKR-T5/T7
Fahrzeugladegerätkabel00276 TLKR-T5/T7 Ladegerät (EU)
00277 TLKR-T5/T7 Ladegerät (GB)
00278 TLKR-T5/T7 Akku
00279 TLKR-T5/T7 Gürtelclip
00174 Ohrhörer
00179 Headset
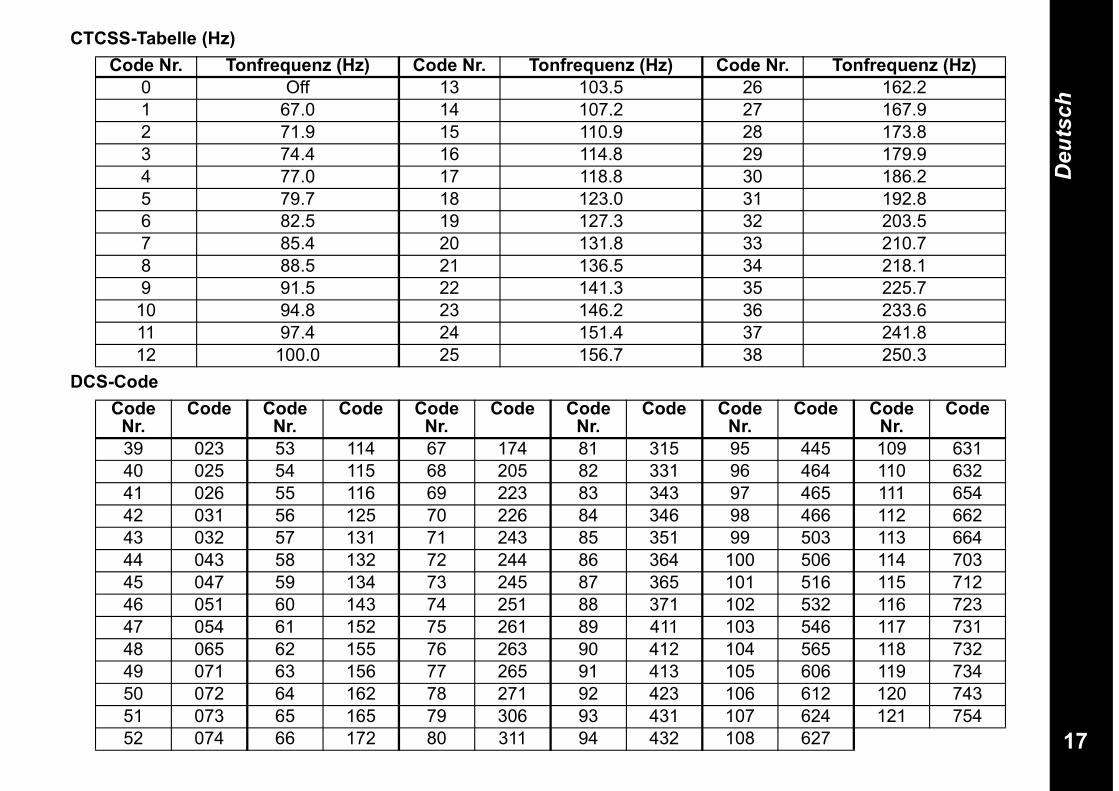
17
Deutsch
CTCSS-Tabelle (Hz)
DCS-Code
Code Nr. Tonfrequenz (Hz) Code Nr. Tonfrequenz (Hz) Code Nr. Tonfrequenz (Hz)0 Off 13 103.5 26 162.21 67.0 14 107.2 27 167.92 71.9 15 110.9 28 173.83 74.4 16 114.8 29 179.94 77.0 17 118.8 30 186.25 79.7 18 123.0 31 192.86 82.5 19 127.3 32 203.57 85.4 20 131.8 33 210.78 88.5 21 136.5 34 218.19 91.5 22 141.3 35 225.7
10 94.8 23 146.2 36 233.611 97.4 24 151.4 37 241.812 100.0 25 156.7 38 250.3
Code Nr.
Code Code Nr.
Code Code Nr.
Code Code Nr.
Code Code Nr.
Code Code Nr.
Code
39 023 53 114 67 174 81 315 95 445 109 63140 025 54 115 68 205 82 331 96 464 110 63241 026 55 116 69 223 83 343 97 465 111 65442 031 56 125 70 226 84 346 98 466 112 66243 032 57 131 71 243 85 351 99 503 113 66444 043 58 132 72 244 86 364 100 506 114 70345 047 59 134 73 245 87 365 101 516 115 71246 051 60 143 74 251 88 371 102 532 116 72347 054 61 152 75 261 89 411 103 546 117 73148 065 62 155 76 263 90 412 104 565 118 73249 071 63 156 77 265 91 413 105 606 119 73450 072 64 162 78 271 92 423 106 612 120 74351 073 65 165 79 306 93 431 107 624 121 75452 074 66 172 80 311 94 432 108 627
18
Deutsch
GarantieinformationenDer autorisierte Motorola Händler oder Vertriebsfirmar, bei dem Sie Ihr Motorola Sprechfunkgerät und/oder das Originalzubehör gekauft haben nimmt Garantieansprüche entgegen und/oder bietet die entsprechenden Garantieleistungen.Bringen Sie bitte Ihr Sprechfunkgerät zu Ihrem Händler oder Vertriebsfirma, um Ihre Garantieleistungen in Anspruch zu nehmen. Bringen Sie das Sprechfunkgerät nicht zu Motorola.Damit Sie die Garantieleistungen in Anspruch nehmen können, müssen Sie den Kaufbeleg oder einen vergleichbaren Kaufnachweis vorlegen, aus dem das Kaufdatum hervorgeht. Auf dem Sprechfunkgerät muss außerdem die Seriennummer deutlich erkennbar sein. Die Garantieansprüche werden hinfällig, wenn die Typen oder Seriennummern auf dem Produkt geändert, entfernt oder ungültig gemacht wurden.
GarantieausschlussDefekte oder Schäden, die sich aus unsachgemäßer oder unüblicher Handhabung oder Nichtbefolgung der in diesem Handbuch vorgegebenen Anweisungen ergeben.Defekte oder Schäden, die auf Missbrauch, Unfall oder Versäumnis zurückzuführen sind.Defekte oder Schäden, die auf nicht ordnungsgemäßes Testen, Betreiben, Warten, Einstellen oder auf irgendwelche Änderungen und Modifikationen zurückzuführen sind.Bruch oder Beschädigung der Antennen, sofern dies nicht direkt auf Material- oder Verarbeitungsfehler zurückzuführen ist.Produkte, die so zerlegt oder repariert worden sind, dass sie den Betrieb des Produkts oder eine angemessene Untersuchung und Prüfung zur Feststellung des Garantieanspruches unmöglich machen.Defekte oder Schäden aufgrund der Reichweite.Defekte oder Schäden aufgrund von Feuchtigkeitseinwirkungen und Eindringen von Flüssigkeiten.
Alle Kunststoffoberflächen und alle anderen freiliegenden Teile, die durch normale Nutzung zerkratzt oder beschädigt sind.Produkte, die über einen beschränkten Zeitraum gemietet sind.Regelmäßige Wartung und Reparatur oder Auswechseln von Teilen aufgrund normaler Nutzung, Verschleißerscheinungen und Abnutzung.
CopyrightinformationenDie in diesem Handbuch beschriebenen Produkte von Motorola enthalten eventuell urheberrechtlich geschützte, in Halbleiterspeichern oder anderen Medien gespeicherte Programme. In den Vereinigten Staaten und anderen Ländern verfügt Motorola über gewisse gesetzliche Rechte bezüglich urheberrechtlich geschützter Computerprogramme, einschließlich dem exklusiven Recht, die urheberrechtlich geschützten Motorola-Programme zu kopieren oder zu vervielfältigen.Dementsprechend ist es untersagt, urheberrechtlich geschützte Motorola-Computerprogramme, die in den in diesem Handbuch beschriebenen Produkten enthalten sind, auf irgendeine Weise zu kopieren oder zu vervielfältigen, soweit nicht ausdrücklich schriftlich zugestanden. Darüber hinaus stellt der Kauf dieses. Motorola-Produkts nicht eine im Rahmen von Motorolas Urheberrechts oder Motorolas Patente oder Patentanmeldungen gewährte Lizenz dar, sei diese ausdrücklich oder stillschweigend, durch Verwirkung oder anderweitig, außer der normalen, nichtexklusiven, gesetzlich durch den Verkauf eines Produkts entstehenden gebührenfreien Lizenz für den Gebrauch.MOTOROLA, das M Logo und alle anderen Markenzeichen sind geschützte Warenzeichen der Firma Motorola, Inc. ® Reg. U.S. Pat. & Tm. Off.
© Motorola, Inc. 2008
1
Español
CONTENDIDOSSeguridad del producto y exposición a la radiofrecuencia (RF) de los transceptores bidireccionales portátiles . . . . . . . . . . . 2Características . . . . . . . . . . . . . . . . . . . . . . . . . . . . . . . . . . . . 2Control y funciones . . . . . . . . . . . . . . . . . . . . . . . . . . . . . . . . 3Pantalla . . . . . . . . . . . . . . . . . . . . . . . . . . . . . . . . . . . . . . . . . 4Contenido del paquete. . . . . . . . . . . . . . . . . . . . . . . . . . . . . . 5Instalación de la batería. . . . . . . . . . . . . . . . . . . . . . . . . . . . . 5Nivel de la batería y alerta de batería baja . . . . . . . . . . . . . . 5Carga del transceptor . . . . . . . . . . . . . . . . . . . . . . . . . . . . . . 5Carga directa . . . . . . . . . . . . . . . . . . . . . . . . . . . . . . . . . . . . 5Carga mediante el soporte . . . . . . . . . . . . . . . . . . . . . . . . . . 5Carga de la batería . . . . . . . . . . . . . . . . . . . . . . . . . . . . . . . . 6Uso del transceptor . . . . . . . . . . . . . . . . . . . . . . . . . . . . . . . . 6Encendido del transceptor y ajuste del volumen . . . . . . . . . 6Ajuste del sonido (pitidos de las teclas) . . . . . . . . . . . . . . . . 6Pitido de mensaje recibido. . . . . . . . . . . . . . . . . . . . . . . . . . . 6Habla por el transceptor . . . . . . . . . . . . . . . . . . . . . . . . . . . . 6Navegación por el menú . . . . . . . . . . . . . . . . . . . . . . . . . . . . 7Menú de selección . . . . . . . . . . . . . . . . . . . . . . . . . . . . . . . . 7Selección del canal . . . . . . . . . . . . . . . . . . . . . . . . . . . . . . . . 7Selección de un subcódigo . . . . . . . . . . . . . . . . . . . . . . . . . . 7Menú normal . . . . . . . . . . . . . . . . . . . . . . . . . . . . . . . . . . . . . 8Función de exploración de canales . . . . . . . . . . . . . . . . . . . 8Modo de doble escucha . . . . . . . . . . . . . . . . . . . . . . . . . . . . 9Transmisión por voz . . . . . . . . . . . . . . . . . . . . . . . . . . . . . . . 9Función de supervisión de salas . . . . . . . . . . . . . . . . . . . . . . 9Transmisión de un tono de llamada . . . . . . . . . . . . . . . . . . 10Modo de silencio . . . . . . . . . . . . . . . . . . . . . . . . . . . . . . . . . 10Temporizador . . . . . . . . . . . . . . . . . . . . . . . . . . . . . . . . . . . 11Modo de grupo . . . . . . . . . . . . . . . . . . . . . . . . . . . . . . . . . . 11Configuración de canal en el modo de grupo . . . . . . . . . . . 11Configuración del cambio automático de canal . . . . . . . . . 11Configuración de canal manual en el modo de grupo . . . . 12Configuración de llamada directa y llamada a todos . . . . . 12Configuración de llamada a todos . . . . . . . . . . . . . . . . . . . 12
Configuración de llamada directa . . . . . . . . . . . . . . . . . . . . .12Menú de grupo . . . . . . . . . . . . . . . . . . . . . . . . . . . . . . . . . . .13Configuración de modo de grupo . . . . . . . . . . . . . . . . . . . . .14Configuración de código de grupo . . . . . . . . . . . . . . . . . . . .14Configuración de tono de llamada . . . . . . . . . . . . . . . . . . . .14Configuración de ID . . . . . . . . . . . . . . . . . . . . . . . . . . . . . . .14Configuración del nombre de ID . . . . . . . . . . . . . . . . . . . . . .14Bloqueo del teclado . . . . . . . . . . . . . . . . . . . . . . . . . . . . . . .15Función de ahorro automático de energía . . . . . . . . . . . . . .15Alerta de batería baja . . . . . . . . . . . . . . . . . . . . . . . . . . . . .15Iluminación de fondo de la pantalla LCD . . . . . . . . . . . . . . .15Función de modo de supervisión. . . . . . . . . . . . . . . . . . . . . .15Especificaciones . . . . . . . . . . . . . . . . . . . . . . . . . . . . . . . . . .16Tabla de frecuencias (MHz) . . . . . . . . . . . . . . . . . . . . . . . . .16Lista de accesorios aprobados . . . . . . . . . . . . . . . . . . . . . . .16Tabla de CTCSS (Hz) . . . . . . . . . . . . . . . . . . . . . . . . . . . . . .17Código DCS . . . . . . . . . . . . . . . . . . . . . . . . . . . . . . . . . . . . .17Información Sobre la Garantía . . . . . . . . . . . . . . . . . . . . . . .18Lo que No está Cubierto por la Garantía . . . . . . . . . . . . . . . . .18Información Sobre el Copyright . . . . . . . . . . . . . . . . . . . . . .18
2
Español
Seguridad del producto y exposición a la radiofrecuencia (RF) de los transceptores bidireccionales portátiles
Características• 8 canales de transceptor móvil privado (PMR)• 121 subcódigos (38 códigos CTCSS y 83 códigos DCS)• Rango de alcance de hasta 10 kilómetros*• Sistema de circuitos VOX interno• 10 alertas de tono de llamada seleccionables• Pantalla LCD con iluminación de fondo• Conector de auriculares para auricular opcional• Pitido de mensaje recibido• Temporizador• Supervisión de salas• Cargador de batería• Medidor del nivel de la batería• Supervisión de canales• Exploración de canales
• Doble escucha• Bloqueo de teclado• Control de supresión de ruido automático• Repetición automática (desplazamiento)• Almacenamiento de batería• Alerta de batería baja• Tono (encendido/apagado)• Llamada directa (llamada con identificador de llamadas)• Llamadas a grupos• Modo de silencio• Llamada a todos• Cambio automático de canal* El rango puede variar en función de las condiciones ambientales o
topográficas.
Antes de utilizar este producto, lea las instrucciones de funcionamiento para uso seguro que se incluyen en elcatálogo de exposición de radiofrecuencia y seguridad del producto del radioteléfono.
!C a u t i o nPrecaución
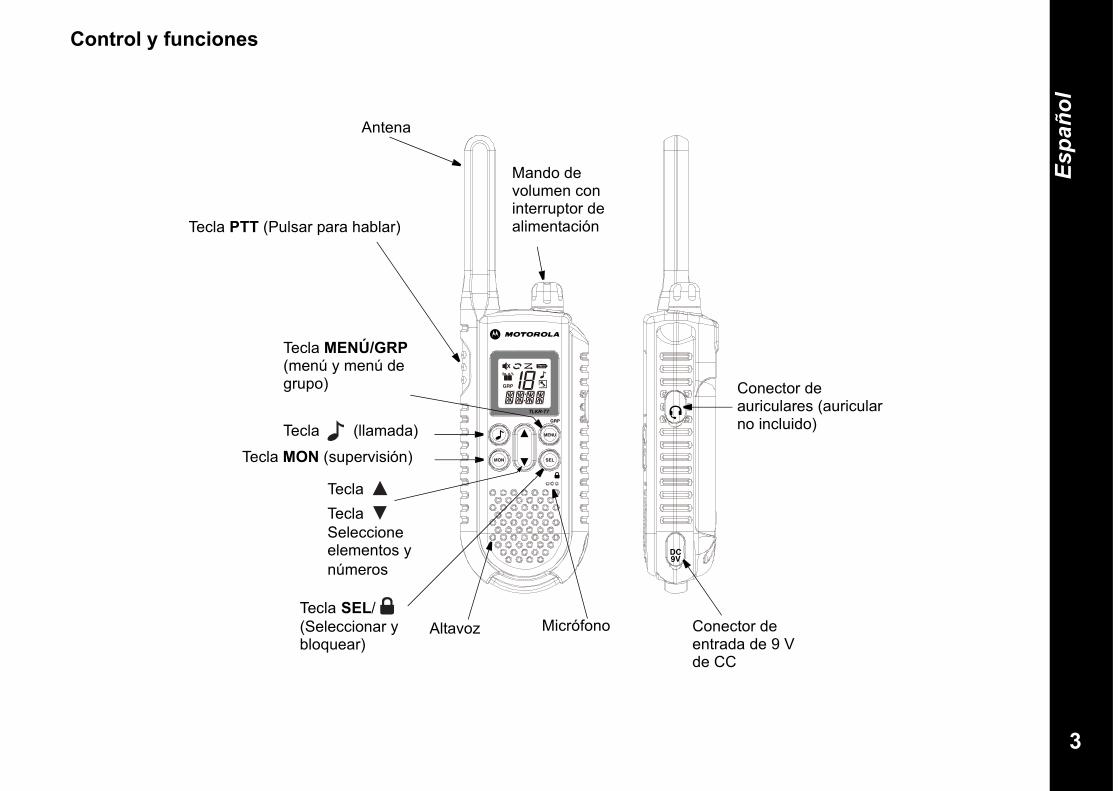
3
Español
Control y funciones
Conector de auriculares (auricular no incluido)
Antena
Mando de volumen con interruptor de alimentaciónTecla PTT (Pulsar para hablar)
Tecla (llamada)
Tecla MON (supervisión)
Tecla Tecla Seleccione elementos y números
Tecla MENÚ/GRP(menú y menú de grupo)
Tecla SEL/(Seleccionar y bloquear)
Altavoz Micrófono Conector de entrada de 9 V de CC
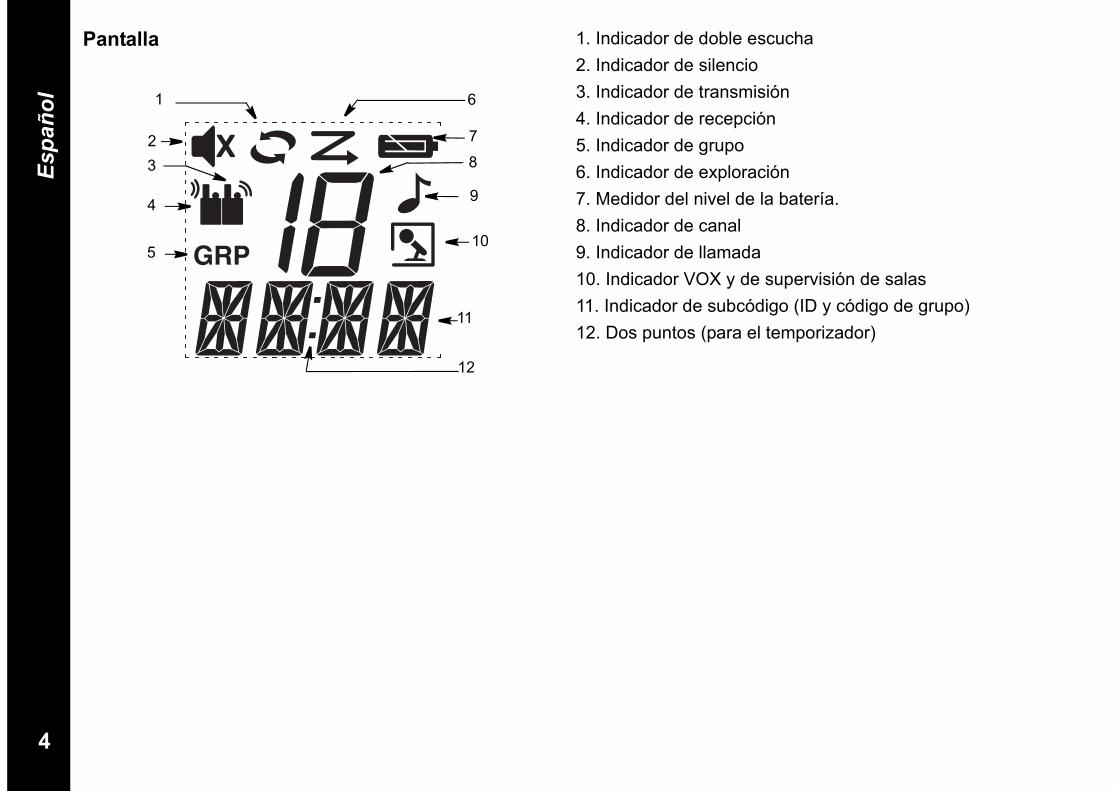
4
Español
Pantalla 1. Indicador de doble escucha2. Indicador de silencio3. Indicador de transmisión4. Indicador de recepción5. Indicador de grupo6. Indicador de exploración7. Medidor del nivel de la batería.8. Indicador de canal9. Indicador de llamada10. Indicador VOX y de supervisión de salas11. Indicador de subcódigo (ID y código de grupo)12. Dos puntos (para el temporizador)
1
23
4
5
12
11
10
6
9
7
8

5
Español
Le felicitamos por la compra de este transceptor TLKR T7. Este producto es un transceptor ligero y de dimensiones reducidas. Puede utilizarlo en eventos deportivos para permanecer en contacto con su familia y amigos, al practicar esquí o senderismo, cuando esté al aire libre o si participa en patrullas vecinales, para poder estar comunicado en todo momento. Este dispositivo compacto de última generación está equipado con numerosas funciones.Contenido del paqueteEl paquete contiene dos transceptores TLKR T7, dos pinzas de cinturón, un soporte para la carga, un adaptador de CA, dos cierres de soporte para la batería, dos paquetes de baterías NiMH recargables y esta guía de referencia. El dispositivo funciona con cuatro pilas alcalinas AAA (no incluidas).Instalación de la batería El transceptor TLKR T7 utiliza el paquete de baterías NiMH o cuatro pilas alcalinas AAA (no incluidas). Si utiliza pilas alcalinas, le recomendamos que éstas sean de primera calidad.Para instalar el paquete de baterías NiMH:1) Compruebe que el transceptor esté desconectado.2) Retire la cubierta del compartimento de baterías pulsando la lengüeta situada en la parte inferior de ésta, de modo que se pueda extraer.3) Instale las baterías NiMH en el compartimento de las baterías. No olvide guiarse por los símbolos + y – del compartimento. Si instala las baterías de forma incorrecta, el dispositivo no funcionará.4) Vuelva a colocar la cubierta del compartimento de baterías.
Nivel de la batería y alerta de batería bajaLa unidad cuenta con un medidor del nivel de la batería en la pantalla en el que se indica el estado de la batería. Cuando el nivel de la batería es bajo, el icono del medidor de nivel parpadea. Cambie las pilas alcalinas inmediatamente.Carga del transceptorSi utiliza el paquete de baterías recargables NiMH, los dos transceptores TLKR T7 pueden cargarse directamente o mediante el soporte para la carga suministrado. Compruebe que el transceptor esté desconectado antes de colocarlo en el soporte para la carga. De lo contrario, el medidor del nivel de la batería no indicará la información correcta.Carga directa:1. Introduzca el conector del adaptador de CC en el
conector de entrada de 9 V de CC del transceptor y conecte el otro extremo a una toma de corriente accesoria del vehículo.
2. Cargue el paquete de baterías durante 16 horas.Carga mediante el soporte:1. Conecte el adaptador de CA a un conector de entrada de
9 V de CC y a una toma eléctrica estándar.2. Instale el soporte para carga en una mesa o similar y
coloque el transceptor en el soporte de carga con el teclado numérico hacia adelante.
3. Compruebe que los indicadores LED se encienden. Cargue el paquete de baterías durante 16 horas y retire el transceptor del soporte una vez terminado el proceso de carga.
Nota: los indicadores LED de carga permanecerán encendidos mientras los transceptores estén en el cargador.
6
Español
Carga de la bateríaEs posible cargar el paquete de baterías NiMH mediante los cierres de soporte para la batería suministrados.1. Coloque el cierre de soporte para la batería en el soporte
para la carga.2. Instale el paquete de baterías NiMH de modo que sus
contactos de carga y los del soporte de carga se toquen. Si se instala mal el paquete de baterías, no se cargará.
3. Compruebe que los indicadores LED se encienden. Cargue el paquete de baterías durante 16 horas.
Nota: los indicadores LED de carga permanecerán encendidos mientras los transceptores estén en el cargador.
Uso del transceptorCon el fin de aprovechar al máximo este nuevo transceptor, lea esta guía de referencia en su totalidad antes de intentar poner en marcha la unidad.Encendido del transceptor y ajuste del volumen1. Para ENCENDER el transceptor, mueva el mando
giratorio hacia la derecha y simplemente muévalo para aumentar el volumen. Para disminuir el volumen, gire el mando giratorio hacia la izquierda.
2. Para APAGAR el transceptor, gire el mando giratorio hasta el final en la dirección contraria a las agujas del reloj.
Ajuste del sonido (pitidos de las teclas) El transceptor emite un pitido cada vez que se pulsa una de las teclas (excepto las teclas PTT y ). Para activar o desactivar este sonido, mantenga pulsada la tecla al encender el transceptor.
Pitido de mensaje recibidoEl pitido de mensaje recibido se envía para notificar el fin de la transmisión (transmisiones PTT y VOX). El pitido de mensaje recibido se oye a través del altavoz cuando los pitidos de las teclas están activados. Se transmite incluso si los pitidos de las teclas están desactivados. No obstante, el pitido de mensaje recibido no se oirá desde el altavoz.
Para activar o desactivar el pitido de mensaje recibido:Mantenga pulsada la tecla al encender el transceptor.
Habla por el transceptorPara hablar por el transceptor:1. Mantenga pulsada la tecla PTT y hable en un tono de
voz claro y normal manteniendo el micrófono a entre 5 y 8 cm de su boca. Mientras transmite, el icono aparecerá en la pantalla. Para evitar que se corte la primera parte de la transmisión, realice una breve pausa antes de pulsar la tecla PTT para comenzar a hablar.
2. Cuando haya terminado de hablar, suelte la tecla PTT.Ahora podrá recibir llamadas entrantes. Mientras recibe, el icono aparecerá en la pantalla.
Nota: si continúa transmitiendo durante 60 segundos, el transceptor emite el tono limitador de transmisión y el icono parpadea. El transceptor detiene la transmisión.
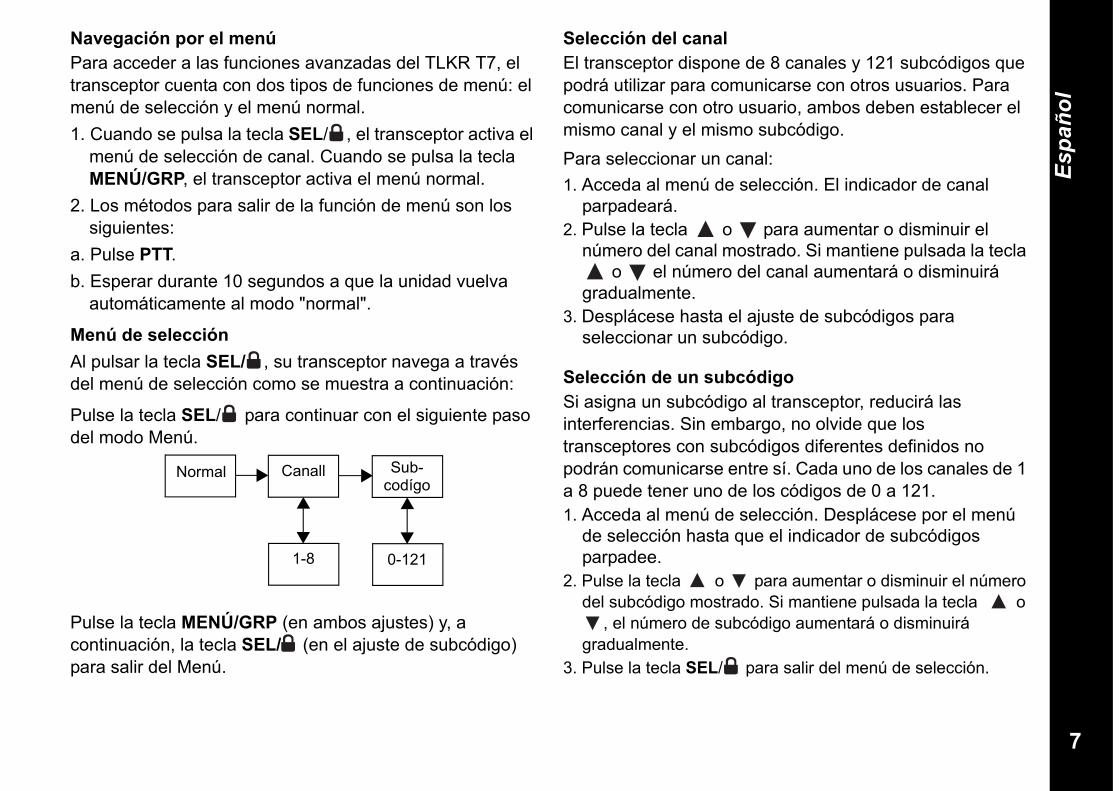
7
Español
Navegación por el menúPara acceder a las funciones avanzadas del TLKR T7, el transceptor cuenta con dos tipos de funciones de menú: el menú de selección y el menú normal.1. Cuando se pulsa la tecla SEL/ , el transceptor activa el
menú de selección de canal. Cuando se pulsa la tecla MENÚ/GRP, el transceptor activa el menú normal.
2. Los métodos para salir de la función de menú son los siguientes:
a. Pulse PTT.b. Esperar durante 10 segundos a que la unidad vuelva
automáticamente al modo "normal".
Menú de selecciónAl pulsar la tecla SEL/ , su transceptor navega a través del menú de selección como se muestra a continuación:
Pulse la tecla SEL/ para continuar con el siguiente paso del modo Menú.
Pulse la tecla MENÚ/GRP (en ambos ajustes) y, a continuación, la tecla SEL/ (en el ajuste de subcódigo) para salir del Menú.
Selección del canalEl transceptor dispone de 8 canales y 121 subcódigos que podrá utilizar para comunicarse con otros usuarios. Para comunicarse con otro usuario, ambos deben establecer el mismo canal y el mismo subcódigo.Para seleccionar un canal:1. Acceda al menú de selección. El indicador de canal
parpadeará.2. Pulse la tecla o para aumentar o disminuir el
número del canal mostrado. Si mantiene pulsada la tecla o el número del canal aumentará o disminuirá
gradualmente.3. Desplácese hasta el ajuste de subcódigos para
seleccionar un subcódigo.
Selección de un subcódigoSi asigna un subcódigo al transceptor, reducirá las interferencias. Sin embargo, no olvide que los transceptores con subcódigos diferentes definidos no podrán comunicarse entre sí. Cada uno de los canales de 1 a 8 puede tener uno de los códigos de 0 a 121. 1. Acceda al menú de selección. Desplácese por el menú
de selección hasta que el indicador de subcódigos parpadee.
2. Pulse la tecla o para aumentar o disminuir el número del subcódigo mostrado. Si mantiene pulsada la tecla o
, el número de subcódigo aumentará o disminuirá gradualmente.
3. Pulse la tecla SEL/ para salir del menú de selección.
Normal Canall Sub-codígo
0-1211-8
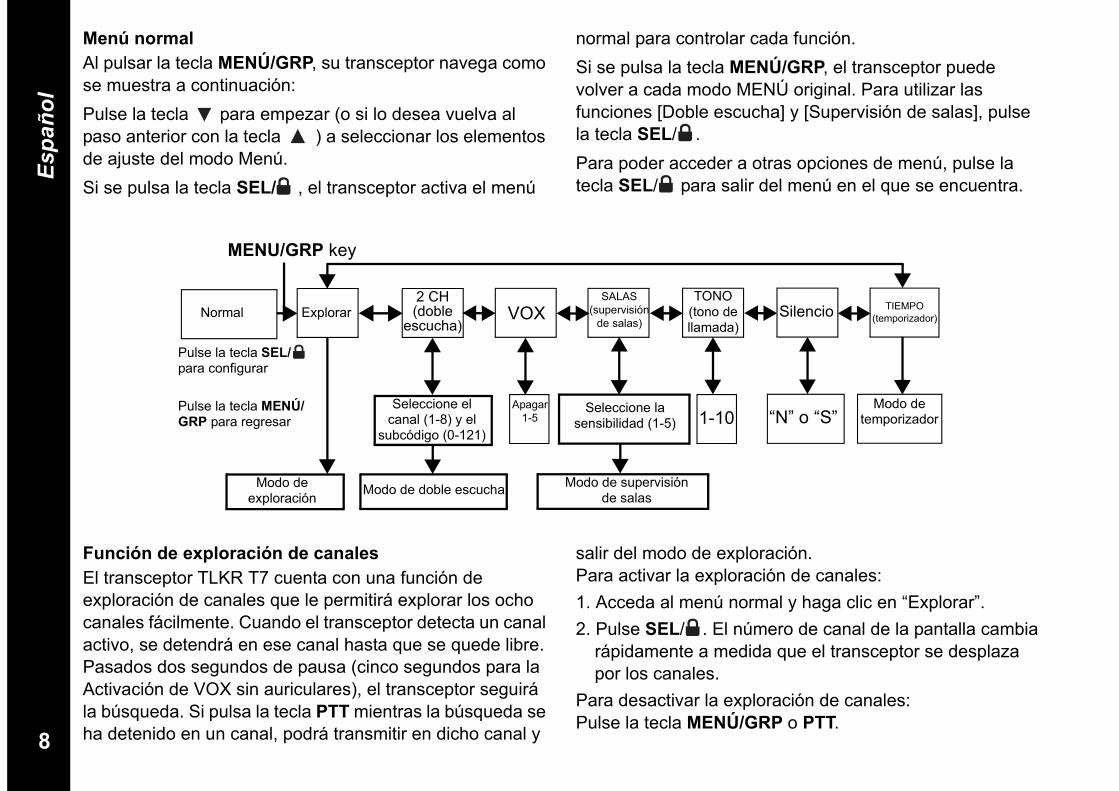
8
Español
Menú normalAl pulsar la tecla MENÚ/GRP, su transceptor navega como se muestra a continuación:Pulse la tecla para empezar (o si lo desea vuelva al paso anterior con la tecla ) a seleccionar los elementos de ajuste del modo Menú.Si se pulsa la tecla SEL/ , el transceptor activa el menú
normal para controlar cada función.Si se pulsa la tecla MENÚ/GRP, el transceptor puede volver a cada modo MENÚ original. Para utilizar las funciones [Doble escucha] y [Supervisión de salas], pulse la tecla SEL/ .Para poder acceder a otras opciones de menú, pulse la tecla SEL/ para salir del menú en el que se encuentra.
Normal Explorar2 CH (doble
escucha)VOX
SALAS (supervisión
de salas)
TONO (tono de llamada)
Silencio TIEMPO (temporizador)
Seleccione el canal (1-8) y el
subcódigo (0-121)
Modo de temporizador
Seleccione la sensibilidad (1-5)
Apagar 1-5 1-10 “N” o “S”
Modo de exploración Modo de doble escucha Modo de supervisión
de salas
MENU/GRP key
Pulse la tecla SEL/ para configurar
Pulse la tecla MENÚ/GRP para regresar
Función de exploración de canalesEl transceptor TLKR T7 cuenta con una función de exploración de canales que le permitirá explorar los ocho canales fácilmente. Cuando el transceptor detecta un canal activo, se detendrá en ese canal hasta que se quede libre. Pasados dos segundos de pausa (cinco segundos para la Activación de VOX sin auriculares), el transceptor seguirá la búsqueda. Si pulsa la tecla PTT mientras la búsqueda se ha detenido en un canal, podrá transmitir en dicho canal y
salir del modo de exploración.Para activar la exploración de canales:1. Acceda al menú normal y haga clic en “Explorar”. 2. Pulse SEL/ . El número de canal de la pantalla cambia
rápidamente a medida que el transceptor se desplaza por los canales.
Para desactivar la exploración de canales:Pulse la tecla MENÚ/GRP o PTT.
9
Español
Modo de doble escuchaEl transceptor puede explorar el canal actual y otro canal de forma alternativa. Es necesario establecer un número de canal con su subcódigo para otro canal.Para establecer otro canal e iniciar la doble escucha:1. Acceda al menú normal y seleccione “2CH”; a
continuación, pulse la tecla SEL/ para continuar con el ajuste de modo de doble escucha. Aparecerá el icono de Doble escucha.
2. Pulse la tecla o para seleccionar el número del canal y, a continuación, pulse la tecla SEL/ key.
3. Pulse la tecla o para seleccionar el número del subcódigo y, a continuación, pulse la tecla SEL/ .
4. El transceptor iniciará el modo de doble escucha.Nota: si establece el mismo número de canal y subcódigo
que en el canal actual, el modo de doble escucha no funcionará.
Para desactivar el modo de doble escucha:Pulse la tecla MENU/GRP.
Transmisión por vozEl transceptor TLKR T5 cuenta con un transmisor por voz (VOX) seleccionable por el usuario que puede utilizarse para transmisiones de voz automáticas. La función VOX está diseñada para utilizarse como manos libres. La transmisión se inicia hablando por el micrófono o el auricular (que no está incluido) del transceptor, en lugar de pulsar la tecla PTT.Para seleccionar el nivel de VOX:1. Acceda al menú normal y haga clic en “VOX”. A
continuación, pulse la tecla SEL/ . El nivel actual
(desactivado, 1–5) parpadea. El nivel “N” (desactivado) desactiva VOX, mientras que los niveles de 1 a 5 definen la sensibilidad del circuito VOX.
2. Pulse la tecla o para seleccionar el nivel de sensibilidad VOX deseado. Utilice el nivel 1 en entornos silenciosos, y el 5 en los más ruidosos. Podrá determinar el nivel de sensibilidad adecuado hablando por el micrófono. Si el icono VOX parpadea, su voz se ha aceptado.
3. Salga del menú normal.Nota: si continúa transmitiendo mediante la función VOX
durante 60 segundos, el transceptor emite el tono limitador de transmisión y el icono parpadea durante 5 segundos.
Función de supervisión de salasEs posible utilizar uno de los transceptores TLKR T7 como supervisión de salas y utilizar el otro transceptor para escuchar y comprobar la voz de otra sala. Al establecer la función de supervisión de salas, el transceptor de supervisión detecta las voces y los ruidos (en función del nivel de sensibilidad establecido) y los transmite al transceptor que escucha sin necesidad de pulsar la tecla PTT. El transceptor de supervisión no puede recibir transmisiones en este modo.To turn the Room Monitor ON:1. Acceda al menú normal y haga clic en “SALAS”. A
continuación, pulse la tecla SEL/ .2. Pulse la tecla o para seleccionar el nivel de
sensibilidad de supervisión de salas deseado. Utilice el nivel 1 en entornos silenciosos, y el 5 en los más
10
Español
ruidosos.3. Pulse la tecla SEL/ para utilizar la opción de
Supervisión de salas.Para desactivar la supervisión de salas:Pulse la tecla MENU/GRP.Nota:- No es posible pulsar la tecla PTT cuando el modo de
supervisión de salas está activado. Si se hace, el transceptor emite el tono de error de PTT.
- Cuando la voz o el ruido de otra sala se prolongan durante más de 60 segundos, el transceptor de supervisión detiene el control durante 5 segundos y retoma su actividad.
Transmisión de un tono de llamadaEl transceptor TLKR T7 cuenta con 10 tonos de llamada seleccionables que se transmitirán al pulsar la tecla en el modo normal.Para seleccionar un tono de llamada:1. Acceda al menú normal y haga clic en “TONO”. A
continuación, pulse la tecla SEL/ .El número de tono de llamada actual (de 1 a 10 también parpadea).
2. Pulse la tecla o para seleccionar el número del tono de llamada deseado. Los tonos se oirán a través del altavoz.
3. Salga del menú normal.Para transmitir el tono de llamada seleccionado, pulse la tecla en el modo normal. El tono se transmitirá de forma automática durante un periodo determinado de tiempo. El tono de llamada se cancelará al pulsar la tecla
PTT.
Modo de silencioCuando enciende el modo de silencio, todas las llamadas entrantes están silenciadas: la luz trasera del transceptor parpadea para avisarle de una llamada entrante.Si no contesta a la llamada, la luz trasera se apagará y el icono de llamada parpadeará hasta que no haya señal.El TLKR T7 también vibrará para recordarle que tiene una llamada perdida.El modo de silencio no se activará durante 15 segundos al transmitir, recibir o pulsar cualquier otro botón.Para configurar el modo de silencio siga los siguientes pasos:1. Acceda al menú normal y haga clic en “SILENCIO”. A
continuación, pulse la tecla SEL/ .2. Pulse la tecla para activar el modo de silencio. El
indicador de canal mostrará el mensaje “S” y aparecerá el icono SILENCIO.
3. Pulse la tecla para desactivar el modo de silencio. El Indicador de canal mostrará el mensaje “N” y desaparecerá el icono SILENCIO.
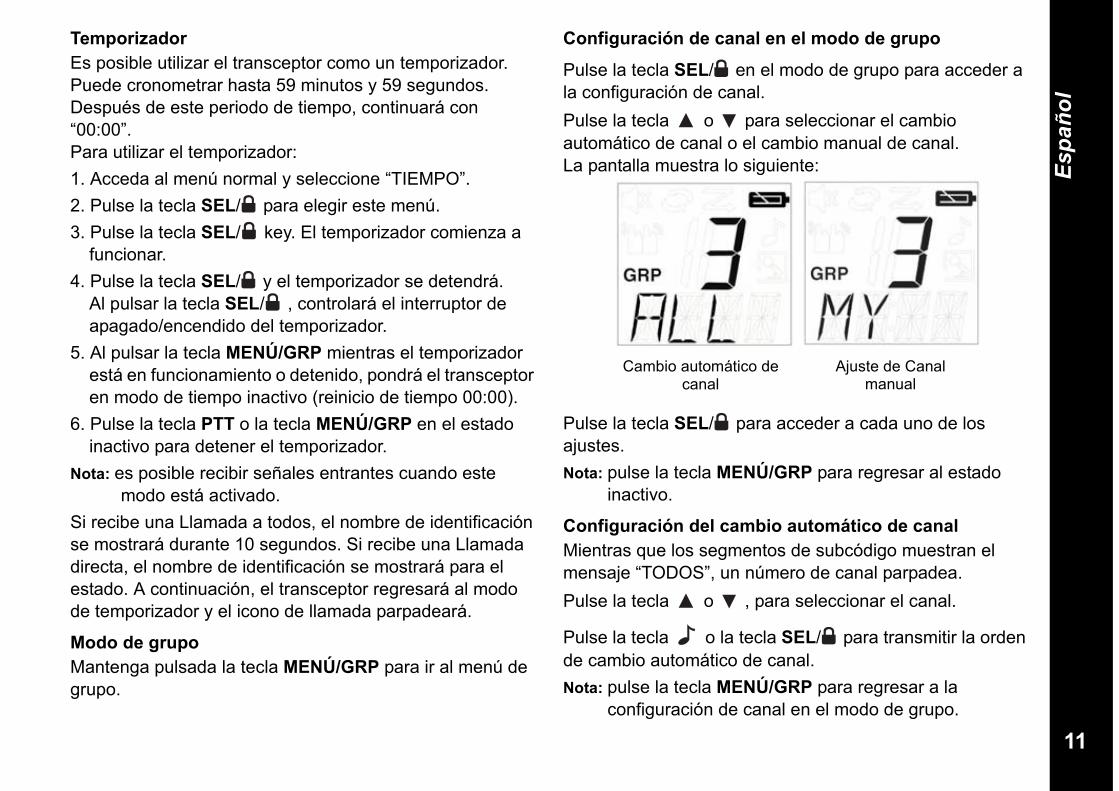
11
Español
Temporizador Es posible utilizar el transceptor como un temporizador. Puede cronometrar hasta 59 minutos y 59 segundos.Después de este periodo de tiempo, continuará con “00:00”.Para utilizar el temporizador:1. Acceda al menú normal y seleccione “TIEMPO”.2. Pulse la tecla SEL/ para elegir este menú.3. Pulse la tecla SEL/ key. El temporizador comienza a
funcionar.4. Pulse la tecla SEL/ y el temporizador se detendrá.
Al pulsar la tecla SEL/ , controlará el interruptor de apagado/encendido del temporizador.
5. Al pulsar la tecla MENÚ/GRP mientras el temporizador está en funcionamiento o detenido, pondrá el transceptor en modo de tiempo inactivo (reinicio de tiempo 00:00).
6. Pulse la tecla PTT o la tecla MENÚ/GRP en el estado inactivo para detener el temporizador.
Nota: es posible recibir señales entrantes cuando este modo está activado.
Si recibe una Llamada a todos, el nombre de identificación se mostrará durante 10 segundos. Si recibe una Llamada directa, el nombre de identificación se mostrará para el estado. A continuación, el transceptor regresará al modo de temporizador y el icono de llamada parpadeará.
Modo de grupoMantenga pulsada la tecla MENÚ/GRP para ir al menú de grupo.
Configuración de canal en el modo de grupo
Pulse la tecla SEL/ en el modo de grupo para acceder a la configuración de canal. Pulse la tecla o para seleccionar el cambio automático de canal o el cambio manual de canal.La pantalla muestra lo siguiente:
Pulse la tecla SEL/ para acceder a cada uno de los ajustes.Nota: pulse la tecla MENÚ/GRP para regresar al estado
inactivo.
Configuración del cambio automático de canalMientras que los segmentos de subcódigo muestran el mensaje “TODOS”, un número de canal parpadea.Pulse la tecla o , para seleccionar el canal.
Pulse la tecla o la tecla SEL/ para transmitir la orden de cambio automático de canal.Nota: pulse la tecla MENÚ/GRP para regresar a la
configuración de canal en el modo de grupo.
Cambio automático de canal
Ajuste de Canal manual
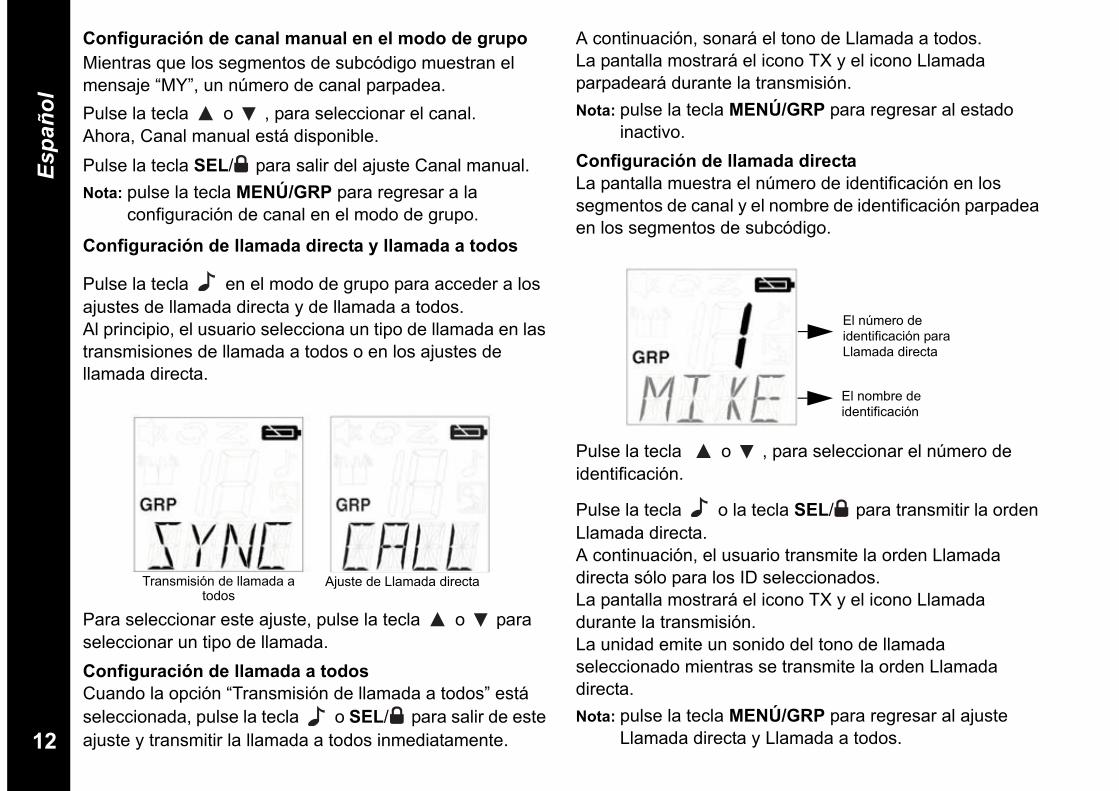
12
Español
Configuración de canal manual en el modo de grupoMientras que los segmentos de subcódigo muestran el mensaje “MY”, un número de canal parpadea.Pulse la tecla o , para seleccionar el canal.Ahora, Canal manual está disponible.Pulse la tecla SEL/ para salir del ajuste Canal manual.Nota: pulse la tecla MENÚ/GRP para regresar a la
configuración de canal en el modo de grupo.
Configuración de llamada directa y llamada a todos
Pulse la tecla en el modo de grupo para acceder a los ajustes de llamada directa y de llamada a todos. Al principio, el usuario selecciona un tipo de llamada en las transmisiones de llamada a todos o en los ajustes de llamada directa.
Para seleccionar este ajuste, pulse la tecla o para seleccionar un tipo de llamada.Configuración de llamada a todosCuando la opción “Transmisión de llamada a todos” está seleccionada, pulse la tecla o SEL/ para salir de este ajuste y transmitir la llamada a todos inmediatamente.
A continuación, sonará el tono de Llamada a todos.La pantalla mostrará el icono TX y el icono Llamada parpadeará durante la transmisión.Nota: pulse la tecla MENÚ/GRP para regresar al estado
inactivo.Configuración de llamada directaLa pantalla muestra el número de identificación en los segmentos de canal y el nombre de identificación parpadea en los segmentos de subcódigo.
Pulse la tecla o , para seleccionar el número de identificación.
Pulse la tecla o la tecla SEL/ para transmitir la orden Llamada directa.A continuación, el usuario transmite la orden Llamada directa sólo para los ID seleccionados.La pantalla mostrará el icono TX y el icono Llamada durante la transmisión.La unidad emite un sonido del tono de llamada seleccionado mientras se transmite la orden Llamada directa.Nota: pulse la tecla MENÚ/GRP para regresar al ajuste
Llamada directa y Llamada a todos.
Transmisión de llamada a todos
Ajuste de Llamada directa
El número de identificación paraLlamada directa
El nombre de identificación
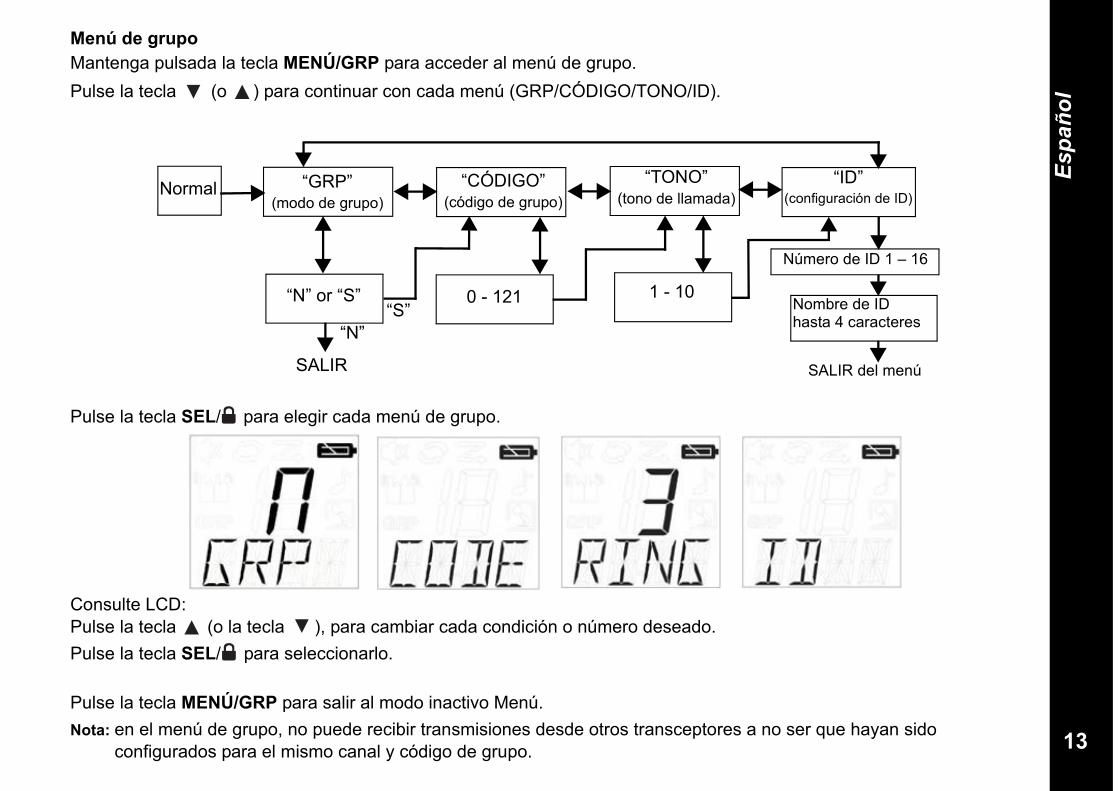
13
Español
Menú de grupoMantenga pulsada la tecla MENÚ/GRP para acceder al menú de grupo.Pulse la tecla (o ) para continuar con cada menú (GRP/CÓDIGO/TONO/ID).
Pulse la tecla SEL/ para elegir cada menú de grupo.
Consulte LCD:Pulse la tecla (o la tecla ), para cambiar cada condición o número deseado. Pulse la tecla SEL/ para seleccionarlo.
Pulse la tecla MENÚ/GRP para salir al modo inactivo Menú.Nota: en el menú de grupo, no puede recibir transmisiones desde otros transceptores a no ser que hayan sido
configurados para el mismo canal y código de grupo.
Normal “GRP”(modo de grupo)
“CÓDIGO”(código de grupo)
“ID” (configuración de ID)
Número de ID 1 – 16
0 - 121 1 - 10
SALIR
Nombre de ID hasta 4 caracteres
“N” or “S”
“N”“S”
SALIR del menú
“TONO”(tono de llamada)
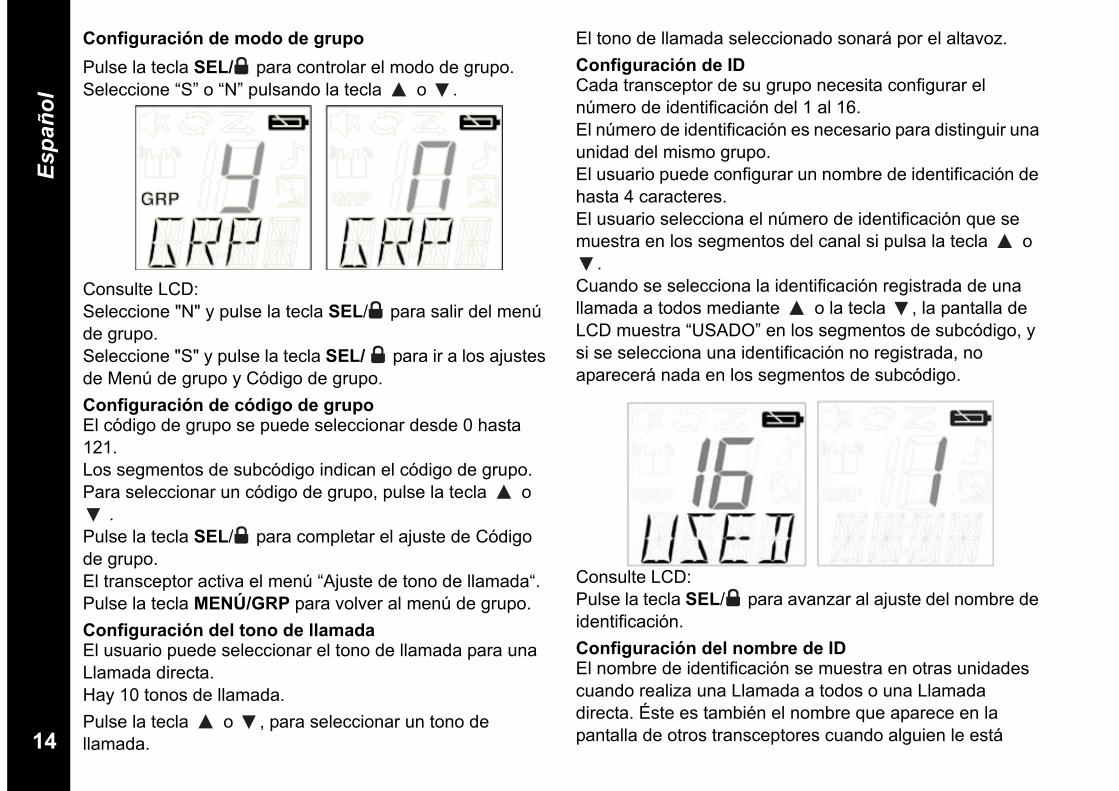
14
Español
Configuración de modo de grupoPulse la tecla SEL/ para controlar el modo de grupo. Seleccione “S” o “N” pulsando la tecla o .
Consulte LCD:Seleccione "N" y pulse la tecla SEL/ para salir del menú de grupo.Seleccione "S" y pulse la tecla SEL/ para ir a los ajustes de Menú de grupo y Código de grupo.Configuración de código de grupo El código de grupo se puede seleccionar desde 0 hasta 121.Los segmentos de subcódigo indican el código de grupo.Para seleccionar un código de grupo, pulse la tecla o
.Pulse la tecla SEL/ para completar el ajuste de Código de grupo. El transceptor activa el menú “Ajuste de tono de llamada“.Pulse la tecla MENÚ/GRP para volver al menú de grupo.Configuración del tono de llamada El usuario puede seleccionar el tono de llamada para una Llamada directa.Hay 10 tonos de llamada.Pulse la tecla o , para seleccionar un tono de llamada.
El tono de llamada seleccionado sonará por el altavoz.Configuración de IDCada transceptor de su grupo necesita configurar el número de identificación del 1 al 16.El número de identificación es necesario para distinguir una unidad del mismo grupo.El usuario puede configurar un nombre de identificación de hasta 4 caracteres. El usuario selecciona el número de identificación que se muestra en los segmentos del canal si pulsa la tecla o
.Cuando se selecciona la identificación registrada de una llamada a todos mediante o la tecla , la pantalla de LCD muestra “USADO” en los segmentos de subcódigo, y si se selecciona una identificación no registrada, no aparecerá nada en los segmentos de subcódigo.
Consulte LCD:Pulse la tecla SEL/ para avanzar al ajuste del nombre de identificación.Configuración del nombre de IDEl nombre de identificación se muestra en otras unidades cuando realiza una Llamada a todos o una Llamada directa. Éste es también el nombre que aparece en la pantalla de otros transceptores cuando alguien le está

15
Español
intentando llamar. El número de unidad aparece cuando no se configura ningún nombre de identificación.Pulse la tecla o para seleccionar un carácter en los segmentos de subcódigo que parpadean.A continuación, pulse la tecla SEL/ para moverse hacia el siguiente carácter. Puede seleccionar hasta 4 caracteres para el nombre de identificación.Finalmente, pulse la tecla SEL/ para registrar el número y el nombre de identificación.El transceptor sale de la configuración de identificación.Nota: cada vez que el usuario pulsa la tecla MENÚ/GRP, la
unidad cancela el número de identificación seleccionado y borra el nombre de identificación introducido y, a continuación, sale del menú de grupo.
Bloqueo del tecladoPara bloquear el teclado:Mantenga pulsada la tecla SEL/ durante dos segundos. Los segmentos de subcódigo muestran el mensaje “BLOQ.“ y, a continuación, vuelve a la pantalla anterior.Para desbloquear el teclado:Mantenga pulsada la tecla SEL/ durante dos segundos. Los segmentos de subcódigo muestran el mensaje “DESBLOQ.“ durante dos segundos y, a continuación, vuelve a la pantalla anterior.Nota: si pulsa cualquier tecla (excepto PTT) mientras está
activado el bloqueo de teclado, el mensaje “BLOQ.” aparece durante dos segundos acompañado de un tono de error.
Función de ahorro automático de energíaEl transceptor cuenta con un circuito único diseñado para aumentar al máximo la duración de la batería. Si no se
producen transmisiones ni llamadas entrantes durante tres segundos, el transceptor pasa al modo de ahorro de energía. El transceptor puede recibir transmisiones en este modo.Alerta de batería baja Las alertas de batería baja aparecen cuando el nivel de batería está vacío.La alerta empieza 30 segundos después de que empiece a parpadear el icono de batería baja.El subcódigo muestra el mensaje “BAT” y, a continuación, el icono de Batería baja parpadea.El tono de alerta suena cada cinco segundos durante 30 segundos cuando la batería está baja.Iluminación de fondo de la pantalla LCDLa iluminación de fondo de la pantalla LCD se encenderá automáticamente al pulsar cualquier tecla (excepto PTT).La pantalla LCD permanecerá iluminada durante 10 segundos después de que se haya pulsado una tecla por última vez.Función de modo de supervisiónEl transceptor TLKR T7 permite oír señales débiles en el canal actual al pulsar la tecla MON.Para activar el modo de supervisión:- Pulse la tecla MON para una escucha breve. El icono RX parpadeará.- Mantenga pulsada la tecla MON durante 1,5 segundos para una escucha prolongada. El icono RX continuará parpadeando.Para desactivar el modo de supervisión:- Pulse las teclas MON, MENU/GRP, o SEL/ para volver al modo “normal”. El icono RX dejará de parpadear.

16
Español
Especificaciones Tabla de frecuencias (MHz)
Lista de Accesorios AprobadosPara adquirir los siguientes accesorios, póngase en contacto con su distribuidor o comercio.
Canales 8 canales de transceptor móvil privado.
Subcódigos 121 (38 códigos CTCSS y 83 códigos DCS).
Frecuencia operativa
Entre 446,00625 y 446,09375 MHz.
Fuente de alimentación
Paquete de baterías AAA Ni-MH.
Cuatro pilas alcalinas AAA (no incluidas).
Rango Hasta 10 km
Duración de la batería
20 horas aproximadamente - Pilas alcalinas
(ciclo de funcionamiento 5/5/90).
18 horas aproximadamente – paquete de baterías NiMH
(ciclo de funcionamiento 5/5/90).
Canal Frecuencia1 446,00625
2 446,01875
3 446,03125
4 446,04375
5 446,05625
6 446,06875
7 446,08125
8 446,09375
Motorola Part No. Description
00275 Cable de cargador para coche TLKR-T5/T7
00276 Cargador de unidad TLKR-T5/T7 (UE)
00277 Cargador de unidad TLKR-T5/T7 (RU)
00278 Batería TLKR-T5/T7
00279 Pinza de cinturón TLKR-T5/T7
00174 Miniauricular del consumidor
00179 Auriculares del consumidor
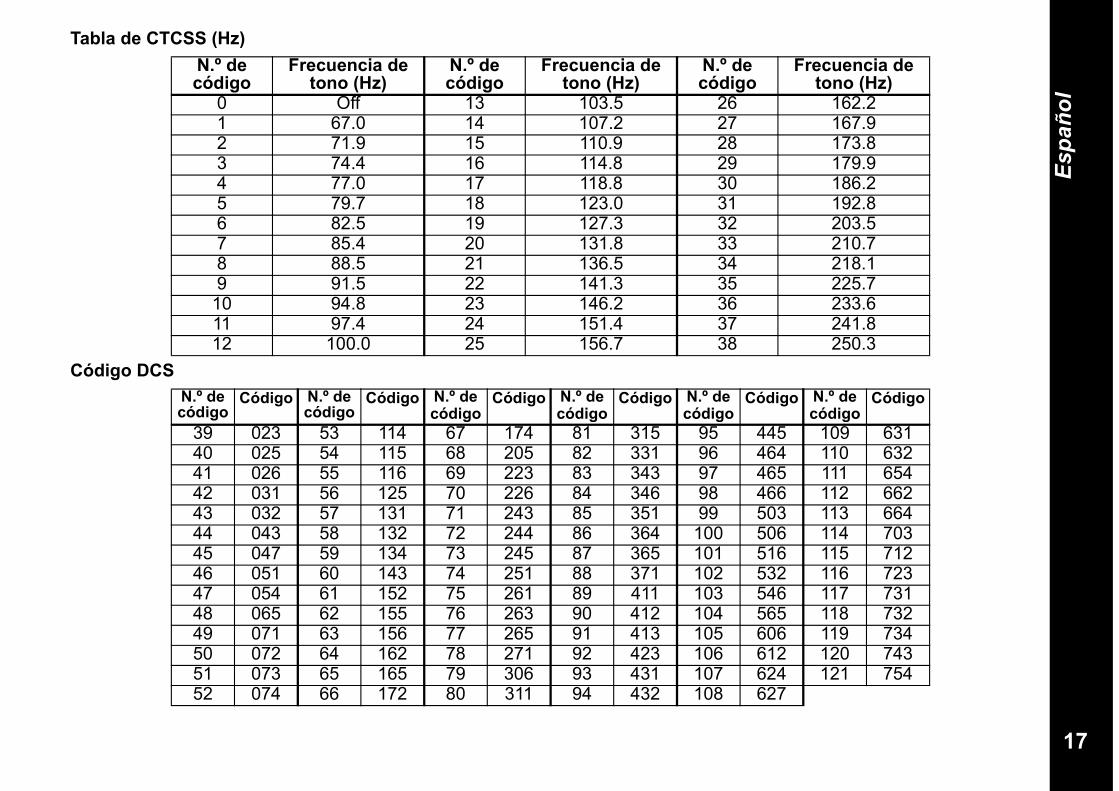
17
Español
Tabla de CTCSS (Hz)
Código DCS
N.º de código
Frecuencia de tono (Hz)
N.º de código
Frecuencia de tono (Hz)
N.º de código
Frecuencia de tono (Hz)
0 Off 13 103.5 26 162.21 67.0 14 107.2 27 167.92 71.9 15 110.9 28 173.83 74.4 16 114.8 29 179.94 77.0 17 118.8 30 186.25 79.7 18 123.0 31 192.86 82.5 19 127.3 32 203.57 85.4 20 131.8 33 210.78 88.5 21 136.5 34 218.19 91.5 22 141.3 35 225.7
10 94.8 23 146.2 36 233.611 97.4 24 151.4 37 241.812 100.0 25 156.7 38 250.3
N.º de código
Código N.º de código
Código N.º de código
Código N.º de código
Código N.º de código
Código N.º de código
Código
39 023 53 114 67 174 81 315 95 445 109 63140 025 54 115 68 205 82 331 96 464 110 63241 026 55 116 69 223 83 343 97 465 111 65442 031 56 125 70 226 84 346 98 466 112 66243 032 57 131 71 243 85 351 99 503 113 66444 043 58 132 72 244 86 364 100 506 114 70345 047 59 134 73 245 87 365 101 516 115 71246 051 60 143 74 251 88 371 102 532 116 72347 054 61 152 75 261 89 411 103 546 117 73148 065 62 155 76 263 90 412 104 565 118 73249 071 63 156 77 265 91 413 105 606 119 73450 072 64 162 78 271 92 423 106 612 120 74351 073 65 165 79 306 93 431 107 624 121 75452 074 66 172 80 311 94 432 108 627
18
Español
Información Sobre la GarantíaEl distribuidor autorizado de Motorola o detallista donde usted compró la radio bidireccional Motorola, y/o los accesorios originales atenderá su reclamación y/o le proveerá servicio bajo garantía. Por favor devuelva la radio a su distribuidor o comerciante detallista para solicitar servicio bajo garantía. No devuelva la radio a Motorola.Para poder recibir el servicio bajo garantía, debe presentar su recibo de compra o prueba sustitutiva comparable de compra que lleva la fecha de compra. La radio bidireccional deberá mostrar también el número de serie. La garantía no será aplicable si el tipo o número de serie en el producto han sido alterados, borrados, quitados, o dañados de modo ilegible.
Lo que No está Cubierto por la GarantíaLos defectos o daños que resulten del uso del Producto en otro uso fuera del normal y habitual o por no seguir las instrucciones de este manual del usuario.Los defectos o daños producidos por uso indebido, accidente o negligencia.Los defectos o daños producidos por pruebas, operaciones, mantenimiento o ajuste inadecuados, o cualquier alteración o modificación de cualquiera índole.Rotura o daño de las antenas a menos que sea causado directamente por defectos en el material o mano de obra.Los productos desmontados o reparados de tal manera que afectan adversamente la función o impiden la inspección y la prueba adecuadas para verificar la reclamación bajo garantía.Defectos o daños debidos al alcance de los equipos.Defectos o daños debido a humedad, líquidos o derrames.Toda superficie de plástico y todas las otras partes expuestas al exterior que estén rayadas o dañadas debido a uso normal.Productos alquilados sobre una base temporal.
Mantenimiento periódico y reparación o reemplazo de partes debido a uso normal y al desgaste.Información Sobre el CopyrightLos productos Motorola descritos en este manual pueden incluir programas de Motorola con derecho del Copyright (derechos de autor), memorias de semiconductores almacenada u otros medios. Las leyes en los Estados Unidos y otros países salvaguardan, para Motorola, ciertos derechos exclusivos sobre los programas de informática (de computador) con derecho del Copyright, que atañe al derecho exclusivo de copiar o reproducir en cualquier forma los programas de Motorola con derecho del Copyright.Por tanto, para cualquier programa de informática (computador) de Motorola con derecho del Copyright contenido en los productos descritos de Motorola en este manual no está permitida su copia o reproducción de ninguna manera sin el permiso expreso y escrito de Motorola. Además, la compra de productos de Motorola no se considerará que conceden directa o indirectamente o por implicación, impedimento legal, o de otro modo, cualquier licencia conforme a los derechos del Copyright, patentes o aplicaciones de patente de Motorola, excepto para las regalías normales no exclusivas de libre licencia de uso que surgen de la operación de la ley en la venta de un producto.MOTOROLA, el logo estilizado M Logo y todas las otras marcas comerciales indicadas como tal son marcas registradas de Motorola, Inc. ® Reg. U.S. Pat. & Tm. Off.© Motorola, Inc. 2008
1
Italiano
INDICESicurezza del prodotto ed esposizione all’energia di radiofrequenza per le radio ricetrasmittenti portatili . . . . . 2Caratteristiche. . . . . . . . . . . . . . . . . . . . . . . . . . . . . . . . . . 2Comandi e funzioni . . . . . . . . . . . . . . . . . . . . . . . . . . . . . . 3Display . . . . . . . . . . . . . . . . . . . . . . . . . . . . . . . . . . . . . . . 4Kit TLKR T7 . . . . . . . . . . . . . . . . . . . . . . . . . . . . . . . . . . . 5Inserimento della batteria . . . . . . . . . . . . . . . . . . . . . . . . . 5Icona dello stato batteria e avviso di batteria scarica . . . . 5Carica della radio . . . . . . . . . . . . . . . . . . . . . . . . . . . . . . . 5Carica diretta . . . . . . . . . . . . . . . . . . . . . . . . . . . . . . . . . . 5Carica con il caricatore . . . . . . . . . . . . . . . . . . . . . . . . . . 5Carica della batteria . . . . . . . . . . . . . . . . . . . . . . . . . . . . . 6Funzionamento della radio . . . . . . . . . . . . . . . . . . . . . . . . 6Accensione della radio e regolazione del volume . . . . . . 6Regolazione del livello del suono (toni tastiera) . . . . . . . 6Tono di fine trasmissione (Roger beep) . . . . . . . . . . . . . . 6Trasmissione . . . . . . . . . . . . . . . . . . . . . . . . . . . . . . . . . . 6Navigazione del menu . . . . . . . . . . . . . . . . . . . . . . . . . . . 7Menu Selezione . . . . . . . . . . . . . . . . . . . . . . . . . . . . . . . . 7Selezione di un canale . . . . . . . . . . . . . . . . . . . . . . . . . . . 7Selezione di un sottocodice . . . . . . . . . . . . . . . . . . . . . . . 7Menu Comune . . . . . . . . . . . . . . . . . . . . . . . . . . . . . . . . . 8Scansione dei canali . . . . . . . . . . . . . . . . . . . . . . . . . . . . 8Modo Dual Watch . . . . . . . . . . . . . . . . . . . . . . . . . . . . . . 9Trasmissione a viva voce . . . . . . . . . . . . . . . . . . . . . . . . . 9Funzione Room monitor . . . . . . . . . . . . . . . . . . . . . . . . . 9Invio di un tono di chiamata . . . . . . . . . . . . . . . . . . . . . 10Modo Silenzioso . . . . . . . . . . . . . . . . . . . . . . . . . . . . . . 10Cronometro . . . . . . . . . . . . . . . . . . . . . . . . . . . . . . . . . . 11Modo Gruppo . . . . . . . . . . . . . . . . . . . . . . . . . . . . . . . . . 11Selezione del canale nel modo Gruppo . . . . . . . . . . . . . 11Selezione automatica del canale . . . . . . . . . . . . . . . . . . 11Selezione manuale del canale nel modo Gruppo . . . . . 11Selezione di una chiamata generale o diretta . . . . . . . . 12
Selezione di una chiamata generale . . . . . . . . . . . . . . .12Selezione di una chiamata diretta . . . . . . . . . . . . . . . . .12Menu Gruppo . . . . . . . . . . . . . . . . . . . . . . . . . . . . . . . . .13Selezione del modo Gruppo . . . . . . . . . . . . . . . . . . . . . .14Selezione del codice del gruppo . . . . . . . . . . . . . . . . . .14Selezione del tono ring . . . . . . . . . . . . . . . . . . . . . . . . .14Assegnazione dell’ID . . . . . . . . . . . . . . . . . . . . . . . . . . .14Impostazione del nome . . . . . . . . . . . . . . . . . . . . . . . . .14Blocco tastiera . . . . . . . . . . . . . . . . . . . . . . . . . . . . . . . .15Risparmio energetico automatico . . . . . . . . . . . . . . . . . .15Avviso di batteria scarica . . . . . . . . . . . . . . . . . . . . . . . .15Retroilluminazione del LCD . . . . . . . . . . . . . . . . . . . . . .15Funzione Monitor . . . . . . . . . . . . . . . . . . . . . . . . . . . . . .15Specifiche tecniche . . . . . . . . . . . . . . . . . . . . . . . . . . . .16Tabella delle frequenze (MHz) . . . . . . . . . . . . . . . . . . . .16Elenco degli accessori approvati . . . . . . . . . . . . . . . . . .16Tabella dei CTCSS (Hz) . . . . . . . . . . . . . . . . . . . . . . . . .17Codici DCS . . . . . . . . . . . . . . . . . . . . . . . . . . . . . . . . . . .17Informazioni Sulla Garanzia . . . . . . . . . . . . . . . . . . . . . .18Cosa Non è Coperto dalla Garanzia . . . . . . . . . . . . . . .18Informazioni Sui Diritti d'Autore . . . . . . . . . . . . . . . . . . . . .18
2
Italiano
Sicurezza del prodotto ed esposizione all’energia di radiofrequenza per le radio ricetrasmittenti portatili
Caratteristiche• 8 canali PMR• 121 sottocodici (38 codici CTCSS e 83 DCS)• Portata fino a 10 km*• Circuito VOX integrato• 10 toni di avviso chiamata selezionabili• Display LCD retroilluminato• Presa per cuffia (cuffia non inclusa)• Tono di fine trasmissione (Roger beep)• Cronometro• Room monitor (ascolto ambientale a distanza)• Caricabatteria• Indicatore stato batteria• Monitoraggio canali• Scansione canali• Dual Watch (sorveglianza su due canali)• Blocco tastiera
• Controllo autosquelch• Ripetizione automatica (scorrimento)• Risparmio batteria• Avviso di batteria scarica• Tono (attivazione/disattivazione)• Chiamata diretta (ID chiamante)• Chiamata di gruppo• Modo Silenzioso• Chiamata generale• Cambio automatico di canale* La portata è soggetta a variazione a seconda delle condizioni
ambientali e/o topografiche.
Prima di utilizzare questo prodotto, leggere le istruzioni per il funzionamento sicuro riportate nell’opuscolo Sicurezza del prodotto ed esposizioneall’energia di radiofrequenza che accompagna la radio.
!C a u t i o nATTENZIONE

3
Italiano
Comandi e funzioni
Presa per cuffia (cuffia non inclusa)
Antenna
Manopola controllo volume e di accensioneTasto PTT (premere per parlare)
Tasto (chiamata)
Tasto MON (Monitor)
Tasto TastoSelezione voce/numeri del menu
Tasto MENU/GRP(Menu e menu Gruppo)
Tasto SEL/(Selezione/Blocco) Altoparlante Microfono Presa DC IN 9V
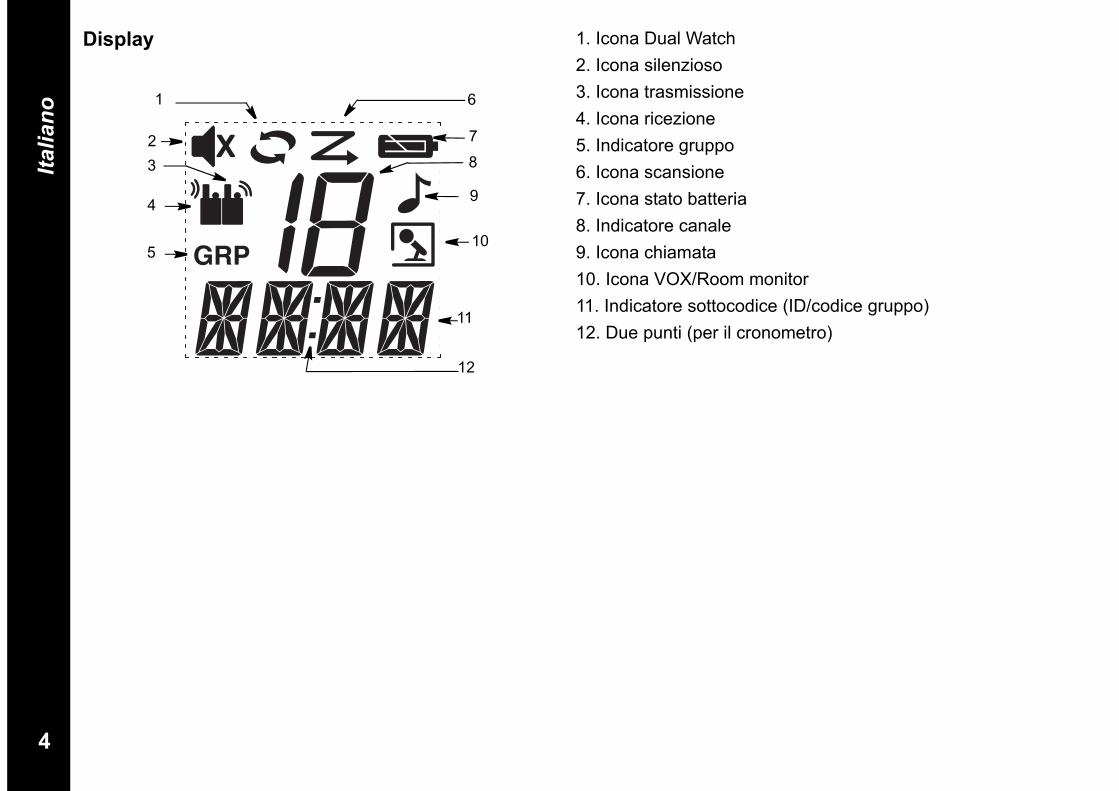
4
Italiano
Display 1. Icona Dual Watch2. Icona silenzioso3. Icona trasmissione4. Icona ricezione5. Indicatore gruppo6. Icona scansione7. Icona stato batteria8. Indicatore canale9. Icona chiamata10. Icona VOX/Room monitor11. Indicatore sottocodice (ID/codice gruppo)12. Due punti (per il cronometro)
1
23
4
5
12
11
10
6
9
7
8
5
Italiano
La ricetrasmittente TLKR T7 è una radio leggera, piccola, che sta nel palmo di una mano. È il compagno ideale per chi ama lo sport, le escursioni, lo sci e la vita all’aria aperta, perché permette di tenersi in contatto con familiari e amici. Nei piani di vigilanza del quartiere (Neighbourhood Watch), è indispensabile per inviare comunicazioni urgenti. Compatta e innovativa, questa ricetrasmittente è dotata di molte funzioni.
Kit TLKR T7Il kit comprende: due radio TLKR T7, due clip per cintura, un caricabatterie, un adattatore c.a., due staffe di sostegno batteria, due pacchi batterie ricaricabili al NiMH, il manuale per l’utente. La radio può essere alimentata anche da 4 batterie alcaline AAA (non incluse nel kit).
Inserimento della batteriaLa radio TLKR T7 è alimentata da un pacco batterie al NiMH oppure da 4 batterie alcaline AAA (non incluse). Se si preferiscono le batterie alcaline, si consiglia di utilizzare batterie di alta qualità.
Inserimento del pacco batterie al NiMH.1. Controllare che la radio sia spenta.2. Premere la linguetta sulla parte inferiore del coperchio
del vano batterie e rimuovere il coperchio.3. Inserire il pacco batterie NiMH nel vano batterie, facendo
attenzione che i poli della batteria siano orientati come indicato dai simboli + e – all’interno del vano. Se le batterie non sono inserite correttamente, la ricetrasmittente non funziona.
4. Riposizionare il coperchio del vano batterie.
Icona dello stato batteria e avviso di batteria scaricaL’icona dello stato batteria visualizzato sul display della ricetrasmittente indica il livello di carica delle batterie. Se è basso, l’icona lampeggia. In questo caso sostituire immediatamente le batterie alcaline.
Carica della radioSe si utilizza il pacco batterie ricaricabili al NiMH, è possibile caricare contemporaneamente due radio TLKR T7 con le batterie inserite sia direttamente che utilizzando il caricatore in dotazione. Controllare di aver spento la radio prima di inserirla nel caricatore. In caso contrario, l’indicazione dell'icona dello stato di carica della batteria non sarà corretta.Carica diretta1. Inserire la spina dell'adattatore c.c. nella presa DC IN 9V
della radio, quindi inserire l’estremità opposta nella presa accendisigari del veicolo.
2. Caricare la batteria per 16 ore.
Carica con il caricatore1. Inserire la spina dell’adattatore c.a. nella presa DC IN 9V
e l’estremità opposta nella presa di corrente.2. Appoggiare il caricatore su una scrivania o su un tavolo,
inserire la radio nel caricatore, facendo attenzione che la tastiera sia rivolta in avanti.
3. Controllare che il LED si illumini. Caricare la batteria per 16 ore. A carica ultimata, rimuovere la radio dal caricatore.
Nota: gli indicatori LED di carica resteranno accesi finché le radio sono nel caricatore.
6
Italiano
Carica della batteriaIl pacco batterie al NiMH può essere caricato da solo, utilizzando la staffa di sostegno in dotazione.1. Inserire la staffa di sostegno nel caricatore.2. Inserire il pacco batterie al NiMH, facendo attenzione che
i contatti della batteria e quelli del caricatore aderiscano perfettamente. Se le batterie non sono inserite correttamente, il caricatore non funziona.
3. Controllare che il LED si illumini. Caricare la batteria per 16 ore.
Nota: gli indicatori LED di carica resteranno accesi finché le radio sono nel caricatore.
Funzionamento della radioPer ottenere prestazioni ottimali dalla ricetrasmittente, leggere con attenzione il presente manuale prima di utilizzare la radio.Accensione della radio e regolazione del volume1. Ruotare la manopola in senso orario per accendere la
radio e, dopo l’accensione, per aumentare il volume. Per abbassare il volume, ruotarla in senso antiorario.
2. Per spegnere la radio, ruotare completamente la manopola in senso antiorario.
Regolazione del livello del suono (toni tastiera) Ogni volta che si preme un tasto - eccettuati i tasti PTT e
- la radio emette un segnale acustico. Per abilitare o disabilitare i toni tastiera, premere e tener premuto il tasto mentre si accende la radio.
Tono di fine trasmissione (Roger beep) Il tono “Roger beep” è un tono inviato per segnalare la fine della trasmissione (PTT e VOX). Se i toni della tastiera
sono abilitati, il tono “Roger beep" viene instradato attraverso l’altoparlante. Questo tono viene inviato anche se i toni della tastiera sono disabilitati; non verrà tuttavia emesso attraverso l’altoparlante.Per abilitare e disabilitare il tono “Roger beep”:Premere e tener premuto il tasto durante l’accensione della radio.
TrasmissionePer comunicare con altri utenti:1. Premere e tener premuto il tasto PTT e parlare
chiaramente, con tono normale, tenendo il microfono a 5-8 cm di distanza dalla bocca. Durante la trasmissione, l’icona viene visualizzata sul display. Per evitare che la parte iniziale della trasmissione venga tagliata, aspettare qualche secondo prima di parlare dopo aver premuto il pulsante PTT.
2. Dopo aver finito di parlare, rilasciare il tasto PTT. È quindi possibile ricevere le chiamate in arrivo. Durante la ricezione, l’icona viene visualizzata sul display.
Nota: se si continua a trasmettere per 60 secondi, la radio emette il tono di timeout TX e l’icona lampeggia. La radio interrompe la trasmissione.
7
Italiano
Navigazione del menuSi accede alle funzioni avanzate della ricetrasmittente TLKR T7 tramite due menu: menu Selezione e menu Modo.1. Per accedere al menu Selezione, premere il tasto SEL/
; è quindi possibile selezionare il canale. Per accedere al menu Comune , premere il tasto MENU/GRP.
2. È possibile uscire dal menu:a. premendo il pulsante PTT.b. attendendo 10 secondi finché la radio torna
automaticamente al modo "Normale".
Menu SelezioneIl tasto SEL/ consente di navigare il menu Seleziona nel modo seguente:
Premere il tasto SEL/ per passare al sottomenu successivo.
Per uscire dal menu, premere il tasto MENU/GRP (in entrambi i sottomenu), o SEL/ (solo nel sottomenu sottocodice).
Selezione di un canalePer comunicare con gli altri utenti, è possibile scegliere tra 8 canali e 121 sottocodici. Per poter comunicare tra loro, ogni ricetrasmittente deve essere impostata sullo stesso canale e sottocodice.Per selezionare un canale:1. Accedere al menu Selezione. L’indicatore del canale
lampeggia.2. Premere il tasto o per incrementare o
decrementare il numero del canale visualizzato. Premendo e tenendo premuto il tasto o , il numero del canale viene incrementato o decrementato rapidamente.
3. Per selezionare il sottocodice, passare al sottomenu successivo.
Selezione di un sottocodiceAssegnando un sottocodice alla radio, si riducono le interferenze. È tuttavia doveroso notare che radio con sottocodici diversi non possono comunicare tra loro. Per ciascuno degli 8 canali, è possibile selezionare un codice compreso tra 0 e 121.1. Accedere al menu Selezione. Scorrere il menu fino a
quando l’indicatore del sottocodice lampeggia.2. Premere il tasto o per incrementare o decrementare il
numero del sottocodice visualizzato. Premendo e tenendo premuto il tasto o , il numero del sottocodice viene incrementato o decrementato rapidamente.
3. Premere il tasto SEL/ per uscire dal menu Selezione.
Normale Canale Sooto codice
0-1211-8
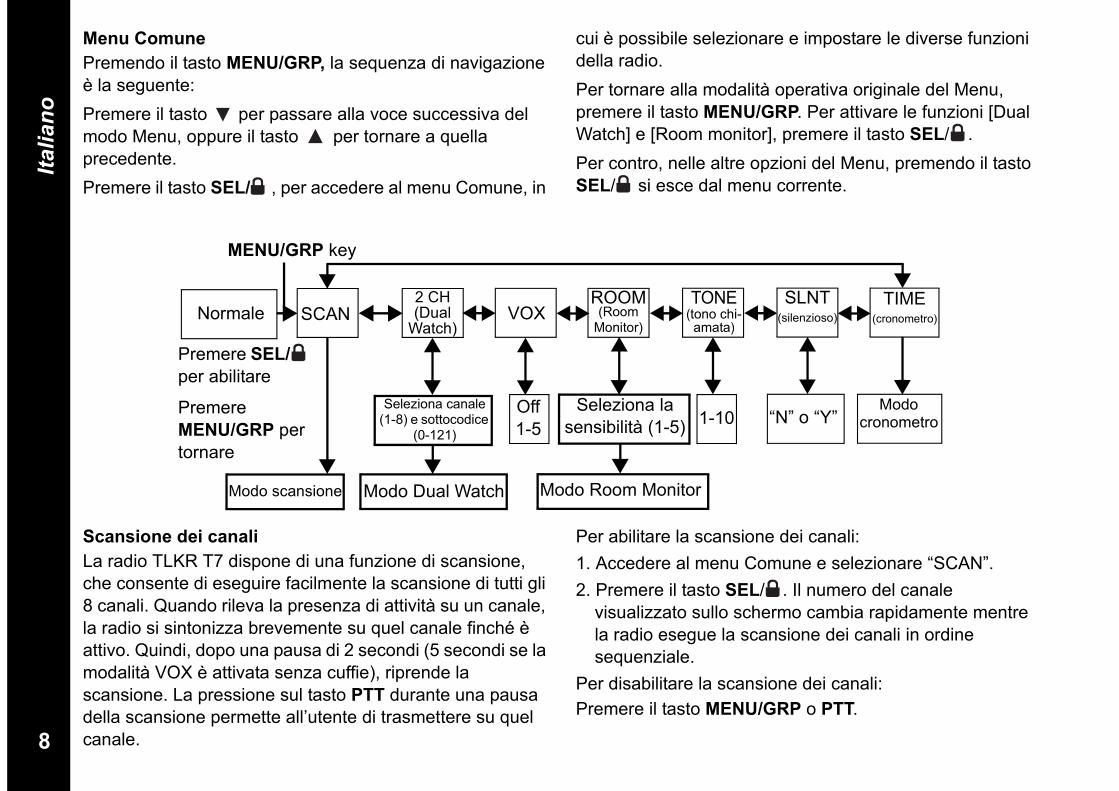
8
Italiano
Menu ComunePremendo il tasto MENU/GRP, la sequenza di navigazione è la seguente:Premere il tasto per passare alla voce successiva del modo Menu, oppure il tasto per tornare a quella precedente.Premere il tasto SEL/ , per accedere al menu Comune, in
cui è possibile selezionare e impostare le diverse funzioni della radio.Per tornare alla modalità operativa originale del Menu, premere il tasto MENU/GRP. Per attivare le funzioni [Dual Watch] e [Room monitor], premere il tasto SEL/ .Per contro, nelle altre opzioni del Menu, premendo il tasto SEL/ si esce dal menu corrente.
Normale SCAN2 CH (Dual
Watch)VOX
ROOM(Room
Monitor)
TONE (tono chi-amata)
SLNT(silenzioso)
TIME(cronometro)
Seleziona canale (1-8) e sottocodice
(0-121)
Modo cronometro
Seleziona la sensibilità (1-5)
Off 1-5 1-10 “N” o “Y”
Modo scansione Modo Dual Watch Modo Room Monitor
MENU/GRP key
Premere SEL/per abilitare
Premere MENU/GRP per tornare
Scansione dei canaliLa radio TLKR T7 dispone di una funzione di scansione, che consente di eseguire facilmente la scansione di tutti gli 8 canali. Quando rileva la presenza di attività su un canale, la radio si sintonizza brevemente su quel canale finché è attivo. Quindi, dopo una pausa di 2 secondi (5 secondi se la modalità VOX è attivata senza cuffie), riprende la scansione. La pressione sul tasto PTT durante una pausa della scansione permette all’utente di trasmettere su quel canale.
Per abilitare la scansione dei canali:1. Accedere al menu Comune e selezionare “SCAN”. 2. Premere il tasto SEL/ . Il numero del canale
visualizzato sullo schermo cambia rapidamente mentre la radio esegue la scansione dei canali in ordine sequenziale.
Per disabilitare la scansione dei canali:Premere il tasto MENU/GRP o PTT.9
9
Italiano
Modo Dual WatchCon la ricetrasmittente TLKR T7 è possibile eseguire alternativamente la scansione sul canale corrente e su un altro canale. È però necessario impostare il numero e il relativo sottocodice per il secondo canale.Per impostare il secondo canale ed abilitare la modalità operativa Dual Watch:1. Accedere al menu Comune e selezionare “2CH”, quindi
premere il tasto SEL/ per selezionare la modalità operativa Dual Watch. Appare l’icona Dual Watch.
2. Premere dapprima il tasto o per selezionare il numero del canale, quindi il tasto SEL/ .
3. Premere il tasto o per selezionare il sottocodice, quindi il tasto SEL/ .
4. La funzione di doppio controllo Dual Watch è abilitata.Nota: se si assegna al secondo canale un numero di canale
e un sottocodice eguali a quello corrente, il doppio controllo non viene effettuato.
Per disabilitare la modalità operativa Dual Watch:Premere il tasto MENU/GRP.Trasmissione a viva voceLa radio TLKR T7 dispone della funzione VOX (Voice Operated Transmitter) selezionabile dall’utente, che attiva la trasmissione automaticamente al rilevamento della voce. Questa funzione consente l’utilizzo a mani libere della radio. La trasmissione viene attivata parlando nel microfono o nella cuffia (questo accessorio non è incluso nel kit) e non dalla pressione sul tasto PTT.1. Accedere al menu Comune e selezionare “VOX”, quindi
premere il tasto SEL/ . Il livello attualmente impostato
(OFF. 1-5) lampeggia. Il livello “N” (OFF) disattiva il VOX, mentre quelli 1-5 consentono di impostare la sensibilità del circuito VOX.
2. Premere il tasto or per selezionare il livello di sensibilità VOX desiderato. Impostare il livello 1 per usare la radio in ambienti silenziosi e il livello 5 per gli ambienti rumorosi. Per individuare il livello di sensibilità appropriato, parlare nel microfono. Se l’icona VOX lampeggia, la voce è stata rilevata correttamente.
3. Uscire dal menu Comune.Nota: se si continua a trasmettere per 60 secondi nella
modalità VOX, la radio emette il tono di timeout TX e l’icona lampeggia per 5 secondi.
Funzione Room MonitorÈ possibile utilizzare una delle radio TLKR T7 per monitorare a distanza la presenza di attività voce nella stanza o nel locale, mentre si ascolta con l’altra radio. Abilitando questa funzione, la radio di controllo, a seconda del livello di sensibilità impostato, si attiva quando rileva voci e rumori e trasmette automaticamente alla radio ricevente senza che l’utente debba premere il tasto PTT. In questa modalità operativa, la radio di controllo non è in grado operare in ricezione.Per abilitare la funzione Room monitor:1. Accedere al menu Comune e selezionare “ROOM”,
quindi premere il tasto SEL/ .2. Premere il tasto o per selezionare il livello di
sensibilità desiderato per il monitoraggio ambientale a distanza. Impostare il livello 1 per usare la radio in ambienti silenziosi, e il livello 5 per gli ambienti rumorosi.
3. Premere il tasto SEL/ per attivare la funzione Room
10
Italiano
monitor.Per disabilitare la funzione Room monitor:Premere il tasto MENU/GRP.Nota:- La pressione del tasto PTT mentre la radio è nella modalità
operativa Room monitor è invalida, per cui la radio emette il tono di errore PTT.
- Se rileva voce o rumori continui per oltre 60 secondi, la radio interrompe il monitoraggio per 5 secondi prima di riprenderlo.
Invio di un tono di chiamataLa radio TLKR T7 dispone di 10 toni di chiamata selezionabili, che vengono inviati alla pressione del tasto
nella modalità operativa Normale.Per selezionare un tono di chiamata:1. Accedere al menu Comune e selezionare “TONE”, quindi
premere il tasto SEL/ .Anche il numero del tono di chiamata attualmente impostato (1-10) lampeggia.
2. Premere il tasto o per selezionare il numero del tono di chiamata desiderato. Ad ogni pressione, si ascolta il tono attraverso l’altoparlante.
3. Uscire dal menu Comune.Per inviare il tono di chiamata selezionato, premere il tasto
nella modalità operativa Normale. Il tono selezionato viene trasmesso automaticamente per un periodo di tempo definito. Il tono di chiamata viene annullato premendo il pulsante PTT.
Modo silenziosoAbilitando il Modo silenzioso, si disattivano tutti i toni di avviso delle chiamate in arrivo: il display della radio lampeggia per avvisare l’utente dell’arrivo di una chiamata.Se non si risponde, il display si spegne e l’icona CALL lampeggia fino alla perdita del segnale.Inoltre, la TLKR-T7 vibra per segnalare la presenza di una chiamata persa.Il modo Silenzioso è disabilitato per 15 secondi durante la trasmissione, ricezione o se si preme un qualsiasi altro pulsante.Per impostare il modo Silenzioso:1. Accedere al menu Comune e selezionare “SLNT”, quindi
premere il tasto SEL/ .2. Premere il tasto per abilitare il modo silenzioso.
L’indicatore di canale mostra “Y” e appare l’icona SILENT.
3. Premere il tasto per disabilitare il modo silenzioso. L’indicatore di canale mostra “N” e l’icona SILENT scompare.
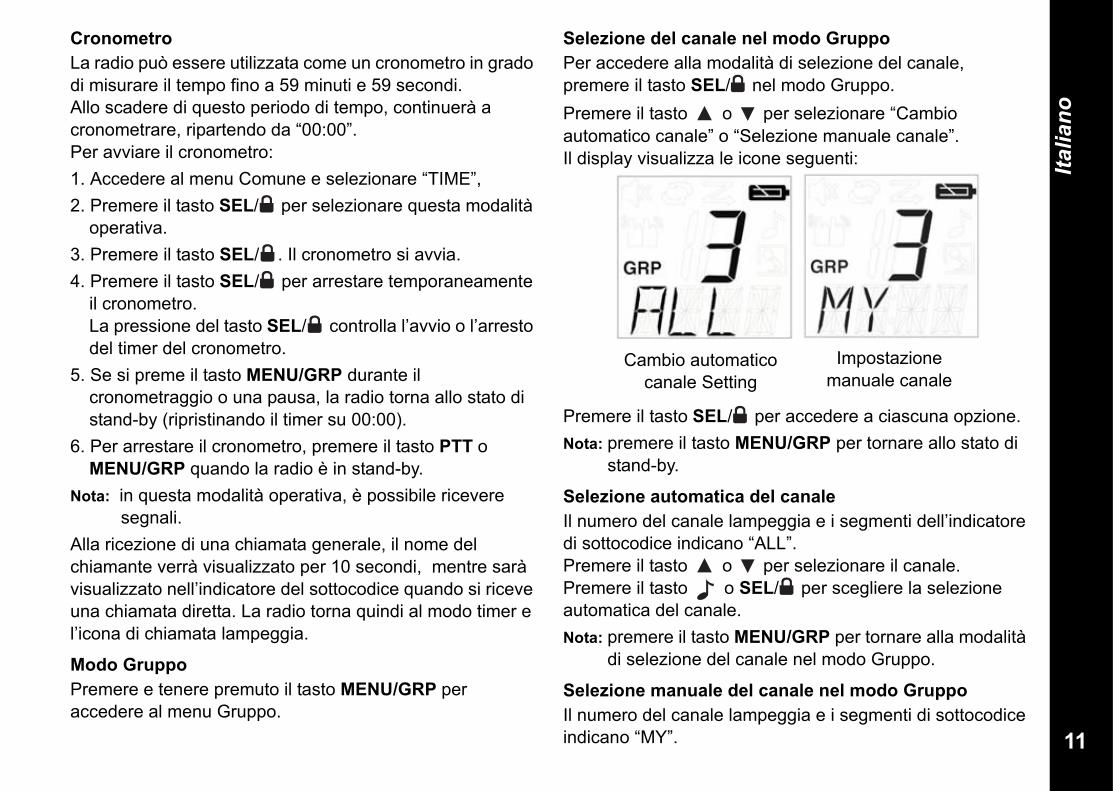
11
Italiano
Cronometro La radio può essere utilizzata come un cronometro in grado di misurare il tempo fino a 59 minuti e 59 secondi.Allo scadere di questo periodo di tempo, continuerà a cronometrare, ripartendo da “00:00”.Per avviare il cronometro:1. Accedere al menu Comune e selezionare “TIME”,2. Premere il tasto SEL/ per selezionare questa modalità
operativa.3. Premere il tasto SEL/ . Il cronometro si avvia.4. Premere il tasto SEL/ per arrestare temporaneamente
il cronometro.La pressione del tasto SEL/ controlla l’avvio o l’arresto del timer del cronometro.
5. Se si preme il tasto MENU/GRP durante il cronometraggio o una pausa, la radio torna allo stato di stand-by (ripristinando il timer su 00:00).
6. Per arrestare il cronometro, premere il tasto PTT oMENU/GRP quando la radio è in stand-by.
Nota: in questa modalità operativa, è possibile ricevere segnali.
Alla ricezione di una chiamata generale, il nome del chiamante verrà visualizzato per 10 secondi, mentre sarà visualizzato nell’indicatore del sottocodice quando si riceve una chiamata diretta. La radio torna quindi al modo timer e l’icona di chiamata lampeggia.
Modo GruppoPremere e tenere premuto il tasto MENU/GRP peraccedere al menu Gruppo.
Selezione del canale nel modo GruppoPer accedere alla modalità di selezione del canale, premere il tasto SEL/ nel modo Gruppo. Premere il tasto o per selezionare “Cambio automatico canale” o “Selezione manuale canale”.Il display visualizza le icone seguenti:
Premere il tasto SEL/ per accedere a ciascuna opzione.Nota: premere il tasto MENU/GRP per tornare allo stato di
stand-by.
Selezione automatica del canaleIl numero del canale lampeggia e i segmenti dell’indicatore di sottocodice indicano “ALL”.Premere il tasto o per selezionare il canale.Premere il tasto o SEL/ per scegliere la selezione automatica del canale.Nota: premere il tasto MENU/GRP per tornare alla modalità
di selezione del canale nel modo Gruppo.
Selezione manuale del canale nel modo GruppoIl numero del canale lampeggia e i segmenti di sottocodice indicano “MY”.
Cambio automatico canale Setting
Impostazione manuale canale
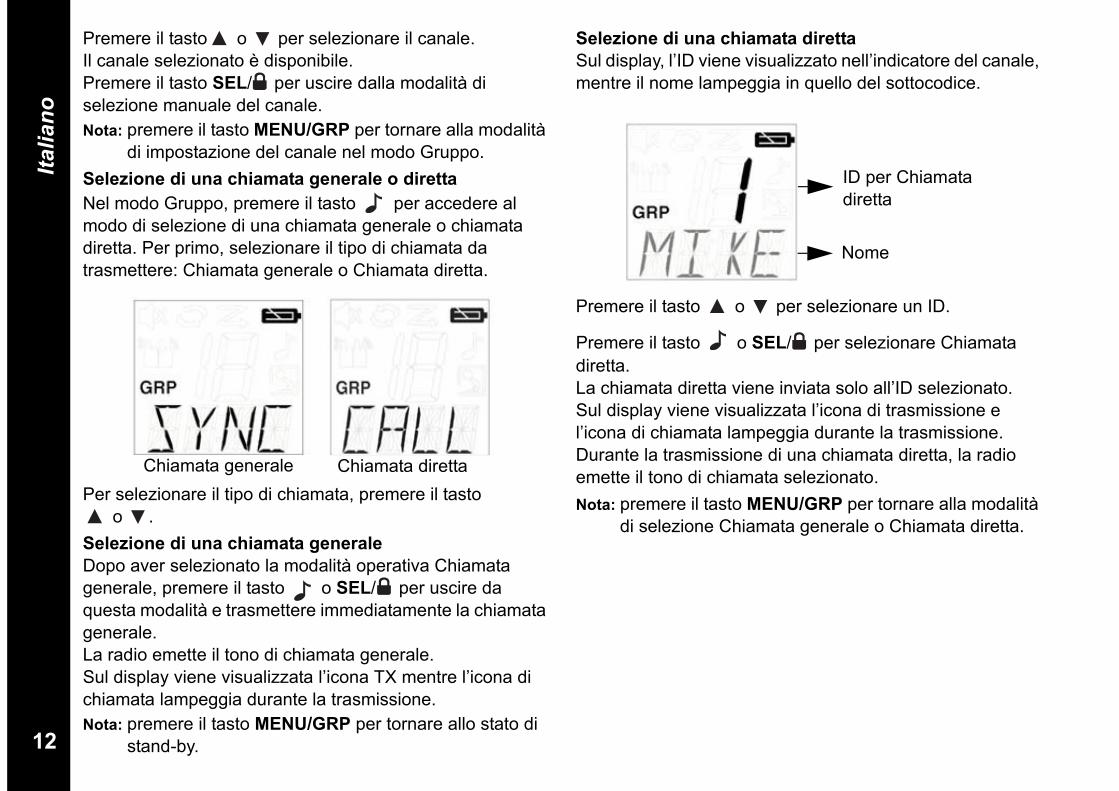
12
Italiano
Premere il tasto o per selezionare il canale.Il canale selezionato è disponibile.Premere il tasto SEL/ per uscire dalla modalità di selezione manuale del canale.Nota: premere il tasto MENU/GRP per tornare alla modalità
di impostazione del canale nel modo Gruppo.Selezione di una chiamata generale o diretta Nel modo Gruppo, premere il tasto per accedere al modo di selezione di una chiamata generale o chiamata diretta. Per primo, selezionare il tipo di chiamata da trasmettere: Chiamata generale o Chiamata diretta.
Per selezionare il tipo di chiamata, premere il tasto o .
Selezione di una chiamata generaleDopo aver selezionato la modalità operativa Chiamata generale, premere il tasto o SEL/ per uscire da questa modalità e trasmettere immediatamente la chiamata generale.La radio emette il tono di chiamata generale.Sul display viene visualizzata l’icona TX mentre l’icona di chiamata lampeggia durante la trasmissione.Nota: premere il tasto MENU/GRP per tornare allo stato di
stand-by.
Selezione di una chiamata direttaSul display, l’ID viene visualizzato nell’indicatore del canale, mentre il nome lampeggia in quello del sottocodice.
Premere il tasto o per selezionare un ID.
Premere il tasto o SEL/ per selezionare Chiamata diretta.La chiamata diretta viene inviata solo all’ID selezionato.Sul display viene visualizzata l’icona di trasmissione e l’icona di chiamata lampeggia durante la trasmissione.Durante la trasmissione di una chiamata diretta, la radio emette il tono di chiamata selezionato.Nota: premere il tasto MENU/GRP per tornare alla modalità
di selezione Chiamata generale o Chiamata diretta.
Chiamata generale Chiamata diretta
ID per Chiamata diretta
Nome
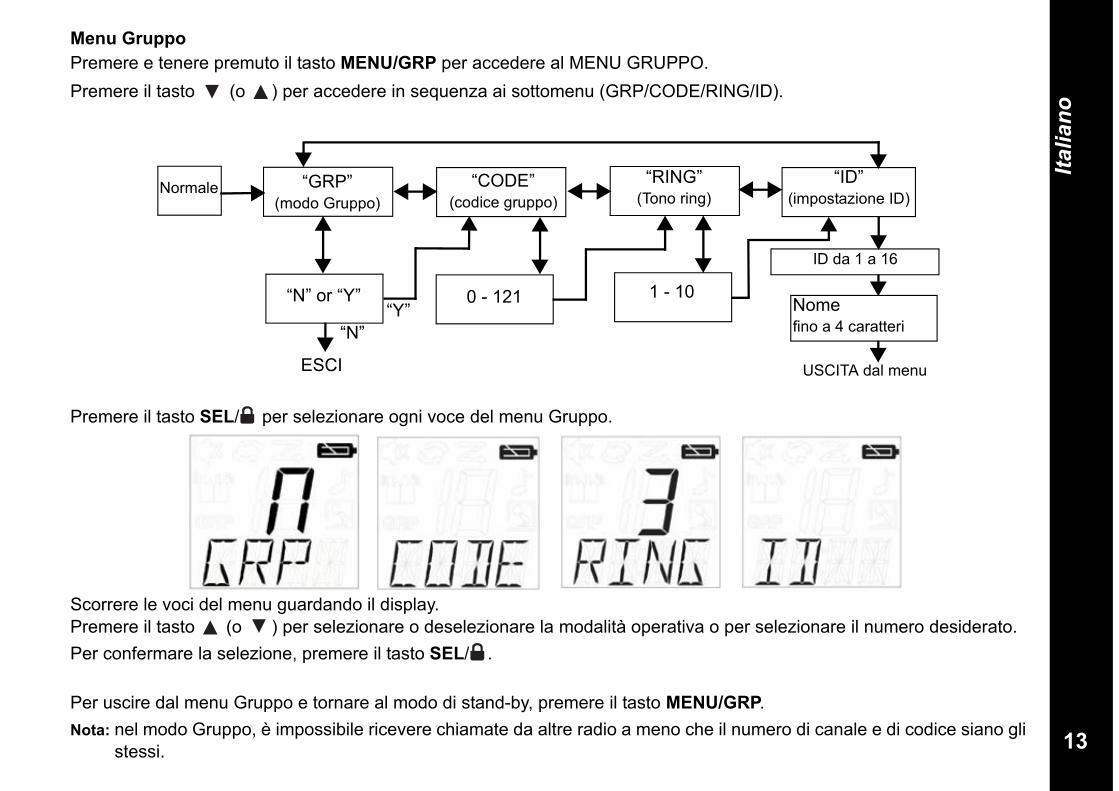
13
Italiano
Menu GruppoPremere e tenere premuto il tasto MENU/GRP per accedere al MENU GRUPPO.Premere il tasto (o ) per accedere in sequenza ai sottomenu (GRP/CODE/RING/ID).
Premere il tasto SEL/ per selezionare ogni voce del menu Gruppo.
Scorrere le voci del menu guardando il display.Premere il tasto (o ) per selezionare o deselezionare la modalità operativa o per selezionare il numero desiderato.Per confermare la selezione, premere il tasto SEL/ .
Per uscire dal menu Gruppo e tornare al modo di stand-by, premere il tasto MENU/GRP.Nota: nel modo Gruppo, è impossibile ricevere chiamate da altre radio a meno che il numero di canale e di codice siano gli
stessi.
Normale “GRP”(modo Gruppo)
“CODE”(codice gruppo)
“ID” (impostazione ID)
ID da 1 a 16
0 - 121 1 - 10
ESCI
Nome fino a 4 caratteri
“N” or “Y”
“N”“Y”
USCITA dal menu
“RING”(Tono ring)
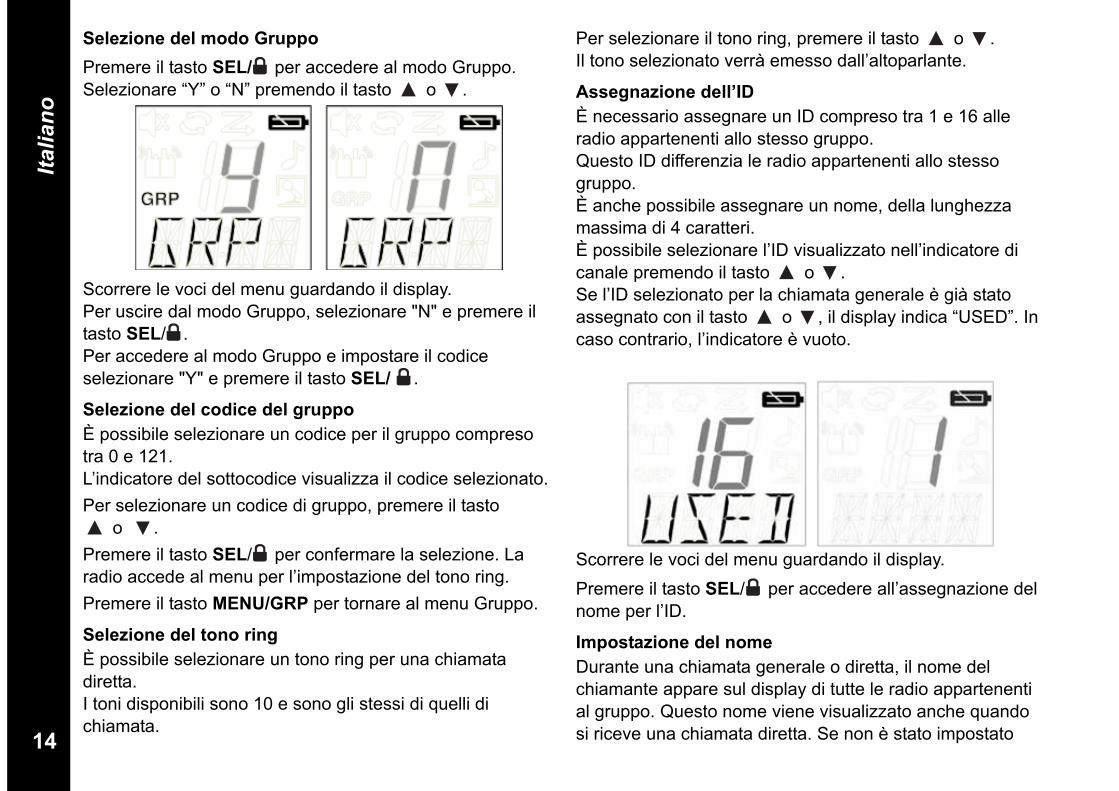
14
Italiano
Selezione del modo GruppoPremere il tasto SEL/ per accedere al modo Gruppo. Selezionare “Y” o “N” premendo il tasto o .
Scorrere le voci del menu guardando il display.Per uscire dal modo Gruppo, selezionare "N" e premere il tasto SEL/ .Per accedere al modo Gruppo e impostare il codice selezionare "Y" e premere il tasto SEL/ .
Selezione del codice del gruppo È possibile selezionare un codice per il gruppo compreso tra 0 e 121.L’indicatore del sottocodice visualizza il codice selezionato.Per selezionare un codice di gruppo, premere il tasto
o .Premere il tasto SEL/ per confermare la selezione. La radio accede al menu per l’impostazione del tono ring.Premere il tasto MENU/GRP per tornare al menu Gruppo.
Selezione del tono ring È possibile selezionare un tono ring per una chiamata diretta.I toni disponibili sono 10 e sono gli stessi di quelli di chiamata.
Per selezionare il tono ring, premere il tasto o .Il tono selezionato verrà emesso dall’altoparlante.
Assegnazione dell’IDÈ necessario assegnare un ID compreso tra 1 e 16 alle radio appartenenti allo stesso gruppo.Questo ID differenzia le radio appartenenti allo stesso gruppo.È anche possibile assegnare un nome, della lunghezza massima di 4 caratteri. È possibile selezionare l’ID visualizzato nell’indicatore di canale premendo il tasto o . Se l’ID selezionato per la chiamata generale è già stato assegnato con il tasto o , il display indica “USED”. In caso contrario, l’indicatore è vuoto.
Scorrere le voci del menu guardando il display.Premere il tasto SEL/ per accedere all’assegnazione del nome per l’ID.
Impostazione del nomeDurante una chiamata generale o diretta, il nome del chiamante appare sul display di tutte le radio appartenenti al gruppo. Questo nome viene visualizzato anche quando si riceve una chiamata diretta. Se non è stato impostato
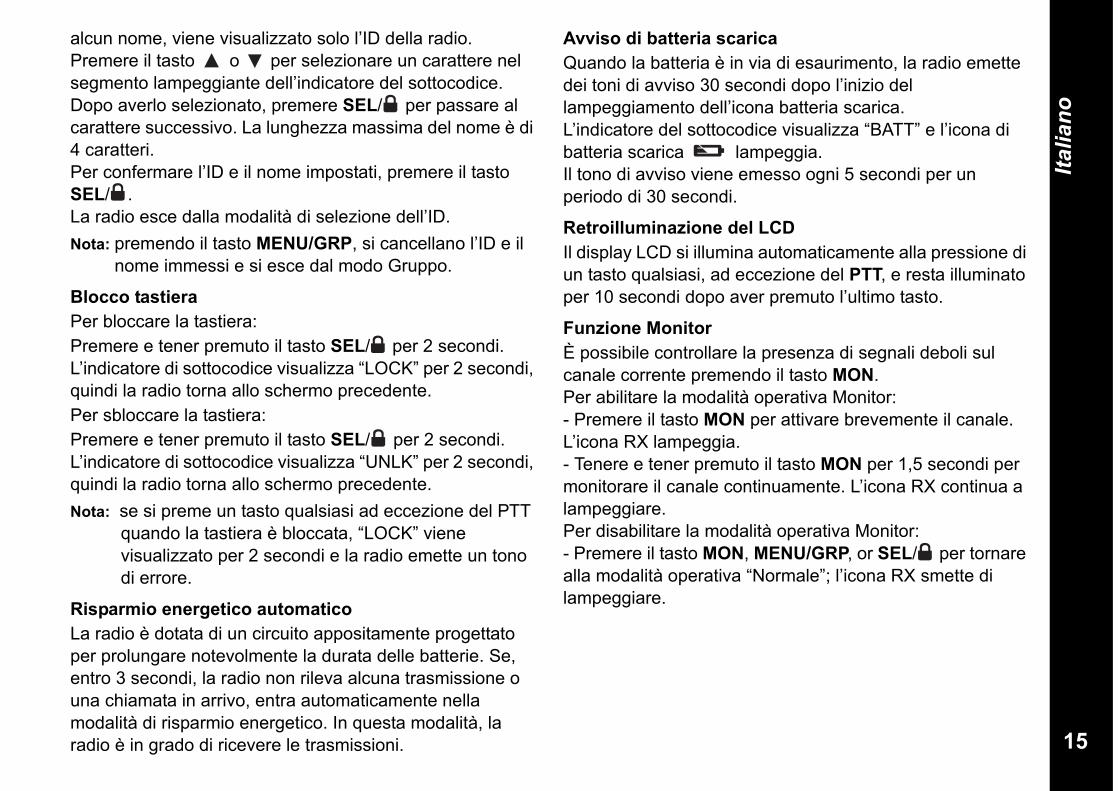
15
Italiano
alcun nome, viene visualizzato solo l’ID della radio.Premere il tasto o per selezionare un carattere nel segmento lampeggiante dell’indicatore del sottocodice.Dopo averlo selezionato, premere SEL/ per passare al carattere successivo. La lunghezza massima del nome è di 4 caratteri.Per confermare l’ID e il nome impostati, premere il tasto SEL/ .La radio esce dalla modalità di selezione dell’ID.Nota: premendo il tasto MENU/GRP, si cancellano l’ID e il
nome immessi e si esce dal modo Gruppo.
Blocco tastieraPer bloccare la tastiera:Premere e tener premuto il tasto SEL/ per 2 secondi. L’indicatore di sottocodice visualizza “LOCK” per 2 secondi, quindi la radio torna allo schermo precedente.Per sbloccare la tastiera:Premere e tener premuto il tasto SEL/ per 2 secondi. L’indicatore di sottocodice visualizza “UNLK” per 2 secondi, quindi la radio torna allo schermo precedente.Nota: se si preme un tasto qualsiasi ad eccezione del PTT
quando la tastiera è bloccata, “LOCK” viene visualizzato per 2 secondi e la radio emette un tono di errore.
Risparmio energetico automaticoLa radio è dotata di un circuito appositamente progettato per prolungare notevolmente la durata delle batterie. Se, entro 3 secondi, la radio non rileva alcuna trasmissione o una chiamata in arrivo, entra automaticamente nella modalità di risparmio energetico. In questa modalità, la radio è in grado di ricevere le trasmissioni.
Avviso di batteria scarica Quando la batteria è in via di esaurimento, la radio emette dei toni di avviso 30 secondi dopo l’inizio del lampeggiamento dell’icona batteria scarica.L’indicatore del sottocodice visualizza “BATT” e l’icona di batteria scarica lampeggia.Il tono di avviso viene emesso ogni 5 secondi per un periodo di 30 secondi.
Retroilluminazione del LCDIl display LCD si illumina automaticamente alla pressione di un tasto qualsiasi, ad eccezione del PTT, e resta illuminato per 10 secondi dopo aver premuto l’ultimo tasto.
Funzione MonitorÈ possibile controllare la presenza di segnali deboli sul canale corrente premendo il tasto MON.Per abilitare la modalità operativa Monitor:- Premere il tasto MON per attivare brevemente il canale. L’icona RX lampeggia.- Tenere e tener premuto il tasto MON per 1,5 secondi per monitorare il canale continuamente. L’icona RX continua a lampeggiare.Per disabilitare la modalità operativa Monitor:- Premere il tasto MON, MENU/GRP, or SEL/ per tornare alla modalità operativa “Normale”; l’icona RX smette di lampeggiare.
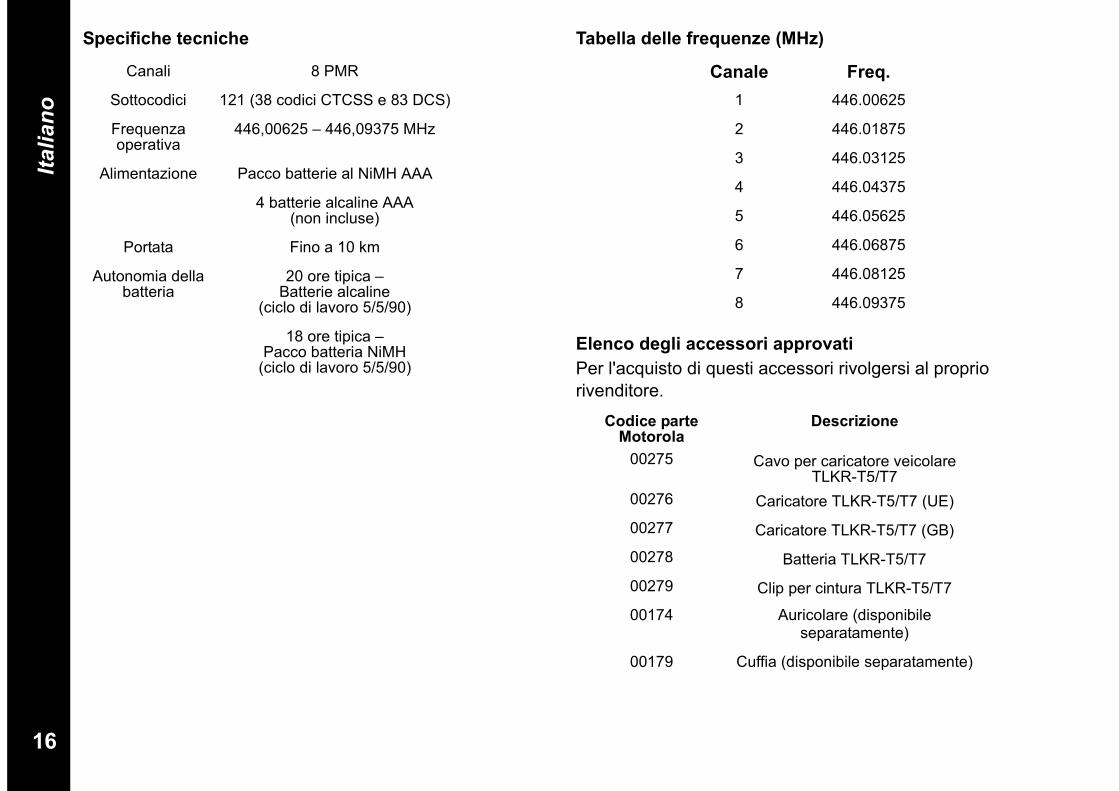
16
Italiano
Specifiche tecniche Tabella delle frequenze (MHz)
Elenco degli accessori approvatiPer l'acquisto di questi accessori rivolgersi al proprio rivenditore.
Canali 8 PMR
Sottocodici 121 (38 codici CTCSS e 83 DCS)
Frequenza operativa
446,00625 – 446,09375 MHz
Alimentazione Pacco batterie al NiMH AAA
4 batterie alcaline AAA (non incluse)
Portata Fino a 10 km
Autonomia della batteria
20 ore tipica – Batterie alcaline
(ciclo di lavoro 5/5/90)
18 ore tipica – Pacco batteria NiMH
(ciclo di lavoro 5/5/90)
Canale Freq.1 446.00625
2 446.01875
3 446.03125
4 446.04375
5 446.05625
6 446.06875
7 446.08125
8 446.09375
Codice parte Motorola
Descrizione
00275 Cavo per caricatore veicolare TLKR-T5/T7
00276 Caricatore TLKR-T5/T7 (UE)
00277 Caricatore TLKR-T5/T7 (GB)
00278 Batteria TLKR-T5/T7
00279 Clip per cintura TLKR-T5/T7
00174 Auricolare (disponibile separatamente)
00179 Cuffia (disponibile separatamente)
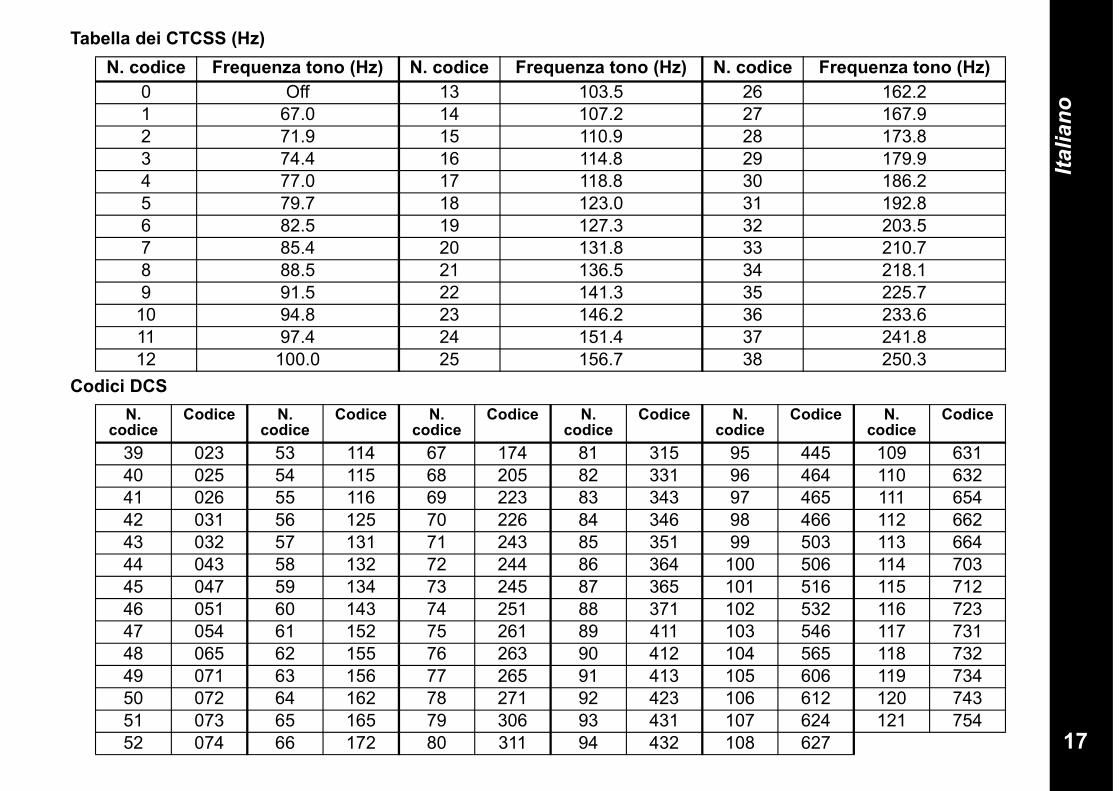
17
Italiano
Tabella dei CTCSS (Hz)
Codici DCS
N. codice Frequenza tono (Hz) N. codice Frequenza tono (Hz) N. codice Frequenza tono (Hz)0 Off 13 103.5 26 162.21 67.0 14 107.2 27 167.92 71.9 15 110.9 28 173.83 74.4 16 114.8 29 179.94 77.0 17 118.8 30 186.25 79.7 18 123.0 31 192.86 82.5 19 127.3 32 203.57 85.4 20 131.8 33 210.78 88.5 21 136.5 34 218.19 91.5 22 141.3 35 225.7
10 94.8 23 146.2 36 233.611 97.4 24 151.4 37 241.812 100.0 25 156.7 38 250.3
N. codice
Codice N. codice
Codice N. codice
Codice N. codice
Codice N. codice
Codice N. codice
Codice
39 023 53 114 67 174 81 315 95 445 109 63140 025 54 115 68 205 82 331 96 464 110 63241 026 55 116 69 223 83 343 97 465 111 65442 031 56 125 70 226 84 346 98 466 112 66243 032 57 131 71 243 85 351 99 503 113 66444 043 58 132 72 244 86 364 100 506 114 70345 047 59 134 73 245 87 365 101 516 115 71246 051 60 143 74 251 88 371 102 532 116 72347 054 61 152 75 261 89 411 103 546 117 73148 065 62 155 76 263 90 412 104 565 118 73249 071 63 156 77 265 91 413 105 606 119 73450 072 64 162 78 271 92 423 106 612 120 74351 073 65 165 79 306 93 431 107 624 121 75452 074 66 172 80 311 94 432 108 627
18
Italiano
Informazioni Sulla GaranziaIl concessionario o il rivenditore Motorola autorizzato presso il quale si è acquistato il ricetrasmettitore Motorola e/o gli accessori originali, accetteranno i reclami di garanzia e/o forniranno l'assistenza prevista dalla garanzia. A questo fine si invita l'utente a restituire la radio al proprio concessionario o rivenditore. Non restituire la radio alla Motorola.Per ricevere l'assistenza prevista dalla garanzia occorre presentare la ricevuta di acquisto o una prova di acquisto comparabile recante la data di acquisto. Il ricetrasmettitore deve anche mostrare chiaramente il numero di serie. La garanzia non è valida se i numeri di modello o serie del prodotto sono stati modificati, cancellati, rimossi o resi illeggibili.
Cosa Non è Coperto dalla GaranziaDifetti o danni risultanti dall'uso del Prodotto in maniera anomala o dalla mancata osservanza delle istruzioni del presente manuale.Difetti o danni derivanti da uso improprio, incidente o negligenza.Difetti o danni derivanti da procedure errate di collaudo, funzionamento, manutenzione, regolazione o da alterazioni o modifiche di qualsiasi tipo.Danni ad antenne, salvo non siano causati direttamente da difetti di materiale o lavorazione.Prodotti smontati o riparati in maniera tale da condizionare in modo avverso le prestazioni dell'unità o da impedire un controllo adeguato dell'unità al fine di verificare la validità del reclamo.Difetti o danni dovuti a campo operativo.
Difetti o danni dovuti a umidità, liquidi o versamenti.Tutte le superfici di plastica e tutte le altre parti esposte esternamente che sono graffiate o danneggiate in conseguenza del normale utilizzo.Prodotti noleggiati su base temporanea.Manutenzione e riparazione periodica o sostituzione di componenti dovuta al normale utilizzo e usura.
Informazioni Sui Diritti d'AutoreI prodotti Motorola descritti in questo manuale possono includere programmi Motorola protetti da diritti d'autore, memorie di semiconduttore archiviate o altri media. Le leggi degli Stati Uniti e di altri paesi garantiscono a Motorola determinati diritti esclusivi per programmi informatici protetti da diritti d'autore, ivi compreso il diritto esclusivo di copiare o riprodurre in qualsiasi forma i programmi Motorola protetti dai suddetti diritti.Di conseguenza, nessun programma Motorola protetto da diritti d'autore contenuto nei prodotti Motorola descritti in questo manuale può essere copiato o riprodotto in alcuna maniera senza la previa autorizzazione scritta della Motorola. Inoltre, l'acquisto di prodotti Motorola non garantisce la concessione per via diretta, per implicazione, preclusione o altro di alcuna licenza ai sensi dei diritti d'autore, brevetti o richieste di brevetti di Motorola, ad eccezione della normale licenza d'uso non esclusiva ed esente da royalties che scaturisce per legge dalla vendita di un prodotto.MOTOROLA e il logo stilizzato M sono registrati negli Stati Uniti d'America. Ufficio marchi e brevetti.© Motorola, Inc. 2008
1
Português
ÍNDICESegurança do produto e exposição à RF para rádios bidireccionais portáteis . . . . . . . . . . . . . . . . . . . . 2Características . . . . . . . . . . . . . . . . . . . . . . . . . . . . . . . . . . . . 2Controlo e Funções . . . . . . . . . . . . . . . . . . . . . . . . . . . . . . . . 3Visor. . . . . . . . . . . . . . . . . . . . . . . . . . . . . . . . . . . . . . . . . . . . 4Conteúdo da Embalagem . . . . . . . . . . . . . . . . . . . . . . . . . . . 5Colocação das Pilhas . . . . . . . . . . . . . . . . . . . . . . . . . . . . . . 5Nível de Carga das Pilhas e Aviso de Pilhas Fracas . . . . . . . . . . . . . . . . . . . . . . . . . . . . . . . . . . 5Carregamento do Rádio. . . . . . . . . . . . . . . . . . . . . . . . . . . . . 5Carregamento Directo . . . . . . . . . . . . . . . . . . . . . . . . . . . . . . 5Utilização do Suporte para Carregamento . . . . . . . . . . . . . . 5Carregamento das Pilhas . . . . . . . . . . . . . . . . . . . . . . . . . . . 6Utilização do Rádio . . . . . . . . . . . . . . . . . . . . . . . . . . . . . . . . 6Ligar o Rádio e Regular o Volume . . . . . . . . . . . . . . . . . . . . 6Regular o Som (Sons das Teclas) . . . . . . . . . . . . . . . . . . . . 6Tom de "Recebido" . . . . . . . . . . . . . . . . . . . . . . . . . . . . . . . . 6Falar pelo Rádio . . . . . . . . . . . . . . . . . . . . . . . . . . . . . . . . . . 6Navegar no Menu . . . . . . . . . . . . . . . . . . . . . . . . . . . . . . . . . 7Menu Seleccionar . . . . . . . . . . . . . . . . . . . . . . . . . . . . . . . . . 7Seleccionar um Canal . . . . . . . . . . . . . . . . . . . . . . . . . . . . . . 7Escolher um Subcódigo. . . . . . . . . . . . . . . . . . . . . . . . . . . . . 7Menu Comum . . . . . . . . . . . . . . . . . . . . . . . . . . . . . . . . . . . . 8Função de Busca de Canais . . . . . . . . . . . . . . . . . . . . . . . . . 8Modo de Escuta Dupla . . . . . . . . . . . . . . . . . . . . . . . . . . . . . 9Transmissão Activada pela Voz . . . . . . . . . . . . . . . . . . . . . . 9Função de Monitorização Ambiente . . . . . . . . . . . . . . . . . . . 9Transmitir um Sinal de Chamada . . . . . . . . . . . . . . . . . . . . 10Modo Silencioso. . . . . . . . . . . . . . . . . . . . . . . . . . . . . . . . . . 10Temporizador . . . . . . . . . . . . . . . . . . . . . . . . . . . . . . . . . . . 11Modo de Grupo . . . . . . . . . . . . . . . . . . . . . . . . . . . . . . . . . . 11Definição de Canal no Modo de Grupo . . . . . . . . . . . . . . . . 11Definição da Alteração Automática de Canal . . . . . . . . . . . 11Definição do Canal Manual no Modo de Grupo . . . . . . . . . 12Definição de Chamada Geral/Directa . . . . . . . . . . . . . . . . . 12
Definição de Chamada Geral . . . . . . . . . . . . . . . . . . . . . . . .12Definição de Chamada Directa . . . . . . . . . . . . . . . . . . . . . . .12Menu Grupo . . . . . . . . . . . . . . . . . . . . . . . . . . . . . . . . . . . . .13Definição do Modo de Grupo . . . . . . . . . . . . . . . . . . . . . . . .14Definição do Código de Grupo . . . . . . . . . . . . . . . . . . . . . . .14Definição de Toque . . . . . . . . . . . . . . . . . . . . . . . . . . . . . . .14Definição de ID . . . . . . . . . . . . . . . . . . . . . . . . . . . . . . . . . . .14Definição de Nome de ID . . . . . . . . . . . . . . . . . . . . . . . . . . .14Bloqueio das Teclas . . . . . . . . . . . . . . . . . . . . . . . . . . . . . . .15Função de Economia Automática de Energia . . . . . . . . . . . . . . . . . . . . . . . . . . . . . . . . . . . . . .15Aviso de Pouca Bateria . . . . . . . . . . . . . . . . . . . . . . . . . . . .15Retroiluminação do LCD . . . . . . . . . . . . . . . . . . . . . . . . . . . .15Função de Modo de Controlo . . . . . . . . . . . . . . . . . . . . . . . .15Especificações . . . . . . . . . . . . . . . . . . . . . . . . . . . . . . . . . . .16Tabela de Frequências (MHz) . . . . . . . . . . . . . . . . . . . . . . . .16Lista de Acessórios Aprovados . . . . . . . . . . . . . . . . . . . . .16Tabela CTCSS (Hz) . . . . . . . . . . . . . . . . . . . . . . . . . . . . . . .17Código DCS . . . . . . . . . . . . . . . . . . . . . . . . . . . . . . . . . . . . .17Informação de Garantia . . . . . . . . . . . . . . . . . . . . . . . . . . . .18A Garantia Não Cobre . . . . . . . . . . . . . . . . . . . . . . . . . . . . .18Informação de Direitos de Autor . . . . . . . . . . . . . . . . . . . .18
2
Português
Segurança do produto e exposição à RF para rádios bidireccionais portáteis
Características• 8 Canais PMR• 121 Subcódigos (38 códigos CTCSS e 83 códigos DCS)• Alcance até 10 km*• Circuito VOX Interno• 10 Sinais de Aviso de Chamada Seleccionáveis• Visor de Cristal Líquido (LCD) Retroiluminado• Tomada para Auscultador Opcional• Tom de "Recebido"• Temporizador• Monitorização Ambiente• Carregador das Pilhas• Medidor do Nível das Pilhas• Controlo de Canais• Busca de Canais• Escuta Dupla• loqueio do Teclado• Controlo Automático do Silenciador• Repetição Automática (Deslocação)
• Poupança de Bateria• Aviso de Pouca Bateria• Sinal (Ligar/Desligar)• Chamada Directa (Chamada por ID de Chamador)• Chamada de Grupo• Modo Silencioso• Chamada Geral• Alteração Automática de Canal* O alcance pode variar de acordo com as condições ambientais e/
ou topográficas.
Antes de utilizar este produto, leia as instruções de utilização segura contidas no folheto de Segurança do Produto e Exposição a RF fornecido com o rádio.CUIDADO!
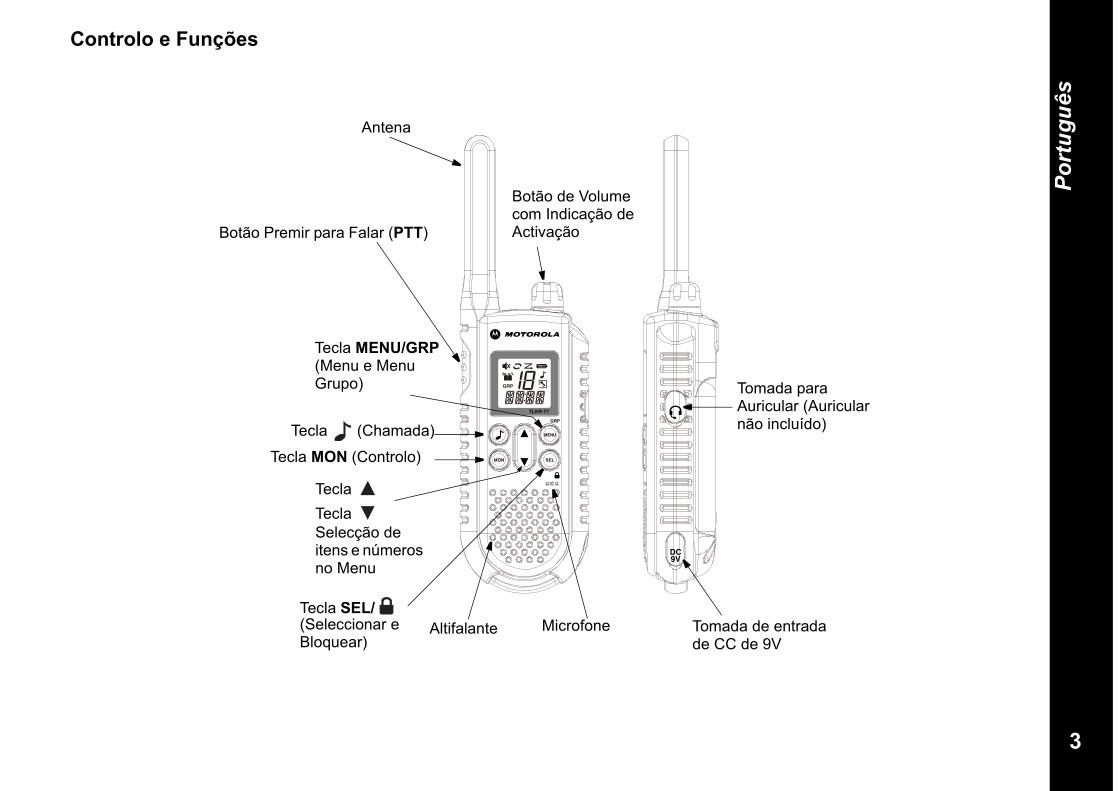
3
Português
Controlo e Funções
Tomada para Auricular (Auricular não incluído)
Antena
Botão de Volume com Indicação de ActivaçãoBotão Premir para Falar (PTT)
Tecla (Chamada)
Tecla MON (Controlo)
Tecla Tecla Selecção de itens e números no Menu
Tecla MENU/GRP(Menu e Menu Grupo)
Tecla SEL/(Seleccionar e Bloquear)
Altifalante Microfone Tomada de entrada de CC de 9V
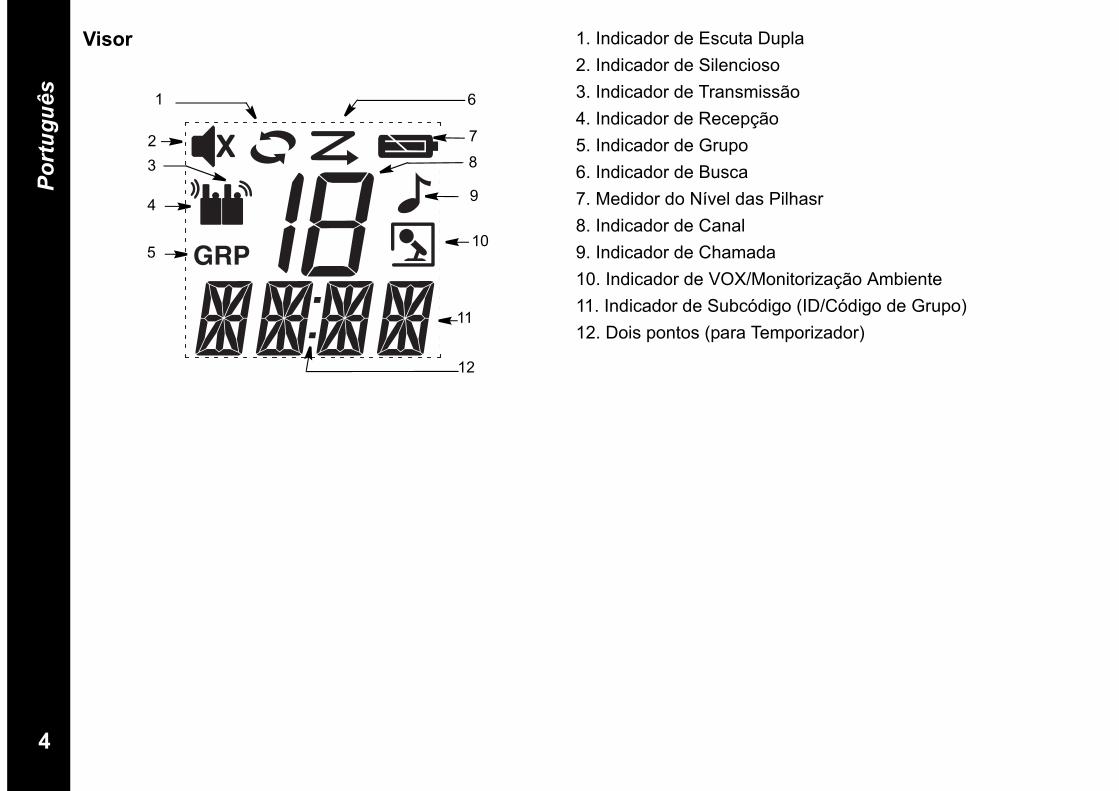
4
Português
Visor 1. Indicador de Escuta Dupla2. Indicador de Silencioso3. Indicador de Transmissão4. Indicador de Recepção5. Indicador de Grupo6. Indicador de Busca7. Medidor do Nível das Pilhasr8. Indicador de Canal9. Indicador de Chamada10. Indicador de VOX/Monitorização Ambiente11. Indicador de Subcódigo (ID/Código de Grupo)12. Dois pontos (para Temporizador)
1
23
4
5
12
11
10
6
9
7
8
5
Português
Parabéns pela aquisição do rádio TLKR T7. Trata-se de um rádio leve, do tamanho da palma da mão. Utilize-o em eventos desportivos, para estar em contacto com familiares e amigos, em caminhadas, ao fazer esqui, no exterior ou numa vigilância de bairro, para estabelecer comunicações essenciais. Este aparelho compacto e com tecnologia de ponta está equipado com muitas funções.
Conteúdo da EmbalagemA embalagem contém dois rádios TLKR T7, dois clips de cinto, um suporte para carregamento, um adaptador CA, dois suportes de pilhas, dois conjuntos de pilhas recarregáveis NiMH e este manual. O aparelho pode funcionar com 4 pilhas alcalinas AAA (não incluídas).
Colocação das Pilhas O rádio TLKR T7 utiliza o conjunto de pilhas NiMH ou 4 pilhas alcalinas AAA (não incluídas). Se utilizar pilhas alcalinas, recomendamos que utilize pilhas da melhor qualidade.
Como colocar o conjunto de pilhas NiMH:1) Certifique-se de que o rádio está desligado.2) Retire a tampa do compartimento das pilhas carregando na patilha no fundo da tampa, o que permitirá a remoção da mesma.3) Coloque as pilhas NiMH no compartimento das pilhas. Certifique-se de que respeita os símbolos dos pólos + e – no compartimento. A colocação incorrecta das pilhas impedirá o funcionamento do aparelho.4) Volte a fechar o compartimento das pilhas com a tampa.
Nível de Carga das Pilhas e Aviso de Pilhas Fracas Este aparelho possui um medidor do nível de carga das pilhas no visor que indica o estado das pilhas. Quando as pilhas do aparelho estiverem gastas, o ícone do medidor de nível das pilhas fica intermitente. Substitua imediatamente as pilhas alcalinas.
Carregamento do RádioSe utilizar o conjunto de pilhas recarregáveis NiMH, poderá carregar dois rádios TLKR T7 directamente ou utilizando o suporte para carregamento fornecido. Verifique se desligou o rádio antes de o colocar no suporte para carregamento. Se não o fizer, o medidor de nível das pilhas não funcionará adequadamente.Carregamento Directo:1. Ligue a ficha do adaptador CC à tomada de entrada de
CC de 9V do rádio e ligue a outra extremidade à fonte de alimentação para acessórios existente no veículo.
2. Carregue o conjunto de pilhas durante 16 horas.
Utilizar o Suporte para Carregamento:1. Ligue o adaptador CA à entrada de CC de 9V e a uma
tomada eléctrica normal.2. Coloque o suporte para carregamento na secretária ou
em cima de uma mesa e coloque o rádio no suporte para carregamento com o teclado virado para a frente.
3. Verifique se o LED se acende. Carregue o conjunto de pilhas durante 16 horas e retire o rádio do suporte para carregamento depois de estar carregado.
Nota: os LEDs do indicador de carga permanecerão acesos enquanto os rádios estiverem no carregador.
6
Português
Carregamento das PilhasPoderá carregar o conjunto de pilhas NiMH utilizando o suporte das pilhas incluído no conjunto.1. Coloque o suporte das pilhas no suporte para
carregamento.2. Instale o conjunto de pilhas NiMH, pondo em contacto os
pontos de carga deste com os do suporte para carregamento. A colocação incorrecta da bateria impedirá o respectivo carregamento.
3. Verifique se o LED se acende. Carregue o conjunto de pilhas durante 16 horas.
Nota: os LEDs do indicador de carga permanecerão acesos enquanto os rádios estiverem no carregador.
Utilização do RádioPara tirar o máximo proveito do seu novo rádio, leia este manual na íntegra antes de tentar colocar o aparelho a funcionar.Ligar o Rádio e Regular o Volume1. Rode o botão rotativo para a direita para ligar o rádio
(ON) e para aumentar o volume. Para diminuir o volume, rode-o para a esquerda.
2. Rode o botão rotativo totalmente para a esquerda para desligar o rádio (OFF).
Regular o Som (Sons das Teclas)O rádio emite um som sempre que é premida uma tecla (excepto as teclas PTT e ). Para desactivar ou activar este som, prima continuamente a tecla enquanto estiver a ligar o rádio.
Tom de "Recebido" O tom de "Recebido" é um tom enviado para assinalar o fim da transmissão (transmissão PTT e VOX). O tom de "Recebido" ouve-se pelo altifalante quando os Sons das Teclas estão activos. É transmitido mesmo quando os Sons das Teclas estão desactivados. No entanto, não se ouvirá o tom de "Recebido" pelo altifalante.Como activar e desactivar o tom de "Recebido":Mantenha a tecla premida enquanto estiver a ligar o rádio.
Falar pelo RádioComo falar com outros usando o rádio:1. Prima continuamente a tecla PTT e fale num tom claro e
normal a cerca de 5-8 cm de distância do microfone. Durante a transmissão, o ícone aparece no visor. Para evitar que a primeira parte da transmissão seja cortada, faça uma ligeira pausa depois de premir a tecla PTT e antes de começar a falar.
2. Quando terminar de falar, solte a tecla PTT. Pode agora receber chamadas. Durante a recepção, o íconeaparece no visor.
Nota: se continuar a transmitir durante 60 segundos, o rádio emite o tom de Interrupção da Transmissão e o ícone
fica intermitente. O rádio pára a transmissão.
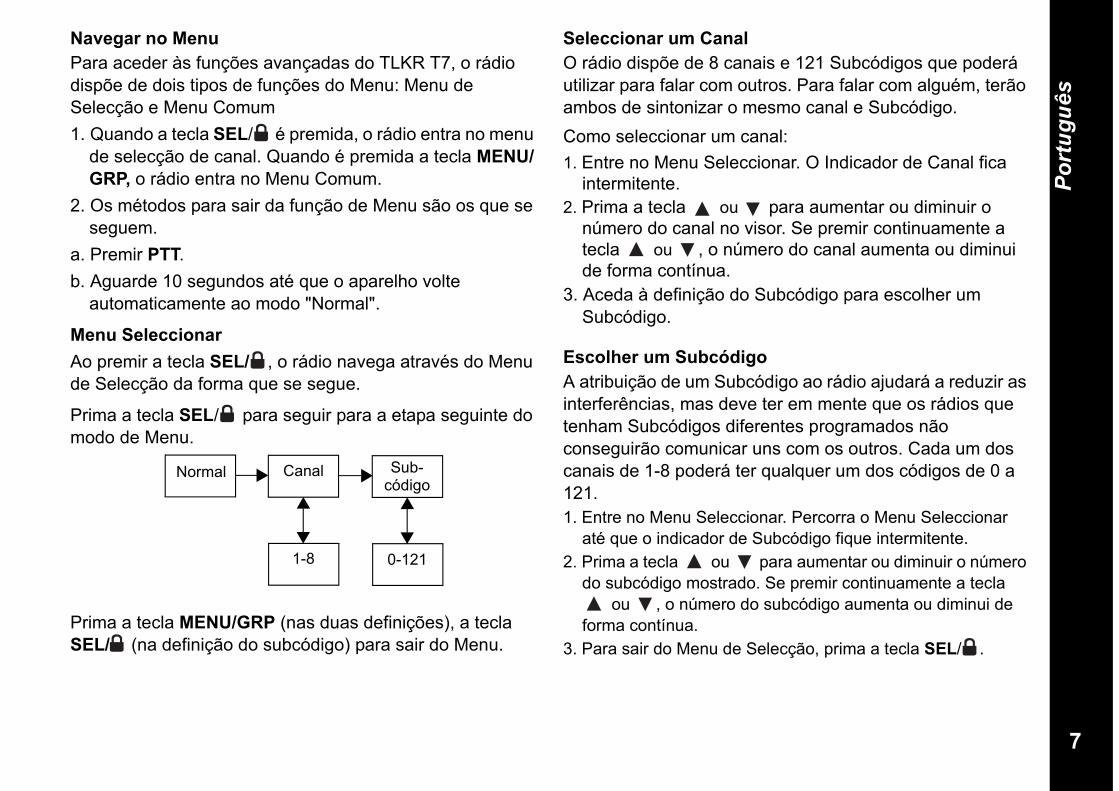
7
Português
Navegar no MenuPara aceder às funções avançadas do TLKR T7, o rádio dispõe de dois tipos de funções do Menu: Menu de Selecção e Menu Comum1. Quando a tecla SEL/ é premida, o rádio entra no menu
de selecção de canal. Quando é premida a tecla MENU/GRP, o rádio entra no Menu Comum.
2. Os métodos para sair da função de Menu são os que se seguem.
a. Premir PTT.b. Aguarde 10 segundos até que o aparelho volte
automaticamente ao modo "Normal".
Menu SeleccionarAo premir a tecla SEL/ , o rádio navega através do Menu de Selecção da forma que se segue.
Prima a tecla SEL/ para seguir para a etapa seguinte do modo de Menu.
Prima a tecla MENU/GRP (nas duas definições), a tecla SEL/ (na definição do subcódigo) para sair do Menu.
Seleccionar um CanalO rádio dispõe de 8 canais e 121 Subcódigos que poderá utilizar para falar com outros. Para falar com alguém, terão ambos de sintonizar o mesmo canal e Subcódigo.Como seleccionar um canal:1. Entre no Menu Seleccionar. O Indicador de Canal fica
intermitente.2. Prima a tecla ou para aumentar ou diminuir o
número do canal no visor. Se premir continuamente a tecla ou , o número do canal aumenta ou diminui de forma contínua.
3. Aceda à definição do Subcódigo para escolher um Subcódigo.
Escolher um SubcódigoA atribuição de um Subcódigo ao rádio ajudará a reduzir as interferências, mas deve ter em mente que os rádios que tenham Subcódigos diferentes programados não conseguirão comunicar uns com os outros. Cada um dos canais de 1-8 poderá ter qualquer um dos códigos de 0 a 121.1. Entre no Menu Seleccionar. Percorra o Menu Seleccionar
até que o indicador de Subcódigo fique intermitente.2. Prima a tecla ou para aumentar ou diminuir o número
do subcódigo mostrado. Se premir continuamente a tecla ou , o número do subcódigo aumenta ou diminui de
forma contínua.3. Para sair do Menu de Selecção, prima a tecla SEL/ .
Normal Canal Sub-código
0-1211-8
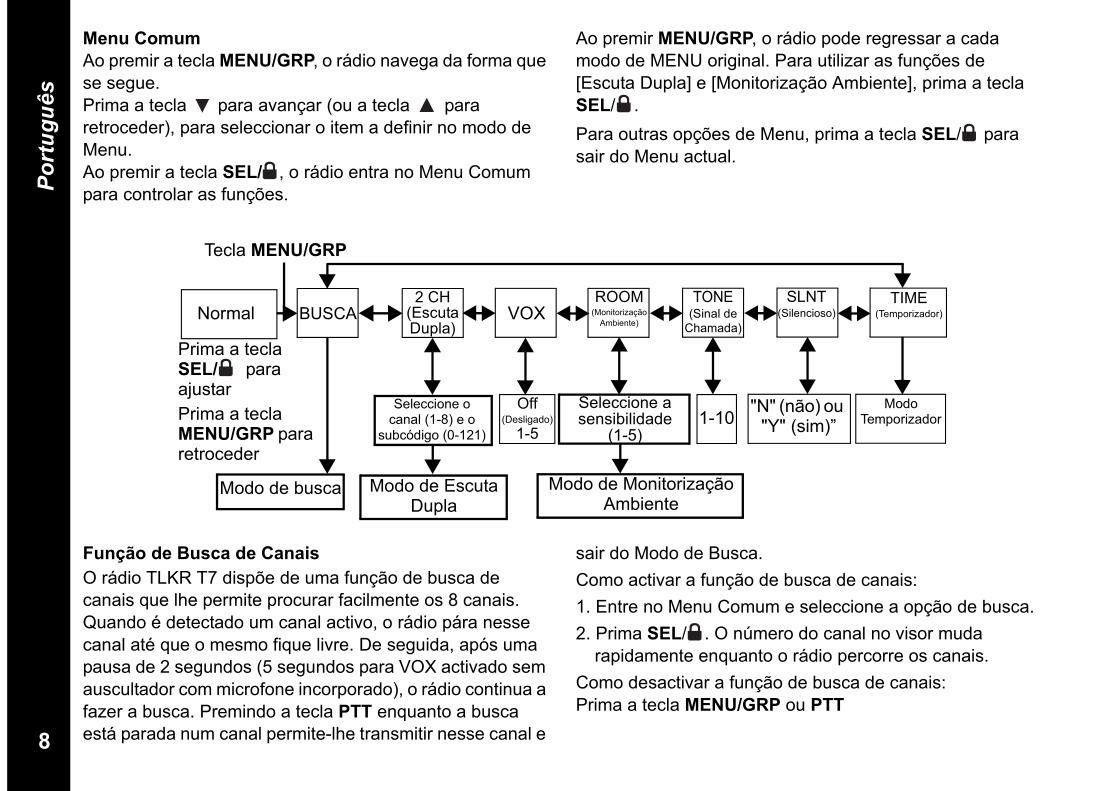
8
Português
Menu ComumAo premir a tecla MENU/GRP, o rádio navega da forma que se segue.Prima a tecla para avançar (ou a tecla para retroceder), para seleccionar o item a definir no modo de Menu.Ao premir a tecla SEL/ , o rádio entra no Menu Comum para controlar as funções.
Ao premir MENU/GRP, o rádio pode regressar a cada modo de MENU original. Para utilizar as funções de [Escuta Dupla] e [Monitorização Ambiente], prima a tecla SEL/ .Para outras opções de Menu, prima a tecla SEL/ para sair do Menu actual.
Normal BUSCA2 CH
(Escuta Dupla)
VOXROOM
(Monitorização Ambiente)
TONE (Sinal de
Chamada)
SLNT(Silencioso)
TIME(Temporizador)
Seleccione o canal (1-8) e o
subcódigo (0-121)
Modo Temporizador
Seleccione a sensibilidade
(1-5)
Off(Desligado)
1-51-10
"N" (não) ou "Y" (sim)”
Modo de busca Modo de Escuta Dupla
Modo de Monitorização Ambiente
Tecla MENU/GRP
Prima a tecla SEL/ para ajustarPrima a tecla MENU/GRP para retroceder
Função de Busca de CanaisO rádio TLKR T7 dispõe de uma função de busca de canais que lhe permite procurar facilmente os 8 canais. Quando é detectado um canal activo, o rádio pára nesse canal até que o mesmo fique livre. De seguida, após uma pausa de 2 segundos (5 segundos para VOX activado sem auscultador com microfone incorporado), o rádio continua a fazer a busca. Premindo a tecla PTT enquanto a busca está parada num canal permite-lhe transmitir nesse canal e
sair do Modo de Busca.Como activar a função de busca de canais:1. Entre no Menu Comum e seleccione a opção de busca. 2. Prima SEL/ . O número do canal no visor muda
rapidamente enquanto o rádio percorre os canais.Como desactivar a função de busca de canais:Prima a tecla MENU/GRP ou PTT
9
Português
Modo de Escuta DuplaO rádio pode procurar alternadamente o canal actual e outro canal. Terá de programar um número de canal e respectivo Subcódigo para outro canal.Como programar outro canal e activar a Escuta Dupla:1. Entre no Menu Comum, seleccione "2CH" e prima a
tecla SEL/ para entrar na definição do modo de Escuta Dupla. Aparece o símbolo de Escuta Dupla.
2. Prima ou para seleccionar o número do canal e, em seguida, prima a tecla SEL/ .
3. Prima ou para seleccionar o número de subcódigo e, de seguida, a tecla SEL/ .
4. O rádio inicia a Escuta Dupla.Nota: se definir um número de canal e um Subcódigo iguais
aos do canal actual, a Escuta Dupla não funciona.Como desactivar o modo de Escuta Dupla:Prima a tecla MENU/GRP.Transmissão Activada pela VozO rádio TLKR T7 está equipado com um Transmissor Activado pela Voz (VOX) seleccionável pelo utilizador que pode ser utilizado para transmissões de voz automáticas. A função VOX destina-se a permitir a utilização mãos-livres. A transmissão inicia-se falando para o microfone do rádio ou do auricular (o auricular não está incluído) em vez de se premir a tecla PTT.Como seleccionar o nível de VOX:1. Entre no Menu Comum e seleccione a função de
transmissão activada pela voz "VOX". Prima a tecla SEL/. O nível actual (Desligado, 1-5) fica intermitente. O
nível "N" (Desligado) desactiva o modo VOX, ao passo que os níveis 1-5 definem a sensibilidade do circuito VOX.
2. Prima a tecla ou para seleccionar o nível de sensibilidade VOX pretendido. Utilize o nível 1 em ambientes silenciosos e o nível 5 ambientes muito ruidosos. Consegue determinar o nível de sensibilidade adequado falando para o microfone. Se o símbolo VOX ficar intermitente, significa que a sua voz foi aceite.
3. Saia do Menu Comum.Nota: se continuar a transmitir utilizando a função VOX
durante 60 segundos, o rádio emite o tom de Interrupção da Transmissão e o ícone fica intermitente durante 5 segundos.
Função de Monitorização AmbientePoderá utilizar um dos rádios TLKR T7 como meio de monitorização ambiente e utilizar o outro para escutar e estar atento às vozes de outro local. Quando define a função de monitorização ambiente, o rádio que efectua a monitorização detecta vozes/ruídos (dependendo do nível de sensibilidade programado) e transmite-os ao rádio receptor sem ser necessário premir a tecla PTT. Neste modo, o rádio que efectua a monitorização não pode receber transmissões.Como activar a Monitorização Ambiente:1. Entre no Menu Comum e seleccione a função de
monitorização ambiente (ROOM). Prima a tecla SEL/ .2. Prima a tecla ou para seleccionar o nível de
sensibilidade de monitorização ambiente pretendido. Utilize o nível 1 em ambientes silenciosos e o nível 5 ambientes muito ruidosos.
3. Prima a tecla SEL/ para activar a Monitorização Ambiente.
Como desactivar a Monitorização Ambiente:Prima a tecla MENU/GRP.
10
Português
Nota:- Premir a tecla PTT no modo de Monitorização Ambiente é
uma acção inválida, pelo que o rádio emite o Tom de Erro PTT.
- Quando a voz/ruído noutra divisão prossegue durante mais de 60 segundos, o rádio que efectua a monitorização deixa de o fazer durante 5 segundos e depois retoma essa actividade.
Transmitir um Sinal de ChamadaO rádio TLKR T7 está equipado com 10 sinais de chamada
seleccionáveis que são transmitidos quando a tecla é premida no Modo Normal.Como seleccionar um sinal de chamada:1. Entre no Menu Comum e seleccione a função de sinal
de chamada (TONE). Prima a tecla SEL/ .O número do sinal de chamada actual (1-10) também fica intermitente.
2. Prima a tecla ou para seleccionar o número do sinal de chamada pretendido. Ouvir-se-á cada um dos sinais pelo altifalante.
3. Saia do Menu Comum.Para transmitir o sinal de chamada seleccionado, prima a tecla no Modo Normal. O sinal de chamada seleccionado será automaticamente transmitido por um espaço de tempo determinado. O sinal de chamada será cancelado quando premir a tecla PTT.
Modo SilenciosoAo activar o modo silencioso, todas as chamadas recebidas são silenciadas: a retroiluminação do rádio fica intermitente para alertar o utilizador da recepção de uma chamada.Se o utilizador não atender a chamada, a retroiluminação desliga-se e o símbolo de chamada fica intermitente até deixar de haver sinal.O TLKR T7 também vibra para relembrar o utilizador do facto de não ter atendido a chamada.O modo silencioso fica desactivado durante 15 segundos quando o utilizador transmite, recebe ou prime qualquer outro botão.Para definir o modo silencioso:1. Entre no Menu Comum e seleccione o modo silencioso
(SLNT); prima a tecla SEL/ .2. Prima para activar o Modo Silencioso. O Indicador de
Canal apresenta "Y" (sim) e aparece o símbolo SILENT.3. Prima a tecla para desactivar o Modo Silencioso. O
Indicador de Canal apresenta "N" (não) e o símbolo SILENT desaparece.
11
Português
TemporizadorPode utilizar este rádio como temporizador. Pode temporizar até 59 minutos e 59 segundos.Decorrido este período, regressará a "00:00".Como usar o temporizador:1. Entre no Menu Comum e seleccione a função de
temporizador (TIME).2. Prima a tecla SEL/ para seleccionar este menu.3. Prima a tecla SEL/ . O temporizador inicia.4. Ao premir a tecla SEL/ , fica em estado de pausa.
Premir a tecla SEL/ controla o início e paragem do temporizador.
5. Ao premir a tecla MENU/GRP durante a temporização ou em pausa, o rádio regressa ao modo de tempo de inactividade (reposição de tempo para 00:00).
6. Prima a tecla PTT ou MENU/GRP no estado de inactividade para parar o temporizador.
Nota: enquanto está neste modo, pode receber sinais de entrada.
Se for recebida uma Chamada Geral, o Nome de ID é mostrado durante 10 segundos. Se for recebida uma Chamada Directa, no estado é indicado o Nome de ID. Depois, o rádio regressa ao modo de temporizador e o símbolo de chamada fica intermitente.
Modo de GrupoPrima continuamente a tecla MENU/GRP para aceder ao Menu Grupo.
Definição de Canal no Modo de Grupo
Prima a tecla SEL/ no Modo de Grupo para entrar na
Definição de Canal. Prima a tecla ou para seleccionar a Definição de Alteração Automática de Canal (Auto Channel Change Setting) ou Definição de Canal Manual (Manual Channel Setting).O visor apresenta o seguinte:
Prima a tecla SEL/ para aceder a cada uma das definições.Nota: pima a tecla MENU/GRP para regressar ao estado de
inactividade.
Definição de Alteração Automática de CanalUm número de canal fica intermitente e os segmentos do subcódigo mostram "ALL".Prima a tecla ou para seleccionar o canal.
Prima a tecla ou SEL/ para transmitir o comando de Alteração Automática de Canal.Nota: prima a tecla MENU/GRP para regressar à Definição
de Canal no Modo de Grupo.
Alteração Automática de Canal
Definição de Canal Manual
12
Português
Definição de Canal Manual no Modo de GrupoUm número de canal fica intermitente e os segmentos do subcódigo mostram "MY".Prima a tecla ou para seleccionar o canal.Assim, fica disponível o Canal Manual.Prima a tecla SEL/ para sair da definição de Canal Manual.Nota: prima a tecla MENU/GRP para regressar à Definição
de Canal no Modo de Grupo.
Definição de Chamada Geral/Directa
Prima a tecla no Modo de Grupo para entrar na opção de Definição de Chamada Geral/Directa. Primeiramente, o utilizador selecciona um tipo de Chamada a partir de transmissão de Chamada Geral ou Definição de Chamada Directa.
Para seleccionar esta definição, prima a tecla ou para seleccionar um tipo de Chamada.Definição de Chamada GeralQuando está seleccionada a opção de Transmissão de
Chamada Geral, prima a tecla ou a SEL/ para sair desta definição e passar imediatamente à transmissão de Chamada Geral.É então emitido o Sinal de Chamada Geral.O visor mostra o símbolo TX e o símbolo de Chamada intermitente durante a transmissão.Nota: prima a tecla MENU/GRP para regressar ao estado
de Inactividade.Definição de Chamada DirectaO visor mostra o Número de ID nos segmentos do Canal e o Nome de ID fica intermitente nos segmentos do Subcódigo.
Prima a tecla ou para seleccionar um Número de ID.
Prima a tecla ou a SEL/ para transmitir o comando de Chamada Directa.Assim, o utilizador transmite o comando de Chamada Directa apenas para a ID seleccionada.O visor mostra o símbolo TX e o símbolo de Chamada durante a transmissão.A unidade emite o Sinal de Chamada seleccionado durante a transmissão do comando de Chamada Directa.Nota: prima a tecla MENU/GRP para regressar à definição
de Chamada Geral/Directa.
Transmissão de Chamada Geral
Definição de Chamada Directa
O Número de ID para Chamada Directa
O Nome de ID

13
Português
Menu GrupoPrima continuamente a tecla MENU/GRP para entrar no MENU GRUPO.Prima a tecla (ou ) para prosseguir para cada menu (GRP/CODE/RING/ID).
Prima a tecla SEL/ para seleccionar cada menu de grupo.
LCD:Prima a tecla (ou ) para alterar as opções ou os números pretendidos. Prima a tecla SEL/ para seleccionar a opção.
Prima a tecla MENU/GRP para sair para o Menu do modo de inactividade.Nota: no modo de grupo, só é possível receber transmissões de outros rádios se estes também estiverem configurados
para o mesmo canal e com o mesmo código de grupo.
Normal "GRP" (Modo de Grupo)
"CODE" (Código de
Grupo)"ID"
(Definição de ID)
Número de ID 1-16
0 - 121 1 - 10
SAIR
Nome de ID até 4 caracteres
"N" (não) ou "Y" (sim)”
"N" (não)
"Y" (sim)
SAIR do Menu
"RING" (Toque)
14
Português
Definição de Modo de GrupoPrima a tecla SEL/ para controlar o Modo de Grupo. Escolha "Y" (sim) ou "N" (não) premindo a tecla ou .
LCD:Escolha "N" (não) e prima a tecla SEL/ para sair do Menu de Grupo.Opte por "Y" (sim) e prima a tecla SEL/ para ir para o Menu Grupo e a definição do Código de Grupo.Definição de Código de Grupo É possível seleccionar o código de grupo entre 0-121.Os segmentos do subcódigo indicam o código de Grupo.Para seleccionar um código de grupo, prima a tecla ou
para seleccionar o código de Grupo.Prima a tecla SEL/ para completar a definição do Código de Grupo. O rádio entra no Menu de Definição de Toque.Prima a tecla MENU/GRP para regressar ao Menu Grupo.Definição de ToqueO utilizador pode seleccionar um Toque para a Chamada Directa.Estão disponíveis 10 Toques, que são iguais aos Sinais de Chamada.Para seleccionar um Toque, prima a tecla ou .Desta forma, o Toque seleccionado é emitido pelo
altifalante.
Definição de IDTodos os rádios do grupo do utilizador têm de estar definidos com o número de ID de 1 a 16.O número de ID é necessário para distinguir uma unidade do mesmo Grupo.O utilizador pode utilizar até 4 caracteres para definir o número de ID. O utilizador selecciona o número de ID que é mostrado nos segmentos do Canal premindo a tecla ou . Ao seleccionar a ID registada de Chamada Geral através da tecla ou , o LCD fornece a indicação de USADA nos segmentos de subcódigo; caso seja seleccionada uma ID não registada, não é indicado nada nos segmentos de subcódigo.
LCD:Prima a tecla SEL/ para prosseguir para a definição do Nome de ID.
Definição de Nome de IDQuando o utilizador realiza uma Chamada Geral ou Directa, o nome de ID aparece no visor das outras unidades. Este é o mesmo nome que aparece nos visores
15
Português
dos outros rádios quando alguém quer realizar uma Chamada Directa para o utilizador. Quando o Nome de ID está definido, aparece o número da unidade. Prima a tecla ou para seleccionar um carácter nos segmentos intermitentes do subcódigo.Em seguida, prima a tecla SEL/ para passar para o carácter seguinte. Para o Nome de ID, é possível seleccionar até 4 caracteres.
Por último, prima a tecla SEL/ para registar o número de ID e o Nome de ID. O rádio sai da definição de ID.Nota: sempre que o utilizador prime a tecla MENU/GRP, a
unidade cancela o Número de ID seleccionado e o Nome de ID introduzido, saindo depois do Menu Grupo.
Bloqueio das TeclasComo bloquear o teclado:Prima continuamente a tecla SEL/ durante 2 segundos. Os segmentos de subcódigo fornecem a indicação de BLOQUEADO durante 2 segundos, regressando depois ao ecrã anterior.Como desbloquear o teclado:Prima continuamente a tecla SEL/ durante 2 segundos. Os segmentos de subcódigo fornecem a indicação de DESBLOQUEADO durante 2 segundos, regressando depois ao ecrã anterior.Nota: se for premida alguma tecla (à excepção de PTT)
quando o Bloqueio das Teclas está activado, é dada a indicação de BLOQUEADO durante 2 segundos e emitido um sinal de erro.
Função de Economia Automática de EnergiaO rádio possui um circuito exclusivo que se destina a aumentar drasticamente a duração das pilhas. Se não houver qualquer transmissão ou chamadas a chegar no espaço de 3 segundos, o rádio muda para o modo de Economia de Energia. Neste modo, o rádio pode continuar a receber transmissões. Aviso de Pouca BateriaO aviso de pouca bateria é emitido quando a carga acaba. O aviso tem início 30 segundos após o símbolo de pouca bateria ficar intermitente.O Subcódigo fornece a indicação de bateria (BATT) e o símbolo de pouca bateria fica intermitente.Quando há pouca bateria, é emitido o Sinal de Aviso a cada 5 segundos, durante 30 segundos.Retroiluminação do LCDA retroiluminação do LCD activa-se automaticamente sempre que se prime qualquer tecla (excepto a PTT). O visor LCD ilumina-se durante 10 segundos após a última tecla ter sido premida.Função de Modo de ControloO TLKR T7 permite-lhe ouvir sinais fracos no canal actual, bastando para tal premir a tecla MON.Como activar o Modo de Controlo:- Prima a tecla MON para uma audição breve. O ícone RX fica intermitente.- Prima a tecla MON durante 1,5 segundos para ouvir continuamente. O símbolo RX continua intermitente.Como desactivar o Modo de Controlo:- Prima a tecla MON, MENU/GRP, ou SEL/ para voltar ao modo “Normal”. O símbolo RX deixa de estar intermitente.
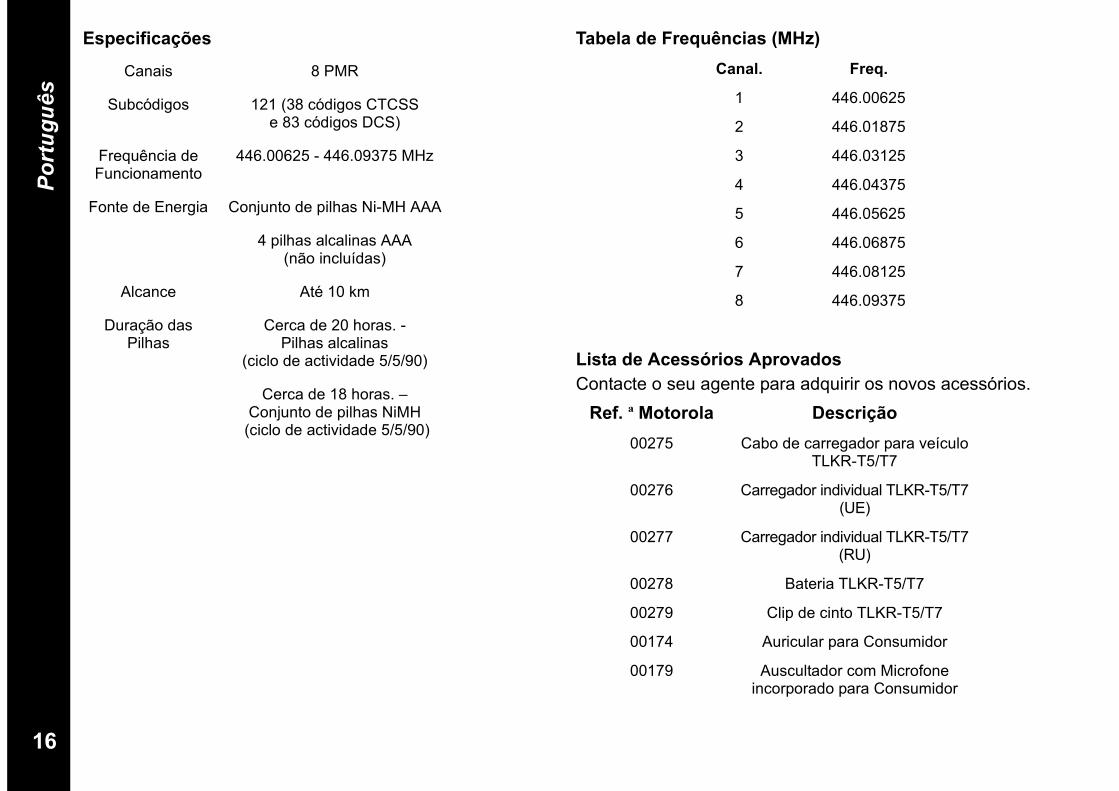
16
Português
Especificações Tabela de Frequências (MHz)
Lista de Acessórios AprovadosContacte o seu agente para adquirir os novos acessórios.
Canais 8 PMR
Subcódigos 121 (38 códigos CTCSS e 83 códigos DCS)
Frequência de Funcionamento
446.00625 - 446.09375 MHz
Fonte de Energia Conjunto de pilhas Ni-MH AAA
4 pilhas alcalinas AAA (não incluídas)
Alcance Até 10 km
Duração das Pilhas
Cerca de 20 horas. - Pilhas alcalinas
(ciclo de actividade 5/5/90)
Cerca de 18 horas. – Conjunto de pilhas NiMH
(ciclo de actividade 5/5/90)
Canal. Freq.
1 446.00625
2 446.01875
3 446.03125
4 446.04375
5 446.05625
6 446.06875
7 446.08125
8 446.09375
Ref. ª Motorola Descrição00275 Cabo de carregador para veículo
TLKR-T5/T7
00276 Carregador individual TLKR-T5/T7 (UE)
00277 Carregador individual TLKR-T5/T7 (RU)
00278 Bateria TLKR-T5/T7
00279 Clip de cinto TLKR-T5/T7
00174 Auricular para Consumidor
00179 Auscultador com Microfone incorporado para Consumidor
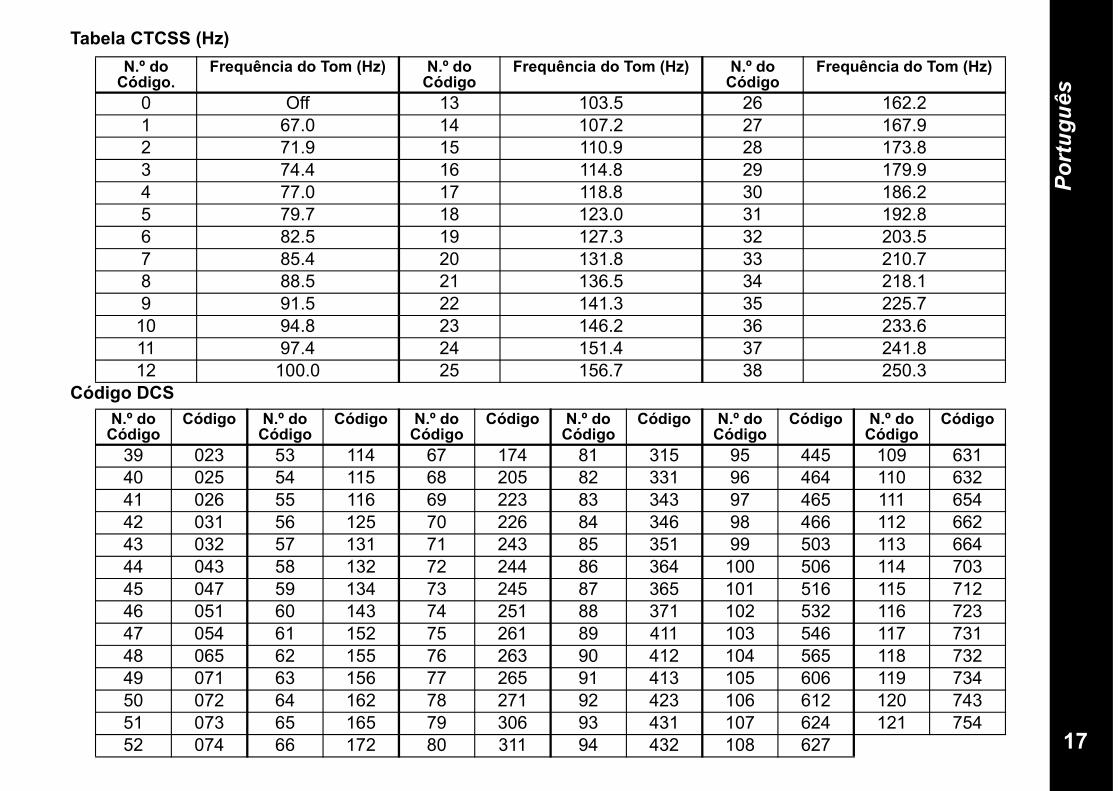
17
Português
Tabela CTCSS (Hz)
Código DCS
N.º do Código.
Frequência do Tom (Hz) N.º do Código
Frequência do Tom (Hz) N.º do Código
Frequência do Tom (Hz)
0 Off 13 103.5 26 162.21 67.0 14 107.2 27 167.92 71.9 15 110.9 28 173.83 74.4 16 114.8 29 179.94 77.0 17 118.8 30 186.25 79.7 18 123.0 31 192.86 82.5 19 127.3 32 203.57 85.4 20 131.8 33 210.78 88.5 21 136.5 34 218.19 91.5 22 141.3 35 225.7
10 94.8 23 146.2 36 233.611 97.4 24 151.4 37 241.812 100.0 25 156.7 38 250.3
N.º do Código
Código N.º do Código
Código N.º do Código
Código N.º do Código
Código N.º do Código
Código N.º do Código
Código
39 023 53 114 67 174 81 315 95 445 109 63140 025 54 115 68 205 82 331 96 464 110 63241 026 55 116 69 223 83 343 97 465 111 65442 031 56 125 70 226 84 346 98 466 112 66243 032 57 131 71 243 85 351 99 503 113 66444 043 58 132 72 244 86 364 100 506 114 70345 047 59 134 73 245 87 365 101 516 115 71246 051 60 143 74 251 88 371 102 532 116 72347 054 61 152 75 261 89 411 103 546 117 73148 065 62 155 76 263 90 412 104 565 118 73249 071 63 156 77 265 91 413 105 606 119 73450 072 64 162 78 271 92 423 106 612 120 74351 073 65 165 79 306 93 431 107 624 121 75452 074 66 172 80 311 94 432 108 627
18
Português
Informação de GarantiaO concessionário ou revendedor autorizado Motorola em que adquiriu o seu rádio bidireccional Motorola e/ou acessórios originais aceitará reclamações dentro da garantia e/ou proporcionará reparações ao abrigo da garantia.Por favor, entregue o seu rádio ao seu concessionário ou revendedor para usufruir do serviço de garantia. Não envie o seu rádio à Motorola. Por forma a poder usufruir do serviço de garantia, deverá apresentar a sua factura de compra ou uma prova de compra equivalente que especifique a data de compra. O rádio bidireccional deverá também exibir claramente o seu número de série. A garantia não será válida se os números de tipo ou de série do produto tiverem sido alterados, apagados, removidos ou tornados ilegíveis.
A Garantia Não CobreDefeitos ou danos provocados por uma utilização do produto em condições diferentes das consideradas normais e para as quais o produto foi concebido ou pela não observância das instruções deste manual de utilizador.Defeitos ou danos resultantes de má utilização, acidente ou negligência.Defeitos ou danos resultantes de testes, utilização, manutenção, afinação impróprias ou de qualquer alteração ou modificação de qualquer tipo.Quebra ou danos em antenas, excepto os resultantes de defeitos de material ou de fabrico.Produtos desmontados ou reparados de forma a afectar adversamente ou a evitar inspecções adequadas e testes para verificações ao abrigo da garantia.Defeitos ou danos provocados pelo alcance.
Defeitos ou danos provocados por humidade, líquidos ou salpicos.Todas as superfícies plásticas e outras peças expostas externamente que se apresentem arranhadas ou danificadas devido a utilização normal.Produtos alugados temporariamente. Manutenção periódica e reparação ou substituição de peças devido a utilização, desgaste e deterioração normais.
Informação de Direitos de AutorOs produtos Motorola descritos neste manual poderão incluir programas, memórias de semicondutor ou outros media cujos direitos de autor são detidos pela Motorola. A legislação dos Estados Unidos da América e de outros países reservam à Motorola certos direitos exclusivos de programas de computador, incluindo o direito exclusivo de copiar ou reproduzir por qualquer forma os programas propriedade da Motorola.De acordo com isto, qualquer programa de computador incluído em produtos Motorola descritos neste manual não poderá ser copiado ou reproduzido sob qualquer forma sem a expressa autorização escrita por parte da Motorola. Além disso, a compra de produtos Motorola não concede de forma alguma, directamente ou de forma implícita ou presumível, ou outra, qualquer licença sobre os direitos de autor, patentes ou aplicações de patentes da Motorola, à excepção da utilização gratuita normal e não exclusiva que deriva da aplicação legal referente à venda de um produto.MOTOROLA, o logotipo M estilisado e todas as outras marcas comerciais indicadas como tal neste manual são marcas da Motorola, Inc. e estão registadas no Gabinete de Patentes e Marcas Comerciais dos Estados Unidos.
© Motorola, Inc. 2008
1
Nederlands
INHOUDSOPGAVEProductveiligheid en blootstelling aan radiogolven voor draagbare zendontvangers . . . . . . . . . 2Kenmerken . . . . . . . . . . . . . . . . . . . . . . . . . . . . . . . . . . . . . . 2Bediening en functies . . . . . . . . . . . . . . . . . . . . . . . . . . . . . . 3Display . . . . . . . . . . . . . . . . . . . . . . . . . . . . . . . . . . . . . . . . . . 3Inhoud van het pakket . . . . . . . . . . . . . . . . . . . . . . . . . . . . . . 5De batterij plaatsen . . . . . . . . . . . . . . . . . . . . . . . . . . . . . . . . 5Batterijniveaumeter en waarschuwing batterij bijna leeg. . . . 5De portofoon opladen . . . . . . . . . . . . . . . . . . . . . . . . . . . . . . 5Direct opladen . . . . . . . . . . . . . . . . . . . . . . . . . . . . . . . . . . . . 5Opladen in het laadvak . . . . . . . . . . . . . . . . . . . . . . . . . . . . . 5De batterij opladen. . . . . . . . . . . . . . . . . . . . . . . . . . . . . . . . . 6De portofoon gebruiken . . . . . . . . . . . . . . . . . . . . . . . . . . . . 6De portofoon aanzetten en het volume afstellen . . . . . . . . . 6De toetstonen afstellen . . . . . . . . . . . . . . . . . . . . . . . . . . . . . 6‘Roger’-toon . . . . . . . . . . . . . . . . . . . . . . . . . . . . . . . . . . . . . 6Spreken via de portofoon . . . . . . . . . . . . . . . . . . . . . . . . . . . 6Navigeren door het menu . . . . . . . . . . . . . . . . . . . . . . . . . . . 7Het selectiemenu . . . . . . . . . . . . . . . . . . . . . . . . . . . . . . . . . 7Een kanaal kiezenl . . . . . . . . . . . . . . . . . . . . . . . . . . . . . . . . 7Een subcode selecteren . . . . . . . . . . . . . . . . . . . . . . . . . . . . 7Algemeen menu. . . . . . . . . . . . . . . . . . . . . . . . . . . . . . . . . . . 8De kanaalscanfunctie . . . . . . . . . . . . . . . . . . . . . . . . . . . . . . 8Dubbel scannen . . . . . . . . . . . . . . . . . . . . . . . . . . . . . . . . . . 9VOX-transmissie . . . . . . . . . . . . . . . . . . . . . . . . . . . . . . . . . . 9De functie Kamer uitluisteren . . . . . . . . . . . . . . . . . . . . . . . . 9Een oproeptoon uitzenden . . . . . . . . . . . . . . . . . . . . . . . . . 10Stille modus . . . . . . . . . . . . . . . . . . . . . . . . . . . . . . . . . . . . . 10Stopwatch . . . . . . . . . . . . . . . . . . . . . . . . . . . . . . . . . . . . . . 11Groepsmodus . . . . . . . . . . . . . . . . . . . . . . . . . . . . . . . . . . . 11Kanaalinstelling in groepsmodus . . . . . . . . . . . . . . . . . . . . 11Automatische kanaalomschakeling instellen . . . . . . . . . . . 11
Handmatig kanaal in groepsmodus instellen . . . . . . . . . . . .11Alle portofoons oproepen/rechtstreeks oproepen instellen . . . . . . . . . . . . . . . . . . . . . . . . . . . . . . . .12Alle portofoons oproepen instellen . . . . . . . . . . . . . . . . . . .12Rechtstreeks oproepen instellen . . . . . . . . . . . . . . . . . . . . .12Groepsmenu . . . . . . . . . . . . . . . . . . . . . . . . . . . . . . . . . . . . .13Groepsmodus instellen . . . . . . . . . . . . . . . . . . . . . . . . . . . . .14Groepscode instellen . . . . . . . . . . . . . . . . . . . . . . . . . . . . . .14Beltoon instellen . . . . . . . . . . . . . . . . . . . . . . . . . . . . . . . . . .14ID instellen . . . . . . . . . . . . . . . . . . . . . . . . . . . . . . . . . . . . . .14ID-naam instellen . . . . . . . . . . . . . . . . . . . . . . . . . . . . . . . . .14Toetsenvergrendeling . . . . . . . . . . . . . . . . . . . . . . . . . . . . . .15Automatische energiebesparing . . . . . . . . . . . . . . . . . . . . . .15Waarschuwing lage batterijspanning . . . . . . . . . . . . . . . . . .15Verlichting van LCD . . . . . . . . . . . . . . . . . . . . . . . . . . . . . . . .15De uitluisterfunctie . . . . . . . . . . . . . . . . . . . . . . . . . . . . . . . .15Specificaties. . . . . . . . . . . . . . . . . . . . . . . . . . . . . . . . . . . . . .16Frequentieschema (MHz) . . . . . . . . . . . . . . . . . . . . . . . . . . .16De lijst van goedgekeurde accessoires . . . . . . . . . . . . . . . .16CTCSS-schema (Hz) . . . . . . . . . . . . . . . . . . . . . . . . . . . . . .17DCS-code . . . . . . . . . . . . . . . . . . . . . . . . . . . . . . . . . . . . . . .17Garantie Informatie . . . . . . . . . . . . . . . . . . . . . . . . . . . . . . . .18Wat Niet Wordt Gedekt Door de Garantie . . . . . . . . . . . . . . .18Copyrightinformatie . . . . . . . . . . . . . . . . . . . . . . . . . . . . . . . .18
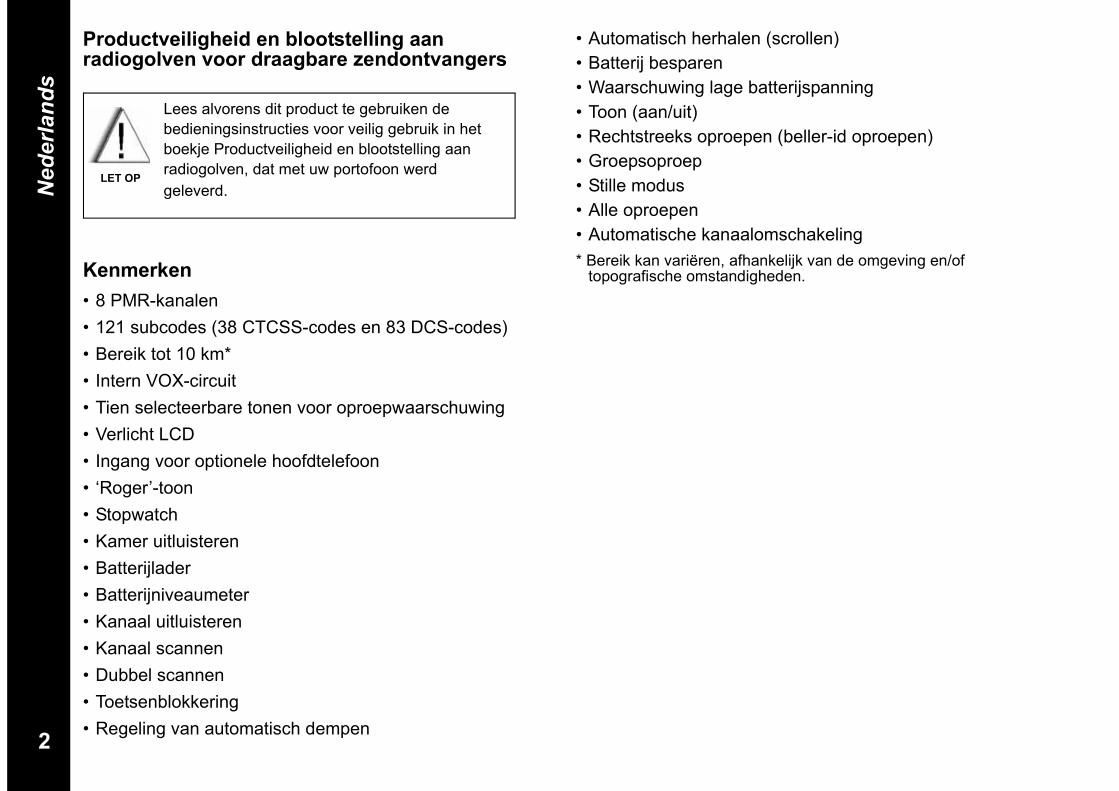
2
Nederlands
Productveiligheid en blootstelling aan radiogolven voor draagbare zendontvangers
Kenmerken• 8 PMR-kanalen• 121 subcodes (38 CTCSS-codes en 83 DCS-codes)• Bereik tot 10 km*• Intern VOX-circuit• Tien selecteerbare tonen voor oproepwaarschuwing• Verlicht LCD• Ingang voor optionele hoofdtelefoon• ‘Roger’-toon• Stopwatch• Kamer uitluisteren• Batterijlader• Batterijniveaumeter• Kanaal uitluisteren• Kanaal scannen• Dubbel scannen• Toetsenblokkering• Regeling van automatisch dempen
• Automatisch herhalen (scrollen)• Batterij besparen• Waarschuwing lage batterijspanning• Toon (aan/uit)• Rechtstreeks oproepen (beller-id oproepen)• Groepsoproep• Stille modus• Alle oproepen• Automatische kanaalomschakeling* Bereik kan variëren, afhankelijk van de omgeving en/of
topografische omstandigheden.
Lees alvorens dit product te gebruiken de bedieningsinstructies voor veilig gebruik in het boekje Productveiligheid en blootstelling aan radiogolven, dat met uw portofoon werd geleverd.
LET OP
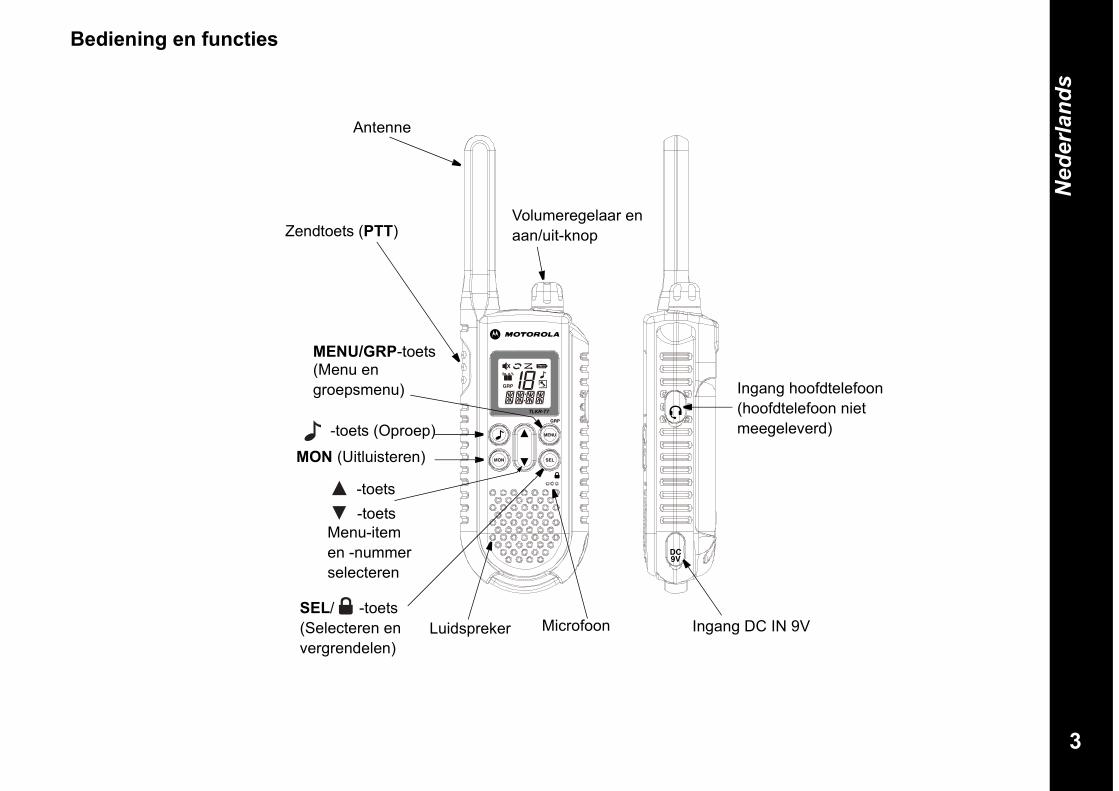
3
Nederlands
Bediening en functies
Ingang hoofdtelefoon (hoofdtelefoon niet meegeleverd)
Antenne
Volumeregelaar en aan/uit-knopZendtoets (PTT)
-toets (Oproep)
MON (Uitluisteren)
-toets -toets
Menu-item en -nummer selecteren
MENU/GRP-toets(Menu en groepsmenu)
SEL/ -toets (Selecteren en vergrendelen)
Luidspreker Microfoon Ingang DC IN 9V
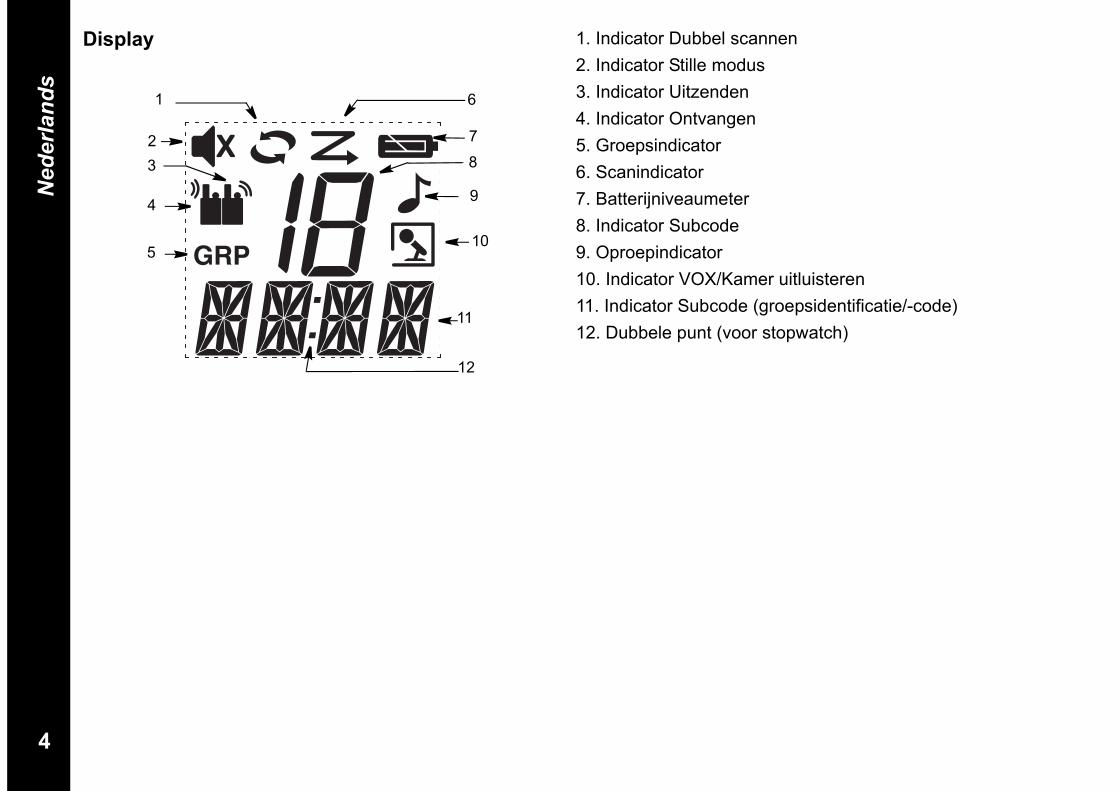
4
Nederlands
Display 1. Indicator Dubbel scannen2. Indicator Stille modus3. Indicator Uitzenden4. Indicator Ontvangen5. Groepsindicator6. Scanindicator7. Batterijniveaumeter8. Indicator Subcode9. Oproepindicator10. Indicator VOX/Kamer uitluisteren 11. Indicator Subcode (groepsidentificatie/-code)12. Dubbele punt (voor stopwatch)
1
23
4
5
12
11
10
6
9
7
8
5
Nederlands
Gefeliciteerd met uw aanschaf van de TLKR T7-portofoon. Dit is een lichtgewicht portofoon van handformaat. Gebruik hem tijdens sportevenementen, wandeltochten, het skiën of andere activiteiten buiten om contact te houden met vrienden en familie, of voor essentiële communicatie in andere omstandigheden, zoals bijvoorbeeld de buurtwacht. Dit compacte, geraffineerde apparaat heeft talrijke functies.
Inhoud van het pakketHet pakket bevat twee TLKR T7-portofoons, twee riemklemmen, een laadvak, AC-adapter, twee batterijsteunen, twee oplaadbare NiMH batterijpakketten en deze handleiding. Het apparaat kan op vier AAA alkaline batterijen werken (niet meegeleverd).
De batterij plaatsenDe TLKR T7-portofoon kan werken op het NiMH batterijpakket of op vier 4 AAA alkaline batterijen (niet meegeleverd). Als alkaline batterijen worden gebruikt, raden wij u aan hoogwaardige alkaline batterijen te gebruiken.
Het NiMH batterijpakket plaatsen:1) Zet de portofoon UIT.2) Druk het lipje onder aan het deksel van de batterijhouder in en verwijder het deksel.3) Plaats de NiMH batterijen in de batterijhouder, zoals aangegeven met de symbolen + en - in de houder. Het apparaat werkt niet als de batterijen incorrect geplaatst zijn.4) Zet het deksel van de batterijhouder weer op zijn plaats.
Batterijniveaumeter en waarschuwing Batterij bijna leegHet apparaat heeft een batterijniveaumeter, die de status van de batterijen op het display weergeeft. Wanneer de batterij in het apparaat bijna leeg is, knippert het symbool
. U dient de alkaline batterijen dan onmiddellijk te vervangen.
De portofoon opladenAls u het oplaadbare NiMH batterijpakket gebruikt, kunnen twee TLKR T7-portofoons direct of in het meegeleverde laadvak worden opgeladen. U dient de portofoon UIT te zetten alvorens hem in het laadvak te plaatsen. Doet u dit niet, dan geeft de batterijniveaumeter een onjuiste indicatie.Direct opladen: 1. Sluit de stekker van de DC-adapter aan op de ingang DC
IN 9V van de portofoon en steek het andere uiteinde in het accessoirecontact van een voertuig.
2. Laad het batterijpakket 16 uur lang op.
Opladen in het laadvak:1. Sluit de AC-adapter aan op de ingang DC IN 9V en op
een gewoon stopcontact.2. Zet de lader op een bureau of tafel en plaats de
portofoon met het toetsenpaneel naar voren gericht in het laadvak.
3. Controleer dat de LED brandt. Laad het batterijpakket 16 uur lang op en neem de portofoon na het opladen uit het laadvak.
Opmerking: de LED’s van de laadindicator blijven branden zo lang de portofoons in de lader zitten.
6
Nederlands
De batterij opladenU kunt het NiMH batterijpakket met gebruikmaking van de batterijsteun ook zonder de portofoon opladen.1. Plaats de batterijsteun in het laadvak.2. Plaats het NiMH batterijpakket zo in het laadvak, dat dit
de laadcontactjes in het laadvak goed raakt. Het apparaat kan het batterijpakket niet opladen als dit incorrect geplaatst is.
3. Controleer dat de LED brandt. Laad het batterijpakket 16 uur lang op.
Opmerking: de LED’s van de laadindicator blijven branden zo lang de portofoons in de lader zitten.
De portofoon gebruikenOm het beste uit deze nieuwe portofoon te halen, dient u deze handleiding helemaal te lezen alvorens de portofoon in gebruik te nemen.De portofoon aanzetten en het volume afstellen1. Draai de draaiknop rechtsom om de portofoon aan te
zetten en draai aan de knop om het volume luider in te stellen. Draai de knop linksom om het volume zachter te zetten.
2. Draai de knop zo ver mogelijk linksom om de portofoon uit te zetten.
De toetstonen afstellenDe portofoon geeft een piepje telkens wanneer een toets (behalve de zendtoets (PTT) en ) wordt ingedrukt. Om dit geluid uit of in te schakelen, houdt u de toets ingedrukt terwijl u de portofoon aanzet.
‘Roger’-toon De toon ‘Roger’ is een piepje dat aan het einde van de transmissie wordt uitgezonden (transmissie met de zendtoets (PTT) en VOX). Wanneer de toetstonen zijn ingeschakeld, is de toon ‘Roger’ via de luidspreker te horen. Wanneer de toetstonen zijn uitgeschakeld, wordt de toon ‘Roger’ toch nog uitgezonden. De toon ‘Roger’ is dan echter niet via de luidspreker te horen.De toon ‘Roger’ uit- of inschakelen:Houd de toets ingedrukt terwijl u de portoon aanzet.
Spreken via de portofoonU kunt met deze portofoon als volgt met anderen spreken:1. Houd de zendtoets (PTT) ingedrukt, houd de microfoon
5-8 cm van uw mond en spreek duidelijk en op normale toon in de microfoon. Tijdens het uitzenden knippert het symbool op het display. Voorkom dat het eerste deel van uw transmissie wordt afgekapt; wacht nadat u de zendtoets (PTT) hebt ingedrukt heel even voordat u gaat spreken.
2. Laat de zendtoets (PTT) los wanneer u bent uitgesproken. U kunt dan weer inkomende oproepen ontvangen. Tijdens het ontvangen knippert het symbool
op het display.Opmerking: wanneer u 60 seconden lang blijft uitzenden,
geeft de portofoon de toon Tx time-out en gaat het symbool knipperen. De portofoon stopt de transmissie.
7
Nederlands
Navigeren door het menuDeze portofoon heeft twee menufuncties, die toegang geven tot de geavanceerde functies van de TLKR T7: het selectiemenu en het algemene menu.1. Wanneer de toets SEL/ wordt ingedrukt, schakelt de
portofoon over naar het kanaalselectiemenu. Wanneer de toets MENU/GRP wordt ingedrukt, schakelt de portofoon over naar het algemene menu.
2. De menufunctie kan op verschillende manieren worden afgesloten:
a. Druk op de zendtoets (PTT).b. Wacht tien seconden totdat de portofoon automatisch
terugkeert naar de ‘normale’ gebruiksmodus.
Het selectiemenuWanneer u SEL/ indrukt, navigeert de portofoon als volgt door het selectiemenu:
Druk op SEL/ om naar het volgende niveau van de menumodus te gaan.
Druk op MENU/GRP (bij beide instellingen) of SEL/ (bij het instellen van de subcode) om het menu af te sluiten.
Een kanaal kiezenDe portofoon heeft acht kanalen en 121 subcodes, die u kunt gebruiken om met anderen te spreken. Om met iemand te kunnen spreken, dient u beiden op hetzelfde kanaal en dezelfde subcode te zijn afgestemd.Een kanaal kiezen:1. Activeer het selectiemenu. De kanaalindicator gaat
knipperen.2. Druk op of om een hoger of lager kanaalnummer
te selecteren. Als u of ingedrukt houdt, blijft het systeem omhoog of omlaag door de kanalen bladeren.
3. Ga naar de subcodes en selecteer een subcode.
Een subcode selecterenDoor een subcode aan uw portofoon toe te wijzen, helpt u storing te beperken. U dient er echter wel rekening mee te houden dat portofoons die op verschillende subcodes zijn afgestemd, niet met elkaar kunnen communiceren. Elk van de kanalen (1-8) kan een subcode krijgen (van 0 tot 121).1. Activeer het selectiemenu. Blader door het selectiemenu
totdat de indicator Subcode gaat knipperen.2. Druk op of om een hogere of lagere subcode weer
te geven. Als u of ingedrukt houdt, blijft het systeem omhoog of omlaag door de subcodes bladeren.
3. Druk op SEL/ om het selectiemenu af te sluiten.
Normal Kanaal Sub-Code
0-1211-8
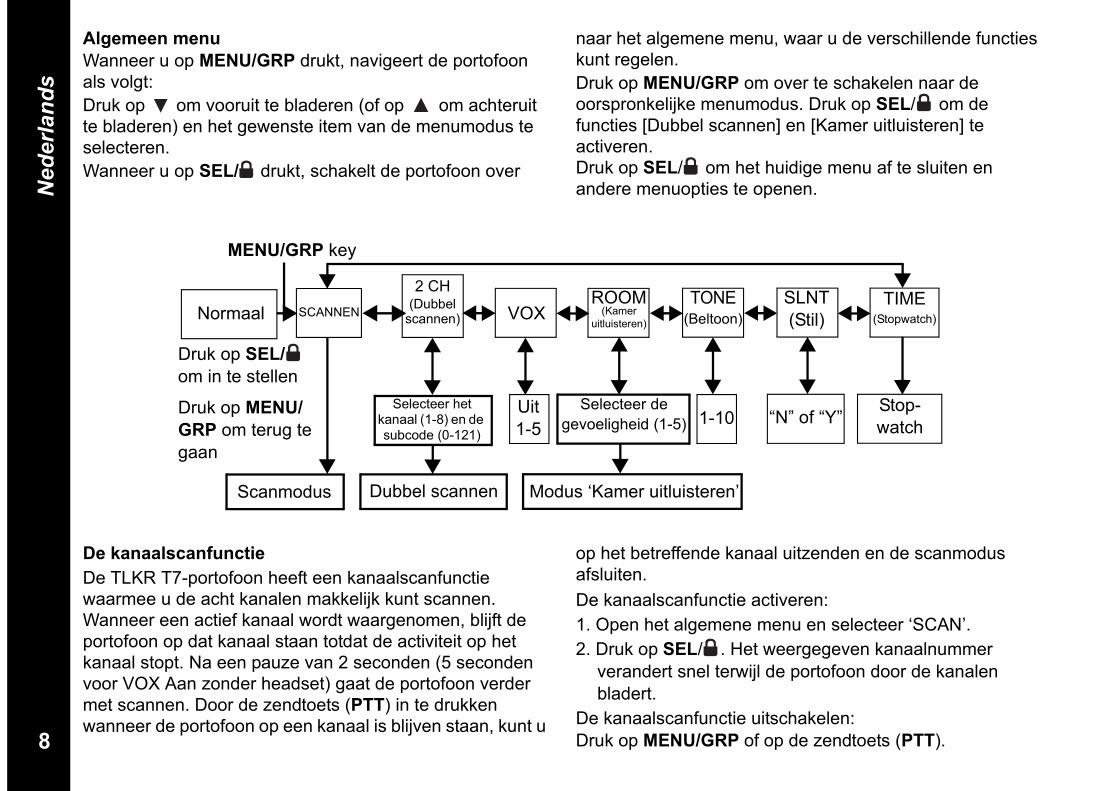
8
Nederlands
Algemeen menuWanneer u op MENU/GRP drukt, navigeert de portofoon als volgt:Druk op om vooruit te bladeren (of op om achteruit te bladeren) en het gewenste item van de menumodus te selecteren.Wanneer u op SEL/ drukt, schakelt de portofoon over
naar het algemene menu, waar u de verschillende functies kunt regelen. Druk op MENU/GRP om over te schakelen naar de oorspronkelijke menumodus. Druk op SEL/ om de functies [Dubbel scannen] en [Kamer uitluisteren] te activeren.Druk op SEL/ om het huidige menu af te sluiten en andere menuopties te openen.
Normaal SCANNEN
2 CH (Dubbel
scannen) VOXROOM
(Kamer uitluisteren)
TONE (Beltoon)
SLNT(Stil)
TIME(Stopwatch)
Selecteer het kanaal (1-8) en de subcode (0-121)
Stop-watch
Selecteer de gevoeligheid (1-5)
Uit1-5 1-10 “N” of “Y”
Scanmodus Dubbel scannen Modus ‘Kamer uitluisteren’
MENU/GRP key
Druk op SEL/om in te stellen
Druk op MENU/GRP om terug te gaan
De kanaalscanfunctieDe TLKR T7-portofoon heeft een kanaalscanfunctie waarmee u de acht kanalen makkelijk kunt scannen. Wanneer een actief kanaal wordt waargenomen, blijft de portofoon op dat kanaal staan totdat de activiteit op het kanaal stopt. Na een pauze van 2 seconden (5 seconden voor VOX Aan zonder headset) gaat de portofoon verder met scannen. Door de zendtoets (PTT) in te drukken wanneer de portofoon op een kanaal is blijven staan, kunt u
op het betreffende kanaal uitzenden en de scanmodus afsluiten.De kanaalscanfunctie activeren:1. Open het algemene menu en selecteer ‘SCAN’.2. Druk op SEL/ . Het weergegeven kanaalnummer
verandert snel terwijl de portofoon door de kanalen bladert.
De kanaalscanfunctie uitschakelen:Druk op MENU/GRP of op de zendtoets (PTT).
9
Nederlands
Dubbel scannenDe portofoon kan afwisselend het huidige kanaal en een ander kanaal scannen. U dient het kanaalnummer en de bijbehorende subcode voor het andere kanaal in te stellen.Het andere kanaal instellen en Dubbel scannen starten:1. Open het algemene menu en selecteer ‘2CH’. Druk
vervolgens op SEL/ om naar de modus Dubbel scannen te gaan. Het symbool voor dubbel scannen wordt weergegeven.
2. Druk op of om het kanaalnummer te selecteren en druk daarna op SEL/ .
3. Druk op of om de subcode te selecteren en druk daarna op SEL/ .
4. De portofoon begint beide kanalen afwisselend te scannen.
Opmerking: als u hetzelfde kanaalnummer en dezelfde subcode instelt als gebruikt wordt voor het huidige kanaal, werkt de functie Dubbel scannen niet.
Dubbel scannen uitschakelen:Druk op MENU/GRP.
VOX-transmissieDe TLKR T7-portofoon is uitgerust met een door spraak bediende zender (VOX), die automatische spraaktransmissies mogelijk maakt. De gebruiker kan deze functie selecteren. De VOX-functie is bedoeld voor handsfree gebruik. De transmissie wordt gestart door in plaats van de zendtoets (PTT) in te drukken, gewoon in de microfoon van de portofoon of hoofdtelefoon te spreken (hoofdtelefoon niet meegeleverd).Het VOX-niveau selecteren:
1. Open het algemene menu en selecteer ‘VOX’. Druk vervolgens op SEL/ . Het huidige niveau (UIT, 1-5) gaat knipperen. Het niveau ‘N’ (UIT) schakelt VOX uit, terwijl niveaus 1-5 de gevoeligheid van het VOX-circuit bepalen.
2. Druk op of om de gewenste VOX-gevoeligheid te selecteren. Gebruik niveau 1 in stille omgevingen en niveau 5 in rumoerige omgevingen. U kunt bepalen welk het juiste gevoeligheidsniveau is door in de microfoon te spreken. Als het VOX-symbool knippert, is uw stem geaccepteerd.
3. Sluit het algemene menu af.Opmerking: wanneer u 60 seconden lang met de
VOX-functie blijft uitzenden, geeft de portofoon de toon Tx time-out en zal het symbool 5 seconden knipperen.
De functie Kamer uitluisterenU kunt een van de TLKR T7-portofoons gebruiken voor het uitluisteren van een kamer, en de andere portofoon dan in een andere kamer gebruiken om te luisteren naar spraakactiviteit. Wanneer u de functie Kamer uitluisteren inschakelt, neemt de portofoon stemmen/geluiden waar (afhankelijk van het gevoeligheidsniveau dat u hebt ingesteld) en stuurt hij deze naar de luisterende portofoon zonder dat de zendtoets (PTT) hoeft te worden ingedrukt. In deze modus kan de uitluisterende portofoon geen oproepen ontvangen.De functie Kamer uitluister activeren:1. Open het algemene menu en selecteer ‘ROOM’. Druk
vervolgens op SEL/ .2. Druk op of om de gewenste uitluistergevoeligheid
10
Nederlands
te selecteren. Gebruik niveau 1 in stille omgevingen en niveau 5 in rumoerige omgevingen.
3. Druk op SEL/ om de kamer uit te luisteren.De functie Kamer uitluister uitschakelen:Druk op MENU/GRP.Opmerking:- De zendtoets (PTT) werkt niet met de functie Kamer
uitluisteren; als u hem indrukt wanneer deze functie is geactiveerd, klinkt de toon PTT fout.
- Wanneer de stemmen/geluiden in de andere kamer meer dan 60 seconden aanhouden, stopt de luisterende portofoon vijf seconden met uitluisteren, waarna hij het uitluisteren weer hervat.
Een oproeptoon uitzendenDe TLKR-T7-portofoon beschikt over tien selecteerbare oproeptonen, die worden uitgezonden wanneer de toets
in de normale modus wordt ingedrukt.Een oproeptoon selecteren:1. Open het algemene menu en selecteer ‘TONE’. Druk
vervolgens op SEL/ .Ook het nummer van de huidige oproeptoon (1-10) gaat knipperen.
2. Druk op of om het nummer van de gewenste oproeptoon te kiezen. U hoort elke toon via de luidspreker.
3. Sluit het algemene menu af.Druk in de normale modus op om de geselecteerde oproeptoon uit te zenden. De oproeptoon wordt geannuleerd wanneer u op de zendtoets (PTT) drukt.
Stille modusWanneer u de stille modus activeert, hoort u bij inkomende oproepen geen geluidssignaal. De schermverlichting van de portofoon gaat knipperen om u te waarschuwen dat u wordt opgeroepen.Als u niet reageert, gaat de schermverlichting uit en blijft het oproepsymbool knipperen totdat er geen signaal meer is.De TLKR-T7 geeft ook een trilalarm om u te laten weten dat u een oproep hebt gemist.Wanneer u uitzendt, ontvangt of een andere toets indrukt, wordt de stille modus 15 seconden lang uitgeschakeld.De stille modus instellen:1. Open het algemene menu en selecteer ‘SLNT’. Druk
vervolgens op SEL/ .2. Druk op om de stille modus te activeren. De
kanaalindicator toont ‘Y’ en het symbool voor de stille modus wordt weergegeven.
3. Druk op om de stille modus uit te schakelen. De kanaalindicator toont ‘N’ en het symbool voor de stille modus verdwijnt.

11
Nederlands
StopwatchU kunt deze portofoon als een stopwatch gebruiken. Hij kan de tijd maximaal 59 minuten en 59 seconden bijhouden.Daarna begint hij weer vanaf 00:00 te tellen.De stopwatch gebruiken:1. Open het algemene menu en selecteer ‘TIME’.2. Druk op SEL/ om dit menu te openen.3. Druk op SEL/ . De stopwatch begint te lopen.4. Druk nogmaals op SEL/ om de stopwatch te
onderbreken.Met SEL/ kunt u de stopwatch activeren en deactiveren.
5. Druk op MENU/GRP wanneer de stopwatch loopt of is gepauzeerd om de portofoon in de inactieve stand te zetten (tijd resetten naar 00:00).
6. Druk in de inactieve stand op de zendtoets (PTT) of MENU/GRP om de stopwatch te stoppen.
Opmerking: in deze modus kunt u nog steeds inkomende signalen ontvangen.
Als een oproep voor alle portofoons wordt ontvangen, wordt tien seconden lang de id-naam weergegeven. Als een rechtstreekse oproep wordt ontvangen, wordt de id-naam weergegeven. De portofoon schakelt weer over naar de stopwatch en het oproepsymbool knippert.GroepsmodusHoud MENU/GRP ingedrukt om het groepsmenu te openen.Kanaalinstelling in groepsmodusDruk in de groepsmodus op SEL/ om over te schakelen naar de kanaalinstelling. Druk op of om ‘automatische kanaalomschakeling’ of ‘handmatig kanaal’ te selecteren.
Op het display wordt het volgende weergegeven:
Druk op SEL/ om naar een van deze instellingen te gaan.Opmerking: druk op MENU/GRP om naar de inactieve
status terug te keren.Automatische kanaalomschakeling instellenEr knippert een kanaalnummer en bij de subcode wordt ‘ALL’ aangegeven.Druk op of om het kanaal te selecteren.Druk op of SEL/ om de opdracht voor automatische kanaalomschakeling uit te zenden.Opmerking: druk op MENU/GRP om terug te keren naar
kanaalinstelling in groepsmodus.Handmatig kanaal in groepsmodus instellenEr knippert een kanaalnummer en bij de subcode wordt ‘MY’ aangegeven.Druk op of om het kanaal te selecteren.Nu is handmatig kanaal beschikbaar.Druk op SEL/ om de handmatige kanaalinstelling af te sluiten.Opmerking: druk op MENU/GRP om terug te keren naar
kanaalinstelling in groepsmodus.
Handmatig kanaalAutomatische kanaalomschakeling
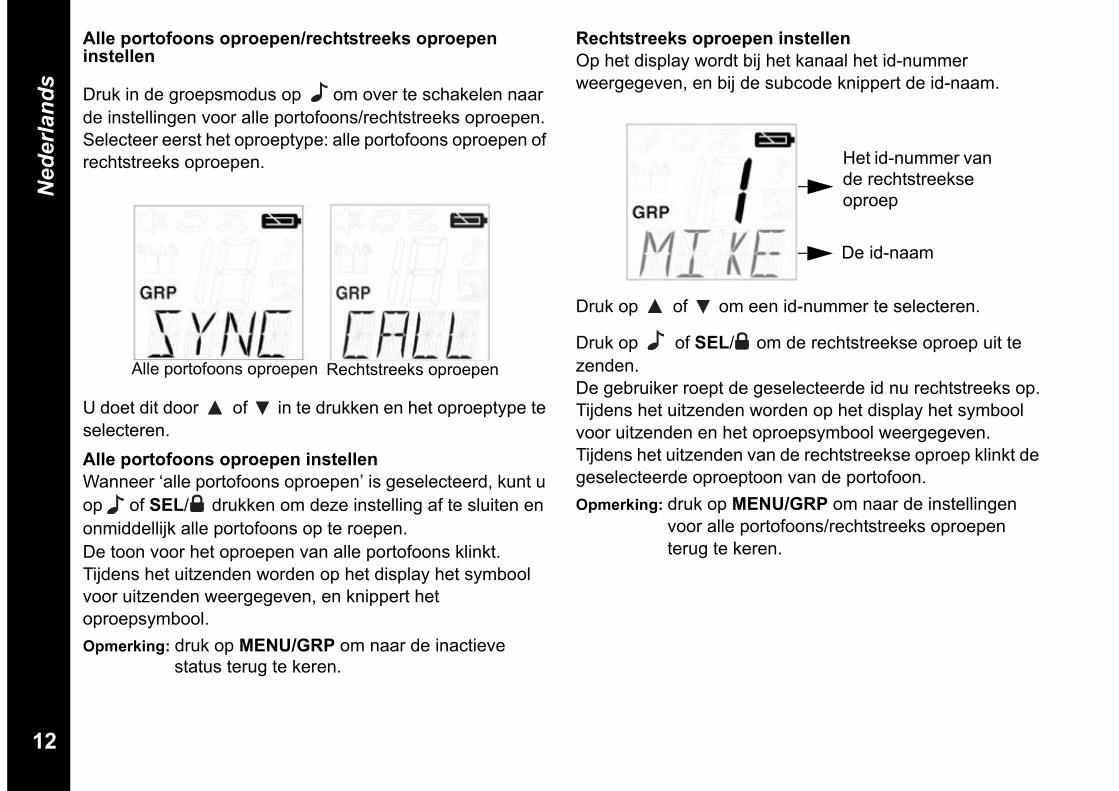
12
Nederlands
Alle portofoons oproepen/rechtstreeks oproepen instellen
Druk in de groepsmodus op om over te schakelen naar de instellingen voor alle portofoons/rechtstreeks oproepen. Selecteer eerst het oproeptype: alle portofoons oproepen of rechtstreeks oproepen.
U doet dit door of in te drukken en het oproeptype te selecteren.Alle portofoons oproepen instellenWanneer ‘alle portofoons oproepen’ is geselecteerd, kunt u op of SEL/ drukken om deze instelling af te sluiten en onmiddellijk alle portofoons op te roepen.De toon voor het oproepen van alle portofoons klinkt.Tijdens het uitzenden worden op het display het symbool voor uitzenden weergegeven, en knippert het oproepsymbool.Opmerking: druk op MENU/GRP om naar de inactieve
status terug te keren.
Rechtstreeks oproepen instellenOp het display wordt bij het kanaal het id-nummer weergegeven, en bij de subcode knippert de id-naam.
Druk op of om een id-nummer te selecteren.
Druk op of SEL/ om de rechtstreekse oproep uit te zenden.De gebruiker roept de geselecteerde id nu rechtstreeks op.Tijdens het uitzenden worden op het display het symbool voor uitzenden en het oproepsymbool weergegeven.Tijdens het uitzenden van de rechtstreekse oproep klinkt de geselecteerde oproeptoon van de portofoon.Opmerking: druk op MENU/GRP om naar de instellingen
voor alle portofoons/rechtstreeks oproepen terug te keren.
Alle portofoons oproepen Rechtstreeks oproepen
Het id-nummer van de rechtstreekse oproep
De id-naam
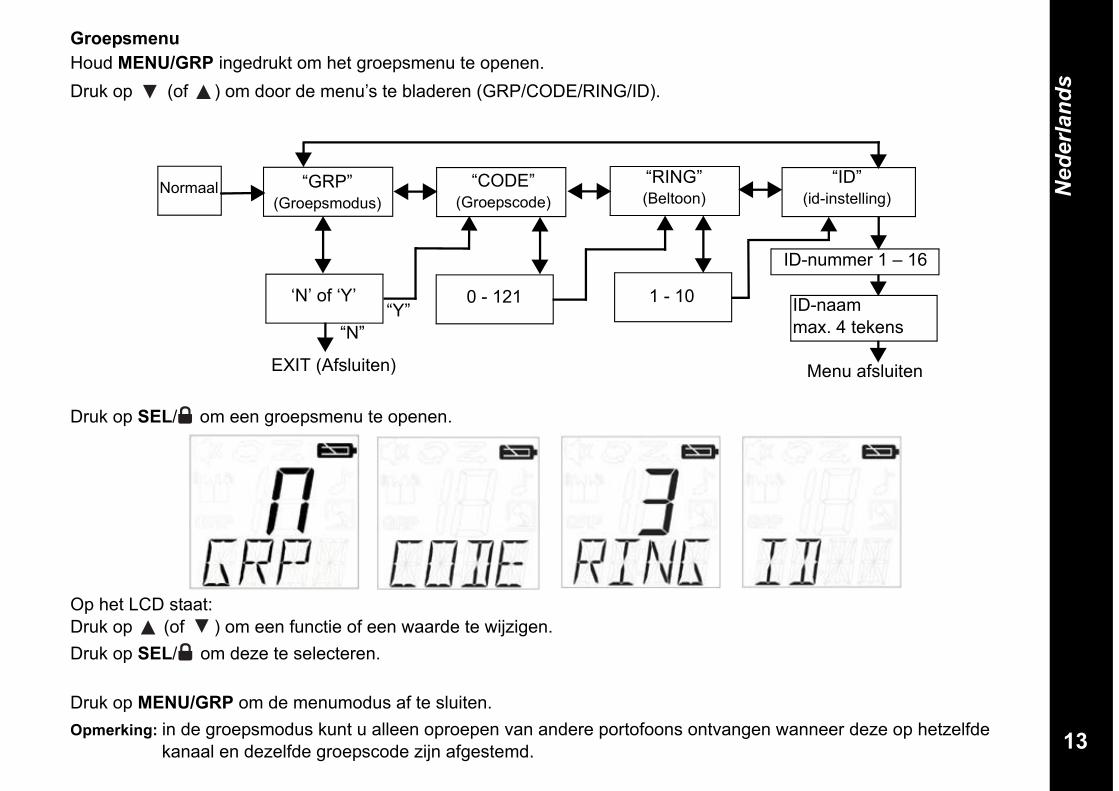
13
Nederlands
GroepsmenuHoud MENU/GRP ingedrukt om het groepsmenu te openen.Druk op (of ) om door de menu’s te bladeren (GRP/CODE/RING/ID).
Druk op SEL/ om een groepsmenu te openen.
Op het LCD staat:Druk op (of ) om een functie of een waarde te wijzigen. Druk op SEL/ om deze te selecteren.
Druk op MENU/GRP om de menumodus af te sluiten.Opmerking: in de groepsmodus kunt u alleen oproepen van andere portofoons ontvangen wanneer deze op hetzelfde
kanaal en dezelfde groepscode zijn afgestemd.
Normaal “GRP”(Groepsmodus)
“CODE”(Groepscode)
“ID” (id-instelling)
ID-nummer 1 – 16
0 - 121 1 - 10
EXIT (Afsluiten)
ID-naam max. 4 tekens
‘N’ of ‘Y’
“N”“Y”
Menu afsluiten
“RING”(Beltoon)
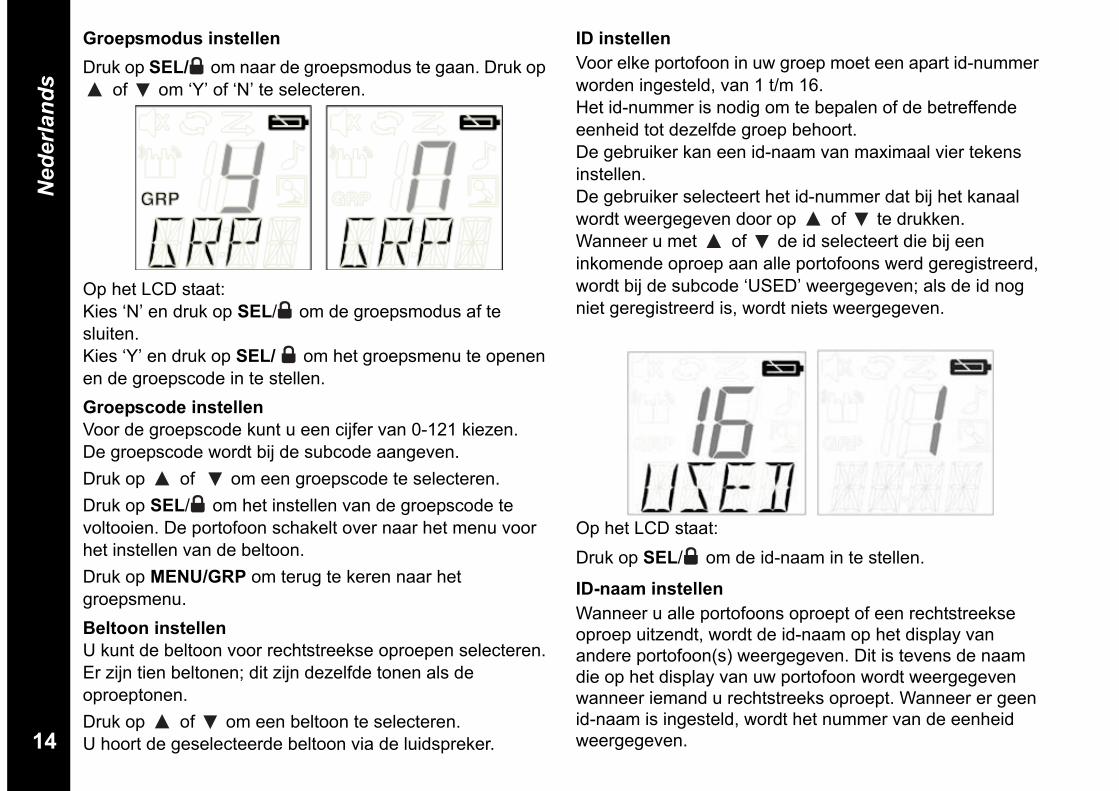
14
Nederlands
Groepsmodus instellenDruk op SEL/ om naar de groepsmodus te gaan. Druk op
of om ‘Y’ of ‘N’ te selecteren.
Op het LCD staat:Kies ‘N’ en druk op SEL/ om de groepsmodus af te sluiten.Kies ‘Y’ en druk op SEL/ om het groepsmenu te openen en de groepscode in te stellen.Groepscode instellenVoor de groepscode kunt u een cijfer van 0-121 kiezen.De groepscode wordt bij de subcode aangeven.Druk op of om een groepscode te selecteren.Druk op SEL/ om het instellen van de groepscode te voltooien. De portofoon schakelt over naar het menu voor het instellen van de beltoon.Druk op MENU/GRP om terug te keren naar het groepsmenu.Beltoon instellen U kunt de beltoon voor rechtstreekse oproepen selecteren.Er zijn tien beltonen; dit zijn dezelfde tonen als de oproeptonen.Druk op of om een beltoon te selecteren.U hoort de geselecteerde beltoon via de luidspreker.
ID instellenVoor elke portofoon in uw groep moet een apart id-nummer worden ingesteld, van 1 t/m 16.Het id-nummer is nodig om te bepalen of de betreffende eenheid tot dezelfde groep behoort.De gebruiker kan een id-naam van maximaal vier tekens instellen.De gebruiker selecteert het id-nummer dat bij het kanaal wordt weergegeven door op of te drukken. Wanneer u met of de id selecteert die bij een inkomende oproep aan alle portofoons werd geregistreerd, wordt bij de subcode ‘USED’ weergegeven; als de id nog niet geregistreerd is, wordt niets weergegeven.
Op het LCD staat:Druk op SEL/ om de id-naam in te stellen.
ID-naam instellenWanneer u alle portofoons oproept of een rechtstreekse oproep uitzendt, wordt de id-naam op het display van andere portofoon(s) weergegeven. Dit is tevens de naam die op het display van uw portofoon wordt weergegeven wanneer iemand u rechtstreeks oproept. Wanneer er geen id-naam is ingesteld, wordt het nummer van de eenheid weergegeven.
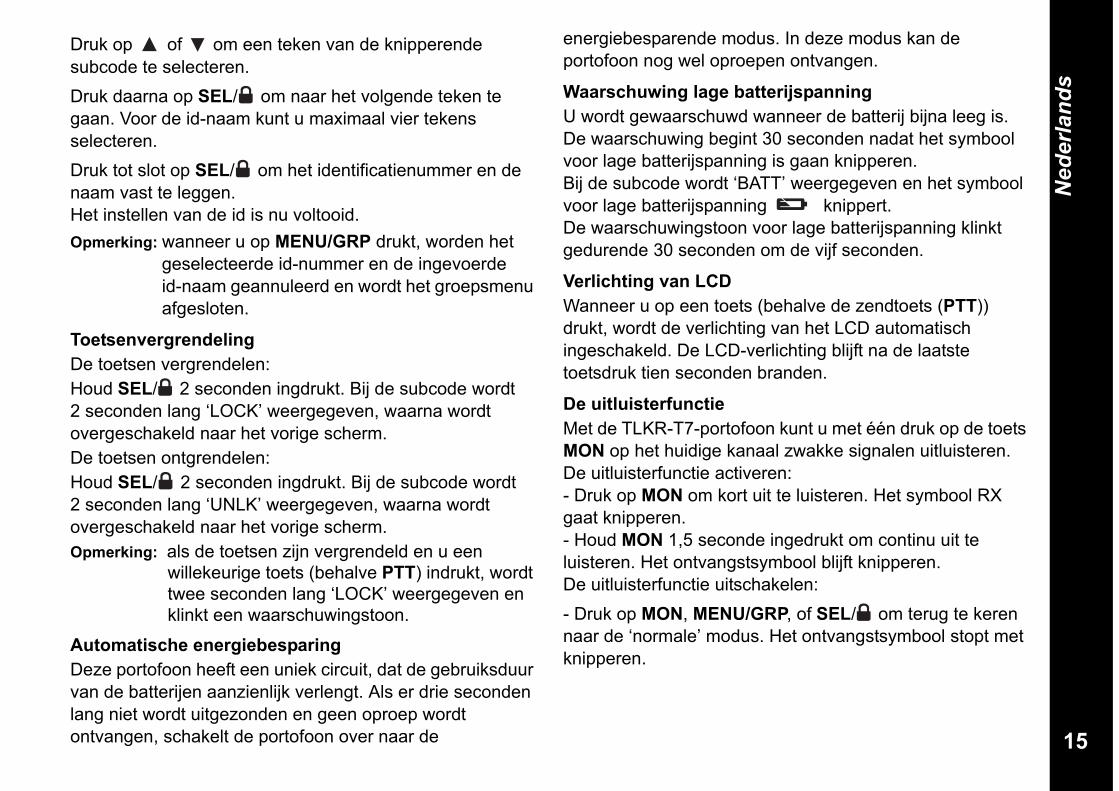
15
Nederlands
Druk op of om een teken van de knipperende subcode te selecteren.Druk daarna op SEL/ om naar het volgende teken te gaan. Voor de id-naam kunt u maximaal vier tekens selecteren.Druk tot slot op SEL/ om het identificatienummer en de naam vast te leggen.Het instellen van de id is nu voltooid.Opmerking: wanneer u op MENU/GRP drukt, worden het
geselecteerde id-nummer en de ingevoerde id-naam geannuleerd en wordt het groepsmenu afgesloten.
ToetsenvergrendelingDe toetsen vergrendelen:Houd SEL/ 2 seconden ingdrukt. Bij de subcode wordt 2 seconden lang ‘LOCK’ weergegeven, waarna wordt overgeschakeld naar het vorige scherm. De toetsen ontgrendelen:Houd SEL/ 2 seconden ingdrukt. Bij de subcode wordt 2 seconden lang ‘UNLK’ weergegeven, waarna wordt overgeschakeld naar het vorige scherm.Opmerking: als de toetsen zijn vergrendeld en u een
willekeurige toets (behalve PTT) indrukt, wordt twee seconden lang ‘LOCK’ weergegeven en klinkt een waarschuwingstoon.
Automatische energiebesparingDeze portofoon heeft een uniek circuit, dat de gebruiksduur van de batterijen aanzienlijk verlengt. Als er drie seconden lang niet wordt uitgezonden en geen oproep wordt ontvangen, schakelt de portofoon over naar de
energiebesparende modus. In deze modus kan de portofoon nog wel oproepen ontvangen.
Waarschuwing lage batterijspanningU wordt gewaarschuwd wanneer de batterij bijna leeg is. De waarschuwing begint 30 seconden nadat het symbool voor lage batterijspanning is gaan knipperen.Bij de subcode wordt ‘BATT’ weergegeven en het symbool voor lage batterijspanning knippert.De waarschuwingstoon voor lage batterijspanning klinkt gedurende 30 seconden om de vijf seconden.
Verlichting van LCDWanneer u op een toets (behalve de zendtoets (PTT))drukt, wordt de verlichting van het LCD automatisch ingeschakeld. De LCD-verlichting blijft na de laatste toetsdruk tien seconden branden.
De uitluisterfunctieMet de TLKR-T7-portofoon kunt u met één druk op de toets MON op het huidige kanaal zwakke signalen uitluisteren.De uitluisterfunctie activeren:- Druk op MON om kort uit te luisteren. Het symbool RX gaat knipperen.- Houd MON 1,5 seconde ingedrukt om continu uit te luisteren. Het ontvangstsymbool blijft knipperen.De uitluisterfunctie uitschakelen:- Druk op MON, MENU/GRP, of SEL/ om terug te keren naar de ‘normale’ modus. Het ontvangstsymbool stopt met knipperen.
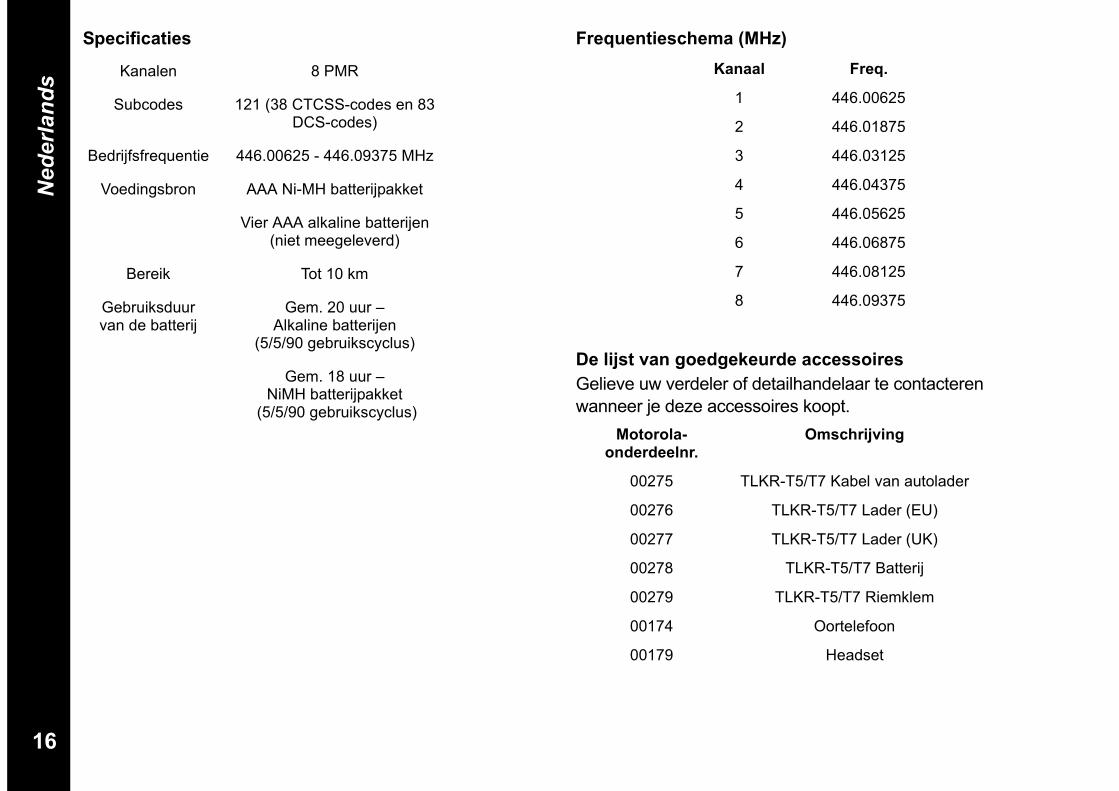
16
Nederlands
Specificaties Frequentieschema (MHz)
De lijst van goedgekeurde accessoiresGelieve uw verdeler of detailhandelaar te contacteren wanneer je deze accessoires koopt.
Kanalen 8 PMR
Subcodes 121 (38 CTCSS-codes en 83 DCS-codes)
Bedrijfsfrequentie 446.00625 - 446.09375 MHz
Voedingsbron AAA Ni-MH batterijpakket
Vier AAA alkaline batterijen (niet meegeleverd)
Bereik Tot 10 km
Gebruiksduur van de batterij
Gem. 20 uur – Alkaline batterijen
(5/5/90 gebruikscyclus)
Gem. 18 uur – NiMH batterijpakket
(5/5/90 gebruikscyclus)
Kanaal Freq.
1 446.00625
2 446.01875
3 446.03125
4 446.04375
5 446.05625
6 446.06875
7 446.08125
8 446.09375
Motorola-onderdeelnr.
Omschrijving
00275 TLKR-T5/T7 Kabel van autolader
00276 TLKR-T5/T7 Lader (EU)
00277 TLKR-T5/T7 Lader (UK)
00278 TLKR-T5/T7 Batterij
00279 TLKR-T5/T7 Riemklem
00174 Oortelefoon
00179 Headset
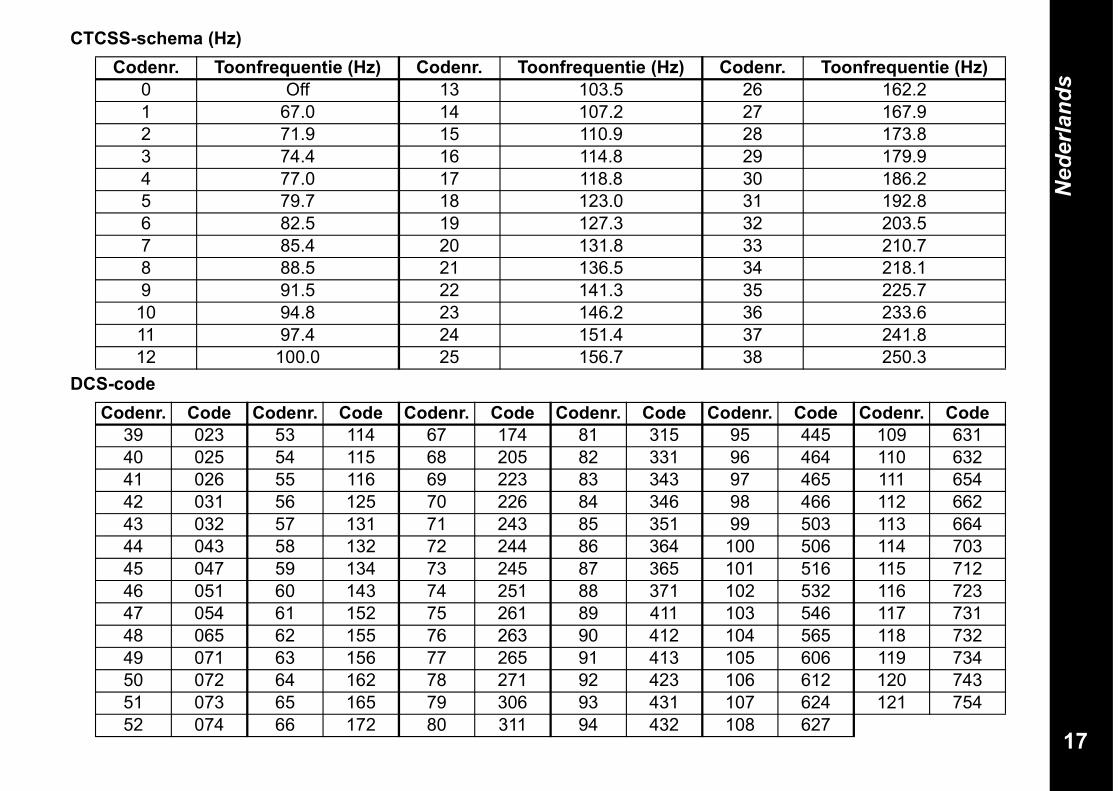
17
Nederlands
CTCSS-schema (Hz)
DCS-code
Codenr. Toonfrequentie (Hz) Codenr. Toonfrequentie (Hz) Codenr. Toonfrequentie (Hz)0 Off 13 103.5 26 162.21 67.0 14 107.2 27 167.92 71.9 15 110.9 28 173.83 74.4 16 114.8 29 179.94 77.0 17 118.8 30 186.25 79.7 18 123.0 31 192.86 82.5 19 127.3 32 203.57 85.4 20 131.8 33 210.78 88.5 21 136.5 34 218.19 91.5 22 141.3 35 225.7
10 94.8 23 146.2 36 233.611 97.4 24 151.4 37 241.812 100.0 25 156.7 38 250.3
Codenr. Code Codenr. Code Codenr. Code Codenr. Code Codenr. Code Codenr. Code39 023 53 114 67 174 81 315 95 445 109 63140 025 54 115 68 205 82 331 96 464 110 63241 026 55 116 69 223 83 343 97 465 111 65442 031 56 125 70 226 84 346 98 466 112 66243 032 57 131 71 243 85 351 99 503 113 66444 043 58 132 72 244 86 364 100 506 114 70345 047 59 134 73 245 87 365 101 516 115 71246 051 60 143 74 251 88 371 102 532 116 72347 054 61 152 75 261 89 411 103 546 117 73148 065 62 155 76 263 90 412 104 565 118 73249 071 63 156 77 265 91 413 105 606 119 73450 072 64 162 78 271 92 423 106 612 120 74351 073 65 165 79 306 93 431 107 624 121 75452 074 66 172 80 311 94 432 108 627
18
Nederlands
Garantie InformatieDe door Motorola goedgekeurde verdeler of kleinhandelaar waarbij u uw two-way radio en/of originele accessoires van Motorola kocht, zal een garantieclaim aanvaarden en/of reparaties onder garantie uitvoeren. Breng uw radio terug naar uw verdeler of kleinhandelaar om uw reparatie onder garantie te vragen. Stuur uw radio niet terug naar Motorola.Om gedekt te zijn door de garantie, moet u uw kassabon of een vergelijkbaar aankoopbewijs waarop de aankoopdatum staat, voorleggen. Het serienummer van de two-way radio moet ook duidelijk te zien zijn. De garantie is niet van toepassing als het type of serienummer op het product gewijzigd, uitgewist, verwijderd of onleesbaar zijn.
Wat Niet Wordt Gedekt Door de GarantieDefecten of schade die ontstaan door het foute gebruik van het product of door het niet volgen van de aanwijzingen in deze handleiding.Defecten of schade door misbruik, ongevallen of verwaarlozing.Defecten of schade door foute testen, bediening, onderhoud, aanpassingen of wijzigingen of verbouwingen van alle aard.Breuk van of schade aan antennes tenzij rechtstreeks veroorzaakt door materiaal- of fabricagefouten.Producten die zo zijn samengesteld of gerepareerd dat ze de prestaties negatief beïnvloeden of een gepaste controle en test van de garantieclaim onmogelijk maken.Defecten of schade omwille van het bereik.Defecten of schade omwille van vocht, vloeistoffen of morsen.Alle plastic oppervlakken en externe blootgestelde
onderdelen die schrammen vertonen of beschadigd zijn door normaal gebruik.Producten die voor een bepaalde periode worden verhuurd.Periodiek onderhoud en reparaties of vervanging van onderdelen door gewoon gebruik en slijtage.
CopyrightinformatieDe Motorola-producten die in deze handleiding beschreven staan, bevatten mogelijk programma's, opgeslagen halfgeleidergeheugens of andere media van Motorola waarop copyright van toepassing is. De wetten van de Verenigde Staten en andere landen geven Motorola bepaalde exclusieve rechten op computerprogramma's met copyright, waaronder het exclusieve recht om deze programma's op om het even welke manier te kopiëren of reproduceren.Dientengevolge mag geen enkel computerprogramma waarvan Motorola de copyright bezit dat in de Motorolaproducten uit deze handleiding gebruikt wordt, op om het even welke manier gekopieerd of gereproduceerd worden zonder de uitdrukkelijke schriftelijke toestemming van Motorola. Daarenboven biedt de aankoop van Motorolaproducten nooit het recht, zowel uitdrukkelijk als impliciet, door uitsluiting of anders, op een vergunning onder de auteursrechten, patenten of patenttoepassingen, uitgezonderd voor de gewoonlijk niet exclusieve kosteloze licentie, voor gebruik dat voortkomt uit de uitvoering van de wetgeving betreffende de verkoop van een product.MOTOROLA, het gestileerde M Logo en alle andere handelsmerken hierin zijn handelsmerken van Motorola, Inc. ® Reg. VS Pat. & Tm. Off.
© Motorola, Inc. 2008
1
Polski
SPIS TRE�CIInformacje dotycz�ce bezpiecze�stwa u�ytkowania oraz nara�enia na dzia�anie promieniowania o cz�stotliwo�ci radiowej (energii RF) dla Radiotelefonów Przeno�nych . . . . . . . . . . . . . . . . . . . . . . . . . . . . . . . . . . . . . 2Charakterystyka. . . . . . . . . . . . . . . . . . . . . . . . . . . . . . . . . . . 2Przyciski steruj�ce i funkcje . . . . . . . . . . . . . . . . . . . . . . . . . . 4Wy�wietlacz . . . . . . . . . . . . . . . . . . . . . . . . . . . . . . . . . . . . . . 3Zawarto�� zestawu . . . . . . . . . . . . . . . . . . . . . . . . . . . . . . . . 5Monta� akumulatorów . . . . . . . . . . . . . . . . . . . . . . . . . . . . . . 5Poziom na�adowania i alarm niskiego poziomu na�adowania akumulatorów. . . . . . . . . . . . . . . . . . . 5adowanie akumulatorów w radiotelefonie . . . . . . . . . . . . . . 5Bezpo�rednie �adowanie . . . . . . . . . . . . . . . . . . . . . . . . . . . . 5U�ywanie stacji �adowarki . . . . . . . . . . . . . . . . . . . . . . . . . . . 5adowanie akumulatorów wyj�tych z radiotelefonu. . . . . . . . 6Korzystanie z radiotelefonu . . . . . . . . . . . . . . . . . . . . . . . . . . 6W��czanie radiotelefonu i regulacja g�o�no�ci . . . . . . . . . . . . . . . . . . . . . . . . . . . . . . . . . . . . . . . 6Regulacja dwi�ku (sygna� przycisku) . . . . . . . . . . . . . . . . . 6Sygna� potwierdzenia . . . . . . . . . . . . . . . . . . . . . . . . . . . . . . 6Rozmawianie przez radiotelefon . . . . . . . . . . . . . . . . . . . . . . 6Poruszanie si� po menu . . . . . . . . . . . . . . . . . . . . . . . . . . . . 7Menu wyboru . . . . . . . . . . . . . . . . . . . . . . . . . . . . . . . . . . . . 7Wybieranie kana�u . . . . . . . . . . . . . . . . . . . . . . . . . . . . . . . . 7Wybieranie kodu . . . . . . . . . . . . . . . . . . . . . . . . . . . . . . . . . . 7Menu g�ówne . . . . . . . . . . . . . . . . . . . . . . . . . . . . . . . . . . . . 8Funkcja skanowania kana�ów . . . . . . . . . . . . . . . . . . . . . . . . 8Tryb nas�uchu dwóch kana�ów . . . . . . . . . . . . . . . . . . . . . . . 9Nadawanie uruchamiane g�osem. . . . . . . . . . . . . . . . . . . . . . 9Funkcja monitorowania pomieszczenia . . . . . . . . . . . . . . . . 9Wysy�anie sygna�u wywo�ania . . . . . . . . . . . . . . . . . . . . . . . 10Tryb cichy . . . . . . . . . . . . . . . . . . . . . . . . . . . . . . . . . . . . . . 10Stoper zliczaj�cy . . . . . . . . . . . . . . . . . . . . . . . . . . . . . . . . . 11Tryb grupy . . . . . . . . . . . . . . . . . . . . . . . . . . . . . . . . . . . . . 11Ustawianie kana�u w trybie grupy . . . . . . . . . . . . . . . . . . . 11
Ustawianie automatycznej zmiany kana�u . . . . . . . . . . . . . .11Ustawianie r�czne kana�u w trybie grupy . . . . . . . . . . . . . .12Ustawianie wywo�ania wszystkich u�ytkowników/bezpo�redniego . . . . . . . . . . . . . . . . . . . . . . . . . . . . . . . . . .12Ustawianie wywo�ania wszystkich u�ytkowników . . . . . . . .12Ustawianie wywo�ania bezpo�redniego . . . . . . . . . . . . . . . .12Menu grupy . . . . . . . . . . . . . . . . . . . . . . . . . . . . . . . . . . . . . .13Ustawianie menu grupy . . . . . . . . . . . . . . . . . . . . . . . . . . . . .14Ustawianie kodu grupy . . . . . . . . . . . . . . . . . . . . . . . . . . . .14Ustawianie dwi�ku dzwonka . . . . . . . . . . . . . . . . . . . . . . .14Ustawianie identyfikatora . . . . . . . . . . . . . . . . . . . . . . . . . . .14Ustawianie nazwy identyfikatora . . . . . . . . . . . . . . . . . . . . . .14Blokada klawiatury . . . . . . . . . . . . . . . . . . . . . . . . . . . . . . . .15Funkcja automatycznego oszcz�dzania akumulatorów . . . . . . . . . . . . . . . . . . . . . . . . . . . . . . . . . . . .15Alarm niskiego poziomu na�adowania akumulatora . . . . . . .15Pod�wietlenie wy�wietlacza LCD . . . . . . . . . . . . . . . . . . . . .15Funkcja trybu monitorowania . . . . . . . . . . . . . . . . . . . . . . . .15Dane techniczne . . . . . . . . . . . . . . . . . . . . . . . . . . . . . . . . . .16Karta cz�stotliwo�ci (MHz) . . . . . . . . . . . . . . . . . . . . . . . . . .16Lista zatwierdzonych akcesoriów . . . . . . . . . . . . . . . . . . . . .16Karta kodów CTCSS (Hz) . . . . . . . . . . . . . . . . . . . . . . . . . . .17Kody DCS . . . . . . . . . . . . . . . . . . . . . . . . . . . . . . . . . . . . . . .17Informacje Dotycz�ce Gwarancji . . . . . . . . . . . . . . . . . . . . .18Gwarancja Nie Obejmuje . . . . . . . . . . . . . . . . . . . . . . . . . . .18Informacje o Prawach Autorskich . . . . . . . . . . . . . . . . . . . . .18
2
Polski
Informacje dotycz�ce bezpiecze�stwa u�ytkowania oraz nara�enia na dzia�anie promieniowania o cz�stotliwo�ci radiowej (energii RF) dla Radiotelefonów Przeno�nych
Charakterystyka• 8 kana�ów PMR• 121 kodów (38 kodów CTCSS i 83 kody DCS)• Zasi�g do 10 km*• Wewn�trzny uk�ad nadawania uruchamianego g�osem
(VOX)• 10 alertów wywo�ania do wyboru• Pod�wietlany wy�wietlacz ciek�okrystaliczny• Gniazdo do pod��czenia opcjonalnego zestawu
s�uchawkowego• Sygna� potwierdzenia• Stoper zliczaj�cy• Monitorowanie pomieszczenia• adowarka do akumulatorów• Wskanik poziomu na�adowania akumulatorów• Monitorowanie kana�ów
• Skanowanie kana�ów• Nas�uch dwóch kana�ów• Blokada klawiatury• Automatyczne wyciszanie szumów• Automatyczne powtarzanie (przewijanie)• Tryb oszcz�dzania baterii• Alarm niskiego poziomu na�adowania akumulatora• Dwi�k (W�./Wy�.)• Wywo�anie bezpo�rednie (z identyfikatorem dzwoni�cego)• Wywo�anie grupowe• Tryb cichy• Wywo�anie wszystkich u�ytkowników• Automatyczna zmiana kana�u* Zasi�g mo�e si� ró�ni� w zale�no�ci od warunków
�rodowiskowych i/lub topograficznych.
Przed rozpocz�ciem u�ytkowania wyrobu nale�y zapozna� si� z instrukcjami dotycz�cymi bezpiecznej obs�ugi urz�dze� zawartymi w broszurze “Zasady bezpiecznego u�ytkowania wyrobu oraz nara�enie na dzia�anie promieniowania o cz�stotliwo�ci radiowej” dostarczonej z radiotelefonem.
Przestroga:
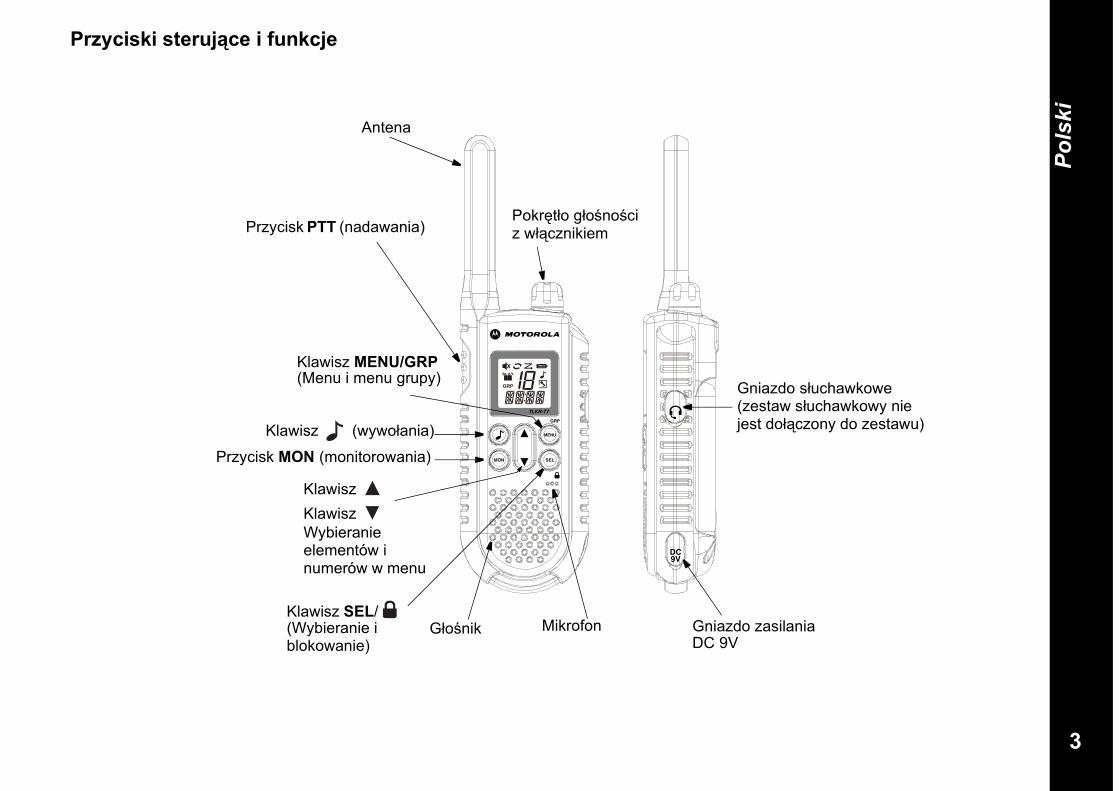
3
Polski
Przyciski steruj�ce i funkcje
Gniazdo s�uchawkowe (zestaw s�uchawkowy nie jest do��czony do zestawu)
Antena
Pokr�t�o g�o�no�ci z w��cznikiemPrzycisk PTT (nadawania)
Klawisz (wywo�ania)
Przycisk MON (monitorowania)
Klawisz Klawisz Wybieranie elementów i numerów w menu
Klawisz MENU/GRP(Menu i menu grupy)
Klawisz SEL/ (Wybieranie i blokowanie)
G�o�nik Mikrofon Gniazdo zasilania DC 9V

4
Polski
Wy�wietlacz 1. Wskanik nas�uchu dwóch kana�ów2. Wskanik trybu cichego3. Wskanik transmisji4. Wskanik odbioru5. Wskanik grupy6. Wskanik skanowania7. Wskanik poziomu na�adowania akumulatorów8. Wskanik kodu9. Wskanik wywo�ania10. Wskanik VOX / monitorowania pomieszczenia11. Wskanik kodu podrz�dnego (identyfikatora/kodu
grupy)12. Dwukropek (w stoperze zliczaj�cym)
1
23
4
5
12
11
10
6
9
7
8
5
Polski
Gratulujemy zakupu radiotelefonu TLKR T7. Niniejszy produkt jest lekkim, mieszcz�cym si� w d�oni radiotelefonem. Korzystaj z niego na imprezach sportowych, aby utrzyma� kontakt z rodzin� i przyjació�mi, podczas pieszych w�drówek, jazdy na nartach, na wolnym powietrzu lub w ramach stra�y s�siedzkiej do zapewnienia koniecznej ��czno�ci. To kompaktowe, nowoczesne urz�dzenie jest wyposa�one w wiele funkcji.Zawarto� zestawuTwój zestaw zawiera dwa radiotelefony TLKR T7, dwa zaczepy do noszenia radiotelefonu na pasku, jedn� �adowark�, adapter AC, dwie wk�adki na akumulatory, dwa pakiety akumulatorów niklowo-wodorkowych (NiMH) oraz podr�cznik u�ytkownika. Do zasilania radiotelefonu mo�esz zastosowa� 4 baterie alkaliczne typu AAA (nie do��czone do zestawu).
Monta� akumulatorów Radiotelefon TLKR T7 mo�e by� zasilany przy u�yciu pakietu akumulatorów niklowo-wodorkowych lub 4 baterii alkalicznych typu AAA (nie do��czonych do zestawu). W przypadku zastosowania baterii alkalicznych, zalecamy u�ycie baterii alkalicznych wysokiej jako�ci.
Aby zamontowa� pakiet akumulatorów niklowo-wodorkowych:1) Upewnij si�, �e radiotelefon jest wy��czony.2) Zdejmij os�on� komory na baterie przez naci�ni�cie klapki u do�u os�ony, co umo�liwi jej zdj�cie.3) Zamontuj pakiet akumulatorów niklowo-wodorkowych w komorze na baterie. Przestrzegaj poprawnego u�o�enia biegunów wed�ug znaków + i – wewn�trz komory na baterie. Nieprawid�owy monta� baterii uniemo�liwi dzia�anie radiotelefonu.4) Ponownie za�ó� os�on� komory na baterie.
Poziom na�adowania i alarm niskiego poziomu na�adowania akumulatorówNiniejszy radiotelefon posiada na wy�wietlaczu wskanik poziomu na�adowania akumulatorów, który wskazuje stan akumulatorów. Gdy poziom na�adowania akumulatorów w radiotelefonie b�dzie niski, ikona wskanika poziomu na�adowania akumulatora b�dzie miga�. W przypadku baterii alkalicznych nale�y je natychmiast wymieni�.
adowanie akumulatorów w radiotelefonieJe�eli stosujesz pakiet akumulatorów niklowo-wodorkowych, dwa radiotelefony TLKR T7 mo�na �adowa� bezpo�rednio lub za pomoc� do��czonej �adowarki.Przed umieszczeniem radiotelefonu w �adowarce, pami�taj, aby go wy��czy. W przeciwnym razie wska�nik poziomu na�adowania akumulatorów nie b�dzie poprawnie wskazywa� stanu na�adowania.adowanie bezpo�rednie: 1. Pod��cz wtyczk� adaptera DC do gniazda DC 9V
radiotelefonu i wetknij drugi koniec adaptera do gniazda zasilaj�cego akcesoria w pojedzie.
2. aduj pakiet akumulatorów przez 16 godzin.
adowanie przy u�yciu �adowarki:1. Pod��cz adapter AC do gniazda DC 9V �adowarki oraz
do standardowego gniazda sieciowego.2. Postaw �adowark� na biurku lub stole i umie��
radiotelefon zwrócony klawiatur� do przodu w �adowarce.
3. Upewnij si�, �e wskanik LED �wieci si�. aduj pakiet akumulatorów przez 16 godzin i wyjmij radiotelefon z �adowarki po na�adowaniu akumulatorów.
Uwaga: Wska�niki LED �adowania b�d� si� �wieci tak d�ugo, jak d�ugo radiotelefony b�d� pozostawa w �adowarce.
6
Polski
adowanie akumulatorów wyj�tych z radiotelefonu Mo�esz �adowa� pakiet akumulatorów niklowo-wodorkowych samodzielnie, korzystaj�c z do��czonej wk�adki na akumulatory.1. Mie�� wk�adk� na akumulatory w �adowarce.2. Zamontuj pakiet akumulatorów niklowo-wodorkowych
przyk�adaj�c jego styki do styków �adowarki. Je�li akumulator zostanie niew�a�ciwie zainstalowany, nie b�dzie mo�na go na�adowa�.
3. Upewnij si�, �e wskanik LED �wieci si�. aduj pakiet akumulatorów przez 16 godzin.
Uwaga: Wska�niki LED �adowania b�d� si� �wieci tak d�ugo, jak d�ugo radiotelefony b�d� pozostawa w �adowarce.
Korzystanie z radiotelefonuAby w pe�ni wykorzysta� mo�liwo�ci swojego nowego radiotelefonu, przed rozpocz�ciem u�ytkowania radiotelefonu przeczytaj ca�y niniejszy podr�cznik u�ytkownika.W��czanie radiotelefonu i regulacja g�o�no�ci 1. Przekr�� pokr�t�o w prawo, aby W�CZY� radiotelefon. Aby
zwi�kszy� g�o�no��, przekr�caj pokr�t�o dalej w prawo. Aby �ciszy� dwi�k, przekr�� pokr�t�o w lewo.
2. Aby WY�CZY� urz�dzenie, przekr�� pokr�t�o do ko�ca w lewo.
Regulacja d�wi�ku (sygna� przycisku) Radiotelefon wysy�a sygna� dwi�kowy po ka�dym naci�ni�ciu jednego z przycisków (z wyj�tkiem przycisku PTT i ). Aby wy��czy� lub w��czy� ten dwi�k, podczas w��czania radiotelefonu naci�nij i przytrzymaj przycisk .
Sygna� potwierdzenia Sygna� potwierdzenia stanowi SYGNA, który jest wysy�any w celu powiadomienia o zako�czeniu transmisji (transmisja PTT i VOX). Sygna� potwierdzenia mo�na us�ysze� z g�o�nika po w��czeniu funkcji sygna�u potwierdzenia. Sygna� potwierdzenia
wysy�any jest nawet wówczas, gdy funkcja sygna�u potwierdzenia jest wy��czona. Jednak�e sygna� potwierdzenia nie b�dzie s�yszalny z g�o�nika.Aby wy��czy� lub w��czy� sygna� potwierdzenia:Naci�nij i przytrzymaj przycisk w��czania radiotelefonu.
Rozmawianie przez radiotelefonAby rozmawia� z innymi osobami przez radiotelefon:1. Naci�nij i przytrzymaj przycisk PTT i zacznij mówi�
wyranym, normalnym g�osem w odleg�o�ci oko�o 5-8 cm od mikrofonu. W czasie transmisji na wy�wietlaczu b�dzie widoczna ikona . Aby unikn�� obci�cia pierwszej cz��ci transmisji, po naci�ni�ciu przycisku PTT, zrób ma�� przerw� zanim zaczniesz mówi�.
2. Po zako�czeniu mówienia zwolnij przycisk PTT. Mo�esz teraz odbiera� przychodz�ce wywo�ania. Podczas odbioru na wy�wietlaczu b�dzie widoczna ikona .
Uwaga: Je�eli b�dziesz kontynuowa transmisj� przez 60 sekund, radiotelefon wy�le sygna� ograniczenia czasu nadawania i ikona zacznie miga. Radiotelefon zatrzyma transmisj�.
7
Polski
Poruszanie si� po menuDla zapewnienia dost�pu do zaawansowanych funkcji TLKR T7, radiotelefon posiada dwa rodzaje funkcji Menu: Wybierz Menu i Menu g�ówne.1. Po naci�ni�ciu klawisza SEL/ w��czane jest menu
wyboru kana�u. Po naci�ni�ciu klawisza MENU/GRP w��czane jest menu g�ówne.
2. Aby wyj�� z menu:a. Naci�nij klawisz PTT.b. Zaczekaj 10 sekund, a� radiotelefon automatycznie powróci
do trybu "Normalnego".
Menu wyboruNaciskanie klawisza SEL/ powoduje przechodzenie mi�dzy opcjami menu wyboru w nast�puj�cy sposób:
Naci�nij klawisz SEL/ , aby przej�� do kolejnego kroku trybu menu.
Aby wyj�� z menu, naci�nij klawisz MENU/GRP (w obu ustawieniach) lub klawisz SEL/ (w ustawieniu kodu podrz�dnego).
Wybieranie kana�uRadiotelefon posiada 8 kana�ów i 121 kodów, z których mo�esz korzysta�, aby rozmawia� z innymi osobami. Aby rozmowa z inn� osob� by�a mo�liwa, ka�da z osób musi mie� ustawiony ten sam kana� i kod.Aby wybra� kana�:1. Wejd do Menu wyboru. Wskanik kana�u zacznie miga�. 2. Naci�nij przycisk lub , aby zwi�kszy� lub zmniejszy�
wy�wietlany numer kana�u. Je�eli naci�niesz i przytrzymasz przycisk lub , numer kana�u wzrasta lub maleje w sposób ci�g�y.
3. Przejd do ustawiania kodów, aby wybra� kod.
Wybieranie koduPrzydzielenie kodu w radiotelefonie pomo�e ograniczy� zak�ócenia, ale nale�y pami�ta�, �e radiotelefony, które maj� ustawione ró�ne kody nie b�d� w stanie komunikowa� si� ze sob�. Ka�dy z kana�ów 1-8 mo�e mie� dowolny kod od 0 do 121.1. Wejd do Menu wyboru. Przechod przez kolejne pozycje
Menu wyboru, a� wskanik kodu zacznie miga�.2. Aby zwi�kszy� lub zmniejszy� wy�wietlany numer kodu
podrz�dnego, naciskaj klawisz lub . Naci�ni�cie i przytrzymanie klawisza lub powoduje ci�g�e zwi�kszanie lub zmniejszanie numeru kodu podrz�dnego.
3. Wyjd z trybu wyboru menu, naciskaj�c klawisz SEL/ .
Tryb norlamny
Kana� Kod
0-1211-8
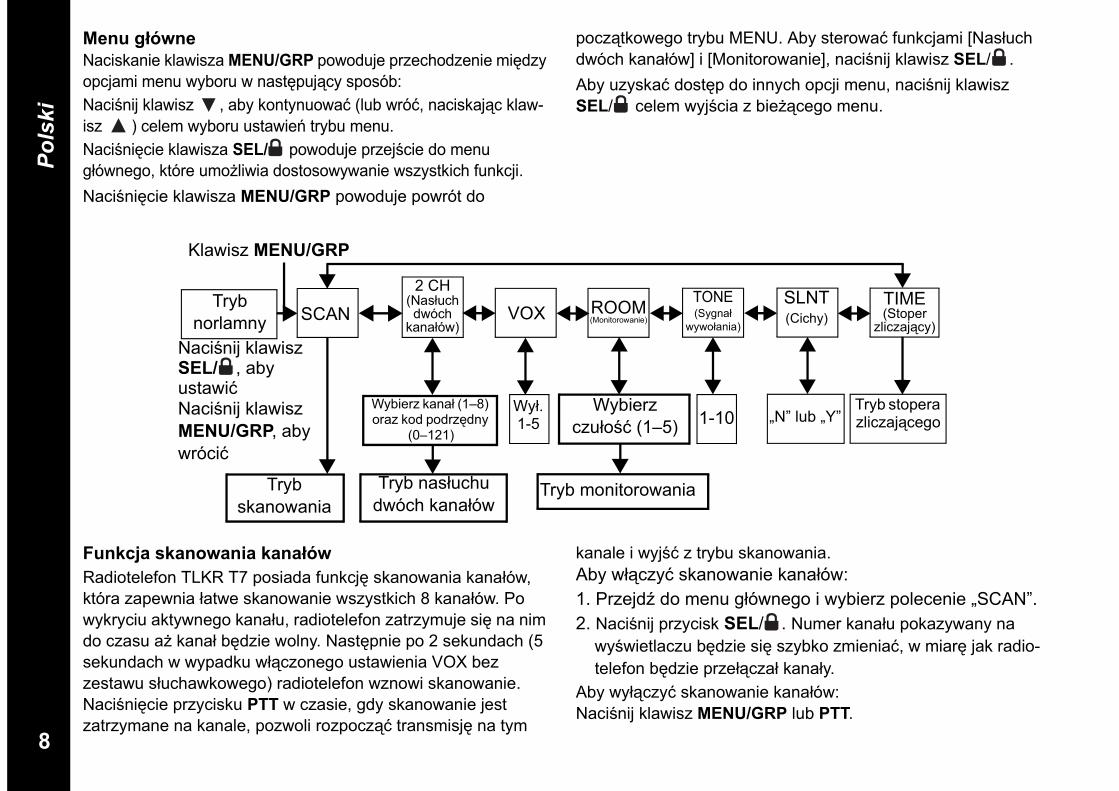
8
Polski
Menu g�ówneNaciskanie klawisza MENU/GRP powoduje przechodzenie mi�dzy opcjami menu wyboru w nast�puj�cy sposób:Naci�nij klawisz , aby kontynuowa� (lub wró�, naciskaj�c klaw-isz ) celem wyboru ustawie� trybu menu.Naci�ni�cie klawisza SEL/ powoduje przej�cie do menu g�ównego, które umo�liwia dostosowywanie wszystkich funkcji.Naci�ni�cie klawisza MENU/GRP powoduje powrót do
pocz�tkowego trybu MENU. Aby sterowa� funkcjami [Nas�uch dwóch kana�ów] i [Monitorowanie], naci�nij klawisz SEL/ .Aby uzyska� dost�p do innych opcji menu, naci�nij klawisz SEL/ celem wyj�cia z bie��cego menu.
Tryb norlamny SCAN
2 CH (Nas�uch dwóch
kana�ów)VOX ROOM
(Monitorowanie)
TONE (Sygna�
wywo�ania)
SLNT (Cichy)
TIME (Stoper
zliczaj�cy)
Wybierz kana� (1–8) oraz kod podrz�dny
(0–121)
Tryb stopera zliczaj�cego
Wybierz czu�o�� (1–5)
Wy�. 1-5 1-10 „N” lub „Y”
Tryb skanowania
Tryb nas�uchu dwóch kana�ów
Tryb monitorowania
Klawisz MENU/GRP
Naci�nij klawisz SEL/ , aby ustawi�Naci�nij klawisz MENU/GRP, aby wróci�
Funkcja skanowania kana�ówRadiotelefon TLKR T7 posiada funkcj� skanowania kana�ów, która zapewnia �atwe skanowanie wszystkich 8 kana�ów. Po wykryciu aktywnego kana�u, radiotelefon zatrzymuje si� na nim do czasu a� kana� b�dzie wolny. Nast�pnie po 2 sekundach (5 sekundach w wypadku w��czonego ustawienia VOX bez zestawu s�uchawkowego) radiotelefon wznowi skanowanie. Naci�ni�cie przycisku PTT w czasie, gdy skanowanie jest zatrzymane na kanale, pozwoli rozpocz�� transmisj� na tym
kanale i wyj�� z trybu skanowania.Aby w��czy� skanowanie kana�ów:1. Przejd do menu g�ównego i wybierz polecenie „SCAN”. 2. Naci�nij przycisk SEL/ . Numer kana�u pokazywany na
wy�wietlaczu b�dzie si� szybko zmienia�, w miar� jak radio-telefon b�dzie prze��cza� kana�y.
Aby wy��czy� skanowanie kana�ów:Naci�nij klawisz MENU/GRP lub PTT.
9
Polski
Tryb nas�uchu dwóch kana�ówRadiotelefon mo�e skanowa� bie��cy kana� i drugi kana� na przemian. Musisz ustawi� numer kana�u i jego kod dla drugiego kana�u.Aby ustawi� drugi kana� i uruchomi� nas�uch dwóch kana�ów:1. Otwórz menu g�ówne i wybierz „2CH”, a nast�pnie naci�nij
klawisz SEL/ , aby przej�� do ustawie� trybu nas�uchu dwóch kana�ów. Zostanie wy�wietlona ikona trybu nas�uchu dwóch kana�ów.
2. Naci�nij przycisk lub , aby wybra� numer kana�u, a nast�pnie naci�nij przycisk SEL/ .
3. Naci�nij lub , aby wybra� numer kodu podrz�dnego, a nast�pnie naci�nij klawisz SEL/ .
4. Tryb nas�uchu dwóch kana�ów zosta� uruchomiony.Uwaga: Je�eli ustawisz taki sam numer kana�u i kod, jak dla
bie��cego kana�u, tryb nas�uchu dwóch kana�ów nie b�dzie dzia�a.
Aby wy��czy� tryb nas�uchu dwóch kana�ów:Naci�nij przycisk MENU/GRP.Nadawanie uruchamiane g�osemRadiotelefon TLKR T7 wyposa�ony jest w ustawian� przez u�ytkownika funkcj� nadawania uruchamianego g�osem (VOX), która mo�e by� wykorzystywana do automatycznych transmisji uruchamianych g�osem. Funkcja VOX przeznaczona jest do obs�ugi radiotelefonu bez u�ycia r�k. Transmisja jest inicjowana poprzez mówienie do mikrofonu radiotelefonu lub zestawu s�uchawkowego (zestaw s�uchawkowy nie jest do��czony do zestawu radiotelefonu) zamiast naciskania przycisku PTT.Aby wybra� poziom funkcji VOX:1. Przejd do menu g�ównego i wybierz polecenie „VOX”.
Nast�pnie naci�nij klawisz SEL/ . Miga informacja o bie��cym poziomie (WY., 1–5). Ustawienie poziomu „N” (WY.) powoduje wy��czenie ustawienia VOX, podczas gdy wybór poziomów 1–5 umo�liwia dostosowanie czu�o�ci
obwodu VOX. 2. Naci�nij przycisk lub , aby wybra� wymagany poziom
czu�o�ci funkcji VOX. Ustaw poziom 1 w cichym otoczeniu, a poziom 5 w bardzo ha�a�liwym otoczeniu. Mo�esz znale� odpowiedni poziom czu�o�ci poprzez mówienie do mikrofonu. Miganie ikony VOX oznacza, �e g�os u�ytkownika zosta� zaakceptowany.
3. Wyjd z menu g�ównego.Uwaga: Je�eli b�dziesz kontynuowa transmisj�
korzystaj�c z funkcji VOX przez 60 sekund, radiotelefon wy�le sygna� czasu nadawania i ikona
b�dzie miga przez 5 sekund.Funkcja monitorowania pomieszczenia Mo�esz wykorzysta� jeden ze swoich radiotelefonów TLKR T7 jako monitor pomieszczenia, a drugi radiotelefon stosowa� do nas�uchu i kontrolowania g�osu w innym pomieszczeniu. Po ustawieniu funkcji monitorowania pomieszczenia, radiotelefon monitoruj�cy b�dzie wykrywa� g�os/ha�asy (zgodnie z ustawionym poziomem czu�o�ci) i transmitowa� je do radiotelefonu nas�uchuj�cego bez naciskania przycisku PTT. Radiotelefon monitoruj�cy nie mo�e odbiera� �adnych transmisji w tym trybie.Aby w��czy� funkcj� monitorowania pomieszczenia:1. Przejd do menu g�ównego i wybierz polecenie „ROOM”.
Nast�pnie naci�nij klawisz SEL/ .2. Naci�nij przycisk lub , aby wybra� wymagany poziom
czu�o�ci funkcji monitorowania pomieszczenia. Ustaw poziom 1 w cichym otoczeniu, a poziom 5 w bardzo ha�a�liwym otoczeniu.
3. Naci�nij klawisz SEL/ , aby dostosowa� ustawienia monitorowania.
Aby wy��czy� funkcj� monitorowania pomieszczenia:Naci�nij przycisk MENU/GRP.
10
Polski
Uwaga: - W trybie monitorowania pomieszczenia przycisk PTT jest
nieaktywny i jego naci�ni�cie powoduje wygenerowanie sygna�u b��du przycisku PTT.
- Je�eli g�os/ha�as w drugim pomieszczeniu b�dzie odbierany przez ponad 60 sekund, radiotelefon monitoruj�cy przestanie monitorowa� przez 5 sekund, a nast�pnie wznowi monitorowanie.
Wysy�anie sygna�u wywo�aniaW radiotelefonie TLKR T7 dost�pnych jest 10 dwi�ków
wywo�ania, które s� przesy�ane po naci�ni�ciu klawisza w trybie normalnym.Aby wybra� sygna� wywo�ania:1. Przejd do menu g�ównego i wybierz polecenie „TONE”.
Nast�pnie naci�nij klawisz SEL/ .B�dzie równie� miga� bie��cy numer sygna�u wywo�ania(1-10).
2. Naci�nij klawisz lub , aby wybra� numer ��danego dwi�ku wywo�ania. Ka�dy sygna� b�dzie s�yszalny z g�o�nika.
3. Wyjd z menu g�ównego.
Aby przes�a� wybrany dwi�k wywo�ania, naci�nij klawisz w trybie standardowym. Wybrany sygna� b�dzie automatycznie transmitowany przez ustalony okres czasu. Sygna� wywo�ania zostanie anulowany po naci�ni�ciu przycisku PTT.
Tryb cichyPo w��czeniu trybu cichego dwi�k wszystkich wywo�a� przychodz�cych jest wyciszany — wywo�anie przychodz�ce jest sygnalizowane miganiem ekranu.Je�li wywo�anie nie zostanie odebrane, ekran jest wy��czony, a ikona wywo�ania b�dzie miga� do momentu utraty sygna�u.Nieodebrane wywo�anie b�dzie równie� sygnalizowane wibracjami.Przesy�anie lub odbieranie wywo�ania b�d naci�ni�cie dowolnego klawisza powoduje wy��czenie trybu cichego na 15 sekund.Aby w��czy� tryb cichy:1. Przejd do menu g�ównego i wybierz polecenie „SLNT”.
Nast�pnie naci�nij klawisz SEL/ .2. Aby w��czy� tryb cichy, naci�nij . Wskanik kana�u
poka�e informacj� „Y”, zostanie te� wy�wietlona ikona SILENT.
3. Aby wy��czy� tryb cichy, naci�nij . Wskanik kana�u poka�e informacj� „N”, a ikona SILENT zniknie.
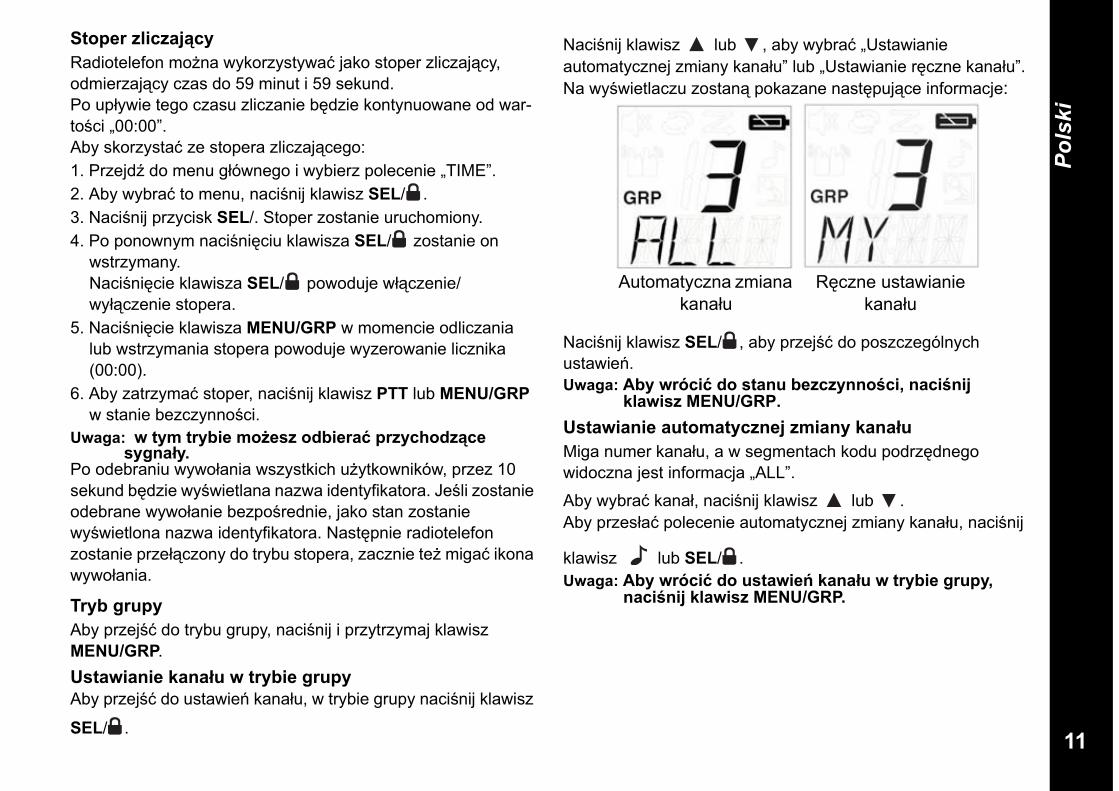
11
Polski
Stoper zliczaj�cy Radiotelefon mo�na wykorzystywa� jako stoper zliczaj�cy, odmierzaj�cy czas do 59 minut i 59 sekund.Po up�ywie tego czasu zliczanie b�dzie kontynuowane od war-to�ci „00:00”.Aby skorzysta� ze stopera zliczaj�cego:1. Przejd do menu g�ównego i wybierz polecenie „TIME”.2. Aby wybra� to menu, naci�nij klawisz SEL/ .3. Naci�nij przycisk SEL/. Stoper zostanie uruchomiony.4. Po ponownym naci�ni�ciu klawisza SEL/ zostanie on
wstrzymany.Naci�ni�cie klawisza SEL/ powoduje w��czenie/wy��czenie stopera.
5. Naci�ni�cie klawisza MENU/GRP w momencie odliczania lub wstrzymania stopera powoduje wyzerowanie licznika (00:00).
6. Aby zatrzyma� stoper, naci�nij klawisz PTT lub MENU/GRP w stanie bezczynno�ci.
Uwaga: w tym trybie mo�esz odbiera przychodz�ce sygna�y.
Po odebraniu wywo�ania wszystkich u�ytkowników, przez 10 sekund b�dzie wy�wietlana nazwa identyfikatora. Je�li zostanie odebrane wywo�anie bezpo�rednie, jako stan zostanie wy�wietlona nazwa identyfikatora. Nast�pnie radiotelefon zostanie prze��czony do trybu stopera, zacznie te� miga� ikona wywo�ania.
Tryb grupyAby przej�� do trybu grupy, naci�nij i przytrzymaj klawisz MENU/GRP.Ustawianie kana�u w trybie grupyAby przej�� do ustawie� kana�u, w trybie grupy naci�nij klawisz
SEL/ .
Naci�nij klawisz lub , aby wybra� „Ustawianie automatycznej zmiany kana�u” lub „Ustawianie r�czne kana�u”.Na wy�wietlaczu zostan� pokazane nast�puj�ce informacje:
Naci�nij klawisz SEL/ , aby przej�� do poszczególnych ustawie�.Uwaga: Aby wróci do stanu bezczynno�ci, naci�nij
klawisz MENU/GRP.Ustawianie automatycznej zmiany kana�uMiga numer kana�u, a w segmentach kodu podrz�dnego widoczna jest informacja „ALL”.
Aby wybra� kana�, naci�nij klawisz lub .Aby przes�a� polecenie automatycznej zmiany kana�u, naci�nij
klawisz lub SEL/ .Uwaga: Aby wróci do ustawie� kana�u w trybie grupy,
naci�nij klawisz MENU/GRP.
R�czne ustawianie kana�u
Automatyczna zmiana kana�u
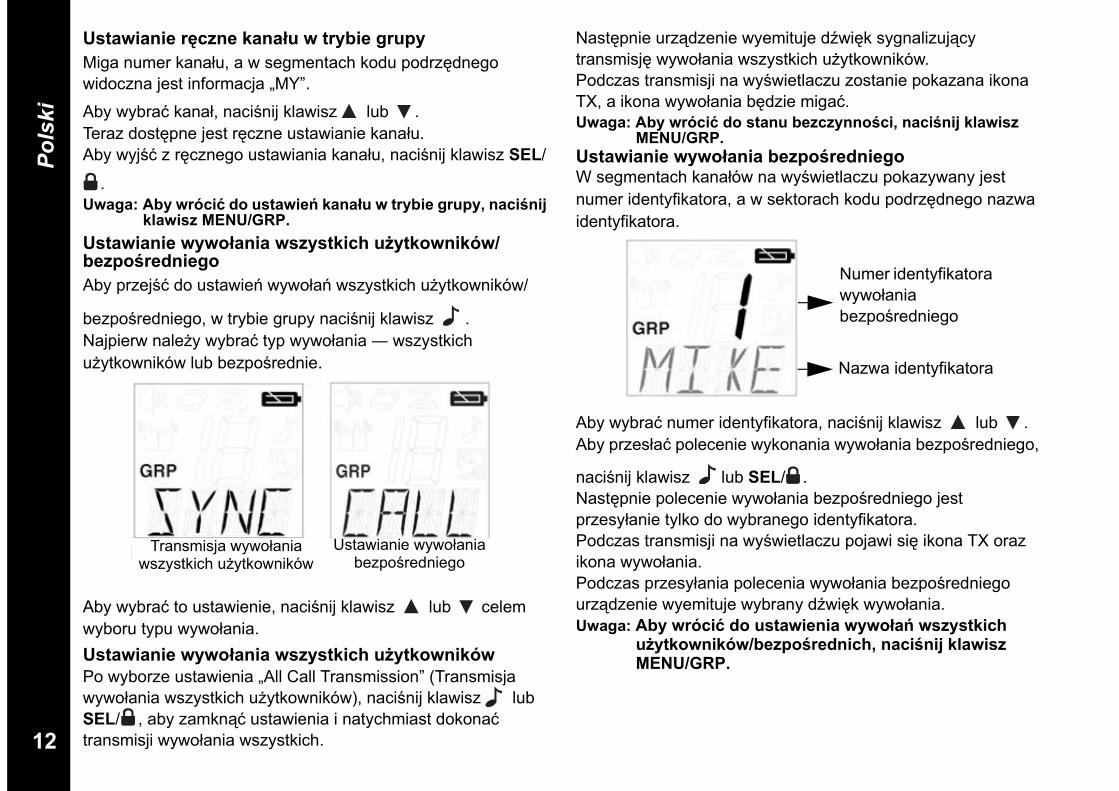
12
Polski
Ustawianie r�czne kana�u w trybie grupyMiga numer kana�u, a w segmentach kodu podrz�dnego widoczna jest informacja „MY”.
Aby wybra� kana�, naci�nij klawisz lub .Teraz dost�pne jest r�czne ustawianie kana�u.Aby wyj�� z r�cznego ustawiania kana�u, naci�nij klawisz SEL/
.Uwaga: Aby wróci do ustawie� kana�u w trybie grupy, naci�nij
klawisz MENU/GRP.Ustawianie wywo�ania wszystkich u�ytkowników/bezpo�redniegoAby przej�� do ustawie� wywo�a� wszystkich u�ytkowników/
bezpo�redniego, w trybie grupy naci�nij klawisz . Najpierw nale�y wybra� typ wywo�ania wszystkich u�ytkowników lub bezpo�rednie.
Aby wybra� to ustawienie, naci�nij klawisz lub celem wyboru typu wywo�ania.Ustawianie wywo�ania wszystkich u�ytkownikówPo wyborze ustawienia „All Call Transmission” (Transmisja wywo�ania wszystkich u�ytkowników), naci�nij klawisz lub SEL/ , aby zamkn�� ustawienia i natychmiast dokona� transmisji wywo�ania wszystkich.
Nast�pnie urz�dzenie wyemituje dwi�k sygnalizuj�cy transmisj� wywo�ania wszystkich u�ytkowników.Podczas transmisji na wy�wietlaczu zostanie pokazana ikona TX, a ikona wywo�ania b�dzie miga�.Uwaga: Aby wróci do stanu bezczynno�ci, naci�nij klawisz
MENU/GRP.Ustawianie wywo�ania bezpo�redniegoW segmentach kana�ów na wy�wietlaczu pokazywany jest numer identyfikatora, a w sektorach kodu podrz�dnego nazwa identyfikatora.
Aby wybra� numer identyfikatora, naci�nij klawisz lub .Aby przes�a� polecenie wykonania wywo�ania bezpo�redniego,
naci�nij klawisz lub SEL/ .Nast�pnie polecenie wywo�ania bezpo�redniego jest przesy�anie tylko do wybranego identyfikatora.Podczas transmisji na wy�wietlaczu pojawi si� ikona TX oraz ikona wywo�ania.Podczas przesy�ania polecenia wywo�ania bezpo�redniego urz�dzenie wyemituje wybrany dwi�k wywo�ania.Uwaga: Aby wróci do ustawienia wywo�a� wszystkich
u�ytkowników/bezpo�rednich, naci�nij klawisz MENU/GRP.
Transmisja wywo�ania wszystkich u�ytkowników
Ustawianie wywo�ania bezpo�redniego
Numer identyfikatora wywo�ania bezpo�redniego
Nazwa identyfikatora
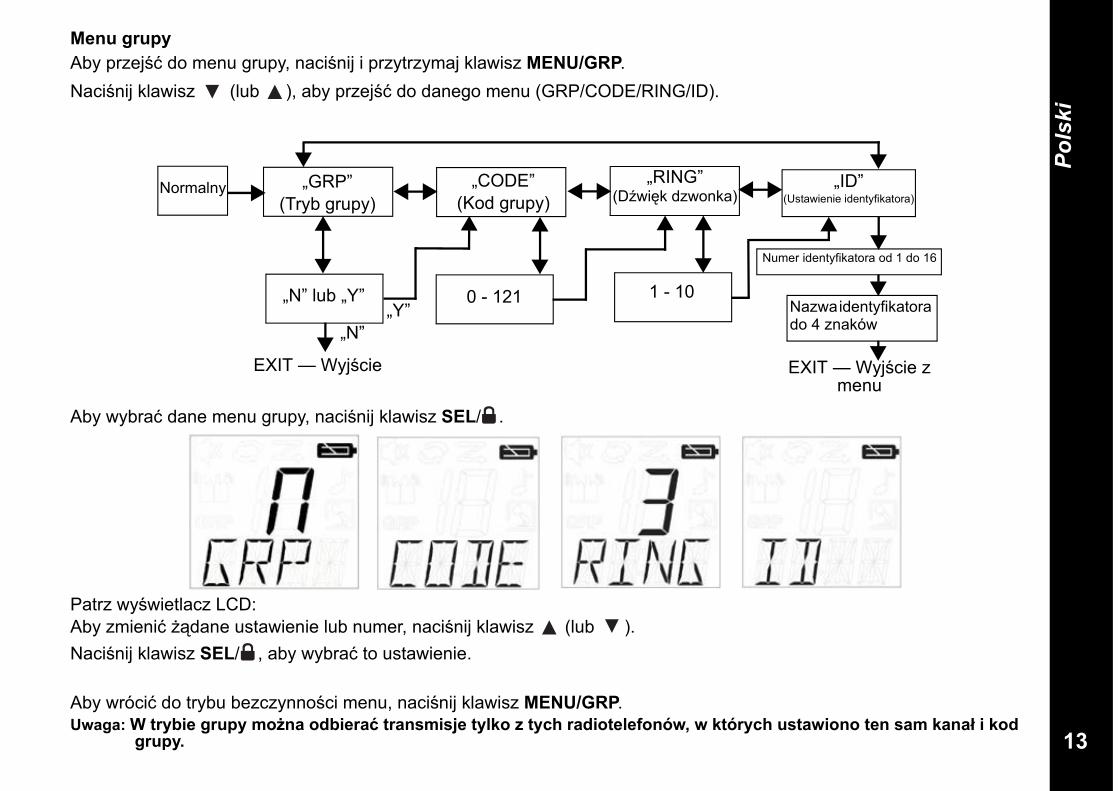
13
Polski
Menu grupyAby przej�� do menu grupy, naci�nij i przytrzymaj klawisz MENU/GRP.Naci�nij klawisz (lub ), aby przej�� do danego menu (GRP/CODE/RING/ID).
Aby wybra� dane menu grupy, naci�nij klawisz SEL/ .
Patrz wy�wietlacz LCD:Aby zmieni� ��dane ustawienie lub numer, naci�nij klawisz (lub ). Naci�nij klawisz SEL/ , aby wybra� to ustawienie.
Aby wróci� do trybu bezczynno�ci menu, naci�nij klawisz MENU/GRP.Uwaga: W trybie grupy mo�na odbiera transmisje tylko z tych radiotelefonów, w których ustawiono ten sam kana� i kod
grupy.
Normalny „GRP”(Tryb grupy)
„CODE”(Kod grupy)
Numer identyfikatora od 1 do 16
0 - 121 1 - 10
EXIT — Wyj�cie
Nazwa identyfikatora do 4 znaków
„N” lub „Y”
„N”„Y”
EXIT — Wyj�cie z menu
„RING”(Dwi�k dzwonka)
„ID” (Ustawienie identyfikatora)
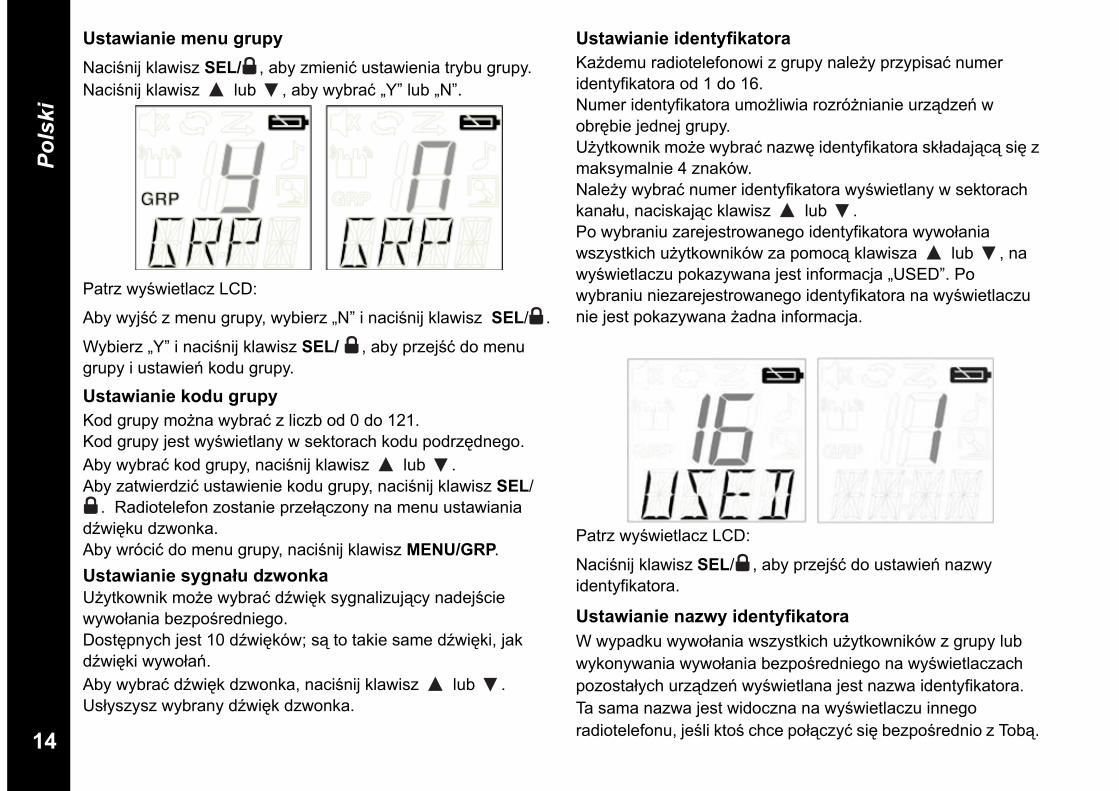
14
Polski
Ustawianie menu grupyNaci�nij klawisz SEL/ , aby zmieni� ustawienia trybu grupy. Naci�nij klawisz lub , aby wybra� „Y” lub „N”.
Patrz wy�wietlacz LCD:
Aby wyj�� z menu grupy, wybierz „N” i naci�nij klawisz SEL/ .
Wybierz „Y” i naci�nij klawisz SEL/ , aby przej�� do menu grupy i ustawie� kodu grupy.
Ustawianie kodu grupy Kod grupy mo�na wybra� z liczb od 0 do 121.Kod grupy jest wy�wietlany w sektorach kodu podrz�dnego.Aby wybra� kod grupy, naci�nij klawisz lub .Aby zatwierdzi� ustawienie kodu grupy, naci�nij klawisz SEL/
. Radiotelefon zostanie prze��czony na menu ustawiania dwi�ku dzwonka.Aby wróci� do menu grupy, naci�nij klawisz MENU/GRP.Ustawianie sygna�u dzwonka U�ytkownik mo�e wybra� dwi�k sygnalizuj�cy nadej�cie wywo�ania bezpo�redniego.Dost�pnych jest 10 dwi�ków; s� to takie same dwi�ki, jak dwi�ki wywo�a�.Aby wybra� dwi�k dzwonka, naci�nij klawisz lub .Us�yszysz wybrany dwi�k dzwonka.
Ustawianie identyfikatoraKa�demu radiotelefonowi z grupy nale�y przypisa� numer identyfikatora od 1 do 16.Numer identyfikatora umo�liwia rozró�nianie urz�dze� w obr�bie jednej grupy.U�ytkownik mo�e wybra� nazw� identyfikatora sk�adaj�c� si� z maksymalnie 4 znaków. Nale�y wybra� numer identyfikatora wy�wietlany w sektorach kana�u, naciskaj�c klawisz lub . Po wybraniu zarejestrowanego identyfikatora wywo�ania wszystkich u�ytkowników za pomoc� klawisza lub , na wy�wietlaczu pokazywana jest informacja „USED”. Po wybraniu niezarejestrowanego identyfikatora na wy�wietlaczu nie jest pokazywana �adna informacja.
Patrz wy�wietlacz LCD:
Naci�nij klawisz SEL/ , aby przej�� do ustawie� nazwy identyfikatora.
Ustawianie nazwy identyfikatoraW wypadku wywo�ania wszystkich u�ytkowników z grupy lub wykonywania wywo�ania bezpo�redniego na wy�wietlaczach pozosta�ych urz�dze� wy�wietlana jest nazwa identyfikatora. Ta sama nazwa jest widoczna na wy�wietlaczu innego radiotelefonu, je�li kto� chce po��czy� si� bezpo�rednio z Tob�.
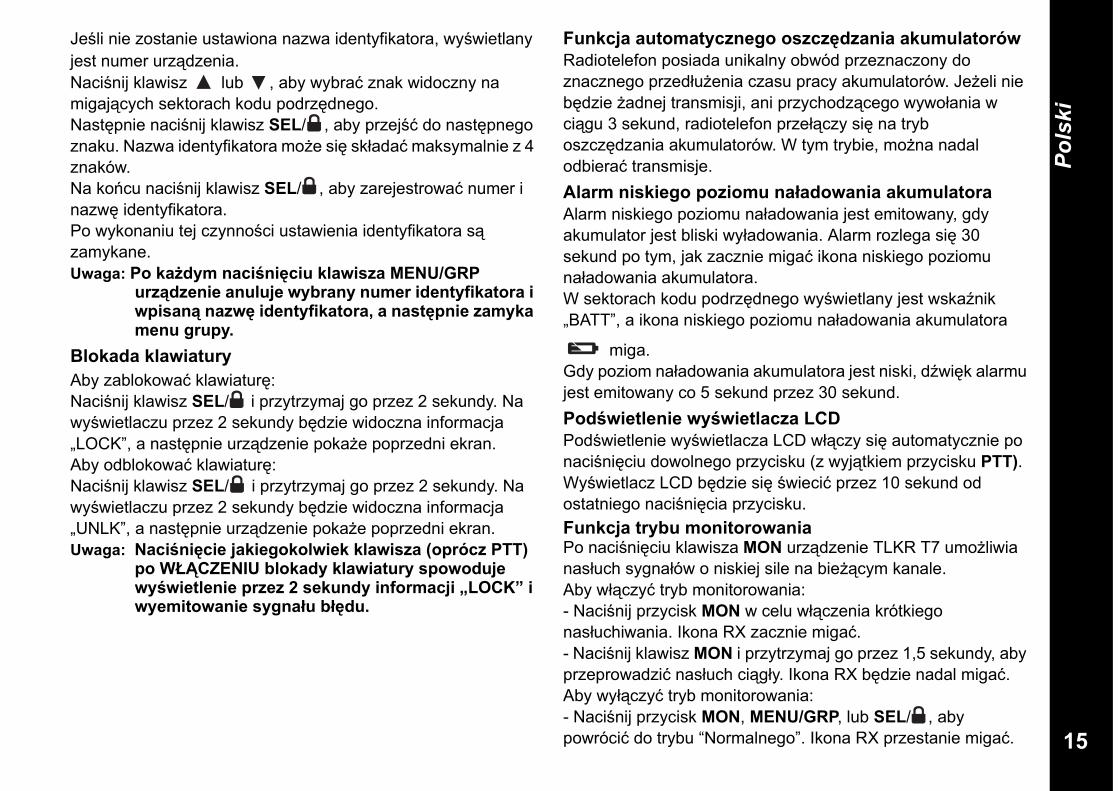
15
Polski
Je�li nie zostanie ustawiona nazwa identyfikatora, wy�wietlany jest numer urz�dzenia. Naci�nij klawisz lub , aby wybra� znak widoczny na migaj�cych sektorach kodu podrz�dnego.Nast�pnie naci�nij klawisz SEL/ , aby przej�� do nast�pnego znaku. Nazwa identyfikatora mo�e si� sk�ada� maksymalnie z 4 znaków.Na ko�cu naci�nij klawisz SEL/ , aby zarejestrowa� numer i nazw� identyfikatora.Po wykonaniu tej czynno�ci ustawienia identyfikatora s� zamykane.Uwaga: Po ka�dym naci�ni�ciu klawisza MENU/GRP
urz�dzenie anuluje wybrany numer identyfikatora i wpisan� nazw� identyfikatora, a nast�pnie zamyka menu grupy.
Blokada klawiaturyAby zablokowa� klawiatur�:Naci�nij klawisz SEL/ i przytrzymaj go przez 2 sekundy. Na wy�wietlaczu przez 2 sekundy b�dzie widoczna informacja „LOCK”, a nast�pnie urz�dzenie poka�e poprzedni ekran. Aby odblokowa� klawiatur�:Naci�nij klawisz SEL/ i przytrzymaj go przez 2 sekundy. Na wy�wietlaczu przez 2 sekundy b�dzie widoczna informacja „UNLK”, a nast�pnie urz�dzenie poka�e poprzedni ekran.Uwaga: Naci�ni�cie jakiegokolwiek klawisza (oprócz PTT)
po W�CZENIU blokady klawiatury spowoduje wy�wietlenie przez 2 sekundy informacji „LOCK” i wyemitowanie sygna�u b��du.
Funkcja automatycznego oszcz�dzania akumulatorów Radiotelefon posiada unikalny obwód przeznaczony do znacznego przed�u�enia czasu pracy akumulatorów. Je�eli nie b�dzie �adnej transmisji, ani przychodz�cego wywo�ania w ci�gu 3 sekund, radiotelefon prze��czy si� na tryb oszcz�dzania akumulatorów. W tym trybie, mo�na nadal odbiera� transmisje.Alarm niskiego poziomu na�adowania akumulatora Alarm niskiego poziomu na�adowania jest emitowany, gdy akumulator jest bliski wy�adowania. Alarm rozlega si� 30 sekund po tym, jak zacznie miga� ikona niskiego poziomu na�adowania akumulatora.W sektorach kodu podrz�dnego wy�wietlany jest wskanik „BATT”, a ikona niskiego poziomu na�adowania akumulatora
miga.Gdy poziom na�adowania akumulatora jest niski, dwi�k alarmu jest emitowany co 5 sekund przez 30 sekund.Pod�wietlenie wy�wietlacza LCDPod�wietlenie wy�wietlacza LCD w��czy si� automatycznie po naci�ni�ciu dowolnego przycisku (z wyj�tkiem przycisku PTT). Wy�wietlacz LCD b�dzie si� �wieci� przez 10 sekund od ostatniego naci�ni�cia przycisku. Funkcja trybu monitorowaniaPo naci�ni�ciu klawisza MON urz�dzenie TLKR T7 umo�liwia nas�uch sygna�ów o niskiej sile na bie��cym kanale.Aby w��czy� tryb monitorowania:- Naci�nij przycisk MON w celu w��czenia krótkiego nas�uchiwania. Ikona RX zacznie miga�.- Naci�nij klawisz MON i przytrzymaj go przez 1,5 sekundy, aby przeprowadzi� nas�uch ci�g�y. Ikona RX b�dzie nadal miga�.Aby wy��czy� tryb monitorowania:- Naci�nij przycisk MON, MENU/GRP, lub SEL/ , aby powróci� do trybu “Normalnego”. Ikona RX przestanie miga�.
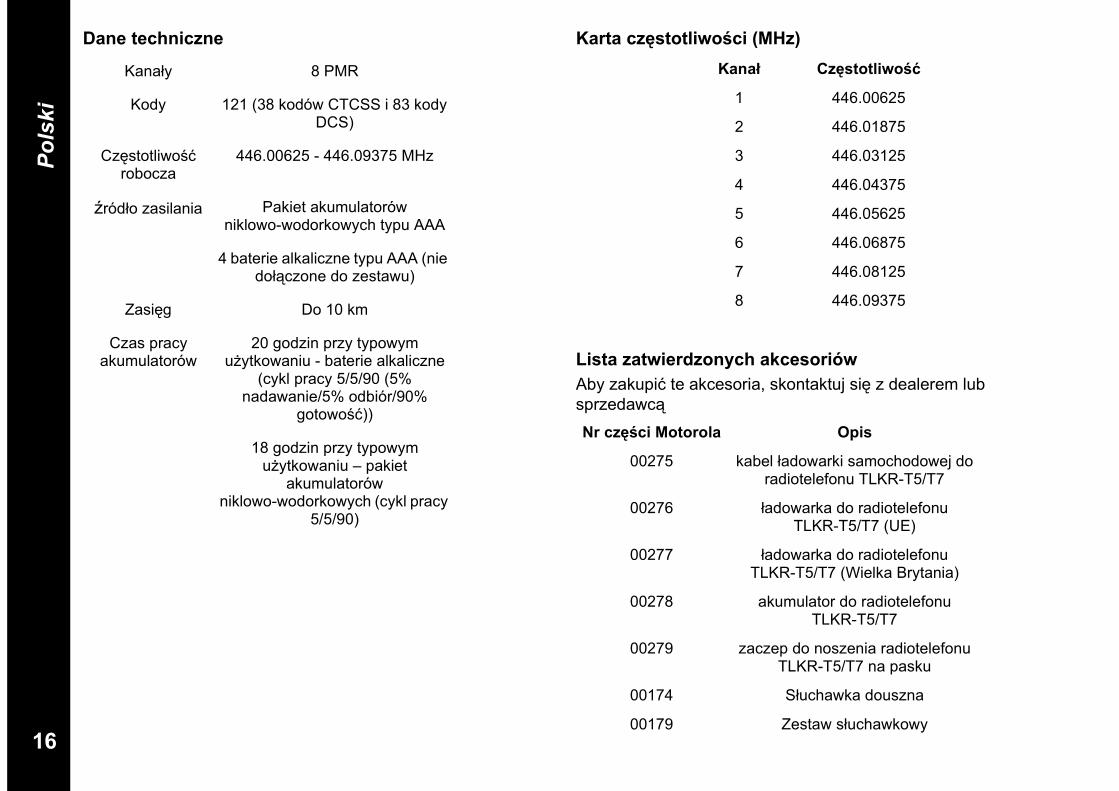
16
Polski
Dane techniczne Karta cz�stotliwo�ci (MHz)
Lista zatwierdzonych akcesoriówAby zakupi� te akcesoria, skontaktuj si� z dealerem lubsprzedawc�
Kana�y 8 PMR
Kody 121 (38 kodów CTCSS i 83 kody DCS)
Cz�stotliwo�� robocza
446.00625 - 446.09375 MHz
ród�o zasilania Pakiet akumulatorów niklowo-wodorkowych typu AAA
4 baterie alkaliczne typu AAA (nie do��czone do zestawu)
Zasi�g Do 10 km
Czas pracy akumulatorów
20 godzin przy typowym u�ytkowaniu - baterie alkaliczne
(cykl pracy 5/5/90 (5% nadawanie/5% odbiór/90%
gotowo��))
18 godzin przy typowym u�ytkowaniu – pakiet
akumulatorów niklowo-wodorkowych (cykl pracy
5/5/90)
Kana� Cz�stotliwo�
1 446.00625
2 446.01875
3 446.03125
4 446.04375
5 446.05625
6 446.06875
7 446.08125
8 446.09375
Nr cz��ci Motorola Opis
00275 kabel �adowarki samochodowej do radiotelefonu TLKR-T5/T7
00276 �adowarka do radiotelefonu TLKR-T5/T7 (UE)
00277 �adowarka do radiotelefonu TLKR-T5/T7 (Wielka Brytania)
00278 akumulator do radiotelefonu TLKR-T5/T7
00279 zaczep do noszenia radiotelefonu TLKR-T5/T7 na pasku
00174 S�uchawka douszna
00179 Zestaw s�uchawkowy
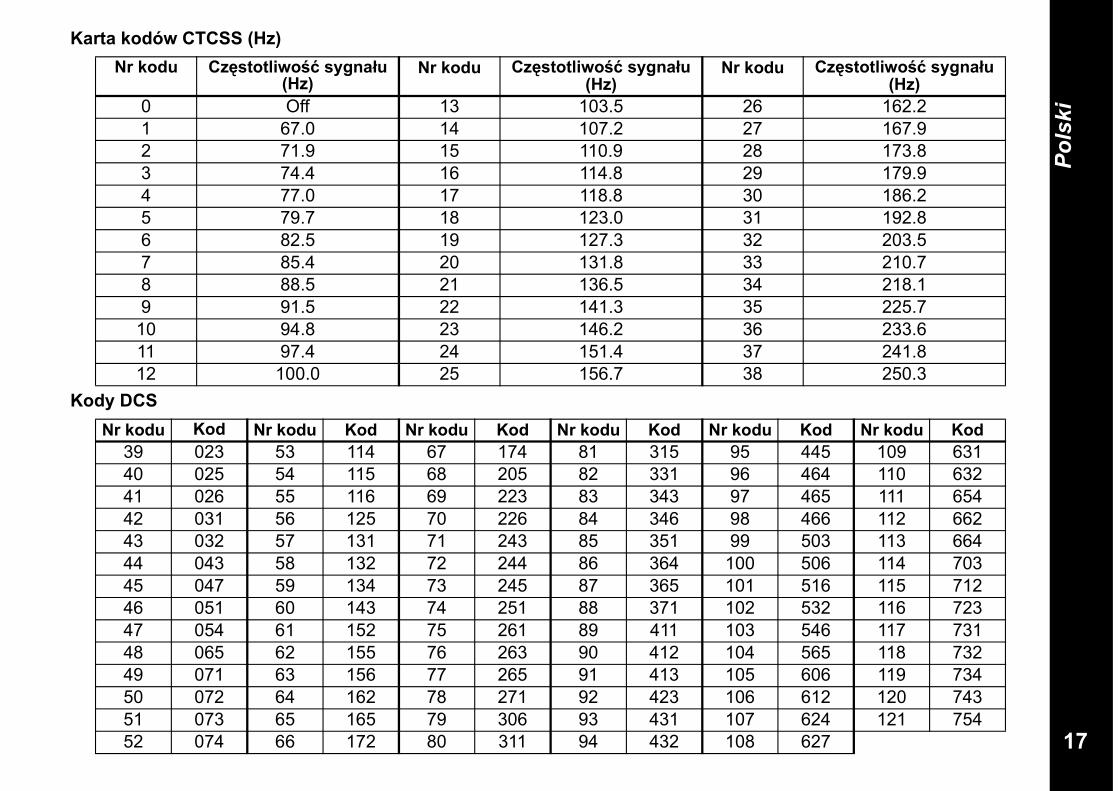
17
Polski
Karta kodów CTCSS (Hz)
Kody DCS
Nr kodu Cz�stotliwo� sygna�u (Hz)
Nr kodu Cz�stotliwo� sygna�u (Hz)
Nr kodu Cz�stotliwo� sygna�u (Hz)
0 Off 13 103.5 26 162.21 67.0 14 107.2 27 167.92 71.9 15 110.9 28 173.83 74.4 16 114.8 29 179.94 77.0 17 118.8 30 186.25 79.7 18 123.0 31 192.86 82.5 19 127.3 32 203.57 85.4 20 131.8 33 210.78 88.5 21 136.5 34 218.19 91.5 22 141.3 35 225.7
10 94.8 23 146.2 36 233.611 97.4 24 151.4 37 241.812 100.0 25 156.7 38 250.3
Nr kodu Kod Nr kodu Kod Nr kodu Kod Nr kodu Kod Nr kodu Kod Nr kodu Kod39 023 53 114 67 174 81 315 95 445 109 63140 025 54 115 68 205 82 331 96 464 110 63241 026 55 116 69 223 83 343 97 465 111 65442 031 56 125 70 226 84 346 98 466 112 66243 032 57 131 71 243 85 351 99 503 113 66444 043 58 132 72 244 86 364 100 506 114 70345 047 59 134 73 245 87 365 101 516 115 71246 051 60 143 74 251 88 371 102 532 116 72347 054 61 152 75 261 89 411 103 546 117 73148 065 62 155 76 263 90 412 104 565 118 73249 071 63 156 77 265 91 413 105 606 119 73450 072 64 162 78 271 92 423 106 612 120 74351 073 65 165 79 306 93 431 107 624 121 75452 074 66 172 80 311 94 432 108 627
18
Polski
Informacje Dotycz�ce GwarancjiAutoryzowany dealer firmy Motorola lub sprzedawca, u którego kupi�e� swój radiotelefon i oryginalne akcesoria, b�dzie honorowa� roszczenie gwarancyjne i zapewni serwis gwarancyjny. Zwró� swój radiotelefon do dealera lub sprzedawcy, aby uzyska� serwis gwarancyjny. Nie odsy�aj radiotelefonu do firmy Motorola. Aby móc uzyska� serwis gwarancyjny, musisz przedstawi� dowód zakupu (rachunek lub inny zast�pczy dokument) wraz z dat� zakupu. Na radiotelefonie powinien by� równie� wyranie widoczny numer seryjny. Gwarancja b�dzie niewa�na, je�eli oznaczenie typu lub numery seryjne na radiotelefonie zosta�y zmienione lub usuni�te.
Gwarancja Nie ObejmujeWad lub uszkodze� b�d�cych wynikiem u�ytkowania produktu w sposób inny ni� normalny lub w sposób niezgodny z instrukcjami zawartymi w niniejszej instrukcji.Wad lub uszkodze� wynikaj�cych z nieprawid�owego u�ytkowania, wypadku lub zaniedbania. Wad lub uszkodze� wynikaj�cych z niew�a�ciwego testowania, pracy, utrzymania, regulacji, lub jakichkolwiek zmian i modyfikacji.Uszkodze� anteny, o ile nie zosta�y spowodowane bezpo�rednio przez wady w materia�ach lub w wykonaniu. Produktów rozmontowanych lub naprawianych w sposób powa�nie wp�ywaj�cy na dzia�anie, lub uniemo�liwiaj�cy odpowiedni� kontrol� i testowanie niezb�dne w celu zweryfikowania roszcze� gwarancyjnych. Wad lub uszkodze� zwi�zanych z zasi�giem.Wad lub uszkodze� spowodowanych przez wilgo�, zalanie lub zachlapanie. Wszelkich powierzchni plastikowych i innych zewn�trznych
cz��ci, zadrapanych lub uszkodzonych wskutek normalnego u�ytkowania.Produktów wypo�yczonych czasowo. Cz��ci zu�ywaj�cych si� w trakcie normalnej eksploatacji.
Informacje o Prawach AutorskichProdukty firmy Motorola, opisane w niniejszej instrukcji, mog� zawiera� programy, zawarto�� pami�ci pó�przewodnikowych i innych no�ników, chronion� prawem autorskim. Przepisy prawne w Stanach Zjednoczonych i innych krajach chroni� wy��czne prawa firmy Motorola do programów komputerowych chronionych prawem autorskim, w tym wy��czne prawo kopiowania i reprodukcji chronionych programów firmy Motorola w jakiejkolwiek formie. Zgodnie z tymi przepisami, �adne zastrze�one programy komputerowe firmy Motorola, zawarte w produktach firmy Motorola, nie mog� by� kopiowane lub reprodukowane w jakikolwiek sposób bez wyranej pisemnej zgody firmy Motorola. Dodatkowo, zakup produktów firmy Motorola nie b�dzie uznawany za bezpo�rednie lub po�rednie przeniesienie jakichkolwiek licencji dotycz�cych praw autorskich, patentów lub wniosków patentowych firmy Motorola, z wyj�tkiem zwyk�ej bezp�atnej licencji na u�ytkowanie, wynikaj�cej z przepisów prawnych zwi�zanych ze sprzeda�� produktu.MOTOROLA, Stylizowane Logo z Liter� M, i wszelkie inne znaki handlowe, oznaczone jako takie w niniejszym dokumencie, s� znakami handlowymi firmy Motorola, Inc.
© Motorola, Inc. 2008
1
Türkçe
Ç NDEK LERÇ�ft yönlü seyyar tels�zler �ç�n ürün güvenl��� ve rf i�ini . . 2Özellikler . . . . . . . . . . . . . . . . . . . . . . . . . . . . . . . . . . . . . . 2Kontrol ve Özellikler . . . . . . . . . . . . . . . . . . . . . . . . . . . . . 3Gösterge . . . . . . . . . . . . . . . . . . . . . . . . . . . . . . . . . . . . . . 4Paket �çeri�i . . . . . . . . . . . . . . . . . . . . . . . . . . . . . . . . . . . 5Bataryan�n Yerle�tirilmesi . . . . . . . . . . . . . . . . . . . . . . . . 5Batarya Seviyesi ve Dü�ük Batarya Uyar�s� . . . . . . . . . . 5Telsizin �arj Edilmesi . . . . . . . . . . . . . . . . . . . . . . . . . . . . 5Do�rudan �arj. . . . . . . . . . . . . . . . . . . . . . . . . . . . . . . . . . 5�arj Aleti K�za��n�n Kullan�lmas�. . . . . . . . . . . . . . . . . . . . 5Bataryan�n �arj edilmesi . . . . . . . . . . . . . . . . . . . . . . . . . . 6Telsizin Kullan�m� . . . . . . . . . . . . . . . . . . . . . . . . . . . . . . . 6Telsizin Aç�lmas� (On) ve Ses Ayar� . . . . . . . . . . . . . . . . . 6Tu� Sesi Ayar� (Tu� Bipleri) . . . . . . . . . . . . . . . . . . . . . . . 6"Anla��ld�/Tamam” Uyar� Sesi . . . . . . . . . . . . . . . . . . . . . 6Telsizinizle Konu�ma . . . . . . . . . . . . . . . . . . . . . . . . . . . . 6Menüde Gezinme . . . . . . . . . . . . . . . . . . . . . . . . . . . . . . 7Menü Seçimi . . . . . . . . . . . . . . . . . . . . . . . . . . . . . . . . . . 7Kanal Seçimi . . . . . . . . . . . . . . . . . . . . . . . . . . . . . . . . . . 7Alt-kod Seçimi . . . . . . . . . . . . . . . . . . . . . . . . . . . . . . . . . 7Genel Menü . . . . . . . . . . . . . . . . . . . . . . . . . . . . . . . . . . . 8Kanal Tarama Özelli�i . . . . . . . . . . . . . . . . . . . . . . . . . . . 8Çift Kanal �zleme Kipi . . . . . . . . . . . . . . . . . . . . . . . . . . . 9Sesle Çal��an �letim (VOX) . . . . . . . . . . . . . . . . . . . . . . . 9Oda �zleme . . . . . . . . . . . . . . . . . . . . . . . . . . . . . . . . . . . 9Ça�r� Tonu �letimi . . . . . . . . . . . . . . . . . . . . . . . . . . . . . 10Sessiz Kip . . . . . . . . . . . . . . . . . . . . . . . . . . . . . . . . . . . . 10Ba�latma zamanlay�c�s� . . . . . . . . . . . . . . . . . . . . . . . . . 11Grup Kipi. . . . . . . . . . . . . . . . . . . . . . . . . . . . . . . . . . . . . 11Grup Kipinde Kanal Ayar� . . . . . . . . . . . . . . . . . . . . . . . 11Otomatik Kanal De�i�tirme Ayar� . . . . . . . . . . . . . . . . . . 11Grup Kipinde Manuel Kanal Ayar� . . . . . . . . . . . . . . . . . 11Herkese/Do�rudan Ça�r� Ayar� . . . . . . . . . . . . . . . . . . . 12Herkese Ça�r� Ayar� . . . . . . . . . . . . . . . . . . . . . . . . . . . . 12
Do�rudan Ça�r� Ayar� . . . . . . . . . . . . . . . . . . . . . . . . . . .12Grup Menüsü . . . . . . . . . . . . . . . . . . . . . . . . . . . . . . . . .13Grup Kipi Ayar� . . . . . . . . . . . . . . . . . . . . . . . . . . . . . . . .14Grup Kodu Ayar� . . . . . . . . . . . . . . . . . . . . . . . . . . . . . . .14Zil Sesi Ayar� . . . . . . . . . . . . . . . . . . . . . . . . . . . . . . . . .14ID Ayar� . . . . . . . . . . . . . . . . . . . . . . . . . . . . . . . . . . . . . .14ID Ad� Ayar� . . . . . . . . . . . . . . . . . . . . . . . . . . . . . . . . . . .14Tu� Kilidi . . . . . . . . . . . . . . . . . . . . . . . . . . . . . . . . . . . . .15Otomatik Güç Tasarrufu Özelli�i . . . . . . . . . . . . . . . . . . .15Dü�ük Batarya Uyar�s� . . . . . . . . . . . . . . . . . . . . . . . . .15LCD Ekran Ayd�nlatmas� . . . . . . . . . . . . . . . . . . . . . . . .15�zleme Kipi Özelli�i . . . . . . . . . . . . . . . . . . . . . . . . . . . .15Teknik Özellikler . . . . . . . . . . . . . . . . . . . . . . . . . . . . . . .16Frekans Çizelgesi (MHz) . . . . . . . . . . . . . . . . . . . . . . . .16Onayl� Aksesuarlar Listesi. . . . . . . . . . . . . . . . . . . . . . . .16CTCSS Çizelgesi (Hz) . . . . . . . . . . . . . . . . . . . . . . . . . .17DCS Kodu . . . . . . . . . . . . . . . . . . . . . . . . . . . . . . . . . . .17Garanti Bilgisi . . . . . . . . . . . . . . . . . . . . . . . . . . . . . . . .18Garanti Kapsam�nda Olmayan Durumlar . . . . . . . . . . . .18Telif Hakk� Bilgisi . . . . . . . . . . . . . . . . . . . . . . . . . . . . . . .18
2
Türkçe
Ç�ft yönlü seyyar tels�zler �ç�n ürün güvenl��� ve rf i�ini
Özellikler• 8 adet PMR (Özel Mobil Telsiz) Kanal�• 121 adet Alt-Kod (38 CTCSS Kodu ve 83 DCS kodu)• 10 km’ye kadar Menzil*• Dâhili VOX (Eller Serbest Kullan�m) Devresi• 10 Adet Seçilebilir Ça�r� Uyar� Sesi• Arkadan Ayd�nlatmal� LCD Gösterge• �ste�e Ba�l� Kulakl�k için Kulakl�k Giri�i• "Anla��ld�/Tamam” Uyar� Sesi• Ba�latma zamanlay�c�s�• Oda �zleme• Batarya �arj Aleti• Batarya Seviyesi Ölçer• Kanal Etkinli�i Denetleyicisi• Kanal Tarama• Çift Kanal �zleme• Tu� Kilidi• Otomatik Susturma Kontrolü• Otomatik Tekrar (Kayd�rma)
• Batarya Tasarruf• Dü�ük Batarya Uyar�s�• Ses (Aç�k/Kapal�)• Do�rudan Ça�r� (Ça�r� Yapan ID Ça�r�s�)• Grup Ça�r�• Sessiz Kip• Herkese Ça�r�• Otomatik Kanal De�i�tirme* Menzil, çevresel ve/ya da topo�rafik ko�ullara göre farkl�l�k
gösterebilmektedir.
Bu ürünü kullanmadan önce, telsizinizle birlikte verilen Ürün Güvenli�i ve RF I��n� kitapç���nda yer alan güvenli kullan�m talimatlar�n� okuyunuz.Uyar�
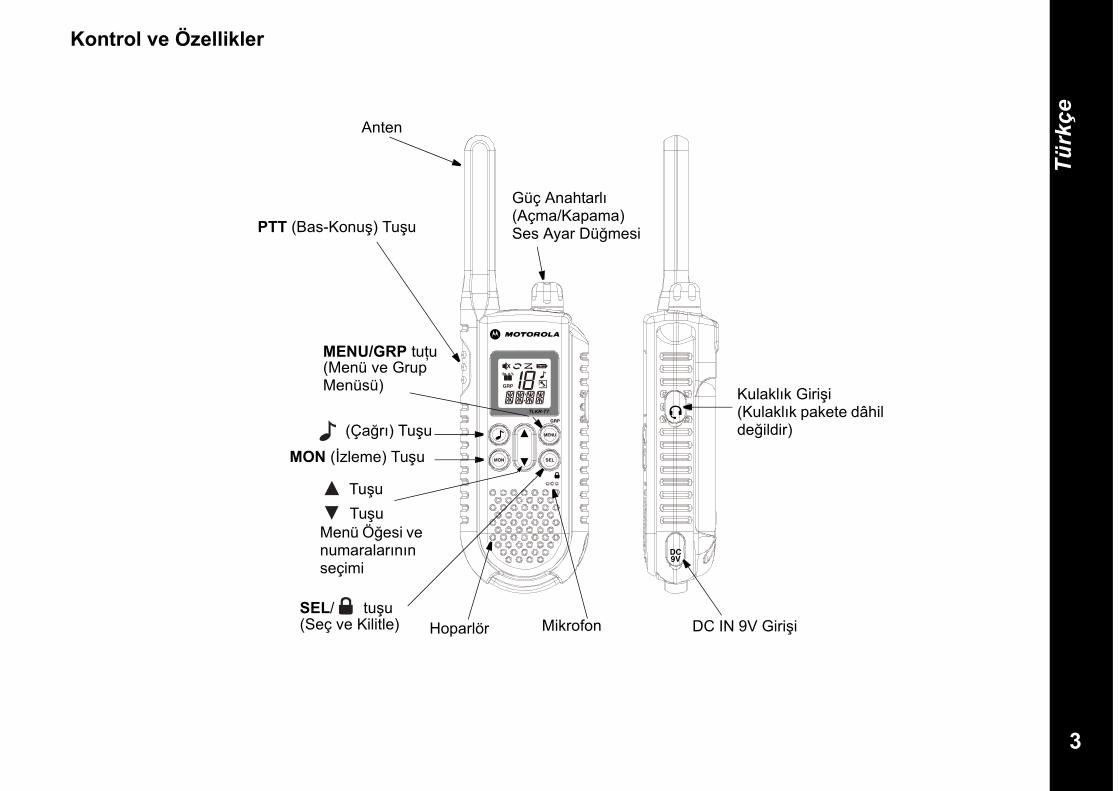
3
Türkçe
Kontrol ve Özellikler
Kulakl�k Giri�i (Kulakl�k pakete dâhil de�ildir)
Anten
Güç Anahtarl� (Açma/Kapama) Ses Ayar Dü�mesiPTT (Bas-Konu�) Tu�u
(Ça�r�) Tu�u
MON (�zleme) Tu�u
Tu�u Tu�u
Menü Ö�esi ve numaralar�n�n seçimi
MENU/GRP tu�u(Menü ve Grup Menüsü)
SEL/ tu�u (Seç ve Kilitle) Hoparlör Mikrofon DC IN 9V Giri�i
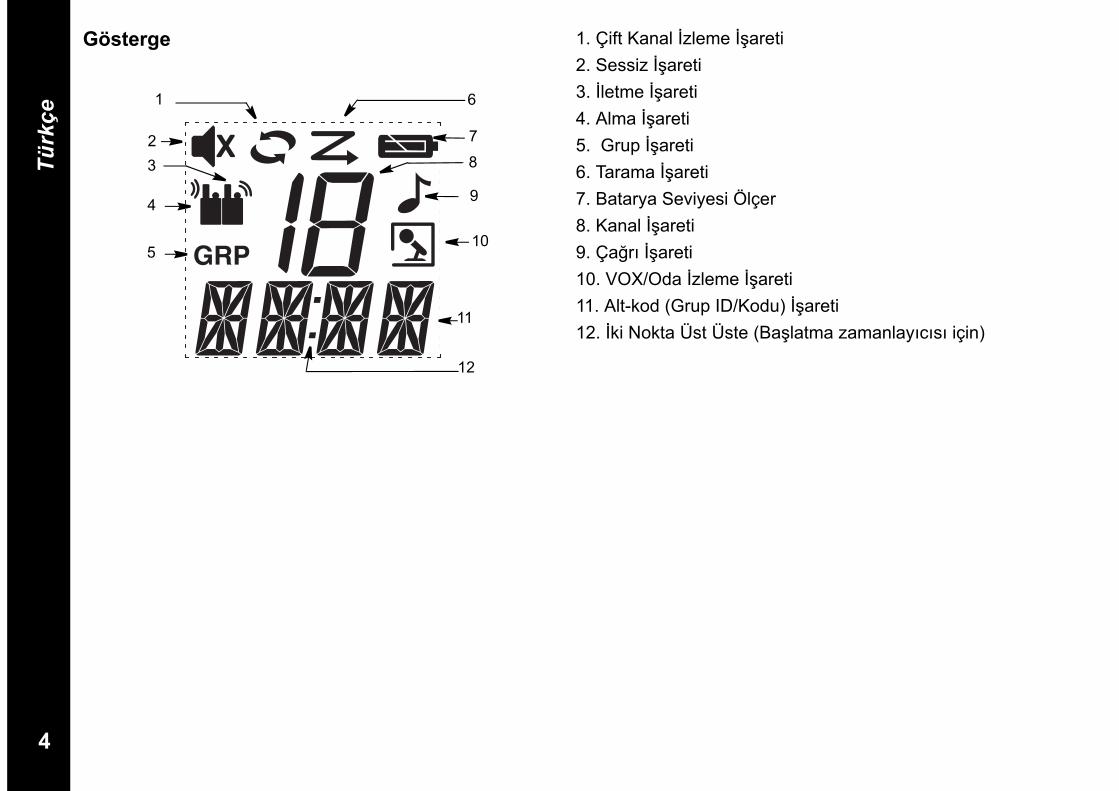
4
Türkçe
Gösterge 1. Çift Kanal �zleme ��areti2. Sessiz ��areti3. �letme ��areti4. Alma ��areti5. Grup ��areti6. Tarama ��areti7. Batarya Seviyesi Ölçer8. Kanal ��areti9. Ça�r� ��areti10. VOX/Oda �zleme ��areti11. Alt-kod (Grup ID/Kodu) ��areti12. �ki Nokta Üst Üste (Ba�latma zamanlay�c�s� için)
1
23
4
5
12
11
10
6
9
7
8
5
Türkçe
TLKR T7 telsiz sat�n ald���n�z için kutlar�z. Bu ürün, çok hafif ve avuç içi büyüklü�ünde bir telsizdir. Bu telsizi, yürüyü�, kayak, aç�k hava etkinlikleri gibi sportif faaliyetlerde arkada�lar�n�z ve ailenizle ba�lant�n�z� kopartmamak ya da canl� bir haberle�me ortam� yaratarak civar�n�z� izlemek için kullanabilirsiniz. Bu kompakt ve geli�mi� cihaz birçok özellikle donat�lm��t�r.
Paket çeri�iSat�n ald���n�z paketin içinde iki adet TLKR T7 telsiz, iki adet kemer kancas�, bir adet �arj aleti k�za��, AC adaptör, iki adet batarya destek kademesi, iki adet NiMH batarya paketi ve bu ba�vuru k�lavuzu bulunmaktad�r. Telsizinizi 4 adet AAA alkalin (pakete dâhil de�ildir) pille de çal��t�rabilirsiniz.
Bataryan�n Yerle�tirilmesiTLKR T7 telsizi NiMH batarya paketi ya da 4 adet AAA alkalin pil (pakete dâhil de�ildir) kullanmaktad�r. Alkalin pil kullanacaksan�z bunlar�n yüksek kaliteli olmas�n� tavsiye ederiz.
NiMH batarya paketini yerle�tirmek için:1) Telsizinizin kapal� oldu�undan emin olun.2) Batarya bölmesinin kapa��n�, bu kapa��n alt taraf�nda bulunan t�rnak uca bast�rarak ç�kart�n. Bu t�rnak uç, kapa�� serbest b�rakacakt�r.3) NiMH bataryalar� batarya bölmesine yerle�tirin. Bataryalar�n + ve – uçlar�n�n do�ru oldu�undan emin olun. Bataryalar�n yanl�� yerle�tirilmesi durumunda telsiz çal��mayacakt�r.4) Batarya bölmesinin kapa��n� yerine tak�n.
Batarya Seviyesi ve Dü�ük Batarya Uyar�s�Telsizinizin göstergesinde bir batarya seviye ölçer bulunmaktad�r. Bu, bataryan�n durumunu göstermektedir. Telsizin bataryas� azalm��sa, batarya seviye ölçer simgesi
yan�p sönecektir. Alkaline bataryalar� hemen de�i�tirin.
Telsizin �arj EdilmesiE�er �arj edilebilir NiMH batarya paketi kullan�yorsan�z, her iki TLKR telsizi de do�rudan ya da verilen �arj aleti k�za��n� kullanarak �arj edebilirsiniz. Telsizi �arj k�za��na koymadan önce mutlaka kapatt���n�zdan (OFF) emin olunuz. Aksi takdirde batarya seviye ölçer simgesi düzgün görünmeyecektir.Do�rudan �arj: 1. DC adaptörünün ba�lant� ucunu telsizin DC IN 9V
giri�ine ve di�er ucunu da arac�n aksesuar elektrik ç�k���na tak�n.
2. Bataryay� 16 saat �arj edin.
�arj Aleti K�za��n� Kullan�lmas�:1. AC adaptörünü DC IN 9V giri�ine ve standart bir elektrik
prizine tak�n.2. �arj etme k�za��n� bir masa ya da sehpa üzerine koyun
ve telsizi tu�lar� ön tarafa bakacak �ekilde �arj etme k�za��n�n içine yerle�tirin.
3. LED �����n�n yand���ndan emin olun. Batarya paketini 16 saat �arj edin ve telsiz dolduktan sonra �arj etme k�za��ndan al�n.
Not: �arj LED ���klar� telsizlerin �arj i�lemi sürdü�ü sürece yan�k kalacakt�r.
6
Türkçe
Bataryan�n �arj edilmesiNiMH batarya paketini, verilen batarya destek kademesini kullanarak tek ba��na �arj edebilirsiniz.1. Batarya destek kademesini �arj etme k�za��n�n içine
yerle�tirin.2. NiMH batarya paketini, �arj etme ba�lant� noktalar� �arj
etme k�za��n�n ba�lant� noktalar�na denk gelecek �ekilde yerle�tirin. Batarya paketinin yanl�� yerle�tirilmesi durumunda batarya paketi �arj olmayacakt�r.
3. LED �����n�n yand���ndan emin olun. Batarya paketini 16 saat �arj edin.
Not: �arj LED ���klar� telsizlerin �arj i�lemi sürdü�ü sürece yan�k kalacakt�r.
Telsizin Kullan�m�Telsizinizin tüm özelliklerinden tam olarak faydalanabilmek için, üniteyi kullanmaya ba�lamadan önce bu ba�vuru k�lavuzunu tamamen okuyunuz.Telsizin Aç�lmas� (On) ve Ses Ayar�1. Telsizi açmak (ON) için döner dü�meyi saat yönünde
çevirin ve sesi yükseltmek için döner dü�meyi saat yönünde çevirmeye devam edin. Sesi k�smak için döner dü�meyi aksi saat yönünde çevirin.
2. Telsizi kapatmak (OFF) için döner dü�meyi sonuna kadar aksi saat yönünde çevirin.
Tu� Sesi Ayar� (Tu� Bipleri) Tu�lara her bas���n�zda telsiziniz bir bip sesi ç�kart�r (PTT (Bas-Konu�) ve tu�lar� hariç). Bu sesi açmak (ON) ya da kapatmak (OFF) için telsizinizi açarken bir süre tu�unu bas�l� tutun.
"Anla��ld�/Tamam” Uyar� Sesi Anla��ld�/Tamam Uyar� Sesi, iletimin tamamland���n� (PTT (Bas-Konu�) ya da VOX (Eller Serbest) iletiminin) belirtmek için gönderilen bir B�P sesidir. Anla��ld�/Tamam uyar� sesi, Bip Tu�u aç�k oldu�unda hoparlörden duyulabilir. Bip Tu�u kapal� olsa bile Anla��ld�/Tamam sesi iletilir; ancak bu sefer Anla��ld�/Tamam sesi hoparlörden duyulmayacakt�r.Anlaþýldý/Tamam Uyarý Sesinin AÇMAK (ON) ya da KAPATMAK (OFF) için:Telsizi açarken tu�unu bas�l� tutun.
Telsizinizle Konu�maTelsizi kullanarak ba�kalar�yla konu�mak için:1. PTT (Bas-Konu�) tu�unu bas�l� tutun ve mikrofondan
5 – 8 cm uzakl�ktan net ve normal bir sesle konu�un. Ses iletimi yaparken göstergede simgesi görünecektir. Ses iletiminizin ilk bölümünün kaybolmamas� için konu�maya ba�lamadan önce PTT (Bas-Konu�) butonuna bast�ktan sonra k�sa bir süre bekleyin.
2. Konu�man�z bittikten sonra PTT (Bas-Konu�) tu�unu serbest b�rak�n. Art�k gelecek konu�malar� dinleyebilirsiniz. Ses iletimi al�rken göstergede simgesi görünecektir.
Not: 60 saniyeden fazla konu�ma yapmaya devam ederseniz, telsiz zaman a��m� (TX Time Out) sesi ç�kartacakt�r ve simgesi yan�p sönecektir. Telsiz ses iletmeyi kesecektir.
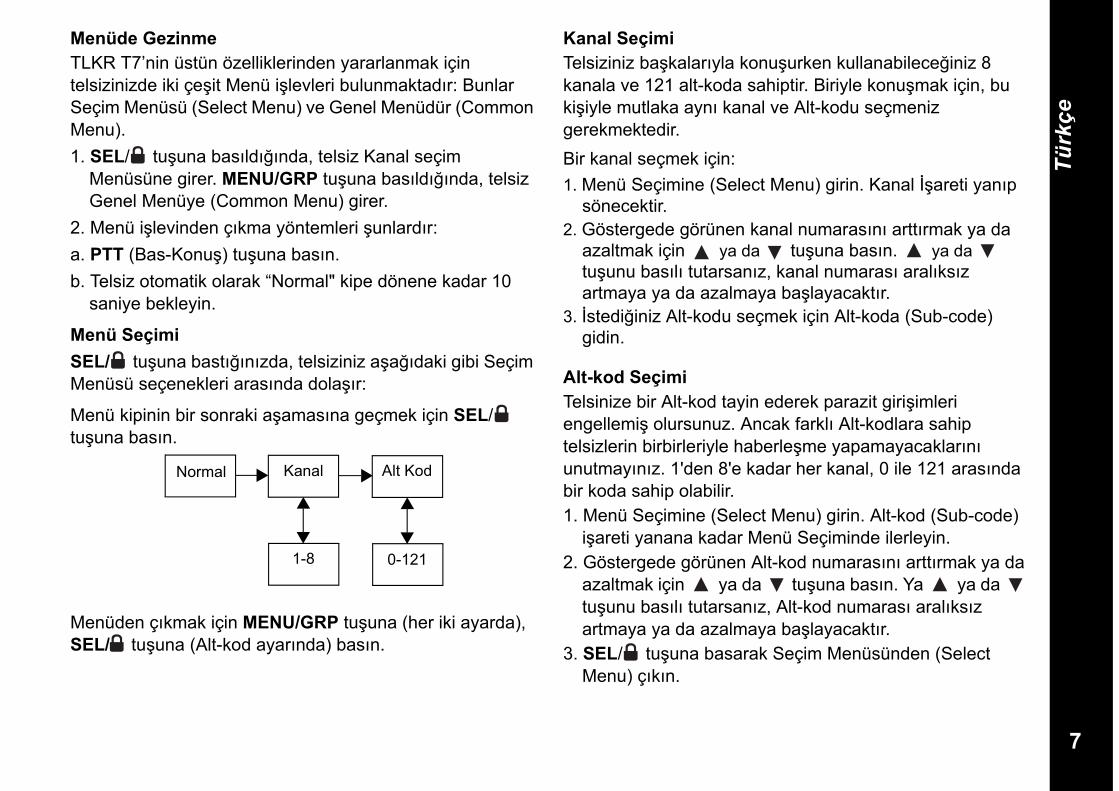
7
Türkçe
Menüde GezinmeTLKR T7’nin üstün özelliklerinden yararlanmak için telsizinizde iki çe�it Menü i�levleri bulunmaktad�r: Bunlar Seçim Menüsü (Select Menu) ve Genel Menüdür (Common Menu).1. SEL/ tu�una bas�ld���nda, telsiz Kanal seçim
Menüsüne girer. MENU/GRP tu�una bas�ld���nda, telsiz Genel Menüye (Common Menu) girer.
2. Menü i�levinden ç�kma yöntemleri �unlard�r:a. PTT (Bas-Konu�) tu�una bas�n.b. Telsiz otomatik olarak “Normal" kipe dönene kadar 10
saniye bekleyin.
Menü SeçimiSEL/ tu�una bast���n�zda, telsiziniz a�a��daki gibi Seçim Menüsü seçenekleri aras�nda dola��r:
Menü kipinin bir sonraki a�amas�na geçmek için SEL/ tu�una bas�n.
Menüden ç�kmak için MENU/GRP tu�una (her iki ayarda), SEL/ tu�una (Alt-kod ayar�nda) bas�n.
Kanal SeçimiTelsiziniz ba�kalar�yla konu�urken kullanabilece�iniz 8 kanala ve 121 alt-koda sahiptir. Biriyle konu�mak için, bu ki�iyle mutlaka ayn� kanal ve Alt-kodu seçmeniz gerekmektedir.Bir kanal seçmek için:1. Menü Seçimine (Select Menu) girin. Kanal ��areti yan�p
sönecektir.2. Göstergede görünen kanal numaras�n� artt�rmak ya da
azaltmak için ya da tu�una bas�n. ya da tu�unu bas�l� tutarsan�z, kanal numaras� aral�ks�z artmaya ya da azalmaya ba�layacakt�r.
3. �stedi�iniz Alt-kodu seçmek için Alt-koda (Sub-code) gidin.
Alt-kod SeçimiTelsinize bir Alt-kod tayin ederek parazit giri�imleri engellemi� olursunuz. Ancak farkl� Alt-kodlara sahip telsizlerin birbirleriyle haberle�me yapamayacaklar�n� unutmay�n�z. 1'den 8'e kadar her kanal, 0 ile 121 aras�nda bir koda sahip olabilir.1. Menü Seçimine (Select Menu) girin. Alt-kod (Sub-code)
i�areti yanana kadar Menü Seçiminde ilerleyin.2. Göstergede görünen Alt-kod numaras�n� artt�rmak ya da
azaltmak için ya da tu�una bas�n. Ya ya da tu�unu bas�l� tutarsan�z, Alt-kod numaras� aral�ks�z artmaya ya da azalmaya ba�layacakt�r.
3. SEL/ tu�una basarak Seçim Menüsünden (Select Menu) ç�k�n.
Normal Kanal Alt Kod
0-1211-8
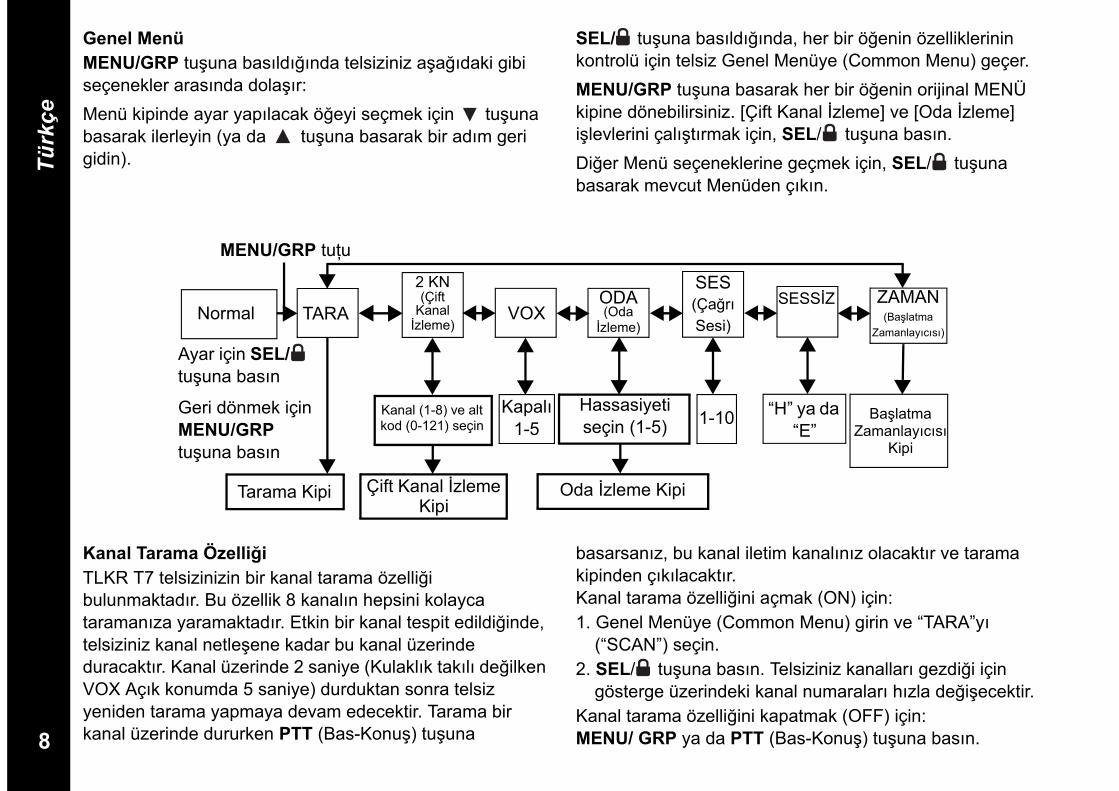
8
Türkçe
Genel MenüMENU/GRP tu�una bas�ld���nda telsiziniz a�a��daki gibi seçenekler aras�nda dola��r:Menü kipinde ayar yap�lacak ö�eyi seçmek için tu�una basarak ilerleyin (ya da tu�una basarak bir ad�m geri gidin).
SEL/ tu�una bas�ld���nda, her bir ö�enin özelliklerinin kontrolü için telsiz Genel Menüye (Common Menu) geçer. MENU/GRP tu�una basarak her bir ö�enin orijinal MENÜ kipine dönebilirsiniz. [Çift Kanal �zleme] ve [Oda �zleme] i�levlerini çal��t�rmak için, SEL/ tu�una bas�n.Di�er Menü seçeneklerine geçmek için, SEL/ tu�una basarak mevcut Menüden ç�k�n.
Normal TARA
2 KN (Çift
Kanal �zleme)
VOXODA(Oda
�zleme)
SES (Ça�r� Sesi)
SESS�Z ZAMAN(Ba�latma
Zamanlay�c�s�)
Kanal (1-8) ve alt kod (0-121) seçin
Ba�latma Zamanlay�c�s�
Kipi
Hassasiyeti seçin (1-5)
Kapal� 1-5 1-10 “H” ya da
“E”
Tarama Kipi Çift Kanal �zleme Kipi
Oda �zleme Kipi
MENU/GRP tu�u
Ayar için SEL/ tu�una bas�n
Geri dönmek için MENU/GRP tu�una bas�n
Kanal Tarama Özelli�iTLKR T7 telsizinizin bir kanal tarama özelli�i bulunmaktad�r. Bu özellik 8 kanal�n hepsini kolayca taraman�za yaramaktad�r. Etkin bir kanal tespit edildi�inde, telsiziniz kanal netle�ene kadar bu kanal üzerinde duracakt�r. Kanal üzerinde 2 saniye (Kulakl�k tak�l� de�ilken VOX Aç�k konumda 5 saniye) durduktan sonra telsiz yeniden tarama yapmaya devam edecektir. Tarama bir kanal üzerinde dururken PTT (Bas-Konu�) tu�una
basarsan�z, bu kanal iletim kanal�n�z olacakt�r ve tarama kipinden ç�k�lacakt�r. Kanal tarama özelli�ini açmak (ON) için:1. Genel Menüye (Common Menu) girin ve “TARA”y�
(“SCAN”) seçin. 2. SEL/ tu�una bas�n. Telsiziniz kanallar� gezdi�i için
gösterge üzerindeki kanal numaralar� h�zla de�i�ecektir.Kanal tarama özelli�ini kapatmak (OFF) için:MENU/ GRP ya da PTT (Bas-Konu�) tu�una bas�n.
9
Türkçe
Çift Kanal zleme KipiTelsiziniz s�ra ile mevcut kanal�n�z� ve ba�ka bir kanal� tarayabilir. Bunun için bir kanal numaras� ve di�er kanal için bu kanal�n bir Alt-kodunu ayarlaman�z gerekecektir.Ba�ka bir kanal� ayarlamak ve Çift Kanal �zleme özelli�ini çal��t�rmak için:1. Genel Menüye (Common Menu) girin ve “2KN”yi (“2CH”)
seçin; daha sonra Çift Kanal �zleme ayar�na geçmek için SEL/ tu�una bas�n. Çift Kanal �zleme simgesi görünecektir.
2. Kanal numaras�n� seçmek için ya da tu�una bas�n ve daha sonra SEL/ tu�una bas�n.
3. Ya ya da tu�una basarak Alt-kod numaras�n� seçin, sonra SEL/ tu�una bas�n.
4. Telsiz Çift Kanal �zlemeyi ba�latacakt�r.Not: Mevcut kanalýnkiyle ayný kanal numarasýný ve Alt-
kodu seçerseniz Çift Kanal Ýzleme çalýþmayacaktýr.Çift Kanal �zleme kipinin kapatmak (OFF) için:MENU/GRP tu�una bas�n.
Sesle Çal��an letim (VOX)TLKR T7 telsiniz, otomatik ses iletimi için kullan�labilecek Sesle Çal��an �letim (VOX) özelli�i ile donat�lm��t�r ve bu özellik kullan�c�n�n seçimine ba�l�d�r. VOX özelli�i, eller serbest kullan�m amac�yla tasarlanm��t�r. PTT (Bas-Konu�) tu�una basmak yerine, telsizin ya da kulakl���n (kulakl�k pakete dâhil de�ildir) mikrofonuna konu�maya ba�layarak ses iletimini ba�latabilirsiniz.VOX seviyesini ayarlamak için:1. Genel Menüye (Common Menu) girin ve “VOX”u seçin.
Sonra SEL/ tu�una bas�n. Mevcut seviye (OFF
[Kapal�], 1 – 5) yan�p sönerek görünecektir. “H” [“N”] (OFF [KAPALI]) seviyesi VOX’u devre d��� b�rak�rken, 1 ile 5 aras�ndaki seviyeler VOX devresinin hassasiyetini ayarlamaktad�r.
2. �stenilen VOX hassasiyet seviyesini seçmek için ya da tu�una bas�n. Sessiz ortamlarda 1. seviyeyi kullan�n; çok gürültülü ortamlarda da 5. seviyeyi kullan�n. Mikrofona konu�arak uygun hassasiyet seviyesini bulabilirsiniz. VOX simgesi yan�p sönerse, sesiniz kabul edilmi� demektir.
3. Genel Menüden (Common Menu) ç�k�n.Not: VOX i�levini kullanarak 60 saniyeden fazla konu�ma
yapmaya devam ederseniz, telsiz 5 saniye boyunca zaman a��m� (TX Time Out) sesi ç�kartacakt�r ve simgesi yan�p sönecektir.
Oda zlemeTLKR T7 telsizlerinden birini oda izleme cihaz� olarak kullanabilir ve di�er telsizi kullanarak ba�ka bir odadan bu oday� dinleyebilir ve kontrol edebilirsiniz. Oda izleme özelli�ini ayarlad���n�zda telsiz, sesleri/gürültüleri alg�layacak (ayarlad���n�z hassasiyet seviyesine göre) ve PTT (Bas-Konu�) tu�una basmaya gerek kalmaks�z�n bunlar� dinleme yap�lan telsize iletecektir. �zleme yapmas� için ayr�lan telsiz bu çal��ma kipinde hiçbir ileti alamayacakt�r.Oda �zleme özelli�ini açmak (ON) için:1. Genel Menüye (Common Menu) girin ve “ODA”y�
(“ROOM”) seçin. Sonra SEL/ tu�una bas�n.2. �stenilen oda izleme hassasiyet seviyesini seçmek için
ya da tu�una bas�n. Sessiz ortamlarda 1. seviyeyi kullan�n; çok gürültülü ortamlarda da 5. seviyeyi kullan�n.
10
Türkçe
3. Oda �zlemeyi çal��t�rmak için SEL/ tu�una bas�n.Oda �zleme özelli�ini kapatmak (OFF) için:MENU/GRP tu�una bas�n.Not:- Oda �zleme kipinde PTT (Bas-Konu�) tu�u devre d���d�r;
bas�ld���nda PTT Hata Tonu verir.- �zleme yap�lan odadaki ses/gürültü 60 saniyeden fazla
kesintisiz sürerse, izleme yapan telsiz 5 saniye duracak sonra yeniden görevine devam edecektir.
Ça�r� Tonu letimiTLKR T7 telsiziniz seçilebilir 10 adet ça�r� sesiyle donat�lm��t�r. Normal Kipte tu�una bast���n�zda seçili ça�r� sesi iletilecektir.Bir çaðrý tonu seçmek için:1. Genel Menüye (Common Menu) girin ve “SES”i
(“TONE”) seçin. Sonra SEL/ tu�una bas�n.Mevcut ça�r� tonu numaras� (1 – 10) yan�p sönmeye ba�layacakt�r.
2. �stedi�iniz ça�r� sesinin numaras�n� seçmek için ‘ya ya da tu�una bas�n. Her ton hoparlörden duyulacakt�r.
3. Genel Menüden (Common Menu) ç�k�n.
Seçili ça�r� sesini iletmek için Normal Kipte tu�una bas�n. Seçili ton belirli bir süre otomatik olarak iletilecektir. Ça�r� tonu, PTT (Bas-Konu�) tu�una bas�ld���nda iptal olacakt�r.
Sessiz KipSessiz kipi açt���n�zda tüm gelen ça�r�lar sessiz olacakt�r: Gelen ça�r�dan haberiniz olmas� için telsizin arka alan ekran ����� yan�p sönecektir.Ça�r�ya yan�t vermemeniz durumunda arka alan ����� kapanacak ve sinyal gelmeyene dek ÇA�RI (CALL) simgesi yan�p sönecektir.TLKR T7, gelen bir ça�r�y� size titre�erek de haber verecektir.�letim al�rken, gönderirken ya da ba�ka bir tu�a bast���n�zda sessiz kip 15 saniye devre d��� kalacakt�r.Telsizi sessiz kipe ayarlamak için:1. Genel Menüye (Common Menu) girin ve “SESS�Z” i
(“SLNT”) seçin. Sonra SEL/ tu�una bas�n.2. Sessiz Kipi Açmak (On) için tu�una bas�n. Kanal
Göstergesinde “E” (“Y”) görünecektir ve SESS�Z (SILENT) simgesi ortaya ç�kacakt�r.
3. Sessiz Kipi Kapamak (Off) için tu�una bas�n. Kanal Göstergesinde “H” (“N”) görünecektir ve SESS�Z (SILENT) simgesi kaybolacakt�r.
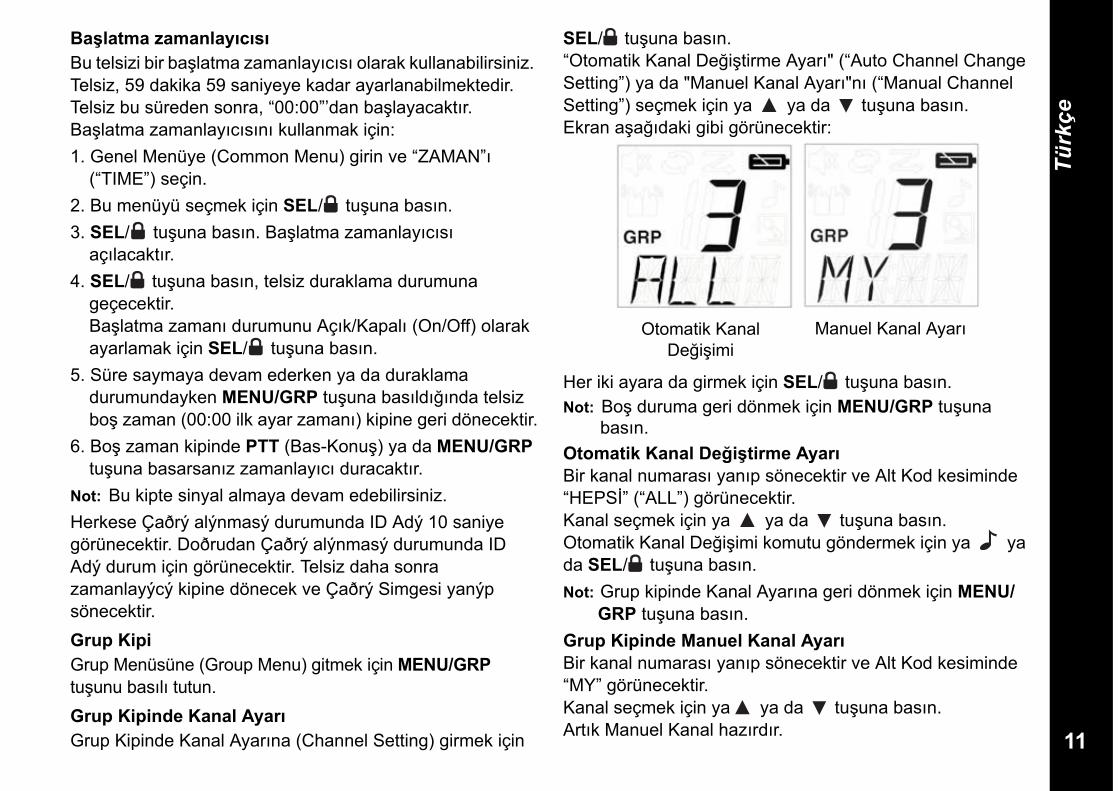
11
Türkçe
Ba�latma zamanlay�c�s� Bu telsizi bir ba�latma zamanlay�c�s� olarak kullanabilirsiniz. Telsiz, 59 dakika 59 saniyeye kadar ayarlanabilmektedir.Telsiz bu süreden sonra, “00:00”’dan ba�layacakt�r.Ba�latma zamanlay�c�s�n� kullanmak için:1. Genel Menüye (Common Menu) girin ve “ZAMAN”�
(“TIME”) seçin.2. Bu menüyü seçmek için SEL/ tu�una bas�n.3. SEL/ tu�una bas�n. Ba�latma zamanlay�c�s�
aç�lacakt�r.4. SEL/ tu�una bas�n, telsiz duraklama durumuna
geçecektir.Ba�latma zaman� durumunu Aç�k/Kapal� (On/Off) olarak ayarlamak için SEL/ tu�una bas�n.
5. Süre saymaya devam ederken ya da duraklama durumundayken MENU/GRP tu�una bas�ld���nda telsiz bo� zaman (00:00 ilk ayar zaman�) kipine geri dönecektir.
6. Bo� zaman kipinde PTT (Bas-Konu�) ya da MENU/GRP tu�una basarsan�z zamanlay�c� duracakt�r.
Not: Bu kipte sinyal almaya devam edebilirsiniz.Herkese Çaðrý alýnmasý durumunda ID Adý 10 saniye görünecektir. Doðrudan Çaðrý alýnmasý durumunda ID Adý durum için görünecektir. Telsiz daha sonra zamanlayýcý kipine dönecek ve Çaðrý Simgesi yanýp sönecektir.Grup KipiGrup Menüsüne (Group Menu) gitmek için MENU/GRP tu�unu bas�l� tutun.Grup Kipinde Kanal Ayar�Grup Kipinde Kanal Ayar�na (Channel Setting) girmek için
SEL/ tu�una bas�n. “Otomatik Kanal De�i�tirme Ayar�" (“Auto Channel Change Setting”) ya da "Manuel Kanal Ayar�"n� (“Manual Channel Setting”) seçmek için ya ya da tu�una bas�n.Ekran a�a��daki gibi görünecektir:
Her iki ayara da girmek için SEL/ tu�una bas�n.Not: Bo� duruma geri dönmek için MENU/GRP tu�una
bas�n.Otomatik Kanal De�i�tirme Ayar�Bir kanal numaras� yan�p sönecektir ve Alt Kod kesiminde “HEPS�” (“ALL”) görünecektir.Kanal seçmek için ya ya da tu�una bas�n.Otomatik Kanal De�i�imi komutu göndermek için ya ya da SEL/ tu�una bas�n.Not: Grup kipinde Kanal Ayar�na geri dönmek için MENU/
GRP tu�una bas�n.Grup Kipinde Manuel Kanal Ayar�Bir kanal numaras� yan�p sönecektir ve Alt Kod kesiminde “MY” görünecektir.Kanal seçmek için ya ya da tu�una bas�n.Art�k Manuel Kanal haz�rd�r.
Otomatik Kanal De�i�imi
Manuel Kanal Ayar�
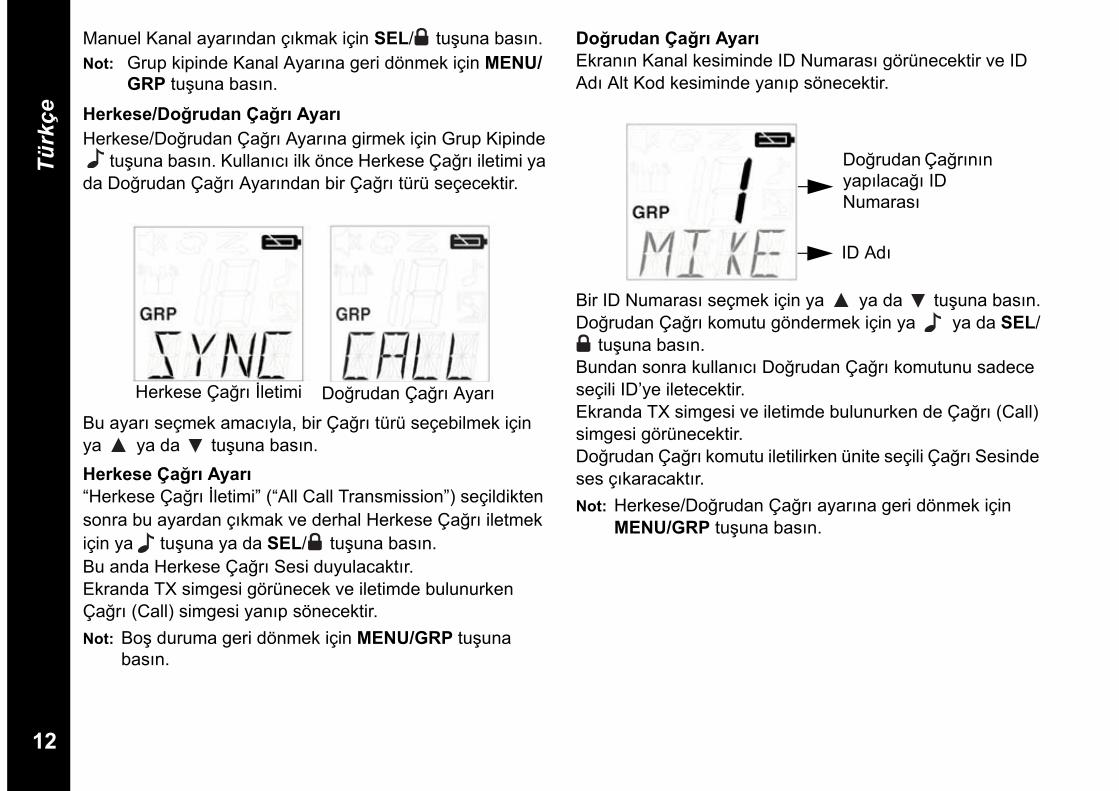
12
Türkçe
Manuel Kanal ayar�ndan ç�kmak için SEL/ tu�una bas�n.Not: Grup kipinde Kanal Ayar�na geri dönmek için MENU/
GRP tu�una bas�n.
Herkese/Do�rudan Ça�r� Ayar� Herkese/Do�rudan Ça�r� Ayar�na girmek için Grup Kipinde
tu�una bas�n. Kullan�c� ilk önce Herkese Ça�r� iletimi ya da Do�rudan Ça�r� Ayar�ndan bir Ça�r� türü seçecektir.
Bu ayar� seçmek amac�yla, bir Ça�r� türü seçebilmek için ya ya da tu�una bas�n.Herkese Ça�r� Ayar�“Herkese Ça�r� �letimi” (“All Call Transmission”) seçildikten sonra bu ayardan ç�kmak ve derhal Herkese Ça�r� iletmek için ya tu�una ya da SEL/ tu�una bas�n.Bu anda Herkese Ça�r� Sesi duyulacakt�r.Ekranda TX simgesi görünecek ve iletimde bulunurken Ça�r� (Call) simgesi yan�p sönecektir.Not: Bo� duruma geri dönmek için MENU/GRP tu�una
bas�n.
Do�rudan Ça�r� Ayar�Ekran�n Kanal kesiminde ID Numaras� görünecektir ve ID Ad� Alt Kod kesiminde yan�p sönecektir.
Bir ID Numaras� seçmek için ya ya da tu�una bas�n.Do�rudan Ça�r� komutu göndermek için ya ya da SEL/
tu�una bas�n.Bundan sonra kullan�c� Do�rudan Ça�r� komutunu sadece seçili ID’ye iletecektir.Ekranda TX simgesi ve iletimde bulunurken de Ça�r� (Call) simgesi görünecektir.Do�rudan Ça�r� komutu iletilirken ünite seçili Ça�r� Sesinde ses ç�karacakt�r.Not: Herkese/Do�rudan Ça�r� ayar�na geri dönmek için
MENU/GRP tu�una bas�n.
Herkese Ça�r� �letimi Do�rudan Ça�r� Ayar�
Do�rudan Ça�r�n�n yap�laca�� ID Numaras�
ID Ad�

13
Türkçe
Grup MenüsüGRUP MENÜSÜNE (GROUP MENU) gitmek için MENU/GRP tu�unu bas�l� tutun.Menülerden (GRP/CODE/RING/ID [grup/kod/zil/ID]) birine ilerlemek için (ya da ) tu�una bas�n.
Bu grup menülerinden birini seçmek için SEL/ tu�una bas�n.
LCD’ye bak�n:Durumu ya da numaray� istedi�iniz de�ere de�i�tirmek için (ya da ) tu�una bas�n. Bu de�eri seçmek için SEL/ tu�una bas�n.
Ç�k�p, Menü bo� kipine dönmek için MENU/GRP tu�una bas�n.Not: Grup kipinde, sizinle ayn� kanala ve ayn� grup koduna ayarlanmad��� sürece di�er telsizlerden ileti alamazs�n�z.
Normal “GRP”(Grup Kipi)
“KOD”(Grup Kodu)
“ID” (ID Ayar�)
ID Numaras� 1 - 16
0 - 121 1 - 10
ÇIK
ID Ad� 4 karaktere kadar
“H” ya da “E”
“H”“E”
Menüden ÇIK
“Z�L”(Zil Sesi)
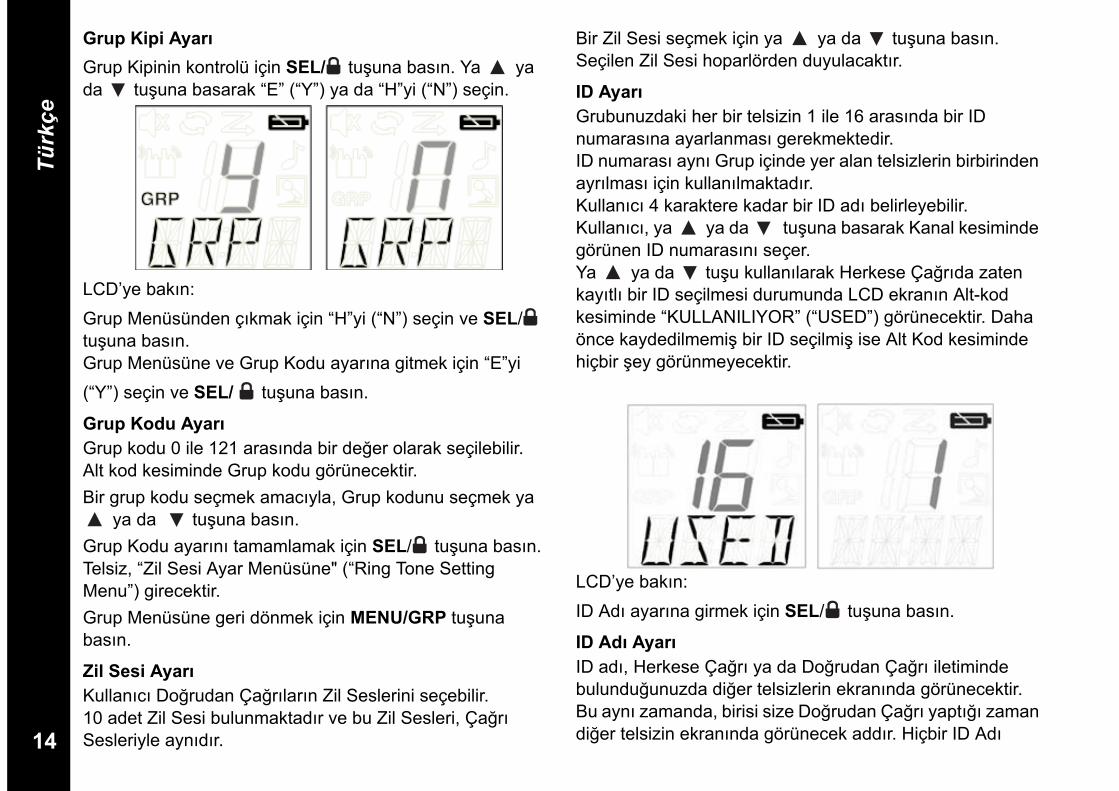
14
Türkçe
Grup Kipi Ayar�Grup Kipinin kontrolü için SEL/ tu�una bas�n. Ya ya da tu�una basarak “E” (“Y”) ya da “H”yi (“N”) seçin.
LCD’ye bak�n:Grup Menüsünden ç�kmak için “H”yi (“N”) seçin ve SEL/ tu�una bas�n.Grup Menüsüne ve Grup Kodu ayar�na gitmek için “E”yi (“Y”) seçin ve SEL/ tu�una bas�n.
Grup Kodu Ayar�Grup kodu 0 ile 121 aras�nda bir de�er olarak seçilebilir.Alt kod kesiminde Grup kodu görünecektir.Bir grup kodu seçmek amac�yla, Grup kodunu seçmek ya
ya da tu�una bas�n.Grup Kodu ayar�n� tamamlamak için SEL/ tu�una bas�n. Telsiz, “Zil Sesi Ayar Menüsüne" (“Ring Tone Setting Menu”) girecektir.Grup Menüsüne geri dönmek için MENU/GRP tu�una bas�n.
Zil Sesi Ayar� Kullan�c� Do�rudan Ça�r�lar�n Zil Seslerini seçebilir.10 adet Zil Sesi bulunmaktad�r ve bu Zil Sesleri, Ça�r� Sesleriyle ayn�d�r.
Bir Zil Sesi seçmek için ya ya da tu�una bas�n.Seçilen Zil Sesi hoparlörden duyulacakt�r.
ID Ayar�Grubunuzdaki her bir telsizin 1 ile 16 aras�nda bir ID numaras�na ayarlanmas� gerekmektedir.ID numaras� ayn� Grup içinde yer alan telsizlerin birbirinden ayr�lmas� için kullan�lmaktad�r.Kullan�c� 4 karaktere kadar bir ID ad� belirleyebilir. Kullan�c�, ya ya da tu�una basarak Kanal kesiminde görünen ID numaras�n� seçer. Ya ya da tu�u kullan�larak Herkese Ça�r�da zaten kay�tl� bir ID seçilmesi durumunda LCD ekran�n Alt-kod kesiminde “KULLANILIYOR” (“USED”) görünecektir. Daha önce kaydedilmemi� bir ID seçilmi� ise Alt Kod kesiminde hiçbir �ey görünmeyecektir.
LCD’ye bak�n:ID Ad� ayar�na girmek için SEL/ tu�una bas�n.
ID Ad� Ayar�ID ad�, Herkese Ça�r� ya da Do�rudan Ça�r� iletiminde bulundu�unuzda di�er telsizlerin ekran�nda görünecektir. Bu ayn� zamanda, birisi size Do�rudan Ça�r� yapt��� zaman di�er telsizin ekran�nda görünecek add�r. Hiçbir ID Ad�
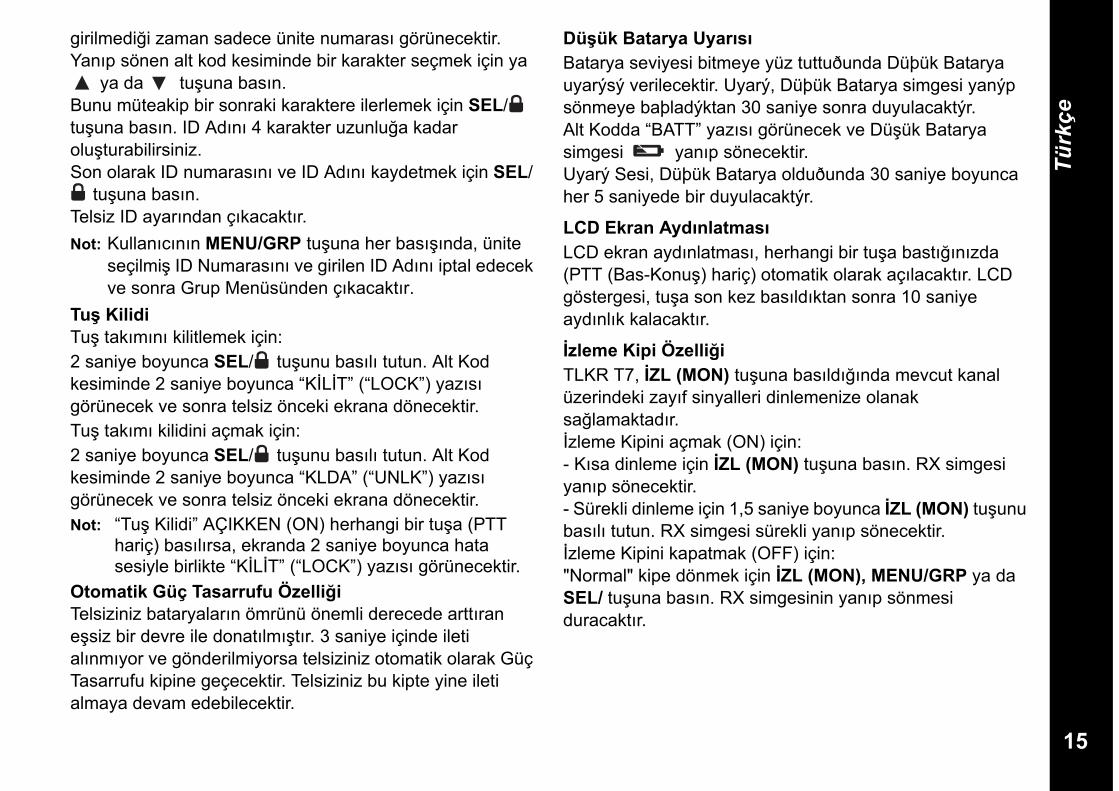
15
Türkçe
girilmedi�i zaman sadece ünite numaras� görünecektir.Yan�p sönen alt kod kesiminde bir karakter seçmek için ya
ya da tu�una bas�n.Bunu müteakip bir sonraki karaktere ilerlemek için SEL/ tu�una bas�n. ID Ad�n� 4 karakter uzunlu�a kadar olu�turabilirsiniz.Son olarak ID numaras�n� ve ID Ad�n� kaydetmek için SEL/
tu�una bas�n.Telsiz ID ayar�ndan ç�kacakt�r.Not: Kullan�c�n�n MENU/GRP tu�una her bas���nda, ünite
seçilmi� ID Numaras�n� ve girilen ID Ad�n� iptal edecek ve sonra Grup Menüsünden ç�kacakt�r.
Tu� KilidiTu� tak�m�n� kilitlemek için:2 saniye boyunca SEL/ tu�unu bas�l� tutun. Alt Kod kesiminde 2 saniye boyunca “K�L�T” (“LOCK”) yaz�s� görünecek ve sonra telsiz önceki ekrana dönecektir. Tu� tak�m� kilidini açmak için:2 saniye boyunca SEL/ tu�unu bas�l� tutun. Alt Kod kesiminde 2 saniye boyunca “KLDA” (“UNLK”) yaz�s� görünecek ve sonra telsiz önceki ekrana dönecektir. Not: “Tu� Kilidi” AÇIKKEN (ON) herhangi bir tu�a (PTT
hariç) bas�l�rsa, ekranda 2 saniye boyunca hata sesiyle birlikte “K�L�T” (“LOCK”) yaz�s� görünecektir.
Otomatik Güç Tasarrufu Özelli�iTelsiziniz bataryalar�n ömrünü önemli derecede artt�ran e�siz bir devre ile donat�lm��t�r. 3 saniye içinde ileti al�nm�yor ve gönderilmiyorsa telsiziniz otomatik olarak Güç Tasarrufu kipine geçecektir. Telsiziniz bu kipte yine ileti almaya devam edebilecektir.
Dü�ük Batarya Uyar�s�Batarya seviyesi bitmeye yüz tuttuðunda Düþük Batarya uyarýsý verilecektir. Uyarý, Düþük Batarya simgesi yanýp sönmeye baþladýktan 30 saniye sonra duyulacaktýr.Alt Kodda “BATT” yaz�s� görünecek ve Dü�ük Batarya simgesi yan�p sönecektir.Uyarý Sesi, Düþük Batarya olduðunda 30 saniye boyunca her 5 saniyede bir duyulacaktýr.
LCD Ekran Ayd�nlatmas�LCD ekran ayd�nlatmas�, herhangi bir tu�a bast���n�zda (PTT (Bas-Konu�) hariç) otomatik olarak aç�lacakt�r. LCD göstergesi, tu�a son kez bas�ld�ktan sonra 10 saniye ayd�nl�k kalacakt�r.
zleme Kipi Özelli�iTLKR T7, ZL (MON) tu�una bas�ld���nda mevcut kanal üzerindeki zay�f sinyalleri dinlemenize olanak sa�lamaktad�r.�zleme Kipini açmak (ON) için:- K�sa dinleme için ZL (MON) tu�una bas�n. RX simgesi yan�p sönecektir.- Sürekli dinleme için 1,5 saniye boyunca ZL (MON) tu�unu bas�l� tutun. RX simgesi sürekli yan�p sönecektir.�zleme Kipini kapatmak (OFF) için:"Normal" kipe dönmek için ZL (MON), MENU/GRP ya da SEL/ tu�una bas�n. RX simgesinin yan�p sönmesi duracakt�r.
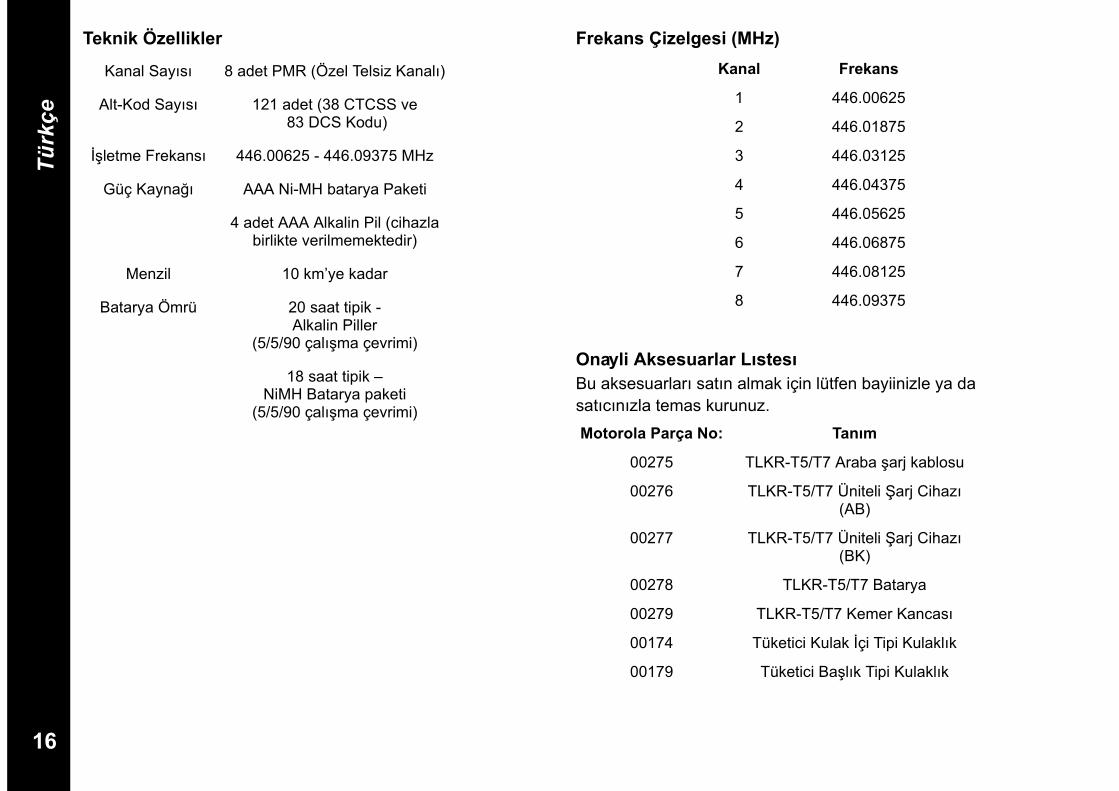
16
Türkçe
Teknik Özellikler Frekans Çizelgesi (MHz)
Onayli Aksesuarlar L�stes�Bu aksesuarlar� sat�n almak için lütfen bayiinizle ya da sat�c�n�zla temas kurunuz.
Kanal Say�s� 8 adet PMR (Özel Telsiz Kanal�)
Alt-Kod Say�s� 121 adet (38 CTCSS ve 83 DCS Kodu)
��letme Frekans� 446.00625 - 446.09375 MHz
Güç Kayna�� AAA Ni-MH batarya Paketi
4 adet AAA Alkalin Pil (cihazla birlikte verilmemektedir)
Menzil 10 km’ye kadar
Batarya Ömrü 20 saat tipik - Alkalin Piller
(5/5/90 çal��ma çevrimi)
18 saat tipik – NiMH Batarya paketi
(5/5/90 çal��ma çevrimi)
Kanal Frekans
1 446.00625
2 446.01875
3 446.03125
4 446.04375
5 446.05625
6 446.06875
7 446.08125
8 446.09375
Motorola Parça No: Tan�m
00275 TLKR-T5/T7 Araba �arj kablosu
00276 TLKR-T5/T7 Üniteli �arj Cihaz� (AB)
00277 TLKR-T5/T7 Üniteli �arj Cihaz� (BK)
00278 TLKR-T5/T7 Batarya
00279 TLKR-T5/T7 Kemer Kancas�
00174 Tüketici Kulak �çi Tipi Kulakl�k
00179 Tüketici Ba�l�k Tipi Kulakl�k
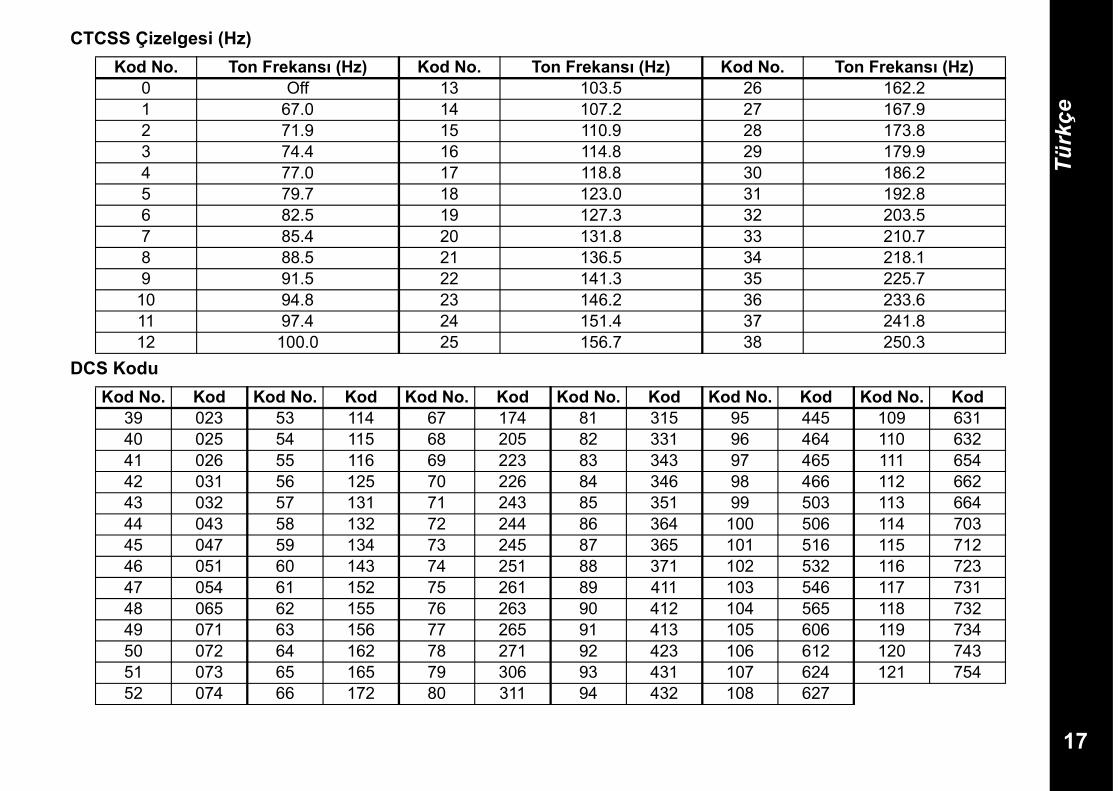
17
Türkçe
CTCSS Çizelgesi (Hz)
DCS Kodu
Kod No. Ton Frekans� (Hz) Kod No. Ton Frekans� (Hz) Kod No. Ton Frekans� (Hz)0 Off 13 103.5 26 162.21 67.0 14 107.2 27 167.92 71.9 15 110.9 28 173.83 74.4 16 114.8 29 179.94 77.0 17 118.8 30 186.25 79.7 18 123.0 31 192.86 82.5 19 127.3 32 203.57 85.4 20 131.8 33 210.78 88.5 21 136.5 34 218.19 91.5 22 141.3 35 225.7
10 94.8 23 146.2 36 233.611 97.4 24 151.4 37 241.812 100.0 25 156.7 38 250.3
Kod No. Kod Kod No. Kod Kod No. Kod Kod No. Kod Kod No. Kod Kod No. Kod39 023 53 114 67 174 81 315 95 445 109 63140 025 54 115 68 205 82 331 96 464 110 63241 026 55 116 69 223 83 343 97 465 111 65442 031 56 125 70 226 84 346 98 466 112 66243 032 57 131 71 243 85 351 99 503 113 66444 043 58 132 72 244 86 364 100 506 114 70345 047 59 134 73 245 87 365 101 516 115 71246 051 60 143 74 251 88 371 102 532 116 72347 054 61 152 75 261 89 411 103 546 117 73148 065 62 155 76 263 90 412 104 565 118 73249 071 63 156 77 265 91 413 105 606 119 73450 072 64 162 78 271 92 423 106 612 120 74351 073 65 165 79 306 93 431 107 624 121 75452 074 66 172 80 311 94 432 108 627

18
Türkçe
Garanti BilgisiMotorola çift yönlü telsizinizi ve/ya da orijinal aksesuarlar�n�z� sat�n ald���n�z yetkili Motorola bayisi ya da sat�c�s� garanti taleplerini kabul edecek ve/ya da garanti hizmeti sunacakt�r.Garanti hizmeti talep etmek için lütfen telsinizi sat�n ald���n�z bayi ya da sat�c�ya geri götürünüz. Telsizleri Motorola’ya göndermeyin.Garanti hizmetini almaya hak kazanmak için, üzerinde telsizinizi sat�n ald���n�z tarih olan sat�� faturan�z� ya da ona e� de�er ba�ka bir kabul edilebilir belgeyi ibraz etmeniz laz�md�r. Çift yönlü telsizinizin seri numaras�n�n aç�k bir �ekilde görünmesi de gerekecektir. Model ya da seri numaras� de�i�mi�, silinmi�, ç�kart�lm�� ya da okunaks�z hale gelmi� ürünler garanti kapsam�nda olmayacakt�r.Garanti Kapsam�nda Olmayan DurumlarÜrünün normal ve mutat olmayan ya da bu kullan�c� k�lavuzunda yer alan talimatlara uygun olmayacak �ekilde kullan�m�ndan kaynaklanan ar�zalar ve hasarlar.Yanl�� kullan�m, kaza ya da ihmalden kaynaklanan ar�zalar ve hasarlar.Uygun olmayan test etme, bak�m, ayar ya da her türlü de�i�iklik ya da tadilat sonucu olu�an ar�zalar ve hasarlar.Do�rudan i�çilik ya da malzeme hatalar�ndan kaynaklanmad��� sürece antenlerin k�r�lmas� ya da hasar görmesi.Performans üzerinde tersi etki yapacak ya da herhangi bir garanti talebini do�rulamak için yeterli denetimlerin ve testlerin yap�lmas�na engel olacak �ekilde parçalara ayr�lm�� ya da onar�lm�� ürünler.Menzile ba�l� olan ar�zalar ve hasarlar.Rutubete, s�v�lara ya da s�v� döküntülerine ba�l� olan ar�zalar ve hasarlar.
Normal kullan�ma ba�l� olarak çizilmi� ya da hasar görmü� tüm plastik parçalar ve d�� etkilere aç�k di�er tüm parçalar.Geçici bir süre kiraya verilmi� ürünler.Normal kullan�m sonucu eskime ve a��nmaya ba�l� olarak yap�lan periyodik bak�mlar, onar�mlar ya da parça de�i�imleri.Telif Hakk� BilgisiTelif hakk� al�nm�� Motorola programlar�, saklanm�� yar�-iletken bellekler ya da di�er medyalar da bu k�lavuzda tan�mlanan Motorola ürünleri aras�nda say�lmaktad�r. ABD ve di�er ülkelerdeki Yasalar, telif hakk� al�nm�� Motorola programlar�n�n herhangi bir �ekilde kopyalanmas� ya da yeniden üretilmesi için olan özel haklar da dahil olmak üzere, telif hakk� al�nm�� bilgisayar programlar� için olan baz� özel haklar� Motorola için sakl� tutar.Buna ba�l� olarak, bu k�lavuzda tan�mlanan Motorola ürünlerinde kullan�lan telif hakk� al�nm�� hiçbir Motorola bilgisayar program�, Motorola’n�n yaz�l� izni al�nmaks�z�n hiçbir �ekilde kopyalanamaz ya da yeniden üretilemez. Ayr�ca, Motorola ürünlerinin sat�n al�nmas�, bu ürünün sat���nda uygulanan yasan�n meydana ç�kartt��� münhas�r olmayan telif ücretsiz normal lisans hariç olmak üzere, Motorola telif haklar�, patentleri ve patent uygulamalar� alt�nda olan hiçbir lisans�n, do�rudan ya da z�mnen, hukuki engel ya da ba�ka herhangi bir yolla sat�n alan ki�iye geçmesini sa�lamamaktad�r.MOTOROLA, Özgün bir biçimde yarat�lm�� M logosu ve i�bu belgede görülen di�er tüm ticari markalar, Motorola, Inc. ® Reg. U.S. Pat. & Tm. Off.’un ticari markalar�d�r.
© Motorola, Inc. 2008
1
�������
������������������ � �����!#��#$� � �����<#$��� ��=>?!�@�< \!���?!#$�$��< ^��\_�� �\�@���$�=`�� { ��\$!$���|@ \!���#$!�}��@ . . . . . . . . . . . . . . . . . . . 2~!\!{$�\�#$�{� . . . . . . . . . . . . . . . . . . . . . . . . . . . . . . . . 2�\_!�| >�\!�=���� � �>�{}�� . . . . . . . . . . . . . . . . . . . 3��#�=�< . . . . . . . . . . . . . . . . . . . . . . . . . . . . . . . . . . . . . . 4��@�=�{$ ��#$!�{�s . . . . . . . . . . . . . . . . . . . . . . . . . . . . 5�#$!���{! �!$!\�< . . . . . . . . . . . . . . . . . . . . . . . . . . . . . 5����{!$�\ >\���� �!\��! �!$!\�< . . . . . . . . . . . . . . . . 5�!\��{! �!$!\�< ��� �$#��������� �$ \!���#$!�}�� . . . . . . . . . . . . . . . . . . . . . . . . . . . . . . . . . 5�\�@!� �!\��{! . . . . . . . . . . . . . . . . . . . . . . . . . . . . . . . 5�!\��{! � �!\����@ >#$\�<#$�� . . . . . . . . . . . . . . . . . . 5�!\��{! �!$!\�< �$��=`�� �$ \!���#$!�}�� . . . . . . . . 6�{#�=>!$!}�� \!���#$!�}�� . . . . . . . . . . . . . . . . . . . . . 6�{=�?���� \!���#$!�}�� � \�_>=�\��{! _\�@{�#$� . . 6�{=�?���� � �|{=�?���� $���� {=!��� . . . . . . . . . . . 6��� {��}! ��\��!?� . . . . . . . . . . . . . . . . . . . . . . . . . . . 6������� \!�����\�_���\�� . . . . . . . . . . . . . . . . . . . . . 6�!��_!}�� �� @��� . . . . . . . . . . . . . . . . . . . . . . . . . . . . 7���� �|��\! . . . . . . . . . . . . . . . . . . . . . . . . . . . . . . . . . 7�|��\ {!�!=! . . . . . . . . . . . . . . . . . . . . . . . . . . . . . . . . . 7�|��\ #>�{��! . . . . . . . . . . . . . . . . . . . . . . . . . . . . . . . . 7���� \���@�� . . . . . . . . . . . . . . . . . . . . . . . . . . . . . . . . 8�>�{}�� #{!��\��!��� {!�!=�� . . . . . . . . . . . . . . . . . . 8����@ ���<��_� #{!��\��!��� . . . . . . . . . . . . . . . . . . . 9��=�#���� >�\!�=���� ��\��!?�< . . . . . . . . . . . . . . . . 9�>�{}�� @���$�\��_! ��@������ . . . . . . . . . . . . . . . . 9���| �|���! . . . . . . . . . . . . . . . . . . . . . . . . . . . . . . . . . 10��#�>@�|< \���@ . . . . . . . . . . . . . . . . . . . . . . . . . . . . 10�>�{}�� $!<@�\! . . . . . . . . . . . . . . . . . . . . . . . . . . . . . 11�\>�����< \���@ . . . . . . . . . . . . . . . . . . . . . . . . . . . . . 11�!#$\�<{! {!�!=�� � _\>�����@ \���@� . . . . . . . . . . 11��$�@!$�?�#{!� #@��! {!�!=�� . . . . . . . . . . . . . . . . . 11
�>?��� �!�!��� {!�!=�� � _\>�����@ \���@� . . . . . .11����� � �\�@|� �|���| . . . . . . . . . . . . . . . . . . . . . . .12����< �|��� . . . . . . . . . . . . . . . . . . . . . . . . . . . . . . . .12�\�@�< �|��� . . . . . . . . . . . . . . . . . . . . . . . . . . . . . . . .12�\>������ @��� . . . . . . . . . . . . . . . . . . . . . . . . . . . . . .13�{=�?���� � �|{=�?���� _\>�����_� \���@! . . . . . .14�!�!��� {��! _\>��| . . . . . . . . . . . . . . . . . . . . . . . . .14�!�!��� $��! ����{! . . . . . . . . . . . . . . . . . . . . . . . . . .14�!�!��� ��@�\! \!���#$!�}�� . . . . . . . . . . . . . . . . . .14�!�!��� �@��� \!���#$!�}�� . . . . . . . . . . . . . . . . . . .14�=�{�\��{! {=!��� . . . . . . . . . . . . . . . . . . . . . . . . . . .15��$�@!$�?�#{!� �>�{}�� ^{���@�� �!$!\�< . . . . . . .15���������� � ���{�@ �!\��� �!$!\�< . . . . . . . . . . .15���#��${! ��#�=�� . . . . . . . . . . . . . . . . . . . . . . . . . . . .15�>�{}�� @���$�\��_! {!�!=! . . . . . . . . . . . . . . . . . . .15�����?�#{�� �!��|� . . . . . . . . . . . . . . . . . . . . . . . . . . .16�!�=�}! ?!#$�$ (��}) . . . . . . . . . . . . . . . . . . . . . . . . . .16��\�?��` ����\���|� !{#�##>!\�� . . . . . . . . . . . . . .16�!�=�}! {���� CTCSS (�}) . . . . . . . . . . . . . . . . . . . . .17���| DCS . . . . . . . . . . . . . . . . . . . . . . . . . . . . . . . . . . .17�!\!�$�<�!� ����\@!}�� . . . . . . . . . . . . . . . . . . . . . .18�$� �� ��{\|�!�$#� _!\!�$��< . . . . . . . . . . . . . . . . . .18����\@!}�� �� !�$�\#{�@ �\!�� . . . . . . . . . . . . . . . .18
2
�������
�������# $ %�&$*+;�$;<� � �$&��=;<��� �&>?@+�[$= \+��$@+;<$<�$= ]��\^�� *\�[���<�>_�$ ` *$\<+<���{[ \+��$;<+�|�#[
}+\+`<�\�;<�`�• 8 {!�!=�� PMR• 121 #>�{�� (38 {���� CTCSS � 83 {��! DCS)• �!��># ��<#$��� - �� 10 {@*• �#$\����!� �>�{}�� VOX• 10 ������!���� $���� �|���! �! �|��\• ��{�{\�#$!==�?�#{�< ��#�=�< # ���#��${�<• ������ �=� _!\��$>\| (_!\��$>\! �\���\�$!�$#�
�$��=`��)• ��� {��}! ��\��!?�• �>�{}�� $!<@�\!• ����$�\��_ ��@������• �!\����� >#$\�<#$��• ����{!$�\ >\���� �!\��! �!$!\�<• ����$�\��_ {!�!=!
• �{!��\��!��� {!�!=��• ���<��� #{!��\��!���• �=�{�\��{! {=!���• ��$�@!$�?�#{�� �>@����!�=����• ��$����$�\ (�\�{\>${!)• ����@ ^{���@�� �!$!\�<• ���������� � ���{�@ �!\��� �!$!\�<• ��� (�{=./�|{=.)• �\�@|� �|���| (����$���{!}�� �|�|�!���_�
!�����$!)• �\>����|� �|���|• ��#�>@�|< \���@• ����� �|���|• ��$�@!$�?�#{!� #@��! {!�!=��* �!��># ��<#$��� \!���#$!�}�� �!��#�$ �$ �{\>�!����
>#=���< � $���_\!��� @�#$��#$�.
��\�� �!?!=�@ �#��=`���!��� ^$�_� ����=�� ���!{�@ $̀�#` # ��#$\>{}��@� �� ^{#�=>!$!}�� � $����{� �����!#��#$�, �\�������|@� � �>{=�$� "�������� � �����!#��#$� �
�����<#$��� ��=>?!�@�< \!���?!#$�$��< ̂ ��\_��" {�$�\|< �����$ � {�@�=�{$ ��#$!�{� �!��< \!���#$!�}��.
!C a u t i o n
!C a u t i o n ~��[+���!
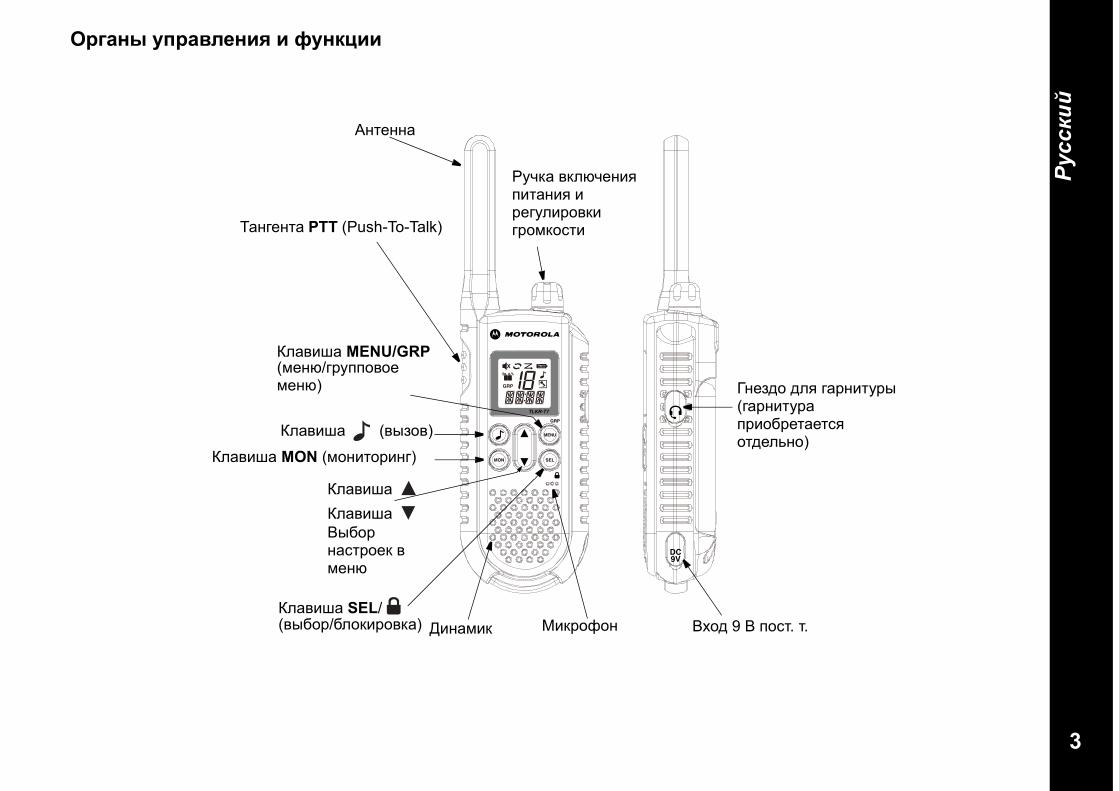
3
�������
�\^+�{ ?*\+�>���# � �?�`|��
������ �=� _!\��$>\| (_!\��$>\! �\���\�$!�$#� �$��=`��)
��$���!
�>?{! �{=�?���� ��$!��� � \�_>=�\��{� _\�@{�#$��!�_��$! PTT (Push-To-Talk)
�=!���! (�|���)
�=!���! MON (@���$�\��_)
�=!���! �=!���! �|��\ �!#$\��{ � @���
�=!���! MENU/GRP(@���/_\>������ @���)
�=!���! SEL/ (�|��\/�=�{�\��{!) ���!@�{ ��{\���� ���� 9 � ��#$. $.
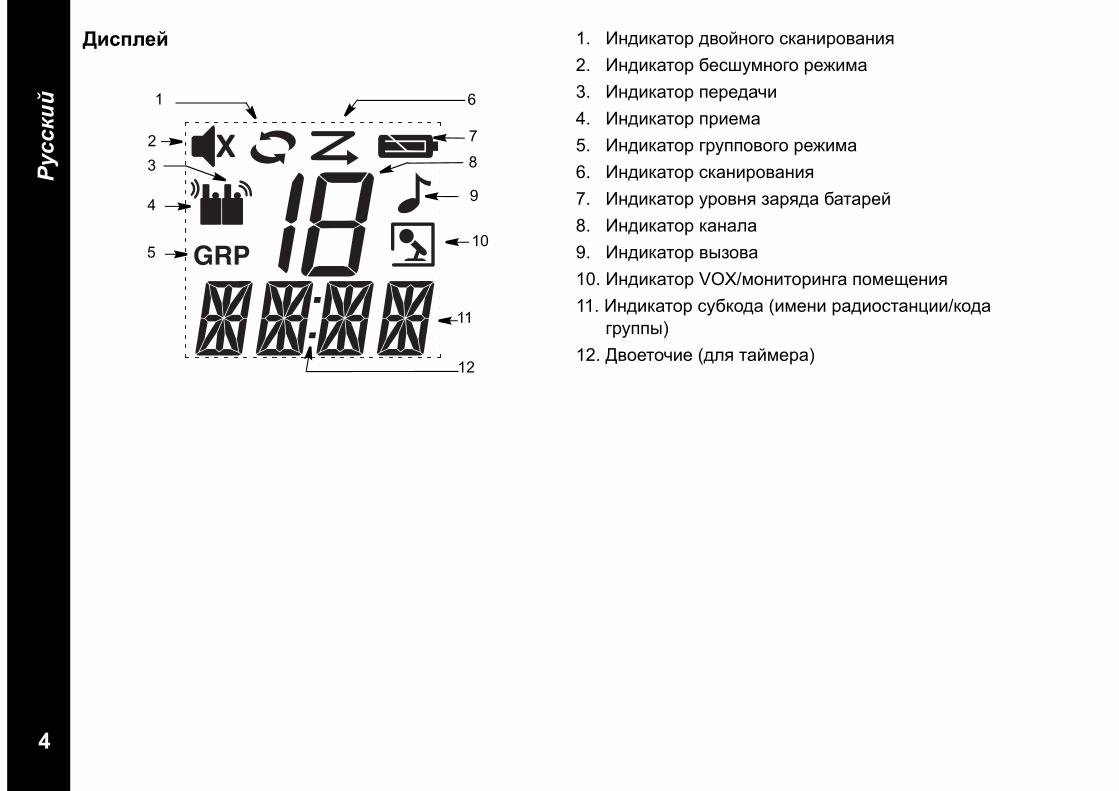
4
�������
��;*>�= 1. ����{!$�\ ���<��_� #{!��\��!���2. ����{!$�\ ��#�>@��_� \���@!3. ����{!$�\ ��\��!?�4. ����{!$�\ �\��@!5. ����{!$�\ _\>�����_� \���@!6. ����{!$�\ #{!��\��!���7. ����{!$�\ >\���� �!\��! �!$!\�<8. ����{!$�\ {!�!=!9. ����{!$�\ �|���!10. ����{!$�\ VOX/@���$�\��_! ��@������11. ����{!$�\ #>�{��! (�@��� \!���#$!�}��/{��!
_\>��|)12. ����$�?�� (�=� $!<@�\!)
1
23
4
5
12
11
10
6
9
7
8
5
�������
����\!�=��@ �!# # �\���\�$����@ \!���#$!�}�� TLKR T7. �!���#$!�}�� �@��$ @!=|< ��# � =�_{� >@��!�$#� �! =!����. ¡< >����� ��=`���!$`#� �=� #���� # \���|@� � �\>�`�@� �! #��\$���|� @�\��\��$���, � $>\�#$�?�#{�� �����!�, {!$!�#` �! =|�!� �=� �\�#$� �! �\�_>={�. �\�_���$#� ��! � � {!?�#$�� #\��#$�! ���������� � �����!#��#$�. �$� #��\�@�����, {�@�!{$��� #\��#$�� #���� �#�!���� @����#$��@ ��=���|� �>�{}�<.
�$[*>�`< *$;<+�`�� {�@�=�{$ ��#$!�{� �����$ ��� \!���#$!�}�� TLKR T7, ��! ���#�|� �!��@!, �!\����� >#$\�<#$��, #�$���< !�!�$�\, ��� ���\�|� #{��| �=� �!$!\�<, ��! �=�{! ��{�=`-@�$!==-_��\���|� !{{>@>=�$�\�|� �!$!\�< � �!���� \>{����#$��. ��$!��� \!���#$!�}�� @���$ $!{�� �#>��#$�=�$`#� �$ 4 ��=�?�|� �!$!\�< ��� (�� �����$ � {�@�=�{$ ��#$!�{�).
�;<+�$�`+ %+<+\�= �!���#$!�}�� TLKR T7 @���$ \!��$!$` �$ ��{�=`-@�$!==-_��\���|� �!$!\�< (�����$ � {�@�=�{$ ��#$!�{�) �=� �$ 4 ��=�?�|� �!$!\�< ��� (�\���\�$!�$#� �$��=`��). ��{�@���>�$#� �#��=`���!$` ��=�?�|� �!$!\�� $�=`{� �|#�{�_� {!?�#$�!.
�=�{ ��{�=`-@�$!==-_��\���|� �!$!\�< >#$!�!�=��!�$#� #=��>���@ ��\!��@:1) �����$�#`, ?$� \!���#$!�}�� �|{=�?��!.2) ���@�$� {\|�{> �!$!\�<��_� �$#�{!, �!�!� �! =!�{> ��{#!$�\! � �����< ?!#$� {\|�{�.3) �#$!����$� ��{�=`-@�$!==-_��\���|� �!$!\�� � �!$!\�<�|< �$#�{. ���=��!<$� ��=�\��#$`, �����!?���>� #�@��=!@� "+" � "-" ��>$\� �$#�{!. ¡#=� �!$!\�� >#$!���=��| ���\!��=`��, \!���#$!�}�� \!��$!$` �� �>��$.4) �#$!����$� �! @�#$� {\|�{> �!$!\�<��_� �$#�{!.
����`+<$\ ?\$��# &+\#�+ %+<+\�= �! ��#�=�� \!���#$!�}�� �@��$#� ����{!$�\ $�{>��_� >\���� �!\��! �!$!\�<. �\� ���{�@ �!\��� �!$!\�< ��!?�{ ����{!$�\! >\���� �!\��! �!$!\�< @�_!�$. ��@��=���� �!@���$� ��=�?�|� �!$!\��.�+\#�`+ %+<+\�= %�& $<;$�������# $< \+��$;<+�|����{�=`-@�$!==-_��\���|� �!$!\�� \!���#$!�}�< TLKR T7 @���� �!\��!$` {!{ �!�\�@>�, $!{ � # ��@��`� �!\����_� >#$\�<#$�!, �������_� � {�@�=�{$ ��#$!�{�. �%#&+<�>_�$ �{`>�@�<� \+��$;<+�|�� *�\�� ?;<+�$�`$= � &+\#��$� ?;<\$=;<�$ �$ �&%��+��� ��`$\\�`<�$= \+%$<{ ����`+<$\+ ?\$��# &+\#�+ %+<+\�=.�\#[+# &+\#�`+:1. ���{=�?�$� �$�{�\ !�!�$�\! ��#$. $. {� ����> 9 � ��#$. $.
\!���#$!�}��. ���{=�?�$� !�!�$�\ { _����> ��\$���< #�$� !�$�@���=�.
2. �!\��!<$� �!$!\�<�|< �=�{ � $�?���� 16 ?!#��.�+\#�`+ � &+\#��$[ ?;<\$=;<��:1. ���{=�?�$� #�$���< !�!�$�\ {� ����> 9 � ��#$. $.
\!���#$!�}�� � { #$!��!\$��< #�$���< \���${�.2. �#$!����$� �!\����� >#$\�<#$�� �! #$�= � �#$!� $̀�
\!���#$!�}�� � �!\����� >#$\�<#$�� {=!���!@� ���\��.
3. �����$�#`, ?$� �{=�?�=#� #��$������|< ����{!$�\. �!\��!<$� �!$!\�<�|< �=�{ � $�?���� 16 ?!#��. �� �!��\����� �!\��{� �|� $̀� \!���#$!�}�� �� �!\����_� >#$\�<#$�!
�\�[�@+���:���<$��$��{= ����`+<$\ &+\#��$^$ ?;<\$=;<�+ *\$�$>�+�< ^$\�<_ � <�@���� �;�^$ �\�[���, *$`+ \+��$;<+�|�# �+�$��<;# � &+\#��$[ ?;<\$=;<��.

6
�������
�+\#�`+ %+<+\�= $<��>_�$ $< \+��$;<+�|����{�=`-@�$!==-_��\���|� �!$!\�� @���� $!{�� �!\��!$` �$��=`�� �$ \!���#$!�}��. �=� ^$�_� ��������@! ���\�!� #{��!, ������!� � {�@�=�{$ ��#$!�{�.1. �#$!����$� ���\�>� #{��> � �!\����� >#$\�<#$��.2. �#$!����$� �!$!\�<�|< �=�{ � �!\����� >#$\�<#$��.
���#��? $̀� #��@������ �!\���|� {��$!{$�� �!$!\�<��_� �=�{! # {��$!{$!@� �!\����_� >#$\�<#$�!. ¡#=� �!$!\�<�|< �=�{ >#$!���=�� ���\!��=`��, �!\��{! �����@���!.
3. �����$�#`, ?$� �{=�?�=#� #��$������|< ����{!$�\. �!\��!<$� �!$!\�<�|< �=�{ � $�?���� 16 ?!#��.
�\�[�@+���: ���<$��$��{= ����`+<$\ &+\#��$^$ ?;<\$=;<�+ *\$�$>�+�< ̂ $\�<_ � <�@���� �;�^$ �\�[���, *$`+ %+<+\�=�{= %>$` �+�$��<;# � &+\#��$[ ?;<\$=;<��.
�`;*>?+<+|�# \+��$;<+�|���$��| ���#��?�$` �\!��=`��� � ��=��� �#��=`���!��� ���@����#$�< �!��< ����< \!���#$!�}��, �\�?�$!<$� �!���� \>{����#$�� �$ �!?!=! �� {��}!, �\���� ?�@ �\�#$>�!$` { ^{#�=>!$!}�� \!���#$!�}��.~`>�@���� \+��$;<+�|�� � \�^?>�\$�`+ ^\$[`$;<�1. �$��| �{=�?�$` \!���#$!�}�� � >��=�?�$` _\�@{�#$`,
����\��$� \>?{> �{=�?���� ��$!��� � \�_>=�\��{� _\�@{�#$� �� ?!#���< #$\�={�. �$��| >@��`��$` _\�@{�#$`, ����\��$� \>?{> �\�$�� ?!#���< #$\�={�.
2. �$��| �|{=�?�$` \!���#$!�}��, ����\��$� \>?{> �\�$�� ?!#���< #$\�={� �� >��\!.
~`>�@���� � �{`>�@���� <$�$� `>+��� �!���� �!�!$�� {=!��� \!���#$!�}�� ({\�@� $!�_��$| PTT � {=!���� ) #��\�����!�$#� $��!=`�|@ #�_�!=�@. �$��| �|{=�?�$` �=� �{=�?�$` $��| {=!���, �{=�?�$� \!���#$!�}��, >��\���!� �!�!$�< {=!���> .
�$� `$�|+ *�\��+@� ��� {��}! ��\��!?� #=>��$ �=� ���������� � {��}� ��\��!?� ({!{ �\� �#��=`���!��� $!�_��$| ���, $!{ � � \���@� VOX). ¡#=� $��| {=!��� �{=�?��|, $� $�� {��}! ��\��!?� �|����$#� �! ���!@�{. ¡#=� $��| {=!��� �|{=�?��|, $� $�� {��}! ��\��!?� ��\��!�$#�, �� �� ���!@�{! �� ��>?�$.�$��| �|{=�?�$` �=� �{=�?�$` $�� {��}! ��\��!?�:�{=�?�$� \!���#$!�}��, >��\���!� �!�!$�< {=!���>
.
~������ \+��$*�\�^$�$\$��$��| �#$>��$` � \!�����\�_���\| # �\>_�< \!���#$!�}��<:1. �!�@�$� $!�_��$> ��� �, >��\���!� �� �!�!$�<,
_���\�$� � @�{\���� # \!##$����� 5-8 #@. ����\�$� ?�${�, �� �� ���|�!� _�=�#!. �� �\�@� ��\��!?� �! ��#�=�� �$��\!�!�$#� ��!?�{ . �� �����!��� ��$�\� ��\�|� #=�� ��\��!?� �� �!?��!<$� _���\�$` #\!�> ��#=� �!�!$�� $!�_��$| ���. ���=!<$� ����=`�>� �!>�>.
2. �!{��?�� _���\�$`, �$�>#$�$� $!�_��$> ���. �$� �!�$ ���@����#$` �\���@!$` ��#$>�!���� �|���|. �� �\�@� �\��@! �! ��#�=�� �$��\!�!�$#� ��!?�{ .
�\�@�?!���:��_�! # @�@��$! �!?!=! ��\��!?� �\�����$ 60 #�{>��, ��>?�$ $��, �\��>�\���!���< �� �#$�?���� �\�@��� ��\��!?�, � ��!?�{ �!?��!�$ @�_!$`. �!���#$!�}�� �\�{\!�!�$ ��\��!?>.
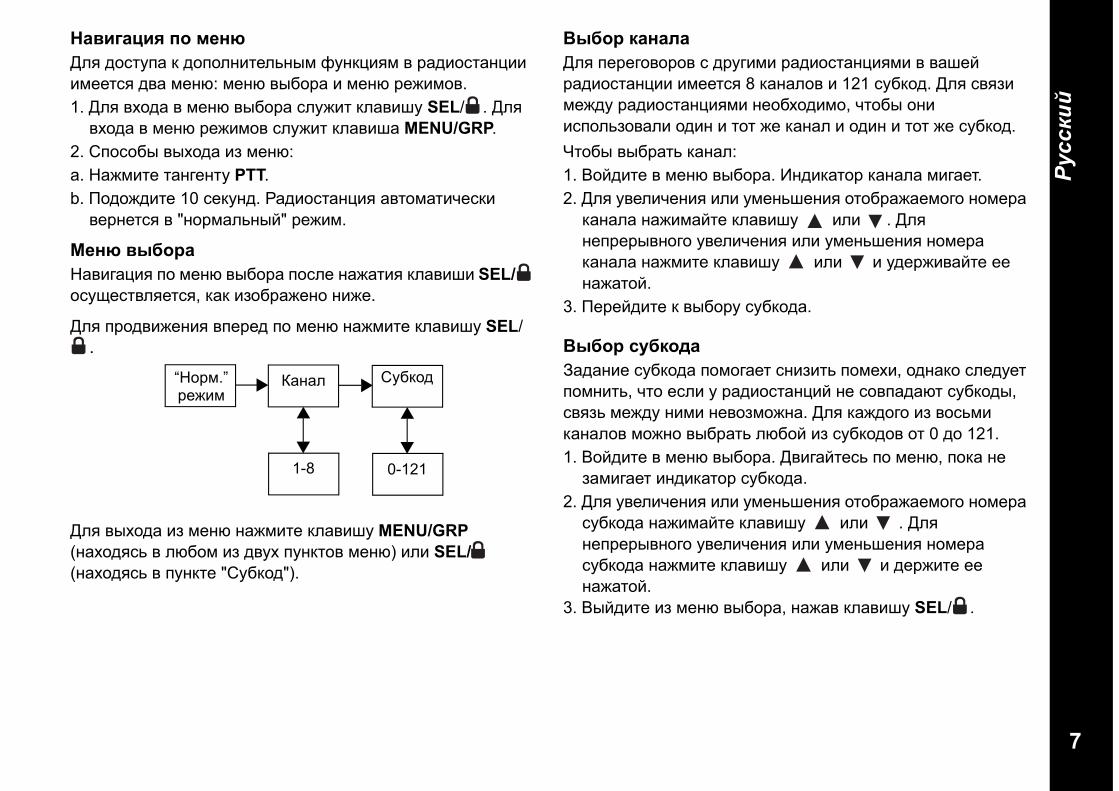
7
�������
�+��^+|�# *$ [����=� ��#$>�! { ����=��$�=`�|@ �>�{}��@ � \!���#$!�}�� �@��$#� ��! @���: @��� �|��\! � @��� \���@��.1. �=� ����! � @��� �|��\! #=>��$ {=!���> SEL/ . �=�
����! � @��� \���@�� #=>��$ {=!���! MENU/GRP.2. ���#��| �|���! �� @���:a. �!�@�$� $!�_��$> PTT.b. �������$� 10 #�{>��. �!���#$!�}�� !�$�@!$�?�#{�
��\��$#� � "��\@!=`�|<" \���@.
���� �{%$\+�!��_!}�� �� @��� �|��\! ��#=� �!�!$�� {=!���� SEL/ �#>��#$�=��$#�, {!{ ����\!���� ����.
�=� �\��������� ���\�� �� @��� �!�@�$� {=!���> SEL/.
�=� �|���! �� @��� �!�@�$� {=!���> MENU/GRP (�!����#` � =���@ �� ��>� �>�{$�� @���) �=� SEL/ (�!����#` � �>�{$� "�>�{��").
~{%$\ `+�+>+�=� ��\�_���\�� # �\>_�@� \!���#$!�}��@� � �!��< \!���#$!�}�� �@��$#� 8 {!�!=�� � 121 #>�{��. �=� #���� @���> \!���#$!�}��@� ��������@�, ?$��| ��� �#��=`���!=� ���� � $�$ �� {!�!= � ���� � $�$ �� #>�{��.�$��| �|�\!$` {!�!=:1. ��<��$� � @��� �|��\!. ����{!$�\ {!�!=! @�_!�$. 2. �=� >��=�?���� �=� >@��`����� �$��\!�!�@�_� ��@�\!
{!�!=! �!��@!<$� {=!���> �=� . �=� ���\�\|���_� >��=�?���� �=� >@��`����� ��@�\! {!�!=! �!�@�$� {=!���> �=� � >��\���!<$� �� �!�!$�<.
3. ��\�<��$� { �|��\> #>�{��!.
~{%$\ ;?%`$�+�!�!��� #>�{��! ��@�_!�$ #����$` ��@���, ���!{� #=��>�$ ��@��$`, ?$� �#=� > \!���#$!�}�< �� #���!�!�$ #>�{��|, #���` @���> ��@� �����@���!. �=� {!���_� �� ��#`@� {!�!=�� @���� �|�\!$` =���< �� #>�{���� �$ 0 �� 121. 1. ��<��$� � @��� �|��\!. ���_!<$�#` �� @���, ��{! ��
�!@�_!�$ ����{!$�\ #>�{��!.2. �=� >��=�?���� �=� >@��`����� �$��\!�!�@�_� ��@�\!
#>�{��! �!��@!<$� {=!���> �=� . �=� ���\�\|���_� >��=�?���� �=� >@��`����� ��@�\! #>�{��! �!�@�$� {=!���> �=� � ��\��$� �� �!�!$�<.
3. �|<��$� �� @��� �|��\!, �!�!� {=!���> SEL/ .
“��\@.” \���@
�!�!= �>�{��
0-1211-8
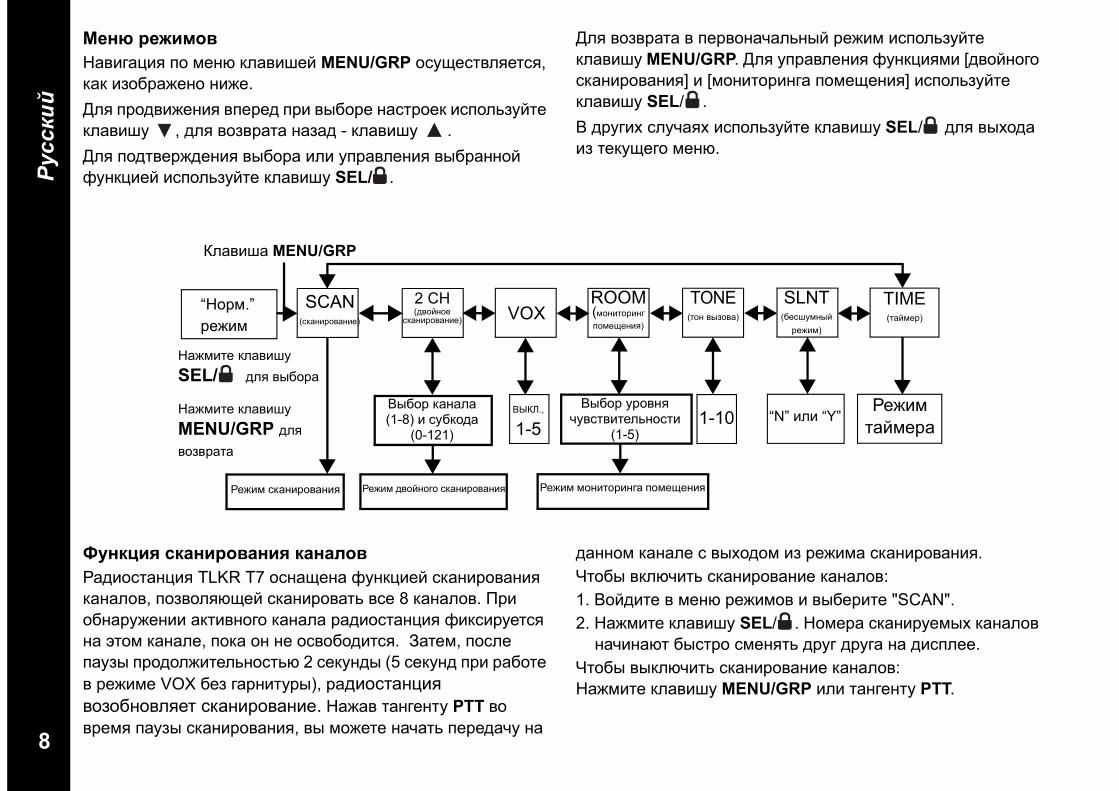
8
�������
���� \���[$��!��_!}�� �� @��� {=!����< MENU/GRP �#>��#$�=��$#�, {!{ ����\!���� ����.�=� �\��������� ���\�� �\� �|��\� �!#$\��{ �#��=`�><$� {=!���> , �=� ����\!$! �!�!� - {=!���> .�=� ���$��\������ �|��\! �=� >�\!�=���� �|�\!���< �>�{}��< �#��=`�><$� {=!���> SEL/ .
�=� ����\!$! � ��\���!?!=`�|< \���@ �#��=`�><$� {=!���> MENU/GRP. �=� >�\!�=���� �>�{}��@� [���<��_� #{!��\��!���] � [@���$�\��_! ��@������] �#��=`�><$� {=!���> SEL/ .� �\>_�� #=>?!�� �#��=`�><$� {=!���> SEL/ �=� �|���! �� $�{>��_� @���.
“��\@.” \���@
SCAN(#{!��\��!���)
2 CH (���<���
#{!��\��!���) VOXROOM(@���$�\��_ ��@������)
TONE ($�� �|���!)
SLNT (��#�>@�|<
\���@)
TIME ($!<@�\)
�|��\ {!�!=! (1-8) � #>�{��!
(0-121)
����@ $!<@�\!
�|��\ >\���� ?>�#$��$�=`��#$�
(1-5)
�¢�£., 1-5 1-10 “N” �=� “Y”
����@ #{!��\��!��� ����@ ���<��_� #{!��\��!��� ����@ @���$�\��_! ��@������
�=!���! MENU/GRP
�!�@�$� {=!���> SEL/ �=� �|��\!
�!�@�$� {=!���>MENU/GRP �=� ����\!$!
�?�`|�# ;`+��\$�+��# `+�+>$��!���#$!�}�� TLKR T7 �#�!���! �>�{}��< #{!��\��!��� {!�!=��, �����=����< #{!��\��!$` �#� 8 {!�!=��. �\� ���!\>����� !{$����_� {!�!=! \!���#$!�}�� ��{#�\>�$#� �! ^$�@ {!�!=�, ��{! �� �� �#������$#�. �!$�@, ��#=� �!>�| �\���=��$�=`��#$`� 2 #�{>��| (5 #�{>�� �\� \!��$� � \���@� VOX ��� _!\��$>\|), \!���#$!�}�� ��������=��$ #{!��\��!���. �!�!� $!�_��$> PTT �� �\�@� �!>�| #{!��\��!���, �| @���$� �!?!$` ��\��!?> �!
�!���@ {!�!=� # �|����@ �� \���@! #{!��\��!���.�$��| �{=�?�$` #{!��\��!��� {!�!=��:1. ��<��$� � @��� \���@�� � �|��\�$� "SCAN". 2. �!�@�$� {=!���> SEL/ . ��@�\! #{!��\>�@|� {!�!=��
�!?��!�$ �|#$\� #@���$` �\>_ �\>_! �! ��#�=��.�$��| �|{=�?�$` #{!��\��!��� {!�!=��:�!�@�$� {=!���> MENU/GRP �=� $!�_��$> PTT.
9
�������
����[ ��$=�$^$ ;`+��\$�+��#�!���#$!�}�� @���$ ����\�@���� #{!��\��!$` $�{>��< {!�!= � {!{�<-=��� �$�\�< {!�!=. �=� ^$�_� ��������@� �!�!$` ��@�\ � #>�{�� �$�\�_� {!�!=!.�$��| �!�!$` �$�\�< {!�!= � �{=�?�$` ���<��� #{!��\��!���:1. ��<��$� � @��� \���@�� � �|��\�$� "2CH", �!$�@
�!�@�$� {=!���> SEL/ �=� �!#$\�<{� \���@! ���<��_� #{!��\��!���. �! ��#�=�� ����=��$#� ��!?�{ ���<��_� #{!��\��!���.
2. �|��\�$� ��@�\ {!�!=! # ��@��`� {=!��� � , �!$�@ �!�@�$� {=!���> SEL/ .
3. �|��\�$� #>�{�� # ��@��`� {=!��� � , �!$�@ �!�@�$� {=!���> SEL/ .
4. �!���#$!�}�� �!?��!�$ ���<��� #{!��\��!���.�\�@�?!���: ���<��� #{!��\��!��� �� ��<#$�>�$, �#=�
�!�!$` $�$ �� ��@�\ � #>�{��, ?$� > $�{>��_� {!�!=!.
�$��| �|{=�?�$` ���<��� #{!��\��!���:�!�@�$� {=!���> MENU/GRP.�$>$;$�$� ?*\+�>���� *�\��+@�=�!���#$!�}�� TLKR T7 �#�!���! �>�{}��< _�=�#���_� >�\!�=���� ��\��!?�< (VOX), {�$�\!� @���$ �|$` �{=�?��! �=� �|{=�?��! ��=`���!$�=�@. �>�{}�� VOX ���#��?��!�$ >�\!�=���� \!��$�< \!���#$!�}�� ��� ��@��� \>{. ��\��!?! �!?��!�$#� !�$�@!$�?�#{�, {�_�! ��=`���!$�=` �!?��!�$ _���\�$` � @�{\���� \!���#$!�}�� �=� _!\��$>\| (_!\��$>\! �\���\�$!�$#� �$��=`��). �!�_��$> ��� �!��@!$` �� $\��>�$#�.�$��| �!#$\��$` �>�{}�� VOX:1. ��<��$� � @��� \���@�� � �|��\�$� "VOX". �!$�@
�!�@�$� {=!���> SEL/ . ��{>��< >\����` VOX (�¢�£. �=� 1-5) @�_!�$. �\����` "N" (�¢�£.) #=>��$ �=� �|{=�?���� �>�{}�� VOX, ! >\���� 1-5 - �=�
\�_>=�\��{� ?>�#$��$�=`��#$� �>�{}�� VOX. 2. �|��\�$� �>��|< >\����` VOX # ��@��`� {=!��� �
. �#��=`�><$� >\����` 1 � �!�@���� �>@�|� >#=�����, ! >\����` 5 - � �!���=�� �>@�|� >#=�����. �$��| �\���\�$` �|�\!��|< >\����` ?>�#$��$�=`��#$�, �!?��$� _���\�$` � @�{\����. ��_!��� ��!?{! VOX ���!?!�$, ?$� \!���#$!�}�� \!#����!=! �!� _�=�#.
3. �|<��$� �� @��� \���@��.�\�@�?!���: ��_�! # @�@��$! �!?!=! ��\��!?� � \���@�
VOX �\�����$ 60 #�{>��, ��>?�$ $��, �\��>�\���!���< �� �#$�?���� �\�@��� ��\��!?�, � ��!?�{ @�_!�$ � $�?���� 5 #�{>��.
�?�`|�# [$��<$\��^+ *$[�����#�$! �>�{}�� �����=��$ �#��=`���!$` ��� \!���#$!�}�� TLKR T7, ?$��| �� ����_� ��@������ #=���$` �! ��>{!@� � �\>_�@ ��@������. �!���#$!�}��, >#$!���=���!� � �\>_�@ ��@������, >=!�=��!�$ _�=�#! �=� �\>_�� �>@| (� �!��#�@�#$� �$ �!�!���_� �!@� >\���� ?>�#$��$�=`��#$�) � ��\��!�$ �� �! �!�> \!���#$!�}�� ��� �!�!$�� $!�_��$| PTT. � \���@� @���$�\��_! ��@������ \!���#$!�}�� �� @���$ �\���@!$` �|���|.�$��| �{=�?�$` @���$�\��_ ��@������:1. ��<��$� � @��� \���@�� � �|��\�$� "ROOM". �!$�@
�!�@�$� {=!���> SEL/ .2. �|��\�$� �>��|< >\����` ?>�#$��$�=`��#$� # ��@��`�
{=!��� � . �#��=`�><$� >\����` 1 � �!�@���� �>@�|� >#=�����, ! >\����` 5 - � �!���=�� �>@�|� >#=�����.
3. �!�@�$� {=!���> SEL/ �=� �{=�?���� @���$�\��_! ��@������.
�$��| �|{=�?�$` @���$�\��_ ��@������:�!�@�$� {=!���> MENU/GRP.
10
�������
�\�[�@+���:- � \���@� @���$�\��_! ��@������ $!�_��$! ��� ��
��<#$�>�$. �\� �� �!�!$�� ��>?�$ $�� ����{�.- ¡#=� _�=�# �=� �>@ � ��@������ ��>?�$ ��=`�� 60
#�{>��, \!���#$!�}�� �\�\|�!�$ @���$�\��_ �! 5 #�{>��, �!$�@ ��������=��$ �_�.
�$�{ �{&$�+� \!���#$!�}�� TLKR T7 �@��$#� �|��\ 10 $���� �|���!, {�$�\|� ��\��!�$#� �\� �!�!$�� {=!���� � ��\@!=`��@ \���@�.�$��| �|�\!$` $�� �|���!:1. ��<��$� � @��� \���@�� � �|��\�$� "TONE". �!$�@
�!�@�$� {=!���> SEL/ , � $�{>��< ��@�\ $��! �|���! (1-5).
2. �|��\�$� �>��|< ��@�\ $��! �|���! # ��@��`� {=!��� � . ���$��$#$�>���� $��| �>�>$ ��>?!$` ��
���!@�{!.3. �|<��$� �� @��� \���@��.�=� ��\��!?� �|�\!���_� $��! �|���! �!�@�$� {=!���>
� ��\@!=`��@ \���@�. �|�\!��|< $�� �>��$ !�$�@!$�?�#{� ��\��!�!$`#� � $�?���� ��{#�\��!���_� �\�@���. ��� �|���! #�\!#|�!�$#� �\� �!�!$�� $!�_��$| PTT.
��;�?[�{= \���[� ��#�>@��@ \���@� ��>{���� ���������� � ��#$>�!���� �|���!� �$#>$#$�>�$. �!���#$!�}�� ������!�$ � ��#$>�=���� �|���! @�_!���@ ���#��${� ��#�=��.¡#=� �| �� �$��?!�$� �! �|���, $� ���#��${! �|{=�?!�$#�, ! ��!?�{ �|���! @�_!�$ �� �\�{\!����� #�_�!=!.�!���#$!�}�� $!{�� �����#$�$ �!# ���\!}��< � �\��>�����@ �|����.�\� ��\��!?�, �\��@� �=� �!�!$�� =���< {=!���� ��#�>@�|< \���@ �|{=�?!�$#� �! 15 #�{>��.�$��| �{=�?�$` �=� �|{=�?�$` ��#�>@�|< \���@:1. ��<��$� � @��� \���@�� � �|��\�$� "SLNT". �!$�@
�!�@�$� {=!���> SEL/ .2. �$��| �{=�?�$` ��#�>@�|< \���@, �!�@�$� {=!���>
. �! ����{!$�\� {!�!=! �$��\!�!�$#� �>{�! "Y". ����=��$#� ��!?�{ ��#�>@��_� \���@!.
3. �$��| �|{=�?�$` ��#�>@�|< \���@, �!�@�$� {=!���> . �! ����{!$�\� {!�!=! �$��\!�!�$#� �>{�! "N".
��!?�{ ��#�>@��_� \���@! �#?��!�$.
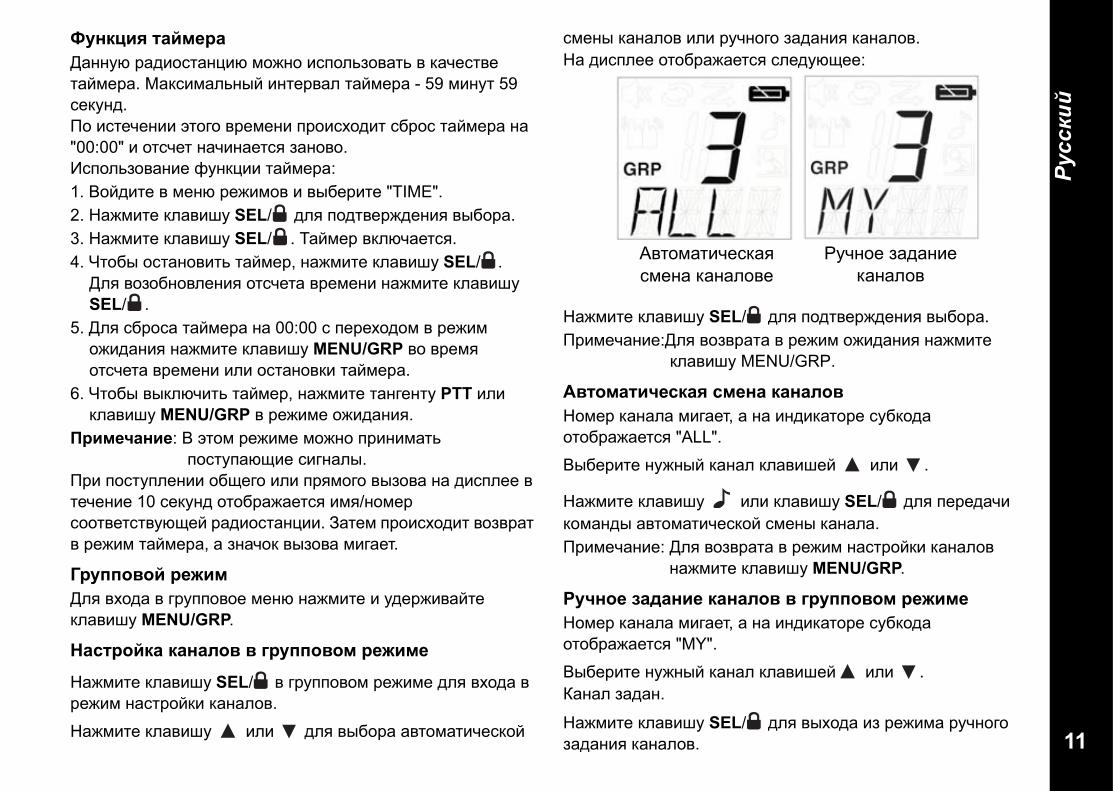
11
�������
�?�`|�# <+=[�\+ �!��>� \!���#$!�}�� @���� �#��=`���!$` � {!?�#$�� $!<@�\!. �!{#�@!=`�|< ��$�\�!= $!<@�\! - 59 @��>$ 59 #�{>��.�� �#$�?���� ^$�_� �\�@��� �\��#����$ #�\�# $!<@�\! �! "00:00" � �$#?�$ �!?��!�$#� �!����.�#��=`���!��� �>�{}�� $!<@�\!:1. ��<��$� � @��� \���@�� � �|��\�$� "TIME".2. �!�@�$� {=!���> SEL/ �=� ���$��\������ �|��\!.3. �!�@�$� {=!���> SEL/ . �!<@�\ �{=�?!�$#�.4. �$��| �#$!����$` $!<@�\, �!�@�$� {=!���> SEL/ .
�=� ��������=���� �$#?�$! �\�@��� �!�@�$� {=!���> SEL/ .
5. �=� #�\�#! $!<@�\! �! 00:00 # ��\�����@ � \���@ ����!��� �!�@�$� {=!���> MENU/GRP �� �\�@� �$#?�$! �\�@��� �=� �#$!���{� $!<@�\!.
6. �$��| �|{=�?�$` $!<@�\, �!�@�$� $!�_��$> PTT �=� {=!���> MENU/GRP � \���@� ����!���.
�\�[�@+���: � ^$�@ \���@� @���� �\���@!$` ��#$>�!���� #�_�!=|.
�\� ��#$>�=���� ����_� �=� �\�@�_� �|���! �! ��#�=�� � $�?���� 10 #�{>�� �$��\!�!�$#� �@�/��@�\ #��$��$#$�>���< \!���#$!�}��. �!$�@ �\��#����$ ����\!$ � \���@ $!<@�\!, ! ��!?�{ �|���! @�_!�$.
�\?**$�$= \���[�=� ����! � _\>������ @��� �!�@�$� � >��\���!<$� {=!���> MENU/GRP.
�+;<\$=`+ `+�+>$� � ^\?**$�$[ \���[�
�!�@�$� {=!���> SEL/ � _\>�����@ \���@� �=� ����! � \���@ �!#$\�<{� {!�!=��.
�!�@�$� {=!���> �=� �=� �|��\! !�$�@!$�?�#{�<
#@��| {!�!=�� �=� \>?��_� �!�!��� {!�!=��.�! ��#�=�� �$��\!�!�$#� #=��>����:
�!�@�$� {=!���> SEL/ �=� ���$��\������ �|��\!.�\�@�?!���:�=� ����\!$! � \���@ ����!��� �!�@�$�
{=!���> MENU/GRP.
��<$[+<�@�;`+# ;[��+ `+�+>$���@�\ {!�!=! @�_!�$, ! �! ����{!$�\� #>�{��! �$��\!�!�$#� "ALL".
�|��\�$� �>��|< {!�!= {=!����< �=� .
�!�@�$� {=!���> �=� {=!���> SEL/ �=� ��\��!?� {�@!��| !�$�@!$�?�#{�< #@��| {!�!=!.�\�@�?!���: �=� ����\!$! � \���@ �!#$\�<{� {!�!=��
�!�@�$� {=!���> MENU/GRP.
�?@�$� &+�+��� `+�+>$� � ^\?**$�$[ \���[���@�\ {!�!=! @�_!�$, ! �! ����{!$�\� #>�{��! �$��\!�!�$#� "MY".
�|��\�$� �>��|< {!�!= {=!����< �=� .�!�!= �!�!�.
�!�@�$� {=!���> SEL/ �=� �|���! �� \���@! \>?��_� �!�!��� {!�!=��.
�>?��� �!�!��� {!�!=��
��$�@!$�?�#{!� #@��! {!�!=��e
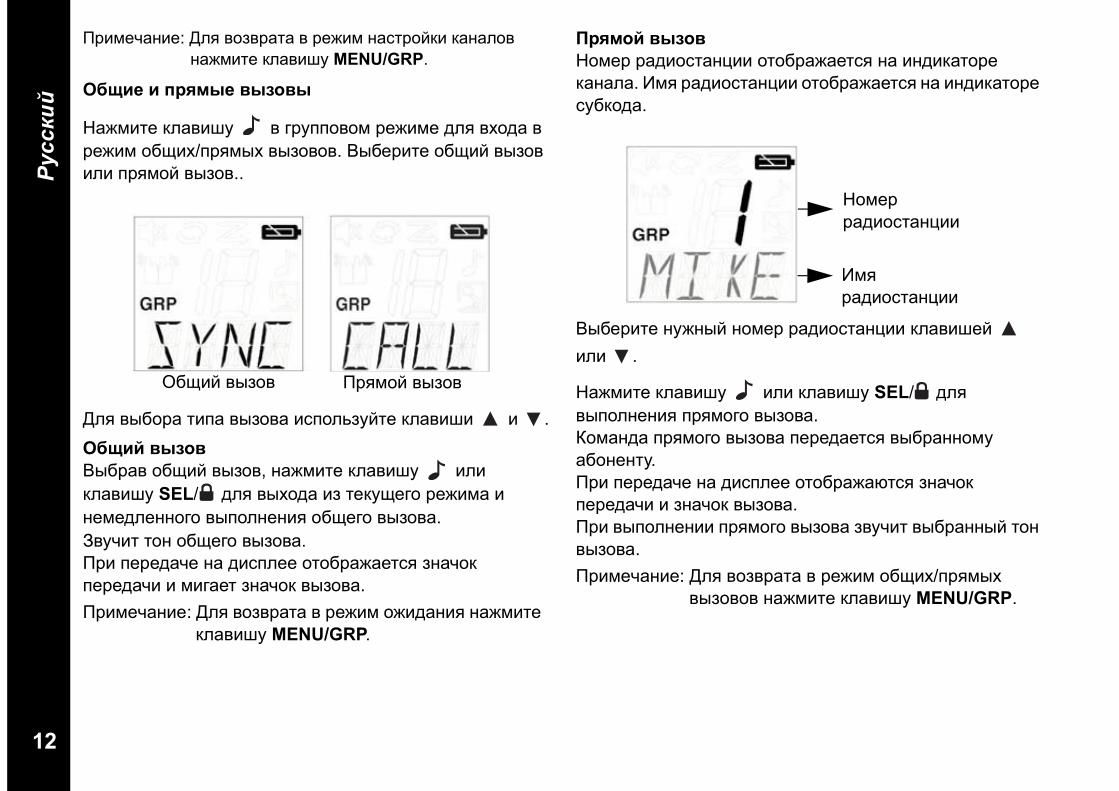
12
�������
�\�@�?!���: �=� ����\!$! � \���@ �!#$\�<{� {!�!=�� �!�@�$� {=!���> MENU/GRP.
�%��� � *\#[{� �{&$�{
�!�@�$� {=!���> � _\>�����@ \���@� �=� ����! � \���@ �����/�\�@|� �|�����. �|��\�$� ����< �|��� �=� �\�@�< �|���..
�=� �|��\! $��! �|���! �#��=`�><$� {=!���� � .�%��= �{&$��|�\!� ����< �|���, �!�@�$� {=!���> �=� {=!���> SEL/ �=� �|���! �� $�{>��_� \���@! � ��@��=����_� �|��=����� ����_� �|���!.��>?�$ $�� ����_� �|���!.�\� ��\��!?� �! ��#�=�� �$��\!�!�$#� ��!?�{ ��\��!?� � @�_!�$ ��!?�{ �|���!.�\�@�?!���: �=� ����\!$! � \���@ ����!��� �!�@�$�
{=!���> MENU/GRP.
�\#[$= �{&$���@�\ \!���#$!�}�� �$��\!�!�$#� �! ����{!$�\� {!�!=!. �@� \!���#$!�}�� �$��\!�!�$#� �! ����{!$�\� #>�{��!.
�|��\�$� �>��|< ��@�\ \!���#$!�}�� {=!����< �=� .
�!�@�$� {=!���> �=� {=!���> SEL/ �=� �|��=����� �\�@�_� �|���!.��@!��! �\�@�_� �|���! ��\��!�$#� �|�\!���@> !�����$>.�\� ��\��!?� �! ��#�=�� �$��\!�!�$#� ��!?�{ ��\��!?� � ��!?�{ �|���!.�\� �|��=����� �\�@�_� �|���! ��>?�$ �|�\!��|< $�� �|���!.�\�@�?!���: �=� ����\!$! � \���@ �����/�\�@|�
�|����� �!�@�$� {=!���> MENU/GRP.
����< �|��� �\�@�< �|���
��@�\ \!���#$!�}��
�@� \!���#$!�}��
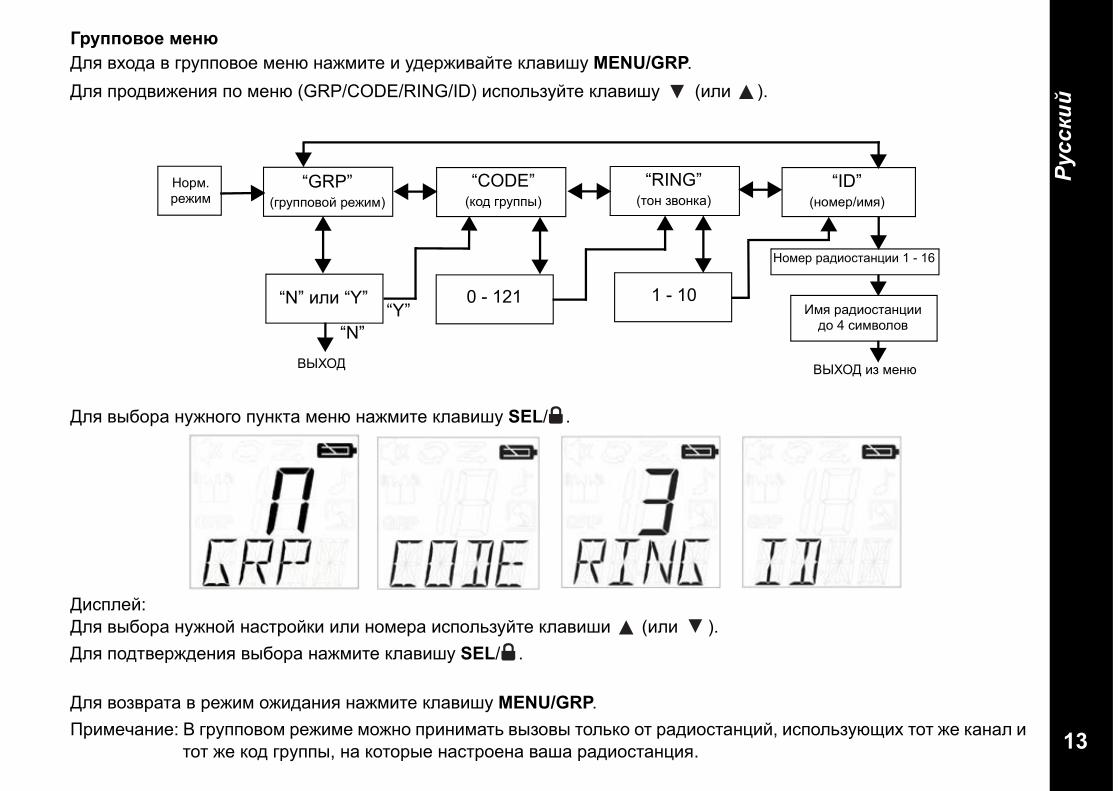
13
�������
�\?**$�$� [����=� ����! � _\>������ @��� �!�@�$� � >��\���!<$� {=!���> MENU/GRP.�=� �\��������� �� @��� (GRP/CODE/RING/ID) �#��=`�><$� {=!���> (�=� ).
�=� �|��\! �>���_� �>�{$! @��� �!�@�$� {=!���> SEL/ .
��#�=�<:�=� �|��\! �>���< �!#$\�<{� �=� ��@�\! �#��=`�><$� {=!���� (�=� ). �=� ���$��\������ �|��\! �!�@�$� {=!���> SEL/ .
�=� ����\!$! � \���@ ����!��� �!�@�$� {=!���> MENU/GRP.�\�@�?!���: � _\>�����@ \���@� @���� �\���@!$` �|���| $�=`{� �$ \!���#$!�}�<, �#��=`�>���� $�$ �� {!�!= �
$�$ �� {�� _\>��|, �! {�$�\|� �!#$\���! �!�! \!���#$!�}��.
��\@.\���@
“GRP”(_\>�����< \���@)
“CODE”({�� _\>��|)
“ID” (��@�\/�@�)
��@�\ \!���#$!�}�� 1 - 16
0 - 121 1 - 10
�¢~��
�@� \!���#$!�}�� �� 4 #�@��=��
“N” �=� “Y”
“N”“Y”
�¢~�� �� @���
“RING”($�� ����{!)
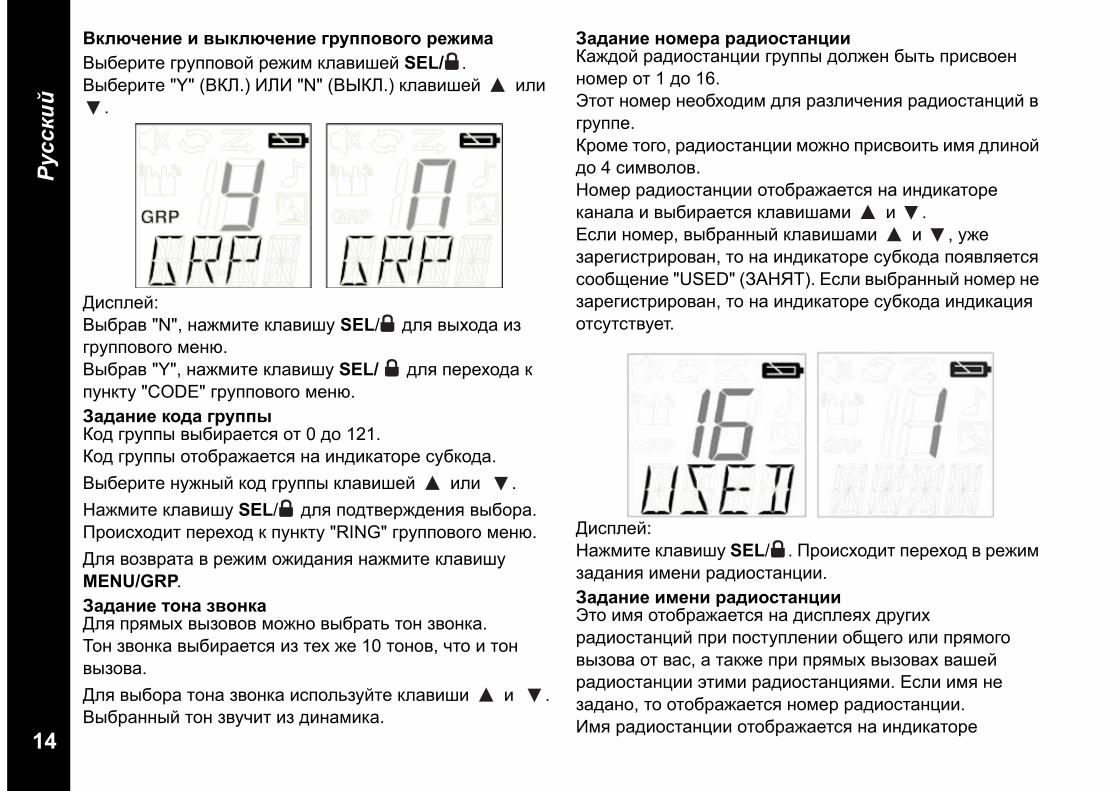
14
�������
~`>�@���� � �{`>�@���� ^\?**$�$^$ \���[+�|��\�$� _\>�����< \���@ {=!����< SEL/ . �|��\�$� "Y" (��£.) �£� "N" (�¢�£.) {=!����< �=�
.
��#�=�<:�|�\!� "N", �!�@�$� {=!���> SEL/ �=� �|���! �� _\>�����_� @���.�|�\!� "Y", �!�@�$� {=!���> SEL/ �=� ��\����! { �>�{$> "CODE" _\>�����_� @���.�+�+��� `$�+ ^\?**{ ��� _\>��| �|��\!�$#� �$ 0 �� 121.��� _\>��| �$��\!�!�$#� �! ����{!$�\� #>�{��!.�|��\�$� �>��|< {�� _\>��| {=!����< �=� .�!�@�$� {=!���> SEL/ �=� ���$��\������ �|��\!. �\��#����$ ��\���� { �>�{$> "RING" _\>�����_� @���.�=� ����\!$! � \���@ ����!��� �!�@�$� {=!���> MENU/GRP.�+�+��� <$�+ &�$�`+�=� �\�@|� �|����� @���� �|�\!$` $�� ����{!.��� ����{! �|��\!�$#� �� $�� �� 10 $����, ?$� � $�� �|���!.�=� �|��\! $��! ����{! �#��=`�><$� {=!���� � .�|�\!��|< $�� ��>?�$ �� ���!@�{!.
�+�+��� �$[�\+ \+��$;<+�|���!���< \!���#$!�}�� _\>��| ��=��� �|$` �\�#���� ��@�\ �$ 1 �� 16.�$�$ ��@�\ ��������@ �=� \!�=�?���� \!���#$!�}�< � _\>���.�\�@� $�_�, \!���#$!�}�� @���� �\�#���$` �@� �=���< �� 4 #�@��=��. ��@�\ \!���#$!�}�� �$��\!�!�$#� �! ����{!$�\� {!�!=! � �|��\!�$#� {=!���!@� � . ¡#=� ��@�\, �|�\!��|< {=!���!@� � , >�� �!\�_�#$\�\��!�, $� �! ����{!$�\� #>�{��! ����=��$#� #�������� "USED" (���¤�). ¡#=� �|�\!��|< ��@�\ �� �!\�_�#$\�\��!�, $� �! ����{!$�\� #>�{��! ����{!}�� �$#>$#$�>�$.
��#�=�<:�!�@�$� {=!���> SEL/ . �\��#����$ ��\���� � \���@ �!�!��� �@��� \!���#$!�}��.�+�+��� �[��� \+��$;<+�|���$� �@� �$��\!�!�$#� �! ��#�=��� �\>_�� \!���#$!�}�< �\� ��#$>�=���� ����_� �=� �\�@�_� �|���! �$ �!#, ! $!{�� �\� �\�@|� �|���!� �!��< \!���#$!�}�� ^$�@� \!���#$!�}��@�. ¡#=� �@� �� �!�!��, $� �$��\!�!�$#� ��@�\ \!���#$!�}��.�@� \!���#$!�}�� �$��\!�!�$#� �! ����{!$�\�
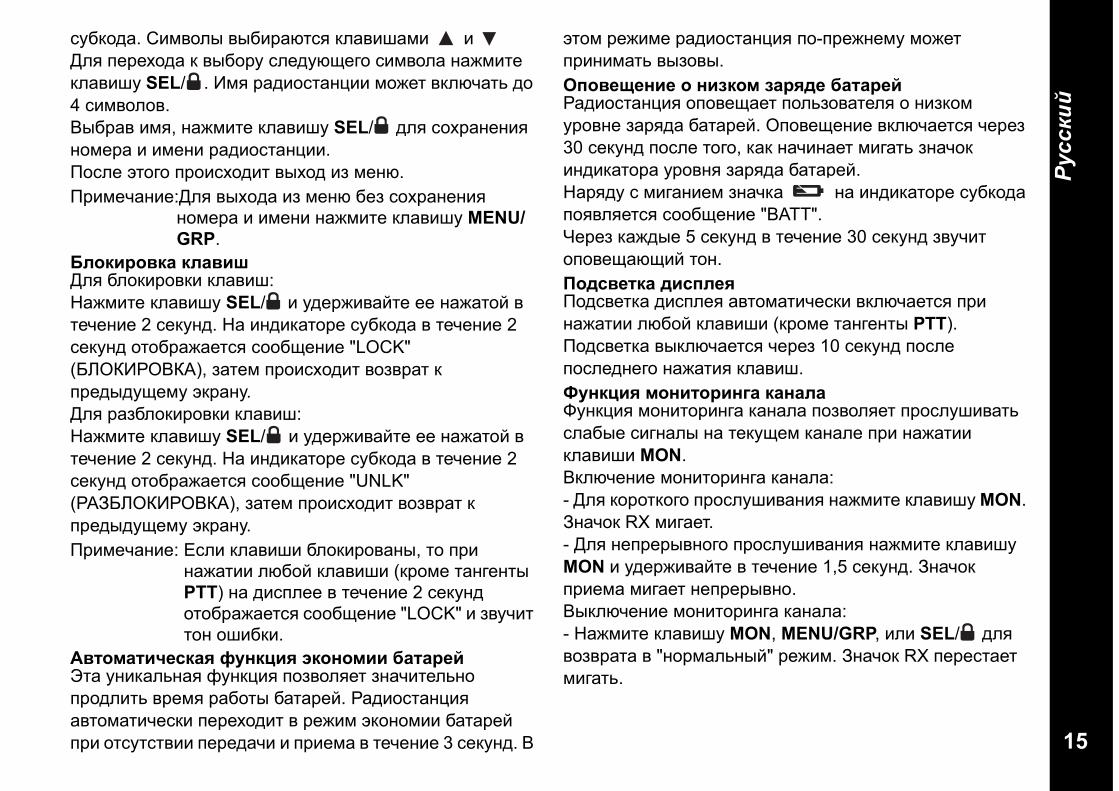
15
�������
#>�{��!. ��@��=| �|��\!�$#� {=!���!@� � �=� ��\����! { �|��\> #=��>���_� #�@��=! �!�@�$� {=!���> SEL/ . �@� \!���#$!�}�� @���$ �{=�?!$` �� 4 #�@��=��.�|�\!� �@�, �!�@�$� {=!���> SEL/ �=� #��\!����� ��@�\! � �@��� \!���#$!�}��. ��#=� ^$�_� �\��#����$ �|��� �� @���.�\�@�?!���:�=� �|���! �� @��� ��� #��\!�����
��@�\! � �@��� �!�@�$� {=!���> MENU/GRP.
�>$`�\$�`+ `>+����=� �=�{�\��{� {=!���:�!�@�$� {=!���> SEL/ � >��\���!<$� �� �!�!$�< � $�?���� 2 #�{>��. �! ����{!$�\� #>�{��! � $�?���� 2 #�{>�� �$��\!�!�$#� #�������� "LOCK" (�£��������), �!$�@ �\��#����$ ����\!$ { �\��|�>��@> ^{\!�>. �=� \!��=�{�\��{� {=!���:�!�@�$� {=!���> SEL/ � >��\���!<$� �� �!�!$�< � $�?���� 2 #�{>��. �! ����{!$�\� #>�{��! � $�?���� 2 #�{>�� �$��\!�!�$#� #�������� "UNLK" (����£��������), �!$�@ �\��#����$ ����\!$ { �\��|�>��@> ^{\!�>.�\�@�?!���: ¡#=� {=!���� �=�{�\��!�|, $� �\�
�!�!$�� =���< {=!���� ({\�@� $!�_��$| PTT) �! ��#�=�� � $�?���� 2 #�{>�� �$��\!�!�$#� #�������� "LOCK" � ��>?�$ $�� ����{�.
��<$[+<�@�;`+# �?�`|�# ]`$�$[�� %+<+\�=�$! >��{!=`�!� �>�{}�� �����=��$ ��!?�$�=`�� �\��=�$` �\�@� \!��$| �!$!\�<. �!���#$!�}�� !�$�@!$�?�#{� ��\�����$ � \���@ ^{���@�� �!$!\�< �\� �$#>$#$��� ��\��!?� � �\��@! � $�?���� 3 #�{>��. �
^$�@ \���@� \!���#$!�}�� ��-�\����@> @���$ �\���@!$` �|���|.�*$������� $ ��&`$[ &+\#�� %+<+\�= �!���#$!�}�� ������!�$ ��=`���!$�=� � ���{�@ >\���� �!\��! �!$!\�<. ���������� �{=�?!�$#� ?�\�� 30 #�{>�� ��#=� $�_�, {!{ �!?��!�$ @�_!$` ��!?�{ ����{!$�\! >\���� �!\��! �!$!\�<.�!\��> # @�_!���@ ��!?{! �! ����{!$�\� #>�{��! ����=��$#� #�������� "BATT".��\�� {!��|� 5 #�{>�� � $�?���� 30 #�{>�� ��>?�$ ������!���< $��.�$�;��<`+ ��;*>�#���#��${! ��#�=�� !�$�@!$�?�#{� �{=�?!�$#� �\� �!�!$�� =���< {=!���� ({\�@� $!�_��$| ���). ���#��${! �|{=�?!�$#� ?�\�� 10 #�{>�� ��#=� ��#=����_� �!�!$�� {=!���.�?�`|�# [$��<$\��^+ `+�+>+�>�{}�� @���$�\��_! {!�!=! �����=��$ �\�#=>���!$` #=!�|� #�_�!=| �! $�{>��@ {!�!=� �\� �!�!$�� {=!���� MON.�{=�?���� @���$�\��_! {!�!=!:- �=� {�\�${�_� �\�#=>���!��� �!�@�$� {=!���> MON. ��!?�{ RX @�_!�$.- �=� ���\�\|���_� �\�#=>���!��� �!�@�$� {=!���> MON � >��\���!<$� � $�?���� 1,5 #�{>��. ��!?�{ �\��@! @�_!�$ ���\�\|���.�|{=�?���� @���$�\��_! {!�!=!:- �!�@�$� {=!���> MON, MENU/GRP, �=� SEL/ �=� ����\!$! � "��\@!=`�|<" \���@. ��!?�{ RX ��\�#$!�$ @�_!$`.

16
�������
�����@�;`�� �+��{� �+%>�|+ @+;<$< (��|)
��\�@��_ ��$%\���{� �`;�;;?+\$��=� �\���\�$���� #=��>���� !{#�##>!\�� ��\!�!<$�#` { ��=�\> �=� �\���\��$�� \����?��< $�\_��=�.
��#=� {!�!=�� 8 {!�!=�� PMR
��#=� #>�{���� 121 (38 {���� CTCSS � 83 {��! DCS)
�!��?!� ?!#$�$! 446,00625 - 446,09375 ��}
�#$�?��{ ��$!���
�=�{ ��{�=`-@�$!==-_��\���|� !{{>@>=�$�\�|� �!$!\�< AAA
4 ��=�?�|� �!$!\�� AAA (�� �����$ � {�@�=�{$ ��#$!�{�)
�!��># ��<#$���
�� 10 {@
��#>\# �!$!\�< 20 ?!#�� ($��.) - ��=�?�|� �!$!\��
(\!��?�< }�{= 5/5/90)
18 ?!#�� ($��.) - ��{�=`-@�$!==-_��\���|�
�!$!\�� (\!��?�< }�{= 5/5/90)
�+�. �+;<.
1 446,00625
2 446,01875
3 446,03125
4 446,04375
5 446,05625
6 446,06875
7 446,08125
8 446,09375
� �&��>�# *$ `+<+>$^? Motorola
�*�;+���
00275 �!��=` !�$�@���=`��_� �!\����_� >#$\�<#$�! �=� TLKR-
T5/T700276 �!\����� >#$\�<#$�� �=� TLKR-
T5/T7 (¡�)00277 �!\����� >#$\�<#$�� �=�
TLKR-T5/T7 (��=�{��\�$!���)00278 �!$!\�� �=� TLKR-T5/T7
00279 ���#��< �!��@ �=� TLKR-T5/T7
00174 �!>���{
00179 �!\��$>\!
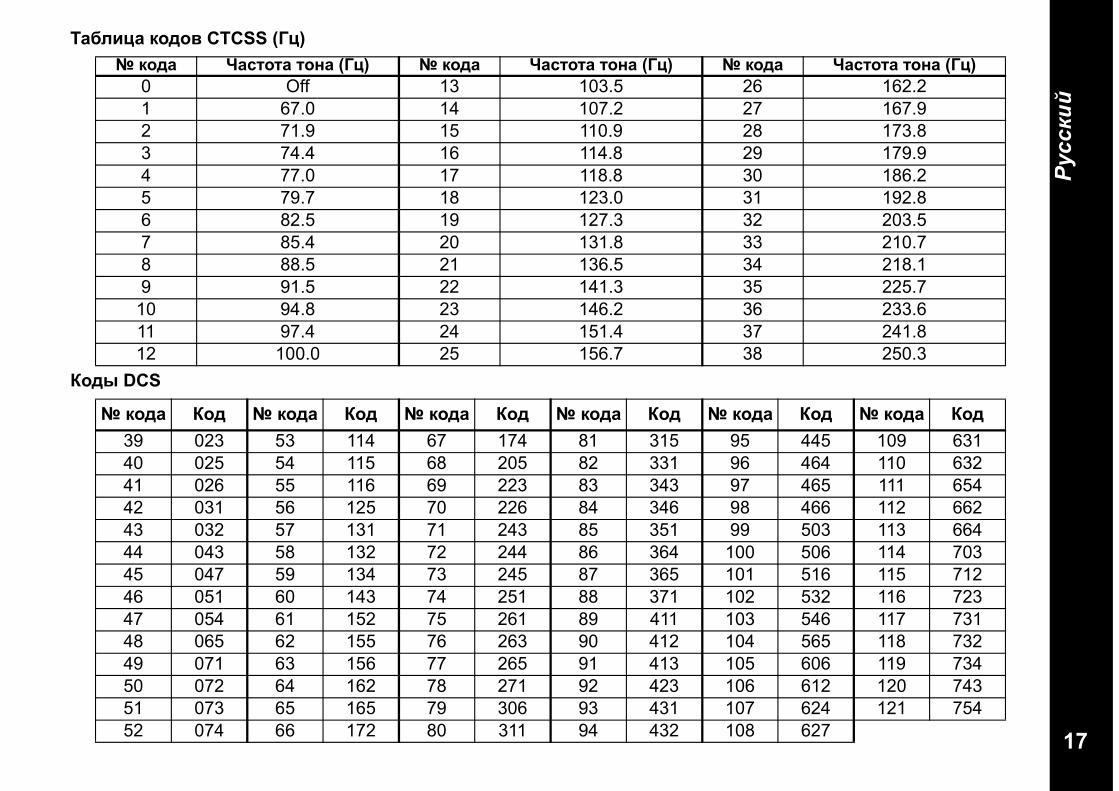
17
�������
�+%>�|+ `$�$� CTCSS (�|)
�$�{ DCS
� `$�+ �+;<$<+ <$�+ (�|) � `$�+ �+;<$<+ <$�+ (�|) � `$�+ �+;<$<+ <$�+ (�|)0 Off 13 103.5 26 162.21 67.0 14 107.2 27 167.92 71.9 15 110.9 28 173.83 74.4 16 114.8 29 179.94 77.0 17 118.8 30 186.25 79.7 18 123.0 31 192.86 82.5 19 127.3 32 203.57 85.4 20 131.8 33 210.78 88.5 21 136.5 34 218.19 91.5 22 141.3 35 225.7
10 94.8 23 146.2 36 233.611 97.4 24 151.4 37 241.812 100.0 25 156.7 38 250.3
� `$�+ �$� � `$�+ �$� � `$�+ �$� � `$�+ �$� � `$�+ �$� � `$�+ �$�39 023 53 114 67 174 81 315 95 445 109 63140 025 54 115 68 205 82 331 96 464 110 63241 026 55 116 69 223 83 343 97 465 111 65442 031 56 125 70 226 84 346 98 466 112 66243 032 57 131 71 243 85 351 99 503 113 66444 043 58 132 72 244 86 364 100 506 114 70345 047 59 134 73 245 87 365 101 516 115 71246 051 60 143 74 251 88 371 102 532 116 72347 054 61 152 75 261 89 411 103 546 117 73148 065 62 155 76 263 90 412 104 565 118 73249 071 63 156 77 265 91 413 105 606 119 73450 072 64 162 78 271 92 423 106 612 120 74351 073 65 165 79 306 93 431 107 624 121 75452 074 66 172 80 311 94 432 108 627
18
�������
�+\+�<�=�+# ���$\[+|�#� _!\!�$�<�|@� �\�$�����@� � �=� �|��=����� _!\!�$�<��_� ��#=>���!��� ��\!�!<$�#` { ���}�!=`��@> ��=�\> {�@�!��� ��$�\�=! �=� �! �\���\��$�� \����?��< $�\_��=�, _�� �| �\���\�=� \!���#$!�}�� ��$�\�=! �/�=� ��\@���|� !{#�##>!\|.�=� ��=>?���� _!\!�$�<��_� ��#=>���!��� ��\��$� \!���#$!�}�� ��=�\> �=� �! �\���\��$�� \����?��< $�\_��=�. �� �$�\!�=�<$� \!���#$!�}�� � !�\�# ��\@| ��$�\�=!.�=� ��=>?���� _!\!�$�<��_� ��#=>���!��� ��������@� �\��¥���$` ��{>@��$ � ��{>�{� # �!$�< ��{>�{�. �! \!���#$!�}�� ��=��� �|$` ?�${� ����� #�\�<�|< ��@�\. �!\!�$�<�|� �\�$����� �� �\���@!�$#�, �#=� $�� �=� #�\�<�|< ��@�\ �! \!���#$!�}�� �|= ��@����, >�!=�� �=� ��\!���\?��.�<$ �� *$`\{�+�<;# ^+\+�<��=����{$| �=� ���\������� � \��>= $̀!$� ���$!$��_� �#��=`���!��� ����=�� �=� ���|��=����� ��#$\>{}�<, �\�������|� � �!���@ \>{����#$��.����{$| �=� ���\������� � \��>= $̀!$� ���\!��=`��_� �#��=`���!���, ��#?!#$��_� #=>?!� �=� ���\����#$�.����{$| �=� ���\������� � \��>= $̀!$� ���\!��=`��_� $�#$�\��!���, ^{#�=>!$!}��, ��#=>���!���, \�_>=�\���{ �=� ���#���|� ��@�����< �=� @�����{!}�< =���_� \��!.��=�@{� �=� ���\������� !�$���, �! �#{=�?����@ ��=�@�{ �=� ���\������<, �������#� �\�@|@ #=��#$���@ ����{$! @!$�\�!=�� �=� ��_�$��=����.����=��, \!���\!��|� �=� �$\�@��$�\��!��|� $!{�@ ��\!��@, ?$� �#=��#$��� $!{�< \!���\{� �=� \�@��$! \��{� >�>���=�#` {!?�#$�� \!��$| ����=�� �=� #$!= �����@���|@ ��\@!=`�|< �#@�$\ � $�#$�\��!��� �=� �\���\{� #�\!���=���#$� _!\!�$�<�|� �\�$����<. ����{$| �=� ���\������� ��-�! ���\!��=`��_� \!##$����� @���> \!���#$!�}��@�.����{$| �=� ���\������� ��-�! ���!�!��� �=!_� �=� ���{�#$�.�#� �=!#$�{��|� ����\���#$� � �\>_�� �!\>��|� �${\|$|�
?!#$�, ��}!\!�!��|� �=� ���\������|� � \��>= $̀!$� ��\@!=`��_� �#��=`���!���.����=��, ���$|� �!�\�{!$.��\����?�#{�� ��#=>���!��� � \�@��$ �=� �!@��! ?!#$�<, $\��>����#� � \��>= $̀!$� ��\@!=`��_� �#��=`���!��� � ����#!.
���$\[+|�# $% +�<$\;`$[ *\+�����#!��|� � �!���@ \>{����#$�� ����=�� ��\@| ��$�\�=! @�_>$ #���\�!$` �!������|� !�$�\#{�@� �\!�!@� �\�_\!@@| ��\@| ��$�\�=!, �\!�����#� �! ��=>�\������{��|� �� �=� �\>_�� ��#�$�=��. �!{��| ���������|� ¦$!$�� �@�\�{� � ��{�$�\|� �\>_�� #$\!� �!���!�$ ��{�$�\|� �#{=�?�$�=`�|� �\!�! {�@�!��� ��$�\�=! � �$������� �!������|� !�$�\#{�@ �\!��@ �\�_\!@@, �{=�?!� �\!�� �! {���\��!��� � ��#�\���������� � =���< ��\@� �!������|� !�$�\#{�@ �\!��@ {�@�`�$�\�|� �\�_\!@@.� #���� # ^$�@ ��{!{�� {�@�`�$�\�|� �\�_\!@@| ��\@| ��$�\�=!, #���\�!���#� � ����=��� ��$�\�=!, ���#!��|� � �!#$����@ \>{����#$��, �� \!�\��!�$#� {���\��!$` �=� ��#�\�������$` {!{�@ �| $� �� �|=� ��|@ #��#���@ ��� ����_� ��#`@����_� \!�\������ ��\@| ��$�\�=!. �\�@� $�_�, ��{>�{! ����=�< ��$�\�=! �� �!�$ ��{!{�� ���|� �=� ���\!�>@��!�@|� �\!� �=� �\!� �! =�}�����, �!�\�@�\ �� ���\!�>@��!�$ �${!�! �=!��=`}�� �$ #���� �\!� � $.�., � �$������� !�$�\#$�!, �!$��$�� �=� �!���{ �! �!$��$| {�@�!��� ��$�\�=!, �! �#{=�?����@ ��|?�|� �� �#{=�?�$�=`�|� �\!� �! ������@����>� =�}����� �! �#��=`���!��� ^$�� ����=�< #�_=!#�� �!{��!@ � �\��!�� ����=�<.
MOTOROLA, #$�=����!��|< =�_�$�� "M" � �\>_�� >��@��>$|� ���#` $��!\�|� ��!{� {�@�!��� Motorola, Inc., ® (�!\�_�#$\�\��!�� � ����@#$�� �!$��$�� � $��!\�|� ��!{�� �¦�).
© Motorola, Inc. 2008


@6864257V01@UTZZ01035AZ(0)
and Motorola are registered trademarks of Motorola, Inc.© 2008 by Motorola, Inc. All Rights Reserved.
6864257V01