Safety and Regulatory Informaion Package Contents
2
Package Contents Lieferumfang / Contenu de l'emballage / Комплект поставки / Przewodnik użytkownika Paket İçeriği Getng familiar with your unit Kennenlernen Ihres Geräts / Découvrez votre unité / Первое знакомство с устройством / Prezentacja zestawu / Cihazınızı daha iyi tanıyın 1 x VESA Mount Bracket & 6 x Screws - 1 x VESA-Halterung & 6 x Schrauben - 1 x support VESA et ses 6 vis - 1 крепление VESA и 6 винтов - 1 zestaw montażowy VESA i 6 śrub mocujących - 1 x VESA Montaj Desteği & 6 x Vida GB-BXBT x 1 - NOT Include any of the following: 2.5” HDD, SO-DIMM memory - Folgende Artkel sind NICHT enthalten: 2,5 "HDD, SO-DIMM-Speicher - Composants non inclus: Disque Dur 2.5", Mémoire SO-DIMM - Следующие позиции не включенеы в комплект поставки: 2,5-дюйм накопитель, SO-DIMM модули ОЗУ - Zestaw nie zawiera: 2.5" HDD, pamieci SO-DIMM - Şunlar dahil değildir : 2.5” HDD, SO-DIMM hafza Quick Start Guide - Schnellstartanleitung - Guide de démarrage rapide - Руководство по быстрой сборке - Instrukcja użytkownika - Hızlı Başlangıç Kılavuzu Driver CD x 1 - Treiber-CD x 1 - CD de drivers x 1 - Диск с драйверами - Płyta CD ze sterownikami - Sürücü CD x 1 BRIX Ultrakompakt-PC-Set / Kit PC ultra compact BRIX Ультракомпактный ПК BRIX / BRIX - Kompaktowy zestaw PC BRIX Ultra Compact PC Kit Quick Start Guide Schnellstartanleitung / Guide de démarrage rapide / Руководство по быстрой сборке Przewodnik użytkownika / Hızlı Başlangıç Kılavuzu BRIX Ultra Compact PC Kit Safety and Regulatory Informaton Informatonen zur Sicherheit und zu gesetzlichen Vorschrifen / Informatons sur la sécurité et les réglementatons / Безопасность и нормативная информация Informacje dotyczące bezpiecznego użytkowania / Güvenlik ve Düzenleme Bilgisi Wall-mount adapter x 1 - Adapter fuer Wandhalterung x 1 - Support mural inclus x 1 - Приспособление для крепления устройства на стене x 1 - Adapter do montażu na ścianie x 1 - Duvar bağlant aparat x 1 A. Wireless Module: How to Safely Remove the Module Wireless-Modul: Das sichere enternen des Moduls / Module sans fil : Comment retrer le module en toute sécurité / Модуль беспроводной связи: Как безопасно удалить модуль Moduł bezprzewodowy: Jak bezpieczne usunąć moduł. / Kablosuz Modülü : Modülü Nasıl Güvenli Kaldırabilirim 1 Disconnect the two antenna by manually lifing off the clips that hold them in place 2 Remove the screw in the lef corner 3 Carefully pull the wireless module from the slot Support Unterstützung / Assistance / Техническая поддержка / Wsparcie / Destek Risk of explosion if the batery is replaced with an incorrect type. Bateries should be recycled where possible. Disposal of used Bateries must be in accordance with local environmental regulatons. Failure to use the included Model GB-BXBT Power Adapter may violate regulatory compliance and may expose the user to safety hazards. Es besteht Explosionsgefahr, wenn die Baterie durch einen falschen Typ ersetzt wird. Baterien müssen recycelt werden, sofern möglich. Gebrauchte Baterien müssen gemäß den örtlichen Umweltschutzvorschrifen entsorgt werden. Die Nichtbenutzung des mitgelieferten Netzteils Modell GB-BXBT könnte eine Einhaltung gesetzlicher Vorschrifen nicht mehr gewährleisten und für den Benutzer zu einem Sicherheitsrisiko werden. Risque d’explosion si la baterie n’est pas du bon type. Les piles doivent être recyclées quand cela est possible. Le rejet des bateries usagées doit être effectué en foncton des réglementatons locales. Un manquement à l'utlisaton de l'adaptateur d'alimentaton du GB-BXBT peut être en infracton avec des réglementatons et vous exposer à des dangers. Характеристики батареи отличные от оригинальных могут привести к разрушению корпуса элемента (микровзрыву). Использованные батареи должны быть утилизированы в соответствии с рекомендациями местных регулирующих органов. Применение стороннего блока питания отличного от устройства из комплекта поставки модели GB-BXBT может повлечь за собой нарушение нормативных требований и правил техники безопасности. Istnieje ryzyko wybuchu, w razie zastosowania nieodpowiedniego typu baterii. Zużyte baterie mogą być odpadami niebezpiecznymi. Zużyte baterie powinny być zatem segregowane i utylizowane w miejscach do tego przeznaczonych. Użycie innego zasilacza niż dostosowany do modelu GB-BXBT może spowodować uszkodzenie sprzętu a także być niebezpieczne dla zdrowia. Yanlış şekilde pil takıldığında patlama tehlikesi bulunmaktadır. Piller mümkün olduğunda geri dönüştürülmelidir. Kullanılmış piller yerel çevresel düzenlemelere uygun olarak atk işleme tesislerine gidecek şekilde atlmalıdır. Güvenlik Uyarısı: GB-BXBT Güç Adaptörünün kullanılmaması kullanıcıya ve cihaza zarar verebilir. 배터리를 잘못된 타입으로 교체하면 폭발 위험이 있습니다. 가능한한 배터리를 재활용하십시오. 수명이 다한 배터리는 현지의 환경 규정에 따라 폐기해야 합니다. 間違ったバッテリーへの交換は、破裂など事故の原因になります。可能であればバッテリー はなるべくリサイクルしてください。使用済みバッテリーは地域の環境規制に従い処理してく ださい。 제공된GB-BXBT전원 어댑터를 사용하지 않은 것은 관련 규정을 어긴 것이며 이로인해 안전상의 위험에 노출될 수 있습니다. GB-BXBTに付属の電源アダプターと電源ケーブルは専用品となります。他の機器で使用しない で下さい、安全上の問題や各種規制違反になる場合がございます。 若未使用隨附的GB-BXBT型號電源變壓器,可能會違反規範合規性,並讓使用者 暴露在危險中。 若以不正確類型的電池進行更換,可能會有爆炸的危險。應儘可能回收電。應依 照當地環保法規棄置使用過的電池。 此产品符合中国能效标识规范─微型计算器效能等级: 1级,属于B类产品类型。典 型能耗值:131kWh 若不使用随货附赠的GB-BXBT型号电源适配器,可能不符合规格,并给用户的人 身安全带来危险。 根据中华人民共和国国家标准GB 28380-2012(微型计算器能效限定值及能效等级 )规范要求,此机型仅适用于产品类型: B类,系统总内存配置容量必须大于2GB( 含2GB)。 更换电池时,若使用的类型不正确,可能存在爆炸危险。废旧电池必须依照当地 环境法规进行废弃处置。 ● For a list of tested memory, 2.5” HDD, wireless adapters and OS supported, go to: htp://www.gigabyte.com ● To download the latest drivers and BIOS updates, go to: htp://www.gigabyte.com ● For product support, go to: htp://www.gigabyte.com ● Pour une liste de types de mémoire, disques 2.5” HDD, adaptateurs sans fil et systèmes d'exploitaton testés, veuillez vous rendre sur : htp://www.gigabyte.com ● A télécharger la dernier version du mis à jour le bios et les pilots, voici: htp://www.gigabyte.com ● Pour l'assistance produit, veuillez vous rendre sur : htp://www.gigabyte.com ● Eine Liste mit geprüfem Arbeitsspeicher, 2.5” HDD, drahtlosen Adaptern und unterstützten Betriebssystemen finden Sie unter: htp://www.gigabyte.com ● Für den Download aktuellster Treiber und BIOS-Updates gehen Sie zu: htp://www.gigabyte.com ● Unterstützung zu Produkten finden Sie unter: htp://www.gigabyte.com ● Подробная информация о протестированных модулях ОЗУ, 2.5” HDD и модулях беспроводной связи под управлением совместимой ОС размещена по адресу: htp://www.gigabyte.com ● Для загрузки актуальных драйверов и обновлений версий BIOSвоспользуйтесь ссылкой: htp://www.gigabyte.com ● Информация о технической поддержке продукта размещена по адресу: htp://www.gigabyte.com ● Test edilen hafza listesi için, 2.5” HDD, kablosuz adaptörler ve desteklenen OS için, ilgili adrese gidiniz: htp://www.gigabyte.com ● En son sürücüleri ve BIOS güncellemelerini indirmek için, ilgili adrese gidiniz: htp://www.gigabyte.com ● Ürün desteği için, ilgili adrese gidiniz: htp://www.gigabyte.com ● Listę komaptybilnych komponentów (pamięć, 2.5” HDD, karty rozszerzeń) oraz systemów operacyjnych można znaleźć pod adresem internetowym: htp://gigabyte.com ● Najnowsze wersje sterowników oraz BIOSu można pobrać ze strony:htp://www.gigabyte.com ● Aby uzyskać wsparcie dotyczące produktów proszę wejść na stronę internetową: htp://www.gigabyte.com ● 如需已測記憶體、 2.5" SATA HDD 、無線介面卡和支援的作業系統清單,前往htp://www.gigabyte.com ● 若要下載最新驅動程式和BIOS更新,前往: htp://www.gigabyte.com ● 如需產品支援資訊,前往: htp://www.gigabyte.com ● サポートされたテスト済みのメモリ、 2.5"SATA HDD 、ワイヤレスアダプター、OSのリストについては、次のサイトで確できます: htp://www.gigabyte.com ● 테스트한 메모리, 무선어댑터 지원 관련 목록은 htp://www.gigabyte.com 을 참조 하십시오 ● 최신 드라이버 및BIOS의 업데이트는 홈페이지 htp://www.gigabyte.com 에서 다운로드하십시오. ● 제품 지원에 대한 상세한 내용은 홈페이지 htp://www.gigabyte.com 를 참조하십시오. ● 如需已测试存、 2.5" SATA HDD 、无线适配卡和支持的操作系统表,请前往: htp://www.gigabyte.com ● 若要下载最新驱动程序和BIOS更新,请前往: htp://www.gigabyte.com ● 如需产品支持信息,请前往: htp://www.gigabyte.com 2 1 【Front】 【Rear】 【Right】 【Lef】 USB 2.0 USB 3.0 RJ-45 HDMI DC-In Headphone/ Microphone VGA D-Sub Kensington lock slot B A C For Windows 7 OS only: Intel Trusted Executon Engine Interface (Intel TXEI) Driver uses KMDF (WDF) 1.11, which is built-in on Windows 8 and Windows 8.1. However, Windows 7 doesn’t have it. Please install Kernel-Mode Driver Framework (KMDF) version 1.1. Otherwise, yellow bang appears on Intel TXEI device upon installaton. Please follow instructons in KB2685811 link : htp://support.microsof.com/kb/2685811/en-us. Or install hot fix from Driver CD. ©2013 GIGABYTE Technology Co., Ltd. All rights reserved. The marks mentoned herein are trademarks or registered trademarks of GIGABYTE Technology Co., Ltd. or its affiliates. All other product names mentoned herein are trademarks or registered trademarks or their respectve owners. The terms HDMI and HDMI High-Definiton Multmedia Interface, and the HDMI Logo are trademarks or registered trademarks of HDMI Licensing LLC in the United States and other countries. 25ME0-XM3100-Q0R 产地:中国 Made in China
Transcript of Safety and Regulatory Informaion Package Contents
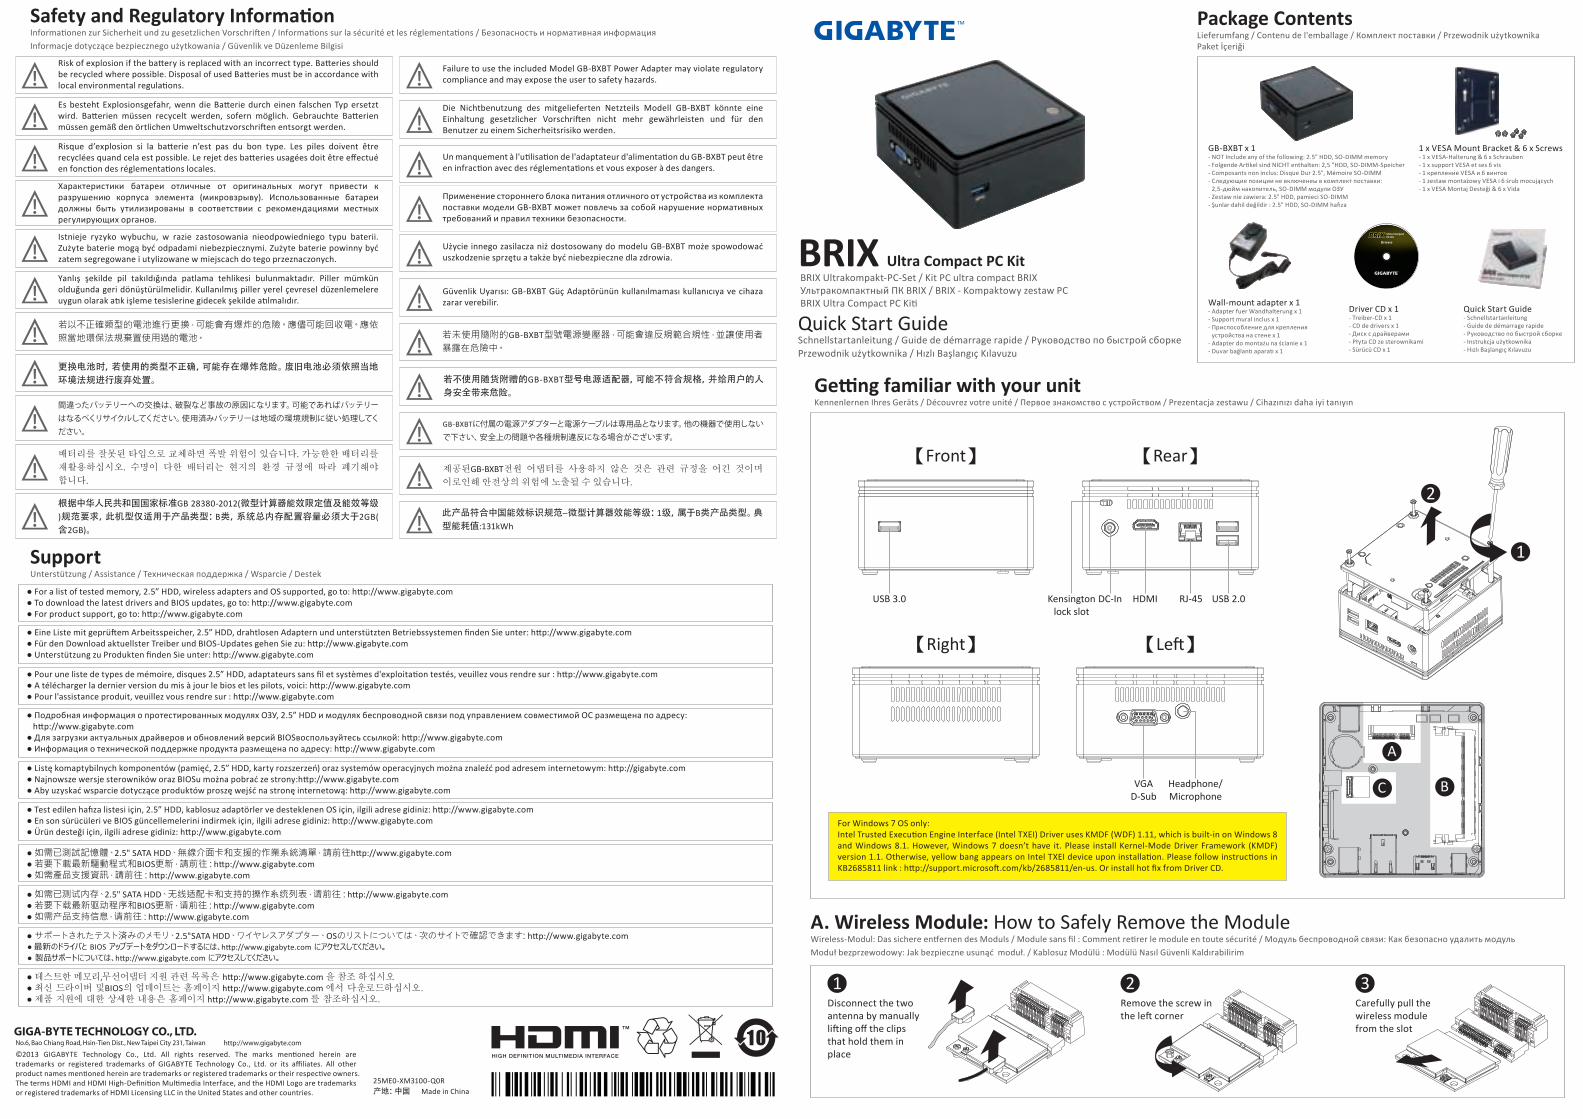
Package ContentsLieferumfang / Contenu de l'emballage / Комплект поставки / Przewodnik użytkownikaPaket İçeriği
Getting familiar with your unitKennenlernen Ihres Geräts / Découvrez votre unité / Первое знакомство с устройством / Prezentacja zestawu / Cihazınızı daha iyi tanıyın
1 x VESA Mount Bracket & 6 x Screws- 1 x VESA-Halterung & 6 x Schrauben- 1 x support VESA et ses 6 vis- 1 крепление VESA и 6 винтов- 1 zestaw montażowy VESA i 6 śrub mocujących- 1 x VESA Montaj Desteği & 6 x Vida
GB-BXBT x 1- NOT Include any of the following: 2.5” HDD, SO-DIMM memory- Folgende Artikel sind NICHT enthalten: 2,5 "HDD, SO-DIMM-Speicher- Composants non inclus: Disque Dur 2.5", Mémoire SO-DIMM- Следующие позиции не включенеы в комплект поставки:
2,5-дюйм накопитель, SO-DIMM модули ОЗУ- Zestaw nie zawiera: 2.5" HDD, pamieci SO-DIMM- Şunlar dahil değildir : 2.5” HDD, SO-DIMM hafıza
Quick Start Guide- Schnellstartanleitung- Guide de démarrage rapide- Руководство по быстрой сборке- Instrukcja użytkownika- Hızlı Başlangıç Kılavuzu
Driver CD x 1- Treiber-CD x 1- CD de drivers x 1- Диск с драйверами- Płyta CD ze sterownikami- Sürücü CD x 1
BRIX Ultrakompakt-PC-Set / Kit PC ultra compact BRIXУльтракомпактный ПК BRIX / BRIX - Kompaktowy zestaw PCBRIX Ultra Compact PC Kiti
Quick Start GuideSchnellstartanleitung / Guide de démarrage rapide / Руководство по быстрой сборкеPrzewodnik użytkownika / Hızlı Başlangıç Kılavuzu
BRIX Ultra Compact PC Kit
Safety and Regulatory InformationInformationen zur Sicherheit und zu gesetzlichen Vorschriften / Informations sur la sécurité et les réglementations / Безопасность и нормативная информацияInformacje dotyczące bezpiecznego użytkowania / Güvenlik ve Düzenleme Bilgisi
Wall-mount adapter x 1- Adapter fuer Wandhalterung x 1- Support mural inclus x 1- Приспособление для крепления
устройства на стене x 1- Adapter do montażu na ścianie x 1- Duvar bağlantı aparatı x 1
A. Wireless Module: How to Safely Remove the ModuleWireless-Modul: Das sichere entfernen des Moduls / Module sans fil : Comment retirer le module en toute sécurité / Модуль беспроводной связи: Как безопасно удалить модульModuł bezprzewodowy: Jak bezpieczne usunąć moduł. / Kablosuz Modülü : Modülü Nasıl Güvenli Kaldırabilirim
1Disconnect the two
antenna by manually
lifting off the clips that hold them in
place
2Remove the screw in
the left corner
3Carefully pull the wireless module
from the slot
SupportUnterstützung / Assistance / Техническая поддержка / Wsparcie / Destek
Risk of explosion if the battery is replaced with an incorrect type. Batteries should be recycled where possible. Disposal of used Batteries must be in accordance with local environmental regulations.
Failure to use the included Model GB-BXBT Power Adapter may violate regulatory compliance and may expose the user to safety hazards.
Es besteht Explosionsgefahr, wenn die Batterie durch einen falschen Typ ersetzt wird. Batterien müssen recycelt werden, sofern möglich. Gebrauchte Batterien müssen gemäß den örtlichen Umweltschutzvorschriften entsorgt werden.
Die Nichtbenutzung des mitgelieferten Netzteils Modell GB-BXBT könnte eine Einhaltung gesetzlicher Vorschriften nicht mehr gewährleisten und für den Benutzer zu einem Sicherheitsrisiko werden.
Risque d’explosion si la batterie n’est pas du bon type. Les piles doivent être recyclées quand cela est possible. Le rejet des batteries usagées doit être effectué en fonction des réglementations locales.
Un manquement à l'utilisation de l'adaptateur d'alimentation du GB-BXBT peut être en infraction avec des réglementations et vous exposer à des dangers.
Характеристики батареи отличные от оригинальных могут привести к разрушению корпуса элемента (микровзрыву). Использованные батареи должны быть утилизированы в соответствии с рекомендациями местных регулирующих органов.
Применение стороннего блока питания отличного от устройства из комплекта поставки модели GB-BXBT может повлечь за собой нарушение нормативных требований и правил техники безопасности.
Istnieje ryzyko wybuchu, w razie zastosowania nieodpowiedniego typu baterii. Zużyte baterie mogą być odpadami niebezpiecznymi. Zużyte baterie powinny być zatem segregowane i utylizowane w miejscach do tego przeznaczonych.
Użycie innego zasilacza niż dostosowany do modelu GB-BXBT może spowodować uszkodzenie sprzętu a także być niebezpieczne dla zdrowia.
Yanlış şekilde pil takıldığında patlama tehlikesi bulunmaktadır. Piller mümkün olduğunda geri dönüştürülmelidir. Kullanılmış piller yerel çevresel düzenlemelere uygun olarak atık işleme tesislerine gidecek şekilde atılmalıdır.
Güvenlik Uyarısı: GB-BXBT Güç Adaptörünün kullanılmaması kullanıcıya ve cihaza zarar verebilir.
배터리를 잘못된 타입으로 교체하면 폭발 위험이 있습니다. 가능한한 배터리를
재활용하십시오. 수명이 다한 배터리는 현지의 환경 규정에 따라 폐기해야
합니다.
間違ったバッテリーへの交換は、破裂など事故の原因になります。可能であればバッテリーはなるべくリサイクルしてください。使用済みバッテリーは地域の環境規制に従い処理してください。
제공된GB-BXBT전원 어댑터를 사용하지 않은 것은 관련 규정을 어긴 것이며
이로인해 안전상의 위험에 노출될 수 있습니다.
GB-BXBTに付属の電源アダプターと電源ケーブルは専用品となります。他の機器で使用しないで下さい、安全上の問題や各種規制違反になる場合がございます。
若未使用隨附的GB-BXBT型號電源變壓器,可能會違反規範合規性,並讓使用者暴露在危險中。
若以不正確類型的電池進行更換,可能會有爆炸的危險。應儘可能回收電。應依照當地環保法規棄置使用過的電池。
此产品符合中国能效标识规范─微型计算器效能等级:1级,属于B类产品类型。典型能耗值:131kWh
若不使用随货附赠的GB-BXBT型号电源适配器,可能不符合规格,并给用户的人身安全带来危险。
根据中华人民共和国国家标准GB 28380-2012(微型计算器能效限定值及能效等级)规范要求,此机型仅适用于产品类型:B类,系统总内存配置容量必须大于2GB(
含2GB)。
更换电池时,若使用的类型不正确,可能存在爆炸危险。废旧电池必须依照当地环境法规进行废弃处置。
● For a list of tested memory, 2.5” HDD, wireless adapters and OS supported, go to: http://www.gigabyte.com● To download the latest drivers and BIOS updates, go to: http://www.gigabyte.com● For product support, go to: http://www.gigabyte.com
● Pour une liste de types de mémoire, disques 2.5” HDD, adaptateurs sans fil et systèmes d'exploitation testés, veuillez vous rendre sur : http://www.gigabyte.com● A télécharger la dernier version du mis à jour le bios et les pilots, voici: http://www.gigabyte.com● Pour l'assistance produit, veuillez vous rendre sur : http://www.gigabyte.com
● Eine Liste mit geprüftem Arbeitsspeicher, 2.5” HDD, drahtlosen Adaptern und unterstützten Betriebssystemen finden Sie unter: http://www.gigabyte.com● Für den Download aktuellster Treiber und BIOS-Updates gehen Sie zu: http://www.gigabyte.com● Unterstützung zu Produkten finden Sie unter: http://www.gigabyte.com
● Подробная информация о протестированных модулях ОЗУ, 2.5” HDD и модулях беспроводной связи под управлением совместимой ОС размещена по адресу: http://www.gigabyte.com● Для загрузки актуальных драйверов и обновлений версий BIOSвоспользуйтесь ссылкой: http://www.gigabyte.com● Информация о технической поддержке продукта размещена по адресу: http://www.gigabyte.com
● Test edilen hafıza listesi için, 2.5” HDD, kablosuz adaptörler ve desteklenen OS için, ilgili adrese gidiniz: http://www.gigabyte.com● En son sürücüleri ve BIOS güncellemelerini indirmek için, ilgili adrese gidiniz: http://www.gigabyte.com● Ürün desteği için, ilgili adrese gidiniz: http://www.gigabyte.com
● Listę komaptybilnych komponentów (pamięć, 2.5” HDD, karty rozszerzeń) oraz systemów operacyjnych można znaleźć pod adresem internetowym: http://gigabyte.com● Najnowsze wersje sterowników oraz BIOSu można pobrać ze strony:http://www.gigabyte.com● Aby uzyskać wsparcie dotyczące produktów proszę wejść na stronę internetową: http://www.gigabyte.com
● 如需已測試記憶體、2.5" SATA HDD、無線介面卡和支援的作業系統清單,請前往http://www.gigabyte.com● 若要下載最新驅動程式和BIOS更新,請前往:http://www.gigabyte.com● 如需產品支援資訊,請前往:http://www.gigabyte.com
● サポートされたテスト済みのメモリ、2.5"SATA HDD、ワイヤレスアダプター、OSのリストについては、次のサイトで確認できます: http://www.gigabyte.com
● 테스트한 메모리,무선어댑터 지원 관련 목록은 http://www.gigabyte.com 을 참조 하십시오● 최신 드라이버 및BIOS의 업데이트는 홈페이지 http://www.gigabyte.com 에서 다운로드하십시오.● 제품 지원에 대한 상세한 내용은 홈페이지 http://www.gigabyte.com 를 참조하십시오.
● 如需已测试内存、2.5" SATA HDD、无线适配卡和支持的操作系统列表,请前往:http://www.gigabyte.com● 若要下载最新驱动程序和BIOS更新,请前往:http://www.gigabyte.com● 如需产品支持信息,请前往:http://www.gigabyte.com
2
1
【Front】 【Rear】
【Right】 【Left】
USB 2.0USB 3.0 RJ-45HDMIDC-In
Headphone/Microphone
VGA
D-Sub
Kensingtonlock slot
B
A
C
For Windows 7 OS only:Intel Trusted Execution Engine Interface (Intel TXEI) Driver uses KMDF (WDF) 1.11, which is built-in on Windows 8 and Windows 8.1. However, Windows 7 doesn’t have it. Please install Kernel-Mode Driver Framework (KMDF) version 1.1. Otherwise, yellow bang appears on Intel TXEI device upon installation. Please follow instructions in KB2685811 link : http://support.microsoft.com/kb/2685811/en-us. Or install hot fix from Driver CD.
©2013 GIGABYTE Technology Co., Ltd. All rights reserved. The marks mentioned herein are trademarks or registered trademarks of GIGABYTE Technology Co., Ltd. or its affiliates. All other
product names mentioned herein are trademarks or registered trademarks or their respective owners.The terms HDMI and HDMI High-Definition Multimedia Interface, and the HDMI Logo are trademarks or registered trademarks of HDMI Licensing LLC in the United States and other countries.
25ME0-XM3100-Q0R产地:中国 Made in China

Multi-BIOS Allows you to choose BIOS mode according to the OS of your choice multiples Bios / Multi-BIOS / Мульти-BIOS / multi-BIOS / Çoklu-BIOS
System Supported- Win 7 - Win 8.x
Note: You have to select the OS mode in the BIOS before installing any OS on your BRIX.
Press or “Del” during device
start up to enter BIOS
1Select “Windows 7” or “Windows 8.x” from “OS selection” on menu bar
2
B. Memory Installation DDR3 Low Voltage (1.35v) Arbeitsspeicher Installation DDR3 Low Voltage (1,35 V) / Installation de la mémoire DDR3 Low Voltage (1.35v) / Установка модулей ОЗУ DDR3 Low Voltage (1,35 В)Instalacja pamięci DDR3 nisko napięciowych (1.35V) / Bellek Yerleştirilmesi DDR3 Düşük Voltaj (1.35v)
Note: The GIGABYTE BRIX
requires DDR3L SO-DIMM system memory. This is low voltage DDR3 memory that
offers great performance at a lower 1.35v.
Push down until the modules click into
place
2Carefully insert
SO-DIMM memory modules
1
USB Power On Function Allows device power on via USB. Useful when mounted behind a display or TVUSB Power On Funktion / Démarrage via USB supporté / Функция USB Power On / Opcja USB Power On / USB Güç Açık Fonksiyonu
System Requirements- Win 7 - Win 8.x (Install utility required)
Note: ‘USB Power On’ functionality in Windows 8 and above requires an additional Windows patch. This is provided on GIGABYTE official website labeled ‘USB Power-On Patch’. Your GIGABYTE BRIX can be powered on via a connected USB device such as a keyboard or mouse, offering greater convenience when mounted behind a display or monitor.
Press “Del” during device start
up to enter BIOS
1Select “Chipset” from the menu
2
Manually configure “Erp” settings to “Disabled”
3Press F4 to Save and Exit4
1
VESA BracketVESA-Halterung / Support VESA / Крепление VESA / Standard montażowy VESA / VESA Desteği
Attach the screws provided on underside of the
BRIX
Attach the VESA mounting plate to the rear of a
compatible display using the screws
provided
2The BRIX can now
be mounted by
sliding the device
into place
3
Warranty TermGarantiebedingung / Informations de garantie / Гарантийные обязательства / Warunku gwarancji / Garanti Şartları
DeutschDas System ist durch eine dreijährige Garantiezeit abgedeckt.Der AC-Adapter (inkl. Netzkabel) und das DLP-Projektor-Modul sind durch eine einjährige Garantiezeit abgedeckt.Das Chassi, die Treiber-CD, das VESA-Montagekit (inkl. Schrauben) und die Produktverpackung sind nicht in der Garantie inbegriffen.GIGABYTE übernimmt keine Haftung für verlorene oder beschädigte Daten und Softwares. GIGABYTE empfiehlt Kunden nachdrücklich, die Erstellung einer vollständigen Datensicherung und eines Recovery-Plans.Weitere Bedingungen, unterliegen den regionalen Garantiebedingungen, in denen das Produkt gekauft wurde.
●●
●
●
●
FrançaisLe système est couvert d’une garantie de trois ans.Le bloc d’alimentation (câble compris) et le module de projection DLP sont couverts d’une garantie d’un an.Le châssis, le CD de drivers, le kit de montage VESA (vis comprises), ainsi que l’emballage ne sont pas inclus dans la garantie.GIGABYTE n’assume aucune responsabilité en cas de perte ou dommage infligés aux données, logiciels, et autre contenu stockés ou préservés sur le produit. GIGABYTE recommande à l’utilisateur d’effectuer une sauvegarde régulière complète de ses données, ainsi que de prévoir un plan de restauration.Tout autre terme et condition est sujet aux termes et conditions de la garantie locale où le produit a été acheté.
●●
●
●
●
EnglishThe system is covered by a three year warranty period.The AC Adapter (inc. power cord ) and DLP projector module are covered by a one year warranty.The chassis, driver CD , VESA mounting kit (including. screws ), product package are not included in the warranty.GIGABYTE will not assume responsibility for any lost or damaged data, software or other materials stored or preserved on the product. GIGABYTE strongly recommends that customers to maintain a complete data backup, and recovery plan.Other terms and conditions shall be subject to regional warranty terms and conditions where the product is bought.
●●●
●
●
РусскийГарантийные обязательства на изделие действительны в течение трех лет.Гарантийные обязательства на блок питания (включая сетевой кабель) и модуль DLP-проектора действительны в течение 1 года.Гарантийные обязательства не распространяются на корпус, а также компакт-диск иVESA-крепление (вместе с винтами) из комплекта поставки изделия.Компания GIGABYTE не несет ответственность за потерю или повреждение данных, целостность ПО и иной информации, хранящейся на накопителях изделия. Компания GIGABYTE настоятельно рекомендует пользователям проводить резервное копирование данных на регулярной основе и заранее продумать план восстановления системы после сбоев.Иные условия подлежат согласованию с учетом положения о гарантийных обязательствах,действующего в том регионе, где было приобретено изделие.
●●
●
●
●
PolskiSystem objęty jest trzyletnim okresem gwarancji.Zasilacz sieciowy (przewód zasilający Inc) i moduł projektora DLP są objęte roczną gwarancją.Obudowa, płyta CD ze sterownikami, zestaw montażowy VESA (w tym śruby), opakowanie produktu nie są objęte gwarancjąGIGABYTE nie ponosi odpowiedzialności za utratę lub uszkodzenie danych, oprogramowania lub innych materiałów przechowywanych na dysku produktu. GIGABYTE zaleca klientom utworzenie kopii zapasowej danych.Pozostałe warunki podlegają regionalnych warunków gwarancji, w którym produkt jest kupowany.
●●●
●
●
TürkçeSistem üç yıllık garanti süresi kapsamındadır.AC Adaptörü (anl. güç kablosu) ve DLP projektör modülü bir yıllık garanti kapsamındadır.Gövde, sürücü CD'si, VESA montaj kiti (vidalar dahil) ve ürün paketi garanti kapsamında değildir.GIGABYTE, üründe depolanan ya da saklanan verilerin, yazılımların veya diğer malzemelerin kaybolmasında ya da hasar görmesinde sorumluluk kabul etmez. GIGABYTE, müşterilerin eksiksiz bir veri yedekleme ve kurtarma planı oluşturmasını kesinlikle önerir.Diğer hüküm ve koşullar, ürünün satın alındığı yerdeki bölgesel garanti hükümleri ve koşullarına tabi olacaktır.
●●●●
●
繁體中文BRIX(台式機電腦)主機保固3年(不含外殼)。變壓器(含電源線) 及DLP投影機模組保固1年。產品外殼、CD 光碟、固定鐵架(含螺絲)、產品包裝,恕不在保固範圍內。產品內的資料可能因維修或重新格式化而遺失,技嘉科技並無提供客戶資料救援與保管之服務。強烈建議您應定時備份資料或為採取資料免於損壞之措施。其他保固條款請見產品購買地區之個別條款。如產品於台灣購買請見技嘉台灣共同保固條款:http://service.gigabyte.tw/Home/Content/
●●●●
●
简体中文BRIX(台式计算机)主机保修3年(不含机壳)。电源适配器(含电源线) 及DLP投影机模组保修1年。主机机壳、CD 光盘、固定铁架(含螺丝)、产品包装,恕不在保修范围内。产品内的数据可能因维修或重新格式化而遗失,技嘉科技并不提供客户数据支持与保管的服务。强烈建议您应定时备份数据或为恢复数据免于损坏的措施。其他保修条款请见产品购买地区的个别条款。如产品于台湾购买请见技嘉台湾共同保修条款:http://service.gigabyte.tw/Home/Content/
●●●●
●
日本語システムの保証期間は3年間です。ACアダプター(電源コード)とDLPプロジェクターモジュールは、1年間の保証が適用されます。筐体、ドライバーCD、VESAマウントキット(ネジを含む)、製品パッケージは保証に含まれません。GIGABYTEは製品に保存されたデータ、ソフトウェア、その他資料に関するあらゆる紛失や破損について責任を負いません。その他の条件については、製品が購入された地域の保証条件に従います。【重要】付属のACアダプターならびに電源ケーブルは汎用コネクタを備えていますが本製品専用です。他の電気機器へは絶対に接続しないでください。
●●
●
●●
한국어시스템에 대한 무상 보증 서비스 기간은 3년입니다.AC 어뎁터(전원 코드 포함)와 DLP 프로젝터 모듈에 대한 무상 보증 서비스 기간은 3년입니다.섀시, CD 드라이버, VESA 조립 키트(나사 포함), 제품 패키지는 무상 보증 서비스에 포함되지
않습니다.GIGABYTE는 소프트웨어 또는 기타 제품에 저장되거나 보존된 데이터의 파손 또는 손실에 대해
책임을 지지 않습니다. GIGABYTE는 고객 여러분께서 데이터 백업 및 복구에 대해 관리할 것을
권장합니다.기타 사용 약관은 제품을 구입한 현지의 사용 약관에 따릅니다.
●●●
●
●
C. SATA 3Gbps HDD: How to install 2.5” HDDSATA 6 Gbps: Wie die 2.5 "HDD richtig installieren / Disque dur SATA 6Gbps : Comment installer le disque dur 2.5"SATA 6 Гбит/c: Порядок инсталляции 2,5-дюйм накопителя HDD / SATA 6Gbps: jak zainstalować HDD 2.5' / SATA 6Gbps: 2.5” HDD 'yi nasıl yerleştirebilirim
1 Unscrew and remove the bottom panel, disconnecting the SATA cable.
5 Connect the SATA cable to the
motherboard and reinstall the
bottom panel.
2 Flip the bottom panel and unscrew the four screws holding the HDD cage in place.
4 Screw the HDD cage in place in the bottom panel.
3 Install the HDD in the cage using the screws provided and connect the SATA cable to the HDD.