Préparé par Elie Matta et al. Université Antonine - Baabda Report...Préparé par Elie Matta et...
23
Préparé par Elie Matta et al. Université Antonine - Baabda Faculté d’ingénieurs en Informatique, Multimédia, Systèmes, Réseaux et Télécommunications Applications mobiles (Pocket PC, etc …) Project: Manipulate School Database Préparé par Elie Matta et al. Copyright © 2010-2011, eliematta.com . All rights reserved
Transcript of Préparé par Elie Matta et al. Université Antonine - Baabda Report...Préparé par Elie Matta et...

Préparé par Elie Matta et al.
Université Antonine - Baabda Faculté d’ingénieurs en Informatique, Multimédia, Systèmes, Réseaux et
Télécommunications
Applications mobiles (Pocket PC, etc …)
Project: Manipulate School Database
Préparé par Elie Matta et al.
Copyright © 2010-2011, eliematta.com. All rights reserved

Préparé par Elie Matta et al.
Table of Contents
Aim of the project ..................................................................................................................................... 1
Solution ..................................................................................................................................................... 1
Software ................................................................................................................................................ 1
Architecture .......................................................................................................................................... 1
Installation guide................................................................................................................................... 2
Installation of the JDK ....................................................................................................................... 2
Installation of NetBeans IDE 6.8 ....................................................................................................... 3
Symbian S80 Emulator – Personal Profile ......................................................................................... 4
Importing the Database .................................................................................................................... 8
Creating the application ........................................................................................................................ 9
Creating the ConnectionServlet project ........................................................................................... 9
Creating the Manipulate School Database Project ......................................................................... 17
Running the application .......................................................................................................................... 21
Préparé par Elie Matta et al.
Copyright © 2010-2011, eliematta.com. All rights reserved 1
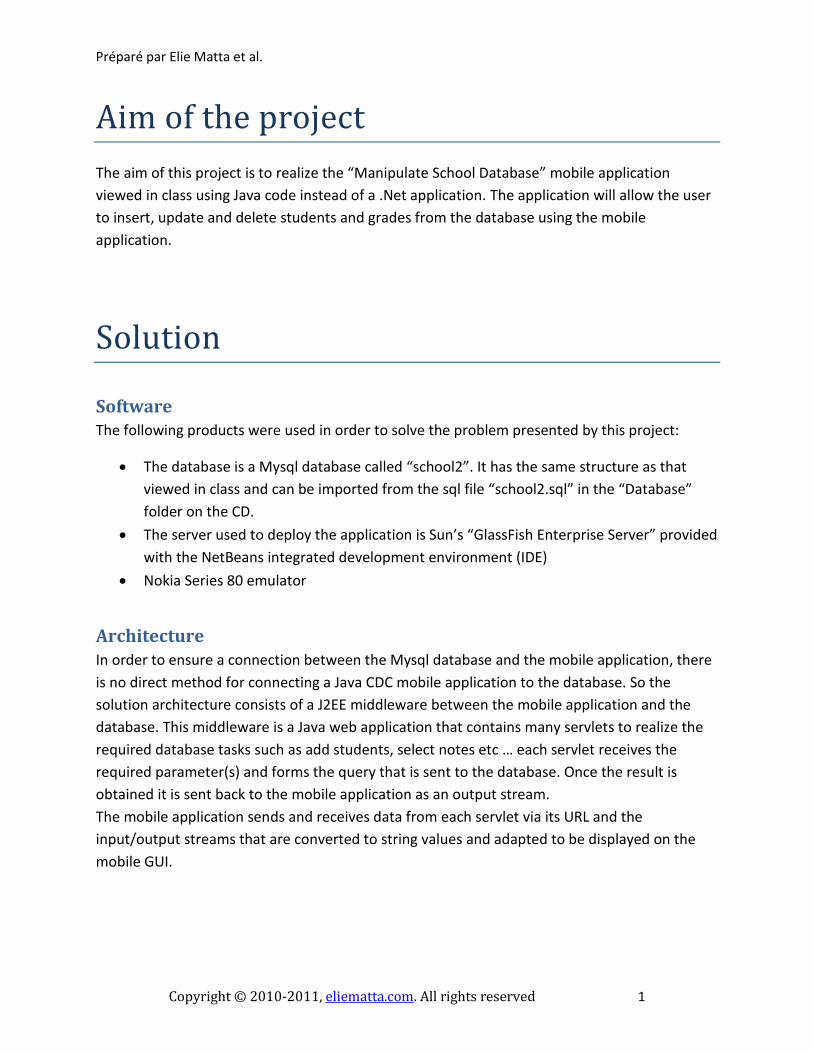
Aim of the project
The aim of this project is to realize the “Manipulate School Database” mobile application
viewed in class using Java code instead of a .Net application. The application will allow the user
to insert, update and delete students and grades from the database using the mobile
application.
Solution
Software The following products were used in order to solve the problem presented by this project:
The database is a Mysql database called “school2”. It has the same structure as that
viewed in class and can be imported from the sql file “school2.sql” in the “Database”
folder on the CD.
The server used to deploy the application is Sun’s “GlassFish Enterprise Server” provided
with the NetBeans integrated development environment (IDE)
Nokia Series 80 emulator
Architecture In order to ensure a connection between the Mysql database and the mobile application, there
is no direct method for connecting a Java CDC mobile application to the database. So the
solution architecture consists of a J2EE middleware between the mobile application and the
database. This middleware is a Java web application that contains many servlets to realize the
required database tasks such as add students, select notes etc … each servlet receives the
required parameter(s) and forms the query that is sent to the database. Once the result is
obtained it is sent back to the mobile application as an output stream.
The mobile application sends and receives data from each servlet via its URL and the
input/output streams that are converted to string values and adapted to be displayed on the
mobile GUI.

Préparé par Elie Matta et al.
Copyright © 2010-2011, eliematta.com. All rights reserved 2
Installation guide As the installation might be a bit tricky part at first, we will try to make it easier by following these steps:
1. Installation of the Java Development Kit (JDK 6 Update 20) 2. Installation of NetBeans IDE 6.8 3. Installation and integration of the Nokia Series 80 Emulator
Installation of the JDK
The JDK framework is essential therefore we will install the JDK update 20 as it is the latest
update since May 2010, this package has been downloaded from www.java.com.
The installation is very easy as it is a step-by-step process beginning as shown in the figure
below:

Préparé par Elie Matta et al.
Copyright © 2010-2011, eliematta.com. All rights reserved 3
Installation of NetBeans IDE 6.8
NetBeans will be our main platform where we will initiate and load our program for further
development, use and debugging, therefore we will install the latest version 6.8 as of February
2010.
This is the full package as you can install the minimum, typical and full setup, the setup loads
and prompts to select the packages you wish to install:
For our project to work, we need only the following packages: Java ME, Java Web and EE and
as runtime: Sun GlassFish Enterprise Server v3.

Préparé par Elie Matta et al.
Copyright © 2010-2011, eliematta.com. All rights reserved 4
Symbian S80 Emulator – Personal Profile
After lots of research, we successfully found “Nokia Series 80 Developer Platform 2.0 SDK for
Symbian OS 7.1.2005 for Personal Profile 1.0.1”. This file is renamed as “S80 DP 2.0 Personal
Profile SDK (emulator).zip” under the “Setup files” directory. Unzip the file first then run the
setup.exe file which guide you through the rest of the setup process.
Please install the emulator to its default directory (C:\Symbian).
After installing the 3 installations, it is now time to integrate them with each other:
To integrate the JDK 1.6 to the NetBeans IDE, we start the NetBeans then we select Java
Platforms from Tools drop down menu:

Préparé par Elie Matta et al.
Copyright © 2010-2011, eliematta.com. All rights reserved 5
Then we add the JDK 1.6 by clicking on and the selecting Java Standard
Edition:

Préparé par Elie Matta et al.
Copyright © 2010-2011, eliematta.com. All rights reserved 6
We point the source to the directory of the JDK, if you have chosen to install the JDK to its
default location then it would be in “C:\Program Files\Java\jdk1.6.0_20”.
Then we hit Next, then finish the installation and as a result we have thus successfully
integrated the JDK 1.6 update 20 into the NetBeans IDE 6.8.
Now, to complete the fully integrated installation, we will have to integrate the emulator into
the NetBeans IDE by following the steps mentioned below:
We go through the same procedure as above; we select Tools, Java Platforms

Préparé par Elie Matta et al.
Copyright © 2010-2011, eliematta.com. All rights reserved 7
We select and then we choose Java ME CDC Platform Emulator, we hit next
and then we choose the directory of the symbian emulator from
C:\Symbian\7.0s\S80_DP2_0_PP_SDK.
Préparé par Elie Matta et al.
Copyright © 2010-2011, eliematta.com. All rights reserved 8
We hit Next, then finish.
Now the entire installation guide is completed and it is time to embed our project into this
mixed platform.
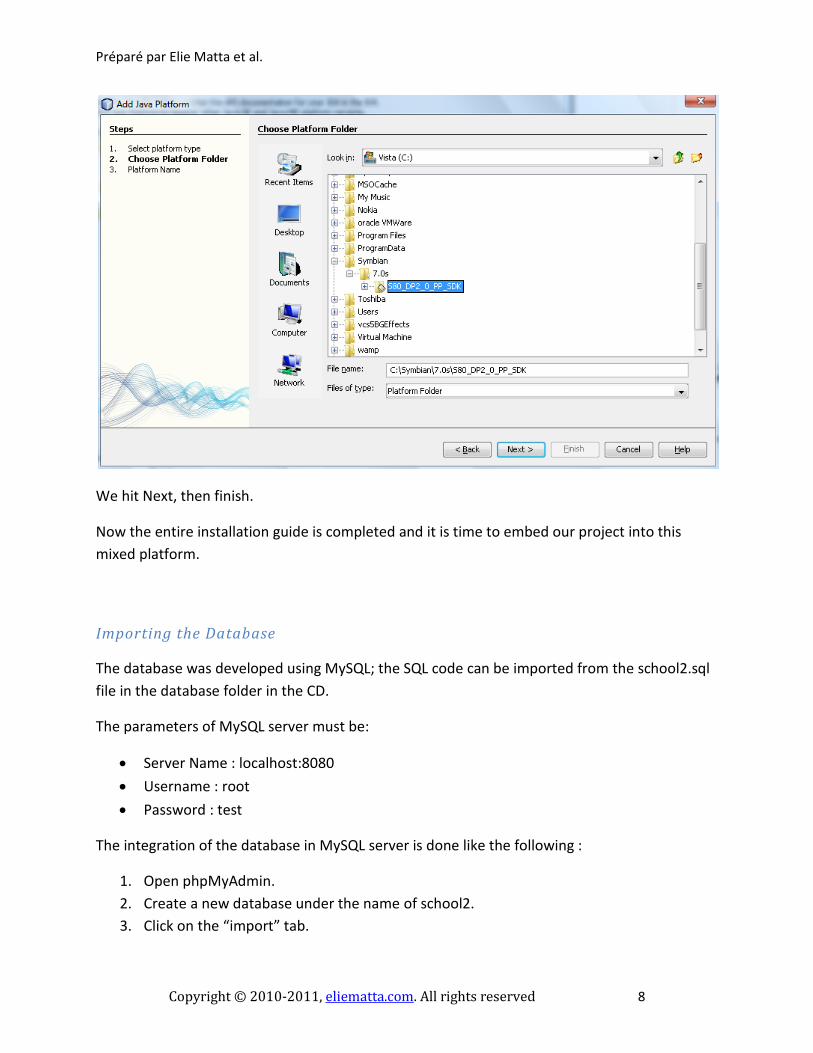
Importing the Database
The database was developed using MySQL; the SQL code can be imported from the school2.sql
file in the database folder in the CD.
The parameters of MySQL server must be:
Server Name : localhost:8080
Username : root
Password : test
The integration of the database in MySQL server is done like the following :
1. Open phpMyAdmin.
2. Create a new database under the name of school2.
3. Click on the “import” tab.
Préparé par Elie Matta et al.
Copyright © 2010-2011, eliematta.com. All rights reserved 9
4. Browse to the location of the school2.sql file given earlier.
5. Click on “GO” button.
One more thing is left for database tier to work correctly is to add mysql connector of the folder
of the CD to the “Lib” directory of the JDK installation.
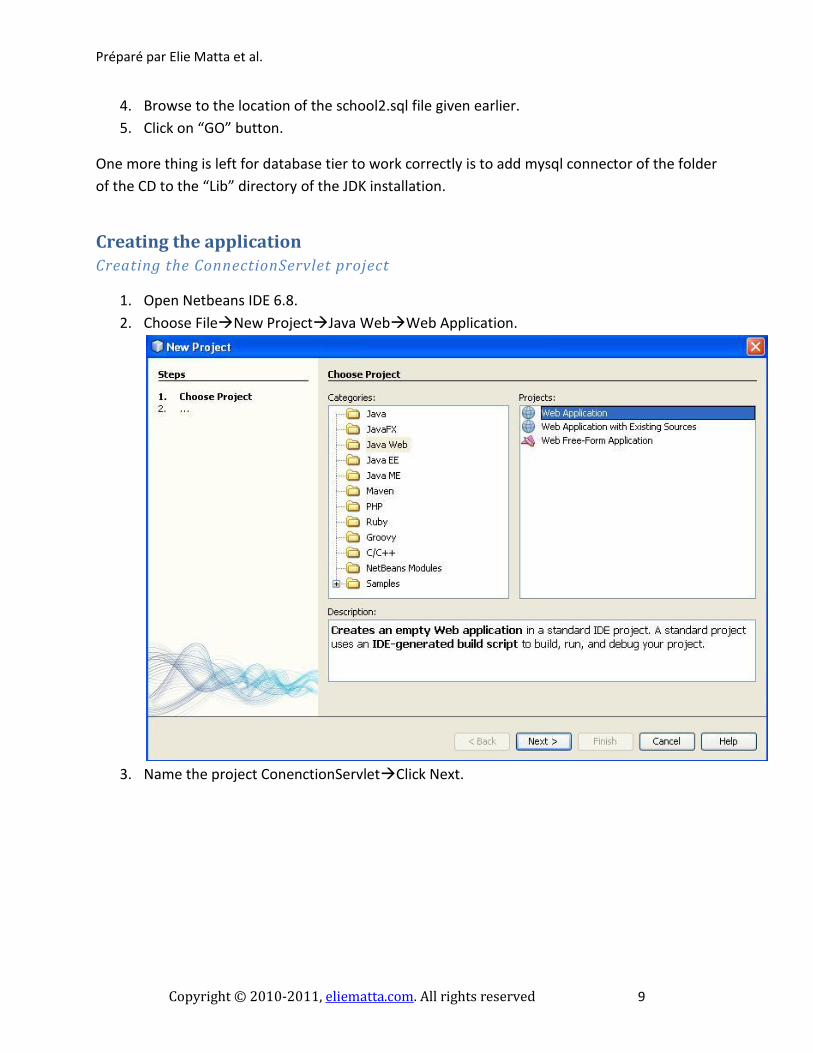
Creating the application Creating the ConnectionServlet project
1. Open Netbeans IDE 6.8.
2. Choose FileNew ProjectJava WebWeb Application.
3. Name the project ConenctionServletClick Next.

Préparé par Elie Matta et al.
Copyright © 2010-2011, eliematta.com. All rights reserved 10
4. Choose “GlassFish v3 Domain” as the server and Java EE 6 Web as Java EE version.
5. Click Finish.
Once the solution is created:
1. Right click the “Source Packages” directory NewJava Package.
2. Call the package “Connection”click Finish.
Right click the newly created package:
1. NewServlet.
2. Call the servlet SelectSt (or a corresponding name for each servlet)
3. Make sure that the package selected is:”Connection”.
4. Click finish.
Once the all servlets are created you will have something that looks like this:

Préparé par Elie Matta et al.
Copyright © 2010-2011, eliematta.com. All rights reserved 11
The code for every servlet will need to import:
Java.sql.*;
The code is provided on the CD and is similar to the following: (SelectStudent and InsertSt
servlet is shown below)
The servlets and the mobile application code are based on the stream communication
explained above.
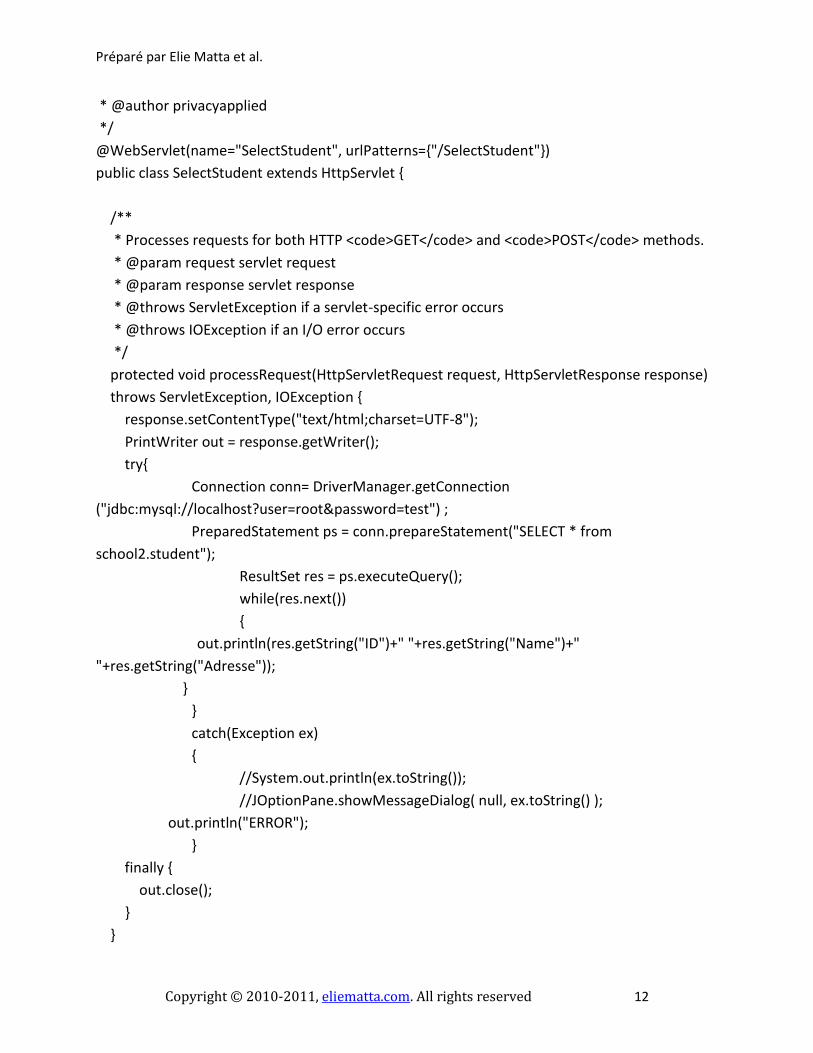
The following code is for the “SelectStudent” servlet that retrieves the students contained in
the “students” table in the database.
package Connection;
import java.io.IOException;
import java.io.PrintWriter;
import javax.servlet.ServletException;
import javax.servlet.annotation.WebServlet;
import javax.servlet.http.HttpServlet;
import javax.servlet.http.HttpServletRequest;
import javax.servlet.http.HttpServletResponse;
import java.sql.*;
/**
*
Préparé par Elie Matta et al.
Copyright © 2010-2011, eliematta.com. All rights reserved 12
* @author privacyapplied
*/
@WebServlet(name="SelectStudent", urlPatterns={"/SelectStudent"})
public class SelectStudent extends HttpServlet {
/**
* Processes requests for both HTTP <code>GET</code> and <code>POST</code> methods.
* @param request servlet request
* @param response servlet response
* @throws ServletException if a servlet-specific error occurs
* @throws IOException if an I/O error occurs
*/
protected void processRequest(HttpServletRequest request, HttpServletResponse response)
throws ServletException, IOException {
response.setContentType("text/html;charset=UTF-8");
PrintWriter out = response.getWriter();
try{
Connection conn= DriverManager.getConnection
("jdbc:mysql://localhost?user=root&password=test") ;
PreparedStatement ps = conn.prepareStatement("SELECT * from
school2.student");
ResultSet res = ps.executeQuery();
while(res.next())
{
out.println(res.getString("ID")+" "+res.getString("Name")+"
"+res.getString("Adresse"));
}
}
catch(Exception ex)
{
//System.out.println(ex.toString());
//JOptionPane.showMessageDialog( null, ex.toString() );
out.println("ERROR");
}
finally {
out.close();
}
}

Préparé par Elie Matta et al.
Copyright © 2010-2011, eliematta.com. All rights reserved 13
// <editor-fold defaultstate="collapsed" desc="HttpServlet methods. Click on the + sign on
the left to edit the code.">
/**
* Handles the HTTP <code>GET</code> method.
* @param request servlet request
* @param response servlet response
* @throws ServletException if a servlet-specific error occurs
* @throws IOException if an I/O error occurs
*/
@Override
protected void doGet(HttpServletRequest request, HttpServletResponse response)
throws ServletException, IOException {
processRequest(request, response);
}
/**
* Handles the HTTP <code>POST</code> method.
* @param request servlet request
* @param response servlet response
* @throws ServletException if a servlet-specific error occurs
* @throws IOException if an I/O error occurs
*/
@Override
protected void doPost(HttpServletRequest request, HttpServletResponse response)
throws ServletException, IOException {
processRequest(request, response);
}
/**
* Returns a short description of the servlet.
* @return a String containing servlet description
*/
@Override
public String getServletInfo() {
return "Short description";
}// </editor-fold>

Préparé par Elie Matta et al.
Copyright © 2010-2011, eliematta.com. All rights reserved 14
}
Here, the servlet receives no parameters but returns the entire table in the output stream.
Another example, is the “InsertSt” servlet where the servlet receives the name and address of
the new student, and adds the information to the database if it is not already present. Then the
query outcome (Done/Error) is written on the output stream.
package Connection;
import java.io.IOException;
import java.io.PrintWriter;
import javax.servlet.ServletException;
import javax.servlet.annotation.WebServlet;
import javax.servlet.http.HttpServlet;
import javax.servlet.http.HttpServletRequest;
import javax.servlet.http.HttpServletResponse;
import java.sql.*;
/**
*
* @author privacyapplied
*/
@WebServlet(name="InsertSt", urlPatterns={"/InsertSt"})
public class InsertSt extends HttpServlet {
/**
* Processes requests for both HTTP <code>GET</code> and <code>POST</code> methods.
* @param request servlet request
* @param response servlet response
* @throws ServletException if a servlet-specific error occurs
* @throws IOException if an I/O error occurs
*/
protected void processRequest(HttpServletRequest request, HttpServletResponse response)
throws ServletException, IOException {
response.setContentType("text/html;charset=UTF-8");
PrintWriter out = response.getWriter();
Préparé par Elie Matta et al.
Copyright © 2010-2011, eliematta.com. All rights reserved 15
try{
Connection conn= DriverManager.getConnection
("jdbc:mysql://localhost?user=root&password=test") ;
PreparedStatement ps = conn.prepareStatement("insert into
school2.student(Name,Adresse) values(?,?)");
ps.setString(1, request.getParameter("name"));
ps.setString(2, request.getParameter("adresse"));
PreparedStatement ps1 = conn.prepareStatement("select * from school2.student
where Name=? and Adresse=?");
ps1.setString(1, request.getParameter("name"));
ps1.setString(2, request.getParameter("adresse"));
ResultSet res1 = ps1.executeQuery();
if(res1.next())
{
out.println("User and Adresse already exist !");
}
else
{
int res = ps.executeUpdate();
if (res!=0)
{
out.println("Done !");
}
else
{
out.println("Error !");
}
}
}
catch(Exception ex)
{
out.println("Error !");
}
finally
{
out.close();

Préparé par Elie Matta et al.
Copyright © 2010-2011, eliematta.com. All rights reserved 16
}
}
// <editor-fold defaultstate="collapsed" desc="HttpServlet methods. Click on the + sign on
the left to edit the code.">
/**
* Handles the HTTP <code>GET</code> method.
* @param request servlet request
* @param response servlet response
* @throws ServletException if a servlet-specific error occurs
* @throws IOException if an I/O error occurs
*/
@Override
protected void doGet(HttpServletRequest request, HttpServletResponse response)
throws ServletException, IOException {
processRequest(request, response);
}
/**
* Handles the HTTP <code>POST</code> method.
* @param request servlet request
* @param response servlet response
* @throws ServletException if a servlet-specific error occurs
* @throws IOException if an I/O error occurs
*/
@Override
protected void doPost(HttpServletRequest request, HttpServletResponse response)
throws ServletException, IOException {
processRequest(request, response);
}
/**
* Returns a short description of the servlet.
* @return a String containing servlet description
*/
@Override
public String getServletInfo() {
return "Short description";
Préparé par Elie Matta et al.
Copyright © 2010-2011, eliematta.com. All rights reserved 17
}// </editor-fold>
}
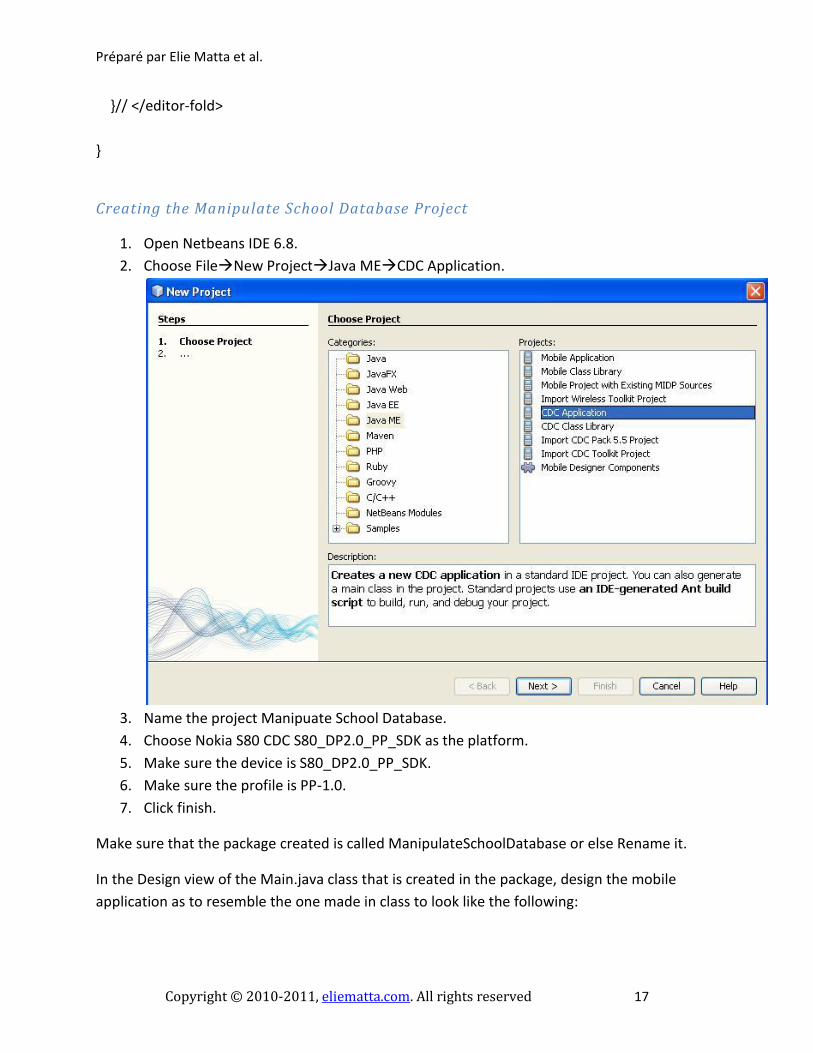
Creating the Manipulate School Database Project
1. Open Netbeans IDE 6.8.
2. Choose FileNew ProjectJava MECDC Application.
3. Name the project Manipuate School Database.
4. Choose Nokia S80 CDC S80_DP2.0_PP_SDK as the platform.
5. Make sure the device is S80_DP2.0_PP_SDK.
6. Make sure the profile is PP-1.0.
7. Click finish.
Make sure that the package created is called ManipulateSchoolDatabase or else Rename it.
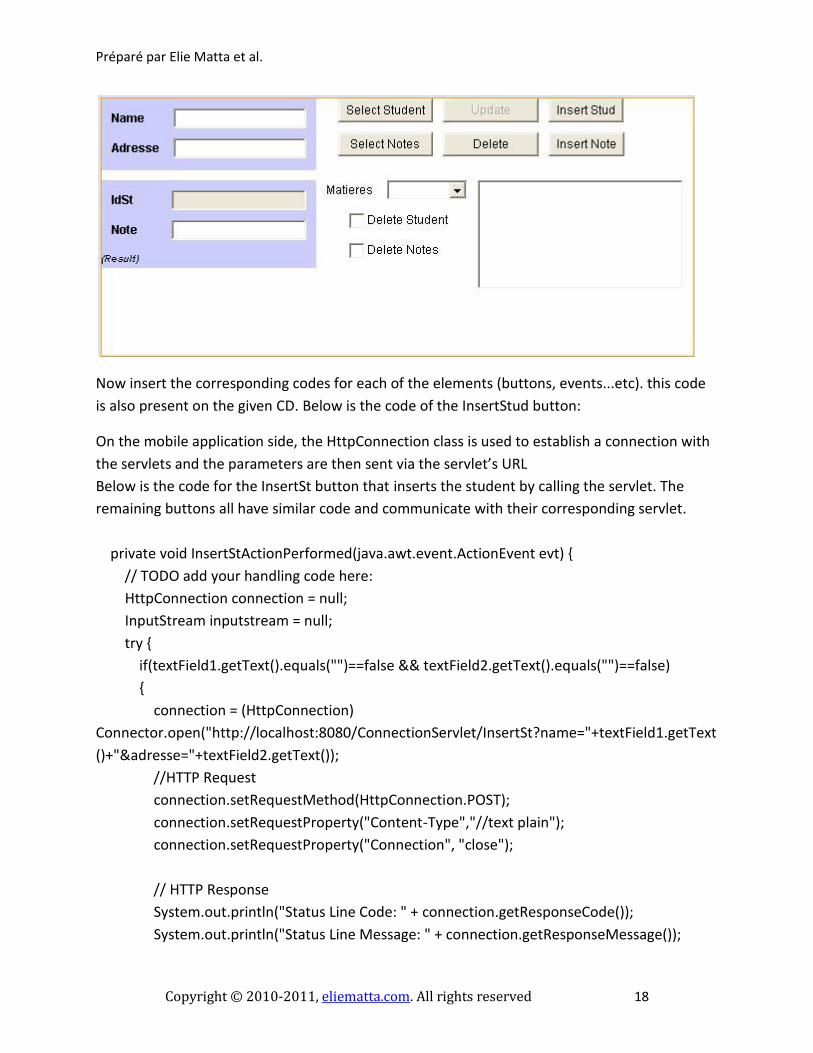
In the Design view of the Main.java class that is created in the package, design the mobile
application as to resemble the one made in class to look like the following:
Préparé par Elie Matta et al.
Copyright © 2010-2011, eliematta.com. All rights reserved 18
Now insert the corresponding codes for each of the elements (buttons, events...etc). this code
is also present on the given CD. Below is the code of the InsertStud button:
On the mobile application side, the HttpConnection class is used to establish a connection with
the servlets and the parameters are then sent via the servlet’s URL
Below is the code for the InsertSt button that inserts the student by calling the servlet. The
remaining buttons all have similar code and communicate with their corresponding servlet.
private void InsertStActionPerformed(java.awt.event.ActionEvent evt) {
// TODO add your handling code here:
HttpConnection connection = null;
InputStream inputstream = null;
try {
if(textField1.getText().equals("")==false && textField2.getText().equals("")==false)
{
connection = (HttpConnection)
Connector.open("http://localhost:8080/ConnectionServlet/InsertSt?name="+textField1.getText
()+"&adresse="+textField2.getText());
//HTTP Request
connection.setRequestMethod(HttpConnection.POST);
connection.setRequestProperty("Content-Type","//text plain");
connection.setRequestProperty("Connection", "close");
// HTTP Response
System.out.println("Status Line Code: " + connection.getResponseCode());
System.out.println("Status Line Message: " + connection.getResponseMessage());
Préparé par Elie Matta et al.
Copyright © 2010-2011, eliematta.com. All rights reserved 19
if (connection.getResponseCode() == HttpConnection.HTTP_OK) {
System.out.println(
connection.getHeaderField(0)+ " " + connection.getHeaderFieldKey(0));
System.out.println(
"Header Field Date: " + connection.getHeaderField("date"));
String str;
inputstream = connection.openInputStream();
int length = (int) connection.getLength();
if (length != -1) {
byte incomingData[] = new byte[length];
inputstream.read(incomingData);
str = new String(incomingData);
} else {
ByteArrayOutputStream bytestream =
new ByteArrayOutputStream();
int ch;
while ((ch = inputstream.read()) != -1) {
bytestream.write(ch);
}
str = new String(bytestream.toByteArray());
bytestream.close();
}
System.out.println(str);
label6.setText(str);
}
textField1.setText("");
textField2.setText("");
this.refreshGridSt();
}
else
{
label6.setText("Field(s) empty !");
}
} catch(IOException error) {
System.out.println("Caught IOException: " + error.toString());
} finally {
if (inputstream!= null) {
try {
Préparé par Elie Matta et al.
Copyright © 2010-2011, eliematta.com. All rights reserved 20
inputstream.close();
} catch( Exception error) {
/*log error*/
}
}
if (connection != null) {
try {
connection.close();
} catch( Exception error) {
/*log error*/
}
}
}
}
It is noticeable that all the code is very similar to the one of the .Net application being imitated.

Préparé par Elie Matta et al.
Copyright © 2010-2011, eliematta.com. All rights reserved 21
Running the application
In order to run the application, the Mysql connector should be present in the lib directory of
the JDK being used. Then, the servers (GlassFish and database server) must be run. This could
be achieved by running the ConnectionServlet project, which will start the required servers (the
server will have to be deployed on the port 8080). The servlet browser page could then be
closed and the servers will remain running.
The mobile application could then be run using the Nokia Series 80 emulator and used in the
same way as with the .Net application. The GUI is the one presented in the snapshot below