2019 Nissan Qashqai Type M Owner's Manual and Maintenance ...
MICROKEY2-25AIRMICROKEY-25
取扱説明書
Owner’s ManualManuel d’utilisation
BedienungsanleitungManual de usuario
用户手册
Thank you for purchasing the Korg microKEY Air/microKEY. In order to use this product in a computer music environment, you’ll need to adjust the MIDI settings of the host application. Please follow the directions in the host application’s owner’s manual to difine these settings.
Merci d’avoir choisi le microKEY Air/microKEY de Korg. Pour intégrer ce produit dans un système de production musi-cale assistée par ordinateur, vous devez régler les paramètres MIDI au sein du logiciel utilisé. Pour ce faire, suivez les instruc-tions dans la documentation de votre logiciel hôte.
Vielen Dank, dass Sie sich für ein microKEY Air/microKEY von Korg entschieden haben. Um dieses Produkt in einer Computermusikumgebung zu verwenden, müssen sie die MIDI-Einstellungen der Host-An-wendung anpassen. Befolgen Sie hierzu bitte die Anweisun-gen in der Bedienungsanleitung der Host-Anwendung.
Gracias por adquirir el microKEY Air/microKEY de Korg.Para utilizar este producto en un entorno musical de orde-nador, deberá realizar los ajustes de MIDI de la aplicación de host. Siga las indicaciones del manual de usuario de la apli-cación de host para definir estos ajustes.
感谢您购买 Korg microKEY Air/microKEY 。 为了能够在计算机音乐环境中使用本产品,您需要调整所使用应用程序的 MIDI 设置。请遵循所使用应用程序用户手册中的说明定义这些设置。
このたびは、コルグ microKEY Air/microKEY をお買い上げいただきまして、まことにありがとうございます。本機の機能を使用するには、ご使用になるアプリケーションの設定が必要です。アプリケーションの取扱説明書を参照し、設定してください。
PrecautionsLocationUsing the unit in the following locations can result in a malfunction.•In direct sunlight•Locations of extreme temperature or humidity•Excessively dusty or dirty locations•Locations of excessive vibration•Close to magnetic fieldsPower supplyBe sure to turn the power switch to OFF when the unit is not in use.Remove the battery in order to prevent it from leaking when the unit is not in use for extended periods.Interference with other electrical devicesRadios and televisions placed nearby may experience reception interference. Operate this unit at a suitable distance from radios and televisions.HandlingTo avoid breakage, do not apply excessive force to the switches or controls.CareIf the exterior becomes dirty, wipe it with a clean, dry cloth. Do not use liquid cleaners such as benzene or thinner, or cleaning compounds or flammable polishes.Keep this manualAfter reading this manual, please keep it for later reference.Keeping foreign matter out of your equipmentNever set any container with liquid in it near this equipment. If liquid gets into the equipment, it could cause a breakdown, fire, or electrical shock. Be careful not to let metal objects get into the equipment.
THE FCC REGULATION WARNING (for USA)NOTE: This equipment has been tested and found to comply with the limits for a Class B digital device, pursuant to Part 15 of the FCC Rules. These limits are designed to provide reasonable protection against harmful interference in a residential installation. This equipment generates, uses, and can radiate radio frequency energy and, if not installed and used in accordance with the instruc-tions, may cause harmful interference to radio communications. However, there is no guarantee that interference will not occur in a particular installation. If this equipment does cause harmful interference to radio or television reception, which can be determined by turning the equipment off and on, the user is encouraged to try to correct the interference by one or more of the following measures:•Reorient or relocate the receiving antenna.•Increase the separation between the equipment and receiver.•Connect the equipment into an outlet on a circuit different from that to which
the receiver is connected.•Consult the dealer or an experienced radio/TV technician for help.If items such as cables are included with this equipment, you must use those included items.Unauthorized changes or modification to this system can void the user’s authority to operate this equipment.
This device complies with Part 15 of the FCC Rules. Operation is subject to the following two conditions: (1) This device may not cause harmful interference, and (2) this device must accept any interference received, including interference that may cause undesired operation.CAN ICES-3 B / NMB-3 B
This equipment complies with FCC radiation exposure limits set forth for an uncontrolled environment and meets the FCC radio frequency (RF) Exposure Guideness. This equipment has very low levels of RF energy that it deemed to comply without maximum permissive exposure evaluation (MPE).
This device complies with Industry Canada licence - example RSS standard(s). Operation is subject to the following two conditions: (1) this device may not cause interference, and (2) this device must accept any interference, including interference that may cause undesired operation of the device.
This equipment complies with IC radiation exposure limits set forth for an uncon-trolled environment and meets RSS-102 of the IC radio frequency (RF) Exposure rules. This equipment has very low levels of RF energy that it deemed to comply without maximum permissive exposure evaluation (MPE).
European Union Directives Conformance StatementKorg Inc. hereby declares that the product meets the requirements of Directive 1999/5/EC.You can view the Declaration of Conformity (DoC) to Directive 1999/5/EC in the Owner’s Manual of this product posted on the Korg website (www.korg.com).
Notice regarding disposal (EU only)If the symbol is shown on the product, manual, battery, or package, you must dispose of it in the correct manner to avoid harm to human health or damage to the environment. Contact your local administrative body for details on the correct disposal method. If the battery contains heavy metals in excess of the regulated amount, a chemical symbol is displayed below the symbol on the battery or battery package.
DECLARATION OF CONFORMITY (for USA)Responsible Party : KORG USA INC.Address : 316 SOUTH SERVICE ROAD, MELVILLETelephone : 1-631-390-6500Equipment Type : BLUETOOTH MIDI KEYBOARD/COMPACT MIDI KEYBOARDModel : microKEY Air/microKEYThis device complies with Part 15 of FCC Rules. Operation is subject to the fol-lowing two conditions: (1) This device may not cause harmful interference,and (2) this device must accept any interference received, including interference that may cause undesired operation.
IMPORTANT NOTICE TO CONSUMERSThis product has been manufactured according to strict specifications and voltage requirements that are applicable in the country in which it is intended that this product should be used. If you have purchased this product via the internet, through mail order, and/or via a telephone sale, you must verify that this product is intended to be used in the country in which you reside.WARNING: Use of this product in any country other than that for which it is intended could be dangerous and could invalidate the manufacturer’s or distribu-tor’s warranty. Please also retain your receipt as proof of purchase otherwise your product may be disqualified from the manufacturer’s or distributor’s warranty.
- Apple, iPad, iPhone, Mac, iOS and Mac OS are trademarks of Apple Inc., registered in the U.S. and other countries.
- Windows 7 and Windows 8 are trademarks of Microsoft Corporation in the U.S. and other countries.
- Bluetooth is a registered trademark of Bluetooth SIG, Inc.- All product names and company names are the trademarks or registered trade-
marks of their respective owners.
PrécautionsEmplacementL’utilisation de cet instrument dans les endroits suivants peut en entraîner le mauvais fonctionnement.•En plein soleil•Endroits très chauds ou très humides•Endroits sales ou fort poussiéreux•Endroits soumis à de fortes vibrations•A proximité de champs magnétiquesAlimentationLorsque vous n’utilisez pas l’appareil, n’oubliez pas de le mettre hors tension. Reti-rez les piles pour éviter toute fuite lorsque l’appareil ne sera pas utilisé pendant de longues périodes de temps.Interférences avec d’autres appareils électriquesLes postes de radio et de télévision situés à proximité peuvent par conséquent souffrir d’interférences à la réception. Veuillez dès lors faire fonctionner cet appareil à une distance raisonnable de postes de radio et de télévision.ManiementPour éviter de les endommager, manipulez les commandes et les boutons de cet instrument avec soin.EntretienLorsque l’instrument se salit, nettoyez-le avec un chiffon propre et sec. Ne vous servez pas d’agents de nettoyage liquides tels que du benzène ou du diluant, voire des produits inflammables.Conservez ce manuelAprès avoir lu ce manuel, veuillez le conserver soigneusement pour toute référence ultérieure.Evitez toute intrusion d’objets ou de liquideNe placez jamais de récipient contenant du liquide près de l’instrument. Si le liquide se renverse ou coule, il risque de provoquer des dommages, un court-circuit ou une électrocution. Veillez à ne pas laisser tomber des objets métalliques dans le boîtier (trombones, par ex.).
Le présent appareil est conforme aux CNR d'Industrie Canada applicables aux ap-pareils radio exempts de licence. L'exploitation est autorisée aux deux conditions suivantes : (1) l'appareil ne doit pas produire de brouillage, et (2) l'utilisateur de l'appareil doit accepter tout brouillage radioélectrique subi, même si le brouillage est susceptible d'en compromettre le fonctionnement.
Cet équipement est conforme aux limites d’exposition aux rayonnements énon-cées pour un environnement non contrôlé et respecte les règles d’exposition aux fréquences radioélectriques (RF) CNR-102 de l’IC. Cet équipement émet une énergie RF très faible qui est considérée conforme sans évaluation de l’exposition maximale autorisée.
Déclaration de conformité aux directives de l’Union européenne
Korg Inc. déclare par la présente que le produit est conforme aux exigences de la directive 1999/5/CE.Vous pouvez consulter la Déclaration de conformité (DoC) à la directive 1999/5/CE dans le mode d’emploi de ce produit, disponible sur le site Internet de Korg (www.korg.com).
Note concernant les dispositions (Seulement EU)Si ce symbole apparait sur le produit, le manuel, les piles ou les packs de piles, cela signifie que vous devez le recycler d’une manière correcte afin de prévenir les dommages pour la santé humaine et les dommages potentiels pour l’environnement. Contactez votre administration locale pour de plus amples renseignements concernant la bonne méthode de recyclage. Si la pile contient des métaux lourds au-delà du seuil régle-menté, un symbole chimique est affiché en dessous du symbole de la
poubelle barrée d’une croix sur la pile ou le pack de piles.
REMARQUE IMPORTANTE POUR LES CLIENTSCe produit a été fabriqué suivant des spécifications sévères et des besoins en tension applicables dans le pays où ce produit doit être utilisé.Si vous avez acheté ce produit via l’internet, par vente par correspondance ou/et vente par téléphone, vous devez vérifier que ce produit est bien utilisable dans le pays où vous résidez.ATTENTION: L’utilisation de ce produit dans un pays autre que celui pour lequel il a été conçu peut être dangereuse et annulera la garantie du fabricant ou du distributeur. Conservez bien votre récépissé qui est la preuve de votre achat, faute de quoi votre produit ne risque de ne plus être couvert par la garantie du fabricant ou du distributeur.
- Apple, iPad, iPhone, Mac, iOS et Mac OS sont des marques commerciales d’Apple Inc. enregistrées aux États-Unis et dans d’autres pays.
- Windows 7 et Windows 8 sont des marques commerciales de Microsoft Corporation aux États-Unis et dans d’autres pays.
- Bluetooth est une marque déposée de Bluetooth SIG, Inc.- Tous les noms de produits et de sociétés sont des marques commerciales ou
déposées de leur détenteur respectif.
VorsichtsmaßnahmenAufstellungsortVermeiden Sie das Aufstellen des Geräts an Orten, an denen•esdirekterSonneneinstrahlungausgesetztist;•hoheFeuchtigkeitoderExtremtemperaturenauftretenkönnen;•StauboderSchmutzingroßenMengenvorhandensind;•dasGerätErschütterungenausgesetztseinkann.•inderNäheeinesMagnetfeldes.StromversorgungStellen Sie den Netzschalter auf OFF, wenn das Gerät nicht benutzt wird. Wenn Sie dasGerätübereinenlängerenZeitraumnichtbenutzen,nehmenSiedieBatterienheraus,damit sie nicht auslaufen.ReinigungBei auftretenderVerschmutzungkönnenSiedasGehäusemit einem trockenen,sauberenTuchabwischen.VerwendenSiekeinerleiFlüssigreinigerwiebeispiels-weiseReinigungsbenzin,Verdünnungs-oderSpülmittel.VerwendenSieniemalsbrennbare Reiniger.BedienungsanleitungBewahren Sie diese Bedienungsanleitung gut auf, falls Sie sie später nocheinmalbenötigen.Flüssigkeiten und FremdkörperStellenSieniemalsBehältnissemitFlüssigkeiteninderNähedesGerätsauf.WennFlüssigkeitindasGerätgelangt,könnenBeschädigungdesGeräts,Feuerodereinelek-trischerSchlagdieFolgesein.BeachtenSie,daßkeinerleiFremdkörperin das Gerät gelangen.
Entsprechungserklärung für die Richtlinien dereuropäischen Union
Korg Inc. erklärt hiermit, dass dieses Gerät die Anforderungen der Richtlinie1999/5/ECerfüllt.DieseEntsprechungserklärung (DoC) fürdie 1999/5/EC-Richtliniefinden Sie in der Bedienungsanleitung dieses Geräts auf der Korg-Web-page (www.korg.com)
Hinweis zur Entsorgung (Nur EU)WennSiedasSymbolmitder„durchgekreuztenMülltonne“aufIhremProdukt,derdazugehörigenBedienungsanleitung,derBat-terieoderderVerpackungsehen,müssenSiedasProduktindervorgeschriebenen Art und Weise entsorgen um Schäden an der menschlichen Gesundheit und der Umwelt zu vermeiden. Batterien oder Akkus, die Schadstoffe enthalten, sind auch mit dem Symbol einerdurchgekreuztenMülltonnegekennzeichnet.InderNähezum
MülltonnensymbolbefindetsichdiechemischeBezeichnungdesSchadstof-fes.CdoderNiCdstehtfürCadmium,PbfürBleiundHgfürQuecksilber.
WICHTIGER HINWEIS FÜR KUNDENDieses Produkt wurde unter strenger Beachtung von Spezifikationen und Spannungsanforderungen hergestellt, die im Bestimmungsland gelten. WennSiediesesProduktüberdasInternet,perPostversandund/odermittelefonischerBestellunggekaufthaben,müssenSiebestätigen,dassdiesesProduktfürIhrWohngebietausgelegtist.WARNUNG: Verwendung dieses Produkts in einem anderen Land als dem, fürdasesbestimmtist,verwendetwird,kanngefährlichseinunddieGaran-tie des Herstellers oder Importeurs hinfällig lassen werden. Bitte bewahren SiedieseQuittungalsKaufbelegauf,daandernfallsdasProduktvonderGarantie des Herstellers oder Importeurs ausgeschlossen werden kann.
- Apple, iPad, iPhone, Mac, iOS und Mac OS sind in den USA und anderen Ländern eingetragene Markenzeichen von Apple Inc.
- Windows 7 und Windows 8 sind in den USA und anderen Ländern einge-tragene Markenzeichen von Microsoft.
- Bluetooth ist ein eingetragenes Markenzeichen der Bluetooth SIG, Inc.- Alle Produkt- und Firmennamen sind Warenzeichen oder eingetragene WarenzeichenderbetreffendenEigentümer.
PrecaucionesUbicaciónEl uso de la unidad en las siguientes ubicaciones puede dar como resultado un mal funcionamiento:•Expuesto a la luz directa del sol•Zonasdeextremadatemperaturaohumedad•Zonasconexcesodesuciedadopolvo•Zonasconexcesivavibración•Cercano a campos magnéticosFuente de alimentaciónApague la unidad cuando no la use la batería. Retire las baterías si no va a usar launidad durante un tiempo largo.
ManejoPara evitar una rotura, no aplique excesiva fuerza a los conmutadores o controles.CuidadoSi exterior se ensucia, límpiese con un trapo seco. No use líquidos limpiadores como disolvente, ni compuestos inflamables.Guarde este manualDespués de leer este manual, guárdelo para futuras consultas.Mantenga los elementos externos alejados del equipoNunca coloque ningún recipiente con líquido cerca de este equipo, podría causar un cortocircuito, fuero o descarga eléctrica. Cuide de que no caiga ningún objeto metálico dentro del equipo.
Declaración de Conformidad con las Directivas de la Unión EuropeaPor la presente, Korg Inc. declara que este producto cumple con los requisitos de la Directiva 1999/5/EC.PuedeconsultarlaDeclaracióndeConformidad(DoC)conlaDirectiva1999/5/EC en el Manual del Usuario de este producto, disponible en el sitio web de Korg (www.korg.com).
Nota respecto a residuos y deshechos (solo UE)Si aparece el símbolo del cubo de basura tachado sobre un producto, su manual de usuario, la batería, o el embalaje de cualquiera de éstos, signi-fica que cuando tire dichos artículos a la basura, ha de hacerlo en acuerdo conlanormativavigentedelaUniónEuropeaparaprevenirdañosalasalud pública y al medioambiente. Le rogamos que se ponga en contacto con su oficina o ministerio de medioambiente para más detalles. Si la ba-tería contiene metales pesados por encima del límite permitido, habrá un
símbolo de un material químico, debajo del símbolo del cubo de basura tachado.
NOTA IMPORTANTE PARA EL CONSUMIDOREste producto ha sido fabricado de acuerdo a estrictas especificaciones y requeri-mientos de voltaje aplicables en el país para el cual está destinado. Si ha comprado esteproductoporinternet,atravésdecorreo,y/oventatelefónica,debeustedverificar que el uso de este producto está destinado al país en el cual reside.AVISO: El uso de este producto en un país distinto al cual está destinado podría resultar peligroso y podría invalidar la garantía del fabricante o distribuidor. Por favor guarde su recibo como prueba de compra ya que de otro modo el producto puede verse privado de la garantía del fabricante o distribuidor.
- Apple, iPad, iPhone, Mac, iOS y Mac OS son marcas comerciales de Apple Inc., registradas en los EE. UU. y en otros países.
- Windows 7 y Windows 8 son marcas comerciales de Microsoft Corporation en los EE. UU. y en otros países.
- Bluetooth es una marca registrada de Bluetooth SIG, Inc.- Todoslosnombresdeproductosycompañíassonmarcascomercialesomarcas
registradas de sus respectivos propietarios.
安全上のご注意ご使用になる前に必ずお読みください
ここに記載した注意事項は、製品を安全に正しくご使用いただき、あなたや他の方々への危害や損害を未然に防ぐためのものです。注意事項は誤った取り扱いで生じる危害や損害の大きさ、または切迫の程度によって、内容を「警告」「注意」の2つに分けています。これらはあなたや他の方々の安全や機器の保全に関わる重要な内容ですので、よく理解した上で必ずお守りください。
火災・感電・人身障害の危険を防止するには
図記号の例
記号は、注意(危険、警告を含む)を示しています。記号の中には、具体的な注意内容が描かれています。左の図は「一般的な注意、警告、危険」を表しています。
記号は、禁止(してはいけないこと)を示しています。記号の中には、具体的な注意内容が描かれることがあります。左の図は「分解禁止」を表しています。
記号は、強制(必ず行うこと)を示しています。記号の中には、具体的な注意内容が描かれることがあります。左の図は「守らなければならないこと」を表しています。
以下の指示を守ってください
警告 この注意事項を無視した取り扱いをすると、死亡や重傷を負う可能性があります
・次のような場合には、直ちに使用を中止する。○ 異物が内部に入ったとき○ 製品に異常や故障が生じたとき
修理が必要なときは、コルグお客様相談窓口へ依頼してください。
・本製品を分解したり改造したりしない。・修理、部品の交換などで、取扱説明書に書かれてること以外は絶対にしない。・大音量や不快な程度の音量で長時間使用しない。
大音量で長時間使用すると、難聴になる可能性があります。万一、聴力低下や耳鳴りを感じたら、専門の医師に相談してください。・本製品に異物(燃えやすいもの、硬貨、針金など)を入れない。・温度が極端に高い場所(直射日光の当たる場所、暖房機器の近く、発熱する機器の上など)で使用や保管はしない。・振動の多い場所で使用や保管はしない。・ホコリの多い場所で使用や保管はしない。
・風呂場、シャワー室で使用や保管はしない。・雨天時の野外のように、湿気の多い場所や水滴のかかる場所で、使用や保管はしない。・本製品の上に、花瓶のような液体が入ったものを置かない。・本製品に液体をこぼさない。
・濡れた手で本製品を使用しない。
注意 この注意事項を無視した取り扱いをすると、傷害を負う可能性 または物理的損害が発生する可能性があります
・正常な通気が妨げられない所に設置して使用する。・テレビ、電子機器などから十分に離して使用する。
本製品をテレビ等の横に設置すると、本製品の磁場によってテレビ等の故障の原因になることがあります。・外装のお手入れは、乾いた柔らかい布を使って軽く拭く。・長時間使用しないときは、電池の液漏れを防ぐために電池を抜く。・電池は幼児の手の届かないところへ保管する。・電池を過度の熱源(日光、火など)にさらさない。
・スイッチやツマミなどに必要以上の力を加えない。故障の原因になります。・外装のお手入れに、ベンジンやシンナー系の液体、コンパウンド質、強燃性のポリッシャーは使用しない。・不安定な場所に置かない。
本製品が落下してお客様がけがをしたり、本製品が破損する恐れがあります。・本製品の上に乗ったり、重いものをのせたりしない。
本製品が落下または損傷してお客様がけがをしたり、本製品が破損する恐れがあります。
・本製品の隙間に指などを入れない。お客様がけがをしたり、本製品が破損する恐れがあります。・本製品に前後方向から無理な力を加えない。
本製品が落下してお客様がけがをしたり、本製品が破損する恐れがあります。
■ワイヤレス(無線)についての注意事項(microKEYAirのみ)本製品の使用周波数は2.4GHz帯です。この周波数帯では、電子レンジなどの産業・科学・医療用機器のほか、工場の製造ラインなどで使用されている移動体識別用の構内無線局(免許を要する無線局)や、特定小電力無線局(免許を要しない無線局)、アマチュア無線局(免許を要する無線局)が運用されています。(以下「他の無線局」と呼ぶ)他の無線機器との電波干渉を防止するために、下記事項に注意してご使用ください。1. 本製品を使用する前に、近くで「他の無線局」が運用されていないことを確認してく
ださい。また重大な影響を及ぼす恐れのある場所(医療機器のそば、航空機内など)では使用しないでください。
2. 万一、本製品と「他の無線局」の間で電波干渉の事例が発生した場合には、速やかに使用を停止した上で、混信回避のための処置(例えば使用場所の変更など)を行ってください。
3. 不明な点、その他お困りのことが起きたときは、弊社の「お客様相談窓口」へお問い合わせください。
* Apple、iPad、iPhone、Mac、iOSおよびMac OSは、Apple Inc.の登録商標です。* Windows 7およびWindows 8は、Microsoft Corporationの登録商標です。* BluetoothはBluetooth SIG, Inc.の登録商標です。* すべての製品名および会社名は、各社の商標または登録商標です。
アフターサービス修理および商品のお取り扱いについてのご質問、ご相談は、お客様相談窓口へお問い合わせください。
お客様相談窓口受付時間:月曜~金曜 10:00~17:00(祝祭日、窓口休業日を除く)※PHS等一部の電話ではご利用できません。固定電話または携帯電話からおかけください。
● サービス・センター: 〒168-0073 東京都杉並区下高井戸1-15-12
コルグ microKEYmicroKEY Air 保証書
本保証書は、保証規定により無償修理をお約束するものです。
お買い上げ日
販売店名.
年 月 日
保証規定(必ずお読みください)本保証書は、保証期間中に本製品を保証するもので、付属品類(ヘッドホンなど)は保証の対象になりません。保証期間内に本製品が故障した場合は、保証規定によって無償修理いたします。1. 本保証書の有効期間はお買い上げ日より1ケ年です。2. 次の修理等は保証期間内であっても有償となります。
• 消耗部品(電池、スピーカー、真空管、フェーダーなど)の交換。• お取扱い方法が不適当のために生じた故障。• 天災(火災、浸水等)によって生じた故障。• 故障の原因が本製品以外の他の機器にある場合。• 不当な改造、調整、部品交換などにより生じた故障または損傷。• 保証書にお買い上げ日、販売店名が未記入の場合、または字句が書き替えられて
いる場合。• 本保証書の提示がない場合。
尚、当社が修理した部分が再度故障した場合は、保証期間外であっても、修理した日より3ケ月以内に限り無償修理いたします。
3. 本保証書は日本国内においてのみ有効です。 This warranty is valid only in Japan.4. お客様が保証期間中に移転された場合でも、保証は引き続きお使いいただけます。
詳しくは、お客様相談窓口までお問い合わせください。5. 修理、運送費用が製品の価格より高くなることがありますので、あらかじめお客様相談窓
口へご相談ください。発送にかかる費用は、お客様の負担とさせていただきます。6. 修理中の代替品、商品の貸し出し等は、いかなる場合においても一切行っておりませ
ん。本製品の故障、または使用上生じたお客様の直接、間接の損害につきましては、弊社は一切の責任を負いかねますのでご了承ください。本保証書は、保証規定により無償修理をお約束するためのもので、これよりお客様の法律上の権利を制限するものではありません。
■お願い1. 保証書に販売年月日等の記入がない場合は無効となります。記入できないときは、お
買い上げ年月日を証明できる領収書等と一緒に保管してください。2. 保証書は再発行致しませんので、紛失しないように大切に保管してください。
注意事项地点在以下地点使用本产品可能会引致故障。• 阳光直接曝晒• 极端温度或潮湿• 非常尘埃或肮脏• 非常震荡• 靠近磁场
电源不使用本机时请确保将电源开关置于 OFF 位置。长时间不使用本机时请确保取出电池以避免电池漏液。操作为避免损坏,操作或按键时不宜过于用力。保养如果产品外表污脏,可用清洁干燥的布擦拭,请勿使用液体清洁剂,如苯或其稀释溶液、清洁复合剂或易燃上光剂等。用户手册的保存阅读完本手册后,请妥善保存以作日后参考之用。需避免接触的物品在本产品周围不宜放置液体,如液体渗入产品内可能会导致损坏、起火或触电,同时须保证任何其他金属物体不会进入产品内。
致用户的重要提示本产品的生产制造均严格按照本产品被指定使用的国家的规格及电压执行。如你的产品是通过互联网邮购及电话订购的,那你必须确认所购买的产品是被指定在你所居住的国家使用的。警告:在被指定使用的国家外的其他地方使用本产品可能会导致危险及无法享受制造商或产品代理商提供的保修。同时,请妥善保存购买本产品时的收据或发票等证明文件,一旦遗失可能会导致制造商及产品代理商无法承认你的产品的保修资格。
本用户手册提及的所有产品名称及公司名称均为商标,或已由该商标持有者注册了的商标。Apple、iPad、iPhone、Mac、iOS 和 Mac OS 是 Apple Inc.在美国和其他国家或地区注册的商标。Windows 7 和 Windows 8 是 Microsoft Corporation 在美国和其他国家或地区注册的商标。Bluetooth 是 Bluetooth SIG, Inc. 的注册商标。
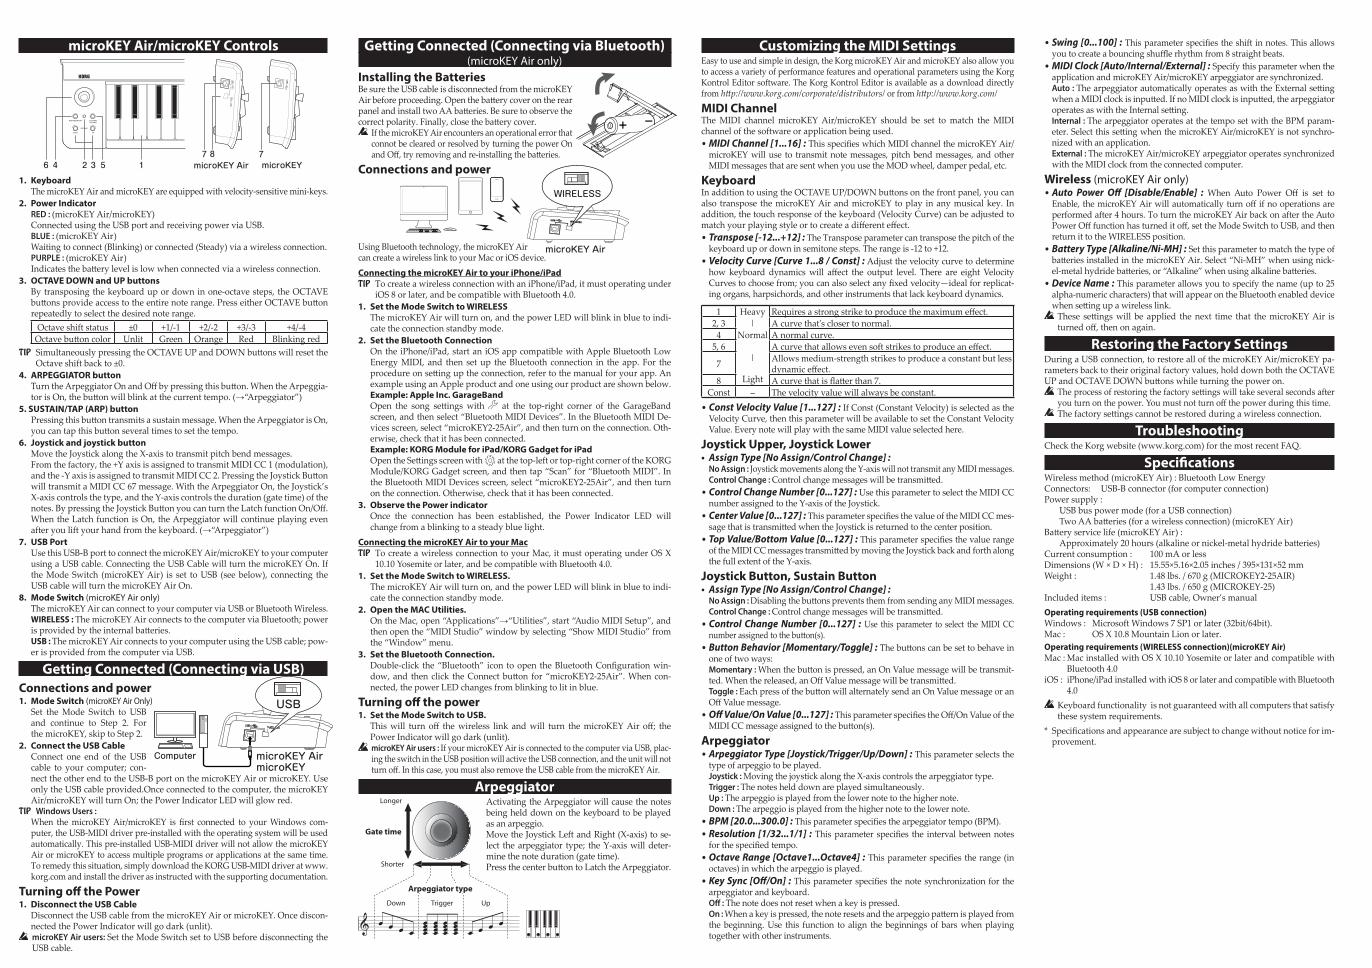
microKEY Air/microKEY Controls
7812 346
75 microKEYmicroKEY Air
1. KeyboardThe microKEY Air and microKEY are equipped with velocity-sensitive mini-keys.
2. Power IndicatorRED : (microKEY Air/microKEY)Connected using the USB port and receiving power via USB.BLUE : (microKEY Air)Waiting to connect (Blinking) or connected (Steady) via a wireless connection.PURPLE : (microKEY Air)Indicatesthebatterylevelislowwhenconnectedviaawirelessconnection.
3. OCTAVE DOWN and UP buttonsBy transposing the keyboard up or down in one-octave steps, the OCTAVE buttonsprovideaccesstotheentirenoterange.PresseitherOCTAVEbuttonrepeatedly to select the desired note range.
Octave shift status ±0 +1/-1 +2/-2 +3/-3 +4/-4Octavebuttoncolor Unlit Green Orange Red Blinking red
TIP SimultaneouslypressingtheOCTAVEUPandDOWNbuttonswillresettheOctave shift back to ±0.
4. ARPEGGIATOR buttonTurntheArpeggiatorOnandOffbypressingthisbutton.WhentheArpeggia-torisOn,thebuttonwillblinkatthecurrenttempo.(→“Arpeggiator”)
5. SUSTAIN/TAP (ARP) buttonPressingthisbuttontransmitsasustainmessage.WhentheArpeggiatorisOn,youcantapthisbuttonseveraltimestosetthetempo.
6. Joystick and joystick buttonMove the Joystick along the X-axis to transmit pitch bend messages. From the factory, the +Y axis is assigned to transmit MIDI CC 1 (modulation), andthe-YaxisisassignedtotransmitMIDICC2.PressingtheJoystickButtonwill transmit a MIDI CC 67 message. With the Arpeggiator On, the Joystick’s X-axis controls the type, and the Y-axis controls the duration (gate time) of the notes.BypressingtheJoystickButtonyoucanturntheLatchfunctionOn/Off.When the Latch function is On, the Arpeggiator will continue playing even after you lift your hand from the keyboard. (→“Arpeggiator”)
7. USB PortUse this USB-B port to connect the microKEY Air/microKEY to your computer using a USB cable. Connecting the USB Cable will turn the microKEY On. If the Mode Switch (microKEY Air) is set to USB (see below), connecting the USB cable will turn the microKEY Air On.
8. Mode Switch (microKEY Air only)The microKEY Air can connect to your computer via USB or Bluetooth Wireless.WIRELESS : ThemicroKEYAirconnectstothecomputerviaBluetooth;powerisprovidedbytheinternalbatteries.USB : ThemicroKEYAirconnectstoyourcomputerusingtheUSBcable;pow-er is provided from the computer via USB.
Getting Connected (Connecting via USB)Connections and power1. Mode Switch (microKEY Air Only)
Set the Mode Switch to USB and continue to Step 2. For the microKEY, skip to Step 2.
2. Connect the USB CableConnect one end of the USB cable to your computer; con-nect the other end to the USB-B port on the microKEY Air or microKEY. Use only the USB cable provided.Once connected to the computer, the microKEY Air/microKEYwillturnOn;thePowerIndicatorLEDwillglowred.
TIP Windows Users :When themicroKEYAir/microKEY is first connected to yourWindows com-puter, the USB-MIDI driver pre-installed with the operating system will be used automatically. This pre-installed USB-MIDI driver will not allow the microKEY Air or microKEY to access multiple programs or applications at the same time. To remedy this situation, simply download the KORG USB-MIDI driver at www.korg.com and install the driver as instructed with the supporting documentation.
Turning off the Power1. Disconnect the USB Cable
Disconnect the USB cable from the microKEY Air or microKEY. Once discon-nected the Power Indicator will go dark (unlit).
microKEY Air users: Set the Mode Switch set to USB before disconnecting the USB cable.
Getting Connected (Connecting via Bluetooth)(microKEY Air only)
Installing the BatteriesBe sure the USB cable is disconnected from the microKEY Airbeforeproceeding.OpenthebatterycoverontherearpanelandinstalltwoAAbatteries.Besuretoobservethecorrectpolarity.Finally,closethebatterycover.
If the microKEY Air encounters an operational error that connot be cleared or resolved by turning the power On andOff,tryremovingandre-installingthebatteries.
Connections and power
WIRELESS
microKEY AirUsing Bluetooth technology, the microKEY Aircan create a wireless link to your Mac or iOS device.Connecting the microKEY Air to your iPhone/iPadTIP To create a wireless connection with an iPhone/iPad, it must operating under
iOS 8 or later, and be compatible with Bluetooth 4.0.1. Set the Mode Switch to WIRELESS
The microKEY Air will turn on, and the power LED will blink in blue to indi-cate the connection standby mode.
2. Set the Bluetooth ConnectionOn the iPhone/iPad, start an iOS app compatible with Apple Bluetooth Low Energy MIDI, and then set up the Bluetooth connection in the app. For the procedureonsettinguptheconnection,refertothemanualforyourapp.Anexample using an Apple product and one using our product are shown below. Example: Apple Inc. GarageBand Open the song settings with at the top-right corner of the GarageBand screen,andthenselect“BluetoothMIDIDevices”.IntheBluetoothMIDIDe-vicesscreen,select“microKEY2-25Air”,andthenturnontheconnection.Oth-erwise, check that it has been connected. Example: KORG Module for iPad/KORG Gadget for iPad OpentheSettingsscreenwith at the top-left or top-right corner of the KORG Module/KORGGadgetscreen,andthentap“Scan”for“BluetoothMIDI”.IntheBluetoothMIDIDevicesscreen,select“microKEY2-25Air”,andthenturnon the connection. Otherwise, check that it has been connected.
3. Observe the Power indicatorOnce the connection has been established, the Power Indicator LED will change from a blinking to a steady blue light.
Connecting the microKEY Air to your MacTIP To create a wireless connection to your Mac, it must operating under OS X
10.10 Yosemite or later, and be compatible with Bluetooth 4.0.1. Set the Mode Switch to WIRELESS.
The microKEY Air will turn on, and the power LED will blink in blue to indi-cate the connection standby mode.
2. Open the MAC Utilities.OntheMac,open“Applications”→“Utilities”,start“AudioMIDISetup”,andthenopenthe“MIDIStudio”windowbyselecting“ShowMIDIStudio”fromthe“Window”menu.
3. Set the Bluetooth Connection.Double-click the“Bluetooth” icon toopen theBluetoothConfigurationwin-dow,and thenclick theConnectbutton for“microKEY2-25Air”.Whencon-nected, the power LED changes from blinking to lit in blue.
Turning off the power1. Set the Mode Switch to USB.Thiswill turn off thewireless link andwill turn themicroKEYAir off; thePower Indicator will go dark (unlit). microKEY Air users : If your microKEY Air is connected to the computer via USB, plac-ing the switch in the USB position will active the USB connection, and the unit will not turnoff.Inthiscase,youmustalsoremovetheUSBcablefromthemicroKEYAir.
ArpeggiatorActivating the Arpeggiator will cause the notes being held down on the keyboard to be played as an arpeggio.Move the Joystick Left and Right (X-axis) to se-lect thearpeggiator type; theY-axiswilldeter-mine the note duration (gate time).PressthecenterbuttontoLatchtheArpeggiator.
Customizing the MIDI SettingsEasy to use and simple in design, the Korg microKEY Air and microKEY also allow you to access a variety of performance features and operational parameters using the Korg Kontrol Editor software. The Korg Kontrol Editor is available as a download directly from http://www.korg.com/corporate/distributors/ or from http://www.korg.com/
MIDI ChannelThe MIDI channel microKEY Air/microKEY should be set to match the MIDI channel of the software or application being used.•MIDI Channel [1...16] :ThisspecifieswhichMIDIchannelthemicroKEYAir/
microKEY will use to transmit note messages, pitch bend messages, and other MIDI messages that are sent when you use the MOD wheel, damper pedal, etc.
KeyboardInadditiontousingtheOCTAVEUP/DOWNbuttonsonthefrontpanel,youcanalso transpose the microKEY Air and microKEY to play in any musical key. In addition, the touch response of the keyboard (Velocity Curve) can be adjusted to matchyourplayingstyleortocreateadifferenteffect.•Transpose [-12...+12] : The Transpose parameter can transpose the pitch of the
keyboard up or down in semitone steps. The range is -12 to +12.•Velocity Curve [Curve 1...8 / Const] : Adjust the velocity curve to determine how keyboard dynamicswill affect the output level. There are eight VelocityCurvestochoosefrom;youcanalsoselectanyfixedvelocity—idealforreplicat-ing organs, harpsichords, and other instruments that lack keyboard dynamics.
1 Heavy Requiresastrongstriketoproducethemaximumeffect.2, 3 | A curve that's closer to normal.4 Normal A normal curve.
5, 6|
Acurvethatallowsevensoftstrikestoproduceaneffect.
7 Allows medium-strength strikes to produce a constant but less dynamiceffect.
8 Light Acurvethatisflatterthan7.Const – The velocity value will always be constant.•Const Velocity Value [1...127] : If Const (Constant Velocity) is selected as the
Velocity Curve, then this parameter will be available to set the Constant Velocity Value. Every note will play with the same MIDI value selected here.
Joystick Upper, Joystick Lower• Assign Type [No Assign/Control Change] :
No Assign : Joystick movements along the Y-axis will not transmit any MIDI messages.Control Change : Controlchangemessageswillbetransmitted.
•Control Change Number [0...127] : Use this parameter to select the MIDI CC number assigned to the Y-axis of the Joystick.
•Center Value [0...127] :ThisparameterspecifiesthevalueoftheMIDICCmes-sagethatistransmittedwhentheJoystickisreturnedtothecenterposition.
•Top Value/Bottom Value [0...127] :ThisparameterspecifiesthevaluerangeoftheMIDICCmessagestransmittedbymovingtheJoystickbackandforthalongthe full extent of the Y-axis.
Joystick Button, Sustain Button• Assign Type [No Assign/Control Change] :
No Assign : DisablingthebuttonspreventsthemfromsendinganyMIDImessages.Control Change : Controlchangemessageswillbetransmitted.
•Control Change Number [0...127] : Use this parameter to select the MIDI CC numberassignedtothebutton(s).
•Button Behavior [Momentary/Toggle] :Thebuttonscanbesettobehaveinone of two ways:Momentary : Whenthebuttonispressed,anOnValuemessagewillbetransmit-ted.Whenthereleased,anOffValuemessagewillbetransmitted.Toggle : EachpressofthebuttonwillalternatelysendanOnValuemessageoranOffValuemessage.
•Off Value/On Value [0...127] :ThisparameterspecifiestheOff/OnValueoftheMIDICCmessageassignedtothebutton(s).
Arpeggiator•Arpeggiator Type [Joystick/Trigger/Up/Down] : This parameter selects the
type of arpeggio to be played.Joystick : Moving the joystick along the X-axis controls the arpeggiator type.Trigger : The notes held down are played simultaneously.Up : The arpeggio is played from the lower note to the higher note.Down : The arpeggio is played from the higher note to the lower note.
•BPM [20.0...300.0] :Thisparameterspecifiesthearpeggiatortempo(BPM).•Resolution [1/32...1/1] :Thisparameter specifies the intervalbetweennotesforthespecifiedtempo.
•Octave Range [Octave1...Octave4] :Thisparameterspecifiestherange(inoctaves) in which the arpeggio is played.
•Key Sync [Off/On] :Thisparameterspecifiesthenotesynchronizationforthearpeggiator and keyboard.Off : The note does not reset when a key is pressed.On : Whenakeyispressed,thenoteresetsandthearpeggiopatternisplayedfromthe beginning. Use this function to align the beginnings of bars when playing together with other instruments.
•Swing [0...100] :Thisparameterspecifiestheshiftinnotes.Thisallowsyoutocreateabouncingshufflerhythmfrom8straightbeats.
•MIDI Clock [Auto/Internal/External] : Specify this parameter when the application and microKEY Air/microKEY arpeggiator are synchronized.Auto : ThearpeggiatorautomaticallyoperatesaswiththeExternalsettingwhenaMIDIclockisinputted.IfnoMIDIclockisinputted,thearpeggiatoroperatesaswiththeInternalsetting.Internal : The arpeggiator operates at the tempo set with the BPM param-eter.SelectthissettingwhenthemicroKEYAir/microKEYisnotsynchro-nized with an application.External : The microKEY Air/microKEY arpeggiator operates synchronized with the MIDI clock from the connected computer.
Wireless (microKEY Air only)•Auto Power Off [Disable/Enable] : When Auto Power Off is set toEnable,themicroKEYAirwillautomaticallyturnoffifnooperationsareperformed after 4 hours. To turn the microKEY Air back on after the Auto PowerOfffunctionhasturneditoff,settheModeSwitchtoUSB,andthenreturn it to the WIRELESS position.
•Battery Type [Alkaline/Ni-MH] : Set this parameter to match the type of batteriesinstalledinthemicroKEYAir.Select“Ni-MH”whenusingnick-el-metalhydridebatteries,or“Alkaline”whenusingalkalinebatteries.
•Device Name : This parameter allows you to specify the name (up to 25 alpha-numeric characters) that will appear on the Bluetooth enabled device whensettingupawirelesslink.These settingswill be applied thenext time that themicroKEYAir isturnedoff,thenonagain.
Restoring the Factory SettingsDuring a USB connection, to restore all of the microKEY Air/microKEY pa-rameters back to their original factory values, hold down both the OCTAVE UPandOCTAVEDOWNbuttonswhileturningthepoweron.
Theprocessofrestoringthefactorysettingswilltakeseveralsecondsafteryouturnonthepower.Youmustnotturnoffthepowerduringthistime. Thefactorysettingscannotberestoredduringawirelessconnection.
TroubleshootingChecktheKorgwebsite(www.korg.com)forthemostrecentFAQ.
SpecificationsWireless method (microKEY Air) : Bluetooth Low EnergyConnectors: USB-B connector (for computer connection)Power supply : USB bus power mode (for a USB connection) TwoAAbatteries(forawirelessconnection)(microKEYAir)Batteryservicelife(microKEYAir): Approximately20hours(alkalineornickel-metalhydridebatteries)Current consumption : 100 mA or lessDimensions (W × D × H) : 15.55×5.16×2.05 inches / 395×131×52 mmWeight : 1.48 lbs. / 670 g (MICROKEY2-25AIR) 1.43 lbs. / 650 g (MICROKEY-25)Included items : USB cable, Owner’s manualOperating requirements (USB connection)Windows : Microsoft Windows 7 SP1 or later (32bit/64bit).Mac : OS X 10.8 Mountain Lion or later.Operating requirements (WIRELESS connection)(microKEY Air)Mac : Mac installed with OS X 10.10 Yosemite or later and compatible with
Bluetooth 4.0iOS : iPhone/iPad installed with iOS 8 or later and compatible with Bluetooth
4.0 Keyboard functionality is not guaranteed with all computers that satisfy these system requirements.
* Specificationsandappearancearesubjecttochangewithoutnoticeforim-provement.
Longer
Shorter
Gate time
Down Trigger Up
Arpeggiator type
microKEY AirmicroKEY
USB
Computer

Commandes du microKEY Air/microKEY
7812 346
75 microKEYmicroKEY Air
1. ClavierLe microKEY Air et le microKEY sont tous deux équipés d’un mini-clavier dynamique.
2. Témoin d’alimentationRouge : (microKEY Air/microKEY)L’instrument est connecté et alimenté via son port USB.Bleu : (microKEY Air)Attentedeconnexion(letémoinclignote)ouconnexionsansfilétablie(témoinallumé).Mauve : (microKEY Air)Indiquequelespilessontpresqueplatesdurantuneconnexionsansfil.
3. Boutons OCTAVE DOWN et UPCesboutonspermettentd’augmenteroudediminuerlahauteurduclavierparpasd’uneoctaveafind’utiliserlatessitureentière.Appuyezplusieursfoissurlebouton OCTAVE voulu pour obtenir la plage de notes souhaitée.
Transposition par octaves ±0 +1/-1 +2/-2 +3/-3 +4/-4
Couleur du bouton OCTAVE Eteint Vert Orange Rouge Rouge clignotant
Astuce Une pression simultanée sur les boutons OCTAVE UP et DOWN coupe la transposition par octave (valeur ±0).
4. Bouton ARPEGGIATORActivez/désactivezl’arpégiateuraveccebouton.Quandl’arpégiateurestactif,cebouton clignote sur le tempo courant. (→“Arpégiateur“)
5. Bouton SUSTAIN/TAP (ARP)Appuyezsurceboutonpourtransmettreunmessagedesustain.Quandl’arpé-giateur est actif, vous pouvez régler le tempo en appliquant quelques pressions successives sur ce bouton.
6. Joystick et bouton de joystickActionnezlejoysticksurl’axeXpourtransmettredesmessagesdePitchBend.À la sortie d’usine, l’axe +Y est dédié à la transmission de la commande de contrôle MIDI CC 1 (modulation), et l’axe -Y à la transmission de la commande de contrôle MIDICC2.VouspouveztransmettreunecommandedecontrôleMIDICC67enappuyantsurleboutondejoystick.Quandl’arpégiateurestactif,l’axeXdujoys-tick commande le type et son axe Y la durée (gate time) des notes. Vous pouvez activer/couper la fonction de verrouillage (Latch) en appuyant sur le bouton du joystick.Quand la fonctiondeverrouillageest active, l’arpégiateur continuedejouer même lorsque vous relâchez toutes les touches du clavier. (→“Arpégiateur“)
7. Port USBBranchez le microKEY Air/microKEY à votre ordinateur en connectant le câble USB fourni à ce port USB-B. Le microKEY est automatiquement mis sous tension quand vous y branchez le câble USB. Le microKEY Air est automatiquement mis sous tension quand vous y branchez le câble USB – à condition que son commu-tateur de mode soit en position USB (voyez l’illustration ci-dessous).
8. Commutateur de mode (microKEY Air uniquement)Vous pouvez relier le microKEY Air à votre ordinateur via le câble USB ou une connexionBluetoothsansfil.WIRELESS : Le microKEY Air est connecté à l’ordinateur via Bluetooth. L’alimenta-tion est assurée par les piles à l’intérieur de l’instrument.USB : Le microKEY Air est relié à l’ordinateur via le câble USB. L’alimentation est assurée par l’ordinateur via USB.
Branchements pour la connexion USBConnexions et alimentation1. Commutateur de mode (microKEY Air uniquement)
Réglez le commutateur de mode en position USB et passez à l’étape 2. Dans le cas du microKEY, passez directement à l’étape 2.
2. Connexion du câble USBRaccordez une extrémité du câble USB fourni à votre ordinateur et reliez l’autre bout du câble au port USB-B du microKEYAir/microKEY.UtilisezuniquementlecâbleUSBfourni.Quandvousreliez le microKEY Air/microKEY à l’ordinateur, l’instrument est automatique-ment mis sous tension et son témoin d’alimentation s’allume en rouge.
Astuce Pour les utilisateurs Windows : La première fois que vous raccordez le micro-KEY Air/microKEY à votre ordinateur Windows, le pilote USB-MIDI préinstallé dans votre système d’exploitation est automatiquement activé. Ce pilote USB-MI-DI préinstallé ne permet pas au microKEY Air ni au microKEY d’accéder simul-tanément à plusieurs logiciels ou applications. Pour un accès multiple simultané, téléchargez le pilote KORG USB-MIDI sur le site internet de Korg (www.korg.com) et installez ce pilote comme décrit dans sa documentation.
Mise hors tension1. Déconnexion du câble USB
Débranchez le câble USB du microKEY Air/microKEY. Une fois que le câble est débranché, le témoin d’alimentation s’éteint. Si vous utilisez un microKEY Air : Réglez le commutateur de mode sur USB avant de débrancher le câble USB.
Branchements pour la Connexion Bluetooth(microKEY Air uniquement)
Mise en place des pilesVérifiezquelecâbleUSBn’estpasbranchéaumicroKEYAir avant de démarrer la procédure. Ouvrez le couvercle du compartiment des piles au dos de l’instrument et insé-rez deux piles AA dans le compartiment. Veillez à orienter correctement les piles en respectant les indications de po-larité. Refermez le couvercle du compartiment des piles.
Si une erreur se produit durant le fonctionnement du microKEYAiretquecetteerreurnepeutêtrecorrigéeenmettantl’instrumenthors tension puis sous tension, essayez de remédier au problème en retirant les pilesdel’instrumentpuisenlesremettantenplace.
Connexions et alimentation
WIRELESS
microKEY AirGrâce à la technologie Bluetooth, vous pouvezreliersansfillemicroKEYAiràvotreMacoudispositifiOS.Connexion du microKEY Air à un iPhone/iPadAstuce Pourpouvoirrelierl’instrumentàuniPhone/iPadviauneconnexionsansfil,
il faut que le dispositif en question tourne sous iOS 8 ou une version plus récente et soit compatible Bluetooth 4.0.
1. Réglez le commutateur de mode sur WIRELESS.Le microKEY Air est mis sous tension et son témoin d’alimentation clignote en bleu,indiquantquelaconnexionestenattente.
2. Établissez la connexion Bluetooth.Lancez sur l’iPhone/iPad une application iOS compatible Apple Bluetooth Low Energy MIDI, puis réglez la connexion Bluetooth au sein de l’appli. Pour en savoir plussurlaconfigurationdeconnexion,voyezladocumentationdel’application.Voyez ci-dessous un exemple de connexion avec un produit Apple et un autre exemple avec un produit Korg. Exemple : Apple Inc. GarageBand Ouvrez les réglages de morceau avec dans le coin supérieur droit de l’écran GarageBand,puis sélectionnez“BluetoothMIDIDevices” (dispositifsBluetoothMIDI).Dans l’écranBluetoothMIDIDevices, sélectionnez “microKEY2-25Air”,puisactivezlaconnexion.Ouvérifiezquelaconnexiondel’instrumentestbienétablie. Exemple : KORG Module pour iPad/KORG Gadget pour iPad Ouvrez l’écran de réglages avec dans le coin supérieur gauche ou droit de l’écran KORGModule/KORG Gadget, puis tapez sur “Scan” pour “BluetoothMIDI”.Dans l’écranBluetoothMIDIDevices, sélectionnez “microKEY2-25Air”,puisactivezlaconnexion.Ouvérifiezquelaconnexiondel’instrumentestbienétablie.
3. Gardez le témoin d’alimentation à l’œil.Une fois la connexion établie, le témoin d’alimentation cesse de clignoter et reste allumé en bleu.
Connexion du microKEY Air à un MacAstuce Pourpouvoirrelierl’instrumentàunMacviauneconnexionsansfil,ilfaut
que l’ordinateur en question tourne sous OS X 10.10 Yosemite ou une version plus récente et soit compatible Bluetooth 4.0.
1. Réglez le commutateur de mode sur WIRELESS.Le microKEY Air est mis sous tension et son témoin d’alimentation clignote en bleu,indiquantquelaconnexionestenattente.
2. Ouvrez le dossier Utilities du Mac.Ouvrezlesdossiers“Applications”→“Utilities”duMac,lancez“AudioMIDISe-tup” et ouvrez la fenêtre “MIDIStudio” en sélectionnant “ShowMIDIStudio”souslemenu“Window”.
3. Établissez la connexion Bluetooth.Double-cliquezsurl’icône“Bluetooth”pourouvrirlafenêtreBluetoothConfigu-ration,puiscliquezsurleboutonConnectpour“microKEY2-25Air”.Unefoislaconnexion établie, le témoin d’alimentation cesse de clignoter et reste allumé en bleu.
Mise hors tension1. Réglez le commutateur de mode sur USB.LaconnexionsansfilestcoupéeetlemicroKEYAirmishorstension.Sontémoind’alimentation s’éteint. Si vous utilisez un microKEY Air : Si votre microKEY Air est relié à un ordinateur avec le câble USB, la connexion USB est activée quand vous placez le commuta-teur de mode sur USB. L’instrument reste alors sous tension. Dans ce cas, pour mettrelemicroKEYAirhorstension,vousdevezaussidébrancherlecâbleUSB.
ArpégiateurQuandl’arpégiateurestactifetquevousjouezun accord sur le clavier, l’instrument produit automatiquement un arpège.L’axe X du joystick (gauche-droite) permet de commander le type d’arpège et son axe Y la du-rée (gate time) des notes.Une pression du bouton au centre du joystick verrouille (Latch) l’arpégiateur.
Personnalisation des paramètres MIDIÀlafoissimpleetfaciled’utilisation,leKorgmicroKEYAir/microKEYoffrel’accèsàdivers paramètres et fonctions de jeu via le logiciel Kontrol Editor de Korg. Le logiciel Kontrol Editor de Korg peut être directement téléchargé en surfant sur http://www.korg.com/corporate/distributors/ ou sur le site http://www.korg.com/ MIDI ChannelVeillezàchoisirsurlemicroKEYAir/microKEYlenuméroducanalMIDIdéfinisurle logiciel ou l’application utilisé.•MIDI Channel [1...16] :SpécifielecanalMIDIutiliséparlemicroKEYAir/micro-KEYpourtransmettredesmessagesdenote,desmessagespitchbendetd’autresmessagesMIDIgénérésquandvousactionnezlamoletteMOD,lapédaledesus-tain, etc.
KeyboardEn plus des boutons OCTAVE UP/DOWN de l’instrument, le paramètre Transpose permet de transposer la hauteur du microKEY Air/microKEY dans toute tonalité. Et le paramètre Velocity Curve permet de choisir la courbe de toucher (réponse du clavieràlaforcedejeu)correspondantàvotrejeuouàl’effetrecherché.•Transpose [-12...+12] : Le paramètre Transpose permet de transposer la hau-
teur du clavier par demi-tons vers le haut ou le bas. La plage de réglage va de -12 à +12.
•Velocity Curve [Curve 1...8 / Const] : La courbe de toucher détermine la façon dontlaforceexercéesurlestouchesaffectelevolumedejeu.Vousavezlechoixentrehuitcourbesdetoucher,ainsiqu’uneréponseautoucherfixe–parfaitepourles sons d’orgue, de clavecin et d’autres instruments sans clavier dynamique.
1 Lourd Courbe requérant un toucher puissant pour obtenir le volume maximum.
2, 3 (Heavy) Courbe plus proche de la réponse normale.4 Normal Courbe de réponse normale.
5, 6 Courbeproduisantuneffetmêmeenréponseàuntoucherléger.
7 LégerUneforcedefrappemoyenneproduituneffetconstantmaismoinsdynamique.
8 (Light) Courbe de réponse plus plate que la courbe 7.Const – Laréponseautoucheraunevaleurfixe(constante).•Const Velocity Value [1...127] : Ce paramètre est disponible quand la courbe detoucher“Const”(dynamiqueconstante)estsélectionnée.Ildéfinitlavaleurfixederéponseautoucher.ChaquenotejouéeaalorslavaleurMIDIdetoucherdéfinieici.
Joystick Upper, Joystick Lower• Assign Type [No Assign/Control Change] :
No Assign : Lesmouvementssurl’axeYdujoysticknetransmettentaucunmessageMIDI.Control Change : Commandes de contrôle transmises.
•Control Change Number [0...127] :CeparamètredéfinitlenuméroCCdelacommandedecontrôleaffectéeàl’axeYdujoystick.
•Center Value [0...127] : Ce paramètre détermine la valeur du message MIDI CC (commande de contrôle) transmis quand le joystick retourne en position centrale.
•Top Value/Bottom Value [0...127] :Ceparamètredéfinitlaplagedevaleursdes commandes de contrôle MIDI transmises quand vous actionnez le joystick sur la course entière de l’axe Y (vers l’avant et vers l’arrière).
Joystick Button, Sustain Button• Assign Type [No Assign/Control Change] :
No Assign : Quandlesboutonssontdésactivés,leurmanipulationnetransmetau-cun message MIDI.Control Change : Commandes de contrôle transmises.
•Control Change Number [0...127] :CeparamètredéfinitlenuméroCCdelacommandedecontrôleMIDIaffectéeau(x)bouton(s).
•Button Behavior [Momentary/Toggle] : Choisissez une des deux actions sui-vantes pour les boutons.Momentary : Un message On Value est transmis quand vousappuyez sur le bouton. UnmessageOffValueesttransmisquandvousrelâchezlebouton.Toggle : UnmessageOnValue(actif)ouOffValue(désactivé)esttransmisalternati-vement chaque fois que vous appuyezsur le bouton.
•Off Value/On Value [0...127] :Ceparamètredéfinitlavaleuractif/désactivédela commande de contrôle MIDI assignée au(x) bouton(s).
Arpeggiator•Arpeggiator Type [Joystick/Trigger/Up/Down] :Ceparamètredéfinit
le type d’arpège produit.Joystick : L’axe X du joystick permet de changer de type d’arpège.Trigger : Les notes correspondant aux touches enfoncées sont jouées simul-tanément.Up : L’arpège est joué de la note la plus basse à la note la plus haute.Down : L’arpège est joué de la note la plus haute à la note la plus basse.
•BPM [20.0...300.0] :Ceparamètredéfinitletempo(BPM)del’arpégiateur.•Resolution [1/32...1/1] :Ceparamètredéfinitl’intervalleentrelesnotespourletempodéfini.
•Octave [Octave1...Octave4] :Ceparamètredéfinitlaplagedehauteur(en octaves) de jeu de l’arpège.
•Key Sync [Off/On] : Ce paramètre règle la synchronisation de note entre l’arpégiateur et le clavier.Off : La note n’est pas initialisée quand une touche est enfoncée.On : Quandvousenfoncezunetouche,lanoteestinitialiséeetlemotifd’ar-pègeest jouédepuis ledébut.Utilisezcette fonctionpour synchroniser ledébut des mesures quand vous accompagnez d’autres instruments.
•Swing [0...100] :Ceparamètredéfinitledécalagetemporelappliquéauxnotes.Vouspouvezl’utiliserpourcréerunshufflebourrédeswingsurbasede 8 temps réguliers.
•MIDI Clock [Auto/Internal/External] : Réglez ce paramètre pour syn-chroniser l’application et l’arpégiateur du microKEY Air/microKEY.Auto : L’arpégiateur fonctionne automatiquement comme en mode External quand il reçoit un signal d’horloge MIDI. En l’absence de signal d’horloge MIDI, l’arpégiateur fonctionne comme en mode Internal.Internal : L’arpégiateurfonctionneautempodéfiniavecleparamètreBPM.Choisissez ce réglage si le microKEY Air/microKEY n’est synchronisé avec aucune application.External : L’arpégiateur du microKEY Air/microKEY se synchronise sur le signal d’horloge MIDI envoyé par l’ordinateur connecté.
Wireless (microKEY Air uniquement)•Auto Power Off [Disable/Enable] :Quandlafonctiondecoupureauto-matiquedel’alimentationestactive(“Enable”),lemicroKEYAirestautoma-tiquementmishorstensionquandaucunemanipulationn’esteffectuéepen-dant4heures.UnefoisquelemicroKEYAiraétémishorstensionparcettefonctionautomatique,pourleremettresoustension,placezlecommutateurdemodesurUSB,puisremettez-leenpositionWIRELESS.
•Battery Type [Alkaline/Ni-MH] : Réglez ce paramètre en fonction du type depileutilisédanslemicroKEYAir.Choisissez“Ni-MH”sivousutilisezdespilesàl’hydruremétalliquedenickelet“Alkaline”pourdespilesalcalines.
•Device Name :Ceparamètredéfinitlenom(jusqu’à25caractèresalpha-numériques)affichésur ledispositifBluetoothactifquandvousétablissezuneconnexionsansfil. Ces réglages sont activés à la prochaine mise sous tension du microKEY Air.
Rétablir les réglages d’usineDans le cas d’une connexion USB, vous pouvez initialiser tous les paramètres du microKEY Air/microKEY et ainsi retrouver leur valeur d’usine. Pour ce faire,mettez l’instrument sous tension enmaintenant enfoncés ses boutonsOCTAVE UP et OCTAVE DOWN.
Le rétablissement des réglages d’usine dure quelques secondes après la misesoustension.Necoupezjamaisl’alimentationdurantcetteopération.
L’initialisation des paramètres n’est pas possible dans le cas d’une connexionsansfil.
DépannageSurfezsurlesiteInternetdeKorg(www.korg.com)etvoyezlesdernièresFAQ.
Fiche techniqueMéthodedeconnexionsansfil(microKEYAir):BluetoothLowEnergyPrises : Prise USB-B (connexion à l’ordinateur)Alimentation : Alimentation par le bus USB (pour connexion USB) DeuxpilesAA(pourconnexionsansfil)(microKEYAir)Autonomie des piles (microKEY Air) : Environ 20 heures (piles alcalines ou à l’hydrure métallique de nickel)Consommation électrique : 100mA ou moinsDimensions (L × P × H) : 395×131×52 mmPoids : 670 g (MICROKEY2-25AIR) / 650 g (MICROKEY-25)Accessoires inclus : Câble USB, Manuel d’utilisationSystème requis (Connexion USB)Windows : Microsoft Windows 7 SP1 ou version ultérieure (32-bit/64-bit).Mac : OS X 10.8 Mountain Lion ou version ultérieure.Système requis (Connexion sans fil)(microKEY Air)Mac : Mac tournant sous OS X 10.10 Yosemite ou version ultérieure et com-
patible Bluetooth 4.0iOS : iPhone/iPad tournant sous iOS 8 ou version ultérieure et compatible
Bluetooth 4.0 Même si votre ordinateur répond aux exigences citées plus haut, il peut arriver que le clavier ne fonctionne pas.
* Lescaractéristiquesetl’aspectduproduitsontsusceptiblesd’êtremodifiéssans avis préalable en vue d’une amélioration.
microKEY AirmicroKEY
USB
Ordinateur
Plus longue
Plus courte
Durée(gate time)
Descendant Déclenchement Ascendant
Type d'arpège

Bedienelemente des microKEY Air/microKEY
7812 346
75 microKEYmicroKEY Air
1. TastaturDasmicroKEYAirundmicroKEYverfügenüberanschlagsdynamischeMi-ni-Tasten.
2. SpannungsanzeigeROT: (microKEY Air/microKEY)MitUSB-PortverbundenundüberUSBmitSpannungversorgt.BLAU: (microKEY Air)Wartet auf drahtlose Verbindung (blinkt) oder drahtlos verbunden (leuchtet).VIOLETT: (microKEY Air)ZeigtniedrigenBatterieladezustandbeidrahtloserVerbindungan.
3. OCTAVE DOWN und UP-TastenÜberdieseTastenkönnenSiedieTastaturinSchrittenvonjeweilseinerOkta-venachobenoderuntentransponieren.DrückenSiedieentsprechendeTasteein-odermehrmals,umdengewünschtenNotenbereichauszuwählen.
Oktavierungsin-tervall ±0 +1 / -1 +2 / -2 +3 / -3 +4 / -4
Farbe der OCTAVE-Taster Aus Grün Orange Rot Blinkt rot
Tipp WennSiebeideTastenUPundDOWNgleichzeitigdrücken,wirddieTas-taturaufdieursprünglicheOktave±0zurückgesetzt.
4. ARPEGGIATOR-TasteMit dieser Taste schalten Sie den Arpeggiator ein und aus. Bei eingeschaltetem Arpeggiator blinkt die Taste im aktuellen Tempo. (→„Arpeggiator“)
5. SUSTAIN/TAP (ARP)-TasteDiese Taste sendet eine Sustain-Nachricht. Bei eingeschaltetem Arpeggiator könnenSiedurchrhythmischesDrückendieserTastedasTempoeinstellen.
6. Joystick und Joystick-TasteBewegen Sie den Joystick entlang der X-Achse, um Pitch Bend-Nachrichten zu senden. Werksseitig eingestellt, dient die +Y-Achse zum Senden von MIDI CC 1 (Mo-dulation) und die - Y-Achse zum Senden von MIDI CC2. Ein Druck auf die Joystick-Taste sendet eine MIDI CC 67-Nachricht. Bei eingeschaltetem Ar-peggiator steuert die X-Achse des Joysticks dessen Art (Arbeitsweise) und die Y-Achse die Dauer (gate time) der Noten. Ein Druck auf die Joystick-Tas-te schaltet die Latch-Funktion ein oder aus. Bei eingeschalteter Latch-Funk-tion spielt der Arpeggiator weiter, wenn Sie die Hand von der Tastatur neh-men. (→„Arpeggiator“)
7. USB-PortUSB-B-Port zum Anschluss des microKEY Air/microKEY an Ihren Compu-ter mithilfe eines USB-Kabels. Wenn das USB-Kabel angeschlossen wird, schaltet sich das microKEY ein. Wenn der Modus-Schalter (microKEY Air) auf USB steht (siehe unten), schaltet sich das microKEY Air ein, wenn das USB-Kabel angeschlossen wird.
8. Modus-Schalter (nur microKEY Air)SiekönnendasmicroKEYAirüberUSBoderdrahtlosüberBluetoothmitIhrem Computer verbinden.WIRELESS : DasmicroKEYAirverbindetsichüberBluetoothmitdemCom-puterundwirdvondeneingelegtenBatteriengespeist.USB : Das microKEY Air wird mithilfe eines USB-Kabels mit Ihrem Computer verbundenundüberdessenUSB-Portgespeist.
Verbinden (über USB)Anschlüsse und Stromversorgung1. Modus-Schalter (nur microKEY Air)
Stellen Sie den Modus-Schal-ter auf USB und fahren Sie mit Schritt 2 fort. Beim microKEYbeginnenSiedirektmitSchritt2.
2. USB-Kabel anschließenVerbinden Sie ein Ende des USB-Kabels mit ihrem Computer, und das andere mit dem USB-B-Port des microKEYAirodermicroKEY.VerwendenSiehierzuausschließlichdasbei-liegende Kabel. Sobald es mit dem Computer verbunden ist, schaltet sich das microKEY Air/microKEY ein und die LED der Spannungsanzeige leuchtet rot.
Tipp Windows Nutzer :Wenn das microKEY Air/microKEY erstmals an Ihren Windows-Computer angeschlossen wird, wird automatisch der vom Betriebssystem vorinstal-lierte USB-MIDI-Treiber verwendet. Dieser vorinstallierte USB-MIDI-Treiber
ermöglichtdemmicroKEYAir/microKEYnicht,aufmehrereProgrammeoderAn-wendungengleichzeitigzuzugreifen.UmAbhilfezuschaffen,ladenSieeinfachdenKORG USB-MIDI-Treiber von www.korg.comherunterundinstallierenihngemäßder Installationsanweisung.
Ausschalten1. USB-Kabel abziehenZiehenSiedasUSB-KabelausdemmicroKEYAirodermicroKEY.SobalddieVer-bindung unterbrochen ist, erlischt die Spannungsanzeige.
microKEY Air Nutzer : Stellen Sie gegebenenfalls den Modus-Schalter auf USB, bevor Sie das USB-Kabel abziehen.
Verbinden (über Bluetooth)(nur microKEY Air)
Batterien einlegenAchten Sie darauf, dass das USB-Kabel aus dem micro-KEYAir gezogen ist, bevor Sie fortfahren. Öffnen Siedas Batteriefach auf der Rückseite und legen Sie zweiAA-Batterienein.AchtenSiehierbeiaufdiekorrektePo-lung.SchließenSiedasBatteriefachwieder.
Falls das microKEY Air nicht richtig funktioniert, und das Problem nach dem Aus- und Einschalten nicht ge-löstist,versuchenSie,dieBatterienzuentnehmenundwiedereinzulegen.
Anschlüsse und Stromversorgung
WIRELESS
microKEY AirDank der Bluetooth-Technologie kann dasmicroKEY Air sich drahtlos mit Ihrem Mac oder iOS-Gerät verbinden.Das microKEY Air mit Ihrem iPhone/iPad verbindenTipp UmeineDrahtlosverbindungzuerstellen,benötigt Ihr iPhone/iPad iOS8oder
neuer und muss Bluetooth 4.0 kompatibel sein.1. Stellen Sie den Modus-Schalter auf WIRELESS
Das microKEY Air schaltet sich ein und die blau blinkende LED der Spannungsan-zeige zeigt den Bluetooth-Bereitschaftsmodus an.
2. Bluetooth-Verbindung erstellen.Starten Sie in Ihrem iPhone/iPad eine mit Apple Bluetooth Low Energy MIDI kompa-tible iOS App und erstellen Sie darin die Bluetooth-Verbindung. Die Vorgehensweise hierzuentnehmenSiebittederBedienungsanleitungIhrerApp.ImfolgendensehenSiejeeinBeispielfüreineProduktvonAppleundvonuns.Beispiel : Apple Inc. GarageBand ÖffnenSiemit die Song-Einstellungen oben rechts im GarageBand Bildschirm undwählenSie„BluetoothMIDIDevices“.WählenSieinderListederBluetoothMIDIGeräte„microKEY2-25Air“ausundaktivierenSiedieVerbindung.Überprü-fen Sie gegebenenfalls, ob die Verbindung steht. Beispiel : KORG Module für iPad/KORG Gadget für iPad ÖffnenSiemit dasEinstellungsmenüobenlinksoderrechtsimBildschirmdesKORGModule/KORGGadgetundtippenSieauf„ScanforBluetoothMIDI“.Wäh-lenSieinderListederBluetoothMIDIGeräte„microKEY2-25Air“ausundaktivie-renSiedieVerbindung.ÜberprüfenSiegegebenenfalls,obdieVerbindungsteht.
3. Spannungsanzeige beobachtenSobalddieVerbindungsteht,hörtdieLEDderSpannungsanzeigezublinkenaufund leuchtet blau.
Das microKEY Air mit Ihrem Mac verbindenTipp UmeineDrahtlosverbindungzuerstellen,benötigtIhrMaciOS10.10Yosemite
oder neuer und muss Bluetooth 4.0 kompatibel sein.1. Stellen Sie den Modus-Schalter auf WIRELESS
Das microKEY Air schaltet sich ein und die blau blinkende LED der Spannungsan-zeige zeigt den Bluetooth-Bereitschaftsmodus an.
2. Öffnen Sie die MAC Dienstprogramme.ÖffnenSie„Programme“→„Dienstprogramme“,startenSie„AudioMIDISetup“undöffnenSie„MIDIStudio“,indemSie„ShowMIDIStudio“im„Window“Menüauswählen.
3. Bluetooth-Verbindung erstellen.DoppelklickenSieaufdasBluetooth-Symbol,umdasBluetooth-Konfigurationsfens-terzuöffnenundklickenSiedenConnect-Buttonfür„microKEY2-25Air“.WenndieVerbindungsteht,hörtdieSpannungs-LEDzublinkenaufundleuchtetblau.
Ausschalten1. Stellen Sie den Modus-Schalter auf USB.
Hiermit unterbrechen Sie die Drahtlosverbindung und schalten das microKEY aus – die Spannungsanzeige erlischt.
microKEY Air Nutzer : FallsIhrmicroKEYAirüberUSBmitdemComputerverbun-den ist, wird beim Umschalten auf USB die USB-Verbindung aktiviert, und das Gerät schaltetsichnichtaus.ZiehenSieindiesemFalldasUSB-KabelausdemmicroKEYAir.
ArpeggiatorBei eingeschaltetem Arpeggiator werden die durch DrückenderTastaturgehaltenenNotenalsArpeg-gio wiedergegeben.Bewegen Sie den Joystick nach links oder rechts (X-Achse), um die Art des Arpeggiators auszu-wählen - mit der Y-Achse legen Sie die Notendauer (gate time) fest.
DrückenSiedieTasteinderMitte,umdieLatch-Funktion des Arpeggiators einzu-schalten.
Personalisieren der MIDI-EinstellungenDas Korg microKEY Air und microKEY sind einfach zu bedienen und schlicht im De-sign, erlauben Ihnen aber auch, diverse Leistungsfeatures und Bedienungsparameter mit der Korg Kontrol Editor Software zu bearbeiten. Korg Kontrol Editor steht zum Download bereit unter http://www.korg.com/corporate/distributors/ oder http://www.korg.com/. MIDI ChannelDer MIDI-Kanal des microKEY Air/microKEY muss mit dem MIDI-Kanal der verwen-detenSoftwareoderAnwendungübereinstimmen.•MIDI Channel [1...16] : Hier wählen Sie den MIDI-Kanal aus, über den das
microKEY Air/microKEY Notennachrichten, Pitch-Bend-Nachrichten und weitere MIDI-Nachrichten sendet, wenn Sie das MOD-Rad, Dämpferpedal usw. verwenden.
KeyboardNeben dem Transponieren um Oktaven mit den UP/DOWN-Tasten auf der Obersei-tekönnenSiedieTastaturdesmicroKEYAirundmicroKEYinjedebeliebigeTonarttransponieren.ZudemkönnenSiedieAnschlagsempfindlichkeitderTastatur(Veloci-ty-Curve)aufIhreSpielweiseoderzumErzeugenvonEffektenanpassen.•Transpose [-12...+12] :MitdemParameterTransposekönnenSiedieTonhöhederTastaturinHalbtonschrittenimBereichvon-12bis+12nachuntenoderobenändern.
•Velocity Curve [Curve 1...8 / Const] : Durch Einstellen der Velocity-Kurve be-stimmen Sie, wie sich die Anschlagsdynamik auf den Ausgangspegel auswirkt. Sie habendieAuswahlunter8Velocity-Kurven,könnenaberaucheinebestimmteAn-schlagstärkefestlegen,idealfürdieEmulationvonOrgeln,CembaliundanderenIns-trumenten ohne Anschlagsdynamik.
1 Stark ErforderteinenstarkenAnschlagfürmaximalenEffekt.2, 3 | Die Anschlagskurve ist näher an Normal.4 Normal Die normale Ansprache.
5, 6|
Bei dieser Anschlagskurve zeigen bereits sanfte Anschläge Wir-kung.
7 BeimittelstarkemAnschlag bleibendieAnschlagwerte konstant(geringe Dynamik).
8 Leicht EineKurve,dieflacheristals7.Const – Alle Notenbefehle verwenden denselben Anschlagwert.
•Const Velocity Value [1...127] : Falls Const (Constant Velocity) als Velocity-Kurve ausgewähltist,könnenSieüberdiesenParametereinenfestenWertfürdieAnschlag-stärke einstellen. Jede Note erklingt dann mit demselben hier ausgewählten MIDI-Wert.
Joystick Upper, Joystick Lower• Assign Type [No Assign/Control Change] :
No Assign : Joystick-Bewegungen entlang der Y-Achse senden keine MIDI-Nachrichten.Control Change : Es werden Control Change Nachrichten gesendet.
•Control Change Number [0...127] :MitdiesemParameterkönnensiedieMIDICC Nummer Auswählen, die der Y-Achse des Joysticks zugewiesen wird.
•Center Value [0...127] : Dieser Parameter legt den Wert der MIDI CC-Nachricht fest,derbeiderMittelpositiondesJoysticksübertragenwird.
•Top Value/Bottom Value [0...127] : Dieser Parameter legt den Wertebereich der MIDICC-Nachrichtenfest,diebeimHin-undHerbewegendesJoysticksüberdiege-samte Y-Achse gesendet werden.
Joystick Button, Sustain Button• Assing Type [No Assign/Control Change] :
No Assign : Die Deaktivierung der Tasten verhindert, dass diese MIDI-Nachrichten sendenkönnen.Control Change : Es werden Control Change Nachrichten gesendet.
•Control Change Number [0...127] :MitdiesemParameterkönnensiedieMIDICC Nummer Auswählen, die der/den Tasten zugewiesen wird.
•Button Behavior [Momentary/Toggle] :SiekönnenzweiVerhaltensweisenderTasten einstellen:Momentary : BeimDrückenderTastewirdeineOnValue-Nachrichtgesendet,beimLoslasseneineOffValue-Nachricht.Toggle : MitjedemTastendruckwirdabwechselndeineOnValue-undOffValue-Nach-richt gesendet.
•Off Value/On Value [0...127] :DieserParameterlegtdenOff/OnValuederder/den Taste/n zugewiesenen MIDI CC-Nachricht fest.
Arpeggiator•Arpeggiator Type [Joystick/Trigger/Up/Down] : Dieser Parameter wählt die
Art des Arpeggiators aus.Joystick : Durch Bewegen des Joysticks entlang der X-Achse wählen Sie die Art des Arpeggiators.Trigger : DiegedrücktgehaltenenNotenwerdensimultanwiedergegeben.Up : DasArpeggiowirdvondertiefstenzurhöchstenNotewiedergegeben.Down : DasArpeggiowirdvonderhöchstenzurtiefstenNotewiedergegeben.
•BPM [20.0...300.0] : Dieser Parameter legt das Tempo des Arpeggiators fest (BPM).
•Resolution [1/32...1/1] :DieserParameterlegtdenNotenintervallfürsvorgege-bene Tempo fest.
•Octave Range [Octave1...Octave4] : Dieser Parameter legt den Bereich (in Oktaven) fest, in dem das Arpeggio wiedergegeben wird.
•Key Sync [Off/On] :DieserParameterlegtdieNotensynchronisierungfürArpeg-giator und Tastatur fest.Off : DieNotewirdbeimDrückeneinerTastenichtzurückgesetzt.On : BeimDrückeneinerTastewirddieNotezurückgesetztunddasArpeggio-Pat-ternwirdvonvornewiedergegeben.MitdieserFunktionkönnenSiedieTaktanfängebeimZusammenspielenmitanderenInstrumentenangleichen.
•Swing [0...100] :DieserParameter legtdieNotenverschiebungfest.Damitkön-nenSie aus einemgeradenTaktmit 8Beats einen swingendenShuffle-Rhythmuserzeugen.
•MIDI Clock [Auto/Internal/External] : Wählen Sie diesen Parameter wenn die Anwendung und der Arpeggiator des microKEY Air/microKEY synchronisiert werden.Auto : Der Arpeggiator arbeitet automatisch nach den externen Einstellungen, wenn eine MIDI-Clock empfangen wird. Wird keine MIDI-Clock empfangen, arbeitet der Arpeggiator nach den internen Einstellungen.Internal : Der Arpeggiator arbeitet im durch den BPM-Parameter vorgegebenen Tem-po. Wählen Sie diese Einstellung, wenn der microKEY Air/microKEY nicht mit einer Anwendung synchronisiert wird.External : Der Arpeggiator des microKEY Air/microKEY arbeitet synchron zur MI-DI-Clock des angeschlossenen Computers.
Wireless (nur microKEY Air)•Auto Power Off [Disable/Enable] : Ist diese Energiesparfunktion aktiviert (En-
able), schaltet sich das microKEY Air automatisch aus, wenn es 4 Stunden lang nicht bedientwordenist.UmdasmicroKEYAirnachAuslösenderEnergiesparfunktionwiedereinzuschalten,stellenSiedenModus-SchalteraufUSBundwiederzurückauf WIRELESS.
•Battery Type [Alkaline/Ni-MH] : Stellen Sie diesen Parameter entsprechend dem immicroKEYAir eingelegten Batterietyp ein.Wählen Sie „Ni-MH“ fürNi-ckel-Metallhydridakkusoder„Alkaline“fürAlkalibatterien.
•Device Name :DieserParameterermöglichtIhnen,denNamen(biszu25alpha-numerischeZeichen)desGeräts anzugeben,der imBluetooth-fähigenGerätbeimAufbaueinerDrahtlosverbindungerscheint. Diese Einstellungen werden beim Ausschalten des microKEY Air gespeichert und beimerneutenEinschaltenübernommen.
Auf Werkseinstellungen zurücksetzenDas Wiederherstellen sämtlicher originalen Parameter des microKEY Air/microKEY erfolgt bei bestehender USB-Verbindung. Halten Sie hierzu die beiden OCTAVE-Tas-tenUPundDOWNgedrücktundschaltenSiedasGerätein.
Das Laden der Werksvorgaben nach dem Einschalten dauert einige Sekunden. Schalten Sie das Gerät während dieses Vorgangs niemals aus.
Besteht eine Drahtlosverbindung, kann das Gerät nicht auf die Werkseinstellun-genzurückgesetztwerden.
FehlersuchAuf der Website von Korg (www.korg.com)findenSiedasaktuellsteFAQ.
Technische DatenDrahtloser Verbindungsstandard (microKEY Air): Bluetooth Low EnergyAnschlüsse: USB-B-Port(fürdieVerbindungmitdemComputer)Stromversorgung: SpeisungüberdenUSB-Bus(fürUSB-Verbindung) ZweiAA-Batterien(fürDrahtlosverbindung)(microKEYAir)Batterielebensdauer(microKEYAir): Circa20Stunden(AlkalibatterienoderNickel-Metallhydridakkus)Stromverbrauch: 100mA oder wenigerAbmessungen (BxTxH): 395×131×52 mmGewicht: 670 g (MICROKEY2-25AIR) / 650 g (MICROKEY-25)Lieferumfang: USB-Kabel, BedienungsanleitungSystemanforderungen (USB-Anschluss)Windows : Microsoft Windows 7 SP1 oder neuer (32bit/64bit).Mac : OS X 10.8 Mountain Lion oder neuer.Systemanforderungen (WIRELESS-Verbindung)(microKEY Air)Mac : Mac mit OS X 10.10 Yosemite oder neuer und Bluetooth 4.0-kompatibel.iOS : iPhone/iPad mit iOS 8 oder neuer und Bluetooth 4.0-kompatibel. Selbst wenn Ihr Computer dieseAnforderungen erfüllt, kann nicht garantiertwerden, dass das Keyboard funktioniert.
* ÄnderungendertechnischenDatenunddesDesignsohnevorherigeAnkündigungvorbehalten.
Länger
Kürzer
Gate time
Runter Trigger Hoch
Arpeggiator Art
microKEY AirmicroKEY
USB
Computer
Controles del microKEY Air/microKEY
7812 346
75 microKEYmicroKEY Air
1. TecladoEl microKEY Air y el microKEY están equipados con teclas mini sensibles a la velocidad.
2. Indicador de alimentaciónROJO : (microKEY Air/microKEY)ConectadoconelpuertoUSByrecibiendoalimentaciónatravésdeUSB.AZUL : (microKEY Air)Enesperadeconexión(parpadeante)oconectado(fijo)atravésdeunaconexióninalámbrica.PÚRPURA : (microKEY Air)Indica que el nivel de las pilas es bajo cuando se conecta a través de una cone-xióninalámbrica.
3. Botones OCTAVE DOWN y UPMediantelatransposicióndeltecladohaciaarribaohaciaabajoenpasosdeunaoctava, los botones OCTAVE proporcionan acceso a la gama de notas completa. Pulse uno de los botones OCTAVE varias veces para seleccionar la gama de notas deseada.
Octava ±0 +1 / -1 +2 / -2 +3 / -3 +4 / -4Colordelbotón Apagado Verde Naranja Rojo Parpadea en Rojo
SUGERENCIA Pulse simultáneamente los botones OCTAVE UP y DOWN de octava para restablecer el cambio de octava a ±0.
4. Botón ARPEGGIATORActiveydesactiveelarpegiadorpulsandoestebotón.Cuandoestéactivado,elbotónparpadearáconeltempoactual.(→”Arpegiador”)
5. Botón SUSTAIN/TAP (ARP)Alpulsarestebotónsetransmiteunmensajedesostener.Cuandoelarpegiadorestáactivado,eltemposepuedeajustartocandoestebotónvariasveces.
6. Joystick y botón joystickMuevaeljoystickalolargodelejeXparatransmitirmensajesdealteracióndeltono (pitch bend).Con los ajustes de fábrica, el eje +Y está asignado para transmitir MIDI CC 1 (mo-dulación),yeleje-YestáasignadoparatransmitirMIDICC2.Alpulsarelbotóndel joystick se transmitirá un mensaje MIDI CC 67. Con el arpegiador activado, elejeXdeljoystickcontrolaeltipo,yelejeYcontrolaladuración(gatetime)delasnotas.Alpulsarelbotóndeljoystickpuedeactivarydesactivarlafunción“Latch”(sujeción).ConlafunciónLatchactivada,elarpegiadorcontinuaráre-produciendo incluso después de retirar las manos del teclado. (→”Arpegiador”)
7. Puerto USBUtilice este puerto USB-B para conectar el microKEY Air/microKEY a su orde-nadorconuncableUSB.LaconexióndelcableUSBencenderáelmicroKEY.Siel interruptor de modo (microKEY Air) se establece en USB (consulte a conti-nuación),alconectarelcableUSBseencenderáelmicroKEYAir.
8. Interruptor de modo (solo para el microKEY Air)El microKEY Air puede conectarse a su ordenador a través de USB o de un conexióninalámbricaBluetooth.WIRELESS : elmicroKEYAirseconectaalordenadoratravésdeBluetooth;laspilasinternasproporcionanlaalimentación.USB : elmicroKEYAirseconectaalordenadorconelcableUSB;laalimentaciónse proporciona desde el ordenador a través de USB.
Cómo conectarse (conexión a través de USB)Conexiones y alimentación1. Interruptor de modo (solo para el microKEY Air)
Establezca el interruptor de modo en USB y continúe con el paso 2. Para el microKEY, salte al paso 2.
2. Conecte el cable USBConecte un extremo del cable USB asuordenador;conecteelotroextremodelpuertoUSB-BenelmicroKEYAiroel microKEY. Utilice únicamente el cable USB proporcionado. Una vez conecta-doalordenador,elmicroKEYAir/microKEYseencenderá;elLEDindicadordealimentaciónseiluminaráenrojo.
SUGERENCIA Usuarios de Windows : Cuando el microKEY Air/microKEY se conecte por primera vez a su ordenador con Windows, el controlador USB-MIDI preinstalado con el sistema operati-vo se utilizará automáticamente. Este controlador USB-MIDI preinstalado no permitirá al microKEY Air o al microKEY acceder a varios programas o apli-
cacionesalmismotiempo.Parasolucionarestasituación,bastacondescargarelcontrolador KORG USB-MIDI en www.korg.com e instalarlo como se indica en ladocumentaciónincluida.
Desactivar el equipo1. Desconecte el cable USB
Desconecte el cable USB del microKEY Air o microKEY. Una vez desconectado, elindicadordealimentaciónseoscurecerá(apagado).
Usuarios de microKEY Air : establezca el interruptor de modo en USB antes de desconectar el cable USB.
Cómo conectarse (conexión a través de Bluetooth)(solo para el microKEY Air)
Colocación de las pilasAsegúrese de que el cable USB está desconectado del mi-croKEY Air antes de continuar. Abra la tapa de las pilas en el panel posterior y coloque dos pilas AA. Asegúrese de respetar la polaridad correcta. Por último, cierre la tapa de las pilas.
Si el microKEY Air detecta un error de funcionamien-to que no se puede borrar o resolver encendiendo y apagandolaalimentación,pruebeaextraeryvolveracolocarlaspilas.
Conexiones y alimentación
WIRELESS
microKEY AirMediante la tecnología Bluetooth, el microKEY Air puede crear un enlace inalámbrico con su dispositivo Mac o iOS.Conexión del microKEY Air a su iPhone/iPadSUGERENCIA ParacrearunaconexióninalámbricaconuniPhone/iPad,debefun-
cionar con iOS 8 o posterior y ser compatible con Bluetooth 4.0.1. Establezca el interruptor de modo en WIRELESSElmicroKEYAirseencenderáyelLEDdealimentaciónparpadearáenazulparaindicarelmododeesperadeconexión.
2. Establezca la conexión BluetoothEneliPhone/iPad,inicieunaaplicacióndeiOScompatibleconAppleBluetoo-thLowEnergyMIDIy,acontinuación,configure laconexiónBluetoothenlaaplicación.Paraobtenerinformaciónsobreelprocedimientoparaconfigurarlaconexión,consulteelmanualdesuaplicación.Acontinuaciónsemuestranunejemplo utilizando un producto Apple y uno utilizando nuestro producto. Ejemplo: GarageBand de Apple Inc. Abralosajustesdecancióncon en la esquina superior derecha de la pantalla deGarageBandy,acontinuación,seleccione“BluetoothMIDIDevices”.EnlapantallaBluetoothMIDIDevices,seleccione“microKEY2-25Air”yactivelaco-nexión.Delocontrario,compruebequesehaconectado.Ejemplo: módulo de KORG para iPad/KORG Gadget para iPad AbralapantallaSettingscon en la esquina superior izquierda o superior derecha de lapantallaKORGModule/KORGGadgety,acontinuación,toque“Scan”para“Blue-toothMIDI”.EnlapantallaBluetoothMIDIDevices,seleccione“microKEY2-25Air”yactivelaconexión.Delocontrario,compruebequesehaconectado.
3. Observe el indicador de alimentaciónUnavezestablecidalaconexión,elLEDindicadordealimentacióncambiarádeparpadeanteaunaluzazulfija.
Conexión del microKEY Air a su MacSUGERENCIA ParacrearunaconexióninalámbricaconsuMac,debefuncionarcon
OS X 10.10 Yosemite o posterior y ser compatible con Bluetooth 4.0.1. Establezca el interruptor de modo en WIRELESS.ElmicroKEYAirseencenderáyelLEDdealimentaciónparpadearáenazulparaindicarelmododeesperadeconexión.
2. Abra las utilidades de MAC.EnelMac,abra“Aplicaciones”→“Utilidades”,inicie“ConfiguracióndeAudioMIDI”y,acontinuación,abralaventana“EstudioMIDI”seleccionando“mos-trarestudioMIDI”enelmenú“Ventana”.
3. Establezca la conexión Bluetooth.Haga doble clic en el icono “Bluetooth” para abrir la ventana Configura-cióndeBluetoothy,acontinuación,hagaclicenelbotónConectarpara“mi-croKEY2-25Air”.Unavezconectado,elLEDdealimentacióncambiadeparpa-deante a iluminado en azul.
Desactivar el equipo1. Establezca el interruptor de modo en USB.EstodesactivaráelenlaceinalámbricoyapagaráelmicroKEYAir;elindicadordealimentaciónseoscurecerá(apagado).
Usuarios de microKEY Air : si su microKEY Air está conectado al ordenador a tra-vésdeUSB,alcolocarelinterruptorenlaposiciónUSBseactivarálaconexiónUSB, y la unidad no se apagará. En este caso, también debe extraer el cable USB del microKEY Air.
ArpegiadorLaactivacióndelarpegiadorprovocaráquelas notas que se mantienen pulsadas en el te-clado se reproduzcan como un arpegio.Mueva el joystick hacia la izquierda y la de-recha (eje X) para seleccionar el tipo de arpe-giador;elejeYdeterminaráladuración(gatetime) de la nota.Pulseelbotóncentralparaaplicarlafun-ción“Latch”(sujeción)alarpegiador.
Personalización de los ajustes de MIDIElmicroKEYAiryelmicroKEYdeKorg,deusosencilloydiseñosimple,tambiénlepermiteaccederaunaseriedefuncionesdeinterpretaciónyparámetrosoperativoscon el software Korg Kontrol Editor. El Korg Kontrol Editor está disponible para su descarga directa en http://www.korg.com/corporate/distributors/ o en http://www.korg.com/. MIDI ChannelEl canal MIDI del microKEY Air/microKEY se debe establecer para que se corres-pondaconelcanalMIDIdelsoftwareolaaplicaciónqueseutilice.•MIDI Channel [1...16] :EspecificaquécanalMIDIutilizaráelmicroKEYAir/
microKEY para transmitir mensajes de nota, mensajes pitch bend y otros mensajes MIDI que se envían al utilizar la rueda MOD, el pedal de apagador, etc.
KeyboardAdemás de utilizar los botones OCTAVE UP/DOWN en el panel delantero, también puede transponer el microKEY Air y el microKEY para interpretar con cualquier clave musical. Además, la respuesta táctil del teclado (curva de velocidad) se puede ajustar paraquesecorrespondaconsuestilodeinterpretaciónoparacrearunefectodistinto.•Transpose [-12...+12] : El parámetro Transpose permite transponer el tono del
teclado hacia arriba o hacia abajo en pasos de semitono. La gama es -12 a +12.•Velocity Curve [Curve 1...8 / Const] : Ajuste la curva de velocidad para deter-minarcómoafectaráladinámicadeltecladoalniveldesalida.Puedeelegirentreochocurvasdevelocidad;tambiénpuedeseleccionarcualquieridealdevelocidadfijoparareplicarórganos,clavecinesyotrosinstrumentosquecarecendediná-mica del teclado.
1 Pesado Requiereunapulsaciónfuerteparaproducirelefectomáximo.2, 3 | Una curva que está más cerca de normal.4 Normal Una curva normal
5, 6|
Una curva que permite que incluso toques blandos produzcan un efecto.7 Permite producir un efecto constante pero menos dinámico con
pulsaciones de fuerza media8 Ligero Una curva que es más plana que 7.
Const – El valor de velocidad será siempre constante
•Const Velocity Value [1...127] : Si se selecciona Const (velocidad constante) como la curva de velocidad, este parámetro estará disponible para establecer el valor de velocidad constante. Cada nota se reproducirá con el mismo valor MIDI seleccionado aquí.
Joystick Upper, Joystick Lower• Assign Type [No Assign/Control Change] :
No Assign : Los movimientos del joystick a lo largo del eje Y no transmitirán men-sajes MIDI.Control Change : Se transmitirán los mensajes de cambio de control.
•Control Change Number [0...127] : Utilice este parámetro para seleccionar el número de MIDI CC asignado al eje Y del joystick.
•Center Value [0...127] :EsteparámetroespecificaelvalordelmensajeMIDICCquesetransmitecuandosedevuelveeljoystickalaposicióncentral.
•Top Value/Bottom Value [0...127] :Esteparámetroespecificaelrangodeva-lores de los mensajes MIDI CC transmitidos al mover el joystick hacia atrás y hacia delante a lo largo del todo el eje Y.
Joystick Button, Sustain Button• Assign Type [No Assign/Control Change] :
No Assign : LadesactivacióndelosbotonesevitaqueenvíenmensajesMIDI.Control Change : Se transmitirán los mensajes de cambio de control.
•Control Change Number [0...127] : Utilice este parámetro para seleccionar el número de MIDI CC asignado a los botones.
•Button Behavior [Momentary/Toggle] : Los botones se pueden ajustar para que se comporten de una de las dos formas siguientes:Momentary : Alpulsarelbotón,setransmitiráunmensaje“OnValue”(valordeac-tivación).Alsoltarlo,setransmitiráunmensaje“OffValue”(valordedesactivación).Toggle : Cadapulsacióndelbotónenviarádeformaalternativaunmensaje“OnValue”ounmensaje“OffValue”.
•Off Value/On Value [0...127] :EsteparámetroespecificaelvalordeactivaciónodesactivacióndelmensajeMIDICCasignadoalosbotones.
Arpeggiator•Arpeggiator Type [Joystick/Trigger/Up/Down] : Este parámetro per-
mite seleccionar el tipo de arpegio que se va a reproducir.Joystick : Al mover el joystick a lo largo del eje X se controla el tipo de arpegiador.Trigger : Las notas que se mantienen pulsadas se reproducen de forma simultánea.Up : El arpegio se reproduce desde la nota más baja a la nota más alta.Down : El arpegio se reproduce desde la nota más alta a la nota más baja.
•BPM [20.0...300.0] : Esteparámetroespecificaeltempodelarpegiador(BPM).•Resolution [1/32...1/1] :Esteparámetroespecificaelintervaloentreno-tasparaeltempoespecificado.
•Octave Range [Octave1...Octave4] :Esteparámetroespecificaelrango(en octavas) en el que se reproduce el arpegio.
•Key Sync [Off/On] : Esteparámetroespecificalasincronizacióndenotasparael arpegiador y el teclado.Off : La nota no se restablece cuando se pulsa una tecla.On : Cuandosepulsaunatecla,lanotaserestableceyelpatróndearpegiosse reproducedesde el principio.Utilice esta funciónpara alinear los co-mienzos de las barras cuando se reproducen junto con otros instrumentos.
•Swing [0...100] :Esteparámetroespecificaelcambioen lasnotas.Estolepermitecrearunritmoshuffledebalanceoapartirde8tiemposrectos.
•MIDI Clock [Auto/Internal/External] : Especifiqueesteparámetrocuan-dolaaplicaciónyelarpegiadormicroKEYAir/microKEYesténsincronizados.Auto : El arpegiador funciona automáticamente como con el ajuste externo cuando se introduce un reloj MIDI. Si no se introduce un reloj MIDI, el ar-pegiador funciona como con el ajuste interno.Internal : El arpegiador funciona en el tempo ajustado con el parámetro BPM. Seleccione este ajuste cuando el microKEY Air/microKEY no esté sin-cronizadoconunaaplicación.External : El arpegiador microKEY Air/microKEY funciona sincronizado con el reloj MIDI desde el ordenador conectado.
Wireless (solo para el microKEY Air)•Auto Power Off [Disable/Enable] :CuandoAutoPowerOffseestablez-
ca en Enable, el microKEY Air se apagará automáticamente si no se realiza ningunaoperacióndurante4horas.ParavolveraencenderelmicroKEYAirtrasdesactivarlafunciónAutoPowerOff,establezcaelinterruptordemodoenUSBy,acontinuación,devuélvaloalaposiciónWIRELESS.
•Battery Type [Alkaline/Ni-MH] : Establezca este parámetro para que se corresponda con el tipo de pilas colocadas en el microKEY Air. Seleccione “Ni-MH”cuandoutilicepilasdehidrurometálicodeníquel,obien“Alkali-ne”cuandoutilicepilasalcalinas.
•Device Name : Este parámetro le permite especificar el nombre (hasta25 caracteres alfanuméricos) que aparecerá en el dispositivo activado para Bluetoothalconfigurarunenlaceinalámbrico.Estosajustesseaplicaránlapróximavezqueseapagueysevuelvaaen-cender el microKEY Air.
Restauración de los ajustes de fábricaDuranteunaconexiónUSB,pararestaurartodoslosparámetrosdemicroKEYAir/microKEY a sus valores de fábrica originales, mantenga pulsados los bo-tonesOCTAVEUPyOCTAVEDOWNmientrasenciendelaalimentación.
Elprocesode inicialización tardarávarios segundos tras encenderel instru-mento. No apague nunca el instrumento mientras se lleva a cabo este proceso.
Losajustesdefábricanosepuedenrestaurarduranteunaconexióninalámbrica.
Solución de ProblemasConsulte el sitio web de Korg (www.korg.com) para ver las preguntas y res-puestas más recientes.
EspecificacionesMétodo inalámbrico (microKEY Air) : Bluetooth de bajo consumoConectores: PuertoUSB-B(paraconexiónalordenador)Alimentación:MododealimentaciónporbusUSB(paraunaconexiónUSB) DospilasAA(paraunaconexióninalámbrica)(microKEYAir)Vida útil de las pilas (microKEY Air) : Aproximadamente 20 horas (pilas alcalinas o de hidruro metálico de níquel)Consumo actual : 100mA o menosDimensiones (Anch. × Prof. × Alt.) : 395 × 131 × 52 mmPeso: 670 g (MICROKEY2-25AIR) / 650 g (MICROKEY-25)Elementos incluidos : USB cable, Manual de usuarioOperating requirements (Conexión USB)Windows : Microsoft Windows 7 SP1 o posterior (32 bits/64 bits).Mac : OS X 10.8 Mountain Lion o posterior.Operating requirements (Conexión WIRELESS)(microKEY Air)Mac : Mac instalado con OS X 10.10 Yosemite o posterior y compatible con Blue-
tooth 4.0iOS : iPhone/iPad instalado con iOS 8 o posterior y compatible con Bluetooth 4.0
No se garantiza el funcionamiento del teclado con todos los ordenadores que cumplan con estos requisitos de sistema.
* Lasespecificacionesyelaspectoestánsujetasacambiossinprevioavisopormejora.
microKEY AirmicroKEY
USB
Ordenador
Más largo
Más corto
Gate time
Bajar Activar Subir
Tipo de arpegiador

microKEY Air/microKEY 控制
7812 346
75 microKEYmicroKEY Air
1. 键盘
microKEY Air 和 microKEY 配备了带有速度感应的迷你按键。
2. 电源指示灯
红色:(microKEY Air/microKEY)
已使用 USB 端口连接且通过 USB 获得电量。
蓝色:(microKEY Air)
等待连接(闪烁)或者已通过无线连接而连接(稳定)。
紫色:(microKEY Air)
通过无线连接进行连接时指示电池电量低。
3. OCTAVE DOWN 和 UP 按钮
通过变调一个八度中的键盘上或下按钮,可使用 OCTAVE 按钮操作整个音符范围。反复按 OCTAVE 按钮即可选择所需的音符范围。
八度偏移状态 ±0 +1/-1 +2/-2 +3/-3 +4/-4
OCTAVE按钮颜色 不亮 绿色 橙色 红色 红色闪烁
TIP 同时按下 OCTAVE UP 和 DOWN 按钮会将八度偏移重置为 ±0。
4. ARPEGGIATOR 按钮
按此按钮可打开和关闭琶音器。打开琶音器后,该按钮将按照当前节奏闪烁。(→“琶音器”)
5. SUSTAIN/TAP (ARP) 按钮
按该按钮可传输持续的信号。打开琶音器后,您可以多按几次该按钮设置节奏。
6. 摇杆和摇杆按钮
向 X 轴方向移动摇杆可传输滑音信号。
根据出厂模式,+Y 轴用于传输 MIDI CC 1(转调),-Y 轴用于传输 MIDI CC 2。按下摇杆按钮将传输 MIDI CC 67 信号。琶音器开启后,摇杆的 X 轴将控制类型,Y 轴将控制音符的持续时间(门时间)。您可以通过按摇杆按钮打开或关闭 Latch 功能。Latch 功能开启后,即使您将手从键盘上拿开,琶音器也将继续播放。(→“琶音器”)
7. USB 端口
使用 USB 线缆通过 USB-B 端口将 microKEY Air/microKEY 连接至您的计算机。连接 USB 线缆将会打开 microKEY。如果 Mode Switch(microKEY Air)设置为 USB(如下所述),连接 USB 线缆将会打开 microKEY Air。
8. Mode Switch(仅限 microKEY Air)
通过 USB 或 Bluetooth 无线可以将 microKEY Air 连接至您的计算机。
WIRELESS:通过 Bluetooth 将 microKEY Air 连接至计算机;电源将由内部电池供应。
USB:使用 USB 线缆将 microKEY Air 连接至计算机时,通过 USB 获得计算机的电源供应。
连接准备(通过 USB 连接)
连接和电源1. Mode Switch(仅限 microKEY Air)
将 Mode Switch 设定为 USB,然后继续步骤 2。对于 microKEY 请忽略步骤 2。
2. 连接 USB 线缆
将 USB 线缆的一端连接至计算机;将另一端连接至 microKEY Air 或 microKEY 的 USB-B 端口。请仅使用随机附带的 USB 线缆。连接至计算机后,microKEY Air/microKEY 将开机,Power Indicator 的 LED 将亮起红灯。
TIP Windows 用户:
microKEY Air/microKEY 第一次连接至您的 Windows 计算机时,将使用系统中预安装的 USB-MIDI 驱动程序。该预先安装的 USB-MIDI 驱动程序不允许 microKEY Air 或 microKEY 同时访问多个程序。若要修复这个问题,只需在 www.korg.com 下载 KORG USB-MIDI 驱动程序并安装支持文档中的说明安装驱动程序即可。
关机1. 断开连接 USB 线缆
从 microKEY Air 或 microKEY 断开连接 USB 线缆。断开连接后,Power Indicator 将变暗(未亮)。
microKEY Air 用户:断开连接 USB 线缆之前将 Mode Switch 设置为 USB。
连接准备(通过 Bluetooth 连接)(仅限 microKEY Air)
安装电池操作前请确保从 microKEY Air 断开连接 USB 线缆。打开后面板电池盖,安装两节 AA 电池。请确保极性正确。最后安上电池盖。
如果 microKEY Air 出现运行错误,无法通过开机关机解决问题,请尝试重新安装电池。
连接和电源
WIRELESS
microKEY Air
microKEY Air 可以使用 Bluetooth 无线连接您的 Mac 或 iOS 装置。
将 microKEY Air 连接至您的 iPhone/iPadTIP 若要无线连接 iPhone/iPad,后者的操作系统必须为 iOS8 或更高版本,
并且必须兼容 Bluetooth 4.0。
1. 将 Mode Switch 设置为 WIRELESS
microKEY Air 将开机,电源 LED 将闪烁蓝色以指示连接待机模式。
2. 设置 Bluetooth 连接
在 iPhone/iPad 上启动兼容 Apple Bluetooth Low Energy MIDI 的 iOS 应用程序,然后在应用程序中设置 Bluetooth 连接。有关设置连接的步骤,请参阅您应用程序的说明。以下是使用 Apple 产品连接我们产品的示例。
示例:Apple Inc. GarageBand
打开 GarageBand 屏幕右上角的 ,然后选择“Bluetooth MIDI Devices”。在 Bluetooth MIDI Devices 窗口中,选择“microKEY2-25 Air”,然后打开连接。如果出现问题,请检查是否已建立连接。
示例:KORG Module for iPad/KORG Gadget for iPad
打开 KORG Module/KORG Gadget 窗口中左上角或右上角带有 的“Setting”窗口,然后按“Scan”搜索“Bluetooth MIDI”。在 Bluetooth MIDI Devices 窗口中,选择“microKEY2-25 Air”,然后打开连接。如果出现问题,请检查是否已建立连接。
3. 观察 Power 指示灯
建立连接后,Power Indicator LED 将从闪烁变为稳定的蓝灯指示。
将 microKEY Air 连接至您的 MacTIP 若要无线连接您的 Mac,后者的操作系统必须为 OS X 10.10 Yosemite
或更高版本,并且必须兼容 Bluetooth 4.0。
1. 将 Mode Switch 设置为 WIRELESS。
microKEY Air 将开机,电源 LED 将闪烁蓝色以指示连接待机模式。
2. 打开 MAC Utilities。
在 Mac 中打开“Applications”→“Utilities”,启动“Audio MIDI Setup”,然后通过从“Window”菜单中选择“Show MIDI Studio”打开“MIDI Studio”窗口。
3. 设置 Bluetooth 连接。
双击“Bluetooth”图标打开 Bluetooth Configuration 窗口,然后单击 Connect 按钮连接“microKEY2-25Air”。连接后,电源 LED 将从闪烁变为稳定蓝色。
关闭电源1. 将 Mode Switch 设置为 USB。
这将会关闭无线链接并关闭 microKEY Air,Power Indicator 将变暗(未亮)。
microKEY Air 用户:如果您通过 USB 将 microKEY Air 连接至计算机,打开 USB 位置的开关将会激活 USB 连接,本机不会关机。在这种情况下,您必须从 microKEY Air 移除 USB 线缆。
琶音器激活琶音器将会实现在键盘上按下音符的效果,播放为琶音。
左右(沿 X 轴)移动摇杆可选择琶音类型,沿 Y 轴将确定音符的时长(门时间)。
按中间的按钮可锁定琶音器。
自定义 MIDI 设置Korg microKEY Air 和 microKEY 的设计简单易用,您可以使用 Korg Kontrol Editor 软件使用各种演奏功能和操作参数。您可以从 http://www.korg.com/corporate/distributors/ 或从 http://www.korg.com/ 下载 Korg Kontrol Editor 软件。
MIDI ChannelmicroKEY Air/microKEY 的 MIDI 通道应设定为匹配所用应用程序或软件的 MIDI 通道。
• MIDI Channel [1...16]当您使用 MOD 滚轮、制音踏板等组件时,这将会指定 microKEY Air/microKEY 应使用哪个通道传输音符信号、滑音信号和发送的其他 MIDI 信号。
Keyboard除了使用前面板上的 OCTAVE UP/DOWN 按钮之外,您也可以移调 microKEY Air 和 microKEY 以实现任何所需的音乐键。此外,您可以调节键盘的触摸响应(Velocity Curve)以符合您的演奏风格或者创造不同的效果。
• Transpose [-12...+12]Transpose 参数可以按照半音步进转调键盘上下的音调。范围是 -12 至 +12。
• Velocity Curve [Curve 1...8 / Const]调节速度曲线可以决定键盘动态如何影响输出电平。有八个 Velocity Curve 可供选择;您也可以选择任意固定速度 - 对于替换管风琴、大键琴和其他缺乏键盘动态的乐器来说是非常好的选择。
1 重 需要用力弹奏才能产生最大效果。
2,3 | 更靠近正常的曲线。
4 正常 正常曲线。
5,6|
更轻地用力即可产生效果的曲线。
7 使用中度力量敲击产生持续但非动态效果。
8 轻 比 7 平坦的曲线。
Const – 力度值将保持于常量。
• Const Velocity Value [1...127]如果将 Const (Constant Velocity) 选定为 Velocity Curve,则可以使用该参数设定 Constant Velocity Value。弹奏的每个音符都使用此处选择的 MIDI 值。
Joystick Upper,Joystick Lower• Assign Type [No Assign/Control Change]No Assign: 沿着 Y 轴移动摇杆不会传输任何 MIDI 信号。
Control Change: 将传输控制更改信号。
• Control Change Number [0...127]使用该参数可选择分配到摇杆 Y 轴上的 MIDI CC 编号。
• Center Value [0...127]该参数将指定摇杆返回到中间位置时传输的 MIDI CC 信号。
• Top Value/Bottom Value [0...127]该参数将指定沿着 Y 轴前后最大程度移动摇杆所传输的 MIDI CC 信号。
Joystick Button, Sustain Button• Assign Type [No Assign/Control Change]No Assign: 禁用该按钮可防止它们发送任何 MIDI 信号。
Control Change: 将传输控制更改信号。
• Control Change Number [0...127]使用该参数可选择分配到这些按钮的 MIDI CC 编号。
• Button Behavior [Momentary/Toggle]可以将这些按钮用作两种用途:
Momentary: 按下该按钮时将传输“开”值信号。松开该按钮时将传输“关”值信号。
Toggle: 每次按下按钮都将交替发送“开”值和“关”值信号。
• Off Value/On Value [0...127]该参数将指定分配给这些按钮的 MIDI CC 信号的开关值。
Arpeggiator• Arpeggiator Type [Joystick/Trigger/Up/Down]该参数将选择要播放的琶音类型。
Joystick: 沿着 X 轴移动摇杆将控制琶音器类型。
Trigger: 按下的音符将同时播放。
Up: 琶音将从低音符到高音符进行播放。
Down: 琶音将从高音符到低音符进行播放。
• BPM [20.0...300.0]该参数将指定琶音器的节奏(BPM)。
• Resolution [1/32...1/1]该参数将为指定节奏的音符之间指定间隔。
• Octave Range [Octave1...Octave4]该参数将指定琶音器播放的范围(八度)。
• Key Sync [Off/On]该参数将为琶音器和键盘指定音符同步。
Off: 按下键时音符不会重置。
On: 按下某个键时,音符重置,琶音样式从头开始播放。在与其他乐器一起播放时使用该功能可以对齐播放条的起始位置。
• Swing [0...100]该参数可以指定音符的移调。允许您通过正常八分音符创建摇摆节奏。
• MIDI Clock [Auto/Internal/External]应用程序和 microKEY Air/microKEY 琶音器同步时指定该参数。
Auto: 输入 MIDI 时钟时琶音器将自动按照外部设置运行。如果没有输入 MIDI 时钟,琶音器将使用内部设置运行。
Internal: 琶音器将按照 BPM 参数设置的节奏运行。microKEY Air/microKEY 没有与应用程序同步时选择该设置。
External: microKEY Air/microKEY 琶音器将使用同步自所连接计算机的 MIDI 时钟运行。
Wireless(仅限 microKEY Air)• Auto Power Off [Disable/Enable]将 Auto Power Off 设定为 Enable 时,microKEY Air 将在没有任何操作 4 小时后自动关机。若要在关闭 Auto Power Off 功能后打开 microKEY Air,请将 Mode Switch 设置为 USB,然后将其返回至 WIRELESS 位置。
• Battery Type [Alkaline/Ni-MH]设置该参数可以匹配 microKEY Air 中所安装电池的类型。使用镍氢电池时选择“Ni-MH”,使用碱性电池时选择“Alkaline”。
• Device Name您可以使用该参数指定设定无线连接时启用 Bluetooth 的装置上显示的名称(最多 25 个数字字母字符)。
这些设置将在 microKEY Air 下次关机并再次开机之后应用。
恢复出厂设置在 USB 连接期间,若要将 microKEY Air/microKEY 参数恢复至其原始出厂值,请在打开电源时按住 OCTAVE UP 和 OCTAVE DOWN 按钮。
开机几秒后将开始恢复出厂设置的步骤。在此期间您必须关机。
无线连接期间无法恢复出厂设置。
故障排除请访问Korg网站(www.korg.com)获取最新的 FAQ。
技术参数无线方式(microKEY Air):Bluetooth Low Energy
连接端子: USB-B 端子(适用于计算机连接)
电源: USB 总线供电模式(适用于 USB 连接) 两节 AA 电池(适用于无线连接)(microKEY Air)
电池寿命(microKEY Air):大约 20 小时(碱性或镍氢电池)
电流功耗: 100 mA 或更少
尺寸(宽x长x高):395×131×52 mm
重量: 670 g (MICROKEY2-25AIR) / 650 g (MICROKEY-25)
随机配件: USB 连接线,用户手册
操作要求(USB 连接)Windows: Microsoft Windows 7 SP1 或后续版本(32 位/64 位)。
Mac: OS X 10.8 Mountain Lion 或后续版本。
操作要求(WIRELESS 连接)(microKEY Air)Mac: 安装有 OS X 10.10 Yosemite 或后续版本的 MAC,且兼容
Bluetooth 4.0
iOS: 安装有 iOS 8 或后续版本的 iPhone/iPad,且兼容 Bluetooth 4.0
不保证所有满足这些系统要求的计算机都能够使用键盘功能。
* 技术参数和外观如有变更恕不另行通知。
microKEY AirmicroKEY
USB
Computer
更长
更短
循环时间
下 触发 上
Arpeggiator type
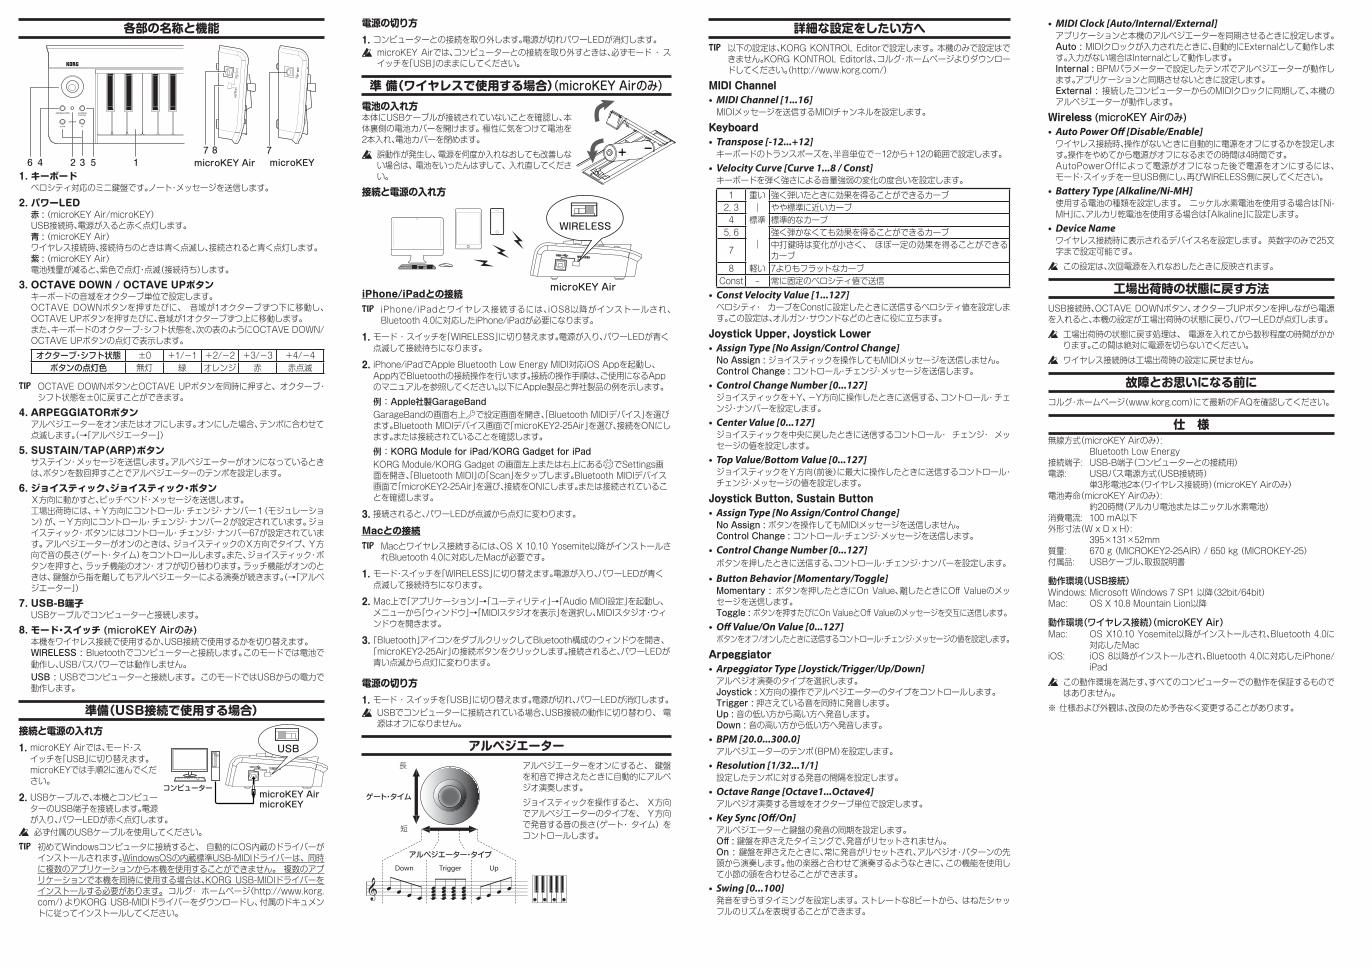
各部の名称と機能
7812 346
75 microKEYmicroKEY Air
1. キーボードベロシティ対応のミニ鍵盤です。ノート・メッセージを送信します。
2. パワーLED赤:(microKEY Air/microKEY)USB接続時、電源が入ると赤く点灯します。青:(microKEY Air)ワイヤレス接続時、接続待ちのときは青く点滅し、接続されると青く点灯します。紫:(microKEY Air)電池残量が減ると、紫色で点灯・点滅(接続待ち)します。
3. OCTAVE DOWN / OCTAVE UPボタンキーボードの音域をオクターブ単位で設定します。OCTAVE DOWNボタンを押すたびに、 音域が1オクターブずつ下に移動し、OCTAVE UPボタンを押すたびに、音域が1オクターブずつ上に移動します。また、キーボードのオクターブ・シフト状態を、次の表のようにOCTAVE DOWN/OCTAVE UPボタンの点灯で表示します。オクターブ・シフト状態 ±0 +1/-1 +2/-2 +3/-3 +4/-4ボタンの点灯色 無灯 緑 オレンジ 赤 赤点滅
TIP OCTAVE DOWNボタンとOCTAVE UPボタンを同時に押すと、オクターブ・シフト状態を±0に戻すことができます。
4. ARPEGGIATORボタンアルペジエーターをオンまたはオフにします。オンにした場合、テンポに合わせて点滅します。(→「アルペジエーター」)
5. SUSTAIN/TAP(ARP)ボタンサステイン・メッセージを送信します。アルペジエーターがオンになっているときは、ボタンを数回押すことでアルペジエーターのテンポを設定します。
6. ジョイスティック、ジョイスティック・ボタンX方向に動かすと、ピッチベンド・メッセージを送信します。工場出荷時には、+Y方向にコントロール・チェンジ・ナンバー1(モジュレーション)が、-Y方向にコントロール・チェンジ・ナンバー2が設定されています。ジョイスティック・ボタンにはコントロール・チェンジ・ナンバー67が設定されています。アルペジエーターがオンのときは、ジョイスティックのX方向でタイプ、Y方向で音の長さ(ゲート・タイム)をコントロールします。また、ジョイスティック・ボタンを押すと、ラッチ機能のオン・オフが切り替わります。ラッチ機能がオンのときは、鍵盤から指を離してもアルペジエーターによる演奏が続きます。(→「アルペジエーター」)
7. USB-B端子USBケーブルでコンピューターと接続します。
8. モード・スイッチ (microKEYAirのみ)本機をワイヤレス接続で使用するか、USB接続で使用するかを切り替えます。WIRELESS:Bluetoothでコンピューターと接続します。このモードでは電池で動作し、USBバスパワーでは動作しません。USB:USBでコンピューターと接続します。このモードではUSBからの電力で動作します。
準備(USB接続で使用する場合)接続と電源の入れ方1. microKEY Airでは、モード・ス
イッチを「USB」に切り替えます。microKEYでは手順2に進んでください。
2. USBケーブルで、本機とコンピューターのUSB端子を接続します。電源が入り、パワーLEDが赤く点灯します。 必ず付属のUSBケーブルを使用してください。
TIP 初めてWindowsコンピュータに接続すると、 自動的にOS内蔵のドライバーがインストールされます。WindowsOSの内蔵標準USB-MIDIドライバーは、同時に複数のアプリケーションから本機を使用することができません。 複数のアプリケーションで本機を同時に使用する場合は、KORG USB-MIDIドライバーをインストールする必要があります。コルグ・ ホームページ(http://www.korg.com/)よりKORG USB-MIDIドライバーをダウンロードし、付属のドキュメントに従ってインストールしてください。
電源の切り方1. コンピューターとの接続を取り外します。電源が切れパワーLEDが消灯します。
microKEY Airでは、コンピューターとの接続を取り外すときは、必ずモード ・ スイッチを「USB」のままにしてください。
準 備(ワイヤレスで使用する場合)(microKEYAirのみ)電池の入れ方本体にUSBケーブルが接続されていないことを確認し、本体裏側の電池カバーを開けます。極性に気をつけて電池を2本入れ、電池カバーを閉めます。
誤動作が発生し、電源を何度か入れなおしても改善しない場合は、電池をいったんはずして、入れ直してください。
接続と電源の入れ方
WIRELESS
microKEY AiriPhone/iPadとの接続TIP iPhone/iPadとワイヤレス接続するには、iOS8以降がインストールされ、
Bluetooth 4.0に対応したiPhone/iPadが必要になります。
1. モード ・ スイッチを「WIRELESS」に切り替えます。電源が入り、パワーLEDが青く点滅して接続待ちになります。
2. iPhone/iPadでApple Bluetooth Low Energy MIDI対応iOS Appを起動し、App内でBluetoothの接続操作を行います。接続の操作手順は、ご使用になるAppのマニュアルを参照してください。以下にApple製品と弊社製品の例を示します。
例:Apple社製GarageBand GarageBandの画面右上 で設定画面を開き、「Bluetooth MIDIデバイス」を選び
ます。Bluetooth MIDIデバイス画面で「microKEY2-25Air」を選び、接続をONにします。または接続されていることを確認します。
例:KORGModuleforiPad/KORGGadgetforiPad KORG Module/KORG Gadget の画面左上または右上にある でSettings画
面を開き、「Bluetooth MIDI」の「Scan」をタップします。Bluetooth MIDIデバイス画面で「microKEY2-25Air」を選び、接続をONにします。または接続されていることを確認します。
3. 接続されると、パワーLEDが点滅から点灯に変わります。
Macとの接続TIP Macとワイヤレス接続するには、OS X 10.10 Yosemite以降がインストールさ
れBluetooth 4.0に対応したMacが必要です。
1. モード・スイッチを「WIRELESS」に切り替えます。電源が入り、パワーLEDが青く点滅して接続待ちになります。
2. Mac上で「アプリケーション」→「ユーティリティ」→「Audio MIDI設定」を起動し、メニューから「ウィンドウ」→「MIDIスタジオを表示」を選択し、MIDIスタジオ・ウィンドウを開きます。
3. 「Bluetooth」アイコンをダブルクリックしてBluetooth構成のウィンドウを開き、「microKEY2-25Air」の接続ボタンをクリックします。接続されると、パワーLEDが青い点滅から点灯に変わります。
電源の切り方1. モード ・ スイッチを「USB」に切り替えます。電源が切れ、パワーLEDが消灯します。
USBでコンピューターに接続されている場合、USB接続の動作に切り替わり、 電源はオフになりません。
アルペジエーターアルペジエーターをオンにすると、 鍵盤を和音で押さえたときに自動的にアルペジオ演奏します。ジョイスティックを操作すると、 X方向でアルペジエーターのタイプを、 Y方向で発音する音の長さ(ゲート・ タイム)をコントロールします。
詳細な設定をしたい方へTIP 以下の設定は、KORG KONTROL Editorで設定します。本機のみで設定はで
きません。KORG KONTROL Editorは、コルグ・ホームページよりダウンロードしてください。(http://www.korg.com/)
MIDI Channel• MIDI Channel [1...16]
MIDIメッセージを送信するMIDIチャンネルを設定します。
Keyboard• Transpose [-12...+12]
キーボードのトランスポーズを、半音単位で-12から+12の範囲で設定します。• Velocity Curve [Curve 1...8 / Const]
キーボードを弾く強さによる音量強弱の変化の度合いを設定します。
1 重い 強く弾いたときに効果を得ることができるカーブ2, 3 | やや標準に近いカーブ4 標準 標準的なカーブ
5, 6|
強く弾かなくても効果を得ることができるカーブ
7 中打鍵時は変化が小さく、 ほぼ一定の効果を得ることができるカーブ
8 軽い 7よりもフラットなカーブConst – 常に固定のベロシティ値で送信
• Const Velocity Value [1...127]ベロシティ・ カーブをConstに設定したときに送信するベロシティ値を設定します。この設定は、オルガン・サウンドなどのときに役に立ちます。
Joystick Upper, Joystick Lower• Assign Type [No Assign/Control Change]NoAssign:ジョイスティックを操作してもMIDIメッセージを送信しません。ControlChange:コントロール・チェンジ・メッセージを送信します。
• Control Change Number [0...127]ジョイスティックを+Y、-Y方向に操作したときに送信する、コントロール・チェンジ・ナンバーを設定します。
• Center Value [0...127]ジョイスティックを中央に戻したときに送信するコントロール・ チェンジ・ メッセージの値を設定します。
• Top Value/Bottom Value [0...127]ジョイスティックをY方向(前後)に最大に操作したときに送信するコントロール・チェンジ・メッセージの値を設定します。
Joystick Button, Sustain Button• Assign Type [No Assign/Control Change]NoAssign:ボタンを操作してもMIDIメッセージを送信しません。ControlChange:コントロール・チェンジ・メッセージを送信します。
• Control Change Number [0...127]ボタンを押したときに送信する、コントロール・チェンジ・ナンバーを設定します。
• Button Behavior [Momentary/Toggle]Momentary: ボタンを押したときにOn Value、離したときにOff Valueのメッセージを送信します。Toggle: ボタンを押すたびにOn ValueとOff Valueのメッセージを交互に送信します。
• Off Value/On Value [0...127]ボタンをオフ/オンしたときに送信するコントロール・チェンジ・メッセージの値を設定します。
Arpeggiator• Arpeggiator Type [Joystick/Trigger/Up/Down]
アルペジオ演奏のタイプを選択します。Joystick:X方向の操作でアルペジエーターのタイプをコントロールします。Trigger:押さえている音を同時に発音します。Up:音の低い方から高い方へ発音します。Down:音の高い方から低い方へ発音します。
• BPM [20.0...300.0]アルペジエーターのテンポ(BPM)を設定します。
• Resolution [1/32...1/1]設定したテンポに対する発音の間隔を設定します。
• Octave Range [Octave1...Octave4]アルペジオ演奏する音域をオクターブ単位で設定します。
• Key Sync [Off/On]アルペジエーターと鍵盤の発音の同期を設定します。Off:鍵盤を押さえたタイミングで、発音がリセットされません。On:鍵盤を押さえたときに、常に発音がリセットされ、アルペジオ・パターンの先頭から演奏します。他の楽器と合わせて演奏するようなときに、この機能を使用して小節の頭を合わせることができます。
• Swing [0...100]発音をずらすタイミングを設定します。ストレートな8ビートから、はねたシャッフルのリズムを表現することができます。
• MIDI Clock [Auto/Internal/External]アプリケーションと本機のアルペジエーターを同期させるときに設定します。Auto:MIDIクロックが入力されたときに、自動的にExternalとして動作します。入力がない場合はInternalとして動作します。Internal:BPMパラメーターで設定したテンポでアルペジエーターが動作します。アプリケーションと同期させないときに設定します。External:接続したコンピューターからのMIDIクロックに同期して、本機のアルペジエーターが動作します。
Wireless (microKEYAirのみ)• Auto Power Off [Disable/Enable]
ワイヤレス接続時、操作がないときに自動的に電源をオフにするかを設定します。操作をやめてから電源がオフになるまでの時間は4時間です。AutoPowerOffによって電源がオフになった後で電源をオンにするには、モード・スイッチを一旦USB側にし、再びWIRELESS側に戻してください。
• Battery Type [Alkaline/Ni-MH]使用する電池の種類を設定します。 ニッケル水素電池を使用する場合は「Ni-MH」に、アルカリ乾電池を使用する場合は「Alkaline」に設定します。
• Device Nameワイヤレス接続時に表示されるデバイス名を設定します。 英数字のみで25文字まで設定可能です。
この設定は、次回電源を入れなおしたときに反映されます。
工場出荷時の状態に戻す方法USB接続時、OCTAVE DOWNボタン、オクターブUPボタンを押しながら電源を入れると、本機の設定が工場出荷時の状態に戻り、パワーLEDが点灯します。
工場出荷時の状態に戻す処理は、 電源を入れてから数秒程度の時間がかかります。この間は絶対に電源を切らないでください。
ワイヤレス接続時は工場出荷時の設定に戻せません。
故障とお思いになる前にコルグ・ホームページ(www.korg.com)にて最新のFAQを確認してください。
仕 様無線方式(microKEY Airのみ): Bluetooth Low Energy接続端子: USB-B端子(コンピューターとの接続用)電源: USBバス電源方式(USB接続時) 単3形電池2本(ワイヤレス接続時)(microKEY Airのみ)電池寿命(microKEY Airのみ): 約20時間(アルカリ電池またはニッケル水素電池)消費電流: 100 mA以下外形寸法(W x D x H): 395×131×52mm質量: 670 g (MICROKEY2-25AIR) / 650 kg (MICROKEY-25)付属品: USBケーブル、取扱説明書
動作環境(USB接続)Windows: Microsoft Windows 7 SP1 以降(32bit/64bit)Mac: OS X 10.8 Mountain Lion以降
動作環境(ワイヤレス接続)(microKEYAir)Mac: OS X10.10 Yosemite以降がインストールされ、Bluetooth 4.0に
対応したMaciOS: iOS 8以降がインストールされ、Bluetooth 4.0に対応したiPhone/
iPad
この動作環境を満たす、すべてのコンピューターでの動作を保証するものではありません。
※ 仕様および外観は、改良のため予告なく変更することがあります。
長
短
ゲート・タイム
Down Trigger Up
アルペジエーター・タイプ
microKEY AirmicroKEY
USB
コンピューター