78889 Gurkenglaslampe EN · 2017-09-21 · garden decoration. The energy of the sun is captured by...
4
Parts list Firmenanschrift aufbewahren - Keep the address of the company - Veuillez conserver l'adresse - Adres bewaren - Nicht geeignet für Kinder unter 3 Jahren! - Verschluckbare Kleinteile! Not suitable for children under 3 years! - Contains small parts! Ne convient pas pour les enfants de moins de trois ans! - Contient de petites pièces pouvant être absorbées! Niet geschikt voor kinderen beneden 3 jaar! - Kleine onderdelen Kunnen worden ingeslikt! Tel.: +49 (0)7502 - 94115-0 - Fax: +49 (0)7502 - 94115-99 [email protected] - www.sol-expert-group.de SOL-EXPERT group, C.Repky - Mehlisstrasse 19 - D-88255 Baindt SOL-EXPERT group group 10+ No. 78889 Number Component Value / Description 1 Circuit board (PCB) 63 mm fitted with Qx5252 3 LEDs white 1 LED green 3 Slide switches Toggle switch, 2 pole 1 Resistor 100 ohm 1 Inductor 56 µH 1 Inductor 220 µH 1 Simple battery holder Size “AA”, UM-3X1 1 NiMH battery 600 mAh, 1.2 V 1 Circular solar panel 50 mA @ 2V 3 Separators made from plastic 1 Cable red 1 Cable black What else is required: Jam-jar or preservative jar, lid diameter at least 85 mm Metal drill bit 5 mm Hand counterbore Glue gun with adhesive cartridges Soldering iron Solder Jam-jar lamp, solar-powered, assembly kit 4 037373 788897 Assembly kit for solar-powered jam-jar lamp Features of the solar-powered jam-jar lamp assembly kit Safety Instructions General: This soldering assembly kit should provide an easy introduction to the basics of soldering. It is perfectly suited for teaching how to solder in schools and workshops. As well as this, the jam-jar assembly kit can be used at summer camps, on summer courses and for other activities to help teach kids how to solder. If the circuit board is already soldered and installed in the jam-jar, it can be used outside as a solar lamp or a solar powered garden decoration. The energy of the sun is captured by the solar panel and stored in the battery. As soon as it gets dark and as long as the battery has been able to store energy over the course of the day, the 3 LEDs should be able to illuminate automatically. The jar shines from within and illuminates its surroundings. With the addition of some decorative materials such as a coloured or patterned serviette, every jam-jar can be decorated uniquely. Whether you paint the glass, attach paper cuttings in a collage or stick on glitter, sequins or seashells - your creativity should know no bounds! The jam-jar lamp can be switched between summer and winter settings in order to guarantee the longest possible illumination period. In summer, the lamp functions for 5 hours at a time. Keep this set of instructions in a safe place so that it can be consulted again in the future if needed! It contains important information! If the battery is defective, only replace it with a new battery of the same value. (600mAh/1.2V) This assembly set is solely intended to be powered using batteries. During soldering, the soldering iron, solder and the component parts which are being soldered are extremely hot. Please be especially careful with them! Always use a soldering pad when soldering! This prevents the component parts and circuit board from sliding around. In order to keep the soldering iron secure during assembly, we recommend using a soldering iron stand. NEVER connect the assembly kit to a mains voltage of 230 V! This could seriously pose a danger to your life and cause death or severe injuries! We recommend: Supervision of the assembly and the soldering process by an adult! (Supervise all soldering sites at all times!)
Transcript of 78889 Gurkenglaslampe EN · 2017-09-21 · garden decoration. The energy of the sun is captured by...
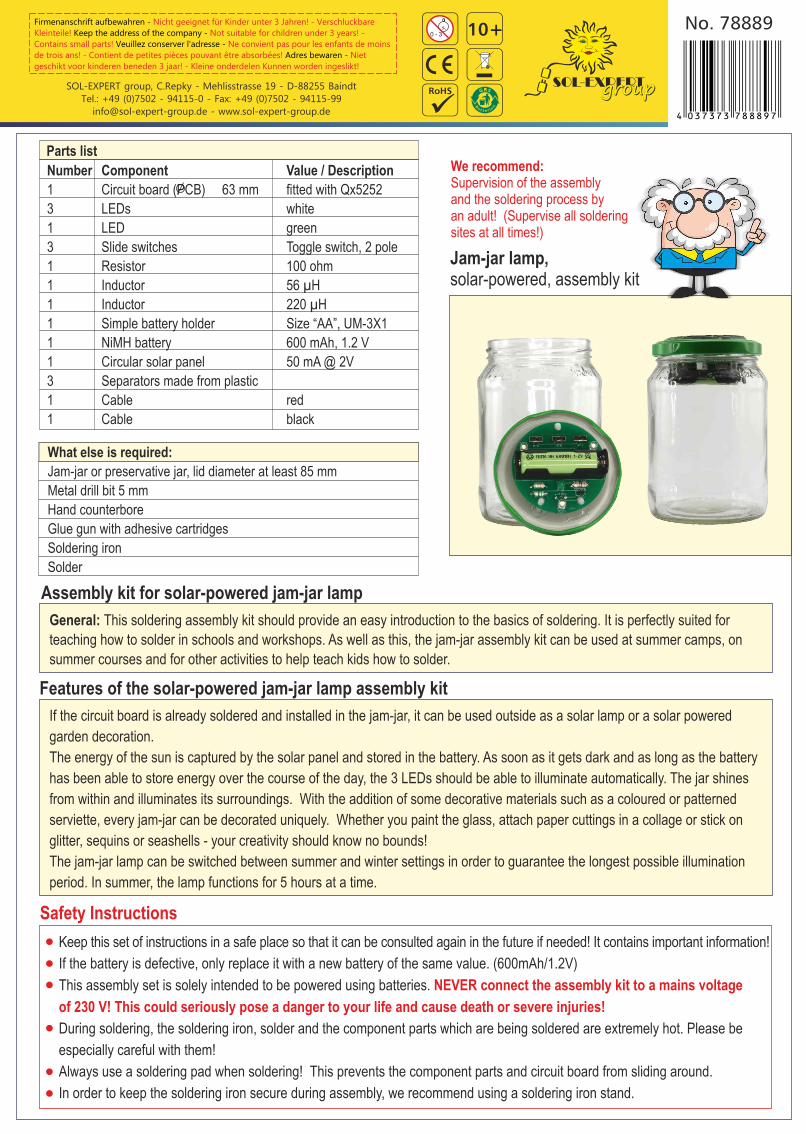
Parts list
Firmenanschrift aufbewahren -
Keep the address of the company -
Veuillez conserver l'adresse -
Adres bewaren -
Nicht geeignet für Kinder unter 3 Jahren! - Verschluckbare
Kleinteile! Not suitable for children under 3 years! -
Contains small parts! Ne convient pas pour les enfants de moins
de trois ans! - Contient de petites pièces pouvant être absorbées! Niet
geschikt voor kinderen beneden 3 jaar! - Kleine onderdelen Kunnen worden ingeslikt!
Tel.: +49 (0)7502 - 94115-0 - Fax: +49 (0)7502 - 94115-99
[email protected] - www.sol-expert-group.de
SOL-EXPERT group, C.Repky - Mehlisstrasse 19 - D-88255 Baindt SOL-EXPERTgroupgroup
10+ No. 78889
Number Component Value / Description
1 Circuit board (PCB) 63 mm fitted with Qx5252
3 LEDs white
1 LED green
3 Slide switches Toggle switch, 2 pole
1 Resistor 100 ohm
1 Inductor 56 µH
1 Inductor 220 µH
1 Simple battery holder Size “AA”, UM-3X1
1 NiMH battery 600 mAh, 1.2 V
1 Circular solar panel 50 mA @ 2V
3 Separators made from plastic
1 Cable red
1 Cable black
What else is required:
Jam-jar or preservative jar, lid diameter at least 85 mm
Metal drill bit 5 mm
Hand counterbore
Glue gun with adhesive cartridges
Soldering iron
Solder
Jam-jar lamp,solar-powered, assembly kit
4 037373 788897
Assembly kit for solar-powered jam-jar lamp
Features of the solar-powered jam-jar lamp assembly kit
Safety Instructions
General: This soldering assembly kit should provide an easy introduction to the basics of soldering. It is perfectly suited for
teaching how to solder in schools and workshops. As well as this, the jam-jar assembly kit can be used at summer camps, on
summer courses and for other activities to help teach kids how to solder.
If the circuit board is already soldered and installed in the jam-jar, it can be used outside as a solar lamp or a solar powered
garden decoration.
The energy of the sun is captured by the solar panel and stored in the battery. As soon as it gets dark and as long as the battery
has been able to store energy over the course of the day, the 3 LEDs should be able to illuminate automatically. The jar shines
from within and illuminates its surroundings. With the addition of some decorative materials such as a coloured or patterned
serviette, every jam-jar can be decorated uniquely. Whether you paint the glass, attach paper cuttings in a collage or stick on
glitter, sequins or seashells - your creativity should know no bounds!
The jam-jar lamp can be switched between summer and winter settings in order to guarantee the longest possible illumination
period. In summer, the lamp functions for 5 hours at a time.
Keep this set of instructions in a safe place so that it can be consulted again in the future if needed! It contains important information!
If the battery is defective, only replace it with a new battery of the same value. (600mAh/1.2V)
This assembly set is solely intended to be powered using batteries.
During soldering, the soldering iron, solder and the component parts which are being soldered are extremely hot. Please be
especially careful with them!
Always use a soldering pad when soldering! This prevents the component parts and circuit board from sliding around.
In order to keep the soldering iron secure during assembly, we recommend using a soldering iron stand.
NEVER connect the assembly kit to a mains voltage
of 230 V! This could seriously pose a danger to your life and cause death or severe injuries!
We recommend: Supervision of the assembly and the soldering process by an adult! (Supervise all soldering sites at all times!)

Solder on the two inductors and resistor, take care when soldering the resistor!
Contacts pre-solder
100 Ohm
Resistance
Spule
56 uH
220 uH
B
Solder the three switches: C
Remove label from the jar
Solder solar cell
12
The smaller IC (Qx5252) has already been soldered!
A
1
2
Solder circuit board3
Instructions for protecting the environment
General: Please bring the circuit board to a certified waste disposal site when it ceases to function. This ensures that the circuit board
is disposed of according to legal guidelines. You can actively ensure that the environment is protected by following the regulations
in place.
Battery regulations: Dearest Customer, you have purchased a product from us which requires batteries. While the battery life is indeed
very long, the battery must eventually be disposed of at some point. Old batteries DO NOT belong in the domestic waste. Consumers
are legally obliged to bring batteries to an appropriate collection point for disposal. Old batteries contain valuable raw materials which
can be recycled. You can also send your used batteries to: SOL-EXPERT group, Mehlisstrasse 19, 88225 Baindt.
Assembly instructions:
++--
Fla
t sid
e
+
+
+
+-
-
-
-
Solder on the three white LEDs and the green LED!Ensure the polarity is correct; the flat side to the right:
D
100 Ohm
56 uH
220 uH
Solder cable
3
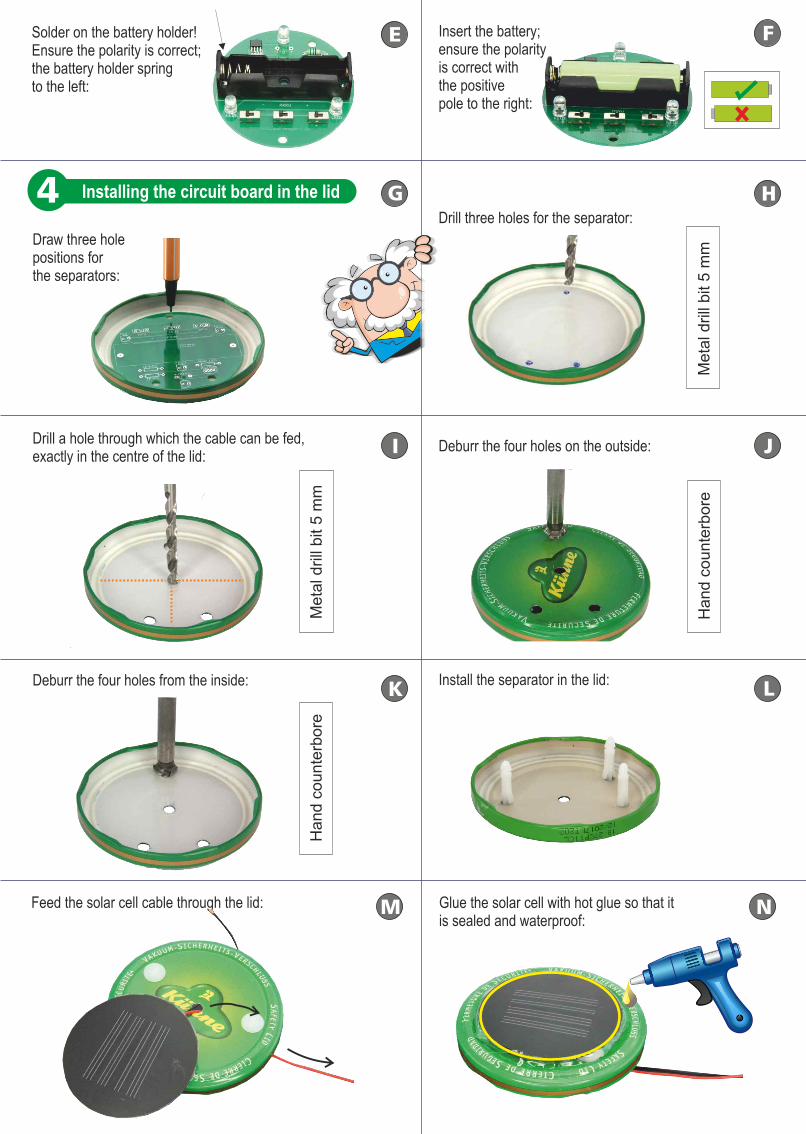
Feed the solar cell cable through the lid: Glue the solar cell with hot glue so that it is sealed and waterproof:
M N
Draw three hole positions for the separators:
Drill three holes for the separator:
Drill a hole through which the cable can be fed, exactly in the centre of the lid:
Deburr the four holes on the outside:
Meta
l drill
bit
5 m
m
Meta
l drill
bit 5
mm
4 G
I
K
H
J
LDeburr the four holes from the inside:
Hand c
ounte
rbore
Hand c
ounte
rbore
Install the separator in the lid:
Installing the circuit board in the lid
Solder on the battery holder!Ensure the polarity is correct; the battery holder spring to the left:
E Insert the battery; ensure the polarity is correct with the positive pole to the right:
F
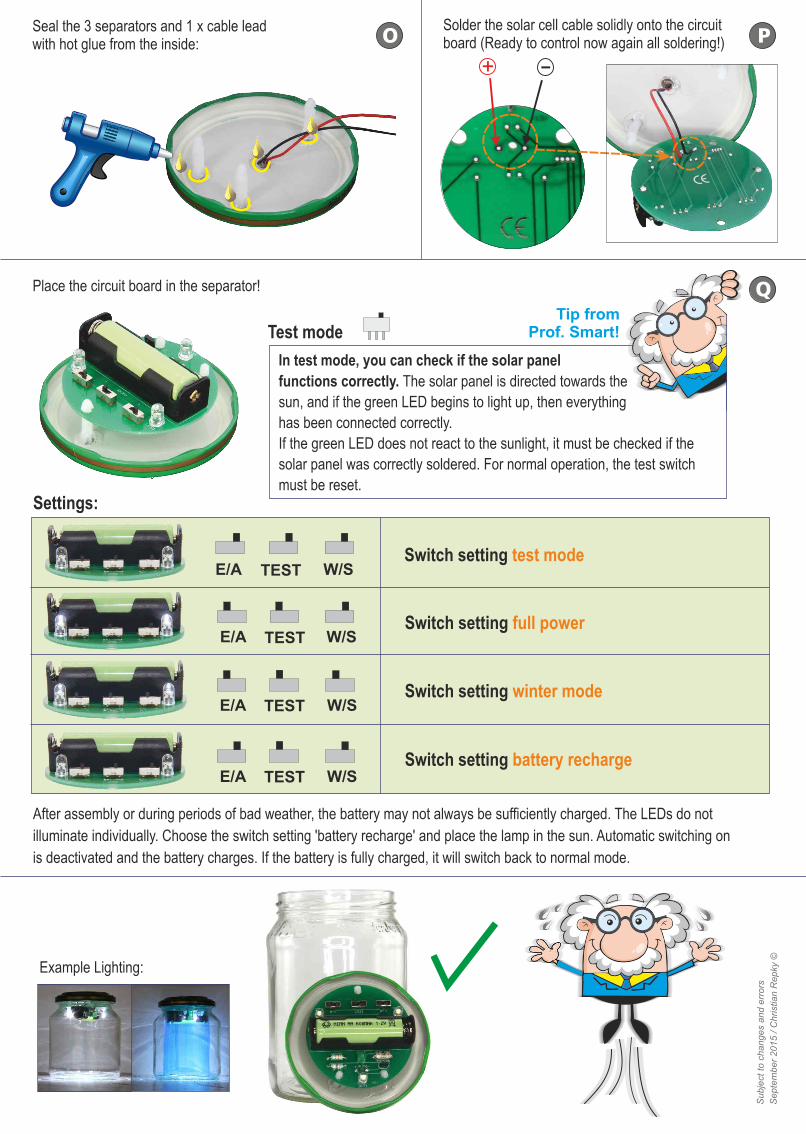
Seal the 3 separators and 1 x cable lead with hot glue from the inside:
Solder the solar cell cable solidly onto the circuit board (Ready to control now again all soldering!)
Place the circuit board in the separator!
Example Lighting:
O
Q
P
Su
bje
ct to c
ha
nges
and e
rrors
Se
pte
mber
2015 / C
hrist
ian R
epky
©
Test mode
In test mode, you can check if the solar panel
functions correctly. The solar panel is directed towards the
sun, and if the green LED begins to light up, then everything
has been connected correctly.
If the green LED does not react to the sunlight, it must be checked if the
solar panel was correctly soldered. For normal operation, the test switch
must be reset. Settings:
Tip from Prof. Smart!
+ -
E/A W/STESTSwitch setting test mode
E/A W/STESTSwitch setting full power
E/A
E/A
W/S
W/S
TEST
TEST
Switch setting winter mode
Switch setting battery recharge
After assembly or during periods of bad weather, the battery may not always be sufficiently charged. The LEDs do not
illuminate individually. Choose the switch setting 'battery recharge' and place the lamp in the sun. Automatic switching on
is deactivated and the battery charges. If the battery is fully charged, it will switch back to normal mode.