11 LD 522-3 - Venta de motores industriales - Comercial Mendez
132
11 LD 522-3 USO-MANUTENZIONE EMPLOI-ENTRETIEN USE-MAINTENANCE BEDIENUNG-WARTUNG USO-MANUTENCION UTILIZAÇÃO-MANUNTENÇÃO
Transcript of 11 LD 522-3 - Venta de motores industriales - Comercial Mendez

11 LD 522-3
USO-MANUTENZIONEEMPLOI-ENTRETIENUSE-MAINTENANCE
BEDIENUNG-WARTUNGUSO-MANUTENCION
UTILIZAÇÃO-MANUNTENÇÃO

2
NOTE - NOTES - BEMERKUNG - NOTAS
○ ○ ○ ○ ○ ○ ○ ○ ○ ○ ○ ○ ○ ○ ○ ○ ○ ○ ○ ○ ○ ○ ○ ○ ○ ○ ○ ○ ○ ○ ○ ○ ○ ○ ○ ○ ○ ○ ○ ○ ○ ○ ○ ○ ○ ○ ○ ○ ○ ○ ○ ○ ○ ○ ○ ○ ○ ○ ○ ○ ○ ○ ○ ○ ○ ○ ○ ○ ○ ○ ○ ○
○ ○ ○ ○ ○ ○ ○ ○ ○ ○ ○ ○ ○ ○ ○ ○ ○ ○ ○ ○ ○ ○ ○ ○ ○ ○ ○ ○ ○ ○ ○ ○ ○ ○ ○ ○ ○ ○ ○ ○ ○ ○ ○ ○ ○ ○ ○ ○ ○ ○ ○ ○ ○ ○ ○ ○ ○ ○ ○ ○ ○ ○ ○ ○ ○ ○ ○ ○ ○ ○ ○ ○
○ ○ ○ ○ ○ ○ ○ ○ ○ ○ ○ ○ ○ ○ ○ ○ ○ ○ ○ ○ ○ ○ ○ ○ ○ ○ ○ ○ ○ ○ ○ ○ ○ ○ ○ ○ ○ ○ ○ ○ ○ ○ ○ ○ ○ ○ ○ ○ ○ ○ ○ ○ ○ ○ ○ ○ ○ ○ ○ ○ ○ ○ ○ ○ ○ ○ ○ ○ ○ ○ ○ ○
○ ○ ○ ○ ○ ○ ○ ○ ○ ○ ○ ○ ○ ○ ○ ○ ○ ○ ○ ○ ○ ○ ○ ○ ○ ○ ○ ○ ○ ○ ○ ○ ○ ○ ○ ○ ○ ○ ○ ○ ○ ○ ○ ○ ○ ○ ○ ○ ○ ○ ○ ○ ○ ○ ○ ○ ○ ○ ○ ○ ○ ○ ○ ○ ○ ○ ○ ○ ○ ○ ○ ○
○ ○ ○ ○ ○ ○ ○ ○ ○ ○ ○ ○ ○ ○ ○ ○ ○ ○ ○ ○ ○ ○ ○ ○ ○ ○ ○ ○ ○ ○ ○ ○ ○ ○ ○ ○ ○ ○ ○ ○ ○ ○ ○ ○ ○ ○ ○ ○ ○ ○ ○ ○ ○ ○ ○ ○ ○ ○ ○ ○ ○ ○ ○ ○ ○ ○ ○ ○ ○ ○ ○ ○
○ ○ ○ ○ ○ ○ ○ ○ ○ ○ ○ ○ ○ ○ ○ ○ ○ ○ ○ ○ ○ ○ ○ ○ ○ ○ ○ ○ ○ ○ ○ ○ ○ ○ ○ ○ ○ ○ ○ ○ ○ ○ ○ ○ ○ ○ ○ ○ ○ ○ ○ ○ ○ ○ ○ ○ ○ ○ ○ ○ ○ ○ ○ ○ ○ ○ ○ ○ ○ ○ ○ ○
○ ○ ○ ○ ○ ○ ○ ○ ○ ○ ○ ○ ○ ○ ○ ○ ○ ○ ○ ○ ○ ○ ○ ○ ○ ○ ○ ○ ○ ○ ○ ○ ○ ○ ○ ○ ○ ○ ○ ○ ○ ○ ○ ○ ○ ○ ○ ○ ○ ○ ○ ○ ○ ○ ○ ○ ○ ○ ○ ○ ○ ○ ○ ○ ○ ○ ○ ○ ○ ○ ○ ○
○ ○ ○ ○ ○ ○ ○ ○ ○ ○ ○ ○ ○ ○ ○ ○ ○ ○ ○ ○ ○ ○ ○ ○ ○ ○ ○ ○ ○ ○ ○ ○ ○ ○ ○ ○ ○ ○ ○ ○ ○ ○ ○ ○ ○ ○ ○ ○ ○ ○ ○ ○ ○ ○ ○ ○ ○ ○ ○ ○ ○ ○ ○ ○ ○ ○ ○ ○ ○ ○ ○ ○
○ ○ ○ ○ ○ ○ ○ ○ ○ ○ ○ ○ ○ ○ ○ ○ ○ ○ ○ ○ ○ ○ ○ ○ ○ ○ ○ ○ ○ ○ ○ ○ ○ ○ ○ ○ ○ ○ ○ ○ ○ ○ ○ ○ ○ ○ ○ ○ ○ ○ ○ ○ ○ ○ ○ ○ ○ ○ ○ ○ ○ ○ ○ ○ ○ ○ ○ ○ ○ ○ ○ ○
○ ○ ○ ○ ○ ○ ○ ○ ○ ○ ○ ○ ○ ○ ○ ○ ○ ○ ○ ○ ○ ○ ○ ○ ○ ○ ○ ○ ○ ○ ○ ○ ○ ○ ○ ○ ○ ○ ○ ○ ○ ○ ○ ○ ○ ○ ○ ○ ○ ○ ○ ○ ○ ○ ○ ○ ○ ○ ○ ○ ○ ○ ○ ○ ○ ○ ○ ○ ○ ○ ○ ○
○ ○ ○ ○ ○ ○ ○ ○ ○ ○ ○ ○ ○ ○ ○ ○ ○ ○ ○ ○ ○ ○ ○ ○ ○ ○ ○ ○ ○ ○ ○ ○ ○ ○ ○ ○ ○ ○ ○ ○ ○ ○ ○ ○ ○ ○ ○ ○ ○ ○ ○ ○ ○ ○ ○ ○ ○ ○ ○ ○ ○ ○ ○ ○ ○ ○ ○ ○ ○ ○ ○ ○
○ ○ ○ ○ ○ ○ ○ ○ ○ ○ ○ ○ ○ ○ ○ ○ ○ ○ ○ ○ ○ ○ ○ ○ ○ ○ ○ ○ ○ ○ ○ ○ ○ ○ ○ ○ ○ ○ ○ ○ ○ ○ ○ ○ ○ ○ ○ ○ ○ ○ ○ ○ ○ ○ ○ ○ ○ ○ ○ ○ ○ ○ ○ ○ ○ ○ ○ ○ ○ ○ ○ ○
○ ○ ○ ○ ○ ○ ○ ○ ○ ○ ○ ○ ○ ○ ○ ○ ○ ○ ○ ○ ○ ○ ○ ○ ○ ○ ○ ○ ○ ○ ○ ○ ○ ○ ○ ○ ○ ○ ○ ○ ○ ○ ○ ○ ○ ○ ○ ○ ○ ○ ○ ○ ○ ○ ○ ○ ○ ○ ○ ○ ○ ○ ○ ○ ○ ○ ○ ○ ○ ○ ○ ○
○ ○ ○ ○ ○ ○ ○ ○ ○ ○ ○ ○ ○ ○ ○ ○ ○ ○ ○ ○ ○ ○ ○ ○ ○ ○ ○ ○ ○ ○ ○ ○ ○ ○ ○ ○ ○ ○ ○ ○ ○ ○ ○ ○ ○ ○ ○ ○ ○ ○ ○ ○ ○ ○ ○ ○ ○ ○ ○ ○ ○ ○ ○ ○ ○ ○ ○ ○ ○ ○ ○ ○
○ ○ ○ ○ ○ ○ ○ ○ ○ ○ ○ ○ ○ ○ ○ ○ ○ ○ ○ ○ ○ ○ ○ ○ ○ ○ ○ ○ ○ ○ ○ ○ ○ ○ ○ ○ ○ ○ ○ ○ ○ ○ ○ ○ ○ ○ ○ ○ ○ ○ ○ ○ ○ ○ ○ ○ ○ ○ ○ ○ ○ ○ ○ ○ ○ ○ ○ ○ ○ ○ ○ ○
○ ○ ○ ○ ○ ○ ○ ○ ○ ○ ○ ○ ○ ○ ○ ○ ○ ○ ○ ○ ○ ○ ○ ○ ○ ○ ○ ○ ○ ○ ○ ○ ○ ○ ○ ○ ○ ○ ○ ○ ○ ○ ○ ○ ○ ○ ○ ○ ○ ○ ○ ○ ○ ○ ○ ○ ○ ○ ○ ○ ○ ○ ○ ○ ○ ○ ○ ○ ○ ○ ○ ○
○ ○ ○ ○ ○ ○ ○ ○ ○ ○ ○ ○ ○ ○ ○ ○ ○ ○ ○ ○ ○ ○ ○ ○ ○ ○ ○ ○ ○ ○ ○ ○ ○ ○ ○ ○ ○ ○ ○ ○ ○ ○ ○ ○ ○ ○ ○ ○ ○ ○ ○ ○ ○ ○ ○ ○ ○ ○ ○ ○ ○ ○ ○ ○ ○ ○ ○ ○ ○ ○ ○ ○
○ ○ ○ ○ ○ ○ ○ ○ ○ ○ ○ ○ ○ ○ ○ ○ ○ ○ ○ ○ ○ ○ ○ ○ ○ ○ ○ ○ ○ ○ ○ ○ ○ ○ ○ ○ ○ ○ ○ ○ ○ ○ ○ ○ ○ ○ ○ ○ ○ ○ ○ ○ ○ ○ ○ ○ ○ ○ ○ ○ ○ ○ ○ ○ ○ ○ ○ ○ ○ ○ ○ ○
3
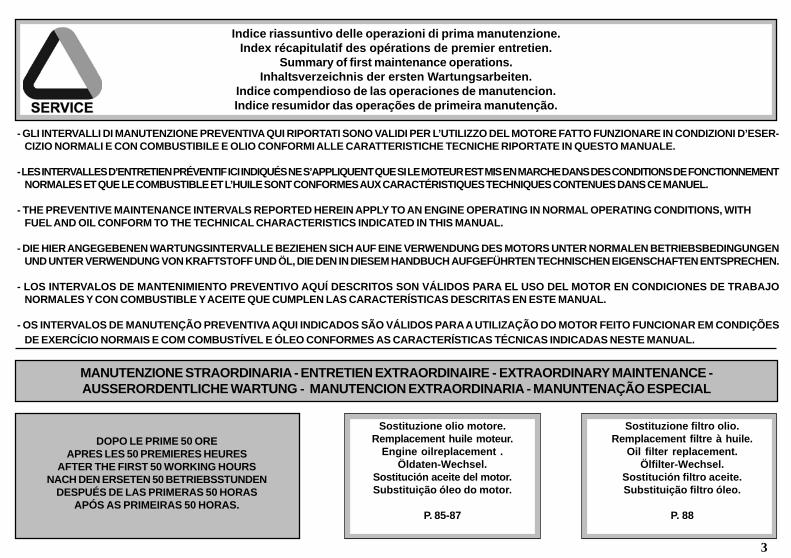
Indice riassuntivo delle operazioni di prima manutenzione.Index récapitulatif des opérations de premier entretien.
Summary of first maintenance operations.Inhaltsverzeichnis der ersten Wartungsarbeiten.
Indice compendioso de las operaciones de manutencion.Indice resumidor das operações de primeira manutenção.
Sostituzione olio motore.Remplacement huile moteur.
Engine oilreplacement .Öldaten-Wechsel.
Sostitución aceite del motor.Substituição óleo do motor.
P. 85-87
Sostituzione filtro olio.Remplacement filtre à huile.
Oil filter replacement.Ölfilter-Wechsel.
Sostitución filtro aceite.Substituição filtro óleo.
P. 88
MANUTENZIONE STRAORDINARIA - ENTRETIEN EXTRAORDINAIRE - EXTRAORDINARY MAINTENANCE -AUSSERORDENTLICHE WARTUNG - MANUTENCION EXTRAORDINARIA - MANUNTENAÇÃO ESPECIAL
- GLI INTERVALLI DI MANUTENZIONE PREVENTIVA QUI RIPORTATI SONO VALIDI PER L’UTILIZZO DEL MOTORE FATTO FUNZIONARE IN CONDIZIONI D’ESER-CIZIO NORMALI E CON COMBUSTIBILE E OLIO CONFORMI ALLE CARATTERISTICHE TECNICHE RIPORTATE IN QUESTO MANUALE.
- LES INTERVALLES D’ENTRETIEN PRÉVENTIF ICI INDIQUÉS NE S’APPLIQUENT QUE SI LE MOTEUR EST MIS EN MARCHE DANS DES CONDITIONS DE FONCTIONNEMENTNORMALES ET QUE LE COMBUSTIBLE ET L’HUILE SONT CONFORMES AUX CARACTÉRISTIQUES TECHNIQUES CONTENUES DANS CE MANUEL.
- THE PREVENTIVE MAINTENANCE INTERVALS REPORTED HEREIN APPLY TO AN ENGINE OPERATING IN NORMAL OPERATING CONDITIONS, WITHFUEL AND OIL CONFORM TO THE TECHNICAL CHARACTERISTICS INDICATED IN THIS MANUAL.
- DIE HIER ANGEGEBENEN WARTUNGSINTERVALLE BEZIEHEN SICH AUF EINE VERWENDUNG DES MOTORS UNTER NORMALEN BETRIEBSBEDINGUNGENUND UNTER VERWENDUNG VON KRAFTSTOFF UND ÖL, DIE DEN IN DIESEM HANDBUCH AUFGEFÜHRTEN TECHNISCHEN EIGENSCHAFTEN ENTSPRECHEN.
- LOS INTERVALOS DE MANTENIMIENTO PREVENTIVO AQUÍ DESCRITOS SON VÁLIDOS PARA EL USO DEL MOTOR EN CONDICIONES DE TRABAJONORMALES Y CON COMBUSTIBLE Y ACEITE QUE CUMPLEN LAS CARACTERÍSTICAS DESCRITAS EN ESTE MANUAL.
- OS INTERVALOS DE MANUTENÇÃO PREVENTIVA AQUI INDICADOS SÃO VÁLIDOS PARA A UTILIZAÇÃO DO MOTOR FEITO FUNCIONAR EM CONDIÇÕESDE EXERCÍCIO NORMAIS E COM COMBUSTÍVEL E ÓLEO CONFORMES AS CARACTERÍSTICAS TÉCNICAS INDICADAS NESTE MANUAL.
DOPO LE PRIME 50 OREAPRES LES 50 PREMIERES HEURES
AFTER THE FIRST 50 WORKING HOURSNACH DEN ERSETEN 50 BETRIEBSSTUNDEN
DESPUÉS DE LAS PRIMERAS 50 HORASAPÓS AS PRIMEIRAS 50 HORAS.

4
Indice riassuntivo delle operazioni di prima manutenzione.Index récapitulatif des opérations de premier entretien.
Summary of first maintenance operations.Inhaltsverzeichnis der ersten Wartungsarbeiten.
Indice compendioso de las operaciones de manutencion.Indice resumidor das operações de primeira manutenção.
MANUNTENZIONE ORDINARIA - ENTRETIEN ORDINAIRE - ORDINARY MAINTENANCEORDENTLICHE WARTUNG - MANUTENCION ORDINARIA - MANUNTENAÇÃO NORMAL
PERIODICITA’ x ORE - FREQUENCE x HEURES - FREQUENCY xHOURS WARTUNGSPERIODEN x STUNDEN PERIODO x
HORAS- FREQUÉNCIA x HORAS
8 50 200 300 500 2500 5000
CONTROLLO - CONTRÔLE - CHECK - KONTROLLE - COMPROBACÍON - CONTRÔLE
LIVELLO OLIO MOTORE - NIVEAU HUILE MOTEUR - LEVEL OIL ENGINE
ÖLSTANDDATEN - NIVEL ACEITE DEL MOTOR - NIVEL ÓLEO DO MOTOR.
FILTRO ARIA A SECCO - FILTRE A AIR SEC - DRY AIR CLEANER
TROCKENLUFTFILTER - FILTRO DE AIRE A SECO - FILTRO AR À SECO.
PULIZIA FILTRO ARIA A BAGNO D’OLIO - NETTOYAGE FILTRE A AIR EN BAIN D’HUILE - OIL BATH AIR CLEANER CLEANING
- ÖLBADLUFTFILTER-REINIGUNG - LIMPIEZA FILTRO AIRE A BAÑO DE ACEITE - LIMPEZA FILTRO AR A BANHO DE ÒLEO
PULIZIA SISTEMA DI RAFFREDDAMENTO - NETTOYAGE DU SYSTÈME DE REFROIDISSEMENT
COOLING SYSTEM CLEANING - REINIGUNG DES KÜHLSYSTEMS
LIMPIEZA DEL SISTEMA DE REFRIGERACIÓN - LIMPEZA DO SISTEMA DE ARREFECIMENTO
TENSIONE CINGHIA - TENSION COURRIE - BELT TENSION
SPANNUNG DES RIEMENS - TENSIÓN DE LA CORREA - ESTICAMENTO DA CORREIA
TARATURA E PULIZIA INIETTORI - TARAGE ET NETTOYAGE INJECTEUR - SETTING AND INJECTORS CLEANING
EINSPRITZDÜSEN ÜBERPRÜFEN - AJUSTE Y LIMPIEZA INYECTORES - TARADURA E LIMPEZA INJETORES
REGISTRO GIOCO BILANCIERI - RÉGLAGE JEU CULBUTEURS - ROCKER ARMS CLEARANCE ADJUSTMENT -
EINSTALLEN DES KIPPHEBEL - AJUSTE DA TOLERÂNCIA DAS BALANCINES - REGISTRO JUEGO DE BILANCINS
PULIZIA SERBATOTIO COMBUSTIBILE - NETTOYAGE DU RÉSERVOIR À COMBUSTIBLE - FUEL TANK CLEANING -
REINIGUNG KRAFTSTOFFTANK - LIMPIEZA DEPÓSITO COMBUSTIBLE - LIMPEZA DO DEPÓSITO DO COMBUSTÍVEL
p. 80
(***)
(***)
(***)
p.83-84
DESCRIZIONE OPERAZIONE - DESCRIPTION DE L’OPÉRATIONOPERATION DESCRIPTION - BESCHREIBUNG DES ARBEITSVORGANGSDESCRIPCIÓN DE LA OPERACIÓN - DESCRIÇÃO DA OPERAÇÃO
p.89-90
p.81-82
p. 95
p. 94
p. 94
p.90-91
5
p. 97
OLIO MOTORE - HUILE MOTEUR- ENGINE OIL
ÖLDATEN - ACEITE DEL MOTOR - ÓLEO MOTOR
FILTRO OLIO ESTERNO - FILTRE A HUILE EXTÉRIEUR - EXTERNAL OIL FILTER
AUSTAUSCH DES ÄUSSEREN ÖLFILTERS - FILTRO DE ACEITE EXTERNO - FILTRO ÓLEO EXTERNO
FILTRO COMBUSTIBILE - FILTRE A COMBUSTIBLE - FUEL FILTER
BRENNSTOFFILTER - FILTRO COMBUSTIBLE - FILTRO COMBUSTIVEL.
CINGHIA - COURROIE - BELT
RIEMEN - CORREA - CORREIA
CARTUCCIA FILTRO ARIA A SECCO - CARTOUCHE FILTRE A AIR DESSÉCHÉE
DRY AIR CLEANER CARTRIDGE - TROCKENLUFTFILTEREINSATZ
CARTUCHO DEL FILTRO DE AIRE SECO - CARTUCHO FILTRO AR À SECO
PERIODICITA’ x ORE - FREQUENCE x HEURES - FREQUENCY xHOURS WARTUNGSPERIODEN x STUNDEN PERIODO x
HORAS- FREQUÉNCIA x HORAS
8 50 200 300 500 2500 5000
(*)
(**)
(*)
(*)
(***)
SOSTITUZIONE - REMPLACEMENT - REPLACEMENT - AUSWECHSELN - SUSTITUCIÓN - SUBSTITUIÇÃO
DESCRIZIONE OPERAZIONE - DESCRIPTION DE L’OPÉRATIONOPERATION DESCRIPTION - BESCHREIBUNG DES ARBEITSVORGANGSDESCRIPCIÓN DE LA OPERACIÓN - DESCRIÇÃO DA OPERAÇÃO
DOPO 6 CONTROLLI CON PULIZIA-AU BOUT DE 6 CONTRÔLESAVEC NETTOYAGE-AFTER 6 CHECKS WITH CLEANING -NACH6 KONTROLLEN MIT REINIGUNG-TRAS 6 INSPECCIONES CONLIMPIEZA-APÓS 6 CONTROLOS COM LIMPEZA
p.85-87
p. 88
p.88-89
p. 92
REVISIONE PARZIALE - REVISION PARTIELLE - PARTIAL OVERHAUL
TEILÜBERHOLUNG - REVISION PARCIAL- REVISÃO PARCIAL.
REVISIONE GENERALE - REVISION GENERALE - TOTAL OVERHAUL
GENERALÜBERHOLUNG - REVISION GENERAL - REVISÃO GENERALA.
REVISIONE - REVISION - OVERHAUL - ÜBERHOLUNG - REVISION - REVISÃO
p. 96
(***) - Il periodo di tempo che deve intercorrere prima di pulire o sostituire l’elemento filtrante è subordinato all’ambientein cui opera il motore. In condizioni ambientali molto polverose il filtro dell’aria deve essere pulito e sostituitopiù spesso.
- Le temps qui doit s’écouler avant de nettoyer ou de remplacer l’élément filtrant dépend des conditions danslesquelles le moteur tourne. Nettoyer et remplacer plus souvent le filtre à air doit quand le milieu est trèspoussiéreux.
- The period of time that must elapse before cleaning or replacing the filter element depends on the environment inwhich the engine operates. The air filter must be cleaned and replaced more frequently In very dusty conditions.
- Das Zeitintervall zwischen den Reinigungen oder dem Auswechseln des Filterelements hängt von der Umgebungab, in der der Motor verwendet wird. In sehr staubiger Umgebung muss der Luftfilter öfter gereinigt undausgetauscht werden.
- El intervalo de tiempo que debe transcurrir antes de limpiar o sustituir el elemento filtrante depende delambiente de funcionamiento del motor. En ambientes muy polvorientos el filtro de aire debe ser limpio y debesustituirse más a menudo.
- O período de tempo que há de passar antes de limpar ou substituir o elemento filtrante está subordinado aoambiente em que o motor trabalha. Em condições ambientais muito poeirentas o filtro do ar deve ser limpo esubstituído muitas vezes.
(*) - In caso di scarso utilizzo: ogni 6 mesi.- En cas d’emploi limitè: tous les 6 mois.- In case of low use: every 6 months.- Im Falls einer niedrigen Benutzung: alle 6 monate.- En caso de escasa utilización: cada 6 meses.- Em situações de reduzida utilização: todos os 6 meses.
(**) - Se si utilizza olio di qualità inferiore a quello consigliato sostituirlo ogni150 ore.
- Si de l’huile de qualité inférieure est employée au lieu de l’huileconseillée, il faudra la vidanger toutes les 150 heures.
- If you are using oil of a quality lower than the recommended one thenyou will have to replace it every 150 hours.
- Bei der Verwendung von Öl mit einer niedrigeren Qualität als derempfohlenen sollte der Wechsel stets nach jeweils 150 Stunden erfolgen.
- Si se utiliza un aceite de calidad inferior respecto al que aconsejamosdeberá efectuar la sustitución cada 150 horas.
- Caso se utilize óleo de qualidade inferior àquele recomendado, deveráser substituído a cada 150 horas.

6
INDICE - TABLE DES MATIERES - INDEX - INHALTS/VERZEICHNIS - INDICE - INDÍCE
Indice riassuntivo delle operazioni di prima manutenzione.Index récapitulatif des opérations de premier entretien.Summary of first maintenance operations.Inhaltsverzeichnis der ersten Wartungsarbeiten.Indice compendioso de las operaciones de manutencion.Indice resumidor das operações de primeira manutenção. .............. P. 3-5
Identificazione motore - Identification moteur - Engine typeIdentifizierungsdaten - Identificacion del motorIdentificação do motor ..................................................................................10
- PREMESSA/CLAUSOLA DI GARANZIA .................................................. 12-13- PREFACE/CERTIFICAT DE GARANTIE ................................................... 14-15- PREFACE/WARRANTY CERTIFICATE .................................................... 16-17- EINLEITUNG/GARANTIEBESTIMMUNGEN ............................................. 18-19- PREMISA/CLAUSULA DE GARANTIA .................................................... 20-21- PREÂMBULO/CERTIFICADO DE GARANTIA .......................................... 22-23
RICHIAMI E AVVISI - ISTRUZIONI PER LA SICUREZZA .......................... 24-25AVERTISSEMENTS - INSTRUCTIONS POUR LA SECURITE ................... 26-27WARNING SIGNS - SAFETY INSTRUCTIONS .......................................... 28-29WARNUNGSZEICHEN - SICHERHEITSVORSCHRIFTEN .......................... 30-31LLAMADAS Y AVISOS - INSTRUCCIONES DE SEGURIDAD ................... 32-33PREVENÇÃO E AVISOS - INSTRUCÇÕES DE SEGURANÇA ................... 34-35PARATHRHSEIE KAI PROEIAOPOIHSEIS - ODHGIES ASFALEIAS ...... 36-37WAARSCHUWINGS TEKENS - VEILIGHEIDSVOORSCHRIFTEN ............ 38-39ADVARSEL TEGN - SIKKERHETS REGLER ............................................. 40-41VARNINGSMÄRKEN - SÄKERHETSFÖRESKRIFTER ............................... 42-43WÄROITUS MERKINNÄT - TURVAOHJEET .............................................. 44-45
CARATTERISTICHE - CARACTERISTIQUES - CHARACTERISTICSTECHNISCHE DATEN - CARACTERISTICAS - CARACTERÍSTICAS .............46
DIMENSIONI D’INGOMBRO - MESURES D’ENCOMBREMENTOVERALL DIMENSION - EINBAUMAßEDIMENSIONE EXTERIORES - DIMENÇÔES EXTERIORES ............................46
PRIMA DELL’AVVIAMENTO - AVANT LE DEMARRAGEBEFORE STARTING - VOR DEM ANLASSENANTES DEL ARRANQUE - ANTES DO AVIAMENTO................................. P. 47
USO - EMPLOI - USE - BEDIENUNG - UTILISACION - UTILIZAÇÃO ....... 48-49
Classificazione SAE - Classement SAE - SAE ClassificationKlassifizierung SAE - Classificación SAE - Classificação SAE ............. 50-51
Gradazione olio - Viscosité huile - Grade oilViskositätsklasse - Viscosidad aceite - Gradação óleo ..............................51
Specifiche internazionali per i lubrificantiSpécifications internationales pour les lubrificantsLubricant international specificationsInternationale Spezifikationen für schmiermittelEspecificaciones internacionales para lubricantesEspecificações internacionais para os lubrificantes ............................. 52-53
Norme ACEA - Normes ACEA - ACEA RegulationsVorschriften ACEA - Normas ACEA - Normas ACEA ....................................54
Sequenze ACEA/API/MIL - Sequences ACEA/API/MILACEA/API/MIL Sequences - ACEA/API/MIL-SequenzenSecuencias ACEA/API/MIL - Sequências CEA/API/MIL ..............................55
OLIO PRESCRITTO - HUILE - PRESCRIBED LUBRICANTVORGESSCHRIEBENE SCHMIERÖLEACEITE RECOMENDADO - ÓLEO RECOMENDADO ......................................56
CAPACITÁ OLIO MOTORE - CAPACITÉ HUILE MOTEUR - ENGINES OILCAPACITY - ÖLINHALT MOTOREN - CAPACIDAD ACEITE MOTORES -CAPACIDADE DE OLEO DE MOTORES .........................................................56
Rifornimento olio motore. - Ravitaillement huile moteur.Fill crankcase with oil. - Öl-aufüllen.Suministración aceite motor. - Reabastecimento óleo motor. .................58
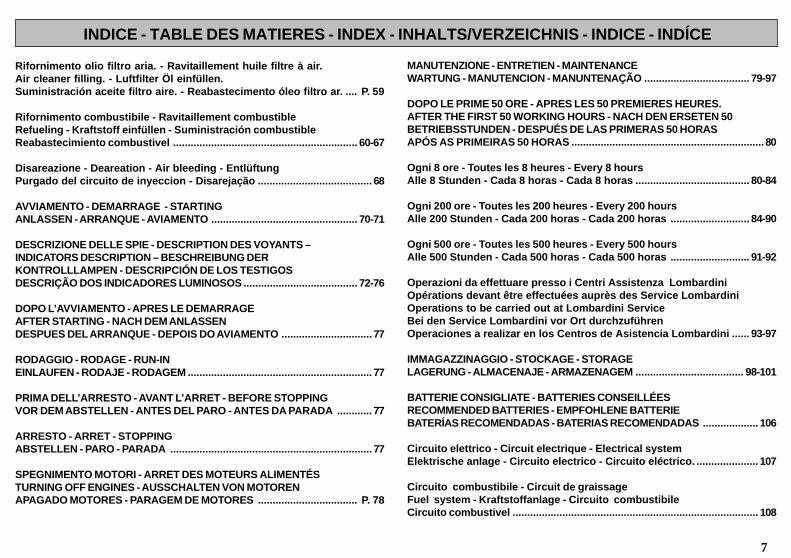
7
INDICE - TABLE DES MATIERES - INDEX - INHALTS/VERZEICHNIS - INDICE - INDÍCE
Rifornimento olio filtro aria. - Ravitaillement huile filtre à air.Air cleaner filling. - Luftfilter Öl einfüllen.Suministración aceite filtro aire. - Reabastecimento óleo filtro ar. .... P. 59
Rifornimento combustibile - Ravitaillement combustibleRefueling - Kraftstoff einfüllen - Suministración combustibleReabastecimiento combustivel ............................................................... 60-67
Disareazione - Deareation - Air bleeding - EntlüftungPurgado del circuito de inyeccion - Disarejação ....................................... 68
AVVIAMENTO - DEMARRAGE - STARTINGANLASSEN - ARRANQUE - AVIAMENTO .................................................. 70-71
DESCRIZIONE DELLE SPIE - DESCRIPTION DES VOYANTS –INDICATORS DESCRIPTION – BESCHREIBUNG DERKONTROLLLAMPEN - DESCRIPCIÓN DE LOS TESTIGOSDESCRIÇÃO DOS INDICADORES LUMINOSOS ....................................... 72-76
DOPO L’AVVIAMENTO - APRES LE DEMARRAGEAFTER STARTING - NACH DEM ANLASSENDESPUES DEL ARRANQUE - DEPOIS DO AVIAMENTO ............................... 77
RODAGGIO - RODAGE - RUN-INEINLAUFEN - RODAJE - RODAGEM ............................................................... 77
PRIMA DELL’ARRESTO - AVANT L’ARRET - BEFORE STOPPINGVOR DEM ABSTELLEN - ANTES DEL PARO - ANTES DA PARADA ............ 77
ARRESTO - ARRET - STOPPINGABSTELLEN - PARO - PARADA ..................................................................... 77
SPEGNIMENTO MOTORI - ARRET DES MOTEURS ALIMENTÉSTURNING OFF ENGINES - AUSSCHALTEN VON MOTORENAPAGADO MOTORES - PARAGEM DE MOTORES .................................. P. 78
MANUTENZIONE - ENTRETIEN - MAINTENANCEWARTUNG - MANUTENCION - MANUNTENAÇÃO .................................... 79-97
DOPO LE PRIME 50 ORE - APRES LES 50 PREMIERES HEURES.AFTER THE FIRST 50 WORKING HOURS - NACH DEN ERSETEN 50BETRIEBSSTUNDEN - DESPUÉS DE LAS PRIMERAS 50 HORASAPÓS AS PRIMEIRAS 50 HORAS ..................................................................80
Ogni 8 ore - Toutes les 8 heures - Every 8 hoursAlle 8 Stunden - Cada 8 horas - Cada 8 horas ....................................... 80-84
Ogni 200 ore - Toutes les 200 heures - Every 200 hoursAlle 200 Stunden - Cada 200 horas - Cada 200 horas ........................... 84-90
Ogni 500 ore - Toutes les 500 heures - Every 500 hoursAlle 500 Stunden - Cada 500 horas - Cada 500 horas ........................... 91-92
Operazioni da effettuare presso i Centri Assistenza LombardiniOpérations devant être effectuées auprès des Service LombardiniOperations to be carried out at Lombardini ServiceBei den Service Lombardini vor Ort durchzuführenOperaciones a realizar en los Centros de Asistencia Lombardini ...... 93-97
IMMAGAZZINAGGIO - STOCKAGE - STORAGELAGERUNG - ALMACENAJE - ARMAZENAGEM ..................................... 98-101
BATTERIE CONSIGLIATE - BATTERIES CONSEILLÉESRECOMMENDED BATTERIES - EMPFOHLENE BATTERIEBATERÍAS RECOMENDADAS - BATERIAS RECOMENDADAS ................... 106
Circuito elettrico - Circuit electrique - Electrical systemElektrische anlage - Circuito electrico - Circuito eléctrico. ..................... 107
Circuito combustibile - Circuit de graissageFuel system - Kraftstoffanlage - Circuito combustibileCircuito combustivel .................................................................................... 108
8
INDICE - TABLE DES MATIERES - INDEX - INHALTS/VERZEICHNIS - INDICE - INDÍCE
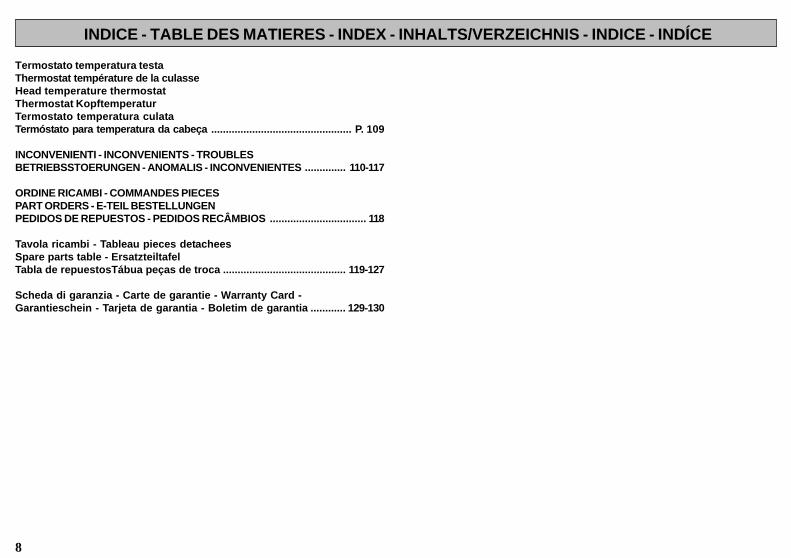
Termostato temperatura testaThermostat température de la culasseHead temperature thermostatThermostat KopftemperaturTermostato temperatura culataTermóstato para temperatura da cabeça ................................................ P. 109
INCONVENIENTI - INCONVENIENTS - TROUBLESBETRIEBSSTOERUNGEN - ANOMALIS - INCONVENIENTES .............. 110-117
ORDINE RICAMBI - COMMANDES PIECESPART ORDERS - E-TEIL BESTELLUNGENPEDIDOS DE REPUESTOS - PEDIDOS RECÂMBIOS ................................. 118
Tavola ricambi - Tableau pieces detacheesSpare parts table - ErsatzteiltafelTabla de repuestosTábua peças de troca .......................................... 119-127
Scheda di garanzia - Carte de garantie - Warranty Card -Garantieschein - Tarjeta de garantia - Boletim de garantia ............ 129-130

9
INDICE - TABLE DES MATIERES - INDEX - INHALTS/VERZEICHNIS - INDICE - INDÍCE
MANUTENZIONE DA ESEGUIRSI SOLO PRESSO STAZIONI DI SERVIZIOENTRETIEN À EFFECTUER PRÈS DES STATIONS-SERVICE
MAINTENANCE TO BE CARRIED OUT AT THE SERVICE STATIONSAN TANKSTELLEN DURCHZUFÜHRENDE WARTUNG
MANTENIMIENTO A REALIZAR EN LAS ESTACIONES DE SERVICIOMANUTENÇÃO A SER EFECTUADA NAS ESTAÇÕES DE SERVIÇO
Pulizia serbatoio - Nettoyage du réservoir à combustible - Fuel tank cleaningReinigung Kraftstofftank - Limpieza del depósito de combustible - Limpeza do depósito do combustível ........................................................................ P. 94
Registro gioco bilancieri - Réglage du jeu des culbuteurs - Setting rocker arms clearanceVentilspiel-Einstellung - Reglajes juego balancines - Registro jogo bilancins ............................................................................................................................ 94
Taratura e pulizia iniettore - Tarage et nettoyage injecteur - Setting and injector cleaningEinspritzdüse-Reinigung und Einstellung - Ajuste y limpieza inyector - Taradura e limpeza injetor ....................................................................................... 95
Revisione parziale - Revision partielle - Partial overhaulTeilüberholung - Revision parcial - Revisão parcial ....................................................................................................................................................................... 96
Revisione generale - Revision générale - Total overhaulGeneralüberholung - Revision general - Revisão general ............................................................................................................................................................ 97
SERIE ACCESSORI FORNITA CON IL MOTORESERIE ACCESSOIRES LIVREE AVEC LE MOTEURACCESSORY SET SUPPLIED WITH THE ENGINE
ZUBEHÖRSATZ MIT DEM MOTOR GELIEFERTSERIE ACCESSORIOS SUMMINISTRADA CON EL MOTOR
SÉRIE ACESSÓRIOS FORNEZIDA COM O MOTOR
Da richiedere se mancante.A demander si pas livbrée.
Request if not supplied.Zu verlangen wenn es fehlt.
Pedir si falta.Pedir se falta.
10
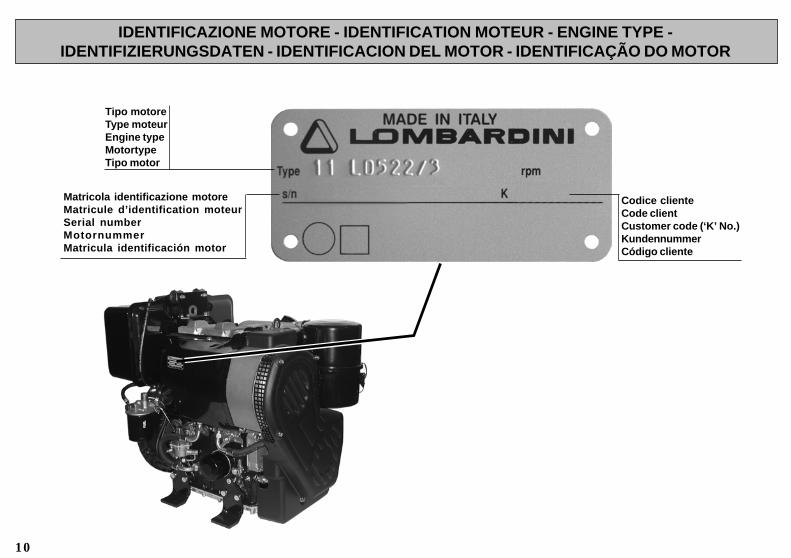
IDENTIFICAZIONE MOTORE - IDENTIFICATION MOTEUR - ENGINE TYPE -IDENTIFIZIERUNGSDATEN - IDENTIFICACION DEL MOTOR - IDENTIFICAÇÃO DO MOTOR
Codice clienteCode clientCustomer code (‘K’ No.)KundennummerCódigo cliente
Tipo motoreType moteurEngine typeMotortypeTipo motor
Matricola identificazione motoreMatricule d’identification moteurSerial numberMotornummerMatricula identificación motor

11
NOTE - NOTES - BEMERKUNG - NOTAS
○ ○ ○ ○ ○ ○ ○ ○ ○ ○ ○ ○ ○ ○ ○ ○ ○ ○ ○ ○ ○ ○ ○ ○ ○ ○ ○ ○ ○ ○ ○ ○ ○ ○ ○ ○ ○ ○ ○ ○ ○ ○ ○ ○ ○ ○ ○ ○ ○ ○ ○ ○ ○ ○ ○ ○ ○ ○ ○ ○ ○ ○ ○ ○ ○ ○ ○ ○ ○ ○ ○ ○
○ ○ ○ ○ ○ ○ ○ ○ ○ ○ ○ ○ ○ ○ ○ ○ ○ ○ ○ ○ ○ ○ ○ ○ ○ ○ ○ ○ ○ ○ ○ ○ ○ ○ ○ ○ ○ ○ ○ ○ ○ ○ ○ ○ ○ ○ ○ ○ ○ ○ ○ ○ ○ ○ ○ ○ ○ ○ ○ ○ ○ ○ ○ ○ ○ ○ ○ ○ ○ ○ ○ ○
○ ○ ○ ○ ○ ○ ○ ○ ○ ○ ○ ○ ○ ○ ○ ○ ○ ○ ○ ○ ○ ○ ○ ○ ○ ○ ○ ○ ○ ○ ○ ○ ○ ○ ○ ○ ○ ○ ○ ○ ○ ○ ○ ○ ○ ○ ○ ○ ○ ○ ○ ○ ○ ○ ○ ○ ○ ○ ○ ○ ○ ○ ○ ○ ○ ○ ○ ○ ○ ○ ○ ○
○ ○ ○ ○ ○ ○ ○ ○ ○ ○ ○ ○ ○ ○ ○ ○ ○ ○ ○ ○ ○ ○ ○ ○ ○ ○ ○ ○ ○ ○ ○ ○ ○ ○ ○ ○ ○ ○ ○ ○ ○ ○ ○ ○ ○ ○ ○ ○ ○ ○ ○ ○ ○ ○ ○ ○ ○ ○ ○ ○ ○ ○ ○ ○ ○ ○ ○ ○ ○ ○ ○ ○
○ ○ ○ ○ ○ ○ ○ ○ ○ ○ ○ ○ ○ ○ ○ ○ ○ ○ ○ ○ ○ ○ ○ ○ ○ ○ ○ ○ ○ ○ ○ ○ ○ ○ ○ ○ ○ ○ ○ ○ ○ ○ ○ ○ ○ ○ ○ ○ ○ ○ ○ ○ ○ ○ ○ ○ ○ ○ ○ ○ ○ ○ ○ ○ ○ ○ ○ ○ ○ ○ ○ ○
○ ○ ○ ○ ○ ○ ○ ○ ○ ○ ○ ○ ○ ○ ○ ○ ○ ○ ○ ○ ○ ○ ○ ○ ○ ○ ○ ○ ○ ○ ○ ○ ○ ○ ○ ○ ○ ○ ○ ○ ○ ○ ○ ○ ○ ○ ○ ○ ○ ○ ○ ○ ○ ○ ○ ○ ○ ○ ○ ○ ○ ○ ○ ○ ○ ○ ○ ○ ○ ○ ○ ○
○ ○ ○ ○ ○ ○ ○ ○ ○ ○ ○ ○ ○ ○ ○ ○ ○ ○ ○ ○ ○ ○ ○ ○ ○ ○ ○ ○ ○ ○ ○ ○ ○ ○ ○ ○ ○ ○ ○ ○ ○ ○ ○ ○ ○ ○ ○ ○ ○ ○ ○ ○ ○ ○ ○ ○ ○ ○ ○ ○ ○ ○ ○ ○ ○ ○ ○ ○ ○ ○ ○ ○
○ ○ ○ ○ ○ ○ ○ ○ ○ ○ ○ ○ ○ ○ ○ ○ ○ ○ ○ ○ ○ ○ ○ ○ ○ ○ ○ ○ ○ ○ ○ ○ ○ ○ ○ ○ ○ ○ ○ ○ ○ ○ ○ ○ ○ ○ ○ ○ ○ ○ ○ ○ ○ ○ ○ ○ ○ ○ ○ ○ ○ ○ ○ ○ ○ ○ ○ ○ ○ ○ ○ ○
○ ○ ○ ○ ○ ○ ○ ○ ○ ○ ○ ○ ○ ○ ○ ○ ○ ○ ○ ○ ○ ○ ○ ○ ○ ○ ○ ○ ○ ○ ○ ○ ○ ○ ○ ○ ○ ○ ○ ○ ○ ○ ○ ○ ○ ○ ○ ○ ○ ○ ○ ○ ○ ○ ○ ○ ○ ○ ○ ○ ○ ○ ○ ○ ○ ○ ○ ○ ○ ○ ○ ○
○ ○ ○ ○ ○ ○ ○ ○ ○ ○ ○ ○ ○ ○ ○ ○ ○ ○ ○ ○ ○ ○ ○ ○ ○ ○ ○ ○ ○ ○ ○ ○ ○ ○ ○ ○ ○ ○ ○ ○ ○ ○ ○ ○ ○ ○ ○ ○ ○ ○ ○ ○ ○ ○ ○ ○ ○ ○ ○ ○ ○ ○ ○ ○ ○ ○ ○ ○ ○ ○ ○ ○
○ ○ ○ ○ ○ ○ ○ ○ ○ ○ ○ ○ ○ ○ ○ ○ ○ ○ ○ ○ ○ ○ ○ ○ ○ ○ ○ ○ ○ ○ ○ ○ ○ ○ ○ ○ ○ ○ ○ ○ ○ ○ ○ ○ ○ ○ ○ ○ ○ ○ ○ ○ ○ ○ ○ ○ ○ ○ ○ ○ ○ ○ ○ ○ ○ ○ ○ ○ ○ ○ ○ ○
○ ○ ○ ○ ○ ○ ○ ○ ○ ○ ○ ○ ○ ○ ○ ○ ○ ○ ○ ○ ○ ○ ○ ○ ○ ○ ○ ○ ○ ○ ○ ○ ○ ○ ○ ○ ○ ○ ○ ○ ○ ○ ○ ○ ○ ○ ○ ○ ○ ○ ○ ○ ○ ○ ○ ○ ○ ○ ○ ○ ○ ○ ○ ○ ○ ○ ○ ○ ○ ○ ○ ○
○ ○ ○ ○ ○ ○ ○ ○ ○ ○ ○ ○ ○ ○ ○ ○ ○ ○ ○ ○ ○ ○ ○ ○ ○ ○ ○ ○ ○ ○ ○ ○ ○ ○ ○ ○ ○ ○ ○ ○ ○ ○ ○ ○ ○ ○ ○ ○ ○ ○ ○ ○ ○ ○ ○ ○ ○ ○ ○ ○ ○ ○ ○ ○ ○ ○ ○ ○ ○ ○ ○ ○
○ ○ ○ ○ ○ ○ ○ ○ ○ ○ ○ ○ ○ ○ ○ ○ ○ ○ ○ ○ ○ ○ ○ ○ ○ ○ ○ ○ ○ ○ ○ ○ ○ ○ ○ ○ ○ ○ ○ ○ ○ ○ ○ ○ ○ ○ ○ ○ ○ ○ ○ ○ ○ ○ ○ ○ ○ ○ ○ ○ ○ ○ ○ ○ ○ ○ ○ ○ ○ ○ ○ ○
○ ○ ○ ○ ○ ○ ○ ○ ○ ○ ○ ○ ○ ○ ○ ○ ○ ○ ○ ○ ○ ○ ○ ○ ○ ○ ○ ○ ○ ○ ○ ○ ○ ○ ○ ○ ○ ○ ○ ○ ○ ○ ○ ○ ○ ○ ○ ○ ○ ○ ○ ○ ○ ○ ○ ○ ○ ○ ○ ○ ○ ○ ○ ○ ○ ○ ○ ○ ○ ○ ○ ○
○ ○ ○ ○ ○ ○ ○ ○ ○ ○ ○ ○ ○ ○ ○ ○ ○ ○ ○ ○ ○ ○ ○ ○ ○ ○ ○ ○ ○ ○ ○ ○ ○ ○ ○ ○ ○ ○ ○ ○ ○ ○ ○ ○ ○ ○ ○ ○ ○ ○ ○ ○ ○ ○ ○ ○ ○ ○ ○ ○ ○ ○ ○ ○ ○ ○ ○ ○ ○ ○ ○ ○
○ ○ ○ ○ ○ ○ ○ ○ ○ ○ ○ ○ ○ ○ ○ ○ ○ ○ ○ ○ ○ ○ ○ ○ ○ ○ ○ ○ ○ ○ ○ ○ ○ ○ ○ ○ ○ ○ ○ ○ ○ ○ ○ ○ ○ ○ ○ ○ ○ ○ ○ ○ ○ ○ ○ ○ ○ ○ ○ ○ ○ ○ ○ ○ ○ ○ ○ ○ ○ ○ ○ ○
○ ○ ○ ○ ○ ○ ○ ○ ○ ○ ○ ○ ○ ○ ○ ○ ○ ○ ○ ○ ○ ○ ○ ○ ○ ○ ○ ○ ○ ○ ○ ○ ○ ○ ○ ○ ○ ○ ○ ○ ○ ○ ○ ○ ○ ○ ○ ○ ○ ○ ○ ○ ○ ○ ○ ○ ○ ○ ○ ○ ○ ○ ○ ○ ○ ○ ○ ○ ○ ○ ○ ○
12
PREMESSA
Abbiamo cercato di fare il possibile per dare informazioni tecniche accurate e aggiornate all'interno di questo manuale. Lo sviluppo dei motori Lombardini è tuttaviacontinuo, pertanto le informazioni contenute all'interno di questa pubblicazione sono soggette a variazioni senza obbligo di preavviso.Le informazioni qui riportate sono di proprietà esclusiva della Lombardini. Pertanto non sono permesse riproduzioni o ristampe nè parziali nè totali senza il permessoespresso della Lombardini.
Le informazioni presentate in questo manuale presuppongono che:
1 - le persone che effettuano un lavoro di servizio su motori Lombardini siano adeguatamente addestrate ed attrezzate per provvedere in modo sicuro e professionalealle operazioni necessarie;
2 - le persone che effettuano un lavoro di servizio su motori Lombardini posseggano un'adeguata manualità e gli attrezzi speciali Lombardini per provvedere in modosicuro e professionale alle operazioni necessarie;
3 - le persone che effettuano un lavoro di servizio su motori Lombardini abbiano letto le specifiche informazioni riguardanti le già citate operazioni Service e abbianochiaramente capito le operazioni da eseguire.
NOTE GENERALI SERVICE
1 - Utilizzare solo ricambi originali Lombardini. Il non uso di particolari originali potrebbe causare prestazioni non corrette e scarsa longevità.2 - Tutti i dati riportati sono in formato metrico, cioè le dimensioni sono espresse in millimetri (mm), la coppia è espressa in Newton-meters (Nm), il peso è espresso
in chilogrammi (kg), il volume è espresso in litri o centimetri cubi (cc) e la pressione è espressa in unità barometriche (bar).
13
CLAUSOLA DI GARANZIA
La Lombardini S.r.l garantisce i prodotti di sua fabbricazione da difetti di conformità per un periodo di 24 mesi dalla data di consegna al primo utente finale.Per i motori installati su gruppi stazionari (con impiego a carico costante e/o lentamente variabile entro i limiti di regolazione ) la garanzia è riconosciuta sino adun limite massimo di 2000 ore di lavoro,se il periodo sopra citato (24 mesi ) non è stato superato.In assenza di strumento conta ore verranno considerate 12 ore di lavoro per giorno di calendario.Per quanto riguarda le parti soggette ad usura e deterioramento (apparato iniezione/alimentazione,impianto elettrico, impianto di raffreddamento ,componenti di tenuta , tubazioni non metalliche, cinghie ) la garanzia ha un limite massimo di 2000 ore difunzionamento, se il periodo sopra citato (24 mesi) non è stato superato.Per la corretta manutenzione e la sostituzione periodica di queste parti è necessario attenersi alle indicazioni riportate nella manualistica fornita a corredo di ognimotore.Al fine dell’operatività della garanzia, l’installazione dei motori, in ragione delle caratteristiche tecniche del prodotto, deve essere effettuata solo da personalequalificato.La lista dei centri di servizio autorizzati da Lombardini S.r.l è contenuta nel libretto “ Service “ fornito a corredo di ogni motore.Nel caso di applicazioni speciali che prevedono modifiche rilevanti dei circuiti di raffreddamento, lubrificazione (esempio: sistemi di coppa a secco),sovralimentazione, filtrazione, valgono le clausole speciali di garanzia espressamente pattuite per iscritto.Entro i suddetti termini la Lombardini S.r.l si impegna, direttamente o a mezzo dei suoi centri di servizio autorizzati, a effettuare gratuitamente la riparazione deipropri prodotti e/o la loro sostituzione, qualora a suo giudizio o di un suo rappresentante autorizzato, presentino difetti di conformità, di fabbricazione o dimateriale.Rimane comunque esclusa qualsiasi responsabilità ed obbligazione per spese, danni e perdite dirette o indirette derivanti dall’uso o dall’impossibilità di uso deimotori, sia totale che parziale.La riparazione o la fornitura sostitutiva non prolungherà, ne rinnoverà la durata del periodo di garanzia.
Gli obblighi della Lombardini S.r.l previsti ai paragrafi precedenti non sono validi nel caso in cui:
- I motori non vengano installati in modo corretto e quindi ne vengano pregiudicati ed alterati i corretti parametri funzionali.- L’uso e la manutenzione dei motori non siano conformi alle istruzioni della Lombardini S.r.l riportate sul libretto di uso e manutenzione fornito a corredo diogni motore.
- Vengano manomessi i sigilli apposti sui motori dalla Lombardini S.r.l .- Si sia fatto uso di ricambi non originali della Lombardini S.r.l.- Gli impianti di alimentazione e iniezione siano danneggiati da combustibile inidoneo o inquinato.- Gli impianti elettrici vadano in avaria a causa di componenti ad essi collegati e non forniti o installati dalla Lombardini S.r.l.- I motori vengano riparati,smontati o modificati da officine non autorizzate dalla Lombardini S.r.l.
Allo scadere dei termini temporali sopra citati e/o al superamento delle ore di lavoro sopra specificate la Lombardini S.r.l si riterrà sciolta da ogni responsabilitàe dagli obblighi di cui ai paragrafi precedenti della seguente clausola.
Eventuali richieste di garanzia relative a non conformità del prodotto devono essere indirizzate ai centri di servizio della Lombardini S.r.l.

14
PREFACE
Nous avons fait le possible pour donner dans ce manuel des informations techniques soignées et à jour. Le développement des moteurs Lombardini est toutefoiscontinu ; par conséquent les informations données par cette publication sont sujettes à des variations sans obligation de préavis.Les informations contenues dans ce manuel sont la propriété exclusive de la Sté Lombardini. Aucune reproduction ou réimpression partielle ou totale n’est donc permisesans l’autorisation expresse de Lombardini.
Les instructions reportées dans ce manuel prévoient que :
1 - Les personnes qui doivent effectuer une travail de Service sur les moteurs Lombardini sont dûment informées et équipées pour exécuter, d’une façon sûre etprofessionnelle, les opérations nécessaires ;
2 - Les personnes qui doivent effectuer un travail de Service sur les moteurs Lombardini possédent une formation manuelle appropriée et les outils spécifiquesLombardini pour exécuter d’une façon sûre et professionnelle les opérations nécéssaires.
3 - Les personnes qui doivent effectuer un travail de Service sur les moteurs Lombardini ont lu les informations spécifiques concernant les opérations de Service déjà
mentionnées et ont compris clairement les opérations à exécuter.
NOTES GENERALES SERVICE
1 - Utiliser seulement des pièces de rechange d’origine Lombardini. L’emploi de tout autre pièce pourrait causer des performances non correctes et reduire la longévité.2 - Toutes les données indiquées sont en format métrique, c’est à dire que les dimensions sont exprimées en millimètres (mm), le couple est exprimé en Newton-meters
(Nm), le poids est exprimé en kilogrammes (kg), le volume est exprimé en litres ou centimètres cubiques (cc) et la pression est exprimée en unités barométriques(bar).

15
CERTIFICAT DI GARANTIELombardini S.r.l. garantit ses produits contre les défauts de conformité pour une durée de 24 mois, à compter de la date de livraison au premier utilisateur.Il faut exclure de ces conditions les groupes stationnaires (avec fonctionnement sous charge constante et/ou légèrement variable dans les limites de réglage)pour lesquels Lombardini S.r.l. accepte la garantie jusqu’à la limite maximale de 2000 heures de travail, si le délai précédemment cité (24 mois) n’a pas étédépassé.Au cas où un compteur ne serait pas disponible, considérer 12 heures de travail par jour de calendrier.Les éléments soumis à l’usure et à la détérioration (système d’injection / alimentation, installation électrique, système de refroidissement, composantsd’étanchéité, tuyauterie non métallique, courroies) sont couverts par la garantie pour une période de 2000 heures au maximum, si le délai précédemment cité(24 mois) n’a pas été dépassé.L’entretien correct et le remplacement périodique de ces éléments doivent se faire en respectant les indications reportées dans les manuels fournis avec lemoteur.Pour que la garantie soit valable, l’installation des moteurs doit respecter les caractéristiques techniques du produit et doit être effectuée par du personnelqualifié.La liste des centres d’assistance autorisés par Lombardini S.r.l. est contenue dans le manuel « Service » fourni avec chaque moteur.En cas d’applications spéciales avec des modifications importantes des circuits de refroidissement, lubrification (par ex. : systèmes de carter huile à sec),suralimentation, filtration, il sera nécessaire de se conformer aux conditions spéciales de garantie stipulées expressément par écrit.Dans lesdits délais, Lombardini S.r.l. s’engage - directement ou par l’intermédiaire de ses centres de service autorisés - à réparer et / ou remplacer gratuitementles pièces qui, à son jugement ou d’après un de ses représentants autorisés, présentent des vices de conformité, de fabrication ou de matériau.Toute autre responsabilité et obligation pour frais divers, dommages et pertes directes ou indirectes dérivant de l’emploi ou de l’impossibilité d’emploi desmoteurs, soit totale soit partielle, est exclue.La réparation ou livraison de pièces en remplacement ne prolonge ni ne renouvelle la durée de la période de garantie.
Les obligations de Lombardini S.r.l. précédemment citées ne sont pas valables si :
- les moteurs ne sont pas installés de manière correcte et, qu’en conséquence, leurs paramètres de fonctionnement subissent des altérations.- l’utilisation et l’entretien des moteurs ne sont pas effectués en conformité avec les instructions de Lombardini S.r.l. reportées dans le manuel d’utilisation
et d’entretien fourni avec chaque moteur.- les cachets apposés par Lombardini S.r.l. sont indûment manipulés.- des pièces de rechange qui ne sont pas d’origine Lombardini S.r.l. ont été utilisées.- les systèmes d’alimentation et d’injection sont endommagés par l’emploi de combustible impropre ou souillé.- les pannes des installations électriques sont provoquées par des composants connectés aux installations mais qui ne sont pas fournis ou installés pas
Lombardini S.r.l.- Les moteurs sont réparés, démontés, ou modifiés par des ateliers non agréés par Lombardini S.r.l.
À l’échéance des délais de garantie précédemment mentionnés, Lombardini S.r.l. se considérera dégagée de toute responsabilité et des obligations indiquéesci-dessus.
Les demandes concernant la non conformité du produit doivent être adressées aux centres de service Lombardini S.r.l.

16
PREFACE
Every attempt has been made to present within this service manual, accurate and up to date technical information. However, development on the Lombardini series iscontinuos. Therefore, the information within this manual is subject to change without notice and without obligation.The information contained within this service manual is the sole property of Lombardini. As such, no reproduction or replication in whole or part is allowed without theexpress written permission of Lombardini.
Information presented within this manual assumes the following:
1 - The person or persons performing service work on Lombardini series engines is properly trained and equipped to safely and professionally perform the subjectoperation;
2 - The person or persons performing service work on Lombardini series engines possesses adequate hand and Lombardini special tools to safely and professionallyperform the subject service operation;
3 - The person or persons performing service work on Lombardini series engines has read the pertinent information regarding the subject service operations and fullyunderstands the operation at hand.
GENERAL SERVICE MANUAL NOTES:
1- Use only genuine Lombardini repair parts. Failure to use genuine Lombardini parts could result in sub-standard performance and low longevity.2- All data presented are in metric format. That is, dimensions are presented in millimeters (mm), torque is presented in Newton-meters (Nm), weight is presented in
kilograms (Kg), volume is presented in liters or cubic centimeters (cc) and pressure is presented in barometric units (bar).
17
WARRANTY CERTIFICATE
The products manufactured by Lombardini Srl are warranted to be free from conformity defects for a period of 24 months from the date of delivery to the firstend user.For engines fitted to stationary equipment, working at constant load and at constant and/or slightly variable speed within the setting limits, the warranty coversa period up to a limit of 2000 working hours, if the above mentioned period (24 months) is not expired.If no hour-meter is fitted , 12 working hours per calendar day will be considered.For what concerns the parts subject to wear and deterioration (injection/feeding system, electrical system, cooling system, sealing parts, non-metallic pipes,belts) warranty covers a maximum limit of 2000 working hours, if the above mentioned period (24 months) is not expired.For correct maintenance and replacement of these parts, it is necessary to follow the instructions reported in the documentation supplied with each engine.To ensure the engine warranty is valid, the engine installation, considering the product technical features, must be carried out by qualified personnel only.The list of the Lombardini authorized dealers is reported in the “Service” booklet, supplied with each engine.Special applications involving considerable modifications to the cooling/lubricating system (for ex.: dry oil sump), filtering system, turbo-charged models, willrequire special written warranty agreements.Within the above stated periods Lombardini Srl directly or through its authorized network will repair and/or replace free of charge any own part or componentthat, upon examination by Lombardini or by an authorized Lombardini agent, is found to be defective in conformity, workmanship or materials.Any other responsibility/obligation for different expenses, damages and direct/indirect losses deriving from the engine use or from both the total or partialimpossibility of use, is excluded.The repair or replacement of any component will not extend or renew the warranty period.
Lombardini warranty obligations here above described will be cancelled if:
- Lombardini engines are not correctly installed and as a consequence the correct functional parameters are not respected and altered.- Lombardini engines are not used according to the instructions reported in the “Use and Maintenance” booklet supplied with each engine.- Any seal affixed to the engine by Lombardini has been tampered with or removed.- Spare parts used are not original Lombardini.- Feeding and injection systems are damaged by unauthorized or poor quality fuel types.- Electrical system failure is due to components, connected to this system, which are not supplied or installed by Lombardini.- Engines have been disassembled, repaired or altered by any part other than an authorized Lombardini agent.
Following expiration of the above stated warranty periods and working hours, Lombardini will have no further responsibility for warranty and will consider itshere above mentioned obligations for warranty complete.
Any warranty request related to a non-conformity of the product must be addressed to the Lombardini Srl service agents.
18
Einleitung
In diesem Werkstatthandbuch werden alle Informationen so genau wie möglich wiedergegeben.Natürlich unterliegt die Baureihe LOMBARDINI ständingen Weiterentwicklungen. Daher können Informationen in diesem Werkstatthandbuch ohne Bemerkungen und /oder Verbindlichkeiten verändert werden.Die inn diesem Werkstatthandbuch veröffentlichten Informationen sind das Eigentum der Firma LOMBARDINI.Es sind keine Reproductionen oder Nachbildungen in Teilen oder im Gesamten ohne schriftliche Erlaubnis der Firma LOMBARDINI gestattet.
Die Informationen in diesem Werkstatthandbuch setzt voraus:
1.) Das die Person oder Personen, die die Arbeiten ausführen an der Motortypreihe LOMBARDINI gut geschult sind und die notwendigen Kenntnisse haben für dieseArbeiten.
2.) Das die Person oder Personen, die die Arbeiten ausführen an der Motortypreihe LOMBARDINI über die notwendigen Werkzeuge und Spezialwerzeuge verfügen,um die Arbeiten auszuführen.
3.) Das die Person oder Personen, die die Arbeiten ausführen an der Motortypreihe LOMBARDINI die sachdienlichen Informationen zu der auszuführenden Arbeitgelesen und auch inhaltlich verstanden haben.
Generelle Informationen zu dem Werkstatthandbuch
1.) Es sind nur original LOMBARDINI - Teile zu verwenden. Beim dem Verwenden von Teilen, die nicht von Lombardini hergestellt wurden, können Fehler in derLebensdauer oder Quallität der Arbeit auftreten.
2.) Alle Daten sind im metrischen System angegeben, d.h. in Millimeter (mm), Anzugsmomente in Newton - Meter (Nm), Gewichte in Kilogramm (kg), Volumen inLiter oder cm³, und Drücke in barometrischen Einheiten (bar).
19
GARANTIEBESTIMMUNGEN
Die Firma Lombardini S.r.l. garantiert über einen Zeitraum von 24 Monaten ab Auslieferung an den ersten Endkunden für einwandfreie Ausführung der von ihrhergestellten Produkte.Bei Motoren, die auf stationären Aggregaten installiert sind (und die bei konstanter bzw. langsam variabler Belastung innerhalb der Grenzwerte arbeiten), giltdie Garantie bis zum Erreichen von maximal 2000 Betriebsstunden, wenn der oben genannte Zeitraum (24 Monate) nicht überschritten wurde.Ist kein Betriebsstundenzähler vorhanden, werden für jeden Kalendertag 12 Betriebsstunden angerechnet.Bei Verschleißteilen (Kraftstoffversorgungs-/Einspritzanlage, elektrische Anlage, Kühlanlage, Dichtungen, nichtmetallische Leitungen, Riemen) gilt die Garantiebis zum Erreichen von maximal 2000 Betriebsstunden, wenn der oben genannte Zeitraum (24 Monate) nicht überschritten wurde.Für eine korrekte Wartung und den regelmäßigen Austausch dieser Teile sind die Anweisungen der zusammen mit jedem Motor gelieferten Handbüchereinzuhalten.Voraussetzung für die Gültigkeit der Garantie ist die Installation der Motoren gemäß ihrer technischen Eigenschaften. Die Installation muss von Fachpersonaldurchgeführt werden.Ein Verzeichnis der von der Firma Lombardini S.r.l autorisierten Kundendienststellen ist im “Serviceheft” zu finden, das jedem Motor beiliegt.Für spezielle Applikationen mit erheblichen Änderungen am Kühlkreislauf, an der Schmierung (z.B.: Trockensumpfschmierung), an der Aufladung oder Filterunggelten die speziell ausgehandelten und schriftlich festgelegten Garantiebestimmungen.Innerhalb des oben genannten Zeitraums verpflichtet sich die Firma Lombardini S.r.l., ihre Produkte selbst oder über eine ihrer autorisierten Kundendienststellenkostenlos zu reparieren oder auszutauschen, wenn Lombardini S.r.l. oder ein von ihr autorisierter Vertreter Konformitätsabweichungen, Herstellungs- oderMaterialfehler festgestellt hat.Von der Garantie ausgeschlossen bleibt jede Verantwortung und Verpflichtung für Kosten, Schäden und direkte oder indirekte Verluste, die durch den Einsatzder Motoren oder den teilweisen bzw. Totalausfall der Motoren entstehen.Die Reparatur oder der gelieferte Ersatz führen zu keiner Verlängerung oder Erneuerung der Garantiezeit.
Die in den vorhergehenden Absätzen angeführten Verpflichtungen der Firma Lombardini S.r.l. verlieren in folgenden Fällen ihre Gültigkeit:
- Wenn die Motoren nicht korrekt aufgebaut werden und in der Folge die korrekten Betriebsparameter beeinträchtigt und verändert werden.- Wenn der Einsatz und die Wartung der Motoren nicht gemäß den von Lombardini S.r.l. in den Betriebs- und Wartungshandbüchern angeführten
Anweisungen erfolgt, die jedem Motor beiliegen.- Wenn die von der Firma Lombardini S.r.l. angebrachten Plomben beschädigt werden.- Wenn keine Originalteile der Firma Lombardini S.r.l. verwendet werden.- Wenn die Kraftstoffversorgungs- und Einspritzanlage durch ungeeignete oder verunreinigte Kraftstoffe beschädigt wurden.- Wenn die elektrische Anlage aufgrund daran angeschlossener und nicht von Lombardini S.r.l. gelieferter oder installierter Komponenten defekt ist.- Wenn die Motoren in nicht von Lombardini S.r.l. autorisierten Werkstätten repariert, auseinandergenommen oder verändert wurden.
Nach Ablauf der oben genannten Fristen bzw. nach dem Erreichen der oben angeführten Anzahl von Betriebsstunden ist die Firma Lombardini S.r.l. frei vonjeglicher Verantwortung und den in den Absätzen dieser Garantiebestimmungen genannten Verpflichtungen.
Eventuelle Garantieansprüche aufgrund einer Konformitätsabweichung des Produkts sind an die Kundendienststellen der Firma Lombardini S.r.l. zu richten.

20
PREMISA
Hemos procurado hacer lo posible por dar información técnica precisa y al dia en el interior de este manual. La evolución de los motores Lombardini es sin embargocontinua por lo tanto la información contenida en el interior de esta publicación está sujeta a variaciones sin obligación de previo aviso.Las informaciones que se refieren son de propiedad exclusiva de la Lombardini, por lo tanto, no están permitidas reproducciones o reimpresiones ni parciales nitotales sin el permiso expreso de la Lombardini.
Las informaciones presentadas en este manual presuponen que:
1 - Las personas que efectuan una labor de servicio sobre motores Lombardini, están adecuadamente adiestradas y instrumentadas para proceder en modo seguro yprofesional a las operaciones necesarias;
2 - Las personas que efectuan una labor de servicio sobre motores Lombardini, poseen una adecuada manualidad y las herramientas especiales Lombardini paraproceder en modo seguro y profesional a las operaciones necesarias;
3 - Las personas que efectuan una labor de servicio sobre motores Lombardini, han leido las específicas informaciones referidas a las ya citadas operaciones deservicio, habiendo comprendido claramente las operaciones a seguir.
NOTAS GENERALES SERVICIO
1 - Utilizar sólo recambios originales Lombardini. El uso de particulares no originales pueden causar prestaciones no correctas y escasa longevidad.2 - Todos los datos reseñados son del tipo métrico, esto es, las dimensiones expresadas en milímetros (mm), el par en Newton-metros (Nm), el peso en kilogramos
(Kg), el volumen en litros o centímetros cúbicos (cc) y la presion en unidad barométrica (bar).

21
CLAUSULA DE GARANTIALombardini S.R.L. garantiza los productos de su fabricación contra defectos de conformidad durante un período de 24 meses a partir de la fecha de entregaal primer usuario final.Para los motores instalados en grupos estacionarios (utilizados a carga constante o ligeramente variable dentro de los límites de regulación) la garantía esreconocida hasta un límite máximo de 2.000 horas de trabajo, siempre que no se haya superado el período anteriormente citado (24 meses).Ante la carencia de un instrumento cuentahoras se computarán 12 horas de trabajo por día de calendario.Con respecto a las partes sujetas a desgaste o deterioro (equipo de inyección/alimentación, instalación eléctrica, sistema de refrigeración, componentes deestanqueidad, tubos no metálicos, correas) la garantía tiene un límite máximo de 2.000 horas de funcionamiento, siempre que no se haya superado el períodoanteriormente citado (24 meses).Para el correcto mantenimiento y la sustitución periódica de estas partes es necesario atenerse a las indicaciones reflejadas en los manuales entregados juntocon el motor.Para que tenga efecto la garantía, la instalación de los motores, debido a las características técnicas del producto, debe ser llevada a cabo sólo por personalcualificado.La lista de centros de servicio autorizados por Lombardini S.R.L. está en el libreto “Service” entregado junto con el motor.En el caso de aplicaciones especiales que conlleven modificaciones importantes de los circuitos de refrigeración, engrase (por ejemplo: sistemas de cárterseco), sobrealimentación, filtrado, tendrán validez las cláusulas especiales de garantía expresamente pactadas por escrito.Dentro de los mencionados plazos Lombardini S.R.L. se compromete, directamente o por medio de sus centros de servicio autorizados, a efectuar gratuitamentela reparación de sus propios productos o su reemplazo, en el caso que a su juicio o de su representante autorizado, presenten defectos de conformidad, defabricación o de material.Queda sea como fuere, excluida cualquier otra responsabilidad u obligación por gastos, daños y pérdidas directas o indirectas derivadas del uso o de laimposibilidad de uso, total o parcial, de los motores.La reparación o sustitución no prolongará, ni renovará la duración del período de garantía.
La garantía quedará sin efecto cuando:
- Los motores no sean instalados correctamente y, por lo tanto, se vean manipulados y modificados los correctos parámetros funcionales.- El uso y el mantenimiento de los motores no sean conformes a las instrucciones de Lombardini S.R.L. indicadas en el manual de uso y mantenimiento
entregado junto con el motor.- Los precintos colocados por Lombardini S.R.L. hayan sido manipulados.- Se hayan utilizado repuestos no originales Lombardini.- Los equipos de alimentación e inyección se hayan dañado por combustible no idóneo o contaminado.- Los equipos eléctricos presenten una avería a causa de componentes conectados a los mismos y no suministrados o instalados por Lombardini
S.R.L.- Los motores sean reparados, desmontados o modificados por talleres no autorizados por Lombardini S.R.L.
Concluido el plazo citado arriba o superadas las horas de trabajo antes especificadas, Lombardini S.R.L. quedará exenta de cualquier responsabilidad y delas obligaciones expresadas en los párrafos anteriores.Las solicitudes de garantía debido a falta de conformidad del producto que pudieran surgir se deben plantear a los centros de servicio de Lombardini S.R.L.

22
PREÂMBULO
Procuramos fazêr o possivel por dar informações técnicas com exatidão e actualizadas no presente manual. O desenvolvimento dos motores Lombardini é todaviacontinuo, portanto as informações contidas nesta publicação estão sujeitas a variações sem obrigação de um pré-aviso.As informações aqui mencionadas são de exclusiva propriedade da Lombardini. Portanto não são permitidas reproduções ou cópias nem parciais nem totais sempermissão expressa da Lombardini.
As informações presentes neste manual presuppôem que:
1- as pessoas que efectuam trabalhos de assistencia nos motores diesel Lombardini estão adequadamente formados para efectuarem com segurança eprofissionalismo as operações necessárias;
2- as pessoas que efectuam trabalhos de assistencia nos motores diesel Lombardini têm caracter e ferramentas especiais Lombardini para efectuar de um modoseguro e profissional as operações necessárias;
3- as pessoas que efectuam trabalhos de assistencia nos motores diesel Lombardini tomaram conhecimento da especificidade das informações e precauções a têrcom as operações de assistência e compreenderam claramente as instruções a seguir.
NOTAS GERAIS DE SERVIÇO
1 - Utilizar Só péças de origem Lombardini. A não utilização de péças originais poderá provocar prestações incorrectas e pequena longevidade.2 - Todos os dados aqui referidos são em formato metrico, ou seja as dimenssões são expressas em milimetros (mm), o binário é expresso em Newton-metros
(Nm), o peso é expresso em Kilogramas (Kg), o volume é expresso em litros ou centimetros cubicos (cc) e a pressão é expressa em unidade barometrica (bar).
23
CERTIFICADO DE GARANTIA
A Lombardini S.r.l. garante os produtos de sua produção por defeitos de conformidade por um período de 24 meses após a data de entrega ao primeiroutilizador final.Para os motores instalados em grupos estacionários (com funcionamento em carga constante e/ou lentamente variável dentro dos limites de regulação) aGarantia é reconhecida por um limite máximo de 2000 horas de trabalho, se o período acima citado (24 meses) não for ultrapassado.Em ausência de instrumento contador de horas serão consideradas 12 horas de trabalho por dia de calendário.No que concerne as peças sujeitas a desgaste e deterioração (sistema de injecção/alimentação, instalação eléctrica, instalação de arrefecimento, componentesde retenção, tubagens não metálicas, correias) o limite máximo da Garantia é de 2000 horas de funcionamento, se o período acima citado (24 meses) não forultrapassado.Para a correcta manutenção e a substituição periódica destas peças é necessário seguir as indicações indicadas no manual fornecido com cada motor.Para que este período de Garantia seja valido, a instalação dos motores, em função das características técnicas do produto, tem de ser executada somentepor pessoal qualificado.A lista dos centros de serviço autorizados pela Lombardini S.r.l é indicada no livro “ Service “ fornecido com cada motor.No caso de aplicações especiais com modificações importantes nos circuitos de arrefecimento, lubrificação (por exemplo: sistemas de carter de óleo a seco),sobrealimentação, filtração, ficarão válidas as condições especiais de Garantia expressamente estipuladas por escrito.Durante os períodos de Garantia a Lombardini S.r.l executará, directamente ou por meio dos seus centros de serviço autorizados, a reparação e/ou asubstituição dos seus produtos gratuitamente, se estes apresentarem defeitos de conformidade, de produção ou de material constatados pela LombardiniS.r.l. ou por um seu agente autorizado.Fica excluída toda e qualquer responsabilidade e obrigação por outras despesas, danificações e perdas directas ou indirectas resultantes do uso ou daimpossibilidade de uso dos motores, seja total ou parcial.A reparação ou entrega de peças em substituição, não prolongará, nem renovará a duração do período de Garantia.
As obrigações da Lombardini S.r.l acima citadas não são validas se:
- Os motores que não forem instalados correctamente e portanto forem prejudicados e alterados os correctos parâmetros funcionais.- O uso e a manutenção dos motores não forem conformes as instruções da Lombardini S.r.l indicadas no livro de uso e manutenção fornecido com cada
motor.- Forem violados os lacres aplicados nos motores pela Lombardini S.r.l .- Forem utilizadas peças de substituição NÃO distribuídas pela Lombardini S.r.l.- Os sistemas de alimentação e injecção forem danificados por emprego de combustível inidôneo ou sujo.- As avarias das instalações eléctricas forem provocadas por componentes ligados nelas e não fornecidos ou instalados pela Lombardini S.r.l.- Os motores forem reparados, desmontados ou modificados por oficinas não autorizadas pela Lombardini S.r.l.
No final dos períodos de Garantia acima mencionados e/ou na ultrapassagem das horas de trabalho acima indicadas a Lombardini S.r.l considera-se livre detodas as responsabilidades e obrigações acima citadas.Eventuais pedidos de Garantia relativos à não conformidade do produto têm de ser enviados para os centros de serviço da Lombardini S.r.l.
24
Il mancato rispetto della prescrizione comporta rischio didanni a persone e a cose
Il mancato rispetto della prescrizione comporta il rischio didanni tecnici alla macchina e/o all'impianto
PERICOLORICHIAMI E AVVISI AVVERTENZA
ISTRUZIONI PER LA SICUREZZA
• I Motori Lombardini sono costruiti per fornire le loroprestazioni in modo sicuro e duraturo nel tempo,condizione per ottenere questi risultati è il rispetto delleprescrizioni di manutenzione nell'apposito libretto edei consigli per la sicurezza riportati di seguito.
• Il motore è stato costruito su specifica del costruttoredi una macchina, ed è stata sua cura adottare tutte leazioni necessarie per soddisfare i requisiti essenzialidi sicurezza e di tutela della salute come prescrittodalle leggi in vigore, ogni utilizzo del motore al di fuoridi quello cosi definito non può essere consideratoconforme all'uso previsto dalla Lombardini che quindideclina ogni responsabilità per gli eventuali infortuniconseguenti a tale operazione.
• Le indicazioni che seguono sono rivolte all'utente dellamacchina per ridurre o eliminare i rischi in relazione alfunzionamento del motore in particolare e le operazionidi manutenzione ordinaria relative.
• L'utente legga attentamente queste istruzioni e prendafamigliarità con le operazioni ivi descritte, in casocontrario si può andare incontro a gravi pericoli per lasicurezza e la salute propria e delle persone chevengano a trovarsi in prossimità della macchina.
• Il motore può essere utilizzato o assemblato a unamacchina solo da personale adeguatamente addestratosul funzionamento e i pericoli connessi, a maggiorragione tale condizione vale per le operazioni dimanutenzione sia ordinaria che, soprattutto,straordinaria, nel quale ultimo caso si dovrà fareriferimento a personale specificatamente addestratodalla Lombardini e operante sulla base della letteraturaesistente.
• Variazioni ai parametri funzionali del motore, alleregistrazioni di portata combustibile e di velocità dirotazione, la rimozione dei sigilli, lo smontaggio erimontaggio di parti non descritte nel manuale d'usoe manutenzione da parte di personale non autorizzatoportano alla decadenza di ogni responsabilità dellaLombardini per eventuali incidenti o per il mancatorispetto di norme di legge.
• All'atto dell'avviamento assicurarsi che il motore sia inposizione prossima all'orizzontale, fatte salve lespecifiche della macchina. Nel caso di avviamentimanuali assicurarsi che le azioni relative possanoavvenire senza pericolo di urtare pareti o oggettipericolosi, tenendo conto anche dello slanciodell'operatore. L'avviamento a corda libera (quindiescluso il solo avviamento autoavvolgente) non èammesso nemmeno nei casi di emergenza.
• Verificare la stabilità della macchina per evitare rischidi ribaltamento.
• Famigliarizzarsi con le operazioni di regolazione dellavelocità di rotazione e di arresto del motore.
• Non avviare il motore in ambienti chiusi o scarsamenteventilati, la combustione genera Monossidi diCarbonio, un gas inodore e altamente velenoso, lapermanenza prolungata in un ambiente nel quale ilmotore scarichi liberamente può portare a perdita diconoscenza e alla morte.
• Il motore non può funzionare in ambienti nei qualisiano presenti materiali infiammabili, atmosfereesplosive, polveri facilmente combustibili a menoche non siano state prese precauzioni specificheadeguate e chiaramente indicate e certificate per la
macchina.• Per prevenire rischi d’incendio mantenere la macchina
ad almeno un metro da edifici o da altri macchinari.• Bambini e animali devono essere mantenuti a debita
distanza dalle macchine in moto per evitare pericoliconseguenti al funzionamento.
• II combustibile è infiammabile, il serbatoio deveessere riempito solo con motore fermo, asciugareaccuratamente il combustibile eventualmenteversato, allontanare il contenitore del combustibile,stracci eventualmente imbevuti di carburante od oli.Accertarsi che eventuali pannelli fonoassorbenticostituiti di materiale poroso non siano imbevuti dicombustibile od olio, accertarsi che il terreno sulquale si trova la macchina non abbia assorbitocombustibile od olio.
• Richiudere accuratamente il tappo del serbatoio dopoogni rifornimento, non riempire il serbatoio finoall’orlo ma lasciare un volume libero adeguato perl’espansione del combustibile.
• I vapori di combustibile sono altamente tossici,effettuare le operazioni di rifornimento solo all’apertoo in ambienti ben ventilati.
• Non fumare od usare fiamme libere durante leoperazioni di rifornimento.
• Il motore deve essere avviato seguendo le istruzionispecifiche riportate nel manuale d’uso del motore e/odella macchina, evitare l’uso di dispositivi ausiliarid’avviamento non installati sulla macchina all’origine(p. es. Startpilot’).
• Prima dell’awiamento rimuovere eventuali attrezzi chesiano stati utilizzati per la manutenzione del motore
25
Proposta California 65
ATTENZIONE
I gas di scarico emessi da questo motore contengonosostanze chimiche, considerate dallo Stato dellaCalifornia come causa di cancro, difetti di nascita edi altri danni riproduttivi.
e/o della macchina, accertarsi che siano staterimontate tutte le protezioni eventualmente rimosse.In caso di funzionamento in climi rigidi per facilitarel’avviamento è consentito mescolare al gasolio delpetrolio (o kerosene), l’operazione deve essereeffettuata nel serbatoio versando prima il petrolio epoi il gasolio, non è consentito l’uso di benzina per ilrischio di formazione di vapori infiammabili.
• Durante íl funzionamento la superficie del motoreraggiunge temperature che possono esserepericolose, in particolare occorre evitare qualunquecontatto con il sistema di scarico.
• Prima di procedere a qualsiasi operazione sulmotore, fermarlo e lasciarlo raffreddare. Noneffettuare operazioni a motore in moto.
• Il circuito di raffreddamento a liquido è sottopressione, non effettuare controlli prima che ilmotore si sia raffreddato ed anche in quel casoaprire con cautela il tappo del radiatore o del vaso diespansione, indossando indumenti e occhialiprotettivi. Nel caso sia prevista una elettroventolanon avvicinarsi a motore caldo perché potrebbeentrare in funzione anche a motore fermo.Effettuare la pulizia dell’impianto di raffreddamentoa motore fermo.
• Durante le operazioni di pulizia del filtro aria a bagnod’olio assicurarsi che l’olio venga smaltito nelrispetto dell’ambiente. Le eventuali masse filtrantispugnose nei filtri aria a bagno d’olio non devonoessere imbevute d’olio. La vaschetta del prefiltro aciclone non deve essere riempita d’olio.
• L’operazione di scarico dell’olio dovendo essereeffettuata a motore caldo (T olio ~ 80°C) richiedeparticolare cura per evitare ustioni, evitarecomunque il contatto dell’olio con la pelle per ipericoli che ne possono derivare alla salute.
• Accertarsi che l’olio scaricato, il filtro olio e l’olio inesso contenuto vengano smaltiti nel rispettodell’ambiente.
• Attenzione alla temperatura del filtro dell’olio nelle
operazioni di sostituzione del filtro stesso.• Le operazioni di controllo, rabbocco e sostituzione
del liquido di raffreddamento devono avvenire amotore fermo e freddo, attenzione nel casovengano mescolati liquidi contenenti nitriti con altrinon contenenti tali componenti per la formazione di“Nitrosamine” dannose per la salute. Il liquido diraffreddamento è inquinante, quindi deve esseresmaltito nel rispetto dell’ambiente.
• Durante le operazioni che comportino l’accesso aparti mobili del motore e/o rimozione delleprotezioni rotanti interrompere ed isolare il cavopositivo della batteria per prevenire corto circuitiaccidentali e l’eccitazione del motorino awiamento.
• Controllare lo stato di tensione delle cinghie solo amotore fermo.
• Per spostare il motore utilizzare solo i golfariprevisti dalla Lombardini, questi punti disollevamento non sono idonei per l’interamacchina, quindi utilizzare i golfari previsti dalcostruttore.

26
Le non-respect des instructions comporte un risque dedommages aux personnes et aux choses.
Le non-respect des instructions comporte un risque dedommages techniques au groupe et/ou à l'installation.
DANGERAVERTISSEMENTS PRECAUTION
INSTRUCTIONS POUR LA SECURITE
• Les moteurs Lombardini sont fabriqués de façon àfournir leurs performances d’une manière sûre etpendant longtemps. La condition essentielle pourobtenir ces résultats est le respect des prescriptionsde maintenance contenues dans le livretcorrespondant et des conseils pour la sécuritéindiqués ci-dessous.
• Le moteur a été fabriqué en respectant lesindications spécifiques du contructeur d’unemachine et ce dernier a tout pris en considérationpour respecter les conditions essentielles desécurité et de protection de la santé, selon lesnormes en vigueur. Toute utilisation du moteurdifférente de celle pour laquelle il a été fabriqué nepeut être considérée conforme à l’usage prévu parLombardini qui, en conséquence, décline touteresponsabilité en cas d’accidents provoqués parcette utilisation.
• Les indications qui suivent sont adressées àl’usager de la machine dans le but de réduire oud’éliminer les risques relatifs au fonctionnement dumoteur en particulier ou bien aux opérations demaintenance ordinaires de ce dernier.
• L'usager doit lire attentivement ces instructions et sefamiliariser avec les opérations qui y sont décrites;dans le cas contraire, il risque de mettre en dangersa propre sécurité et sa propre santé aínsi quecelles des personnes se trouvant à proximité de lamachine.
• Le moteur devra être utilisé ou assemblé à unemachine par du personnel spécialement instruit surson fonctionnement et sur les dangers qui en
dérivent. Cette condition est encore plusnécessaire pour les opérations de maintenance,qu’elles soient ordinaires ou, encore plus,extraordinaires. Dans ce dernier cas, utiliser dupersonnel spécialement instruit par Lombardini etqui opère sur la base des documents existants.
• Des variations apportées aux paramètres defonctionnement du moteur, aux réglages du débitde carburant et de la vitesse de rotation,l’élimination des scellés, le démontage et leremontage de pièces non décrits dans le livretd’emploi et de maintenance, effectués par dupersonnel non agréé, entraînent la déchéance detoute responsabilité de Lombardini pour leséventuels accidents ou pour le non respect desnormes en vigueur.
• Lors de son démarrage, s’assurer que le moteursoit installé le plus horizontalement possible, saufnécessités spécifiques de la machine. Dans lecas de démarrage à la main, contrôler que tous lesgestes nécessaires à ce démarrage puissent sefaire sans heurter les murs ou des objetsdangereux, en tenant compte de l’élan que doitprendre l’opérateur. Le démarrage par lanceur àcorde libre (et non pas avec lanceur auto-enrouleur) est interdit, même en cas d’urgence.
• Vérifier la stabilité de la machine afin d’éviter lesrisques de basculement.
• Se familiariser avec les opérations de réglage de lavitesse de rotation et d’arrêt du moteur.
• Ne pas mettre le moteur en marche dans deslocaux clos ou faiblement aérés. La combustion
engendre du monoxyde da carbone qui est un gazinodore et fortement toxique. La permanenceprolongée dans un local dans lequel le moteurévacue ses gaz de combustion librement peutentraîner la perte de connaissance et la mort.
• Le moteur ne peut fonctionner dans des locaux danslesquels se trouvent des matériaux infiammables,des atmosphères explosives, des poudres facilementcombustibles, à moins que des précautionsspécifiques, appropriées et clairement indiquées etcertifiées pour la machine, aient été prises.
• Dans le but de prévenir les risques d’incendies,placer la machine à au moins un mètre des murs oudes autres machines.
• Les enfants et les animaux ne doivent pass’approcher des machines en mouvement afind’éviter les dangers relatifs au fonctionnement.
• Le carburant est infiammable: le réservoir doit êtrerempli uniquement lorsque le moteur est à l’arrét.Essuyer soigneusement le carburant éventuellementversé. Eloigner le bidon du carburant, les chiffonséventuellement imprégnés de carburant et d'huile.S'assurer que les éventuels panneaux d’isolation dubruit constitués en matériau poreux ne soient pasimprégnés de carburant ni d’huile. S'assurer que leterrain sur lequel se trouve la machine n'ait pasabsorbé de carburant ni d'huile.
• Refermer soigneusement le bouchon du réservoiraprès chaque ravitaillement; ne pas remplir leréservoir j'usqu'au bord mais laisser un volume librepermettant l’expansion du carburant.
• Les vapeurs de carburant sont hautement toxiques:

27
Proposition de Californie 65
ATTENTION !
Le gaz d’échappement de ce moteur contient dessubstances chimiques qui sont considérés par l’Étatde Californie comme des causes de cancer, dedéfauts congénitaux ou d’autres dommagesreproductifs.
effectuer le ravitaillement en plein air uniquement oubien dans des locaux bien aérés.
• Ne pas fumer ni utiliser de flammes libres pendant leravitaillement.
• Le moteur doit être mis en route en suivant lesinstructions indiquées dans le livret d’emploi dumoteur et/ou de la machine. Eviter d’utiliser desdispositifs auxiliaires de démarrage non installés surla machine à l‘origine (par ex.: Start pilot)
• Avant de procéder au démarrage, enlever les outilséventuellement utilisés pour effectuer lamaintenance du moteur et/ou de la machine.S’assurer que toutes les protections éventuellementenlevées aient été remises. Dans le cas defonctionnement sous des climats rigoureux, il estpermis de mélanger du pétrole au gazole (oukérosène) pour faciliter le démarrage. Cetteopération doit être effectuée en versant d’abord lepétrole puis le gazole dans le réservoir. Il n’est paspermis d’utiliser de l’essence en raison du risque deformation de vapeurs infiammables.
• Pendant le fonctionnement du moteur, sa surfaceatteint une température qui peut être dangereuse;éviter en particulier d'entrer en contact avec ledispositif d’évacuation des gaz d'échappement.
• Avant de procéder à toute opération sur le moteur,l’arrêter et le laisser refroidir. Ne pas intervenirlorsque le moteur est en marche.
• Le circuit de refroidissement avec liquide est souspression: ne pas effectuer de vérifications avant quele moteur ne se soit refroidi, et même dans ce cas,dévisser le bouchon du radiateur ou du vased’expansion prudemment, après avoir mis desvêtements et des lunettes de protection. Dans lecas où il y aurait un ventilateur, ne pas s’enapprocher lorsque le moteur est chaud car il peut semettre en marche même lorsque le moteur est àl’arrêt. Nettoyer l’installation de refroidissement àmoteur froid.
• Pendant le nettoyage du filtre à air en bain d’huile,s’assurer que l’huile soit évacuée en respectant
l’environnement. Les éventuelles masses filtrantesspongieuses se trouvant dans les filtres à air enbain d’huile ne doivent pas être imprégnées d’huile.Le bac du préfiltre à cyclone ne doit pas être pleind’huile.
• La vidange de l’huile doit étre effectuée avec lemoteur chaud (T huile 80°); en conséquence,prendre des précautions particulières pour evitarles brûlures et ne pas mettre la peau en contactavec l’huile en raison des dangers qui peuvent endériver pour la santé.
• S’assurer que l’huile vidangée, le filtre à huile etl’huile qu’il contient soient éliminés en respectantl’environnement.
• Faire attention à la temperature du filtre de l’huileau cours du remplacement du filtre même.
• Les opérations de vérification, du remise à niveauet de remplacement du liquide de refroidissementdu moteur doivent être effectuées lorsque cedernier est à l’arrêt et froid; faire attention à laformation de “Nitrosamine" qui est dangereusepour la santé, dans le cas où des liquidescontenant des nitrites seraient mélangés à desIiquides n’en contenant pas. Le liquide derefroidissement est polluant: il doit donc êtreéliminé en respectant l’environnement.
• Lors d’opérations nécessitant l’accès à des partiesmobiles du moteur et/ou l’enlèvement desprotections pivotantes, interrompre et isoler lecâble positif de la batterie pour eviter les courts-circuits et l’excitation du démarreur accidentels.
• Vérifier la tension des courroies uniquementlorsque le moteur est à l’arrêt.
• Pour déplacer le moteur, utiliser uniquement lesoeillets prévus par Lombardini; ces points desoulèvement ne sont pas appropriés pour soulevertoute la machine: utiliser les oeillets prévus par leconstructeur de cette dernière.
28
By not respecting these directions the user may place atrisk persons and objects.
By not respecting these directions the user can cause technicaldamage to the unit and/or to the installation.
DANGERWARNING SIGNS
CAUTION
SAFETY INSTRUCTIONS
• Lombardini engines are built to provide safe andlonglasting performances, but in order to obtainthese results it is essential that the maintenancerequirements described in the manual are observedalong with the following safety recommendations.
• The engine has been built to the specifications of amachine manufacturer, and it is his responsibility toensure that all necessary action is taken to meetthe essential and legally prescribed health andsafety requirements. Any use of the machine otherthan that described cannot be considered ascomplying with its intended purpose as specified byLombardini, which therefore declines allresponsibility for accidents caused by suchoperations.
• The following instructions are intended for the userof the machine in order to reduce or eliminate risks,especially those concerning the operation andstandard maintenance of the engine.
• The user should read these instructions carefullyand get to know the operations described. By notdoing so he may place at risk his own health andsafety and that of anyone else in the vicinity of themachine.
• The engine may be used or mounted on a machineonly by personnel suitably trained in its operationand aware of the dangers involved. This isparticularly true for standard and, above all, specialmaintenance work. For special maintenancecontact personnel trained specifically byLombardini. This work should be carried out inaccordance with existing literature.
• Lombardini declines all responsibility for accidentsor for failure to comply with the requirements oflaw if changes are made to the engine’s functionalparameters or to the fuel flow rate adjustmentsand speed of rotation, if seals are removed, or ifparts not described in the operating andmaintenance manual are removed andreassembled by unauthorized personnel.
• In addition to all other machine specifications,ensure that the engine is in a near horizontalposition when starting. lf starting manually, ensurethat the necessary operations can be performedwithout any risk of striking against walls ordangerous objects. Rope starting (except forrecoil rope starting) is not permitted even inemergencies.
• Check that the machine is stable so that there is norisk of it overturning.
• Get to know the engine speed adjustment andmachine stop operations.
• Do not start the machine in closed or poorlyventilated environments. The internal combustionprocess generates carbon monoxide, an odourlessand highly toxic gas, so spending too long a timein an environment where the engine discharges itsexhaust products freely can lead to loss ofconsciousness and even death.
• The engine may not be used in environmentscontaining flammable materials, explosiveatmospheres or easily combustible powders,unless adequate and specific precautions havebeen taken and are clearly stated and certified for
the machine.• To prevent the risk of fire, keep the machine at a
distance of at least one metre from buildings or othermachines.
• Children and animals must be kept at a sufficientdistance from the machine to prevent any dangerresulting from its operation.
• Fuel is flammable, so the tank must be filled onlywhen the engine is turned off. Dry carefully any fuelthat may have spilled, remove the fuel container andany cloths soaked in fuel or oil, check that anysound-absorbing panels made of porous material arenot soaked with fuel or oil, and make sure that theground on which the machine is located has notabsorbed fuel or oil.
• To start the engine follow the specific instructionsprovided in the engine and/or machine operatingmanual. Do not use auxiliary starting devices notoriginally installed on the machine (e.g. Startpilotsystems which utilise ether etc.)
• Before starting, remove any tools that have beenused for carrying out maintenance work to theengine and/or the machine and check that anyguards removed have been replaced. In coldclimates it is possible to mix kerosene with the dieselfuel to make the engine easier to start. The liquidsmust be mixed in the tank by pouring in first thekerosene and then the diesel fuel. ConsultLombardini technical office for mixture proportions.Petrol may not be used because of the risk of itforming flammable vapours.
• During operation the surface of the engine reaches

29
California Proposition 65
WARNING
Engine exhaust from this product containschemicals known to the State of California to causecancer, birth defects, or other reproductive harm.
temperatures that may be dangerous. Avoid inparticular all contact with the exhaust system.
• Before carrying out any work on the engine, turn itoff and allow it to cool down. Do not perform anyoperation while the engine is running.
• The liquid cooling circuit is under pressure. Do notcarry out any checks before the engine has cooleddown, and even then open the radiator cap or theexpansion tank cautiously. Wear protective clothingand glasses. lf there is an electric fan, do notapproach the engine while it is still hot as the fanmay come on even when the engine is not running.Clean the cooling system with the engine turned off.
• While cleaning the oil bath air filter, check that the oilis disposed of in such a way as not to harm theenvironment. Any filtering sponges in the oil bathair filter should not be soaked with oil. The cyclonepre-filter cup must not be filled with oil.
• Since the oil must be emptied out while the engine isstill hot (approx. 80°C), particular care should betaken in order to avoid burns. In any case makesure that oil does not come into contact with yourskin because of the health hazards involved.
• Check that the discharged oil, the oil filter and the oilcontained in the oil filter are disposed of in such away as not to harm the environment.
• Close the fuel tank filler cap carefully after eachfílling operation. Do not fill the tank right up to thetop, but leave sufficient space to allow for anyexpansion of the fuel.
• Fuel vapours are highly toxic, so fill up only in theopen air or in well ventilated environments.
• Do not smoke or use naked flames while filling.• Take care when removing the oil filter as it may be
hot.• The operations of checking, filling up and replacing
the cooling liquid must be carried out with theengine turned off and cold. Take particular care ifliquids containing nitrites are mixed with others notcontaining these compounds as this may give riseto the formation of nitrosamines which are a health
hazard. The cooling liquid is polluting, so disposeof in a manner that does not damage theenvironment.
• During operations which involve access to movingparts of the engine and/or removal of the rotaryguards, disconnect and insulate the positive cableof the battery so as to prevent accidental shortcircuits and activation of the starter motor.
• Check the belt tension only when the engine isturned off.
• In order to move the engine use exclusively theeyebolts fitted for this purpose by Lombardini.These lifting points are however not suitable forthe entire machine, so in this case use theeyebolts fitted by the manufacturer.

30
BEI NICHT - BEACHTUNG DIESER ANWEISUNGEN KANNDER BEDIENER SCHÄDEN AN PERSONEN UND OBJEKTENVERURSACHEN
BEI NICHT - BEACHTUNG DIESER ANWEISUNGEN KANNDER BEDIENER TECHNISCHE SCHÄDEN AN DER MASCHINEUND/ODER INSTALLATION VERURSACHEN
GEFAHRWARNUNGSZEICHEN
ACHTUNG
SICHERHEITSVORSCHRIFTEN
• Die Bauweise der LOMBARDINI MOTORENgarantiert einen sicheren Betrieb und eine langeLebensdauer, sofern die Bedienungs - undwartungsanweisungen aus dem hierzuvorgesehenen Handbuch, und die nachstehendenSicherheitsvorschriften befolgt werden.
• Der Motor ist in einer gemäβ desMaschienenhersteller gewünschten Spezifikationgefertigt. Der Maschinenhersteller hat in seinerVerant wortung sicherzustellen, daβ allenotwendigen Maβnahmen, zur Sicherheit und zumSchutze der Gesundheit gemäβ den geltendenGesetzen, gestroffen werden. Der Gebrauch desMotors bei Nichtvorliegen dieser Bedingungen kannnicht als der von LOMBARDINI vorgeseheneGebrauch betrachtet werden. LOMBARDINIúbernimmt daher keine Haftung für eventuelleUnfälle bzw. Schäden, die durch einen derartigenGebrauch entstehen.
• Die nachstehenden Hinweise sind für den Bedienerder Maschine bestimmt, um Gefahren inVerbindung mit dem motorenbetrieb, insbesonderemit den dazugehörigen ordentlichenWartungsarbeiten zu verringern oder zu beseitigen.
• Der Benutzer soll diese Hinweise aufmerksamdurchlesen und sich mit den hier beschriebenenVorgängen vertraut machen. Andernfalls könnenernste Gefahren für die Sicherneit und Gesundheitder eigenen Person sowie anderer Personen, diesich in der Nähe der Maschine aufhalten,entstehen.
• Der Motor darf nur von Personen bedient, oder an
einer Maschine montiert werden, die über dieFunktion und den damit verbundenen Gefahreneingewiesen sind. Insbesondere gilt dieseVorschrift für die ordentliche und vor allem für dieauβerordentliche Wartung, die nur von Personenvorgenommen werden darf, die speziel vonLOMBARDINI eingewiesen sind und auf dervorhandenen Literatur arbeiten.
• Änderungen der Betriebsparameter des Motorssowie der Einstellung für die kraftstoffmenge anddie Drehzahl, das Entfernen der Siegel, der Abbauund Anbau von teilen, die nicht in der Bedienungs- und Wartungsanleitung enthalten sind, sowie dieWartung durch unbefugte Personen oder dieNichteinhaltung der Gesetzesvorschriftenbewirkenden Verfall der Haftung seitensLOMBARDINI für eventuelle Unfälle oderSchäden.
• Vor dem Starten hat sich der Bediener zuvergwissern, daβ sich der Motor, vorbehaltlich derMaschinenspezifikation, auf einem nahezuwaagerechten Untergrund befindet. BeimAnlassen im Handbetrieb ist sicherzustellen, daβdie vorgeschriebenen Betätigungen, ohne dasGefahr besteht gegen Wände oder gegen sonstigegefärliche gegenstände zu fahren, erfolgen.Desweiteren ist sicherzustellen, daβ der bedienergenügend Freiraum beim Starten hat. Der Start mitStartseil (mit Ausnahme des Revesierstarters) istauch für den notstart nicht zulässig.
• Maschine gegen Wegrollen und Kippen sichern.• Der Bediener muβ Sich mit den Vorgängen für die
Drehzahleistellung und das Abstellen des Motorsvertraut machen.
• Den Motor nicht in geschlossenen oder schlechtbelüften Raümen sarten. BeimVerbrennungprozesses im des motors entstehtKohlenmonoxyd, ein geruchloses und hochgiftigesGas. Der Aufenthalt in einem Raum, in dem dieMotorabgase frei ausgestoβen werden, kann zurBewustlosigkeit oder sogar zum Tod führen.
• Der Motor darf nicht in Betrieb genommen werden,wenn in dessen Umgebung feuergefährlichesMaterial oder leicht brennbarer Staub vorhanden ist,sofern nicht angemessene spezifischeVorsichtsmaβnahmen gestroffen worden sind, die fürdie Maschine angezeigt und bescheinigt sind.
• Zur Vorbeugung von Brandgefahren ist die Maschineauf einem Abstand von mindestens einem Meter vonGebäuden oder Maschinen oder anderenGegenständen zu halten
• Kinder und Tiere sollen sich in einem angemessenenAbstand von der in Betrieb befindlichen Maschinebefinden, um Gefahren in Verbindung mit demMaschinenbetrieb zu vermeiden.
• Alle Kraftstoffe sind feuergefährlich. Der Tank darfnur bei Stillstand des Motors befüllt werden.Eventuell verschütteten Kraftstoff sofort sorgfältigentfernen. Die kraftstoff - oder Ölgetränkten Binde -bzw. Putzmittel gemäβ gesetzlichen Vorschriftenentsorgen. Desweiteren sich vergewissern, daβeventuell vorhandene schalldämmende Platten ausporösem Material nicht mit kraftstoff getränkt sindund der boden unter der Maschine nicht kraftstoff
31
California Proposition 65
WARNUNG
Die von diesem Motor ausgestoßenen Abgaseenthalten chemische Produkte, die vom StaatKalifornien eingestuft werden als: krebserregend,Geburtsfehler erhöhend und schädlich für dieFortpflanzung.
oder Öl aufgesaugt hat.• Nach jedem Tanken den Tankverschluβ sorfälting
verschlieβen, den Tank nicht bis zum Rand befüllen, sondern einen entsprechenden Freiraum für dietemperaturbedingte Expansion des Kraftstoffeslassen.
• Kraftstoffdämpfe sind hochgiftig. Das Tanken darfnur im Frein oder in gut belüfteten Räumenvorgenommen werden.
• Wärden des Tankes ist das Rauchen und derUmgang mit offenem Feuer verboten.
• Der motor ist nach den Anweisungen desBedienungshandbuches des motors bzw, derMaschine zu starten. Keine zusätzlichen Starthilfendie nicht ursprünglich an der Maschine vorhandensind (startpilot atc) verwenden.
• Vor dem Starten alle für eine eventuelle Wartung ammotor oder maschine benutzten Werkzeuge,Betriebsstoffe und Betriebshilfsstoffe entfernen. Esist sicherzustellen, daβ alle ggf entfertenSchutzverkleidungen wieder angebaut sind.
• Für den Betrieb bei sehr niedrigen Temperaturendarf, um den Startvorgang zu erleichtern, derDieselkraftstoff mit Petroleum (oder kerosin)gemischt werden. Dieser Vorgang hat im Tank zuerfolgen. Zuerst wird Petroleum und anschlieβendDieselkraftstoff eingefüllt. Die Verwendung vonBenzin ist nicht gestattet, da sich gefährlicheDämpfe bilden.
• Während des Betriebes erreicht die Oberfläche desMotors Temperaturen die gefärlich sein können,insbesondere ist die Berührung der Abgasanlage zuvermeiden.
• Bevor Arbeiten am Motor durchgeführt werden, muβdieser abgekühllt sein. Keine Arbeiten am laufendenmotor ausführen.
• Das Kühlflüssigkeitssystem steht unter Druck.Keine kontrollen ausführen bevor der Motor nichtabgekühlt ist. Auch bei abgekühlten motor denVerschluβ des Kühlers oder des Ausgleichgefäsesmit Vorsicht öffnen, sowie Schutzbekleidung und
Schutzbrille tragen. Falls ein elektrischer Lüfterangebaut ist, sich nicht dem heiβen motor nähern,da sich der Lüfter auch bei abgestellten Motoreinschalten kann. Die Reinigung der Kühlanlageist bei Stillstand des Motors vorzunehmen.
• Bei Reinigung des ölbadluftfilters darauf achten,daβ das verschmutze Öl gemäb den gesetzlichenVorschriften entsorgt wird: Das eventuell in denluftfiltern befindliche schwammartige Filtermaterialdarf nicht mit Öl getränkt sein. Der Zyklonvorfiltersoll frei von Öl sein.
• Der Ölwechsel, der betriebswarmen Motor(Öltemperatur ca. 80° C) vorzunehmen ist,erfordert besondere Vorsicht, daVerbennungsgefahrbesteht. Hautkontakt mit Öl istzu vermeiden, da es gesundheiitsschädlich ist.
• Bei dem Wechsel des Ölfilters ist zu beachten,daβ er eine hohe Temperatur haben kann(Verbrennungsgefahr).
• Es ist sicherzustellen, daβ das Altöl, der Ölfilterund das darin vorhandene Ölbinde - undPutzmittel, gemäβ den gesetzlichen Vorschriften,entsorgt werden.
• Die Kontrolle, Nachfüllung und der Wechsel desKühlmittels sollen bei abgestelltem und kaltemMotor vorgenommen werden. Es ist zu beachten,daβ bei der mischung von nitrithaltigenFlüssigkeiten mit anderen Flüssigkeiten, die nichtderartige Bestandteile enthalten,gesundheitsschädliche Nitrosamine entstehenkönnen. Das Kühlmittel ist umweltschädlich und istdaher gemäβ den gesetzlichen Vorschriften zuentsorgen.
• Bei Arbeiten, die den Zugang zu beweglichenTeilen des Motors bzw, den Abbau derSchutzverkleidung an Rotationsstellen beimhalten,ist die batterie abzuklemmen, damit zufälligeKurzschlüsse und das Einschalten des Anlassersverhindert wird.
• Die Keilriemenspannung nur bei Stillstand desMotors kontrollieren.
Fur den Transport des Motors nur die dafür vonLOMBARDINI vorgesehenen Transportösenverwenden. Diese Transportösen sind nicht alsHubpunkte für die gesamte Maschine geeignet.Hierfür sind die vom Maschinenherstellervorgesehenen Vorrichtungen zu verwenden.
32
El incumplimiento de la prescripción comporta el riesgo dedaños a personas y/o a cosas
El incumplimiento de la prescripción comporta el riesgo dedaños técnicos a la máquina y/o a la instalación
PELIGROLLAMADAS Y AVISOS
ADVERTENCIA
INSTRUCCIONES DE SEGURIDAD
• Los motores Lombardini están construidos para quesus prestaciones sean seguras y duraderas en eltiempo. Condición indispensable para obtenerestos resultados es el respeto a las instruccionesde mantenimiento que figuran en el manual y a losconsejos de seguridad que se dan a continuación.
• El motor ha sido construido según lasespecificaciones del fabricante de la máquina, y esresponsabilidad suya adoptar los mediosnecesarios para cumplir los requisitos esencialesde seguridad y salvaguardia de la salud, de acuerdocon la legislación vigente. Cualquier utilización delmotor que no sea para la que se ha definido nopodrá considerarse conforme al uso previsto por lafirma Lombardini, que, por lo tanto, declinacualquier responsabilidad sobre los eventualesaccidentes resultantes de tales usos.
• Las indicaciones que se dan a continuación estándestinadas al usuario de la máquina para quepueda reducir o eliminar los riesgos derivados delfuncionamiento del motor en particular y de lasoperaciones de mantenimiento en general.
• El usuario debe leer atentamente estasinstrucciones y familiarizarse con las operacionesque se describen. En caso contrario, podríanpresentarse graves peligros tanto para la seguridadcomo para su propia salvaguardia y la de laspersonas que se encontraren próximas a lamáquina.
• Solo el personal adiestrado adecuadamente en elfuncionamiento del motor y conocedor de losposibles peligros podrá utilizarlo o montarlo en una
máquina, tanto más cuanto que esta precaución esvalida también para las operaciones demantenimiento ordinarias y, sobre todo, para lasextraordinarias. En este último caso habrá querecurrir a personal formado especificamente por lafirma Lombardini y trabajando de acuerdo con losmanuales existentes.
• Cualquier variación de los parámetros funcionalesdel motor, del registro del paso de combustible yde la velocidad de rotación, así como la retirada deprecintos, el montaje o desmontaje de partes nodescritas en el manual de uso y mantenimientorealizados por personal no autorizado, acarreará ladeclinación de toda responsabilidad por parte de lafirma Lombardini en el caso de producirseincidentes eventuales o de no respetarse lanormativa legal.
• En el momento de su puesta en marcha, hay queasegurarse de que el motor está en posiciónpróxima a la horizontal, de acuerdo con lasespecificaciones de la máquina. En caso depuesta en marcha manual, habrá que asegurarsede que todo se hace sin peligro de choques contraparedes u objetos peligrosos y teniendo tambiénen cuenta el impulso del operador. La puesta enmarcha a cuerda libre (que excluye, por tanto, elarranque recuperable) no es admisible, ni siquieraen casos de emergencia.
• Hay que verificar la estabilidad de la máquina Paraevitar peligros de vuelco.
• Es necesario familiarizarse con las operaciones dèregulación de la velocidad de rotación y de paro del
motor.• EL motor no debe ponerse en marcha en recintos
cerrados o escasamente ventilados: la combustióngenera monóxido de carbono, un gas inodoro yaltamente venenoso. La permanencia prolongada enun entorno donde el escape del motor sea librepuede acarrear la pérdida de conocimiento y hasta lamuerte.
• El motor no puede funcionar en recintos quecontengan materiales inflamables, atmósferasexplosivas o polvo facilmente combustible, a menosque se hayan tomado las precauciones específicas,adecuadas y claramente indicadas y comprobadaspara la máquina.
• Para prevenir los riesgos de incendio. la máquina hade mantenerse, al menos, a un metro de edificios yde otras maquinarias.
• Para evitar los peligros que puede provocar elfuncionamiento, los niños y los animales debenmantenerse a una distancia prudente de lasmáquinas en movimiento.
• El combustible es inflamable. El deposito ha dellenarse solo con el motor parado; el combustibleeventualmente derramado se secarácuidadosamente; el deposito de combustible y lostrapos embebídos con carburante o aceites semántendrán alejados; se tendrá buen cuidado da quelos eventuales paneles fonoabsorbentes hechos conmaterial poroso no queden impregnados decombustible o de aceite y se comprobará que elterreno sobre el que se encuentra la máquina nohaya absorbido combustible o aceite.
33
Propuesta California 65
ATENCIÓN
Los gases de escape emitidos por este motorcontienen sustancias químicas que el estado deCalifornia considera como causa de cáncer,defectos de nacimiento y otros problemas dereproducción.
• Se volverá a tapar cuidadosamente el tapón deldepósito después de cada rellenado. El deposito nodebe llenarse nunca hasta el borde, sino que hayque dejar libre una parte para permitir la expansiondel combustible.
• Los vapores del combustible son altamente tóxicos,por tanto, las operaciones de rellenado seefectuarán al aire libre o en ambientes bienventilados.
• No fumar ni utilizar llamas libres durante lasoperaciones de rellenado.
• El motor debe ponerse en marcha siguiendo lasinstrucciones específicas que figuran en el manualde uso del motor y/o de la máquina. Se evitarà eluso de dispositivos auxiliares de puesta en marchano instalados de origen en la máquina (por ejemplo,un “Startpilot”).
• Antes da la puesta en marcha, retirar los eventualesdispositivos que se hubiesen utilizado para elmantenimiento del motor y/o de la máquina; secomprobará también que se han vuelto a montartodas las protecciones retiradas previamente. Encaso de funcionamiento en climas extremados, parafacilitar la puesta en marcha está permitido mezclarpetróleo (o queroseno) al gasóleo. La operacióndebe efectuarse en el deposito, vertiendo primero elpetróleo y después el gasóleo. No está permitido eluso de gasolina por el riesgo de formación devapores inflamables.
• Durante el funcionamiento, la superficie del motoralcanza temperaturas que pueden resultarpeligrosas. Es absolutamente necesario evitarcualquier contacto con el sistema de escape.
• Antes de proceder a cualquier manipulación delmotor, hay que parado y dejarlo enfriar. Nunca semanipulará si está en marcha.
• El circuito de refrigeración con liquido está bajopresión. No se efectuará ningún control si el motorno se ha enfriado e, incluso en este caso, el tapóndel radiador o del vaso de expansión se abrirá concautela. El operador llevará gafas y traje protector.
Si se ha previsto un ventilador eléctrico, no hayque aproximarse al motor caliente, porque podríaentrar en funcionamiento también con el motorparado. Efectuar la limpieza del sistema derefrigeración con el motor parado.
• Durante las operaciones de limpieza del filtro deaire con baño de aceite, hay que asegurarse deque el aceite que se va a utilizar cumple lascondiciones de respeto al medio ambiente. Loseventuales materiales filtrantes esponjosos en losfiltros de aire con baño de aceite no deben estarimpregnados de aceite. El ciclòn prefiltro decentrifugado no ha de llenarse de aceite.
• Como la operación de vaciado del aceite ha deefectuarse con el motor caliente (T aceite 80°C),es preciso tener un cuidado especial para prevenirlas quemaduras: en cualquier caso, hay que evitarsiempre el contacto del aceite con la piel por elpeligro que esto puede representar.
• Debe comprobarse que el aceite procedente delvaciado, el filtro del aceite y el aceite que contienecumplan los requisitos de respeto al medioambiente.
• Atención especial merece la temperatura del filtrode aceite durante las operaciones de sustituciónde este filtro.
• Las tareas de control, rellenado y sustitución delliquido de refrigeracíón deben hacerse con elmotor parado y frío. Habrá que tener cuidado en elcaso de que estén mezclados líquidos quecontienen nitritos con otros que carecen de estoscomponentes. Podrían formarse nitrosaminas,unas substancias dañinas para la salud. Loslíquidos de refrigeración son contaminantes; portanto, solo deben emplearse los que respetan elmedio ambiente.
• Durante las operaciones destinadas a acceder apartes móviles del motor y/o a la retirada de lasprotecciones giratorias, hay que interrumpir y aislarel cable positivo de la bateria con el fin de prevenircortocircuitos accídentales y la excitación del
motor de arranque.• La tensión de las correas se controlará unicamente
con el motor parado.• Para desplazar el motor, utilícense tan solo los
anclajes previstos por la firma Lombardini.• Estos puntos de anclaje para el alzado del motor no
son idóneos para toda la máquina, por lo que seutilizarán los anclajes previstos por el constructor.

34
A FALTA DE RESPEITO PELAS PRESCRIÇÕES IMPLICA RISCODE DANOS A PESSOAS E COISAS
A FALTA DE RESPEITO PELAS PRESCRIÇÕES IMPLICA RISCODE DANOS TECNICOS NA MÁQUINA E/OU NA INSTALAÇÃO
PERIGOPREVENÇÃO E AVISOS
ADEVERTÊNCIA
INSTRUCÇÕES DE SEGURANÇA
• Os motores Lombardini estão construidos para queas suas prestações sejan seguras e duradouras notempo. É condição indispensável para obter estesresultados respeitar as instrucção que fuguram nomanual e os conselhos de segurança que sãodados a continuação.
• O motor foi construido segundo as especificaçõesdo fabricante de uma máquina, e è da suaresponsabilidade adoptar os meios necessáriospara cumprir os requisitos essenciais de sugurançae salvaguarda da saúde, conforme a legislaçãovigente. Qualquer utilização vigente. Qualquerutilização do motor que não seja a definida nãoo sepoderáconsiderar conforme ao uso previsto pelamarca Lombardini que, portanto, rejeitará qualquerresponsabilidade sobre os eventuais acidentesresultantes de tais usos.
• As indicações que são dadas a seguir destinam-seao usuário da mãquina para que possa reduzir oueliminar os riscos derivados do funcionamento domotor em particular e das operações demanutenção em geral.
• O usuário deve ler com atenção estas instrucções efamiliarizar-se com as operações descritas. Casocontrário, poderÍam apresentar-se graves perigostanto para a segurança como para a sua própriasalvaguarda e a das pessoas que se encontraremperto da máquina.
• Só o pessoal formado adequadamente nofuncionamento do motor e conhecedor dos perigospossíveis poderá utilizá-lo o montá-lo numamáquina, tendo em conta que esta precução è
também válida para as operações de manutençãoordinárias e, sobretudo, para as extraordinárias.Neste último caso, ter-se-á que recorrer aopessoal formado específicamente pela empresaLombardini e trabalhar de acordo com os manuaisexistentes.
• Quelquer variação dos parâmetros funcionais domotor, do registo da passagem do combustível eda velocidade de rotação, assim como a retiradadas precintas, a montagem ou desmontagem daspartes não descritas nomanual de uso emanutenção realizados pelo pessoal nãoautorizado, provocará a eliminação de toda aresponsabilidade por parte da marca Lombardinino caso de se produzir incidentes eventuais ou denao se respeitar a normativa legal.
• No momento de pô-lo em funcionamento, é precisoter a certeza de que o motor esteja na posiçãopróxima à horizontal, de acordo com asespecificações da máquina. no caso de pô-lo emfuncionamento de forma manual, será peciso estarseguro de que tudo è feito sem perigo de choquescontra paredes ou ou objectos perigosos, tendotambém em conta o impulso do eperador. Põr omotor em funcionamento à corda livre (que exclui,portanto, o arranque recuperável ) não éadmissíveò, nem sequer nos casos deemergência.
• Tem de ser verificada a estabilidade da máquinapara evitar perigos de tombo.
• E necessário familiarizar-se com as operações deregulação da velocidade de rotação e de paro do
motor.• O motor não deve ser posto em funcionamento em
locais fechedos ou pouco ventilados: a combustãogera monóxido de carbono, um gás inodoro ealtamente venoso. A permanência prolongada numambiente onde o escape do motor seja livre podeatingir a perda do conhecimento e inclusivamente amorte.
• O motor não pode funcionar em locais quecontenham materiais inflamáveis, atmosferasexplosivas ou pófacilmente combustível,a não serque se tenham tornado as Precauções específicas,adequadas e claramente indicadas e comprovadaspara a máquina.
• Para prevenir os riscos de incêndio, a máquina temde ser mantida, pelo menos, a um metro dosedifícios e de outras máquinas.
• Para evitar os perigos que pode provocar ofuncionamento, as crianças e os animais devemmantener-se a uma distância prudente dasmáquinas em movimento.
• O combustível é inflamável. O depósito tem de serenchido apenas com o motor parado; o combustíveleventualmente derramado deverá secarsecuidosamente; o depósito de combustível e os traposembedidos com carburante ou óleos devem manter-se afastados; deve ter-se muito cuidado de que oseventuais panéisfonoabsorventes faitos com materialporoso não fiquem impregnados de combustível oude óleo e deve comprovarse que o terreno sobre oqual se encontra a máquina não tenha absorvidocombustível ou óleo.

35
Proposta Califórnia 65
ATENÇÃO
Os gases de descarga emitidos por este motorcontêm produtos químicos, considerados peloEstado da Califórnia como causa de câncer, máformação em crianças e outros danos reprodutivos.
• Volte a tapar cuidadosamente a tampa do depósitocada vez que o ancha. O depósito nunca se deveencher até ficar cheio, senão que se tem que deixarlivre uma parte para permitir a expansão docombustível.
• Os vapores do combustível são altamente tóxicos.Portanto, as operações de encher o depósito têm deser efectuadas ao or livre ou em ambientes muitoventilados.
• Não se deve fumar nem utilizar chamas livres nomomento de encher o depósito.
• O motor deve ser posto em funcionamento seguindoas instruções específicas que figuram no manual deuso do motor e/ou da máquina. Evite o uso dedisposiitivos auxiliares de arranque do motor quenão foram originariamente instalados na máquina(por exemplo, um "Starpilot").
• Antes de pôr o motor em funcionamento, é precisoretirar os eventuais dispositivos que podem ter sidoutilizados para a manutenção do motor e/ou damáquina; comprove tambén que se voltaram amontar todas as protecções retiradas previamente.No caso do funcionamentoem climas extremos,para facilitaro arranque é permitido misturar petróleo(ou querosene) com o gasóleo. A operação deveefectuar-se no depósito, vertindo primeiro o petróleoe depois o gasóleo. Nao é permitido o uso degasolina pelo risco de formação de vaporesinflamáveis.
• Durante o funcionamento, a superfície do motoratinge temperaturas que podem resultar perigosas.É absolutamente necessário evitar qualquercontacto com o sistema de escape.
• Antes de procedera a qualquer manipulação domotor, tem de pará-lo e dexar arrefecer. Nunca semanipule se está em funcionamento.
• O circuito de refrigeração com líquido está sobpressão. Não efectue nenhum contolo se o motornão tiver arrefecido e, inclusivamente neste caso, atampa do radiador ou do vaso de expansão deve seraberta com cautela. Operador tem de levar óculos e
fato protector. Sese tem previsto um ventiladoreléctrico, a pessoa não se pode aproximar aomotor quente porque o referido ventilador poderiaentrar em funcionamento com o mootor parado.Efectuar a limpeza do sistema de refrigeração como motor parado.
• Durante as operações de limpeza do foltro de arcom banho de óleo, é preciso ter a ceteza de que oóleo que vai ser utilizado cumpre as condições derespeiito ao meio ambiente. Os eventuais materiaisfiltrantes esponjosos nos filtros de ar com banhode óleo não devem estar impregnados de óleo. Orecipiente do pre-filtro de centrifugação não sedeve encher de óleo.
• Como a operação do esvaziamento do óleo deveser efectuada com o motor quente (T óleo -80°), épreciso ter um cuidado especial para prevenir asqueimaduras; em qualquer caso, tem de evitar-seo contacto do óleo com a pele pelo perigo que istopode representar.
• É preciso comprovar que o óleo procedente doesvaziamento, filtro do óleo que contém cumpramos requisitos de respeito ao meio ambiente.
• A temperatura do filtro de óleo merece umaespecial atenção durante as operações desubstituição deste filtro.
As tarefas de controlo , enchimento e substituiçãodo líquido de refrigeração devem ser feitas com omotorparado e frio. Será necessário ter cuidadocaso estejam misturados líquidos que contenhamnitritos com outros que careçam dessescomponentes. Poderiam formar-se nitrosaminas,umas substâncias daninhas para a saúde. Oslíquidos de refrigeração são contaminantes;portanto, sódevem ser empregues os querespeitam o meio ambiente.
• Durante as operações destinadas a aceder áspartes móveis do motor e/ou á retirada dasprotecções giratórias, tem-se de interromper eisolar o fio positivo da bateria com o fim deprevenir curto-circuitos acidentais e a excitação do
motor de arranque.• A tensão das correias deve ser controlada
unicamente com o motor parado.Para deslocar o motor, apenas devem ser utilizadasas ancorgens previstaspela marca Lombardini.Estes pontos de ancoragem para o alçado do motornão são apropriados para toda a máquina, razão pelaqual serão utilizadas as ancoragens previstas peloconstrutor.
36
Η ελειψη τηρησης της οδηγιας θα προκαλεσει κινδυνοΗ ελειψη τηρησης της οδηγιας θα προκαλεσει κινδυνοΗ ελειψη τηρησης της οδηγιας θα προκαλεσει κινδυνοΗ ελειψη τηρησης της οδηγιας θα προκαλεσει κινδυνοΗ ελειψη τηρησης της οδηγιας θα προκαλεσει κινδυνοζηµιας σε προσωπα και αντικειµεναζηµιας σε προσωπα και αντικειµεναζηµιας σε προσωπα και αντικειµεναζηµιας σε προσωπα και αντικειµεναζηµιας σε προσωπα και αντικειµενα
Η ελειψη τηρηοης της της οδηγιας θα προκαλεοει κινδυνοΗ ελειψη τηρηοης της της οδηγιας θα προκαλεοει κινδυνοΗ ελειψη τηρηοης της της οδηγιας θα προκαλεοει κινδυνοΗ ελειψη τηρηοης της της οδηγιας θα προκαλεοει κινδυνοΗ ελειψη τηρηοης της της οδηγιας θα προκαλεοει κινδυνοβλαβης τον µηξανηµατος η της εγκατασταδηςβλαβης τον µηξανηµατος η της εγκατασταδηςβλαβης τον µηξανηµατος η της εγκατασταδηςβλαβης τον µηξανηµατος η της εγκατασταδηςβλαβης τον µηξανηµατος η της εγκατασταδης
ΚΙΝΑΙΝΟΣΚΙΝΑΙΝΟΣΚΙΝΑΙΝΟΣΚΙΝΑΙΝΟΣΚΙΝΑΙΝΟΣΠΑΡΑΤΗΡΗΣΕΙΕ ΚΑΙΠΑΡΑΤΗΡΗΣΕΙΕ ΚΑΙΠΑΡΑΤΗΡΗΣΕΙΕ ΚΑΙΠΑΡΑΤΗΡΗΣΕΙΕ ΚΑΙΠΑΡΑΤΗΡΗΣΕΙΕ ΚΑΙΠΡΟΕΙΑΟΠΟΙΗΣΕΙΣΠΡΟΕΙΑΟΠΟΙΗΣΕΙΣΠΡΟΕΙΑΟΠΟΙΗΣΕΙΣΠΡΟΕΙΑΟΠΟΙΗΣΕΙΣΠΡΟΕΙΑΟΠΟΙΗΣΕΙΣ
ΠΛΗΡΟΦΟΡΙΑΠΛΗΡΟΦΟΡΙΑΠΛΗΡΟΦΟΡΙΑΠΛΗΡΟΦΟΡΙΑΠΛΗΡΟΦΟΡΙΑ
Ο∆ΗΓΙΕΣ ΑΣΦΑΛΕΙΑΣΟ∆ΗΓΙΕΣ ΑΣΦΑΛΕΙΑΣΟ∆ΗΓΙΕΣ ΑΣΦΑΛΕΙΑΣΟ∆ΗΓΙΕΣ ΑΣΦΑΛΕΙΑΣΟ∆ΗΓΙΕΣ ΑΣΦΑΛΕΙΑΣ
• Οι κινητηρες Lombardini εχουν κατασκευαστειπροκειµενου να προσϕερουν επιδοσεις µε τροποασϕαλη και διαρκη. Aπαραιτητη προυποθεση γιανα υπαρξουν τα παοτελεσµατα ειναι η τηρηοη τωνοδηγιων συντηρησης του ειδικου εγχειριδιου καιτωι συµβουλων ασϕαλειας που αναϕερονταιπαρακατω.
• Ο κινητηρας κατασκευαστηκε συµϕωυα µεεςειδικευµενες του κατασκευαστη ενοςµηχανηµατος και εληϕθησαν ολα τα απαραιτηταωοτε να ικανοποιησει την ασϕαλεια και τηνπροστασια της υγειας, οπως προβλεπεται απο τουςισχυοντες κανονισµους. Οποιαδηποτε χρηση τονκινητηρα εκτος της προκαθορισµενης δενθεωρειται συµϕωνη µε την χρηση που προβλεπεταιαπο την LOMBARDINI πραγµα το οποιο ακυρωνεικαθε ευθυνη για ενδεχοµενα ατυχηµαταπροερχοµενα απο τετοιες ενεργειες.
• Οι οδηγιες πον ακολουθουονται στον χειριστη τηςµηχαυης προκειµενου να µειωσουν η και νααποκλεισουν τους κινδυνους που εχουν σχεσηµετην λειτουργια η την περιοδικη συντηρηση τονκιυητηρα.
• Ο χειριοτης πρεπει υα διαβασει προσεκτικα τιςοδηγιες και υα ευεργειες οι οποιες πειλαµβανονταισε αντες. Στην αντιθετη περιπτωοη θααντιτµετωπισει κιδυνους και τωη αλλωνπροσωπων που βριοκονται κοντα σοντα στηνµηχανη.
• Ο κινητηρας µπορει να χρησιµοποιηθει οε µια µιαµηχανη µονο απο προσωπικο επαρκωςεκπαιδευµενο στην λειτουργα και τους
επακολουθους κινδυθους. Τα παραπανω ιοχνουνκυχυουν κυριως για εργασιες επιθεωρησηζπεριοδικης και γενικης. Μαλιστα η τελευταιαπρεπει να γινεταια πρεπει να γινεται αποπροσωπικο ειδικα εκπαιδευµενο βασει τηςυπαρχουσας βιβλιογραϕιας βιβλιογραϕιας.
• Αλλαγες τωη παραµετρων λειτουργιας τονκινητηρα οπως τωυ ρυθµισεων παυσιυου τηςπεριστροϕικης ταχυτητας, της µετακιυηση τωνσϕραγιδων, της αποσυναρµολογηοης καισυναρµολογησης των µεριγραϕουται στο εγχειριδιο χρησης και συντηρησης απο προσωπικο µηεξουσιοδοτηµενο, εχουν σαν αποτελεσµα τηνακυρωση καθε ευθε ευθυνης την ακυρωση καθεευθυνης της LOMBARDINI για ενδεχοµεναατυχηµατα.
• Κατα την εκκινηοη βεβαιωθειτε οτι ο κινητηραςβρισκεται σε οριςοντια θεση η στα οριααποκλιοηςαπο την οριςοντια θεση συµϕωνα µετις προδιαγραϕες της µηχανης. Στην περιπτωσηχειροκινητης εκκινησης σιγουρευτειτε οτι οισχετικες κινησεις πραγµατοποιουνται χωριςκινδυνο προσκρουσης σε τοιχωµατα η αλλαεµποδια υπολογιςοντας και την αποσταση τοντραβηγµατος τον σχοινιου απο τον χειριοτη. Ηεκκιυηση µε αλευθερο σχοινι (µε εξαιρεοη τοεπανατυλιοοµενο σχοινι δεν ειναι αποδεκτη ουτεσε περιπτωση εκτακτης αναγκης.
• Ελεγχετε την ευοταθεια της µηχανης µηχανηςπροκειυενου νου να αποϕυγετε την ανατροπητης.
• Εξοικειωθητε µε τις ενεργειες ρυθµιοης της
ταχυτητας στροϕων και διακοπης λειτουργιας τουκινητηρα.
• Μην εκκινειτε τον κινητηρα σε κλειστο περιβαλλονη µε ανεπαρκη αερισµο. Η καυσηδηµιουργειµονοξειδιο τον ανθρακα, ενα αεριοαοσµο και δηλητηριωδες. Η παρατεταµενη σεπεριβαλλον οπον ο κινητηρας παραγει ελευθερααναθυµιασεις µπορει να προκαλεσει λιποθυµια ηκαι θανατο.
• Ο κινητηρας δεν πρεπει να λειτουργει σεπεριβαλλον στο σποιο βριοκονται ευϕλεκτα υλικα,ατµοσϕαιρα εκρκτικη η σκονη που ευκολααναϕλεγεται εκτος και εαν εχουν παρθει οιαπαραιτητες προϕνλαξεις οι οποιες πρεπει να ειναιποτοποιηµενες για µηχανηµα.
• Προκειµενου να εξαλειϕθουν οι κινδυνοι πυρκαιαςη µηχανη πρεπει να απεχει τουλαχιστον ενα µετροαπο κτιρια η αλλο
µηχαανικο εξοπλιστον.• Παιδια και ςωα πρεπει να βριοκονται σε αποσταση
απο τις µηχανες κατα την λειτουργιαπροκειµενουνα αποϕενκτουν επικνδυνες ουνεπειε∫.
• Το καυσιµο ειναι ευϕλεκτο υλικο και η δεξαµενηκαυσιµον πρεπει να γεµιςει µουο µε τον κινητηραεκτος λειτονργιας. Στραγγιξτε προοεκτικα τοκαυσιυο µε το οποιο θα εϕοδιασετε το δοχειοκαυσιυου και αποµακρυνετε οτιδηποτε εχειευποτιοτει µε καυοιυµο η λαδι καθως και τηυδεξαυενη ανεϕοδιασµον. Ειεγξτε εαν το εδαϕος στοστο οποιο βριοκεται η µηχανη η τα ηχοµονωτικαεχουν εχουν εµποτιστει µε καυσιµο η λαδι.
• Κλειστε προσεκτικα το πωµα της δεξαµενης

37
California Proposition 65
WARNING
Engine exhaust from this product containschemicals known to the State of California to causecancer, birth defects, or other reproductive harm.
καυσιµου µετα απο καθε εϕοδιασµο και µηνγεµιςετε την δεξαµενη µεχρι το χειλος. Αϕηστεαρκετο χωρο ελευθερο λια την διαστολη τονκαυσιυου.
• Οι εργασιες εϕοδιασµου καυσιµου πρεπει υαγινονται σε καλα αεριςοµευους χωρους διοτι οατµος του καυσιµου ειναι δηλητηριωδης.
• Επιοης δεν επιτρεπεται το κατα τον εϕοδιασµοκαυοιµον.
• Ο κινητηρας πρεπι να εκκινει συµϕωνα µε τιςλεπτοµερεις οδηγιες πον αναγραϕονται στοεγχειριδιο τον κιηνητηρα η τον υηχανηµατος. Νααποϕυγετε την χρηοη βοηθητικωυ συσκευησηςεαν δεν εχουν προσρµοστει στο µηχανηµα αποτηναρχη (π.χ. START PILOT).
• Πριν την εκκινηοη µετακινηοτε τα εργαλειαπουηουχρησιµοποιηκαν για την συντηρηση τονκινητηρα καιβεβαιωθειτε οτι εχουνσυναρµολογηθει ολα τα προστατευτικαεξαρτηµατα που ειχαυ αϕαιρεθει. Σε ψυχρακλιυατα για την διευκολυνση της εκκινησηςεπιτρεπεται η αναµιξη τον πετρελαιου diesel µεκαθαρο πετρελαιο. H εκτελεοη της παραπανοεργασιας γινεται ως εξης: Βαςετε στο δοχειοκαυοιµου το καθαρο πετρελαιο και µετα το dieselκινσης. Η χρηση της βενζινης δεν επιτρεπεταιδτοτι σχηµατιςει ευϕλεκτους.
• Κατα την ςταρκεια λειτουργιας λειτουργιας ηεξωτερικη επιϕανεια του κινητηρα ϕτανειθερµοκρασιες που ειναι επικινδυνες. Ιδιαιτεραπρεπει να αποϕευγεται καθε επαϕη µε το ουοτηαεξαγωγης κανσαεριων.
• Πριυ προχωρησετε σε εργασιες στον κινητηραπρεηει να τον σταµατησετε και να τον αϕησετενα κρυωει. Να υην εκτελετε εργασιες µε τονκινητηρα σε λειτουργια.
• Το συστηµα ψυξηξ στους υςροψυκτουςκινητηρεςειναι υπο πιεση. Μην κανετε ελεγχουςπριν ο κινητηρας κρυωσει. Ακοµη και σε αυτη τηνπεριπτωση ανοιξτε το πωµα τον ψυγειου η τοςοχειο διαστολης ϕορωντας προστατευτικα γυαλια
και ρονεχα. Σε περιπτωση πον εχει προβλεϕθειηϕεκτροβαλβιδα µην πλησιαςετε σε ςεστοκινητηρα γιατι θα µπορουδε να αρχισει ναλειτουργει. Η καθαριοτητα τον συστηµατοςψυξης να γινεται µε κινητηρα εκτος λειτονργιας.
• κατα την διαρκεια την καθαριοτητας τον ϕιλτροναερος, τυπον λαδιυο βεβαιωθειτε οτι το λαδιαποβαλλεται χωρις να ρυπαιενει το περιβαλλον.Το στοιχειο ϕιλτρον δεν πρρεεπει να ευποτισθειµε λαδι και το δοχειο τον προϕιλτρον δεν πρεπεινα ειναι γεµατο λαδι.
• Η αλλαγη λαδιου πρεπει να γινεται µε ςεστοκινητηρα (θερµοκρασια λαδιου 80° C) καιαπαιτειται ιδιαιτερη προσοχη προκειµενου νααποϕευκτουν εγκαυµατα. Αποϕυγετε την επαϕητον επαϕη τον επαϕη τον λαδιου µε το δερµα.
• Βεβαιωθειτε οτι το ακαθαρτο λαδι του ϕιλτρουλαδιον αποβαλλεται χωρις να ριπαιυει τοπεριβαλλον.
• Κατα την αλλαγη τον ϕιλτρου λαδιου προσεξτετην θερµοκρασια του.
• Οεϕοδιασµος και η αντικατασταση τον υγρονψυξης πρεπει να γινουν µε τον κινητηρα εκτοςλειτουργιας και κρυο. Προσχ χρειαςεται οταναναµειγνυονται ρευστα που περιεχουν νιτρωδηαλατα µε αλλα που δεν περιεχουν διοτισχηµατιςουν βλαβερες ενωσεις για την υγεια. Τουγρο ψυξης πρεπει να αποβαλλεται χωρις ναρυπαινει το περιβαλλον.
• Κατα τις εραγασιες πον επιτρεπουν τηνπροσπελαση οε κινιητα µερη τον κινητηρ η τηνµετακινηση των προστατευτικων διακοψτε καιαποµονωσετε το θετικο πολο του συσσωρευτονγια να αποϕυετε βραχυκυκλωµα η την διεγερσητης µιςας.
• Ελεγςτε την ταση τον ιµαντα µονο µε κινητηραεκτος λειτουργιας.
• Προκειµενου να µετακινησετε τον κινητηραχρησιυοποιηστε µονο τα σηµεια πουπροβλεπονται απο την LOMBARDINI. Tα σηµειαανυψωσης δεν ειναι τα ιδανικα για την
υετακινηοη ολοκληρον του µηχανηµατος. Σε αυτητην περιπτωση χρησιυοποιηστε τα οηµεια πονπροβλεπει ο κατασκευαστης του µηχανηµατος.

38
Als de gebruiker deze instructies niet opvolgt, kan gevaarvoor personen en goederen ontstaan.
Als de aanwijzing en instucties liet apgevolgd worden , kancechnksche schade aan de motor en of installatie onstaan.
GEVAARWAARSCHUWINGS
TEKENS
VOORZICHTIG
VEILIGHEIDSVOORSCHRIFTEN
• Lombardini motoren worden gebouwd om veilig eenlange levensduur te bereiken. Hiervoor is wel nodigdat de onderhoudsvoorschriften, zoalsomschereven in de handleiding, zowel als devolgende veiligheidsvoorschriften wordenopgevolgd.
• De motor is gebouwd volgens een door de bouwervan de machine verlangde specificatie. De bouwervan de machine is verantwoordelijk voor het nemenvan alle maatregelen die veiligheid en gezondheidvan de gebruiker garanderen. Het gebruik van demachine op andere dan de voorgeschreven wijsedan niet worden beschouwd als gebruik zoals doorLombardini bedoeld. Lombardini aanvaardt dan ookgeen enkele verantwoordelijkheid voor ongelukkenals gevolg van bovenbedoeld oneigenlijk gebruik.
• De volgende voorschriften zijn bedoeld voor degebruiker van de machine om risico's, voroal bijbediening en onderhoud van de motor, teverminderen of uit te sluiten.
• De gebriuker behoort deze voorschriften zorgvuldigte lezen en zich met de hier beschrevenhandelingen vertrouwd te maken. Zo niet, dan kanhij de gezondheid en de veiligheid van zichzelf enanderen in de buurt van de machine ernstig ingevaar brengen.
• De motor mag slechts worden bediend of op eenmachine worden gemonteerd door personen, diebeschikken over voldoende opleiding en ervaring endie van de eraan verbonden risico's op de hoogtezijn. Dit geldt vooral voor normale en bovenalbijzondere onderhoudswerkzaamheeden. Bijzondere
onderhoudswerkzaamheden mogen alleen wordenuitgevoerd door personeel dat door Lombardini isopgeleid en werkt volgens de beschikbareLombardini voorschriften.
• Lombardini aanvaardt geen enkeleverantwoordelijkheiid voor ongelukken, die hetgevolg zijn van wijzigingen aan de normale bedrjfsomstandigheden van de motor, wijzigingen vande afstelling van de brandstofpompen, wijzigingenvan de afstelling van het toerental, het verwijderenvan verzegelingen, en het demonteren en weermonteren door onbevoegd personeel vanaanbouwdelen die niet in de handleiding voorinstructie en onderhoud worden beschreven.
• Zorg voor het starten dat voldan is aan allevoorschriften voor de betreffende machine en datbovendien de motor zoveel mogelijk horizontaalstaat. Zorg bij het met de hand starten dat murenof gevaarlijke voorwerpen niet kunnen wordengeraakt.Behalve bij een repeteerstarter is hetstarten met een koord, zelfs in noodgevallen, niettoegestaan.
• Zorg dat de machine niet kan wegrijden ofomvallen.
• Maak u vertrouwd met de werking van detoerenversterbediening en de stopbediening.
• Start de motor niet in gesloten of slechtgeventileerde ruimten. Waneer de motor draaitontstaat koolmonoxyde, een reukloos en zeer giftiggas. Een te lang verblijf in een ruimte waar demotor uitlaatgassen uitstoot kan bewusteloosheiden zelfs de dood tot gevolg hebben.
• De motor mag niet worden gebruikt in ruimten, waarinzich brandgevaarlijde materialen, of licht ontvlambarestoffen bevinden of waar explosiegevaar bestaat,tenzij bijsondere voorzorge, zoals voorgeschrevenvoor de bettrefende machine, zijn genomen.
• Om het risico van brand te vookomen mag demachine slechts worden gebruikt op een afstand vanminimaaléén meter van gebouwen en anderemachines.
• Houdt kinderen en dieren op voldoende afstand vande machine om gevaren bij het gebruik ervan tevoorkomen.Alle motorbrandstoffen zijn brandbaar. De tank magdaarom alleen worden gevuld bij stilstaande motor.Verwijder eventueel gemorste brandstof zorgvuldig,verwijder brandstofvaten en jerrycans en metbrandstof of smeerolie doordrenkte lappen, zorg dateventuele geluiddempende panelen of de bodemonder de machine niet met brandstof of smeeroliezijn doordrenkt.
• Sluit na elke keer bijtanken de tankdop zorgvuldig.Vul de tank nniet tot de rand, maar laat voldoenderuimte voor uitzetten van de brndstof.
• Brandstofdampen zijn zeer giftig. Tank dus alleen inde open lucht of in goed geventileerde ruimten.
• Bij het vullen van de tank niet roken en geen openvuur gebruiken.
• Volg, om de motor te starten, de betreffendeaanwijzingen in de handleiding voor instructie enonderhoud van hetzij de motor of de machine.Gebruik geen starthulp die niet door demachinefabrikant is aangebracht (zoals startpilot of
39
California Proposition 65
WARNING
Engine exhaust from this product containschemicals known to the State of California to causecancer, birth defects, or other reproductive harm.
andere middelen op etherbasis).• Verwijder voor het starten alle gereedschap dat bij
ondrhoud van motor of machine is gebruikt encontroleer of alle gedemonteerde scher mplatenweer zijn gemonteerd. In koude klimaten kankerosine door de gasolie worden gemengd om hetstarten te veremakkelijken. De vloeistoffen moetenin de tank worden vermengd door eerst de kerosinein de tank te gieten en daarna de gasolie. RaadpleegLombardini technici voor de mengverhouding.Gebruik geen benzine wegens het risico vanvorming van ontvlambare damp.
• Tijdens het draaien kan de buitenkant van de motorop sommige plaatsen gevaarlijk hoge temperaturenbereiken. Vermijdt vooral het aanraken vanonderdelen van het uitlaatsysteem.
• Stop de motor en laat hem afkoelen alvorens eraante werken. Werk niet aan een draaiende motor.
• Het koelcircuit staat onder druk. Voer geen controlesuit voordat de motor is afgekoeld en open zelfs danradiator of expansietank voorzichtig. Draagbeschermende kleding en een veiligheidsbril. Indieneen elektrische ventilator is gemonteerd, is hetverboden hierbij in de buurt te komen tot de motor isafgkoeld; zelfs bij stilstaande motor kan de ventilatorgaan draaien. Maak het koelsystem schoon bijstilstaande motor.
• Zorg bij het schoonmaken van het oliebadluchtfilterdat de vuileolie niet in het milieu terecht komt.Eventueel in het filter gemonteerde sponsfiltersmogen niet met olie doordrenkt zijn: Het cycloonvoorfilter mag niet met olie gevuld zijn.
• Daar de smeerolie moet worden afgetapt bij nogwarme motor (± 80° C) moet bijzonder wordengewaakt tegen verbrandingen. Zorg er in ieder gevalvoor dat de afgewerkte smeerolie niet in contactkomt met de huid, dit kangevaar voor de gezondheidopleveren.
• Zorg ervoor dat afgewerkte smeerolie, oliefilter en deolie die in het smeeroliefilter zit geen schade voorhet milieu kunnen opleveren.
• Kijk uit bij verwijderen van het smeerolie, het kanheet zijn.
• Het controleren, bijvullen en vervangen van dekoelvloeistof moet gebeuren bij stilstaande koudemotor. Houdt er rekening mee dat bij het mengenvan nitritbevattende vloeistoffen met andere geennitrietbevattende vloeistoffen nitrosamines kunnenworden ge vormd die gevaar voor de gezondheidopleveren. Koelvloeistof is milieubelastend,zorgdus bij het weggooien van door nieuwevervangen koelvloeistof dat deze niet in het milieuterecht kan komen.
• Maak de ± kabel van de accu los en isoleer deze bijhet werken aan de motor of het demonteren vanschermplaten, zodat, wanneer bij ongeluk eenkorstsluiting ontstaat de startmotor niet kan gaanwerken.
• Contoleer de spanning van ventilatorriem of anderev-snaren slechts bij stilstaande motor.
• Gebruik bijdesmontage van de motor uit demachine slechts de door Lombardini hiervorgemonteerde hijsogen: Deze hijsogen zijn echterniet geschikt om de complete machine aan ophijsen. Gebruik in dit geval de door demachinefabrikant gemonteerde hijsogen.
40
Ved ikke respektere retningslinjene vil brukeren kunne skadepersoner og materiell.
Ved ikke respektere retningslinjene vil brukeren kunne skadeenheten eller installasjonen.
DANGERADVARSEL TEGN
ADVARSEL CAUTION
SIKKERHETS REGLER
• Lombardini motorer er konstueret, så sikkierhedog lang levetid er tilgodeset, men ertil kraeves, atinstruktionsbogens anvisninger vedrørendevedligholdelse og sikkerhed nøje overholdes.
• Motoren er konsttrueret efter specifikationer fraden enkelte maskinfabrik, og det er fabrikantensansvar at sikre, at alle lovmaessigesikkerhedskrav overholdes på det samledeprodukt. Hvisder foretages aendringer påmotoren, eller den anvendes i andensammenhaeng end den foreskrevne, kan detbevirke, at Lombardini's ansvar vedrørendesikkerhed på motoren aphører.
• De følgende anvisninger skal hjaelpe brugeren tilat formindskke de risici, som følger med betjeningog vedligeholdelse af en motor.
• Som bruger skal man omhyggeligtgennemlaesenaervaerende anvisninger og kendede beskrevne arbejdsgange. Hvis dette ikkeertilfaeldet, risikerer man at skade ikke alene sigselv, men også andre.
• Motorer må kun monteres på en masckine af enansvarligt uddannet person, der kender de risici,der følger med - specielt ved allevedligeholdesesarbejder på motoren. Hvis derskal foretages konstruktionsmaessige aendringer,skal man kontakte et autoriseret Lombardinivaerksted eller importøren, der vil udføre arbejdeti henholdtil gaeldende bestemmelser ogfabrikkens anvisninger.
• Lombardini vil afvise ethvert sikkerheds - oggarantimaessigt krav, hvis motorens indstillinger
aendres, herunder også aendring imotoromdrejninger. Samme afvisning af kravgaelder også,hvis plomberingsforseglinger brydeseller fjernes, eller hvis dele, der ikke er beskrevet iinstruktionsbogen, afmonteres og repareres af ikkeautoriseret personel.
• Ved start af motor skal motoren stå så naer vandretsom mulight. Hvis motoren har manuel start, skalman sikre sig, at der er den fornødne plads, såman ikke slår armen ind i en mur eller andenforhindring, når man traekker i snoren. Man mãunder ingen omstaendigheder prøve at starte medet reb uden hãndtag (rbstart). Det skal påses, atmotooren stãr stabilt, sãden ikke vaelter, nãr denstartes.
• Som bruger skal man vaere fuldt fortrolig med Sombruger skal man vaere fuldt fortrolig med betjening,indstilling af omdrenjninger og stop af motor, førman begynder at arbejde med den.
• Lad aldrig motoren vaere i gang i dårligt ventileredeeller lukkede rum. Udstødningsgassen indeholderkulite, der er dødbringende selv i små maengder.Kulite kan hveriken ses eller lugres.
• Motoren måikke bruges i naerheden af braendbareeller eksplosionsfarlige materieler og heller ikke imeget støvfyldte rum, hvis den ikke erspecialudstyret med foranstaltninger, der gørdetforsvarlight at bruge den sådanne steder.
• For at mindske risiko for brand skal en maskinemed motoren i gang altid holde ensikkerhedsafstand på mindst een meter tilbygninger og braendbare materialer.
• Børn og dyr skal holdes på forsvarlig afstand fraen arbejdende maskine.
• Breandstof er yderst brandfarling, såfyldningmå kum foregå med stoppet, afkølet motor.Eventuel spildt braendstof skal straks tørres af, ogbraendstofdunk og klude brugt til aftørring skalfjernes. Det skal kontrolleresm at eventuelle,porøse Iydabsorberende materialer ikke haropsuget braendstof eller olie, samt at der ikke erspildt braenstof eller oliem hvor maskinen står.
• Tankdaeslet skal lukkes korrekt efter hverpåfyldnig. Fyld ikke braendstoftanken helt op, menlad et par centimeter luft vaere tilbage vedpåfyldning. Når en motor bliver varm under brug,vil braendstoffet ogsåopvarmes og udvide sig.
• Braendstofdampe, isaer benzindampe, isaerbenzindampem er meget giftige, så påfyldning måkun foregåunder åben himmel eller i godt eller igodt ventilerede rum.
• Enhver form for åben ild og tobaksrygning skalholdes langt vaek ved braendstofpåfyldning, derheller ikke må ske, hvor der kan vaere risiko forantaendelse fra gnist i elinstallation, elmotorer oglignende.
• Ved motorstrt skal man følge anvisningerne iinstruktionsogen: Brug aldrig hjaelpemidler somaeter, startpilot og lignende. I meget kolde perioderkan man - ved dieselmotorer - blande petroleu idieselolien. Blanding skal foretages, førpåfyldning. Man må IKKE blande benzin i
41
California Proposition 65
WARNING
Engine exhaust from this product containschemicals known to the State of California to causecancer, birth defects, or other reproductive harm.
dieselolien.• Ved start efter servicearbejde på motor eller maskine
skal man sikre sig, at vaerktøj er fjernet, og atsikkerhedsskaerme og lignende er korrekt monteret.
• Under arbejdet vil motoren - og specieltudstødningssystemet - blive meget varm, selv omdet ikke umiddelbart kan ses. man skal derfor passepå, at man ikke kommer til at røre disse dele.
• Motoren skal vaere stoppet og afkølet, før etservicearbejde pâbegyndes.
• Ved motorer med vaeskedøling er kølevaeskenunder tryk. Lad derfor motoren køle Godt af, førkølerdaekslet skrues af - og alligevel skal det gøresmed største forsigtighed. Det tilrådes at baerebeskyttelsestøj/ - handsker og - briller. Hvis enventilator er elektrisk termostatstyret, kan det ske, atden ved varm motor går i gang, selv om motoren erstoppet. Rengøring af kølesystemet skal altid skemed stopped, kold motor.
• Filterelementet i et oliebadsluftfilter mâ ikke vaeregennemvaedet med olie. Det skal have lov til atdryppe godt af, førdet genmonteres. Filterskålen iforfilter må ikke påfyldes olie.
• Skift af motorolie skal foretages, medens motoren ervarm. Man skal passe på, at man ikke får olie på sig.Olien vil umiddelbart efter stop vaere ca. 80° varmog kan give alvorlige forbraendinger. Det gaelderogså ved skift af oliefilteret. Det anbefales at lademotoren køle lidt ned, før olien aftappes.
• Spildolie fra motor og filtre skal bortskaffes pålovligvis. Kontakt eventuelt teknisk forvaltning i Dereskommune for naermere information.
• Udskiftning af kølevaeske skal ske med stoppet,kold motor. Aftappet kølevaeske skal opbevares pålovlig vis. Den indeholder stoffer, der ermiljøforurenende.
• Veùd arbejde påmotorens/maskinens roterende deleskal batteriets pluskabel - eller ved benzinmotorertaendrørsgaetten - afmonteres, så utilsigtet startundgås.
• Eventuel justering af remme foretages altid med
stoppet motor.• Ved af - eller påmontering af motor skal man altid
løfte i de originale løftebeslag / øjebolte. Dissebeslag må kun anvendes til at løfte motoren ogaldrig hele maskinen.
42
Genom att inte ta hänsyn till dessa föreskrifter, kananvändaren utsätta personer och föremäl för fara.
Genom att inte ta hänsyn till dessa föreskrifter, kananvändaren förorsaka tekniska skador på aggregatet och/eller på installationen
FARAVARNINGSMÄRKEN
VARNING
SÄKERHETSFÖRESKRIFTER
• Lombardini industrimoterer är byggda för att gesäker och läng livslängd. För att detta mäl skakunna nås är det viktigt att de krav som ställsbeträffande skötseln, âtföljs på det sätt sombeskrivs i handboken. Detsamma gäller även desäkerhetsföreskrifter som följer nedan.
• Motorn är uppbyggd anligt maskintillverkarensspecifikationer och det är också denne som äransvarig för att alla nödvändiga steg tas för attmaskinen ska uppfylla viktiga, och av lagstiftarenföreskrivna, krav beträffande hälsa och säkerhet.Används maskinen på annat sätt än det sombeskrivits, kan det inte anses motsvara det avseddaändamål som specificerats av Lombardini, somdärför avsäger sig allt ansvar för olycka somuppstått vid sådan användning.
• De instuktioner som följer är riktade till anvädaren avmaskinen för att minska eller eliminera risker,speciellt sâdana som kan uppstå i samband meddrift eller normal skötsel av motorn.
• Användaren ska noggrant läsa dessa instruktioneroch lära sig de operationer som beskrivs. Om haninte gör detta, riskerar han inte bara sin egen hälsaoch säkerhet, utan kan även utsätta annan person,som befinner sig i omedelbar närhet, för fara.
• Motorn får endast användas eller monteras i enmaskin av personal som utbildats på lämpligt sättoch som är medveten om eventuella faromoment.Detta gäller speciellt normala och framför alltsärskilda underhållsarbeten ska endast utföras avpersonal som utbildats av Lombardini. Sådanaarbeten ska utföras i enlighet med befintlig litteratur.
• Lombardini frånsäger sig allt ansvar för olycka elleravvikelse från lagstiftade krav om ändring gjorts,som berör motorns driftsparametrar ellerinställning av bränslemängd och varvtal, omplombering brutits, eller om motordel som aj finnsbeskriven i instruktions - och skötselhandbokendemonterats och monterats av obehörig.
• Utöver alla andra föreskrifter för maskinen, skaföraren även alltid se till att motorn står i detnärmaste vågrätt vid start. Startas motornmanuellt, måste föraren alltid förvissa sig om attnödvandiga arbetsmoment kan utföras utan risk förberöring med vägg eller farligt föremål. Start medlöst startsonöre (gäller ej magnapullstart) är ejtillåtet ens i nädfall.
• Tillse att maskinen står stadigt, så att igen riskfinns för att maskinen kan stjälpa.
• Ta reda på hur motorvarvtalet ställs in och hurmotorn stoppas.
• Starta aldrig motorn i stängt eller dåligt ventileratutrymme. Vid förbränningen uppstår kolmonoxid,en luktfri och mycket giftig gas. Därför kan vistelsei utrymme där avgaser släpps ut fritt leda tillförgiftning med medvetslöshet eller dödsfall somföljd.
• Motorn fär ej användas i omgivning därlättantändligt material eller damm därexplosioinsfara råder, om inte lämpliga specifikamotåtgärder vidtagits, vilka är entydigt beskrivnaoch godkäanda för maskinen ifråga.
• För att för att förhindra brandrisk, bör maskinenhållas på minst en meters avstånd från byggnader
eller andra maskiner.• Barn och djur måste hållas på behörigt avstånd från
maskinen för att för att förhindra att fara uppstår närmaskinen används.
• Bränsle är lättantändligt och tankning får därförendast ske sedan motorn stoppats. Torka uppeventuelit utspillt bränsle noggrant och avlägsnabränsledunk och trasor som indränkts med bränsleeller olja. Kontrollera att inte ljudisoleringamatta,tillverkad av poröst material, absorberat olja ellerbränsle samt sämt säkerställ att bränsle eller oljainte spillts ut under maskinen.
• Stäng tanklocket noga efter varje tankning. Fyll intetanken bräddfull, utan lämma tillräcklig plats för attbränslet ska kunna expandera t.ex. genom solsken.
• Bränsleångor är giftiga. Tanka därför endastutomhous eller i välventilerat utrymme.
• Rök ej och använd aldrig öppen låga vid tankining.• Starta endast motorn på det sätt som beskrivs i
bifogad handbok för motor resp. maskin. Anvädaldrig starthjälp som inte är originalnonteradpâmotorn (t. ex startpilot).
• Innan motorn startas ska verktyg, som har använtsvid underhållsarbete på motor eller maskin,avlägsnas. Kontrollera också att skydd somdemonterats, monteras på nytt. I kallt klimat kandieselbränslet blandas med lysfotogen för attunderlätta start: Bränslet måste blandas i taken,genom att fotogen fylls på först varefter dieseltillsätts. bensin får ej användas dårisk finns attexplosiva ångor uppstår.
• Vid drift uppnår motorns ytor temperaturer som kan

43
California Proposition 65
WARNING
Engine exhaust from this product containschemicals known to the State of California to causecancer, birth defects, or other reproductive harm.
vara farliga: Undvik framför allt att beröraavgassystemet: Innan arbete utförs på motorn, skaden först stängas av så att sen får svalna. Utföraldrig arbete på motorn så länge den är igång.
• Kylvätskan stär under tryck. Kontrolleraaldrigvätskenivån innan motorn har svalnat. Även då skakylarlocket öppnas försiktigt. Anväd skyddskläderoch skyddsglasögon. Finns eldriven fläkt, får intearbete utföras runt motorn så läange den är varmaftersnomfläkten kan startatrots att motorn äravstängt. Rengör motorns kylsystem endast vidavstängd motor.
• Vid rengöring av oljebadsfilter ska Du noga ta handom oljan så att den inte vållar skada påmiljön. Finnsinsats av skumplast i oljebadsfiltret ska detta intedränkas in i olja. Skålen i cyklnrenaren får ej fyllasmed olja.
• Eftensom oljan måste tappas av motorn i varmttillstånd (oljetemperatur ca. 80°) måste specielluppmärksamhet riktas på att förhindra brännskador.Tillse att oljan på inga vilkkor kommer i beröring medhuden p.g.a. de hälsorisker som då kan uppstå.
• Se till att avtappad olja, oljefilter samt i filtretresterande olja, tas hand om på sådant sätt attnaturen inte skadas.
• Var fär försiktig vid oljefilterbyterbytet eftersom dettakan vara hett.
• Kontroll, efterfyllning och byte av olja och andravätskor måste ske med avstängd och kall motor. Sespeciellt upp med att aldrig blanda vätskainnehållande nitriter med andra vätskor, eftersomdetta kan leda till att hälsovådliga nitrosaminerbildas. Kylvätskan är ett förorenande ämne ochmåste därför tas omhand på sådant sätt att den inteskadar miljön.
• Vid arbete där motorns roterande delar måste görasåtkomliga eller där skydd för roterande delar måsteavlägsnas, ska batteriets pluskabel lossas ochisoleras för att förhindra att kortslutning uppståreller att startmotorn oavsikligt inkopplas.
• Kontrollera kilremspänningen endast sedan motorn
stängts av.• För transport av motor, ska uteslutande de lyftöglor
användas, som monterats av Lombardini för dettaändamål. Dessa lyftöglor får emellertid inteanvändas för att lyfta hela maskinen. För att lyftamaskinen får endast de lyftöglor som monterats avmaskintillverkaren användas.

44
Näiden ohjeiden noudattamatta jättäminen saattaa aiheuttaavaaran ihmisille ja esineille
Näiden ohjeiden noudattamatta jättäminen saattaa aiheuttaateknisen vian laitteille ja/tai asennukselle kokonaisuudessaan
VAARAVÄROITUS MERKINNÄT
HUOMIO
TURVAOHJEET
• Lombardini teollisuusmoottorit ovat rakennettuvarmaa käyttöä ja pitkää käyttöikääajatellen. Jottatämä tavoite saavutetaan on moottoreiden käytön jahuollon yhteydessä huomioitava seuraavatturvaohjeet. Sama koskee myös käyttöohjessaannettuja ohjeita ja varoituksia.
• Moottori on rakennettu konevalmistajan erittelynmukaisesti ja on myös hänen vastuullaan, ettäkaikkitarvittava on huomioitu koneen rakenteessa jotta setäyttäisi lain säätäjän määräämät vaatimuksetterveyden ja turvallisunden varalta. Koneenkäyttäminen muuhun tarkoitukseen kuin valmistajantarkoittamaan käyttötarkoitukseen ei voida katsoatarkkkoituksedsi johon Lombardini on eritellytvalmistamansa moottorin. Näin tapahtuessaLombardini sanoutuu irti kaikesta vastuustavahingosta joka saattaa olla seurauksena sellaisestakäytöstä.
• Tässä seuraavat ohjeet ovat suunnattu koneenkäyttäjäjälle tarkoituksena vähentää taikka poistaariskit varsinkin koskien käyttöäja pälvittäistä houltoa.
• Käyttäjän tulee tarkasti lukea nämä ohjeet ja opetellaesistyt toiminnat. Mikäli näin ei tapahdu hän saattaavaarantaa omaa terveyttään ja myös toisenhenkilön,joka saattaa olla koneen läheisyydessä.
• Moottoria saa käyttää ainoastaan henkilö jolla onriittävä koulutus ja kokemus kyseessä olevankoneen käyttämiseen. Täm koskee eritysestipäivittälsiä houltotoimia ja ennen kaikkea eritvisiähoultotoimenpiteitä ajatalen. Erityisosaamistavaativiin houltotoimenpiteisiin tulee käyttää vainLombardinin kouluttamaa henkilökuntaa. Tämä työ
on lisäksi souritettava käytossä olevanohjekirjaston mukaisesti.
• Lombardini irtisanoutuu kaikesta vastuustaonnettomuuden yhteydessä, mikäli turvaohjeet onjätetty huomioita ja mikäli moottorinkäyttöasetuksiin on ohjeiden vastaisesti koskettu.Näitä ovat mm. polttoainemäärän rajoituksenmuuttaminen, sinettien poistaminen taikka jokinmuu moottorin osan poistaminen taikka lisääminenalkuperäisen rakenteen vastaisesti. Myös erityisethuoltotoimet kouluttoman henkilön toimestasuoritettuna ovat vastuun ulkopuolella.
• Koneen kaikkien muiden ohjeiden lisäksi onkäyttäjän varmistauduttava siitä, että moottori onmahdollisimman lähellä vaaka-asentoa moottoriiakäynnistettäessä. Mikäli moottori käynnistetäänkäsin on varmistettava, että täma voidan suoritaasiten että käynnistäjä ei joudu kosketukseenvaarallisen esineen taikka seinän kanssa.Käynnistysnaru on aina kiristettävä (ei koskeMagnapull-käynnistintä). Tarkista myös, että koneon vakaalla alustalla eikä ole vaaraa, että sekaatuisi käynnistyksen yhteydessä.
• Harjoittele kierrosluvun säätöä ja koneenpysäyttämistoimintoja.
• Älä milloinkaan käynnistä moottoria suljetussataikka huonosti tuuletetussa tilassa. Moottorinkäydessä muodostuu hiilimonoksiidia, hajuton jahyvin myrkyllinen kaasu. Siksi saattaa pidempioleskelu tilassa johon pakokaasuja vapaastipääsee purkautumaan johtaa myrkytykseenjonkaseurauksena saattaa olla tajuttomuus taikka
kuolema.• Moottoria ai pidä käyttää ympäristössä jossa on
helposti syttyviä ainelta, pölyä taikka mikäliräjähdysvaara on ilmeinen, ellei erityisiin vastatoimiinole ryhdyttytaikka koneen rakenne ja käyttö k.o.tilassa on erikseen sovellettu ja viranomastenpuolesta hyväksytty.
• Jotta paloriski voidaan välttääon kone pidettävävävähintään metrin päässä rakennuksen seinästätaikka toisesta koneesta.
• Lapset ja eläimet on pidettävä riittävän etäisyydenpäässäkoneesta sitä käytettäessä.
• Polttoaine on helposti syttyvää ja tankkaussuoritetaan vain koneen ollessa pysäytettynä.Puhdista mahdollisesti roiskunut polttoaine tarkasti japoista polttoainesäiliö ja käytetyt rätit/trasselit joktaovat polttoaineen taikka öljyn tahrimia. Tarkista myös,ettämahdolliset äänieristyspaneli joissa on huokoisiaeristysaineita eivät ole öljyn taikka polttoaineentahrimia. Tarkista lisäksi, että maahan taikka lattiallekoneen alle ei ole tippunut polttoainetta ja öljyä.
• Sulje tankin tulppa huolellisesti joka tankkauksenjälkeen. Älä myöskään täytä säiliötä aivan täyteensillä polttoaineelle on jätettävä tilaa lämpölaajentuman varalta.
• Polttoainehöyryt ovat myrkyllisiä. Suorita tankkausaina ulkona taikka hyvin tuuletetussa tilassa.
• Älä tupakoi ja äläkä milioinkaan käytä avotultatankkauksen yhteydessä.
• Käynnistä moottori vain niitten ohjeiden mukaan jotkaseuraavat moottoria taikka konetta. Älä käytästarttiapua ellei se ole valmistajan alkuperäisasennus

45
California Proposition 65
WARNING
Engine exhaust from this product containschemicals known to the State of California to causecancer, birth defects, or other reproductive harm.
koneen yhteydessä. (erityisesti ulkoiset nk. Starpilot-avut jne).
• Ennen moottorin käynnistystäon tarkistettava,ettätyökalut joita on huollon yhteydessä käytetty ovatpoistettu koneen päältä. Tarkista myös, että kaikkikoteloinnin osat ovat kiinnitetty ja asiallisestipaikoillaan: Eritysen kylmissä olosuhteissa voidaandieselpolttoaineeseen sekoittaa valopetrooliakäynnistystä heipottamaan. Mikäli saatavilla onerityistä talvipolttoainetta suositellaan sen käyttöä. Bensiinin käyttöä ai sallita sen muodostaessaräjähdysalttiita kaasuja.
• Moottorin käydessä sen pinnan lämpötila nousee.Varsin vaarallisia lämpötiloja muodostuupakosarjaan ja pako-putkistoon - vältä näittenkoskettamista.
• Ennen minkään huolto-taikka korjaustoimminnanaloittamista on moottorin annettava jäähtyä. Älämilloinkaan suorita houltotöitä koneen käydessä.
• Jäähdytysneste on paieneen alainen. Älä miloinkaantarkkista nestepintaa moottoriin ollessa lämmin.Moottorin jäähdyttyä on jäähdyttäjän kansi avattavavaroen.Käytä suojavaatteita ja suojalaseja silläjäähdytysneste on haitallista. Mikäli moottori onvarustettu sähkökäyttöisellä tuulettimella huoltotyötäei saa suorittaa moottorin ollessa lämmin, koskatuuletin saattaa käynnistyä iitsestään vaikka moottorion pysäytettynä. Puhdista moottorinjäähdytysjärjesteimä vain moottoriin qllessapysäytettynä.
• Öljkylpyilmauodattimen puhdistuksen yhteydessä onhuomattava, että poistettu öljy otetaan talteen ilmanettä ympäristölle aiheutetaan vahinkoa. Mikälisuodattimessa on huokoinen vaahtomuovinenesisuodatin tätä ei tule kastaa öljyyn.Sykloonisuodattimessa olevaa kuppia ai saa täyttääoljyllä.
• Koska moottoriöljy poistetaan moottorista lämpimänä(ölyn lämpötila n:80°C) on erityistävarovaisuuttanoudettava poistuvan oljyn suuntaamisessa.Varovaisuutta on noudatetta jotta vältyttäisiin
paloriskiltä ja öljyn kosketuksesta ihon kanssa.• Varmista, että poistetusta öljysta, öljysuodattimesta
ja suodattimessa olevasta öljysta houlehditaan, niinettei ympäristölle aiheuteta vahinkoa.
• Varo erityisesti öljyn vaihdon yhteydessäkuumaaöljyä.
• Turkistus, jälkitäyttö ja vaihto öljylle ja muillekäytetyille nesteille on tehtävä moottorin ollessapysäytettynä. Varo erityisesti sekoitteita tehtäessä,että nitriittejä sisältäviä aineita ei milloinkaan saasekoittaa toisiin nesteisiin. Mainitunlainen sekoitesaattaa muodostaa vahingollisia yhdisteitä:Jäähdytysneste on saastuttava aine ja siitä onhuolehdit jottei luonta vahingoittaisi.
• Mikäli houltotyön yhteydessäjoudutaan irroittamaanmoottorin pyöriviiä osia on varmistettava, että akunpluskaapeli on irroitettu ja eristetty, jottavarmistetaan ettei aiheuteta oikosulkua ja estetäänkäynnistysmoottorin tahaton käynnistyminen.
• Kiilahihnan tarkistus on suoritettava ainoastaanmoottotin ollessa pysäytettynä.
• Moottorin nostoa varten on käytettävä Lombardininsitä varten asentamia korvakkeita. Näitú aikuitenkaan saa käyttää koko laitteennnoostamiseen. Laitteen nostoa varten on koneenvalmistajan takoittamia nostopisteitä käytettävä.

46
DIMENSIONI D’INGOMBRO
MESURESD’ENCOMBREMENT
OVERALL DIMENSION
EINBAUMAßE
DIMENSIONE EXTERIORES
DIMENÇÕES EXTERIORES
CARATTERISTICHE - CARACTERISTIQUES - CHARACTERISTICS - TECHNISCHE DATEN - CARACTERISTICAS - CARACTERÍSTICAS
CILINDRI - CYLINDRES - CYLINDERS - ZILINDERZAHL - CILINDROS - CILINDROS
ALESAGGIO - ALESAGE - BORE - BOHRUNG - DIAMETRO - ALESAGEM
CORSA - COURSE - STROKE - HUB - CARRERA - CORRIDA
CILINDRATA - CYLINDREE - DISPLACEMENT - HUBRAUM - CILINDRATA - CILINDRADA
INCLINAZIONE MAX DISCONTINUA (ISTANTANEO)(MAX 1’) - INCLINAISON MAX TEMPORAIRE (INSTANTANÉE)(MAX1’) - MAX INTERMITTENT ANGULARITY (PEAK VALUES)(MAX 1’) - MAX SCHRÄGLAGE WECHSELBETRIEB(MOMENTAN)(MAX 1’) - INCLINACION MAX DISCONTINUA (INSTANTÀNEO)(MAX 1’)
QUANTITÀ OLIO - QUANTITÉ HUILE - OIL QUANTITY - ÖLMENGE - CANTIDAD ACEITE - QUANTIDADE ÓLEO
PESO A SECCO - POIDS À VIDE - DRY WEIGHT - TROKENGEWICHT - PESO EN SECO
N.
mm
mm
Cm³
L.
Kg.
3
85
92
1566
25° (35°)
4.3
147
A
B
C
D
E
F
371
68
67
DIMENSIONI mm - MESURES mm - DIMENSION mm - EINBAUMAßE mm - DIMENSIONE mm - DIMEN0ÇÕES (mm)
G
H
I
211.5
169.5
283
L
M
N
146
732
373
O
P
Q
359
181
164.5
R
S
T
362
80
455
U
V
Z
167
642
333
180
160
327
11 LD 522-3
11 LD 522-3
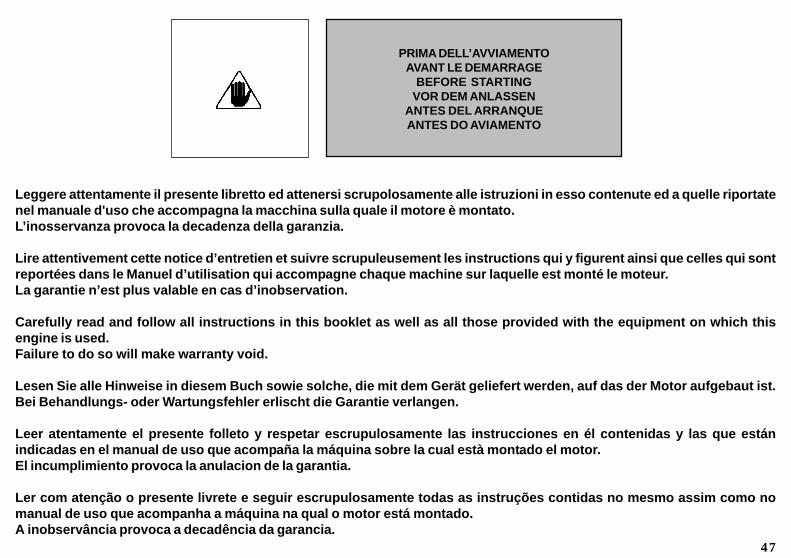
47
PRIMA DELL’AVVIAMENTOAVANT LE DEMARRAGE
BEFORE STARTINGVOR DEM ANLASSEN
ANTES DEL ARRANQUEANTES DO AVIAMENTO
Leggere attentamente il presente libretto ed attenersi scrupolosamente alle istruzioni in esso contenute ed a quelle riportatenel manuale d'uso che accompagna la macchina sulla quale il motore è montato.L’inosservanza provoca la decadenza della garanzia.
Lire attentivement cette notice d’entretien et suivre scrupuleusement les instructions qui y figurent ainsi que celles qui sontreportées dans le Manuel d’utilisation qui accompagne chaque machine sur laquelle est monté le moteur.La garantie n’est plus valable en cas d’inobservation.
Carefully read and follow all instructions in this booklet as well as all those provided with the equipment on which thisengine is used.Failure to do so will make warranty void.
Lesen Sie alle Hinweise in diesem Buch sowie solche, die mit dem Gerät geliefert werden, auf das der Motor aufgebaut ist.Bei Behandlungs- oder Wartungsfehler erlischt die Garantie verlangen.
Leer atentamente el presente folleto y respetar escrupulosamente las instrucciones en él contenidas y las que estánindicadas en el manual de uso que acompaña la máquina sobre la cual està montado el motor.El incumplimiento provoca la anulacion de la garantia.
Ler com atenção o presente livrete e seguir escrupulosamente todas as instruções contidas no mesmo assim como nomanual de uso que acompanha a máquina na qual o motor está montado.A inobservância provoca a decadência da garancia.
48
Il motore può danneggiarsi se fatto lavorare con insufficiente olio. É inoltre pericoloso immettere troppo olio perchè la sua combustionepuò provocare un brusco aumento della velocità di rotazione. Utilizzare l’olio adatto in maniera da proteggere il motore. Niente piùdell’olio di lubrificazione incide sulle prestazioni e la durata del motore.Impiegando olio di qualità inferiore o in mancanza di regolare sostituzione, aumentano i rischi di grippaggio del pistone, incollaggio dellefasce elastiche, e di una rapida usura della camicia del cilindro, dei cuscinetti e tutte le altre parti in movimento. La durata del motore nerisulterà notevolmente ridotta. La viscosità dell’olio deve essere adeguata alla temperatura ambiente in cui il motore opera. Per la suadeterminazione utilizzare la seguente tabella
Le moteur pourrait être endommagé s’il fonctionne avec une quantité insuffisante d’huile de lubrification. Il est également dangereux defournir excessivement de l’huile de lubrification au moteur car une augmentation brusque des tours/minute du moteur pourrait causer sacombustion. Utiliser l’huile de lubrification appropriée afin de protéger le moteur. Rien n’influence plus le rendement et la durabilité devotre moteur que l’huile de lubrification utilisée. Si une huile inférieure est employée, ou si l’huile du moteur n’est pas changée régulièrement,il y aura augmentation des risques de grippage de piston, de calage des segments de piston et une usure accélérée de la chemise decylindre, des roulements ou autres composantes mobiles. Et dans ce cas la durée de service du moteur sera raccourcie remarquablement.Il est recommandé d’utiliser de l’huile présentant la viscosité appropriée pour la température ambiante dans laquelle le moteur fonctionne.Se référer au diagramme de cette page lorsque l’on sélectionne l’huile du moteur.
The engine may be damaged if operated with insufficient lube oil. It is also dangerous to supply too much lube oil to the engine becausea sudden increase in engine rpm could be caused by its combustion. Use proper lube oil preserve your engine. Nothing affects theperformance and durability of your engine more than the lube oil you use. If inferior oil is used, or if your engine oil is not changedregularly, the risk of piston seizure, piston ring sticking, and accelerated wear of the cylinder liner, bearing and other moving componentsincreases significantly.Always use oil with the right viscosity for the ambient temperature in which your engine is being operated . Use the chart on this pagewhen chosing your engine oil.
USOEMPLOI
USEBEDIENUNGUTILISACIONUTILIZAÇÃO
49
Bei unzureichender Schmierölmenge kann der Motor Schaden erleiden. Zuviel Schmiröl ist ebenfalls gefährlich, denn seine Verbrennungkann zu plötzlichem Anstleg der motordregzahl führen. Verwenden Sie das richtige Schmieröl, um Ihren Motor in einwandfrelem Zustandzuhalten.Die Wahl des Korrecten Schmieröls ist für die Leistung und Haltbarkeit des Motors von außerordentlicher Bedentung. Wenn minderwertigesÖl versendet wird oder kein regelmäßiger Ölwechsel erfolgt, erhöht sich die Gefahr von Kolbenfraß, Kolbenringverklemmung undschnellem Verscheiß von Zylinderlaufbüchse, Lager und sonstiger beweglicher Teile. Die Lebenserwartung Ihres Motors könnte sichstark verkürzen.Verwenden Sie stets Öl mit einer für die jeweilige Umgebungstemperatur am besten geeigneten Viskosität. Als Hilfe dient Ihnen dieTabelle auf dieser Seite.
El motor puede dañarse si está operado con una cantidad insuficiente de aceite de lubricación. Es también peligroso suministrar unacantidad excesiva de aceite de lubrificación al motor debido a que una aumento repentino de los RPM del motor puede causar su combustión.Usar el aceite de lubricación apropriado para mantener el motor en buena condición. Nada influye mayormente en el rendimiento y la vidadel generador que el aceite de lubricación usado. Si se usa un aceite de calidad menor, o si no se cambia regularmente el aceite del motor,se aumentarà el riesgo de agarrado del pistón, de anillos de pistón y se causerà un desgaste ràpido de la camisa del cilindro, de loscojinetes u otros componentes móviles. En este caso la vida del generador se reducirà mucho. Se recomendia usar aceite con la viscosidadapropriada la temperatura ambiente en la cual se opera el motor. Refiérase al diagrama de esta pàgina cuando se selecciona el aceite delmotor.
O motor poderà ficar danificado se funcionar com quantitade insuficiente de oleo de lubrificação. E’ igualmente perigoso encherexcessivamente com oleo de lubrificação o motor , porque um aumento brusco de rotações do motor poderá causar a sua combustão.Utilizar oleo de lubrificação apropriado afim de proteger o motorNada influencia mais o rendimento e a duração do seu motor que oleo de lubrificação utilizado. Se um oleo inferior é empregue ou se ooleo não for trocado regularmente, haverá um aumento dos riscos de gripagem do piston, de colagem dos segmentos e um desgasteprematuro da camisa dos cilindros, dos rolamentos e outros componentes moveis. Neste caso a duração do motor serã notoriamentecurta. E’ recomendado utilizar um oleo que tenha a viscosidade apropriada para a temperatura ambiente em que o motor funcione, para asua determinação utilizar a seguinte tabela.
50
L’olio motore esausto può essere causa di cancro alla pelle se lasciato ripetutamente a contatto e per periodi prolungati. Se il contatto con l'olio fosse inevitabile, siconsiglia di lavarsi accuratamente le mani con acqua e sapone non appena possibile. Non disperdere l’olio esausto in ambiente in quanto altamente inquinante.
L’huile moteur épuisée peut être la cause de cancer de la peau si laissée fréquemment à contact pour des périodes prolongées. Si le contact avec l’huile estinévitable, se laver les mains à l’eau et savon avec soin dès que possible. Ne pas vidanger l’huile épuisée dans le milieu, car elle a un haut niveau de pollution.
The used engine oil can cause skin-cancer if kept frequently in contact for prolonged periods. If contact with oil cannot be avoided, wash carefully your hands with waterand soap as soon as possible. Do not disperse the oil in the ambient, as it has a high pollution power.
Schmieröl kann Hautkrebs erzeugen, wenn es häufig in Hautkontakt kommt. Kann ein Kontakt nicht vermieden werden, sollte man sich so schnell wie möglich dieHände gründlich waschen. Wegen dem hohen Grad der Umweltverschmutzung, ist Sorge zu tragen, daß kein Öl ins Erdreich.
El aceite del motoe sucio (usaoo) puede ser causa de cancer de piel, si es repetidamente ó prolongado su contacto. Si el contacto con el aceite fuese inevitable, seaconseja lavarse adecuadamente las manos con jabon lo antes posible. Non dispersar o tirar el aceite usado: por ser de un alto nivel de contaminante.
O óleo velho do motor pode provocar cancro na pele se entrar frequentemente em contacto e por períodos prolongados com a mesma. No caso em que o contacto como óleo seja inevitável, aconselha-se lavar bem as mãos com água e sabão assim que for possível. Não dispersar o óleo velho no ambiente porque é muito poluidor.
CLASSIFICAZIONE SAE
Nella classificazione SAE, gli oli vengono identificati in base alla viscosità, non tenendo conto di nessun altra caratteristica qualitativa.Il primo numero si riferisce alla viscosità a freddo, per uso invernale (simbolo W = winter ), mentre il secondo prende in considerazione quella a caldo.Il criterio di scelta deve tener conto, per l’inverno della minima temperatura ambiente cui il motore sarà sottoposto e della massima temperatura di funzionamento per l’estate.Gli oli monogradi sono utilizzati generalmente quando la temperatura di funzionamento varia poco.Un olio multigrado è meno sensibile alle variazioni di temperatura.
CLASSEMENT SAE
Dans le classement SAE, les huiles sont indiquées en fonction de la viscosité, sans tenir compte d’aucune autre caractéristique qualitative.Le premier chiffre se réfère à la viscosité à froid, en hiver (symbole W = winter ), tandis que le second considère celle à chaud.Au moment de choisir l’huile, le critère doit être la température minimale ambiante à laquelle sera soumis le moteur en hiver ou la température maximale de fonctionnement en été.L’huile monograde est généralement utilisée quand la température de fonctionnement ne varie que de peu.L’huile multigrade est moins sensible aux écarts de température.
SAE CLASSIFICATION
In the SAE classification, oils differ on the basis of their viscosity, and no other qualitative characteristic is taken into account.The first number refers to the viscosity when the engine is cold (symbol W = winter), while the second considers viscosity with the engine at régime.The criteria for choosing must consider, during winter, the lowest outside temperature to which the engine will be subject and the highest functioning temperature during summer.Single-degree oils are normally used when the running temperature varies scarcely.Multi-degree oil is less sensitive to temperature changes.
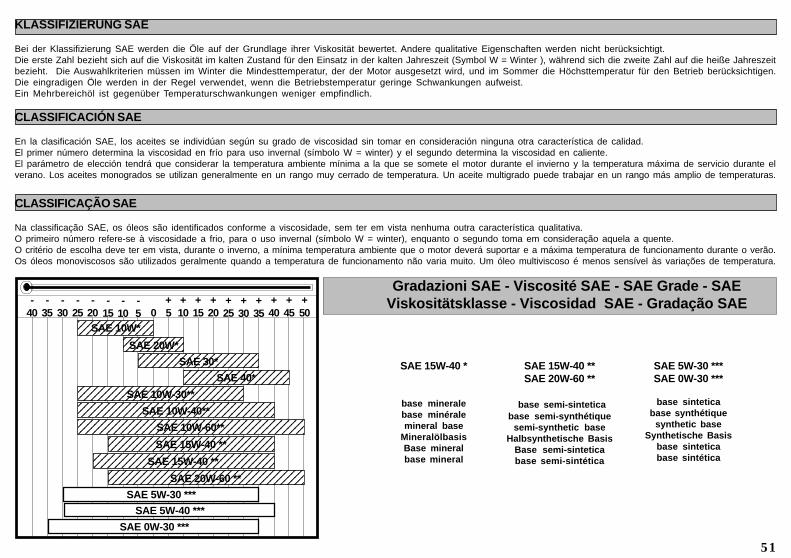
51
SAE 15W-40 *
base mineralebase minéralemineral base
MineralölbasisBase mineralbase mineral
SAE 15W-40 **SAE 20W-60 **
base semi-sinteticabase semi-synthétique
semi-synthetic baseHalbsynthetische Basis
Base semi-sinteticabase semi-sintética
Gradazioni SAE - Viscosité SAE - SAE Grade - SAEViskositätsklasse - Viscosidad SAE - Gradação SAE
SAE 5W-30 ***SAE 0W-30 ***
base sinteticabase synthétique
synthetic baseSynthetische Basis
base sinteticabase sintética
KLASSIFIZIERUNG SAE
Bei der Klassifizierung SAE werden die Öle auf der Grundlage ihrer Viskosität bewertet. Andere qualitative Eigenschaften werden nicht berücksichtigt.Die erste Zahl bezieht sich auf die Viskosität im kalten Zustand für den Einsatz in der kalten Jahreszeit (Symbol W = Winter ), während sich die zweite Zahl auf die heiße Jahreszeitbezieht. Die Auswahlkriterien müssen im Winter die Mindesttemperatur, der der Motor ausgesetzt wird, und im Sommer die Höchsttemperatur für den Betrieb berücksichtigen.Die eingradigen Öle werden in der Regel verwendet, wenn die Betriebstemperatur geringe Schwankungen aufweist.Ein Mehrbereichöl ist gegenüber Temperaturschwankungen weniger empfindlich.
CLASSIFICACIÓN SAE
En la clasificación SAE, los aceites se individúan según su grado de viscosidad sin tomar en consideración ninguna otra característica de calidad.El primer número determina la viscosidad en frío para uso invernal (símbolo W = winter) y el segundo determina la viscosidad en caliente.El parámetro de elección tendrá que considerar la temperatura ambiente mínima a la que se somete el motor durante el invierno y la temperatura máxima de servicio durante elverano. Los aceites monogrados se utilizan generalmente en un rango muy cerrado de temperatura. Un aceite multigrado puede trabajar en un rango más amplio de temperaturas.
CLASSIFICAÇÃO SAE
Na classificação SAE, os óleos são identificados conforme a viscosidade, sem ter em vista nenhuma outra característica qualitativa.O primeiro número refere-se à viscosidade a frio, para o uso invernal (símbolo W = winter), enquanto o segundo toma em consideração aquela a quente.O critério de escolha deve ter em vista, durante o inverno, a mínima temperatura ambiente que o motor deverá suportar e a máxima temperatura de funcionamento durante o verão.Os óleos monoviscosos são utilizados geralmente quando a temperatura de funcionamento não varia muito. Um óleo multiviscoso é menos sensível às variações de temperatura.
123456789012345678901234567890SAE 20W*123456789012345678
123456789012345678123456789012345678SAE 30*1234567890123456
12345678901234561234567890123456SAE 40*123456789012345678901234
123456789012345678901234123456789012345678901234SAE 10W-30**123456789012345678901234567891234567890123456789012345678912345678901234567890123456789SAE 10W-40**123456789012345678901234567890121123456789012345678901234567890121123456789012345678901234567890121SAE 10W-60**1234567890123456789012345
12345678901234567890123451234567890123456789012345
12345678901234567890123456712345678901234567890123456712345678901234567890123456712345678901234567890123456789
1234567890123456789012345678912345678901234567890123456789
SAE 15W-40 **
SAE 15W-40 **
SAE 20W-60 **
SAE 5W-30 ***
SAE 0W-30 ***
-30
-25
-20
-15
-10
-5 0
+5
+10
+15
+20
+25
+30
+35
+40
+4512345678901
1234567890112345678901SAE 10W*
+50
-35
-40
SAE 5W-40 ***
52
SPECIFICHE INTERNAZIONALI PER I LUBRIFICANTI
Esse definiscono prestazioni e procedure di prova che i lubrificanti devono superare con successo in varie prove motore ed esami di laboratorio per essere valutati idonei econsiderati in norma per il tipo di lubrificazione richiesta.
A.P.I : ( American Petroleum Institute )MIL : Specifica militare U.S.A. per oli motore rilasciata per motivi logisticiACEA : Associazione dei Costruttori Europei Automobilistici
Le tabelle riportate a pag. 51 e 55 sono un riferimento da utilizzare quando si compra un olio.Le sigle sono normalmente stampigliate sul contenitore dell’olio e risulta utile capire il loro significato per poter confrontare oli di diversa marca e poterne scegliere le giustecaratteristiche.In genere una specifica con un numero o una lettera maggiore è migliore di una con un numero o lettera minore.Per esempio un olio SF ha migliori prestazioni rispetto ad un olio SE ma meno di un SG.
SPÉCIFICATIONS INTERNATIONALES POUR LES LUBRIFIANTS
Elles définissent les performances et les tests à faire sur les lubrifiants lors des différents essais du moteur et en laboratoire pour les déclarer adaptés au type de lubrificationrequis et les considérer conformes aux normes.
A.P.I : (American Petroleum Institute)MIL : Spécification militaire des États-Unis pour les huiles moteur délivrée pour des motifs logistiquesACEA : Association des Constructeurs d’automobiles européens
Les tableaux reportés à la page 51 et page 55 sont une référence à utiliser quand on achète de l’huile.Les sigles sont normalement gravés sur le bidon d’huile et il est utile de comprendre leur signification pour pouvoir comparer les huiles de plusieurs marques et choisir celleayant les bonnes caractéristiques.Une spécification avec un nombre ou une lettre supérieur est en général meilleure que celle avec un nombre ou une lettre inférieur.Une huile SF offre par exemple de meilleures performances qu’une huile SE mais elle est moins bonne qu’une huile SG.
LUBRICANT INTERNATIONAL SPECIFICATIONS
They define testing performances and procedures that the lubricants need to successfully respond to in several engine testing and laboratory analysis so as to be consideredqualified and in conformity to the regulations set for each lubrication kind.
A.P.I : ( American Petroleum Institute )MIL : Engine oil U.S. military specifications released for logistic reasonsACEA : European Automobile Manufacturers Association
Tables shown on pages 51 and 55 are of useful reference when buying a kind of oil.Codes are usually printed-out on the oil container and the understanding of their meaning is useful for comparing different brands and choosing the kind with the rightcharacteristics.Usually a specification showing a following letter or number is preferable to one with a preceding letter or number.An SF oil, for instance, is more performing than a SE oil but less performing than a SG one.
53
INTERNATIONALE SPEZIFIKATIONEN FÜR SCHMIERMITTEL
Mit diesen Spezifikationen werden die Leistungen und die Testverfahren definiert, die die Schmiermittel erfolgreich in verschiedenen Motortests und bei Laboruntersuchungenbestehen müssen, damit sie als geeignet und normgerecht für die erforderliche Schmierart eingestuft werden.
A.P.I : ( American Petroleum Institute )MIL : Militär-Spezifikation USA für Motoröle, erlassen aus logistischen GründenACEA : Verband der Europäischen Automobilhersteller
Die auf Seite 51 und 55 aufgeführten Tabellen dienen als Bezug für den Einkauf von Öl.Die Abkürzungen sind in der Regel auf den Ölbehältern aufgeprägt und deren Bedeutung sollte bekannt sein, damit Öle verschiedener Marken verglichen und die richtigenEigenschaften gewählt werden können.Im Allgemeinen ist eine Spezifikation mit einer höheren Nummer oder Buchstaben besser als eine Spezifikation mit niedriger Nummer oder Buchstaben.Ein Öl SF weist beispielsweise bessere Leistungen auf als ein Öl SE, seine Leistungen sind jedoch geringer als die eines SG.
ESPECIFICACIONES INTERNACIONALES PARA LUBRICANTES
Ellas indican las prestaciones y los procedimientos de ensayo que los lubricantes tienen que cumplir en las varias pruebas de motor y laboratorio para ser consideradosaptos y conformes con el tipo de lubricación demandada.
A.P.I : (Instituto Americano del Petróleo)MIL : Especificación militar EE.UU. para aceites motor otorgada por razones logísticasACEA : Asociación de Constructores Europeos de Automóviles
Utilizar las tablas de la página 51 e 55 como referencia cuando se compra un aceite.Generalmente las siglas aparecen en el envase del aceite y entender su significación es muy importante para hacer las comparaciones entre aceites de diferentes marcasy elegir las características más adecuadas.Mayor es el número o la letra de la especificación mejor es la calidad; así mismo, a un numero o una letra menor corresponde calidad inferior.Por ejemplo, un aceite SF ofrece prestaciones mejores que un aceite SE pero menos que un aceite SG.
ESPECIFICAÇÕES INTERNACIONAIS PARA OS LUBRIFICANTES
Definem as prestações e os processos de teste que os lubrificantes devem passar com sucesso durante vários testes do motor e em exames de laboratório pararesultarem idóneos e serem considerados a norma para o tipo de lubrificação pedida.
A.P.I : ( American Petroleum Institute )MIL : Especificação militar E.U.A. para óleos de motor, emitida por motivos logísticosACEA : Associação dos Construtores Europeus Automobilísticos
As tabelas indicadas na pág. 51 e 55 constituem uma referência a utilizar quando precisar comprar um óleo.As siglas são normalmente imprimidas no recipiente do óleo e torna-se útil entender o significado delas para poder confrontar óleos de marca diferente e poder escolheras exactas características deles.Geralmente uma especificação com um número ou uma letra maior é melhor de uma com um número ou letra menor.Por exemplo, um óleo SF há rendimentos melhores a respeito de um óleo SE mas menos de um SG.

54
123456789012345678901123456789012345678901123456789012345678901
BENZINA - ESSENCE - PETROL - BENZIN - GASOLINA
A1 = Bassa viscosità, per riduzione attritiBasse viscosité, pour réduction frottementsLow-viscosity, for frictions reductionNiedrige Viskosität wegen verminderter ReibungBaja viscosidad, para reducir la fricciónBaixa viscosidade, para reduzir os atritos
A2 = Standard
A3 = Elevate prestazioniPerformances élevéesHigh performancesHohe LeistungElevadas prestacionesRendimentos elevados
DIESEL LEGGERI - DIESEL LÉGER - LIGHT DUTY DIESEL ENGINESDIESELMOTOREN FÜR LEICHTE ARBEITEN - DIESEL LIGERO - GASOLIO TIPO LEVE
B1 = Bassa viscosità, per riduzione attritiBasse viscosité, pour réduction frottementsLow-viscosity, for frictions reductionNiedrige Viskosität wegen verminderter ReibungBaja viscosidad, para reducir la fricciónBaixa viscosidade, para reduzir os atritos
B2 = Standard
B3 = Elevate prestazioni ( iniezione indiretta )Performances élevées ( injection indirecte)
High performances (indirect injection)Hohe Leistung (indirekte Einspritzung)Elevadas prestaciones (inyección indirecta)Rendimentos elevados ( injecção indirecta )
B4 = Elevata qualità ( iniezione diretta )Qualité élevée ( injection directe )High quality (direct injection)Hohe Qualität (direkte Einspritzung)Elevada calidad (inyección directa)
DIESEL PESANTI - DIESEL LOURD - HEAVY DUTY DIESEL ENGINESDIESELMOTOREN FÜR SCHWERE ARBEITEN - DIESEL PESADOGASOLIO TIPO PESADO
E1 = OBSOLETO - OBSOLETE
E2 = Standard
E3 = Condizioni gravose ( motori Euro 1 - Euro 2 )Conditions particulièrement lourdes ( moteurs Euro 1 - Euro 2 )Heavy conditions (Euro 1 - Euro 2 engines )Erschwerte Bedingungen (Motoren Euro 1 - Euro 2)Condiciones exigentes (motores Euro 1 - Euro 2 )Condições gravosas ( motores Euro 1 - Euro 2 )
E4 = Condizioni gravose ( motori Euro 1 - Euro 2 - Euro 3 )Conditions particulièrement lourdes ( moteurs Euro 1 - Euro 2 - Euro 3)Heavy conditions (Euro 1 - Euro 2 - Euro 3 engines )Erschwerte Bedingungen (Motoren Euro 1 - Euro 2 - Euro 3)Condiciones exigentes (motores Euro 1 - Euro 2 - Euro 3)Condições gravosas ( motores Euro 1 - Euro 2 - Euro 3)
E5 = Elevate prestazioni in condizioni gravose ( motori Euro 1 - Euro 2 - Euro 3 )Performances élevées dans des conditions particulièrement lourdes (moteurs Euro 1 - Euro 2 - Euro 3)High performances in heavy conditions (Euro 1 - Euro 2 - Euro 3 engines )Hohe Leistungen unter erschwerten Bedingungen (Motoren Euro 1 - Euro 2 -Euro 3)Elevadas prestaciones en condiciones exigentes (motores Euro 1 - Euro 2 -Euro 3)Rendimentos elevados em condições gravosas ( motores Euro 1 - Euro 2 -Euro 3)
NORME ACEA - NORMES ACEA - ACEA REGULATIONS - VORSCHRIFTEN ACEA - NORMAS ACEA - NORMAS ACEASEQUENZE ACEA - SEQUENCES ACEA - ACEA SEQUENCES - ACEA-SEQUENZEN - SECUENCIAS ACEA - SEQUÊNCIAS ACEA

55
SEQUENZE API / MIL - SEQUENCES API / MIL - API / MIL SEQUENCES
API / MIL-SEQUENZEN - SECUENCIAS API / MIL - SEQUÊNCIAS API / MIL
123456789012345678901123456789012345678901123456789012345678901123456789012345678901
123456789012345678123456789012345678123456789012345678123456789012345678
123456789012345678123456789012345678123456789012345678OBSOLETI - OBSOLETE
CF CE CD CC CB CA SA SB SC SD SE SF SG
DIESELBENZINA - ESSENCE - PETROL
BENZIN - GASOLINA
L - 2104 D / EL - 46152 B / C / D / E
SHAPI SJ SLCH-4 CG-4 CF-4 CF-2
MIL
CORRENTI - CURRENT
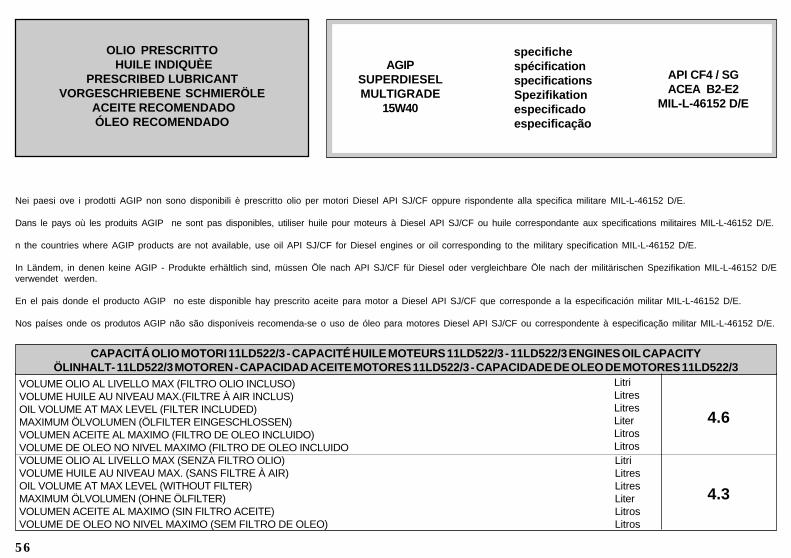
56
AGIPSUPERDIESELMULTIGRADE
15W40
API CF4 / SGACEA B2-E2
MIL-L-46152 D/E
OLIO PRESCRITTO HUILE INDIQUÈE
PRESCRIBED LUBRICANTVORGESCHRIEBENE SCHMIERÖLE
ACEITE RECOMENDADOÓLEO RECOMENDADO
specifiche spécification specifications Spezifikation especificado especificação
Nei paesi ove i prodotti AGIP non sono disponibili è prescritto olio per motori Diesel API SJ/CF oppure rispondente alla specifica militare MIL-L-46152 D/E.
Dans le pays où les produits AGIP ne sont pas disponibles, utiliser huile pour moteurs à Diesel API SJ/CF ou huile correspondante aux specifications militaires MIL-L-46152 D/E.
n the countries where AGIP products are not available, use oil API SJ/CF for Diesel engines or oil corresponding to the military specification MIL-L-46152 D/E.
In Ländem, in denen keine AGIP - Produkte erhältlich sind, müssen Öle nach API SJ/CF für Diesel oder vergleichbare Öle nach der militärischen Spezifikation MIL-L-46152 D/Everwendet werden.
En el pais donde el producto AGIP no este disponible hay prescrito aceite para motor a Diesel API SJ/CF que corresponde a la especificación militar MIL-L-46152 D/E.
Nos países onde os produtos AGIP não são disponíveis recomenda-se o uso de óleo para motores Diesel API SJ/CF ou correspondente à especificação militar MIL-L-46152 D/E.
VOLUME OLIO AL LIVELLO MAX (FILTRO OLIO INCLUSO)VOLUME HUILE AU NIVEAU MAX.(FILTRE À AIR INCLUS)OIL VOLUME AT MAX LEVEL (FILTER INCLUDED)MAXIMUM ÖLVOLUMEN (ÖLFILTER EINGESCHLOSSEN)VOLUMEN ACEITE AL MAXIMO (FILTRO DE OLEO INCLUIDO)VOLUME DE OLEO NO NIVEL MAXIMO (FILTRO DE OLEO INCLUIDOVOLUME OLIO AL LIVELLO MAX (SENZA FILTRO OLIO)VOLUME HUILE AU NIVEAU MAX. (SANS FILTRE À AIR)OIL VOLUME AT MAX LEVEL (WITHOUT FILTER)MAXIMUM ÖLVOLUMEN (OHNE ÖLFILTER)VOLUMEN ACEITE AL MAXIMO (SIN FILTRO ACEITE)VOLUME DE OLEO NO NIVEL MAXIMO (SEM FILTRO DE OLEO)
LitriLitresLitresLiterLitrosLitrosLitriLitresLitresLiterLitrosLitros
4.6
4.3
CAPACITÁ OLIO MOTORI 11LD522/3 - CAPACITÉ HUILE MOTEURS 11LD522/3 - 11LD522/3 ENGINES OIL CAPACITYÖLINHALT- 11LD522/3 MOTOREN - CAPACIDAD ACEITE MOTORES 11LD522/3 - CAPACIDADE DE OLEO DE MOTORES 11LD522/3

57
NOTE - NOTES - BEMERKUNG - NOTAS
○ ○ ○ ○ ○ ○ ○ ○ ○ ○ ○ ○ ○ ○ ○ ○ ○ ○ ○ ○ ○ ○ ○ ○ ○ ○ ○ ○ ○ ○ ○ ○ ○ ○ ○ ○ ○ ○ ○ ○ ○ ○ ○ ○ ○ ○ ○ ○ ○ ○ ○ ○ ○ ○ ○ ○ ○ ○ ○ ○ ○ ○ ○ ○ ○ ○ ○ ○ ○ ○ ○ ○
○ ○ ○ ○ ○ ○ ○ ○ ○ ○ ○ ○ ○ ○ ○ ○ ○ ○ ○ ○ ○ ○ ○ ○ ○ ○ ○ ○ ○ ○ ○ ○ ○ ○ ○ ○ ○ ○ ○ ○ ○ ○ ○ ○ ○ ○ ○ ○ ○ ○ ○ ○ ○ ○ ○ ○ ○ ○ ○ ○ ○ ○ ○ ○ ○ ○ ○ ○ ○ ○ ○ ○
○ ○ ○ ○ ○ ○ ○ ○ ○ ○ ○ ○ ○ ○ ○ ○ ○ ○ ○ ○ ○ ○ ○ ○ ○ ○ ○ ○ ○ ○ ○ ○ ○ ○ ○ ○ ○ ○ ○ ○ ○ ○ ○ ○ ○ ○ ○ ○ ○ ○ ○ ○ ○ ○ ○ ○ ○ ○ ○ ○ ○ ○ ○ ○ ○ ○ ○ ○ ○ ○ ○ ○
○ ○ ○ ○ ○ ○ ○ ○ ○ ○ ○ ○ ○ ○ ○ ○ ○ ○ ○ ○ ○ ○ ○ ○ ○ ○ ○ ○ ○ ○ ○ ○ ○ ○ ○ ○ ○ ○ ○ ○ ○ ○ ○ ○ ○ ○ ○ ○ ○ ○ ○ ○ ○ ○ ○ ○ ○ ○ ○ ○ ○ ○ ○ ○ ○ ○ ○ ○ ○ ○ ○ ○
○ ○ ○ ○ ○ ○ ○ ○ ○ ○ ○ ○ ○ ○ ○ ○ ○ ○ ○ ○ ○ ○ ○ ○ ○ ○ ○ ○ ○ ○ ○ ○ ○ ○ ○ ○ ○ ○ ○ ○ ○ ○ ○ ○ ○ ○ ○ ○ ○ ○ ○ ○ ○ ○ ○ ○ ○ ○ ○ ○ ○ ○ ○ ○ ○ ○ ○ ○ ○ ○ ○ ○
○ ○ ○ ○ ○ ○ ○ ○ ○ ○ ○ ○ ○ ○ ○ ○ ○ ○ ○ ○ ○ ○ ○ ○ ○ ○ ○ ○ ○ ○ ○ ○ ○ ○ ○ ○ ○ ○ ○ ○ ○ ○ ○ ○ ○ ○ ○ ○ ○ ○ ○ ○ ○ ○ ○ ○ ○ ○ ○ ○ ○ ○ ○ ○ ○ ○ ○ ○ ○ ○ ○ ○
○ ○ ○ ○ ○ ○ ○ ○ ○ ○ ○ ○ ○ ○ ○ ○ ○ ○ ○ ○ ○ ○ ○ ○ ○ ○ ○ ○ ○ ○ ○ ○ ○ ○ ○ ○ ○ ○ ○ ○ ○ ○ ○ ○ ○ ○ ○ ○ ○ ○ ○ ○ ○ ○ ○ ○ ○ ○ ○ ○ ○ ○ ○ ○ ○ ○ ○ ○ ○ ○ ○ ○
○ ○ ○ ○ ○ ○ ○ ○ ○ ○ ○ ○ ○ ○ ○ ○ ○ ○ ○ ○ ○ ○ ○ ○ ○ ○ ○ ○ ○ ○ ○ ○ ○ ○ ○ ○ ○ ○ ○ ○ ○ ○ ○ ○ ○ ○ ○ ○ ○ ○ ○ ○ ○ ○ ○ ○ ○ ○ ○ ○ ○ ○ ○ ○ ○ ○ ○ ○ ○ ○ ○ ○
○ ○ ○ ○ ○ ○ ○ ○ ○ ○ ○ ○ ○ ○ ○ ○ ○ ○ ○ ○ ○ ○ ○ ○ ○ ○ ○ ○ ○ ○ ○ ○ ○ ○ ○ ○ ○ ○ ○ ○ ○ ○ ○ ○ ○ ○ ○ ○ ○ ○ ○ ○ ○ ○ ○ ○ ○ ○ ○ ○ ○ ○ ○ ○ ○ ○ ○ ○ ○ ○ ○ ○
○ ○ ○ ○ ○ ○ ○ ○ ○ ○ ○ ○ ○ ○ ○ ○ ○ ○ ○ ○ ○ ○ ○ ○ ○ ○ ○ ○ ○ ○ ○ ○ ○ ○ ○ ○ ○ ○ ○ ○ ○ ○ ○ ○ ○ ○ ○ ○ ○ ○ ○ ○ ○ ○ ○ ○ ○ ○ ○ ○ ○ ○ ○ ○ ○ ○ ○ ○ ○ ○ ○ ○
○ ○ ○ ○ ○ ○ ○ ○ ○ ○ ○ ○ ○ ○ ○ ○ ○ ○ ○ ○ ○ ○ ○ ○ ○ ○ ○ ○ ○ ○ ○ ○ ○ ○ ○ ○ ○ ○ ○ ○ ○ ○ ○ ○ ○ ○ ○ ○ ○ ○ ○ ○ ○ ○ ○ ○ ○ ○ ○ ○ ○ ○ ○ ○ ○ ○ ○ ○ ○ ○ ○ ○
○ ○ ○ ○ ○ ○ ○ ○ ○ ○ ○ ○ ○ ○ ○ ○ ○ ○ ○ ○ ○ ○ ○ ○ ○ ○ ○ ○ ○ ○ ○ ○ ○ ○ ○ ○ ○ ○ ○ ○ ○ ○ ○ ○ ○ ○ ○ ○ ○ ○ ○ ○ ○ ○ ○ ○ ○ ○ ○ ○ ○ ○ ○ ○ ○ ○ ○ ○ ○ ○ ○ ○
○ ○ ○ ○ ○ ○ ○ ○ ○ ○ ○ ○ ○ ○ ○ ○ ○ ○ ○ ○ ○ ○ ○ ○ ○ ○ ○ ○ ○ ○ ○ ○ ○ ○ ○ ○ ○ ○ ○ ○ ○ ○ ○ ○ ○ ○ ○ ○ ○ ○ ○ ○ ○ ○ ○ ○ ○ ○ ○ ○ ○ ○ ○ ○ ○ ○ ○ ○ ○ ○ ○ ○
○ ○ ○ ○ ○ ○ ○ ○ ○ ○ ○ ○ ○ ○ ○ ○ ○ ○ ○ ○ ○ ○ ○ ○ ○ ○ ○ ○ ○ ○ ○ ○ ○ ○ ○ ○ ○ ○ ○ ○ ○ ○ ○ ○ ○ ○ ○ ○ ○ ○ ○ ○ ○ ○ ○ ○ ○ ○ ○ ○ ○ ○ ○ ○ ○ ○ ○ ○ ○ ○ ○ ○
○ ○ ○ ○ ○ ○ ○ ○ ○ ○ ○ ○ ○ ○ ○ ○ ○ ○ ○ ○ ○ ○ ○ ○ ○ ○ ○ ○ ○ ○ ○ ○ ○ ○ ○ ○ ○ ○ ○ ○ ○ ○ ○ ○ ○ ○ ○ ○ ○ ○ ○ ○ ○ ○ ○ ○ ○ ○ ○ ○ ○ ○ ○ ○ ○ ○ ○ ○ ○ ○ ○ ○
○ ○ ○ ○ ○ ○ ○ ○ ○ ○ ○ ○ ○ ○ ○ ○ ○ ○ ○ ○ ○ ○ ○ ○ ○ ○ ○ ○ ○ ○ ○ ○ ○ ○ ○ ○ ○ ○ ○ ○ ○ ○ ○ ○ ○ ○ ○ ○ ○ ○ ○ ○ ○ ○ ○ ○ ○ ○ ○ ○ ○ ○ ○ ○ ○ ○ ○ ○ ○ ○ ○ ○
○ ○ ○ ○ ○ ○ ○ ○ ○ ○ ○ ○ ○ ○ ○ ○ ○ ○ ○ ○ ○ ○ ○ ○ ○ ○ ○ ○ ○ ○ ○ ○ ○ ○ ○ ○ ○ ○ ○ ○ ○ ○ ○ ○ ○ ○ ○ ○ ○ ○ ○ ○ ○ ○ ○ ○ ○ ○ ○ ○ ○ ○ ○ ○ ○ ○ ○ ○ ○ ○ ○ ○
○ ○ ○ ○ ○ ○ ○ ○ ○ ○ ○ ○ ○ ○ ○ ○ ○ ○ ○ ○ ○ ○ ○ ○ ○ ○ ○ ○ ○ ○ ○ ○ ○ ○ ○ ○ ○ ○ ○ ○ ○ ○ ○ ○ ○ ○ ○ ○ ○ ○ ○ ○ ○ ○ ○ ○ ○ ○ ○ ○ ○ ○ ○ ○ ○ ○ ○ ○ ○ ○ ○ ○

58
- Rifornimento olio motore.- Ravitaillement huile moteur.- Fill engine with oil.- Öl-aufüllen.- Suministración aceite
motor.- Reabastecimento óleo
motor.
- Il rifornimento e il controllo livello olio deve essere effettuato con il motore in posizione orizzontale.
- Le ravitaillement et le contrôle du niveau d’huile doit être fait avec le moteur sur une surface plane.
- Oil filling and level inspections must be carried out with the engine on a flat surface.
- Um das Öl nachzufüllen und den Stand zu prüfen, muß der Motor immer eben stehen.
- El abastecimiento y el control nivel aceite debe efectuarse con el motor sobre terreno plano.
- O abastecimento e o controle do nível do óleo deve ser feito com o motor em posição perfeitamente horizontal.
- Togliere il tappo rifornimento olio.Versare l’olio e rimettere il tappo.
- Dévisser le bouchon de remplissage d’huile.Verser l’huile et remettre le bouchon.
- Remove oil filler cap.Pour the oil in and reassemble oil cap.
- Entfernen Sie die Öleinfüllschraube.Füllen Sie das Öl ein und schließen Sie den Öleinfüllstutzen wieder.
- Sacar el tapón llenado aceite.Poner aceite y montar el tapón
- Tirar o tampa reabastecimento óleo.Deitar óleo e repor o tampa.
- Controllare che il livello sia prossimo al massimo.Reinserire in modo corretto l’asta livello olio.
- Verifier que le niveau soit presque au maximum.Remettre correctement en place la jauge d’huile
- Make sure that is nearly at max.Fit the dipstick correctly back in place.
- Kontrollieren dass der Ölstand fast Maximum zeigt.Den Ölmeßstab auf korrekte Weise einstecken.
- Controlar que el nivel se encuentre casi al màximo.Reintroducir en modo correcto la varilla nivel aceite.
- Controlar que o nivel seja quase ao maximo.Introduzir correctamente a haste do nível do óleo.
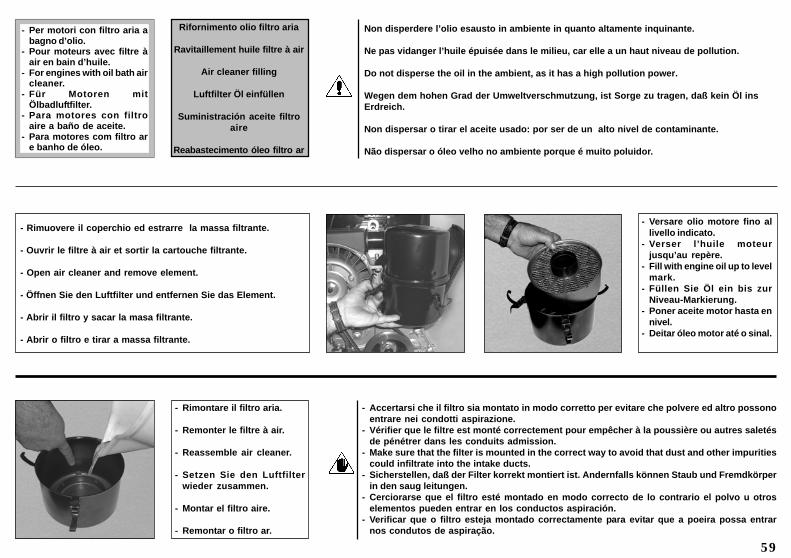
59
Rifornimento olio filtro aria
Ravitaillement huile filtre à air
Air cleaner filling
Luftfilter Öl einfüllen
Suministración aceite filtroaire
Reabastecimento óleo filtro ar
- Per motori con filtro aria abagno d’olio.
- Pour moteurs avec filtre àair en bain d’huile.
- For engines with oil bath aircleaner.
- Für Motoren mitÖlbadluftfilter.
- Para motores con filtroaire a baño de aceite.
- Para motores com filtro are banho de óleo.
Non disperdere l’olio esausto in ambiente in quanto altamente inquinante.
Ne pas vidanger l’huile épuisée dans le milieu, car elle a un haut niveau de pollution.
Do not disperse the oil in the ambient, as it has a high pollution power.
Wegen dem hohen Grad der Umweltverschmutzung, ist Sorge zu tragen, daß kein Öl insErdreich.
Non dispersar o tirar el aceite usado: por ser de un alto nivel de contaminante.
Não dispersar o óleo velho no ambiente porque é muito poluidor.
- Versare olio motore fino allivello indicato.
- Verser l’huile moteurjusqu’au repère.
- Fill with engine oil up to levelmark.
- Füllen Sie Öl ein bis zurNiveau-Markierung.
- Poner aceite motor hasta ennivel.
- Deitar óleo motor até o sinal.
- Rimontare il filtro aria.
- Remonter le filtre à air.
- Reassemble air cleaner.
- Setzen Sie den Luftfilterwieder zusammen.
- Montar el filtro aire.
- Remontar o filtro ar.
- Rimuovere il coperchio ed estrarre la massa filtrante.
- Ouvrir le filtre à air et sortir la cartouche filtrante.
- Open air cleaner and remove element.
- Öffnen Sie den Luftfilter und entfernen Sie das Element.
- Abrir il filtro y sacar la masa filtrante.
- Abrir o filtro e tirar a massa filtrante.
- Accertarsi che il filtro sia montato in modo corretto per evitare che polvere ed altro possonoentrare nei condotti aspirazione.
- Vérifier que le filtre est monté correctement pour empêcher à la poussière ou autres saletésde pénétrer dans les conduits admission.
- Make sure that the filter is mounted in the correct way to avoid that dust and other impuritiescould infiltrate into the intake ducts.
- Sicherstellen, daß der Filter korrekt montiert ist. Andernfalls können Staub und Fremdkörperin den saug leitungen.
- Cerciorarse que el filtro esté montado en modo correcto de lo contrario el polvo u otroselementos pueden entrar en los conductos aspiración.
- Verificar que o filtro esteja montado correctamente para evitar que a poeira possa entrarnos condutos de aspiração.
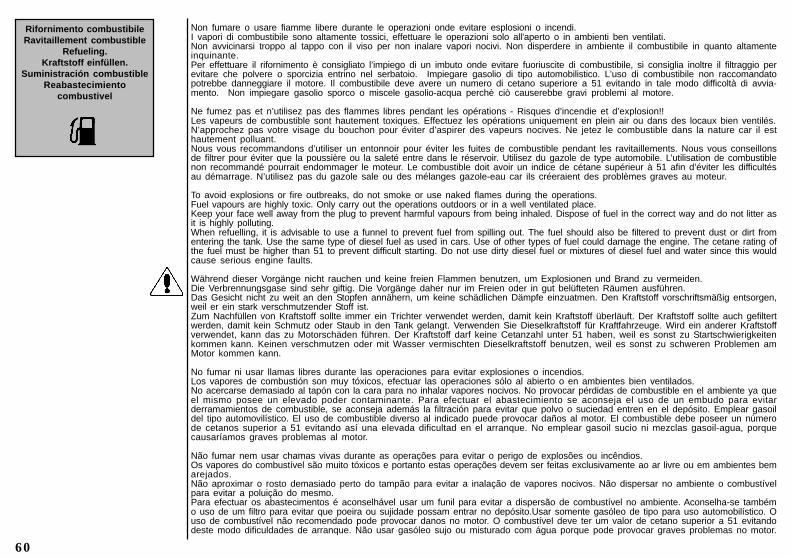
60
Rifornimento combustibileRavitaillement combustible
Refueling.Kraftstoff einfüllen.
Suministración combustibleReabastecimiento
combustivel
Non fumare o usare fiamme libere durante le operazioni onde evitare esplosioni o incendi.I vapori di combustibile sono altamente tossici, effettuare le operazioni solo all'aperto o in ambienti ben ventilati.Non avvicinarsi troppo al tappo con il viso per non inalare vapori nocivi. Non disperdere in ambiente il combustibile in quanto altamenteinquinante.Per effettuare il rifornimento è consigliato l’impiego di un imbuto onde evitare fuoriuscite di combustibile, si consiglia inoltre il filtraggio perevitare che polvere o sporcizia entrino nel serbatoio. Impiegare gasolio di tipo automobilistico. L’uso di combustibile non raccomandatopotrebbe danneggiare il motore. Il combustibile deve avere un numero di cetano superiore a 51 evitando in tale modo difficoltà di avvia-mento. Non impiegare gasolio sporco o miscele gasolio-acqua perchè ciò causerebbe gravi problemi al motore.
Ne fumez pas et n’utilisez pas des flammes libres pendant les opérations - Risques d’incendie et d’explosion!!Les vapeurs de combustible sont hautement toxiques. Effectuez les opérations uniquement en plein air ou dans des locaux bien ventilés.N’approchez pas votre visage du bouchon pour éviter d’aspirer des vapeurs nocives. Ne jetez le combustible dans la nature car il esthautement polluant.Nous vous recommandons d’utiliser un entonnoir pour éviter les fuites de combustible pendant les ravitaillements. Nous vous conseillonsde filtrer pour éviter que la poussière ou la saleté entre dans le réservoir. Utilisez du gazole de type automobile. L’utilisation de combustiblenon recommandé pourrait endommager le moteur. Le combustible doit avoir un indice de cétane supérieur à 51 afin d’éviter les difficultésau démarrage. N’utilisez pas du gazole sale ou des mélanges gazole-eau car ils créeraient des problèmes graves au moteur.
To avoid explosions or fire outbreaks, do not smoke or use naked flames during the operations.Fuel vapours are highly toxic. Only carry out the operations outdoors or in a well ventilated place.Keep your face well away from the plug to prevent harmful vapours from being inhaled. Dispose of fuel in the correct way and do not litter asit is highly polluting.When refuelling, it is advisable to use a funnel to prevent fuel from spilling out. The fuel should also be filtered to prevent dust or dirt fromentering the tank. Use the same type of diesel fuel as used in cars. Use of other types of fuel could damage the engine. The cetane rating ofthe fuel must be higher than 51 to prevent difficult starting. Do not use dirty diesel fuel or mixtures of diesel fuel and water since this wouldcause serious engine faults.
Während dieser Vorgänge nicht rauchen und keine freien Flammen benutzen, um Explosionen und Brand zu vermeiden.Die Verbrennungsgase sind sehr giftig. Die Vorgänge daher nur im Freien oder in gut belüfteten Räumen ausführen.Das Gesicht nicht zu weit an den Stopfen annähern, um keine schädlichen Dämpfe einzuatmen. Den Kraftstoff vorschriftsmäßig entsorgen,weil er ein stark verschmutzender Stoff ist.Zum Nachfüllen von Kraftstoff sollte immer ein Trichter verwendet werden, damit kein Kraftstoff überläuft. Der Kraftstoff sollte auch gefiltertwerden, damit kein Schmutz oder Staub in den Tank gelangt. Verwenden Sie Dieselkraftstoff für Kraftfahrzeuge. Wird ein anderer Kraftstoffverwendet, kann das zu Motorschäden führen. Der Kraftstoff darf keine Cetanzahl unter 51 haben, weil es sonst zu Startschwierigkeitenkommen kann. Keinen verschmutzen oder mit Wasser vermischten Dieselkraftstoff benutzen, weil es sonst zu schweren Problemen amMotor kommen kann.
No fumar ni usar llamas libres durante las operaciones para evitar explosiones o incendios.Los vapores de combustión son muy tóxicos, efectuar las operaciones sólo al abierto o en ambientes bien ventilados.No acercarse demasiado al tapón con la cara para no inhalar vapores nocivos. No provocar pérdidas de combustible en el ambiente ya queel mismo posee un elevado poder contaminante. Para efectuar el abastecimiento se aconseja el uso de un embudo para evitarderramamientos de combustible, se aconseja además la filtración para evitar que polvo o suciedad entren en el depósito. Emplear gasoildel tipo automovilístico. El uso de combustible diverso al indicado puede provocar daños al motor. El combustible debe poseer un númerode cetanos superior a 51 evitando así una elevada dificultad en el arranque. No emplear gasoil sucio ni mezclas gasoil-agua, porquecausaríamos graves problemas al motor.
Não fumar nem usar chamas vivas durante as operações para evitar o perigo de explosões ou incêndios.Os vapores do combustível são muito tóxicos e portanto estas operações devem ser feitas exclusivamente ao ar livre ou em ambientes bemarejados.Não aproximar o rosto demasiado perto do tampão para evitar a inalação de vapores nocivos. Não dispersar no ambiente o combustívelpara evitar a poluição do mesmo.Para efectuar os abastecimentos é aconselhável usar um funil para evitar a dispersão de combustível no ambiente. Aconselha-se tambémo uso de um filtro para evitar que poeira ou sujidade possam entrar no depósito.Usar somente gasóleo de tipo para uso automobilístico. Ouso de combustível não recomendado pode provocar danos no motor. O combustível deve ter um valor de cetano superior a 51 evitandodeste modo dificuldades de arranque. Não usar gasóleo sujo ou misturado com água porque pode provocar graves problemas no motor.
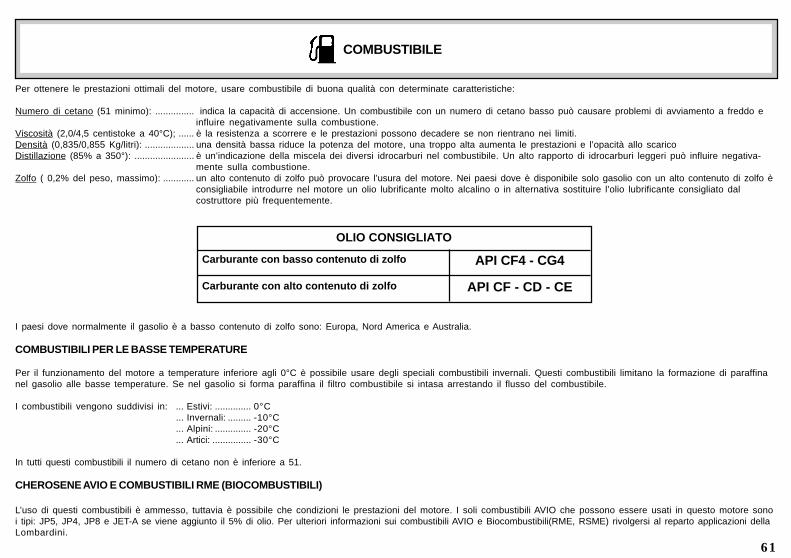
61
Per ottenere le prestazioni ottimali del motore, usare combustibile di buona qualità con determinate caratteristiche:
Numero di cetano (51 minimo): ............... indica la capacità di accensione. Un combustibile con un numero di cetano basso può causare problemi di avviamento a freddo einfluire negativamente sulla combustione.
Viscosità (2,0/4,5 centistoke a 40°C); ...... è la resistenza a scorrere e le prestazioni possono decadere se non rientrano nei limiti.Densità (0,835/0,855 Kg/litri): ................... una densità bassa riduce la potenza del motore, una troppo alta aumenta le prestazioni e l’opacità allo scaricoDistillazione (85% a 350°): ....................... è un’indicazione della miscela dei diversi idrocarburi nel combustibile. Un alto rapporto di idrocarburi leggeri può influire negativa-
mente sulla combustione.Zolfo ( 0,2% del peso, massimo): ............ un alto contenuto di zolfo può provocare l’usura del motore. Nei paesi dove è disponibile solo gasolio con un alto contenuto di zolfo è
consigliabile introdurre nel motore un olio lubrificante molto alcalino o in alternativa sostituire l’olio lubrificante consigliato dalcostruttore più frequentemente.
I paesi dove normalmente il gasolio è a basso contenuto di zolfo sono: Europa, Nord America e Australia.
COMBUSTIBILI PER LE BASSE TEMPERATURE
Per il funzionamento del motore a temperature inferiore agli 0°C è possibile usare degli speciali combustibili invernali. Questi combustibili limitano la formazione di paraffinanel gasolio alle basse temperature. Se nel gasolio si forma paraffina il filtro combustibile si intasa arrestando il flusso del combustibile.
I combustibili vengono suddivisi in: ... Estivi: .............. 0°C... Invernali: ......... -10°C... Alpini: .............. -20°C... Artici: ............... -30°C
In tutti questi combustibili il numero di cetano non è inferiore a 51.
CHEROSENE AVIO E COMBUSTIBILI RME (BIOCOMBUSTIBILI)
L’uso di questi combustibili è ammesso, tuttavia è possibile che condizioni le prestazioni del motore. I soli combustibili AVIO che possono essere usati in questo motore sonoi tipi: JP5, JP4, JP8 e JET-A se viene aggiunto il 5% di olio. Per ulteriori informazioni sui combustibili AVIO e Biocombustibili(RME, RSME) rivolgersi al reparto applicazioni dellaLombardini.
Carburante con basso contenuto di zolfo
Carburante con alto contenuto di zolfo
API CF4 - CG4
API CF - CD - CE
OLIO CONSIGLIATO
COMBUSTIBILE
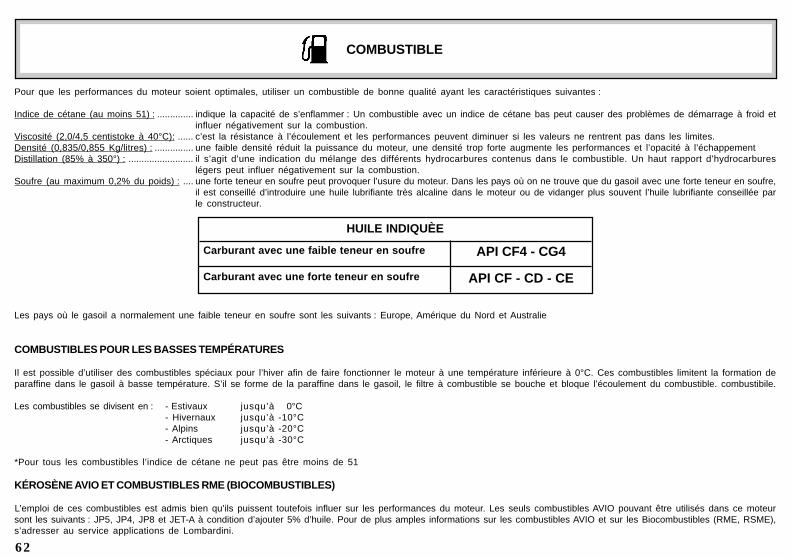
62
Pour que les performances du moteur soient optimales, utiliser un combustible de bonne qualité ayant les caractéristiques suivantes :
Indice de cétane (au moins 51) : .............. indique la capacité de s’enflammer : Un combustible avec un indice de cétane bas peut causer des problèmes de démarrage à froid etinfluer négativement sur la combustion.
Viscosité (2,0/4,5 centistoke à 40°C): ...... c’est la résistance à l’écoulement et les performances peuvent diminuer si les valeurs ne rentrent pas dans les limites.Densité (0,835/0,855 Kg/litres) : ............... une faible densité réduit la puissance du moteur, une densité trop forte augmente les performances et l’opacité à l’échappementDistillation (85% à 350°) : ......................... il s’agit d’une indication du mélange des différents hydrocarbures contenus dans le combustible. Un haut rapport d’hydrocarbures
légers peut influer négativement sur la combustion.Soufre (au maximum 0,2% du poids) : .... une forte teneur en soufre peut provoquer l’usure du moteur. Dans les pays où on ne trouve que du gasoil avec une forte teneur en soufre,
il est conseillé d’introduire une huile lubrifiante très alcaline dans le moteur ou de vidanger plus souvent l’huile lubrifiante conseillée parle constructeur.
Les pays où le gasoil a normalement une faible teneur en soufre sont les suivants : Europe, Amérique du Nord et Australie
COMBUSTIBLES POUR LES BASSES TEMPÉRATURES
Il est possible d’utiliser des combustibles spéciaux pour l’hiver afin de faire fonctionner le moteur à une température inférieure à 0°C. Ces combustibles limitent la formation deparaffine dans le gasoil à basse température. S’il se forme de la paraffine dans le gasoil, le filtre à combustible se bouche et bloque l’écoulement du combustible. combustibile.
Les combustibles se divisent en : - Estivaux jusqu’à 0°C- Hivernaux jusqu’à -10°C- Alpins jusqu’à -20°C- Arctiques jusqu’à -30°C
*Pour tous les combustibles l’indice de cétane ne peut pas être moins de 51
KÉROSÈNE AVIO ET COMBUSTIBLES RME (BIOCOMBUSTIBLES)
L’emploi de ces combustibles est admis bien qu’ils puissent toutefois influer sur les performances du moteur. Les seuls combustibles AVIO pouvant être utilisés dans ce moteursont les suivants : JP5, JP4, JP8 et JET-A à condition d’ajouter 5% d’huile. Pour de plus amples informations sur les combustibles AVIO et sur les Biocombustibles (RME, RSME),s’adresser au service applications de Lombardini.
Carburant avec une faible teneur en soufre
Carburant avec une forte teneur en soufre
API CF4 - CG4
API CF - CD - CE
HUILE INDIQUÈE
COMBUSTIBLE
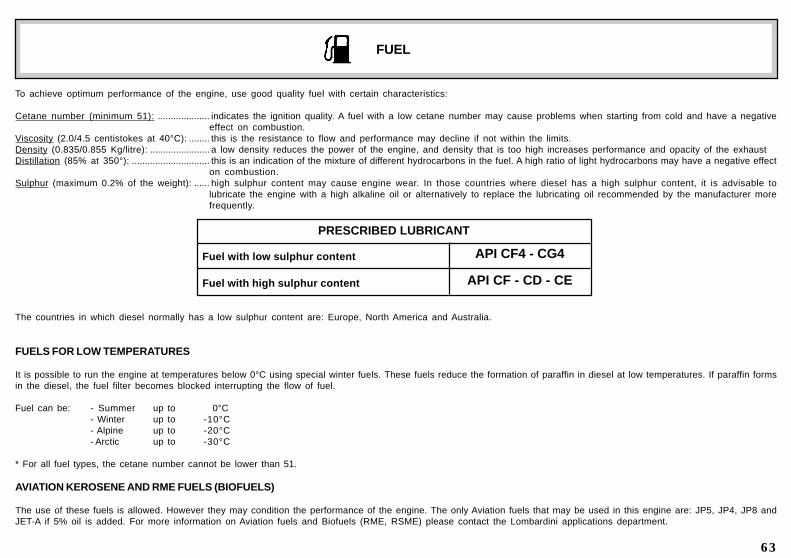
63
To achieve optimum performance of the engine, use good quality fuel with certain characteristics:
Cetane number (minimum 51): .................... indicates the ignition quality. A fuel with a low cetane number may cause problems when starting from cold and have a negativeeffect on combustion.
Viscosity (2.0/4.5 centistokes at 40°C): ........ this is the resistance to flow and performance may decline if not within the limits.Density (0.835/0.855 Kg/litre): ....................... a low density reduces the power of the engine, and density that is too high increases performance and opacity of the exhaustDistillation (85% at 350°): .............................. this is an indication of the mixture of different hydrocarbons in the fuel. A high ratio of light hydrocarbons may have a negative effect
on combustion.Sulphur (maximum 0.2% of the weight): ...... high sulphur content may cause engine wear. In those countries where diesel has a high sulphur content, it is advisable to
lubricate the engine with a high alkaline oil or alternatively to replace the lubricating oil recommended by the manufacturer morefrequently.
The countries in which diesel normally has a low sulphur content are: Europe, North America and Australia.
FUELS FOR LOW TEMPERATURES
It is possible to run the engine at temperatures below 0°C using special winter fuels. These fuels reduce the formation of paraffin in diesel at low temperatures. If paraffin formsin the diesel, the fuel filter becomes blocked interrupting the flow of fuel.
Fuel can be: - Summer up to 0°C- Winter up to -10°C- Alpine up to -20°C- Arctic up to -30°C
* For all fuel types, the cetane number cannot be lower than 51.
AVIATION KEROSENE AND RME FUELS (BIOFUELS)
The use of these fuels is allowed. However they may condition the performance of the engine. The only Aviation fuels that may be used in this engine are: JP5, JP4, JP8 andJET-A if 5% oil is added. For more information on Aviation fuels and Biofuels (RME, RSME) please contact the Lombardini applications department.
Fuel with low sulphur content
Fuel with high sulphur content
API CF4 - CG4
API CF - CD - CE
PRESCRIBED LUBRICANT
FUEL
64
Für eine optimale Motorleistung muss qualitativ guter Kraftstoff mit bestimmten Eigenschaften verwendet werden:
Cetanzahl (mindestens 51): ........................ Angabe der Zündfähigkeit. Ein Kraftstoff mit niedriger Cetanzahl kann zu Problemen beim Kaltstart führen und sich negativ auf dieVerbrennung auswirken.
Viskosität (2,0/4,5 Centistoke bei 40°C): .... Angabe der Fließzähigkeit, die Leistung kann abnehmen, wenn die Viskosität nicht im vorgeschriebenen Rahmen liegt.Dichte (0,835/0,855 kg/l): ............................. eine geringe Dichte vermindert die Motorleistung, eine zu hohe Dichte erhöht die Menge und Trübung der Abgase.Destillation (85% bei 350°C): ...................... Angabe des Gemisches unterschiedlicher Kohlenwasserstoffe im Kraftstoff. Ein hohes Verhältnis leichter Kohlenwasserstoffe kann
sich negativ auf die Verbrennung auswirken.Schwefel (maximal 0,2% des Gewichts): ... Ein hoher Schwefelgehalt kann zu Motorverschleiß führen. In Ländern, in denen nur Diesel mit hohem Schwefelgehalt erhältlich ist,
wird empfohlen, in den Motor entweder stark alkalisches Schmieröl einzufüllen oder das vom Hersteller empfohlene Öl öfterauszutauschen.
Länder, in denen Diesel normalerweise einen niedrigen Schwefelgehalt aufweist: Europa, Nordamerika und Australien.
KRAFTSTOFFE FÜR NIEDRIGE TEMPERATUREN
Für den Motorbetrieb bei Temperaturen unter 0°C können spezielle Winterkraftstoffe verwendet werden. Diese Kraftstoffe vermindern bei niedrigen Temperaturen dieParaffinbildung im Diesel. Wenn es im Diesel zur Paraffinbildung kommt, verstopft der Kraftstofffilter und der Kraftstofffluss wird unterbrochen.
Die Kraftstoffe lassen sich wie folgt einteilen: - Sommerkraftstoffe bis 0°C- Winterkraftstoffe bis -10°C- Alpin-Winterkraftstoffe bis -20°C- Arktische Winterkraftstoffe bis -30°C
* Bei keinem der Kraftstoffe darf die Cetanzahl unter 51 liegen
FLUGKEROSIN UND RME-KRAFTSTOFFE (BIOKRAFTSTOFFE)
Die Verwendung dieser Kraftstoffe ist grundsätzlich erlaubt, die Motorleistung kann jedoch dadurch beeinflusst werden. Die einzigen Flugkraftstoffe, die bei diesem Motorverwendet werden dürfen, sind: JP5, JP4, JP8 und JET-A, wenn 5% Öl beigemengt werden. Für weitere Informationen zu den Flug- und Biokraftstoffen (RME, RSME) wendenSie sich bitte an die Abteilung für praktische Anwendungen des Unternehmens Lombardini.
Kraftstoff mit niedrigem Schwefelgehalt
Kraftstoff mit hohem Schwefelgehalt
API CF4 - CG4
API CF - CD - CE
VORGESCHRIEBENE SCHMIERÖLE
KRAFTSTOFF
65
Para conseguir prestaciones óptimas del motor, usar combustible de buena calidad con características específicas.
Índice de cetano (51 mínimo): ....................... indica la capacidad de inflamación del combustible. Un combustible con un índice de cetano bajo puede causar problemas dearranque en frío e influir negativamente en la combustión.
Viscosidad (2,0/4,5 centistoke a 40°C): ....... indica la resistencia a fluir y las prestaciones pueden reducirse si no se mantienen en los límites.Densidad (0,835/0,855 Kg/litros): ................. una densidad baja reduce la potencia del motor, una demasiado alta aumenta las prestaciones y la opacidad de los humos de
escape.Destilación (85% a 350°): .............................. indica la mezcla de diferentes hidrocarburos en el combustible Un alto porcentaje de hidrocarburos ligeros puede influir
negativamente en la combustión.Azufre ( 0,2% del peso, máximo): ................. un alto contenido en azufre puede provocar el desgaste del motor. En los países donde el gasóleo tiene un alto contenido en
azufre, se aconseja introducir en el motor un aceite lubricante muy alcalino o como alternativa sustituir el aceite lubricanterecomendado por el fabricante más a menudo.
Los países donde normalmente el gasóleo tiene un bajo contenido en azufre son: Europa, Norte de América y Australia.
COMBUSTIBLES PARA BAJAS TEMPERATURAS
Para el funcionamiento del motor a temperaturas inferiores a 0°C es posible usar combustibles de invierno especiales. Estos combustibles limitan la formación de parafinaen el gasóleo a bajas temperaturas. Si en el gasóleo se forma parafina el filtro del combustible se obstruye deteniendo el flujo del combustible.
Los combustibles se subdividen en: - De verano hasta: 0°C- De invierno hasta -10°C- Alpinos hasta -20°C- Árticos hasta -30°C
* Para todos, el índice de cetano no puede ser inferior a 51
QUEROSENO DE AVIACIÓN Y COMBUSTIBLE RME (BIOCOMBUSTIBLES)
El uso de estos combustibles está permitido pero puede que condicione las prestaciones del motor. Los únicos combustibles de aviación que pueden usarse en este motorson: JP5, JP4, JP8 y JET-A si se añade el 5% de aceite. Para más información sobre los combustibles de aviación y Biocombustibles (RME, RSME) contactar con la secciónde aplicaciones de Lombardini.
Carburante con bajo contenido en azufre
Carburante con alto contenido en azufre
API CF4 - CG4
API CF - CD - CE
ACEITE RECOMENDADO
COMBUSTIBLE
66
Para obter os rendimentos ideais do motor, utilize combustível de boa qualidade com determinadas características:
Número de cetano (51 mínimo): ................... indica a capacidade de combustão. Um combustível com um número de cetano baixo pode causar problemas de arranque a frioe influir negativamente sobre a combustão.
Viscosidade (2,0/4,5 centistoke a 40°C): ..... é a resistência de escoamento e os rendimentos podem decair se não estiverem dentro dos limites.Densidade (0,835/0,855 Kg/litros): ............... uma baixa densidade diminui a potência do motor, uma alta demais aumenta os rendimentos e a opacidade na descargaDestilação (85% a 350°): ............................... é uma indicação da mistura dos diferentes hidrocarbonetos no combustível. Uma relação alta de hidrocarbonetos ligeiros pode
influir negativamente sobre a combustão.Enxofre ( 0,2% do peso, máximo): ................ um conteúdo alto de enxofre pode provocar o desgaste do motor. Nos países onde for disponível apenas gasóleo com um alto
conteúdo de enxofre é aconselhável introduzir no motor um óleo lubrificante muito alcalino ou, em alternativa, substituir o óleolubrificante aconselhado pelo fabricante mais frequentemente
Os países onde normalmente o gasóleo é com baixo conteúdo de enxofre são: Europa, América do Norte e Austrália.
COMBUSTÍVEIS PARA BAIXAS TEMPERATURAS
Para o funcionamento do motor a temperaturas inferiores a 0°C é possível utilizar uns combustíveis invernais especiais. Estes combustíveis limitam a formação de parafinano gasóleo a baixas temperaturas. Se no gasóleo se formar parafina o filtro do combustível entupir-se-á parando o fluxo do combustível.
Os combustíveis dividem-se em: - De Verão até 0°C- De Inverno até -10°C- Alpinos até -20°C- Árcticos até -30°C
* Para todos o número de cetano não pode ser inferior a 51
QUEROSENE AVIO E COMBUSTÍVEIS RME (BIOCOMBUSTÍVEIS)
O uso destes combustíveis é permitido, todavia é possível que condicione os rendimentos do motor. Os únicos combustíveis AVIO que podem ser utilizados neste motor sãoos do tipo: JP5, JP4, JP8 e JET-A se for adicionado 5% de óleo. Para mais informações sobre os combustíveis AVIO e Biocombustíveis (RME, RSME) contacte a secçãoaplicações da Lombardini.
Carburante com baixo conteúdo de enxofre
Carburante com alto conteúdo de enxofre
API CF4 - CG4
API CF - CD - CE
ÓLEO RECOMENDADO
COMBUSTÍVEL

67
- Togliere il tappo serbatoio.
- Enlever le bouchon réservoir.
- Remove fuel tank cap.
- Entfernen Sie denBrennstoffeinfülldeckel.
- Sacar el tapón del deposito.
- Tirar o tampa depósito.
Versare il combustibile e rimettere il tappo.
Verser le carburant et remettre le bouchon.
Pour the fuel and reassemble fuel tank cap.
Füllen Sie Kraftstoff ein und schließend.
Poner el combustible y montar el tapón.
Deitar o combustivel e repor o tampa.
- In condizioni di temperature ambientali rigide (-10° C) additivare il gasolio con additivi specifici onde evitare la formazione di paraffina.
- Avec températures ambiante rigoreuses (-10°C) joindre au gasoil des additifs spécifiques pour éviter la formation de paraffine.
- With low ambient temperatures (-10°C) add specific additives to diesel fuel, to avoid paraffine crystals solidification.
- Mit niedrigen Raumtemperaturen (-10°C) besonderen Zusatzstoffen zu Gasöl hinzufugen, um Paraffinbildung zu vermeiden.
- Con temperaturas ambiente rigidas (-10°C) adjuntar aditivos specificos al gasóleo, para evitar la formación de parafina.
- Com temperaturas ambientais rigorosas (-10°C) juntar aditivos especificos ao gasóleo, para evitar formação de parafina.
- Non riempire completamente il serbatoio , ma tenersi a circa 1 cm dal livello massimo, onde permettere un certo movimento del carburante.Prima di avviare, asciugare eventuali fuoriuscite di carburante.
- Il est conseillé de ne pas remplir complètement le réservoir , mais de s'arrêter à 1 cm environ du niveau maximum afin de permettre un peu de mouvement aucombustible.Avant de procéder au démarrage, essuyer des éventuelles sorties de combustible.
- Do not fill the fuel tank completely , but just up to 1 cm (0.39 in) from the top of the tank, to provide space for fuel movement. Wipe any fuel spillage from engine beforestarting.
- Füllen Sie den Tank nicht zum Ueberlaufen, sondern lassen Sie etwa 1 cm bis zur Oberkante des Tanks frei, damit sich der Kraftstoff noch ausdehnen kann.Wischen Sie verschütteten Kraftstoff vor Inbetriebnahme auf.
- No llenar completamente el tanque, sino tenerse a 1 cm. del nivel maximo, para permitir un cierto movimiento del combustible. Antes de poner en marcha, secareventuales derrames de gasolina.
- Não encher completamente o depósito, mas deixar cerca de 1 cm. antes do nivel máximo, para permitir um certo movimento do carburante. Antes do arranquecertificar-se de eventuais fugas de gasolina.

68
- Disareazione.- Deareation.- Air bleeding.- Entlüftung.- Purgado del circuito de
inyeccion.- Disarejação.
Pompare il combustibile sulla pompa alimentazione.
Pomper le carburant avec la pompe d’alimentation.
Operate fuel feeding pump until a steady flow is obtained.
Bedienen Sie den Pumphebel der Kraftstofförderpumpe, bis einkontinuierlicher Durcfluß wieder ein.
Bombear a mano la bomba de alimentación.
Tirarcom bomba o combustivel sobre a bomba alimentação.
Acceleratore al massimo.
Accélérateur au maximum.
Trottle to maximum position.
Gashebel auf Maximalstand.
Palanca del acelerador almaximo.
Acelerador no máximo

69
NOTE
○ ○ ○ ○ ○ ○ ○ ○ ○ ○ ○ ○ ○ ○ ○ ○ ○ ○ ○ ○ ○ ○ ○ ○ ○ ○ ○ ○ ○ ○ ○ ○ ○ ○ ○ ○ ○ ○ ○ ○ ○ ○ ○ ○ ○ ○ ○ ○ ○ ○ ○ ○ ○ ○ ○ ○ ○ ○ ○ ○ ○ ○ ○ ○ ○ ○ ○ ○ ○ ○ ○ ○
○ ○ ○ ○ ○ ○ ○ ○ ○ ○ ○ ○ ○ ○ ○ ○ ○ ○ ○ ○ ○ ○ ○ ○ ○ ○ ○ ○ ○ ○ ○ ○ ○ ○ ○ ○ ○ ○ ○ ○ ○ ○ ○ ○ ○ ○ ○ ○ ○ ○ ○ ○ ○ ○ ○ ○ ○ ○ ○ ○ ○ ○ ○ ○ ○ ○ ○ ○ ○ ○ ○ ○
○ ○ ○ ○ ○ ○ ○ ○ ○ ○ ○ ○ ○ ○ ○ ○ ○ ○ ○ ○ ○ ○ ○ ○ ○ ○ ○ ○ ○ ○ ○ ○ ○ ○ ○ ○ ○ ○ ○ ○ ○ ○ ○ ○ ○ ○ ○ ○ ○ ○ ○ ○ ○ ○ ○ ○ ○ ○ ○ ○ ○ ○ ○ ○ ○ ○ ○ ○ ○ ○ ○ ○
○ ○ ○ ○ ○ ○ ○ ○ ○ ○ ○ ○ ○ ○ ○ ○ ○ ○ ○ ○ ○ ○ ○ ○ ○ ○ ○ ○ ○ ○ ○ ○ ○ ○ ○ ○ ○ ○ ○ ○ ○ ○ ○ ○ ○ ○ ○ ○ ○ ○ ○ ○ ○ ○ ○ ○ ○ ○ ○ ○ ○ ○ ○ ○ ○ ○ ○ ○ ○ ○ ○ ○
○ ○ ○ ○ ○ ○ ○ ○ ○ ○ ○ ○ ○ ○ ○ ○ ○ ○ ○ ○ ○ ○ ○ ○ ○ ○ ○ ○ ○ ○ ○ ○ ○ ○ ○ ○ ○ ○ ○ ○ ○ ○ ○ ○ ○ ○ ○ ○ ○ ○ ○ ○ ○ ○ ○ ○ ○ ○ ○ ○ ○ ○ ○ ○ ○ ○ ○ ○ ○ ○ ○ ○
○ ○ ○ ○ ○ ○ ○ ○ ○ ○ ○ ○ ○ ○ ○ ○ ○ ○ ○ ○ ○ ○ ○ ○ ○ ○ ○ ○ ○ ○ ○ ○ ○ ○ ○ ○ ○ ○ ○ ○ ○ ○ ○ ○ ○ ○ ○ ○ ○ ○ ○ ○ ○ ○ ○ ○ ○ ○ ○ ○ ○ ○ ○ ○ ○ ○ ○ ○ ○ ○ ○ ○
○ ○ ○ ○ ○ ○ ○ ○ ○ ○ ○ ○ ○ ○ ○ ○ ○ ○ ○ ○ ○ ○ ○ ○ ○ ○ ○ ○ ○ ○ ○ ○ ○ ○ ○ ○ ○ ○ ○ ○ ○ ○ ○ ○ ○ ○ ○ ○ ○ ○ ○ ○ ○ ○ ○ ○ ○ ○ ○ ○ ○ ○ ○ ○ ○ ○ ○ ○ ○ ○ ○ ○
○ ○ ○ ○ ○ ○ ○ ○ ○ ○ ○ ○ ○ ○ ○ ○ ○ ○ ○ ○ ○ ○ ○ ○ ○ ○ ○ ○ ○ ○ ○ ○ ○ ○ ○ ○ ○ ○ ○ ○ ○ ○ ○ ○ ○ ○ ○ ○ ○ ○ ○ ○ ○ ○ ○ ○ ○ ○ ○ ○ ○ ○ ○ ○ ○ ○ ○ ○ ○ ○ ○ ○
○ ○ ○ ○ ○ ○ ○ ○ ○ ○ ○ ○ ○ ○ ○ ○ ○ ○ ○ ○ ○ ○ ○ ○ ○ ○ ○ ○ ○ ○ ○ ○ ○ ○ ○ ○ ○ ○ ○ ○ ○ ○ ○ ○ ○ ○ ○ ○ ○ ○ ○ ○ ○ ○ ○ ○ ○ ○ ○ ○ ○ ○ ○ ○ ○ ○ ○ ○ ○ ○ ○ ○
○ ○ ○ ○ ○ ○ ○ ○ ○ ○ ○ ○ ○ ○ ○ ○ ○ ○ ○ ○ ○ ○ ○ ○ ○ ○ ○ ○ ○ ○ ○ ○ ○ ○ ○ ○ ○ ○ ○ ○ ○ ○ ○ ○ ○ ○ ○ ○ ○ ○ ○ ○ ○ ○ ○ ○ ○ ○ ○ ○ ○ ○ ○ ○ ○ ○ ○ ○ ○ ○ ○ ○
○ ○ ○ ○ ○ ○ ○ ○ ○ ○ ○ ○ ○ ○ ○ ○ ○ ○ ○ ○ ○ ○ ○ ○ ○ ○ ○ ○ ○ ○ ○ ○ ○ ○ ○ ○ ○ ○ ○ ○ ○ ○ ○ ○ ○ ○ ○ ○ ○ ○ ○ ○ ○ ○ ○ ○ ○ ○ ○ ○ ○ ○ ○ ○ ○ ○ ○ ○ ○ ○ ○ ○
○ ○ ○ ○ ○ ○ ○ ○ ○ ○ ○ ○ ○ ○ ○ ○ ○ ○ ○ ○ ○ ○ ○ ○ ○ ○ ○ ○ ○ ○ ○ ○ ○ ○ ○ ○ ○ ○ ○ ○ ○ ○ ○ ○ ○ ○ ○ ○ ○ ○ ○ ○ ○ ○ ○ ○ ○ ○ ○ ○ ○ ○ ○ ○ ○ ○ ○ ○ ○ ○ ○ ○
○ ○ ○ ○ ○ ○ ○ ○ ○ ○ ○ ○ ○ ○ ○ ○ ○ ○ ○ ○ ○ ○ ○ ○ ○ ○ ○ ○ ○ ○ ○ ○ ○ ○ ○ ○ ○ ○ ○ ○ ○ ○ ○ ○ ○ ○ ○ ○ ○ ○ ○ ○ ○ ○ ○ ○ ○ ○ ○ ○ ○ ○ ○ ○ ○ ○ ○ ○ ○ ○ ○ ○
○ ○ ○ ○ ○ ○ ○ ○ ○ ○ ○ ○ ○ ○ ○ ○ ○ ○ ○ ○ ○ ○ ○ ○ ○ ○ ○ ○ ○ ○ ○ ○ ○ ○ ○ ○ ○ ○ ○ ○ ○ ○ ○ ○ ○ ○ ○ ○ ○ ○ ○ ○ ○ ○ ○ ○ ○ ○ ○ ○ ○ ○ ○ ○ ○ ○ ○ ○ ○ ○ ○ ○
○ ○ ○ ○ ○ ○ ○ ○ ○ ○ ○ ○ ○ ○ ○ ○ ○ ○ ○ ○ ○ ○ ○ ○ ○ ○ ○ ○ ○ ○ ○ ○ ○ ○ ○ ○ ○ ○ ○ ○ ○ ○ ○ ○ ○ ○ ○ ○ ○ ○ ○ ○ ○ ○ ○ ○ ○ ○ ○ ○ ○ ○ ○ ○ ○ ○ ○ ○ ○ ○ ○ ○
○ ○ ○ ○ ○ ○ ○ ○ ○ ○ ○ ○ ○ ○ ○ ○ ○ ○ ○ ○ ○ ○ ○ ○ ○ ○ ○ ○ ○ ○ ○ ○ ○ ○ ○ ○ ○ ○ ○ ○ ○ ○ ○ ○ ○ ○ ○ ○ ○ ○ ○ ○ ○ ○ ○ ○ ○ ○ ○ ○ ○ ○ ○ ○ ○ ○ ○ ○ ○ ○ ○ ○
○ ○ ○ ○ ○ ○ ○ ○ ○ ○ ○ ○ ○ ○ ○ ○ ○ ○ ○ ○ ○ ○ ○ ○ ○ ○ ○ ○ ○ ○ ○ ○ ○ ○ ○ ○ ○ ○ ○ ○ ○ ○ ○ ○ ○ ○ ○ ○ ○ ○ ○ ○ ○ ○ ○ ○ ○ ○ ○ ○ ○ ○ ○ ○ ○ ○ ○ ○ ○ ○ ○ ○
○ ○ ○ ○ ○ ○ ○ ○ ○ ○ ○ ○ ○ ○ ○ ○ ○ ○ ○ ○ ○ ○ ○ ○ ○ ○ ○ ○ ○ ○ ○ ○ ○ ○ ○ ○ ○ ○ ○ ○ ○ ○ ○ ○ ○ ○ ○ ○ ○ ○ ○ ○ ○ ○ ○ ○ ○ ○ ○ ○ ○ ○ ○ ○ ○ ○ ○ ○ ○ ○ ○ ○

70
AVVIAMENTO
DEMARRAGE
STARTING
ANLASSEN
ARRANQUE
AVIAMENTO
- Azionare il motorino di avviamento per non più di 20 secondi consecutivi: se il motore non si avvia attendere un minuto prima di ripetere la manovra di avviamento.Nel caso in cui il motore non si avvii dopo due tentativi di avviamento conviene consultare la tabella a pag. 106-113, onde individuare la causa dell’inconveniente.
- Ne pas actionner le démarreur plus de 20 secondes consécutives. Si le moteur ne démmarre pas, répéter l’opération de démarrage au bot d’une minute.Si le moteur n’a pas démarré après deux essais de démarrage, en rechercher la cause en fonction du tableau des anomalies (voir page 106-113).
- Do not actuate starter for more than 20 seconds at a time. If engine does not start,wait 1 minute before repeating attempt.If engine does not start after two attempts, trace the cause according to Diagnosis Chart (see page 106-113).
- Max. 20 Sekunden ununterbrochen starten. Wenn Motor nicht ansprigt nach einer Minute Pause Startvorgang wiederholen.Ist der Motor nach zwei Startvorgängen nicht angesprungen, Ursache gemäß Störungstabelle (s.106-113) suchen.
- Accionar el motor de arranque no más de 20 segundos consecutivos: si el motor no arranca esperar un minuto antes de repetir la maniobra de arranque.Si el motor no arranca luego de dos tentativos de arranque conviene consultar la tabla de la pág. 106-113, para individualizar la causa del inconveniente.
- Não accionar o motor de ignição por mais de 20 segundos consecutivos: no caso em que o motor não comece a trabalhar aguardar um minuto antes de repetir a operaçãode arranque.No caso em que o motor não comece a trabalhar depois de duas tentativas de arranque convém consultar a tabela constante na pág. 106-113, a fim de se identificar a causado inconveniente.
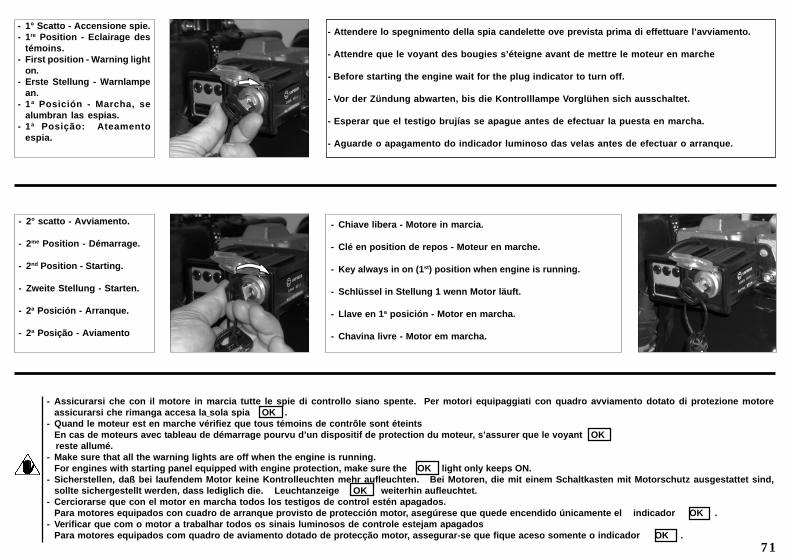
71
- 1° Scatto - Accensione spie.- 1re Position - Eclairage des
témoins.- First position - Warning light
on.- Erste Stellung - Warnlampe
an.- 1a Posición - Marcha, se
alumbran las espias.- 1a Posição: Ateamento
espia.
- Attendere lo spegnimento della spia candelette ove prevista prima di effettuare l’avviamento.
- Attendre que le voyant des bougies s’éteigne avant de mettre le moteur en marche
- Before starting the engine wait for the plug indicator to turn off.
- Vor der Zündung abwarten, bis die Kontrolllampe Vorglühen sich ausschaltet.
- Esperar que el testigo brujías se apague antes de efectuar la puesta en marcha.
- Aguarde o apagamento do indicador luminoso das velas antes de efectuar o arranque.
- 2° scatto - Avviamento.
- 2me Position - Démarrage.
- 2nd Position - Starting.
- Zweite Stellung - Starten.
- 2a Posición - Arranque.
- 2a Posição - Aviamento
- Chiave libera - Motore in marcia.
- Clé en position de repos - Moteur en marche.
- Key always in on (1st) position when engine is running.
- Schlüssel in Stellung 1 wenn Motor läuft.
- Llave en 1a posición - Motor en marcha.
- Chavina livre - Motor em marcha.
- Assicurarsi che con il motore in marcia tutte le spie di controllo siano spente. Per motori equipaggiati con quadro avviamento dotato di protezione motoreassicurarsi che rimanga accesa la sola spia OK .
- Quand le moteur est en marche vérifiez que tous témoins de contrôle sont éteintsEn cas de moteurs avec tableau de démarrage pourvu d’un dispositif de protection du moteur, s’assurer que le voyant OK
reste allumé.- Make sure that all the warning lights are off when the engine is running.
For engines with starting panel equipped with engine protection, make sure the OK light only keeps ON.- Sicherstellen, daß bei laufendem Motor keine Kontrolleuchten mehr aufleuchten. Bei Motoren, die mit einem Schaltkasten mit Motorschutz ausgestattet sind,
sollte sichergestellt werden, dass lediglich die. Leuchtanzeige OK weiterhin aufleuchtet.- Cerciorarse que con el motor en marcha todos los testigos de control estén apagados.
Para motores equipados con cuadro de arranque provisto de protección motor, asegúrese que quede encendido únicamente el indicador OK .- Verificar que com o motor a trabalhar todos os sinais luminosos de controle estejam apagados
Para motores equipados com quadro de aviamento dotado de protecção motor, assegurar-se que fique aceso somente o indicador OK .

72
Spia pressione olio -Voyant pression de l’huile - Oil pressure indicator - Kontrolllampe Öldruck - Testigo presión aceite -Indicador luminoso de pressão do óleo(Colore rosso - Couleur rouge - Red colour - Farbe rot - Color rojo - Cor vernelha)
- Si accende in caso di insufficiente pressione olio. L‘arresto del motore avviene dopo che la spia rimane accesa in modocostante per 3 secondi.
- Il s’allume si la pression de l’huile est insuffisante. L'arrêt du moteur se produit lorsque le voyant demeure allumé fixependant 3 secondes.
- Turns on when oil pressure is low. When the indicator light remains fixed for 3 seconds, the engine stop takes place.- Diese Kontrolllampe leuchtet bei unzureichendem Öldruck auf. Der Motor wird angehalten, wenn die Kontrolllampe für
einen Zeitraum von 3 Sekunden dauerhaft aufleuchtet.- Se activa cuando la presión del aceite es insuficiente. La parada del motor se produce después de que el piloto
permanece encendido permanentemente durante 3 segundos.- Acende-se quando a pressão do óleo for insuficiente. A paragem do motor acontece depois do indicador luminoso ficar
aceso de modo constante durante 3 segundos.
Spia ricarica batteria - Voyant recharge batterie - Battery recharge indicator - Kontrolllampe Batterieladung - Testigo cargabatería - Indicador luminoso de recarga da bateria(Colore giallo - Couleur jaune - Yellow colour - Farbe rot - Color amarillo - Cor amarela)
- Si accende in caso di mancata ricarica batteria. L‘arresto del motore avviene dopo che la spia rimane accesa in modocostante per 3 secondi.
- Il s’allume si la batterie ne se recharge pas. L'arrêt du moteur se produit lorsque le voyant demeure allumé fixe pendant3 secondes.
- Turns on in the case of a battery recharge failure. When the indicator light remains fixed for 3 seconds, the engine stoptakes place.
- Diese Kontrolllampe leuchtet bei unzureichender Batterieladung auf. Der Motor wird angehalten, wenn die Kontrolllampefür einen Zeitraum von 3 Sekunden dauerhaft aufleuchtet.
- Se activa cuando la batería no está cargada. La parada del motor se produce después de que el piloto permaneceencendido permanentemente durante 3 segundos.
- Acende quando não houver a recarga da bateria. A paragem do motor acontece depois do indicador luminoso ficaraceso de modo constante durante 3 segundos.
DESCRIZIONE DELLE SPIE - DESCRIPTION DES VOYANTS – INDICATORS DESCRIPTION – BESCHREIBUNG DER KONTROLLLAM-PEN - DESCRIPCIÓN DE LOS TESTIGOS – DESCRIÇÃO DOS INDICADORES LUMINOSOS

73
Spia intasamento filtro aria - Voyant filtre à air engorgé - Air filter obstruction indicator - Kontrolllampe Luftfilter verstopft - Testigo obturación filtro aire - Indicadorluminoso de entupimento do filtro do ar
- Si accende in caso di intasamento filtro aria.- Il s’allume en cas d’engorgement du filtre à air.- Turns on in the case of an air filter obstruction.- Diese Kontrolllampe leuchtet bei Verstopfungen des Luftfilters auf.- Se activa cuando el filtro del aire está obturado.- Acende-se quando o filtro do ar estiver entupido.
- Questa spia è presente su tutti i nostri quadretti di comando, ma la sua funzionalità dipende dal tipo di applicazione.- Ce voyant est situé dans tous les tableaux de commande, mais son fonctionnement dépend du type d'application.- This indicator light is on all our control panels, but its function depends on the application type.- Diese Kontrolllampe befindet sich auf allen unseren Schaltkästen, ihre Funktion hängt jedoch von der jeweiligen Anwendungsart ab.- Este piloto se encuentra en todos nuestros cuadros de mando pero su función depende del tipo de aplicación.- Este indicador luminoso está presente em todos os nossos quadros de comando, mas a sua funcionalidade depende do tipo de aplicação.
Spia livello carburante - Voyant niveau de carburant - Fuel indicator - Kontrolllampe Kraftstoffstand - Testigo nivel carburante - Indicador luminoso do nível decarburante(Colore giallo - Couleur jaune - Yellow colour - Farbe gelb - Color amarillo - Cor amarela)
- Si accende quando il carburante si sta esaurendo.- Il s'allume lorsque le carburant est en train de s'épuiser.- Turns on when the fuel is about to finish.- Leuchtet auf, wenn der Kraftstoff zur Neige geht.- Se enciende cuando el carburante se está agotando.- Acende-se quando o carburante está a esgotar-se.
- Questa spia è presente su tutti i nostri quadretti di comando, ma la sua funzionalità dipende dal tipo di applicazione.- Ce voyant est situé dans tous les tableaux de commande, mais son fonctionnement dépend du type d'application.- This indicator light is on all our control panels, but its function depends on the application type.- Diese Kontrolllampe befindet sich auf allen unseren Schaltkästen, ihre Funktion hängt jedoch von der jeweiligen Anwendungsart ab.- Este piloto se encuentra en todos nuestros cuadros de mando pero su función depende del tipo de aplicación.- Este indicador luminoso está presente em todos os nossos quadros de comando, mas a sua funcionalidade depende do tipo de aplicação.
- Nei quadretti con contagiri quando la spia carburante si si accende la spia protezione motore da verde diventa rossa intermittente.- Dans les tableaux avec compte-tours, lorsque le voyant du carburant s'allume, le voyant de protection moteur vert devient rouge clignotant.- In the panels with revolution counter, when the fuel indicator light turns on, the green engine protection indicator light turns red and starts blinking.- Auf den Schaltkästen mit Drehzahlermesser schaltet die Kontrolllampe Motorschutzschalter von grünem auf rotes Blinklicht um, wenn die Kontrolllampe
Kraftstoff aufleuchtet.- En los cuadros con cuentarrevoluciones cuando el piloto del carburante se enciende, el piloto de la protección del motor cambia de verde a rojo intermitente.- Em quadros com taquímetro, quando o indicador luminoso do carburante se acende, o indicador luminoso de protecção do motor de verde torna-se vermelho e
pisca.

74
Spia sovratemperatura olio o testa motore - Voyant surchauffe de l’huile ou de la culasse - Oil or cylinder over-temperature indicator - Kontrolllampe Über-temperatur Öl oder Zylinderkopf - Testigo sobretemperatura aceite o cabeza motor - Indicador luminoso de sobreaquecimento do óleo ou do cabeçote motor(Colore rosso - Couleur rouge - Red colour - Farbe rot - Color rojo - Cor vernelha)
- Essa si accende quando la temperatura del liquido refrigerante và oltre la soglia di sicurezza. L‘arresto del motore avviene dopo che la spia rimane accesain modo costante per 3 secondi.
- Il s‘allume lorsque la température du liquide de refroidissement dépasse le seuil de sureté. L'arrêt du moteur se produit lorsque le voyant demeure allumé fixependant 3 secondes.
- Turns on when the coolant temperature is above safety level. When the indicator light remains fixed for 3 seconds, the engine stop takes place.- Diese leuchtet auf, wenn die Temperatur der Kühlflüssigkeit die Sicherheitsschwelle übersteigt. Der Motor wird angehalten, wenn die Kontrolllampe für einen
Zeitraum von 3 Sekunden dauerhaft aufleuchtet.- Se enciende cuando la temperatura del líquido refrigerante supera el umbral de seguridad. La parada del motor se produce después de que el piloto
permanece encendido permanentemente durante 3 segundos.- Esta se acende quando a temperatura do líquido refrigerante ultrapassa o limite de segurança. A paragem do motor acontece depois do indicador luminoso
ficar aceso de modo constante durante 3 segundos.
Spia candelette - Voyant bougies - Plugs indicator - Kontrolllampe Vorglühen - Testigo brujías - Indicador luminoso das velas(Colore giallo - Couleur jaune - Yellow colour - Farbe gelb - Color amarillo - Cor amarela)
- Rimane accesa durante il preriscaldo (il tempo di preriscaldo varia con la temperatura ambiente; più lungo nei periodi freddi e più corto in quelli caldi).- Il reste allumé durant le préchauffage (Le temps de préchauffage varie selon la température ambiante: il sera plus long dans les périodes froides et plus court dans
les périodes chaudes).- Remains on during preheat (The preheating time varies according to the environment temperature: longer in cold periods and shorter in hot periods).- Diese Kontrolllampe leuchtet während des Vorglühens auf (die Vorglühzeit hängt von der Umgebungstemperatur ab. Sie ist in den kälteren Jahreszeiten länger und
in den wärmeren Jahreszeit kürzer).- Queda encendido durante el precalentamiento (el tiempo de precalentamiento varía de acuerdo con la temperatura ambiente: más largo en los periodos fríos y
más corto en los periodos calientes).- Fica aceso durante o pré-aquecimento (o tempo de pré-aquecimento varia com a temp. ambiente; mais longo durante os períodos frios e mais curto durante os quentes).
- Nei quadretti senza contagiri la spia candelette funziona ad intermittenza quando manca l‘alimentazione alle candelette (fusibile bruciato o relè in avaria).- Dans les tableaux sans compte-tours, le voyant des bougies s'allume clignotant en cas de non alimentation des bougies (fusible grillé ou relais défectueux).- In the panels without revolution counter, the glow plug indicator light starts blinking when the glow plug supply is missing (burnt-out fuse or relay failure).- En los cuadros sin cuentarrevoluciones el testigo de las bujías es intermitente cuando las bujías no están alimentadas (fusible quemado o relé averiado).- In den Schaltkästen ohne Drehzahlmesser blinkt die Kontrolllampe Glühkerzen, wenn die Versorgung der Kerzen ausfällt (Sicherung durchgebrannt oder Relais defekt).- Em quadros sem taquímetro o indicador luminoso das velas pisca quando falta a alimentação nas velas (fusível queimado ou relé avariado).
- Nei quadretti con contagiri la spia protezione motore durante il preriscaldo diventa verde quando manca l‘alimentazione alle candelette (fusibile bruciato o relè in avaria).- Dans les tableaux avec compte-tours, le voyant de protection moteur lors du préchauffage devient vert en cas de non alimentation des bougies (fusible grillé ou
relais défectueux).- In the panels with revolution counter, during the preheating phase the engine protection indicator light turns green when the glow-plug supply is missing (burnt-out
fuse or relay failure).- In den Schaltkästen mit Drehzahlmesser leuchtet die Kontrolllampe Motorschutzschalter ùwährend des Vorglühens grün auf, wenn die Versorgung der Kerzen
ausfällt (Sicherung durchgebrannt oder Relais defekt).- En los cuadros con cuentarrevoluciones el testigo de la protección del motor durante el precalentamiento cambia a verde cuando las bujías no están alimentadas
(fusible quemado o relé averiado).- Em quadros com taquímetro o indicador luminoso de protecção do motor durante o pré-aquecimento torna-se verde quando falta a alimentação nas velas (fusível
queimado ou relé avariado).

75
Spia OK - Voyant OK - Indicator OK - Kontrolllampe OK - Testigo OK - Indicador luminoso OK
- Si accende con il motore in moto e se le altre spie sono spente.- Il s’allume lorsque le moteur est en marche et si les autres voyants sont éteints.- Turns on when the engine is running/on and the other indicators are off.- Diese Kontrolllampe leuchtet bei laufendem Motor auf, wenn die anderen Kontrolllampen ausgeschaltet sind.- Se activa cuando el motor ha arrancado y los demás testigos están apagados.- Acende-se com o motor em marcha e se os demais indicadores estiverem apagados.
Display contagiri con spia di protezione motore - Afficheur de compte-tours avec voyant de protection moteur - Revolution counter display withengine protection indicator light - Display Drehzahlmesser mit Kontrolllampe Motorschutzschalter - Display cuentarrevoluciones con testigo dela protección del motor - Visor do taquímetro com indicador luminoso de protecção do motor
- Esso indica il regime di rotazione del motore in tempo reale da 0 a 5‘000 r.p.m.Nel centro del contagiri vi è la spia di protezione motore. Quando la spia è verde indica che tutto funziona normalmente e il motore gira.Quando la spia diventa rossa con luce intermittente o continua vi è una anomalia in corso.Nel caso una delle funzioni importanti per il motore quali:
la pressione olio bassa ( ), la temperatura del liquido refrigerante troppo elevata ( ) o il filtro dell‘aria intasato ( ); la spia protezione
motore da verde diventa rossa e se la spia anomalia rimane accessa per almeno 3 secondi il motore si arresta.
Nel caso il carburante la sta per esaurirsi ( ) la spia protezione motore da verde diventa rosso intermittente.
Nel caso di mancata alimentazione della candeletta ( ) la spia protezione motore diventa verde intermittente.
- Cela indique le régime de rotation du moteur en temps réel de 0 à 5000 tr./min.Le voyant de protection moteur est situé au centre du compte-tours. Lorsque ce voyant s'allume en vert, le moteur tourne et fonctionnecorrectement.Lorsqu'il devient rouge (fixe ou clignotant), une anomalie est présente.En cas d'anomalie d'une de ces fonctions principales du moteur, à savoir :
la pression de l'huile basse ( ), la température du liquide de refroidissement trop élevée ( ) ou le filtre à air encrassé ( ); le voyant
de protection moteur vert devient rouge. Si le voyant signalant l'anomalie demeure allumé pendant au moins 3 secondes, le moteur s'arrête.
Si le carburant est en train de s'épuiser ( )le voyant de protection moteur vert devient rouge clignotant.
En cas de non alimentation de la bougie ( ) le voyant de protection moteur devient vert clignotant.
- It indicates the engine rotation speed in real time from 0 to 5,000 rpm.At the centre of the revolution counter there is the engine protection indicator light. When the indicator light is green it indicates thateverything is working correctly and the engine is running. When the indicator light turns red and starts blinking or is fixed there is a failure.If one of the following important engine conditions takes place:
the oil preassure is low ( ), the coolant temperature is too high ( ) or the air filter is clogged ( ); If the failure indicator light remains
on for at least 3 seconds, the engine turns off.
If the fuel is starting to finish ( ) the green engine protection indicator light turns red and starts blinking.
If the glow plug supply is missing ( ) the engine protection indicator light turns green and starts blinking.
- Spia protezione motore- Voyant de protection
moteur- Engine protection
idicator light- K o n t r o l l l a m p e
Motorschutzschalter- Testigo de la protección
del motor- Indicador luminoso de
protecção do motor

76
1 7 4 3 . 4
- Zeigt die Drehzahl des Motors in Echtzeit zwischen 0 und 5000 U/Min. an.In der Mitte des Drehzahlmessers befindet sich die Kontrolllampe Motorschutzschalter. Leuchtet die Kontrolllampe grün auf, so bedeutet dies, dass keineStörungen vorhanden sind und der Motor läuft. Leuchtet die Kontrolllampe dauerhaft oder mit Blinkintervallen rot auf, so liegt eine Störung vor.Im Falle einer der wichtigen Funktionen für den Motor:
der Öldruck ist niedrig ( ), die Temperatur der Kühlflüssigkeit ist zu hoch ( ) oder der Luftfilter ist verstopft ( ); schaltet die Kontrolllampe
Motorschutzschalter von grün auf rot und wenn die Kontrolllampe für die Störung für einen Zeitraum von mindestens 3 Sekunden aufleuchtet, hält der Motoran.
Sollte der Kraftstoff zur Neige gehen ( ) schaltet die Kontrolllampe Motorschutzschalter von grünem auf rotes Blinklicht um.
Sollte die Zündkerze nicht versorgt werden ( )schaltet die Kontrolllampe Motorschutzschalter auf grünes Blinklicht um.
- Este display visualiza el régimen de revoluciones del motor en tiempo real de 0 a 5000 rpm.En el centro del cuentarrevoluciones se encuentra el testigo de la protección del motor. Cuando el testigo se enciende en verde indica que todo funcionanormalmente y el motor está en marcha. Cuando el testigo cambia a rojo con luz intermitente o permanente quiere decir que hay una anomalía en curso.En caso de que se verifique una de las tres condiciones importantes para el motor:
presión de aceite baja ( ), temperatura del líquido refrigerante demasiado elevada ( ) o filtro del aire obstruido ( ); el testigo de la protección del
motor cambia de verde a rojo y si el testigo de anomalía permanece encendido durante al menos 3 segundos el motor se para.
En caso de que el carburante se esté agotando ( ) el testigo de la protección del motor cambiará de verde a rojo intermitente.
En caso de falta de alimentación de la bujía ( ) el testigo de la protección del motor cambia a verde intermitente.
- Indica o regime de rotação do motor em tempo real de 0 a 5‘000 r.p.m.No centro do taquímetro está presente o indicador luminoso de protecção do motor. Quando o indicador luminoso é verde indica que tudo funciona normalmentee o motor funciona. Quando o indicador luminoso torna-se vermelho, fixo ou a piscar, há uma anomalia em curso.Caso aconteça uma das funções importantes para o motor como:
a pressão de óleo baixa ( ), a temperatura do líquido refrigerante demasiado elevada ( ) ou o filtro de ar entupido ( ); o indicador luminoso de
protecção do motor de verde torna-se vermelho e se o indicador luminoso de anomalia fica aceso pelo menos durante 3 segundos, o motor pára.
Caso o carburante está a esgotar-se ( ) o indicador luminoso de protecção do motor de verde torna-se vermelho e pisca.
No caso de falta de alimentação na vela ( ) o indicador luminoso de protecção do motor torna-se verde e pisca.
Display contaore - Afficheur compteur des heures - Hour counter display - Display Betriebsstundenzähler - Visor contador horario - Visor contadorde horas
- Indica le ore di funzionamento del motore in ore e decimi di ora.- Il indique les heures de fonctionnement du moteur en heures et dixièmes d’heure.- Indicates engine’s running hours and tenths.- Zeigt die Betriebsstunden des Motors in Stunden und Zehntelstunden an.- Indica las horas de servicio del motor en horas y décimos de hora.- Indica as horas de funcionamento do motor em horas e décimos de hora.

77
DOPO L’AVVIAMENTO
APRES LE DEMARRAGE
AFTER STARTING
NACH DEM ANLASSEN
DESPUES DEL ARRANQUE
DEPOIS DO AVIAMENTO
Al minimo per qualche minuto come da tabella.
Au minimum pendant quelques minuts d’après tableau.
At idle speed for a few minutes according to table.
Im Leerlauf für die Zeit einiger Minuten (siehe Tabelle).
Al minimo por algunos minutos como indicado en la tabla.
Ao minimo por alguns minutos como na tabela.
TemperaturaTempératureTemperatureTemperaturTemperaturaTemperatura
TempoDuréeTimeZeitTiempoTempo
≤≤≤≤≤ - 20° C
- 20° C / - 10° C
- 10° C - 5° C
≥≥≥≥≥ 5° C
5’
2’
1’
20”
PRIMA DELL’ARRESTO
AVANT L’ARRET
BEFORE STOPPING
VOR DEM ABSTELLEN
ANTES DEL PARO
ANTES DA PARADA
- Al minimo per qualcheminuto.
- Au minimum pendantquelques minuts.
- At idels speed for a fewminutes.
- lm Leerlauf einige Minutenlaufen lassen.
- Al minimo por algunosminutos.
- Ao minimo por algunsminutos.
RODAGGIO
RODAGE
RUN-IN
EINLAUFEN
RODAJE
RODAGEM
- Nelle prime 50 ore non superare il 70% del carico totale.- Pour les premières 50 heures ne pas dépasser 70% de la
puissance totale.- During first 50 hours do not exceed 70% of maximum rated
power.- Für die ersten 50 Stunden sind 70% del Vollastleistung nicht zu
überschreiten.- Durante las primeras 50 horas hacerlo funcionar al 70% de su
cargo normal.- Nas primeiras 50 horas não superar o 70% do cargo total.
ARRESTO
ARRET
STOPPING
ABSTELLEN
PARO
PARADA
Levetta e/o chiavetta in posizione di stop.
Levier et/ou clé en position de stop.
Lever and/or key in stop position.
Hebel und/oder Schlüssel in Stopstellung.
Palanca y/o llave en posición de stop.
Alavanca e/o chavínha em posiçáo de stop

78
SPEGNIMENTO MOTORI
ARRET DES MOTEURS
TURNING OFF ENGINES
AUSSCHALTEN VON MOTOREN
APAGADO MOTORES
PARAGEM DE MOTORES
NOTE
○ ○ ○ ○ ○ ○ ○ ○ ○ ○ ○ ○ ○ ○ ○ ○ ○ ○ ○ ○ ○ ○ ○ ○ ○ ○ ○ ○ ○ ○ ○ ○ ○ ○ ○ ○ ○ ○ ○ ○ ○ ○ ○ ○ ○ ○ ○ ○ ○ ○ ○ ○ ○ ○ ○ ○ ○ ○ ○ ○ ○ ○ ○ ○ ○ ○ ○ ○ ○ ○ ○ ○
○ ○ ○ ○ ○ ○ ○ ○ ○ ○ ○ ○ ○ ○ ○ ○ ○ ○ ○ ○ ○ ○ ○ ○ ○ ○ ○ ○ ○ ○ ○ ○ ○ ○ ○ ○ ○ ○ ○ ○ ○ ○ ○ ○ ○ ○ ○ ○ ○ ○ ○ ○ ○ ○ ○ ○ ○ ○ ○ ○ ○ ○ ○ ○ ○ ○ ○ ○ ○ ○ ○ ○
○ ○ ○ ○ ○ ○ ○ ○ ○ ○ ○ ○ ○ ○ ○ ○ ○ ○ ○ ○ ○ ○ ○ ○ ○ ○ ○ ○ ○ ○ ○ ○ ○ ○ ○ ○ ○ ○ ○ ○ ○ ○ ○ ○ ○ ○ ○ ○ ○ ○ ○ ○ ○ ○ ○ ○ ○ ○ ○ ○ ○ ○ ○ ○ ○ ○ ○ ○ ○ ○ ○ ○
○ ○ ○ ○ ○ ○ ○ ○ ○ ○ ○ ○ ○ ○ ○ ○ ○ ○ ○ ○ ○ ○ ○ ○ ○ ○ ○ ○ ○ ○ ○ ○ ○ ○ ○ ○ ○ ○ ○ ○ ○ ○ ○ ○ ○ ○ ○ ○ ○ ○ ○ ○ ○ ○ ○ ○ ○ ○ ○ ○ ○ ○ ○ ○ ○ ○ ○ ○ ○ ○ ○ ○
○ ○ ○ ○ ○ ○ ○ ○ ○ ○ ○ ○ ○ ○ ○ ○ ○ ○ ○ ○ ○ ○ ○ ○ ○ ○ ○ ○ ○ ○ ○ ○ ○ ○ ○ ○ ○ ○ ○ ○ ○ ○ ○ ○ ○ ○ ○ ○ ○ ○ ○ ○ ○ ○ ○ ○ ○ ○ ○ ○ ○ ○ ○ ○ ○ ○ ○ ○ ○ ○ ○ ○
○ ○ ○ ○ ○ ○ ○ ○ ○ ○ ○ ○ ○ ○ ○ ○ ○ ○ ○ ○ ○ ○ ○ ○ ○ ○ ○ ○ ○ ○ ○ ○ ○ ○ ○ ○ ○ ○ ○ ○ ○ ○ ○ ○ ○ ○ ○ ○ ○ ○ ○ ○ ○ ○ ○ ○ ○ ○ ○ ○ ○ ○ ○ ○ ○ ○ ○ ○ ○ ○ ○ ○
○ ○ ○ ○ ○ ○ ○ ○ ○ ○ ○ ○ ○ ○ ○ ○ ○ ○ ○ ○ ○ ○ ○ ○ ○ ○ ○ ○ ○ ○ ○ ○ ○ ○ ○ ○ ○ ○ ○ ○ ○ ○ ○ ○ ○ ○ ○ ○ ○ ○ ○ ○ ○ ○ ○ ○ ○ ○ ○ ○ ○ ○ ○ ○ ○ ○ ○ ○ ○ ○ ○ ○
○ ○ ○ ○ ○ ○ ○ ○ ○ ○ ○ ○ ○ ○ ○ ○ ○ ○ ○ ○ ○ ○ ○ ○ ○ ○ ○ ○ ○ ○ ○ ○ ○ ○ ○ ○ ○ ○ ○ ○ ○ ○ ○ ○ ○ ○ ○ ○ ○ ○ ○ ○ ○ ○ ○ ○ ○ ○ ○ ○ ○ ○ ○ ○ ○ ○ ○ ○ ○ ○ ○ ○
○ ○ ○ ○ ○ ○ ○ ○ ○ ○ ○ ○ ○ ○ ○ ○ ○ ○ ○ ○ ○ ○ ○ ○ ○ ○ ○ ○ ○ ○ ○ ○ ○ ○ ○ ○ ○ ○ ○ ○ ○ ○ ○ ○ ○ ○ ○ ○ ○ ○ ○ ○ ○ ○ ○ ○ ○ ○ ○ ○ ○ ○ ○ ○ ○ ○ ○ ○ ○ ○ ○ ○
○ ○ ○ ○ ○ ○ ○ ○ ○ ○ ○ ○ ○ ○ ○ ○ ○ ○ ○ ○ ○ ○ ○ ○ ○ ○ ○ ○ ○ ○ ○ ○ ○ ○ ○ ○ ○ ○ ○ ○ ○ ○ ○ ○ ○ ○ ○ ○ ○ ○ ○ ○ ○ ○ ○ ○ ○ ○ ○ ○ ○ ○ ○ ○ ○ ○ ○ ○ ○ ○ ○ ○
○ ○ ○ ○ ○ ○ ○ ○ ○ ○ ○ ○ ○ ○ ○ ○ ○ ○ ○ ○ ○ ○ ○ ○ ○ ○ ○ ○ ○ ○ ○ ○ ○ ○ ○ ○ ○ ○ ○ ○ ○ ○ ○ ○ ○ ○ ○ ○ ○ ○ ○ ○ ○ ○ ○ ○ ○ ○ ○ ○ ○ ○ ○ ○ ○ ○ ○ ○ ○ ○ ○ ○
- Non spegnere il motore in condizioni di pieno carico o alta velocità.Prima di spegnerlo, lasciarlo funzionare per breve tempo al minimo a vuoto.
- Ne pas arretér le moteur en conditions de plein charge ou de haute vitesse.Avant de l’arretér, le laisser fonctionner pour peu de temps au ralenti à vide.
- Do not stop the engine when operating at full load or high speed.Before stopping it. Let it run for a short time at low idle.
- Den Motor nicht abstellen bei hoher Belastung oder hoher Geschwindigkeit.Vor den Motor abzustellen, bitte lassen ihn kurzzeitig im Leerlauf.
- No parar el motor en condicion de llena carga o alta velocidad .Antes de parar el motor dejar marchar poco tiempo en vacio.
- Não desligar o motor em condições de cargas pesadas ou de alta velocidade. Antes dedesligar o motor, deixar funcionar durante pouco tempo no mínimo e em ponto morto.
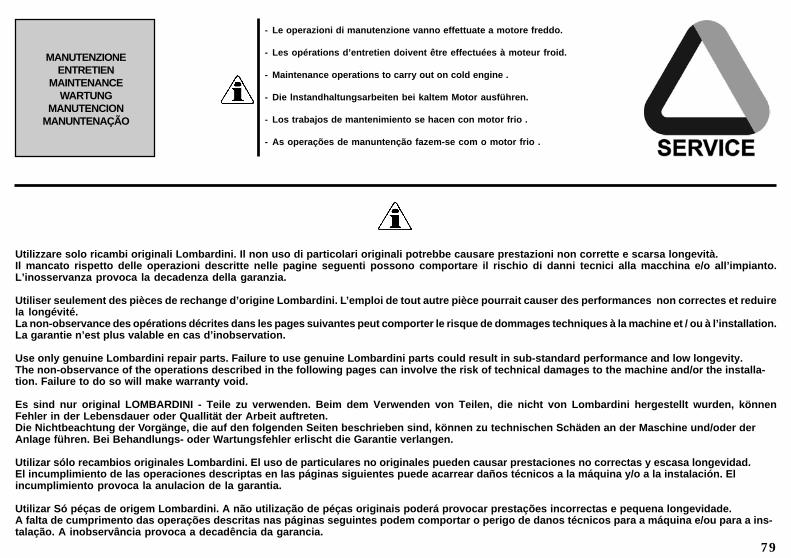
79
- Le operazioni di manutenzione vanno effettuate a motore freddo.
- Les opérations d’entretien doivent être effectuées à moteur froid.
- Maintenance operations to carry out on cold engine .
- Die lnstandhaltungsarbeiten bei kaltem Motor ausführen.
- Los trabajos de mantenimiento se hacen con motor frio .
- As operações de manuntenção fazem-se com o motor frio .
MANUTENZIONEENTRETIEN
MAINTENANCEWARTUNG
MANUTENCIONMANUNTENAÇÃO
Utilizzare solo ricambi originali Lombardini. Il non uso di particolari originali potrebbe causare prestazioni non corrette e scarsa longevità.Il mancato rispetto delle operazioni descritte nelle pagine seguenti possono comportare il rischio di danni tecnici alla macchina e/o all’impianto.L’inosservanza provoca la decadenza della garanzia.
Utiliser seulement des pièces de rechange d’origine Lombardini. L’emploi de tout autre pièce pourrait causer des performances non correctes et reduirela longévité.La non-observance des opérations décrites dans les pages suivantes peut comporter le risque de dommages techniques à la machine et / ou à l’installation.La garantie n’est plus valable en cas d’inobservation.
Use only genuine Lombardini repair parts. Failure to use genuine Lombardini parts could result in sub-standard performance and low longevity.The non-observance of the operations described in the following pages can involve the risk of technical damages to the machine and/or the installa-tion. Failure to do so will make warranty void.
Es sind nur original LOMBARDINI - Teile zu verwenden. Beim dem Verwenden von Teilen, die nicht von Lombardini hergestellt wurden, könnenFehler in der Lebensdauer oder Quallität der Arbeit auftreten.Die Nichtbeachtung der Vorgänge, die auf den folgenden Seiten beschrieben sind, können zu technischen Schäden an der Maschine und/oder derAnlage führen. Bei Behandlungs- oder Wartungsfehler erlischt die Garantie verlangen.
Utilizar sólo recambios originales Lombardini. El uso de particulares no originales pueden causar prestaciones no correctas y escasa longevidad.El incumplimiento de las operaciones descriptas en las páginas siguientes puede acarrear daños técnicos a la máquina y/o a la instalación. Elincumplimiento provoca la anulacion de la garantia.
Utilizar Só péças de origem Lombardini. A não utilização de péças originais poderá provocar prestações incorrectas e pequena longevidade.A falta de cumprimento das operações descritas nas páginas seguintes podem comportar o perigo de danos técnicos para a máquina e/ou para a ins-talação. A inobservância provoca a decadência da garancia.
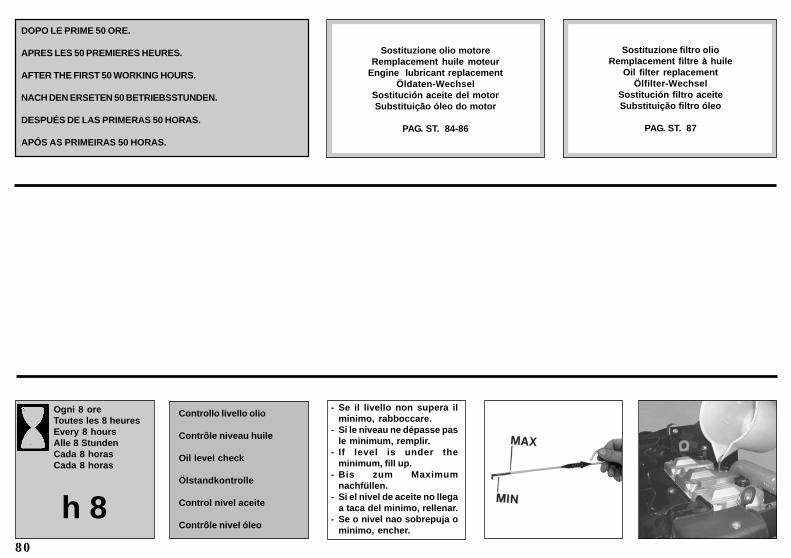
80
DOPO LE PRIME 50 ORE.
APRES LES 50 PREMIERES HEURES.
AFTER THE FIRST 50 WORKING HOURS.
NACH DEN ERSETEN 50 BETRIEBSSTUNDEN.
DESPUÉS DE LAS PRIMERAS 50 HORAS.
APÓS AS PRIMEIRAS 50 HORAS.
Sostituzione olio motoreRemplacement huile moteur
Engine lubricant replacementÖldaten-Wechsel
Sostitución aceite del motorSubstituição óleo do motor
PAG. ST. 84-86
Sostituzione filtro olioRemplacement filtre à huile
Oil filter replacementÖlfilter-Wechsel
Sostitución filtro aceiteSubstituição filtro óleo
PAG. ST. 87
Controllo livello olio
Contrôle niveau huile
Oil level check
Ölstandkontrolle
Control nivel aceite
Contrôle nivel óleoh 8
Ogni 8 oreToutes les 8 heuresEvery 8 hoursAlle 8 StundenCada 8 horasCada 8 horas
- Se il livello non supera ilminimo, rabboccare.
- Si le niveau ne dépasse pasle minimum, remplir.
- If level is under theminimum, fill up.
- Bis zum Maximumnachfüllen.
- Si el nivel de aceite no llegaa taca del minimo, rellenar.
- Se o nivel nao sobrepuja ominimo, encher.
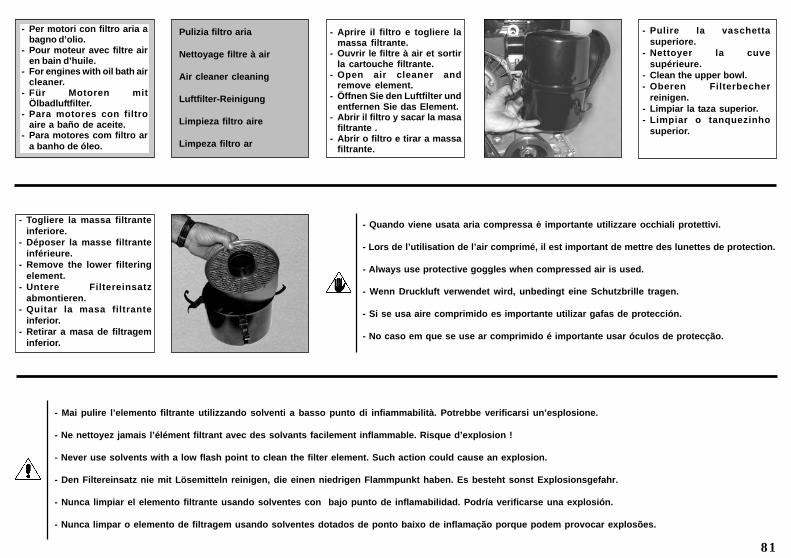
81
- Per motori con filtro aria abagno d’olio.
- Pour moteur avec filtre airen bain d’huile.
- For engines with oil bath aircleaner.
- Für Motoren mitÖlbadluftfilter.
- Para motores con filtroaire a baño de aceite.
- Para motores com filtro ara banho de óleo.
Pulizia filtro aria
Nettoyage filtre à air
Air cleaner cleaning
Luftfilter-Reinigung
Limpieza filtro aire
Limpeza filtro ar
- Aprire il filtro e togliere lamassa filtrante.
- Ouvrir le filtre à air et sortirla cartouche filtrante.
- Open air cleaner andremove element.
- Öffnen Sie den Luftfilter undentfernen Sie das Element.
- Abrir il filtro y sacar la masafiltrante .
- Abrir o filtro e tirar a massafiltrante.
- Pulire la vaschettasuperiore.
- Nettoyer la cuvesupérieure.
- Clean the upper bowl.- Oberen Filterbecher
reinigen.- Limpiar la taza superior.- Limpiar o tanquezinho
superior.
- Togliere la massa filtranteinferiore.
- Déposer la masse filtranteinférieure.
- Remove the lower filteringelement.
- Untere Filtereinsatzabmontieren.
- Quitar la masa filtranteinferior.
- Retirar a masa de filtrageminferior.
- Quando viene usata aria compressa è importante utilizzare occhiali protettivi.
- Lors de l’utilisation de l’air comprimé, il est important de mettre des lunettes de protection.
- Always use protective goggles when compressed air is used.
- Wenn Druckluft verwendet wird, unbedingt eine Schutzbrille tragen.
- Si se usa aire comprimido es importante utilizar gafas de protección.
- No caso em que se use ar comprimido é importante usar óculos de protecção.
- Mai pulire l’elemento filtrante utilizzando solventi a basso punto di infiammabilità. Potrebbe verificarsi un’esplosione.
- Ne nettoyez jamais l’élément filtrant avec des solvants facilement inflammable. Risque d’explosion !
- Never use solvents with a low flash point to clean the filter element. Such action could cause an explosion.
- Den Filtereinsatz nie mit Lösemitteln reinigen, die einen niedrigen Flammpunkt haben. Es besteht sonst Explosionsgefahr.
- Nunca limpiar el elemento filtrante usando solventes con bajo punto de inflamabilidad. Podría verificarse una explosión.
- Nunca limpar o elemento de filtragem usando solventes dotados de ponto baixo de inflamação porque podem provocar explosões.

82
- Lavare e asciugare lamassa filtrante.
- Nettoyer et essuyer lamasse filtrante.
- Clean and dry filteringelement.
- Filtereinsatz reinigen undtrocknen.
- Lavar y secar el elementofiltrante.
- Lavar e enxugar a massafiltrante.
- Non disperdere l’olio esausto in ambiente in quantoaltamente inquinante.
- Ne pas vidanger l’huile épuisée dans le milieu, car elle aun haut niveau de pollution.
- Do not disperse the oil in the ambient, as it has a highpollution power.
- Wegen dem hohen Grad der Umweltverschmutzung, istSorge zu tragen, daß kein Öl ins Erdreich.
- Non dispersar o tirar el aceite usado: por ser de un altonivel de contaminante.
- Não dispersar o óleo velho no ambiente porque é muitopoluidor.
- Vuotare e pulire lavaschetta.
- Vidanger et nettoyer la cuvedu filtre.
- Drain and clean bowl.- Reinigen und leeren Sie das
Luftfilter unterteil.- Vaciar y limpiar la taza.- Esvaziar e limpar o
tanquezinho.
- Versare olio motore fino alsegno.
- Verser l’huile moteurjusqu’au repère.
- Fill with engine oil up to levelmark.
- Füllen Sie Öl ein bis zurNiveau-Markierung.
- Poner aceite motor hasta ennivel.
- Deitar óleo motor até o sinal.
- Rimontare il filtro aria.
- Remonter le filtre à air.
- Reassemble air cleaner.
- Setzen Sie den Luftfilterwieder zusammen.
- Montar el filtro aire.
- Remontar o filtro ar.
- Accertarsi che il filtro sia montato in modo corretto altrimenti polvere ed altro possono entrare nei condotti aspirazione.
- Vérifier que le filtre est monté correctement pour empêcher à la poussière ou autres saletés de pénétrer dans les conduits admission.
- Make sure that the filter is mounted in the correct way otherwise dust and other impurities could ilfiltrate into the intake ducts.
- Sicherstellen, daß der Filter korrekt montiert ist. Andernfalls können Staub und Fremdkörper in den saug leitungen.
- Cerciorarse que el filtro esté montado en modo correcto de lo contrario el polvo u otros elementos pueden entrar en los conductos aspiración.
- Verificar que o filtro esteja montado correctamente para evitar que a poeira possa entrar nos condutos de aspiração.
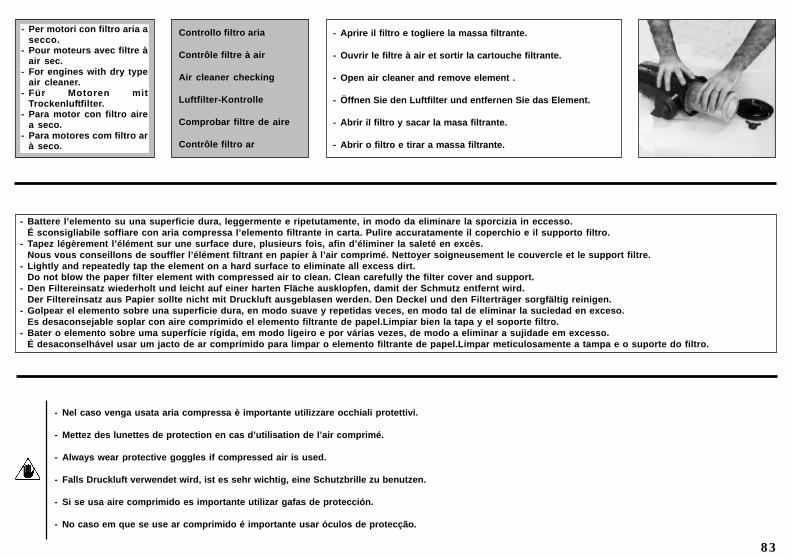
83
- Per motori con filtro aria asecco.
- Pour moteurs avec filtre àair sec.
- For engines with dry typeair cleaner.
- Für Motoren mitTrockenluftfilter.
- Para motor con filtro airea seco.
- Para motores com filtro arà seco.
Controllo filtro aria
Contrôle filtre à air
Air cleaner checking
Luftfilter-Kontrolle
Comprobar filtre de aire
Contrôle filtro ar
- Aprire il filtro e togliere la massa filtrante.
- Ouvrir le filtre à air et sortir la cartouche filtrante.
- Open air cleaner and remove element .
- Öffnen Sie den Luftfilter und entfernen Sie das Element.
- Abrir il filtro y sacar la masa filtrante.
- Abrir o filtro e tirar a massa filtrante.
- Battere l’elemento su una superficie dura, leggermente e ripetutamente, in modo da eliminare la sporcizia in eccesso.É sconsigliabile soffiare con aria compressa l’elemento filtrante in carta. Pulire accuratamente il coperchio e il supporto filtro.
- Tapez légèrement l’élément sur une surface dure, plusieurs fois, afin d’éliminer la saleté en excès.Nous vous conseillons de souffler l’élément filtrant en papier à l’air comprimé. Nettoyer soigneusement le couvercle et le support filtre.
- Lightly and repeatedly tap the element on a hard surface to eliminate all excess dirt.Do not blow the paper filter element with compressed air to clean. Clean carefully the filter cover and support.
- Den Filtereinsatz wiederholt und leicht auf einer harten Fläche ausklopfen, damit der Schmutz entfernt wird.Der Filtereinsatz aus Papier sollte nicht mit Druckluft ausgeblasen werden. Den Deckel und den Filterträger sorgfältig reinigen.
- Golpear el elemento sobre una superficie dura, en modo suave y repetidas veces, en modo tal de eliminar la suciedad en exceso.Es desaconsejable soplar con aire comprimido el elemento filtrante de papel.Limpiar bien la tapa y el soporte filtro.
- Bater o elemento sobre uma superfície rígida, em modo ligeiro e por várias vezes, de modo a eliminar a sujidade em excesso.É desaconselhável usar um jacto de ar comprimido para limpar o elemento filtrante de papel.Limpar meticulosamente a tampa e o suporte do filtro.
- Nel caso venga usata aria compressa è importante utilizzare occhiali protettivi.
- Mettez des lunettes de protection en cas d’utilisation de l’air comprimé.
- Always wear protective goggles if compressed air is used.
- Falls Druckluft verwendet wird, ist es sehr wichtig, eine Schutzbrille zu benutzen.
- Si se usa aire comprimido es importante utilizar gafas de protección.
- No caso em que se use ar comprimido é importante usar óculos de protecção.
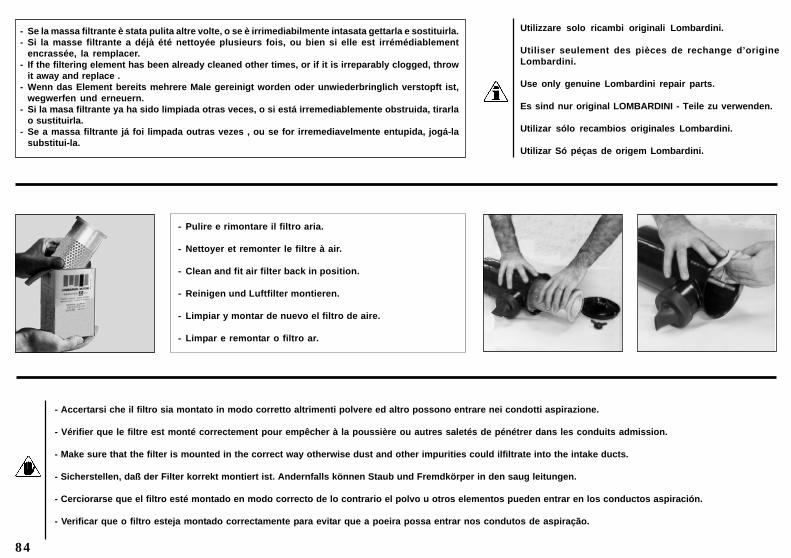
84
- Pulire e rimontare il filtro aria.
- Nettoyer et remonter le filtre à air.
- Clean and fit air filter back in position.
- Reinigen und Luftfilter montieren.
- Limpiar y montar de nuevo el filtro de aire.
- Limpar e remontar o filtro ar.
- Accertarsi che il filtro sia montato in modo corretto altrimenti polvere ed altro possono entrare nei condotti aspirazione.
- Vérifier que le filtre est monté correctement pour empêcher à la poussière ou autres saletés de pénétrer dans les conduits admission.
- Make sure that the filter is mounted in the correct way otherwise dust and other impurities could ilfiltrate into the intake ducts.
- Sicherstellen, daß der Filter korrekt montiert ist. Andernfalls können Staub und Fremdkörper in den saug leitungen.
- Cerciorarse que el filtro esté montado en modo correcto de lo contrario el polvo u otros elementos pueden entrar en los conductos aspiración.
- Verificar que o filtro esteja montado correctamente para evitar que a poeira possa entrar nos condutos de aspiração.
- Se la massa filtrante è stata pulita altre volte, o se è irrimediabilmente intasata gettarla e sostituirla.- Si la masse filtrante a déjà été nettoyée plusieurs fois, ou bien si elle est irrémédiablement
encrassée, la remplacer.- If the filtering element has been already cleaned other times, or if it is irreparably clogged, throw
it away and replace .- Wenn das Element bereits mehrere Male gereinigt worden oder unwiederbringlich verstopft ist,
wegwerfen und erneuern.- Si la masa filtrante ya ha sido limpiada otras veces, o si está irremediablemente obstruida, tirarla
o sustituirla.- Se a massa filtrante já foi limpada outras vezes , ou se for irremediavelmente entupida, jogá-la
substitui-la.
Utilizzare solo ricambi originali Lombardini.
Utiliser seulement des pièces de rechange d’origineLombardini.
Use only genuine Lombardini repair parts.
Es sind nur original LOMBARDINI - Teile zu verwenden.
Utilizar sólo recambios originales Lombardini.
Utilizar Só péças de origem Lombardini.
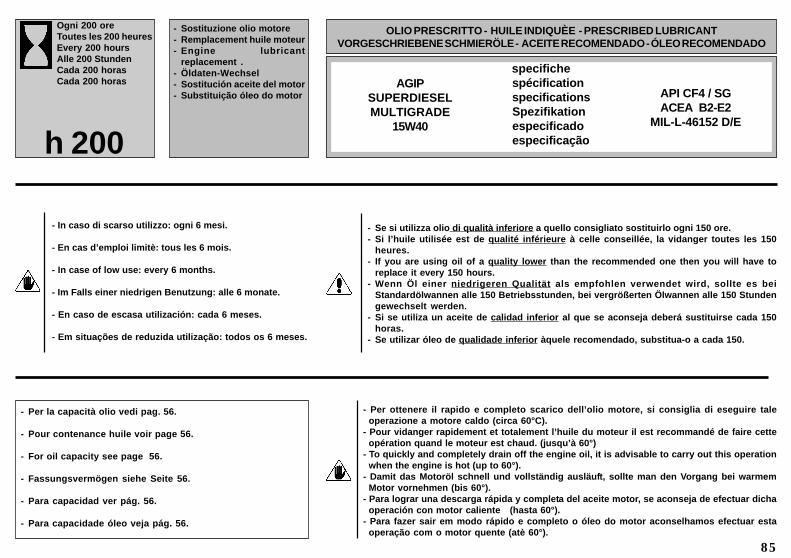
85
Ogni 200 oreToutes les 200 heuresEvery 200 hoursAlle 200 StundenCada 200 horasCada 200 horas
h 200
- Sostituzione olio motore- Remplacement huile moteur- Engine lubricant
replacement .- Öldaten-Wechsel- Sostitución aceite del motor- Substituição óleo do motor
- Per ottenere il rapido e completo scarico dell’olio motore, si consiglia di eseguire taleoperazione a motore caldo (circa 60°C).
- Pour vidanger rapidement et totalement l’huile du moteur il est recommandé de faire cetteopération quand le moteur est chaud. (jusqu’à 60°)
- To quickly and completely drain off the engine oil, it is advisable to carry out this operationwhen the engine is hot (up to 60°).
- Damit das Motoröl schnell und vollständig ausläuft, sollte man den Vorgang bei warmemMotor vornehmen (bis 60°).
- Para lograr una descarga rápida y completa del aceite motor, se aconseja de efectuar dichaoperación con motor caliente (hasta 60°).
- Para fazer sair em modo rápido e completo o óleo do motor aconselhamos efectuar estaoperação com o motor quente (atè 60°).
OLIO PRESCRITTO - HUILE INDIQUÈE - PRESCRIBED LUBRICANTVORGESCHRIEBENE SCHMIERÖLE - ACEITE RECOMENDADO - ÓLEO RECOMENDADO
specifiche spécification specifications Spezifikation especificado especificação
AGIPSUPERDIESELMULTIGRADE
15W40
API CF4 / SGACEA B2-E2
MIL-L-46152 D/E
- In caso di scarso utilizzo: ogni 6 mesi.
- En cas d’emploi limitè: tous les 6 mois.
- In case of low use: every 6 months.
- Im Falls einer niedrigen Benutzung: alle 6 monate.
- En caso de escasa utilización: cada 6 meses.
- Em situações de reduzida utilização: todos os 6 meses.
- Se si utilizza olio di qualità inferiore a quello consigliato sostituirlo ogni 150 ore.- Si l’huile utilisée est de qualité inférieure à celle conseillée, la vidanger toutes les 150
heures.- If you are using oil of a quality lower than the recommended one then you will have to
replace it every 150 hours.- Wenn Öl einer niedrigeren Qualität als empfohlen verwendet wird, sollte es bei
Standardölwannen alle 150 Betriebsstunden, bei vergrößerten Ölwannen alle 150 Stundengewechselt werden.
- Si se utiliza un aceite de calidad inferior al que se aconseja deberá sustituirse cada 150horas.
- Se utilizar óleo de qualidade inferior àquele recomendado, substitua-o a cada 150.
- Per la capacità olio vedi pag. 56.
- Pour contenance huile voir page 56.
- For oil capacity see page 56.
- Fassungsvermögen siehe Seite 56.
- Para capacidad ver pág. 56.
- Para capacidade óleo veja pág. 56.

86
- Togliere il tappo rifornimento olio.
- Dévisser le bouchon de remplissage d’huile.
- Remove oil filter cap.
- Entfernen Sie die Öleinfüllschraube.
- Quitar el tapón llenado aceite.
- Tirar o tampa reabastecimento óleo.
- Togliere il tappo e scaricare l’olio in un contenitore adatto.
- Enlevez le bouchon et vidangez l’huile dans un récipient approprié.
- Remove the plug and drain the oil into a suitable vessel.
- Den Stopfen abschrauben und das Öl in einen geeigneten Behälter auslaufen lassen.
- Quitar el tapón y descargar el aceite en un contenedor idóneo.
- Retirar o tampão e recolher o óleo num recipiente apropriado.
- Rimettere il tappo scarico olio.
- Revisser le bouchon de vidange.
- Reassemble oil drain cap.
- Abiaßschraube wieder einsetzen.
- Montar el tapon vaciado aceite.
- Repor o tampa descarregamento óleo.
- L’olio motore esausto può essere causa di cancro alla pelle se lasciato ripetutamente a contatto e per periodi prolungati. Se il contatto con l'olio fosse inevitabile,si consiglia di lavarsi accuratamente le mani con acqua e sapone non appena possibile. Non disperdere l’olio esausto in ambiente in quanto altamente inquinante.
- L’huile moteur épuisée peut être la cause de cancer de la peau si laissée fréquemment à contact pour des périodes prolongées. Si le contact avec l’huile estinévitable, se laver les mains à l’eau et savon avec soin dès que possible. Ne pas vidanger l’huile épuisée dans le milieu, car elle a un haut niveau de pollution.
- The used engine oil can cause skin-cancer if kept frequently in contact for prolonged periods. If contact with oil cannot be avoided, wash carefully your handswith water and soap as soon as possible. Do not disperse the oil in the ambient, as it has a high pollution power.
- Schmieröl kann Hautkrebs erzeugen, wenn es häufig in Hautkontakt kommt. Kann ein Kontakt nicht vermieden werden, sollte man sich so schnell wie möglichdie Hände gründlich waschen. Wegen dem hohen Grad der Umweltverschmutzung, ist Sorge zu tragen, daß kein Öl ins Erdreich.
- El aceite del motoe sucio (usaoo) puede ser causa de cancer de piel, si es repetidamente ó prolongado su contacto. Si el contacto con el aceite fuese inevitable,se aconseja lavarse adecuadamente las manos con jabon lo antes posible. Non dispersar o tirar el aceite usado: por ser de un alto nivel de contaminante.
- O óleo velho do motor pode provocar cancro na pele se entrar frequentemente em contacto e por períodos prolongados com a mesma. No caso em que o contacto como óleo seja inevitável, aconselha-se lavar bem as mãos com água e sabão assim que for possível. Não dispersar o óleo velho no ambiente porque é muito poluidor.
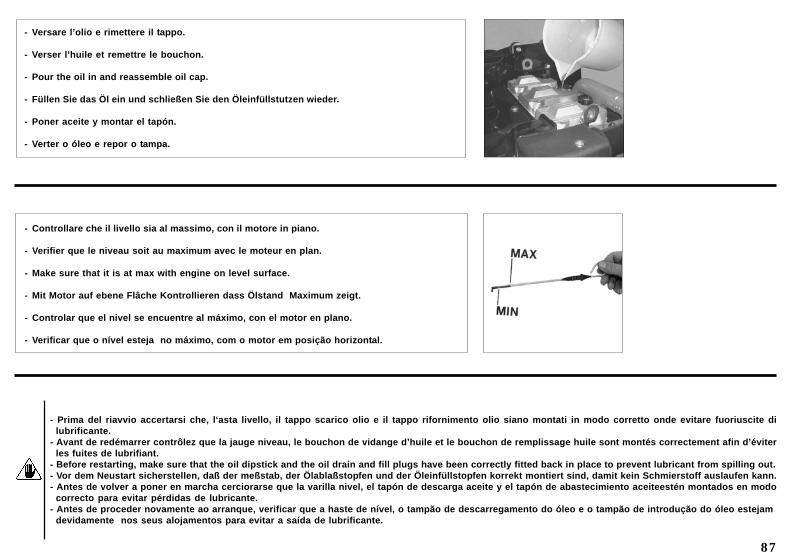
87
- Controllare che il livello sia al massimo, con il motore in piano.
- Verifier que le niveau soit au maximum avec le moteur en plan.
- Make sure that it is at max with engine on level surface.
- Mit Motor auf ebene Flâche Kontrollieren dass Ölstand Maximum zeigt.
- Controlar que el nivel se encuentre al máximo, con el motor en plano.
- Verificar que o nível esteja no máximo, com o motor em posição horizontal.
- Versare l’olio e rimettere il tappo.
- Verser l’huile et remettre le bouchon.
- Pour the oil in and reassemble oil cap.
- Füllen Sie das Öl ein und schließen Sie den Öleinfüllstutzen wieder.
- Poner aceite y montar el tapón.
- Verter o óleo e repor o tampa.
- Prima del riavvio accertarsi che, l‘asta livello, il tappo scarico olio e il tappo rifornimento olio siano montati in modo corretto onde evitare fuoriuscite dilubrificante.
- Avant de redémarrer contrôlez que la jauge niveau, le bouchon de vidange d’huile et le bouchon de remplissage huile sont montés correctement afin d’éviterles fuites de lubrifiant.
- Before restarting, make sure that the oil dipstick and the oil drain and fill plugs have been correctly fitted back in place to prevent lubricant from spilling out.- Vor dem Neustart sicherstellen, daß der meßstab, der Ölablaßstopfen und der Öleinfüllstopfen korrekt montiert sind, damit kein Schmierstoff auslaufen kann.- Antes de volver a poner en marcha cerciorarse que la varilla nivel, el tapón de descarga aceite y el tapón de abastecimiento aceiteestén montados en modo
correcto para evitar pérdidas de lubricante.- Antes de proceder novamente ao arranque, verificar que a haste de nível, o tampão de descarregamento do óleo e o tampão de introdução do óleo estejam
devidamente nos seus alojamentos para evitar a saída de lubrificante.
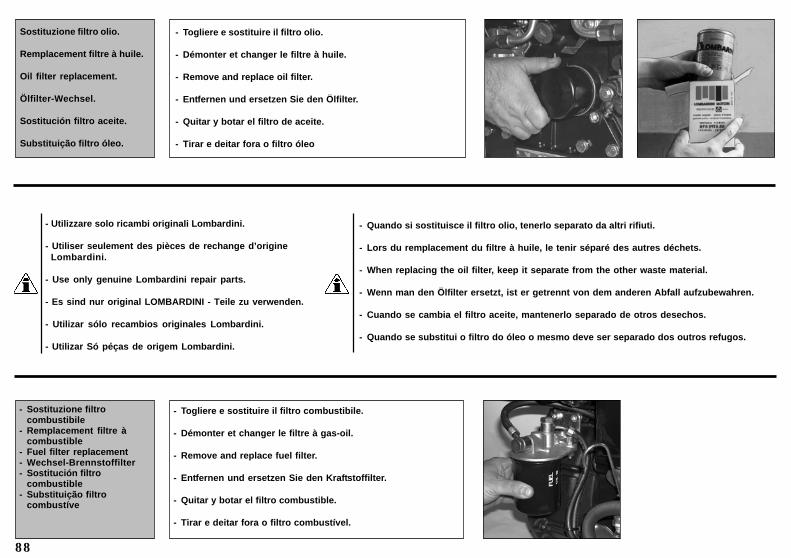
88
- Sostituzione filtrocombustibile
- Remplacement filtre àcombustible
- Fuel filter replacement- Wechsel-Brennstoffilter- Sostitución filtro
combustible- Substituição filtro
combustíve
- Quando si sostituisce il filtro olio, tenerlo separato da altri rifiuti.
- Lors du remplacement du filtre à huile, le tenir séparé des autres déchets.
- When replacing the oil filter, keep it separate from the other waste material.
- Wenn man den Ölfilter ersetzt, ist er getrennt von dem anderen Abfall aufzubewahren.
- Cuando se cambia el filtro aceite, mantenerlo separado de otros desechos.
- Quando se substitui o filtro do óleo o mesmo deve ser separado dos outros refugos.
Sostituzione filtro olio.
Remplacement filtre à huile.
Oil filter replacement.
Ölfilter-Wechsel.
Sostitución filtro aceite.
Substituição filtro óleo.
- Togliere e sostituire il filtro olio.
- Démonter et changer le filtre à huile.
- Remove and replace oil filter.
- Entfernen und ersetzen Sie den Ölfilter.
- Quitar y botar el filtro de aceite.
- Tirar e deitar fora o filtro óleo
- Togliere e sostituire il filtro combustibile.
- Démonter et changer le filtre à gas-oil.
- Remove and replace fuel filter.
- Entfernen und ersetzen Sie den Kraftstoffilter.
- Quitar y botar el filtro combustible.
- Tirar e deitar fora o filtro combustível.
- Utilizzare solo ricambi originali Lombardini.
- Utiliser seulement des pièces de rechange d’origineLombardini.
- Use only genuine Lombardini repair parts.
- Es sind nur original LOMBARDINI - Teile zu verwenden.
- Utilizar sólo recambios originales Lombardini.
- Utilizar Só péças de origem Lombardini.
89
- Pulizia sistema diraffreddamento
- Nettoyage du système derefroidissement
- Cooling system cleaning- Reinigung Kraftstofftank- Liempeza del sistema de
refrigeración- Limpeza do sistema de
arrefecimento
Togliere il convogliatore.
Enlever la coiffe ventilateur.
Remove air shroud.
Die Ventilatorhaubeabnehmen.
Quitar la caja ventilador.
Tire o transportador.
- Pulire le alette con pennelloe gasolio.
- Nettoyer les aiettes avec unpinceau et du gasoil.
- Clean fins with a brush andfuel oil.
- Die Kühlrippen Pinsel undDieselöl reinigen.
- Limpiar las aletas conbrocha y gasoil.
- Limpe as aletas com umpincel e gasóleo.
- Quando si sostituisce il filtro combustibile, tenerlo separatoda altri rifiuti.
- Lors du remplacement du filtre à combustible, le tenirséparé des autres déchets
- When replacing the fuel filter, keep it separate from theother waste material.
- Wenn man den Kraftstoffilter ersetzt, ist er getrennt vondem anderen Abfall aufzubewahren.
- Cuando se cambia el filtro combustible, mantenerloseparado de otros desechos.
- Quando se substitui o filtro do combustível o mesmo deveser separado dos outros refugos.
- Eseguire disareazione (vedi pag. 68). Avviare il motore e verificare che non vi siano perdite o trasudazioni di combustibile dalnuovo filtro.
- Effectuer la désaération (voir page 68). Mettre le moteur en marche et vérifier si le combustible ne fuit pas ou ne suinte pas dufiltre neuf.
- Carry out air bleeding (see page 68). Start the engine and check for leaks and sweating from the new filter.- Entlüftung ausführen (siehe S. 68). Den Motor anlassen und prüfen, dass kein Kraftstoff aus dem neuen Filter ausläuft oder
ausschwitzt.- Realizar la desaireación (ver pág. 68). Arrancar el motor y comprobar que no haya pérdidas o transpiración de combustible desde
el nuevo filtro.- Execute a desgaseificação (veja pág. 68). Ligue o motor e verifique que não haja vazamentos ou infiltrações de combustível do
novo filtro.
- Utilizzare solo ricambi originali Lombardini.
- Utiliser seulement des pièces de rechange d’origineLombardini.
- Use only genuine Lombardini repair parts.
- Es sind nur original LOMBARDINI - Teile zu verwenden.
- Utilizar sólo recambios originales Lombardini.
- Utilizar Só péças de origem Lombardini.
90
- Controllo tensione cinghia- Contrôle tension
courrioies- Blower belts tenion
checking- Keilriemenspannung
kotrollieren- Control tensión correas- Controlo do esticamento
da correia
- Eseguire il controllo solo dopo avere isolato il cavo positivo della batteria per prevenire cortocircuiti accidentali e di conseguenza l’eccitazione del motorino di avviamento.
- Effectuez le contrôle seulement après avoir isolé le câble positif de la batterie pour prévenirles courts-circuits accidentels et par conséquent l’excitation du démarreur
- Only check after having insulated the positive battery cable to prevent accidental short-circuits and the starter motor from being consequently energized.
- Die Kontrolle erst vornehmen, nachdem man das positive Kabel der Batterie isoliert hat,damit er nicht zu Kurzschlüssen und folglich zum Erregen des Starters kommt.
- Efectuar el control sólo luego de haber aislado el cable positivo de la batería para prevenircortocircuitos accidentales y como consecuencia la excitación del motor de arranque.
- Efectuar o controle somente depois de se ter isolado o cabo positivo da bateria para evitarcurto-circuitos acidentais e por conseguinte a excitação do motor de ignição.
Togliere la protezione e controllare la tensione della cinghietta.
Démonter la protection et contôrler la tension de la courroie.
Remove belt guard and check tension.
Emtfernen Sie den Riemenschutz und prüfen Sie die Spannung.
Quitar la protección y comprobar la tension de la correras.
Remova a protecção da correia e verificar o correctoesticamento da correia.
- Rimontare il convogliatore.- Remonter la coiffe
ventilateur.- Reassemble air shroud.- Die ventilatorhaube
wiederzusammensetzen.- Poner la caja ventilador.- Volte a montar o
transportador.
- Asciugare con getto d’ariacompressa.
- Sécher avec un jet d’aircomprimé.
- Dry with a jet of compressedair.
- Mit Druckluft trocknen.- Secar con aire comprimido.- Seque com jacto de ar
comprimido.

91
- Rimontare la protezionecinghiette.
- Remonter la protectioncourroie.
- Reassemble bel guard.- Bauen Sie den
Riemenshutz wieder an.- Montar la protección
correa.- Volte a montar a
protecção da correia.
- Ricontrollare che la tensione della cinghia sia entro i parametri previsti.
- Contrôler à nouveau si la tension de la courroie respecte les paramètres prévus.
- Recheck that the belt tension is within the required parameters.
- Erneut prüfen, ob die Spannung des Riemens innerhalb der vorgesehenen Parameter liegt.
- Volver a comprobar que el tensado de la correa esté dentro de los parámetros previstos.
- Certifique-se novamente de que o esticamento da correia esteja dentro dos parâmetros previstos.
Smontare la semipuleggia.
Démonter la demi-poulie.
Disassemble half-pulley.
Riemenscheibenhälftabmontieren.
Desmontar la semipolea.
Desmonte a semi-roldana.
- Togliendo spessori si aumenta la tensione della cinghietta.
- En enlevant des cales, on augumente la tension del la courroie.
- Removing shims tension of the belt will increase.
- Nehmen Sie die Scheiben heraus, um die Riemenspannung zuerhöhen.
- Quitando espesores se regula la tensión de la correa.
- Ao tirar os distanciadores aumentará o esticamento da correia.
- Se la flessione è superiore ad 1 cm esercitando una pressionedi 10Kg, tendere la cinghia.
- Si la flexion est inférieure à 1 cm en exerçant une pression de10 kg, tendre la courroie.
- If it flexes more than 1 cm exercising a pressure of 10 kg,tension the belt.
- Wenn bei einem Druck von 10 kg die Biegung 1 cmüberschreitet, den Riemen spannen.
- Si la flexión es superior a un 1 cm ejerciendo una presión de10 kg, tensar la correa.
- Se, ao exercitar uma pressão de 10Kg, a flexão ultrapassar 1cm, estique a correia.
- Rimontare la semipuleggia.- Remonter la demi-poulie.- Reassemble half pulley.- Bauen Sie die
R i e m e n s c h e i b e n h ä l f t ewider an.
- Mentar la semipolea.- Volte a montar a semi-
roldana.
10 kg10 kg
10 kg10 kg
92
- Rimontare cinghia esemipuleggia.
- Remonter la courroie et lademi-poulie.
- Reassemble belt and half-pulley.
- Wiedereinsetzen desRiemens und derHalbriemenscheibe.
- Volver a montar la correa yla semipolea.
- Volte a montar a correia ea semi-roldana.
- Rimontare la protezionecinghia .
- Remonter la protectioncourroie.
- Reassemble bel guard.- Bauen Sie den Riemenshutz
wieder an.- Montar la protección correa.- Volte a montar a protecção
da correia.
Sostituzione cinghia
Remplacement curroie
Belt replacement
Riemen-Wechsel
Sostitución correa
Substituição correia
Ogni 500 oreToutes les 500 heuresEvery 500 hoursAlle 500 StundenCada 500 horasCada 500 horas
h 500
- Eseguire il controllo solo dopo avere isolato il cavo positivo della batteria per prevenire cortocircuiti accidentali e di conseguenza l’eccitazione del motorino di avviamento.
- Effectuez le contrôle seulement après avoir isolé le câble positif de la batterie pour prévenirles courts-circuits accidentels et par conséquent l’excitation du démarreur
- Only check after having insulated the positive battery cable to prevent accidental short-circuits and the starter motor from being consequently energized.
- Die Kontrolle erst vornehmen, nachdem man das positive Kabel der Batterie isoliert hat, damiter nicht zu Kurzschlüssen und folglich zum Erregen des Starters kommt.
- Efectuar el control sólo luego de haber aislado el cable positivo de la batería para prevenircortocircuitos accidentales y como consecuencia la excitación del motor de arranque.
- Efectuar o controle somente depois de se ter isolado o cabo positivo da bateria para evitarcurto-circuitos acidentais e por conseguinte a excitação do motor de ignição.
- Togliere la protezionecinghia.
- Démonter la protection de lacourroie.
- Remove belt guard.- Entfernen Sie den
Keilriemenschutz.- Quitar la protección
correas.- Remova a protecção da
correia .
- Smontare la semipuleggia esostituire la cinghia.
- Démonter la demi-poulie etremplacer la courroie.
- Remove the semi-pulley andreplace the belt.
- Die Halbriemenscheibeausbauen und den Riemenaustauschen.
- Desmontar la semipolea ysustituir la correa.
- Desmonte a semi-roldana esubstitua a correia.
- Utilizzare solo ricambi originali Lombardini.
- Utiliser seulement des pièces de rechange d’origineLombardini.
- Use only genuine Lombardini repair parts.
- Es sind nur original LOMBARDINI - Teile zu verwenden.
- Utilizar sólo recambios originales Lombardini.
- Utilizar Só péças de origem Lombardini.

93
Per le seguenti operazioni rivolgersi alle Stazioni di Servizio autorizzate Lombardini.Pour les opérations suivantes veuillez vous adresser aux stations de service autorisées Lombardini.
Following operations should be performed by authorized personnel trained on the product.Folgende Wartungsarbeiten sollen von Fachwerkstätten durchgeführt werden.
Las operaciones que siguen aconsejamos efectuar a través de nuestra red de asistencia.Para as seguintes operações dirigir-se às estações de servicio autorizadas pela Lombardini.
94
Ogni 300 oreToutes les 300 heuresEvery 300 hoursAlle 300 StundenCada 300 horasCada 300 horas
h 300
- Registro gioco bilancieri- Réglage du jeu des
culbuteurs- Setting rocker arms
clearance- Ventilspiel-Einstellung- Reglajes juego balancines- Registro jogo bilancins.
- É necessario effettuare le regolazioni e i controlli a mo-tore freddo.
- Il est nécéssaire effectuer les réglages et les contrôlesavec moteur froid.
- Adjustments and controls must be carried out on coldengine.
- Die Kontrollen und Einstellungen sind bei kaltem Motorauszuführen.
- Es necesario efectuar las regulaciones y los controlescon el motor frío.
- É necessário efectuar as regulações e os controlescom o motor frio.
Per registrare il gioco tra valvole e bilancieri: Togliere il cappello bilancieri - Girare l’albero motore fino a portare il pistone al punto mortosuperiore, in fase di compressione. Allentare i dadi bloccaggio viti di registro - Inserire lo spessimetro (mm 0.15) tra i bilancieri e le valvole.Avvitare le viti di registro, fino che lo spessimetro si possa sfilare senza incontrare resistenza. Serrare i dadi bloccaggio viti di registro.
Pour régIer le jeu entre valves et culbuteurs: enlever le couvercle culbuteurs - Tourner le vilebrequin en portant le position au P.M.S., enphase de compression - Déserrer les écrous blocage vis de régIage. lnsérer l’epaisseurmètre (0.15mm.) entre culbuteurs et soupapes.Serrer les vis de régIage, iusqu’à quand l’épaisseurmètre peut être enlevé sans difficulté - Serrer les écrous de blocage vis de régIage.
Valve-rocker arm clearance setting : Remove rocker arm cover - Turn flywheeI until piston reaches T.D.C. on compression stroke - Unlockadjusting screw nuts - Set feeler gauge (mm. 0.15) after turning flywheel until pistol reaches - Tighten adjusting screws locking nuts.
Einstellung: KipphebeldeckeI abnehmen - Kolben im O.T. nach dem Verdichtungstakt, D.H. mit Kipphebel in Ruhestellung, stellt man dasSpiel zwischen Ventilen und Kipphebeln (0.15mm.) durch Verdrehen der Einstellschrauben nach lockern der Kontermuttern ein - Klemmutterder Einstellschrauben wieder spannen.
Para el reglaje entre valvulas y balancines: Rodar el cigueñal hasta colocar el piston en punto muerto superior, en fase de compresión -Aflojar las controtuercas de los tornillos de reglaje - Poner una galga-sonda (0.15mm.) entre balancines y valvulas. Bloquear los tornilloshasta que la galgasonda se deslise sin resistencia - Bloquear las controtuercas.
Para registrare o jogo entre váIvulas e bilancis: Virar o eixo motor até trazer o pistão ao P.M.S. (punto morte superiore), em fase decompressão. Afrouxar os dados de bloqueio parafusos de registro. Introduzir uma galgasonda (mm 0.15) entre bilanceiro e eixo excêntrico.Parafusar os parafusos do registro até que se pode desenfiar a galgasonda sem encontrae resistência. Cerrar os dados de bloqueioparafusos de registro.
- Pulizia serbatoiocombustibile
- Nettoyage du réservoir àcombustible
- Fuel tank cleaning- Reinigung Kraftstofftank- Limpieza del depósito de
combustible- Limpeza do depósito do
combustível

95
- Taratura e pulizia iniettori.- Tarage et nettoyage
injecteur.- Setting and injectors
cleaning.- Einspritzdüsenkontrolle.- Ajuste y limpieza
injectores.- Taradura e limpeza
injetores.
Per pulire e tarare gli iniettori, occorre una pompa prova taratura pressione iniettori, con manometro adeguato.Togliere l’iniettore - Collegarlo alla pompa e al manometro - Azionare la pompa - Controllare se l’iniettorepolverizza e se la pressione di taratura è Kg/cm² 220-230. Se l’iniettore non polverizza, svitare la ghiera, pulireil foro centrale e il pernetto dell’ago con spazzola metallica di ottone e lavare accuratamente con benzina. Sepolverizza ma la pressione di taratura è inferiore, aumentare l’altezza degli spessori sotto la molla di taratura.Se la pressione eccede diminuire l’altezza degli spessori.
Pour nettoyer et tarer les injecteurs il faut une pompe d’essai de tarage de la pression des injecteurs, avecmanomètre approprié. Déposez l’injecteur - Branchez-le à la pompe et au manomètre - Actionnez la pompe -Contrôlez la pulvérisation de l’injecteur et si la pression de tarage est à 220-230 Kg/cm². Si l’injecteur ne
pulvérise pas, dévissez la douille, nettoyez le trou central et l’axe de l’aiguille avec une brosse métallique en laiton et lavez soigneuse-ment à l’essence. S’il y a pulvérisation mais la pression de tarage est inférieure, augmentez la hauteur des rondelles de réglage sous leressort de tarage. Si la pression excède diminuez la hauteur des rondelles.
An injector pressure setting test pump with an adequate pressure gauge are required to clean and calibrate the injectors - Remove theinjector – Connect it to the pump and pressure gauge – Operate the pump – Check to make sure that the injector atomizes and that thepressure setting is 220-230 Kg/cm². If the injector fails to atomize, unscrew the ring nut, clean the central hole and the needle pin with abrass brush, then thoroughly wash with gasoline. If it atomizes but the pressure setting is lower, increase the height of the shims underthe calibrating spring. Lower the height of the shims if the pressure is excessive.
Um die Einspritzdüsen zu reinigen und einzustellen, braucht man eine Pumpe zum Einstellen des Drucks der Einspritzpumpen, die mitangemessenem Manometer ausgestattet ist. Die Einspritzdüse ausbauen, sie an die Pumpe und das Manometer anschließen. Die Pumpebetätigen und prüfen, ob die Einspritzdüse funktioniert und ob der Eichdruck 220-230 kg/cm² ausmacht. Wenn die Einspritzdüse verstopftist, die Ringmutter losdrehen und die zentrale Öffnung und den kleinen Bolzen der Nadel mit einer Messingbürste reinigen und sorgfältigmit Benzin reinigen. Wenn sie verstäubt, aber der Eichdruck kleiner ist, die Höhe der Beilagen unter der Eichfeder erhöhen. Wenn derDruck zu groß ist, die Höhe der Beilagen verringern.
Para limpiar y calibrar los inyectores, es necesario una bomba prueba calibrado presión inyectores, con manómetro idóneo. Quitar elinyector – Conectarlo a la bomba y al manómetro – Accionar la bomba – Controlar si el inyector atomiza y si la presión de calibrado es de220-230 Kg/cm2. Si el inyector no atomiza, desenroscar la tuerca, limpiar el orificio central y el perno de la aguja con cepillo metálico delatón y lavar bien con gasolina. Si atomiza pero la presión de calibrado es inferior, aumentar la altura de los espesores bajo el muelle decalibrado. Si la presión es excesiva disminuir la altura de los espesores.
Para limpar e regular os injectores, é necessário usar uma bomba de prova de regulação de pressão dos injectores, dotada de manómetroapropriado. Desmontar o injector - Ligar o injector à bomba e ao manómetro - Accionar a bomba - Controlar se o injector pulveriza e se apressão de regulação é kg/cm² 220-230. Se o injector não pulveriza, desatarraxar a rosca, limpar o orifício central e o perno da agulha comuma escova metálica de latão e lavar meticulosamente com gasolina. No caso em que pulverize mas a pressão de regulação é inferior,aumentar a altura das espessuras debaixo da mola de regulação. Se a pressão excede diminuir a altura das espessuras.

96
Dopo 2500 oreAprès 2500 heuresAfter 2500 hoursNach 2500 StundenDespués de 2500 horasDepois 2500 horas
h 2500
REVISIONE PARZIALE
REVISION PARTIELLE
PARTIAL OVERHAUL
TEILÜBERHOLUNG
REVISION PARCIAL
REVISÃO PARCIAL
Revisione parziale: Smerigliatura valvole e sedi - Revisione iniettori e pompe di iniezione - Controllo sporgenza iniettori - Controlloanticipo iniezione - Controllo spazio morto tra testa e pistone - Controllo gioco assiale di albero motore e albero a camme - Serraggiobulloni bloccaggio teste.
Revision partielle: Rodage soupapes et logements - Revision injecteurs et pompes injection - Contrôle saillie injecteurs, avance àl’iniection, espacement mort entre culasse et piston, jeu axial de vilebrequin et arbre à cames - Serrage boulons blocage coulasses.
Partial overhaul: Valve and seat lapping - Injection equipment checking - injection timing - Injection timing - Bumping clearance - Crankshaftand camshaft end play - Cylinder head tightening.
Teilweise Überholung - Ventile und Sitze abscheifen - Einspritzdüse Pumpe , Einspritzpunkt, Totpunkt, Längspiel del Kurbelwelle und derNockenwelle prüfen. Bolzin zur Befestigung der ZylinderKöpfe anziehen.
Revision parcial: Emserilado valvulas y asientos - Revision inyectores y bomba inyeccion - Controlar la salida de la punta inyectores -Comprobar el inicio de inyección - Comprobar el espacio muerto tra culata y piston - Comprobar el juego axial de cigueñal y de levas -Controlar el aprieto de las tuercas que fijan las culatas.
Revisão parcial: Esmerilhamento váIvulas e sedes - Revisáo injetores y bomba inyeccion - Contrôle adiantamento injeção - Contrôle jogoaxial do eixo motor e eixo excêntrico.
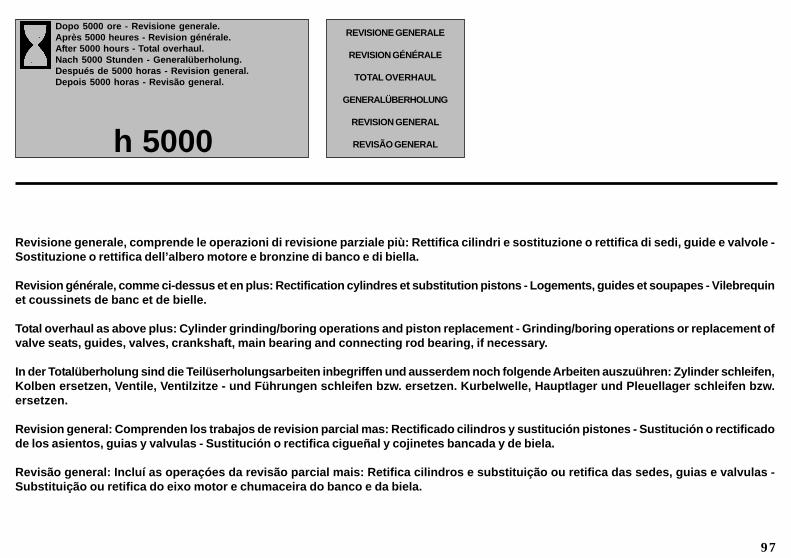
97
Dopo 5000 ore - Revisione generale.Après 5000 heures - Revision générale.After 5000 hours - Total overhaul.Nach 5000 Stunden - Generalüberholung.Después de 5000 horas - Revision general.Depois 5000 horas - Revisão general.
h 5000
REVISIONE GENERALE
REVISION GÉNÉRALE
TOTAL OVERHAUL
GENERALÜBERHOLUNG
REVISION GENERAL
REVISÃO GENERAL
Revisione generale, comprende le operazioni di revisione parziale più: Rettifica cilindri e sostituzione o rettifica di sedi, guide e valvole -Sostituzione o rettifica dell’albero motore e bronzine di banco e di biella.
Revision générale, comme ci-dessus et en plus: Rectification cylindres et substitution pistons - Logements, guides et soupapes - Vilebrequinet coussinets de banc et de bielle.
Total overhaul as above plus: Cylinder grinding/boring operations and piston replacement - Grinding/boring operations or replacement ofvalve seats, guides, valves, crankshaft, main bearing and connecting rod bearing, if necessary.
In der Totalüberholung sind die Teilüserholungsarbeiten inbegriffen und ausserdem noch folgende Arbeiten auszuühren: Zylinder schleifen,Kolben ersetzen, Ventile, Ventilzitze - und Führungen schleifen bzw. ersetzen. Kurbelwelle, Hauptlager und Pleuellager schleifen bzw.ersetzen.
Revision general: Comprenden los trabajos de revision parcial mas: Rectificado cilindros y sustitución pistones - Sustitución o rectificadode los asientos, guias y valvulas - Sustitución o rectifica cigueñal y cojinetes bancada y de biela.
Revisão general: Incluí as operaçóes da revisão parcial mais: Retifica cilindros e substituição ou retifica das sedes, guias e valvulas -Substituição ou retifica do eixo motor e chumaceira do banco e da biela.

98
NOTE - NOTES - BEMERKUNG - NOTAS
○ ○ ○ ○ ○ ○ ○ ○ ○ ○ ○ ○ ○ ○ ○ ○ ○ ○ ○ ○ ○ ○ ○ ○ ○ ○ ○ ○ ○ ○ ○ ○ ○ ○ ○ ○ ○ ○ ○ ○ ○ ○ ○ ○ ○ ○ ○ ○ ○ ○ ○ ○ ○ ○ ○ ○ ○ ○ ○ ○ ○ ○ ○ ○ ○ ○ ○ ○ ○ ○ ○ ○
○ ○ ○ ○ ○ ○ ○ ○ ○ ○ ○ ○ ○ ○ ○ ○ ○ ○ ○ ○ ○ ○ ○ ○ ○ ○ ○ ○ ○ ○ ○ ○ ○ ○ ○ ○ ○ ○ ○ ○ ○ ○ ○ ○ ○ ○ ○ ○ ○ ○ ○ ○ ○ ○ ○ ○ ○ ○ ○ ○ ○ ○ ○ ○ ○ ○ ○ ○ ○ ○ ○ ○
○ ○ ○ ○ ○ ○ ○ ○ ○ ○ ○ ○ ○ ○ ○ ○ ○ ○ ○ ○ ○ ○ ○ ○ ○ ○ ○ ○ ○ ○ ○ ○ ○ ○ ○ ○ ○ ○ ○ ○ ○ ○ ○ ○ ○ ○ ○ ○ ○ ○ ○ ○ ○ ○ ○ ○ ○ ○ ○ ○ ○ ○ ○ ○ ○ ○ ○ ○ ○ ○ ○ ○
○ ○ ○ ○ ○ ○ ○ ○ ○ ○ ○ ○ ○ ○ ○ ○ ○ ○ ○ ○ ○ ○ ○ ○ ○ ○ ○ ○ ○ ○ ○ ○ ○ ○ ○ ○ ○ ○ ○ ○ ○ ○ ○ ○ ○ ○ ○ ○ ○ ○ ○ ○ ○ ○ ○ ○ ○ ○ ○ ○ ○ ○ ○ ○ ○ ○ ○ ○ ○ ○ ○ ○
○ ○ ○ ○ ○ ○ ○ ○ ○ ○ ○ ○ ○ ○ ○ ○ ○ ○ ○ ○ ○ ○ ○ ○ ○ ○ ○ ○ ○ ○ ○ ○ ○ ○ ○ ○ ○ ○ ○ ○ ○ ○ ○ ○ ○ ○ ○ ○ ○ ○ ○ ○ ○ ○ ○ ○ ○ ○ ○ ○ ○ ○ ○ ○ ○ ○ ○ ○ ○ ○ ○ ○
○ ○ ○ ○ ○ ○ ○ ○ ○ ○ ○ ○ ○ ○ ○ ○ ○ ○ ○ ○ ○ ○ ○ ○ ○ ○ ○ ○ ○ ○ ○ ○ ○ ○ ○ ○ ○ ○ ○ ○ ○ ○ ○ ○ ○ ○ ○ ○ ○ ○ ○ ○ ○ ○ ○ ○ ○ ○ ○ ○ ○ ○ ○ ○ ○ ○ ○ ○ ○ ○ ○ ○
○ ○ ○ ○ ○ ○ ○ ○ ○ ○ ○ ○ ○ ○ ○ ○ ○ ○ ○ ○ ○ ○ ○ ○ ○ ○ ○ ○ ○ ○ ○ ○ ○ ○ ○ ○ ○ ○ ○ ○ ○ ○ ○ ○ ○ ○ ○ ○ ○ ○ ○ ○ ○ ○ ○ ○ ○ ○ ○ ○ ○ ○ ○ ○ ○ ○ ○ ○ ○ ○ ○ ○
○ ○ ○ ○ ○ ○ ○ ○ ○ ○ ○ ○ ○ ○ ○ ○ ○ ○ ○ ○ ○ ○ ○ ○ ○ ○ ○ ○ ○ ○ ○ ○ ○ ○ ○ ○ ○ ○ ○ ○ ○ ○ ○ ○ ○ ○ ○ ○ ○ ○ ○ ○ ○ ○ ○ ○ ○ ○ ○ ○ ○ ○ ○ ○ ○ ○ ○ ○ ○ ○ ○ ○
○ ○ ○ ○ ○ ○ ○ ○ ○ ○ ○ ○ ○ ○ ○ ○ ○ ○ ○ ○ ○ ○ ○ ○ ○ ○ ○ ○ ○ ○ ○ ○ ○ ○ ○ ○ ○ ○ ○ ○ ○ ○ ○ ○ ○ ○ ○ ○ ○ ○ ○ ○ ○ ○ ○ ○ ○ ○ ○ ○ ○ ○ ○ ○ ○ ○ ○ ○ ○ ○ ○ ○
○ ○ ○ ○ ○ ○ ○ ○ ○ ○ ○ ○ ○ ○ ○ ○ ○ ○ ○ ○ ○ ○ ○ ○ ○ ○ ○ ○ ○ ○ ○ ○ ○ ○ ○ ○ ○ ○ ○ ○ ○ ○ ○ ○ ○ ○ ○ ○ ○ ○ ○ ○ ○ ○ ○ ○ ○ ○ ○ ○ ○ ○ ○ ○ ○ ○ ○ ○ ○ ○ ○ ○
○ ○ ○ ○ ○ ○ ○ ○ ○ ○ ○ ○ ○ ○ ○ ○ ○ ○ ○ ○ ○ ○ ○ ○ ○ ○ ○ ○ ○ ○ ○ ○ ○ ○ ○ ○ ○ ○ ○ ○ ○ ○ ○ ○ ○ ○ ○ ○ ○ ○ ○ ○ ○ ○ ○ ○ ○ ○ ○ ○ ○ ○ ○ ○ ○ ○ ○ ○ ○ ○ ○ ○
○ ○ ○ ○ ○ ○ ○ ○ ○ ○ ○ ○ ○ ○ ○ ○ ○ ○ ○ ○ ○ ○ ○ ○ ○ ○ ○ ○ ○ ○ ○ ○ ○ ○ ○ ○ ○ ○ ○ ○ ○ ○ ○ ○ ○ ○ ○ ○ ○ ○ ○ ○ ○ ○ ○ ○ ○ ○ ○ ○ ○ ○ ○ ○ ○ ○ ○ ○ ○ ○ ○ ○
○ ○ ○ ○ ○ ○ ○ ○ ○ ○ ○ ○ ○ ○ ○ ○ ○ ○ ○ ○ ○ ○ ○ ○ ○ ○ ○ ○ ○ ○ ○ ○ ○ ○ ○ ○ ○ ○ ○ ○ ○ ○ ○ ○ ○ ○ ○ ○ ○ ○ ○ ○ ○ ○ ○ ○ ○ ○ ○ ○ ○ ○ ○ ○ ○ ○ ○ ○ ○ ○ ○ ○
○ ○ ○ ○ ○ ○ ○ ○ ○ ○ ○ ○ ○ ○ ○ ○ ○ ○ ○ ○ ○ ○ ○ ○ ○ ○ ○ ○ ○ ○ ○ ○ ○ ○ ○ ○ ○ ○ ○ ○ ○ ○ ○ ○ ○ ○ ○ ○ ○ ○ ○ ○ ○ ○ ○ ○ ○ ○ ○ ○ ○ ○ ○ ○ ○ ○ ○ ○ ○ ○ ○ ○
○ ○ ○ ○ ○ ○ ○ ○ ○ ○ ○ ○ ○ ○ ○ ○ ○ ○ ○ ○ ○ ○ ○ ○ ○ ○ ○ ○ ○ ○ ○ ○ ○ ○ ○ ○ ○ ○ ○ ○ ○ ○ ○ ○ ○ ○ ○ ○ ○ ○ ○ ○ ○ ○ ○ ○ ○ ○ ○ ○ ○ ○ ○ ○ ○ ○ ○ ○ ○ ○ ○ ○
○ ○ ○ ○ ○ ○ ○ ○ ○ ○ ○ ○ ○ ○ ○ ○ ○ ○ ○ ○ ○ ○ ○ ○ ○ ○ ○ ○ ○ ○ ○ ○ ○ ○ ○ ○ ○ ○ ○ ○ ○ ○ ○ ○ ○ ○ ○ ○ ○ ○ ○ ○ ○ ○ ○ ○ ○ ○ ○ ○ ○ ○ ○ ○ ○ ○ ○ ○ ○ ○ ○ ○
○ ○ ○ ○ ○ ○ ○ ○ ○ ○ ○ ○ ○ ○ ○ ○ ○ ○ ○ ○ ○ ○ ○ ○ ○ ○ ○ ○ ○ ○ ○ ○ ○ ○ ○ ○ ○ ○ ○ ○ ○ ○ ○ ○ ○ ○ ○ ○ ○ ○ ○ ○ ○ ○ ○ ○ ○ ○ ○ ○ ○ ○ ○ ○ ○ ○ ○ ○ ○ ○ ○ ○
○ ○ ○ ○ ○ ○ ○ ○ ○ ○ ○ ○ ○ ○ ○ ○ ○ ○ ○ ○ ○ ○ ○ ○ ○ ○ ○ ○ ○ ○ ○ ○ ○ ○ ○ ○ ○ ○ ○ ○ ○ ○ ○ ○ ○ ○ ○ ○ ○ ○ ○ ○ ○ ○ ○ ○ ○ ○ ○ ○ ○ ○ ○ ○ ○ ○ ○ ○ ○ ○ ○ ○

99
- Quando i motori rimangono inutilizzati per oltre 3 mesi, devono essere protetti, attuando le operazioni descritte nelle pagine seguenti.
- Si les moteurs doivent rester inactifs pendant plus de 3 mois, les protéger en faisant les opérations décrites dans les pages qui suivent.
- When the engines are not for more than 3 months, they have to be protected performing the operations described in the followingpages.
- Wenn die Motoren für einen Zeitraum von mehr als 3 Monate nicht benutzt werden, müssen sie geschützt werden. Dabei sind den aufden folgenden Seiten zu findenden Anleitungen auszuführen.
- Cuando los motores permanecen durante más de 3 meses sin ser utilizados, se deben proteger, realizando las operaciones descritasen las páginas siguientes.
- Se não utilizar os motores por mais de 3 meses será necessário protegê-los, realizando as operações descritas nas páginas seguintes.
IMMAGAZZINAGGIO - Conservazione.
STOCKAGE - Conservation.
STORAGE - Storage.
KONSERVIERUNG - Erhaltung.
ALMACENAJE - Almacemaje.
ARMAZENAGEM - Armazenagem.

100
MESSA IN SERVIZIO MOTORE DOPO IL TRATTAMENTO PROTETTIVO
Dopo un periodo di inattività, prima di installare il motore e metterlo in servizio, ènecessario effettuare alcuni interventi per garantire condizioni di massima efficienza.
1 - Togliere il telo protettivo.2 - Togliere le eventuali otturazioni dai condotti di aspirazione e di scarico.3 - Utilizzare un panno imbevuto di prodotto sgrassante per rimuovere il trattamento
protettivo esterno.4 - Rimuovere il collettore di aspirazione.5 - Iniettare olio lubrificante (non oltre 2 cm3) nelle valvole ed installare il collettore
di aspirazione.6 - Regolare la tensione della cinghia alternatore/ventilatore.7 - Girare manualmente il volano per verificare la corretta movimentazione degli
organi meccanici.8 - Rifornire il serbatoio con del combustibile nuovo.9 - Accendere il motore e portarlo a 3/4 del massimo regime per 5-10 minuti.10 - Spegnere il motore.11 - Togliere l’olio protettivo per sostituirlo con l’olio motore.12 - Introdurre l’olio nuovo (vedi “Olio prescritto”) fino a raggiungere il livello corretto
segnalato sull’asta.13 - Sostituire i filtri (aria, olio, combustibile) con ricambi originali.
Alcuni componenti del motore e i lubrificanti, anche in caso di inattività,nel tempo perdono le loro proprietà, quindi, è necessario considerare laloro sostituzione non solo in base ai chilometri percorsi, ma anche perl’invecchiamento da stress.
14 - Effettuare l’installazione del motore sulla macchina ed eseguire i collegamentied allacciamenti necessari.
15 - Controllare l’integrità e l’efficienza dei contatti elettrici.16 - Controllare che l’olio motore sia a livello.17 - Accendere il motore e mantenerlo al regime minimo per qualche minuto.18 - Verificare eventuali perdite di liquidi e, se necessario, individuare il difetto ed
eliminare l’anomalia.19 - Spegnere il motore.20 - Ricontrollare che l'olio motore sia a livello.
STOCCAGGIO MOTORE (NON INSTALLATO)
- In caso di prevista inattività prolungata del motore, verificare le condizionidell’ambiente, il tipo di imballaggio e controllare che tali condizioni ne assicurinoun corretto mantenimento. Se necessario coprire il motore con un adeguato teloprotettivo.
- Evitare lo stoccaggio del motore a diretto contatto con il suolo, in ambienti umidied esposti ad intemperie, in prossimità di fonti di pericolo e anche quelle menovisibili (linee elettriche ad alta tensione, ecc.).
Se l’inattività prevista del motore è superiore a 1 mese,è necessarioeffettuare un trattamento protettivo valido per 6 mesi (vedi “Trattamentoprotettivo”).
Se il motore, trascorsi i primi 6 mesi, non viene utilizzato, è necessarioeffettuare un ulteriore intervento per estendere il periodo di stoccaggio(vedi “Trattamento protettivo”).
TRATTAMENTO PROTETTIVO
1 - Controllare che l’olio motore sia a livello.2 - Effettuare il riempimento combustibile additivandolo con il 10 % di AGIP RUSTIA NT.3 - Accendere il motore e mantenerlo al regime minimo, a vuoto, per 15 minuti.4 - Spegnere il motore.5 - Togliere l’olio di lubrificazione.6 - Riempire il carter con olio protettivo AGIP RUSTIA C.7 - Accendere il motore e verificare eventuali perdite di combustibile e di olio.8 - Portare il motore a 3/4 del massimo regime per 5÷10 minuti.9 - Spegnere il motore.10 - Svuotare completamente il serbatoio combustibile.11 - Spruzzare olio SAE 10W nei collettori di scarico e di aspirazione.12 - Togliere gli iniettori, versare un cucchiaio di olio SAE 10W nei cilindri e ruotare a
mano per distribuire l'olio. Rimontare gli iniettori.13 - Chiudere tutte le aperture per evitare l’introduzione di corpi estranei.14 - Pulire accuratamente, con prodotti adeguati, tutte le parti esterne del motore, le
alette smaltimento calore e il radiatore olio (se presente).15 - Trattare le parti non verniciate con prodotti protettivi (AGIP RUSTIA 100/F).16 - Allentare la cinghia alternatore/ventilatore.17 - Se necessario, coprire il motore con un adeguato telo protettivo.
Nei paesi in cui i prodotti AGIP non sono commercializzati, reperirne sulmercato uno equivalente.AGIP RUSTIA NT: MIL-L-21260 P10, grade 2AGIP RUSTIA C: MIL-L-644-P9AGIP RUSTIA 100/F: MIL-C-16173D, grade 3.

101
MISE EN SERVICE DU MOTEUR APRÈS LE TRAITEMENT DE PROTECTION
Après une période d’inactivité, avant d’installer le moteur et de le mettre en marche,il est nécessaire de réaliser des interventions afin de garantir des conditionsd’extrême efficacité.
1 - Enlever la toile de protection.2 - Retirer les obstructions éventuelles des conduites d’aspiration et
d’échappement.3 - Utiliser un chiffon imbibé de produit dégraissant pour enlever le traitement de
protection extérieur.4 - Retirer le collecteur d’admission.5 - Injecter de l’huile lubrifiante (pas plus de 2 cm3) dans les soupapes et monter
le collecteur d’aspiration.6 - Régler la tension de la courroie alternateur/ventilateur.7 - Tourner manuellement le volant afin de vérifier le déplacement exact des
organes mécaniques.8 - Verser du combustible neuf dans le réservoir.9 - Démarrer le moteur et le garder aux 3/4 du régime maximal pendant 5-10
minutes.10 - Éteindre le moteur.11 - Vidanger l’huile de protection afin de le remplacer par de l’huile moteur.12 - Introduire de l’huile neuve (voir « Huile conseillée ») jusqu’à atteindre le niveau
exact indiqué sur la tige.13 - Remplacer les filtres (air, huile, combustible) par des pièces de rechange
originales.
Certains composants du moteur et les lubrifiants, même en casd’inactivité, avec le temps perdent leurs propriétés et par conséquent, ilfaut considérer le remplacement non seulement sur la base deskilomètres parcourus mais aussi du vieillissement dû aux contraintes.
14 - Procéder à l’installation du moteur sur le véhicule et effectuer les raccordementset les branchements nécessaires.
15 - Contrôler l’intégrité et l’efficacité des contacts électriques.16 - Contrôler que l’huile moteur est mis à niveau.17 - Démarrer le moteur et le garder au régime de ralenti pendant quelques minutes.18 - Vérifier les fuites éventuelles de liquides et, si nécessaire, localiser le défaut
et éliminer l’anomalie.19 - Éteindre le moteur.20 - Contrôler de nouveau que l’huile moteur est mis à niveau.
STOCKAGE DU MOTEUR (PAS INSTALLÉ)
- En cas d’inactivité planifiée et prolongée du moteur, vérifier les conditions del’environnement, le type d’emballage et contrôler que ces conditions en garantissentun maintien correct.Le cas échéant, couvrir le moteur avec une toile de protection.
- Éviter de stocker le moteur en contact direct avec le sol, dans un endroit humide etexposé aux intempéries, à proximité de sources de danger ou même de cellesmoins visibles (lignes électriques à haute tension, etc.).
En cas d’inactivité planifiée du moteur supérieure à 1 mois, il faut réaliserun traitement de protection valable pour 6 mois (voir « Traitement deprotection »).
Dans le cas où le moteur, après les 6 premiers mois, n’est pas utilisé, il estnécessaire de réaliser une nouvelle intervention pour prolonger la périodede stockage (voir « Traitement de protection »).
TRAITEMENT DE PROTECTION
1 - Contrôler que l’huile moteur est mis à niveau.2 - Remplir le réservoir de carburant en ajoutant 10% d’additifs AGIP RUSTIA NT.3 - Démarrer le moteur et le garder au régime de ralenti, à vide, pendant 15 minutes.4 - Éteindre le moteur.5 - Vidanger l’huile de lubrification.6 - Remplir le carter d’huile de protection AGIP RUSTIA C.7 - Mettre le moteur en marche et vérifier s’il y a des fuites de combustible ou d’huile.8 - Porter le moteur aux 3/4 du régime maximal pendant 5÷10 minutes.9 - Éteindre le moteur.10 - Vider complètement le réservoir du combustible.11 - Vaporiser l’huile SAE 10W sur les collecteurs d’échappement et d’admission.12 - Démonter les injecteurs, verser une cuillérée d'huile SAE 30 dans les cylindres
et tourner à la main pour distribuer l'huile. Remonter les injecteurs.13 - Fermer toutes les ouvertures pour éviter l’introduction de corps étrangers.14 - Nettoyer soigneusement toutes les parties extérieures du moteur, les ailettes de
refroidissement et le radiateur à huile en utilisant des produits appropriés.15 - Appliquer des produits de protection (AGIP RUSTIA 100/F) sur les parties non
vernies.16 - Desserrer la courroie alternateur/ventilateur.17 - Couvrir si nécessaire le moteur avec une toile de protection appropriée.
Dans les pays ou les produits AGIP ne sont pas commercialisés,trouver un produit équivalent disponible sur le marché.AGIP RUSTIA NT: MIL-L-21260 P10, grade 2AGIP RUSTIA C: MIL-L-644-P9AGIP RUSTIA 100/F: MIL-C-16173D, grade 3.
102
ENGINE STORAGE (NOT INSTALLED)
- If the engine is not to be used for long periods, check the storage environment,the type of packaging and make sure these conditions will allow propermaintenance. If necessary, cover the engine with protective sheeting.
- Do not store the engine directly on the ground, in damp environments, in areasexposed to the elements, near sources of danger, including less visible hazardssuch as high-voltage power lines, etc.
If the engine is not to be used for more than 1 month, it is necessary toapply protective measures that are valid for 6 months (see “Protectivetreatment”).
If, after the first 6 months, the engine is still not to be used, it is necessaryto carry out further measures to extend the protection period (see“Protective treatment”).
PROTECTIVE TREATMENT
1 - Check that the engine oil is up to level.2 - Fill up with fuel containing 10% AGIP RUSTIA NT3 - Run the engine at minimum idle speed for 15 minutes.4 - Switch off the engine.5 - Remove the lubrication oil.6 - Fill the sump with protective oil: AGIP RUSTIA C.7 - Start the engine and check for fuel and oil leaks.8 - Bring the engine to ¾ of the maximum speed for 5-10 minutes.9 - Switch off the engine.10 - Empty the fuel tank completely.11 - Spray SAE 10W oil on the exhaust and intake manifolds.12 - Remove injectors, pour a spoonful of oil type SAE 30 into the cylinders and
rotate manually to distribute the oil. Refit injectors.13 - Close all openings to prevent foreign bodies from entering.14 - Thoroughly clean all external parts of the engine, the heat dissipating fins and
the oil radiator (if present) using suitable products.15 - Treat non-painted parts with protective products (AGIP RUSTIA 100/F).16 - Loosen the alternator/fan belt.17 - If necessary, cover the engine with protective sheeting.
In countries in which AGIP products are not available, find an equivalentproduct.AGIP RUSTIA NT: MIL-L-21260 P10, grade 2AGIP RUSTIA C: MIL-L-644-P9AGIP RUSTIA 100/F: MIL-C-16173D.
PREPARING THE ENGINE FOR OPERATION AFTER PROTECTIVE TREATMENT
After a period of inactivity and before installing and running the engine, it is necessaryto carry out a few measures in order to ensure that it runs at maximum efficiency.
1 - Remove the protective sheeting.2 - Eliminate any blockages in the exhaust and intake ducts.3 - Use a cloth soaked in degreasing product to remove the external protective
treatment.4 - Remove the intake manifold.5 - Inject lubrication oil (no more than 2 cm3) into the valves and install the intake
manifold.6 - Adjust the alternator/fan belt tension.7 - Turn the flywheel manually to check the movement of the mechanical parts.8 - Refill the tank with fresh fuel.9 - Start the engine and run at ¾ of the maximum speed for 5-10 minutes.10 - Switch off the engine.11 - Remove the protective oil to replace with engine oil.12 - Introduce new oil (see “Prescribed Lubricant”) up to the correct level marked on
the dipstick.13 - Replace the filters (air, oil, fuel) with original spare parts.
Over time, a number of engine components and lubricants lose theirproperties, even when the engine is not in use, and so it is important toconsider whether they need replacing, based not only on the mileage, butalso on age and wear.
14 - Install the engine and make the necessary connections and unions.15 - Make sure that electrical contacts are intact and efficient.16 - Check that the engine oil is up to level.17 - Start the engine and keep at minimum speed for a few minutes.18 - Check for leaks and, if necessary, find and eliminate the cause.19 - Switch off the engine.20 - Double check that the engine oil is up to level.

103
LAGERUNG DES MOTORS (NICHT INSTALLIERT)
- Im Fall eines geplanten, längeren Sti l lstands des Motors dieUmgebungsbedingungen und das Verpackungsmaterial prüfen undsicherstellen, dass diese Bedingungen eine korrekte Aufbewahrunggewährleisten. Gegebenenfalls den Motor mit einer geeigneten Schutzplaneabdecken.
- Den Motor nicht direkt auf dem Boden, in feuchter oder Witterungseinflüssenausgesetzter Umgebung, in der Nähe gefährlicher oder schlecht sichtbarerStellen (Hochspannungsleitungen, usw.) aufbewahren.
Wenn der Motor länger als 1 Monat stillsteht, muss eine für den Zeitraumvon 6 Monaten ausreichende Schutzbehandlung vorgenommen werden(siehe “Schutzbehandlung”).
Wenn der Motor nach Ablauf von 6 Monaten weiterhin nicht verwendetwird, sind weitere Maßnahmen notwendig, um die Lagerungsdauer zuverlängern (siehe “Schutzbehandlung”).
SCHUTZBEHANDLUNG
1 - Der Stand des Motoröls kontrollieren.2 - Kraftstoff tanken und das Additiv AGIP RUSTIA NT in 10% Mischung beigeben.3 - Den Motor starten und 15 Minuten lang unbelastet und bei Leerlaufdrehzahl
laufen lassen.4 - Den Motor abstellen.5 - Das Schmieröl entfernen.6 - Den Ölsumpf mit Schutzöl AGIP RUSTIA C füllen.7 - Den Motor starten und prüfen, ob Kraftstoff- oder Ölleckagen vorliegen.8 - Den Motor 5-10 Minuten lang bei ¾ der Höchstdrehzahl laufen lassen.9 - Den Motor abstellen.10 - Den Kraftstofftank vollständig leeren.11 - Öl der Type SAE 10W in die Auspuff- und Ansaugkrümmer spritzen.12 - Einspritzdüsen ausbauen, einen Öllöffel voll SAE 30 in die Zylinder giessen
und von Hand drehen um das Öl zu verteilen. Einspritzdüsen wieder einbauen.13 - Alle Öffnungen verschließen, damit keine Fremdkörper eindringen können.14 - Alle Außenteile des Motors, die Kühlrippen und den Ölkühler sorgfältig mit
geeigneten Produkten reinigen.15 - Nicht lackierte Teile mit Schutzmitteln behandeln (AGIP RUSTIA 100/F).16 - Den Riemen Drehstromgenerator/Lüfterrad lockern.17 - Gegebenenfalls den Motor mit einer Schutzplane abdecken.
In den Ländern, in denen die Produkte von AGIP nicht erhältlich sind,kann ein gleichwertiges Produkt erworben werden.AGIP RUSTIA NT: MIL-L-21260 P10, grade 2AGIP RUSTIA C: MIL-L-644-P9AGIP RUSTIA 100/F: MIL-C-16173D.
INBETRIEBNAHME DES MOTORS NACH DER SCHUTZBEHANDLUNG
Vor der Installation und Inbetriebnahme des Motors nach einem längeren Stillstandmüssen einige Arbeiten durchgeführt werden, um die maximale Effizienz des Motorszu gewährleisten.
1 - Die Schutzplane entfernen.2 - Die Ein- und Auslasskanäle von ev. Verstopfungen befreien.3 - Die außen angebrachte Schutzschicht mit Hilfe eines mit einem Fettlöser
getränkten Tuchs entfernen.4 - Den Ansaugkrümmer abnehmen.5 - Schmieröl (nicht mehr als 2 cm³) in die Ventile spritzen und den Ansaugkrümmer
anbringen.6 - Die Spannung des Riemens Drehstromgenerator/Lüfterrad einstellen.7 - Das Schwungrad mit der Hand drehen und prüfen, ob sich die mechanischen
Bauteile ordnungsgemäß bewegen.8 - Den Tank mit neuem Kraftstoff füllen.9 - Den Motor starten und 5-10 Minuten lang bei ¾ der Höchstdrehzahl laufen
lassen.10 - Den Motor abstellen.11 - Das Schutzöl entfernen und durch Motoröl ersetzen.12 - Das neue Öl (siehe “Vorgesschriebene Schmieröle”) bis zum Erreichen des
auf dem Ölstab markierten, richtigen Standes einfüllen.13 - Die Filter (Luft, Öl, Kraftstoff) durch Originalersatzteile ersetzen.
Einige Bauteile des Motors und die Schmiermittel verlieren auch beiStillstand im Laufe der Zeit ihre Wirkung. Für den Zeitpunkt desAuswechselns sind daher nicht nur die gefahrenen Kilometerausschlaggebend, sondern auch die Alterung durch den Stillstand.
14 - Den Motor auf der Maschine installieren und die notwendigen Anschlüsse undVerbindungen herstellen.
15 - Prüfen, ob sich die elektrischen Kontakte in einem einwandfreien Zustandbefinden.
16 - Der Stand des Motoröls kontrollieren.17 - Den Motor starten und einige Minuten lang im Leerlauf laufen lassen.18 - Prüfen, ob Flüssigkeitsverluste vorliegen und gegebenenfalls Beschädigungen
orten und beseitigen.19 - Den Motor abstellen.20 - Erneut kontrollieren, ob das Motoröl den richtigen Stand aufweisen.
104
ALMACENAJE MOTOR (SIN INSTALAR)
- Si se prevé un período prolongado de inactividad del motor, inspeccionar elestado del lugar y el tipo de embalaje. Dichas condiciones deben asegurar elmantenimiento correcto del motor. De ser necesario, cubrir el motor con una telade protección adecuada.
- Evitar almacenar el motor en contacto directo con el suelo, en ambientes húmedosy expuestos a la intemperie. Mantener el motor lejos de fuentes de peligro, inclusode las que son menos visibles ( líneas eléctricas de alta tensión, etc.)
Si la inactividad del motor prevista es superior a 1 mes, es necesariollevar a cabo un tratamiento de protección válido durante 6 meses (véase“Tratamiento de protección”).
Si el motor, después de los primeros seis meses, no se utiliza, esnecesario realizar un tratamiento más para extender el período dealmacenamiento (véase “Tratamiento de protección”).
TRATAMIENTO DE PROTECCIÓN
1 - Comprobar que el aceite del motor se encuentra al nivel adecuado.2 - Rellenar con combustible añadiendo el 10 % de AGIP RUSTIA NT3 - Arrancar el motor y mantenerlo al régimen mínimo, en vacío, durante 15 minutos.4 - Apagar el motor.5 - Vaciar el aceite de lubricación.6 - Rellenar el cárter con aceite de protección AGIP RUSTIA C.7 - Arrancar el motor y comprobar que no haya pérdidas de combustible y aceite.8 - Llevar el motor a 3/4 del máximo durante 5-10 minutos.9 - Apagar el motor.10 - Vaciar completamente el depósito de combustible.11 - Rociar aceite Sae 10W en los colectores de escape y de admisión.12 - Quitar los inyectores, poner una cucharada de aceite SAE 30 en los cilindros y
girar a mano para distribuir el aceite. Montar los inyectores.13 - Cerrar todas las aberturas para evitar la entrada de cuerpos ajenos.14 - Limpiar cuidadosamente, con productos adecuados, todas las partes externas
del motor, las aletas de disipación y el radiador de aceite (si está presente).15 - Tratar las partes que no están barnizadas con productos de protección (AGIP
RUSTIA 100/F).16 - Aflojar la correa del alternador / ventilador.17 - De ser necesario, cubrir el motor con una tela de protección adecuada.
En los países en los que no se comercializan los productos AGIP, buscaren el mercado un producto equivalente.AGIP RUSTIA NT: MIL-L-21260 P10, grade 2AGIP RUSTIA C: MIL-L-644-P9AGIP RUSTIA 100/F: MIL-C-16173D.
PUESTA EN SERVICIO DEL MOTOR DESPUÉS DEL TRATAMIENTO DE PROTECCIÓN
Después de un período de inactividad, antes de instalar el motor y ponerlo enservicio, es necesario llevar a cabo algunas operaciones para asegurar condicionesde máxima eficiencia.
1 - Retirar la tela de protección.2 - Eliminar las posibles obstrucciones de los conductos de admisión y escape.3 - Utilizar un paño humedecido con producto desengrasante para quitar el
tratamiento de protección externo.4 - Retirar el colector de admisión.5 - Inyectar aceite lubricante (no más de 2 cm³) en las válvulas e instalar el colector
de admisión.6 - Ajustar la tensión de la correa del alternador / ventilador.7 - Girar manualmente el volante para comprobar el correcto movimiento de los
órganos mecánicos.8 - Llenar el depósito con combustible nuevo.9 - Arrancar el motor y llevarlo a 3/4 del régimen máximo durante 5-10 minutos.10 - Apagar el motor.11 - Vaciar el aceite de protección y sustituirlo por el aceite del motor.12 - Introducir el aceite nuevo (véase “Aceite recomendado”) hasta alcanzar el
nivel correcto que se indica en la varilla.13 - Sustituir los filtros (aire, aceite, combustible) usando recambios originales.
Algunos componentes del motor y los lubricantes, en caso de inactividad,pierden sus propiedades en el tiempo, así que es necesario considerarsu sustitución no sólo en función de los kilómetros recorridos sinotambién del desgaste.
14 - Instalar el motor en la máquina y realizar las conexiones necesarias.15 - Comprobar la integridad y la eficiencia de los contactos eléctricos.16 - Comprobar que el aceite del motor se encuentra al nivel adecuado.17 - Arrancar el motor y mantenerlo al régimen mínimo durante unos minutos.18 - Comprobar la presencia de posibles pérdidas de líquidos y, de ser necesario,
localizar el defecto y eliminar la anomalía.19 - Apagar el motor.20 - Volver a comprobar que el aceite del motor se encuentra al nivel adecuado.

105
ARMAZENAGEM DO MOTOR (NÃO INSTALADO)
- Em caso de prevista inactividade prolongada do motor, verifique as condiçõesdo ambiente, o tipo de embalagem e controle que estas condições asseguremuma correcta conservação. Se precisar, cubra o motor com um toldo apropriadode protecção.
- Evite armazenar o motor a contacto directo com o chão, em ambientes húmidose expostos a intempérie, perto de fontes de perigo e também de fontes menosvisíveis (linhas eléctricas de alta tensão, etc.).
Se a inactividade prevista do motor ultrapassar 1 mês, será necessárioefectuar um tratamento protector válido 6 meses (veja “Tratamentoprotector”).
Se o motor, depois dos primeiros 6 meses, não for utilizado, seránecessário efectuar uma ulterior intervenção para prolongar o períodode armazenagem (veja “Tratamento protector”).
TRATAMENTO PROTECTOR
1 - Controlar que o nivel de oleo esteja no nivel.2 - Abasteça com combustível a adicionar 10% de AGIP RUSTIA NT como aditivo.3 - Ligue o motor e ponha-o a funcionar em regime mínimo, sem carga, por 15 minutos.4 - Desligue o motor.5 - Tire o óleo de lubrificação.6 - Encha o cárter com óleo protector AGIP RUSTIA C.7 - Ligue o motor e verifique perdas eventuais de combustível e de óleo.8 - Ponha a funcionar o motor a 3/4 do máximo regime por 5÷10 minutos.9 - Desligue o motor.10 - Esvazie completamente o depósito do combustível.11 - Borrife óleo SAE 10W nos colectores de descarga e de aspiração.12 - Tirar os injectores, colocar uma colher de oleo SAE 10W nos cilindros e rodar à
mão o volante para distribuir o oleo. Remontar os injectores.13 - Encerre todas as aberturas a fim de evitar a introdução de corpos estranhos.14 - Limpar cuidadosamente, com produtos adequados, todas as partes externas
do motor, as alhetas de eliminação e o radiador de oleo (se presente).15 - Trate as partes não envernizadas com produtos protectores (AGIP RUSTIA 100/F).16 - Afrouxar a correia do alternador/ventilador.17 - Se necessário, cubra o motor com um toldo apropriado de protecção.
Nos países em que os produtos AGIP não são comercializáveis,procure um produto equivalente à venda.AGIP RUSTIA NT: MIL-L-21260 P10, grade 2AGIP RUSTIA C: MIL-L-644-P9AGIP RUSTIA 100/F: MIL-C-16173D.
PÔR A FUNCIONAR O MOTOR APÓS O TRATAMENTO PROTECTOR
Após um período de inactividade, antes de instalar o motor e pôr a funcioná-lo, seránecessário efectuar algumas intervenções para garantir condições de máximaeficiência.
1 - Tire a cobertura de protecção.2 - Tire as eventuais obturações dos condutos de aspiração e de descarga.3 - Utilize um pano molhado com produto desengordurante para remover o
tratamento de protecção externo.4 - Remova o colector de aspiração.5 - Injecte óleo lubrificante (menos de 2 cm3) nas válvulas e instale o colector de
aspiração.6 - Ajuste a tensão da correia do alternador/ventilador.7 - Vire manualmente o volante a fim de verificar a correcta movimentação dos
órgãos mecânicos.8 - Abasteça o depósito com combustível novo.9 - Ligue o motor e ponha-o a funcioná-lo a 3/4 do máximo regime por 5-10
minutos.10 - Desligue o motor.11 - Tire o óleo protector e substitua-o com o óleo motor.12 - Introduza o óleo novo (veja “Lubrificantes”) até atingir o nível correcto indicado
na haste.13 - Substitua os filtros (ar, óleo, combustível) com peças sobresselentes originais.14 - Esvazie completamente o circuito de arrefecimento e introduza o líquido de
arrefecimento novo até atingir o nível correcto.
Alguns componentes do motor e os lubrificantes, mesmo quandoinactivos, perdem, com o passar do tempo, as suas propriedades,portanto, é necessário considerar a substituição deles não apenasconforme os quilómetros percorridos, mas também conforme oenvelhecimento devido a stress.
15 - Efectue a instalação do motor na máquina e realize as conexões e ligaçõesnecessárias.
16 - Controle a integridade e a eficiência dos contactos eléctricos.17 - Controlar que o nivel de oleo esteja no nivel.18 - Ligue o motor e ponha-o a funcionar em regime mínimo por alguns minutos.19 - Verifique eventuais perdas de líquidos e, se necessário, individue o defeito e
elimine a anomalia.20 - Desligue o motor.21 - Controle de novo que o nivel de oleo esteja no nivel.

106
CIRCUITICIRCUITSCIRCUITSANLAGEN
INSTALACIONESCIRCUITOS
1)* Circuito elettricoCircuit electriqueElectrical systemElektrische anlageCircuito electricoCircuito eléctrico
2) Circuito combustibileCircuit de graissageFuel systemKraftstoffanlageCircuito combustibileCircuito combustivel
Batteria non fornita. Se il motore ha supporti in gomma collegare a massa.
La batterie n’est pas livrée. Si le moteur a des supports en caoutchouc, connecter à la masse.
Battery not supplied. Ground rubber mounted engines.
Lieferung der Batterie nicht inbegriffen. Wird Motor auf Gummielementen gelargert - Masseband anbringen.
Sin incuir bateria. Si el motor va montado sobre soportes de goma efectuar una buena connexión a massa.
Bateria não fornezida. Se o motor tem suportes de burracha ligar à massa.
1)*
BATTERIE CONSIGLIATEBATTERIES CONSEILLÉESRECOMMENDED BATTERIESEMPFOHLENE BATTERIEBATERÍAS RECOMENDADASBATERIAS RECOMENDADAS
In condizioni di avviamento normaleEn conditions de démarrage standard
In standard start conditionsEn condiciones de arranque normalEm condições de arranque normal
3) Termostato temperatura testaThermostat température de la culasseHead temperature thermostatThermostat KopftemperaturTermostato temperatura culataTermóstato para temperatura da cabeça
12V - 70Ah/350A

107
4
8
1
2
3
5
6
7
MMMMM MarroneMarronBrownBraunMarrón
Colore Colore Colore Colore Colore x Sezione (mm²) - Couleur Couleur Couleur Couleur Couleur x Section (mm²) - ColorColorColorColorColor x Section (mm²) - Farbe Farbe Farbe Farbe Farbe xQuerschnitt (mm²) - Color Color Color Color Color x Sección (mm²)
Chiave avviamento (opzionale)Clé de contact (fournie sur demande)Ignition key (optional)Zündschlüssel (optional)Llave de encendido (opcional)
Regolatore di tensioneRégulateur de tensionVoltage regulatorSpannungsreglerRegulador de tensión
Motorino avviamentoDémarreurEngine starterZündmotorMotor de arranque
Batteria (non fornita)Batterie (non fournie)Battery (not included)Batterie (nicht mitgeliefert)Batería (no suministrada)
AlternatoreAlternateurAlternatorDrehstromgeneratorAlternador
PressostatoPressostatPressure switchDruckwächterPresostato
Spia insufficiente ricarica batteria (opzionale)Voyant rechargement batterie insuffisant (fourni surdemande)Battery recharge warning light (optional)Leuchtanzeige für nicht ausreichende Batterieladung(optional)Testigo de recarga insuficiente de la batería (opcional)
Spia insufficiente pressione olio (opzionale)Voyant pression huile insuffisante (sur demande)Oil pressure warning light (optional)Leuchtanzeige für nicht ausreichenden Öldruck (optional)Testigo de presión de aceite insuficiente (opcional)
NNNNN NeroNoirBlackSchwarzNegro
AAAAA BiancoBlancWhiteWeißBlanco
VVVVV VerdeVertGreenGrünVerde
RRRRR RossoRougeRedRotRojo
ColoreColoreColoreColoreColoreCouleurCouleurCouleurCouleurCouleurColorColorColorColorColorFarbeFarbeFarbeFarbeFarbeColorColorColorColorColor
1) Circuito elettrico - Circuit electrique - Electrical system - Elektrische anlage - Circuito electrico - Circuito eléctrico

108
Pompa alimentazionePompe d’alimentationFuel feeding pumpKraftstoff-FörderpumpeBomba alimentacionBomba alimentação
Pompe iniezionePompe d’injectionIniection pumpsEinspritzpumpeBomba inyeccionBomba injeção
IniettoriInjecteursInjectorsEinspritzdüsenInyectoresInjetor
Tubo rifiuto iniettoriTuyau rebut injecteursInjector return lineLeckölleitungTubo retorno inyectoresTubo refugo injetor
Filtro a cartucciaFiltre à cartoucheCartridge filterPatronenfilterFiltro de cartuchoFiltro a cartucha
SerbatoioRéservoirFuel tankKrafftstofftankDepositoTanque
2) Circuito combustibile - Circuit de graissage - Fuel system - Kraftstoffanlage - Circuito combustibile - Circuito combustivel

109
3) Termostato temperatura testa - Thermostat température de la culasse- Head temperature thermostat - Thermostat KopftemperaturTermostato temperatura culata - Termóstato para temperatura da cabeça
110
TABELLE PROBABILI ANOMALIE IN FUNZIONE DEI SINTOMI
TABLEAU ANOMALIES PROBABLES EN FONCTION DES SYMPTÔMES
TABLE OF LIKELY ANOMALIES AND THEIR SYMPTOMS
TABELLE MIT MÖGLICHEN STÖRUNGEN AUFGRUND BESTIMMTER SYMPTOME
TABLA DE POSIBLES ANOMALÍAS EN FUNCIÓN DE LOS SÍNTOMAS
TABELA DAS PROVÁVEIS ANOMALIAS CONFORME OS SINTOMAS

111
QUANDO IL MOTORE DEVE ESSERE IMMEDIATAMENTE ARRESTATOLORSQU’IL FAUT ARRÊTER LE MOTEUR TOUT DE SUITETHE ENGINE MUST BE STOPPED IMMEDIATELY WHEN:
DER MOTOR MUSS SOFORT ABGESTELLT WERDEN, WENN:EL MOTOR SE DEBE PARAR INMEDIATAMENTE CUANDO:QUANDO É PRECISO PARAR IMEDIATAMENTE O MOTOR
1) - I giri del motore aumentano e diminuiscono improvvisamente- Les tours du moteur augmentent et diminuent tout à coup- The engine rpms suddenly increase and decrease- Die Motordrehzahl plötzlich steigt und sinkt- Las revoluciones del motor aumentan y disminuyen de repente- As voltas do motor aumentam e diminuem repentinamente
2) - Viene udito un rumore inusuale e improvviso- On entend un bruit inconnu et inattendu- A sudden and unusual noise is heard- Ein plötzilcher und unüblicher Lärm gehört wird- Se oye un ruido inusual y repentino- Ouve-se um ruído inusual e improviso
3) - Il colore dei gas di scarico diventa improvvisamente scuro- La couleur des gaz d’échappement devient tout à coup sombre- The colour of the exhaust fumes suddenly darkens- Die Farbe der Abgase plötzlich dunkler wird- El color de los gases de escape se vuelve obscuro de repente- A cor dos gases de descarga torna-se repentinamente escura
4) - La spia di controllo pressione olio si accende durante la marcia- Le voyant de contrôle de la pression de l’huile s’allume pendant que le moteur est en marche- The oil pressure indicator light turns on while running- Die Kontrolllampe für den Öldruck sich während des Betriebs anschaltet- El testigo de control de la presión del aceite se enciende durante la marcha- O indicador luminoso de controlo da pressão do óleo acende-se durante o funcionamento
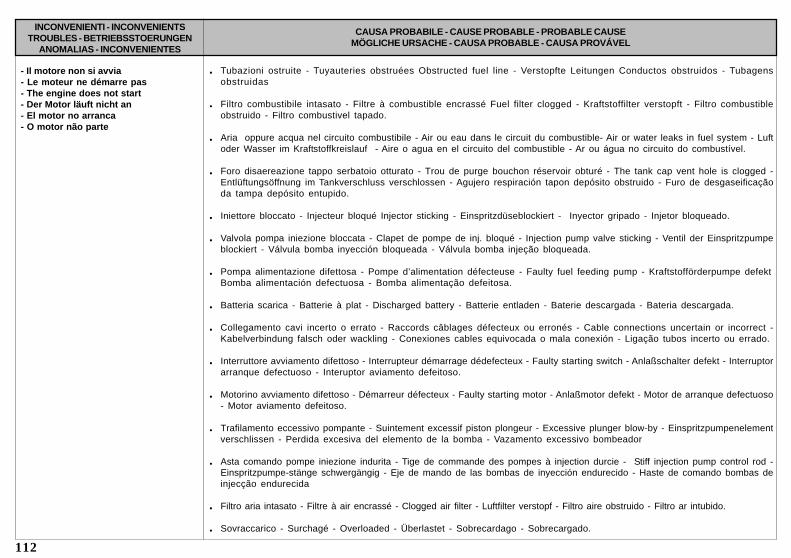
112
- Il motore non si avvia- Le moteur ne démarre pas- The engine does not start- Der Motor läuft nicht an- El motor no arranca- O motor não parte
. Tubazioni ostruite - Tuyauteries obstruées Obstructed fuel line - Verstopfte Leitungen Conductos obstruidos - Tubagensobstruidas
. Filtro combustibile intasato - Filtre à combustible encrassé Fuel filter clogged - Kraftstoffilter verstopft - Filtro combustibleobstruido - Filtro combustivel tapado.
. Aria oppure acqua nel circuito combustibile - Air ou eau dans le circuit du combustible- Air or water leaks in fuel system - Luftoder Wasser im Kraftstoffkreislauf - Aire o agua en el circuito del combustible - Ar ou água no circuito do combustível.
. Foro disaereazione tappo serbatoio otturato - Trou de purge bouchon réservoir obturé - The tank cap vent hole is clogged -Entlüftungsöffnung im Tankverschluss verschlossen - Agujero respiración tapon depósito obstruido - Furo de desgaseificaçãoda tampa depósito entupido.
. Iniettore bloccato - Injecteur bloqué Injector sticking - Einspritzdüseblockiert - Inyector gripado - Injetor bloqueado.
. Valvola pompa iniezione bloccata - Clapet de pompe de inj. bloqué - Injection pump valve sticking - Ventil der Einspritzpumpeblockiert - Válvula bomba inyección bloqueada - Válvula bomba injeção bloqueada.
. Pompa alimentazione difettosa - Pompe d’alimentation défecteuse - Faulty fuel feeding pump - Kraftstofförderpumpe defektBomba alimentación defectuosa - Bomba alimentação defeitosa.
. Batteria scarica - Batterie à plat - Discharged battery - Batterie entladen - Baterie descargada - Bateria descargada.
. Collegamento cavi incerto o errato - Raccords câblages défecteux ou erronés - Cable connections uncertain or incorrect -Kabelverbindung falsch oder wackling - Conexiones cables equivocada o mala conexión - Ligação tubos incerto ou errado.
. Interruttore avviamento difettoso - Interrupteur démarrage dédefecteux - Faulty starting switch - Anlaßschalter defekt - Interruptorarranque defectuoso - Interuptor aviamento defeitoso.
. Motorino avviamento difettoso - Démarreur défecteux - Faulty starting motor - Anlaßmotor defekt - Motor de arranque defectuoso- Motor aviamento defeitoso.
. Trafilamento eccessivo pompante - Suintement excessif piston plongeur - Excessive plunger blow-by - Einspritzpumpenelementverschlissen - Perdida excesiva del elemento de la bomba - Vazamento excessivo bombeador
. Asta comando pompe iniezione indurita - Tige de commande des pompes à injection durcie - Stiff injection pump control rod -Einspritzpumpe-stänge schwergängig - Eje de mando de las bombas de inyección endurecido - Haste de comando bombas deinjecção endurecida
. Filtro aria intasato - Filtre à air encrassé - Clogged air filter - Luftfilter verstopf - Filtro aire obstruido - Filtro ar intubido.
. Sovraccarico - Surchagé - Overloaded - Überlastet - Sobrecardago - Sobrecargado.
INCONVENIENTI - INCONVENIENTSTROUBLES - BETRIEBSSTOERUNGEN
ANOMALIAS - INCONVENIENTES
CAUSA PROBABILE - CAUSE PROBABLE - PROBABLE CAUSEMÖGLICHE URSACHE - CAUSA PROBABLE - CAUSA PROVÁVEL

113
- Il motore non si avvia- Le moteur ne démarre pas- The engine does not start- Der Motor läuft nicht an- El motor no arranca- O motor não parte
- Si avvia e si ferma- Demarre et s’arret- Starts and stops- Spring nur Kurz an- Arranca y se para- Avia e para -se
. Messa a punto degli apparati di iniezione errata ( anticipo pareggiamento portate) - Mise au point des dispositifs d’injectionerronée (avance nivellement débits) - Incorrect tuning of injection components (delivery balancing advance) - Falsche Einstellungder Einspritzvorrichtungen (Förderbeginn und Abgleich der Fördermengen) - Puesta a punto de los aparatos de inyección incorrecta(avance e igualación de los caudales) - Afinação dos equipamentos de injecção errada (avanço nivelamento capacidades).
. Leve regolatore giri fuori fase - Levier régulateur de régime hors phase - Incorrect governor linkage adjustment - Reglerhebelfalsch einstellt - Palancas de regulator mal montadas - Alavancas regulador mal montadas
. Valvole bloccate - Soupapes bloquées - Valves sticking - Ventile blockiert - Válvulas pisadas - Valvulas bloqueadas
. Leve regolatore giri non scorrevoli - Levier régulateur coulissant mal - Governor linkage not free to slide - Hebel desDrehzahlreglers schwergängig - Palanca reguladora de giro no desliza - Alavancas regulador de velocidade bloqueadas
. Guarnizione testata danneggiata - Joint culasse endommagé - Damaged cylinder head gasket - Zylinderkopfdichtung beschädigt- Junta de la culata deteriorada - Guarnição do cabeçote danificada.
..... Filtro aria intasato - Filtre à air encrassé - Clogged air filter - Luftfilter verstopf - Filtro aire obstruido - Filtro ar intubido.
..... Minimo basso - Ralanti trop bas - Low idle speed - Leerlaufdrehzahl zu niedrig - Ralenti bajo - Minimo baixo.
..... Filtro combustibile intasato - Filtre à combustible encrassé - Fuel filter clogged -Kraftstoffilter verstopft - Filtro combustibleobstruido - Filtro combustivel tapado.
..... Aria oppure acqua nel circuito combustibile - Air ou eau dans le circuit du combustible- Air or water leaks in fuel system - Luftoder Wasser im Kraftstoffkreislauf - Aire o agua en el circuito del combustible - Ar ou água no circuito do combustível.
..... Foro disaereazione serbatoio otturato - Trou de purge du réservoir obturée - Clogged tank vent hole - Entlüftungsöffnung imTank Verschlosen - Agujero respiración depósito obstruido - Buraco disarejação depósito tapado.
..... Pompa alimentazione difettosa - Pompe d’alimentation défecteuse - Faulty fuel feeding pump - Kraftstofförderpumpe defekt -Bomba alimentación defectuosa - Bomba alimentação defeitosa.
..... Molla regolatore sganciata o rotta - Ressort du regulateur decroché ou cassé - Governor spring broken or unhooked -Reglerfeder ausgelöst oder defekt - Muelle regulador desenganchada o roto - Mola do regulador desenganchada ou quebrada.
. Sovraccarico - Surchagé - Overloaded - Überlastet - Sobrecardago - Sobrecargado.
. Messa a punto degli apparati di iniezione errata ( anticipo pareggiamento portate) - Mise au point des dispositifs d’injectionerronée (avance nivellement débits) - Incorrect tuning of injection components (delivery balancing advance) - Falsche Einstellungder Einspritzvorrichtungen (Förderbeginn und Abgleich der Fördermengen) - Puesta a punto de los aparatos de inyección incorrecta(avance e igualación de los caudales) - Afinação dos equipamentos de injecção errada (avanço nivelamento capacidades).
. Leve regolatore giri non scorrevoli - Levier régulateur coulissant mal - Governor linkage not free to slide - Hebel desDrehzahlreglers schwergängig - Palanca reguladora de giro no desliza - Alavancas regulador de velocidade bloqueadas
INCONVENIENTI - INCONVENIENTSTROUBLES - BETRIEBSSTOERUNGEN
ANOMALIAS - INCONVENIENTES
CAUSA PROBABILE - CAUSE PROBABLE - PROBABLE CAUSEMÖGLICHE URSACHE - CAUSA PROBABLE - CAUSA PROVÁVEL
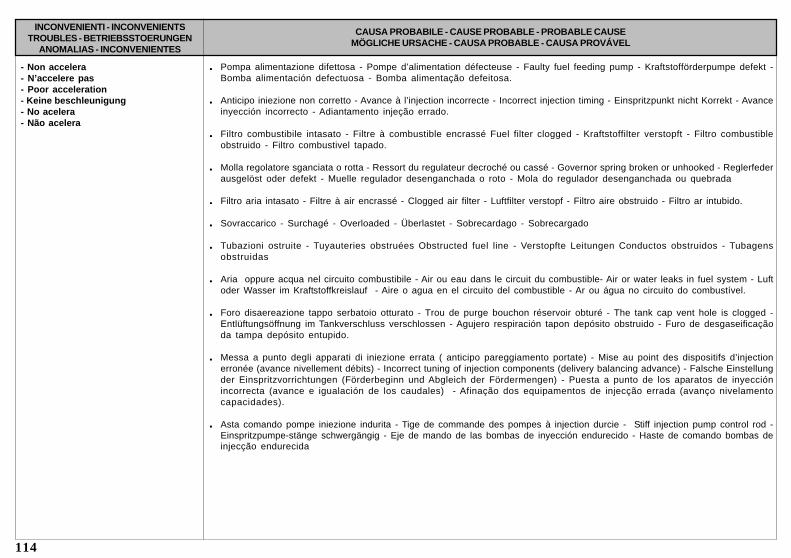
114
- Non accelera- N’accelere pas- Poor acceleration- Keine beschleunigung- No acelera- Não acelera
. Pompa alimentazione difettosa - Pompe d’alimentation défecteuse - Faulty fuel feeding pump - Kraftstofförderpumpe defekt -Bomba alimentación defectuosa - Bomba alimentação defeitosa.
. Anticipo iniezione non corretto - Avance à l’injection incorrecte - Incorrect injection timing - Einspritzpunkt nicht Korrekt - Avanceinyección incorrecto - Adiantamento injeção errado.
. Filtro combustibile intasato - Filtre à combustible encrassé Fuel filter clogged - Kraftstoffilter verstopft - Filtro combustibleobstruido - Filtro combustivel tapado.
. Molla regolatore sganciata o rotta - Ressort du regulateur decroché ou cassé - Governor spring broken or unhooked - Reglerfederausgelöst oder defekt - Muelle regulador desenganchada o roto - Mola do regulador desenganchada ou quebrada
. Filtro aria intasato - Filtre à air encrassé - Clogged air filter - Luftfilter verstopf - Filtro aire obstruido - Filtro ar intubido.
. Sovraccarico - Surchagé - Overloaded - Überlastet - Sobrecardago - Sobrecargado
. Tubazioni ostruite - Tuyauteries obstruées Obstructed fuel line - Verstopfte Leitungen Conductos obstruidos - Tubagensobstruidas
. Aria oppure acqua nel circuito combustibile - Air ou eau dans le circuit du combustible- Air or water leaks in fuel system - Luftoder Wasser im Kraftstoffkreislauf - Aire o agua en el circuito del combustible - Ar ou água no circuito do combustível.
. Foro disaereazione tappo serbatoio otturato - Trou de purge bouchon réservoir obturé - The tank cap vent hole is clogged -Entlüftungsöffnung im Tankverschluss verschlossen - Agujero respiración tapon depósito obstruido - Furo de desgaseificaçãoda tampa depósito entupido.
. Messa a punto degli apparati di iniezione errata ( anticipo pareggiamento portate) - Mise au point des dispositifs d’injectionerronée (avance nivellement débits) - Incorrect tuning of injection components (delivery balancing advance) - Falsche Einstellungder Einspritzvorrichtungen (Förderbeginn und Abgleich der Fördermengen) - Puesta a punto de los aparatos de inyecciónincorrecta (avance e igualación de los caudales) - Afinação dos equipamentos de injecção errada (avanço nivelamentocapacidades).
. Asta comando pompe iniezione indurita - Tige de commande des pompes à injection durcie - Stiff injection pump control rod -Einspritzpumpe-stänge schwergängig - Eje de mando de las bombas de inyección endurecido - Haste de comando bombas deinjecção endurecida
INCONVENIENTI - INCONVENIENTSTROUBLES - BETRIEBSSTOERUNGEN
ANOMALIAS - INCONVENIENTES
CAUSA PROBABILE - CAUSE PROBABLE - PROBABLE CAUSEMÖGLICHE URSACHE - CAUSA PROBABLE - CAUSA PROVÁVEL

115
- Regime incostante- Régime incostant- Non-uniform speed- Drehzahl schwankt- Regimen incostante- Regime incostante
- Fumo nero- Fumee noire- Black smoke- Schwarzer Ausfpuffqualm- Humo nero- Fumo preto
. Filtro combustibile intasato - Filtre à combustible encrassé Fuel filter clogged - Kraftstoffilter verstopft - Filtro combustible obstruido- Filtro combustivel tapado.
..... Aria oppure acqua nel circuito combustibile - Air ou eau dans le circuit du combustible- Air or water leaks in fuel system - Luft oderWasser im Kraftstoffkreislauf - Aire o agua en el circuito del combustible - Ar ou água no circuito do combustível.
..... Leve regolatore giri fuori fase - Levier régulateur de régime hors phase - Incorrect governor linkage adjustment - Reglerhebelfalsch einstellt - Palancas de regulator mal montadas - Alavancas regulador mal montadas
. Asta comando pompe iniezione indurita - Tige de commande des pompes à injection durcie - Stiff injection pump control rod -Einspritzpumpe-stänge schwergängig - Eje de mando de las bombas de inyección endurecido - Haste de comando bombas deinjecção endurecida
. Messa a punto degli apparati di iniezione errata ( anticipo pareggiamento portate) - Mise au point des dispositifs d’injectionerronée (avance nivellement débits) - Incorrect tuning of injection components (delivery balancing advance) - Falsche Einstellungder Einspritzvorrichtungen (Förderbeginn und Abgleich der Fördermengen) - Puesta a punto de los aparatos de inyección
..... Minimo basso - Ralanti trop bas - Low idle speed - Leerlaufdrehzahl zu niedrig - Ralenti bajo - Minimo baixo.
. Livello olio alto - Niveau d’huile haut - Oil level too high - Ölstand zu hoch - Nivel aceite alto - Nivel óleo alto.
..... Filtro aria intasato - Filtre à air encrassé - Clogged air filter - Luftfilter verstopf - Filtro aire obstruido - Filtro ar intubido.
..... Sovraccarico - Surchagé - Ovrloaded - Überlastet - Sobrecardago - Sobrecargado.
..... Taratura iniettore non corretta - Réglage injecteur pas correct - Incorrect injector calibration - Einstellung der Spritzdüse nichtkorrekt - Reglaje del inyector no correcto - Calibração do injector incorrecta.
..... Messa a punto degli apparati di iniezione errata ( anticipo pareggiamento portate) - Mise au point des dispositifs d’injectionerronée (avance nivellement débits) - Incorrect tuning of injection components (delivery balancing advance) - Falsche Einstellungder Einspritzvorrichtungen (Förderbeginn und Abgleich der Fördermengen) - Puesta a punto de los aparatos de inyecciónincorrecta (avance e igualación de los caudales) - Afinação dos equipamentos de injecção errada (avanço nivelamentocapacidades).
..... Supplemento combustibile bloccato - Supplément combustible bloqué - Extra fuel control level sticking - Krafstoffmehrmengeblockiert - Suplement combustible no funciona - Suplemento combustivel bloqueado.
..... Albero motore non scorrevole - Arbre moteur coulissant mal - Crankshaft not turning freely - Kürbelwelle schwergängig,gefressen - Cigüeñal duro - Veio de cambota do motor não corrediço
. Trafilamento eccessivo pompante - Suintement excessif piston plongeur - Excessive plunger blow-by - Einspritzpumpenelementverschlissen - Perdida excesiva del elemento de la bomba - Vazamento excessivo bombeador
INCONVENIENTI - INCONVENIENTSTROUBLES - BETRIEBSSTOERUNGEN
ANOMALIAS - INCONVENIENTES
CAUSA PROBABILE - CAUSE PROBABLE - PROBABLE CAUSEMÖGLICHE URSACHE - CAUSA PROBABLE - CAUSA PROVÁVEL

116
- Fumo Bianco- Fumee blanke- White smoke- Weiß-blauer Auspuffqualm- Humo blanco- Fumo branco
- Pressione olio bassa- Basse pression d’huile- Low oil preassure- Niedriger Öldruck- Pression aceite baja- Pressão óleo baixa
. Funzionamento prolungato al minimo - Régime trop prolongé au ralenti - Excessive idle operation Zulange im Leerlauf -Funcionamiento excesivo a ralenti - Funcionamento estendido ao minimo.
. Rodaggio incompleto - Rodage insuffisant - Incomplete run-in - Unvollständiges Einlaufen - Rodaje incompleto - Rodagemincompleto.
. Segmenti usurati o incollati - Segments usagés ou collés - Rings worn or sticking - Kolbenringe abgenutzt oder fest -Segmentos desgastados o inadaptados - Segmentos desgastados e colados.
. Cilindro usurato - Cylindre usagé - Worn cylinder - Zylinder abgenutzt - Cilindros desgastados - Cilindro desgastado.
. Iniettore danneggiato - Injecteur abîmé -Damaged injector - Einspritzdüse beschädigt - Inyector dañado - Injector danificado.
. Livello olio alto - Niveau d’huile haut - Oil level too high - Ölstand zu hoch - Nivel aceite alto - Nivel óleo alto.
. Guide valvole usurate - .Guides soupapes usés - Worn valve guides - Ventilführungen abgenutzt - Guía de válvulas desgastada- Guias válvulas desgastadas
..... Filtro aria intasato - Filtre à air encrassé - Clogged air filter - Luftfilter verstopf - Filtro aire obstruido - Filtro ar intubido.
..... Aria oppure acqua nel circuito combustibile - Air ou eau dans le circuit du combustible - Air or water leaks in fuel system - Luftoder Wasser im Kraftstoffkreislauf - Aire o agua en el circuito del combustible - Ar ou água no circuito do combustível.
. Bronzine banco-biella usurate - Coussinets pallers ou bielle usagés - Worn main con. rods bearings - Haupt-oderSchubstangenlager abgenutzt - Cojinete bancada-biela, desgastados - Chumaceira banco-biela desgstada.
. Valvola regolazione pressione bloccata - Clapet réglage pression bloqué - Oil pressure sticking - Öldruckkontrollventil blockiert- Válvula regulación presión, bloqueada - Vaálvula regulação pressão bloqueada.
. Pompa olio usurata - Pompe à huile usagée - Worm oil pump - Ölpumpe abgenutzt - Bomba aceite desgastada - Bomba óleodesgastada.
. Aria nell’aspirazione olio - Air dans le tube d’aspiration d’huile - Air into oil suction line - Lufteintritt ins Ölansaugrohr - Aire entubo aspiración aceite - Ar no tubo aspiração óleo.
. Manometro o pressostato difettoso - Manomètre ou pressostat défecteux - Faulty pressure gauge or pressure switch -Manometer oder Öldruckschalter defekt - Manometro o presostato defectuoso - Manómetro e presostado defeitoso.
. Tubo aspirazione olio ostruito - Tube aspiration d’huile obstrué - Oil suction line clogged - Ölansaugohr verstopft - Tuboaspiración aceite obstruido - Tubo aspiração óleo obstruido.
INCONVENIENTI - INCONVENIENTSTROUBLES - BETRIEBSSTOERUNGEN
ANOMALIAS - INCONVENIENTES
CAUSA PROBABILE - CAUSE PROBABLE - PROBABLE CAUSEMÖGLICHE URSACHE - CAUSA PROBABLE - CAUSA PROVÁVEL

117
- Consumo olio eccessivo- Consommation excessive d’huile- Excessive oil consumption- Übermäßiger Ölverbrauch- Consumo de aceite excesivo- Consumo de óleo excessivo
- Gocciola olio e combustibile dalloscarico
- Goutte huile et combustible àl'échappement
- Oil and fuel dripping from exhaust- Öl und Kraftstoff tropfen aus dem
Auspuff- Goteo de aceite y combustible por el
escape- Gotejamento de óleo e combustível do
tubo de descarga
. Funzionamento prolungato al minimo - Régime trop prolongé au ralenti - Excessive idle operation Zulange im Leerlauf -Funcionamiento excesivo a ralenti - Funcionamento estendido ao minimo.
. Rodaggio incompleto - Rodage insuffisant - Incomplete run-in - Unvollständiges Einlaufen - Rodaje incompleto - Rodagemincompleto.
. Cilindri usurati - Cylindre usagé - Worn cylinders - Zylinder abgenutzt - Cilindros desgastados - Cilindro desgastado.
. Livello olio motore troppo alto - Niveau d’huile moteur trop élevé - Engine oil level too high - Motorölstand zu hoch - Nivel aceitedemasiado alto - Nível do óleo motor demasiado alto.
. Segmenti usurati o incollati - Segments usagés ou collés - Rings worn or sticking - Kolbenringe abgenutzt oder fest -Segmentos desgastados o inadaptados - Segmentos desgastados e colados.
..... Filtro aria intasato - Filtre à air encrassé - Clogged air filter - Luftfilter verstopf - Filtro aire obstruido - Filtro ar intubido.
. Guide valvole usurate - .Guides soupapes usés - Worn valve guides - Ventilführungen abgenutzt - Guía de válvulas desgastada- Guias válvulas desgastadas
. Valvola pompa iniezione bloccata - Clapet de pompe de inj. bloqué - Injection pump valve sticking - Ventil der Einspritzpumpeblockiert - Válvula bomba inyección bloqueada - Válvula bomba injeção bloqueada.
. Funzionamento prolungato al minimo - Régime trop prolongé au ralenti - Excessive idle operation Zulange im Leerlauf -Funcionamiento excesivo a ralenti - Funcionamento estendido ao minimo.
. Rodaggio incompleto - Rodage insuffisant - Incomplete run-in - Unvollständiges Einlaufen - Rodaje incompleto - Rodagemincompleto.
. Segmenti usurati o incollati - Segments usagés ou collés - Rings worn or sticking - Kolbenringe abgenutzt oder fest -Segmentos desgastados o inadaptados - Segmentos desgastados e colados.
. Cilindri usurati - Cylindre usagé - Worn cylinders - Zylinder abgenutzt - Cilindros desgastados - Cilindro desgastado.
. Guide valvole usurate - .Guides soupapes usés - Worn valve guides - Ventilführungen abgenutzt - Guía de válvulas desgastada- Guias válvulas desgastadas
INCONVENIENTI - INCONVENIENTSTROUBLES - BETRIEBSSTOERUNGEN
ANOMALIAS - INCONVENIENTES
CAUSA PROBABILE - CAUSE PROBABLE - PROBABLE CAUSEMÖGLICHE URSACHE - CAUSA PROBABLE - CAUSA PROVÁVEL

118
SERVICE
ORDINE RICAMBICOMMANDES PIECES
PART ORDERSE-TEIL BESTELLUNGEN
PEDIDOS DE REPUESTOSPEDIDOS RECÂMBIOS
- Per ordini ricambi precisare i seguenti dati: TIPO E MATRICOLA DEL MOTORE - Versione (K) - sulla targhetta motore- Pour commandes pièces détachées indiquer les données suivantes: TYPE ET MATRICULE DU MOTEUR - Version (K) - sur la plaque moteur- For any spare parts order please specify following details: ENGINE TYPE AND SERIAL NUMBER - Version (K) - on the engine name plate- Für Ersatzteilebestellungen sind folgende Daten bekannt zu geben: MOTOR-TYP UND-NUMMER - Version (K) - Typenschild am Motor- Para pedir repuestos indicar: TIPO Y NUMERO DEL MOTOR - Versión (K) - en la chapa de caracteristica motor- Para pedidos de recâmbios precisar: TIPO E NUMERO DO MOTOR - Versión (K) - sobre a tabuletazinha do motor
Per assistenza e ricambi rivolgersi a stazioni di servizio autorizzate Lombardini. N. Tel. su libretto Service.
Pour toute exigence de service après vente et pièces détachées, s'adresser aux Stations du service du réseau Lombardini.N. de téléphone indiqué sur brochure relative au service après vente.
For spare parts and after sale assistance contact authorized Lombardini service centers. Tel. No. appears on service booklet.
Für Service und Ersatzteile bitten wir, sich an autorisierte Werkstätte zu wenden. Tel. Nummer laut unserem Service - Büchlein.
Para asistencia y repuestos, dirigirse a las estaciones de servicio autorizadas Lombardini N. Tel. su libreto service.
Para asistência e recâmbios dirigir-se às estações de servício autorizadas pela Lombardini N. Tel. está sobre a caderneta de servício.
119
TTTTTAAAAAVVVVVOLA RICAMBIOLA RICAMBIOLA RICAMBIOLA RICAMBIOLA RICAMBITTTTTABLEAABLEAABLEAABLEAABLEAU PIECES DETU PIECES DETU PIECES DETU PIECES DETU PIECES DETAAAAACHEESCHEESCHEESCHEESCHEES
SPSPSPSPSPARE PARE PARE PARE PARE PARARARARARTS TS TS TS TS TTTTTABLEABLEABLEABLEABLEERSAERSAERSAERSAERSATZTEILTZTEILTZTEILTZTEILTZTEILTTTTTAFELAFELAFELAFELAFEL
TTTTTABLA DE REPUESTABLA DE REPUESTABLA DE REPUESTABLA DE REPUESTABLA DE REPUESTOSOSOSOSOSTÁBTÁBTÁBTÁBTÁBUUUUUA PEÇAS DE A PEÇAS DE A PEÇAS DE A PEÇAS DE A PEÇAS DE TRTRTRTRTROCAOCAOCAOCAOCA
Disegni non impegnativi - Per applicazioni speciali consultare i Centri Assistenza e Ricambi.Les illustrations peuvent être modifiées. Pour les adaptations consulter les Agents Service.Drawing are subject to modifications - Pls contact Service Centers for special applications.Bildänderungen vorbehalten - Für Sonderanfertigungen sich an Service Werkstätten wenden.
Illustraciones pueden ser modificadas - Para aplicaciones especiales contactar a las Centros Repuestos.Desenhos podem sêr alterados - Para aplicações especiais consultar os Centros de Asistência e Péças.
11 LD 522-311 LD 522-311 LD 522-311 LD 522-311 LD 522-3

120
A
F
E
D
C
B
G
BASAMENTO / PORTINA DI FONDO / ASTA LIVELLO / FLANGIATURA / PIEDI / SERIE GUARNIZIONICARTER / CARTER HUILE / JAUGE NIVEAU / BRIDAGE / PIEDS / JEU DE JOINTSCRANKCASE /OIL SUMP / OIL DIPSTICK / FLANGING / MOUNTS / GASKET SETKURBELGEHÄUSE / ÖLWANNE / ÖLSTANGE / ANTRIEBSFLANSCH / MOTORFÜSSE / DICHTUNGSATZBANCADA / CARTER ACEITE / VARILLA NIVEL / BRIDA / PIES / JUEGO DE JUNTASBASE / CARTER / HASTE DO NÍVEL / FLANGE LADO VOLANTE / PÉS / SÉRIE DE GUARNIÇÕESBIELLA / PISTONE / CILINDRO / ALBERO A GOMITO / SUPPORTI / VOLANO / PULEGGIA AVVIAMENTOBIELLE / PISTON / CYLINDRE / VILEBREQUIN / SUPPORTS / VOLANT / POULIE DEMARRAGECONN.ROD / PISTON SET / CYLINDER / CRANKSHAFT / SUPPORTS / FLYWHEEL / START.PULLEYPLEUELSTANGE / KOLBEN / ZYLINDER / KURBELWELLE / LAGERHALTER / SCHWUNGRAD / RIEMENSCHEIBEBIELA / PISTON / CILINDRO / CIGÜEÑAL / SOPORTES / VOLANTE / POLEA ARRANQUEBIELA / PISTÃO / CILINDRO / VIRABREQUIM / SUPORTES / VOLANTE / ROLDANA DE AVIAMENTOALBERO A CAMME / REGOLATORE DI GIRI / LEVE COMANDO REGOLATOREARBRE A CAMMES / REGULATEUR DE VITESSE / LEVIER COMMANDE REGULATEURCAMSHAFT / SPEED GOVERNOR / CONTROL LEVERNOCKENWELLE / DREHZAHLREGLER / REGLERHEBELEJE DE LEVAS / REGULADOR DE REVOLUCIONES / PALANCA MANDO REGULADOREIXO DE EXCÊNTRICOS / REGULADOR DE VOLTAS / ALAVANCA COMANDO DO REGULADORASPIRAZIONE / SCARICO / TESTA / CAPPELLO BILANCIERI / VALVOLEADMISSION / ECHAPPEMENT / CULASSE / COUVERCLE CULBUTEURS / SOUPAPESINTAKE / EXHAUST / CYLINDER HEAD / ROCKER ARM BOX / VALVESEINLASS / AUSLASS / ZYLINDERKOPF / VENTILDECKEL / VENTILEASPIRACION / ESCAPE / CULATA / TAPA BALANCINES / VALVULASASPIRAÇÃO / DESCARGA / CULATRA / CORPO DOS BALANCINS / VÁLVULASCIRCUITO COMBUSTIBILECIRCUIT COMBUSTIBLEFUEL SYSTEMKRAFTSTOFFANLAGECIRCUITO COMBUSTIBLECIRCUITO COMBUSTIVELRAFFREDDAMENTOREFROIDISSEMENTCOOLING SYSTEMKÜHLUNGREFRIGERACIONESFRIAMENTOAVVIAMENTO ELETTRICODEMARRAGE ELECTRIQUEELECTRICAL STARTINGELEKTRISCHER ANLASSERARRANQUE ELECTRICO

121

122
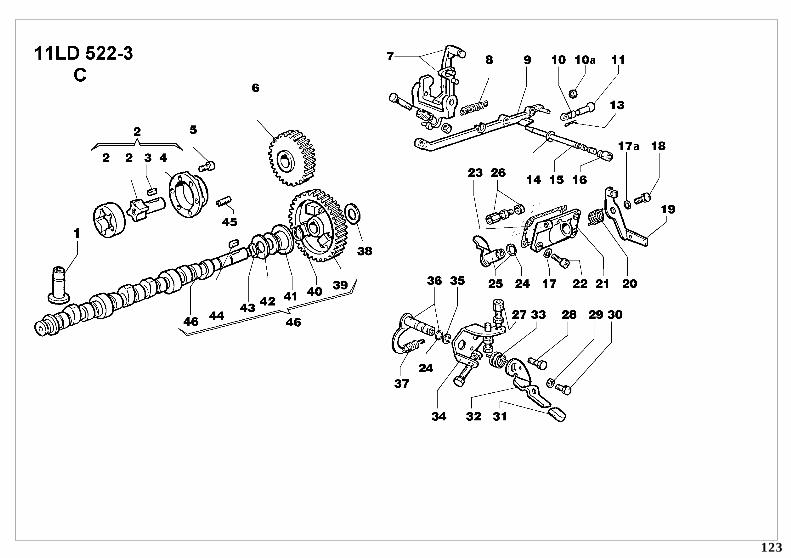
123
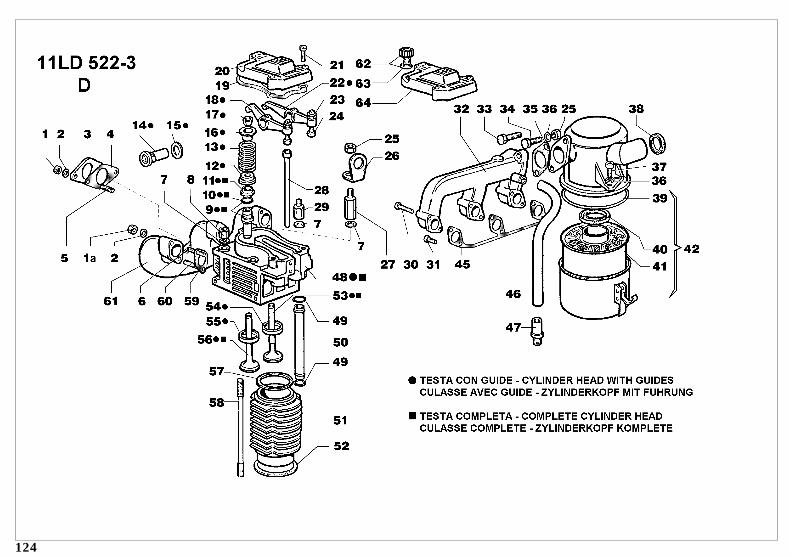
124
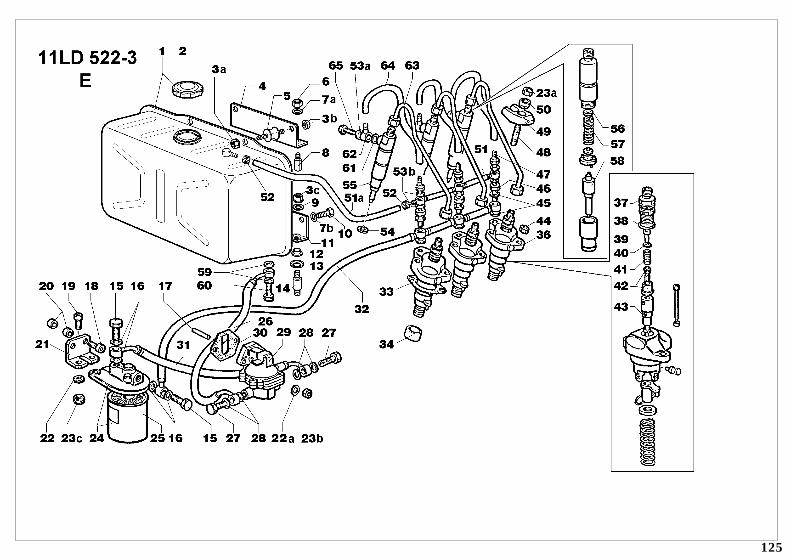
125

126
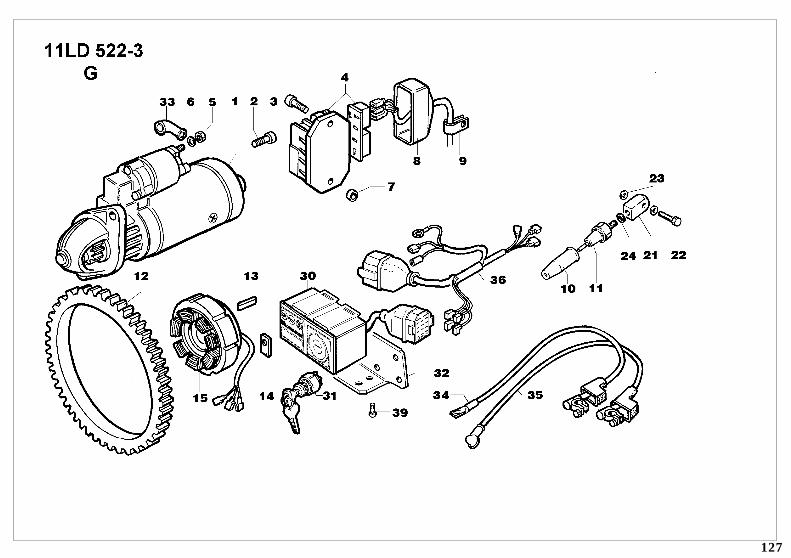
127

128
NOTE - NOTES - BEMERKUNG - NOTAS
○ ○ ○ ○ ○ ○ ○ ○ ○ ○ ○ ○ ○ ○ ○ ○ ○ ○ ○ ○ ○ ○ ○ ○ ○ ○ ○ ○ ○ ○ ○ ○ ○ ○ ○ ○ ○ ○ ○ ○ ○ ○ ○ ○ ○ ○ ○ ○ ○ ○ ○ ○ ○ ○ ○ ○ ○ ○ ○ ○ ○ ○ ○ ○ ○ ○ ○ ○ ○ ○ ○ ○
○ ○ ○ ○ ○ ○ ○ ○ ○ ○ ○ ○ ○ ○ ○ ○ ○ ○ ○ ○ ○ ○ ○ ○ ○ ○ ○ ○ ○ ○ ○ ○ ○ ○ ○ ○ ○ ○ ○ ○ ○ ○ ○ ○ ○ ○ ○ ○ ○ ○ ○ ○ ○ ○ ○ ○ ○ ○ ○ ○ ○ ○ ○ ○ ○ ○ ○ ○ ○ ○ ○ ○
○ ○ ○ ○ ○ ○ ○ ○ ○ ○ ○ ○ ○ ○ ○ ○ ○ ○ ○ ○ ○ ○ ○ ○ ○ ○ ○ ○ ○ ○ ○ ○ ○ ○ ○ ○ ○ ○ ○ ○ ○ ○ ○ ○ ○ ○ ○ ○ ○ ○ ○ ○ ○ ○ ○ ○ ○ ○ ○ ○ ○ ○ ○ ○ ○ ○ ○ ○ ○ ○ ○ ○
○ ○ ○ ○ ○ ○ ○ ○ ○ ○ ○ ○ ○ ○ ○ ○ ○ ○ ○ ○ ○ ○ ○ ○ ○ ○ ○ ○ ○ ○ ○ ○ ○ ○ ○ ○ ○ ○ ○ ○ ○ ○ ○ ○ ○ ○ ○ ○ ○ ○ ○ ○ ○ ○ ○ ○ ○ ○ ○ ○ ○ ○ ○ ○ ○ ○ ○ ○ ○ ○ ○ ○
○ ○ ○ ○ ○ ○ ○ ○ ○ ○ ○ ○ ○ ○ ○ ○ ○ ○ ○ ○ ○ ○ ○ ○ ○ ○ ○ ○ ○ ○ ○ ○ ○ ○ ○ ○ ○ ○ ○ ○ ○ ○ ○ ○ ○ ○ ○ ○ ○ ○ ○ ○ ○ ○ ○ ○ ○ ○ ○ ○ ○ ○ ○ ○ ○ ○ ○ ○ ○ ○ ○ ○
○ ○ ○ ○ ○ ○ ○ ○ ○ ○ ○ ○ ○ ○ ○ ○ ○ ○ ○ ○ ○ ○ ○ ○ ○ ○ ○ ○ ○ ○ ○ ○ ○ ○ ○ ○ ○ ○ ○ ○ ○ ○ ○ ○ ○ ○ ○ ○ ○ ○ ○ ○ ○ ○ ○ ○ ○ ○ ○ ○ ○ ○ ○ ○ ○ ○ ○ ○ ○ ○ ○ ○
○ ○ ○ ○ ○ ○ ○ ○ ○ ○ ○ ○ ○ ○ ○ ○ ○ ○ ○ ○ ○ ○ ○ ○ ○ ○ ○ ○ ○ ○ ○ ○ ○ ○ ○ ○ ○ ○ ○ ○ ○ ○ ○ ○ ○ ○ ○ ○ ○ ○ ○ ○ ○ ○ ○ ○ ○ ○ ○ ○ ○ ○ ○ ○ ○ ○ ○ ○ ○ ○ ○ ○
○ ○ ○ ○ ○ ○ ○ ○ ○ ○ ○ ○ ○ ○ ○ ○ ○ ○ ○ ○ ○ ○ ○ ○ ○ ○ ○ ○ ○ ○ ○ ○ ○ ○ ○ ○ ○ ○ ○ ○ ○ ○ ○ ○ ○ ○ ○ ○ ○ ○ ○ ○ ○ ○ ○ ○ ○ ○ ○ ○ ○ ○ ○ ○ ○ ○ ○ ○ ○ ○ ○ ○
○ ○ ○ ○ ○ ○ ○ ○ ○ ○ ○ ○ ○ ○ ○ ○ ○ ○ ○ ○ ○ ○ ○ ○ ○ ○ ○ ○ ○ ○ ○ ○ ○ ○ ○ ○ ○ ○ ○ ○ ○ ○ ○ ○ ○ ○ ○ ○ ○ ○ ○ ○ ○ ○ ○ ○ ○ ○ ○ ○ ○ ○ ○ ○ ○ ○ ○ ○ ○ ○ ○ ○
○ ○ ○ ○ ○ ○ ○ ○ ○ ○ ○ ○ ○ ○ ○ ○ ○ ○ ○ ○ ○ ○ ○ ○ ○ ○ ○ ○ ○ ○ ○ ○ ○ ○ ○ ○ ○ ○ ○ ○ ○ ○ ○ ○ ○ ○ ○ ○ ○ ○ ○ ○ ○ ○ ○ ○ ○ ○ ○ ○ ○ ○ ○ ○ ○ ○ ○ ○ ○ ○ ○ ○
○ ○ ○ ○ ○ ○ ○ ○ ○ ○ ○ ○ ○ ○ ○ ○ ○ ○ ○ ○ ○ ○ ○ ○ ○ ○ ○ ○ ○ ○ ○ ○ ○ ○ ○ ○ ○ ○ ○ ○ ○ ○ ○ ○ ○ ○ ○ ○ ○ ○ ○ ○ ○ ○ ○ ○ ○ ○ ○ ○ ○ ○ ○ ○ ○ ○ ○ ○ ○ ○ ○ ○
○ ○ ○ ○ ○ ○ ○ ○ ○ ○ ○ ○ ○ ○ ○ ○ ○ ○ ○ ○ ○ ○ ○ ○ ○ ○ ○ ○ ○ ○ ○ ○ ○ ○ ○ ○ ○ ○ ○ ○ ○ ○ ○ ○ ○ ○ ○ ○ ○ ○ ○ ○ ○ ○ ○ ○ ○ ○ ○ ○ ○ ○ ○ ○ ○ ○ ○ ○ ○ ○ ○ ○
○ ○ ○ ○ ○ ○ ○ ○ ○ ○ ○ ○ ○ ○ ○ ○ ○ ○ ○ ○ ○ ○ ○ ○ ○ ○ ○ ○ ○ ○ ○ ○ ○ ○ ○ ○ ○ ○ ○ ○ ○ ○ ○ ○ ○ ○ ○ ○ ○ ○ ○ ○ ○ ○ ○ ○ ○ ○ ○ ○ ○ ○ ○ ○ ○ ○ ○ ○ ○ ○ ○ ○
○ ○ ○ ○ ○ ○ ○ ○ ○ ○ ○ ○ ○ ○ ○ ○ ○ ○ ○ ○ ○ ○ ○ ○ ○ ○ ○ ○ ○ ○ ○ ○ ○ ○ ○ ○ ○ ○ ○ ○ ○ ○ ○ ○ ○ ○ ○ ○ ○ ○ ○ ○ ○ ○ ○ ○ ○ ○ ○ ○ ○ ○ ○ ○ ○ ○ ○ ○ ○ ○ ○ ○
○ ○ ○ ○ ○ ○ ○ ○ ○ ○ ○ ○ ○ ○ ○ ○ ○ ○ ○ ○ ○ ○ ○ ○ ○ ○ ○ ○ ○ ○ ○ ○ ○ ○ ○ ○ ○ ○ ○ ○ ○ ○ ○ ○ ○ ○ ○ ○ ○ ○ ○ ○ ○ ○ ○ ○ ○ ○ ○ ○ ○ ○ ○ ○ ○ ○ ○ ○ ○ ○ ○ ○
○ ○ ○ ○ ○ ○ ○ ○ ○ ○ ○ ○ ○ ○ ○ ○ ○ ○ ○ ○ ○ ○ ○ ○ ○ ○ ○ ○ ○ ○ ○ ○ ○ ○ ○ ○ ○ ○ ○ ○ ○ ○ ○ ○ ○ ○ ○ ○ ○ ○ ○ ○ ○ ○ ○ ○ ○ ○ ○ ○ ○ ○ ○ ○ ○ ○ ○ ○ ○ ○ ○ ○
○ ○ ○ ○ ○ ○ ○ ○ ○ ○ ○ ○ ○ ○ ○ ○ ○ ○ ○ ○ ○ ○ ○ ○ ○ ○ ○ ○ ○ ○ ○ ○ ○ ○ ○ ○ ○ ○ ○ ○ ○ ○ ○ ○ ○ ○ ○ ○ ○ ○ ○ ○ ○ ○ ○ ○ ○ ○ ○ ○ ○ ○ ○ ○ ○ ○ ○ ○ ○ ○ ○ ○
○ ○ ○ ○ ○ ○ ○ ○ ○ ○ ○ ○ ○ ○ ○ ○ ○ ○ ○ ○ ○ ○ ○ ○ ○ ○ ○ ○ ○ ○ ○ ○ ○ ○ ○ ○ ○ ○ ○ ○ ○ ○ ○ ○ ○ ○ ○ ○ ○ ○ ○ ○ ○ ○ ○ ○ ○ ○ ○ ○ ○ ○ ○ ○ ○ ○ ○ ○ ○ ○ ○ ○

129
SCHEDA DI GARANZIA DA COMPILARE E SPEDIRE IN BUSTA CHIUSA A :
CARTE DE GARANTIE À REMPLIR ET ENVOYER PAR LA POSTE À :
WARRANTY CARD TO BE FILLED IN AND SENT BY MAIL TO :
GARANTIESCHEIN AUSGEFÙLLT :
TARJETA DE GARANTIA A RELLENAR Y REMITIR POR CORREO A :
BOLETIM DE GARANTIA A PREENCHER E EXPEDIR EM ENVELOPE FECHA DO PARA :
LOMBARDINI s.r.l. a socio unicoUfficio Assistenza TecnicaVia Cav. del Lavoro Adelmo Lombardini, 242100 Reggio EmiliaITALIA
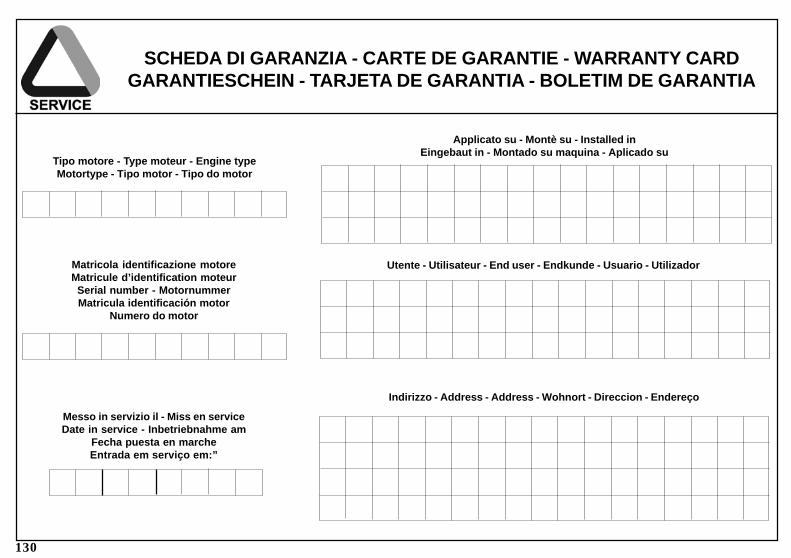
130
SCHEDA DI GARANZIA - CARTE DE GARANTIE - WARRANTY CARDGARANTIESCHEIN - TARJETA DE GARANTIA - BOLETIM DE GARANTIA
Tipo motore - Type moteur - Engine typeMotortype - Tipo motor - Tipo do motor
Matricola identificazione motoreMatricule d’identification moteurSerial number - MotornummerMatricula identificación motor
Numero do motor
Applicato su - Montè su - Installed inEingebaut in - Montado su maquina - Aplicado su
Messo in servizio il - Miss en serviceDate in service - Inbetriebnahme am
Fecha puesta en marcheEntrada em serviço em:”
Utente - Utilisateur - End user - Endkunde - Usuario - Utilizador
Indirizzo - Address - Address - Wohnort - Direccion - Endereço

131
NOTE - NOTES - BEMERKUNG - NOTAS
○ ○ ○ ○ ○ ○ ○ ○ ○ ○ ○ ○ ○ ○ ○ ○ ○ ○ ○ ○ ○ ○ ○ ○ ○ ○ ○ ○ ○ ○ ○ ○ ○ ○ ○ ○ ○ ○ ○ ○ ○ ○ ○ ○ ○ ○ ○ ○ ○ ○ ○ ○ ○ ○ ○ ○ ○ ○ ○ ○ ○ ○ ○ ○ ○ ○ ○ ○ ○ ○ ○ ○
○ ○ ○ ○ ○ ○ ○ ○ ○ ○ ○ ○ ○ ○ ○ ○ ○ ○ ○ ○ ○ ○ ○ ○ ○ ○ ○ ○ ○ ○ ○ ○ ○ ○ ○ ○ ○ ○ ○ ○ ○ ○ ○ ○ ○ ○ ○ ○ ○ ○ ○ ○ ○ ○ ○ ○ ○ ○ ○ ○ ○ ○ ○ ○ ○ ○ ○ ○ ○ ○ ○ ○
○ ○ ○ ○ ○ ○ ○ ○ ○ ○ ○ ○ ○ ○ ○ ○ ○ ○ ○ ○ ○ ○ ○ ○ ○ ○ ○ ○ ○ ○ ○ ○ ○ ○ ○ ○ ○ ○ ○ ○ ○ ○ ○ ○ ○ ○ ○ ○ ○ ○ ○ ○ ○ ○ ○ ○ ○ ○ ○ ○ ○ ○ ○ ○ ○ ○ ○ ○ ○ ○ ○ ○
○ ○ ○ ○ ○ ○ ○ ○ ○ ○ ○ ○ ○ ○ ○ ○ ○ ○ ○ ○ ○ ○ ○ ○ ○ ○ ○ ○ ○ ○ ○ ○ ○ ○ ○ ○ ○ ○ ○ ○ ○ ○ ○ ○ ○ ○ ○ ○ ○ ○ ○ ○ ○ ○ ○ ○ ○ ○ ○ ○ ○ ○ ○ ○ ○ ○ ○ ○ ○ ○ ○ ○
○ ○ ○ ○ ○ ○ ○ ○ ○ ○ ○ ○ ○ ○ ○ ○ ○ ○ ○ ○ ○ ○ ○ ○ ○ ○ ○ ○ ○ ○ ○ ○ ○ ○ ○ ○ ○ ○ ○ ○ ○ ○ ○ ○ ○ ○ ○ ○ ○ ○ ○ ○ ○ ○ ○ ○ ○ ○ ○ ○ ○ ○ ○ ○ ○ ○ ○ ○ ○ ○ ○ ○
○ ○ ○ ○ ○ ○ ○ ○ ○ ○ ○ ○ ○ ○ ○ ○ ○ ○ ○ ○ ○ ○ ○ ○ ○ ○ ○ ○ ○ ○ ○ ○ ○ ○ ○ ○ ○ ○ ○ ○ ○ ○ ○ ○ ○ ○ ○ ○ ○ ○ ○ ○ ○ ○ ○ ○ ○ ○ ○ ○ ○ ○ ○ ○ ○ ○ ○ ○ ○ ○ ○ ○
○ ○ ○ ○ ○ ○ ○ ○ ○ ○ ○ ○ ○ ○ ○ ○ ○ ○ ○ ○ ○ ○ ○ ○ ○ ○ ○ ○ ○ ○ ○ ○ ○ ○ ○ ○ ○ ○ ○ ○ ○ ○ ○ ○ ○ ○ ○ ○ ○ ○ ○ ○ ○ ○ ○ ○ ○ ○ ○ ○ ○ ○ ○ ○ ○ ○ ○ ○ ○ ○ ○ ○
○ ○ ○ ○ ○ ○ ○ ○ ○ ○ ○ ○ ○ ○ ○ ○ ○ ○ ○ ○ ○ ○ ○ ○ ○ ○ ○ ○ ○ ○ ○ ○ ○ ○ ○ ○ ○ ○ ○ ○ ○ ○ ○ ○ ○ ○ ○ ○ ○ ○ ○ ○ ○ ○ ○ ○ ○ ○ ○ ○ ○ ○ ○ ○ ○ ○ ○ ○ ○ ○ ○ ○
○ ○ ○ ○ ○ ○ ○ ○ ○ ○ ○ ○ ○ ○ ○ ○ ○ ○ ○ ○ ○ ○ ○ ○ ○ ○ ○ ○ ○ ○ ○ ○ ○ ○ ○ ○ ○ ○ ○ ○ ○ ○ ○ ○ ○ ○ ○ ○ ○ ○ ○ ○ ○ ○ ○ ○ ○ ○ ○ ○ ○ ○ ○ ○ ○ ○ ○ ○ ○ ○ ○ ○
○ ○ ○ ○ ○ ○ ○ ○ ○ ○ ○ ○ ○ ○ ○ ○ ○ ○ ○ ○ ○ ○ ○ ○ ○ ○ ○ ○ ○ ○ ○ ○ ○ ○ ○ ○ ○ ○ ○ ○ ○ ○ ○ ○ ○ ○ ○ ○ ○ ○ ○ ○ ○ ○ ○ ○ ○ ○ ○ ○ ○ ○ ○ ○ ○ ○ ○ ○ ○ ○ ○ ○
○ ○ ○ ○ ○ ○ ○ ○ ○ ○ ○ ○ ○ ○ ○ ○ ○ ○ ○ ○ ○ ○ ○ ○ ○ ○ ○ ○ ○ ○ ○ ○ ○ ○ ○ ○ ○ ○ ○ ○ ○ ○ ○ ○ ○ ○ ○ ○ ○ ○ ○ ○ ○ ○ ○ ○ ○ ○ ○ ○ ○ ○ ○ ○ ○ ○ ○ ○ ○ ○ ○ ○
○ ○ ○ ○ ○ ○ ○ ○ ○ ○ ○ ○ ○ ○ ○ ○ ○ ○ ○ ○ ○ ○ ○ ○ ○ ○ ○ ○ ○ ○ ○ ○ ○ ○ ○ ○ ○ ○ ○ ○ ○ ○ ○ ○ ○ ○ ○ ○ ○ ○ ○ ○ ○ ○ ○ ○ ○ ○ ○ ○ ○ ○ ○ ○ ○ ○ ○ ○ ○ ○ ○ ○
○ ○ ○ ○ ○ ○ ○ ○ ○ ○ ○ ○ ○ ○ ○ ○ ○ ○ ○ ○ ○ ○ ○ ○ ○ ○ ○ ○ ○ ○ ○ ○ ○ ○ ○ ○ ○ ○ ○ ○ ○ ○ ○ ○ ○ ○ ○ ○ ○ ○ ○ ○ ○ ○ ○ ○ ○ ○ ○ ○ ○ ○ ○ ○ ○ ○ ○ ○ ○ ○ ○ ○
○ ○ ○ ○ ○ ○ ○ ○ ○ ○ ○ ○ ○ ○ ○ ○ ○ ○ ○ ○ ○ ○ ○ ○ ○ ○ ○ ○ ○ ○ ○ ○ ○ ○ ○ ○ ○ ○ ○ ○ ○ ○ ○ ○ ○ ○ ○ ○ ○ ○ ○ ○ ○ ○ ○ ○ ○ ○ ○ ○ ○ ○ ○ ○ ○ ○ ○ ○ ○ ○ ○ ○
○ ○ ○ ○ ○ ○ ○ ○ ○ ○ ○ ○ ○ ○ ○ ○ ○ ○ ○ ○ ○ ○ ○ ○ ○ ○ ○ ○ ○ ○ ○ ○ ○ ○ ○ ○ ○ ○ ○ ○ ○ ○ ○ ○ ○ ○ ○ ○ ○ ○ ○ ○ ○ ○ ○ ○ ○ ○ ○ ○ ○ ○ ○ ○ ○ ○ ○ ○ ○ ○ ○ ○
○ ○ ○ ○ ○ ○ ○ ○ ○ ○ ○ ○ ○ ○ ○ ○ ○ ○ ○ ○ ○ ○ ○ ○ ○ ○ ○ ○ ○ ○ ○ ○ ○ ○ ○ ○ ○ ○ ○ ○ ○ ○ ○ ○ ○ ○ ○ ○ ○ ○ ○ ○ ○ ○ ○ ○ ○ ○ ○ ○ ○ ○ ○ ○ ○ ○ ○ ○ ○ ○ ○ ○
○ ○ ○ ○ ○ ○ ○ ○ ○ ○ ○ ○ ○ ○ ○ ○ ○ ○ ○ ○ ○ ○ ○ ○ ○ ○ ○ ○ ○ ○ ○ ○ ○ ○ ○ ○ ○ ○ ○ ○ ○ ○ ○ ○ ○ ○ ○ ○ ○ ○ ○ ○ ○ ○ ○ ○ ○ ○ ○ ○ ○ ○ ○ ○ ○ ○ ○ ○ ○ ○ ○ ○
○ ○ ○ ○ ○ ○ ○ ○ ○ ○ ○ ○ ○ ○ ○ ○ ○ ○ ○ ○ ○ ○ ○ ○ ○ ○ ○ ○ ○ ○ ○ ○ ○ ○ ○ ○ ○ ○ ○ ○ ○ ○ ○ ○ ○ ○ ○ ○ ○ ○ ○ ○ ○ ○ ○ ○ ○ ○ ○ ○ ○ ○ ○ ○ ○ ○ ○ ○ ○ ○ ○ ○
La Lombardini si riserva il diritto di modificare in qualunque momento i dati contenuti in questa pubblicazione.Lombardini se rèserve le droit de modifier, à n'importe quel moment, les données reportées dans cette publication.
Data reported in this issue can be modified at any time by Lombardini.Lombardini vorbehält alle Rechte, diese Angabe jederzeit verändern.
La Lombardini se reserva el derecho de modificar sin previo aviso los datos de esta publicación.A Lombardini permita-se o dirito de poder modificar em qualquer momento as instruções contenidas nesta publicação
MODELLO N°
50877/1
DATA EMISSIONE
01.05.03REVISIONE 03
DATA
28.01.2008
COD. LIBRO
1.5302.592
ENTE COMPILATORE TECO/ATI
LOMBARDINI U.S.A. INC. 2150 Boggs Road, Bldg. 300, Suite 300 - Duluth, GA 30096, U.S.A.LOMBARDINI FRANCE S.A. Allée de Riottier, 47 - 69400 Limas-Villefranche S/Saône, FranceLOMBARDINI MOTOREN GmbH Silostr. 41 - 65929 Frankfurt/Main - DeutschlandLOMBARDINI (U.K.) LTD. Unit 7 - Ferry Mills, Osney Mead Industrial Estate - Oxford OX2 OES, U.K.LOMBARDINI ESPAÑA S.A. c/Paris, n° 1-9 - Poligono Industrial Cova Solera, 08191 - Rubi Barcelona, ESPÃNA
42100 Reggio Emilia – Italia - ITALYVia Cav. del Lavoro Adelmo Lombardini, 2Cas. Post. 1074 - Tel. (+39) 0522 3891Telex 530003 Motlom I – Telegr.:LombarmotorR.E.A. 227083 - Reg. Impr. RE 10875Cod. fiscale e Partita IVA 01829970357CEE Code IT 01829970357E-MAIL: [email protected]: http://www.lombardini.it
VISTO